


Form No. 3413-484 Rev A
Light Kit
TimeCutter® HD Riding Mower
Model No. 136-7493
Installation Instructions
 WARNING
CALIFORNIA
Proposition 65 Warning
This product contains a chemical or chemicals known to the State of California to cause cancer, birth defects, or reproductive harm.
Safety
Safety and Instructional Decals
Safety decals and instructions are easily visible to the operator and are located near any area of potential danger. Replace any decal that is damaged or missing.
decal136-9182
136-9182
1.Lights
© 2017—The Toro® Company |
Register at www.Toro.com. |
Original Instructions (EN) |
*3413-484* A |
8111 Lyndale Avenue South |
|
Printed in the USA |
|
Bloomington, MN 55420 |
|
All Rights Reserved |

Installation
Loose Parts
Use the chart below to verify that all parts have been shipped.
Description |
Qty. |
Use |
|
|
|
|
|
No parts required |
– |
Prepare the machine. |
|
|
|
|
|
LED light |
1 |
|
|
Front light bracket |
1 |
|
|
Thread-forming screw (5/16 x 3/4 |
2 |
Install the front LED light. |
|
inch)—standard platform only |
|||
|
|
||
Hex-head bolt (5/16 x 3/4 inch) |
1 |
|
|
Flange nut (5/16 inch) |
1 |
|
|
LED light |
1 |
|
|
Side light bracket |
1 |
|
|
Self-tapping hex washer-head bolt (3/8 x 3/4 |
2 |
Install the side LED light. |
|
inch) |
|||
|
|
||
Hex-head bolt (5/16 x 3/4 inch) |
1 |
|
|
Flange nut (5/16 inch) |
1 |
|
|
Light switch bracket |
1 |
|
|
Self-tapping screw (#10 x 1/2 inch) |
2 |
Install the light switch. |
|
Rocker switch |
1 |
||
|
|||
Light switch decal |
1 |
|
|
Wire harness |
1 |
|
|
Cable tie |
6 |
Route the wire harness. |
|
Magnetic tie-wrap mount |
1 |
|
|
No parts required |
– |
Route the wire harness overview (for machines with a |
|
standard platform). |
|||
|
|
||
No parts required |
– |
Route the wire harness overview (for machines with a |
|
MyRide™ platform). |
|||
|
|
||
No parts required |
– |
Test the lights. |
|
|
|
|
Preparing the Machine
1.Park the machine on a level surface.
2.Disengage the blade-control switch.
3.Move the motion-control levers outward to the
NEUTRAL-LOCK position.
4.Engage the parking brake.
5.Shut off the engine and remove the key.
2

Installing the Front LED
Light
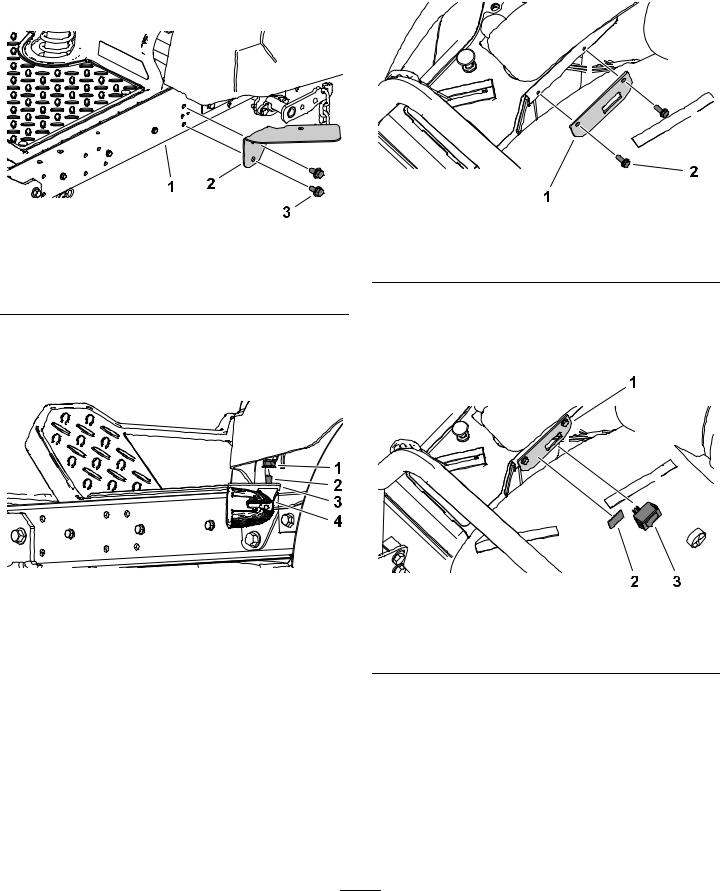
1.If you have a machine with a MyRide™ platform, remove the existing 2 thread-forming screws (5/16 x 3/4) securing the bumper brackets (Figure 1).
3.If you have a machine with a standard platform, install the front light bracket to the front axle tube using the 2 thread-forming screws (5/16 x 3/4) provided with the kit (Figure 3).
g210249
|
Figure 1 |
1. Bumper bracket |
2. Thread-forming screw |
|
(5/16 x 3/4 inch) |
2.If you have a machine with a MyRide™ platform, install the front light bracket using the previously removed 2 thread-forming screws (5/16 x 3/4) as shown in Figure 2.
g210246
|
Figure 2 |
1. Front light bracket |
2. Thread-forming screw |
|
(5/16 x 3/4 inch) |
|
|
g210247
|
Figure 3 |
1. Front axle tube |
3. Thread-forming screw |
|
(5/16 x 3/4 inch) |
2.Front light bracket
4.Secure the LED light to the front light bracket using a hex-head bolt (5/16 x 3/4 inch) and flange nut (5/16 inch) as shown in Figure 4.
|
|
Figure 4 |
g210248 |
|
|
|
|
|
Standard Platform Shown |
||
1. |
Flange nut (5/16 inch) |
3. |
Hex-head bolt (5/16 x 3/4 |
|
|
|
inch) |
2. |
LED light |
4. |
Front light bracket |
|
|
|
|
3
Installing the Side LED
Light
1.Secure the side light bracket to the platform using 2 self-tapping hex washer-head bolts as shown in Figure 5.
Install the Light Switch
1.Install the light switch bracket using the 2 self-tapping screws (#10 x 1/2 inch) as shown in Figure 7.
g210264
|
Figure 5 |
1. Platform |
3. Self-tapping hex |
|
washer-head bolt |
2.Side light bracket
2.Insert the hex-head bolt (5/16 x 3/4 inch) through the LED light and side light bracket, and secure it with the flange nut (5/16 inch) as shown in Figure 6.
g210263
Figure 6
1. |
Flange nut (5/16 inch) |
3. |
Side light bracket |
2. |
Hex-head bolt (5/16 x 3/4 |
4. |
LED light |
|
inch) |
|
|
|
|
|
|
|
g210324 |
|
Figure 7 |
1. Light switch bracket |
2. Self-tapping screw (#10 x |
|
1/2 inch) |
2.Insert the rocker switch into the light switch bracket (Figure 8).
3.Apply the light switch decal to the light switch bracket (Figure 8).
g210323
Figure 8
1. Light switch bracket |
3. Rocker switch |
2.Light switch decal
4.Connect the wire-harness connector to the back of the rocker switch.
4
 Loading...