


DPL913VD
1
3
DPL913VD
THOMSON
46, quai Alphonse Le Gallo
92648 Boulogne
Cedex FRANCE
www.thomson.net
TOCOM
It is important to read this instruction book prior to using your new product for the first time.
Avant d’utiliser votre appareil pour la première fois, il est primordial que vous lisiez attentivement ce Guide d’Instructions.
Bevor Sie Ihr neues Produkt das erste Mal anwenden, müssen Sie unbedingt dieses Bedienhandbuch lesen.
È importante leggere attentamente questo manuale di istruzioni prima di utilizzare questo nuovo prodotto per la prima volta.
Es importante leer el libro de instrucciones antes de usar este nuevo producto por primera vez.
user
manual
DPL913VD-EN receiver 10/26/04 2:22 PM Page 2
1
Safety Information
Getting Started
Unpacking the DVD Receiver . . . . . . . . .2
Unpacking the Speakers . . . . . . . . . . . . .2
Inserting Batteries into Remote Control .3
Set Up and Maintenance of the
Receiver . . . . . . . . . . . . . . . . . . . . . . . . . .3
Protect your Components from
Overheating . . . . . . . . . . . . . . . . . . . . . . .3
Disc Information . . . . . . . . . . . . . . . . . . .3
Connecting to Audio-Visual
Components . . . . . . . . . . . . . . . . . . . . . .4
Connecting Antennas . . . . . . . . . . . . . . .5
Connecting the Speakers . . . . . . . . . . . . .6
Positioning your Speaker . . . . . . . . . . . . .7
Front Speaker Placement . . . . . . . . . . . . .7
Advanced Setting . . . . . . . . . . . . . . . . . .7
Preferred Surround Placement . . . . . . . .8
Advanced Setting . . . . . . . . . . . . . . . . . .8
Test Tone / Channel Balance . . . . . . . . . .9
Factory Setting . . . . . . . . . . . . . . . . . . . . .9
Operating your Receiver
Receiver Controls . . . . . . . . . . . . . . . . . .10
Remote Control . . . . . . . . . . . . . . . . . . .11
Display . . . . . . . . . . . . . . . . . . . . . . . . . .12
Switching On/Off . . . . . . . . . . . . . . . . . .13
Selection of Audio Source . . . . . . . . . . .13
Connection of Audio Source . . . . . . . . .14
Advanced Sound Contr
ol
Sound Enhancement Systems . . . . . . . .15
Fine Setting of Components . . . . . . . . .16
Fine Setting of the Speakers . . . . . . . . .17
Speaker icons . . . . . . . . . . . . . . . . . . . . .18
DVD Player
Basic Playback Features . . . . . . . . . . . . .19
Quick Search . . . . . . . . . . . . . . . . . . . . .19
Time Search . . . . . . . . . . . . . . . . . . . . . .19
Freeze Frame and Frame Advance . . . .19
Slow Motion Playback (DVD only) . . . . .20
On-Screen Banner Display . . . . . . . .20-24
Setup Menu . . . . . . . . . . . . . . . . . . . . . .25
CD / mp3 Player
mp3 Recommendations . . . . . . . . . . . . .30
Loading and Playing an Audio CD . . . .30
Quick Scan . . . . . . . . . . . . . . . . . . . . . .31
On-Screen Banner Display for CD
Playback . . . . . . . . . . . . . . . . . . . . . .32-34
On-Screen Display for mp3 playback
. . . . . . . . . . . . . . . . . . . . . . . . . . . . .35-36
JPEG CD
On-Screen Display for JPEG CD . . . . . . .37
DivX
On-Screen Display for DivX . . . . . . . . . .38
To rent (purchase) DivX VOD files . . . . . .39
Radio
Operating the Radio . . . . . . . . . . . . .40-41
Troubleshooting Tips . . . . . . . .42-43
Care and Maintenance . . . . . . . . .44
EN
Table of Content
Safety Information
Thomson Information
CAUTION!
Invisible laser radiation when open. Avoid exposure to
beam. Class 1 laser product. This system must be opened
only by qualified technicians to prevent accidents caused
by the laser beam.
LASER λ = 780 nm, P max = 5 mW
Rating Information: At bottom of the unit
this unit comply with the existing requirements
In accordance with the rating plate of the
unit, this unit complies with current
standards concerning electrical safety and
electromagnetic compatibility.
Please respect the environment Before
throwing any batteries away, consult your
distributor who may be able to take them
back for specific recycling.
Have a Blast- Just Not in Your Eardrums
Make sure you turn down the volume on
the unit before you put on headphones.
Increase the volume to the desired level
only after headphone are in place.
CAUTION – INVISIBLE LASER RADIATION
WHEN OPEN AND INTERLOCKS FAILED OR
DEFEATED. AVOID EXPOSURE TO BEAM.
ATTENTION –
RAYONNEMENT LASER INVISIBLE
DANGEREUX EN CAS D'OUVERTURE ET LORSQUE
LA SECURITE EST NEUTRALISEE.
EXPOSITION DANGEREUSE AU FAISCEAU.
For UK Only
CONNECT THE MAIN LEAD INTO AC MAINS POWER
SOCKET
POWER SUPPLY 230V. It must not be connected to D.C.
mains.
Note; The mains lead of the set is fitted with a molded
plug. If the mains socket are not compatible or if for any
reason the plug is removed please follow the directions
below. The molded plug cannot be rewired and if
removed must be disposed of safely.
DO NOT under any circumstances plug the severed plug
into any mains socket as this could result in electric shock.
Important: If the plug is removed, rewire the new plug
as follow:
The wires in the mains plug are coloured in accordance
to the following code:
BLUE = NEUTRAL/BROWN = LIVE
If the colours of the wires in the mains lead of this
apparatus may not correspond with the coloured
markings identifying the terminals in your plug, proceed
as follows:
BLUE wire to the terminal coded N (Neutral) or coloured
black.
BROWN wire to the terminal coded L (Live) or coloured
red.
DO NOT
make any connection to the
terminal in the plug which is marked by
the letter E or by the earth symbol or
coloured green or green and yellow.
A fused plug must be fitted with a 13A fuse approved by
ASTA or BS1362 and fuse covers must be always be
securely replaced. If you set does not work, the fuse may
be blown.
13A
This product incorporates copyright protection technology that is protected by
method claims of certain U.S. patents
and other international property rights
owned by Macrovision Corporation and
other rights owners. Use of this copyright protection technology must be authorized by
Macrovision Corporation, and is intended for home
use only unless otherwise authorized by Macrovision
Corporation. Reverse engineering or disassembly is
prohibited.
DPL913VD-EN receiver 10/26/04 2:22 PM Page 4
ADVARSEL!
USYNLIG LASERSTRÅLNING VED ÅBNING NAR
SIKKERHEDSAFBR
UNGDÅ UDSAETTELSE FOR STRÅLNING.
VORSICHT!
UNSICHTBARE LASERSTRALUNG
WENN ABDECKUNG GEÖFFNET UND SICHERHEITS–
VERRIEGELUNG ÜBERBRÜCKT.
NICHT DEM LASERSTRAHL AUSSETZEN!
VAR NING–
OSYNLIG LASERSTRÅLNING NÄR DENNA DEL
ÄR ÖPPNAD OCH SPÄRRAN ÄR URKOPPLADE.
BETRAKTA EJ STRÅLEN.
VARO!
AVAT T AESSA JA SOUJALUKITUS OHITETT
OLET AL
LASERSÄTEILYLLE ÄLÄ KATSO SÄTEESEEN.
YDERE ER UDE AF FUNKTION.
CLASS 1 LASER PRODUCT
LASER KLASSE 1
AREIL
APP
A LASER
LUOKAN 1 LASERLAITE
KLASS 1 LASERAPPARAT
TTIINA NÄKYMÄTTÖMÄLLE.
DE CLASSE 1
AESSA
CAUTION
RISK OF ELECTRIC SHOCK
DO NOT OPEN
THE LIGHTNING
FLASH AND ARROWHEAD WITHIN THE
TRIANGLE IS A
WARNING SIGN
ALERTING YOU OF
"DANGEROUS
VOLTAGE" INSIDE
THE PRODUCT.
SEE MARKING ON BOTTOM / BACK OF PRODUCT
WARNING: TO PREVENT FIRE
SHOCK HAZARD,
TO RAIN OR MOISTURE.
CAUTION: TO REDUCE THE
RISK OF ELECTRIC SHOCK,
DO NOT REMOVE COVER
(OR BACK). NO USERSERVICEABLE PARTS INSIDE. REFER SERVICING
TO QUALIFIED SERVICE
PERSONNEL.
DO NOT EXPOSE THIS PRODUCT
THE EXCLAMATION
POINT WITHIN THE
TRIANGLE IS A
WARNING SIGN
ALERTING YOU OF
IMPORTANT
INSTRUCTIONS
ACCOMPANYING
THE PRODUCT.
OR ELECTRICAL
Getting Started
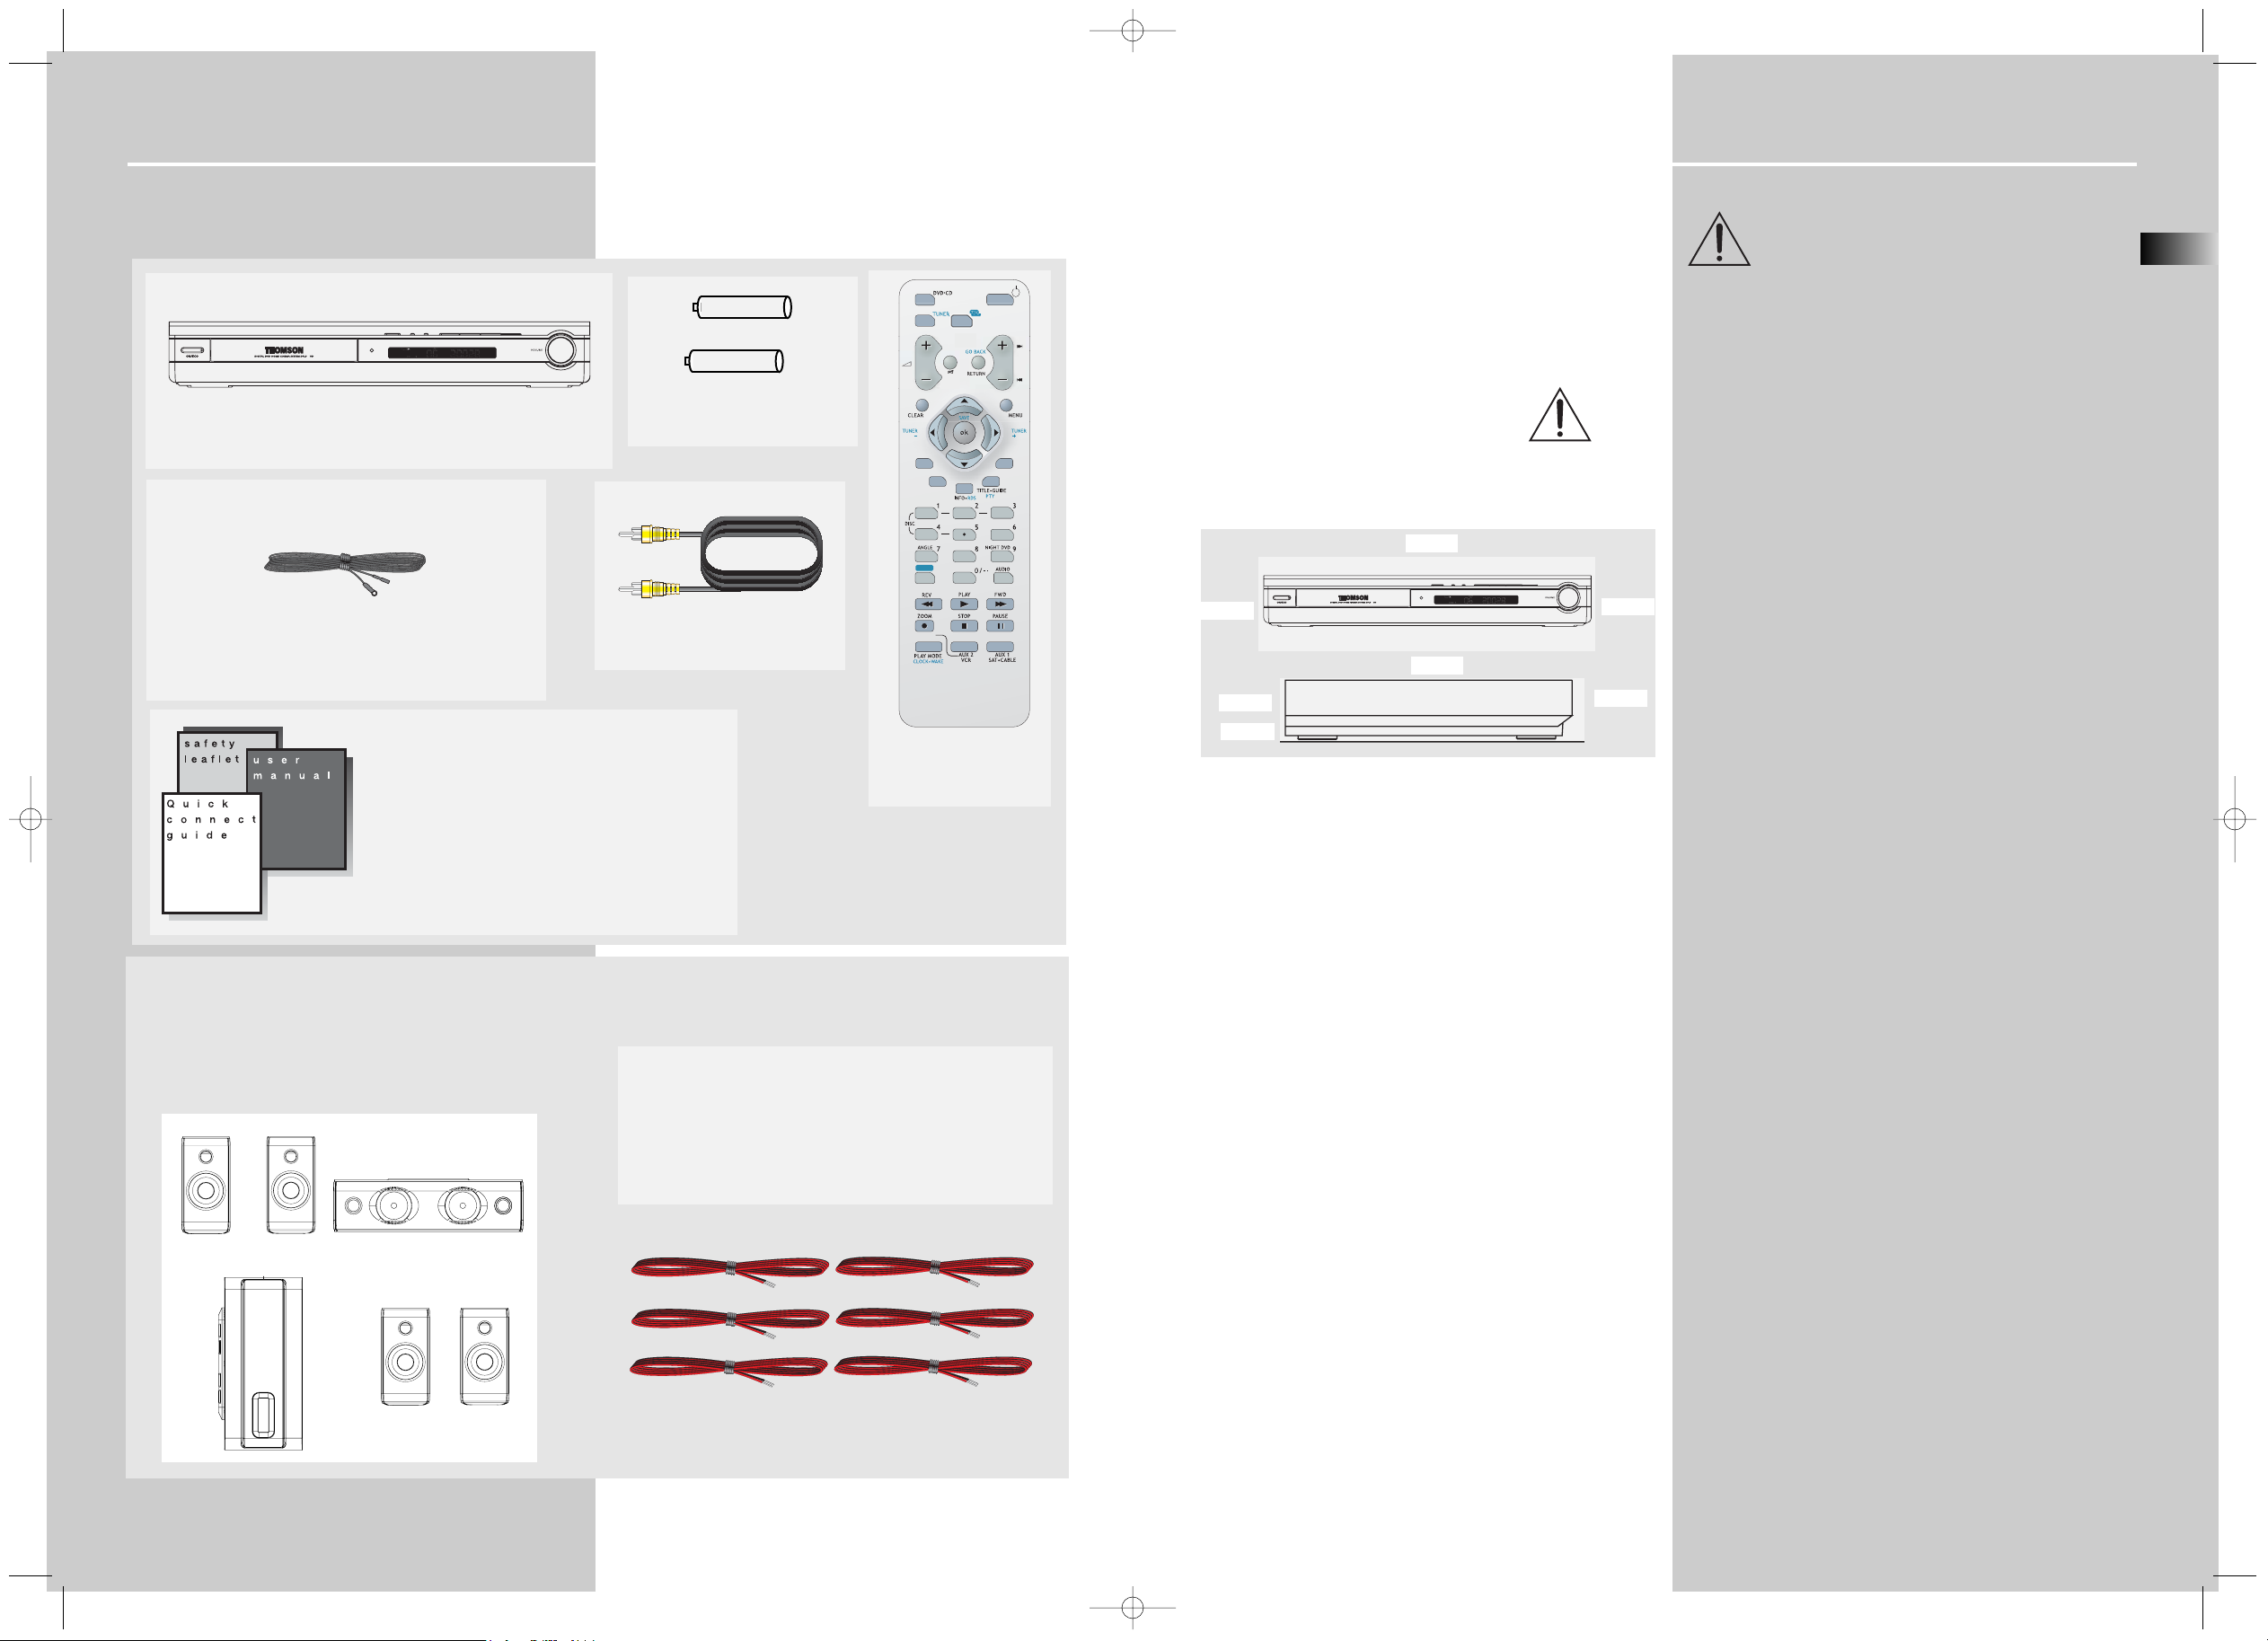
Inserting Batteries into Remote Control
Insert two “AAA” batteries according to the + and - signs
on the battery compartment. To use the remote control,
point it directly at your receiver.
Set up and Maintenance of the Receiver
IMPORTANT NOTE
• Provide spaces for sufficient ventilation as indicated
below. If the space is insufficient, the unit may overheat
resulting in malfunction and shorter life time.
• Do not connect to the AC power cords until all connections are completed.
• Do not use your set immediately after transferring it from
a cold place to a warm place: there is risk of condensation.
• Do not expose your set to water and excessively high
temperatures.
• After having disconnected your set, clean the case with a
soft cloth, or with a slightly damp leather chamois. Never
use strong solvents.
Disc handling precaution:
• Do not touch the recorded surface.
• Do not use record cleaning sprays, solvent or anti-static
liquid.
• If the disc is dirty, clean it with a damp cloth and wipe
from the center out. Wipe in straight line and not in circular motion.
• Do not attach stickers, label on the disc.
• Store the disc in its case after playing.
Regional coding
Your DVD player has been designed to process regional
management information that is stored on DVD. DVD that
have different regional codes to that of your player cannot
be played. The regional code for your player is 2. All means
all regions. When you buy a disc, check that it bears the
correct logo.
Protect your Components from
Overheating
• Do not block ventilation holes in any component.
Arrange the components so that air can circulate freely.
• Do not stack components directly on top of each other.
• Allow adequate ventilation when placing your components in a stand.
• Place the receiver near the top shelf of the stand so
heated air rising from it will not affect other components.
Disc you can play
While advances have been made to ensure that your player
is compatible with the largest number of discs possible, it
cannot be guaranteed that you will be able to play discs
which might not be compatible with audio CD, VCD and
SVCD standards. In the case of writable and rewritable
discs, compatibility with this player depends on the DVD
writer, the write sofeware and the disc used.
DVD video - Digital video discs - 12 cm and 8 cm, single or doubled sided, single or dual layer. DVDs are high-density optical discs
on which high quality picture and audio are recorded by means of
digital signals.
DVD-R, DVD-RW, DVD+R, DVD+RW - Most DVD-R and DVD+R
(one recording only), DVD-RW and DVD+RW discs (rewritable).
Depending on the DVD writer and discs used. Recordings using
DVD-R and DVD+RW discs must be made in Video DVD mode.
Recordings using DVD+RW discs must be made in accordance with
the specifications for DVD+RW discs with a 4.7 GB capacity.
VCD, Video Compact Disc - CD on which you can record up to 74
minutes of VHS-quality video associated with still images, audio
tracks and interactive menu.
SVCD, Super Video Compact Disc - Most SVCDs comply with the
IEC62107 standards. SVCDs can be used to record up to 70 minutes of digital sound and images in accordance with MPEG-2 standards for video and MPEG-1 standards for audio.
Audio CDs - Audio CDs (8 and 12cm)
CD-R, CD-RW - Most CD-R (one recording only) and CD-RW
discs (rewritable). This player can play most CD-R discs. CD-Rs
written during a multisession recording can also be played, provided that the session had ended before the disc is played (depending on the write software). However, depending on the condition of
the CD writer, computer and the disc used, you may find that not
all discs will play successfully. When playing a CD-R disc, it is completely normal for the unit to take up to 30 seconds to recognize
the disc before starting to play. If the disc is not recognized
after a period of 30 seconds, remove the disc and then insert it
again.
• Irrespective of the actual recording capacity of the CD-R, do
not use its full capacity.
• CD-Rs should be preferably used instead of CD-RWs (rewritable
CDs) as, in certain cases, CD-RW playback may be faulty.
• Use reliable, good-quality CD write software.
• Close all other applications on the computer to ensure reliable
CD-R disc recording.
Disc you cannot play
DVD-ROM, DVD RAM, CDV, SACD, DVD Audio (High resolution tracks). Data
part of CD Extra, disc with non standard shape (e.g. heart), disc with region
code different from the one specified on the back of the unit.
EN
3
Getting Started
Unpacking the DVD Receiver
You should receive the following items:
2
One DVD receiver unit
One pair of “AAA”
batteries
One Pig-Tail
antenna wire
one video cable (single wire)
with yellow connectors
• one instruction book;
• one safety leaflet;
• one Quick Connection Guide
One Remote Control
(RCT311AC1)
Unpacking The Speakers
• one set of speakers including 1 set of left and right front
speakers, 1 centre speaker, 1 subwoofer and 1 set of left
and right rear speakers.
10cm/4”
5cm/2”
10cm/4”
10cm/4”
10cm/4”
1 X green/grey stripped wire for center speaker
1 X red/grey stripped wire for front right speaker
1 X white/grey stripped wire for front left speaker
1 X purple/grey stripped wire for subwoofer
1 X blue/grey stripped wire for rear left speaker
1 X grey/grey stripped wire for rear right speaker
Front
Rear
DPL913VD-EN receiver 10/26/04 2:22 PM Page 6
13
FRONT SPEAKERS
SUBWOOFER
CENTER SPEAKER
REAR SPEAKERS
(SURROUND SOUND)
+ -
+ -
SURROUND
AV
REC
EQ. LEVEL
SUBWOOFER
PR
13
Getting Started
EN
5
Getting Started
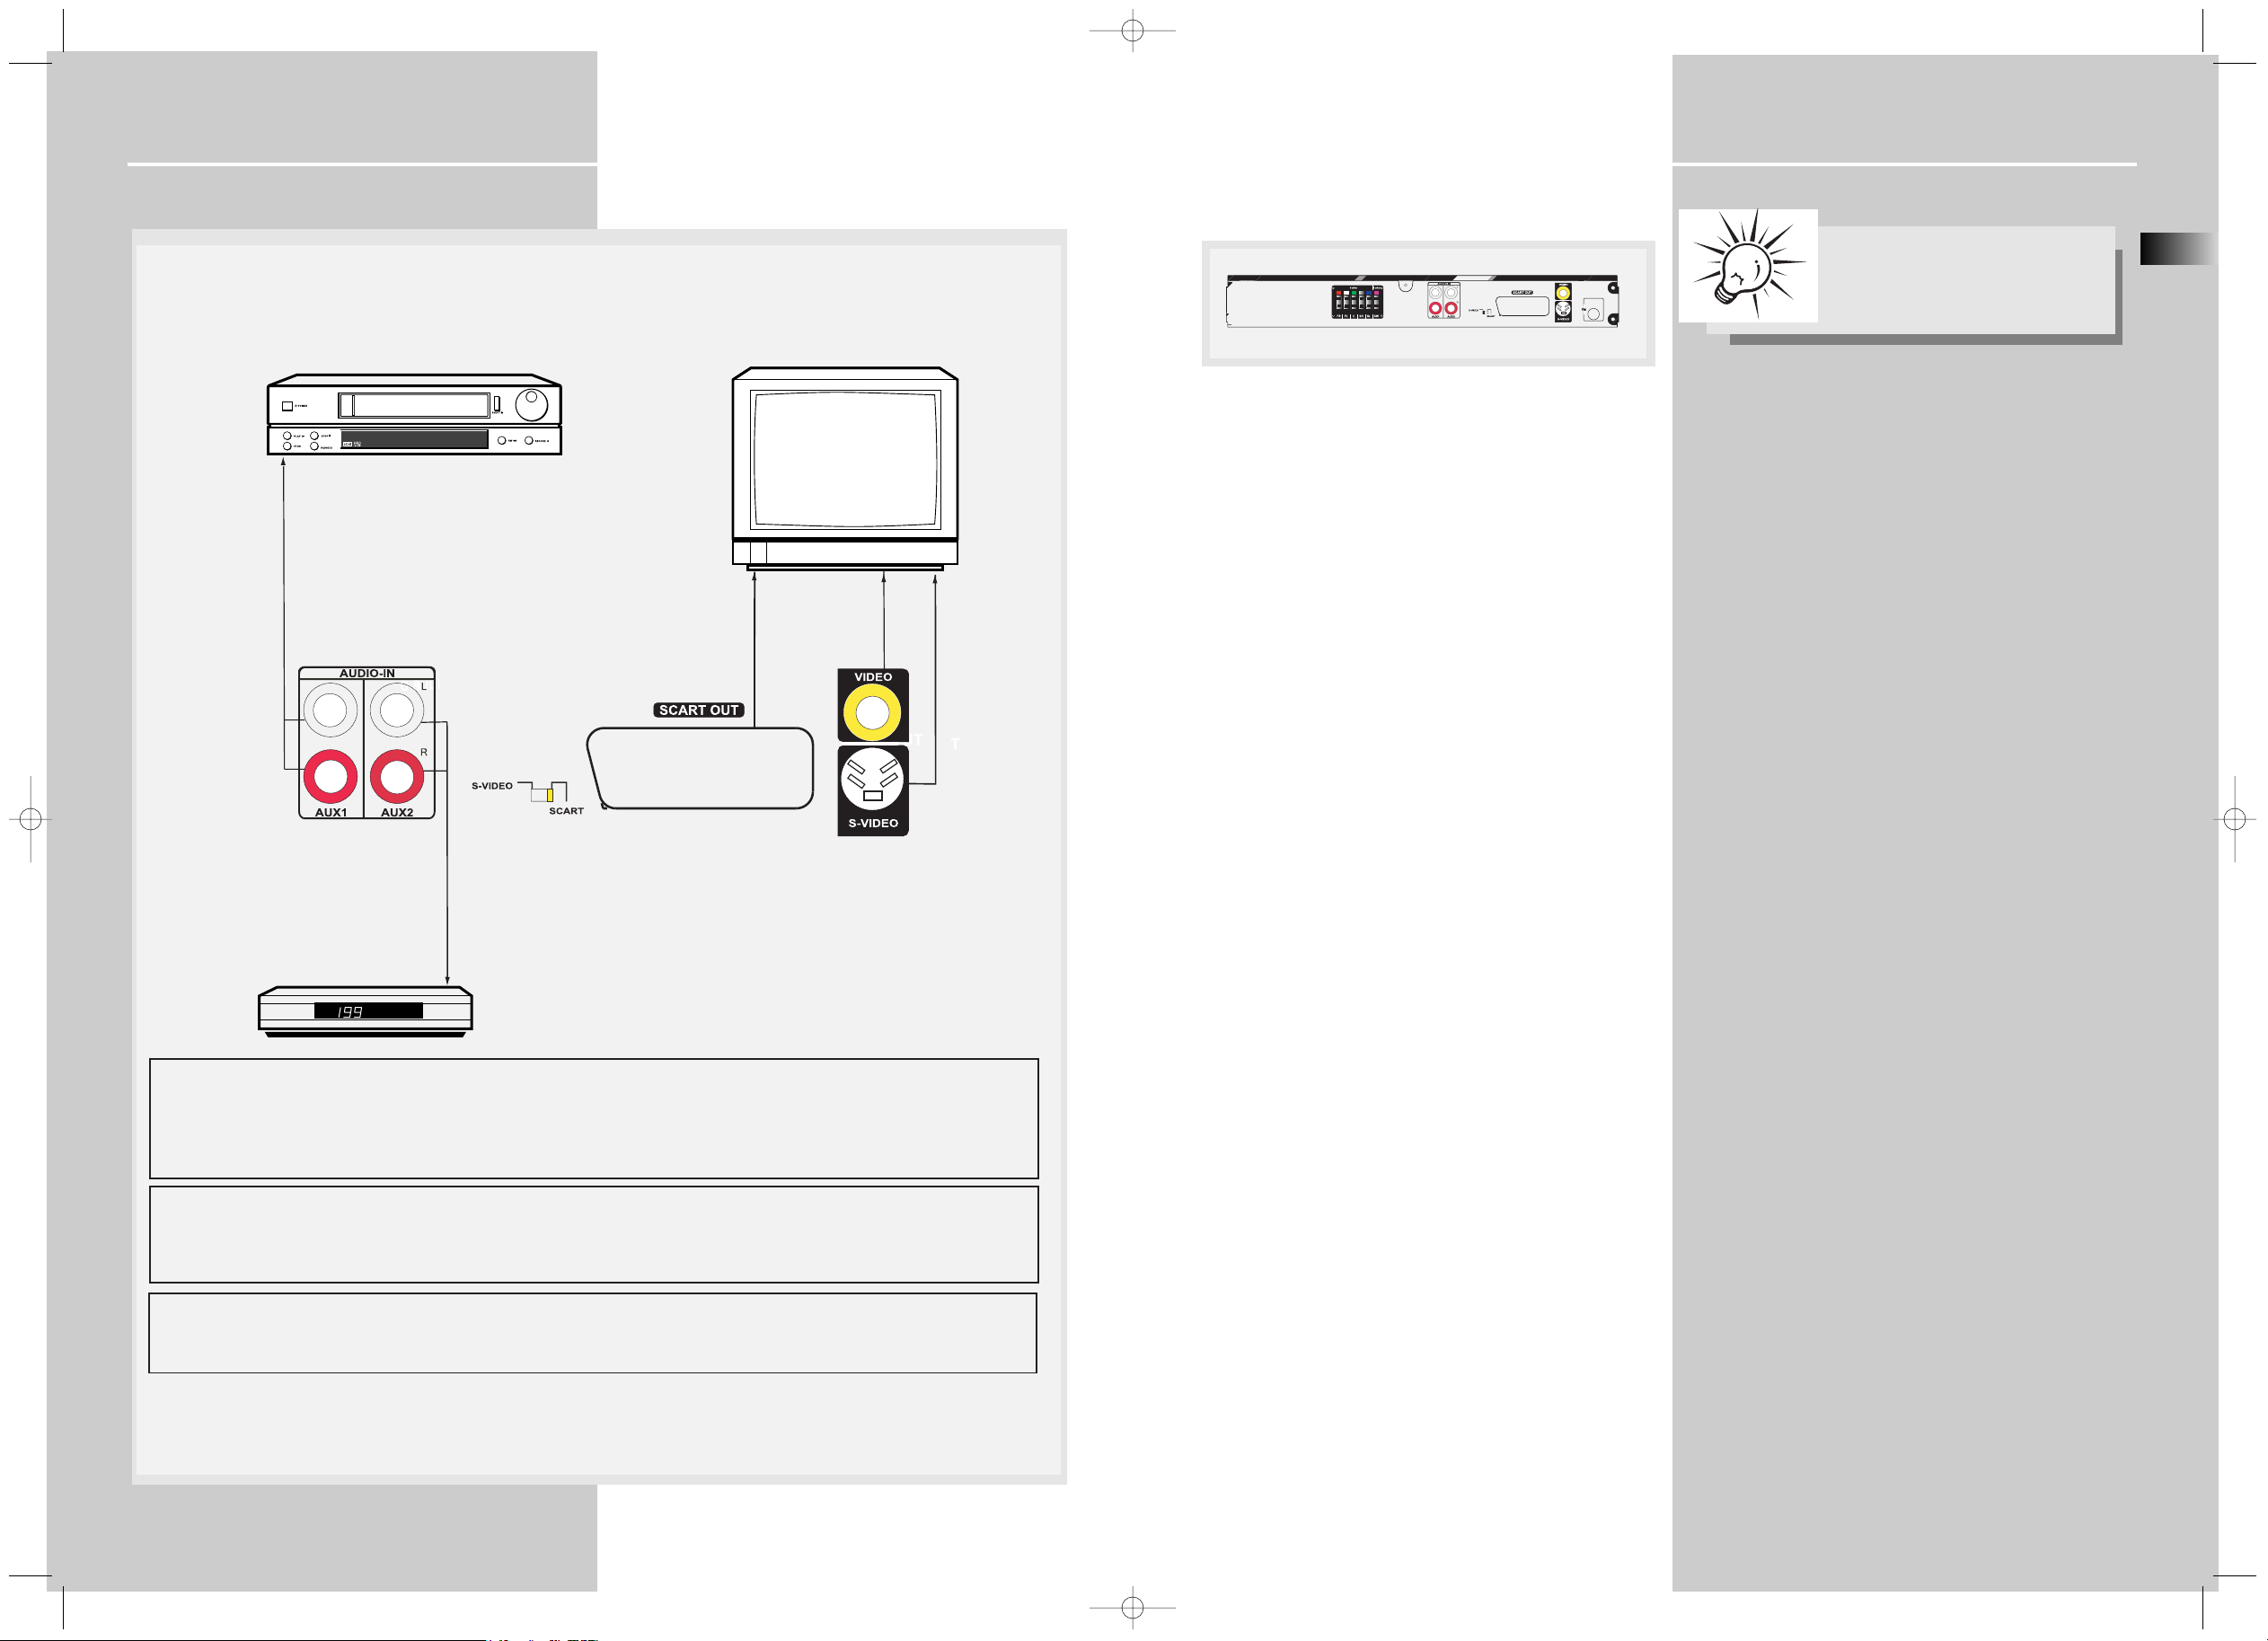
Connecting to Audio-Visual Components
4
Connecting the Antennas
The FM antennas connect to the FM terminals on the system’s back panel.
They must be hooked up in order to have clear reception.
Tip:
• For FM reception, extend antenna to its
full length and arrange the antenna at different parts of the room until the reception is optimized.
DPL913VD-EN receiver 10/26/04 2:22 PM Page 8
It is recommended that you should only use one kind of connection method listed
below.
VCR
AUDIO OUT (VCR)
SCART IN (TV)
TV
VIDEO IN (TV)
S-VIDEO IN (TV)
1
AUDIO OUT (SAT)
SAT
Setup video output
You can select either S-video or SCART as your video output (default is SCART). Try power off the unit and turn it on
again if you see any picture distortion on the TV.
When S-video output is selected, SCART will only provide composite video signal.
When SCART output is selected, S-video ouput will be disabled.
Composite video signal is always available.
SCART video output (SCART cable is not supplied with this unit)
SCART video terminal provides the best quality for video signal. If there is no SCART socket is available on your TV
set, check whether your TV has another Video socket (Composite, S-video) that you can use to connect your player.
The unit does not have audio signal from the SCART output.
S-video
S-video provides a better connection for the video portion of the signal than composite video (yellow color terminal). When
connecting S-video cable, a Composite video cable (yellow RCA connector) must also be used.
 Loading...