

Page 1

Getting Started with the
TI-84 Plus C Silver Edition
Graphing Calculator
This guidebook applies to software version 4.0. To obtain the latest
version of the documentation, go to education.ti.com/go/download.
Page 2

Important Information
Except as otherwise expressly stated in the License that accompanies a
program, Texas Instruments makes no warranty, either express or
implied, including but not limited to any implied warranties of
merchantability and fitness for a particular purpose, regarding any
programs or book materials and makes such materials available solely on
an "as-is" basis. In no event shall Texas Instruments be liable to anyone
for special, collateral, incidental, or consequential damages in connection
with or arising out of the purchase or use of these materials, and the sole
and exclusive liability of Texas Instruments, regardless of the form of
action, shall not exceed the amount set forth in the license for the
program. Moreover, Texas Instruments shall not be liable for any claim of
any kind whatsoever against the use of these materials by any other
party.
© 2012 Texas Instruments Incorporated
ii
Page 3

Contents
Important Information................................................................... ii
Getting Started with the TI-84 Plus C Silver Edition .............1
Documentation Conventions......................................................... 1
Using the TI-84 Plus C in the Classroom........................................ 1
Using Color on the TI-84 Plus C ..................................................... 1
TI-84 Plus C Keyboard..................................................................... 4
Turning On and Turning Off the TI-84 Plus C ............................... 7
Setting the Display Brightness....................................................... 8
The Home Screen............................................................................ 9
Setting Modes............................................................................... 16
Using the Clock............................................................................. 22
Equation Operating System (EOS™) ........................................... 23
Entering Expressions and Instructions......................................... 25
Pictures and Backgrounds............................................................ 29
Using Variable Names .................................................................. 30
Storing Variable Values................................................................ 31
Recalling Variable Values............................................................. 32
QuickPlot and Fit Equation.......................................................... 33
ENTRY (Last Entry) Storage Area................................................. 34
Menus............................................................................................ 36
VARS Menus.................................................................................. 39
Grouping files ............................................................................... 41
Special Features of the TI-84 Plus C............................................. 42
Other TI-84 Plus C Features.......................................................... 42
Interchangeable Faceplates......................................................... 44
Battery Information ..................................................................... 45
Replacing TI Rechargeable Batteries........................................... 47
TI-84 Plus C Charging Station ...................................................... 49
Transferring the OS from calculator to calculator...................... 52
Error Conditions ........................................................................... 53
Linking Compatibility................................................................... 54
...................................... 57
Texas Instruments Support and Service
Service and Warranty Information.............................................. 57
.
iii
Page 4

iv
Page 5

Getting Started with the TI-84 Plus C Silver Edition
Documentation Conventions
This Getting Started guide is similar to Chapter 1 of the TI-84 Plus C Silver
Edition guidebook. Several of the chapters in the full guidebook are
referenced in this Getting Started guide. The full guidebook is available
as a free download from education.ti.com/go/download.
In this document,
referred to as the TI-84 Plus C.
the TI-84 Plus C
Using the TI-84 Plus C in the Classroom
The TI-84 Plus C shares many features with the TI-84 Plus. However, some
features you may be accustomed to using in the classroom may differ.
Some of these differences are listed here.
• TI-Navigator™ software supports the TI-84, T
SE. TI-Navigator™ software does not support the TI-84 Plus C.
• TI-84 Plus C does not work with TI-Presenter™ video adapter or
ViewScreen™ overhead panel, but the TI-84 Plus C view option in the
TI-SmartView™ software allows you to project the graphing
calculator emulator to the classroom.
• Some files and variables are compatible between the TI-84 Plus C and
the TI-84 Plus family of graphing calculators. For more information
on file compatibility, see Linking Compatibility later in this chapter.
• The TI-84 Plus C graphing calculator comes equipped with a Li-ion
rechargeable battery. To ensure battery life, store the graphing
calculators in the TI-84 Plus C Charging Station, or connect individual
graphing calculators to a wall charger.
Warning: RAM memory will be lost if the battery charge is lost. You
should back up or archive your variables if your battery power gets
low.
For more information on the batteries and the charging station, see
Battery Information and TI-84 Plus C Charging Station later in this
chapter.
Silver Edition graphing calculator is also
I
-84 Plus, and TI-84 Plus
Using Color on the TI-84 Plus C
The TI-84 Plus C graphing calculator has many color options and a high
resolution display that allows more information to be shown on the
screen. The TI-84 Plus C uses color in the following ways:
Getting Started with the TI-84 Plus C Silver Edition 1
Page 6

• Y= editor for line color.
• DRAW commands for line color, such as vertical lines, circles, and text
on the graph screen.
• The graph format screen for grid, axes, or border color, and applying
a background image or color.
• Statistical Plots.
The color options are selected using a spinner, which can contain various
options depending on the feature. Press
color options to set a color.
| and ~ to scroll through the
Note: T
areas so that all features are visible.
You can reset the calculator to its default settings, including color
ake care to choose appropriate co
settings, by pressing y L
7 2 2.
lor combinations for the graph
Using Color on the Graph Screen
The examples below show how to set line color on the Y= editor using
the spinner, and how to set a Background Image for a graph.
Enter an equation in the Y=
editor.
1. Press o.
2. Press k „
¡ Ã 6.
2 Getting Started with the TI-84 Plus C Silver Edition
Page 7
To set the line color in the Y=
editor:
3. Press y | | | to sele
ct
the color/line box to the left
of Y=, and then press Í.
The spinner dialog box
becomes active.
4. Press ~ ~ ~ to select
magenta.
5. Press †.
Note: The thick line style is
the default. It can be
changed by pressing | or
~.
6. Press † to highlight OK and
then press Í.
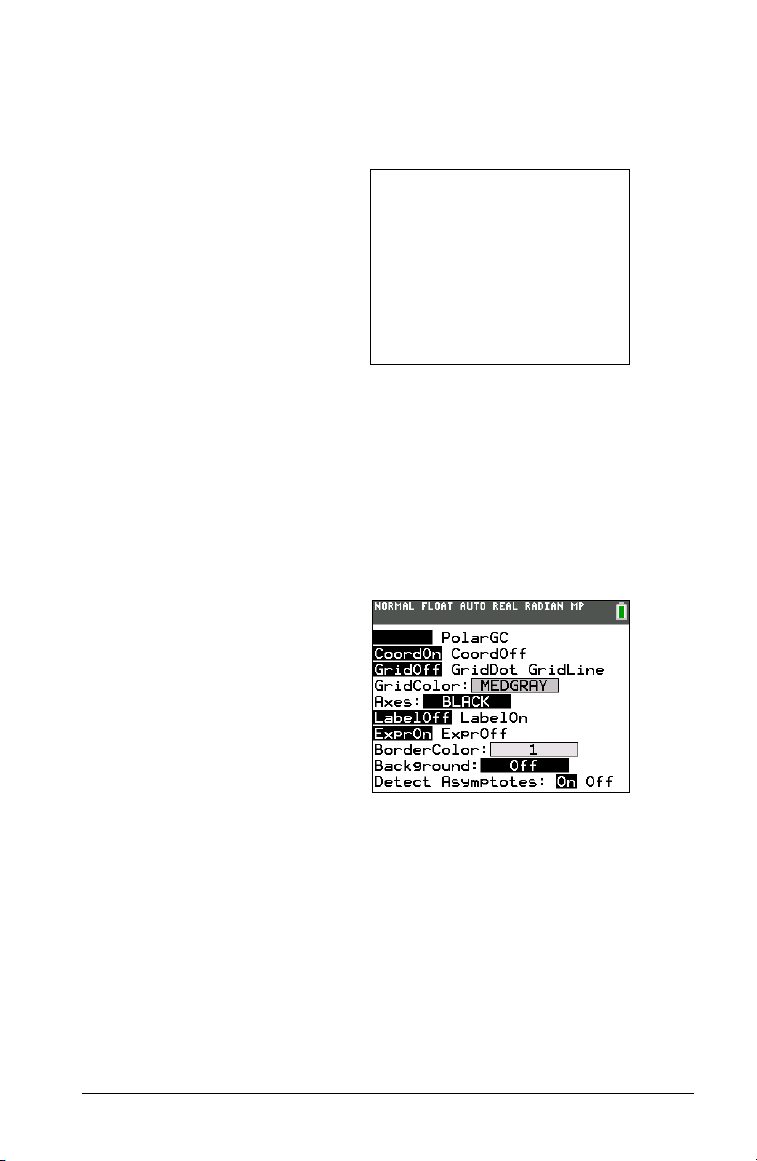
To set a Background Image:
7. Press y ..
Set grid color, axes, and
border color as desired.
8. Press } or † as necessary to
highlight Background.
The spinner dialog box
becomes active.
9. Press ~ as necessary to select
the desired Background
Image or color.
Note: Your pre-loaded
Image Var may be different
than the one displayed.
Note: To create Background
Image Vars, use the free
TI Connect™ software to
convert and send images to
your TI-84 Plus C graphing
calculator.
Getting Started with the TI-84 Plus C Silver Edition 3
Page 8

10. Press r to see the graph
and trace points.
Note: You can manipulate the
graph to “fit” an object in the
Background Image Var. You can
also use QuickPlot and Fit
Equation to fit an equation to a
shape. (See QuickPlot later in
this chapter.)
TI-84 Plus C Keyboard
Generally, the keyboard is divided into these zones: graphing keys,
editing keys, advanced function keys, and scientific calculator keys.
Keyboard Zones
Graphing—Graphing keys access the interactive graphing features. The
third function of these keys (t ^-a) displays the shortcut menus,
which include templates for fractions, n/d, quick matrix entry, and some
of the functions found on the MATH and VARS menus. When some
features are active, you may also see a shortcut menu in the t b
location for special shortcuts available in that particular feature.
Editing—Edi
ting keys allow you to edit expressions and values.
Advanced—Advanc
advanced functions.
Scientific—S
scientific calculator.
4 Getting Started with the TI-84 Plus C Silver Edition
ed function keys display menus that access the
cientific calculator keys access the capabilities of a standard
Page 9
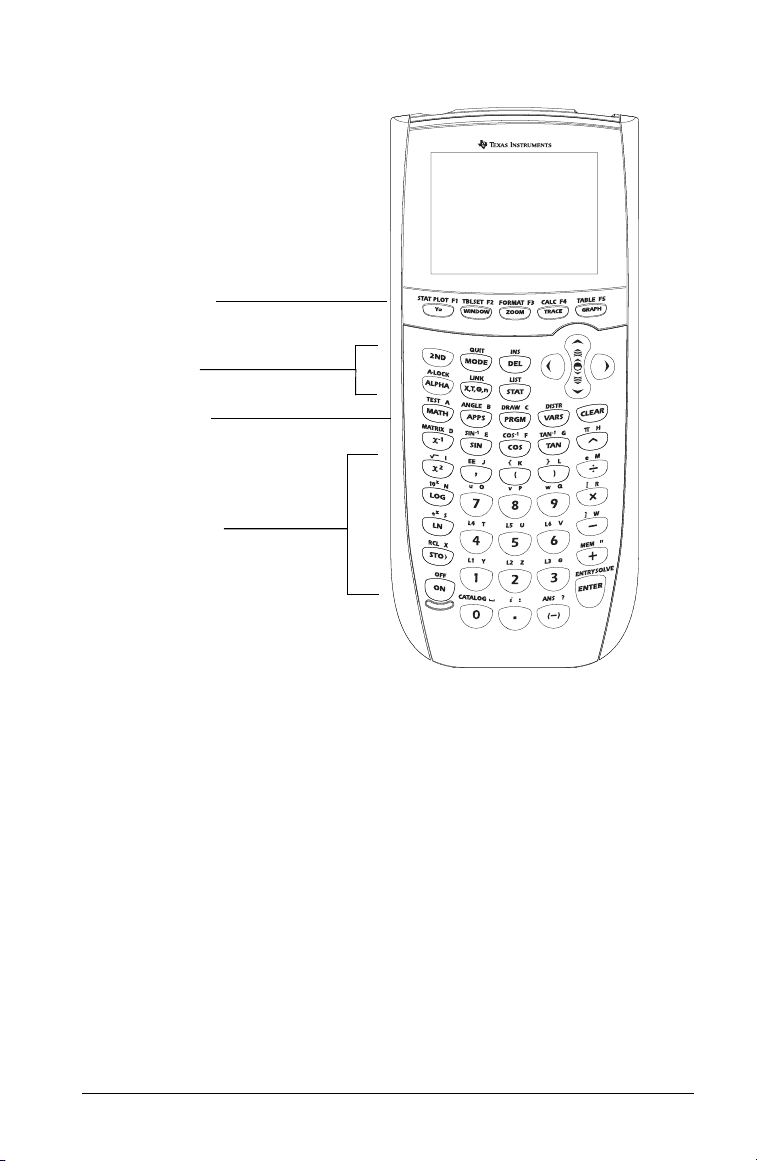
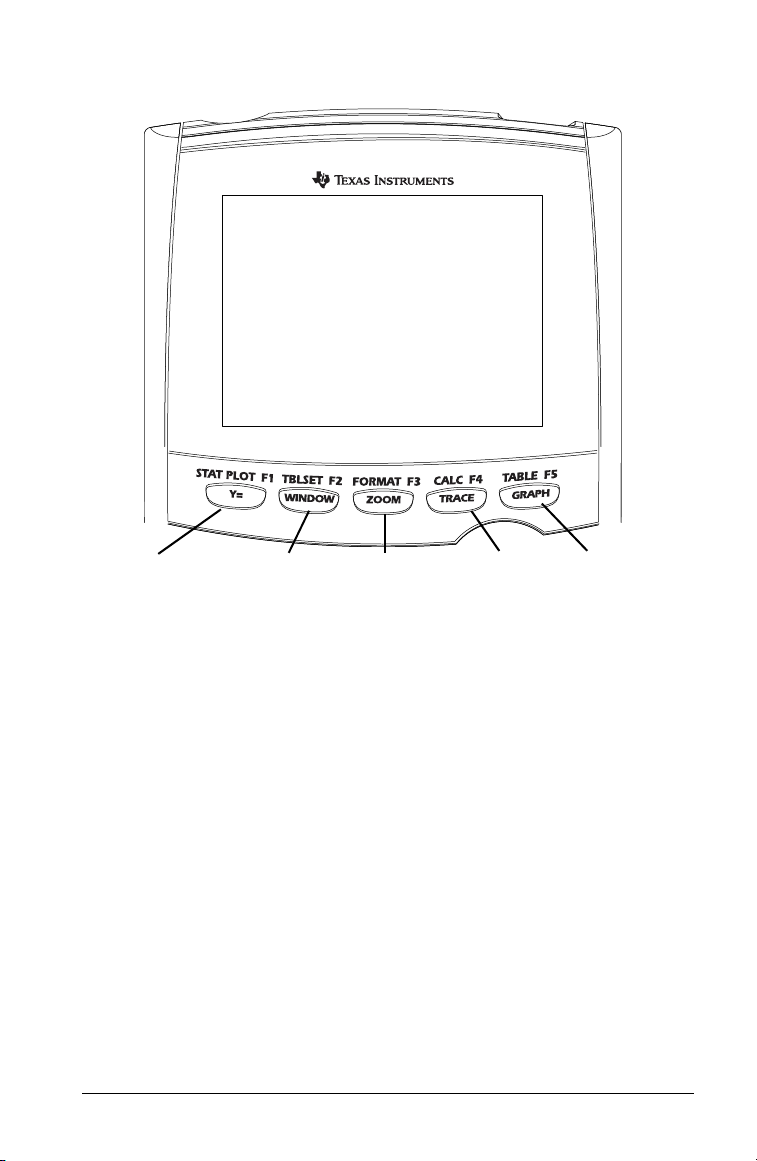
TI-84 Plus C Silver Edition
TI-84 Plus C Silver Edition
Graphing Keys
Editing Keys
Advanced
Function Keys
Scientific
Calculator Keys
Using the Color.Coded Keyboard
The keys on the TI-84 Plus C are color-coded to help you easily locate the
key you need.
The light colored keys are the number keys. The ke
the keyboard are the common math functions. The keys across the top set
up and display graphs. The Πkey provides access to applications such as
Polynomial Root Finder and Simultaneous Equation Solver, Inequality
Graphing, and more.
Note: Catalog Help is an application on the TI-84 Plus, but is built into
the TI-84 Plus C operating system. The Catalog Help contains syntax
information for most menu items, and most of the functions in the
catalog. To use Catalog Help on the TI-Plus C, select a menu item and
then press Ã.
The primary function of each key is printe
when you press , the MATH menu is displayed.
ys along the right
side of
d on the keys. For example,
Getting Started with the TI-84 Plus C Silver Edition 5
Page 10
Using the y and ƒ Keys
The secondary function of each key is printed above the key in the same
color as the y key. When you press the y key, the character,
abbreviation, or word printed above the other keys becomes active for
the next keystroke. For example, when you press y and then , the
TEST menu is displayed. This guidebook describes this keystroke
combination as y :.
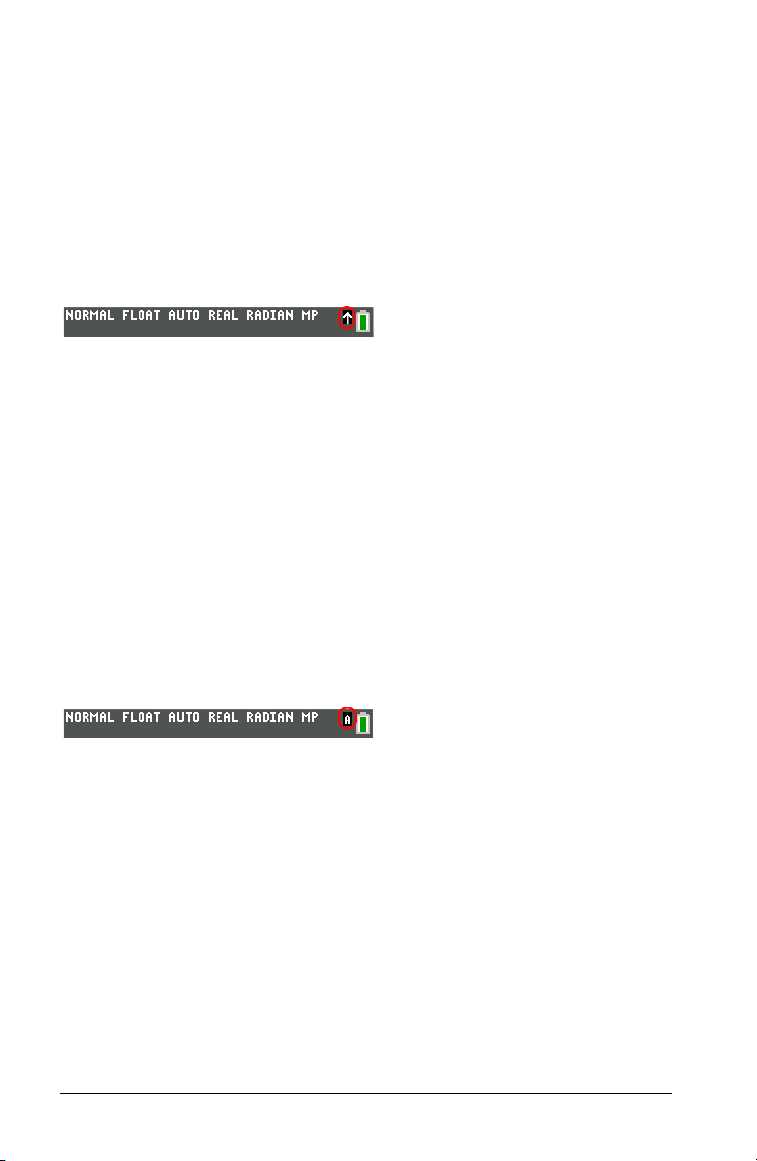
The flashing cursor changes
the cursor location, or in the status bar on the top of the screen.
2nd key indicator on the status bar
to Þ when you press y. The Þ may show in
Many keys also have a third function. These functions are
printed above
the keys in the same color as the ƒ key. The third functions enter
alphabetic characters and special symbols, as well as access SOLVE and
shortcut menus. For example, when you press ƒ and then , the
A is entered. This guidebook describes this keystroke combination
letter
as ƒ [
A].
If you want to enter several alphabetic characters in a row, you can press
y 7 to
lock the alpha key in the On position and avoid having to
press ƒ multiple times. Press ƒ a second time to unlock it.
The flashing cursor changes to Ø when
you press
ƒ, even if you are
accessing a function or a menu. The Ø may show in the cursor location, or
in the status bar on the top of the screen.
Alpha key indicator on the status bar
6 Getting Started with the TI-84 Plus C Silver Edition
Page 11

TI-84 Plus C Silver Edition
y
Accesses the
second function
printed above
each key.
ƒ
Accesses the
third function
printed above
each key.
ƒ ^ - a
Access shortcut
menus for
functionality
including templates
for fractions, n/d,
and other functions.
Turning On and Turning Off the TI-84 Plus C
Turning On the Graphing Calculator
To turn on the TI-84 Plus C, press É. An information screen displays
reminding you that you can press t ^ - a to display the shortcut
menus, and press à for Catalog Help. This message also displays when
you reset RAM. When some features are active, you may also see a
shortcut menu in the t b location for special shortcuts available in
that particular feature.
To continue but not see this information screen again, press 1.
To continue and see this information screen again the next time you
• If you previously had turned off the graphing calculator by pressing
turn on the TI-84 Plus C
, press 2.
y M, the TI-84 Plus C displays the home screen as it was when you
last used it and clears any error. (The information screen displays
first, unless you chose not to see it again.) If the home screen is
blank, press } to scroll through the history of previous calculations.
Getting Started with the TI-84 Plus C Silver Edition 7
Page 12

• If Automatic Power Down™ (APD™) had previously turned off the
graphing calculator, the TI-84 Plus C will return exactly as you left it,
including the display, cursor, and any error.
• If the TI-84 Plus C is turned off and connected to another graphing
calculator or personal computer, any communication activity will
“wake up” the TI-84 Plus C.
To prolong the life of the battery, APD™ turns off the TI-84 Plus C
automatically after about five minutes without any activity.
Turning Off the Graphing Calculator
To turn off the TI-84 Plus C manually, press y M.
• All settings and memory contents a
Memory™ function.
• Any error condition is cleared.
re retained by the Constant
Setting the Display Brightness
Adjusting the Display Brightness
You can adjust the display brightness to suit your viewing angle and
lighting conditions.
To adjust the contrast, follow these steps.
Press y † to darken the screen one level at a time.
Press y } to lighten the screen one level at a time.
The TI-84 Plus C retains the brightness setting in memory when it is
d
off.
turne
Automatic Dimming
The TI-84 Plus C has an automatic dimming feature. To help prolong
battery life, the screen dims after 90 seconds of no activity. Press É to
return the screen to the preset brightness setting. Pressing É does not
affect any calculations, cursors, or error messages.
8 Getting Started with the TI-84 Plus C Silver Edition
Page 13
The Home Screen
The home screen is the primary screen of the TI-84 Plus C. On this screen,
enter instructions to execute and expressions to evaluate. The answers
are displayed on the same screen. Most calculations are stored in the
history on the home screen. You can press } and † to scroll through the
history of entries on the home screen and you can paste the entries or
answers to the current entry line.
Press y 5 from any screen to go to the home screen.
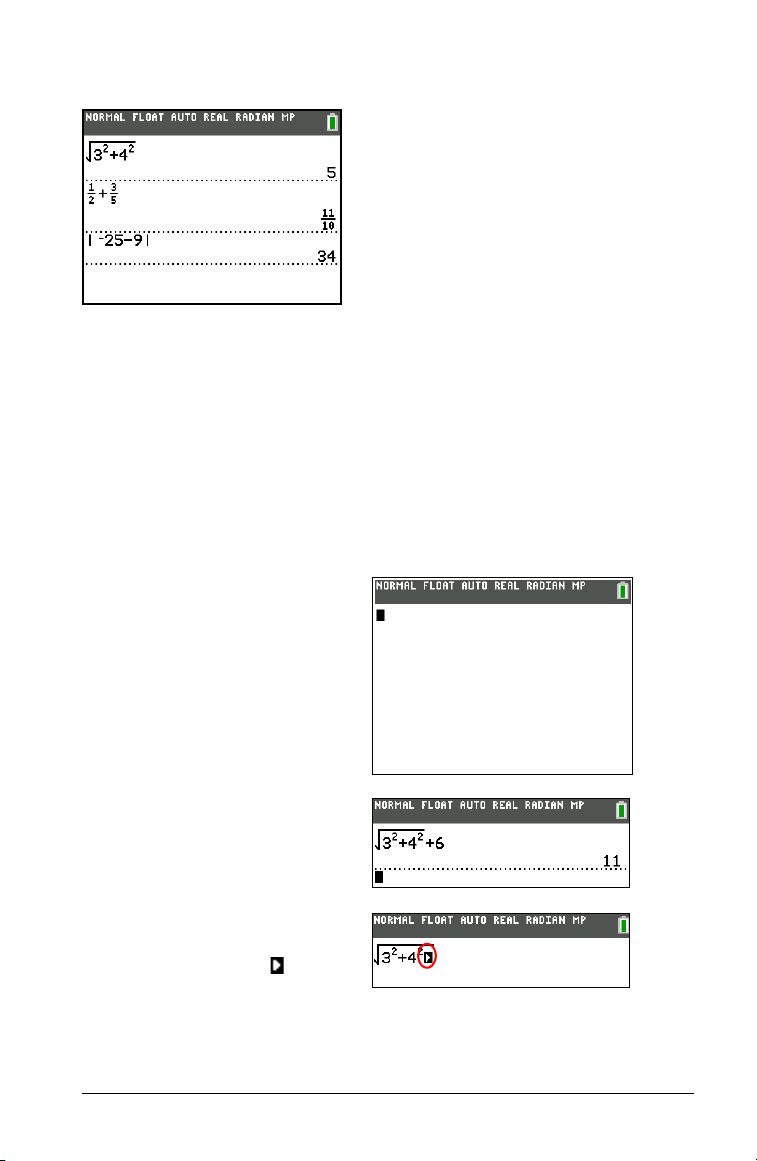
Enter a calculation.
1. Press y 5
the home screen, if needed.
to return to
2. Press y C 3 ¡ Ã 4 ¡ ~
à 6 Í.
Note: When you are in a
MathPrint™ template, the cursor
turns to a right arrow to
indicate that you must press ~
to get out of the template
before you continue entering
the calculation.
Getting Started with the TI-84 Plus C Silver Edition 9
Page 14
Displaying Entries and Answers
• When text is displayed, the TI-84 Plus C screen can display a
maximum of 10 lines with a maximum of 26 characters per line in
Classic mode. In MathPrint™ mode, fewer lines and fewer characters
per line may be displayed, depending on the MathPrint™ template
used.
• A dotted line separates each set of entries and answers.
• If an expression on the home screen, the Y= editor (Chapter 3 in the
guidebook), or the program editor (Chapter 16 in the guidebook) is
longer than one line, it wraps to the beginning of the next line in
Classic mode. In MathPrint™ mode, an expression on the home
screen or Y= editor that is longer than one line scrolls off the screen
to the right. An arrow on the right side of the screen indicates that
you can scroll right to see more of the expression. In numeric editors
such as the window screen (Chapter 3), a long expression scrolls to
the right and left in both Classic and MathPrint™ modes.
Tip: Press y ~ to move the cursor to the end of the line. Press y |
to move the cursor to the beginning of the line.
• When an entry is executed on the home screen, the answer is
displayed on the right side of the next line.
• The mode settings control the way the TI-84 Plus C interprets
expressions and displays answers.
• Press z to switch between Classic and MathPrint™ modes and see
expressions in both formats. The Classic and MathPrint™ modes are
on the top line of the mode screen.
• If an answer, such as a list or matrix, is too long to display entirely on
one line, an arrow (MathPrint™) or an ellipsis (Classic) is displayed to
the right or left. Press ~ and | to display the answer.
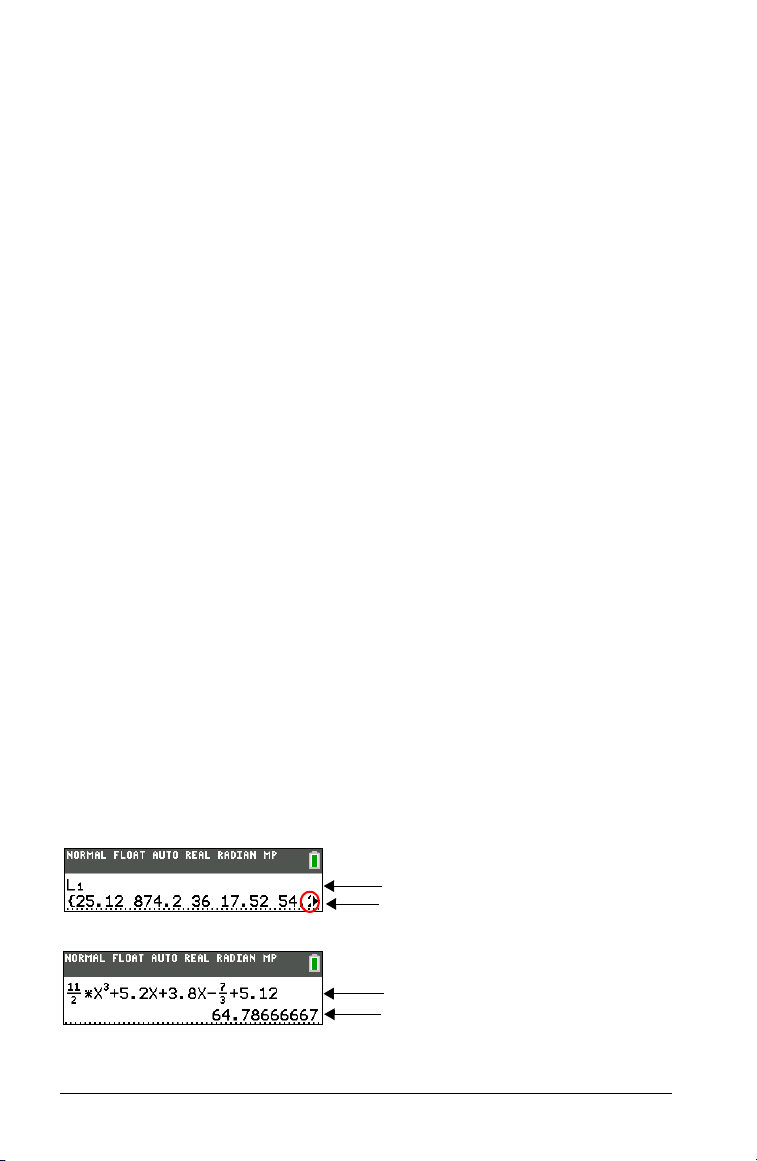
MathPrint™ (default)
Entry
Answer
Entry
Answer
10 Getting Started with the TI-84 Plus C Silver Edition
Page 15
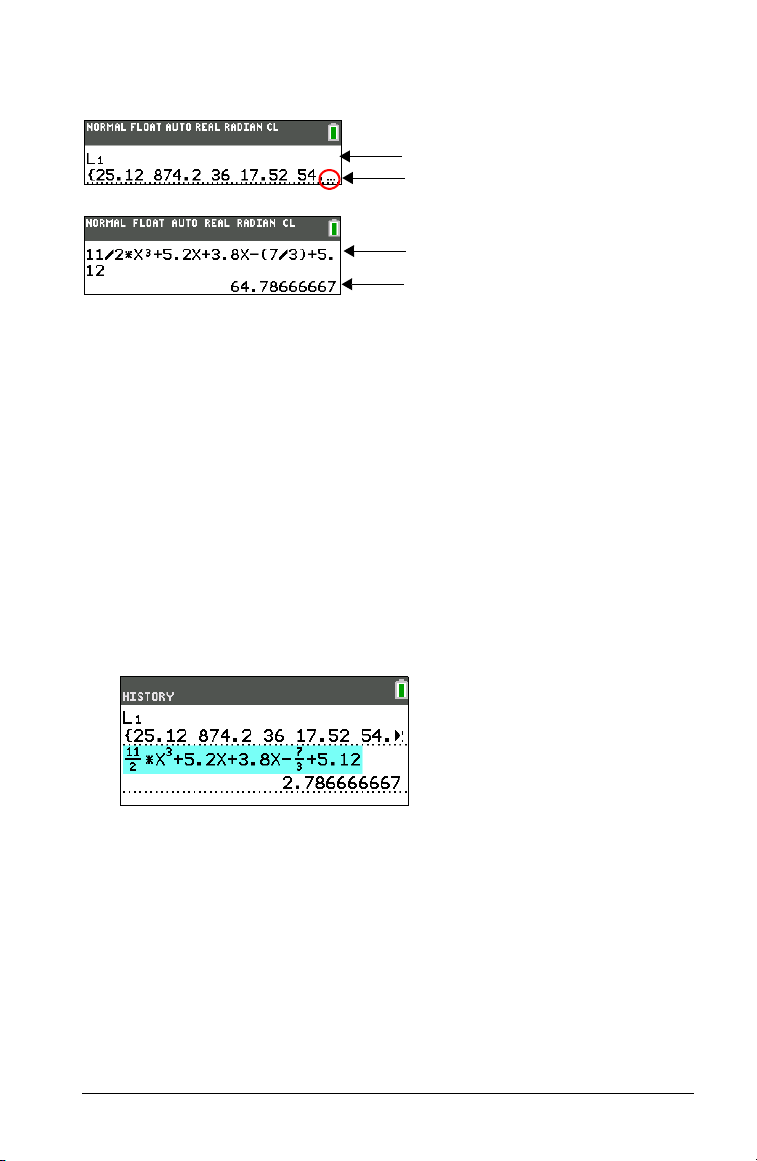
Classic
Entry
Answer
Entry
Answer
Scrolling Through Previous Entries on the Home Screen
If all lines of the display are full, text scrolls off the top of the display.
You can scroll up through previous entries and answers on the home
screen,
answer that you want to use, you can select it and paste it (press Í)
on the current entry line.
Note: List and matrix answers cannot be copied and pasted to the new
entry line. However, you can copy the list or matrix command to the new
entry line and execute the command again to display the answer.
Press } or † to move the cursor to the entry or answer you want to
even if you have cleared the screen. When you find an entry or
copy and then press Í.
The TI-84 Plus C highlights the entry the cursor is on to help you
select your desired choice.
The entry or answer that you copied is automatically pasted on the
current input line at the cursor location.
Note: If the cursor is in a MathPrint™ expression, press t } to
move the cursor out of the expression and then move the cursor to
the entry or answer you want to copy.
Press u or { to delete an entry/answer pair. After an
entry/answer pair has been deleted, it cannot be displayed or
recalled again.
Note: For more information on using previous entries, see ENTRY (Last
Entry) Storage Area later in this chapter.
Getting Started with the TI-84 Plus C Silver Edition 11
Page 16
Returning to the Home Screen
To return to the home screen from any other screen, press y 5.
Status Bar
The status bar displays on all screens, and gives information about the
selected calculator mode settings, any context help available for the item
you currently have selected, and battery status. The status bar may also
show a busy indicator if the calculator is performing an operation, Ø to
indicate the calculator is in alpha status, and
function is active.
Selected mode settings are displayed on the top line of the status bar
when the
when the cursor is in the home screen history, since the mode may have
been different for previous calculations.
Context help, if available, is displayed on the second line.
status icon, busy indicator, alpha indicator, and second key indicator are
on the right. When you scroll into the home screen history, the context
help on the status bar displays HISTORY.
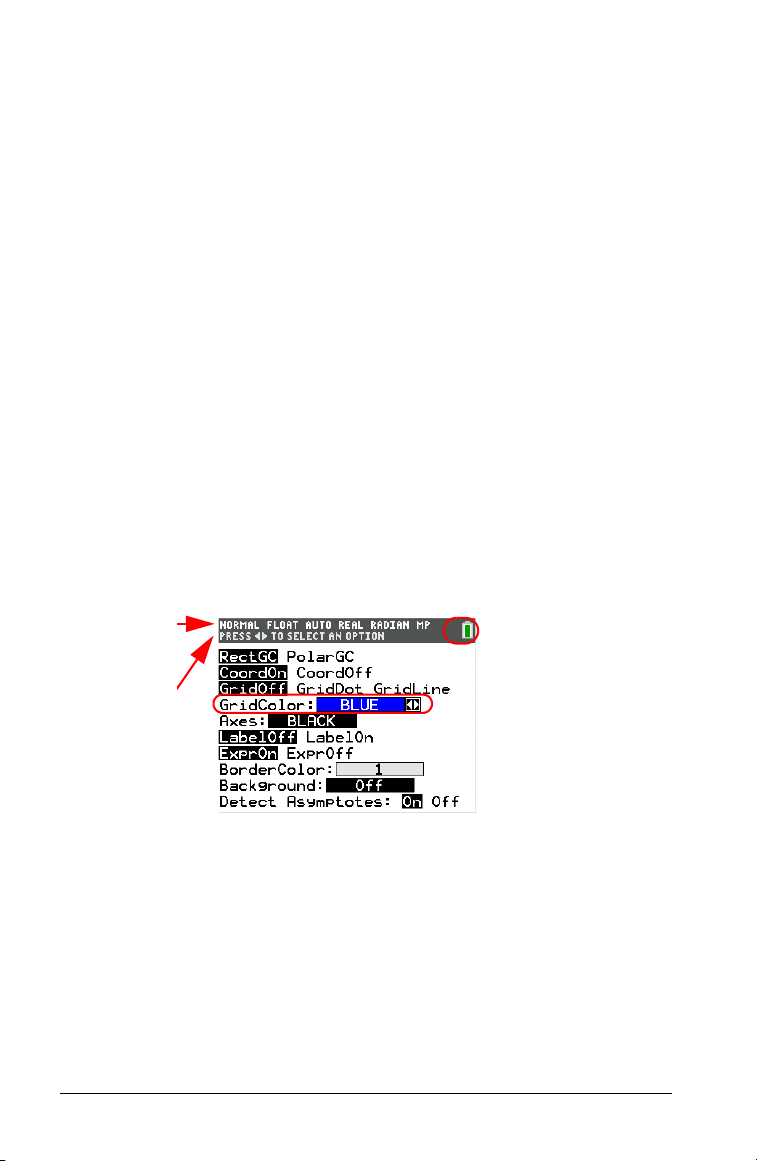
In the example below, the cursor is on
help for GridColor is on the second line of the status bar.
sor is in the active entry area. Mode settings do not display
cur
Þ to indicate the secondary
Th
e battery
th
e GridColor option. The context
Selected
MODE
settings.
Context help
for current
cursor
position.
12 Getting Started with the TI-84 Plus C Silver Edition
Battery icon.
This
status bar also
displays the busy
indicator, alpha
indicator, and
second key indicator,
depending on the
state of the
graphing calculator.
area of the
Page 17
Using Shortcut Menus
t^
Opens FRAC
menu.
t_
Opens FUNC
menu.
ta
Opens YVAR
menu.
tb
Opens special
menus.
ta
t`
Opens MTRX
menu.
TI-84 Plus C Silver Edition
Shortcut menus allow quick access to the following:
• Templates to enter fractions, and to
toggle between whole and
mixed fractions, and fractions and decimals.
• Selected functions from the MATH MATH and MATH NUM menus as
you would see them in a textbook, when in MathPrint™ mode.
Functions include absolute value, numeric differentiation, numeric
integration, summation, log base n, square root, permutations,
combinations, and factorials.
• Quick MathPrint™ matrix entry, when available.
• Names of function variables from the VARS Y-VARS menu.
To open a shortcut menu, press t plus the F-key that corresponds to
the menu, that is, ^ for FRAC, _ for FUNC, ` for MTRX, a for YVAR,
or b for special menus within interactive graph activities such as DRAW
or QuickPlot and Fit Equation, and more. To select a menu item, either
press the number corresponding to the item, or use the arrow keys to
move the cursor to the appropriate line and then press Í.
Getting Started with the TI-84 Plus C Silver Edition 13
Page 18

All shortcut menu items except matrix templates can also be selected
using standard menus. For example, you can choose the summation
template from three places:
FUNC shortcut menu
MATH MATH menu
Catalog
The shortcut menus are available to us
calculator is in Classic mode, or if a screen is displayed that does not
support MathPrint™ display, entries will be displayed in Classic display.
The MTRX menu is only available in MathPrint™ mode on the home
screen and in the Y= editor.
Note: Shortcut menus may not be available if t plus F-key
combinations are used by an application that is running.
e where input is allowed. If the
Busy Indicator
14 Getting Started with the TI-84 Plus C Silver Edition
Page 19

Display Cursors
In most cases, the appearance of the cursor indicates what will happen
when you press the next key or select the next menu item to be pasted as
a character.
Note: The second cursor
and alpha cursor may appear
depending on the context.
Cursor Appearance Effect of Next Keystroke
on the status bar,
Entry Solid rectangle
$
aracter is entered at the
A ch
cursor; any existing
character is overwritten.
Insert Underline
__
Second Reverse arrow
Þ
A character is inserted in
front of the cursor location.
A 2nd character is entered
or a 2nd operation is
executed.
Alpha Reverse A
Ø
An alpha character is
entered,
SOLVE is executed,
or shortcut menus are
displayed.
Full Checkerboard rectangle#No entry; the maximum
characters are entered at a
prompt or memory is full.
Also indicates the limit of
the allowed MathPrint™
mode levels.
MathPrint™ Right arrow The cursor moves to either
the next part of the
template or out of the
template. Press the right
arrow to move out of all
MathPrint™ templates
before entering the
remaining terms in an
expression.
If you press ƒ
A (A). If you press y during an insertion, the underlined cursors becomes
during a
n insertion, the cursor becomes an underlined
an underlined # (#).
Getting Started with the TI-84 Plus C Silver Edition 15
Page 20

Note: If you highlight a small character such as a colon or a comma and
then press ƒ or y, the cursor does not change because the cursor
width is too narrow.
Graphs and editors sometimes display additional cursors, which are
described in the guidebook.
Setting Modes
Checking Mode Settings
Mode settings control how the TI-84 Plus C displays and interprets
numbers and graphs. Mode settings are retained by the Constant
Memory™ feature when the TI-84 Plus C is turned off. All numbers,
including e
current mode settings.
lements of matrices and lists, are displayed according to the
To display the mode settings, press z. The current se
highlighted. Defaults are highlighted below. The following pages
describe the mode settings in detail.
Note: When you press z, the cursor is on NORMA
to switch between the MathPrint™ and Classic modes.
MATHPRINT CLASSIC Controls whether inputs and
outputs on the home screen and
in the Y= editor are displayed as
they are in textbooks
NORMAL SCI ENG Numeric notation
FLOAT 0 1 2 3 4 5 6 7 8 9 Number of decimal places in
answers
RADIAN DEGREE Unit of angle measure
FUNCTION PARAMETRIC POLAR SEQ Type of graphing
THCK DOT-THICK THIN DOT-THIN Resets all Y= line styles
SEQUENTIAL SIMUL Whether to plot sequentially or
simultaneously
REAL a+b
FULL HORIZONTAL GRAPH-TABLE Full screen, two split-screen modes
FRACTION TYPE: n/d Un/d Displays results as simple fractions
ANSWERS:
i re^qi
AUTO
DEC FRAC-APPROX
Real, rectangular complex, or
polar complex
or mixed fractions
Controls the format of the
answers
ttings are
L by default. Press }
16 Getting Started with the TI-84 Plus C Silver Edition
Page 21

1
2
--
3
4
---+
x2xd
1
2
GOTO 2ND FORMAT GRAPH: No Yes S
STAT DIAGNOSTICS: Off On Determines which information is
STAT WIZARDS: On Off Determines if syntax help prompts
SET CLOCK Sets the time and date.
hortcut to the Format Graph
screen (y .)
displayed in a statistical regression
calculation
are provided for optional and
required arguments for many
statistical, regression and
distribution commands and
functions.
Changing Mode Settings
To change mode settings, follow these steps.
1. Press † or } to move the cursor to th
want to change.
2. Press ~ or | to move the cursor to the setting you want.
3. Press Í.
e line of the setting that you
Setting a Mode from a Program
You can set a mode from a program by entering the name of the mode
as an instruction; for example,
command line, select the mode setting from the mode screen; the
instruction is pasted to the cursor location.
Func or Float. From a blank program
MATHPRINT, CLASSIC
MathPrint™ mode displays most inputs and outputs the way they are
shown in textbooks, such as
Classic mode displays expressi
such as 1/2 + 3/4.
Note: If you switch betwee
however matrix calculations will not be preserved.
Getting Started with the TI-84 Plus C Silver Edition 17
n these modes, most entries will be preserved;
and
ons and answers as if written on one line,
.
Page 22

NORMAL, SCI, ENG
Notation modes only affect the way an answer is displayed on the home
screen. Numeric answers can be displayed with up to 10 digits and a twodigit exponent and as fractions. You can enter a number in any format.
Normal notation mode is the usual way we express numbers, with digits
to the left and right of the decimal, as in
Sci (scientific) notation mode expresses numbers in two parts. The
12345.67.
significant digits display with one digit to the left of the decimal. The
appropriate power of 10 displays to the right of å, as in
Eng (engineering) notation mode is similar to scientific notation.
1.234567â4.
However, the number can have one, two, or three digits before the
decimal; and the power-of-10 exponent is a multiple of three, as in
12.34567â3.
Note: If you select
Normal notation, but the answer cannot display in 10
digits (or the absolute value is less than .001), the TI-84 Plus C expresses
the answer in scientific notation.
FLOAT, 0 1 2 3 4 5 6 7 8 9
Float (floating) decimal mode displays up to 10 digits, plus the sign and
decimal.
FIX 0123456789 decimal mode specifies the number of digits (0 through
9) to display to the right of the decimal for decimal answers.
The decimal setting applies to
The decimal setting applies to these
Answer mode setting:
• An answer displayed on the home screen
C
oordinates on a graph (Chapters 3, 4, 5, and 6 in the guidebook)
•
•The
Tan ge nt ( DRAW instruction equation of the line, x, and dy/dx
values (Chapter 8 in the guidebook)
• Results of CALCULATE operations (Chapters 3, 4, 5, and 6 in the
guidebook)
• The regression equation stored after the execution of a regression
model (Chapter 12 in the guidebook)
Normal, Sci, and Eng notation modes.
numbers, with respect to the
RADIAN, DEGREE
Angle modes control how the TI-84 Plus C interprets angle values in
trigonometric functions and polar/rectangular conversions.
18 Getting Started with the TI-84 Plus C Silver Edition
Page 23

Radian mode interprets angle values as radians. Answers display in
radians.
Degree mode interprets angle values as degrees. Answers display in
degrees.
FUNCTION, PARAMETRIC, POLAR, SEQ
Graphing modes define the graphing parameters. Chapters 3, 4, 5, and 6
in the guidebook describe these modes in detail.
Func (function) graphing mode plots functions, where Y is a function of
X (Chapter 3).
Par (parametric) graphing mode plots relations, where X and Y are
functions of T (Chapter 4).
Pol (polar) graphing mode plots functions, where r is a function of q
(Chapter 5).
Seq (sequence) graphing mode plots sequences (Chapter 6).
THICK, DOT-THICK, THIN, DOT-THIN
THICK plotting mode is a quick way to reset all Y= line styles to a thick
line connecting each point calculated for the selected functions. You can
change individual line styles in the Y= editor.
Note: The T
HICK plotting mode on the TI-84 Plus C is equivalent to the
CONNECTED plotting mode on the TI-84 Plus graphing calculator.
DOT-THICK plotting mode is a quick way to reset all Y= line styles to a
large dot and plots only the calculated points of the selected functions.
You can change individual line styles in the Y= editor.
DO
Note: The
T-THICK plotting mode on the TI-84 Plus C is equivalent to
the DOT plotting mode on the TI-84 Plus graphing calculator. You can
change individual line styles in the Y= editor.
THIN plotting mode is a quick way to reset all Y= line styles to a thin line
connecting each point calculated for the selected functions.
N
Note: Use THI
plotting mode for function graphing when looking at
any functions which asymptote to an axis.
DOT-THIN plotting mode is a quick way to reset all Y= line styles to a
small dot and plots only the calculated points of the selected functions.
You can change individual line styles in the Y= editor.
SEQUENTIAL, SIMUL
Sequential graphing-order mode evaluates and plots one function
completely before the next function is evaluated and plotted.
Getting Started with the TI-84 Plus C Silver Edition 19
Page 24

Simul (simultaneous) graphing-order mode evaluates and plots all
selected functions for a single value of X and then evaluates and plots
them for the next value of X.
Note: R
wi
egardless of which graphing mode is selected, the TI-84 Plus C
ll sequentially graph all stat plots before it graphs any functions.
REAL, a+bi, re^(qi)
Real mode does not display complex results unless complex numbers are
entered as input.
Two complex modes display complex
a+bi (rectangular complex mode) displays complex numbers in the
•
form a+b
•
re^(qi) (polar complex mode) displays complex numbers in the form
re^(q
i.
i).
results.
Note: When you use the n/d template, both n and d must be real
numbers. For example, you can enter (the answer is displayed as
a decimal value) but if you enter , a data type error displays. To
perform division with a complex number in the numerator or
denominator, use regular division instead of the n/d template.
See the complete guidebook for complete details on complex numbers
and how the TI-84 Plus C functions work with complex number entries.
FULL, HORIZONTAL, GRAPH-TABLE
Full screen mode uses the entire screen to display a graph or edit screen.
Each split-screen mode displays two screen
s simultaneously.
• Horiz (horizontal) mode displays the current graph on the top half of
the screen; it displays the home screen or an editor on the bottom
half (Chapter 9 in the guidebook).
• G-T (graph-table) mode displays the current graph on the left half of
the screen; it displays the table screen on the right half (Chapter 9 in
the guidebook).
20 Getting Started with the TI-84 Plus C Silver Edition
Page 25

FRACTION TYPE: n/d, Un/d
n/d displays results as a simple fraction. Fractions may contain a
maximum of six digits in the numerator; the value of the denominator
may not exceed 9999.
Un/d di
be all be integers. If
U … n/d. If n or d is a non-integer, a syntax error is displayed. The whole
splays results as a mixed number, if applicable.
U is a non-integer, the result may be converted
U, n, and d must
number, numerator, and denominator may each contain a maximum of
three digits.
Note: To perform division with a complex number in the num
erator or
denominator, use regular division instead of the n/d template.
ANSWERS: AUTO, DEC, FRAC-APPROX
Auto displays answers in a similar format as the input. For example, if a
fraction is entered in an expression, the answer will be in fraction form, if
possible. If a decimal appears in the expression, the output will be a
decimal number.
displays answers as integers or decimal numbers.
Dec
Fr
ac-Approx attempt
decimals carried by the graphing calculator. A fraction answer may be
exact or approximate for any real number result.
Note: The Answers mode setting also affects how values in sequences,
lists, and tables are displayed. Choose
are displayed in either decimal or fraction form. You can also convert
values from decimal to fraction or fraction to decimal using the
shortcut menu or the MATH menu.
s a fraction conversion using the number of
Dec or Frac to ensure that values
FRAC
GOTO 2ND FORMAT GRAPH: NO, YES
No does not display the FORMAT graph screen, but can always be
accessed by pressing y ..
aves the mode screen and displays
Yes le
the FORMAT graph screen when
you press Í so that you can change the graph format settings. To
return to the mode screen, press z.
STAT DIAGNOSTICS: OFF, ON
Off displays a statistical regression calculation without the correlation
coefficient (r) or the coefficient of determination (r
On displays a statistical regression calculation with the corre
coefficient (r), and the coefficient of determination (r
Getting Started with the TI-84 Plus C Silver Edition 21
2
).
lation
2
), as appropriate.
Page 26

STAT WIZARDS: ON OFF
On: Selection of menu items in MATH PROB, STAT CALC, DISTR DISTR,
DISTR DRAW and seq( in LIST OPS displays a screen which provides syntax
help (wizard) for the entry of required and optional arguments into the
command or function. The function or command will paste the entered
arguments to the Home Screen history or to most other locations where
the cursor is available for input. Some calculations will compute directly
from the wizard. If a command or function is accessed from N the
command or function will paste without wizard support. Use Catalog
Help for more syntax help when needed. To use Catalog Help, select a
menu item and then press Ã.
The function or command will paste to the cursor loca
Off:
syntax help (wizard)
tion with no
SET CLOCK
Use the clock to set the time, date, and clock display formats.
Using the Clock
Use the clock to set the time and date, select the clock display format,
and turn the clock on and off. The clock is turned on by default and is
accessed from the mode screen.
Displaying the Clock Settings
1. Press z.
2. Press } } to move the cursor to
SET CLOCK.
3. Press Í.
22 Getting Started with the TI-84 Plus C Silver Edition
Page 27

Changing the Clock Settings
1. Press ~ or | to h
field.
• Press Í to select the
date and time format.
• Press ‘ and type a
number for the year, month,
date, hour, and minute
fields.
2. To save changes, press † to
highlight
Í.
SAVE, and then press
ighlight each
Turning the Clock On and Off
1. Press y N.
2. Press † or } to scroll the
CATALOG until the selection
cursor points to
ClockOn.
3. Press Í Í.
ClockOff or
Equation Operating System (EOS™)
Order of Evaluation
The Equation Operating System (EOS™) defines the order in which
functions in expressions are entered and evaluated on the TI-84 Plus C.
EOS™ lets you enter numbers and functions in a simple, straightforward
sequence.
r
EOS™ evaluates the functions in an exp
Order
Number
1 Functions that precede the argument, such as ‡,
2 Functions that are entered after the argument,
Function
sin(, or log(
such as
2, M1
, !, ¡, r, and conversions
Getting Started with the TI-84 Plus C Silver Edition 23
ession in this order.
Page 28

Order
5x32
Number
Function
3
Powers and roots, such as
4 Permutations (
nPr) and combinations (nCr)
5
2
or
5 Multiplication, implied multiplication, and
division
6 Addition and subtraction
7 Relational functions, such as > or
8 Logic operator
and
9 Logic operators or and xor
Note: Within a priority level, EOS™ evaluates functions from left to
right. Calculations within parentheses are evaluated first.
Implied Multiplication
The TI-84 Plus C recognizes implied multiplication, so you need not press
¯ to express multiplication in all cases. For example, the TI-84 Plus C
interp
Note: TI-84 Plus
other graphing calculators. For example, the TI-84 Plus C evaluates
(1à2)…X, while some graphing calculators may evaluate 1à2X as
as
1à(2…X) (Chapter 2 in the guidebook).
2p, 4sin(46), 5(1+2), and (2…5)7 as implied multiplication.
rets
C implied multiplication rules differ from those of some
1à2X
Parentheses
All calculations inside a pair of parentheses are completed first. For
example, in the expression
inside the parentheses, 1+2, and then multiplies the answer, 3, by 4.
4(1+2), EOS™ first evaluates the portion
Negation
To enter a negative number, use the negation key. Press Ì and then
enter the number. On the TI-84 Plus C, negation is in the third level in the
EOS™ hierar
chy. Functions in the first level, such as squar
evaluated before negation.
24 Getting Started with the TI-84 Plus C Silver Edition
ing, are
Page 29
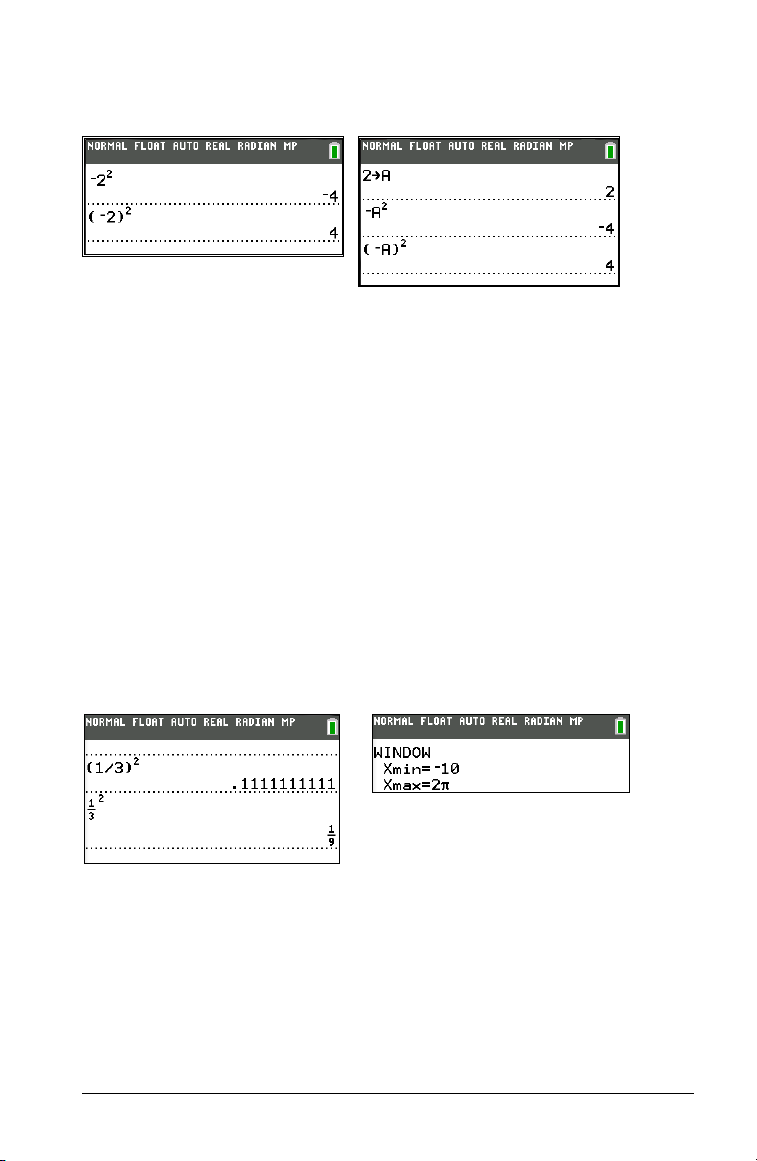
Example: MX2, evaluates to a negative number (or 0). Use parentheses to
square a negative number.
Note: Use the ¹
press ¹ to enter a negative number, as in
indicate subtraction, as in
A Ì ƒ B, it is interpreted as implied multiplication (A…MB).
ƒ
key for subtraction and the Ì key for negation. If you
9 ¯ ¹ 7, or if you press Ì to
9 Ì 7, an error occurs. If you press
Entering Expressions and Instructions
What Is an Expression?
An expression is a group of numbers, variables, functions and their
arguments, or a combination of these elements. An expression evaluates
to a single answer. On the TI-84 Plus C, you enter an expression in the
same order as you
expression.
You can use an expression on the home scr
most places where a value is required, you can use an expression to enter
a value.
would write it on paper. For example, pR
een
to calculate an answer. In
2
is an
Entering an Expression
To create an expression, you enter numbers, variables, and functions
using the keyboard and menus. An expression is completed when you
press Í, regardless of the cursor location. The entire expression is
evaluated according to Equation Operating System (EOS™) rules, and the
answer is displayed according to the mode setting for
Getting Started with the TI-84 Plus C Silver Edition 25
Answer.
Page 30

Most TI-84 Plus C functions and operations are symbols comprising
several characters. You must enter the symbol from the keyboard or a
menu; do not spell it out. For example, to calculate the log of 45, you
must press «
the TI-84 Plus C interprets the entry as implied multip
variables
Note: In MathPrint™ mode, press ~
45. Do not enter the letters L, O, and G. If you enter LOG,
lication of the
L, O, and G.
to get out of the MathPrint™
template and continue entering the expression.
Calculate 3.76 P (L7.9 + ‡5) + 2 log 45.
MathPrint™
3 Ë 76 ¥ £ Ì 7 Ë 9 Ã
y C
5 ~ ¤ Ã 2 « 45 ¤
Í
Classic
3 Ë 76 ¥ £ Ì 7 Ë 9 Ã
5 ¤ ¤ Ã 2 « 45 ¤
y C
Í
Multiple Entries on a Line
To enter two or more expressions or instructions on a line, separate them
with colons (ƒ [
:]). All instructions are stored together in last entry
(ENTRY).
Entering a Number in Scientific Notation
1. Enter the part of the number that precedes the exponent. This value
can be an expression.
2. Press y D. â is pasted to the cursor location.
3. Enter the exponent, which can be one or two digits.
Note: If the exponent is negative, press Ì, and then enter the
exponent.
26 Getting Started with the TI-84 Plus C Silver Edition
Page 31

When you enter a number in scientific notation, the TI-84 Plus C does not
automatically display answers in scientific or engineering notation. The
mode settings and the size of the number determine the display format.
Functions
A function returns a value. For example, ÷, L, +, ‡, and log( are the
functions in the example on the previous page. In general, the first letter
of each function is lowercase. Most functions take at least one argument,
as indicated by an open parenthesis following the name. For example,
requires one argument,
sin(value).
sin(
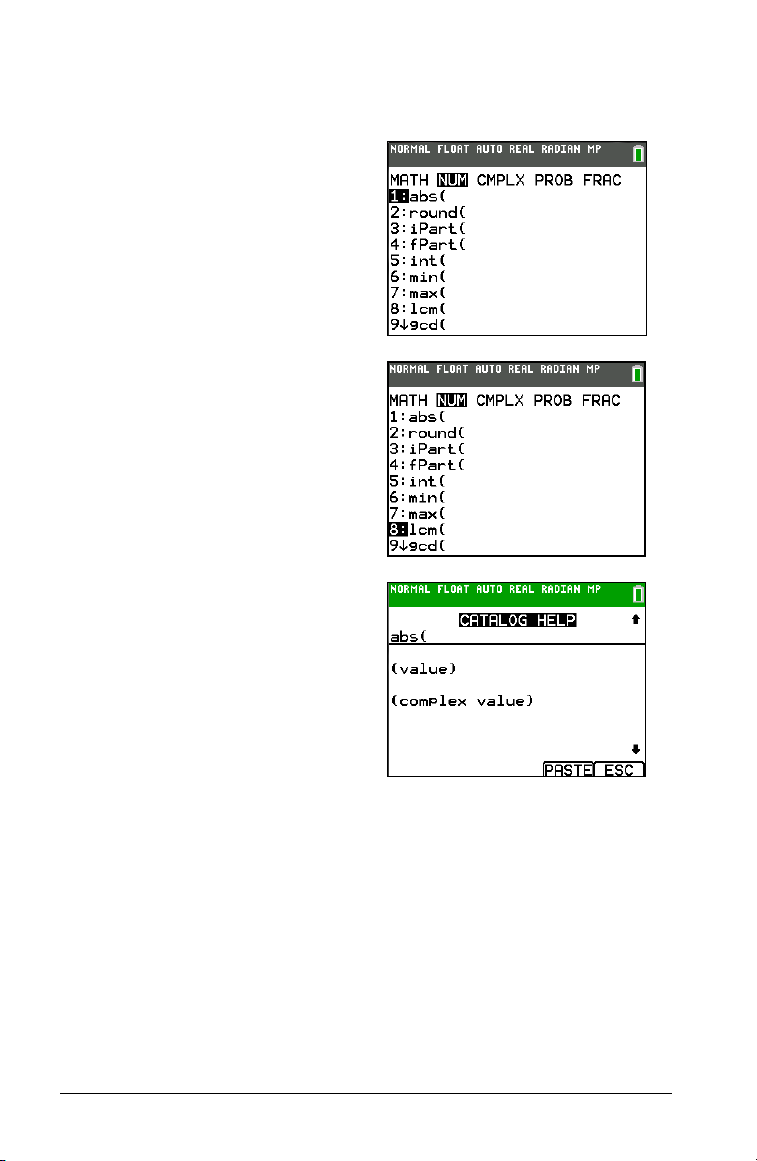
Note: The Catalog Help contains syntax infor
functions in the catalog. To use Catalog Help, select a menu item and
then press Ã.
mation for most of the
Instructions
An instruction initiates an action. For example, ClrDraw is an instruction
that clears any drawn elements from a graph. Instructions cannot be used
in expressions. In general, the first letter of each instruction name is
uppercase. Some instructions take more than one argument, as indicated
by an open parenthesis at the end of the name. For example, on the
TI-84 Plus C,
arguments:
Circle( requires three arguments, and has two optional
Circle(X,Y,radius[,color, linestyle]).
Interrupting a Calculation
To interrupt a calculation or graph in progress, which is indicated by the
busy indicator in the status bar, press É.
When you interrupt a calculation, a menu is displayed.
• To return to the home screen, select
• To go to the location of the interruption, select
When you interrupt a graph, a partial graph is displayed.
• To return to the home screen, press ‘ or any
• To restart graphing, press a graphing key or select a graphing
instruction.
1:Quit.
2:Goto.
non-graphing key.
TI-84 Plus C Edit Keys
Keystrokes Result
~ or | Moves the cursor within an expression; these keys
repeat.
Getting Started with the TI-84 Plus C Silver Edition 27
Page 32

Keystrokes Result
} or † Moves the cursor from line to line within an
expression that occupies more than one line; these
keys repeat.
Moves the cursor from term to term within an
expression in MathPrint™ mode; these keys repeat.
On the home screen, scrolls through the history of
entries and answers.
y | Moves the cursor to the beginning of an expression.
y ~ Moves the cursor to the end of an expression.
ƒ } On the home screen, moves the cursor out of a
MathPrint™ expression and up into history.
In the Y=editor, moves the cursor from a MathPrint™
expression to the previous Y-var.
ƒ † In the Y=editor, moves the cursor from a MathPrint™
expression to the next Y-var.
Í Evaluates an expression or executes an instruction.
‘ On a line with text on the home screen, clears the
current line.
On a blank line on the home screen, clears everything
on the home screen.
In an editor, clears the expression or value where the
cursor is located; it does not store a zero.
{ Deletes a character at the cursor; this key repeats.
y 6 Changes the cursor to an underline (__); inserts
characters in front of the underline cursor; to end
insertion, press y 6 or press |, }, ~, or †.
y Changes the cursor or status bar indicator to Þ; the
next keystroke performs a
2nd function (displayed
above a key and to the left); to cancel 2nd, press y
again.
ƒ Changes the cursor or status bar indicator to Ø; the
next keystroke performs a third function of that key
(displayed above a key and to the right) or accesses a
shortcut menu. To cancel ƒ, press ƒ or press
|, }, ~, or †.
28 Getting Started with the TI-84 Plus C Silver Edition
Page 33

Keystrokes Result
y 7 Changes the cursor to Ø; sets alpha-lock; subsequent
keystrokes access the third functions of the keys
pressed; to cancel alpha-lock, press ƒ. If you are
prompted to enter a name such as for a group or a
program, alpha-lock is set automatically.
Note: The TI-84 Plus C does not automatically set
alpha-lock for entries that require list names.
„ Pastes an X in
mode, or an
Func mode, a T in Par mode, a q in Pol
n in Seq mode with one keystroke.
Pictures and Backgrounds
The TI-84 Plus C uses both pictures and background images. They are
both stored in Flash archive, but they are used in different ways:
• Image Vars (Image1 - Image9, and Image0) are variables stored in
archive memory.
graph area. Several images are pre-loaded on the TI-84 Plus C. You
can also convert images to TI-84 Plus C Image Vars in the
TI Connect™ software and load them to the calculator. You cannot
create images on the calculator.
Note: TI Connect™ software is available as a free download from
education.ti.com/go/download.
• Pic Vars (Pic1 - Pic 9, and Pic0) are also variables stored in archive
memory. Pic Vars can be creating by drawing in the graphing area,
and the changes saved and recalled to the graphing area. Saving a
Pic Var will not include the Background Image behind your graphing
area.
• Both Image Vars and Pic Vars are stored and run in Flash archive, not
in RAM. They are both accessible in the VARS menu.
• Image Vars and Pic Vars can only be shared with another TI-84 Plus C
graphing calculator.
• TI-84 Plus Pic Vars cannot be shared between the TI-84 Plus and the
TI-84 Plus C graphing calculators.
• If you perform a RAM reset on the TI-84 Plus C, the Image Vars and
Pic Vars remain in Archive memory for use.
• TI-84 Plus pictures are stored in RAM or archive, while TI-84 Plus C
pictures are stored only in archive.
An Image Var is used as a Background Image in the
Getting Started with the TI-84 Plus C Silver Edition 29
Page 34

Using Variable Names
Variables and Defined Items
You can enter and use several types of data, including real and complex
numbers, matrices, lists, functions, stat plots, graph databases, graph
pictures, and strings.
The TI-84 Plus C uses assigned names for variables and other items saved
. For
in memory
Variable Type Names
Real numbers (including
fractions)
Complex numbers
Matrices ã
lists, you also can create your own five-character names.
A, B, ... , Z, q
A, B, ... , Z, q
Aä, ãBä, ãCä, ... , ãJä
Lists
Functions
Parametric equations X1T and Y1T, ... , X6T and Y6T
Polar functions r1, r2, r3, r4, r5, r6
Sequence functions u, v, w
Stat plots
Graph databases GDB1, GDB2, ... , GDB9, GDB0
Background images Image1, Image2, ... , Image9, Image0
Pictures Pic1, Pic2, ... , Pic9, Pic0
Strings Str1, Str2, ... , Str9, Str0
Apps Applications
AppVars Application variables
Groups Grouped variables
System variables
L1, L2, L3, L4, L5, L6, and user-defined
names
Y1, Y2, ... , Y9, Y0
Plot1, Plot2, Plot3
Xmin, Xmax, and others
Notes about Variables
• You can create as many list names as memory will allow (Chapter 11
in the guidebook).
• Programs have user-defined names and share memory with variables
(Chapter 16 in the guidebook).
30 Getting Started with the TI-84 Plus C Silver Edition
Page 35

• From the home screen or from a program, you can store to matrices
(Chapter 10), lists (Chapter 11), strings (Chapter 15), system variables
Xmax (Chapter 1), TblStart (Chapter 7), and all Y= functions
such as
(Chapters 3, 4, 5, and 6 in the guidebook).
• From an editor, you can store to matrices, lists, and Y= functions
(Chapter 3 in the guidebook).
• From the home screen, a program, or an editor, you can store a value
to a matrix element or a list element.
• You can use DRAW STO menu items to store and recall Pic Vars
(Chapter 8 in the guidebook).
• Although most variables can be archived, system variables including
r, T, X , Y, a n d q cannot be archived (Chapter 18 in the guidebook).
• Apps are independent applications, which are stored in Flash
archive.
by independent applications. You cannot edit or change variables in
AppVars unless you do so through the application which created
them.
AppVars is a variable holder used to store variables created
Storing Variable Values
Storing Values in a Variable
Values are stored to and recalled from memory using variable names.
When an expression containing the name of a variable is evaluated, the
value of the variable at that time is used.
To store a value to a variable from the home screen or a program using
the ¿ key
1. Enter the value you want
2. Press ¿. ! is copied to the cursor location.
3. Press ƒ and then the letter of the variable to which you want to
store the value.
4. Press Í. If you entered an expression, it is evaluated. The value is
stored to the variable.
, begin on a blank line and follow these steps.
to store. The value can be an expression.
Displaying a Variable Value
To display the value of a variable, enter the name on a blank line on the
home screen, and then press Í.
Getting Started with the TI-84 Plus C Silver Edition 31
Page 36

Archiving Variables (Archive, Unarchive)
You can archive data, programs, or other variables in a section of
memory called user data archive where they cannot be edited or deleted
inadvertently. These archived variables are indicated by asterisks (ä) to
the left of the variable names. These archived variables cannot be edited
or executed. They can only be seen and unarchived. For example, if you
archive list L1, you will see that L1 exists in memory but if you select it
and paste the name L1 to the home screen, you won’t be able to see its
contents or edit it until it is unarchived.
Note: Image Vars are run and stored in ar
displayed in the VARS 4:Picture & Background, the BACKGROUND menu
does not display the asterisk ä.
chive, but when Image Vars are
Recalling Variable Values
Using Recall (RCL)
To recall and copy variable contents to the current cursor location, follow
these steps. To leave
1. Press y K. RCL and the edit cursor are displayed on the bottom
line of the screen.
2. Enter the name of the variable in one of five ways.
• Press ƒ and then the letter of the variable.
• Press y 9, and then select the name of the list, or press
L1] or [L2], and so forth.
y [
• Press y >, and then select the name of the matrix.
• Press to display the
VARS Y-VARS menu; then select the type and then the name of
the variable or function.
• Press t a to display the YVAR shortcut menu, then select
the name of the function.
• Press |, and then select the name of the program (in the
program editor only).
The variable name you selected is displayed on the bottom line and
the cursor disappears.
RCL, press ‘.
VARS menu or ~ to display the
32 Getting Started with the TI-84 Plus C Silver Edition
Page 37

3. Press Í. The variable contents are inserted where the cursor was
located before you began these steps.
Note: You can edit the characters pasted to the expression without
affecting the value in memory.
QuickPlot and Fit Equation
QuickPlot and Fit Equation allows you to drop points on a graph screen
and model a curve to those points using regression functions. You can
select color and line style, draw points on a graph, and choose an
equation to fit the drawn points. You can then store the results of the
plot and equation. For details, refer to Chapter 12 in the guidebook.
QuickPlot and Fit Equation is an option in the … / menu.
Prior to starting the QuickPlot
graph area, be sure to set your Background Image Var and other graph
settings from the FORMAT screen. Also set your WINDOW or ZOOM
settings.
and Fit Equation interactive feature on the
Drop points
on the
screen.
Points can be
saved to lists.
Calculate the
regression
equation, draw
the curve, and
store the
function.
Getting Started with the TI-84 Plus C Silver Edition 33
Page 38

ENTRY (Last Entry) Storage Area
Using ENTRY (Last Entry)
When you press Í on the home screen to evaluate an expression or
execute an instruction, the expression or instruction is placed in a storage
area called ENTRY (last entry). When you turn off the TI-84 Plus C, ENTRY
is retained in memory.
recall ENTRY, press y [. The last entry is past
To
cursor location, where you can edit and execute it. On the home screen
or in an editor, the current line is cleared and the last entry is pasted to
the line.
Because the TI-84 Plus C updates ENTRY only when you press Í, you
can recall the previous
expression.
5 Ã 7
Í
y [
entry even if you have begun to enter the next
ed to the current
Note: You can also scroll up through previous entries a
home screen, even if you have cleared the screen. When you find an
entry or answer that you want to use, you can select it and paste it (press
Í) on the current entry line. List and matrix answers cannot be
copied and pasted to the new entry line.
For more information on copying an
Scrolling Through Previous Entries on the Home Screen earlier in this
chapter.
d pasting
previous entries, see
nd answers on the
Clearing ENTRY
Clear Entries (Chapter 18 in the guidebook) clears all data that the
TI-84 Plus C is holding in the
screen history.
ENTRY storage area, and clears the home
Using Ans in an Expression
When an expression is evaluated successfully from the home screen or
from a program, the TI-84 Plus C stores the answer to a storage area
called Ans (last answer). Ans may be a real or complex number, a list, a
matrix, or a string. When you turn off the TI-84 Plus C, the value in
retained in memory.
34 Getting Started with the TI-84 Plus C Silver Edition
Ans is
Page 39

You can use the variable Ans to represent the last answer in most places.
Press y Z to copy the variable name
the expression is evaluated, the TI-84 Plus C uses the value of
Ans to the cursor location. When
Ans in the
calculation.
Calculate the area of a garden plot 1.7 meters by 4.2 mete
rs. Then
calculate the yield per square meter if the plot produces a total of 147
tomatoes.
1 Ë 7 ¯ 4 Ë 2
Í
147 ¥ y Z
Í
Continuing an Expression
You can use Ans as the first entry in the next expression without entering
the value again or pressing y Z. On a blank line on the home screen,
enter the function. The TI-84 Plus C pastes
the variable name
Ans to the
screen, then the function.
5 ¥ 2
Í
9 Ë 9
¯
Í
Storing Answers
To store an answer, store Ans to a variable before you evaluate another
expression.
nPr, nCr, and xth root
Note:
template.
Calculate the area of a circle of radius 5 meters. Next, calculate the
volume of a cylinder of radius 5 meters and height 3.3 meters, and then
store the result in the variable V.
do not pull Ans into the MathPrint™
5 ¡
y B
Í
3 Ë 3
¯
Í
¿ ƒ
Í
V
Getting Started with the TI-84 Plus C Silver Edition 35
Page 40

Menus
Using Menus
You can access most TI-84 Plus C operations using menus. When you press
a key or key combination to display a menu, one or more menu names
appear on the top line of the screen.
• The menu name on the left side of the top line is highlighted. Up to
nine items in that menu are displayed, beginning with item 1, which
also is highlighted.
• A number or letter identifies each menu item’s place in the menu.
The order is 1 through 9, then 0, then A, B, C, and so on, if
appropriate.
• When the menu continues beyond the displayed items, a down
arrow ($) replaces the colon next to the last displayed item.
• When a menu item ends in an ellipsis (
secondary menu or editor when you select it.
• When an asterisk (ä) appears to the left of a menu item, that item is
stored in user data archive (Chapter 18 in the guidebook).
...), the item displays a
Displaying a Menu
While using your TI-84 Plus C, you
often will need to access items from
its menus.
36 Getting Started with the TI-84 Plus C Silver Edition
Page 41

When you press a key that displays a
menu, that menu temporarily
replaces the screen where you are
working. For example, when you
press , the
displayed as a full screen.
Note: If a context help message is in
the status bar when you press a
menu which temporarily replaces the
screen, that context help will remain
in the status bar as a reminder that
you are working within a context.
After you select an item from a
menu, the screen where you are
working usually is displayed again.
MATH menu is
Moving from One Menu to Another
Some keys access more than one
menu. When you press such a key,
the names of all accessible menus are
displayed on the top line. When you
highlight a menu name, the items in
that menu are displayed. Press ~ and
| to highlight each menu name.
Note: FRAC shortcut menu items are
found in the FRAC menu, and are
also found on the MATH NUM menu.
FUNC shortcut menu items are also
found on the MATH MATH menu.
Scrolling a Menu
To scroll down the menu items, press †. To scroll up the menu items,
press }.
To page down six menu items at a time, press ƒ †. To page up six
enu items at a time, press ƒ }.
m
fir
To go to the last menu item directly from the
go to the first menu item directly from the last menu item, press †.
Getting Started with the TI-84 Plus C Silver Edition 37
st menu item, press }. To
Page 42
Selecting an Item from a Menu
You can select an item from a menu in three ways.
• Press the number or letter of the
item you want to
cursor can be anywhere on the
menu, and the item you select
does not need to be displayed
on the screen.
• Press † or } to move the cursor
to the item you want, and then
press Í.
After you select an item from a
menu, the TI-84 Plus C typically
displays th
• Move the cursor to the item you
e previous screen.
want, and then press Ã. For
most commands, the Catalog
Help syntax editor displays the
correct syntax. Enter the syntax
using the displayed help, and
then press t a to paste.
The Catalog Help pastes the
complete command.
Press t b to escape without
pasting the command.
select. The
the
Note: On
items 1 through 9 and 0 are labeled in such a way that you can select
them by pressing the appropriate number key. To move the cursor to the
first item beginning with any alpha character or q, press the key
combination for that alpha character or q. If no items begin with that
character, the cursor moves beyond it to the next item.
LIST NAMES, PRGM EXEC, and PRGM EDIT menus, only
Leaving a Menu without Making a Selection
You can leave a menu without making a selection in any of four ways.
38 Getting Started with the TI-84 Plus C Silver Edition
Page 43

• Press y 5 to return to the home screen.
• Press ‘ to return to the previous screen.
• Press a key or key combination for a different menu, such as or
y 9.
• Press a key or key combination for a different screen, such as o or
y 0.
VARS Menus
VARS Menu
You can enter the names of functions and system variables in an
expression or store to them directly.
To dis play the
secondary menus, which show the names of the system variables.
1:Window, 2:Zoom, 4:Picture&Background, and 5:Statistics each access
more than one secondary menu.
VARS Y-VARS COLOR
1:Window...
2:Zoom...
3:GDB...
4:Picture & Background...
5:Statistics...
6:Table...
7:String...
VARS menu, press . All VARS menu items display
X/Y, T/q, and U/V/W variables
ZX/ZY, ZT/Zq, and ZU variables
Graph database variables
Picture and Background (image)
variables
XY, G, EQ, TEST, and PTS variables
TAB LE variables
String variables
Selecting a Variable from the VARS Menu or VARS Y-VARS Menu
To dis play the VARS Y-VARS menu, press ~. 1:Function,
2:Parametric, and 3:Polar display secondary menus of the Y= function
variables.
VARS Y-V ARS COLOR
1: Function...
2: Parametric...
3: Polar...
4: On/Off...
Yn functions
XnT, YnT functions, also found on the
YVARS shortcut menu
rn functions, also found on the YVARS
shortcut menu
Lets you select/deselect functions
Getting Started with the TI-84 Plus C Silver Edition 39
Page 44

Note:
• The sequence variables (
second functions of ¬, −, and ®.
• These Y= function variables are also on the YVAR shortcut menu.
To select a variable from the VARS menus, follow these steps.
1. Display the
• Press to display the
• Press ~ to display the
2. Select the type of variable, such as
3:Polar from the VARS Y-VARS menu. A secondary menu is
displayed.
3. Press ~ or | to display other secondary menus.
4. Select a variable name from the menu.
It is pasted to the cursor location.
VARS or VAR S Y-VARS menu.
u, v, w) are located on the keyboard as the
VARS menu.
VARS Y-VARS menu.
2:Zoom from the VARS menu or
Selecting an argument from the VARS COLOR Menu
To dis play the VARS COLOR menu, press ~ ~.
VARS Y-VARS COLOR
1: BLUE
2: RED
3: BLACK
4: MAGENTA
5: GREEN
6: ORANGE
7: BROWN
8: NAVY
9: LTBLUE
0: YELLOW
A: WHITE
B: LTGRAY
C: MEDGRAY
D: GRAY
E: DARKGRAY
To select an argument from the
1. Press ~ ~
40 Getting Started with the TI-84 Plus C Silver Edition
to display the VARS COLOR menu.
VARS COLOR menu, follow these steps.
Page 45

2. Select the color argument, such as 2:RED.
It is pasted to the cursor location.
Note: Although the menu numbers for COLOR are 1-9, 0, A-E, colors are
represented by the numbers 10-24 for selected programming commands.
Grouping files
Grouping lets you make a copy of two or more variables and store them
in the Flash archive of the TI-84 Plus C. This function is similar to
ng" a computer file and storing it. For example, suppose that you
"zippi
want to save data you collected for time, temperature, humidity, and
barometric pressure because you may need to use the data for another
assignment.
h
Grouping lets you keep these lists toget
trying to locate the correct lists and remember which ones were collected
together, you can simply recall the group. Grouping also saves space on
your calculator by copying variables from RAM to Flash archive.
Grouping using the GROUP feature on the graphing calculator is for
f
sharing
PC and TI Connect™ software for Mac each have a grouping file feature
that is best for storing graphing calculator files on the computer. See the
help file in the TI Connect™ software to understand more about the
software groups files.
iles in the classroom and on the web. TI Connect™ software for
er for future use. Instead of
Note: Since Image Vars and Pic Vars reside in
cannot group Image Vars and Pic Vars.
Flash archive, not RAM, you
To group files:
1. Press y L 8 1 to select Create New on the GROUP UNGROUP
screen.
2. Type a group name and press Í.
3. Navigate to the files you want to group and select each file by
moving the cursor to the file and pressing Í.
4. Press ~ 1 to select
The files you selected are grouped.
Done.
To ungroup files:
1. Press y L 8 ~ to select UNGROUP.
2. Move the cursor to the group name that you want to ungroup and
press Í.
3. Press 3 to select Overwrite All.
Getting Started with the TI-84 Plus C Silver Edition 41
Page 46

The files in the selected group are ungrouped.
Special Features of the TI-84 Plus C
3.5 Megabytes of Available Memory
3.5 MB of available memory is built into the TI-84 Plus C Silver Edition.
About 21 kilobytes (K) of RAM (random access memory) are available for
you to compute and store functions, programs, and data.
About 3.5 M of user data archive allow you to store data, programs,
pl
ications, or any other variables to a safe location where they cannot
ap
be edited or deleted inadvertently. You can also free up RAM by
archiving variables to user data. For details, refer to Chapter 18 in the
guidebook.
Applications
Some applications are preloaded on your TI-84 Plus C, and others can be
installed to customize the TI-84 Plus C to your needs. You can install
applications and the TI Co
education.ti.com/go/download.
The 3.5 MB archive space lets you stor
time on the TI-84 Plus C. Applications can also be stored on a computer
for later u
guidebook.
se or linked unit-to-unit. For details, refer to Chapter 18 in the
Archiving
You can store variables in the TI-84 Plus C user data archive, a protected
area of memory separate from RAM. The user data archive lets you:
nnect™ software at
e
up to 216 applications at one
• Store data, programs, applications or
location where they cannot be edited or deleted inadvertently.
• Create additional free RAM by archiving variables.
By archiving variables that do not need to
free up RAM for applications that may require additional memory. For
details, refer to: Chapter 18 in the guidebook.
any other variables to a safe
be edited frequently, you can
Other TI-84 Plus C Features
Graphing
You can store, graph in color, and analyze up to 10 functions, up to six
parametric functions, up to six polar functions, and up to three
sequences. You can use DRAW instructions to annotate graphs in color.
42 Getting Started with the TI-84 Plus C Silver Edition
Page 47

The graphing chapters appear in this order: Function, Parametric, Polar,
Sequence, and DRAW. For graphing details, refer to Chapters 3, 4, 5, 6,
and 8 in the guidebook.
Sequences
You can generate sequences and graph them over time. Or, you can
graph them as web plots or as phase plots. For details, refer to Chapter 6
in the guidebook.
Tab l es
You can create function evaluation tables to analyze many functions
simultaneously. For details, refer to Chapter 7 in the guidebook.
Split Screen
You can split the screen horizontally to display both a graph and a
related editor (such as the Y= editor), the table, the stat list editor, or the
home screen. Also, you can split the screen vertically to display a graph
and its table simultaneously. For details, refer to Chapter 9 in the
guidebook.
Matrices
You can enter and save up to 10 matrices and perform standard matrix
operations on them. For details, refer to Chapter 10 in the guidebook.
Lists
You can enter and save as many lists as memory allows for use in
statistical analyses. You can attach formulas to lists for automatic
computation. You can use lists to evaluate expressions at multiple values
simultaneously and to graph a family of curves. For details, refer to
Chapter 11 in the guidebook.
Statistics
You can perform one- and two-variable, list-based statistical analyses,
including logistic and sine regression analysis. You can plot the data as a
histogram, xyLine, scatter plot, modified or regular box-and-whisker
plot, or normal probability plot. You can define and store up to three stat
plot definitions. For details, refer to Chapter 12 in the guidebook.
Inferential Statistics
You can perform 16 hypothesis tests and confidence intervals and 15
distribution functions. You can display hypothesis test results graphically
or numerically. For details, refer to Chapter 13 in the guidebook.
Getting Started with the TI-84 Plus C Silver Edition 43
Page 48

Applications
Press Πto see the complete list of applications that came with your
graphing calculator.
Visit education.ti.com/go/download for additional applications and
guidebooks. For details, refer to Chapter 14
in the guidebook.
CATALOG
The CATALOG is a convenient, alphabetical list of all functions and
instructions on the TI-84 Plus C. You can paste any function or instruction
from the
Chapter 15 in the guidebook.
Catalog Help is built into the TI-84 Plu
Help contains syntax information for most of the functions in the
catalog. To use Catalog Help, select a menu item and then press Ã.
CATALOG to the current cursor location. For details, refer to
s
C operating system. The Catalog
Programming
You can enter and store programs that include extensive control and
input/output instructions. For details, refer to Chapter 16 in the
guidebook.
Communication Link
The TI-84 Plus C Silver Edition has a USB port using a USB unit-to-unit
cable to connect and communicate with another TI-84 Plus C Silver
Edition, TI-84 Plus
I/O
port using an I/O unit-to-unit cable to communicate with a TI-84 Plus C
Silver Edition, TI-8
TI-83 Plus, TI-83, TI-82, TI-73, CBL 2™, or a CBR 2™ System.
With TI Connect™ software and a USB computer cable, you can also link
I
-84 Plus C to a personal computer. TI Connect™ software is
the T
available as a free downloa
As future software upgrades become avai
can download the software to your PC and then use the TI Connect™
tware and a USB computer cable to upgrade your TI-84 Plus C.
sof
For details, refer to Chapter 19
Silver Edition, or TI-84 Plus. The TI-84 Plus C also has an
4 Plus Silver Edition, TI-84 Plus, TI-83 Plus Silver Edition,
d from education.ti.com/go/download.
lable on the TI Web site, you
in the guidebook.
Interchangeable Faceplates
The TI-84 Plus C Silver Edition has interchangeable faceplates that let you
customize the appearance of your unit. To purchase additional
faceplates, refer to the TI Online Store at education.ti.com.
44 Getting Started with the TI-84 Plus C Silver Edition
Page 49

Removing a Faceplate
1. Lift the tab at the bottom edge
of the faceplate away from the
TI-84 Plus C Silver Edition case.
2. Carefully lift the faceplate away
from the unit until it releases.
Be careful not to damage the
faceplate or the keyboard.
Installing New Faceplates
1. Align the top of the faceplate in
the corresponding grooves of
the TI-84 Plus C Silver Edition
case.
2. Gently click the faceplate into
place. Do not force.
3. Make sure you gently press
each of the grooves to ensure
the faceplate is installed
properly. See the diagram for
proper groove placement.
Battery Information
The TI-84 Plus C graphing calculator comes equipped with a Li-ion
rechargeable battery. Like a cell phone or other similar device, charge the
battery for at least four hours to ensure optimum performance. The
graphing calculator also comes with a USB computer cable for
transferring files to and from a computer and for charging the battery.
To check the status of the TI Rechargeable Battery in a TI-84 Plus C
aphi
ng calculator, turn it on. The battery status icon on the upper right
gr
of the screen gives information on the battery life.
Getting Started with the TI-84 Plus C Silver Edition 45
Page 50

The battery icons indicate the level of battery power remaining, and
indicate if the battery is charging.
Icon Meaning
Battery is 75% to 100% charged.
Battery is 50% to 75% charged.
Battery is 25% to 50% charged.
Battery is 5% to 25% charged.
Battery is charging.
Warning: RA
should back up or archive your variables if your battery power gets low.
Displays this message when
you turn on the unit.
M memory will be
Message A
lost if the battery charge is lost. You
Recharging the TI Rechargeable Battery
You should make sure the TI-84 Plus C battery is charged for classroom
use and before exams.
Use one of the following options to charge the batte
graph
ing calculator:
ry in the TI-84 Plus C
46 Getting Started with the TI-84 Plus C Silver Edition
Page 51

• Connect the graphing calculator to a computer using a USB
computer cable.
• Connect to a wall outlet using a TI wall adapter (may be sold
separately).
• Place the graphing calculator in a TI-84 Plus C Charging Station.
The amount of time required to fully charge the battery may vary, but
charging normally takes four to six hours. It is not necessary to remove
the TI Rechargeable Battery from the graphing calculator to recharge it.
The graphing calculator operates normally while it is attached to a
charging source.
To recharge a graphing calculator from a computer, a TI USB driver must
be installed. To download TI Connect™ or TI-SmartView™ software that
includes a driver, go to education.ti.com/go/download.
When the TI Rechargeable Battery is
calculator draws power in the following order:
• First, from a connected external power source, such as:
– A computer
– A TI wall adapter (may be sold separately)
• Second, from the TI Rechargeable Battery
connected through a USB computer cable
fully charged, the graphing
Replacing TI Rechargeable Batteries
Take these precautions when replacing rechargeable batteries:
• Use only the charger recommended for the batt
was provided with the original equipment.
• Remove the graphing calculator from the charger or alternating
current adapter when not in use or being charged.
• Use of the battery in other devices may result in personal injury or
damage to equipment or property.
• There is a risk of explosion if a battery is replaced by the wrong type.
Replacing the Battery
Use only the TI Rechargeable Battery to replace the TI-84 Plus C battery.
To replace the battery, follow these steps.
1. Use a small screwdriver to release the panel from the back of the
handheld.
ery, or the one that
Getting Started with the TI-84 Plus C Silver Edition 47
Page 52

2. Remove the panel.
3. Remove the old battery.
4. Insert the white connector of the new battery into the jack located
at the top of the battery compartment.
5. Thread the wire into the case to secure it. Insert the rechargeable
battery into its compartment.
48 Getting Started with the TI-84 Plus C Silver Edition
Page 53

6. Replace the back panel and fasten the screws with a screwdriver.
Disposing of Used Batteries Safely and Properly
Do not mutilate, puncture, or dispose of batteries in fire. The batteries
can burst or explode, releasing hazardous chemicals. Discard used
batteries according to local regulations.
TI-84 Plus C Charging Station
The TI-84 Plus C Charging Station is used to charge the TI Rechargeable
Battery in the TI-84 Plus C Silver Edition graphing calculator.
h slot
The charging station has 10 slots, and eac
TI-84 Plus C Silver Edition graphing calculator.
can accommodate a
Note: It is not necessary to fill all the
charge batteries.
The charging station is designed to be easy to use and easy to move
when needed in a different classroom.
Indentations on each side of the charging stations enable you to lift a
ch
arging station using both hands. When you move a charging station to
another location, always use two hands to lift the charging station.
Getting Started with the TI-84 Plus C Silver Edition 49
slots in the charging station to
Page 54

When the charging station is empty, turn it over and you will notice the
bottom is indented. If necessary to ensure the charging station sits flat on
a surface, thread the cable through this space.
t
Place the charging station on a flat, s
can also use a wheeled cart if you need to move the charging station
from classroom to classroom. When deciding on a location, it is
important to consider proximity to a power source such as a power strip
or wall outlet.
able surface such as a table. You
Preparing Charging Stations for Use
The TI-84 Plus C Charging Station is shipped with the following
components in each package:
• A TI-84 Plus C Charging Station
A
n AC adapter
•
• A regional power cord adapter
1. Insert the small end of the power adapter cord into the charging
station’s power jack.
2. Plug the other end of the adapter into a power outlet.
Inserting Graphing Calculators into the Charging Station
The slots in the TI-84 Plus C Charging Station are designed to
accommodate a graphing calculator without a slide case attached. The
calculator will not fit in the slots if the slide case is attached.
50 Getting Started with the TI-84 Plus C Silver Edition
Page 55

The front of the calculator must face the front of the charging station.
You may cause damage to the TI-84 Plus C graphing calculator if you try
to force it
looking at the TI logo on the charging station, calculators are inserted
into the slot with the keypad facing left.
into the charging station facing the wrong direction. When
Back of the calculator
Back of the charging
station
1. Remove the slide case from the grap
2. Align the grooves on the sides of the graphing calculator with the
guides in the charging station slots. Ensure the calculator is facing
the proper direction.
3. Gently push the graphing calculator into the slot. You will feel a
slight resistance; continue pushing down until the graphing
calculator is seated.
When the TI-84 Plus C graphing calculator is properly seated in a slot, the
ght on the side of the calculator turns amber to indicate it is
LED li
charging.
hing calculator.
Charging Batteries
The TI-84 Plus C Silver Edition graphing calculator uses a Li Ion
TI Rechargeable Battery.
The charging process starts automatically when
placed in a slot on a powered charging station. You can charge a
classroom set of graphing calculators overnight.
a graphing calculator is
Determining Battery Status
The LED light on each connected graphing calculator in the charging
station provides basic information about the status of the rechargeable
battery.
• When the light is amber, the battery is charging.
• When the light is green, the battery is fully charged.
Getting Started with the TI-84 Plus C Silver Edition 51
Page 56

Troubleshooting
If the recharge fails:
• Make sure the graphing calculator is seated pro
Batteries are not charged if the connector on the graphing calculator
and the connector in the slot are not aligned.
• Check the connector on the graphing calculator to ensure that it is
clean. If there is build-up on the graphing calculator’s connector, you
can remove it with a clean, dry cloth or a pencil eraser. Never use wet
cloths or solutions of any kind.
perly in the slot.
Storing Charging Stations
Store the TI-84 Plus C Charging Station on a flat surface such as a table or
a wheeled cart. You cannot damage the charging station by leaving it
plugged in for extended periods of time. Also, you cannot damage the
batteries by leaving them in the charging station beyond the time
needed to fully charge them.
Transferring the OS from calculator to calculator
You can transfer the operating system from one calculator to another
using a USB unit-to-unit cable or an I/O unit-to-unit cable (sold
separately).
Note: You cannot transfer the OS or files usin
Station. The TI-84 Plus C Charging Station only charges the TI-84 Plus C
graphing calculators.
Connect the two calculators by firmly insert
cable ends into the calculators. The USB and I/O ports are located on the
top edge of the calculator.
g the TI-84 Plus C Charging
ing either the USB or I/O
Receiving unit:
y 8 ~ Í
When you press Í, the
graphing calculator displays the
message Waiting...
52 Getting Started with the TI-84 Plus C Silver Edition
Page 57

Sending unit:
y 8
} } Í
Error Conditions
Diagnosing an Error
The TI-84 Plus C detects errors while performing these tasks.
• Evaluating an expression
xecuting an instruction
• E
• Plotting a graph
• Storing a value
When the TI-84 Plus C detects an error, it returns an erro
short description. Appendix B describes each error type and possible
reasons or
hints about the most frequent ways an error occurs.
r message with a
• If you select 1:Quit (or press y 5 or ‘), then the home
screen is displayed.
• If you select
cursor at or near the error location.
Note: If a syntax error occurs in the contents of a Y= function during
program execution, then the Goto option returns to the Y= editor, not to
the program.
2:Goto, then the previous screen is displayed with the
Getting Started with the TI-84 Plus C Silver Edition 53
Page 58

Correcting an Error
To correct an error, follow these steps.
1. Note the error type (ERROR:error ty
2. Select
3. Determine the error. The error screens give helpful hints about what
4. Correct the expression.
2:Goto, if it is available. The previous screen is displayed with
the cursor at or near the error location.
may have happened, but the errors are not always fully explained. If
you cannot recognize the error, refer to Appendix B.
pe).
Linking Compatibility
The TI-84 Plus C has files and variables that may or may not be
compatible with the TI-84 Plus family of graphing calculators. The table
below is provided as a reference for what you can SEND and RECEIVE.
Note: Not all TI-84 Plus C graphing calculator files are compatible with
ot
her TI-84 Plus Family graphing calculator files because of the high
resolution of the TI-84 Plus C color screen. In general, numeric files (not
limited to lists, variables, matrices, and functions) are shared between
these graphing calculators but Apps are not shared between these
graphing calculators even if they have the same title. When not
compatible, the computer file extensions for the TI-84 Plus C are
different from a similar variable from the TI-84 Plus/TI-84 Plus Silver
Edition graphing calculators.
File type Link from TI-84 to
TI-84 Plus C?
Operating System No No
Apps No No
Link from TI-84 Plus C
to TI-84?
AppVar* Yes Yes
Programs - TI Basic* Yes Yes
Assembly
Programs*
Pictures No No
Background Images N/A No
Group files Yes Yes
User Zoom Yes Yes
54 Getting Started with the TI-84 Plus C Silver Edition
Yes No
Page 59

String Yes Yes
Tab le Yes Yes
Function file Yes Yes
GDB** Yes Yes
List Yes Yes
Matrix Yes Yes
Number Yes Yes
Complex Yes Yes
Window Setup Yes Yes
Certificate No No
Backup No No
* Programs created using commands available only in the latest OS
version will not transfer to graphing calculators with an earlier OS
version.
* App Vars and Programs should be reviewed for use after the transfer
between the TI-84 Plus Family and TI-84 Plus C graphing calculators.
Some App Vars may not set up an App as expected. Some Programs will
need to be modified due to the difference in screen resolution and new
commands.
** You may receive a version error if you used DOT-THIN line style.
Change the line style to avoid the error.
Getting Started with the TI-84 Plus C Silver Edition 55
Page 60

56 Getting Started with the TI-84 Plus C Silver Edition
Page 61

Texas Instruments Support and Service
For U.S. and Canada:
For General Information
Home Page: education.ti.com
KnowledgeBase and
e-mail inquiries:
Phone: (800) TI-CARES / (800) 842-2737
International
information:
education.ti.com/support
For U.S., Canada, Mexico, Puerto Rico, and
Virgin Islands only
education.ti.com/international
For Technical Support
For Product (Hardware) Service
Customers in the U.S., Canada, Mexico, Puerto Rico and Virgin
Islands: Always contact Texas Instruments Customer Support before
returning a product for service.
For All Other Countries:
For general information
For more information about TI products and se
or visit the TI Internet address.
E-mail inquiries: ti-cares@ti.com
Home Page: education.ti.com
rvices, contact TI by e-mail
Service and Warranty Information
For information about the length and terms of the warranty or about
product service, refer to the warranty statement enclosed with this
product or contact your local Texas Instruments retailer/distributor.
57
Page 62

58
Page 63

Index
- (negation) 24
Symbols
! Store 31
( ) (parentheses)
24
A
a+bi (rectangular complex mode) 20
AC adapters
alpha cursor
alpha-lock
angle modes
Ans (last answer)
APD (Automatic Power Down)
Apps
AppVars
Archive
Automatic Power Down (APD)
50
15
29
18
34
7
30
30
32
7
B
batteries 45
charging
status
troubleshooting
busy indicator
51
51
52
14
Y= editor
color on the TI-84 Plus C
2
1
complex
modes (a+bi, re^
numbers
20
contrast (display)
cursors
15, 28
qi) 20
8
D
decimal mode (float or fixed) 18
Degree angle mode
display brightness
display cursors
Displaying the Clock Settings
18
8
15
22
E
E (exponent) 18, 26
edit keys table
Eng (engineering notation mode)
ENTRY (last entry key)
entry cursor
EOS (Equation Operating System)
Equation Operating System (EOS)
errors
diagnosing and correcting
expression
27
34
15
53
25
18
23
23
C
Catalog Help 27, 44
charge status
LED indicator
charging batteries
troubleshooting
charging station
classroom use
TI-84 Plus C
TI-Navigator™
Clock
22
color
DRAW commands
graph format screen
spinner
stat plots
51
49
1
2
2
51
1
52
F
Faceplates 44
Fix (fixed-decimal mode)
fixed-decimal mode (Fix)
Float (floating-decimal mode)
floating-decimal mode (Float)
fractions
n/d
21
Un/d
21
Full (full-screen mode)
full-screen mode (Full)
2
2
Func (function graphing mode)
function graphing
modes
19
function, definition of
18
18
18
18
20
20
19
27
59
Page 64

G
graphing modes 19
graphing-order modes
graph-table split-screen mode (G-T)
20
G-T (graph-table split-screen mode)
20
19
H
home screen 9
scrolling
Horiz (horizontal split-screen mode)
20
9, 11
I
implied multiplication 24
insert cursor
inserting
calculators in charging station
instruction, definition of
15
50
27
K
keyboard
layout
4
L
Last Entry 34
LED lights
51
M
menus 36
scrolling
shortcut
mode
Answers
Classic
MathPrint
mode settings
a+bi (complex rectangular)
Degree (angle)
Eng (notation)
Fix (decimal)
Float (decimal)
Full (screen)
Func (graphing)
37
4, 13
21
10, 17
10, 17
16
20
18
18
18
18
20
19
G-T (screen)
Horiz (screen)
Normal (notation)
Par/Param (graphing)
Pol/Polar (graphing)
Radian (angle)
re^
i (complex polar) 20
Real
Sci (notation)
Seq (graphing)
Simul (graphing order)
N
n/d 21
negation (-)
Normal notation mode
20
20
18
20
18
19
24
O
order of evaluating equations 23
P
Par/Param (parametric graphing
mode)
19
parentheses
Pol/Polar (polar graphing mode)
polar graphing
mode (Pol/Polar)
previous entry (Last Entry)
24
R
Radian angle mode 18
RCL (recall)
re^
i) (polar complex mode) 20
Real mode
rechargeable batteries
Removing a Faceplate
32
20
status
51
troubleshooting
S
Sci (scientific notation mode) 18
scientific notation
screen modes
second cursor (2nd)
second key (2nd)
26
20
15
6
18
19
19
19
18
19
19
34
52
45
60
Page 65

Seq (sequence graphing mode) 19
setting
display contrast
modes
17
modes from a program
8
17
Simul (simultaneous graphing order
mode)
19
spinner
2
status
LED indicator
rechargeable batteries
status bar
Store (
!) 31
51
51
12
storing
TI-84 Plus C Charging Stations
variable values
31
52
T
TI Rechargeable Batteries
charging
TI-84 Plus C Charging Stations
storing
51
49
52
TI-Navigator™ software and the TI-
84 Plus C
troubleshooting
1
52
U
Un/d 21
UnArchive
32
Statistics
String
39
Table
39
Window
Zoom
39
Y
Y-VARS menu
Function
On/Off
39
Parametric
Polar
39
39
39
39
39
V
variables
complex
displaying and storing values
graph databases
graph pictures
list
matrix
real
recalling values
types
user and system
VARS and Y-VARS menus
VARS menu
GDB
Picture
30
30
30
30
30
30
32
30
30
39
39
31
39
61
Page 66

62
 Loading...