

W-860R
3D0021700D
Double Auto Reverse Cassette Deck
OWNER’S MANUAL . . . . . . . . 4
MANUEL DU PROPRIETAIRE . . 16
BEDIENUNGSANLEITUNG . . . . 28
MANUALE DI ISTRUZIONI . . . . 40
MANUAL DEL USUARIO . . . . . 52
GEBRUIKSAANWIJZING . . . . . 64
ENGLISHFRANÇAISDEUTSCHITALIANOESPAÑOL
NEDERLANDS
Thanks for buying a TEAC. Read this manual carefully to get the best performance from this unit.
Nous vous remercions pour l’achat d’un appareil TEAC.
Lire ce manuel avec attention pour obtenir les meilleures performances possibles de cet appareil.
Vielen Dank für den Kauf dieses TEAC-Geräts.
Bitte lesen Sie diese Anleitung sorgfältig durch, um die Leistungs-fähigkeit dieses Geräts optimal nutzen zu können.
Grazie per aver acquistato un prodotto TEAC.
Leggere attentamente questo manuale per ottenere le migliori prestazioni da questo apparecchio.
Enhorabuena por la adquisición de un TEAC.
Lea detenidamente este manual a fin de obtener el mejor rendimiento de esta unidad.
Dank u voor de aanschaf van een TEAC.
Lees deze gebruiksaanwijzing aandachtig door teneinde de beste prestaties van dit toestel te verkrijgen.
PRINTED IN CHINA 0599D
≠
MA-0183D
2
Important Safety Instructions
CAUTION
–Read all of these Instructions.
–Save these Instructions for later use.
–Follow all Warnings and Instructions marked on the audio equipment.
1)Read Instructions — All the safety and operating instructions should
be read before the product is operated.
2)Retain Instructions — The safety and operating instructions should
be retained for future reference.
3)Heed Warnings — All warnings on the product and in the operating
instructions should be adhered to.
4)Follow Instructions — All operating and use instructions should be
followed.
5)Cleaning — Unplug this product from the wall outlet before cleaning.
Do not use liquid cleaners or aerosol cleaners. Use a damp cloth for
cleaning.
6)Attachments — Do not use attachments not recommended by the
product manufacturer as they may cause hazards.
7)Water and Moisture — Do not use this product near water — for
example, near a bath tub, wash bowl, kitchen sink, or laundry tub; in a
wet basement; or near a swimming pool; and the like.
8)Accessories — Do not place this product on an unstable cart, stand,
tripod, bracket, or table. The product may fall, causing serious injury to
a child or adult, and serious damage to the product. Use only with a
cart, stand, tripod, bracket, or table recommended by the manufacturer,
or sold with the product. Any mounting of the product should follow the
manufacturer’s instructions, and should use a mounting accessory
recommended by the manufacturer.
9)A product and cart combination should be moved
with care. Quick stops, excessive force, and uneven
surfaces may cause the product and cart
combination to overturn.
10)Ventilation — Slots and openings in the cabinet
are provided for ventilation and to ensure reliable operation of the
product and to protect it from overheating, and these openings must
not be blocked or covered. The openings should never be blocked by
placing the product on a bed, sofa, rug, or other similar surface. This
product should not be placed in a built-in installation such as a
bookcase or rack unless proper ventilation is provided or the
manufacturer’s instructions have been adhered to.
11)Power Sources — This product should be operated only from the
type of power source indicated on the marking label. If you are not sure
of the type of power supply to your home, consult your product dealer
or local power company. For products intended to operate from battery
power, or other sources, refer to the operating instructions.
12)Grounding or Polarization — This product may be equipped with a
polarized alternating-current line plug (a plug having one blade wider
than the other). This plug will fit into the power outlet only one way. This
is a safety feature. If you are unable to insert the plug fully into the
outlet, try reversing the plug. If the plug should still fail to fit, contact
your electrician to replace your obsolete outlet. Do not defeat the safety
purpose of the polarized plug.
13)Power-Cord Protection — Power-supply cords should be routed
so that they are not likely to be walked on or pinched by items placed
upon or against them, paying particular attention to cords at plugs,
convenience receptacles, and the point where they exit from the
product.
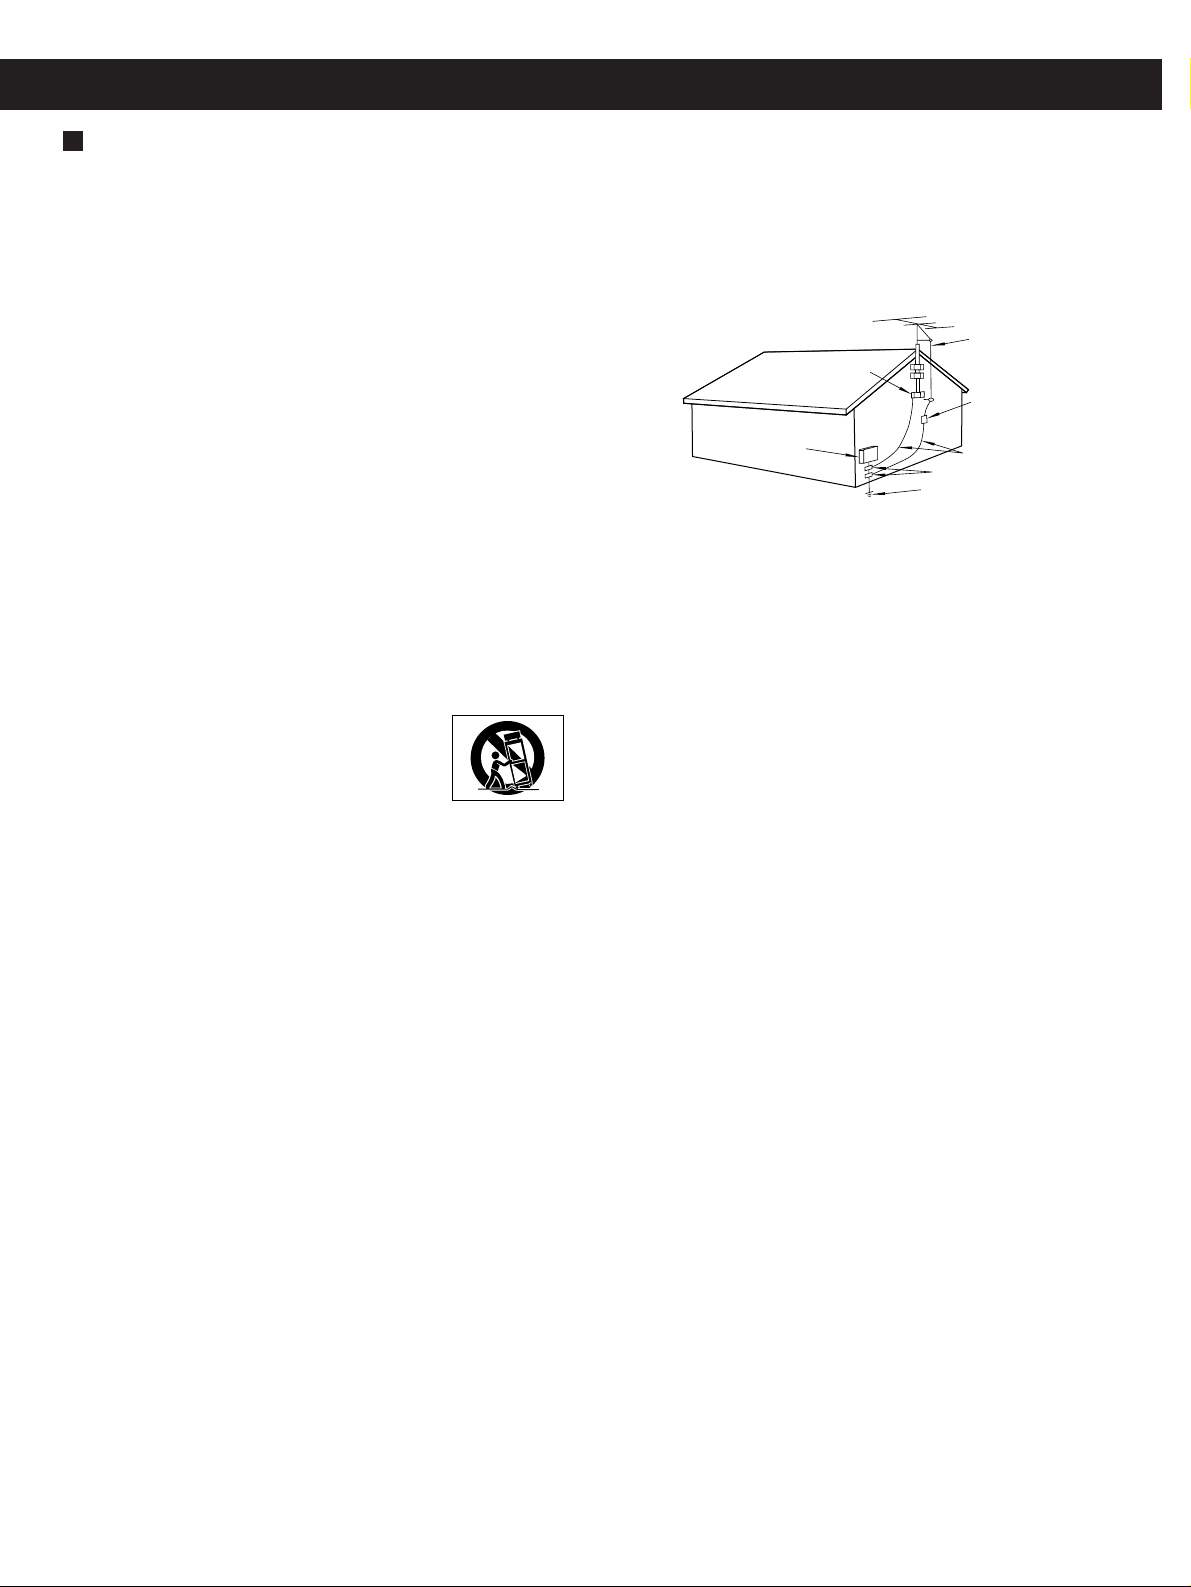
14)Outdoor Antenna Grounding — If an outside antenna or cable
system is connected to the product, be sure the antenna or cable
system is grounded so as to provide some protection against voltage
surges and built-up static charges. Article 810 of the National Electrical
Code, ANSI/NFPA 70, provides information with regard to proper
grounding of the mast and supporting structure, grounding of the leadin wire to an antenna discharge unit, size of grounding conductors,
location of antenna-discharge unit, connection to grounding electrodes,
and requirements for the grounding electrode.
“Note to CATV system installer:
This reminder is provided to call the CATV system installer’s attention
to Section 820-40 of the NEC which provides guidelines for proper
grounding and, in particular, specifies that the cable ground shall be
connected to the grounding system of the building, as close to the
point of cable entry as practical.”
15)Lightning — For added protection for this product during a lightning
storm, or when it is left unattended and unused for long periods of time,
unplug it from the wall outlet and disconnect the antenna or cable
system. This will prevent damage to the product due to lightning and
power-line surges.
16)Power Lines — An outside antenna system should not be located in
the vicinity of overhead power lines or other electric light or power
circuits, or where it can fall into such power lines or circuits. When
installing an outside antenna system, extreme care should be taken to
keep from touching such power lines or circuits as contact with them
might be fatal.
17)Overloading — Do not overload wall outlets, extension cords, or
integral convenience receptacles as this can result in risk of fire or
electric shock.
18)Object and Liquid Entry — Never push objects of any kind into this
product through openings as they may touch dangerous voltage points
or short-out parts that could result in a fire or electric shock. Never spill
liquid of any kind on the product.
19)Servicing — Do not attempt to service this product yourself as
opening or removing covers may expose you to dangerous voltage or
other hazards. Refer all servicing to qualified service personnel.
20)Damage Requiring Service — Unplug this product from the wall
outlet and refer servicing to qualified service personnel under the
following conditions:
a ) when the power-supply cord or plug is damaged.
b) if liquid has been spilled, or objects have fallen into the product.
c ) if the product has been exposed to rain or water.
d) if the product does not operate normally by following the operating
instructions. Adjust only those controls that are covered by the
operating instructions as an improper adjustment of other controls may
result in damage and will often require extensive work by a qualified
technician to restore the product to its normal operation.
e) if the product has been dropped or damaged in any way.
f ) when the product exhibits a distinct change in performance _ this
indicates a need for service.
21)Replacement Parts — When replacement parts are required, be
sure the service technician has used replacement parts specified by the
manufacturer or have the same characteristics as the original part.
Unauthorized substitutions may result in fire, electric shock, or other
hazards.
22)Safety Check — Upon completion of any service or repairs to this
product, ask the service technician to perform safety checks to
determine that the product is in proper operating condition.
23)Wall or Ceiling Mounting — The product should be mounted to a
wall or ceiling only as recommended by the manufacturer.
24)Heat — The product should be situated away from heat sources
such as radiators, heat registers, stoves, or other products (including
amplifiers) that produce heat.
ANTENNA
LEAD IN
WIRE
ANTENNA
DISCHARGE UNIT
(NEC SECTION 810-20)
GROUNDING CONDUCTORS
(NEC SECTION 810-21)
GROUND CLAMPS
POWER SERVICE GROUNDING
ELECTRODE SYSTEM
(NEC ART 250. PART H)
NEC - NATIONAL ELECTRICAL CODE
ELECTRIC
SERVICE
EQUIPMENT
Example of Antenna Grounding
as per National Electrical
Code, ANSI/NFPA 70
GROUND
CLAMP

3
Precautions
WARNING: TO PREVENT FIRE OR SHOCK HAZARD, DO NOT EXPOSE THIS APPLIANCE TO RAIN OR MOISTURE.
THE EXCLAMATION POINT WITHIN AN EQUILATERAL TRIANGLE IS INTENDED TO ALERT THE USER TO THE PRESENCE OF
IMPORTANT OPERATING AND MAINTENANCE (SERVICING) INSTRUCTIONS IN THE LITERATURE ACCOMPANYING THE
APPLIANCE.
THE LIGHTNING FLASH WITH ARROWHEAD SYMBOL, WITHIN AN EQUILATERAL TRIANGLE, IS INTENDED TO ALERT THE USER
TO THE PRESENCE OF UNINSULATED “DANGEROUS VOLTAGE” WITHIN THE PRODUCT’S ENCLOSURE THAT MAY BE OF
SUFFICIENT MAGNITUDE TO CONSTITUTE A RISK OF ELECTRIC SHOCK TO PERSONS.
CAUTION: TO REDUCE THE RISK OF ELECTRIC SHOCK, DO NOT REMOVE COVER (OR
BACK). NO USER-SERVICEABLE PARTS INSIDE. REFER SERVICING TO QUALIFIED
SERVICE PERSONNEL.
Ü
ÿ
Ÿ
Voltage Conversion
(
General export models only)
Be sure to remove the power cord from the AC outlet before
repositioning the voltage converter switch.
1. Locate the voltage selector on the rear panel.
2. Using a flat-bladed screwdriver, set to the appropriate 230V
or 120V position according to your area.
AC POWER CORD CONNECTION
CAUTION:
TO PREVENT ELECTRIC SHOCK, MATCH WIDE
BLADE OF PLUG TO WIDE SLOT, FULLY INSERT.
IN NORTH AMERICA USE ONLY ON 120 V SUPPLY. DANS L'AMÉRIQUE DU NORD: UTILISABLE SUR 120 V
D'ALIMENTATION UNIQUEMENT.
CORDE DE CONNEXION CA
ATTENTION:
POUR ÉVITER LES CHOCS ÉLECTRIQUES, INTRODUIRE LA
LAME LA PLUS LARGE DE LA FICHE DANS LA BORNE
CORRESPONDANTE DE LA PRISE ET POUSSER JUSQU’AU
FOND.
For CANADA
Pour le CANADA
Before Use
4
Connection
Tape Handling
Do not store tapes in the following places:
… On top of heaters, exposed to direct sunlight or in any other
places with high temperatures.
… Near speakers, on TV sets or amplifiers or where they would
be exposed to strong magnetic fields.
… Where humidity is high and in dirty, dusty places.
… Avoid dropping or subjecting cassettes to excessive shocks.
… As C-120 tapes are physically weak and could become
entangled in the transport mechanism, do not use them.
Tape Selection
For the automatic tape select function to work properly, metal
and chrome (cobalt) tapes must have identification holes.
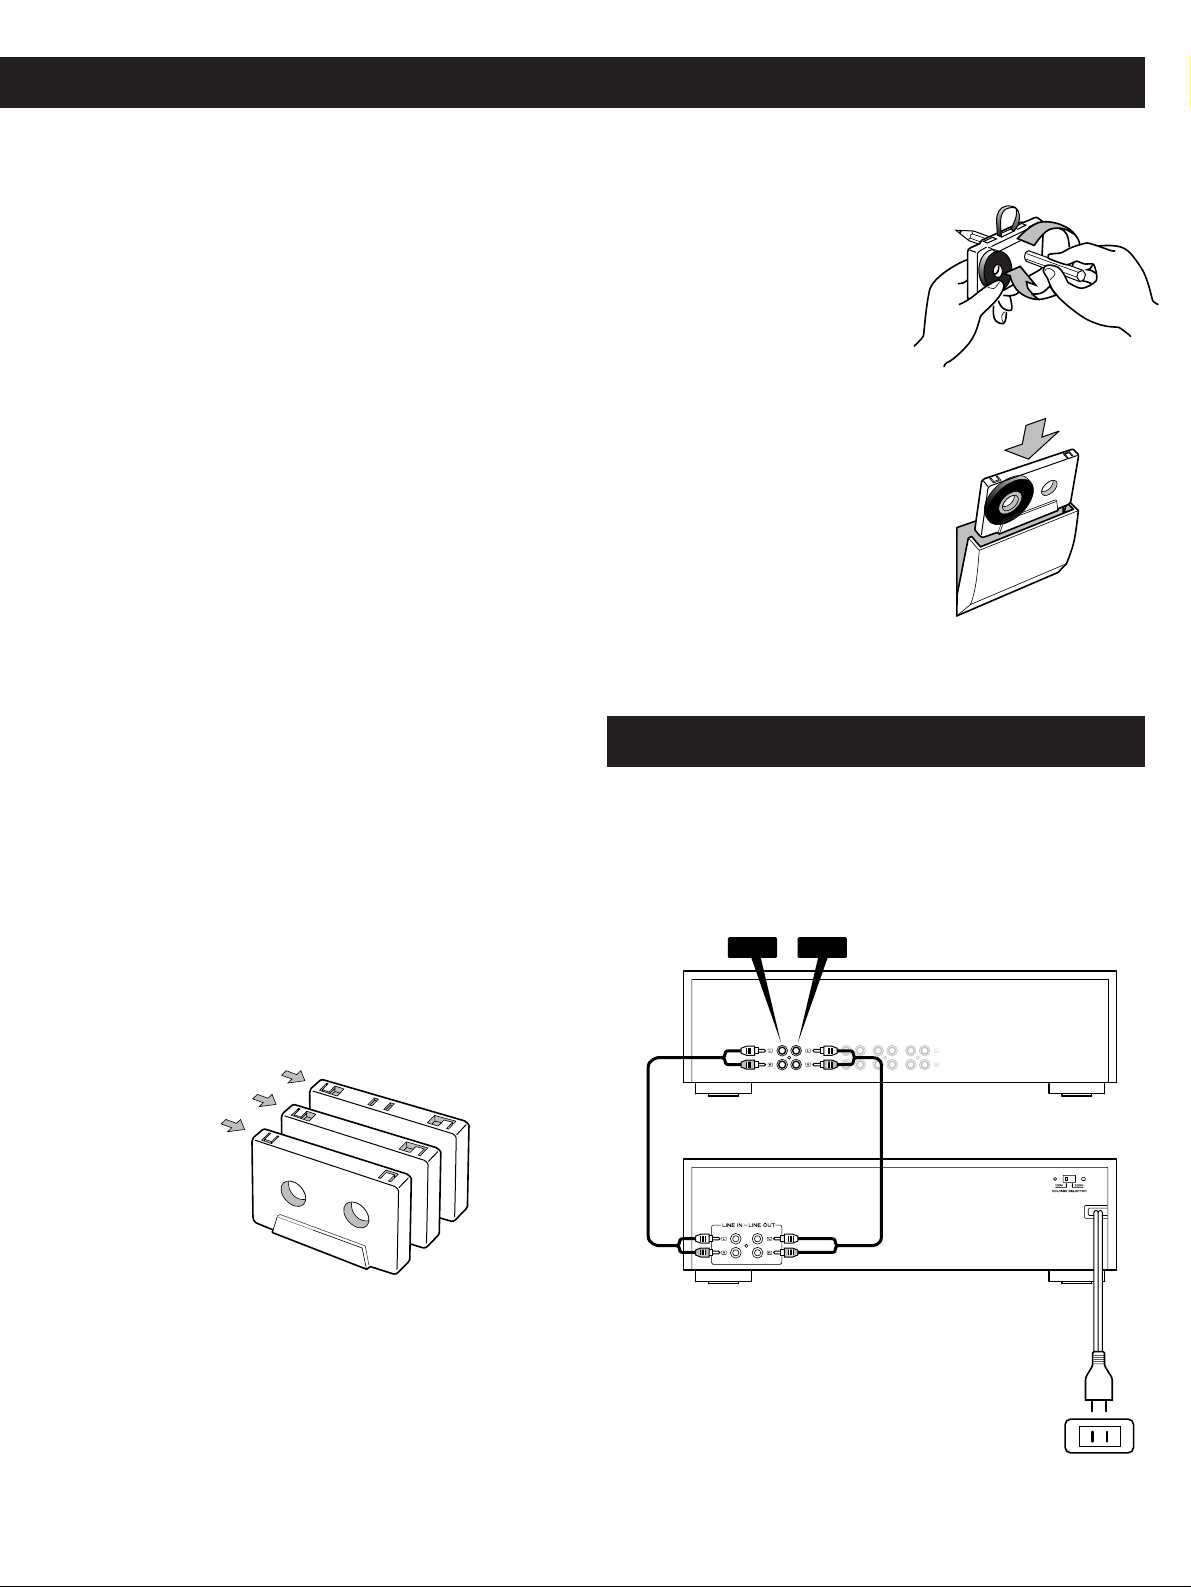
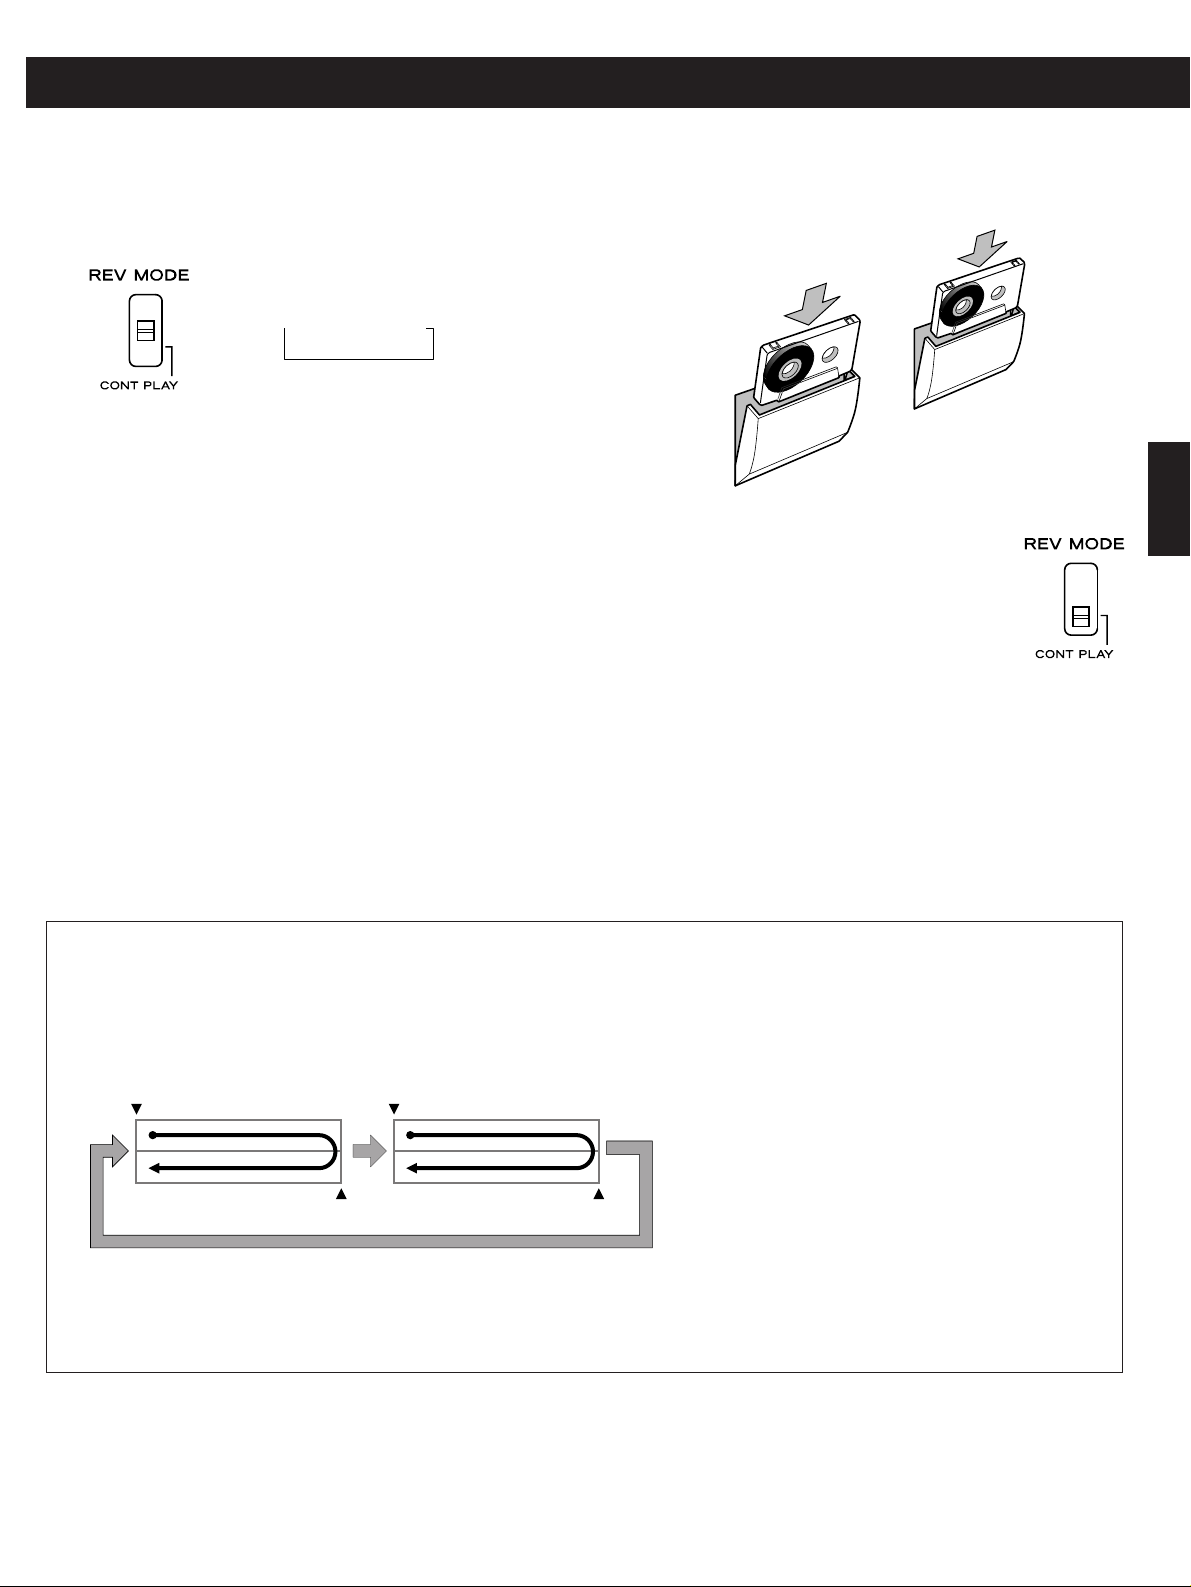
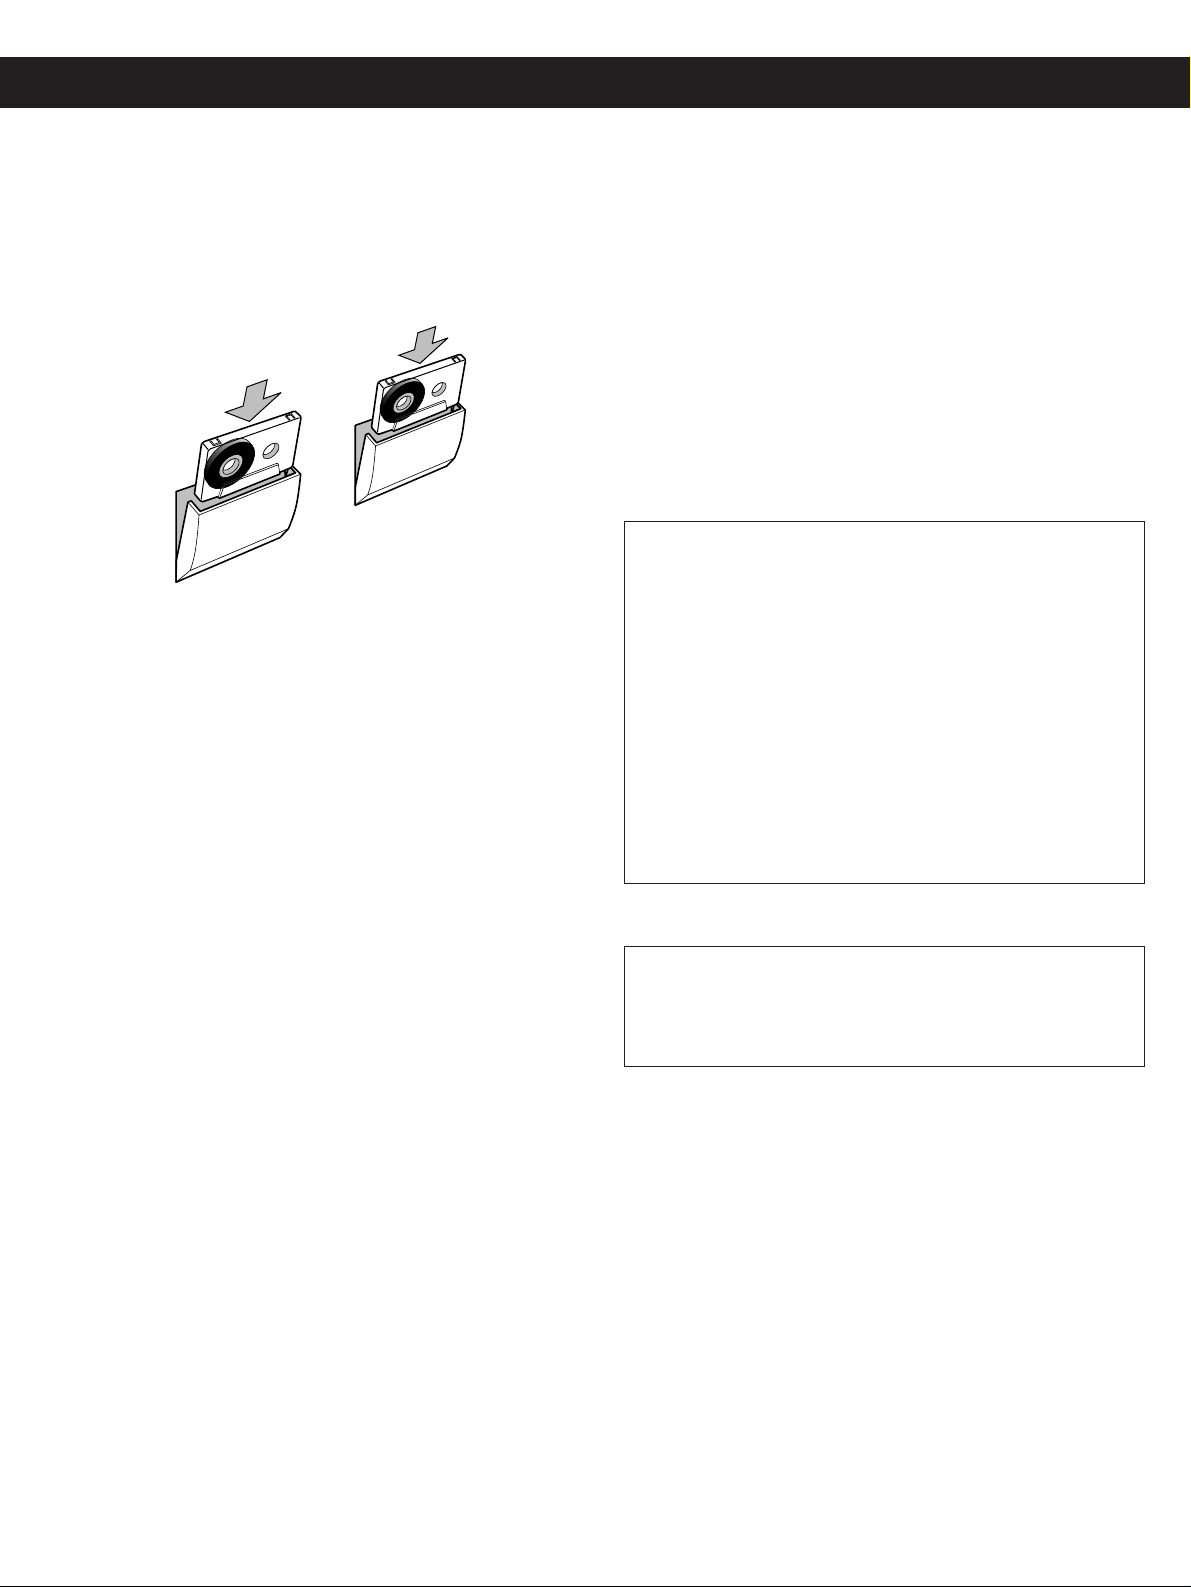
Loading a Cassette Tape
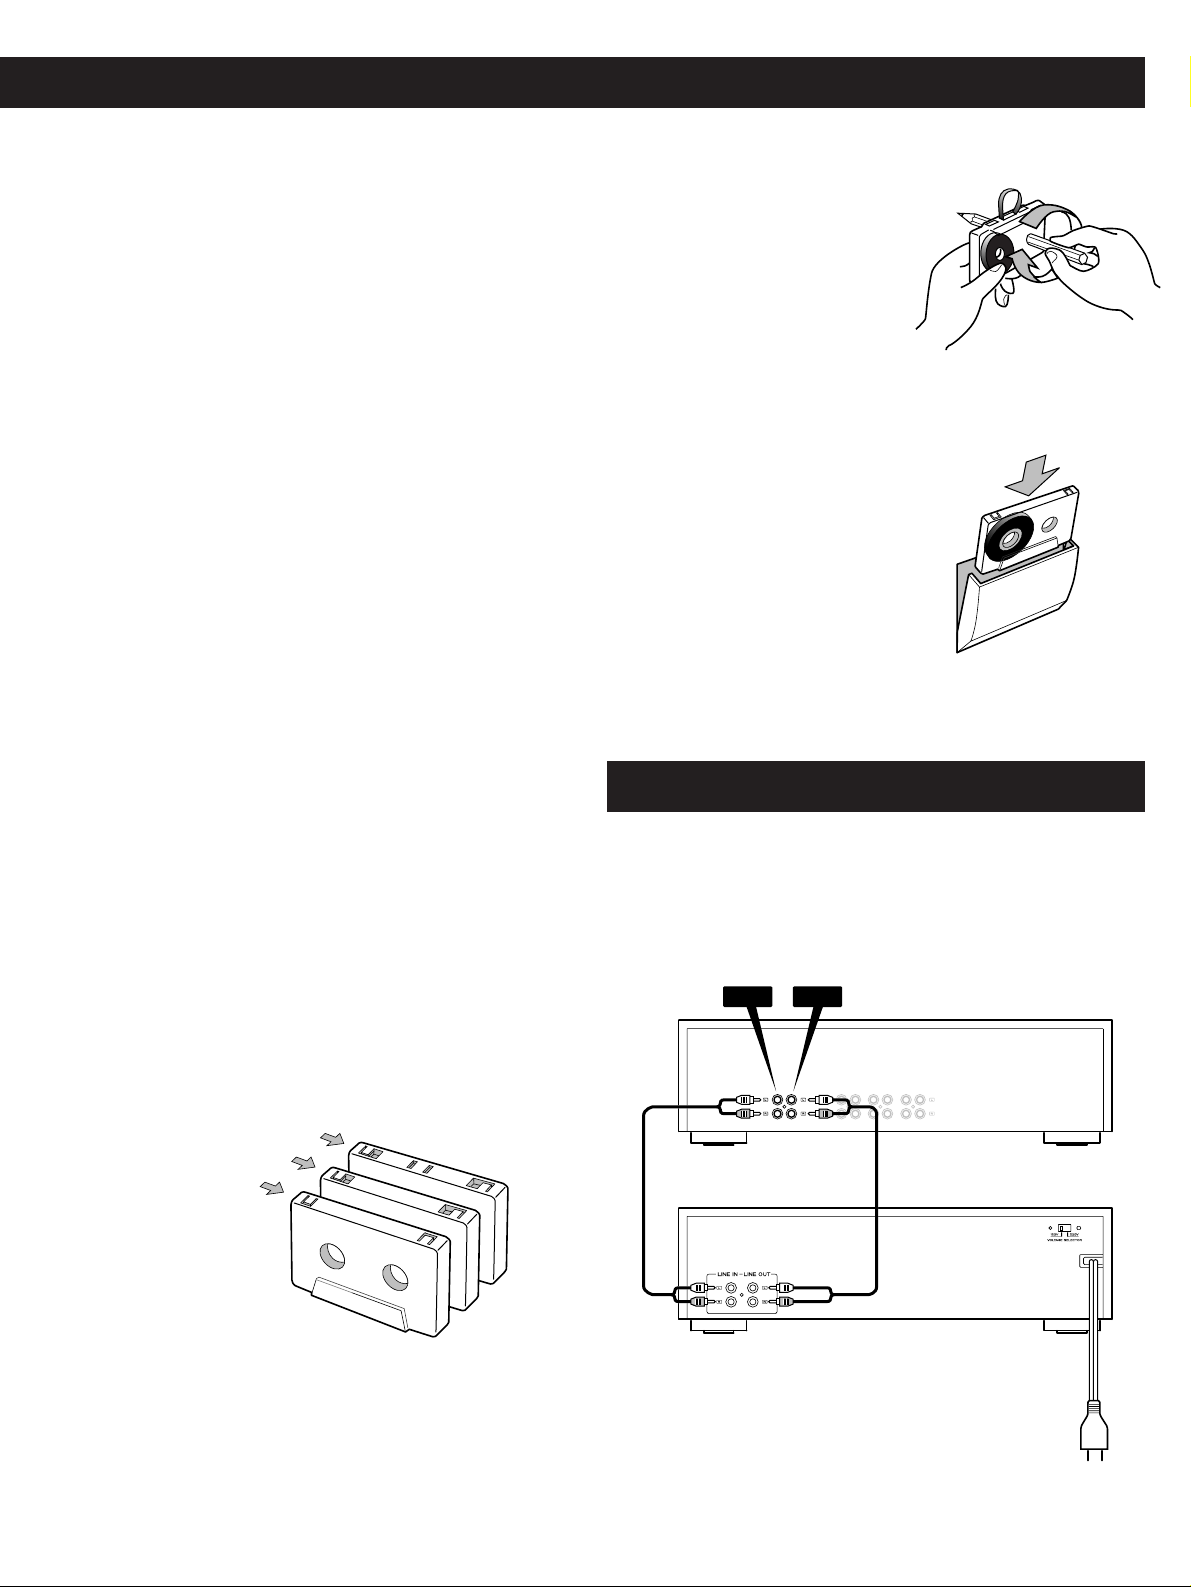
1. Use your finger or a pencil to
turn the cassette's hub and take
up any slack tape.
… Avoid touching the tape.
Fingerprints attract dust and
dirt.
2. Press the EJECT button to open
the compartment door.
… The cassette holder cannot be
opened during recording or
playback.
3. Load the cassette tape with its
open edge facing down.
4. Gently close the compartment
door.
… Turn off the power switches of all equipment before making
connections.
… Read the instructions of each component you intend to use
with the deck.
Read This Before Operating
… Choose the installation location of your unit carefully. Avoid
placing it in direct sunlight or close to a source of heat. Also
avoid locations subject to vibrations and excessive dust,
heat, cold or moisture. Keep away from such sources that
hum, such as transformers or motors.
… Do not open the cabinet as this might result in damage to the
circuitry or electrical shock. If a foreign object should get into
the set, contact your dealer.
… When removing the power plug from the wall outlet, always
pull directly on the plug, never yank the cord.
… Do not attempt to clean the unit with chemical solvents as
this might damage the finish. Use a clean, dry cloth.
… Keep this manual in a safe place for future reference.
Metal
(
2
(
Type#
(
Type%
Type%^
)
)
)
CrO
Normal
REC PLAY
Amplifier
W-860R
AC Power
ENGLISH
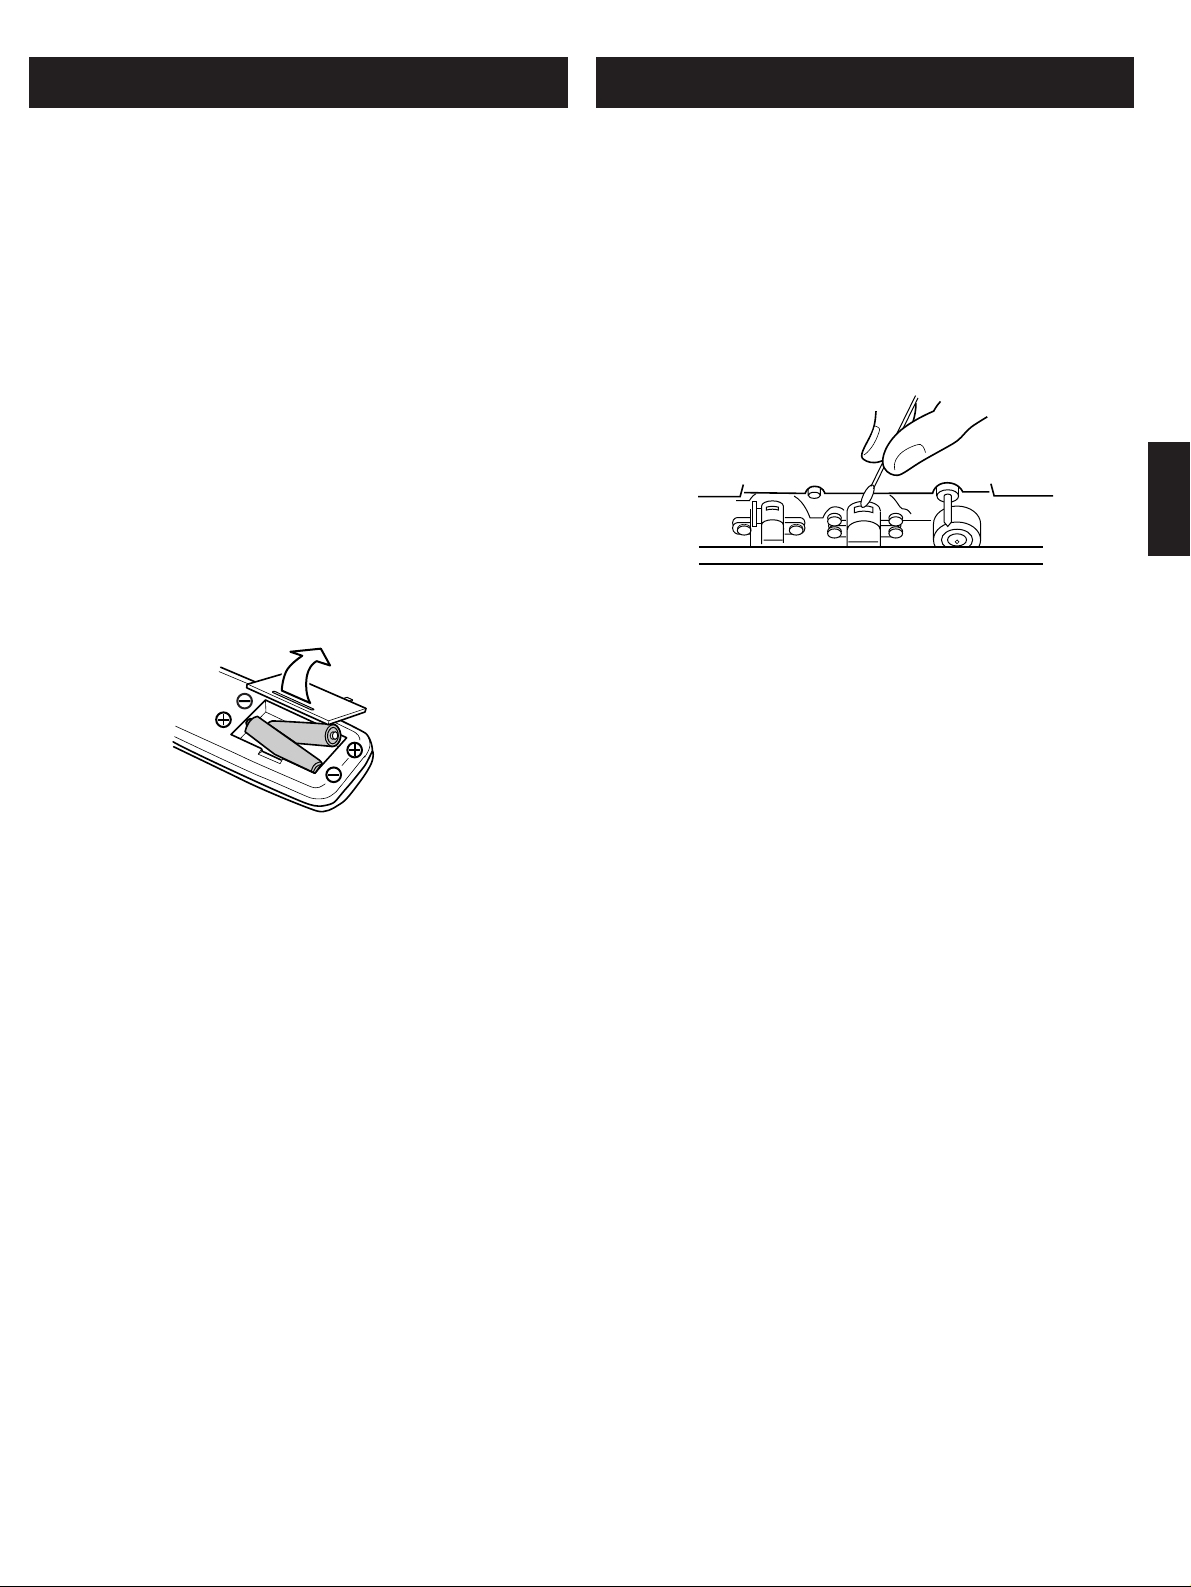
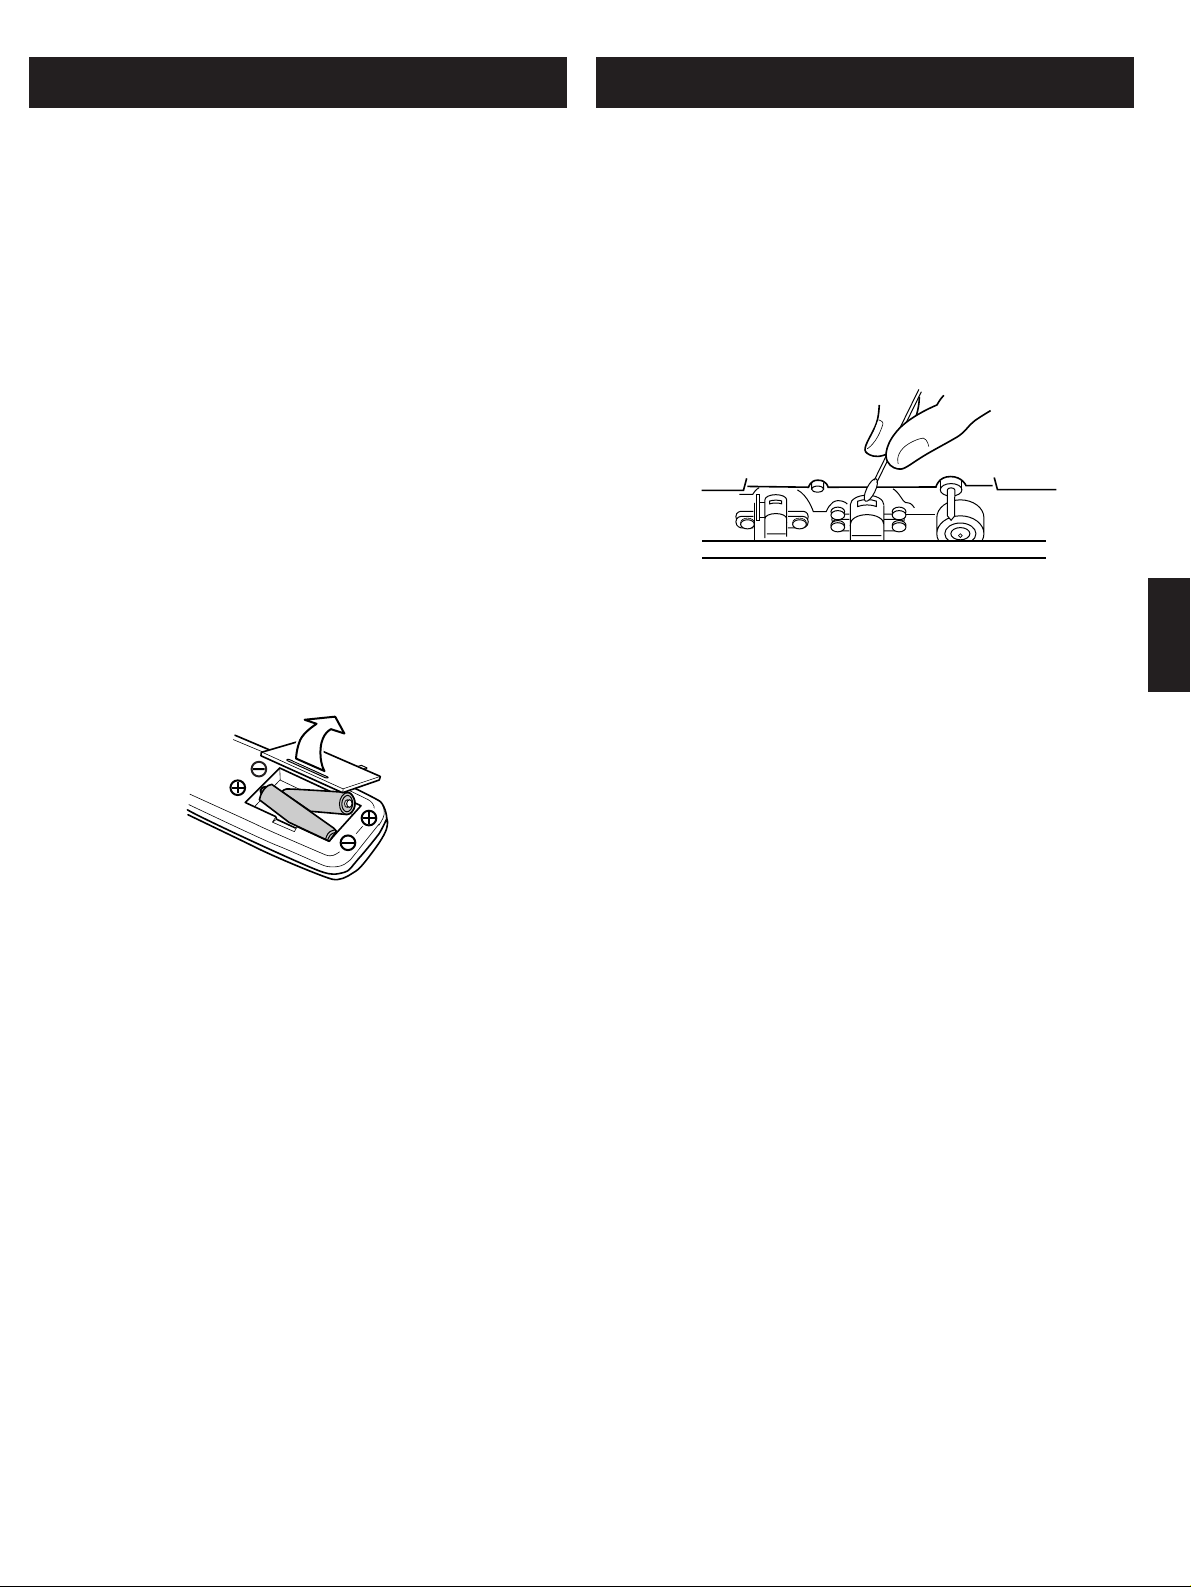
Battery Installation
1. Remove the battery compartment cover.
2. Insert two "AA" (R6, SUM-3) dry batteries.
Make sure that the batteries are inserted with their positive ±
and negative — poles positioned correctly.
3. Close the cover until it clicks.
Battery Replacement
If you notice that the distance between the remote control unit
and the player for correct operation becomes shorter, it
indicates that the batteries are exhausted. In this case replace
the batteries with new ones.
Precautions concerning batteries
… Be sure to insert the batteries with correct positive ± and
negative
— polarities.
… Use batteries of the same type. Never use different types of
batteries together.
… Rechargeable and non-rechargeable batteries can be used.
Refer to the precautions on their labels.
… When the remote control unit is not to be used for a long time
(more than a month), remove the batteries from the remote
control unit to prevent them from leaking. If they leak, wipe
away the liquid inside the battery compartment and replace
the batteries with new ones.
… Do not heat or disassemble batteries and never dispose of
old batteries by throwing them in a fire.
The provided Remote Control Unit allows the unit to be
operated from a distance.
When operating the remote control unit, point it towards the
remote sensor on the front panel of the unit.
… Even if the remote control unit is operated within the effective
range, remote control operation may be impossible if there
are any obstacles between the player and the remote control.
… If the remote control unit is operated near other appliances
which generate infrared rays, or if other remote control
devices using infrated rays are used near the player, the
player may operate incorrectly. In the reverse way, the other
appliances may operate incorrectly.
Remote Control Operation
5
Maintenance
The heads and tape path should be cleaned and
demagnetized periodically.
Cleaning Tape Path
… Apply head cleaning fluid to a cotton swab or soft cloth, and
lightly rub the heads, capstan and all metal parts in the tape
path.
… Also clean the pinch roller using rubber cleaning fluid.
Demagnetizing Heads
Be sure that the power is off, then demagnetize the heads using
a demagnetizer. For details of its use, read its instructions.
Caution:
If the surface of the unit gets dirty, wipe with a soft cloth or use
diluted neutral cleaning liquid. Be sure to remove any fluid
completely. Do not use thinner, benzine or alcohol as they may
damage the surface of the unit.
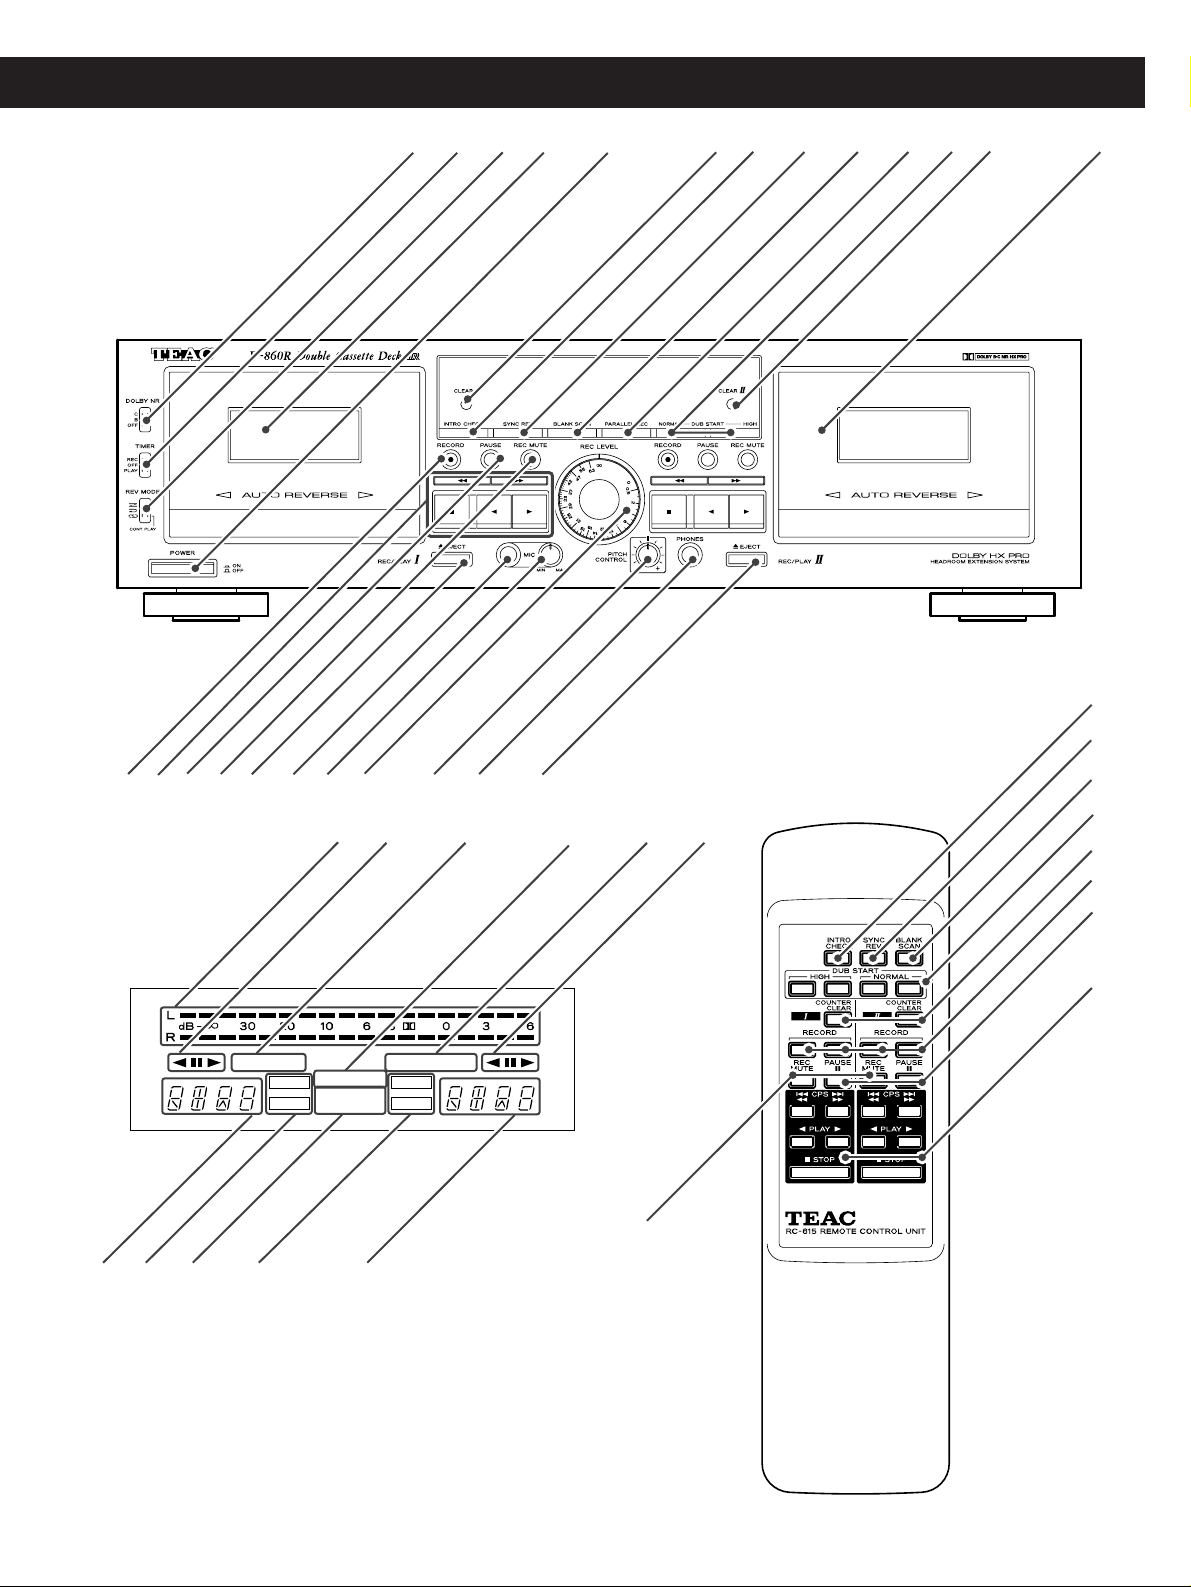
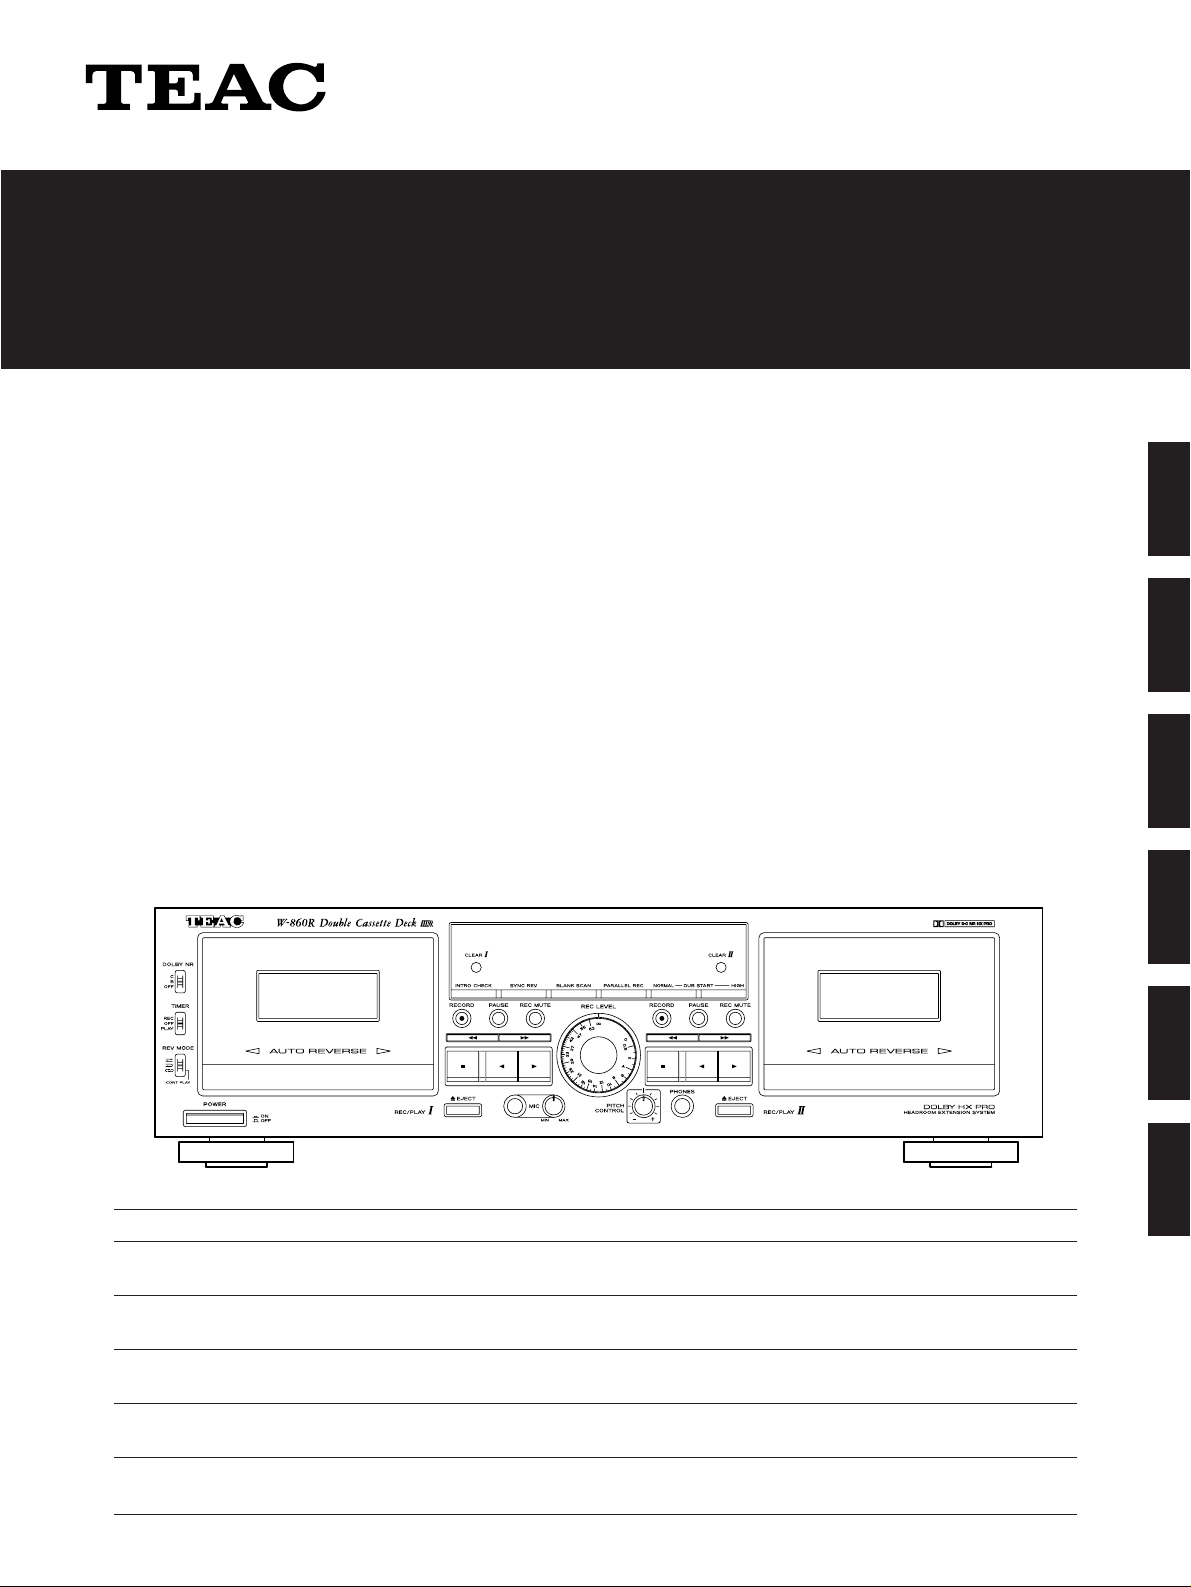
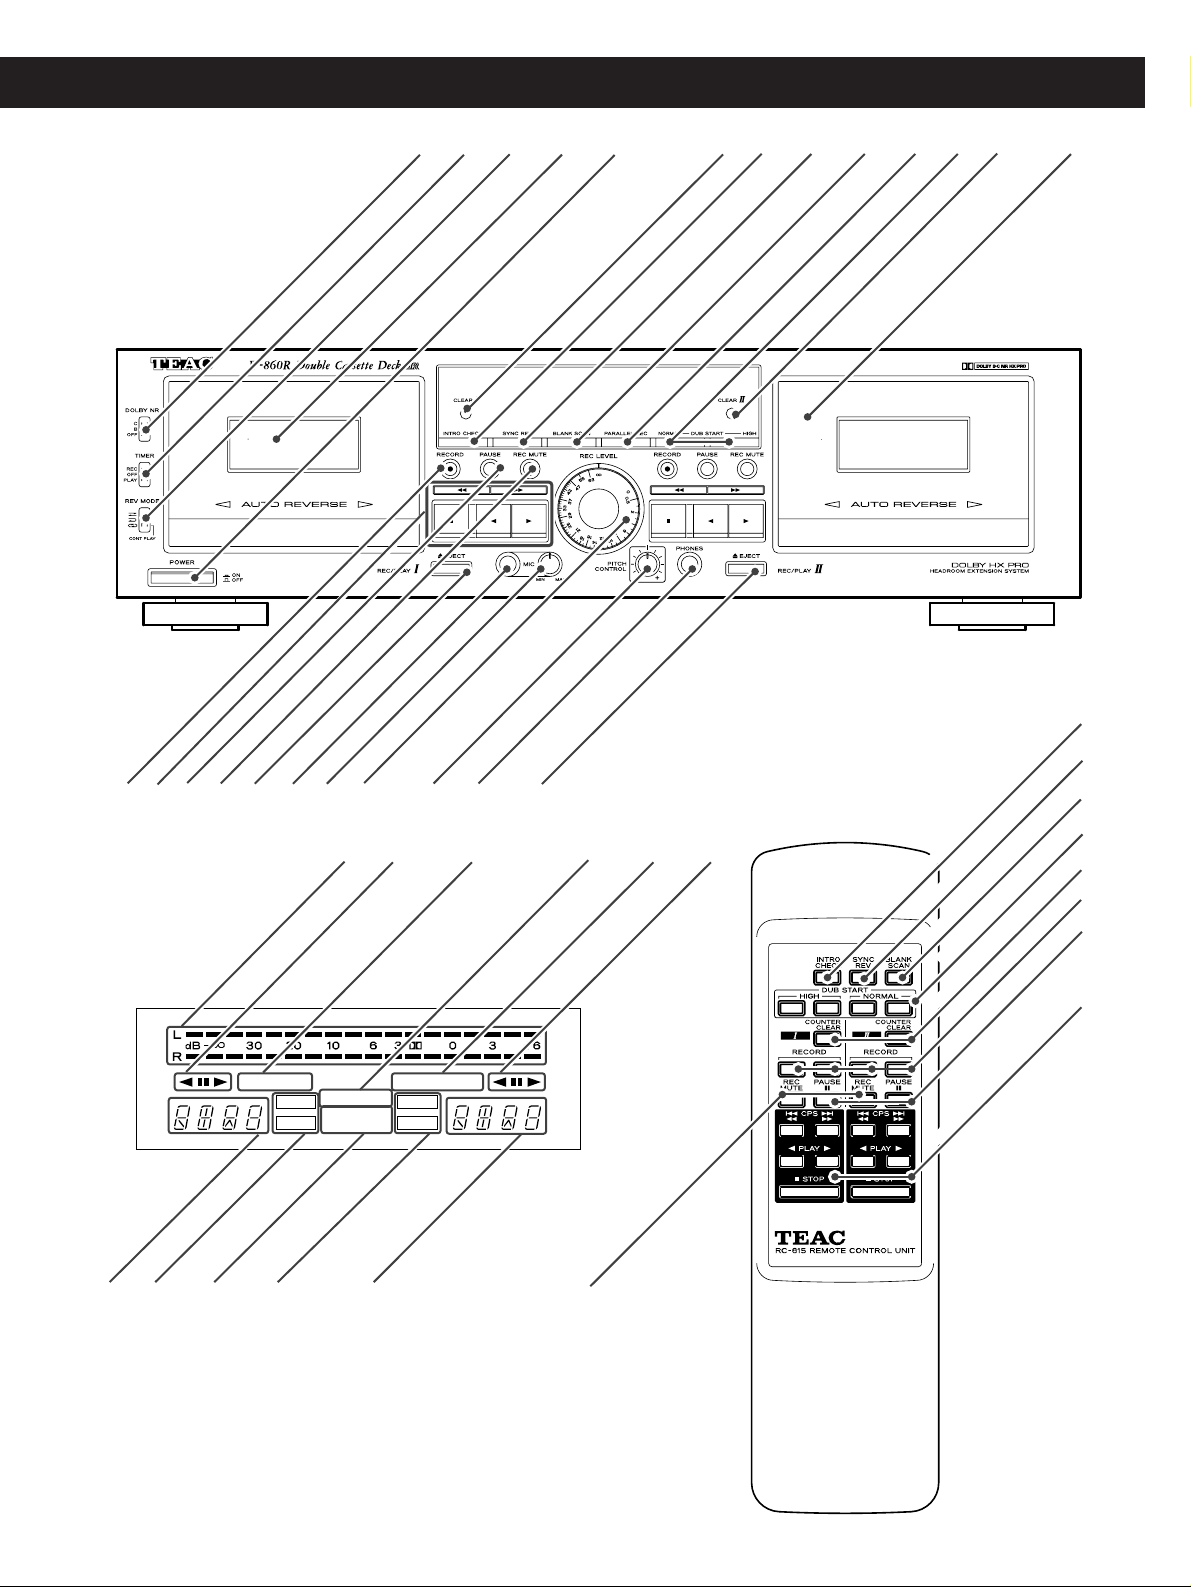
Name of Each Control
6
REC MUTE Button
PAUSE Button
*Tape Operation Buttons
RECORD Button
DOLBY NR Switch
MIC Level Control Knob
MIC Jack
EJECT Button (I)
TIMER Switch
REVERSE MODE Switch
REC LEVEL Control Knob
Cassette Holder (I)
PITCH CONTROL Knob
PHONES Jack
POWER Switch
COUNTER CLEAR Button (I)
EJECT Button (II)
INTRO CHECK Button
SYNC REVERSE Button
BLANK SCAN Button
*Tape Operation Buttons
Á :Forward PLAY Button
Ó :Reverse PLAY Button
ª :STOP Button
Ô:Rewind/CPS Button
:Fast Forward/CPS Button
DUB START Button
PARALLEL REC Button
COUNTER CLEAR Button (II)
Cassette Holder (II)
INTRO CHECK Button
DUBBING Indicators
Mode Indicators ( I )
Multi Counter ( I )
Peak Level Meter
Direction & PAUSE Indicators ( I )
SYNC REV BLANK SCAN
Mode Indicators ( II )
SYNC REVERSE Indicators
PARALLEL
REC
HIGH DUB
PLAY
NORM DUB
Multi Counter ( II )
REC
PLAY
PARALLEL REC Indicator
BLANK SCAN Indicators
Direction & PAUSE Indicators ( II )
REC MUTE Button
SYNC REVERSE Button
BLANK SCAN Button
DUB START Button
RECORD Button
COUNTER CLEAR Button
PAUSE Button
*Tape Operation Buttons
ENGLISH
7
Playback
Playback with TAPE I or TAPE Il
1. Press the POWER switch.
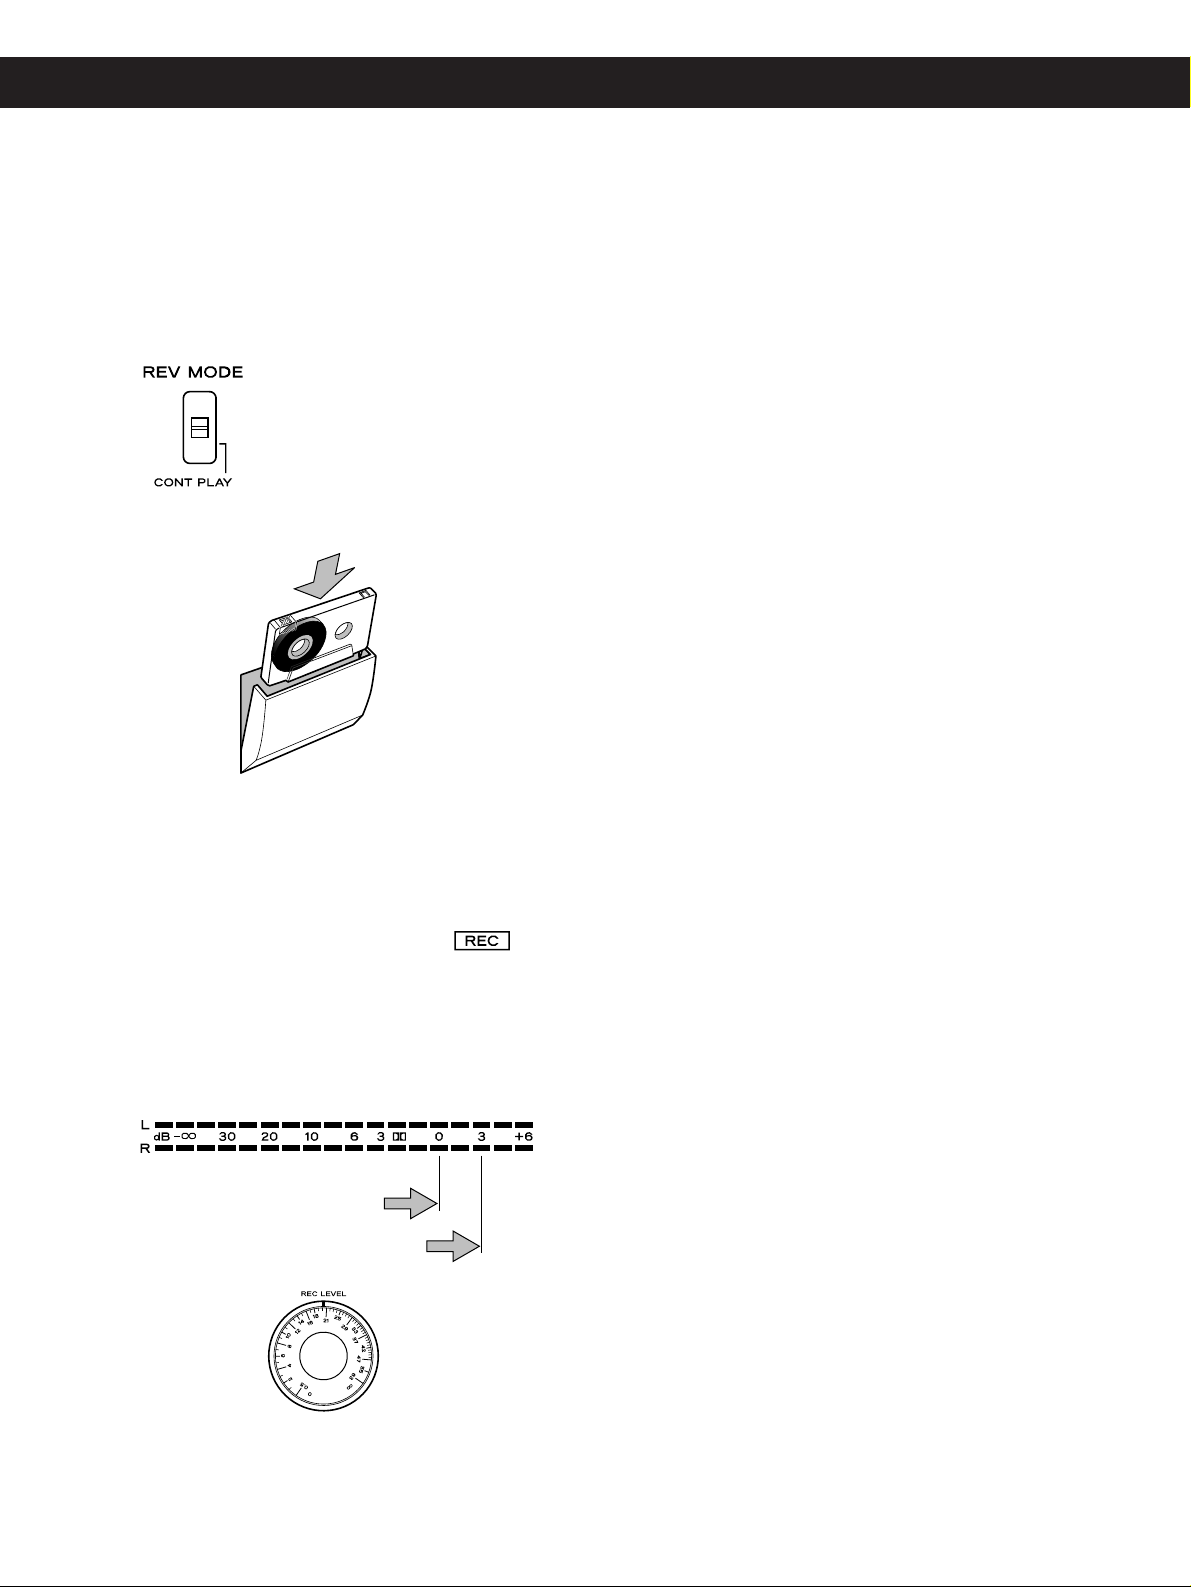
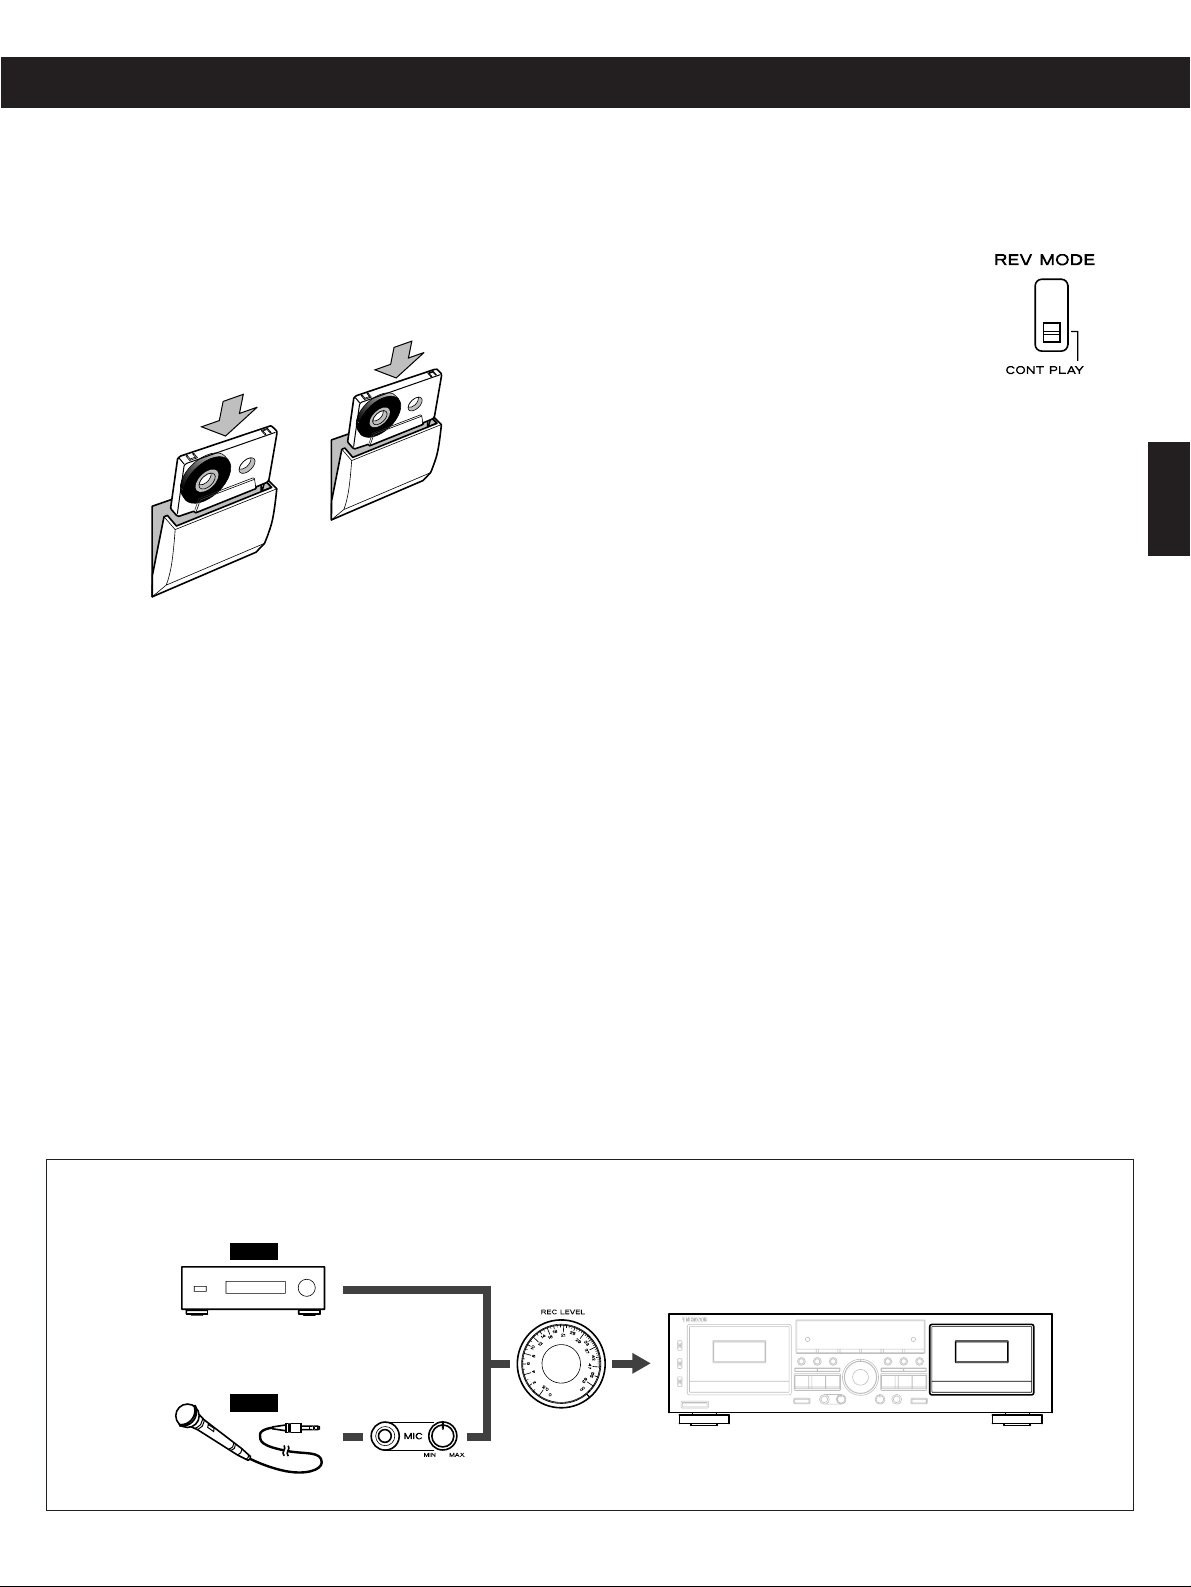
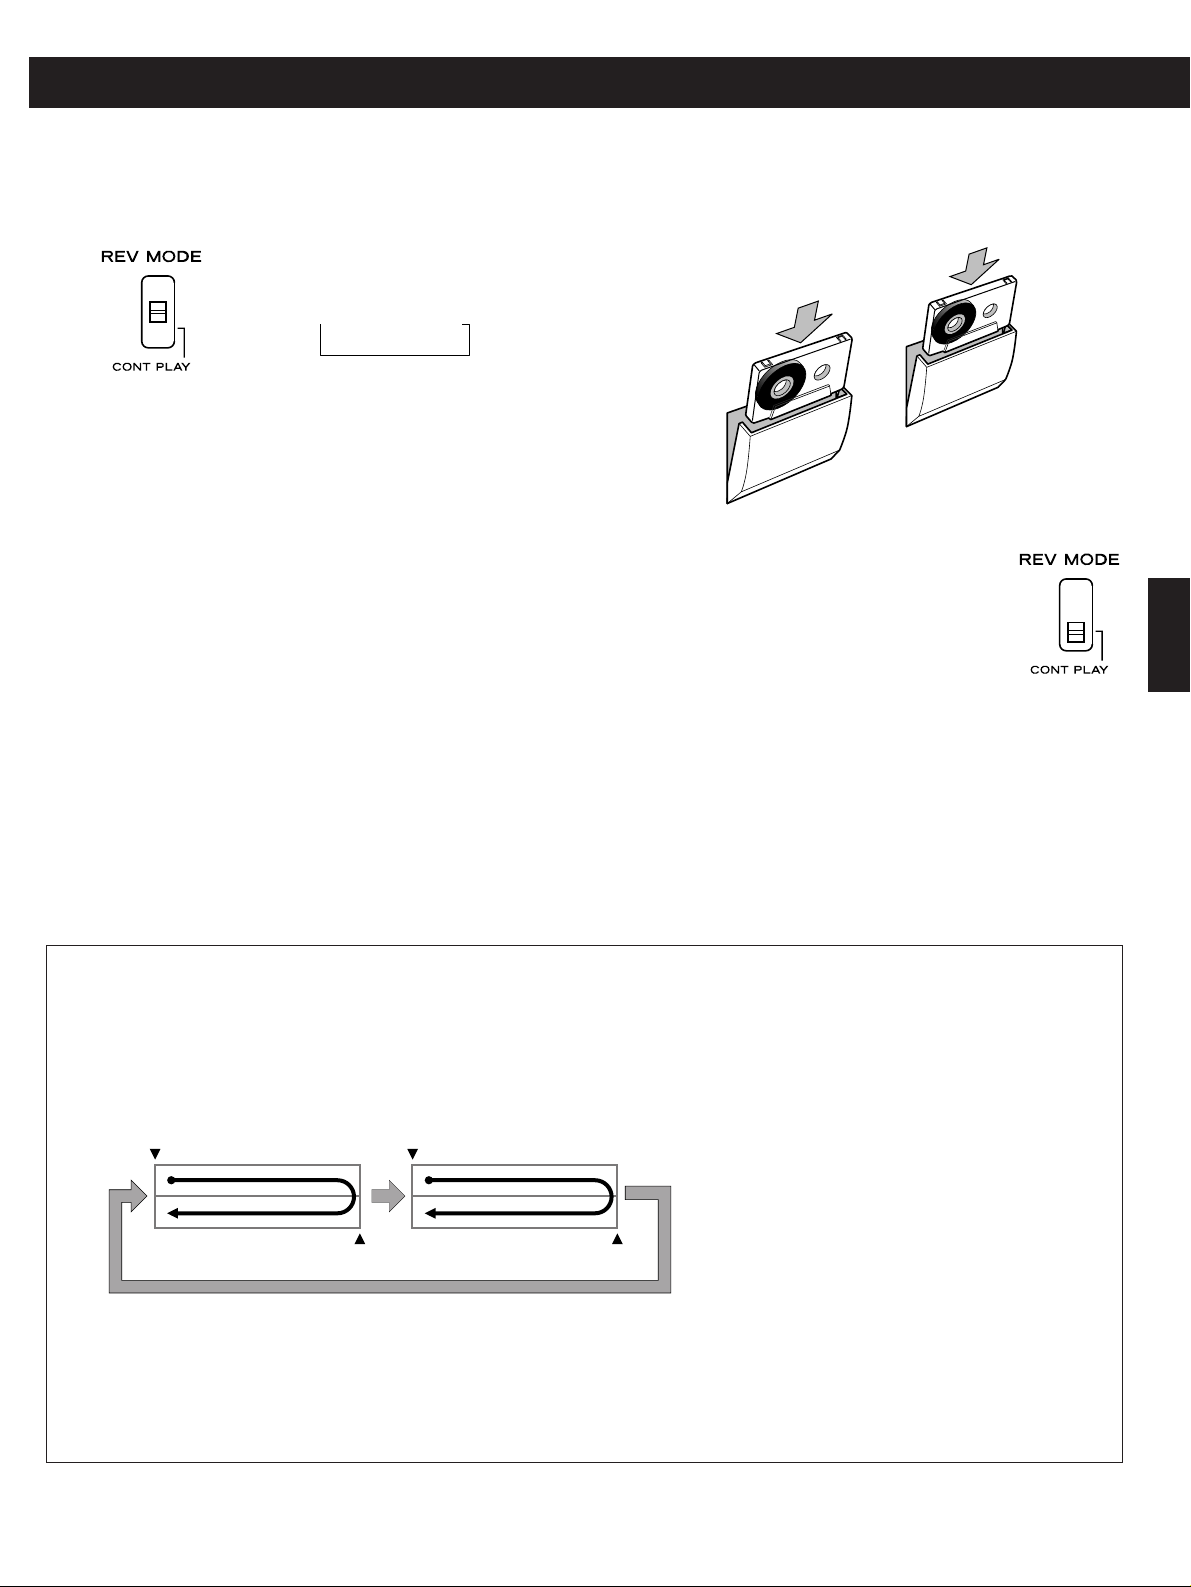
2. Set the REV MODE switch to the required tape travel
mode.
3. Load a pre-recorded cassette tape in TAPE I or II.
4. Select the appropriate DOLBY NR system.
5. Press the
Ó or Á button of TAPE I or II to start
playback.
6. Adjust the volume with the amplifier's volume control.
… To stop playback, press the STOP button.
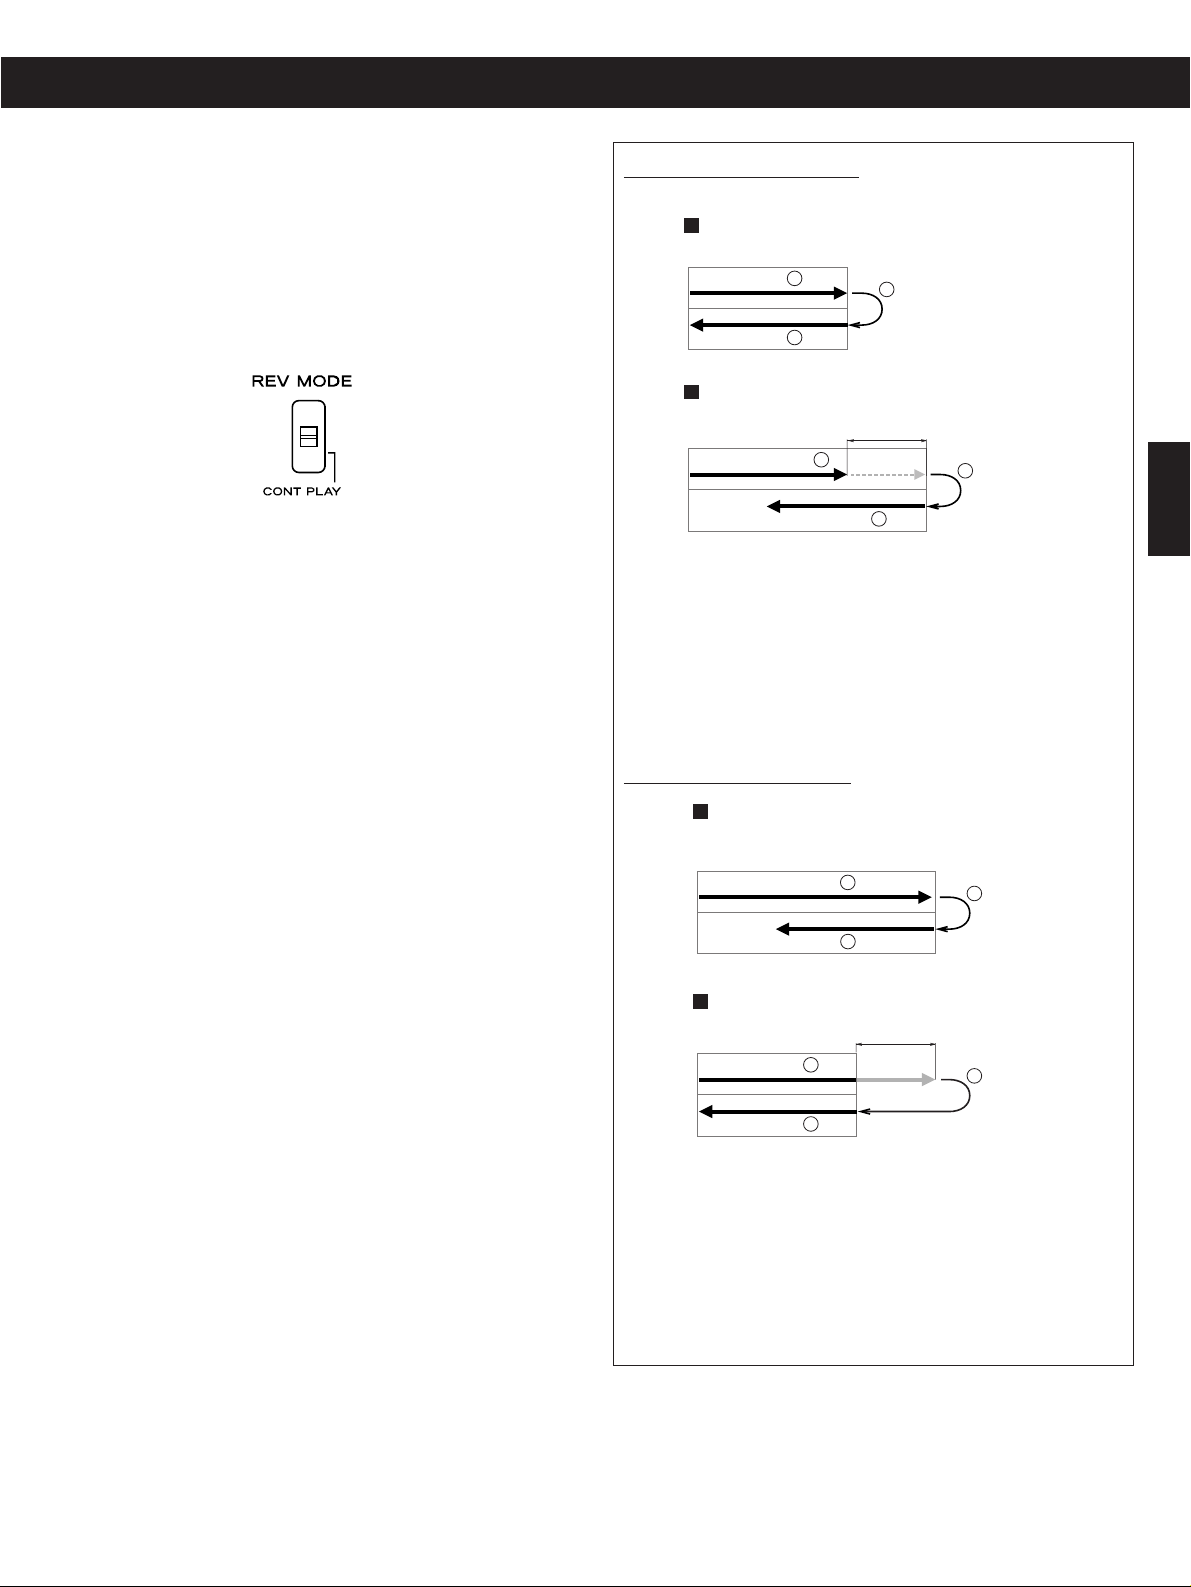
Continuous Playback
1. Load pre-recorded cassette tapes in TAPE I and TAPE ll
2. Select the appropriate DOLBY NR system.
3. Set the REV MODE switch to the
CONT PLAY
(
ä
)
position.
4. Press the Ó or Á button of the deck
to be played back first.
5. Tapes will be played back continuously. See the chart
below;
… To stop continuous play before the tapes are played back 5
times, press the STOP button of either deck.
Continuous Playback Operation
Pitch Control (TAPE I only
)
Using the Pitch Control knob, the pitch (tape speed) of TAPE I
can be changed.
The center is the normal speed. Turning the knob toward +(
-
)
increases (decreases) the tape speed, plus or minus 10%
compared with the normal speed.
… If a Dolby NR encoded tape is played back with Pitch
Control, the sound may not be reproduced properly.
1. When playback starts in the forward
direction, at the end of Side A, the tape is
reversed to play the other side, Side B.
At the end of Side B, TAPE I is released.
If you start playback from Side B, TAPE I is
released at the end of Side B.
2. Control is transferred to TAPE Il, and
playback starts from Side A.
At the end of Side A, it is reversed and Side
B is played back.
3. At the end of Side B of TAPE II, control is
transferred back to TAPE l, and the
playback of Side A starts.
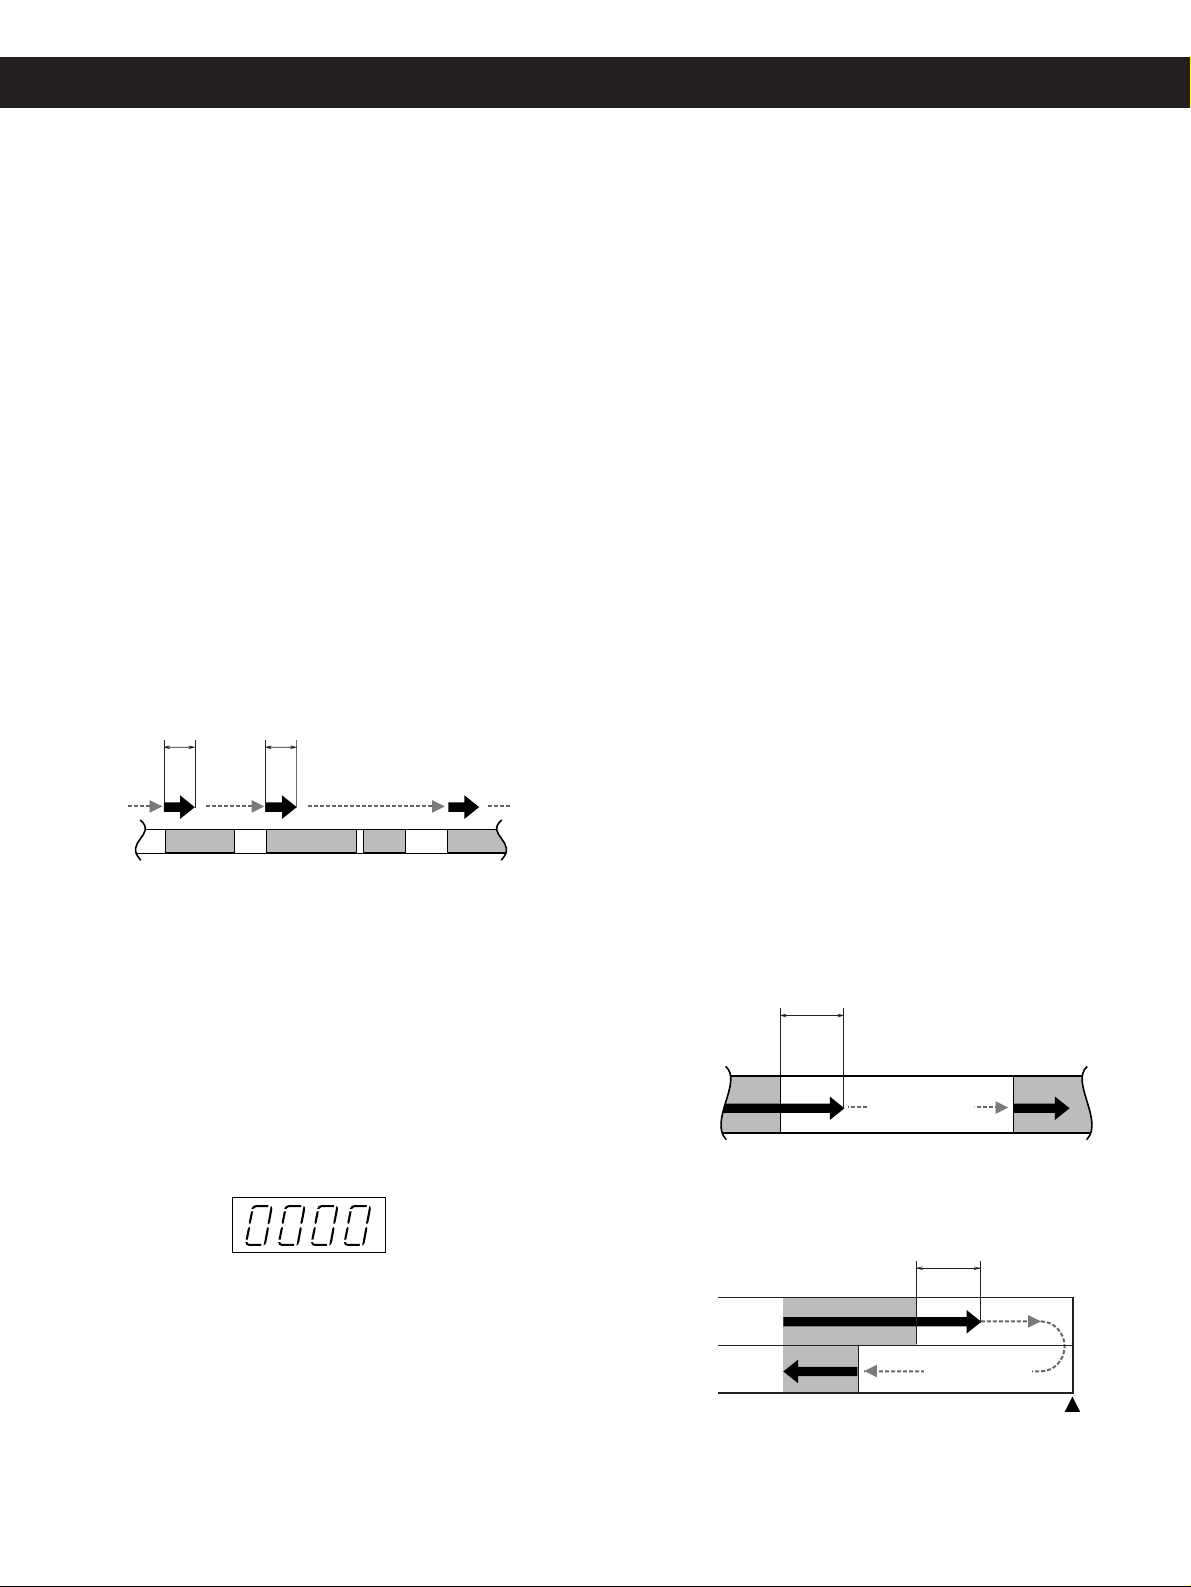
… TAPE I and II will be played back 5 times in
total, then this function will stop.
Ä: One Side Playing
ï
Ë
ä
Ë: SideA ∑ SideB ∑ Stop
ä: ∑ SideA ∑ SideB
The tape will stop after 5 cycles.
ï
Ë
ä
Tape I Tape II
Side A Start
Side B Start
Side A Start
Side B Start
8
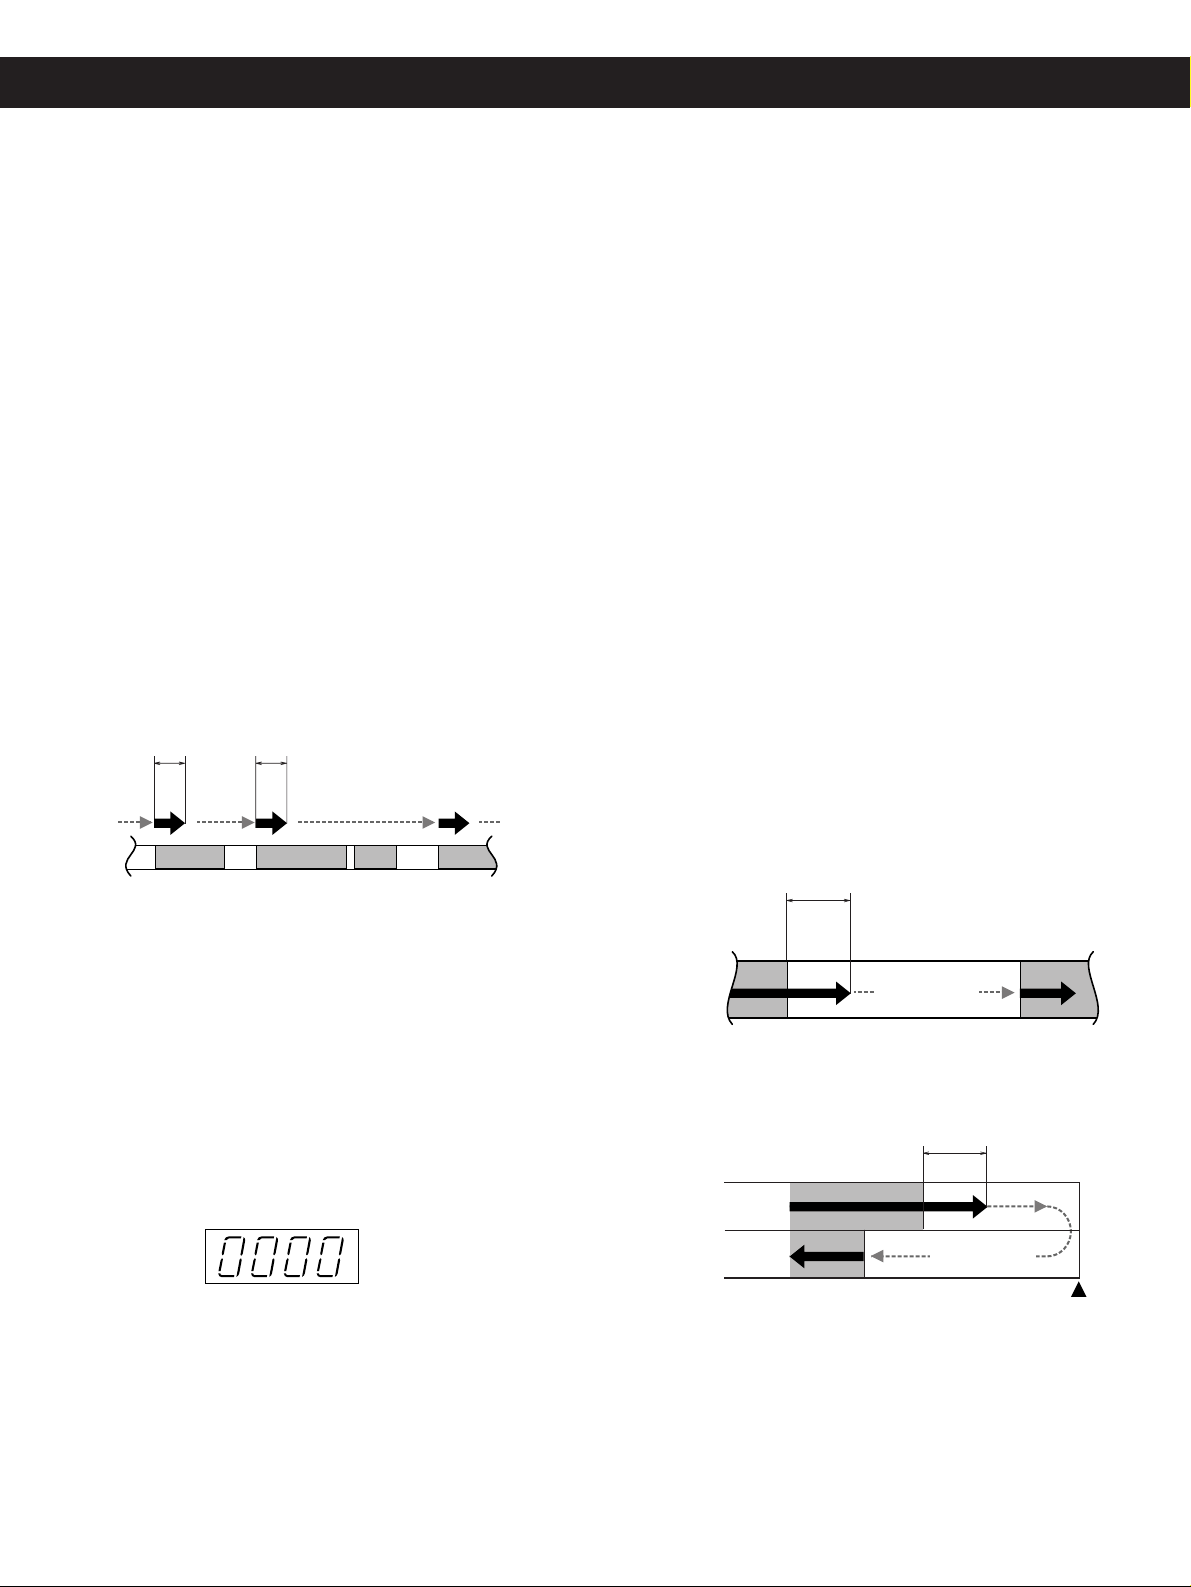
Intro Check
This function can be used to search for a specific track by
playing the beginning of each track for 15 seconds.
Press the INTRO CHECK button.
The deck will fast-wind to the beginning of a track, play the first
15 seconds (approx.), and fast-wind to the beginning of the
next track, from which point the cycle starts again.
… If the play button of TAPE I is pressed during the Intro Check
operation, playback will resume.
… If the STOP button is not pressed, the Intro Check function is
released depending on the setting of the REV MODE switch.
Ä: Released when tape reaches the end.
Ë: Released when tape reaches the end of the
reverse side.
ä: Released after completing one full loop of
the tape from the initial side.
Blank Scan
This function is provided so that the deck will skip long blank
portions during playback.
1. During playback, press the BLANK SCAN button (the
indicator lights).
If a blank section of more than about 10 seconds is detected
during playback, the deck will enter the fast-forward mode
automatically. When the beginning of the next recorded
section is detected, playback will resume.
2. To release blank scan, press the BLANK SCAN button
again (the indicator goes off).
Notes:
… When the REV MODE switch is set to the Ë or ä
position, the tape will be fast-forwarded at the end of either
side of the tape after running the tape for 10 seconds
without any sound.
… To check if the tape is entirely blank, start blank scan at the
beginning of either side with the REV MODE switch set to
the
ä position.
… If there are sections of tape recorded at a low signal level,
because of fading out, etc., these sections may be detected
as blank and blank scan may start. In this case, the music
will be interrupted for about 10 seconds.
Playback
Multi-Counter
Tape Counter Mode
In this mode, the counter functions as a conventional tape
counter, counting up when the tape is moving forward and
down when the tape is being rewound. The display can be
cleared by pressing the CLEAR button, which resets the counter
index to "0000".
Play
15sec.
15sec.
Fastforward
BlankTune
4 seconds' blank needed.
Fastforward
*More than approx.
Play
Side A
Side B
No sound
for 10 seconds
Play
Fast-forward
BlankTune Tune
No sound
for 10 seconds
Play
Fast-forward
Play
Side B Start
ENGLISH
9
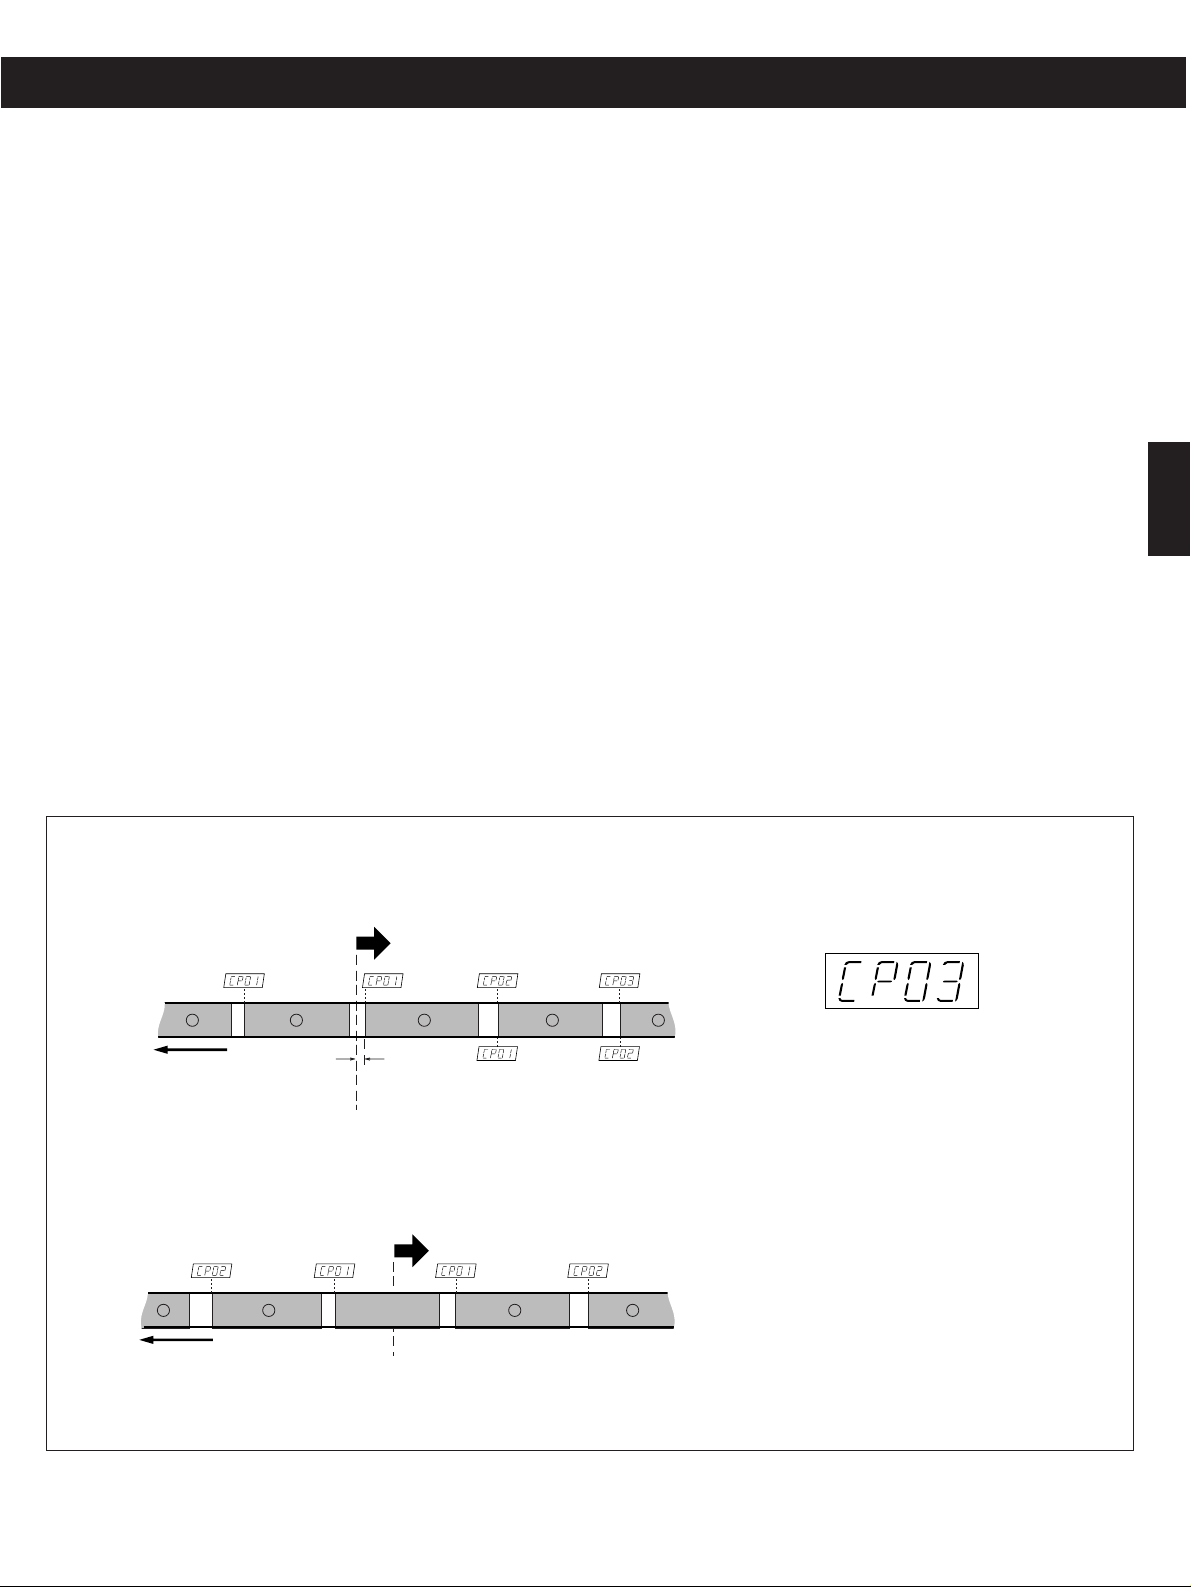
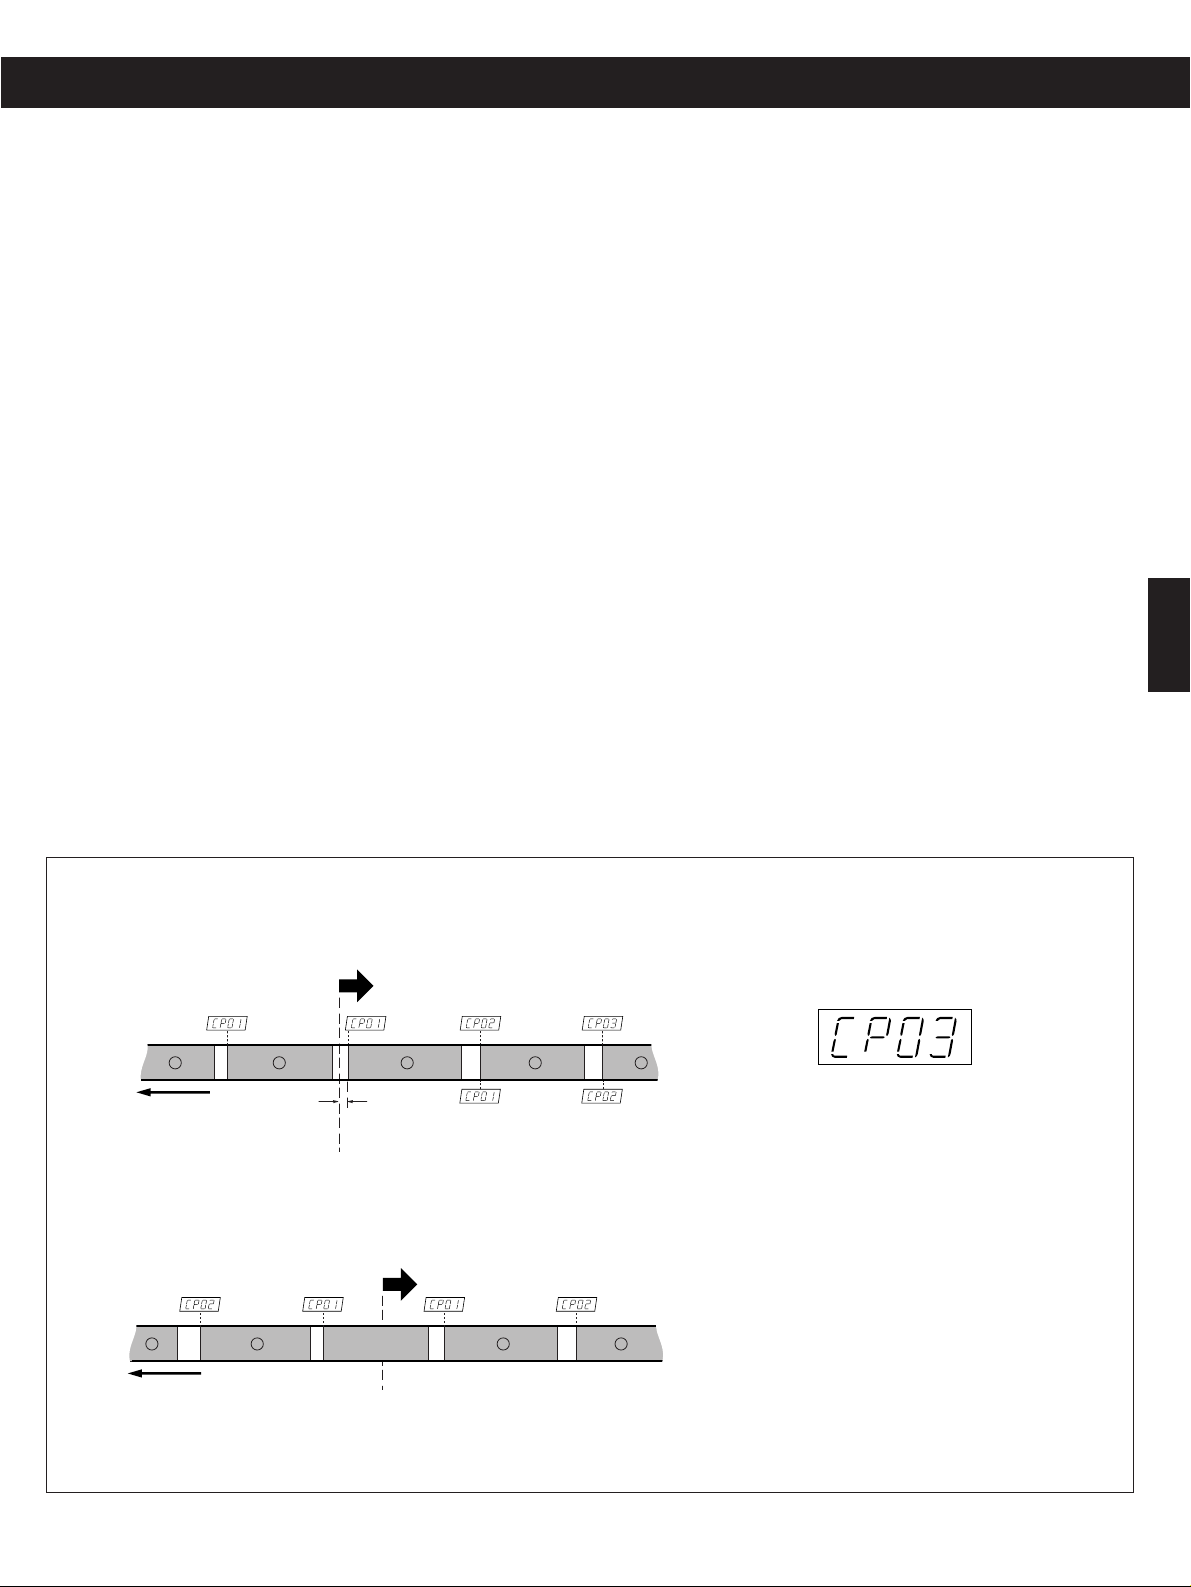
How to Select any Required Tune Using CPS
CPS (Computomatic Program Search
)
CPS allows the selection and playback of any track up to 20
tracks ahead or before the one being played. This function
operates by detecting blank spaces of at least 4 seconds
between tracks. These blanks can be created by using the REC
MUTE Function.
During forward playback, press theÔ or button
repeatedly until the number of tracks to be skipped appears
in the counter display.
Use the button to search a track ahead of the current
track, and
Ô button for a track before the current track.
Notes on CPS
CPS operates by detecting and counting blanks of about 4
seconds, the standard interval between tracks. Therefore, with
the following types of tapes, search functions may not work
correctly.
… When the intervals between tracks cannot be detected.
- Intervals of less than 4 seconds.
- High levels of noise in intervals.
-Long low level sections (in classical music, etc.)
This problem can be corrected by using the REC MUTE
function.
Note:
To simplify the description, the explanation is given for "forward
playback"
(
Á direction). A similar procedure should be used for
"reverse playback".
… If the required CPS number setting is exceeded by , use
the
Ô button to count down the CPS number until the
required CPS number is displayed.
… When the button is pressed, the next track is counted as
"1" and when the
Ô button is pressed, the current track is
counted as "1 ".
The tape is fast-wound to detect blanks between tracks until the
required track is reached. Then playback starts from the
beginning of the designated track.
Example*:
To select the 3rd tune from the
current tape position, select
"CP03".
If "t" is less than 4 seconds, it
will not be counted as a blank.
In this case, designate "CP02"
instead of "CP03" to select the
3rd tune.
Multi-Counter
PLAY
1 1 2 32
Direction of
tape travel
Direction of
tape travel
Current Tape Position
1 1 22
Current Tape Position
t
PLAY
Example
*
Recording
10
Recording with TAPE I and TAPE ll
Recording from a Stereo System
1. Press the POWER switch.
Select the source of the stereo system to record.
2. If you want to make a bi-directional recording, set the
REV MODE switch to the
Ë position.
3. Load a recordable cassette tape in TAPE I or II.
… If the safety tabs of the cassette tape have been broken off,
block the holes with adhesive tape.
4. Select the desired DOLBY NR system.
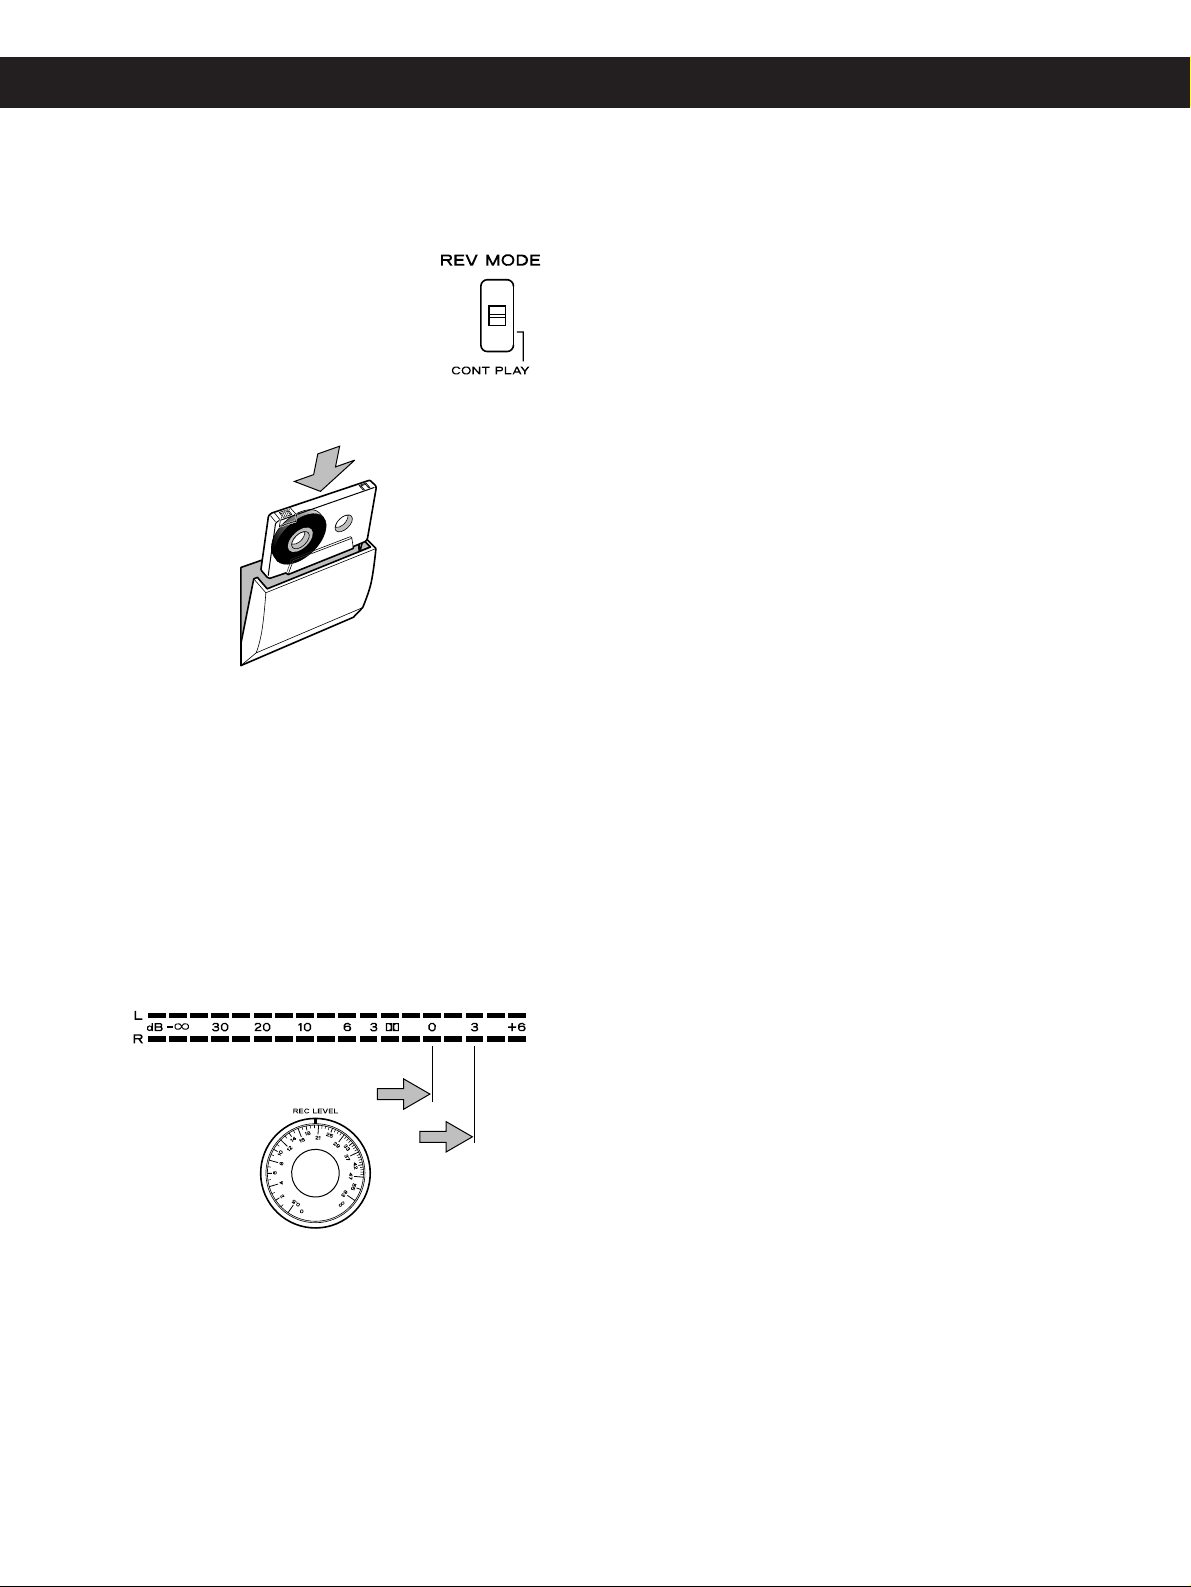
5. Press the RECORD button.
The deck enters the record-pause mode. and π
indicators light.
6. Adjust the recording level with the REC LEVEL control.
The loudest sound should briefly reach around the "0 dB"
point (for Normal or Chrome tapes) or the "+3 dB" point (for
Metal tapes).
7. Press the PAUSE button to start recording.
… To stop recording temporarily, press the PAUSE button. To
restart the tape, press the PAUSE button or play button.
… During the record-pause mode, if the button whose Ó/Á
indicator is lit is pressed, recording will start. However, if the
button whose
Ó/Á indicator is not lit is pressed, only the
tape direction will be changed; to restart the tape, press the
button again.
… To stop recording, press the STOP button.
Erasing
Anything previously recorded on the tape will be automatically
erased when you make a new recording on it. It can also be
erased by "recording" on it with the REC LEVEL control set to
"
‹".
Record Muting Operation (TAPE I and TAPE Il
)
Automatic spacing operation for 4-second blanks (during
recording)
1. Press the REC MUTE button during recording.
The tape movement continues and a blank space of about 4
seconds is recorded (the RECORD indicator blinks). Then the
deck enters the record-pause mode automatically (both the
RECORD and PAUSE indicators light).
2. Press the PAUSE button to restart recording.
The PAUSE indicator goes off.
… Automatic spacing operation for 4-second blanks (during
record-pause)
In the record-pause mode, pressing the REC MUTE button
will initiate the above record-muting operation automatically.
The deck then returns to the record-pause mode.
… For a blank of more than 4 seconds
During recording, hold the REC MUTE button depressed for
more than 4 seconds. A blank space will be made as long as
the button is pressed. Release the button to enter the recordpause mode. To restart recording, press the PAUSE button.
… For a blank of less than 4 seconds
After pressing the REC MUTE button during recording, press
the PAUSE button before 4 seconds has elapsed. The deck
will stop and enter the record-pause mode. To restart
recording, press the PAUSE button again.
Note:
During record muting operation (while the RECORD indicator is
blinking), pressing the REC MUTE button again will release the
record muting operation and recording will restart without
stopping the tape.
… Set to the Ä position if
recording is to be made on
a single side of the tape.
ï
Ë
ä
Normal/CrO2 Tape
Metal Tape
ENGLISH
11
Parallel Recording
A single program source can be recorded onto the two cassette
tapes simultaneously.
1. Follow the steps 1 to 6 described in "Recording with
TAPE I and TAPE Il" except that in step 3, load cassette
tapes into both TAPE I and TAPE Il. (See page 10
)
2. Press the PARALLEL REC button.
Notes:
… Recording will start in the direction indicated by the direction
indicator; therefore, set the direction beforehand.
… During recording, only following buttons are operational:
TAPE I : STOP button
TAPE Il : STOP, REC MUTE and PAUSE buttons
… To stop recording, press the STOP button. Both TAPE I and
TAPE Il will stop.
MIC/LINE Mixing Recording (TAPE I and TAPE Il
)
Using this unit, you can mix and record the MIC inputs and
LINE IN inputs.
1. Plug microphones equipped with a standard phone plug
into the MIC jack on the front panel of this unit.
2. Use headphones to monitor the inputs.
This prevents acoustic feedback, 'howling', that might occur
if you listen to the sound from the speakers.
3. Press the RECORD button.
The deck enters the record-pause mode.
4. Balance the relative levels of MIC inputs and LINE IN
inputs with MIC LEVEL and REC LEVEL knobs.
Be sure to keep the total input level within the limitations
indicated by the peak level meters.
5. Press the PAUSE button to start recording.
Continuous Recording (TAPE I to TAPE Il
)
1. Load two recordable cassette tapes into TAPE I and ll.
2. Set the NR SYSTEM and REC LEVEL as required.
3. Set the REV MODE switch to the
ä
position.
4. Press the RECORD button, then
PAUSE (or play) button of TAPE I to
start recording.
After recording with TAPE I is
completed, TAPE ll starts recording
automatically in the forward direction.
5. To clear the continuous recording mode, press the STOP
button.
Notes:
… In continuous recording, since recording with TAPE II always
begins in the forward direction, make sure the cassette tape
loaded in TAPE Il can be recorded on both sides.
… If the tape running direction is set to reverse side of TAPE l,
recording will be done on only the reverse side of the tape
loaded in TAPE l.
… Continuous recording from TAPE II to TAPE I is impossible.
MIC/LINE Mixing Recording
ï
Ë
ä
LINE
MIC
W-860R
Dubbing
12
Dubbing (Copying from TAPE I to TAPE ll
)
How to dub the entire recorded section of a pre-recorded
cassette
1. Load the pre-recorded cassette tape into TAPE I and a
recordable cassette tape into TAPE Il.
2. Set the REV MODE switch to the desired position.
Ä: Dubbing will be performed for one side only.
Ë: Dubbing will be stopped after both sides have
been dubbed.
3. See that both decks are set to the Á direction.
4. Press the DUB START HIGH or NORMAL button to start
dubbing.
NORMAL:
Dubbing is performed at normal speed.
HIGH: Dubbing is performed at the twice of
normal speed.
… After dubbing is completed, both decks stop automatically,
in accordance with the setting of the REV MODE button. To
stop dubbing, press the STOP button of TAPE I or TAPE II.
… If one of the tapes reaches the end, both decks will stop.
… The peak level meter indicates the TAPE I signal levels.
Recording level of TAPE II cannot be changed.
Manual Editing with PAUSE (TAPE Il only)
During normal-speed dubbing, you can edit the dubbed tape as
required using the PAUSE button. For example, you can record
only the required tracks from TAPE I to TAPE Il skipping
unwanted tracks.
… Press the PAUSE button of TAPE Il to enter the record-
pause mode. TAPE l continues playback. When TAPE I
reaches a section you want to dub, press the PAUSE button
(
TAPE Il)again to restart recording on TAPE Il.
CAUTION:
Recording pre-recorded tapes, records, or other published
or broadcast material may infringe copyright laws. Check
before recording.
Notes:
… The settings of the REC LEVEL control and DOLBY NR
switch are ignored during dubbing as they have no effect.
… During NORMAL speed dubbing, only the STOP button of
TAPE I, and the STOP and PAUSE buttons of TAPE Il work.
… During HIGH speed dubbing, only the STOP button works.
… The sound quality of the dubbed tape may be slightly
worse than that of the original tape. For this reason,
multigeneration dubbing is not recommended.
… If there is a TV set near the deck during high speed
dubbing, the TV's horizontal scanning frequency may be
recorded on the tape. In this case, dub at normal speed,
switch off the television or keep the deck away from the
TV.
ENGLISH
13
Synchro Reverse Dubbing
The SYNC REV button reverses both decks at exactly the same
time during dubbing. This function is convenient when the
lengths of tapes are different.
1. Set the tape running direction of both decks to the Á
(forward) direction, and set the REV MODE switch to the
Ë position.
2. Press the SYNC REV button (the indicator will light).
3. Press the DUB START button (HIGH or NORMAL).
4. To stop dubbing, press the STOP button of TAPE I or
TAPE II.
Notes:
… Synchro Reverse Dubbing mode can be entered only when
the REV MODE switch is in the
Ë position and the
direction indicators of both TAPE I and TAPE Il are
Á.
…
If the original tape is shorter than the dubbed tape, blank
sections will be left at both ends of the dubbed tape. To
prevent this, use tapes with the same length as far as
possible.
TAPE I shorter than TAPE II
➀
When TAPE I reaches the end of the forward side, TAPE I
stops and TAPE II enters the "no signal recording" mode.
➁
When TAPE II reaches the end, both TAPE I and ll are
reversed simultaneously. TAPE l starts reverse play and
TAPE II resumes recording.
➂
When TAPE I reaches the end of the reverse side, both
TAPE I and ll stop simultaneously.
TAPE I longer than TAPE II
➀
When TAPE II reaches the end of forward side, TAPE Il
enters the record-pause mode, while TAPE I continues
playback.
➁
When TAPE I reaches the end, TAPE I starts reverse play
and TAPE II starts recording .
➂
When TAPE Il reaches the end of the reverse side, both
TAPE I and ll stop simultaneously.
ï
Ë
ä
Tape I
(Playback)
1
Play
3
Play
Tape II
(Recording)
Recording
No Signal Recording
1
Reverse
2
Reverse
2
Recording
3
Tape I
(Playback)
Play
Play
1
3
Reverse
2
Tape II
(Recording)
Recording
1
No Recording
Reverse
2
Recording
3

Timer Controlled Operation
14
Timer Recording
Recording a broadcast program
1. Connect this unit and stereo system to a commercially
available audio timer.
2. Set the power switches of all components to ON.
3. Load a recordable cassette tape(s) in TAPE I or ll (or both
decks for continuous recording).
4. Set the REV MODE switch to the required position.
Ä: SideA
Ë: SideA ∑ SideB
ä: Continuous Recording (TAPE I to TAPE II
)
5. Set the TIMER switch to the REC
position.
6. Tune to the broadcasting station to be
recorded.
7. Press the RECORD button of the deck to
be recorded to set the deck to the recordpause mode.
8. Adjust the recording level.
9. Set the DOLBY NR switch as required.
10. Set the tape running direction of TAPE l and/or II.
11. Set the audio timer to the required start (power on) and stop
(power off) times. When this setting is completed, the power
to all components will be switched off .
When the preset start time is reached, power will be supplied
and recording will start automatically.
… By using the timer, continuous recording with cassette
tapes loaded in both TAPE I and ll, and the REV MODE
switch in the
ä position, is possible. For continuous
recording, see page 11.
Timer Playback
1. Connect this unit and stereo system to a commercially
available audio timer.
2. Set the power switches of all components to ON.
3. Load a prerecorded cassette tape in TAPE I or ll (or both
decks for continuous playback).
4. Set the REV MODE switch to the required position.
Ä: SideA
Ë: SideA ∑ SideB ∑ Stop
ä: Continuous Playing (TAPE I to TAPE II
)
5. Set the TIMER switch to the PLAY position.
6. Set the DOLBY NR switch as desired.
7. Set the tape running direction in which
playback is to start for TAPE I and/or ll.
8. Set the audio timer to the required start
(power on) and stop (power off) times.
When this setting is completed, the power to all components
will be switched off.
When the preset start time is reached, power will be supplied
and playback will start automatically.
Notes:
… When cassette tapes are loaded in both decks with the REV
MODE switch in either
Ä or Ë position, TAPE I will start
playback first because it has priority.
… When cassette tapes are loaded in both decks with the REV
MODE switch in the
ä position, continuous playback is
possible. See page 7.
… Be sure to set the TIMER switch to the OFF position after
timer operation is completed.
By using this unit with an audio timer, tapes can be recorded or played back at any preset time.
Connection
Audio Timer
AC Power
W-860R
Amplifier
Tuner

ENGLISH
15
Troubleshooting Specifications
Basic troubleshooting of a cassette tape deck is similar to
troubleshooting of any other electrical or electronic equipment.
Always check the most obvious possible causes first. To give
you a few ideas of what to look for, check the following:
No power
® Is the power cord connected?
The deck starts to play suddenly
® Set the TIMER switch to OFF.
No audio output
® Check the connections to the stereo system.
Low sound quality
® If the heads are dirty or magnetized, clean/demagnetize the
heads.
® Has the correct NR System been selected?
Strange Sound
® Set the PITCH CONTROL knob to the center (normal
speed).
Impossible to enter the record mode
® If the record protection tabs of the cassette tape are
broken off, cover the hole with adhesive tape.
® Turn the REC LEVEL knob to the right.
Remote control unit operation is impossible.
® Press the power switch of the main unit.
® Insert or change the batteries of the remote control unit.
Track System:
4-track, 2-channel stereo
Heads:
Deck l; 1 Erase and 1 Record/ Playback (rotating)
Deck II; 1 Erase and 1 Record/ Playback (rotating)
Type of Tape:
Cassette tape C-60 and C-90 (Philips type
)
Tape Speeds:
4.76 cm/sec (1-7/8 ips)
9.5 cm/sec (3-3/4 ips; in Hi-Speed Dub)
Pitch Control:
±
10%
Motors:
2 DC Servo motors (1 ea. Deck)
Wow and Flutter (WRMS):
0.09%.
Frequency Response (Overall, -20 dB):
25-19,000 Hz, Metal tape
25-18,000 Hz, CrO
2 tape
25-17,000 Hz, Normal tape
Signal-to-Noise Ratio (Overall):
59 dB (NR off, 3% THD Level, Weighted)
69 dB (Dolby B NR on, over 5 kHz
)
79 dB (Dolby C NR on, over 1 kHz)
Fast Winding Time:
Approximately 110 seconds for C-60
Inputs:
Line: 97 mV, 50k ohms
Mic: 0.38 mV, 200 ohms
Outputs:
Line: 0.52 V for load impedance of 50k ohms or more
Headphones: 1 mW/8 ohms
Power Requirements:
120/230 V AC, 50/60 Hz (General Export Model)
120 V AC, 60 Hz (U.S.A./Canada Model)
230 V AC, 50 Hz (Europe/UK Model)
240 V AC, 50 Hz (Australia Model)
Power Consumption:
22 W
Dimensions (W x H x D):
435 x 127 x 292 mm
(
17-1/8" x 4-15/16" x 11-1/2"
)
Weight (net):
4.0 kg (8-13/16 Ibs.
)
Standard Accessories:
Wireless Remote Control Unit (RC-615)
Battery (SUM-3,"AA","R6"type) x 2
Input-output connection cords
… Improvements may result in specification or feature changing
without notice.
Dolby noise reduction and HX Pro headroom extension
manufactured under license from Dolby Laboratories
Licensing Corporation. HX Pro originated by Bang & Olufsen.
"DOLBY", the double-D symbol
∂ and "HX PRO" are
trademarks of Dolby Laboratories Licensing Corporation.
Chargement d'une cassette
1. Utiliser un doigt ou un crayon
pour tourner le moyeu de la
cassette et rattraper le jeu de
la bande.
… Eviter de toucher la bande. Les
empreintes digitales attirent la
poussière et les sale-tés.
2. Appuyer sur la touche EJECT
pour ouvrir le volet du
compartiment cassette.
… Le porte cassette ne peut pas
être ouvert pendant
l'enregistrement ou la lecture.
3. Charger la cassette avec son
côté ouvert dirigé vers la bas.
4. Fermer gentiment le volet du
compartiment.
Avant utilisation
16
Raccordements
Sélection de bande:
Pour que la fonction de sélection automatique de bande agisse
correctement, les bandes à formule métal et chrome (cobalt)
doivent posséder des trous d'identification.
Manipulation des cassettes
Ne pas ranger les cassettes dans les endroits suivants:
… Au-dessus d'appareils de chauffage, en plein soleil ou des
températures élevées.
… Près de haut-parleurs, sur un téléviseur ou un amplificateur
ou des endroits où elles pourraient être exposées à des
champs magnétiques puissants.
… Dans des endroits sales et poussiéreux ou exposés à
l'humidité.
… Eviter de faire tomber des cassettes ou de leur faire subir des
chocs excessifs.
… Comme les bandes des cassettes C120 sont peu résistantes
et peuvent facilement se coincer dans le mécanisme de
transport, ne pas les utiliser.
Lire ceci avant de faire fonctionner l'appareil
… Choisir avec soin l'endroit où vous placerez votre appareil.
Eviter de le placer directement au soleil ou près d'une source
de chaleur. Eviter aussi les endroits sujets à des vibrations, à
de la poussière excessive, à la chaleur, au froid ou à
l'humidité. Toujours le garder éloigné de sources de
bourdonnements telles que des transformateurs ou moteurs.
… Ne pas ouvrir le coffret car ceci risquerait de provoquer des
dommages aux circuits ou des chocs électriques. Si un objet
rentre dans l'appareil, contacter votre revendeur.
… Lors du débranchement du cordon d'alimentation de la prise
murale, toujours tirer sur la fiche et non sur le cordon.
… Ne pas essayer de nettoyer l'appareil avec des solvants
chimiques car ceci pourrait endommager le fini de l'appareil.
Utiliser un chiffon propre et sec.
… Garder soigneusement ce manuel d'instructions pour une
référence ultérieure.
Avant de faire des raccordements, bien lire le manuel
d'instructions de l'amplificateur stéréo et couper l'alimentation
de l'amplificateur stéréo et du lecteur.
Métal
(
2
(
Type#
(
Type%
Type%^
)
)
)
CrO
Normale
REC PLAY
Amplificateur stéréo
W-860R
Price secteur CA
FRANÇAIS
17
Mise en place des piles
1. Retirer le couvercle du compartiment des piles.
2. Introduire deux piles "AA" (R6, SUM-3).
S'assurer que les piles sont correctement mises en
respectant les polarités plus
± et moins — .
3. Fermer le couvercle jusqu'au déclic.
Remplacement des piles
Si vous remarquez que la distance entre le boîtier de
télécommande et le lecteur devient plus courte pour un
fonctionnement correct, ceci indique que les piles sont usées.
Dans ce cas, remplacer les piles par des nouvelles.
Précautions à observer concernant les piles
… Bien placer les piles en respectant les polarités plus ± et
moins
— .
… Utiliser des piles du même type. Ne jamais essayer d'utiliser
des types de pile différents ensemble.
… Des piles ou des batteries peuvent être utilisées. Se référer à
leurs étiquettes pour les précautions à respecter.
… Si le boîtier de télécommande n'est pas utilisé pendant une
longue période (pluss d'un mois), retirer les piles du boîtier
de télécommande pour éviter des fuites de pile. Si elles
coulent, essuyer le liquide dans le compartiment des piles et
remplacer les piles par des neuves.
… Ne pas chauffer, démonter les piles ni les mettre au feu.
Le boîtier de télécommande fourni permet la commande à
distance defourni permet la commande à distance de l'appareil.
Pour l'utilisation du boîtier de télécommande, le diriger vers le
détecteusation du boîtier de télécommande, le diriger vers le
détecteur de télécommande du panneau avant de l'appareil.
… Même si le boîtier de télécommande est activé dans la zone
de fonctionnement, la commande à distance peut être
impossible s'il y a des obstacles entre le lecteur et le boîtier
de télécommande.
… Si le boîtier de télécommande fonctionne dans le voisinage
d'autres appareils générant des rayons infrarouges, ou si
d'autres télécommandes utilisant des rayons infrarouges
sont utilisées près du lecteur, le lecteur peut de ne pas bien
fonctionner. Dans la situation inverse, les autres apaareils
peuvent ne pas bien fonctionner.
Boîtier de télécommande
Les têtes et le chemin de la bande doivent être nettoyés et
démagnétisés périodiquement.
Nettoyage du chemin de bande
… Appliquer un liquide de nettoyage de tête sur le cotontige
spécial ou sur un chiffon doux et frotter légèrement les têtes,
cabestans et toutes les pièces de métal du chemin de bande.
… Nettoyer aussi le galet presseur avec un liquide de nettoyage
pour caoutchouc.
Démagnétisation des têtes
S'assurer que l'alimentation est coupée, puis démagnétiser les
têtes avec le démagnétiseur.
Pour plus de détails sur son utilisation, lire son manuel
d'instructions.
Attention
Si la surface de l'appareil devient sale, nettoyer celle-ci à l'aide
d'un chiffon doux ou utiliser un liquide de nettoyage neutre. La
nettoyer entièrement. Ne pas utiliser de diluant, de benzine ou
d'alcool car ils risquent d'endommager la surface de l'appareil.
Entretien
18
Nom de chaque commande
Commutateur de réduction de bruit ( DOLBY NR )
Touche d'éjection ( I )
Touche d'enregistrement silencieux
Touche de pause
*Touches de commande des bandes
Touche d'enregistrement
Prise de microphone
Sélecteur de minuterie
Commande de mode d'inversion
Commande du niveau d'enregistrement
Commande de niveau micro
Porte-cassette ( Platine I )
Interrupteur d'alimentation
Prise de casque
Bouton de réglage de l'acuité du son
Touche de balayage des blancs
Touche d'inversion synchronisée
Touche de vérification d'introductions
Touche de remise à zéro du compteur ( I )
Touche d'enregistrement parallèle
*Touches de commande des bandes
Á :Touche de lecture avant
Ó :Touche de lecture inverse
ª :Touche d'arrêt
Ô:Touches de rembobinage
Touche d'éjection ( II )
:Touches d'avance rapide
Touche de lacement de copie
Touche de remise à zéro du compteur ( II )
Porte-cassette ( Platine II )
Indicateur de niveau crête
Indicateur de sens de défilement
SYNC REV BLANK SCAN
Indicateurs de REC/PLAY ( I )
Affichage du compteur ( I )
Indicateurs de lacement de copie
de la bande et pause( I )
Indicateur de SYNC REVERSE
PARALLEL
REC
HIGH DUB
PLAY
NORM DUB
Indicateurs de REC/PLAY ( II )
REC
PLAY
Affichage du compteur ( II )
Indicateur de PARALLEL REC
Indicateur de BLANK SCAN
Indicateur de sens de défilement
Touche d'enregistrement silencieux
de la bande et pause( II )
Touche de vérification d'introductions
Touche d'inversion synchronisée
Touche de balayage des blancs
Touche de lacement de copie
Touche de pause
Touche d'enregistrement
Touche de remise à zéro du compteur
* Touches de commande des bandes
FRANÇAIS
19
Lecture
Lecture avec la Platine I ou la Platine Il
1. Mettre l’appareil sous tension.
2. Mettre la commande REV MODE sur la position requise.
3. Mettre une cassette préenregistrée dans la Platine I ou
dans la Platine Il.
4. Sélectionner le système DOLBY NR voulu.
5. Appuyer sur la touche
Ó ou Á de la Platine I ou de la
Platine Il pour lancer la lecture.
6. Régler le volume avec la commande de l’amplificateur.
… Pour arrêter la lecture, appuyer sur la touche STOP.
Lecture continue
1. Mettre une cassette préenregistrée dans la Platine I et
dans la Platine Il.
2. Sélectionner le système DOLBY NR voulu.
3. Mettre la commande REV MODE sur la
position CONT PLAY
(
ä
)
.
4. Appuyer sur la touche
Ó ou Á de la
platine devant être utilisée la première.
5. Les bandes seront lues d’une manière continue.
… Pour arrêter la lecture continue avant que les bandes soient
lues 5 fois, appuyer sur la touche STOP d’une des platines.
Lecture Continue
Réglage de l'acuité du son (Platine I seulement)
En ublisant le bouton PITCH CONTROL, la commande de
vitesse de la Platine I (vitesse de la bande) dans le mode de
lecture est possible. La gamme variable de la vitesse de bande
est plus ou moins 10% de la vitesse normale. Avec cette
commande dans sa position centrale avec déclic "0", la vitesse
de la bande sera la vitesse normale. Tourner cette commande
vers + (
-
) augmente (diminue) la vitesse de la bande.
… En utilisant PITCH CONTROL, s’assurer d’utiliser des bandes
non codées Dolby NR. Si une bande codée Dolby NR est lue,
le son peut ne pas étre reproduit correctement.
1. Lorsque la lecture de la bande est lancée
dans le sens avant, le sens de défilement
est inversé a la fin de la bande et la lecture
continue sur l’autre face. A la fin de cette
face, la Platine I s’arrête.
Lorsue la lecture de la bande est lancée
dans le sens inverse, la Platine I s’arrête à
la fin de la bande.
2. La commande est transférée à la Platine Il.
La lecture commence dans le sens avant;
le sens de défilement est inversé à la fin de
la bande et la lecture continue sur l’autre
face.
3. A la fin de la bande, la commande est
transféré à nouveau à la Platine I et les
deux faces de la bande sont lues.
… TAPE I et Il sont lues un total de 5 fois,
puis cette fonction s’arrête.
ï
Ë
ä
Ä: Lecture d'une face
Ë: FaceA ∑ FaceB ∑ Arrêt
ä: ∑FaceA ∑ FaceB
La cassette s'arrête après 5 cycles.
ï
Ë
ä
Platine I
Face A début
Face B Début
Platine II
Face A début
Face B Début
20
Lecture
Dispositif de vérification d'introduction (Intro Check)
Ce dispositif facilite la recherche d’un morceau donné en
détectant continuellement le début de chaque morceau.
Presser la touche INTRO CHECK.
La platine avancera a bande jusqu’au début d’un morceau, la
lira pendant les 15 premières secondes et avancera la bande
jusqu’au début du morceau suivant, endroit où le cycle
recommence.
… Pour annuler la fonction de vérification d’introduction,
presser la touche STOP.
… Si la touche STOP n’est pas pressée, la fonction de
vérification d’introduction est relâchée selon le réglage du
commutateur REV MODE.
Ä: Relâchée quand la bande arrive en fin de course.
Ë: Relâchée quand la bande arrive en fin de course de la
face inverse.
ä: Relâchée après avoir effectué une boucle complète
de la bande après la face initiale.
Fonction de balayage des blancs
Cette fonction a été prévue pour que l’appareil puisse sauter les
blancs d’une durée prolongée.
1. En mode de lecture, appuyer sur la touche BLANK SCAN
(l’indicateur s’allume).
Si une plage vierge de plus de 10 secondes est détectée
pendant la lecture, l’appareil se met automatiquement en
mode d’avance rapide jusqu’au début du morceau suivant,
où la lecture reprend.
2. Pour désactiver le balayage des blancs, appuyer une
deuxième fois sur la touche BLANK SCAN (l’indicateur
s’éteint).
Remarques:
… Si la commande REV MODE est sur la position Ë ou ä
lorsque la touche BLANK SCAN est sollicitée, la bande
avance rapidement jusqu’à la fin de la face après que la
bande a défilé 10 secondes sans son.
… Pour vérifier si la bande est entièrement viergue, commencer
le balayage des blancs au début de l’une des deux faces,
avec la commande REV MODE sur la position
ä.
… Si des parties de la bande sont enregistrées à un niveau très
bas, à cause d’une atténuation progressive, etc., ces parties
peuvent être déectées comme si elles étaient des blancs,
dans un tel cas le balayage des blancs commence et le son
est interrompu pendant 10 secondes.
Compteur de bande
L'indication du compteur augmente quand la bande défile vers
l'avant et elle diminue quand la bande est rembobinée. La
touche CLEAR permet de ramener l'affichage à"0000".
Lecture
15sec.
15sec.
Avance
rapide
Blanc
Morceau
*Plus d'environ 4 secondes nécessaires.
Avance
rapide
Pas de son pendant
10 secondes
Lecture
Face A
Face B
Lecture
Lecture
Avance rapide
Blanc
Pas de son pendant
10 secondes
Lecture
Avance rapide
Face B Marche
FRANÇAIS
21
CPS (recherche informatisée de programme)
La CPS permet la lecture de 20 morceaux en amont ou en aval
de celui qui est lu. Cette fonction est effectuée en détectant des
espaces vierges d’au moins 4 secondes entre les morceaux.
Ces blancs peuvent être créés en utilisant la fonction REC
MUTE.
En lecture avant, appuyer plusieurs fois sur la touche Ô
oujusqu’à ce que le nombre de morceaux à sauter
apparaisse dans l’affichage du compteur.
Utiliser la touche pour chercher un morceau suivant le
morceau courant et la touche
Ô pour un morceau avant le
morceau courant.
Remarques sur la CPS
La CPS fonctionne par détection et comptage de blancs
d’environ 4 secondes, comme des intervalles standard entre les
morceaux. Toutefois, avec les types suivants de bandes, les
fonctions de recherche peuvent ne pas fonctionner
correctement.
… Lorsque les intervalles entre les morceaux ne peuvent pas
être détectés.
- Intervalles de moins de 4 secondes.
- Hauts niveaux de bruit dans les intervalles.
- Longues sections à faible niveau
(en musique classique, etc.)
Ce problème peut être corrigé en utilisant les possibilités de
REC MUTE.
Remarque:
Pour simplifier la description, l’explication est donnée pour la
“lecture avant” (sens
Á). Une procédure similaire doit être
utilisée pour la “lecture inverse”.
… Si, en utilisant sur, le réglage du nombre CPS voulu est
dépassé, utiliser la touche
Ô pour revenir en arrière jusqu’à
l’affichage du numéro CPS voulu.
… Quand la toucheest pressée, le morceau suivant est
compté comme “1” et quand la touche
Ô est pressée, le
morceau courant est compté comme “1”.
Alors que la bande défile rapidement pour détecter les blancs
entre les morceaux jusqu’à atteindre le morceau voulu. Puis la
lecture commence au début du morceau désigné.
Comment sélectionner n'importe quel morceau voulu en utilisant la CPS
Exemple*:
Pour sélectionner le 3ème
morceau après la position
courante, sélectionner "CP03".
Si "t" est inferieur à 4 secondes, il
ne sera pas compté comme un
espace vierge. Dans ce cas,
sélectionner "CP02" au lieu de
"CP03" pour sélectionner le 3ème
morceau.
Affichage du compteur
Lecture
1 1 2 32
Sens de défilement
de la bande
Sens de défilement
de la bande
Position courante de la bande
1 1 22
Position courante de la bande
t
Lecture
Exemple
*
Enregistrement
22
Enregistrement avec la Platine I et Platine II
Enregistrement à partir d’une chaîne stéréo:
1. Mettre l’appareil sous tension.
2. Pour effectuer un enregistrement bidirectionnel, mettre la commande REV
MODE sur la position
Ë.
3. Mettre une cassette enregistrable dans la Platine I ou
Platine Il.
… Vérifier que les languettes de protection de la cassette n’ont
pas été cassées. Si elles sont cassées, boucher le trou avec
un morceau de ruban adhésif.
4. Sélectionner le système DOLBY NR voulu.
5. Appuyer sur la touche RECORD.
La platine passe en mode de pause d’enregistrement (Les
indicateurs
π et REC s’àllument).
6. Régler le niveau d’enregistrement à l’aide de la commande
de réglage REC LEVEL de manière que l’indicateur de niveau
atteigne brièvement le point “0 dB” (bande normale ou au
chrome) ou le point “+3 dB” (bande métal) à l’enregistrement
des signaux ayant le niveau le plus élevé.
Effacement
Tous les matériaux précédemment enregistrés sur une bande
seront effacés par un nouvel enregistrement. Il est également
possible d’effacer une bande en “enregistrant” avec la
commande de réglage du niveau REC LEVEL mise sur “
‹”.
Fonctionnement de l'enregistrement silencieux
(Platine I/Platine II)
Insertion automatique de blancs de 4 secondes (pendant
l’enregistrement)
1. Appuyer sur la touche REC MUTE pendant
l’enregistrement.
La bande continue de défiler et un blanc d’environ 4
secondes est enregistré (l’indicateur REC clignote). L’appareil
se met ensuite automatiquement en mode de pause à
l’enregistrement (les indicateurs REC et
π restent tous deux
allumés).
2. Pour relancer l’enregistrement, appuyer sur la touche
PAUSE (l’indicateur
π s’éteint).
… Insertion automatique de blancs de 4 secondes (pendant
la pause à l’enregistrement)
En mode de pause à l’enregistrement, le fait d’appuyer sur la
touche REC MUTE lance automatiquement l’opération d’enregistrement silencieux décrite ci-dessus. L’appareil revient
ensuite au mode de pause à l’enregistrement.
… Insertion d’un blanc de plus de 4 secondes
Pendant l’enregistrement, maintenir enfoncée la touche REC
MUTE plus longtemps. Un blanc sera enregistré aussi
longtemps que la touche REC MUTE est maintenue
enfoncée. Relâcher la touche pour passer au mode de pause
à l’enregistrement. Pour relancer l’enregistrement, appuyer
sur la touche PAUSE.
… Insertion d’un blanc de moins de 4 secondes
En mode d’enregistrement, après avoir appuyé sur la touche
REC MUTE, appuyer sur la touche PAUSE avant la fin des 4
secondes. La bande s’arrête et l’appareil se met en mode de
pause à l’enregistrement au point où la touche PAUSE a été
sollicitée. Pour relancer l’enregistrement, appuyer à nouveau
sur la touche PAUSE.
Remarque:
Pendant l’enregistrement silencieux (pendant que l’indicateur
REC clignote), le fait d’appuyer une deuxième fois sur la touche
REC MUTE désactive ce mode et l’enregistrement reprend sans
que la bande s’arrête.
7. Appuyer une deuxième fois sur la touche PAUSE pour
lancer l’enregistrement.
… Pour interrompre l’enregistrement, appuyer sur la touche
PAUSE. Appuyer une deuxième fois pour relancer la bande.
… Pendant la pause d’enregistrement, l’enregistrement
commence si la touche dont l’indicateur
Ó/Á est allumé est
actionnée, mais seul le sens de défilement change si la
touche dont l’indicateur
Ó/Á est éteint est actionnée. Pour
poursuivre l’enregistrement, appuyer une nouvelle fois sur la
touche.
… Pour arrêter l’enregistrement, appuyer sur la touche STOP.
ï
Ë
ä
Normal/CrO
2
Metal

Enregistrement continu (Platine I vers Platine Il)
1. Charger deux cassettes enregistrables dans les deux
Platines I et Il.
2. Régler le système de réduction de bruit et REC LEVEL
comme voulu.
3. Régler le commutateur REV MODE
sur la position
ä.
4. Appuyer sur la touche RECORD puis
sur la touche PAUSE (ou de lecture)
pour lancer enregistrement.
Après la fin de l’enregistrement sur la
Platine I, la Platine Il lance
automatiquement I enregistrement dans
le sens avant.
5. Appuyer sur la touche STOP pour annuler le mode
d'enregistrement continu.
Remarques:
… En enregistrement continu, comme l’enregistrement avec la
Platine Il est toujours commencé dans le sens avant,
s'assurer gue la cassette chargée dans la Platine Il peut étre
enregistrée sur les deux faces.
… L’enregistrement continu de la Platine Il vers la Platine I n’est
pas possible.
… Si le sens de défilement de la bande est réglé sur la face
inverse pour la Platine I. l’enregistrement sera fait seulement
sur la face inverse de la cassette chargée dans la Platine I.
Enregistrement parallèle
Une seule source de programme peut être enregistrée
simultanément sur les deux cassettes.
1. Effectuer les étapes 1 à 6 décrites dans "Enregistrement
avec la Platine I et Platine II" sauf dans l’étape 3, charger
des cassettes dans les deux Platines I et Il.
2. Appuyer sur la touche PARALLEL REC.
Remarques:
… L’enregistrement sera lancé dans le sens indiqué par
l’indicateur de sens de défilement; par conséquent, régler le
sens à l’avance.
… Pendant l’enregistrement, seule la touche STOP de la Platine
I fonctionne ainsi que les touches STOP, REC MUTE et
PAUSE de la Platine Il.
… Si la touche STOP est pressée, les deux Platines I et Il
sarrêteront pour terminer l’enregistrement.
FRANÇAIS
23
Enregistrement mixage
MIC/LINE
Enregistrement mixage
MIC/LINE
En utilisant cet appareil, le mixage des entrées MIC et LINE IN
et les enregistrer est possible.
1. Brancher des microphones disposant d’une fiche
standard aux prises MIC sur le panneau avant de cet
appareil.
2. Utiliser un casque d’écoute pour contrôler les entrées.
Ceci évite un retour acoustique -- "hurlement" -- qui peut se
produire si vous écoutez le son à partir des haut-parleurs.
3. Avant l’enregistrement réel, placer la platine à utiliser
dans le mode de pause d’enregistrement puis équilibrer
les niveaux relatifs entre les entrées MIC et LINE IN en
ajustant manuellement les commandes tout en
maintenant le niveau global des entrées dans les
limitations indiquées par les indicateurs de niveau de
crête.
4. Appuyer une deuxième fois sur la touche PAUSE pour
lancer l’enregistrement.
ï
Ë
ä
LINE
MIC
W-860R

Copie
24
Copie (copie de la Platine I à la Platine Il)
Pour copier la totalité de la partie préenregistrée d’une
cassette
1. Mettre la cassette préenregistrée dans la Platine I et la
cassette enregistrable dans la Platine Il.
2. Mettre la commande REV MODE sur la position voulue:
Ä: Copie d’une seule face.
Ë: La copie s’arrêtera à la fin de la face inverse.
3. Mettre les deux platines dans le sens Á.
4. Appuyer sur la touche DUB START, HIGH ou NORMAL,
pour lancer la copie. L’indicateur correspondant à la
touche sollicitée s’allume.
NORMAL:
Copie à vitesse normale.
HIGH: Copie à deux fois la vitesse normale.
… L’indicateur PEAK LEVEL METER indique le niveau des
signaux de la Platine I; le niveau d’enregistrement de la
Platine Il sera réglé automatiquement (au même niveau que la
Platine I).
… Une fois que la copie est terminée, les deux platines
s’arrêtent automatiquement en fonction du réglage de la
commande REV MODE.
… Pour arrêter la copie, appuyer sur l’une des deux touches
STOP.
ATTENTION:
L’enregistrement de bandes préenregistrées, de disques,
ou de tout autre matériau enregistré ou diffusé peut
contrevenir à la réglementation sur les droits d’auteur. Se
renseigner avant d’enregistrer.
Remarques:
… Le réglage de la commande de niveau REC LEVEL et celui
du commutateur DOLBY NR seront ignorés pendant la
copie du fait qu’ils n’ont aucun effet.
… Pendant la copie à vitesse normale (NORMAL), seule la
touche STOP de la Platine I fonctionne ainsi que les
touches STOP et PAUSE de la Platine Il.
… Pendant la copie à vitesse rapide (HIGH), seule la touche
STOP tonctionne.
… La qualité sonore de la bande de copie peut être
légèrement moins bonne que celle de la bande d’origine.
Pour cette raison, il n’est pas conseillé de faire des copies
de copie.
… Si un récepteur de TV se trouve à proximité du W-860R, il
est possible que la fréquence de balayage horizontal de TV
soit enregistrée sur la bande pendant la copie rapide. Si ce
phénomène se produit, ou pour éviter qu'il se produise,
enregistrer à vitesse normale et couper l'alimentation du
récepteur de TV, ou éloigner les deux appareils I'un de
l'autre.
Montage manuel avec PAUSE (Platine Il Seulement)
Il est possible de monter une bande pendant la copie à vitesse
normale, en utilisant la touche PAUSE. On peut, par exemple,
n’enregistrer que certains morceaux de la Platine I sur la Platine
Il en sautant les morceaux non désirés.
… Pendant la copie à vitesse normale, lorsque la touche PAUSE
est enfoncée, la Platine II entre en mode de pause à
l’enregistrement alors que la Platine I continue la lecture.
Ecouter la bande de la Platine I et appuyer une deuxième fois
sur la touche PAUSE au début du morceau qui doit être
copié pour relancer l’enregistrement sur la Platine Il.

FRANÇAIS
25
Copie avec inversion synchronisée
Utiliser la touche SYNC REV pour que l’inversion de bande se
fasse simultanément sur les deux platines. Cette fonction est
pratique lorsque les bandes n’ont pas la même longueur ou
lorsque l’on souhaite obtenir une copie qui soit absolument
identique à l’original.
1. Régler le sens de défilement des deux platines sur Á (avant)
et mettre la commande REV MODE sur la position
Ë.
2. Appuyer sur la touche SYNC REV.
(l'indicateur correspondant s’allume).
3. Appuyer sur une touche DUB START (HIGH ou NORMAL).
Remarque:
… Si des bandes de longueur différentes sont utilisées, la partie
non enregistrée sera augmentée. Pour empêcher cela, utiliser
autant que possible des bandes de même longueur.
La bande de la Platine I est plus courte que celle de la
Platine II.
➀
Lorsque la Platine I atteint la fin de la face avant, elle
s’arrête et la Platine Il entre en mode “Pas de signaux
enregistrés”.
➁
Lorsque la Platine Il arrive à la fln, le sens de défilement est
simultanément inversé sur les deux platines et elles
reprennent en même temps la lecture et l’enregistrement.
➂
Lorsque la Platine I atteint la fin de la face inverse, les deux
platines s’arrêtent simultanément.
La bande de la Platine I est plus longue que celle de la
Platine II.
➀
Lorsque la Platine Il atteint la fin de la face avant, elle entre
en mode de pause à l’enregistrement pour la face inverse,
alors que la Platine I continue la lecture.
➁
Lorsque la Platine I arrive à la fln, les deux platines lancent
simultanément la lecture et l’enregistrement.
➂
Lorsque la Platine Il atteint la fin de la face inverse, les
deux platines s’arrêtent simultanément.
Platine I
(lecture)
lecture
1
Inverse
2
ï
Ë
ä
3
lecture
Platine II
(enregistrement)
enregistrement
Pas de signaux enregistrés
1
enregistrement
3
Inverse
2
Platine I
(lecture)
lecture
lecture
1
3
Inverse
2
Platine II
(enregistrement)
enregistrement
enregistrement
1
3
Inverse
2

Utilisation d'une minuterie
26
Enregistrement par minuterie
Enregistrement d'une émission
1. Raccorder cet appareil et la chaîne stéréo à une minuterie
audio disponible dans le commerce comme montré sur le
schéma.
2. Mettre tous les appareils sous tension.
3. Mettre une cassette enregistrable dans la Platine I ou Il (ou
dans les deux platines pour enregistrement continu).
4. Régler le commutateur REV MODE sur la position voulue.
5. Mettre le commutateur TIMER sur la position REC.
6. Accorder le syntoniseur sur la station à enregistrer.
7. Appuyer sur la touche RECORD de la platine qui va
enregistrer pour régler la platine en mode de pause
d’enregistrement.
8. Ajuster le niveau d’enregistrement.
9. Régler les commutateurs DOLBY tIR sur la position voulue.
10. Régler le sens de défilement de la bande de la Platine I et/ou
Il dans lequel l’enregistrement va
être lancé.
11. Régler la minuterie audio à l'heure de
début (mise sous tension) et à
l’heure d’arrét (mise hors tension)
requises. Lorsque ce réglage est
terminé, l'alimentation de tous les
appareils sera coupée.
A l’heure préréglée, les appareils seront remis sous tension et
l’enregistrement commencera automatiquement.
… L’enregistrement continu avec des cassettes chargées dans
les deux platines I et Il et le commutateur REV MODE dans
la position
ä est également possible en utilisant la
minuterie. Pour l'enregistrement continu, voir la page 23.
Cet appareil est doté d’une fonction minuterie qui permet de fixer l’heure à laquelle la lecture ou l’enregistrement doivent
commencer quand une minuterie en option est raccordée.
Lecture par minuterie
1. Raccorder cet appareil et la chaîne stéréo à une minuterie
audio disponible dans le commerce comme montré sur le
schéma.
2. Mettre tous les appareils sous tension.
3. Mettre une cassette préenregistrée dans la Platine I ou Il (ou
dans les deux platines pour la lecture continue).
4. Régler le commutateur REV MODE sur la
position voulue.
5. Mettre le commutateur TIMER sur la position
PLAY.
6. Mettre les commutateurs DOLBY NR comme
voulu.
7. Régler le sens de défilement de la bande
dans lequel la lecture est lancée pour la Platine I et/ou Il.
8. Régler la minuterie audio à l’heure de début (mise sous
tension) et à l’heure d’arrêt (mise hors tension) requises.
Lorsque ce réglage est terminé, l’alimentation de tous les
appareils sera coupée.
A l’heure préréglée, les appareils seront remis sous tension et la
lecture commencera automatiquement.
Remarques:
… Lorsque des cassettes sont chargées dans les deux platines
avec le commutateur REV MODE dans la position
Ä ou
Ë, la Platine I commence la lecture parce qu’elle a priorité.
… Lorsque des cassettes sont chargées dans les deux platines
avec le commutateur REV MODE dans la position
ä, la
lecture continue est possible. Voir page 19.
… Bien remettre le commutateur TIMER sur la position OFF
après la fin du fonctionnement par minuterie.
Raccordements
Minuterie audio
Alimentation CA
W-860R
Amplificateur
Syntoniseur

FRANÇAIS
27
La résolution des problèmes de base est similaire pour la
plupart des appareils électriques ou électroniques. Toujours
rechercher d’abord la cause la plus probable. Vérifier les points
suivants pour avoir une idée des points à contrôler.
Pas d'alimentation quand I'interrupteur d'alimentation est
pressé.
® La prise d'alimentation n'est pas bien branchée. Bien la
brancher.
Pas de sortie audio.
® Le raccordement à la chaîne stéréo est incorrect. Vérifier
les raccordements.
Mauvaise qualité du son.
® Les têtes sont sales. Les nettoyer.
® Les têtes sont magnétisées. Les démagnétiser.
® La position du commutateur DOLBY NR nest pas correct.
Le changer de position.
Son étrange.
® Le réglage du bouton PITCH CONTROL a été changé.
Le régler sur la position centrale.
Enregistrement impossible.
® Les languettes de protection d’enregistrement ont été
brisées. Recouvrir les ouvertures de ruban adhésif.
® Les têtes sont sales. Nettoyer les têtes.
® Le niveau d’enregistrement est trop bas. Tourner la
commande REC LEVEL vers la droite.
Le fonctionnement du boîtier de télécommande est
imossible.
® L'interrupteur POWER du lecteur est sur OFF. Placer
I'interrupteur sur ON.
® Les piles ne sont pas en place dans le boîtier de
télécommande. Installer les piles.
En cas de difficulté
Système de pistes:
4 pistes, 2 canaux stéréo
Têtes: 4
Platine I; 1 tête d’effacement
et 1 tête d’enregistrement/lecture(rotative)
Platine II; 1 tête d’effacement
et 1 tête d’enregistrement/lecture(rotative)
Type de bande:
Cassettes C-60 ou C-90 (type Philips)
Réglage de l'acuité du son:
±
10%
Vitesse de défilement:
4.76 cm/s
9.5 cm/s (copie à grande vitesse)
Moteurs:
2 moteurs asservis CC
Pleurage et scintillement (WRMS):
0.09%
Bande passante (globale, -20 dB):
25-19,000 Hz, métal
25-18,000 Hz, CrO
2
25-17,000 Hz, normale
Rapport signal/bruit (global):
59 dB (sans réduction de bruit, DHT 3 %, pondéré)
69 dB (avec le Dolby B NR, audessus de 5 kHz)
79 dB (avec le Dolby C NR, audessus de 1 kHz)
Durée de bobinage rapide:
Environ 110 secondes pour une C-60
Entrée:
ligne: 97 mV, 50k ohms
Microphone: 0.38 mV, 200 ohms
Sortie:
Ligne:0.52V pour une impédance de charge de 50k ohms ou plus
Casque:8 ohms
Alimentation:
120/230 V CA, 50/60 Hz (modèle d'exportation générale)
120 V CA, 60 Hz (modèle Etats-Unis, Canada)
230 V CA, 50 Hz (modèle Royaume-Uni/Europe)
240 V CA, 50 Hz (modèle Australie)
Consommation:
22 W
Dimensions( L x H x P ):
435 x 127 x 292 mm (17-1/8" x 4-15/16" x 11-1/2"
)
Poids (net):
4.0 kg (8-13/16 Ibs.
)
Accessoires standard:
Boîtier de télécommande sans fil (RC-615)
Pile (type SUM-3,"AA","R6") x 2
Cordons d’entrée-sortie
… Des améliorations peuvent apporier des chagememts dans
les caractéristiques techniques et générales sans avis
préalable.
… Les photos et illustrations peuvent légèrement différer du
produit fini.
Spécifications
Réduction de bruit Dolby et HX Pro headroom extension
fabriqués sous license de Dolby Laboratories Licensing
Corporation. HX Pro est d'origine Bang & Olufsen.
DOLBY, le symbole double-D
∂ et HX PRO sont des
marques de Dolby Laboratories Licensing Corporation.

28
Vor Inbetriebnahme
Bitte vor Inbetriebnahme lesen
… Wählen Sie einen geeigneten Standort für den Spieler. Nicht
geeignet sind Standorte, die direkter Sonneneinstrahlung,
Heizquellen, Vibrationen, Staubeinwirkung, starken
Temperaturschwankungen oder Feuchtigkeit ausgesetzt
sind. Von Brummstörungen verursachenden Geräten wie
Transformatoren etc. fernhalten.
… Niemals das Gehäuse öffnen, da hierdurch Schäden an der
Elektronik und/oder elektrische Schläge verursacht werden
können. Falls ein Fremdkörper in das Geräteinnere gelangen
sollte, wenden Sie sich bitte an Ihren Fachhändler.
… Bei Abziehen des Netzkabels darauf achten, das Kabel am
Stecker zu halten. Niemals am Kabel ziehen.
… Zur Gehäusereinigung keine Lösungsmittel verwenden, da
hierdurch die Gehäuseoberfläche beschädigt werden kann.
Ein sauberes trockenes Tuch verwendeen.
… Bewahren Sie diese Bedienungsanleitung auf, um bei
eventuell später auftauchenden Fragen darin nachschlagen
zu können.
KassettenHandhabung
Kassetten niemals an Orten aufbewahren, die folgenden
Umgebungseinflüssen ausgesetzt sind:
… Direkte Sonneneinstrahlung (z.B. auf Fenstersims), hohe
Temperaturen (z B. neben Heizkörper).
… Starke elektromagnetische Felder (z.b. neben Lautsprechern,
auf einem TV-Gerät, neben einem Netzteil etc.).
… Hohe Luftfeuchtigkeit, starke Staubeinwirkung oder sonstige
start verschmutzte Umgebungen.
… Kassetten niemals heftigen Stößen order Erschütterungen
aussetzen.
… Wie empfehlen, C-120-Kassetten nicht ZU verwenden, da es
zu Bandverschlingungen und schweren Betriebsstörungen
kommen kann.
Bandsortenwahl
Die automatische Bandsortenwahl (Metall und Chromband
(Kobaltband)) arbeitet nur einwandfrei, wenn Kassetten
entsprechende Identifikationsöffnungen vorweisen.
Einlegen einer Kassette
1. Das Band straffen. Hierzu die
Nabe mit einem Finger oder
Bleistift etc. drehen.
… Nicht das Band berühren! Finger-
abdrücke verursachen Staubund Schmutzablagerungen.
2. Die Auswurftaste (EJECT)
drücken, um den Kassettenhalter
zu öffnen.
… Der Kassettenhalter kann bei
Aufnahme oder Wiedergabe
nicht geöffnet werden.
3. Ein Kassette mit nach unten
weisender Bandöffnung einlegen.
4. Den Kassettenhalter vorsichtig
andrücken.
Anschlüsse
Vor der Herstellung der Anschlüsse sicherstellen, daß bei allen
Geräten die Spannungsversorgung abgeschaltet ist. Die
diesbezüglichen Angaben in der Bedienungsanleitung des
Stereo-Verstärkers etc. unbedingt beachten.
Metal
bänder
(
2
Type%
(
Type#
)
Type%^
)
)
Normalbänder
CrO
(
REC PLAY
Stereo-Verstärker
W-860R
Netzsteckdose

DEUTSCH
29
Fernbedienung
Betrieb mit der Fernbedienung
Die mitgelieferte Fernbedienungseinheit ermöglicht die
Bedienung des CD-Spielers bequem vom Sitzplatz aus.
Die Fernbedienung auf den Fern-bedienungs-Empfangssensor
am CD-Spieler richten.
… Innerhalb des zulässigen Entfernungsbereichs kann der
Signalempfang durch zwischen Fernbedienung und
Empfangssensor befindliche Gegenstände behindert werden.
… Bei Fernbedienbetrieb kann der CD-Spieler Fehlfunktionen
zeigen, wenn er in der Nähe eines Infrarotstrahlen
ausstrahlenden Geräts betrieben wird oder wenn im gleichen
Raum Infrarot-Fernbedienungen anderer Geräte verwendet
werden. Umgekehrt kann die Fernbedienung dieses CDSpielers Fehlfunktionen bei anderen mit Infrarotsignalen zu
bedienenden Geräten verursachen.
Einlegen der Batterien
1. Die Batteriefach-Abdeckung entfernen.
2. Zwei Batterien "AA" (R6, SUM-3) unter Beachtung der
Polarität (
±/—) einlegen.
3. Die Abdeckung wieder anbringen.
Batteriewechsel
Sollte es erforderlich werden, den Abstand zwischen Gerät und
Fernbedienung zur Funktionsauslösung zu verringern, wird ein
Batteriewechsel notwendig. Stets zwei neue Batterien einlegen.
Batterie-Vorsichtsmaßnahmen
… Die Batterien unter Beachtung der korrekten Polarität
(
±und—) einlegen.
… Stets zwei Batterien des gleichen Typs verwenden, niemals
eine gebrauchte und eine frische Batterie zusammen
verwenden.
… Sowohl Einweg- als auch wiederaufladbare Batterien können
verwendet werden. Die Sicherheitshinweise auf den Batterien
beachten.
… Bei längerem Nichtgebrauch (über einen Monat) sollten die
Batterien entnommen werden, um ein Auslaufen im
Batteriefach zu verhindern. Ausgelaufene Batterien
entnehmen und nach Säubern des Batteriefachs gegen
frische auswechseln.
… Batterien nicht erhitzen, zerlegen oder verbrennen.
Pflege und Wartung
Köpfe und Bandpfad sollten in regelmäßigen Abständen
gereinigt und entmagnetisiert werden.
Reinigung des Bandpfades
… Auf ein Wattestäbchen oder weiches Tuch
Kopfreinigungsflüssigkeit auftragen und Köpfe, Capstan und
alle Metallteile des Bandpfades leicht abreiben.
… Die Andruckrolle mit Gummireinigungsflüssigkeit reinigen.
Entmagnetisieren der Köpfe
Sichergehen, daß die Spannungsversorgung abgeschaltet ist;
dann die Köpfe mit dem Entmagnetisierer oder einem
gleichwertigen Gerät entmagnetisieren. Detaillierte Angaben zur
Handhabung finden sich in der Bedienungsanleitung dieser
Geräte.
Warnung:
Wenn die Geräteoberfläche verschmutzt sein sollte, wischen Sie
diese mit einem weichen Tuch ab oder verwenden Sie eine
verdünnte, neutrale Reinigungsflüssigkeit. Reinigen Sie sie
gründlich. Verwenden Sie keinen Verdünner, Benzin oder
Alkohol, da dies die Geräteoberfläche beschädigen kann.

30
Bezeichnungen der Bedienungselemente
Überspielstarttaste
Rückstelltasten
Stummaufnahmetaste
Pausetaste
*Bandbetrieb-Funktionstasten
Aufnahmetaste
Leerstellensprung-Taste
Synchron-Bandumkehrtaste
Taste für Anspielfunktion
SYNC REV BLANK SCAN
PARALLEL
HIGH DUB
NORM DUB
REC
PLAY
REC
PLAY
Bandlaufrichtungsanzeigen
und Pause ( I )
Synchron-Bandumkehrtaste
Leerstellensprung
Bandlaufrichtungsanzeigen
und Pause ( II )
Zählwerkanzeige ( II )
Überspielstartanzeigen
Parallelaufnahme
Zählwerkanzeige ( I )
Spitzenpegelmesser
*Bandbetrieb-Funktionstasten
Á : Vorwärts-Wiedergabetaste
Ó : Rückwärts-Wiedergabetaste
ª : Stopptaste
Ô: Rücklauftaste
: Schnellvorlauftaste
Dolby-Rauschunterdrückungsschalter
Timer-Schalter
Bandlauf-Wahlschalter
Netzschalter
Kassettenhalter ( I )
Kassettenhalter (II)
Rückstelltasten ( I )
Taste für Anspielfunktion
Synchron-Bandumkehrtaste
Leerstellensprung-Taste
Parallelaufnahmetaste
Überspielstarttaste
Rückstelltasten ( II )
Auswurftaste ( II )
Kopfhörerbuchse
Geschwindigkeitsfeinregler
Aufnahmepegelregler
Mikrofonpegelregler
Mikrofonbuchsen
Stummaufnahmetaste
Auswurftaste ( I )
Pausetaste
*Bandbetrieb-Funktionstasten ( I )
Aufnahmetaste
Funktionsanzeigen(REC/PLAY)( I )
Funktionsanzeigen(REC/PLAY)( II )

DEUTSCH
31
Wiedergabe
Wiedergabe mit Deck I order II
1. Das Gerät einschalten.
2. Mit dem REV MODE-Schalter die Bandlaufrichtung und umkehr einstellen.
3. Eine bespielte Kassette in Deck I oder II einlegen.
4. DOLBY NR nach Erforderlichkeit einstellen.
5. Die Taste
Ó oder Á des Decks I oder II drücken, um die
Wiedergabe zu starten.
6. Die Lautstärke über den Lautstärkeregler des Verstärkers
einstellen.
… Zum Stoppen der Wiedergabe die STOP Taste betätigen.
Folgewiedergabe
1. In Deck I und II bespielte Kassetten einlegen.
2. DOLBY NR nach Erforderlichkeit einstellen.
3. Den REV MODE-Schalter auf CONT
PLAY
(
ä
)
stellen.
4. Die Taste
Ó oder Á des Decks
drücken, das mit der Wiedergabe
beginnen soll.
5. Die beiden Kassetten werden nun entsprechend
"Folgewiedergabe" nacheinander wiedergegeben.
… Zum Abbrechen der Dauerwiedergabe vor 5 maligem
Abspielen der Cassetten die STOP-Taste an einem der
beiden Decks drücken.
Verwendung des PITCH CONTROL Reglers
(nur Deck I)
Mit dem PITCH CONTROL-Regler kann die
Bandgeschwindigkeit (und damit die Tonhöhe) von Deck I bei
der Wiedergabe übergangslos verändert werden. Der
Regelbereich geht über plus/minus 10% der
Normalgeschwindigkeit. Wenn der Regler in Mittelstellung steht,
läuft das Band mit normaler Geschwindigkeit. Beim Verstellen in
Richtung"+" nimmt die Bandgeschwindigkeit zu, und in
Richtung "
-
" ab.
Hinweis:
Der PITCH CONTROL-Regler sollte nur bei Kassetten verstellt
werden, die nicht mit Dolby Rauschunterdrückung bespielt
wurden. Bei Dolby-bespielten Kassetten wird der Ton unter
Umständen nicht sauber reproduziert.
1. Das Band wird in Vorwärtsrichtung
wiedergegeben. Am Bandende wird die
Bandrichtung umgekehrt und die
Wiedergabe der zweiten Seite beginnt. Am
Bandende dieser Seite stoppt das Deck I.
Nach der Wiedergabe in Umkehrrichtung
stoppt Deck I am Bandende.
2. Es wird auf Deck II geschaltet. Das Band
wird in Vorwärtsrichtung wiedergegeben.
Am Bandende wird die Bandrichtung
umgekehrt und die Wiedergabe der zweiten
Seite erfolgt.
3. Am Bandende der zweiten Seite wird wieder
auf Deck I geschaltet, das dann beide
Kassettenseiten wiedergibt usw.
… TAPE I und TAPE II werden insgesamt 5 mal
gespielt, wonach die Funktion stoppt.
Folgewiedergabe
Ä: Wiedergabe einer Seite
ï
Ë
ä
Ë: SeiteA ∑ SeiteB ∑ Stopp
ä: ∑SeiteA ∑ SeiteB
Das Band wird nach 5 Abläufen gestoppt.
ï
Ë
ä
Deck I
Seite A Anfang
Seite B Anfang
Deck II
Seite A Anfang
Seite B Anfang

32
Anspielfunktion (Intro Check)
Durch diese Funktion kann ein Titel bequem und zeitsparend
gesucht werden.
Die INTRO CHECK-Taste betätigen.
Das Band wird zum Beginn eine Titels umgespult, der nun für 15
Sekunden abgespielt wird. Hierauf erfolgt erneut Umspulen bis
zum folgenden Titel und Wiedergabe für 15 Sekunden usw.
… Zur Abschaltung der Anspielfunktion die STOP-Taste
betätigen.
… Wird die STOP-Taste nicht betätigt, schaltet die
Anspielfunktion entsprechend der AUTO REVSchalterposition ab.
Ä: Abschaltung nach Erreichen des Bandendes einer
Bandseite.
Ë: Abschaltung nach Erreichen des Bandendes nach
erfolgter Reverse-wiedergabe.
ä: Abschaltung nach Durchlaufen beider Bandseiten
(von der Anfangsseite aus gerechnet).
Wiedergabe
Bandzähler
Der Bandzähler zählt aufwärts bei Vorwärtsrichtung und abwärts
bei Rückwärtsrichtung. Die Anzeige kann mit Taste CLEAR auf
"0000" rückgestellt werden.
Leerstellensprung
Mit der BLANK SCAN-Funktion können während der
Wiedergabe längere Leerstellen im Schnellvor-/rücklauf
übersprungen werden.
1. Während der Wiedergabe die BLANK SCAN-Taste
drücken (deren Anzeige leuchtet auf).
Wenn eine Leerstelle von mehr als 10 Sekunden entdeckt
wird, schaltet das Deck auf Schnellvorlauf bis zum Anfang
der nächsten Aufnahme, wo dann wieder auf Wiedergabe
geschaltet wird.
2. Um den Leerstellensprung auszuschalten, die BLANK
SCAN-Taste erneut drücken. (die Anzeige erlischt).
Hinweise:
… Falls beim Drücken der BLANK SCAN-Tast der REV MODE-
Schalter auf
Ë order ä steht, wird das Band am Ende
einer Seite nach 10 Sekunden Leerstelle schnell vorgespult
und dann umgekehrt.
… Um zu prüfen, ob ein Band vollständig leer ist, den REV
MODE-Schalter auf
ä stellen und die BLANK SCAN-Taste
am Bandbeginn einer Seite drücken.
… Längere Bandstellen mit niedrigen Pegeln wie bei
Ausblendungen usw. können die BLANK SCAN-Funktion
aktivieren, wodurch die Wiedergabe 10 Sekunden lang
unterbrochen werden könnte.
Wiedergabe
15Sek.
Vorspulen
15Sek.
Vorspulen
Titel
Leerabschnitt
*Mindestens 4 Sek.lang
Länger als 10
Sekunden kein Ton
Wiedergabe
Seite A
Seite B
Wiedergabe
Schnellvorlauf
Länger als 10
Sekunden kein Ton
Wiedergabe
Schnellvorlauf
Wiedergabe
Seite B Anfang

Wahl eines Titels mit der CPS-Funktion
DEUTSCH
33
Computergesteuerter Titelsuchlauf
(CPS : Computomatic Program Search)
Die CPS-Funktion erlaubt Suchlauf bis zum 20.
Titelanfang vor bzw. nach dem spielenden Titel. Die Funktion
richtet sich hierbei nach mindestens 4 Sekunden langen
Leerstellen zwischen Titeln, die mit der REC MUTE-Taste bei
der Aufnahme eingefügt werden.
Hinweis:
In den folgenden Bedienschritten wird die Funktionsweise zur
Vereinfachung anhand der "Vorwärts-Wiedergabe" (
ÁRichtung) beschrieben. Die Bedienung bei "RückwärtsWiedergabe" (
Ó-Richtung) ist entsprechend.
Während der Vorwärts-Wiedergabe die Ô oder -Taste
drücken, bis die gewünschte Zahl an Titelsprüngen auf der
Zähleranzeige zu sehen ist.
Die -Taste dient hierbei für Suchlauf zu folgenden Titeln,
und die
Ô-Taste für Suchlauf zu vorangehenden
Titelanfängen.
… Wenn die -Taste zu oft betätigt wurde, kann die Zahl der
angezeigten Titelsprünge durch Drücken der
Ô-Taste
reduziert und damit berichtigt werden.
… Beim Drücken der -Taste wird der nächste Titel als "1
Titel" gezählt, während mit der
Ô-Taste der spielende Titel
als "1 Titel" angenommen wird.
Das Band wird vorgespult, bis die Funktion die eingegebene
Zahl an Leerstellen abgezählt hat. Die Wiedergabe setzt dann
am Anfang des gesuchten Titels wieder ein.
Hinweise zur CPS-Funktion
Der Suchlauf orientiert sich an 4 Sekunden langen Leerstellen
zwischen Titeln. In den folgenden Fällen arbeitet die Funktion
daher unter Umständen nicht ordnungsgemäß.
… Wenn das Intervall zwischen Titeln nicht als Leerstelle
erkannt wird:
- Tonfreie Stellen von weniger als 4 Sekunden Dauer.
- Rauschen und andere Geräusche.
- Längere niedrigpegelige Passagen (klassische Musik usw.).
Zur Berichtigung können mit der REC MUTE Taste nachträglich
vollwertige Leerstellen eingefügt werden.
Beispiel*:
Für Suchlauf zum 3.Titelanfang nach der
gegenwärtigen Bandposition "CP03" wählen.
Wenn "t" kürzer ist als 4 Sekunden, wird das
Intervall nicht als Leerstelle gezählt. In diesem
Fall muß zur Wahl des 3.Titels "CP02" anstelle
von "CP03" eingegeben werden.
Zählwerkanzeige
1 1 2 32
Bandlaufrichtung
Gegenwärtige Bandposition
1 1 22
t
Beispiel
*
Bandlaufrichtung
Gegenwärtige Bandposition

Aufnahme
34
Aufnahme mit Deck I und Deck II
Aufnahme von einer Stereoanlage:
1. Das Gerät einschalten.
2. Falls auf beide Seiten mit Auto-Reverse aufgenommen
werden soll, den REV MODE-Schalter auf
Ëstellen.
3. Eine bespielbare Kassette in Deck I oder II einlegen.
… Sicherstellen,daß die Löschschutzzungen der Kassette
vorhanden sind. Falls nicht, die Löcher mit Klebeband
abdecken.
4. Die DOLBY NR-Rauschunterdrückung nach Bedarf
zuschalten.
5. Die RECORD-Taste drücken.
Das Gerät befindet sich nun im Aufnahme-Pausezustand.
(Die Anzeigen
π und REC leuchten.)
6. Den Aufnahmepegel mit dem REC LEVEL-Regler so
aussteuern, daß mit Normal-bändern bei Pegelspitzen die 0
dB Diode der Spitzenpegelanzeige kurz auf-leuchtet. Bei
Reineisenbändern den Aufnahmepegel auf einen maximalen
Spitzenwert von "+3 dB" einstellen.
Löschen
Bespieltes Material wird bei Neuaufnahme automatisch gelöscht
und durch die neue Aufnahme ersetzt. Um ein Band ohne
Neuaufnahme zu löschen, den REC LEVEL Regler auf "
‹"
stellen und aufnahmen.
Stummaufnahme (Deck I/Deck II)
Automatische 4 Sekunden Leerstelleneinfügung während
Aufnahme
1. Die REC MUTE-Taste während der Aufnahme drücken.
Der Bandtransport läuft weiter und es wird eine Leerstelle
von ca. 4 Sekunden Länge aufgezeichnet (die REC-Anzeige
blinkt). Danach schaltet das Deck auf Aufnahmepause (
π
und REC-Anzeigen leuchten).
2. Zum Fortsetzen der Aufnahme die PAUSE-Taste erneut
drücken (die
π-Anzeige erlischt).
… Automatisches Anfügen einer 4 Sekunden langen
Leerstelle während Aufnahmepause
Die REC MUTE-Taste während der Aufnahme drücken. Damit
wird der Bandtransport automatisch für 4 Sekunden aktiviert,
um eine 4 Sekunden lange Leerstelle anzufügen. Danach
schaltet das Deck wieder auf Aufnahme-pause.
… Aufzeichnen einer Leerstelle von mehr als 4 Sekunden
Während der Aufnahme die REC MUTE Taste länger
drücken. Die Leerstelle wird so lange aufgezeichnet, wie die
REC MUTE-Taste gedrückt wird. Nach Loslassen der REC
MUTE-Taste geht das Deck wieder auf Aufnahmepause über.
Zum Fortsetzen der Aufnahme die PAUSE-Taste drücken.
… Für Leerstellen von weniger als 4 Sekunden
Nach dem Drücken der REC MUTE Taste während Aufnahme
die PAUSE-Taste vor Ablauf der 4 Sekunden betätigen. Damit
stoppt der Bandlauf und das Deck schaltet auf Aufnahmepause.
Zum Fortsetzen der Aufnahme die PAUSE-Taste drücken.
Hinweis:
Während der Aufnahmestummschaltung (die REC-Anzeige
blinkt), kann durch erneutes Drücken der REC MUTE-Taste die
Stummschaltung aufgehoben und die Aufnahme direkt
fortgesetzt werden.
7. Zum Aufnahmestart nochmals die PAUSE-Taste drücken.
… Zur kurzzeitigen Aufnahmeunterbrechung die PAUSE-Taste
drücken. Zur Aufnahmefortsetzung die PAUSE-Taste oder
die Wiedergabetaste
Ó/Á drücken. Wird bei
Aufnahmepause die Taste gedrückt, deren Anzeige (
Ó oder
Á) leuchtet, erfolgt der Aufnahmestart. Wird die Taste
gedrückt, deren Anzeige nicht leuchtet, wird nur die Bandlaufrichtung gewechselt. Zum Aufnahmestart die gleiche
Taste nochmals drücken.
… Zum Aufnahmestopp die STOP Taste drücken.
ï
Ë
ä
Normal/CrO2 Tape
Metal Tape

DEUTSCH
35
MIC/LINE-Mischaufnahme
Mit diesem Gerät können die Eingangssignale der MIC und LINE
IN-Buchsen gemischt aufgenommen werden.
1. Mikrofone mit Standard-Klinkenstecker an die MICBuchsen an der Frontplatte des Geräts anschließen.
2. Zum Überwachen der Eingangssignale Kopfhörer
verwenden.
Hierdurch lassen sich Rückkopplungen "Pfeifgeräusche"
vermeiden, die bei Tonwiedergabe über die
Lautsprecherboxen auftreten können.
3. Vor der eigentlichen Aufnahme das verwendete Deck
zunächst auf Aufnahmepause stellen und die relativen Pegel
zwischen dem MIC und dem LINE IN-Signaleingang mit den
Reglern von Hand einstellen, wobei der Gesamtaufnahmepegel die an den Spitzenpegelmessern angegebene
Übersteuerungsgrenze nicht überschreiten darf.
4. Zum auslösen der Aufnahme die PAUSE-Taste erneut
drücken.
Parallslaufnahme
Eine Signalquelle kann gleichzeitig auf zwei Kassetten
aufgenommen werden.
1. Die Schritte 1 bis 6 wie in Abschnitt "Aufnahme mit Deck
I und Deck II" beschrieben durchführen. Eine Ausnahme
beachten: Bei Schritt 3 eine Kassette in Deck I und Deck
II einlegen.
2. Die PARALLEL REC-Taste drücken.
Hinweise:
… Die Aufnahme startet in der Richtung entsprechend der
leuchtenden Anzeige. Daher die erforderliche Richtung vorher
einstellen.
… Bei Aufnahme arbeiten nur die STOP-Taste von Deck I sowie
die STOP, REC MUTE und PAUSE Taste von Deck II.
… Bei Betätigen der STOP-Taste schalten Deck I und Deck II
auf Stop.
Kontinuierliche Aufnahme (Deck I zu Deck II)
1. Zwei bespielbare Cassetten in Deck I und II einlegen.
2. Den NR SYSTEM-Schalter und REC LEVEL wie
erforderlich einstellen.
3. Den REC MODE-Schalter auf Position
ä stellen.
4. Zum Aufnahmestart die RECORD- und
dann die PAUSE-Taste (oder
Wiedergabetaste) von Deck I drücken.
Nach kompletter Aufnahme für Deck I
startet Deck II automatisch die Aufnahme
in Vorwärtsrichtung.
5. Zur Abschaltung dieser Aufnahmefunktion die Stoptaste
drücken.
Hinweise:
… Bei kontinuierlicher Aufnahme beachten:die Aufnahme für
Deck II startet stets in Vorwärtsrichtung. Daher sichergehen,
daß die in Deck II eingelegte Kassette für die Bespielung
beider Seiten geeignet ist.
… Die kontinuierliche Aufnahme von Deck II zu Deck I ist nicht
möglich.
… Wenn Deck I auf Rückwärtsrichtung geschaltet ist, wird die in
Deck I eingelegte Kassette nur in Rückwärtsrichtung
aufgenommen.
MIC/LINE-Mischaufnahme
ï
Ë
ä
LINE
MIC
W-860R

Überspielbetrieb
36
Überspielbetrieb (von Deck I auf Deck II)
Überspielen eines ganzen Aufnahmeabschnitts einer
bespielten Kassette
1. Die bespielte Kassette in Deck I und die unbespielte in
Deck II einlegen.
2. Den REV MODE-Schalter auf die gewünschte Position
stellen:
Ä: Überspielen einer einzigen Seite
Ë: Überspielen beider Seiten und anschließender Stopp.
3. Beide Decks auf Á Laufrichtung stellen.
4. Mit den Tasten DUB START HIGH oder NORMAL die
Überspielgeschwindigkeit wählen. Die Anzeige der
gedrückten Taste leuchtet zur Bestätigung.
NORMAL:
Überspielen mit normaler Bandgeschwindigkeit
HIGH: Überspielen mit zweifacher Bandgeschwindigkeit
… Die PEAK LEVEL-Anzeige gibt die Signalpegel für Deck I an.
Der Aufnahmepegel wird entsprechend den Pegeln auf Deck
I automatisch eingestellt.
… Nach dem Überspielen stoppen beide Decks automatisch.
… Zum Abbrechen der Überspielung die STOP-Taste betätigen.
Manuelle Editierfunktion mit PAUSE (nur Deck II)
Während Überspielen mit normaler Ge schwindigkeit können
bestimmte Aufnahmen mit Hilfe die PAUSE-Taste ausgelassen
werden. Damit können z.B. beim Überspielen von Deck I auf
Deck II bestimmte Stücke übersprungen werden.
… Wenn während Überspielen mit normaler Geschwindigkeit
die PAUSE-Taste auf Deck II gedrückt wird, schaltet Deck II
auf Aufnahmepause, während Deck I die Wiedergabe
fortsetzt. Wenn die nächste zu überspielenden Aufnahme
erreicht wird, die PAUSE-Taste erneut drücken, um die
Aufnahme mit Deck II fortzusetzen.
Hinweise:
… Die Einstellungen von REC LEVEL-Regler und DOLBY NR-
Schalter haben beim Überspielbetrieb keine Wirkung.
… Bei Überspielen in Normalgeschwindigkeit arbeiten nur die
STOP-Taste von Deck I sowie die STOP- und PAUSETaste von Deck II. Bei Überspielen in hoher
Geschwindigkeit arbeitet nur die STOP-Taste.
… Die Qualität des überspielten Materials ist etwas
beeinträchtigt. Deshalb ist von Mehrfachkopien abzuraten.
… Falls sich beim HIGH-Überspielbetrieb ein Fernseher in der
Nähe des W-860R befindet, wird unter Umständen die
Horizontalaustastfrequenz des Fernsehgeräts
aufgezeichnet. In diesem Fall mit normaler
Geschwindigkeit überspielen, oder den Fernseher
ausschalten bzw. in weiterer Entfernung aufstellen.
VORSCHT:
Das Aufzeichnen von kommerzielle bespielten Kassetten,
Schallplatten, Sendungen und anderen Medien kann gegen
das Urheberrecht verstoßen. Die gesetzlichen
Bestimmungen vor dem Aufnehmen überprüfen.

DEUTSCH
37
Überspielbetrieb mit Synchron Bandumkehr
Durch Drücken der SYNC REV-Taste wird die Bandrichtung
beider Decks während der Überspielung simultan umgekehrt.
Diese Funktion ist praktisch, wenn verschieden lange Bänder
verwendet werden, oder das neue Band genau wie das Original
bespielt werden soll.
1. Beide Decks mit den Taste Á auf Bandvorlauf schalten
und den REV MODE-Schalter auf
Ë stellen.
2. Die SYNC REV-Taste drücken (die entsprechende
Anzeige leuchtet auf).
3. Eine der DUB START-Tasten (HIGH oder NORMAL)
drücken.
Hinweis:
… Falls Kassetten mit unterschiedlicher Bandlänge verwendet
werden, kommt es zu längeren Leerstellen. Deher wenn
möglich, gleichlange Bänder verwenden.
Band in Deck I kürzer als in Deck II
➀
Wenn Deck I das Ende der ersten Seite erreicht, stoppt
Deck I und Deck II schaltet auf Stummaufnahme.
➁
Wenn Deck II das Bandende erreicht hat, wird der
Bandlauf in beiden Decks simultan umgekehrt.
➂
Wenn Deck I das Ende der zweiten Seite erreicht, stoppen
Deck I und Deck II gleichzeitig.
Band in Deck I länger als in Deck II
➀
Wenn Deck II das Ende der ersten Seite erreicht, schaltet
es auf Aufnahmepause, während Deck I weiter wiedergibt.
➁
Wenn Deck I das Bandende erreicht hat, wird der Bandlauf
in beiden Decks simultan umgekehrt.
➂
Wenn Deck II das Ende der zweiten Seite erreicht, stoppen
Deck I und Deck II gleichzeitig.
Deck I
(Wiedergabe)
Wiedergabe
1
Umkehr
2
ï
Ë
ä
Wiedergabe
3
Deck II
(Aufnahme)
Aufnahme
Keine Signalaufnahme
1
Aufnahme
3
Umkehr
2
Deck I
(Wiedergabe)
Wiedergabe
1
Umkehr
2
Wiedergabe
3
Deck II
(Aufnahme)
Aufnahme
Aufnahme
1
3
Umkehr
2

Timergesteueurter Betrieb
38
Timergesteuerte Aufnahme
Aufnahme einer Rundfunksendung
1. Die Anlagengeräte gemäß der Abbildung an einen
handelsüblichen Audio-Timer anschließen.
2. Alle Geräte einschalten.
3. Eine bespielbare Kassette in Deck I oder II einlegen (oder
jeweils eine in beide Decks für Folgeaufnahme).
4. Den REV MODE-Schalter nach Bedarf einstellen.
5. Den TIMER-Schalter auf REC stellen.
6. Den Sender abstimmen, dessen
Programm aufgezeichnet werden soll.
7. Die RECORD-Taste an dem für
Aufnahme verwendeten Deck drücken,
um es in den Aufnahme-Pausezustand
zu versetzen.
8. Den Aufnahmepegel aussteuern.
9. Den bzw. die DOLBY NR-Schalter wunschgemäß einstellen.
10. Die Bandlaufrichtung für Aufnahmestart an Deck I bzw. II
vorgeben.
11. Die Einschaltzeit (Start) und Ausschaltzeit (Stopp) im AudioTimer einstellen. Nach dieser Einstellung wird die
Stromversorgung zu den angeschlossenen Anlagengeräten
unterbrochen.
Zur voreingestellten Startzeit versorgt der Timer die Anlage mit
Strom, wobei die Aufnahme automatisch anläuft.
Wenn jeweils eine Kassette in Deck I und Deck II eingelegt und
der REV MODE-Schalter auf
ä gestellt ist, werden die beiden
Kassetten im Folgeaufnahme-Betrieb nacheinander bespielt.
Die Folgeaufnahme ist auf Seite 35 näher beschrieben.
In Verbindung mit einem Audio-Timer ist automatischer Aufnahme-bzw. Wiedergabebetrieb zu einer voreingestellten Startzeit
möglich.
Timergesteuerte Wiedergabe
1. Die Anlagengeräte gemäß der Abbildung an einen
handelsüblichen Audio-Timer anschließen.
2. Alle Geräte einschalten.
3. Eine bespielte Kassette in Deck I oder II einlegen (oder
jeweils eine in beide Decks für Folgewiedergabe).
4. Den REV MODE-Schalter nach Bedarf
einstellen.
5. Den TIMER-Schalter auf PLAY stellen.
6. Den bzw. die DOLBY NR-Schalter der
Kassette gemäß einstellen.
7. Die Bandlaufrichtung für Wiedergabe-start
an Deck I bzw. II vorgeben.
8. Die Einschaltzeit (Start) und Ausschaltzeit (Stopp) im AudioTimer einstellen. Nach dieser Einstellung wird die
Stromversorgung zu den angeschlossenen Anlagengeräten
unterbrochen.
Zur voreingestellten Startzeit versorgt der Timer die Anlage mit
Strom, wobei die Wiedergabe automatisch anläuft.
Hinweise:
… Wenn sowohl in Deck I als auch in Deck II eine Kassette
eingelegt und der REV MODE-Schalter auf
ÄoderË
gestellt ist, hat Deck I Priorität, so daß dessen Kassette
zuerst wiedergegeben wird.
… Wenn sowohl in Deck I als auch in Deck II eine Kassette
eingelegt und der REV MODE-Schalter auf
ä gestellt ist,
werden beide Kassetten im Folgewiedergabe-Betrieb
nacheinander gespielt. Siehe auch Seite 31.
… Nach dem timergesteuerten Betrieb nicht vergessen, den
TIMER-Schalter wieder auf 0FF zu stellen.
Anschlüsse
Audio-Timer
Netzanschluß
W-860R
Verstärker
Tuner

DEUTSCH
39
Störungssuche Technische Daten
Die grundsätzliche Störungssuche sollte wie bei sonstigen
elektrischen oder elektronischen Geräten üblich vorgenommen
werden. Zunächst naheliegende mögliche Störungsursachen
überprüfen. Hier sind einige Beispiele aufgeführt:
Nach Betätigen der POWER-Taste wird das Gerät nicht
eingeschaltet.
® Netzkabel ist nicht korrekt angebracht.
Korrekt anschließen.
Brummstörung.
® Die Verbindungskabel sind unkorrekt angebracht. Den
Anschluß korrigieren.
Kein Tonausgang.
® Unkorrekter Anschluß am Stereosystem. Die Anschlüsse
überprüfen.
Kein Fernbedienbetrieb möglich.
® Gerät ist ausgeschaltet. Gerät einschalten.
® Keine Batterien im Batteriefach der Fernbedienung.
Batterien einlegen.
Dumpfes Klangbild.
® Verschmurzte Köpfe. Die Köpfe reinigen.
® Magnetisierte Köpfe. Die Köpfe entmagnetisieren.
® Ungeeignete Stellung des DOLBY NR-Schalters. Den
Schalter in die geeignete Stellung bringen.
Ungewohntes Klangbild.
® Die Geschwindigkeitsfeineinstellung wurde verstellt. Den
Geschwindigkeitsfeinregler in die mittlere Stellung
bringen.
Aufnahme ist nicht möglich.
® Die Aufnahmezungen der Cassette sind entfernt. Die
Löschschutzöffnungen mit Klebeband abdecken.
® Verschmutzte Köpfe. Die Köpfe reinigen.
® Zu niedriger Aufnahmepegel. Den Regler REC LEVEL
nach rechts drehen.
Spursystem:
4-Spur, 2-Kanal-Stereo
Köpfe: 4
Deck I: 1 Löschkopf und 1 Aufnahme/Wiedergabekopf
(Drehkopf)
Deck II: 1 Löschkopf und 1 Aufnahme/Wiedergabekopf
(Drehkopf)
Bandtyp:
Kassetten C-60 und C-90 (Typ Philips)
Bandgeschwindigkeit:
4,76 cm/Sek.
9,5 cm/Sek. (bei Schnellüberspielen)
Geschwindigkeitsfeineinstellung:
±
10%
Motoren:
2 Gleichstrom-Servomotoren
Gleichlaufschwankungen (WRMS):
0.09%.
Frequenzgang (Insgesamt, -20 dB):
25-19,000 Hz, Metallband
25-18,000 Hz, Hz, Chromband
25-17,000 Hz, Normalband
Störspannungsabstand (Insgesamt):
59 dB (ohne Dolby, 3% Klirrfaktor,gewichtet)
69 dB (mit Dolby B, über 5 kHz)
79 dB (mit Dolby C, über 1 kHz)
Schnellablaufzeit:
Ca. 110 Sek. für C-60
Eingänge:
Line: 97 mV, 50 kOhm
Mik.: 0,38 mV, 200 Ohm
Ausgänge:
Line: 0,52 V für eine Lastimpedanz von 50 kOhm und darüber
Kopfhörer: 8 Ohm
Spannungsversorgung:
120 V Wechselspannung, 60 Hertz(USA-Modell)
230 V Wechselspannung, 50 Hertz
(Großbritannien-/Europa-Modell)
120/230 V Wechselspannung, 50/60 Hertz
(allgemeines Exportmodell)
240 V Wechselspannung, 50 Hertz(Australien-Modell)
Leistungsaufnahme:
22 Watt
Abmessungen(BxHxT):
435 x 127 x 292 mm (17-1/8" x 4-15/16" x 11-1/2"
)
Netto-Gewicht:
4.0 kg (8-13/16 Ibs.
)
Standardzubehör:
Eingangs/Ausgangskabel
Drahtlose Fernbedienung (RC-615)
Batterie (SUM-3,"AA","R6") x 2
… Technische Änderungen vorbehalten.
… Fotografische und graphische Abbildungen können leicht
vom gekauften Modell abweichen.
Dolby Rauschunterdrückung und HX Pro headroom extension
hergestellt unter Lizenz von Dolby Laboratories Licensing
Corporation. HX Pro enstand bei Bang & Olufsen.
DOLBY, das Doppel-D-Symbol
∂ und HX PRO sind
Warenzeichen der Dolby Laboratories Licensing Corporation.

40
Prima dell'uso
Leggere questo manuale prima di procedere all'uso
… Scegliere con cura il luogo in cui installare l'apparecchio.
Evitare di esporlo alla diretta luce del sole o ad una sorgente
di calore. Evitare inoltre luoghi soggetti a vibrazioni o ad
eccessive accumulazioni di polvere, calore, freddo od
umidità. Tenere inoltre l'apparecchio lontano da sorgenti di
disturbi quali trasformatori o motori.
… Non aprire la cassa dell'apparecchio. Ciò potrebbe
danneggiarne la circuitazione o causare scariche elettriche.
Se un qualche oggetto estraneo dovesse essere entrato
nell'apparecchio stesso, rivolgersi al rivenditore.
… Per staccare la spina dalla presa di rete, agire direttamente
sulla spina stessa, evitando di tirare il cavo.
… Evitare di pulire l'apparecchio con solventi chimici poichè ciò
potrebbe danneggiare la rifinitura esterna. Fare
semplicemente uso di un panno pulito ed asciuto.
… Tenere questo manuale in un luogo di facile accesso, per
ogni eventuale futuro riferimento.
Uso delle audiocassette
Non conservare audiocassette in luoghi come i seguenti:
… Su caloriferi e in luoghi esposti a luce solare diretta o
temperature elevate.
… Vicino a diffusori, televisori o amplificatori o comunque a
campi magnetici intensi.
… In luoghi umidi e polverosi.
… In luoghi che espongano l’unità a cadute ed urti.
… I nastri C-120 sono troppo sottili e tendono a impigliarsi nei
meccanismi di lettura del nastro, e se ne sconsiglia quindi
l’uso.
Scelta dei nastri:
Perché il dispositivo di rilevamento automatico del tipo di nastro
possa funzionare normalmente, l’audiocassetta deve possedere
fori di identificazione dei tipi metal o al cromo (cobalto).
Caricamento di una cassetta
1. Usate un dito o una matita per
far girare il mozzo della cassetta
e stringere il nastro attorno al
suo rocchetto.
… Evitate in modo rigoroso di
toccare il nastro vero e proprio.
Le impronte digitali trattengono
la polvere e lo sporco.
2. Premete il tasto di espulsione
(EJECT) della piastra per farne
aprire il vano cassetta.
… Lo sportello del vano cassetta
non può essere aperto durante
la riproduzione o la
registrazione.
3. Caricate il nastro con il lato
aperto rivolto verso il basso.
4. Chiudete con delicatezza lo
sportello del vano cassetta.
Collegamenti
… Peima di eseguire i collegamenti, spegnere tutti gli
apparecchi.
… Laggere le istruzioni di tutti i componenti che si vogliono
usare.
Metallo
(
(
Tipo#
(
Tipo%
Tipo%^
)
)
)
CrO
Normale
2
REC PLAY
Amplificatore stereo
W-860R
Ad una presa di corrente
alternata di rete

ITALIANO
41
Manutenzione
Le testine e il percorso del nastro devono essere puliti
regolarmente.
Pulizia del percorso del nastro
… Applicare del liquido di pulizia su un apposito bastoncino
ovattato o su una pezzuola soffice e pulire quindi le testine, i
cabestani e tutte le parti metalliche sul percorso del nastro.
… Pulire pure i rulli pressori, usando un apposito liquido per
parti di gomma.
Smagnetizzazione delle testine
Prima di procedere alla smagnetizzazione delle testine usando
lo smagnetizzatore, verificare che l'apparecchio sia spento.
Vedere le altre istruzioni che accompagnano lo
smagnetizzatore.
Attenzione:
Se la superficie dell'apparecchio dovesse sporcarsi, pulirla
strofinandola con uno straccio morbido, oppure usare una
soluzione blanda di detergente. Pulire a fondo. Non usare
diluenti, benzina o alcool, in quanto potrrebbero rovinare la
superficie del mobile.
Installazione batterie
1. Rimuovere il coperchio del vano batterie.
2. Inserire due batterie "AA" (R6, SUM-3).
Accertarsi che le batterie siano inserite con i poli positivo ± e
negativo
— nelle posizioni corrette.
3. Chiudere il coperchio fino a sentire uno scatto.
Sostituzione batterie
Se si notasse che la distanza di funzionamento diminuisce, ciò
indica che le batterie sono scariche. In tale caso sostituire le
batterie con altre di nuove.
Precauzioni riguardanti le batterie
… Accertarsi di inserire le batterie con le polarità ± e — nella
posizione corretta.
… Usare batterie dello stesso tipo. Non usare mai tipi diversi di
batterie assieme.
… Possono essere usate sia batterie ricaricabili che batterie non
ricaricabili.
Fare riferimento alle indicazioni sull'etichetta.
… Quanddo si prevede di non utilizzare il telecomando per un
lungo periodo (più di un mese), rimuovere le batterie per
prevenire perdite. Se si verificassero delle perdite, pulire il
vano batterie e sostituire le batterie con altre di nuove.
… Non riscaldare o disassemblare le batterie e non gettarle nel
fuoco.
Uso del telecomando
L'unità di telecomando in dotazione pemette di comandare a
distanza l'apparecchio.
Quando si utilizza l'unità di telecomando, puntarla verso il
sensore sul pannello anteriore dell'apparecchio.
… Anche se l'unità di telecomando viene utilizzata entro il
campo efficace, il comando a distanza potrebbe essere
impossibile se vi sono degli ostacoli tra il telecomando ed il
lettore.
… Se l'unità di telecomando viene utilizzata in prossimità di altri
apparecchi che generano raggi infrarossi oppure se altri
dispositivi di comando a distanza utilizzanti raggi infrarossi
vengono utilizzati in prossimità del lettore, esso potrebbe
funzionare in modo scorretto. Dal punto di vista opposto
anche gli altri apparecchi potrebbero funzionare in modo
scorretto.

Nome dei comandi
42
Tasto PAUSE
*Tasti di funzione
Tasto RECORD
Interruttore del timer
Selettore del sistema per la riduzione del rumore
Tasto REC MUTE
Tasto per l'espulsione (I)
Interruttore della modalità di inversione
Comando REC LEVEL
Comando MIC
Prese MIC
Vano portacassetta (I)
Interruttore di accensione
Presa per la cuffia
Manopola di comando dell'altezza
Tasto di verifica degli inizi
Tasti COUNTER CLEAR (I)
Tasto per l'individuazione degli spazi bianchi
Tasto per l'espulsione (II)
Tasto per l'inversione
Tasti DUB START
Tasto PARALLEL REC
Tasti COUNTER CLEAR (II)
Vano portacassetta (II)
*Tasti di funzione
Á :Tasto di riproduzione in direzione normale
Ó :Tasto di riproduzione in direzione inversa
ª :Tasto stop
Ô:Tasto di riavvolgimento
:Tasto di avanzamento rapido
Tasto di verifica degli inizi
Tasto per l'inversione
Misuratore del livello di picco
Indicatori di operazione ( I )
Contanastro ( I )
Indicatori DUB START
( REC,PLAY )
Indicatore SYNC REV
Indicatore di direzione e PAUSE ( I )
SYNC REV BLANK SCAN
PARALLEL
REC
HIGH DUB
PLAY
NORM DUB
Indicatori di operazione ( II )
( REC,PLAY )
REC
PLAY
Contanastro ( II )
Indicatore PARALLEL REC
Indicatore BRANK SCAN
Indicatore di direzione e PAUSE ( II )
Tasto REC MUTE
Tasti DUB START
Tasto per l'individuazione degli spazi bianchi
Tasto RECORD
Tasti COUNTER CLEAR
Tasto PAUSE
*Tasti di funzione

ITALIANO
43
Riproduzione
Riproduzione per mezzo del deck I o del deck Il
1. Accendere l’apparecchio.
2. Disporre l’interruttore della modalità di inversione (REV
MODE) sulla posizione corrispondente alla direzione
desiderata. In proposito.
3. Inserire nel deck I o lI la cassetta che si intende
ascoltare.
4. Selezionare il tipo di sistema DOLBY NR desiderato.
5. Premere il tasto
Ó o Á del deck I (o lI) per dare inizio
alla riproduzione.
6. Regolare il volume per mezzo del commando del volume
dell’amplificatore.
… Per arrestare la riproduzione, premere il tasto STOP.
Riproduzione continua
1. Inserire nei deck I e II le cassette che si vogliono
ascoltare.
2. Selezionare il tipo di sistema DOLBY NR desiderato.
3. Disporre il selettore della modalità di
inversione (REV MODE) sulla
posizione CONT PLAY (
ä).
4. Premere il tasto
Ó o Á del deck che si intende avviare
per primo.
5. Le cassette vengono riprodotte continuativamente una
dopo l’altro.
… Per far terminare la riproduzione contuna prima che i nastri
siano stati riprodotti cinque volte, premere il tasto STOP di
una delle due piastre.
Riproduzione Continua
1. Quando il nastro inizia ad essere
riprodotto nella direzione in avanti, alla
fine della corsa viene rovesciato per
passare alla riproduzione dell’altro lato, al
termine del quale il Deck I viene
disattivata.
Se la riproduzione inizia dal lato inverso,
al termine del nastro il deck I si arresta.
2. Il comando passa poi al Deck II.
Cui la riproduzione ha inizio nella
direzione normale in avanti. A fine corsa,
il nastro si inverte in modo automatico
per passare alla riproduzione dell’altro
lato.
3. Alla fine del nastro, il comando viene
ritrasferito di nuovo al deck I, che
riproduce entrambi i lati della cassetta.
… Le cassette in Deck I e Deck Il vengono
riprodotte continuamente 5 volte, quindi
la funzione cessa.
Comando Pitch Control (solo Deck I)
La manopola PITCH CONT permette il controllo dell’altezza del
suono prodotto dalla Deck I attraverso il controllo della velocità
di scorrimento del nastro. La variabilità della velocità del nastro
è del 10% in più o in meno della velocità normale. Se il
comando si trova nella posizione centrale (in cui scatta), la
velocità del nastro è normale. Ruotando la manopola verso + (o
-
) aumenterete (o diminuirete) la velocità del nastro e quindi
l’altezza del suono.
… Usate il comando PITCH CONT solo con nastri non coditicati
con il sistema Dolby NR. Questi non potrebbero altrimenti
venire riprodotti correttamente.
Ä: Riproduzione di un solo lato
ï
Ë
ä
Ë: LatoA ∑ LatoB ∑ Arresto
ä: ∑ LatoA ∑ LatoB
Il nastro si arresta dopo 5 cicli.
ï
Ë
ä
Deck I
Lato A Inizio
Lato B Inizio
Deck II
Lato A Inizio
Lato B Inizio

44
Riproduzione
Funzione di ricerca degli inizi (Intro Check)
Questo dispositivo serve a facilitare la ricerca dei brani
desiderati esplorando in modo continuo l’inizio di ogni singolo
brano.
Premere il tasto INTRO CHECK.
In tal modo il nastro avanza velocemente di brano in brano
riproducendo l’inizio di ciascuno per un periodo di circa 15
secondi.
… Per disinserire questa funzione premere il tasto STOP.
… Se non si preme il tasto STOP, il punto di disattivazione
naturale della funzione INTRO CHECK dipende dalla
posizione del selettore AUTO REV.
Ä: Funzione disattivata quando il nastro giunge alla fine.
Ë: Funzione disattivata quando il nastro giunge alla fine
dal lato rovescio.
ä: Funzione disattivata alla fine del nastro dopo che
l’apparecchio ha eseguito la riproduzione di entrambi
i lati (in qualsiasi ordine).
Funzione di Individuazione degli spazi non registrati
Questa funzione consente di saltare rapidamente dei lunghi
spazi non registrati eventualmente presenti sul nastro, nel corso
della riproduzione.
1. Nel corso della riproduzione, premere il tasto BLANK
SCAN (la reltiva indicazione si accende).
Se nel corso della riproduzione viene individuata una sezione
non registrata di durata superiore ai 10 secondi, il deck
avanza rapidamente sino all’inizio della successiva sezione
registrata, da dove la riproduzione riprende normalmente.
2. Per disattivare la funzione di individuazione degli spazi
non registrati premere di nuovo il tasto BLANK SCAN (la
relativa indicazione si spegne).
Note:
… Con il selettore REV MODE sulla posizione Ë o ä ,
quando si inserisce il tasto BLANK SCAN il nastro viene fatto
avanzare velocemente sino alla fine del lato corrispondente
dopo averlo riprodotto normalmente per 10 secondi senza
alcun suono.
… Per verificare se il nastro è completamente non registrato,
avviare la funzione di individuazione degli spazi bianchi a
partire dall’inizio di uno dei due lati, indifferentemente, con il
selettore REV MODE sulla posizione
ä.
… Se sul nastro vi sono sezioni registrate ad un livello molto
basso, o sa vi sono delle dissolvenze in uscita, queste sezioni
possono essere individuate come non registrate e la funzione
di individuazione potrebbe attivarsi automaticamente, nel
qual caso la riproduzione musicale viene interrotta per circa
10 secondi.
Contanastro
Le cifre del contanastro aumentano se il nastro si sta spostando
in avanti, e diminuiscono se il nastro si sta spostando in
direzione inversa. Agendo sul tasto CLEAR, l’indicazione del
contanastro viene riazzerata, ritornando alla posizione "0000".
Riproduzione
15secondi
15secondi
Spazio non
registrato
Avanzamento veloce
Brano
*Spazio non registrato di
oltre 4 secondi
Nessun suono per
10 secondi
Riproduzione
Riproduzione
Lato A
Lato B
Riproduzione
Riproduzione
Avanzament
rapido
Nessun suono per
10 secondi
Avanzament
rapido
Lato B Inizio

Scelta di un particolare brano con la funzione CPS
ITALIANO
45
Esempio*:
Per raggiungere il terzo brano dopo
quello in corso, scegliete "CP03".
Se "t" dura meno di 4 secondi, non
viene un contato come uno spazio in
bianco. In questo caso, impostato
CP02 invece di CP03 per impostare il
terzo brano.
CPS (ricerca computerizzata di brani)
La funzione CPS permette la selezione e la riproduzione in
qualsiasi momento di sino a 20 brani più oltre o prima di quello
riprodotto. Questa funzione opera rilevando gli spazi non
registrati da almeno 4 secondi fra un brano e l’altro. Questi
spazi non registrati possono essere creati con la funzione REC
MUTE.
Durante la riproduzione in direzione normale, premete il
tasto
Ô o più volte sino a far apparire sul contanastro
il numero di brani che volete evitare.
Usate il tasto per raggiungere il brano dopo quello in corso
e quello
Ô per raggiungere invece quello precedente.
Note sulla funzione CPS
La funzione CPS opera rilevando e contando gli spazi da 4
secondi circa che precedono ciascun brano. Con nastri dei tipi
seguenti, essa potrebbe non funzionare normalmente.
… Quando gli intervalli fra i brani non possono essere rilevati.
- Gli intervalli durano meno di 4 secondi.
- Gli intervalli fra brani contengono alti livelli di rumore.
- Il brano contiene dei pianissimo molto lunghi
(musica classica, ecc.).
Questo problema può venire corretto con la funzione REC
MUTE.
Nota:
Per semplificare la descrizione essa viene fatta solo per la
direzione normale (direzione
Á). La stessa procedura può però
essere usata anche in direzione opposta.
… Se premendo il tasto superate il numero CPS richiesto,
potete usare quello
Ô per tornare indietro al nomero CPS
richiesto.
… Quando il tasto viene premuto, il brano successivo viene
conteggiato come primo brano, mentre se viene premuto
quello
Ô, viene conteggiato come primo brano il brano in
corso.
Il nastro viene fatto avanzare rapidamente in modo da rilevare
gli spazi in bianco fra i brani sino a che il brano richiesto non
viene raggiunto. La riproduzione inizia poi dall’inizio del brano
designato.
Contanastro
1 1 2 32
Direzione di scorrimento
del nastro
Posizione attuale del nastro
1 1 22
Direzione di scorrimento
del nastro
Posizione attuale del nastro
t
*
Es

Registrazione con deck I e deck II
Registrazione da un sistema stereo esterno:
1. Accendere l’apparecchio.
2. Se si intende effettuare la
registrazione in entrambe le
direzioni, disporre il selettorone
REV MODE sulla posizione
Ë.
3. Inserire nel deck I o II una cassetta utilizzabile per la
registrazione.
… Verificare che le linguette
protettive sulla costa della
cassetta siano intatte. Se state
spezzate, ricoprirne i fori con del
nastro adesivo.
Registrazione
46
4. Selezionare il tipo di sistema DOLBY NR desiderato.
5. Premete il tasto RECORD.
II registratore si porta nel modo di pausa di registrazione (e
gli indicatori
π e REC si illuminato).
6. Regolare il livello di registrazione per mezzo dell’apposito
comando REC LEVEL, in modo che il più forte suono da
registrare faccia raggiungere ai misuratori, per un breve
istante, i punti intorno al valore "0 dB" (per i nastri normali o
al cromo) o "+3 dB" (per i nastri di metallo).
Cancellazione
Qualsiasi registrazione precedentemente effettuata si cancella
automaticamente quando se ne effettua una nuova sullo stesso
nastro. In alternativa, il nastro può anche essere cancellato
"registrandolo" con il comando del livello REC LEVEL posto a
"
‹".
Funzionamento del silenziamento della
registrazione (deck I / deck II)
Funzionamento per spaziatura automatica per spazi non
registrati di circa 4 secondi (durante la registrazione)
1. Nel corso della registrazione premere il tasto REC MUTE.
Il movimento del nastro continua e viene registrato uno
spazio in bianco di circa 4 secondi (mentre l’indicazione
RECORD lampeggia). Il deck passa poi automaticamente alla
posizione di pausa della registrazione (entrambe le
indicazioni REC e
π si illuminato).
2. Per riprendere la registrazione premere di nuovo il tasto
PAUSE (la relativa indicazione si spegne).
… Funzionamento per spaziatura automatica per spazi non
registrati di circa 4 secondi (durante la pausa della
registrazione)
Nella modalità di pausa della registrazione, premendo il tasto
REC MUTE si avvia automaticamente la suddetta operazione
di spaziatura, al termine della quale il deck ritorna alla
posizione di pausa della registrazione.
… Per uno spazio in bianco superiore a 4 secondi
Nel corso della registrazione tenere premuto il tasto REC
MUTE per un periodo più lungo. La registrazione viene
silenziata sin tanto che si tiene premuto il tasto. Disinserendo
il tasto si passa alla modalità di pausa della registrazione. Per
riprendere la registrazione premere il tasto PAUSE.
… Per uno spazio in bianco inferiore ai 4 secondi
Dopo aver premuto il tasto REC MUTE durante la
registrazione, premere poi il tasto PAUSE prima dello
scadere dei 4 secondi. II deck si ferma ed entra in modalità di
pausa della registrazione al punto in cui si preme il tasto
PAUSE. Per riprendere la registrazione, premere di nuovo il
tasto PAUSE.
Note:
Nel corso delle operazioni di silenziamento (e cioè mentre
l’indicazione REC lampeggia), premendo di nuovo il tasto REC
MUTE si disattiva la funzione stessa, e la registrazione riprende
senza che il nastro si fermi.
7. Per avviare la registrazione premere di nuovo il tasto π
PAUSE.
… Per arrestare temporaneamente la registrazione agire sul
tasto
π PAUSE. Per riavviare poi il nastro agire di nuovo sullo
stesso tasto
π PAUSE, o sui tasti di riproduzione Ó o Á.
…
Se in modalità di pausa della registrazione, premendo il tasto
di riproduzione la cui relativa indicazione
Ó o Á si trova
illuminata, la registrazione viene avviata. Se invece si preme il
tasto di riproduzione la cui relativa indicazione
Ó o Á non si
trova illuminata, si ottiene solamente il cambiamento di
direzione del movimento del nastro, che però rimane fermo.
Per riavviare il movimento del nastro è necessario premere lo
stesso tasto una seconda volta.
… Per arrestare la registrazione premere il tasto STOP.
Normal/CrO2 Tape
ï
Ë
ä
Metal Tape

ITALIANO
47
Registrazione parallela
Una singola fonte può essere registrata contemporaneamente
su due cassette.
1. Eseguire le fasi da i a 6 della sezione "Registrazione con
deck I e deck II" caricando, nella fase 3, cassette in
entrambe le piastre deck I e deck II.
2. Premere il tasto PARALLEL REC.
Note:
… La registrazione inizia nella direzione indicata dall’indicatore
di indicazione della direzione e perciò impostare la direzione
di scorrimento in anticipo.
… Durante la registrazione, il solo tasto STOP di deck I ed i tasti
STOP, REC MUTE e PAUSE di deck II funzionano.
… Se il tasto STOP viene premuto, sia deck I che deck II
interrompono la registrazione.
Registrazione continuata
1. Caricare due cassette registrabili nelle piastre deck I e II.
2. Impostare NR SYSTEM e REC LEVEL, come desiderato.
3. Impostare REV MODE nella posizione
ä.
4. Premere il tasto RECORD e quindi il tasto
PAUSE (oppure il tasto di riproduzione ) di
deck I per avviare la registrazione.
Quando la registrazione con deck I è
terminata, deck Il inizia a registrare
automaticamente nella direzione in avanti.
5. Per cancellare il modo di registrazione continuata
premere il tasto STOP.
Note:
… Nel modo di registrazione continuata, dato che la
registrazione con deck Il inizia sempre nella direzione in
avanti, accertarsi che la cassetta caricata in deck Il possa
essere registrata su entrambi i lati.
… La registrazione continuata da deck II a deck I è impossIbile.
… Se la direzione di scorrimento del nastro è impostata per il
lato inverso di deck I, la registrazione viene eseguita solo sul
lato inverso del nastro caricato in deck I.
Registrazione con missaggio MIC/LINE
Registrazione con missaggio MIC/LINE
Quest’unità permette il missaggio degli ingressi MIC e LINE IN e
la loro successiva registrazione.
1. Collegate microfoni dotati di presa lana standard alle
prese MIC del pannello anteriore di quest’unità.
2. Usate cuffie per controllare il segnale in ingresso.
Ciò evita fenomeni di retroazione acustica (forti rumori) che
potrebbero aversi ascoltando il segnale con i diffusori.
3. Prima della registrazione vera e propria, portate il registratore
nel modo di pausa di registrazione e quindi bilanciate i vari
livelli degli ingressi MIC e di quelli LINE IN manualmente con i
comandi , tenendo d’occhio il livello totale affinché sia
compreso nei limiti massimi indicati dai misuratori di livello di
picco.
4. Per avviare la registrazione premere di nuovo il tasto π
PAUSE.
ï
Ë
ä
LINE
MIC
W-860R

Duplicazione
48
AVVERTENZA
La duplicazione di nastri già registrati, di dischi, o di altro
materiale pubblicato o transmesso via radio può costituire
una violazione delle leggi sui diritti d’autore. Verificare
attentamente le leggi relative prima della registrazione.
Note:
… I valori predisposti per il livello della registrazione (REC
LEVEL) e la posizione del selettore DOLBY NR non hanno
alcun effetto sulla duplicazione e vengono pertanto
ignorati.
… Durante la duplicazione alla velocità NORMAL, il solo tasto
STOP di deck I ed i tasti STOP e PAUSE di TAPE II
funzionano. Durante la duplicazione alla velocità HIGH,
solo il tasto STOP funziona.
… La qualità del suono del nastro copia èleggermente
inferiore a quella del nastro originale. Per questo motivo si
sconsiglia di effettuare duplicazioni successive.
… Se nelle vicinanze del W-860R vi è un televisore acceso
mentre si effettua la duplicazione ad alta velocità, è
possibile che la frequenza delle linee di esplorazione
orizzontale del televisore venga registrata sul nastro. In tal
caso, o per prevenirne il verificarsi, duplicare a velocità
normale, oppure spegnere televisore, oppure tenere il
registratore ad una sufficiente distanza del televisore.
Duplicazione (copia dal deck I al deck II)
Duplicazione dell’intera registrazione di una cassetta
preregistrata
1. Inserire la cassetta che si vuole duplicare nel deck I e
quella sulla quale si vuole effettuare la registrazione nel
deck II.
2. Disporre l’interruttore REV MODE sulla modalità
desiderata.
Ä: La duplicazione viene effettuata per un solo lato.
Ë: La duplicazione si arresta al termine del nastro dal lato
rovescio.
3. Disporre entrambi i deck sulla direzione Á.
4. Per avviare la duplicazione premere il tasto DUB START
HIGH o NORMAL. L’indicazione corrispondente al tasto
premuto si accende.
NORMAL: Duplicazione a. velocità normale.
HIGH: Duplicazione a velocità doppia di quella normale.
… Il misuratore PEAK LEVEL METER indica i livelli del segnale
del deck I. Il livello di registrazione sul deck II viene disposto
automaticamente (allo stesso livello del deck I).
… Al termine della duplicazione entrambi i deck si arrestano
contemporaneamente, in base alle istruzioni stabilite per
mezzo del selettore REV MODE.
… Per arrestare la duplicazione nel corso della sua effettuazione
premere entrambi i tasti STOP.
Montaggio manuale con PAUSE (solo deck Il)
Nel corso della duplicazione a velocità normale, è possibile
procedere nel modo desiderato al montaggio del nastro sul
quale si effettua la duplicazione, agendo sui tasto PAUSE. Ad
esempio, è possibile registrare sul nastro II solamente i brani
voluti contenuti nel nastro I, passando oltre i brani non
desiderati.
… Nel corso della duplicazione a velocità normale, se si preme il
tasto PAUSE, il deck II passa alla modalità di pausa della
registrazione mentre il deck I continua la riproduzione.
Ascoltando il nastro del deck I, quando si raggiunge la
porzione di nastro che si intende continuare a duplicare,
premere di nuovo il tasto PAUSE per riprendere la
registrazione sul deck II.

ITALIANO
49
Deck I più corto del Deck II
➀
Quando il nastro del deck I giunge alla fine del lato
anteriore, il deck I si ferma ed il deck Il passa allo stato di
“nessuna registrazione”.
➁
Quando il nastro del deck II giunge a fine corsa, entrambi i
deck I e II vengono invertiti simultaneamente e riprendono
poi dal lato opposto la riproduzione e la registrazione,
rispettivamente.
➂
Quando il nastro del deck I giunge alla fine del lato
rovescio, entrambi i deck I e II si arrestano allo stesso
tempo.
Deck I più lungo del Deck II
➀
Quando il nastro del deck II giunge al termine del lato
anteriore, il deck II entra in modalità di pausa della
registrazione, mentre il deck I continua la riproduzione.
➁
Quando il nastro del deck I giunge alla fine, entrambi i deck
I e II iniziano simultaneamente la riproduzione, e la
registrazione, dell’altro lato.
➂
Quando il nastro del deck Il giunge alla fine del lato
rovescio, entrambi i deck I e II si arrestano allo stesso
tempo.
Duplicazione ad inversione sincronizzata
Il tasto SYNC REV consente di invertire il movimento di
entrambi i deck esattamente allo stesso momento nel corso
della duplicazione. Questa funzione è molto comoda quando si
fa uso di nastri di lunghezze diverse, o quando si vuole
duplicare un nastro in modo assolutamente identico
all’originale.
1. Disporre la direzione di movimento di entrambi i deck su
Á(in avanti), ed il selettore REV MODE su Ë.
2. Premere il tasto SYNC REV (la relativa indicazione si
accende).
3. Premere il tasto DUB START desiderato (HIGH o
NORMAL).
Nota:
Se si usano nastri di diverse lunghezze le eventuali sezioni non
registrate (in bianco) aumentano. Per evitare questo problema,
per quanto possibile utilizzare nastri della stessa lunghezza.
ï
Ë
ä
Deck I
(Riproduzione)
Riproduzione
Riproduzione
1
3
Deck II
(Registrazione)
Registrazione
Registrazione
Inversione
2
Nessuna registrazione
1
Inversione
2
3
Deck I
(Riproduzione)
Riproduzione
Riproduzione
1
3
Inversione
2
Deck II
(Registrazione)
Registrazione
Nessuna registrazione
1
Inversione
2
Registrazione
3

Uso del timer
50
Usando quest’unità con un timer audio, i nastri possono essere registrati o riprodotti ad ore da voi specificate.
Registrazione via timer
Registrazione di una trasmissione radio.
1. Collegate quest’unità ed un sistema stereo ad un timer
audio del tipo normalmente in commercio nel modo indicato
nel diagramma.
2. Portate tutti gli interruttori d’accensione dei vari componenti
su ON.
3. Caricate una cassetta registrabile nella deck I o Il (o in
ambedue per ottenere una registrazione continua).
4. Portate il comando REV MODE sulla posizione opportuna.
5. Portate il comando TIMER sulla
posizione REC.
6. Mettete in sintonia la stazione radio
da registrare.
7. Premete il tasto RECORD della
piastra con cui volete registrare in
modo da impostare il modo di pausa di registrazione.
8. Regolate il livello di registrazione.
9. Regolate i comandi DOLBY NR come necessario.
10. Impostate una direzione di scorrimento per la deck I e/o la
deck II.
11. Impostate i tempi di accensione e spegnimento del timer.
Ciò fatto, tutti i componenti si spengono automaticamente.
All'ora fissata, essi si accendono e la registrazione inizia
automaticamente.
… Il timer può effettuare anche la registrazione continua con
cassette in ambedue le piastre ed il comando REV MODE
sulla posizione
ä, per informazioni sulla registrazione
continua, vedi pag. 47.
Riproduzione via timer
1. Collegate quest'unità ed un sistema stereo ad un timer audio
del tipo normalmente in commercio nel modo indicato nel
diagramma.
2. Portate tutti gli interruttori d’accensione dei vari componenti
su ON.
3. Caricate una cassetta registrata nella deck I o II (o in
ambedue per ottenere una riproduzione continua).
4. Portate il comando REV MODE sulla posizione opportuna.
5. Portate il comando TIMER sulla posizione
PLAY.
6. Regolate i comandi DOLBY NR come
necessario.
7. Impostate una direzione di scorrimento per la
deck I e/o la deck II.
8. Impostate i tempi di accensione e spegnimento del timer. Ciò
fatto, tutti i componenti si spengono.
All’ora fissata, il sistema si accende e la riproduzione ha inizio.
Note:
… Quando ambedue le piastre contengono cassette e il
comando REV MODE si trova nella posizione
Ä o Ë ,la
deck I riceve la prorità ed inizia la riproduzione per prima.
… Se le cassette sono caricate in ambedue le piastre ed il
comando REV MODE si trova nella posizione
ä, la
riproduzione continua è possibile. Consultate pag. 43.
… Dopo aver usato il timer, portate sempre il comando TIMER
su 0FF.
Collegamenti
Timer audio
Presa di c.a.
W-860R
Amplificatore
Sintonizzatore

ITALIANO
51
Dispositivo Dolby di riduzione del rumore e HX Pro headroom
extension sono fabbricato su licenza della Doìby Laboratories
Licensing Corporation. HX Pro creata da Bang & Olufsen.
DOLBY, il simbolo della doppia D
∂ e HX PRO sono marchi
della Dolby Laboratories Licensing Corporation.
Diagnostica
Le operazioni per la diagnostica di eventuali problemi insorti nel
funzionamento di questo apparecchio sono simili a quelle che si
effettuano per qualsiasi altra apparecchiatura elettrica o
elettronica. Controllare per prime sempre le cause più probabili
ed ovvie. Qui di seguito si indicano alcuni dei principali problemi
e la loro possibile soluzione.
L'apparecchio non si accende anche premendo il tasto
POWER.
® Cavo di alimentazione non ben inserito nella presa.
Inserire saldamente il cavo.
Nessuna uscita audio.
® Il collegamento con il sistema stereo non è stato effettuato
in modo corretto. Verificare i collegamenti.
Si verificano fruscii.
® La spina del cavo di collegamento non è ben fissata.
Fissare bene la spina del cavo di collegamento.
Non si riesce ad utilizzare l'unità per il comando a distanza.
® L'interruttore POWER del lettore è nella posizione 0FF.
Porre l'interruttore nella posizione ON.
® L'unità per il comando a distanza è senza batterie.
Inserire le batterie.
Suono di qualità scadente.
® Le testine sono sporche. Ripulirle.
® Le testine sono magnetizzate. Prima di procedere alla
smagnetizzazione delle testine usando lo smagnetizzatore.
® La posizione dell'interruttore di riduzione del rumore
DOLBY NR non è quella corretta. Modificarla in modo
appropriato.
Suoni strani.
® Il comando dell'altezza è stato modificato. Riportare il
punto del comando dell’altezza sulla posizione centrale.
Registrazione impossibile.
® Le linguette della cassetta per la protezione dalle
cancellazioni accidentali sono spezzate. Ricoprirne i fori
con del nastro adesivo un po' spesso.
® Le testine sono sporche. Ripulirle.
® Il livello di registrazione è troppo basso. Alzarlo, ruotando
la manopola verso destra.
Dati tecnici
Formato piste:
4 piste, 2 canali stereo
Testine: 4
Deck I:1 di cancellazione ed 1 di registrazione/riproduzione
(rotante)
Deck Il:1 di cancellazione ed 1 di registrazione/riproduzione
(rotante)
Tipo nastro:
Nastri a cassetta C-60 e C-90 (tipo Philips)
Velocità nastro:
4,76 cm/sec(1-7/8 ips)
9,5 cm/sec (3-3/4 ips;duplicazione ad alta velocità)
Comando dell'altezza:
±
10%
Motori:
2 servomotori CC
Wow e Flutter (WRMS):
0.09%.
Risposta in frequenza (globale, -20dB):
25 - 19000 Hz, nastro Metal
25 - 18000 Hz, nastro CrO2
25 - 17000 Hz, nastro normale
Rapporto segnale/rumore (globale):
59dB (NR disattivato, livello THD 3%, pesato)
69dB (Dolby NR B attivato, più di 5 kHz)
79dB (Dolby NR C attivato, più di 1 kHz)
Tempo di avvolgimento veloce:
Circa 110 sec. per C-60
Ingressi:
Line: 97mV, 50k ohms
Mic: 0.38 mV, 200 ohms
Uscite:
Line: 0,52V per un'impedenza di carico di 50k ohms o più
Cuffie: 8 ohm
Alimentazione:
120 V di c.a., 60 Hz (modello USA)
230 V di c.a.,50Hz(modelli britannico ed europeo)
120/230 V di c.a., 50-60 Hz
(modello generale per l'esportazione)
240 V di ca., 50 Hz(modello per l'Australia)
Consumo energia:
22 W
Dimensioni (LxAxP):
435 x 127 x 292 mm (17-1/8" x 4-15/16" x 11-1/2"
)
Peso netto:
4.0 kg (8-13/16 Ibs.
)
Accessori in dotazione:
Telecomando (RC-615)
2 batterie (tipo SUM-3,"AA","R6")
Cavo di collegamento ingresso-uscita
… Eventuali miglioramenti possono comportare cambiamenti di
dati tecnici e di caratteristiche senza preavviso.
… Le fotografie e le illustrazioni possono differire leggermente
dal modelli prodotti.

52
Previo al empleo
Lea lo siguiente antes de poner en funcionamiento
el aparato
… Elija con cuidado el lugar de instalación para su aparato. No
lo coloque a la luz solar directa o cerca de fuentes que
generen calor. Evite también lugares expuestos a vibraciones
y muy polvorientos, calurosos, fríos o húmedoss. Manténgalo
alejado de fuentes de zumbidos tales como transformadores
o motores.
… No abra el gabinete ya que esto podría producir daños en los
circuitos o electrochoques. Si entrara algún objeto en el
interior del aparato, póngase en contacto con su
concesionario.
… Al desenchufar el cordón del tomacorriente, tire siempre de
la clavija, nunca del cordón.
… No utilice solventes químicos para limpiar el aparato ya que
podría dañar el acabado. Use un paño seco y limpio.
… Guarde este manual en un lugar seguro para usarlo como
referencia en el futuro.
Manipulación de cintas
No almacene las cintas en los siguientes lugares:
… En la parte superior de calentadores, expuestas a la luz
directa del sol o en cualquier otro lugar con alta temperatura.
… Cerca de altavoces, receptores de TV o amplificadores o
dónde puedan ser sujetas a fuertes campos magnéticos.
… Dónde la humedad sea elevada y en lugares sucios o
polvorientos.
… Evite dejar caer o someter a los cassettes a choques fuertes.
… Como las cintas C-120 son débiles y pueden atascarse en el
mecanismo de transporte, no las use.
Selección de cinta
Para que la función de selección automática de cinta funcione
correctamente, las cintas de metal y de cromo (cobalto), deben
tener orificios de identificación.
Carga de un cassette
1. Utilice el dedo o un lápiz para
girar el carrete del cassette si
la cinta está floja.
… Trate de no tocar la cinta. Las
huellas digitales atraen polvo
y suciedad.
2.Presione el botón de expulsión
(EJECT) para abrir el
portacassette.
… El portacassette no puede
abrirse durante una grabación
o reproducción.
3. Coloque el cassette con la
parte abierta hacia abajo.
4. Cierre suavemente el
portacassette.
Conexiones
… Apague todos los equipos antes de efectuar las conexiones.
… Lea las intrucciones de cada componente que piensa utilizar
con el magnetófono.
Metal
(
2
(
Type%^
Type#
(
Type%
)
)
)
CrO
Normales
REC PLAY
Amplificador estereofónico
W-860R
Tomacorriente de CA

ESPAÑOL
53
Las cabezas y la trayectoria de la cinta deben limpiarse y
desmagnetizarse periódicamente.
Limpieza de la trayectoria de la cinta
… Aplique el líquido de limpieza de cabezas a un hisopo
especial o paño suave y frote ligeramente las cabezas,
cabrestantes y todas las partes metálicas de la trayectoria de
la cinta.
… Limpie también los rodillos de presión usando el líquido de
limpieza para goma.
Desmagnetización de las cabezas
Asegúrese que la alimentación esté desconectada, luego
desmagnetice las cabezas usando el desmagnetizador. Para
mayores detalles sobre su uso, lea sus instrucciones.
Precaución:
Cuando la superficie de la unidad se ensucia, límpiela con un
trozo de tela suava o use un líquido de limpieza diluido y neutro.
Límpiela por completo. No se debe usar diluente, bencina o
alcohol pues podrían dañar la superficie de la unidad.
Mantenimiento
Instalación de las pilas
1. Abra la tapa del compartimiento de las pilas.
2. Coloque dos pilas "AA" (R6, SUM-3).
Asegúrese de que las pilas queden ubicadas con sus polos
positivo
± y negativo — correctamente posicionados.
3. Cierre la tapa hasta que se trabe.
Cambio de pilas
Si nota que ha disminuido la distancia necesaria para un control
correcto entre el control remoto y el reproductor, significa que
las pilas están gastadas. En este caso, reemplácelas por
nuevas.
Precauciones con las pilas
… Asegúrese de insertar las pilas con sus polaridades positiva
± y negativa — correctas.
… Utilice el mismo tipo de pilas. Nunca utilice diferentes tipos
de pilas juntas.
… Pueden utilizarse pilas recargables y no recargables.
Refiérase a las precauciones en sus rótulos.
… Si no va a utilizar el control remoto por mucho tiempo (más
de un mes), retire las pilas para evitar pérdidas. Si se
produce pérdidas, limpie el líquido en el interior del
compartimiento y cambie las pilas por nuevas.
… No caliente ni desarme las pilas y nunca arroje pilas gastadas
al fuego.
Operación de control remoto
La unidad de control remoto suministrada le permite controlar el
aparato a distancia.
Cuando opere con el control remoto, diríjalo hacia el sensor
remoto en el panel frontal del aparato.
… Aunque se utilice la unidad dentro del margen de
funcionamiento efectivo, es imposible el control a distancia si
hay obstáculos entre el reproductor y el control remoto.
… Si se utiliza la unidad cerca de otros aparatos que generen
rayos infrarrojos o si se emplean otros aparatos de control
remoto por rayos infrarrojos cerca del reproductor, es posible
que éste no funcione correctamente. Del mismo modo, es
posible que los otros aparatos tampoco funcionen
correctamente.

54
Nombre de controles
Selector del sistema reductor de ruido Dolby
(DOLBY NR)
Interruptor TIMER
Portacassette ( TAPE I )
Interruptor de alimentación
Conmutador de modo de inversión
Botón de grabación paralela
Botón de inversión sincronizada
Botón de reposición del contador ( I )
Botón de verificación de comienzos de canciones
Botón de búsqueda de secciones sin grabar
Botones de comienzo de copia
Bóton de reposición del contador ( II )
*Botones de operación de la cinta
Portacassette ( TAPE II )
Botón de pausa
*Botones de operación de la cinta
Botón de grabación
Medidor de nivel de cresta
Contador ( I )
Indicateurs de lacement de copie
Indicadores de REC/PLAY ( I )
Control de nivel de grabación
Control de nivel de micrófono
Jack para micrófono
Botón de expulsión ( I )
Botón de silenciamiento de grabación
de la cinta y pausa( I )
Indicadores de dirección
Indicador de inversión sincronizada
SYNC REV BLANK SCAN
Indicadores de REC/PLAY ( II )
REC
PLAY
PARALLEL
HIGH DUB
NORM DUB
Contador ( II )
Mando PITCH CONTROL
Indicadores de grabación paralela
REC
PLAY
Jack para auriculares
Botón de expulsión ( II )
Indicador de búsqueda
Indicadores de dirección
de secciones sin grabar
Botones de comienzo de copia
Á :Botón de reproducción en avance
Ó :Botón de reproducción en retroceso
ª :Parada
Ô:Botón de rebobinado
:Botón de avance rápido
de la cinta y pausa( II )
Botón de inversión sincronizada
Botón de búsqueda
Botón de verificación de comienzos de canciones
de secciones sin grabar
Botón de grabación
Botón de reposición del contador
Botón de pausa
*Botones de operación de la cinta
Botón de silenciamiento de grabación

Reproducción continua
1. Coloque cassettes pregrabados en TAPE I y TAPE II.
2. Seleccione el sistema reductor de ruido DOLBY deseado.
3. Coloquel el selector REV MODE en
la posición CONT PLAY (
ä).
4. Presione el botón
Ó o Á del
magnetófono que desee que se
reproduzca primero.
5. Las cintas se reproducirán en forma continua.
… Para parar la reproducción continuada antes de reproducir
las cintas 5 veces, presione el botón STOP de cualquiera de
las platinas.
ESPAÑOL
55
Reproducción
Reproducción continua
Reproducción con TAPE I o TAPE II
1. Presione el interruptor POWER ubicándolo en ON.
2. coloque el selector REV MODE en el modo requerido.
3. Coloque un cassette pregrabado en TAPE I o II.
4. Seleccione el sistema reductor de ruido DOLBY deseado.
5. Presione el botón
Ó o Á de TAPE I o II para iniciar la
reproducción.
6. Ajuste el volumen con el control correspondiente del
amplificador.
… Para detener la reproducción, presione el botón STOP.
1. Cuando la cinta comienza a reproducirse en
la dirección de avance, se invierte al final de
la misma y se reproduce el otro lado. Al
finalizar este lado, se desactiva
reproducción. Cuando la cinta comienza a
reproducirse en la dirección inversa, se
desactiva TAPE I al final de la misma.
2. El control es transferido a TAPE II.
La reproducción se inicia en la dirección de
avance; al finalizar la cinta se invierte y se
reproduce el otro lado.
3. Al final de la cinta, el control es transferido
nuevamente a TAPE I, que reproduce los dos
lados.
… Las cintas TAPE I y II son reproducidas 5
veces en total y después de ello esta
functión se desactiva.
Uso de PITCH CONTROL (TAPE I solamente)
Utilizando la perilla PITCH CONTROL, es posible el control de
paso de la platina (velocidad de la cinta) en el modo de
reproducción. La gama variable de velocidades de la cinta es
más o menos el 10% de la velocidad normal. Con este control
ubicado en su posición central, la velocidad de la cinta será
normal. Girando el control hacia + (
-
) aumentará (disminuirá) la
velocidad.
… Cuando utilice el PITCH CONTROL, asegúrese de usar cintas
no codificadas con el sistema Dolby. Si se reproduce una
cinta codificada con Dolby, es posible que el sonido no sea
bueno.
Ä: Reproducción de un sólo lado
ï
Ë
ä
Ë: LadoA ∑ LadoB ∑ parada
ä: ∑ LadoA ∑ LadoB
La cinta parará después de 5 ciclos.
ï
Ë
ä
TAPE I
Lado A Inicio
Lado B Inicio
TAPE II
Lado A Inicio
Lado B Inicio

56
Reproducción
Contador de cinta
El contador de cinta se incrementa cuando la cinta se está
moviendo hacia adelante y se reduce cuando la cinta está
siendo rebobinada. La indicación puede ser borrada
presionando el botón CLEAR que reposiciona la lectura del
contador a "0000".
Función de verificación de comienzos de canciones
(Intro Check)
Esta función facilita la búsqueda de una canción en especial,
detectando secuencialmente el comienzo de cada canción.
Presione el botón INTRO CHECK.
La platina avanzará rápidamente la cinta hasta el comienzo de
una canción, reproduciendo los primeros 15 segundos (aprox.),
y luego avanzará rápidamente hasta el comienzo de la siguiente
canción iniciándose nuevamente el ciclo desde ese punto.
… Cuando se presiona el botón de reproducción de TAPE I
durante el modo de verificación de comienzos de canciones,
se reanuda la reproducción normal.
… Si no se presione el botón STOP, esta función se desactiva
de acuerdo con la posición del selector REV MODE.
Ä: Se desactiva cuando la cinta llega al final.
Ë: Se desactiva cuando la cinta llega al final del lado de
retroceso.
ä: Se desactiva una vez explorados los dos lados a
partir del lado inicial.
Función de búsqueda de secciones sin grabar
Esta función se utiliza para saltar prolongadas secciones sin
grabar durante la reproducción.
1. Durante la reproducción, presione el botón BLANK SCAN
(se enciende el indicador).
Si se detecta una sección sin señal de más de 10 segundos
durante la reproducción, el magnetófono se establece
automáticamente en el modo de avance rápido hasta que se
detecta el comienzo de la próxima sección grabada,
reanudándose la reproducción desde dicho punto.
2. Para cancelar la búsqueda de secciones sin grabar,
presione nuevamente el botón BLANK SCAN (se apaga el
indicador).
Notas:
… Con el selector REV MODE en la posición Ë o ä ,
cuando el botón BLANK SCAN está activado, la cinta avanza
rápidamente al final de cualquier lado del casette después de
haber circulado por 10 segundos sin ningún sonido.
… Para verificar si la cinta es completamente virgen, inicie la
búsqueda de secciones sin grabar al comienzo de cualquier
lado con el selector REV MODE en la posición
ä.
… Si hay secciones de la cinta con un registro de señales de
bajo nivel, debido a una atenuación del sonido, etc., éstas
pueden ser detectadas como secciones sin grabar
iniciándose la búsqueda, en cuyo caso la música será
interrumpida por unos 10 segundos.
Riproducción
15seg.
15seg.
Avance rápido
Canción
Blanco
*Se requieren más de
aproximadamente 4 seg.
Sin sonido por
10 segundos
Reproducción
Reproducción
Lado A
Lado B
Reproducción
Reproducción
Avance rápido
Sin sonido por
10 segundos
Avance rápido
Lado B Principio

ESPAÑOL
57
Función CPS (Búsqueda automática de programa por
computadora)
La función CPS permite la selección y reproducción de
cualquier canción dentro de un máximo de 20 canciones
posteriores o previas a la reproducida. Esta función opera
detectando los espacios en blanco de 4 segundos como
mínimo entre canciones. Estos blancos pueden crearse
utilizando la función de silenciamiento de grabación.
Durante la reproducción en avance, presione repetidamente
el botón
Ô o hasta que aparezca el número de
canciones a saltarse en el contador.
Utilíce el botón para ubicar la siguIente canción y el botón
Ô para la canción anterior.
Natas sobre CPS
La función CPS detecta y cuenta los espacios de
aproximadamente 4 segundos que corresponden normalmente
a los intervalos entre canciones. Por lo tanto, con los siguientes
tipos de cintas, es posible que la búsqueda no funcione
correctamente.
… Cuando no pueden detectarse los intervalos entre canciones.
- Intervalos de menos de 4 segundos.
- Alto nivel de ruido en los Intervalos.
- Largas secciones con bajo nivel (en música clásica, etc.)
Este problema puede corregirse utilizando la función REC
MUTE.
Cómo seleccionar la canción deseada utilizando CPS
Ej*:
Para seleccionar la 3° canción
posterior a la posición actual de la
cinta, seleccione "CP03".
Si "t" es de menos de 4 segundos, no
será contado como espacio en
blanco. En este caso, designe “CP02”
en lugar de “CP03” para seleccionar
la 3° canción.
Contador
Nota:
Para simplificar la descripción, la explicación corresponde a la
"reproducción en avance" (dirección
Á). Un procedimiento
similar debe usarse para "reproducción en retroceso".
… Si se pasa el númelo CPS deseado mediante el botón ,
utilice el botón
Ô para retroceder hasta el número CPS
requerido.
… Cuando se presiona el botón , la próxima canción es
contada como "1" y cuando se presiona el botón
Ô, la
canción actual es contada como "1".
La cinta avanza rápidamente y se van detectando los espacios
en blanco entre canciones hasta que se ubica la canción
deseada. Entonces se inicia la reproducción desde el principió
de la canción seleccionada.
Ej
1 1 2 32
Dirección de la cinta
Posición actual de la cinta
1 1 22
Dirección de la cinta
t
Posición actual de la cinta
*

Grabación con TAPE I y TAPE II
Grabación de un sistema estereofónico
1. Presione el interruptor POWER ubicándolo en ON.
2. Si desea realizar una grabación
bidireccional, coloque el selector REV
MODE en la posición
Ë.
3. Coloque un cassette apto para grabar
en TAPE l o II.
… Verifique que el cassette tenga sus lengúetas de seguridad.
Si han sido extraídas, cubra los orificios con cinta adhesiva.
4. Seleccione el sistema reductor de ruido Dolby deseado.
5. Presione el botón RECORD.
La platina se establecerá en el modo de pausa de grabación
(se encienden los indicadores REC y
π ).
6. Ajuste el nivel de grabación con el control REC LEVEL de tal
forma que el sonido más fuerte a grabarse haga que los
medidores lleguen brevemente al punto "0 dB"(para cintas
normales o de cromo) o al punto "+3 dB" (para cintas
metálicas).
Grabación
58
7. Presione otra vez el botón PAUSE π para iniciar la
grabación.
… Para parar la grabación temporariamente, presione el botón
PAUSE. Para reiniciar el transporte de cinta, presione el
botón PAUSE o el botón
Ó/Á de reproducción. Con el
modo de pausa de grabación activada y si presiona el botón
cuyo indicador
Ó/Áestá encendido, se iniciará la grabación;
sin embargo si presiona el botón cuyo indicador
Ó/Áno está
encendido, sólo cambiará el sentido de transporte de la
cinta. Para reiniciar el transporte de cinta, presione el botón
otra vez.
… Para parar la grabación, presione el botón STOP.
Borrado
Cualquier material previamente grabado en la cinta será
automáticamente borrado al efectuar una nueva grabación en la
misma. También puede borrarse una cinta “grabando”’ sobre
ella con el control de nivel REC LEVEL ubicado en la posición
"
‹".
Silenciamiento de grabación
Espaciamiento automático para secciones sin grabar de 4
segundos (durante la grabación)
1. Presione el botón REC MUTE durante una grabación.
El movimiento de la cinta continúa y queda una sección en
blanco de unos 4 segundos (destella el indicador REC). El
magnetófono se establece automáticamente en el modo de
pause de grabación (se encienden los indicadores REC y
π).
2. Para reanudar la grabación, presione el botón PAUSE (se
apaga el indicador
π).
… Espaciamiento automático para secciones sin grabar de
4 segundos (durante el moda de pausa de grabación)
En el modo de pausa de grabación, la pulsación del botón
REC MUTE iniciará automáticamente el silenciamiento de la
grabación mencionado. El magnetófono retornará después al
modo de pausa de grabación.
… Para una sección sin grabar de más de 4 segundos
Durante la grabación, mantenga presionado el botón REC
MUTE por más tiempo. Quedará una sección sin grabar
mientras se mantenga presionado el botón. Suelte el botón
para establecer el modo de pausa de grabación. Para
reanudar la grabación, presione el botón PAUSE.
… Para una sección sin grabar de menos de 4 segundos
Después de presionar el botón REC MUTE durante la
grabación, presione el botón PAUSE antes de que hayan
transcurrido los 4 segundos. El magnetófono se detendrá y
entrará en el modo de pausa de grabación en el punto donde
se presiono el botón PAUSE. Para reanudar la grabación,
presione nuevamente el botón PAUSE.
Nota:
Durante el silenciamiento de grabación (mientras está
parpadeando el indicador REC), una nueva pulsación del botón
REC MUTE desactivará el silenciamiento y se reanudará al
grabación sin detener la cinta.
ï
Ë
ä
Normal/CrO2 Tape
Metal Tape

Grabación continua (TAPE I a TAPE II)
1. Coloque dos cassettes grabables en TAPE I y TAPE II.
2. Ajuste el sistema de reducción de ruido y REC LEVEL
según se requiera.
3. Ajuste el selector REV MODE en la
posición
ä.
4. Presione el botón RECORD y luego
PAUSE (o reproducción) de TAPE I
para iniciar la grabación.
Cuando finaliza la grabación en TAPE I,
se inicia automáticamente la grabación
en TAPE II en la dirección de avance.
5. Para desactivar el modo de grabación continua, presione
el botón STOP.
Notas:
… En la grabación continua, puesto que TAPE II inicia siempre
la grabación en la dirección de avance, verifique que el
cassette colocado en esta platina pueda grabarse de ambos
lados.
… Es imposible la grabación continua de TAPE II a TAPE I.
… Si la dirección de movimiento de la cinta está fijada para el
lado de retroceso en TAPE I, la grabación se realizará sólo en
dicho lado de la cinta colocada en esta platina.
Grabación paralela
Puede grabarse una misma fuente en dos cassettes
simultáneamente.
1. Realice los pasos 1 al 6 descriptos en "Grabación con
TAPE I y TAPE II" pero en el paso 3 coloque cassettes en
TAPE I y TAPE II.
2. Presione el botón PARALLEL REC.
Notas:
… La grabación se iniciará en la dirección señalada por el
indicador correspondiente; por lo tanto, fije la dirección
previamente.
… Durante la grabación, sólo funcionan el botón STOP de TAPE
I y los botones STOP, REC MUTE y PAUSE de TAPE II.
… Si se presiona el botón STOP, se detendrán TAPE I y TAPE II,
finalizando la grabación.
ESPAÑOL
59
Grabación de mezcla MIC/LINE
Grabación de mezcla microfónica/línea (MIC/LINE)
Utilizando esta unidad, es posible mezclar las entradas MIC y
LINE IN y luego grabarlas.
1. Enchufe micrófonos con clavija tipo telefónico
normalizada en los jacks MIC del panel frontal de esta
unidad.
2. Utilice auriculares para monitorear las entradas.
Esto prevendrá la retroalimentación acústica “silbido” que
puede ocurrir si escucha el sonido de los altavoces.
3. Antes de la grabación real, ajuste la platina a usarse en el
modo de pausa de grabación y luego equilibre los niveles
respectivos entre las entradas MIC y LINE IN ajustando
manualmente los controles mientras mantiene el nivel de
entrada total dentro de los límites indicados por los
medidores de nivel de cresta.
4. Presione otra vez el botón PAUSE π para iniciar la
grabación.
ï
Ë
ä
LINE
MIC
W-860R

Copia de cintas
60
Copia de cintas (de TAPE I a TAPE II)
Para copiar una sección completa de un cassette pregrabado
1. Coloque el cassette pregrabado en TAPE I y el cassette
en el cual desea realizar la copia en TAPE II.
2. Coloque el selector REV MODE en la posición deseada.
Ä: La copia se realizará de un solo lado.
Ë: La copia se detendrá al final del lado inverso.
3. Ajuste ambos magnetófonos en la dirección Á.
4. Presione el botón DUB START NORMAL o HIGH para
iniciar la copia.
Se encenderá el indicador correspondiente al botón
presionado.
NORMAL: La copia se efectúa a velocidad normal.
HIGH: La copia es 2 veces más rápida que la copia a
velocidad normal.
… PEAK LEVEL METER indica los niveles de las seflales de las
señales de TAPE I; el nivel de grabación de TAPE II se
ajustará automáticamente (al mismo nivel de TAPE II).
… Una vez que finaliza la copia, ambos magnetófonos se
detienen automáticamente da acuerdo con la posición del
botón REV MODE.
… Para detener la copia, presione uno de los botones STOP.
Edición manual con PAUSE (Unicamente TAPE II)
Durante la copia a velocidad normal, puede realizar la edición
de una cinta copiada utilizando el botón PAUSE. Por ejemplo,
puede grabar únicamente las canciones. que le gustan de TAPE
I a TAPE II omitiendo aquellas que no le agradan.
… La pulsación del botón PAUSE, durante la copia a velocidad
normal, establece el modo de pausa de grabación en TAPE
II, mientras que TAPE I continúa la reproducción. Mientras
escucha el sonido de TAPE I, cuando llegue la parte que
desea copiar, presione nuevamente el botón PAUSE para
reanudar la grabación en TAPE II.
ATENCION:
La grabación de cintas pregrabadas, discos o cualquier
otro material publicado o de radiodifusión puede violar
leyes de propiedad intelectual. Examine estas leyes antes
de grabar.
Notas:
… La posición de control de nivel REC LEVEL y del selector
DOLBY NR serán ignoradas durante la copia ya que no
tienen ningún efecto.
… Durante la copia a velocidad normal, sólo funcionan el
botón STOP de TAPE I y los botones STOP y PAUSE de
TAPE II. Durante la copia a alta velocidad, sólo funciona el
botón STOP.
… La calidad sonora de la cinta copiada será ligeramente
inferior a la de la cinta original. Por esta razón, no se
recomienda la copia multigeneracional.
… Si hay un televisor cerca del W-860R durante la copia a
alta velocidad, es posible que se grabe la frecuencia de
exploración horizontal del televisor en la cinta. Si esto
sucede o para prevenirla con antelación, realice la copia a
velocidad normal, apaque el televisor o deje una distancia
adecuada entre ambos aparatos.

ESPAÑOL
61
Copia con inversión sincronizada
El botón SYNC REV permite la inversión sincronizada de ambos
magnetófonos exactamente al mismo tiempo. Esta función es
conveniente cuando se utilizan cintas de diferente duración o
para efectuar una copia completamente igual a la cinta original.
1. Fije la dirección de movimiento de la cinta de ambos
magnetófonos en la dirección
Á (de avance) y coloque el
selectore REV MODE en la posición
Ë.
2. Presione el botón SYNC REV.
(se encenderá el indicador correspondiente)
3. Presione uno de los botones DUB START (HIGH o
NORMAL).
Nota:
… Si se utilizan cintas de diferente duración, aumentará la
sección sin grabar. Para evitarlo, emplee en lo posible cintas
con la misma duración.
La cinta de TAPE I es de menor duración que la de TAPE II
➀
TAPE I se detiene cuando llega al final del lado de avance
y TAPE II se establece en el modo de "grabación sin
señal".
➁
Cuando TAPE II llega al final, TAPE I y II se invierten
simultáneamente y luego reanudan la reproducción y
grabación inversa respectivamente.
➂
Cuando TAPE I llega al final del lado inverso, ambos
magnetófonos se detienen simultáneamente.
La cinta de TAPE I es de mayor duración que la de TAPE II
➀
Cuando TAPE I llega al final del lado de avance, se
establece en el modo de pausa de grabación para el lado
inverso, mientras TAPE I continúa la reproducción.
➁
Cuando TAPE I llega al final, TAPE I y II inician
simultáneamente la reproducción y grabación inversa.
➂
Cuando TAPE II llega al final del lado inverso, ambos
magnetófonos se detienen simultáneamente.
TAPE I
(Reproducción)
Reproducción
Inversión
1
2
ï
Ë
ä
Reproducción
3
TAPE II
(Grabación)
Grabación
Grabación sin señal
1
Grabación
3
Inversión
2
TAPE I
(Reproducción)
Reproducción
Reproducción
1
3
Inversión
2
TAPE II
(Grabación)
Grabación
Grabación
1
3
Inversión
2

Reproducción programada
1. Conecte esta unidad y el sistema estereofónico a un
temporizador de audio comercialmente adquirible como se
muestra en el diagrama.
2. Encienda todos los componentes.
3. Coloque un cassette pregrabado en la TAPE I o II (o en
ambas platinas para una reproducción continua).
4. Coloque el selector REV MODE en la posición requerida.
5. Coloque el selector TIMER en la posición
PLAY.
6. Ajuste el selector DOLBY NR como lo desee.
7. Fije la dirección de la cinta en la cual desea
iniciar la reproducción en la TAPE I y/o II.
8. Fije la hora de inicio (encendido) y la hora de
parada (apagado) deseada en el temporizador. Al finalizar el
ajuste, se apagarán todos los componentes.
Cuando llegue la hora de inicio prefijada, se suministrará
alimentación y se iniciará automáticamente la reproducción.
Notas:
… Cuando se colocan cassettes en ambas platinas con el
selector REV MODE en la posición
Ä o Ë, la TAPE I
comenzará primero la reproducción debido a que tiene
prioridad.
… Cuando se colocan cassettes en ambas platinas con el
selector REV MODE en la posición
ä, es posible la
reproducción continua. Véase la página 55.
… No se olvide de colocar el selector TIMER en la posición 0FF
luego de finalizar la reproducción o grabación programada.
Grabación y reproducción programadas
62
Grabación programada
Grabación de una radiodifusión:
1. Conecte esta unidad y el sistema estereofónico a un
temporizador de audio comercialmente adquirible como se
muestra en el diagrama.
2. Encienda todos los componentes.
3. Coloque un cassette(s) grabable(s) en la TAPE I o II (o
ambas platinas para una grabación continua).
4. Coloque el selector REV MODE en la posición requerida.
5. Coloque el selector TIMER en la posición REC.
6. Sintonice la radiodifusora que desee grabar.
7. Presione el botón RECORO de la píatina
donde se realizará la grabación para
establecer la misma en el modo de pausa de
grabación.
8. Ajuste el nivel de grabación.
9. Ajuste el selector DOLBY NR como lo desee.
10. Fije la dirección de la cinta de la TAPE I y/o II en la que
desea que se inicie la grabación.
11. Fije la hora de inicio (encendido) y la hora de parada
(apagado) deseada en el temporizador. Al finalizar el ajuste,
se apagarán todos los componentes.
Cuando llegue la hora de inicio prefijada, se suministrará
alimentación y se iniciará automáticamente la grabación.
… Es posible la grabación continua con cassettes colocados en
ambas TAPE I y II y el selector REV MODE en la posición
ä,utilizando el temporizador. En cuanto a la grabación
continua, véase la página 59.
Utilizando esta unidad junto con un temporizador de audio, puede efectuarse la grabación o reproducción de cintas a
cualquier hora prefijada.
Conexiones
Temporizador de audio
Corriente alterna
W-860R
Amplificador
Sintonizadore

ESPAÑOL
63
Especificaciones
Sistema de pistas:
4 pistas, 2 canales estereofónicos
Cabezas: 4
Tape I:1 de borrado y 1 de grabación/reproducción (giratoria)
Tape II:1 de borrado y 1 de grabación/reproducción (giratoria)
Tipo de cassette:
C-60 y C-90 (tipo Philips)
Velocidades de la cinta:
4,76 cm/seg.
9,5 cm/seg.(copia a alta velocidad)
Control de tono:
±
10%
Motores:
2 servomotores de CC
Fluctuación y tremolacion (WRMS):
0.09%.
Respuesta de frecuencia (total, -20 dB):
25 - 19.000 Hz, cinta de metal
25 - 18.000 Hz, cinta de cromo
25 - 17.000 Hz, cinta normal
Relación señal-ruido (total):
59 dB (Sistema Dolby desactivado, 3% de distorsión
armónica total, ponderada)
69 dB (Sistema Dolby B activado,más de 5 kHz)
79 dB (Sistema Dolby C activado,más de 1 kHz)
Tiempo de bobinado rápido:
Aproximadamente 110 segundos para C-60
Entradas:
Línea: 97 mV, 50 k ohms
Micrófono: 0,38 mV, 200 ohms
Salidas:
Línea: 0,52 V para una impedancia de carga de 50k ohms o más
Auriculares: 8 ohms
Alimentación:
120 V CA, 60 Hz(Modelo para EE.UU.)
230 V CA, 50 Hz(Modelo para RU/Europa)
120/230 V CA, 50-60 Hz(Modelo de exportación general)
240 V CA, 50Hz(Modelo para Australia)
Consumo de energía:
22 W
Dimensiones(AxAlt.xP):
435 x 127 x 292 mm(17-1/8" x 4-15/16" x 11-1/2"
)
Peso neto:
4.0 kg (8-13/16 Ibs.
)
Accesorios de serie:
Control remote inalámbrico (RC-615)
Pila (tipo SUM-3,"AA","R6") x 2
Cables de conexión de entrada-salida
… Posibles mejoras puede originar cambios en las
especificaciones o características sin aviso.
… Las fotos e ilustraciones puede diferir ligeramente de los
modelos de producción.
Detección de problemas
La localización y reparación de averías de esta unidad es similar
a la de cualquier otro equipo eléctrico o electrónico. No se
olvide de inspeccionar las causas más probables primero. Para
ofrecerle algunas ideas de dónde buscar, vea lo siguiente.
No se enciende al presionar POWER.
® La clavija de alimentación no está bien enchufada.
Enchúfela firmemente.
No hay salida de audio.
® La conexión al sistema estereofónico es incorrecta.
Verifique las conexiones.
Es imposible el uso de la unidad de control remoto.
® El interruptor POWER del reproductor está desactivado
(0FF). Active el interruptor (ON).
® No hay pilas en la unidad de control remoto. Coloque
pilas.
Baja calidad de sonido.
® Las cabezas están sucias. Limpie las cabezas.
® Las cabezas están magnetizadas. Desmagnetice las
cabezas.
® El conmutador Dolby NR está incorrectamente ajustado.
Cambie la posición.
Sonidos extraños.
® Se ha modificado el control de tono. Ajuste el mando de
control de tono en la posición central.
La grabación no funciona.
® Las Iengüetas de protección contra borrado del cassette
están rotas. Coíoque cinta adhesiva para cubrir el orificio.
® Las cabezas están sucias. Limpie las cabezas.
® El nivel de grabación es demasiado bajo. Gire el mando
REC LEVEL hacia la derecha.
Reduccion de ruido Dolby y HX Pro headroom extension
fabricados bajo licencia de Dolby Laboratories Licensing
Corporation. HX Pro producido por Bang & Olufsen.
DOLBY, el símbolo de la D doble
∂ son marcas de Dolby
Laboratories Licensing Corporation.

64
Alvorens in gebruik te nemen
Lees dit alvorens het toestel in gebruik te nemen
… Kies de plaats zorgvuldig voor het installeren van dit toestel.
Vermijd plaatsen in het direkte zonlicht of dichtbij een
warmtebron. Vermijd ook plaatsen die blootstaan aan
trillingen en overmatig stof, te veel hitte, koude of vocht.
Houd het toestel uit de buurt van bronnen met brom zoals
transformators en motoren.
… Open de behuizing niet daar dit kan resulteren in schade aan
de schakelingen of een elektrische schok. Neem kontakt op
met de dealer mochten er vreemde voorwerpen in het toestel
komen.
… Bij het uitnemen van de stekker uit het stopkontakt altijd de
stekker zelf beetpakken en nooit aan het snoer trekken.
… Probeer het toestel niet te reinigen met chemische
oplosmiddelen daar deze de afwerking kunnen aftasten.
Gebruik een schone, droge doek.
… Bewaar deze gebruiksaanwijzing op een veilige plaats om
deze later te kunnen naslaan.
Aansluitingen
… Schakel de spanning van alle apparatuur uit alvorens de
aansluitingen te maken.
… Lees de gebruiksaanwijzing van elk komponent door voordat
u het deck gaat gebruiken.
Behandelen van cassettes
Vermijd voor het bewaren van uw cassettes de volgende
plaatsen:
… Vlakbij of bovenop een verwarming, in de volle zon of op
andere plaatsen met hoge temperaturen.
… Dichtbij luidsprekers, op een TV-toestel of een versterker,
waar de cassettes kunnen worden blootgesteld aan krachtige
magnetische velden.
… Vemijd plaatsen met veel vocht, stof of vuil.
… Zorg dat uw cassettes niet kunnen vallen en niet worden
blootgesteld aan heftige schokken.
… Gebruik liever geen C-120 cassettes, aangezien de uiterst
dunne band hiervan gemakkelijk kan uitrekken en verstrikt
kan raken in het bandloopwerk.
Plaatsen van een cassette
1. Trek eventuele lussen in de
band strak met uw vinger of een
pen zoals afgebeeld.
… Raak de band zelf niet aan.
Vingerafdrukken trekken
namelijk stof en vuil aan.
2. Druk op de uitwerptoets (EJECT)
om de cassettenhouder te
openen.
… De cassettehouder kan niet
tijdens opname of weergave
worden geopenend.
3. Plaats een cassette met de kant
waar de band bloot ligt naar
beneden gericht.
4. Sluit de cassettehouder
voorzichtig.
Soorten Cassetteband
Keuze van de bandsoort:
De automatische bandsoort-instelling van dit apparaat kan
slechts naar behoren werken als cassettes met chroom- (kobalt)
of metaalband zijn voorzien van hun eigen karakteristieke
bandsoort-openingen.
REC PLAY
Stereo versterker
Metaal
(
(
Type#
(
Type%
Type%^
)
)
)
CrO
Normale
2
W-860R
naar een stopkontakt

NEDERLANDS
65
Onderhoud
Inleggen van de batterijen
1. Verwijder het deksel van het batterijvak.
2. Plaats twee "AA" (R6, SUM-3) formaat batterijen.
Zorg ervoor dat de batterijen ingelegd zijn met hun positieve
± en negatieve — polen in de juiste richting.
3. Sluit het deksel (het klikt vast).
Vervangen van de batterijen
Als de bedieningsafstand tussen de afstandsbediening en de
diskspeler echter korter wordt, geeft dit aan dat de batterijen
uitgeput zijn. Vervang de batterijen in dit geval door nieuwe.
Voorzorgsmaatregelen aangaande batterijen
… Zorg ervoor dat de batterijen ingelegd zijn met de juiste
polariteit
± en —.
… Gebruik altijd batterijen van hetzelfde type. Probeer nooit
verschillende typen batterijen door elkaar te gebruiken.
… Zowel oplaadbare als normale batterijen kunnen worden
gebruikt. Zie de voorzorgsmaatregelen op de respektievelijke
labels.
… Haal de batterijen uit de afstandsbediening om lekken te
voorkomen, als de afstandsbediening voor langere tijd
(langer dan 1 maand) niet gebruikt wordt. Veeg de vloeistof
binnen het batterijvak weg en vervang de batterijen door
nieuwe als de batterijen toch hebben gelekt.
… Verhit geen batterijen en haal ze niet uit elkaar en gooi nooit
oude batterijen in het vuur.
Bediening op afstand
Richt de bijgeleverde afstandsbediening tijdens het bedienen op
de signaalontvanger op het voorpaneel van het toestel. De
afstandsbediening kan binnen het in de afbeelding getoonde
bereik worden gebruikt.
… Zelfs bij bediening binnen het effektieve berek kan bediening
van de afstandsbediening onmogelijk zijn als er zich een
obstakel tussen de diskspeler en de afstandsbediening
bevindt.
… Als afstandsbedieningen bij andere toestellen gebruikt
worden die infrarood stralen gebruiken of als andere
afstandsbedieningen met infrarood stralen gebruikt worden
bij de diskspeler kan deze onjuist funktioneren. Omgekeerd
kan het ook voorkomen dat een ander toestel verkeerd gaat
werken.
De koppen en de onderdelen waarlangs de band loopt
dienen geregeld schoongemaakt en gedemagnetiseerd te
worden.
Reinigen van de onderdelen waarlangs de band
loopt
… Breng koppenreinigingsvloeistof aan op speciale katoenen
stokjes of op een zachte doek en wrijf voorzichtig over de
koppen, windassen en alle metalen onderdelen waarlangs de
band loopt.
… Reinig tevens de aandrukrollen m.b.v.
rubberreinigingsvloeistof.
Demagnetiseren van de koppen
Zorg er allereerst voor dat de spanning uitgeschakeld is.
Demagnetiseer vervolgens de koppen m.b.v. de
demagnetiseerder of een gelijkwaardig apparaat. Lees de
bijbehorende aanwijzingen voor details.
Waarschuwing:
Als de behuizing van het toestel vuil wordt, kunt u deze afvegen
met een zachte doek of gebruik maken van een neutraal sopje.
Veeg het oppervlak goed af. Maak nooit gebruik van een
verdunner, benzine of alkohol daar deze het oppervlak van het
toestel kunnen beschadigen.

Benaming van de bedieningsorganen
66
Keuzeschakelaar voor Dolby ruisonderdrukking
Uitwerptoets ( I )
Opnamedempingstoets
Pauzetoets
*Bandtransport bedienigstoetsen
Opnametoets
(DOLBY NR)
Schakelklok-schakelaar
Keuzeschakelaar voor bandloopomkeerfunktie
Opnameniveauregelaar
Mikrofoonniveauregelaar
Mikrofoonaansluitingen
Cassettehouder ( TAPE I )
Snelheidsregelaar
Spanningsschakelaar
Hoofdtelefoonaansluiting
Bandtellernulsteltoetsen ( I )
Toets voor gesynchroniseerde bandloopomkeer
Uitwerptoets ( II )
Introweergavetoets
Blanko-aftasttoets
Parallel opnametoets
Dubbingtoetsen
Bandtellernulsteltoetsen ( II )
Cassettehouder ( TAPE II )
*Bandtransport bedieningstoetsen
Á :Weergavetoets voorwaartse bandlooprichting
Ó :Weergavetoets omgekeerde bandlooprichting
ª :Stoptoets
Ô:Terugspoeltoets
:Snel-doorspoeltoets
REC/PLAY indikators ( I )
Bandteller ( I )
Piekniveaumeter
en pauzeindikators( I )
Bandlooprichtingindikators
SYNC REV BLANK SCAN
REC
PLAY
REC/PLAY indikators ( II )
DUB START indikators
SYNC REV indikator
PARALLEL
HIGH DUB
NORM DUB
Bandteller ( II )
REC
PLAY
PARALLEL REC indikator
BLANK SCAN indikator
Bandlooprichtingindikators
en pauzeindikators( II )
Dubbingtoetsen
Opnamedempingstoets
Introweergavetoets
Blanko-aftasttoets
Toets voor gesynchroniseerde bandloopomkeer
Opnametoets
Bandtellernulsteltoetsen
Pauzetoets
*Bandtransport bedienigstoetsen

Weergave met TAPE I of TAPE II
1. Zet het toestel aan met de POWER schakelaar.
2. Kies met de REV MODE schakelaar de gewenste
bandtransportfunktie.
3. Plaats een voorbespeelde cassette in TAPE l of II.
4. Kies het gewenste Dolby ruisonderdrukkingssysteem met
de DOLBY NR schakelaar.
5. Start de weergave op TAPE I of TAPE II met de
Ó of Á
toets.
6. Stel het volume in met de regelaar op de versterker.
… Druk op de STOP toets om de weergave te stoppen.
NEDERLANDS
67
Weergave
Doorlopende weergave
Gebruik van de PITCH CONTROL regelaar voor de
bandsnelheid (Alleen TAPE I)
Met behulp van de PITCH CONTROL regelaar kan de
bandsnelheid van TAPE I tijdens weergave worden bijgeregeld
binnen een bereik van 10% sneller of langzamer ten opzichte
van de normale snelheid. Als de regelaar in de middenstand is
geklikt, zal de band op de normale snelheid lopen. Door de
regelaar in de "+" of "
-
"richting te verdraaien, zal de
bandsnelheid respektievelijk toe- of afnemen.
… Bijregeling van de snelheid met de PITCH CONTROL
regelaar is alleen mogelijk voor cassettes opgenomen zonder
Dolby ruisonderdrukking. Indien de betreffende cassette wel
met Dolby werd opgenomen, zal de weergavekwaliteit
Doorlopende weergave
1. Plaats voorbespeelde cassettes in TAPE I en TAPE II.
2. Kies het gewenste Dolby ruisonderdrukkingssysteem met
de DOLBY NR schakelaar.
3. Zet de REV MODE schakelaar op CONT PLAY (
ä).
4. Druk op de
Ó of Á toets van het deck met de cassette
die u het eerst wilt spelen.
… Druk op de STOP toets van een van de decks om de
doorlopende weergavefunktie te stoppen voordat de
cassettes vijf keer zijn weergegeven.
1. Weergave gestart in de voorwaartse
richting, zal aan het einde van de band in
tegenovergestelde richting aan de andere
kant worden voortgezet. Aan het einde van
deze TAPE I stopt de weergave.
Als de weergave wordt gestart in de
omgekeerde bandlooprichting zal aan het
einde van de band TAPE I worden
uitgeschakeld.
2. Bediening schakelt over op TAPE II.
Weergave start in de voorwaartse richting;
aan het einde van band word
overgeschakeld op weergave van de
andere cassettekant.
3. Aan het einde van deze kant wordt weer
overgeschakeld naar TAPE I, waar
vervolgens beide kanten worden
weergeven.
… De cassettes in TAPE I en II worden in
totaal vijf keer weergegeven waarna deze
funktie stopt.
Ä:
Afspelen van een enkele cassettekant
Ë: KANT A ∑ KANT B ∑ Stop
ï
Ë
ä
ä: ∑KANT A ∑ KANT B
Na vijfmaal volledig afspelen stopt de
bandloop.
TAPE I
Kant A Begin
Kanto B Begin
TAPE II
Kant A Begin
Kanto B Begin

68
Kort weergeven ban het begin van alle fragmenten
(Intro Check)
Met gebruik van deze funktie kunt u snel het gewenste fragment
opzoeken door achtereenvolgens alle begingedeelten van de
fragmenten kort weer te geven.
Druk op de INTRO CHECK toets.
Het deck spoelt nu automatisch door naar het begin van de
fragmenten en geeft van elk ca. de eerste 15 sekonden weer.
… Druk op de weergavetoets van TAPE I zodra u het gewenste
fragment gevonden heeft.
… Tenzij de STOP toets voortijdig wordt ingedrukt, zal de intro-
aftastfunktie afhankelijk van de stand van de REV MODE
schakelaar als volgt worden uitgeschakeld.
Ä: Schakelt uit zodra het bandeinde wordt bereikt.
Ë: Schakelt uit als het bandeinde van de andere
cassettekant wordt bereikt.
ä: Schakelt uit na het volledig aftasten van beide
cassettekanten.
BIanko-aftastfunktie
Deze funktie biedt u de mogelijkheid om tijdens weergave lange
blanko passages over te slaan.
1. Druk tijdens weergave op de BLANK SCAN toets (de
indikator licht op).
Indien een blanko passage van meer dan 10 sekonden
tijdens weergave wordt waargenomen, zal het deck
automatisch snel doorspoelen tot het begin van het
eerstvolgende geluidsfragment, en daar de weergave
vervolgens hervatten.
2. Door nogmaals op de BLANK SCAN toets te drukken
wordt de blanko-aftastfunktie uitgeschakeld (de indikator
dooft).
Opmerkingen:
… Als de REV MODE schakelaar op Ë of ä staat en de
BLANK SCAN toets ingeschakeld is, zal de band aan het
eind van een cassettekant worden doorgespoeld als er
langer dan 10 sekonden geen geluidssignaal meer is
waargenomen.
… Om te kontroIeren of de gehele cassette blanko is, start u het
blanko-aftasten met de REV MODE schakelaar in de
ä
stand aan het begin van een van beide cassettekanten.
… Indien er een zeer rustige passage op de band is,
bijvoorbeeld zoals tijdens het wegstervende geluid aan het
eind van een nummer, kan het blanko-aftastsysteem in
werking treden en de muziekweergave voor ongeveer 10
sekonden onderbreken.
Weergave
Bandteller
De bandteller telt op wanneer de band in voorwaartse richting
loopt en telt terug tijdens het terugspoelen van de band. Om
een punt op de band terug te vinden kunt u de bandteller op nul
zetten met een druk op de CLEAR nulsteltoets, zodat het
tellervenster "0000" aangeeft.
Weergave
15sekonden
15sekonden
Fragment
Blanko
Snel doorspoelen
*Interval van meer dan
ca. 4 sekonden.
Geen geluid voor
10 sekonden
Weergave
Kanto A
Kanto B
Weergave
Weergave
Weergave
Snel
doorspoelen
Geen geluid voor
10 sekonden
Snel
doorspoelen
Kanto B Begin

NEDERLANDS
69
Kiezen van het gewenste fragment met het CPS fragmentzoeksysteem
Voorbeeld*:
Kies "CP03" voor het 3de
fragment na de huidige positie
van de band.
Zal onderbreking "t" niet
worden meegeteld indien deze
korter dan 4 sekonden is. Stel in
dat geval "CP02" in plaats van
"CP03" in om door te spoelen
naar het 3e fragment.
Bandteller
CPS fragmentzoeksysteem
(Computomatic Program Search)
Met het CPS fragmentzoeksysteem kunt u snel en eenvoudig
een geluidsfragment opzoeken dat tot 20 fragmenten na of voor
het spelende muziekstuk ligt. Het systeem werkt door het
waarnemen van blanko passages van tenminste 4 sekonden
lengte tussen de muziekfragmenten. Deze blanko intervallen
kunnen worden aangebracht met de funktie voor
opnamedemping (REC MUTE).
Druk tijdens voorwaartse weergave net zo vaak op de Ô
of toets totdat het aantal fragmenten dat u wenst over
te slaan op het display wordt getoond.
Gebruik de toets voor doorspoelen naar een verder
gelegen fragment, en de
Ô toets voor terugspoelen naar een
eerder gelegen fragment.
Opmerkingen aangaande het CPS fragmentzoeksysteem
Het CPS systeem werkt door het tellen van blanko passages
van meer dan 4 sekonden en neemt daarbij aan dat deze tussen
muziekfragmenten liggen. Hierdoor zal bij de navolgende
cassettes het CPS systeem mogelijk niet naar behoren
funktioneren.
… Als de intervallen tussen fragmenten niet waarneembaar zijn:
- Intervallen van minder dan 4 sekonden lengte.
- Veel ruis in het interval.
- Zeer lange rustige passages (zoals b.v. in klassieke muziek)
Voor een goede werking van het CPS fragmentzoeksysteem
wordt het aanbevolen om tussen fragmenten een interval van
voldoende lengte aan te brengen met de REC MUTE funktie.
Opmerking:
Om de beschrijving eenvoudig te houden, wordt alleen
uitgegaan van "voorwaartse weergave" (
Árichting). De
procedure in het geval van weergave in de tegengestelde
bandlooprichting is echter gelijk.
… Indien u per ongeluk te vaak op bijvoorbeeld de toets
heeft gedrukt, dan kunt u het aantal fragmenten dat in het
display wordt getoond verminderen door net zo vaak als
vereist op de
Ô toets te drukken.
… Bij het drukken op de toets zal het volgende fragment
als nummer "1" worden geteld. Bij het drukken op de
Ô
toets is het spelende fragment echter nummer "1".
De band spoelt nu door naar het begin van het fragment dat het
gekozen aantal fragmenten verder ligt, waarna automatisch op
weergave wordt overgeschakeld.
*
Vb
1 1 2 32
Bandlooprichting
Bandlooprichting
Huidige positie van de band
1 1 22
Huidige positie van de band
t

Opname
70
Opname met TAPE I en TAPE II
Opnemen van een stereo-installatie:
1. Zet het toestel aan met de POWER schakelaar.
2. Zet de REV MODE schakelaar op de
Ë stand als u een
opname op beide cassettekanten wilt maken.
3. Plaats een cassette geschikt voor opname in TAPE l of II.
… Kontroleer of de wispreventielipjes in de rug van de cassette
nog aanwezig zijn. Indien ze zijn weggebroken dient u de
uitsparingen te bedekken met plakband.
4. Kies het gewenste DOLBY NR ruisonderdrukkingssysteem.
5. Druk op de RECORD toets; het deck schakelt in de
opnamepauzefunktie (de REC en
π indikators lichten op).
6.
Stel het opnameniveau met de REC LEVEL regelaar dusdanig
in dat de meters bij het krachtigste opnamesignaal net het "0
dB" punt bij normale of chroom-cassettes bereiken. Bij
metaalcassettes dient dit piekpunt bij de"+3 dB" te liggen.
7. Druk op de π pauzetoets wanneer u met opnemen wilt
beginnen.
… Om het opnemen tijdelijk te onderbreken, drukt u op de π
pauzetoets. Om het opnemen daarna te hervatten, drukt u
nogmaals op de
π pauzetoets of op de Ó/ Á
weergavetoets. Als u tijdens de opnamepauzestand op de
weergavetoets drukt waarvan het
Ó/Á lampje brandt,
begint het opnemen onmiddellijk; drukt u echter op de
weergavetoets waarvan het
Ó/Á lampje niet brandt, dan
verandert alleen de bandlooprichting; om te beginnen met
opnemen drukt u dan nogmaals op dezelfde toets.
… Om te stoppen met opnemen drukt u op de STOP toets.
Uitwissen
Een eerder gemaakte opname zal automatisch worden gewist
door er een nieuwe opname overheen aan te brengen. Verder
kan opgenomen materiaal ook worden gewist door een opname
te maken met de REC LEVEL regelaar op "
‹".
Opnamedemping (TAPE I/TAPE II)
Automatische intervalfunktie voor blanko intervallen van 4
sekonden (tijdens opname)
1. Druk tijdens opname op de REC MUTE toets.
De band blijft lopen en een blanko interval van 4 sekonden
wordt opgenomen (de REC indikator knippert). Hierna
schakelt het deck automatisch in opnamepauze (zowel de
REC als de
π indikators lichten op).
2. Druk op de PAUSE toets om de opname vervolgens te
hervatten (de
π indikator dooft).
… Automatischeintervalfunktie voor blanko intervallen van 4
sekonden (tijdens opnamepauze)
Door tijdens de opnamepauzefunktie op de REC MUTE toets
de drukken zal de bovenstaande blankoopnameprocedure
automatisch in werking worden gesteld. Het deck zal
vervolgens terugschakelen in opnamepauze, klaar voor
verdere opnamen.
… Opnemen van een blanko interval van meer dan 4
sekondon
Houd de REC MUTE toets tijdens opname voor een langere
periode ingedrukt. Een blanko passage van gelijke lengte zal
op band worden aangebracht. Laat de toets los om in de
opnamepauzefunktie over te schakelen. Druk op de PAUSE
toets om hierna de opname te hervatten.
… Opnemen van een blanke interval van minder dan 4
sekonden
Druk tijdens opname eerst op de REC MUTE toets en
vervolgens, voordat de 4 sekonden om zijn, op de PAUSE
toets. De band zal stoppen en het deck schakelt in op
opnamepauze op het punt waar de PAUSE toets werd
ingedrukt.
Opmerking:
Indien u tijdens het opnemen van een blanko interval (terwijl de
REC indjkator knippert) opnieuw op de REC MUTE toets drukt,
zal de blanko-opname stoppen en de opname direkt worden
voortgezet.
ï
Ë
ä
Normal/CrO2 Tape
Metal Tape

NEDERLANDS
71
Parallelopname (gelijktijdige opname op beide
cassettes)
Dezelfde geluidsbron kan gelijktijdig op beide cassettes worden
opgenomen.
1. Volg de stappen 1 t/m 6 van het gedeelte ‘Opname met
TAPE I en TAPE II’. Laad in stap 3 echter cassettes in
zowel TAPE I als TAPE II.
2. Druk op de PARALLEL REC toets om de opname te
starten.
Opmerkingen
… De opname start in de richting aangegeven door het
oplichtende indikator. Stel derhalve eerst de gewenste
bandlooprichting in.
… Tijdens opname funktioneert alleen de STOP toets van TAPE
I en de STOP, REC MUTE en PAUSE toetsen van TAPE II.
… Als de STOP toets wordt ingedrukt, zullen zowel TAPE I als
TAPE II stoppen met de opname.
4. Druk op de RECORD toets en vervolgens de PAUSE (of
weergave-) toets van TAPE I om de opname te starten.
… Nadat de opname op TAPE I is volbracht, wordt automatisch
overgeschakeld op opname op TAPE II in voorwaartse
richting.
5. Druk op de STOP toets als u de doorlopende opname
wenst te stoppen.
Opmerkingen:
… Daar de opname op TAPE II bij doorlopende opname altijd in
voorwaartse richting wordt gestart, dient de daar geplaatste
cassette geschikt te zijn voor opname op beide kanten.
… Het maken van een doorlopende opname van TAPE II naar
TAPE I is niet mogelijk.
… Als de bandlooprichting van TAPE I in de terugwaartse
(omgekeerde) richting is gesteld, zal alleen een opname
worden gemaakte op de ommezijde van de cassette in TAPE
I.
Gemengd opnemen van mikrofoon- en Iijnsignalen
Het via de MIC aansluiting ingestuurde signaal van een
mikrofoon kan gemengd worden opgenomen met het signaal
dat wordt ontvangen via de LINE IN ingangsaansluitingen.
1. Sluit mikrofoons voorzien van standaard mikrofoonpluggen
aan op de MIC aansluitingen op het voorpaneel.
2. Kontroleer het ingangssignaal via een hootdtelefoon om
"doorzingen" te voorkomen, hetgeen kan optreden tijdens
het beluisteren van het geluid via de luidsprekers.
3. Alvorens het maken van de werkelijke opname, schakel het
te gebruiken deck in de opnamepauzefunktie en regel
vervolgens de relatieve niveau’s van de MIC en de LINE IN
ingangssignalen bij door de volgende regelaars met de hand
bij te stellen terwijl daarbij het totale ingangsniveau binnen de
door de piekniveaumeters aangegeven limieten wordt
gehouden.
4. Druk op de
π pauzetoets wanneer u met opnemen wilt
beginnen.
Doorlopende opname (TAPE I naar TAPE II)
1. Plaats voor opname geschikte cassettes in TAPE I en
TAPE II.
2. Maak de instellingen voor het
ruisonderdrukkingssysteem en REC
LEVEL.
3. Zet de REV MODE schakelaar in de
ä
stand.
Gemengd opnemen van mikrofoon- en Iijnsignalen
ï
Ë
ä
LINE
MIC
W-860R

Dubben
72
Dubben (Kopiëren van TAPE I of TAPE II)
Dubben van al het opgenomen materiaal van een cassette
1. Plaats de bespeelde cassette in TAPE I en de cassette
waarop opgenomen gaat worden in TAPE II.
2. Stel de REV MODE schakelaar in de gewenste stand.
Ä: Slechts één cassettekant zal worden gedubd.
Ë: Dubben zal stoppen aan het eind van de andere kant.
3. Stel beide decks in de Á bandlooprichting.
4. Druk op de DUB START HIGH of NORMAL toets om het
dubben te starten. De met de ingedrukte toets
overeenkomende indikator zal oplichten.
NORMAL:
Dubben vindt plaats met de normale bandsnelheid.
HIGH: Dubben vindt plaats met verhoogde bandsnelheid.
… De PEAK LEVEL METER zal het TAPE I signaalniveau
aangeven; het opname-niveau van TAPE II zal automatisch
worden ingesteld (gelijk aan het niveau van TAPE I).
… Nadat het dubben is voltooid, zullen beide decks
automatisch stoppen overeenkomstig de instelling van de
REV MODE schakelaar.
… Druk op een van beide STOP toetsen om het dubben te
stoppen.
Handbediend monteren met de PAUSE toets
(alleen TAPE II)
Tijdens dubben op normale snelheid kunt u de opname op de
TAPE II cassette monteren met behulp van de PAUSE toets. Zo
kunt u b.v. de niet gewenste fragmenten van TAPE I overslaan
voor opname.
… Indien tijdens dubben op normale snelheid op de PAUSE
toets wordt gedrukt, zal TAPE II op opnamepauze schakelen
en TAPE I de weergave vervolgen. Zodra TAPE I weer een
fragment bereikt wat u wilt opnemen, drukt u eenvoudigweg
opnieuw op de TAPE II PAUSE toets om de opname te
herstarten.
LET OP:
Het opnemen van voorbespeelde cassettes,
grammofoonplaten of ander geluidsmateriaal kan een
inbreuk op de auteursrechtwetgeving inhouden. Stel u
daarom op de hoogte van deze wetten alvorens op te
nemen.
Opmerkingen:
… De instelling van de REC LEVEL regelaar en de DOLBY NR
schakelaar heeft geen invloed op het opnameresultaat
tijdens dubben.
… Tijdens kopiëren met de NORMAL bandsnelheid
funktioneren alleen de STOP toets van TAPE I en de STOP
en PAUSE toetsen van TAPE II. Tijdens kopiëren met de
HIGH bandsnelheid werkt alleen de STOP toets.
… De geluidskwaliteit van de kopie zal iets minder dan het
origineel zijn. Het is daarom niet aan te bevelen om
multigeneratie kopieën te maken.
… Indien er een televisietoestel dichtbij de W-860R staat
tijdens verhoogde snelheid dubben, is het mogelijk dat de
horizontale aftastresolutie van de televisie op de band
wordt opgenomen. Indien dit optreedt, of om dit te
voorkomen, dient u met normale snelheid te kopiëren, de
televisie uit te schakelen, of het deck van de televisie
vandaan te houden.

NEDERLANDS
73
Gesynchroniseerd dubben van beide cassettekanten
Middels de SYNC REV toets kunt ervoor zorgen dat de
cassettes tijdens dubben op precies hetzelfde moment
overschakelen op de andere kant. Deze funktie is met name
handig tijdens het dubben van cassettes van verschillende
lengte of indien u een exact duplicaat van het origineel wilt
maken.
1. Stel de bandloop-richtingindikator van beide decks in de
Á(voorwaartse) richting en de REV MODE schakelaar
op
Ë.
2. Druk op de SYNC REV toets (de overeenkomstige
indikator zal oplichten).
3. Druk op een van beide DUB START toetsen (HIGH of
NORMAL).
Opmerking:
Bij gebruik van cassettebanden met verschillende lengte zal het
blanko gedeelte van de band langer zijn.
TAPE I korter dan TAPE II
➀
Zodra TAPE I het einde van kant 1 bereikt, zal TAPE I
stoppen en TAPE II een opname zonder signaal maken.
➁
Zodra TAPE II het eind bereikt, zullen de TAPE I en TAPE II
cassettes gelijktijdig worden omgekeerd en vervolgens aan
de andere kant respektievelijk de weergave en opname
voortzetten.
➂
Als TAPE I het eind van de 2de kant bereikt, zullen TAPE I
en II tegelijkertijd stoppen.
TAPE I langer dan TAPE II
➀
AIs TAPE II het eind van kant 1 bereikt, zal TAPE II voor de
andere kant in de opnamepauze schakelen, en TAPE I de
weergave vervolgen.
➁
Zodra TAPE I aan het eind komt, zullen TAPE I en II
tegelijkerktijd respektievelijk weergave en opname op de
andere kant vervolgen.
➂
Als TAPE II het eind van de 2de kant bereikt, zullen TAPE I
en II tegelijkertijd stoppen.
TAPE I
(Weergave)
Weergave
1
Omgekeerde
bandloop
2
ï
Ë
ä
Weergave
3
TAPE II
(Opname)
Opname
Signaalloze opname
1
Opname
3
Omgekeerde
bandloop
2
TAPE I
(Weergave)
Omgekeerde
Weergave
1
bandloop
2
Weergave
3
TAPE II
(Opname)
Omgekeerde
Opname
Opname
1
3
bandloop
2

Timer-geregelde funkties
74
Timer-geregeld opnemen
Opnemen van een radioprogramma:
1. Sluit het deck en het audiosysteem aan op een los
verkrijgbare audiotimer volgens de in de afbeelding
aangegeven wijze.
2. Schakel alle komponenten aan.
3. Plaats de cassette(s) waarop u gaat opnemen in TAPE I of II
(of beide decks in geval van een doorlopende opname).
4. Zet de REV MODE schakelaar in de gewenste stand.
5. Zet de TIMER schakelaar op “REC.
6. Stem af op de op te nemen zender.
7. Druk op de RECORD toets van het voor
opname te gebruiken deck om het deck in
de opnamepauzefunktie te schakelen.
8. Stel het opnameniveau in.
9. Stel de DOLBY NR schakelaar in als gewenst.
10. Stel TAPE I en/of II in de bandlooprichting waarin u de
opname wilt starten.
11. Stel de gewenste starttijd (aanschakeltijd) en eindtijd
(uitschakeltijd) in op de audiotimer. Nadat deze instelling is
gemaakt, zal de spanning van alle aangesloten
komponenten worden uitgeschakeld.
Zodra de ingestelde tijd wordt bereikt, zal de spanning worden
ingeschakeld en de opname automatisch van start gaan.
… Timer-geregelde doorlopende opname met cassettes in
beide decks en de REV MODE schakelaar in de ä stand is
tevens mogelijk. Zie pagina 71 voor nadere bijzonderheden
omtrent doorlopende opname.
Timer-geregeld weergeven
1. Sluit het deck en het audiosysteem aan op een los
verkrijgbare audiotimer volgens de in de afbeelding
aangegeven wijze.
2. Schakel alle komponenten aan.
3. Plaats voorbespeelde cassette(s) in TAPE I of II (of beide).
4. Zet de REV MODE schakelaar in de
gewenste stand.
5. Zet de TIMER schakelaar op “PLAY”.
6. Stel de DOLBY NR schakelaar in als
gewenst.
7. Stel TAPE I en/of II in de bandlooprichting
waarin u de opname wilt starten.
8. Stel de gewenste starttijd (aanschakeltijd) en eindtijd
(uitschakeltijd) in op de audiotimer. Nadat deze instelling is
gemaakt, zal de spanning van alle aangesloten komponenten
worden uitgeschakeld.
Zodra de ingestelde tijd wordt bereikt zal de spanning worden
ingeschakeld en de weergave automatisch van start gaan.
Opmerkingen:
… Als er cassettes in beide decks zijn geplaatst en de REV
MODE schakelaar in de
Ä of Ë stand staat, zal TAPE I
voorrang hebben bij het starten van de weergave.
… Doorlopende weergave is mogelijk als er cassettes in beide
decks zijn geplaatst en de REV MODE schakelaar in de
ä
stand is gesteld. Zie pagina 67 voor nadere bijzonderheden.
… Let erop de TIMER schakelaar in de “0FF” stand te zetten
nadat het ingestelde timerprogramma is uitgevoerd.
Door dit toestel in kombinatie met een audiotimer te gebruiken, kunt u cassettes opnemen of weergeven op een vooraf
ingesteld tijdstip.
Aansluitingen
Audiotimer
Netspanning
W-860R
Versterker
Tuner

NEDERLANDS
75
Sporingssysteem:
4 sporen, 2 kanalen stereo
Koppen: 4
Tape I: 1 wis en 1 opname/weergave(roterend)
Tape II: 1 wis en 1 opname/weergave(roterend)
Cassettetype:
C-60 en C-90 cassettes (Philips type)
Bandsnelheid:
4,76 cm/sek.
9,5 cm/sek. bij Hi-Speed kopiëren
Snelheidsfijnregeling:
±
10%
Motoren:
2 gelijkstroom servomotoren
Wow & Flutter (WRMS):
0.09%.
Frekwentierespons (Algemeen) (-20 dB):
25 - 19.000 Hz metaalband
25 - 18.000 Hz CrO2 band
25 - 17.000 Hz normale band
Signaal-tot-ruisverhouding (Algemeen):
59 dB (Zonder ruisonderdrukking,3% totale harmonische
vervorming,symmetrisch)
69 dB (Dolby B aan, boven 5 kHz)
79 dB (Dolby C aan, boven 1 kHz)
Snelspoeltijd:
Ca. 110 sekonden voor C-60 cassette
Ingangen:
Lijn: 97 mV, 50 kOhm
Mikrofoon: 0,38 mV, 200 Ohm
Uitgangen:
Lijn: 0,52 V bij een belastingsimpedantie van 50 kOhm of
meer.
Hoofdtelefoon: 8 Ohm
Spanningsvereisten:
120 V wisselstroom, 60 Hz(V.S. model)
230V wisselstroom, 50 Hz
(Groot-Brittanië en Europees model)
120/230V wisselstroom, 50-60 Hz(Algemeen model)
240V wisseistroom, 50 Hz(Australisch model)
Stroomverbruik:
22 W (wisselstroom)
Afmetingen(BxHxD):
435 x 127 x 292 mm (17-1/8" x 4-15/16" x 11-1/2"
)
Netto gewicht:
4.0 kg (8-13/16 Ibs.
)
Standaard toebehoren:
Draadloze afstandsbediening (RC-615)
Batterijen (SUM-3,"AA","R6") x 2
ln-/Uitgangssnoeren
… Verbeteringen kunnen resulteren in veranderingen in de
technische gegevens of kenmerken zonder voorafgaande
kennisgeving.
… Fotos en afbeeldingen kunnen enigszins afwijken van de
produktiemodellen.
Technische gegevens
Dolby ruisonderdrukking en HX Pro headroom extension
geproduceerd onder licentie van: Dolby Laboratories
Licensing Corporation. HX Pro ontwikkeld door Bang &
Olufsen.
DOLBY, het dubbel D symbool
∂ en HX PRO zijn
handelsmerken van: Dolby Laboratories Licensing
Corporation.
Oplossen van moeilijlkheden
Mocht er zich met dit apparaat een probleem voordoen, dan
kunt u dezelfde werkwijze volgen als voor andere elektrische of
elektronische apparatuur. Kontroleer altijd eerst de mogelijke
oorzaken die het meest voor de hand liggen. Als leidraad kunt u
bijvoorbeeld de volgende kontrolepunten doornemen:
Geen spanning wanneer de POWER toets ingedrukt wordt.
® De stekker is niet goed ingestoken. Steek de stekker
stevig in.
Geen weergave van geluid.
® Aansluiting op het stereosysteem is niet korrekt. Ga de
aansluitingen na.
Op afstand bedienen is niet mogelijk.
® De POWER schakelaar van de diskspeler staat uit (0FF).
Zet de schakelaar aan (ON).
® Geen batterijen in de afstandsbediening. Plaats batterijen.
De geluidskwaliteit is beneden peil.
® De bandkoppen zijn vuil. Maak de bandkoppen schoon.
® De bandkoppen zijn gemagnetiseerd. Demagnetiseer de
koppen.
® De DOLBY NR schakelaar staat in de verkeerde stand. Zet
de schakelaar om.
De weergave klinkt vreemd.
® De snelheidsregelaar is verdraaid.
Zet de snelheidsregelaar terug in de middenpositie.
Het opnemen werkt niet.
® Een of beide wispreventienokjes van de geplaatste
cassette zijn uitgebroken. Plak de ontstane
uitsparing(en) af met plakband.
® De bandkoppen zijn vuil. Maak de bandkoppen schoon.
® Het opnameniveau staat te laag ingesteld. Draai de REC
LEVEL regelaar wat verder naar rechts.

TEAC CORPORATION
PRINTED IN CHINA 1199.MA-0354A
W-860R/W-790R
Z
3D0034400A
Notes regarding timer recording
When using the timer recording function, recording always starts using side A of the
cassette. If you have previously used the cassette, and the tape is stopped part of the
way through side B of the cassette, timer recording will then start part of the way
through the A side. Always bear this in mind, so that you do not accidentally erase any
important recordings. You should take special note of this after recording twice or more
on the same cassette using the timer recording function.
Notes concernant l’enregistrement programmé
Avec l’utilisation de l’enregistrement programmé, l’enregistrement commence toujours
par le côté A de la cassette. Si vous avez précédemment utilisé la cassette et que la
bande est arrêtée quelque part sur le côté B, l’enregistrement programmé commencera
à cette place-là mais sur le côté A. Gardez toujours cela en tête afin de ne pas effacer
accidentellement d’importants enregistrements. Vous devriez noter ceci après avoir
enregistré 2 fois ou plus sur la même cassette en utilisant la fonction enregistrement
programmé.
Anmerkungen zur Timer-gesteuerten Aufnahme:
Bei der Timer-gesteuerten Aufnahme beginnt die Aufzeichnung immer in der üblichen
Laufrichtung der Kassette (A-Seite: nach rechts) und nicht in Reverse-Richtung. Wenn
Sie die Kassette bereits vorher abgespielt und auf der B-Seite gestoppt haben, beginnt
die Timer-gesteuerte Aufnahme an dieser Stelle, bespielt aber Seite A.Bitte
berücksichtigen Sie dies stets, um ein unbeabsichtiges Löschen wichtiger Aufnahmen
zu vermeiden. Insbesondere sollten Sie darauf achten, wenn Sie eine Kassette bereits
zwei- oder mehrmals Timer-gesteuert bespielt haben.
Osservazioni riguardanti la registrazione con l'uso del timer.
Quando si applica la funzione di registrazione con l'uso del timer, ricordare che bisogna
sempre iniziare dal lato A della cassetta. Qualora la cassetta del A. Tenere presente
questo importante particolare, per non correre il rischio di cancellare accidentalmente
qualche importante registrazione, tramite l'uso del timer.
NOTAS
Al utilizar la función de grabación por temporizador, la grabación siempre comienza por
la cara A del cassette. Si la cinta de cassette ha sido utilizada previamente y se
encuentra parada en algún punto de la cara B, la grabación por temporizador empezará
en el punto correspondiente de la cara A. Tenga esto siempre en mente, ya que puede
borrar accidentalmente cualquier grabación importante, especialmente después de
haber grabado dos o más veces la misma cinta utilizando la función de grabación por
temporizador.
 Loading...