

Page 1

TASCAM
TEAC Professional Division
D00000000A
MMR-8
Modular Multitrack Recorder
MMP-16
Modular Multitrack Player
MMR-8/MMP-16 Version 1.25 through 1.27
OWNER’S MANUAL UPDATE
Page 2

MMR-8 Version 1.25 through 1.27 Update
Table of Contents
TABLE OF CONTENTS ............................................................................................................................2
MMR/MMP VERSION 1.25 THROUGH 1.27 UPDATE............................................................................... 3
INSTALLING THE MMR/MMP SOFTWARE UPDATE................................................................................. 3
BACKUP IN DESTRUCTIVE RECORD MODE .............................................................................................. 3
KEYBOARD OPERATION (WITH MM-RC OPTION).................................................................................... 4
The MM-RC Keyboard Connector ................................................................................................... 4
Using the PC Keyboard................................................................................................................... 5
OMF EXPORT....................................................................................................................................... 6
Creating an OMF Export ................................................................................................................. 6
To Import the OMF Export File into Pro Tools................................................................................ 6
Crossfades in OMF .......................................................................................................................... 7
SUPPORT FOR PRO TOOLS
CHANGING THE DEFAULT RECORD DRIVE................................................................................................ 7
Recording four tracks each to two drives simultaneously................................................................. 7
Set up a Project template on each drive....................................................................................................... 8
Create an “A” project on the lowest numbered SCSI drive...................................................................... 8
Create a “B” project on the lowest numbered SCSI drive........................................................................ 8
Copy (backup) the “B” project to the second drive.................................................................................. 8
Setting up to Record ................................................................................................................................... 8
Load Project “A” from the first drive...................................................................................................... 8
Load tracks from Project “B”.................................................................................................................. 8
USING THE MMR EDITOR PORT (SONY P-2 PROTOCOL).......................................................................... 9
New Editor Mode Menus.................................................................................................................. 9
Menu 400: Editor Device............................................................................................................................ 9
Sony PCM-7030..................................................................................................................................... 9
Sony BVU-950....................................................................................................................................... 9
TASCAM MMR-8 ................................................................................................................................. 9
Menu 401: Editor Auto EE.........................................................................................................................10
Menu 402: Editor Edit Fld .........................................................................................................................10
Auto......................................................................................................................................................10
Field 1 ..................................................................................................................................................10
Field 2 ..................................................................................................................................................10
Menu 403: Editor Trk Arm ........................................................................................................................11
Digital Audio ........................................................................................................................................11
Analog A1-A4.......................................................................................................................................11
Local [enbl+any] ...................................................................................................................................11
Local [enbl+Aud] ..................................................................................................................................11
Local [enbl+A1] ....................................................................................................................................11
Local [enbl+A2] ....................................................................................................................................11
Local [enbl+A3] ....................................................................................................................................11
Local [enbl+A4] ....................................................................................................................................11
SOFTWARE VERSION 1.26.................................................................................................................... 12
OMF Export Enhancements........................................................................................................... 12
Bowties .....................................................................................................................................................12
Overlapping Events....................................................................................................................................12
Tape Mode Export to OMF........................................................................................................................12
Dynamic Backup Status Display .................................................................................................... 12
Locking Kingston Carrier Option .................................................................................................. 13
Loop Mode Bug Fix....................................................................................................................... 13
SOFTWARE VERSION 1.27.................................................................................................................... 13
Backup Bug Fix............................................................................................................................. 13
OMF to WaveFrame Conversion.................................................................................................... 13
®
3.2 SESSION FILES....................................................................................... 7
Tascam MMR/MMP Owner’s Manual • Version 1.25 Update Information2
Page 3

MMR/MMP Version 1.25 through 1.27 Update
This document details changes and new features in the software Versions 1.25 through 1.27 for the
TASCAM MMR-8 and MMP-16 Modular Multitrack units and the MM-RC remote. The Version
1.25 changes are detailed first, while the Version 1.26 and Version 1.27 changes are detailed
separately only in the last section.
Installing The MMR/MMP Software Update
To install software in an MMR-8, first make sure the unit to be updated already has version 1.2 or
higher software already installed (the Rescue A boot disk version is also acceptable). The most
recent software update may be downloaded from the TASCAM web site at
http://www.tascam.com. The software fits on a single floppy disk. To install the software update,
insert the floppy disk into the front panel floppy drive while the unit is operating normally. Access
Menu 995 (Load Software) and press STO. The system will ask “Are you sure?” Make sure the
floppy is properly inserted and press STO again to confirm. After the software update is installed,
the system will display a message that the update is complete to verify that the installation has been
successful. Remove the floppy disk and recycle the power on the unit to operate it with the new
software installed. Keep system floppy disks in a secure location in case they may be needed in the
future.
Backup In Destructive Record Mode
Previous versions of the MMR-8 / MMP-16 software did not allow backing up a project while in
Destructive Record (Auto-Cleanup or Tape Mode). The purpose of this was to prevent backing up
a tape mode project while recording to the same project. This restriction has been removed in
Version 1.25 to allow more freedom for users of the MMR-8 and MMP-16 in backing up projects,
and it is now possible to backup a project regardless of the current Record Mode. Note that it is
still important not to backup an active project which is loaded and being recorded into. Recording
into a project while backing it up at the same time will produce unknown consequences. To be safe,
only back up projects that are not currently loaded.
Tascam MMR/MMP Owner’s Manual • Version 1.25 Update Information 3
Page 4
Keyboard Operation (with MM-RC option)
Note: The internal software of the MM-RC will be automatically updated when an MMR-8 or
MMP-16 is booted with version 1.25 software while attached to the MM-RC. Be sure the power
switch of the MM-RC is on while the MMR/P unit is started so the unit can sense the presence of
the remote.
The optional MM-RC (Remote Control unit) has a keyboard connector located on the rear panel
which accepts a standard PC-AT style keyboard. The purpose of the keyboard is to facilitate
selecting menu items while in the Setup Mode and to make it easier to name Projects and Tracks.
There is no way to connect a keyboard directly to the MMR or MMP – this must be done using the
MM-RC.
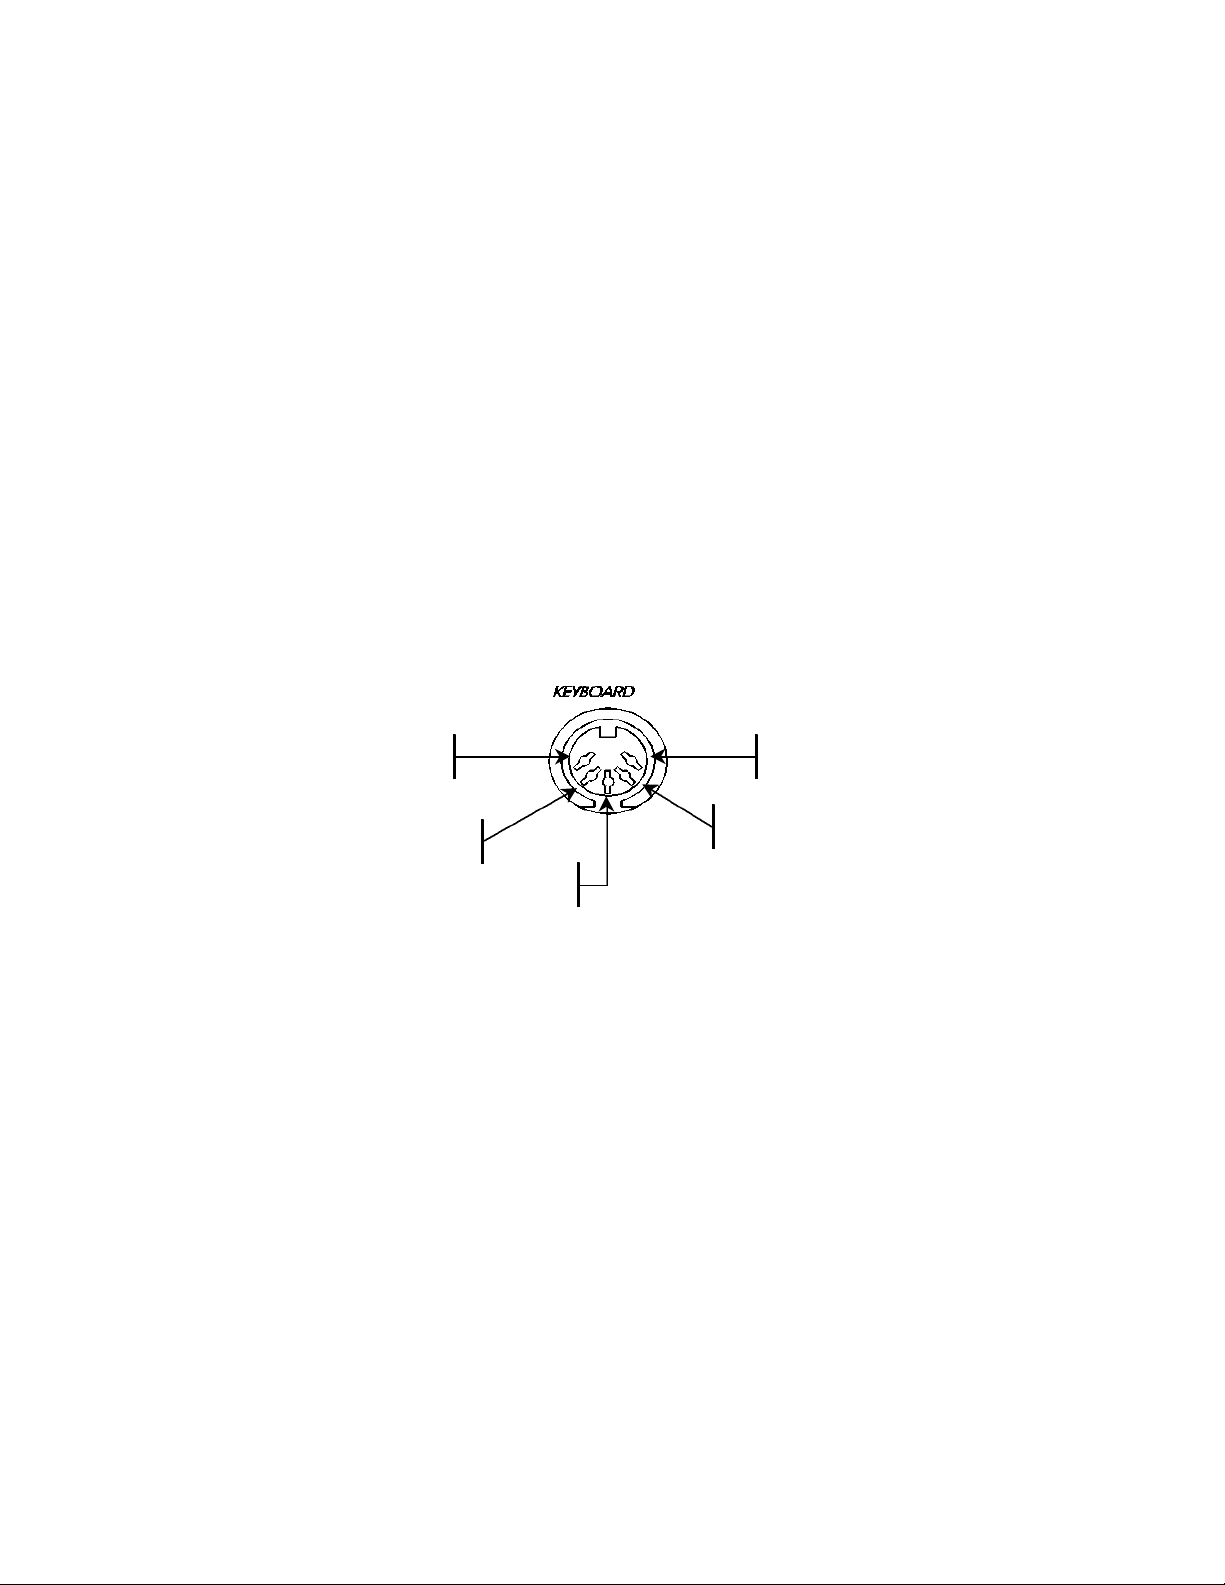
The MM-RC Keyboard Connector
The MM-RC keyboard connector provides a means to attach a standard PC-AT style keyboard.
Here are the pin out signals for this connector as seen facing the back of the MM-RC:
Pin 3: X
Pin 5: PC KBD 5V
Pin 2: PC KBD DATA
You may attach the PC Keyboard to the MM-RC before or after switching on the MM-RC power.
Pin 1: PC KBD CLK
Pin 4: PC KBD GND
Tascam MMR/MMP Owner’s Manual • Version 1.25 Update Information4
Page 5

Using the PC Keyboard
Use the keyboard to perform the following data entry tasks on the MMR or MMP:
• Enter Project and Track names directly by using the standard alphanumeric keys.
• Enter Tape Mode Start time, Pre-Roll and Post-Roll directly using the number keys.
• Access Menu Banks directly by using the Number keys.
• Use the Up and Down arrow keys on the keyboard to scroll through the Setup Menus.
• Use the Up and Down arrow keys to scroll through menu parameters. Once the desired menu is
reached, press F1 to toggle the Trim key function.
• Pressing Enter on the keyboard has the same effect as pressing STO on the MMR or MMP
front panel and will store the parameter selection displayed in the LCD.
Not all keys on the PC keyboard are active. Use the following keys:
F1 – Press F1 to enter Setup. Once Setup Mode has been entered, F1 will toggle the TRIM key on
the MMR front panel.
Escape (Cancel) key – This key is equivalent to the Cancel (CLR) key on the MMR front panel.
Press Esc to leave the Setup Mode and return to the Normal Display State.
Arrow keys - These serve the same function as the Arrow keys on the MMR front panel.
Enter key - Equivalent to STO on the MMR front panel. When a menu or parameter setting has
been changed pressing Enter stores the new parameter.
Shift key - Acts like a standard keyboard Shift key, but will only work in conjunction with Letter
keys and the Minus key.
Letter keys – May be used shifted or unshifted. Note that most punctuation keys are not
supported.
Minus key - Shifted for Underscore, or unshifted for Minus/Hyphen.
Caps Lock - Works like a standard keyboard Caps Lock key.
Num Lock - When Num Lock is active (Num Lock is lit on the keyboard) use of the numeric
Keypad is enabled. The Number keys and the Enter key are active in this mode, and they function
exactly like they do on the keyboard. When Num Lock is not active (the Num Lock light is not lit),
the numeric keypad serves only as up (8), down (2), left (4), and right (6) arrows.
Tascam MMR/MMP Owner’s Manual • Version 1.25 Update Information 5
Page 6

OMF Export
WaveFrame projects may be converted to OMF projects by using a new feature called OMF
Export. This function is currently restricted to creating an OMF export from WaveFrame to
Macintosh (Sound Designer II). This is done as a part of the system’s Backup function by writing
the WaveFrame audio media as Sound Designer II files, and the WaveFrame EDL as an OMF
Composition referencing those files onto a Macintosh formatted disk drive.
Creating an OMF Export
To perform the OMF export operation, first select the project that you wish to convert by pressing
LOAD TRACK on the MMR front panel. Then use the Wheel to scroll through the names of
available projects and select the desired project.
To access OMF Export press SHIFT + SLIP (this accesses the BACKUP function) and use the
Wheel to scroll through the Backup menus until “OMF Export to:” is displayed. Press TRIM and
select the disk to which you would like to export (shown by SCSI ID number) and then press STO.
You will be prompted by the message “Are you sure (y/n)?” to confirm that you wish to perform
an OMF export. Press YES to execute the export or press NO to cancel the export. The target disk
must be Macintosh-formatted in order to perform the OMF export function. If it is not, the
message “Vol does not support format” will be displayed. The newly created OMF project will
have the same name as the project from which it originated, but it will be identifiable by the
extension “.omf” which is automatically added to the file name of the exported file. The
WaveFrame project, from which the OMF project was created, will remain unaffected.
To Import the OMF Export File into Pro Tools
The OMF export files created by the MMR can be imported into the Pro Tools Session format by
using the Digidesign OMF Tool software to convert the OMF Composition (EDL file) into the Pro
Tools Session EDL format. Sound file data is not re-written for this import step. To get the
Digidesign OMF Tool, contact your authorized Digidesign representative, or go to the following
FTP site to download the Digidesign OMF Tool:
ftp://ftp.digidesign.com/pub/support/digi/mac/PTs/
Once at this site, download the file OMFTool203.sea.hqx onto a Macintosh computer and un-stuff
the file. Once you have completed installation of the software, use it to translate the OMF
Composition files generated by the MMR into Pro Tools Session files. You may then open the
Session files directly in Pro Tools. Note that other Versions of the OMF tool (2.05 and above) are
not fully tested with the MMR and may not work properly.
Tascam MMR/MMP Owner’s Manual • Version 1.25 Update Information6
Page 7

Crossfades in OMF
Occasionally a WaveFrame project will have an asymmetrical crossfade that must be adjusted in
order to perform an OMF Export, since asymmetrical crossfades in OMF files are not supported.
This is very rare, but when this situation does arise the message “OK to conform xfades?” will be
displayed. Answering YES will conform the crossfades (make them symmetrical) and the OMF
export will be performed. If NO is selected the message “EDL not exportable, try TapeMode
convert first” will be displayed. Once the project is converted to TapeMode it is possible to
perform an OMF Export without conforming the crossfades. This is because all crossfades are
rendered into a single media file per track after using the Tape Mode Convert backup function.
Support for Pro Tools® 3.2 Session Files
With Version 1.25 software, the MMR-8 and MMP-16 now both support playback of version 3.2
as well as version 4.0 and higher of Digidesign’s Pro Tools Session file format.
Changing the default record drive
When a project is loaded from an external SCSI drive, that drive will become the new record drive.
Any subsequent new projects will be recorded to that drive until a project is loaded from either a
different external drive, or the MMR’s removable hard drive. In other words, the record drive is
always the drive from which the current project was loaded. Rebooting will return the MMR to its
default record drive, which is normally the removable hard drive.
It is possible to load tracks from other volumes into the current project. The audio recorded to
these tracks will be placed on the same volume from which the track was loaded. However,
recording onto, or editing these tracks will not make them part of the current project. These tracks
will still belong to the volumes and projects from which they were loaded, so caution should be
exercised.
Note: WaveFrame is still the only format supported for direct recording in version 1.25.
Recording four tracks each to two drives simultaneously
A valuable use for this feature is to record files simultaneously onto several different disk volumes.
Since every track will record to the disk volume and track file from which it was loaded, simply
load tracks one at a time to correspond with where you want the audio and track files to be
recorded. Here is a step by step procedure for setting up to record to two drives simultaneously,
four channels to each. There are other ways to accomplish this, but the principle should be clear
using this method.
Tascam MMR/MMP Owner’s Manual • Version 1.25 Update Information 7
Page 8

Set up a Project template on each drive
Create an “A” project on the lowest numbered SCSI drive
Boot the system, create the desired project name in menu 800 and press STO
Arm 4 tracks and record at least a second or so of audio
The project is created on the disk
Create a “B” project on the lowest numbered SCSI drive
Name the project in menu 800, press STO
Arm the last 4 track (5-8) and record at least a second or so of audio
The project is created on the disk
Copy (backup) the “B” project to the second drive
Press LOAD TRACK, find “B”
Press SHIFT + SLIP (Backup) to enter backup state
Choose Backup to (target drive #) for second drive
Press STO to start the backup
Setting up to Record
Load Project “A” from the first drive
Press LOAD TRACK, find “A”
Press LOAD TRACK again to select lowest numbered SCSI Device and press STO
Project “A” from lowest numbered SCSI device is loaded into tracks 1-4
Load tracks from Project “B”
Press LOAD TRACK, find “B”
Press LOAD TRACK again to view tracks
Load Tracks 5-8 from Project B into Tracks 5-8 of “A” which is already loaded
Now when recording, the audio for tracks 1-4 will be recorded onto Project “A” on the lowest
numbered drive, and tracks 5-8 will be recorded into project “B” on the second SCSI drive
simultaneously.
Tascam MMR/MMP Owner’s Manual • Version 1.25 Update Information8
Page 9

Using the MMR Editor Port (Sony P-2 protocol)
01234567890123456789
20 position LCD character positi
The MMR-8 may be controlled from a video editor or other serial controller that is capable of
controlling machines using Sony P-2 protocol. This is done by connecting the edit controller to the
9-pin Editor port on the rear panel of the MMR-8.
To use the 9-pin Editor port, set menu 000 (Control Mode) to Editor. Once these steps have been
completed, place the MMR online (press the ONLINE button on the front panel transport section).
Basic transport control and track arming of the MMR is now possible.
Note: To insure proper operation in the Editor mode, a video black burst reference signal must
be present at the VIDEO IN connector on the back of the MMR, regardless of the menu setting
for system reference.
New Editor Mode Menus
Version 1.25 has new menus to configure the MMR for control by an external device.
Menu 400: Editor Device
Menu 400 (Editor Device) allows a choice of three different “personalities” for the MMR to
emulate in its remote 9-pin serial operation. To set Menu 400 (Editor Device) to the desired
machine, go to menu 400 and press the TRIM key. The LCD will display the following message:
400 Editor Device Top: (menu name)
* Sony BVU-950 Bottom: (List of decks)
There are three possible settings for configuring the MMR serial operation:
Sony PCM-7030
Emulates operation of a two-channel DAT machine. Only tracks one and two can be
armed for recording via the 9-pin port. All tracks can be armed locally or via the MM-RC
remote.
Sony BVU-950
Emulates operation of this ¾” video deck. Only tracks one and two can be armed for
recording via the 9-pin port. All tracks can be armed locally or via the MM-RC remote.
TASCAM MMR-8
This is the default setting. The Tascam MMR-8 is the only setting which allows arming of
all eight digital tracks on the MMR.
Tascam MMR/MMP Owner’s Manual • Version 1.25 Update Information 9
Page 10

Menu 401: Editor Auto EE
01234567890123456789
20 position LCD character positi
01234567890123456789
20 position LCD character positi
Menu 401 (Editor Auto EE) allows input monitoring when the MMR transport is in Stop.
The LCD will display the following message:
401 Editor Auto EE Top: (menu name)
*Off Bottom: (indicates On or Off)
Parameter choices are On or Off.
Menu 402: Editor Edit Fld
Menu 402 (Editor Edit Fld) allows the choice of three insert modes, Auto, Field 1 and Field 2. The
LCD will display the following message:
402 Editor Edit Fld Top: (menu name)
*Auto Bottom:(3 parameter choices)
Auto
The MMR will insert the edit at the field number in which the record command is received.
Field 1
The MMR will insert the edit in the first (odd) field depending on the selection.
Field 2
The MMR will insert the edit in the second (even) field depending on the selection.
Tascam MMR/MMP Owner’s Manual • Version 1.25 Update Information10
Page 11

Menu 403: Editor Trk Arm
01234567890123456789
20 position LCD character positi
Menu 403 (Editor Trk Arm) allows the choice of several different track-arming modes.
The LCD will display the following message:
Editor Trk Arm Top: (menu name)
*Analog A1-A4 Bottom: (Parameter choices)
Digital Audio
Used with devices that have digital track arming capability.
Analog A1-A4
Only tracks 1 through 4 may be armed remotely.
Local [enbl+any]
All tracks may be armed locally, and unit will follow serial track record or rehearse
commands coming in on any video or audio channel.
Local [enbl+Aud]
All tracks may be armed locally, and unit will follow serial track record or rehearse
commands coming in on any audio channel.
Local [enbl+A1]
All tracks may be armed locally, and unit will follow serial track record or rehearse
commands coming in on audio channel 1.
Local [enbl+A2]
All tracks may be armed locally, and unit will follow serial track record or rehearse
commands coming in on audio channel 2.
Local [enbl+A3]
All tracks may be armed locally, and unit will follow serial track record or rehearse
commands coming in on audio channel 3.
Local [enbl+A4]
All tracks may be armed locally, and unit will follow serial track record or rehearse
commands coming in on audio channel 4.
Tascam MMR/MMP Owner’s Manual • Version 1.25 Update Information 11
Page 12

Software Version 1.26
The MMR/MMP Software version 1.26 provides several system enhancements. These are detailed
here.
OMF Export Enhancements
The OMF Export function in the Backup menu can be used to write (export) WaveFrame format
projects to a Macintosh disk as Sound Designer II files with an OMF Composition EDL. The
WaveFrame allows certain edits that are difficult to represent in the OMF Composition structure.
Version 1.26 improves on the handling of these events when they are exported to an OMF file.
Bowties
Overlapping crossfades on the WaveFrame editor can lead to a type of crossfade event commonly
referred to as a “bowtie”. This type of event has a fade up and a fade down occurring
simultaneously. Version 1.26 converts these events properly when making an OMF export so that
the event has a “legal” fade up and fade down shape that can be properly imported by other
applications.
Overlapping Events
The WaveFrame editor can, under some circumstances, allow parts of three events to exist
simultaneously on the same track. This is not an allowable situation in the OMF editing model and
can not be properly represented in an export. Version 1.26 will modify these occurrences when
exporting them as an OMF file so that no more than two events are ever overlapped.
Tape Mode Export to OMF
The WaveFrame format allows “holes” to exist in a sound file, a capability that preserves disk
space when working in the MMR/MMP Tape Mode. The Macintosh file system does not allow
this, so Tape Mode projects exported to the Mac take more space because the “holes” in the file are
written as digital silence and take up disk space. Version 1.26 has changed this so that when
projects that were created in Tape Mode in the WaveFrame format are exported as OMF
Compositions and Sound Designer media files, each event in the track will be exported as a
separate sound file rather than allocating continuous space for the entire track. This saves drive
space when going to the Macintosh file system.
Note that this affects only the export of Tape Mode projects to OMF. Using the Tape Mode
Convert capability (in the Backup menu) will cause the new files to be “flattened out” so that the
track is written as one continuous piece of audio media. Because of this change, the OMF export
composition will be seen by the MMR/MMP as a Non-destructive Record mode project, not a
Tape Mode project.
Dynamic Backup Status Display
In previous versions, it was necessary to clear the display and press SHIFT + SLIP (Backup) to
interrogate the current status of the backup process. The current status (percent complete) for the
Backup, Tape Mode Convert, and OMF Export functions in the Backup Menu is now dynamically
updated and will display progress all the way to completion as it goes.
Tascam MMR/MMP Owner’s Manual • Version 1.26 & 1.27 Update Information12
Page 13

Locking Kingston Carrier Option
Version 1.26 makes changes in the MMR/MMP software to allow use of the locking solenoid
mechanism for the Kingston removable drive carrier. There is a required field modification to some
of the hardware components inside the MMR/MMP before this type of Kingston carrier can be
used. The changes in Version 1.26 will allow this type of locking mechanism to be used only when
the hardware changes have also been made.
The locking solenoid Kingston carrier mechanism will lock the hard disk volume in place until all
drives are unmounted. This prevents the user from removing the drive until it is properly
unmounted, thus preventing accidental damage to disk files.
Please contact TASCAM customer Service for information on adapting existing units to take
advantage of the locking Kingston carrier mechanism.
Loop Mode Bug Fix
Loop Mode now works properly when referenced to video sync.
Software Version 1.27
Two minor changes, one of them a necessary bug fix, have been made in Version 1.27.
Backup Bug Fix
Version 1.27 corrects a bug in the Backup, Tape Mode Convert, and OMF Export process which
would sometimes cause only 1 track to be selected for backup.
OMF to WaveFrame Conversion
A change has been made in Version 1.27 to facilitate file conversions from OMF to WaveFrame.
Source clip names are now retained when converting OMF files to WaveFrame projects.
Tascam MMR/MMP Owner’s Manual • Version 1.26 & 1.27 Update Information 13
Page 14

TASCAM
TEAC Professional Division
MMR-8/MMP-16
Version 1.25 through 1.27 update
TEAC CORPORATION 3-7-3, Nakacho, Musashino-shi, Tokyo 180, Japan Phone: (0422) 52-5082
TEAC AMERICA, INC. 7733 Telegraph Road, Montebello, California 90640 Phone: (213) 726-0303
TEAC CANADA LTD. 5939 Wallace Street, Mississauga, Ontario L4Z 1Z8, Canada Phone: 905-890-8008 Facsimile: 905-890-9888
TEAC MEXICO, S.A. De C.V Privada De Corina, No.18, Colonia Del Carmen Coyoacon, Mexico DF 04100 Phone: 5-658-1943
TEAC UK LIMITED 5 Marlin House, Marlins Meadow, The Croxley Centre, Watford, Herts. WD1 8YA, U.K. Phone: 01923-819699
TEAC DEUTSCHLAND GmbH Bahnstrasse 12, 65205 Wiesbaden-Erbenheim, Germany Phone: 0611-71580
TEAC FRANCE S. A. 17 Rue Alexis-de-Tocqueville, CE 005 92182 Antony Cedex, France Phone: (01) 42.37.01.02
TEAC BELGIUM NV/SA P.A. TEAC Nederland BV, Perkinsbaan 11a, 3439 ND Nieuwegein, Netherlands Phone: 0031-30-6048115
TEAC NEDERLAND BV Perkinsbaan 11a, 3439 ND Nieuwegein, Netherlands Phone: 030-6030229
TEAC AUSTRALIA PTY., LTD. 106 Bay Street, Port Melbourne, Victoria 3207, Australia Phone: (03) 9644-2442 A.C.N. 005 408 462
TEAC ITALIANA S.p.A. Via C. Cantù 5, 20092 Cinisello Balsamo, Milano, Italy Phone: 02-66010500
73234 Rev C
 Loading...