

TANDBERG 1000 MXP, 8000 MXP, Edge 95 MXP, Edge 85 MXP, Edge 75 MXP Administrator's Manual
...Page 1

Software version F8
AUGUST 2010
www.tandberg.com
TANDBERG MXP
Administrator Guide
D14033.06—AUGUST 2010
1
Page 2
Chapter 0 Table of
Contents - Hid den
text anchor
The top menu bar and the entries in the Table
of Contents are all hyperlinks, just click on
them to go to the topic.
We recommend you visit the TANDBERG web
site regularly for an updated version of this
guide. Go to: http://www.tandberg.com/docs
What’s in
this guide?
Table of contents
Introduction
What’s new in vers ion F8? .............................................................. 8
New products added to the guide ..................................................9
Intellectual Property Rights...........................................................10
Trademark .................................................................................... 10
Disclaimer ..................................................................................... 10
Patent Information ........................................................................ 10
Copyright Notice ..........................................................................10
Safety Instructions ........................................................................ 11
TANDBERG 8000 M XP ............................................................. 11
TANDBERG 6000 M XP Profile ................................................... 11
TANDBERG Profile 52” w ith Codec 6000 MXP ......................... 11
TANDBERG 3000 M XP Profile ................................................... 11
TANDBERG 1700 MXP ............................................................. 11
TANDBERG 1000 MXP ............................................................. 11
TANDBERG Edge 95/ 85/75 MXP ............................................. 11
TANDBERG 990/ 880/ 770 MXP ................................................ 11
TANDBERG 550 MXP ............................................................... 11
TANDBERG Compass MXP ...................................................... 12
TANDBERG Utility MXP ............................................................ 12
TANDBERG Tactical MXP ......................................................... 13
Environmental Issues.................................................................... 14
Monitors - After Image Lagging ....................................................15
After image lagging due to remainin g electri cal load ................. 15
After-image la gging due to sti cking ........................................... 15
Solving after-image lagging problems ....................................... 15
China RoHS table ......................................................................... 16
Getting started
TANDBERG Remote control TRC3 ...............................................18
TANDBERG Remote con trol TRC4 ............................................... 19
The Installation Wizard ................................................................. 20
Description of the settings .........................................................20
Choose a la nguage for th e system ............................................ 20
Enter a system na me ................................................................. 20
Enter soft ware options ............................................................... 21
IP settings .................................................................................. 21
If you need to set a s tatic IP addre ss ...................................... 21
SIP Settings ...............................................................................21
External management ...............................................................21
External manager settings ...................................................... 21
Specif y how to register your system .......................................... 22
Enter gatekeeper settings .......................................................22
- or enter Call m anager set tings .............................................. 22
- or select D irect cal l setup ..................................................... 22
Save and rest art ........................................................................ 22
Verify your settings .......................................................................23
View the default system settings .................................................. 24
Restore to default system set tings ............................................. 24
Installation Profiles ........................................................................ 25
Save Profile ................................................................................ 25
Activate Profile ........................................................................... 25
Delete Profile ..............................................................................25
The Control Panel menu structure
Select you r video me eting system ................................................ 27
Menu stru cture for 800 0 MXP, 6000 MXP Prof ile, Maestro M XP.. 28
About the Control Panel ............................................................29
Password Protection ............................................................... 29
Remote contro l shortcu t keys ................................................. 29
The Control Panel overview .......................................................30
The Gene ral settin gs menus - Par t 1 ......................................... 31
The Gene ral settin gs menus - Par t 2 ......................................... 32
The Menu se ttings me nus ......................................................... 33
The Presentation settings menus ..............................................34
The Call Qu ality set tings men us ................................................ 35
The Audio se ttings me nus - Part 1 ............................................ 36
The Audio se ttings me nus - Part 2 ............................................ 37
The Vide o settings m enus ......................................................... 38
The Security settings menu .......................................................39
The Netwo rk setting s menus - Par t 1 ........................................ 40
The Netwo rk setting s menus - Par t 2 ........................................ 41
The Netwo rk setting s menus - Par t 3 ........................................ 42
D14033.06—AUGUST 2010
2
MXP Administrator Guide
Contents Introduction Getting started The menu structure The setti ngs librar y Using the sys tem Physica l interf aces Peripheral equipment Contact usAppendices
Contents
Page 3

The Netwo rk setting s menus - Par t 4 ........................................ 43
The Netwo rk setting s menus - Par t 5 ........................................ 44
The Netwo rk setting s menus - Par t 6 ........................................ 45
The Netwo rk setting s menus - Par t 7 ........................................ 46
The Netwo rk setting s menus - Par t 8 ........................................ 47
The Netwo rk setting s menus - Par t 9 ........................................ 48
The other Co ntrol Panel me nu buttons ...................................... 49
The Diagn ostics men u - Part 1 .................................................. 50
The Diagn ostics men u - Part 2 .................................................. 51
Menu stru cture for 300 0 MXP Profil e, Tactical MXP ..................... 52
About the Control Panel ............................................................53
Password Protection ............................................................... 53
Remote contro l shortcu t keys ................................................. 53
The Control Panel overview .......................................................54
The Gene ral settin gs menus - Par t 1 ......................................... 55
The Gene ral settin gs menus - Par t 2 ......................................... 56
The Menu se ttings me nus ......................................................... 57
The Presentation settings menus ..............................................58
The Call Qu ality set tings men us ................................................ 59
The Audio se ttings me nus - Part 1 ............................................ 60
The Audio se ttings me nus - Part 2 ............................................ 61
The Vide o settings m enus ......................................................... 62
The Security settings menus .....................................................63
The Netwo rk setting s menus - Par t 1 ........................................ 64
The Netwo rk setting s menus - Par t 2 ........................................ 65
The Netwo rk setting s menus - Par t 3 ........................................ 66
The Netwo rk setting s menus - Par t 4 ........................................ 67
The Netwo rk setting s menus - Par t 5 ........................................ 68
The Netwo rk setting s menus - Par t 6 ........................................ 69
The Netwo rk setting s menus - Par t 7 ........................................ 70
The other Co ntrol Panel me nu buttons ...................................... 71
The Diagn ostics men us - Part 1 ................................................ 72
The Diagn ostics men us - Part 2 ................................................ 73
Menu stru cture for 1700 MXP ....................................................... 74
About the Control Panel ............................................................75
Password Protection ............................................................... 75
Remote contro l shortcu t keys ................................................. 75
The Control Panel overview .......................................................76
The Gene ral settin gs menus - Par t 1 ......................................... 77
The Gene ral settin gs menus - Par t 2 ......................................... 78
The Menu se ttings me nus ......................................................... 79
The Presentation settings menus ..............................................80
The Call Qu ality set tings men us ................................................ 81
The Audio settings menus .........................................................82
The Vide o settings m enus ......................................................... 83
The Security settings menus .....................................................84
The Netwo rk setting s menus - Par t 1 ........................................ 85
The Netwo rk setting s menus - Par t 2 ........................................ 86
The Netwo rk setting s menus - Par t 3 ........................................ 87
The Netwo rk setting s menus - Par t 4 ........................................ 88
The Netwo rk setting s menus - Par t 5 ........................................ 89
The Netwo rk setting s menus - Par t 6 ........................................ 90
The other Co ntrol Panel me nu buttons ...................................... 91
The Diagn ostics men us - Part 1 ................................................ 92
The Diagn ostics men us - Part 2 ................................................ 93
Menu stru cture for 1000 MX P, Compas s MXP, Utility MXP .......... 94
About the Control Panel ............................................................95
Password Protection ............................................................... 95
Remote contro l shortcu t keys ................................................. 95
The Control Panel overview .......................................................96
The Gene ral settin gs menus - Par t 1 ......................................... 97
The Gene ral settin gs menus - Par t 2 ......................................... 98
The Menu se ttings me nus ......................................................... 99
The Presentation settings menus ............................................10 0
The Call Qu ality set tings men us .............................................. 101
The Audio settings menus ....................................................... 102
The Vide o settings m enus ....................................................... 103
The Security settings menus ................................................... 104
The Netwo rk setting s menus - Par t 1 ...................................... 10 5
The Netwo rk setting s menus - Par t 2 ...................................... 10 6
The Netwo rk setting s menus - Par t 3 ...................................... 10 7
The Netwo rk setting s menus - Par t 4 ...................................... 10 8
The Netwo rk setting s menus - Par t 5 ...................................... 10 9
The Netwo rk setting s menus - Par t 6 .......................................110
The Netwo rk setting s menus - Par t 7 .......................................111
The other Co ntrol Panel me nu buttons .....................................112
The Diagn ostics men us - Part 1 ...............................................11 3
The Diagn ostics men us - Part 2 ...............................................11 4
Menu stru cture for Edge 95 /85/75 MX P, 990/ 880/770 MX P ......115
About the Control Panel ...........................................................116
Password Protection ..............................................................116
Remote contro l shortcu t keys ................................................116
The Control Panel overview ......................................................117
The Gene ral settin gs menus - Par t 1 ........................................118
The Gene ral settin gs menus - Par t 2 ........................................119
The Menu se ttings me nus ....................................................... 120
The Presentation settings menus ............................................ 121
The Call Qu ality set tings men us .............................................. 122
The Audio se ttings me nus - Part 1 .......................................... 12 3
The Audio se ttings me nus - Part 2 .......................................... 124
The Vide o settings m enus ....................................................... 125
The Security settings menus ................................................... 126
The Netwo rk setting s menus - Par t 1 ...................................... 12 7
The Netwo rk setting s menus - Par t 2 ...................................... 12 8
The Netwo rk setting s menus - Par t 3 ...................................... 12 9
The Netwo rk setting s menus - Par t 4 ...................................... 13 0
The Netwo rk setting s menus - Par t 5 ...................................... 131
The Netwo rk setting s menus - Par t 6 ...................................... 13 2
The Netwo rk setting s menus - Par t 7 ...................................... 13 3
The other Co ntrol Panel me nu buttons .................................... 13 4
The Diagn ostics men us - Part 1 .............................................. 13 5
The Diagn ostics men us - Part 2 .............................................. 13 6
Menu stru cture for 550 MX P ...................................................... 137
About the Control Panel ..........................................................13 8
Password Protection ............................................................. 13 8
Remote contro l shortcu t keys ............................................... 138
The Control Panel overview .....................................................13 9
The Gene ral settin gs menus - Par t 1 ....................................... 14 0
The Gene ral settin gs menus - Par t 2 ....................................... 141
The Menu se ttings me nus ....................................................... 142
The Presentation settings menus ............................................14 3
The Call Qu ality set tings men us .............................................. 144
The Audio settings menus ....................................................... 145
The Vide o settings m enus ....................................................... 14 6
The Security settings menus ................................................... 147
The Netwo rk setting s menus - Par t 1 ...................................... 14 8
The Netwo rk setting s menus - Par t 2 ...................................... 14 9
The Netwo rk setting s menus - Par t 3 ...................................... 15 0
The Netwo rk setting s menus - Par t 4 ...................................... 151
D14033.06—AUGUST 2010
3
MXP Administrator Guide
Contents Introduction Getting started The menu structure The setti ngs librar y Using the sys tem Physica l interf aces Peripheral equipment Contact usAppendices
Contents
Page 4

The Netwo rk setting s menus - Par t 5 ...................................... 15 2
The Netwo rk setting s menus - Par t 6 ...................................... 15 3
The Netwo rk setting s menus - Par t 7 ...................................... 15 4
The other Co ntrol Panel me nu buttons .................................... 15 5
The Diagn ostics men us - Part 1 .............................................. 15 6
The Diagn ostics men us - Part 2 .............................................. 15 7
The Control Panel settings library
Table of contents ........................................................................ 159
The Contro l Panel setti ngs listed in th e same orde r as they
appear in t he menus ................................................................... 16 3
Using the system
Password Protection of the Control Panel Settings ....................23 3
About administrator password................................................. 233
Gain Acce ss to a Password Prote cted Control Pa nel Menu .... 233
Setting the administrator password .........................................233
Clear the administrator password ............................................233
General room guidelines ............................................................234
The physical conditions ...........................................................234
The room equipment ...............................................................234
Environmental considerations ..................................................234
The audio quality .....................................................................235
Natural communication ............................................................235
Guidelines for meeting room setup............................................. 236
Sharing a PC presentation .......................................................237
Other presentation sources .....................................................237
PC Presenter .............................................................................. 238
Using PC Pres enter ................................................................. 238
Configuration ........................................................................238
PC SoftPre senter and VN C ........................................................ 239
Using PC Sof tPresenter ...........................................................23 9
VNC Ser ver Soft ware ............................................................ 239
VNC Server Software Configuration .....................................239
Showing PC c ontents on the vi deo system ........................... 239
Dual Video Stream (DuoVideoTF/H.239/BFCP) ........................... 240
Dual Vid eo Stream an d Bandwid th .......................................... 240
Presentat ion Settings and Dual V ideo Strea m ......................... 24 0
Exampl e with Presentation Star t set to Auto ......................... 24 0
Exampl e with Presentation Star t set to Manu al .................... 240
Call Rate with D uoVideoTF/H.239 /BFCP ................................. 24 0
When net work is H.323 ......................................................... 24 0
When net work is SIP ............................................................. 24 0
When net work is ISDN .......................................................... 240
Wireless Network Adapters ........................................................ 2 41
Recommended cards .............................................................. 241
Recommended access points ................................................. 2 41
Recommended Wireless Network Adapters ............................ 241
Configuration ........................................................................ 241
Services for Multipoint Calls ....................................................... 242
Embedded or external MCU .................................................... 242
External serv ices from T MS ..................................................... 242
About the E xterna l Servi ces Menu .......................................... 242
How to Enable the External Services Menu .......................... 24 2
External services features ..................................................... 242
Call Control with Access Codes ................................................. 243
How to activate acc ess code s ................................................. 24 3
How to create an access code f ile and upl oad the file ............. 243
TANDBERG Management Suite ............................................ 243
Kiosk Mode ................................................................................ 244
How to activate Ki osk Mode .................................................... 24 4
How to deactiva te Kiosk Mod e ................................................ 244
Waking up the s ystem ............................................................. 244
Quick Key for IP A ddress ......................................................... 24 4
Quick Key to Dea ctivate Kios k Mode ....................................... 24 4
Intelligent Video Management (IVM) ........................................... 245
Video input configured to Motion ............................................. 245
At low bit rate: ....................................................................... 245
At high bit rate : ...................................................................... 245
Video input configured to Sharpness ......................................24 5
Dialing i n From Outside th e Enterprise ....................................... 246
Dialing i n without be ing registe red to a TANDBERG Gatekee per 246
Connecting the System to IS DN using NT1 Net work Adapter .... 247
Placing the N T1 Adapter .......................................................... 247
Connecting Cables ............................................................... 247
Configure the Video System ................................................. 247
Setting up a c all .................................................................... 247
Connecting the System to PRI/T1 .............................................. 248
Using a CSU (Channel Service Unit) adapter ...........................24 8
Connecting to Adtran T1 ESF CSU ACE ............................... 24 8
Configure the Video system ..................................................248
Configu re the Adtran T1 ESF CSU ACE ................................ 24 8
Setting up a c all .................................................................... 248
Connecting the System to Switched 56k Network .....................24 9
Using Telesync TS -256 SW56/ISDN ad apter ........................... 24 9
Connecting Cables ............................................................... 249
Configure the Video system ..................................................249
Setting up a c all .................................................................... 249
Setting up B onded ISDN Calls using H.221 or 2x64k (2 x56k) .... 250
H.221 or 2x64 (2 x56) Call ing .................................................. 250
Setting up a c all .................................................................... 250
About Sub-address .................................................................... 251
How to Specify a Sub-address .............................................2 51
About Extension Address ........................................................... 251
About MCU Password ................................................................ 2 51
Using the fi le system ................................................................... 252
Descrip tion of files ................................................................... 252
Snapshot files ....................................................................... 252
Configure the video system for snapshots ............................ 252
Using a DOS wi ndow to acces s a JPG-file ........................... 252
Using a Web brows er to access a J PG-file ........................... 252
Apply your own logo ...................................................................253
Apply your o wn logo usin g a DOS window .............................. 25 3
Apply your o wn logo usin g a web browser .............................. 25 3
Dual Monitor, XGA Monitors and Projectors ............................... 254
Dual monitor ............................................................................254
Control Panel Settings ..........................................................254
XGA Monitors and Projectors .................................................. 254
Control Panel Settings ..........................................................254
Physical interfaces
The Digit al Visual I nterface ( DVI) ................................................. 25 6
DVI Specifications ....................................................................256
VGA formats supported on DVI-I in ....................................... 256
Supported DVI Cables ..........................................................256
DVI Cable Len gth .................................................................. 256
The DVI-I Connector .............................................................256
The DVI-I Pin- Out tabl e ......................................................... 256
D14033.06—AUGUST 2010
4
MXP Administrator Guide
Contents Introduction Getting started The menu structure The setti ngs librar y Using the sys tem Physica l interf aces Peripheral equipment Contact usAppendices
Contents
Page 5

The VGA to DVI Cabl e ................................................................ 257
VGA - DVI Connector with audio ............................................. 257
PC cable, VGA - DVI w ith integrate d audio .............................. 257
The VGA to DVI-A Cab le ............................................................. 258
VGA to DVI-A Cable Pi n Assignm ents ..................................... 258
VGA to DVI-A Cable Pi nouts .................................................... 258
Codec 60 00 MXP Inter faces a nd sockets .................................. 259
Audio Sockets .........................................................................259
Audio Sign al Levels in Vpp a nd dBu ........................................ 260
Video sockets ..........................................................................2 61
Camera sockets.......................................................................262
Data ports ................................................................................263
Power Socket & On /Off Switch ............................................... 264
Codec 30 00 MXP and 3 000 MXP N et Interfaces and soc kets...26 5
Rear pane l sockets and i nterface g roups ................................ 265
Audio Sockets .........................................................................266
Audio Sign al levels in Vpp a nd dBu ......................................... 267
Video Sockets..........................................................................268
Camera Sockets ......................................................................269
ISDN BRI Sockets ....................................................................270
Net Socket ............................................................................... 271
Network interface sockets ....................................................... 272
Power Socket & On /Off Switch ............................................... 273
TANDBERG 1700 MXP interfa ces and soc kets .......................... 2 74
Rear Pane l Sockets ................................................................. 2 74
Video, Audio and Network .......................................................2 75
Audio level settings table .........................................................276
TANDBERG 1000 MXP, Compass /Utilit y MXP inter faces an d sockets
278
Rear Pane l Sockets ................................................................. 278
Video, Audio and Network .......................................................279
TANDBERG Edge 95/ 85/75 MXP inte rfaces a nd sockets .......... 28 0
Rear Pane l Sockets ................................................................. 280
Video input/output and Audio input ......................................... 281
Audio output, Network a nd ISDN BRI ...................................... 282
Data port and Camera port .....................................................283
TANDBERG 990/ 880/ 770 MXP interf aces and soc kets ............. 284
Rear Pane l Sockets ................................................................. 284
Rear pane l and sockets w ith V.35 interface ............................. 28 5
Video inputs/outputs and Audio inputs ...................................286
Audio outputs, Networ k and ISDN BRI interface ..................... 2 87
TANDBERG 550 MXP inte rfaces and sockets ............................ 28 9
Rear Pane l Sockets ................................................................. 289
Video inputs/outputs and Audio inputs ...................................290
Audio output, Network a nd Data por t ...................................... 291
Cable specification .....................................................................292
External Network Pinout ..........................................................292
External Network V.35/RS-366 Cable ..................................... 294
External Network RS-449 Cable..............................................295
External Network RS-449/RS-366 Cable ................................296
External Network RS-530 Cable..............................................2 97
External Network RS-530/RS-366 Cable ................................29 8
External Networ k RS-449 Cab le to KIV-7 ................................299
Peripheral equipment
TANDBERG PrecisionHD camera............................................... 301
TANDBERG WAVE II camera ...................................................... 302
Multiple cameras ........................................................................303
Document camera ......................................................................304
TANDBERG Remote Con trols Key Map ..................................... 305
TANDBERG Camera Tracker ......................................................306
Remote Contro l for Camera ..................................................... 306
Using Camera Tracking ...........................................................306
Preparations ............................................................................ 306
Using Camera Tracking ...........................................................306
Moving the Ca mera - Using t he remote contro l ....................306
Moving the Ca mera - Using t he menu .................................. 306
DVD/VCR Recording and Playback ............................................307
DVD/VCR Recording .............................................................. 307
Recording a video conference ..............................................3 07
Stereo recording ................................................................... 307
Configurations ......................................................................3 07
DVD/VCR Pl ayback, Mon o ...................................................... 307
Configurations ......................................................................3 07
Additional Microphones ..............................................................308
Voice Activated C amera Tracking ............................................ 308
Audio Science Microphone ......................................................308
DNAM for Prof ile 52” with Cod ec 6000 M XP .............................30 9
The DNAM Loudspeaker Cabinet ............................................309
The DNAM Amplifier ................................................................309
TANDBERG DNAM with Amplifier and Speakers ....................... 310
TANDBERG DNAM (Digital Natural Audio Module)* ................ 310
The DNAM Amplifier* ............................................................ 310
The DNAM Loudspeaker Cabinet (Center Speakers)* ............. 310
Integrated Stereo Speakers** ................................................ 310
Interface Required for Playback ............................................... 310
TANDBERG DNAM Configurations ............................................. 3 11
TANDBERG Mini-DNAM with Amplifier and Speaker ................. 312
TANDBERG Mini-DNAM* ......................................................... 3 12
Mini-DNAM Loudspeaker Cabinet* ....................................... 312
Mini-DNAM Amplifier* ........................................................... 312
Stereo Spe aker Kit ..................................................................... 313
Stereo Spe aker Kit................................................................... 313
Control Panel Settings .......................................................... 313
Installation ............................................................................. 3 13
Stereo Speaker Kit specification ........................................... 313
Telephone Add-On ..................................................................... 314
Appendices
Security ...................................................................................... 316
Access Code ........................................................................... 316
Administrator Password ........................................................... 316
Streaming password ................................................................ 316
IP Password ............................................................................. 316
IP Serv ices ............................................................................... 316
SNMP Security alert ................................................................ 316
Encryption ............................................................................... 316
IEEE 802.1x /EAP (Exte nsible Aut henticatio n Protocol) .......... 316
The Web Interface ...................................................................... 317
System upgrade using the web interface ................................... 318
Software File ............................................................................ 3 18
Release Key ............................................................................. 318
Backup .................................................................................... 318
What happens If the upgrade is interrupted ............................. 318
The system upgrade procedure ............................................... 3 18
System upgrade using FTP ........................................................ 319
Software File ............................................................................ 3 19
Release Key ............................................................................. 319
D14033.06—AUGUST 2010
5
MXP Administrator Guide
Contents Introduction Getting started The menu structure The setti ngs librar y Using the sys tem Physica l interf aces Peripheral equipment Contact usAppendices
Contents
Page 6

Backup .................................................................................... 319
What happens If the upgrade is interrupted ............................. 319
The system upgrade procedure ............................................... 3 19
System upgrade using ISDN ......................................................320
Software File ............................................................................320
Release Key .............................................................................320
Backup .................................................................................... 320
What happens If the upgrade is interrupted .............................320
About far e nd ISDN system u pgrade ....................................... 320
The system upgrade procedure ............................................... 320
Diagnost ics Tools for IP .............................................................. 3 21
Using Diag nostic Tools for IP ( H.323) ...................................... 321
Q.931 .................................................................................... 321
Ping ....................................................................................... 321
Traceroute .............................................................................321
Layer 4 Por ts used in H.323 cal ls.......................................... 321
Monitor Power Management Systems ....................................... 322
VESA Displ ay Power Manage ment .......................................... 322
VESA DPMS Sta ndard ............................................................. 322
Digital Monitor Power Management ......................................... 322
Monitor On Powe r state ........................................................ 322
Interme diate Powe r state ...................................................... 322
Active-off Powe r state ........................................................... 322
Non-Link Recoverable Off Power State ................................ 322
Monitor Power S witch Off Po wer state ................................. 322
Extend ed Display I dentific ation Data ( EDID) ............................... 323
E1/T1 Networks - NSF Se rvice C odes ....................................... 324
About FIPS M ode ....................................................................... 325
How to activate FIPS M ode ..................................................... 325
How to deactiva te FIPS Mode ................................................. 325
Menus dis abled in FIPS m ode ................................................. 325
Certificate management ..........................................................326
Uploadin g HTTPS ce rtifi cate for FIPS Mod e ......................... 326
The software upload procedure ............................................326
After havi ng uploade d the Cert ificate .................................... 326
Cisco CallManager Registration .................................................327
Configuring TANDBERG MXP on Cisco CallManager 4.1 ........327
Supported RFCs in SIP ..............................................................328
Bandwidth information for TANDBERG endpoints .....................329
Declaration of conformity ...........................................................330
Dimensions ................................................................................. 333
TANDBERG 8000 MXP dimensions.........................................333
TANDBERG Profile 52” w ith Codec 6000 MXP di mensions ....334
TANDBERG 6000 MXP Profile dimensions ..............................335
TANDBERG 3000 M XP Profile 42” di mensions .......................336
TANDBERG 3000 M XP Profile 32” d imension s ....................... 337
TANDBERG Maestro MXP dimensions ....................................338
TANDBERG 1700 MXP dimensions .........................................339
TANDBERG 1000 MXP dimensions .........................................340
TANDBERG Edge 95/85/75 MXP dimensions ......................... 3 41
TANDBERG 990/ 880/ 770 MXP and 550 MXP d imensio ns ..... 342
TANDBERG Compass MXP dimensions..................................343
TANDBERG Utility MXP dimensions ........................................344
TANDBERG PrecisionHD camera dimensions .........................345
TANDBERG WAVE II camera di mensions ................................346
Technical specifications..............................................................3 47
TANDBERG 8000 M XP ............................................................ 347
TANDBERG 6000 M XP Profile ................................................. 349
TANDBERG 3000 M XP Profile ................................................. 351
TANDBERG Maestro M XP ....................................................... 353
TANDBERG 1700 MXP ............................................................ 355
TANDBERG 1000 MXP ............................................................ 3 57
TANDBERG Edge 95/ 85/75 MXP ............................................ 359
TANDBERG 990/ 880/ 770 MXP ............................................... 361
TANDBERG 550 MXP .............................................................. 363
TANDBERG Tactical MXP ........................................................365
TANDBERG Compass MXP ..................................................... 3 67
TANDBERG Utility MXP ...........................................................369
Glossary ..................................................................................... 3 71
D14033.06—AUGUST 2010
6
MXP Administrator Guide
Contents Introduction Getting started The menu structure The setti ngs librar y Using the sys tem Physica l interf aces Peripheral equipment Contact usAppendices
Contents
Page 7

Chapter 1 Introduction - Hidden text anchor
Introduction
In thi s c ha pter...
What’s new?
Intellectual property rights
Trademark
Disclaimer
Copyright notice
License information
Patent information
Safety instructions
Environmental issues
Monitor information
China RoHS table
Chapter 1
Thank you for choosing TANDBERG!
The Administrator Guide describes the
TANDBERG MXP video systems (F-se ries) an d is
designed for system administrators..
How to read th is document
You will find that so me places i nformation h as
been cop ied from othe r chapters ( but adapted,
when nee ded) to let you h ave all the relev ant
information there and then. This helps eliminating
the need to read through long sections before
you can even th ink of gettin g started.
Our main ob jective wit h this user gu ide is to
address your goals and needs. Please let us
know how well we s ucceeded!
Stay up-to-date
We recommen d you visit the TANDB ERG web
site regularly for an updated version of this guide.
Go to: http://www.tandberg.com/docs
D14033.06—AUGUST 2010
7
MXP Administrator Guide
Contents Introduction Getting started The menu structure The setti ngs librar y Using the sys tem Physica l interf aces Peripheral equipment Contact usAppendices
Introduction
Page 8

What’s new in version F8?
Multiway
This featu re will exten d point to point c alls to confere nces on MCU s
hosted in the n etwork. Th e new parti cipant wil l be consulte d before he is
added to the co nference. T he feature is su pported o n H.323 and SIP.
SIP ICE
Standard s based NAT travers al for the SIP protoc ol.
MNS support
The NAT traversal f unctiona lity is ex tended with M NS (“Me dia Networ k
Servi ces”) mo de. This mod e prioritizes use of TURN, s o that all med ia
traffi c is relayed, unl ess sent to an e ndpoint on th e local net work. This
mode is inten ded for use wi th dedicate d media tran sport net works (s ee
e.g. http://www.medianetworkservices.com).
Security improvements.
• Removed known vulnerabilities with regards to cross-site scripting
• Security log
• Password restr iction
Call features
• H.323 Call Transfer
• Dire ct DNS dialling. The abi lity to launch a call via DNS lookup for
calls that a re dialed to a tru e A-record, not a f ull URI.
• Call last number with double press on Connect button.
Improved usability
• Move keyp ad icon in DTMF mo de. In the Icon s menu you can
configu re the keypad ico n to be displaye d on the right or l eft side of
the scree n.
• Number key mode, added an “always use this” option
• Configurable Aspect ratio on local display
• Call s received w hen “Do not di sturb” is active w ill be put in M issed
Calls list ( earlie r they were put in R eceived C alls)
• Russian search in Phonebook
• Mic on /off in dication for S IP calls
• New layo ut for 3-par ty call s on dual moni tor systems. Th e two calle d
partie s on a Mulitis ite host can be d isplayed on s eparate scre ens.
This is defa ult enabl ed for T7000 /T80 00 systems. Fo r other dual
screen sys tems it can be e nabled fro m the menu.
• Wide CP layout
• Rever se Camera s teering. Configurati on to decide wh at directio n the
camera wi ll move when you p ress the ar row keys.
OCS Integration
TANDBERG MXP syste ms can be nati vely integrate d into an OCS
2007 R2 environ ment. When a TANDBERG MXP system ha s been
registere d and authen ticated with th e OCS R2, the MXP en dpoint wil l
appear a s a contact wit h presence i nformatio n in the Micros oft Off ice
Communicator contact list.
The TANDBERG MXP a lso suppor ts the OCS’ MP OP mechan ism,
which mea ns that a user c an register h is endpoint on his/ her OCS
R2 account. A ll incoming calls to this u ser will be for ked to both the
Communi cator client a s well as to the TANDBERG M XP system.
Miscellaneous
• Support WXGA as PC input
• Added ALD support (hearing impaired feature)
• Enhance Picture control menu. Added white balance to the picture
control menu.
Software release note
The soft ware relea se note is found at the TANDBERG web site.
Go to: http://www.tandberg.com/support/documentation.
php?p=Upgrades_ and_Diagnostics
D14033.06—AUGUST 2010
8
MXP Administrator Guide
Contents Introduction Getting started The menu structure The setti ngs librar y Using the sys tem Physica l interf aces Peripheral equipment Contact usAppendices
Introduction
Page 9
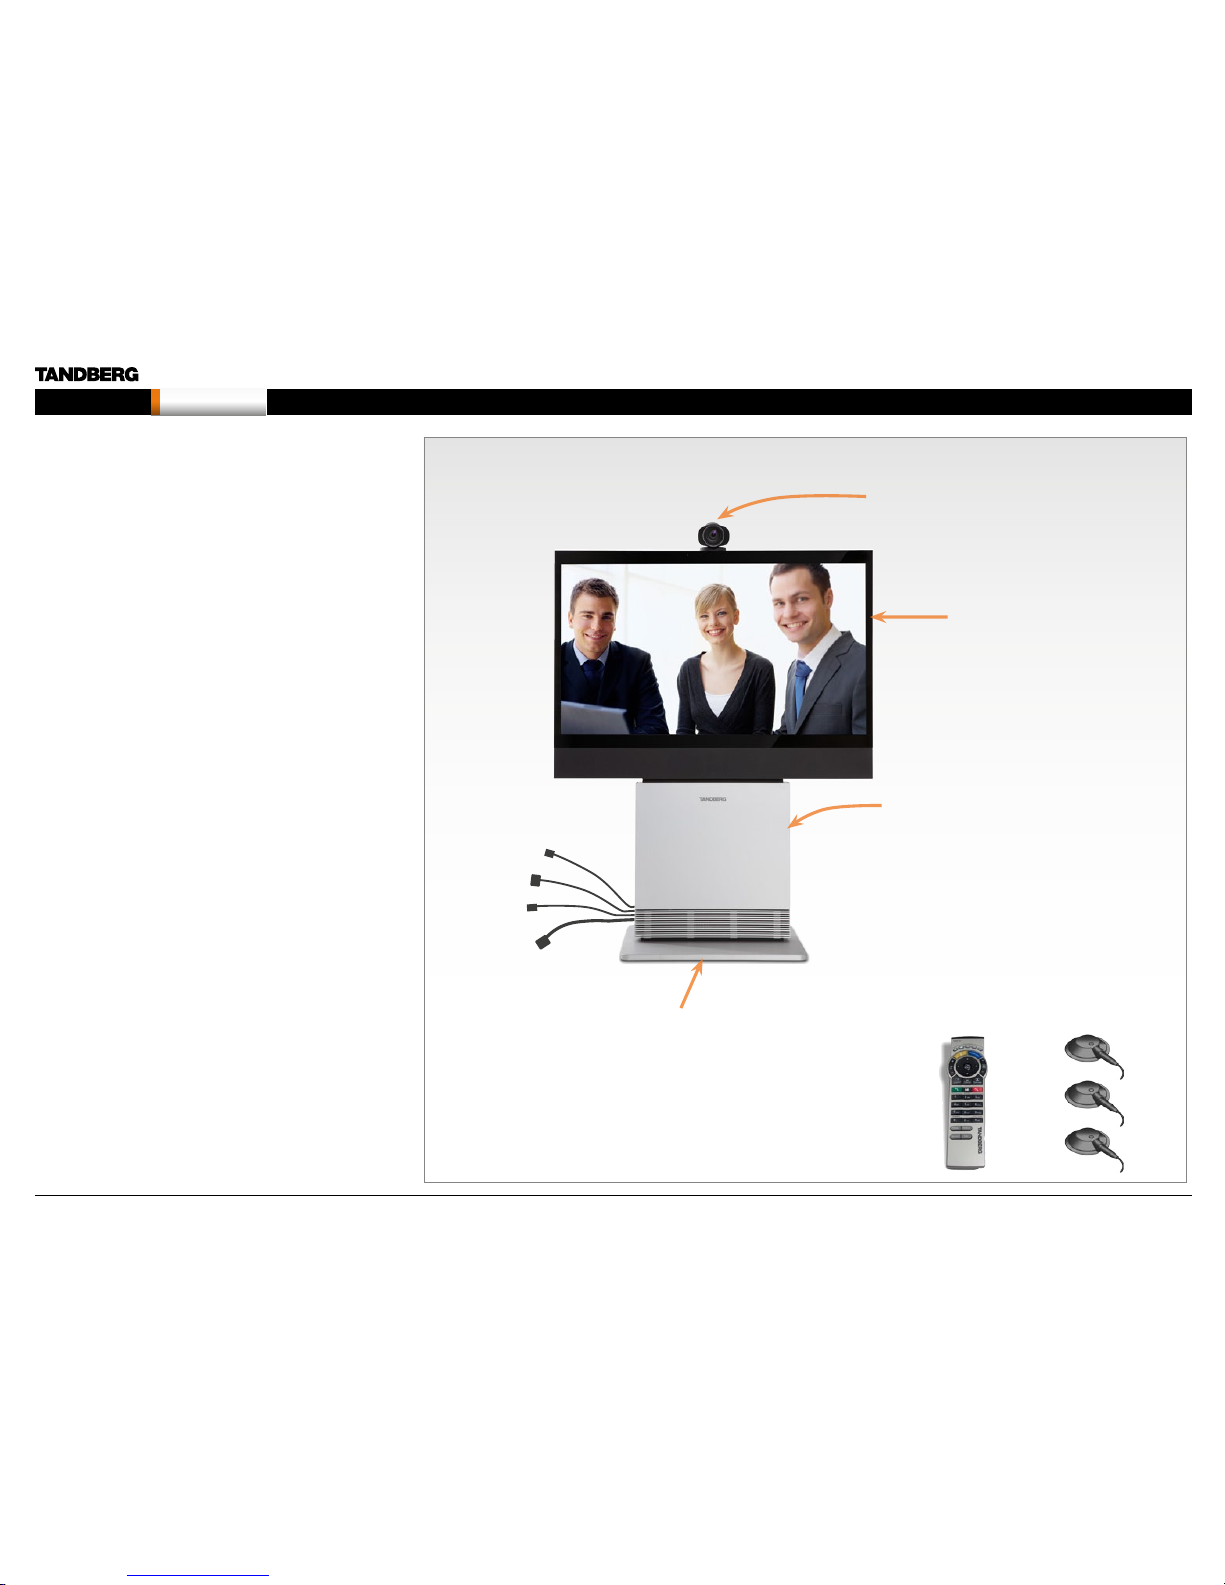
Power cable
Mic cable
PC cable
Ethernet cable
Foot stand (standalone,
wheelba se or wall mou nting
foot module)
PrecisionHD camera
Monitor 52’’
Full HD LCD
In the bottom module:
• Audio amplifier (DNAM)
• TANDBERG Co dec 600 0 MXP
TANDBERG Profile 52” with Codec 6000 MXP
3 x Microphones with
cables
Remote contro l
with 4 batter ies
New products added to the guide
The TANDBERG Profi le 52” with Code c 6000 MX P is added to thi s
version of the MXP Administrator Guide.
System overview
A high-per forman ce HD team-me eting solu tion for both IP an d ISDN
networks. Easily share presentations and multimedia.
• Fully i ntegrated syste m with 1080p 52” wid escreen LCD,
Precisio nHD 720p camer a and 600 0 MXP Codec
• Optim al defini tion up to 720p
• Join u p to 6 video and 5 audio sites wi th embedd ed MultiSite
functionality
• Choi ce of Networ k: up to 2 Mbps ISDN o r externa l network
(H.320 )/4 Mbps IP ( H.323 or SIP)/ 6 Mbps in Mult iSite
Monitor
52” Full HD LCD, 16:9, 1080 x 1920 resoluti on
Audio
• Optim ized DNAM for TANDB ERG Profile 52”, providin g crysta l
clear and natural audio.
• Wide band audio module supp orting : 20 kHz AAC-L D, full echo
canceling, stereo
Microphones
3 x Microphones
Remote control
TANDBERG Remote Control with batteries
Foot stand
Foot stand: Standalone, wheelbase or wall mounting
D14033.06—AUGUST 2010
9
MXP Administrator Guide
Contents Introduction Getting started The menu structure The setti ngs librar y Using the sys tem Physica l interf aces Peripheral equipment Contact usAppendices
Introduction
Page 10

Intellectual Property Rights
This Administrator Guide and the Products to which it relates contain
information that is proprietary to TANDBERG and its licensors.
Information regarding the Products is found on the page entitled
License Agreements and Patent Information.
This Administrator Guide may be reproduced in its entirety,
including all copyright and intellectual property notices, in limited
quantities in connection with the use of the Products. Except for the
limited exce ption set for th in the previo us sentenc e, no part of thi s
Administrator Guide may be reproduced, stored in a retrieval system, or
transmit ted, in any form, o r by any means, electronic ally, mechani cally,
by photocopying, or otherwise, without the prior written permission of
TANDBERG. Requests for such permission should be addressed to
tandberg@tandberg.com.
Trade mar k
TANDBERG® is a regis tered trade mark belo nging to Tandberg ASA .
Other trad emarks us ed in this docu ment are the p ropert y of their
respective holders.
COPYRIGH T © 2008, TANDBERG
All rights r eserve d.
Philip Pede rsens vei 20
1366 Lysaker, Norway
Tel: +47 67 125 125 Fax: +47 67 125 234
E-mail: tandberg@tandberg.com
Disclaimer
The specifications for the Products and the information in this document
are subjec t to change at any time, without notice, by TANDBERG.
Every effort has been made to supply complete and accurate
information in this Administrator Guide, however, TANDBERG assumes
no responsibility or liability for any errors or inaccuracies that may
appear in t his docume nt.
INTELLECTUAL PROPERTY RIGHTS
The Products that are covered by this Administrator Guide are protected
under copy right, patent, a nd other intell ectual pro perty r ights of vari ous
jurisdic tions. Any ap plicabl e softwar e license s and any limite d warrant y
are located i n the Licens e Informatio n section in t his TANDBERG Code c
C60 Administrator Guide.
This Product is
COPYRIGH T © 2008, TANDBERG
All rights r eserve d.
Patent Information
The produc ts descri bed in this ma nual are cove red by one or more of
the followin g patents:
US6,584,077 US5,8 38,664 US5,600,6 46
US5,768,263 US 5,991,277 US7,034,860
US7,010,119 US7.283.588 US5,886,734
US5,990,933 EP01953201 GB1338127
Other patents pending.
Please vi ew http://www.tandberg.com/tandberg_pm.jsp for an
updated list
Copyright Notice
The product that is covered by this Administrator Guide is protected
under copy right, patent, a nd other intell ectual pro perty r ights of vari ous
jurisdictions. This product is Copyright © 2008, Tandberg Telecom AS.
All rights reserved. This product includes copyrighted software licensed
from others .
A documen t describ ing the copyr ight notice s and the terms a nd
conditio ns of use can be fo und at: http://www.tandberg.com/docs
Navigate to User manuals > TANDBERG MX P Copyrigh t and Licen se
Information to download the pdf.
IMPORTANT: USE OF THIS PRO DUCT IS SUBJE CT IN ALL CASES TO
THE COPYRI GHT RIGHTS A ND THE TERMS A ND CONDITI ONS OF
USE REFERRED TO AB OVE. USE OF THIS PRO DUCT CONSTIT UTES
AGREEMENT TO SUCH T ERMS AND CON DITIONS.
D14033.06—AUGUST 2010
10
MXP Administrator Guide
Contents Introduction Getting started The menu structure The setti ngs librar y Using the sys tem Physica l interf aces Peripheral equipment Contact usAppendices
Introduction
Page 11

• If the apparatus ha s been subj ected to
excessive shock by being dropped.
• If the cabinet has b een damag ed.
• If the apparatus se ems to be overhe ated.
• If the apparatus emits smoke or abnormal
odor.
• If the apparatus fails to operate in ac cordance
with the operating instructions.
ACCESSORIES
Use only accessories specified by the manufacturer,
or sold with the apparatus.
COMMUNICATION LINES
Do not use communication equipment to report a
gas leak in t he vicinit y of the leak.
Applies to: TANDBERG 8000MXP, 6000MXP Profil e,
TANDBERG Profile 52” w ith Codec 6000MXP,
3000MXP Profile, 1000MXP, 95/85/75MXP,
990/880/770MXP, 550MXP
• Never touch uninstalled communication wires
or terminals unless the telephone line has been
disconnected at the network interface.
• To reduce the r isk of fire, use o nly No. 26 AWG or
larger telecommunication line cord (ISDN cables).
Safety Instructions
The following safety instructions applies to:
TANDBERG 8000 M XP
TANDBERG 6000 M XP Profile
TANDBERG Profile 52” w ith Codec 6000 MXP
TANDBERG 3000 M XP Profile
TANDBERG 1700 MXP
TANDBERG 1000 MXP
TANDBERG Edge 95/ 85/75 MXP
TANDBERG 990/ 880/ 770 MXP
TANDBERG 550 MXP
For your protection please read these safety
instructions completely before you connect the
equipme nt to the power sou rce. Careful ly obser ve all
warnings, precautions and instructions both on the
apparatus and in these operating instructions.
Retain this m anual for future refere nce.
WATER AND MOISTURE
Do not opera te the apparatu s under or ne ar water –
for example near a bathtub, kitchen sink, or laundry
tub, in a wet basem ent, near a swi mming pool o r in
other areas with high humidity.
• Never i nstall jac ks for commun ication ca bles
in wet locations unless t he jack is spe cifica lly
designed for wet locations.
• Do not touch the product with wet hands.
CLEANING
Unplug the apparatus from communication lines,
mains power-ou tlet or any power s ource befor e
cleaning or polishing. Do not use liquid cleaners
or aerosol c leaners . Use a lint-free clot h lightly
moistened w ith water for cleaning the ex terior of the
apparatus.
VENTILATION
Do not block a ny of the ventilat ion openin gs of the
apparatu s. Never cover th e slots and ope nings with
a cloth or other m aterial. Neve r install the a pparatus
near heat s ources suc h as radiators , heat registe rs,
stoves, or other apparatus (including amplifiers) that
produce heat.
Do not place the product in direct sunlight or close to
a surfac e directly h eated by the sun.
LIGHTNING
Never use this apparatus, or connect/disconnect
communication cables or power cables during
lightning storms.
DUST
Do not opera te the apparatu s in areas wi th high
concentration of dust.
VIBRATION
Do not opera te the apparatu s in areas wi th vibration
or place it on an unstable surface.
POWER CONNECT ION AND HA ZARDO US
VO LTAG E
The product may have hazardous voltage inside.
• Never a ttempt to open t his product, o r any
peripherals connected to the product, where this
action requires a tool.
• This product should always be powered from an
grounded power outlet.
• Never connect attached power supply cord to
other products.
• In cas e any parts of the product h as visual
damage never attempt to connect main power,
or any other power source, before consulting
service personnel
• The plug connecting the power cord to the
product/power supply serves as the main
disconnect device for this equipment. The power
cord must always be easily accessible.
• Route th e power cord so a s to avoid it being
walked on or pinched by items placed upon or
against it. Pay p articul ar attentio n to the plugs,
receptac les and the po int where the c ord exits
from the apparatus.
• Do not tu g the power cord.
• If the pr ovided plu g does not fit i nto your outlet,
consult an electrician.
• Never i nstall ca bles, or any pe riphera ls, without
first unplugging the device from its power source.
Applies to: TANDBERG 3000 MXP Profile, Cod ec
3000 MXP, 1700 MXP, 1000 MXP, 990/880/ 770
MXP, 550 MXP
• Always use the power supply (AC–DC adaptor)
provided with this product.
• Replace only with power supply (AC–DC adaptor)
specified by TANDBERG.
• Never connect attached power supply (AC–DC
adaptor) to other products.
SERVICING
• Do not at tempt to ser vice the apparatus your self
as openin g or removing c overs may expo se you
to dangerou s voltages o r other hazards, and will
void the warr anty. Refer all se rvici ng to qualifi ed
service personnel.
• Unplug the apparatus from its power source and
refer ser vicing to qualified p ersonne l under the
following conditions:
• If the power cord or plu g is damaged or
frayed.
• If liquid has been spilled into the apparatus.
• If objects have fallen into the apparatus.
• If the apparatus ha s been expos ed to rain or
moisture
声 明
此为A级产品,在生活环境中,该产品可能会造成无线电干扰。在这种
情况下,可能需要用户对其干扰采取切实可行的措施。
WARNING:
This is a class A product. In a domestic environment this product
may cause radio interference in which case the user may be
required to take adequate measures.
A Class Declaration for TANDBERG 8000 MXP
D14033.06—AUGUST 2010
11
MXP Administrator Guide
Contents Introduction Getting started The menu structure The setti ngs librar y Using the sys tem Physica l interf aces Peripheral equipment Contact usAppendices
Introduction
Page 12

Safety Instructions
The following safety instructions applies to:
TANDBERG Compass MXP
TANDBERG Utility MXP
For your protection please read these safety
instructions completely before you connect the
equipme nt to the power sou rce. Careful ly obser ve all
warnings, precautions and instructions both on the
apparatus and in these operating instructions.
Retain this m anual for future refere nce.
OPERATOR SAFETY INSTRUCTIONS
For your protection please read these safety
instructions completely before you connect the
equipment to the power source.
The inform ation in this su mmary i s intended for
operators.
Carefull y observe all warning s, precauti ons and
instructions both on the apparatus and in these
operating instructions.
Retain this m anual for future refere nce.
WATER AND MOISTURE
• Do not o perate the app aratus unde r or near water
– for example near a bathtub, kitchen sink, or
laundr y tub, in a wet basem ent, near a swi mming
pool or in other areas with high humidity.
• Never i nstall jac ks for commun ication ca bles
in wet locations unless t he jack is spe cifica lly
designed for wet locations.
• Do not touch the product with wet hands.
CLEANING
• Unplug the apparatus from communication lines,
mains power-ou tlet or any power s ource befor e
cleaning or polishing.
• Do not use liquid cleaners or aerosol cleaners.
• Use a li nt-free cloth ligh tly moistene d with water
for cleaning the exterior of the apparatus.
VENTILATION
• Do not b lock any of the ve ntilation op enings
of the appara tus. Never cove r the slots and
opening s with a cloth or oth er materia l. Never
install the a pparatus n ear heat sources such
as radiators, h eat registe rs, stoves, or othe r
apparatus (including amplifiers) that produce
heat.
• Do not place the product in direct sunlight or
close to a sur face direc tly heated by th e sun.
LIGHTNING
Never use this apparatus, or connect/disconnect
communication cables during lightning storms.
DUST
Do not opera te the apparatu s in areas wi th high
concentration of dust
VIBRATION
Do not opera te the apparatu s in areas wi th vibration.
POWER CONNECT ION AND HA ZARDO US
VO LTAG E
• The product may have hazardous voltage inside.
Never attem pt to open this pro duct, or any
peripherals connected to the product, where this
action requires a tool.
SERVICING
• Do not at tempt to ser vice the apparatus your self
as openin g or removing c overs may expo se you
to dangerou s voltages o r other hazards, and will
void the warr anty. Refer all se rvici ng to qualifi ed
service personnel.
• Refe r servic ing to qualif ied pers onnel und er the
following conditions:
• If liquid has been spilled into the apparatus.
• If objects have fallen into the apparatus.
• If the apparatus ha s been expos ed to rain or
moisture
• If the apparatus ha s been subj ected to
excessive shock by being dropped.
• If the cabinet has b een damag ed.
• If the apparatus se ems to be overhe ated.
• If the apparatus emits smoke or abnormal odor.
• If the apparatus fails to operate in ac cordance
with the operating instructions
ACCESSORIES
Use only accessories specified by the manufacturer,
or sold with the apparatus.
COMMUNICATION LINES
• Never touch uninstalled communication wires
or terminals unless the telephone line has been
disconnected at the network interface.
• Do not use communication equipment to report a
gas leak in t he vicinit y of the leak.
• To reduce the r isk of fire, use o nly No. 26 AWG or
larger telecommunication line cord (ISDN cables).
D14033.06—AUGUST 2010
12
MXP Administrator Guide
Contents Introduction Getting started The menu structure The setti ngs librar y Using the sys tem Physica l interf aces Peripheral equipment Contact usAppendices
Introduction
Page 13

Safety Instructions
The following safety instructions applies to:
TANDBERG Tactical MXP
For your protection please read these safety
instructions completely before you connect the
equipme nt to the power sou rce. Careful ly obser ve all
warnings, precautions and instructions both on the
apparatus and in these operating instructions.
Retain this m anual for future refere nce.
OPERATIONAL ENVIRONMENT TESTING
• The product complies testing in the following
environmental parameters:
• Air te mperature l ow: -5 deg C (16h)
• Air te mperature h igh: 40 deg C (16h)
• Air te mperature c hange: 25 de g C / 40 deg C,
0,5 cycle (T= 3h), 0,5 de g C / min
• Humi dity rela tive high: 9 3%rh, 30 d eg C (4
days)
• Humidity relative condensation: 30 deg C, 90-
100%rh, 1 cyc le (12+12h)
• Vibration random: 5-10Hz (+12dB/oct.), 10-
50Hz (0,02m2/ s3), 50-100Hz (-12dB/oct.). 3
axis x 30 min
• Shoc ks: Half si ne, 11ms, 30m /s2, 6 directions,
3 in each dire ction.
WATER AND MOISTURE
• Do not o perate the app aratus unde r or near water
- for example near a bathtub, kitchen sink, or
laundr y tub, in a wet basem ent, near a swi mming
pool or in othe r areas wit h high humid ity (Se e
Operational Environment Testing above).
• Never i nstall jac ks for commun ication ca bles
in wet locations unless t he jack is spe cifica lly
designed for wet locations.
• Do not touch the product with wet hands.
CLEANING
• Unplug the apparatus from communication lines,
mains power-ou tlet or any power s ource befor e
cleaning or polishing.
• Do not use liquid cleaners or aerosol cleaners.
Use a lint-free cl oth lightly moistened with w ater
for cleaning the exterior of the apparatus.
VENTILATION
• Do not b lock any of the ve ntilation op enings
of the appara tus. Never cove r the slots and
opening s with a cloth or oth er materia l. Never
install the a pparatus n ear heat sources such
as radiators, h eat registe rs, stoves, or othe r
apparatus (including amplifiers) that produce
heat.
• Do not place the product in direct sunlight or
close to a sur face direc tly heated by th e sun.
LIGHTNING
Never use this apparatus, or connect/disconnect
communication cables during lightning storms.
DUST
Do not opera te the apparatu s in areas wi th high
concentration of dust
VIBRATION
• Do not o perate the app aratus in are as with
extensive vibration or place it on an unstable
surface. (See Operational Environment Testing
above).
POWER CONNECT ION AND HA ZARDO US
VO LTAG E
• The product may have hazardous voltage inside.
Never attem pt to open this pro duct, or any
peripherals connected to the product, where this
action requires a tool.
• This product should always be powered from an
grounded power outlet.
• Never connect attached power supply cord to
other products.
• In cas e any parts of the product h as visual
damage never attempt to connect mains power,
or any other power source, before consulting
service personnel.
• The plug connecting the power cord to the
product/power supply serves as the main
disconnect device for this equipment. The power
cord must always be easily accessible.
• Route th e power cord so a s to avoid it being
walked on or pinched by items placed upon or
against it. Pay p articul ar attentio n to the plugs,
receptac les and the po int where the c ord exits
from the apparatus.
• Do not tu g the power cord.
• If the pr ovided plu g does not fit i nto your outlet,
consult an electrician.
• Never i nstall ca bles, or any pe riphera ls, without
first unplugging the device from it’s power
source.
• Always use the power supply (AC-DC adapter)
provided with this product.
• Replace only with power supply (AC-DC adapter)
specified by TANDBERG.
• Never connect attached power supply (AC-DC
adapter) to other products.
SERVICING
• Do not at tempt to ser vice the apparatus your self
as openin g or removing c overs may expo se you
to dangerou s voltages o r other hazards, and will
void the warr anty. Refer all se rvici ng to qualifi ed
service personnel.
• Unplug the apparatus from it’s power source and
refer ser vicing to qualified p ersonne l under the
following conditions:
• If the power cord or plu g is damaged or frayed.
• If liquid has been spilled into the apparatus.
• If objects have fallen into the apparatus.
• If the apparatus ha s been expos ed to rain or
moisture
• If the apparatus ha s been subj ected to
excessive shock by being dropped.
• If the cabinet has b een damag ed.
• If the apparatus se ems to be overhe ated.
• If the apparatus emits smoke or abnormal odor.
• If the apparatus fails to operate in ac cordance
with the operating instructions
ACCESSORIES
Use only accessories specified by the manufacturer,
or sold with the apparatus.
COMMUNICATION LINES
• Never touch uninstalled communication wires
or terminals unless the telephone line has been
disconnected at the network interface.
• Do not use communication equipment to report a
gas leak in t he vicinit y of the leak.
• To reduce the r isk of fire, use o nly No. 26 AWG or
larger telecommunication line cord (ISDN cables).
D14033.06—AUGUST 2010
13
MXP Administrator Guide
Contents Introduction Getting started The menu structure The setti ngs librar y Using the sys tem Physica l interf aces Peripheral equipment Contact usAppendices
Introduction
Page 14

Environmental Issues
Thank you fo r buying a pro duct which c ontribute s to
a reductio n in pollutio n, and thereby h elps save the
environment. Our products reduce the need for travel
and transport and thereby reduce pollution. Our
products have either none or few consumable parts
(chemi cals, toner, gas, pap er).
TANDBERG’S ENVIRONMENTAL POLICY
Environmental stewardship is important to
TANDBERG’s culture. As a global company with
strong corporate values, TANDBERG is committed
to following international environmental legislation
and designing technologies that help companies,
individuals and communities creatively address
environmental challenges.
TANDBERG’s environmental objectives are to:
• Develop products that reduce energy
consumption, CO2 emissio ns, and traf fic
congestion
• Provide products and services that improve
quality of life for our customers
• Produce products that can be recycled or
dispose d of safely at the e nd of product l ife
• Comply with all relevant environmental legislation.
DIGITAL USER GUIDES
TANDBERG is pleas ed to announ ce that we have
replaced the printed versions of our user guides
with digital versions available on the TANDBERG
web site: http://www.tandberg.com/docs. The
environm ental bene fits of this ar e significant. The
user guid es can still b e printed loc ally, whenever
needed.
EUROPEAN ENVIRONMENTAL DIRECTIVES
As a manufacturer of electrical and electronic
equipment TANDBERG is responsible for compliance
with the requirements in the European Directives
2002/9 6/EC ( WEEE - Waste Electr ical and El ectronic
Equipmen t) and 2002/ 95/EC ( RoHS) .
The prima ry aim of the W EEE Directi ve and RoHS
Directive i s to reduce the im pact of dispo sal of
electrical and electronic equipment at end-of-life.
The WEEE Dire ctive aims to re duce the amo unt
of waste electrical and electronic equipment sent
for disposal to landfill or incineration by requiring
producers to arrange for collection and recycling.
The RoHS Di rective ban s the use of cer tain heav y
metals and b rominated f lame retard ants to reduce
the environ mental imp act of WEEE whic h is in landf ill
or incinerated.
TANDBERG has implemented necessary process
changes to comply with the European WEEE
Directive ( 2002/ 96/EC ) and the Euro pean RoHS
Directive ( 2002/ 95/EC ).
WASTE HANDLIN G
In order to avoid th e dissemi nation of ha zardous
substanc es in our env ironment and to diminish th e
pressure o n natural res ources, we en courage you to
use the appropriate recycling systems in your area.
Those syste ms will reus e or recycle mo st of the
materials o f your end of life e quipment i n a sound
way.
TANDBERG products put on the market after
August 200 5 are marked w ith a crossed -out
wheelie b in symbol th at invites you to us e
those take-back systems.
Please contact your local supplier, the regional waste
administration or visit our web page http://www.
tandberg.com/recycling if you need more info rmation
on the colle ction and re cycling syste m in your area.
INFORMATION FOR RECYCLERS
As part of c omplianc e with the Europ ean WEEE
Directive, TANDBERG provides recycling information
on reques t for all typ es of new equip ment put on th e
market in Euro pe after 13 August 20 05.
Please co ntact TANDBERG and p rovide the fol lowing
details for t he product fo r which you wou ld like to
receive recycling information:
• Model number of TANDBERG product
• Your company’s name
• Contact name
• Address
• Telephone number
• E-ma il.
D14033.06—AUGUST 2010
14
MXP Administrator Guide
Contents Introduction Getting started The menu structure The setti ngs librar y Using the sys tem Physica l interf aces Peripheral equipment Contact usAppendices
Introduction
Page 15

Monitors - After Image Lagging
CAUTION ! Avoid disp laying the s ame images c ontinuou sly over a long
period of time on the monitors.
Displayi ng the same im ages such a s still image s for a long time m ay
cause af ter-image lagging. This may occ ur in the case s described here.
After image lagging due to remaining electrical load
When imag e patterns w ith very hi gh peak lum inance are d isplayed for
more than 1 mi nute, after-image l agging may oc cur due to the remaining
electri c load. The af ter-images rema ining on the s creen will d isappe ar
when movin g images are d isplayed. T he time for the af ter-images to
disappe ar depen ds on the lumin ance of the sti ll images an d the time
they had been displayed.
After-image lagging due to sticking
When imag es of the same p attern are di splayed con tinuousl y for
several hou rs or displ ayed for a shor t period of t ime every d ay, afterimages may re main on the sc reen due to the s ticking of th e fluoresc ent
materials . In this case, the se images m ay decreas e if moving im ages are
displayed a fter them, bu t basical ly they will not d isappea r.
Solving after-image lagging problems
If you have got af ter-image laggi ng on your moni tors, you can re duce
the problem to an acceptable level by displaying a white image on the
monitors for a few hours. Th is can be acco mplishe d by focusing th e
camera towar ds a white pape r and setti ng maxim um brightne ss. See
the ‘User Manual’ for deta ils.
NOTE: War ranty may be invalidated i f the precau tions listed a bove are
not followed.
D14033.06—AUGUST 2010
15
MXP Administrator Guide
Contents Introduction Getting started The menu structure The setti ngs librar y Using the sys tem Physica l interf aces Peripheral equipment Contact usAppendices
Introduction
Page 16

China RoHS table
These products complies with the Chineese RoHS.
D14033.06—AUGUST 2010
16
MXP Administrator Guide
Contents Introduction Getting started The menu structure The setti ngs librar y Using the sys tem Physica l interf aces Peripheral equipment Contact usAppendices
Introduction
Page 17

Chapter 2 Get ting star ted - Hidden tex t anchor
Getting started
Chapter 2
This chapter introduces you to your MXP product
and gets you up a nd going.
Remote control
For your conve nience you c an print out the
descript ion of the remote control and pla stic
laminate the page.
Installation Wizard
The Instal lation Wiz ard takes you thr ough the
basic conf iguratio ns of the video s ystem and is
described in this section.
Stay up-to-date
We recommen d you visit the TANDB ERG web
site regularly for an updated version of this guide.
Go to: http://www.tandberg.com/docs
In thi s c ha pter...
Usin g the remote control
Installation Wizard
Verif y the setti ngs
Installation Profiles
View default settings
Restore to defaults
D14033.06—AUGUST 2010
17
MXP Administrator Guide
Contents Introduction Getting started The menu structure The setti ngs librar y Using the sys tem Physica l interf aces Peripheral equipment Contact usAppendices
Getting started
Page 18

PRE SE NTATION key switche s to a predefin ed present ation sourc e.
If the Presen tation key is hel d down for one se cond then th e
Presentat ion video sources men u will appe ar.
MIC OFF turns your microphone on and off.
VOLUME + and – adjusts the Cod ec volume on ly and
not the monitor volume.
Press OK/MENU to show the me nu and
select menu items.
LAYO UT key toggles bet ween ful l screen and differe nt
display layouts.
Press the CALL key to pl ace a call.
CAMERA PRESETS Came ra presets de fine spec ific cam era
position s. To activate a preset whi lst in a call, sim ply press a nd
release th at number key. Move the c amera to the de sired posi tion
and press a nd hold a numb er key for one se cond to save the
current camera position to that number key.
The ALPHANUMERICAL KEYPAD functions in th e same mann er as
a cellular phone.
SNAPSHOT takes a sna pshot of your vi deo durin g a call.
ARROW keys are used to navigate in the me nus and for mov ing the
camera* when the menu is h idden.
Use ZOOM + a nd – to zoom the came ra* in and out.
The SELF VIEW key displ ays your outgoi ng video. Pres s again to turn
off.
The CANCEL key take s you back one ste p in the menu sys tem,
i.e. to leave a menu und oing any cha nges. Use CA NCEL to delete
character s in an input f ield. Pres s and hold the CANCEL key for one
second to close the menu.
Use the PHONE BOOK key to store and rec all video c ontacts for
easy place ment of cal ls.
Use the END CALL key to end the cur rent call. You can als o use the
END CALL key to exi t a menu, and if yo u press the END CALL key
once agai n the STA NDBY men u will be displayed and you c an put
the system in to S TAN DBY mode.
Press TOUCH TONES key when yo u are in a call a nd need to dial
extensio n numbers. Toggle b etween AB C and abc mod e by pressing
the # key. To switch between let ter and 123 mode pres s the # key for
one secon d. Press the OK/MENU but ton to exit TOUCH TON ES.
* Applie s to systems with c ontrollab le camera s.
TANDBERG Remote control TRC3
D14033.06—AUGUST 2010
18
MXP Administrator Guide
Contents Introduction Getting started The menu structure The setti ngs librar y Using the sys tem Physica l interf aces Peripheral equipment Contact usAppendices
Getting started
Page 19

MIC OFF turns your microphone on and off.
VOLUME + and – adjusts the Cod ec volume on ly and
not the monitor volume.
Press OK/MENU to show the me nu and
select menu items.
LAYO UT key toggles bet ween ful l screen and differe nt
display layouts.
Press the CALL key to pl ace a call.
CAMERA PRESETS Came ra presets de fine spec ific cam era
position s. To activate a preset whi lst in a call, sim ply press a nd
release th at number key. Move the c amera to the de sired posi tion
and press a nd hold a numb er key for one se cond to save the
current camera position to that number key.
The ALPHANUMERICAL KEYPAD functions in th e same mann er as
a cellular phone.
SNAPSHOT takes a sna pshot of your vi deo durin g a call.
CHANGE VIDEO SOURCE. Select the d esired vid eo source
(Main C am, PC, DocCam, DVD, AUX ). Press th e video sou rce
button aga in to desele ct the video s ource.
PRESET Press P reset + a numb er to activate a pres et.
SERVICES Press the Services button to open the Servi ces menu.
FAR END Pressing Far End tu rns Far End co ntrol on and of f.
HELP Press the H elp button to op en the User Guide menu
TANDBERG Remote control TRC4
PRE SE NTATION key switche s to a predefin ed present ation sourc e.
If the Presen tation key is hel d down for one se cond then th e
Presentat ion video sources men u will appe ar.
ARROW keys are used to navigate in the me nus and for mov ing the
camera* when the menu is h idden.
Use ZOOM + a nd – to zoom the came ra* in and out.
The SELF VIEW key displ ays your outgoi ng video. Pres s again to turn
off.
The CANCEL key take s you back one ste p in the menu sys tem,
i.e. to leave a menu und oing any cha nges. Use CA NCEL to delete
character s in an input f ield. Pres s and hold the CANCEL key for one
second to close the menu.
Use the PHONE BOOK key to store and rec all video c ontacts for
easy place ment of cal ls.
Use the END CALL key to end the cur rent call. You can als o use the
END CALL key to exi t a menu, and if yo u press the END CALL key
once agai n the STA NDBY men u will be displayed and you c an put
the system in to S TAN DBY mode.
Press TOUCH TONES key when yo u are in a call a nd need to dial
extensio n numbers. Toggle b etween AB C and abc mod e by pressing
the # key. To switch between let ter and 123 mode pres s the # key for
one secon d. Press the OK/MENU but ton to exit TOUCH TON ES.
* Applie s to systems with c ontrollab le camera s.
D14033.06—AUGUST 2010
19
MXP Administrator Guide
Contents Introduction Getting started The menu structure The setti ngs librar y Using the sys tem Physica l interf aces Peripheral equipment Contact usAppendices
Getting started
Page 20
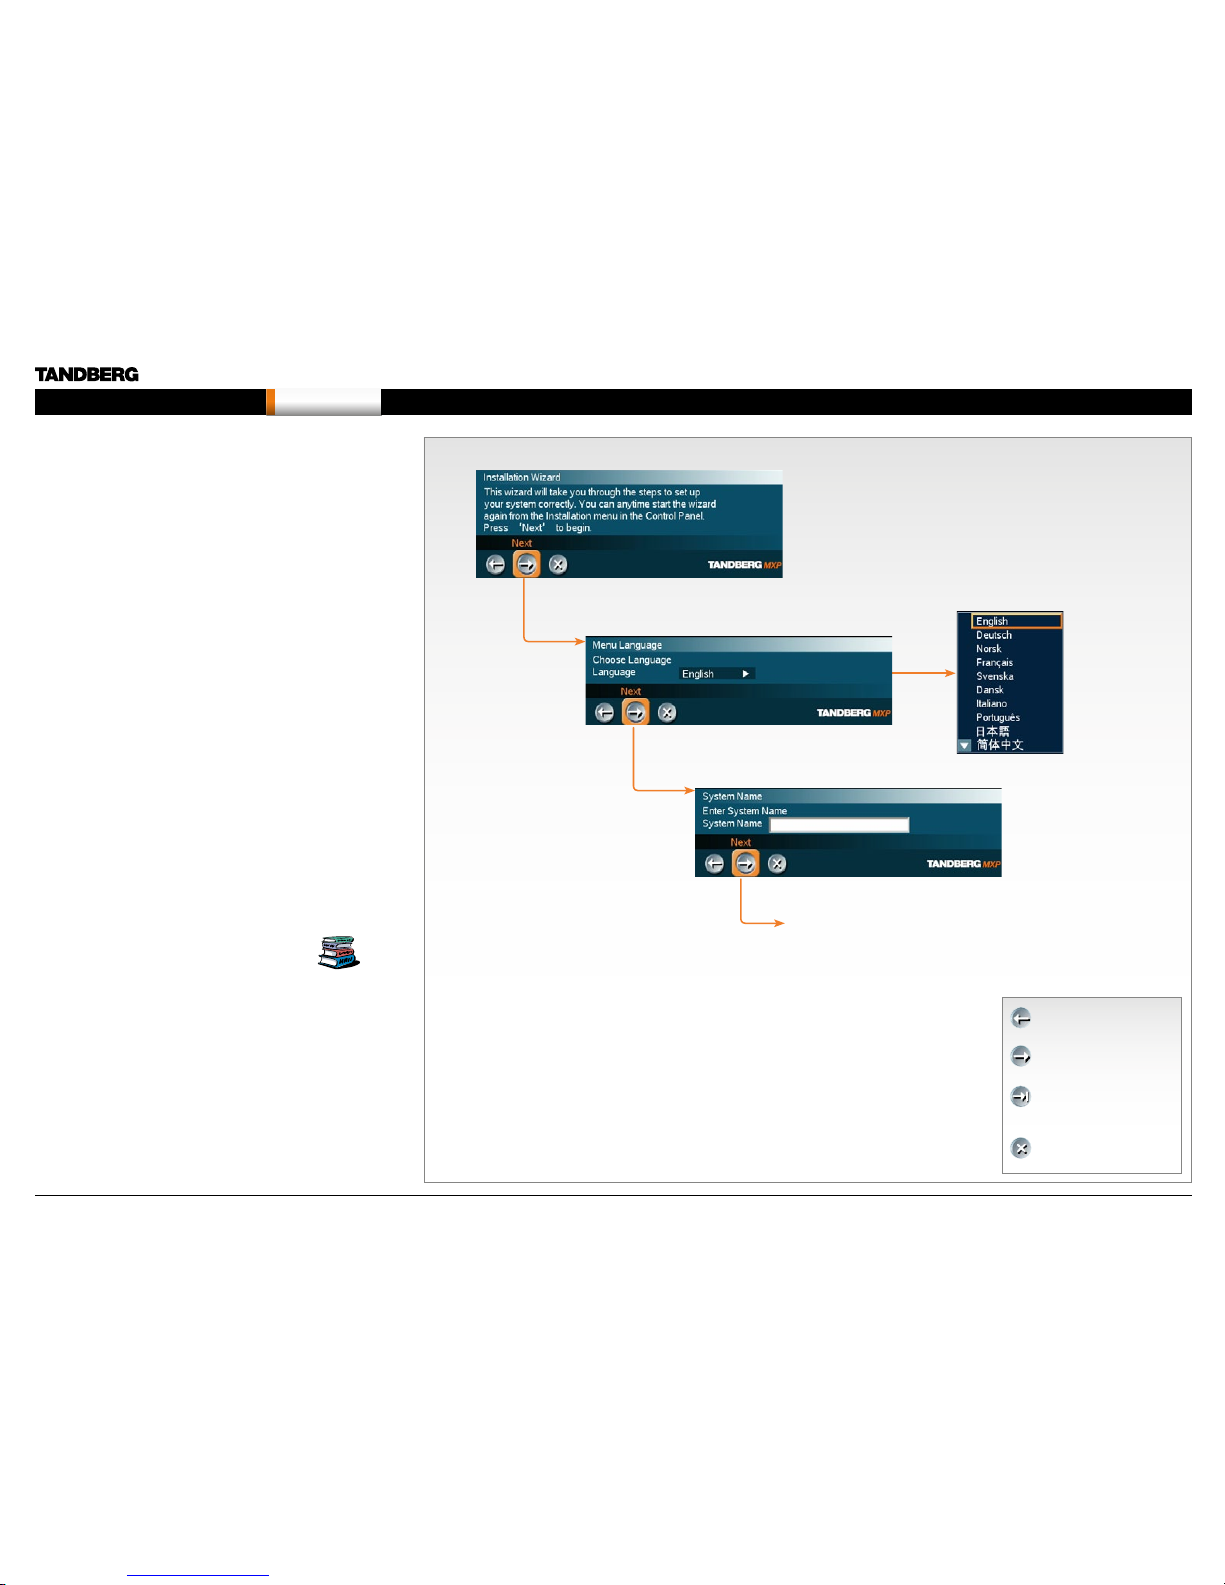
The Installation Wizard
The Instal lation Wiz ard start s automatica lly when the v ideo system i s
installed at the first time and guides you through the basic configuration
of the system in th e following ste ps:
1. Welcome page
2. Select Language
3. Enter System Name
4. Enter Sof tware Option Keys
5. Enter IP Settings
• Obta in IP Address A utomatical ly
• Static IP Address (address, subnet, gateway)
6. Enter SIP Settings
7. Enter External Management settings
• On : Enter informa tion for your TMS ser ver (address, path)
• Of f: Selec t from the list :
• Gatekeeper and enter the gatekeeper settings
• Call Manager and enter the ca ll manage r settings
• Direct
8. Finish the wizard. Th e system will au tomaticall y restart the sys tem.
The Instal lation Wiz ard can be ru n any time from th e Control Pane l
menu.
Description of the settings
Each setti ng is descr ibed in in The settings library.
Press The settings library menu bu tton on top of
the page to go the s ettings lib rary or u se the search
functionality in the Adobe Acrobat PDF document to
make a searc h for the settin g.
PREVIOUS: Step back.
NEXT: Step forwa rd.
FINISH: Save chan ges
and restar t the system.
CANCEL: Ex it without
saving any changes.
Nex t pa ge...
Choose a language for the system
Enter a system name
D14033.06—AUGUST 2010
20
MXP Administrator Guide
Contents Introduction Getting started The menu structure The setti ngs librar y Using the sys tem Physica l interf aces Peripheral equipment Contact usAppendices
Getting started
Page 21

Read more ab out Static IP a ddress...
Read more about External manager settings...
Read more about Software options...
PREVIOUS: Step back.
NEXT: Step forwa rd.
FINISH: Save chan ges
and restar t the system.
CANCEL: Ex it without
saving any changes.
Nex t pa ge...
Nex t pa ge...
Read more about SIP settings...
The Installation Wizard, co nt...
Enter software options
IP settings
If you need to set a static IP address
SIP Settings External management
External manager settings
Description of the settings
Each setti ng is descr ibed in in The settings library.
Press The settings library menu bu tton on top of
the page to go the s ettings lib rary or u se the search
functionality in the Adobe Acrobat PDF document to
make a searc h for the settin g.
D14033.06—AUGUST 2010
21
MXP Administrator Guide
Contents Introduction Getting started The menu structure The setti ngs librar y Using the sys tem Physica l interf aces Peripheral equipment Contact usAppendices
Getting started
Page 22
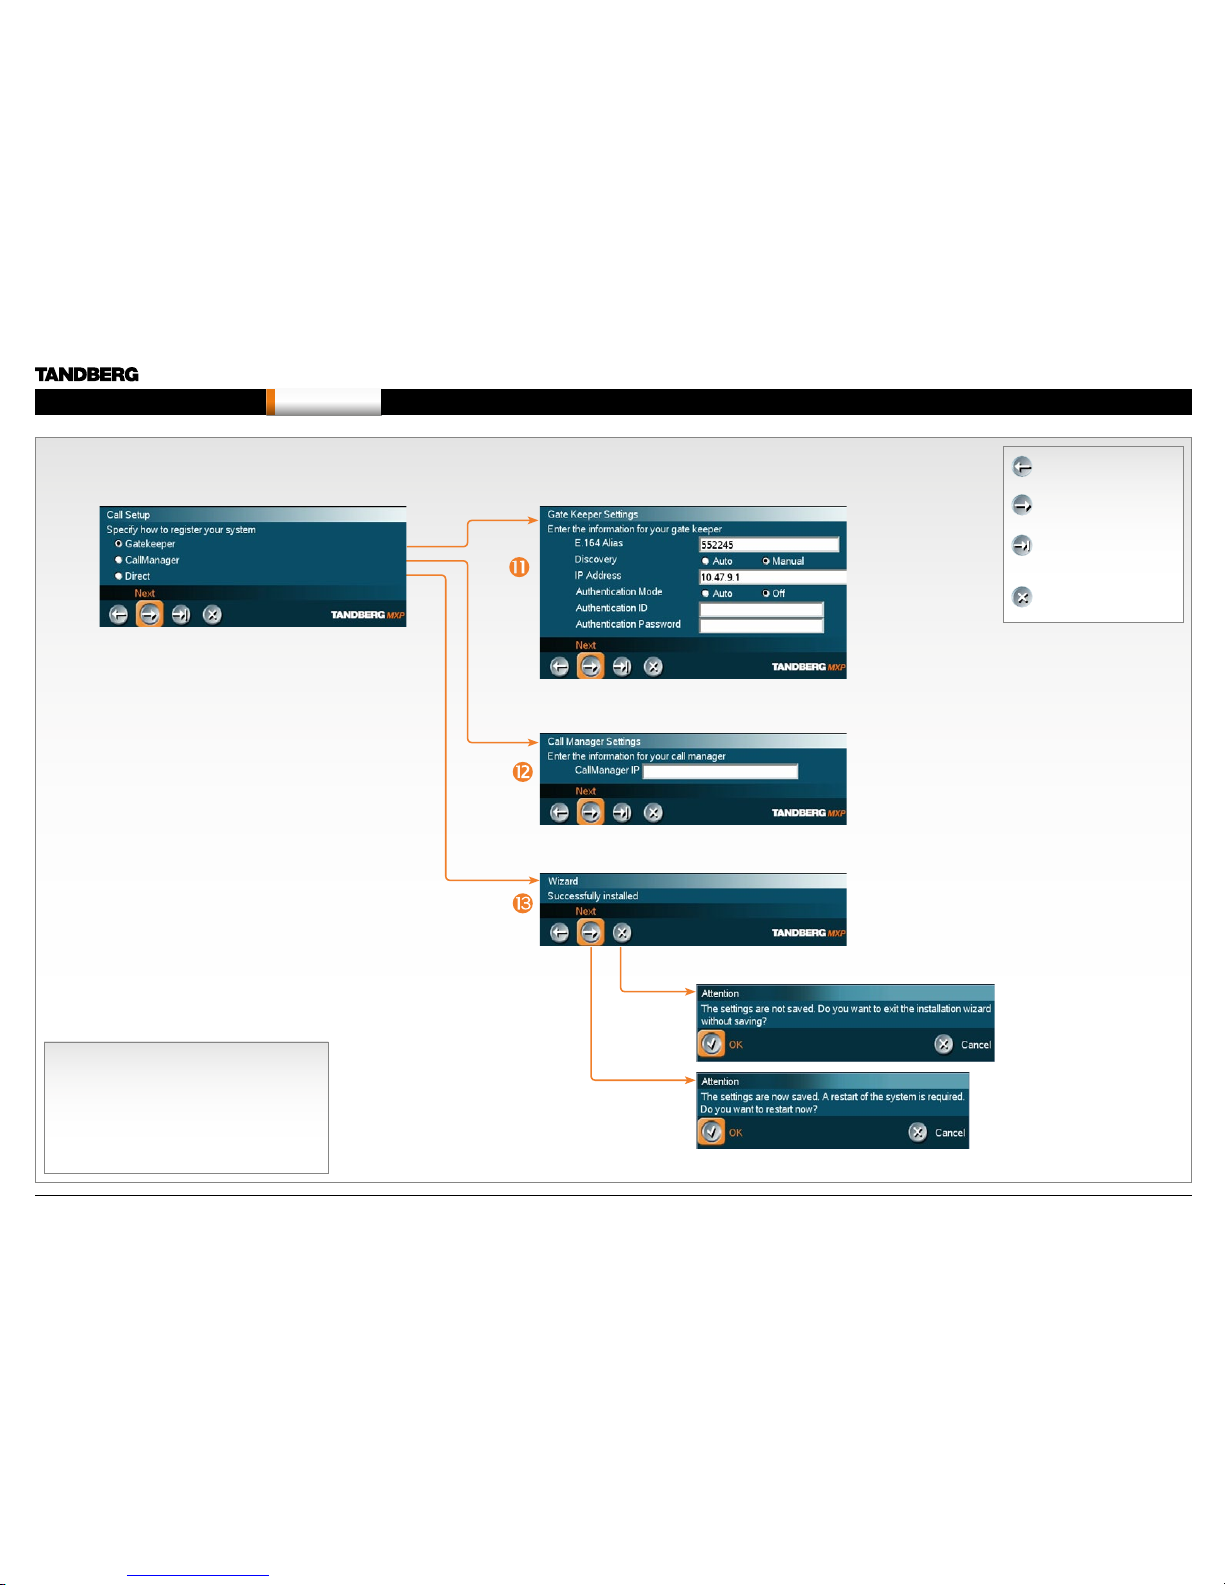
Read more about Gatekeeper settings...
Read more ab out Call ma nager set tings...
PREVIOUS: Step back.
NEXT: Step forwa rd.
FINISH: Save chan ges
and restar t the system.
CANCEL: Ex it without
saving any changes.
Specify how to register your system
Enter gatekeeper settings
- or enter Call manager settings
- or select Direct call setup
Save and
restart
Description of the settings
Each setti ng is descr ibed in in The settings library.
Press The settings library menu bu tton on top of
the page to go the s ettings lib rary or u se the search
functionality in the Adobe Acrobat PDF document to
make a searc h for the settin g.
The Installation Wizard, co nt...
D14033.06—AUGUST 2010
22
MXP Administrator Guide
Contents Introduction Getting started The menu structure The setti ngs librar y Using the sys tem Physica l interf aces Peripheral equipment Contact usAppendices
Getting started
Page 23

Verify your settings
Press any bu tton on the rem ote control to wake up th e system. Naviga te to
the System Info rmation pa ge, as descr ibed below, to veri fy the set tings.
Click on arrow
down/up to scroll.
In the Call me nu, press the
Control Panel button.
In the Control Pa nel menu,
press the Diagnostics button.
In the Diagn ostics men u, press
the System Information button.
Verify you r settings i n the System Info rmation pag e.
PREVIOUS: Step back.
NEXT: Step forwa rd.
FINISH: Save chan ges
and restar t the system.
CANCEL: Ex it without
saving any changes.
Description of the settings
Each setti ng is descr ibed in in The settings library.
Press The settings library menu bu tton on top of
the page to go the s ettings lib rary or u se the search
functionality in the Adobe Acrobat PDF document to
make a searc h for the settin g.
D14033.06—AUGUST 2010
23
MXP Administrator Guide
Contents Introduction Getting started The menu structure The setti ngs librar y Using the sys tem Physica l interf aces Peripheral equipment Contact usAppendices
Getting started
Page 24
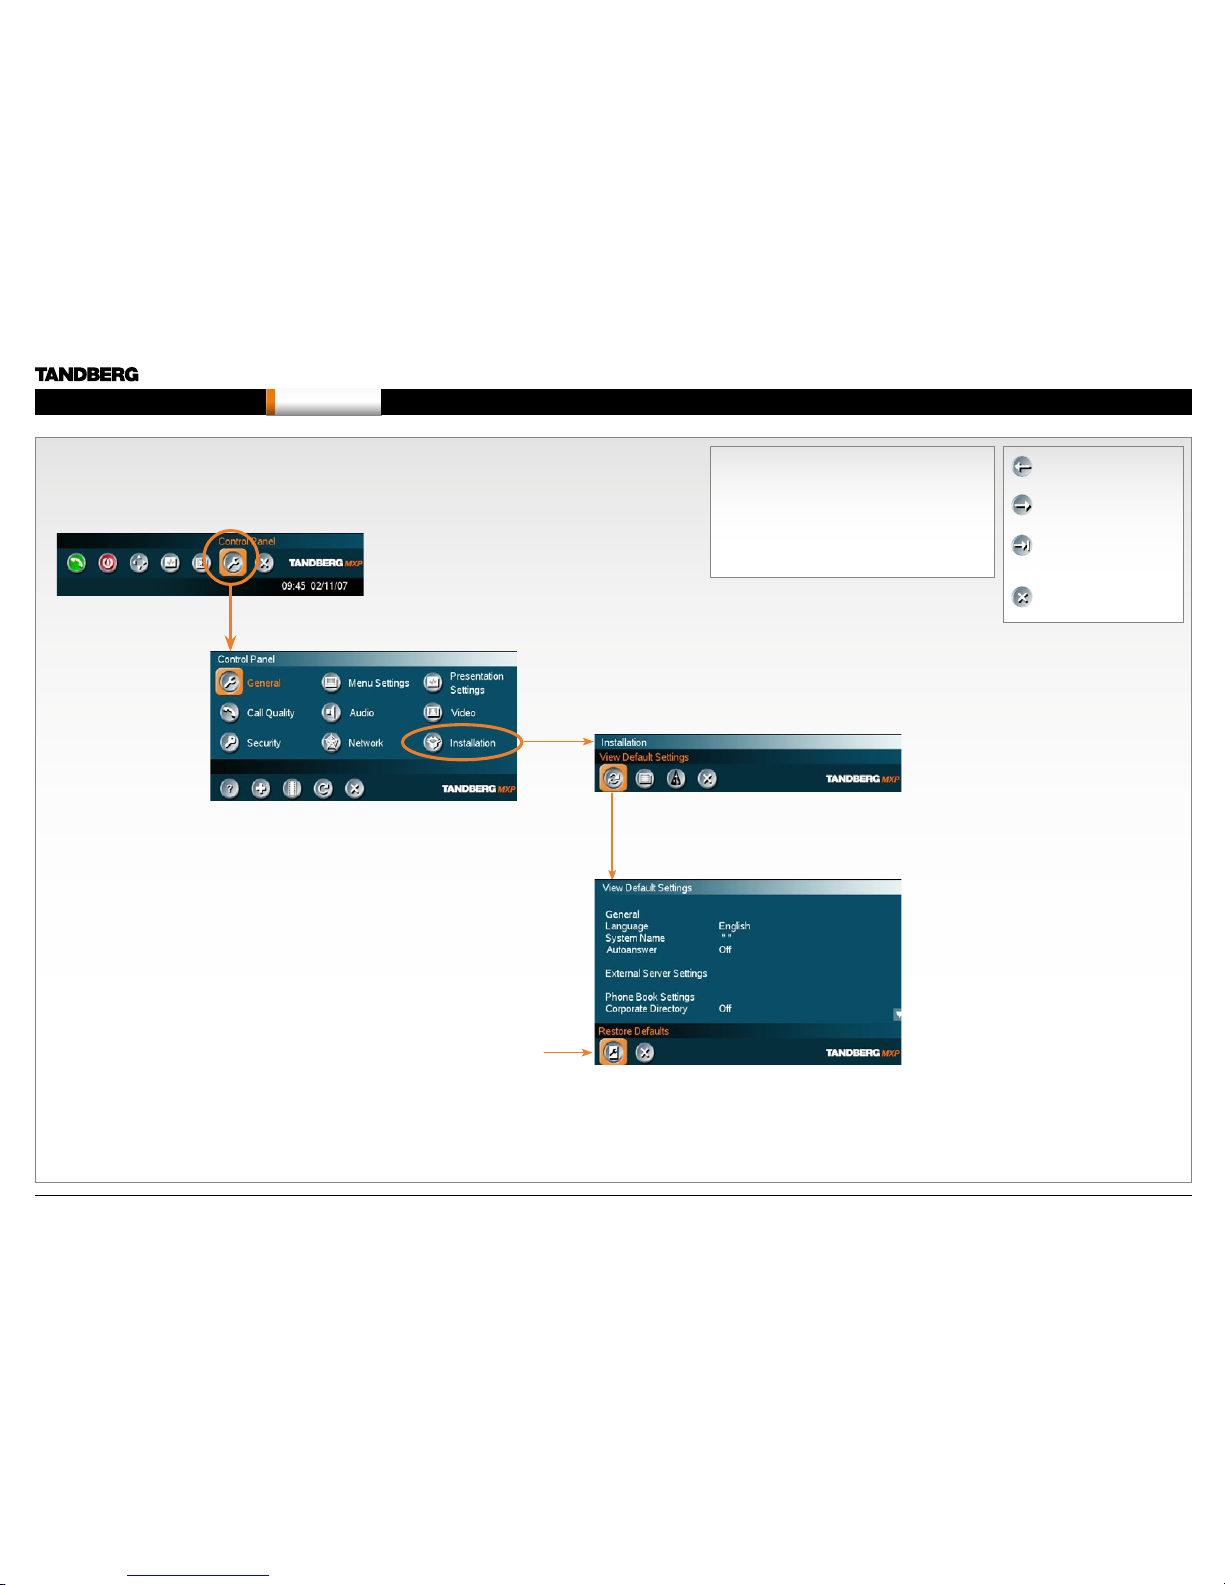
View the default system settings
Press any bu tton on the rem ote control to wake up th e system. Go to the
Installat ion menu and V iew defaul t settings m enu to see a list ing of the
default system settings.
In the Call me nu, press the
Control Panel button.
Restore to default system settings
Click on Re store Default s button to restor e to
default settings.
In the Control Pa nel menu,
press the Diagnostics button.
Click on arrow
down/up to scroll.
PREVIOUS: Step back.
NEXT: Step forwa rd.
FINISH: Save chan ges
and restar t the system.
CANCEL: Ex it without
saving any changes.
Description of the settings
Each setti ng is descr ibed in in The settings library.
Press The settings library menu bu tton on top of
the page to go the s ettings lib rary or u se the search
functionality in the Adobe Acrobat PDF document to
make a searc h for the settin g.
D14033.06—AUGUST 2010
24
MXP Administrator Guide
Contents Introduction Getting started The menu structure The setti ngs librar y Using the sys tem Physica l interf aces Peripheral equipment Contact usAppendices
Getting started
Page 25
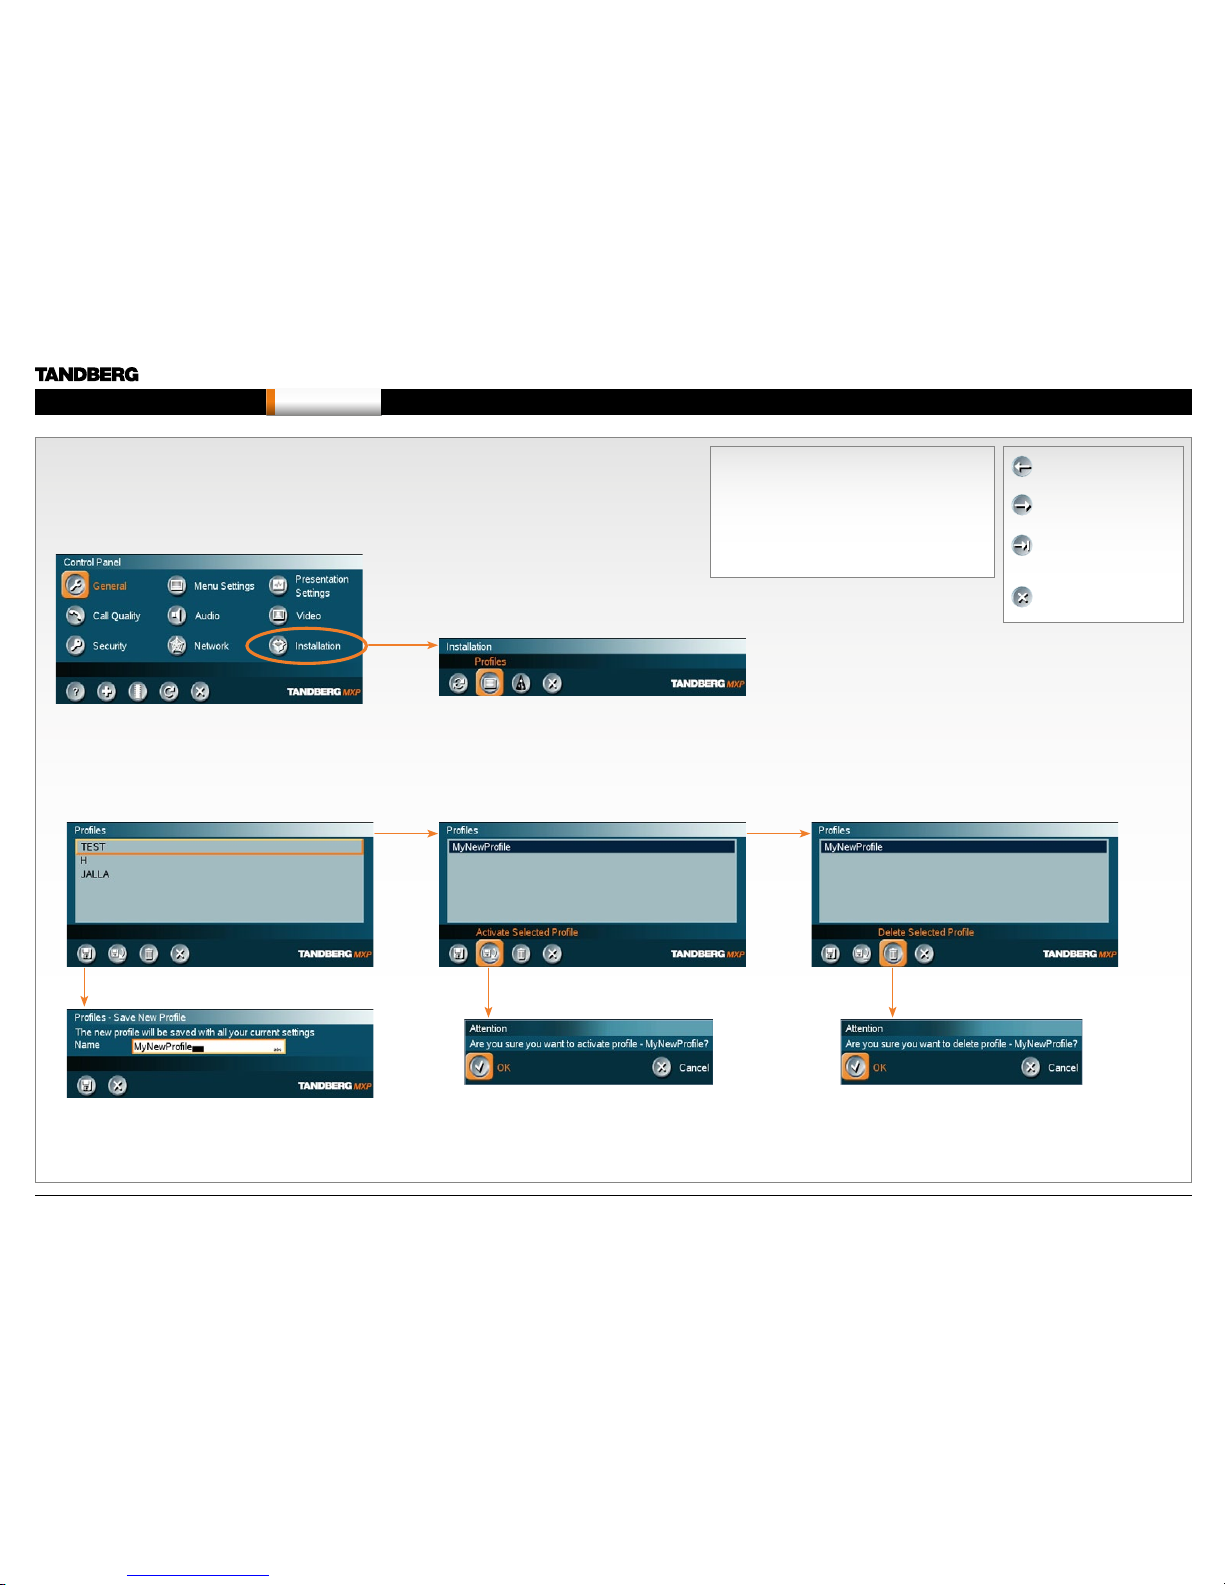
Read more about Installation Profiles...
Save Profile Activate Profile Delete Profile
Installation Profiles
You can create insta llation prof iles to easily switch bet ween dif ferent sets of
configurations for the system.
Configu re the system and s ave the settin gs in an Insta llation prof ile.
PREVIOUS: Step back.
NEXT: Step forwa rd.
FINISH: Save chan ges
and restar t the system.
CANCEL: Ex it without
saving any changes.
Description of the settings
Each setti ng is descr ibed in in The settings library.
Press The settings library menu bu tton on top of
the page to go the s ettings lib rary or u se the search
functionality in the Adobe Acrobat PDF document to
make a searc h for the settin g.
D14033.06—AUGUST 2010
25
MXP Administrator Guide
Contents Introduction Getting started The menu structure The setti ngs librar y Using the sys tem Physica l interf aces Peripheral equipment Contact usAppendices
Getting started
Page 26

Chapter 3 The m enu struc ture - Hidden tex t anchor
Each menu i tem is descr ibed
in The settings library section.
The Control Panel menu structure
Chapter 3
The Control Panel menu structure section gives
an overv iew of all the Con trol Panel me nus for all
video syste ms in the MXP F –serie s.
Detailed i nformatio n about eac h setting is fo und
in the The settings library. The settings available
will var y within the MX P system rang e, dependin g
on the system an d softwa re options ins talled.
Overlea f you can sele ct a video system and go
directly to a de scriptio n of the Control Pa nel
menu struc ture for this sys tem.
Stay up-to-date
We recommen d you visit the TANDB ERG web
site regularly for an updated version of this guide.
Go to: http://www.tandberg.com/docs
MXP User Guide
You may find descr iptions of a few of th e menus
outside th e Control Pane l in this guide, b ut in
general t hese menu s are descri bed in the MX P
User Guid e.
Go to: http://www.tandberg.com/docs
In thi s c ha pter...
Select your video system
Overview of the menu structure for
8000 MXP
60 00 MXP Profi le
60 00 MXP Profi le 52”
Maestro MXP
300 0 MXP Profi le
Tactical MXP
1700 MXP
1000 MXP
Compass MXP
Utility MXP
Edge 95/85/75 MXP
Set top 9 90/88 0/770
Set top 55 0 MXP
Go the next page to select a video system
D14033.06—AUGUST 2010
26
MXP Administrator Guide
Contents Introduction Getting started The menu structure The setti ngs librar y Using the sys tem Physica l interf aces Peripheral equipment Contact usAppendices
The menu structure
Page 27
Each menu i tem is descr ibed
in The settings library section.
TANDBERG 8000 M XP TANDBERG 6000 M XP Profile TANDBERG Maestro M XP
TANDBERG 1700 MXP
TANDBERG 1000 MXP
TANDBERG 550 MXPTANDBERG Edge 95/ 85/75 MXP
TANDBERG Tactical MXP
TANDBERG 3000 M XP Profile
TANDBERG 990/ 880/ 770 MXP
Select your video meeting system
Click on a pic ture, or the link below the pic ture, to go directl y to a descript ion of the menu s tructure for yo ur video sys tem.
TANDBERG Compass MXP
See also Kiosk Mode
TANDBERG Utility MXP
See also Kiosk Mode
TANDBERG Profile 52”
with Code c 6000 MX P
D14033.06—AUGUST 2010
27
MXP Administrator Guide
Contents Introduction Getting started The menu structure The setti ngs librar y Using the sys tem Physica l interf aces Peripheral equipment Contact usAppendices
The menu structure
Page 28
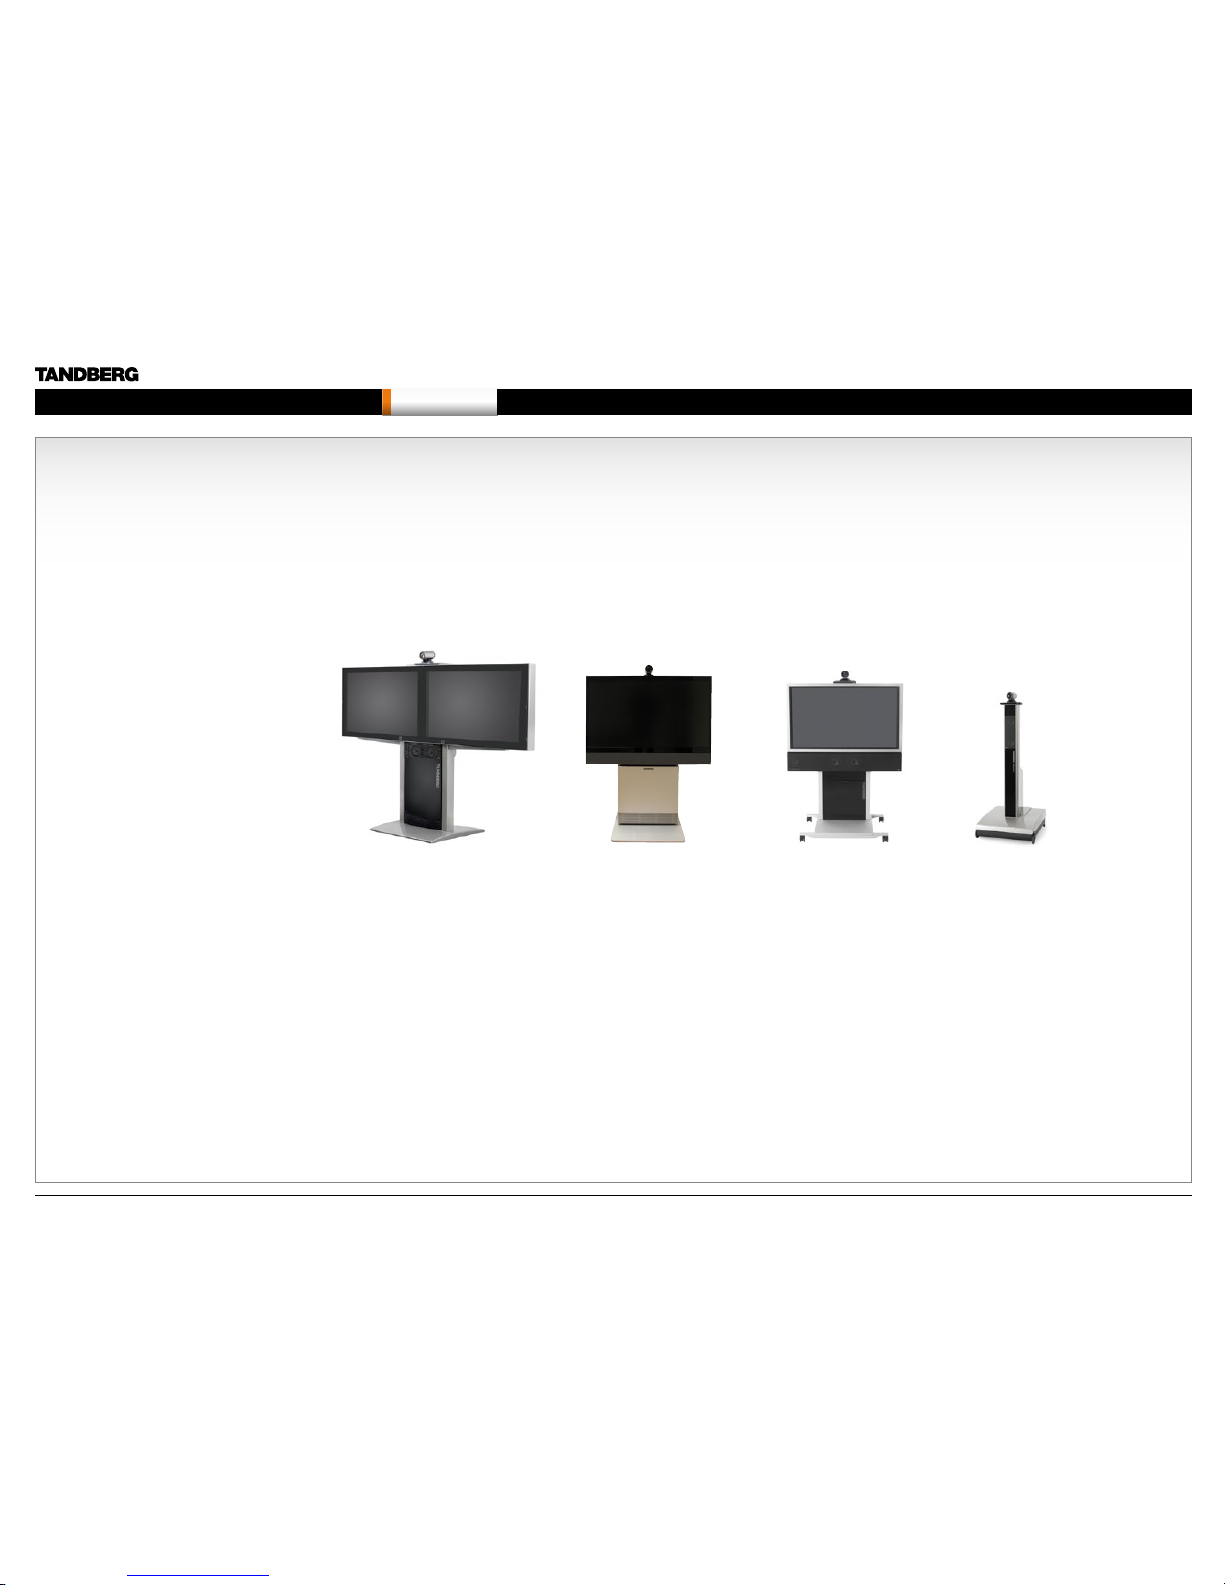
Menu structure for 8000 MXP, 6000 MXP Profile, Maestro MXP
Chapter 3 - 80 00, 6000, Maestro - Hidd en text anch or
Each menu i tem is descr ibed
in The settings library section.
This guide describes the menu structure for the
systems disp layed on this pa ge, with all options
installed.
Descrip tions of each m enu item are fou nd in
The settings library section.
Control Panel menu structure for:
TANDBERG 8000 M XP
TANDBERG PROFILE 52”
with Code c 6000 MX P
TANDBERG 6000 M XP Profile TANDBERG Maestro M XP
D14033.06—AUGUST 2010
28
MXP Administrator Guide
Contents Introduction Getting started The menu structure The setti ngs librar y Using the sys tem Physica l interf aces Peripheral equipment Contact usAppendices
The menu structure
Page 29

Open the Control Panel
Press the OK key on the r emote control to wa ke up the system,
and to display t he Call menu.
In the Call me nu, use the arrow keys on the remote
control to navi gate to the Control Panel button and
press the OK key to dis play the Contro l Panel.
Each menu i tem is descr ibed in
The settings library section.
BACK
RE STA RT (the syste m switches it self Of f and On again )
AUDIO DEMO (demonstra tes the audio of th e system)
DIAGNOSTICS (see the system status and warn ings))
ON-LINE US ER GUIDE (open the online user guide).
Remote control shortcut keys
About the Control Panel
The dif ferent par ts of the Contro l Panel are exp lained on th e
following page s.
The menu structure section presen ts all the Contr ol Panel men us
by product. This section applies to:
• TANDBERG 80 00 MXP
• TANDBERG 60 00 MXP Profil e
• TANDBERG Prof ile 52” with Cod ec 6000 MX P
• TANDBERG Ma estro MXP
Password Protection
Making ch anges to the Co ntrol Panel S ettings wi ll change th e
behavior o f the system. We reco mmend pas sword protectin g the
access to the C ontrol Pane l Settings to pre vent occas ional use rs
from making crucial changes to the system. Set an Administrator
Password to cont rol the acces s to these settings.
Read more ab out passwo rd protection in t he Using the sys tem
section.
RE-DIAL: Double clic k on the green c all button o n the
remote contro l to start calling the las t number.
STANDBY: Double click on the red end call button on
the remote cont rol to set the system i nto standby.
SHOW SYSTEM INFORMATION: Open the call men u
and press th e arrow up key onc e to show the System
information page.
RESET MENU LANGUAGE: Click on the Phone B ook
button 5 time s and then pre ss the numb er key 1 to
reset the me nu languag e to English.
D14033.06—AUGUST 2010
29
MXP Administrator Guide
Contents Introduction Getting started The menu structure The setti ngs librar y Using the sys tem Physica l interf aces Peripheral equipment Contact usAppendices
The menu structure
Page 30

Each menu i tem is descr ibed
in The settings library section.
The Control Panel overview
Applies to : 8000 MXP, 6000 MXP Profile, Maestro MXP
D14033.06—AUGUST 2010
30
MXP Administrator Guide
Contents Introduction Getting started The menu structure The setti ngs librar y Using the sys tem Physica l interf aces Peripheral equipment Contact usAppendices
The menu structure
Page 31

Each menu i tem is descr ibed
in The settings library section.
Describ ed on the nex t page.
The General settings menus - Part 1
Applies to : 8000 MXP, 6000 MXP Profile, Maestro MXP
D14033.06—AUGUST 2010
31
MXP Administrator Guide
Contents Introduction Getting started The menu structure The setti ngs librar y Using the sys tem Physica l interf aces Peripheral equipment Contact usAppendices
The menu structure
Page 32

Each menu i tem is descr ibed
in The settings library section.
Describ ed on the previous page.
The General settings menus - Part 2
Applies to : 8000 MXP, 6000 MXP Profile, Maestro MXP
D14033.06—AUGUST 2010
32
MXP Administrator Guide
Contents Introduction Getting started The menu structure The setti ngs librar y Using the sys tem Physica l interf aces Peripheral equipment Contact usAppendices
The menu structure
Page 33

Each menu i tem is descr ibed
in The settings library section.
The Menu settings menus
Applies to : 8000 MXP, 6000 MXP Profile, Maestro MXP
D14033.06—AUGUST 2010
33
MXP Administrator Guide
Contents Introduction Getting started The menu structure The setti ngs librar y Using the sys tem Physica l interf aces Peripheral equipment Contact usAppendices
The menu structure
Page 34

Each menu i tem is descr ibed
in The settings library section.
The Presentation settings menus
Applies to : 8000 MXP, 6000 MXP Profile, Maestro MXP
D14033.06—AUGUST 2010
34
MXP Administrator Guide
Contents Introduction Getting started The menu structure The setti ngs librar y Using the sys tem Physica l interf aces Peripheral equipment Contact usAppendices
The menu structure
Page 35

Each menu i tem is descr ibed
in The settings library section.
NOTE! T he Call Settings are also av ailable from the
Call Menu. W hen makin g a call you can c hange the
Call Settings. Choose SET AS DEFAULT to make the
changes t he new DEFAULT CALL SETT INGS.
The Call Quality settings menus
Applies to : 8000 MXP, 6000 MXP Profile, Maestro MXP
D14033.06—AUGUST 2010
35
MXP Administrator Guide
Contents Introduction Getting started The menu structure The setti ngs librar y Using the sys tem Physica l interf aces Peripheral equipment Contact usAppendices
The menu structure
Page 36

Each menu i tem is descr ibed
in The settings library section.
Describ ed on the nex t page.
TIP! If Stereo Sp eakers are e nabled in th e menu witho ut
having any ste reo speake rs connec ted to the Digital
NAM, it may cause the acous tic echo-c ancelle r to
malfunction.
TIP! It is your ech o cancell er that improves the audio
qualit y experienced by the othe r side. When yo u hear
an echo of you r own audio it is m ost likely the far end’s
echo canceller that is malfunctioning.
OTHER AUDIO 5/6 INPUT OPTIONS:
• Audio 5 for VC R Left
• Audio 6 for VC R Right.
OTHER AUDIO OUTPUT 2/3 OPTIONS:
• Out 2 for VCR Le ft
• Out 3 for VCR R ight.
The Audio settings menus - Part 1
Applies to : 8000 MXP, 6000 MXP Profile, Maestro MXP
D14033.06—AUGUST 2010
36
MXP Administrator Guide
Contents Introduction Getting started The menu structure The setti ngs librar y Using the sys tem Physica l interf aces Peripheral equipment Contact usAppendices
The menu structure
Page 37

Each menu i tem is descr ibed
in The settings library section.
Describ ed on the previous page.
TIP! To ensure correc t behavior o f the AGC (Automati c
Gain Contro l), it is cr ucial that th e levels on the i nput
connectors are adjusted correctly using the audio input
level setti ngs. The AGC wil l not compen sate for severe
maladjustment of input levels.
The Audio settings menus - Part 2
Applies to : 8000 MXP, 6000 MXP Profile, Maestro MXP
D14033.06—AUGUST 2010
37
MXP Administrator Guide
Contents Introduction Getting started The menu structure The setti ngs librar y Using the sys tem Physica l interf aces Peripheral equipment Contact usAppendices
The menu structure
Page 38

Each menu i tem is descr ibed
in The settings library section.
The Vide o Name typ ed in will ap pear in the Pre sentation
menu. To find the Pres entation me nu, press the O K button
on the remote co ntrol and sel ect the Prese ntation but ton.
The Video settings menus
Applies to : 8000 MXP, 6000 MXP Profile, Maestro MXP
D14033.06—AUGUST 2010
38
MXP Administrator Guide
Contents Introduction Getting started The menu structure The setti ngs librar y Using the sys tem Physica l interf aces Peripheral equipment Contact usAppendices
The menu structure
Page 39

Each menu i tem is descr ibed
in The settings library section.
Password Protection of the Control Panel
Making ch anges to the Co ntrol Panel S ettings wi ll
change the b ehavior of th e system.
We recommen d password prote cting the acc ess to the
Control Panel Settings to prevent occasional users from
making cr ucial cha nges to the syste m.
Set an Admin istrator Passwo rd to control the ac cess to
these settings.
The Security settings menu
Applies to : 8000 MXP, 6000 MXP Profile, Maestro MXP
D14033.06—AUGUST 2010
39
MXP Administrator Guide
Contents Introduction Getting started The menu structure The setti ngs librar y Using the sys tem Physica l interf aces Peripheral equipment Contact usAppendices
The menu structure
Page 40

Each menu i tem is descr ibed
in The settings library section.
Describ ed on the following pages.
When the ISDN SWITCH TY PE is NATIONAL ISDN then
the Auto BRI Co nfig menu is enabled.
The Network settings menus - Part 1
Applies to : 8000 MXP, 6000 MXP Profile, Maestro MXP
D14033.06—AUGUST 2010
40
MXP Administrator Guide
Contents Introduction Getting started The menu structure The setti ngs librar y Using the sys tem Physica l interf aces Peripheral equipment Contact usAppendices
The menu structure
Page 41

Each menu i tem is descr ibed
in The settings library section.
Describ ed on the nex t page.
Describ ed on the previous page.
The Network settings menus - Part 2
Applies to : 8000 MXP, 6000 MXP Profile, Maestro MXP
D14033.06—AUGUST 2010
41
MXP Administrator Guide
Contents Introduction Getting started The menu structure The setti ngs librar y Using the sys tem Physica l interf aces Peripheral equipment Contact usAppendices
The menu structure
Page 42

Each menu i tem is descr ibed
in The settings library section.
Describ ed on the previous page.
The Network settings menus - Part 3
Applies to : 8000 MXP, 6000 MXP Profile, Maestro MXP
D14033.06—AUGUST 2010
42
MXP Administrator Guide
Contents Introduction Getting started The menu structure The setti ngs librar y Using the sys tem Physica l interf aces Peripheral equipment Contact usAppendices
The menu structure
Page 43

Each menu i tem is descr ibed
in The settings library section.
Describ ed on the following
pages.
Select SAVE AND RESTART after
making ch anges to IP Set tings
Select SAVE AND RESTART after
making ch anges to DNS S ettings
The Network settings menus - Part 4
Applies to : 8000 MXP, 6000 MXP Profile, Maestro MXP
D14033.06—AUGUST 2010
43
MXP Administrator Guide
Contents Introduction Getting started The menu structure The setti ngs librar y Using the sys tem Physica l interf aces Peripheral equipment Contact usAppendices
The menu structure
Page 44

Each menu i tem is descr ibed
in The settings library section.
Describ ed on the following
pages.
Describ ed on the prev ious page.
The Network settings menus - Part 5
Applies to : 8000 MXP, 6000 MXP Profile, Maestro MXP
D14033.06—AUGUST 2010
44
MXP Administrator Guide
Contents Introduction Getting started The menu structure The setti ngs librar y Using the sys tem Physica l interf aces Peripheral equipment Contact usAppendices
The menu structure
Page 45

Each menu i tem is descr ibed
in The settings library section.
Describ ed on the following
pages.
Describ ed on the prev ious page.
The Network settings menus - Part 6
Applies to : 8000 MXP, 6000 MXP Profile, Maestro MXP
Select SAVE AND RESTART after
making ch anges to SIP Se ttings
D14033.06—AUGUST 2010
45
MXP Administrator Guide
Contents Introduction Getting started The menu structure The setti ngs librar y Using the sys tem Physica l interf aces Peripheral equipment Contact usAppendices
The menu structure
Page 46

Each menu i tem is descr ibed
in The settings library section.
Select SAVE AND RESTART after
making ch anges to IP Se rvice s
Describ ed on the following
pages.
Describ ed on the prev ious page.
The Network settings menus - Part 7
Applies to : 8000 MXP, 6000 MXP Profile, Maestro MXP
D14033.06—AUGUST 2010
46
MXP Administrator Guide
Contents Introduction Getting started The menu structure The setti ngs librar y Using the sys tem Physica l interf aces Peripheral equipment Contact usAppendices
The menu structure
Page 47

Each menu i tem is descr ibed
in The settings library section.
Describ ed on the prev ious page.
The Network settings menus - Part 8
Applies to : 8000 MXP, 6000 MXP Profile, Maestro MXP
D14033.06—AUGUST 2010
47
MXP Administrator Guide
Contents Introduction Getting started The menu structure The setti ngs librar y Using the sys tem Physica l interf aces Peripheral equipment Contact usAppendices
The menu structure
Page 48

Each menu i tem is descr ibed
in The settings library section.
The Network settings menus - Part 9
Applies to : 8000 MXP, 6000 MXP Profile, Maestro MXP
D14033.06—AUGUST 2010
48
MXP Administrator Guide
Contents Introduction Getting started The menu structure The setti ngs librar y Using the sys tem Physica l interf aces Peripheral equipment Contact usAppendices
The menu structure
Page 49

Each menu i tem is descr ibed
in The settings library section.
The Instal lation men u is descri bed in the
Getting started section.
The other Control Panel menu buttons
Applies to : 8000 MXP, 6000 MXP Profile, Maestro MXP
D14033.06—AUGUST 2010
49
MXP Administrator Guide
Contents Introduction Getting started The menu structure The setti ngs librar y Using the sys tem Physica l interf aces Peripheral equipment Contact usAppendices
The menu structure
Page 50

Each menu i tem is descr ibed
in The settings library section.
Described overleaf.
Click on arrow
down/up to scroll.
The Diagnostics menu - Part 1
Applies to : 8000 MXP, 6000 MXP Profile, Maestro MXP
D14033.06—AUGUST 2010
50
MXP Administrator Guide
Contents Introduction Getting started The menu structure The setti ngs librar y Using the sys tem Physica l interf aces Peripheral equipment Contact usAppendices
The menu structure
Page 51

Each menu i tem is descr ibed
in The settings library section.
Describ ed on the previous page.
Click on WARNINGS to see the warnings.
Click on IP ADDRESS CONFL ICT CHECK to see t he conflic ts.
The Diagnostics menu - Part 2
Applies to : 8000 MXP, 6000 MXP Profile, Maestro MXP
Click on arrow
down/up to scroll.
D14033.06—AUGUST 2010
51
MXP Administrator Guide
Contents Introduction Getting started The menu structure The setti ngs librar y Using the sys tem Physica l interf aces Peripheral equipment Contact usAppendices
The menu structure
Page 52

Menu structure for 3000 MXP Profile, Tactical MXP
Chapter 3 - 30 00, Tactical - Hidde n text ancho r
Each menu i tem is descr ibed
in The settings library section.
Control Panel menu structure for:
This guide describes the menu structure for the
systems disp layed on this pa ge, with all options
installed.
Descrip tions of each m enu item are fou nd in
The settings library section.
TANDBERG 3000 M XP Profile
TANDBERG Tactical MXP
D14033.06—AUGUST 2010
52
MXP Administrator Guide
Contents Introduction Getting started The menu structure The setti ngs librar y Using the sys tem Physica l interf aces Peripheral equipment Contact usAppendices
The menu structure
Page 53

Open the Control Panel
Press the OK key on the r emote control to wa ke up the system,
and to display t he Call menu.
In the Call me nu, use the arrow keys on the remote
control to navi gate to the Control Panel button and
press the OK key to dis play the Contro l Panel.
Each menu i tem is descr ibed in
The settings library section.
BACK
RE STA RT (the syste m switches it self Of f and On again )
AUDIO DEMO (demonstra tes the audio of th e system)
DIAGNOSTICS (see the system status and warn ings))
ON-LINE US ER GUIDE (open the online user guide).
Remote control shortcut keys
About the Control Panel
The dif ferent par ts of the Contro l Panel are exp lained on th e
following page s.
The menu structure section presen ts all the Contr ol Panel men us
by product. This section applies to:
• TANDBERG 30 00 MXP Profile
• TANDBERG Tactical MXP
Password Protection
Making ch anges to the Co ntrol Panel S ettings wi ll change th e
behavior o f the system. We reco mmend pas sword protectin g the
access to the C ontrol Pane l Settings to pre vent occas ional use rs
from making crucial changes to the system. Set an Administrator
Password to cont rol the acces s to these settings.
Read more ab out passwo rd protection in t he Using the sys tem
section.
RE-DIAL: Double clic k on the green c all button o n the
remote contro l to start calling the las t number.
STANDBY: Double click on the red end call button on
the remote cont rol to set the system i nto standby.
SHOW SYSTEM INFORMATION: Open the call men u
and press th e arrow up key onc e to show the System
information page.
RESET MENU LANGUAGE: Click on the Phone B ook
button 5 time s and then pre ss the numb er key 1 to
reset the me nu languag e to English.
D14033.06—AUGUST 2010
53
MXP Administrator Guide
Contents Introduction Getting started The menu structure The setti ngs librar y Using the sys tem Physica l interf aces Peripheral equipment Contact usAppendices
The menu structure
Page 54

Each menu i tem is descr ibed
in The settings library section.
The Control Panel overview
Applies to : 3000 MXP Profile, Tactical MXP
D14033.06—AUGUST 2010
54
MXP Administrator Guide
Contents Introduction Getting started The menu structure The setti ngs librar y Using the sys tem Physica l interf aces Peripheral equipment Contact usAppendices
The menu structure
Page 55

Each menu i tem is descr ibed
in The settings library section.
Describ ed on the nex t page.
The General settings menus - Part 1
Applies to : 3000 MXP Profile, Tactical MXP
D14033.06—AUGUST 2010
55
MXP Administrator Guide
Contents Introduction Getting started The menu structure The setti ngs librar y Using the sys tem Physica l interf aces Peripheral equipment Contact usAppendices
The menu structure
Page 56

Each menu i tem is descr ibed
in The settings library section.
Describ ed on the previous page.
NOTE: The Monitor Brightness, Monitor Contrast and
Monitor Color settings appl ies to systems sh ipped with
TANDBERG Remote Con trol only, which me ans there wi ll
not be any sec ond remote cont rol for the moni tor.
The General settings menus - Part 2
Applies to : 3000 MXP Profile, Tactical MXP
D14033.06—AUGUST 2010
56
MXP Administrator Guide
Contents Introduction Getting started The menu structure The setti ngs librar y Using the sys tem Physica l interf aces Peripheral equipment Contact usAppendices
The menu structure
Page 57

Each menu i tem is descr ibed
in The settings library section.
The Menu settings menus
Applies to : 3000 MXP Profile, Tactical MXP
D14033.06—AUGUST 2010
57
MXP Administrator Guide
Contents Introduction Getting started The menu structure The setti ngs librar y Using the sys tem Physica l interf aces Peripheral equipment Contact usAppendices
The menu structure
Page 58

Each menu i tem is descr ibed
in The settings library section.
The Presentation settings menus
Applies to : 3000 MXP Profile, Tactical MXP
D14033.06—AUGUST 2010
58
MXP Administrator Guide
Contents Introduction Getting started The menu structure The setti ngs librar y Using the sys tem Physica l interf aces Peripheral equipment Contact usAppendices
The menu structure
Page 59

Each menu i tem is descr ibed
in The settings library section.
The Call Quality settings menus
Applies to : 3000 MXP Profile, Tactical MXP
NOTE! T he Call Settings are also av ailable from the
Call Menu. W hen makin g a call you can c hange the
Call Settings. Choose SET AS DEFAULT to make the
changes t he new DEFAULT CALL SETT INGS.
D14033.06—AUGUST 2010
59
MXP Administrator Guide
Contents Introduction Getting started The menu structure The setti ngs librar y Using the sys tem Physica l interf aces Peripheral equipment Contact usAppendices
The menu structure
Page 60

Each menu i tem is descr ibed
in The settings library section.
Describ ed on the nex t page.
TIP! If Stereo Sp eakers are e nabled in th e menu witho ut
having any ste reo speake rs connec ted to the Digital
NAM, it may cause the acous tic echo-c ancelle r to
malfunction.
TIP! It is your ech o cancell er that improves the audio
qualit y experienced by the othe r side. When yo u hear
an echo of you r own audio it is m ost likely the far end’s
echo canceller that is malfunctioning.
OTHER AUDIO 5/6 INPUT OPTIONS:
• Audio 5 for VC R Left
• Audio 6 for VC R Right.
OTHER AUDIO OUTPUT 2/3 OPTIONS:
• Out 2 for VCR Le ft
• Out 3 for VCR R ight.
The Audio settings menus - Part 1
Applies to : 3000 MXP Profile, Tactical MXP
D14033.06—AUGUST 2010
60
MXP Administrator Guide
Contents Introduction Getting started The menu structure The setti ngs librar y Using the sys tem Physica l interf aces Peripheral equipment Contact usAppendices
The menu structure
Page 61

Each menu i tem is descr ibed
in The settings library section.
Describ ed on the previous page.
The Audio settings menus - Part 2
Applies to : 3000 MXP Profile, Tactical MXP
TIP! To ensure correc t behavior o f the AGC (Automati c
Gain Contro l), it is cr ucial that th e levels on the i nput
connectors are adjusted correctly using the audio input
level setti ngs. The AGC wil l not compen sate for severe
maladjustment of input levels.
D14033.06—AUGUST 2010
61
MXP Administrator Guide
Contents Introduction Getting started The menu structure The setti ngs librar y Using the sys tem Physica l interf aces Peripheral equipment Contact usAppendices
The menu structure
Page 62

Each menu i tem is descr ibed
in The settings library section.
The Video settings menus
Applies to : 3000 MXP Profile, Tactical MXP
The Vide o Name typ ed in will ap pear in the Pre sentation
menu. To find the Pres entation me nu, press the O K button
on the remote co ntrol and sel ect the Prese ntation but ton.
D14033.06—AUGUST 2010
62
MXP Administrator Guide
Contents Introduction Getting started The menu structure The setti ngs librar y Using the sys tem Physica l interf aces Peripheral equipment Contact usAppendices
The menu structure
Page 63

Each menu i tem is descr ibed
in The settings library section.
Password Protection of the Control Panel
Making ch anges to the Co ntrol Panel S ettings wi ll
change the b ehavior of th e system.
We recommen d password prote cting the acc ess to the
Control Panel Settings to prevent occasional users from
making cr ucial cha nges to the syste m.
Set an Admin istrator Passwo rd to control the ac cess to
these settings.
The Security settings menus
Applies to : 3000 MXP Profile, Tactical MXP
D14033.06—AUGUST 2010
63
MXP Administrator Guide
Contents Introduction Getting started The menu structure The setti ngs librar y Using the sys tem Physica l interf aces Peripheral equipment Contact usAppendices
The menu structure
Page 64

Each menu i tem is descr ibed
in The settings library section.
Describ ed on the following pages.
The Network settings menus - Part 1
Applies to : 3000 MXP Profile, Tactical MXP
TANDBERG Tactical MXP
The Came ra Port set ting does not a pply to TANDBERG
Tac ti cal MXP.
TANDBERG 3000/Tactical/990/880 NET
MXP
The TANDBERG 3000/Tactical/990/ 880 NET MXP are
equipped with RS449/V.35/X.21 network interfaces
instead of ISD N-BRI.
NOTE! T he referenc es to ISDN in the User Manual d o
not apply to the N ET versio n.
Configuration of NET versions
• All refe rences to ISDN -BRI Setti ngs are to be
replace d with referen ce to Exter nal Networ k
Settings.
• The Net work sele ctions in the C all Settings menu
only appl y to IP calls. Use IS DN in the Netw ork
menu to sele ct RS449/ V.35/X.21.
• MultiSite entries in the Phone Book can only consist
of IP sites.
D14033.06—AUGUST 2010
64
MXP Administrator Guide
Contents Introduction Getting started The menu structure The setti ngs librar y Using the sys tem Physica l interf aces Peripheral equipment Contact usAppendices
The menu structure
Page 65

Each menu i tem is descr ibed
in The settings library section.
Select SAVE AND RESTART after
making ch anges to IP Set tings
Select SAVE AND RESTART after
making ch anges to DNS S ettings
Describ ed on the following
pages.
The Network settings menus - Part 2
Applies to : 3000 MXP Profile, Tactical MXP
D14033.06—AUGUST 2010
65
MXP Administrator Guide
Contents Introduction Getting started The menu structure The setti ngs librar y Using the sys tem Physica l interf aces Peripheral equipment Contact usAppendices
The menu structure
Page 66

Each menu i tem is descr ibed
in The settings library section.
Describ ed on the following
pages.
Describ ed on the previous page.
The Network settings menus - Part 3
Applies to : 3000 MXP Profile, Tactical MXP
D14033.06—AUGUST 2010
66
MXP Administrator Guide
Contents Introduction Getting started The menu structure The setti ngs librar y Using the sys tem Physica l interf aces Peripheral equipment Contact usAppendices
The menu structure
Page 67

Each menu i tem is descr ibed
in The settings library section.
Describ ed on the following pages.
Describ ed on the previous page.
The Network settings menus - Part 4
Applies to : 3000 MXP Profile, Tactical MXP
Select SAVE AND RESTART after
making ch anges to SIP Se ttings
D14033.06—AUGUST 2010
67
MXP Administrator Guide
Contents Introduction Getting started The menu structure The setti ngs librar y Using the sys tem Physica l interf aces Peripheral equipment Contact usAppendices
The menu structure
Page 68

Each menu i tem is descr ibed
in The settings library section.
Describ ed on the following pages.
Describ ed on the previous page.
Select SAVE AND RESTART after
making ch anges to IP Se rvice s
Select SAVE AND RESTART after
making ch anges to WL AN Settin gs
The Network settings menus - Part 5
Applies to : 3000 MXP Profile, Tactical MXP
D14033.06—AUGUST 2010
68
MXP Administrator Guide
Contents Introduction Getting started The menu structure The setti ngs librar y Using the sys tem Physica l interf aces Peripheral equipment Contact usAppendices
The menu structure
Page 69

Each menu i tem is descr ibed
in The settings library section.
Describ ed on the previous page.
The Network settings menus - Part 6
Applies to : 3000 MXP Profile, Tactical MXP
D14033.06—AUGUST 2010
69
MXP Administrator Guide
Contents Introduction Getting started The menu structure The setti ngs librar y Using the sys tem Physica l interf aces Peripheral equipment Contact usAppendices
The menu structure
Page 70

Each menu i tem is descr ibed
in The settings library section.
TANDBERG TACTICAL MXP
The Camer a Port set ting does not a pply to
TANDBERG Tactical MXP.
The Network settings menus - Part 7
Applies to : 3000 MXP Profile, Tactical MXP
D14033.06—AUGUST 2010
70
MXP Administrator Guide
Contents Introduction Getting started The menu structure The setti ngs librar y Using the sys tem Physica l interf aces Peripheral equipment Contact usAppendices
The menu structure
Page 71

Each menu i tem is descr ibed
in The settings library section.
The other Control Panel menu buttons
Applies to : 3000 MXP Profile, Tactical MXP
The Instal lation men u is descri bed in the
Getting started section.
D14033.06—AUGUST 2010
71
MXP Administrator Guide
Contents Introduction Getting started The menu structure The setti ngs librar y Using the sys tem Physica l interf aces Peripheral equipment Contact usAppendices
The menu structure
Page 72

Each menu i tem is descr ibed
in The settings library section.
Described overleaf.
Click on arrow
down/up to scroll.
NOTE: T he CH ANN EL STAT US
do not apply to NET versions.
The Diagnostics menus - Part 1
Applies to : 3000 MXP Profile, Tactical MXP
D14033.06—AUGUST 2010
72
MXP Administrator Guide
Contents Introduction Getting started The menu structure The setti ngs librar y Using the sys tem Physica l interf aces Peripheral equipment Contact usAppendices
The menu structure
Page 73

Each menu i tem is descr ibed
in The settings library section.
Describ ed on the previous page.
The Diagnostics menus - Part 2
Applies to : 3000 MXP Profile, Tactical MXP
Click on WARNINGS to see the warnings.
Click on IP ADDRESS CONFL ICT CHECK to see t he conflic ts.
Click on arrow
down/up to scroll.
D14033.06—AUGUST 2010
73
MXP Administrator Guide
Contents Introduction Getting started The menu structure The setti ngs librar y Using the sys tem Physica l interf aces Peripheral equipment Contact usAppendices
The menu structure
Page 74

Menu structure for 1700 MXP
Chapter 3 - 1700 - Hidden tex t anchor
Each menu i tem is descr ibed
in The settings library section.
Control Panel menu structure for:
This guide describes the menu structure for the
systems disp layed on this pa ge, with all options
installed.
Descrip tions of each m enu item are fou nd in
The settings library section.
TANDBERG 1700 MXP
D14033.06—AUGUST 2010
74
MXP Administrator Guide
Contents Introduction Getting started The menu structure The setti ngs librar y Using the sys tem Physica l interf aces Peripheral equipment Contact usAppendices
The menu structure
Page 75

Open the Control Panel
Press the OK key on the r emote control to wa ke up the system,
and to display t he Call menu.
In the Call me nu, use the arrow keys on the remote
control to navi gate to the Control Panel button and
press the OK key to dis play the Contro l Panel.
Each menu i tem is descr ibed in
The settings library section.
BACK
RE STA RT (the syste m switches it self Of f and On again )
AUDIO DEMO (demonstra tes the audio of th e system)
DIAGNOSTICS (see the system status and warn ings))
ON-LINE US ER GUIDE (open the online user guide).
Remote control shortcut keys
About the Control Panel
The dif ferent par ts of the Contro l Panel are exp lained on th e
following page s.
The menu structure section presen ts all the Contr ol Panel men us
by product. This section applies to:
• TANDBERG 1700 MXP
Password Protection
Making ch anges to the Co ntrol Panel S ettings wi ll change th e
behavior o f the system. We reco mmend pas sword protectin g the
access to the C ontrol Pane l Settings to pre vent occas ional use rs
from making crucial changes to the system. Set an Administrator
Password to cont rol the acces s to these settings.
Read more ab out passwo rd protection in t he Using the sys tem
section.
RE-DIAL: Double clic k on the green c all button o n the
remote contro l to start calling the las t number.
STANDBY: Double click on the red end call button on
the remote cont rol to set the system i nto standby.
SHOW SYSTEM INFORMATION: Open the call men u
and press th e arrow up key onc e to show the System
information page.
RESET MENU LANGUAGE: Click on the Phone B ook
button 5 time s and then pre ss the numb er key 1 to
reset the me nu languag e to English.
D14033.06—AUGUST 2010
75
MXP Administrator Guide
Contents Introduction Getting started The menu structure The setti ngs librar y Using the sys tem Physica l interf aces Peripheral equipment Contact usAppendices
The menu structure
Page 76

Each menu i tem is descr ibed
in The settings library section.
The Control Panel overview
Applies to : 1700 MXP
D14033.06—AUGUST 2010
76
MXP Administrator Guide
Contents Introduction Getting started The menu structure The setti ngs librar y Using the sys tem Physica l interf aces Peripheral equipment Contact usAppendices
The menu structure
Page 77

Each menu i tem is descr ibed
in The settings library section.
Describ ed on the nex t page.
The General settings menus - Part 1
Applies to : 1700 MXP
D14033.06—AUGUST 2010
77
MXP Administrator Guide
Contents Introduction Getting started The menu structure The setti ngs librar y Using the sys tem Physica l interf aces Peripheral equipment Contact usAppendices
The menu structure
Page 78

Each menu i tem is descr ibed
in The settings library section.
Describ ed on the previous page.
The General settings menus - Part 2
Applies to : 1700 MXP
D14033.06—AUGUST 2010
78
MXP Administrator Guide
Contents Introduction Getting started The menu structure The setti ngs librar y Using the sys tem Physica l interf aces Peripheral equipment Contact usAppendices
The menu structure
Page 79

Each menu i tem is descr ibed
in The settings library section.
The Menu settings menus
Applies to : 1700 MXP
D14033.06—AUGUST 2010
79
MXP Administrator Guide
Contents Introduction Getting started The menu structure The setti ngs librar y Using the sys tem Physica l interf aces Peripheral equipment Contact usAppendices
The menu structure
Page 80

Each menu i tem is descr ibed
in The settings library section.
The Presentation settings menus
Applies to : 1700 MXP
D14033.06—AUGUST 2010
80
MXP Administrator Guide
Contents Introduction Getting started The menu structure The setti ngs librar y Using the sys tem Physica l interf aces Peripheral equipment Contact usAppendices
The menu structure
Page 81

Each menu i tem is descr ibed
in The settings library section.
The Call Quality settings menus
Applies to : 1700 MXP
NOTE! T he Call Settings are also av ailable from the
Call Menu. W hen makin g a call you can c hange the
Call Settings. Choose SET AS DEFAULT to make the
changes t he new DEFAULT CALL SETT INGS.
D14033.06—AUGUST 2010
81
MXP Administrator Guide
Contents Introduction Getting started The menu structure The setti ngs librar y Using the sys tem Physica l interf aces Peripheral equipment Contact usAppendices
The menu structure
Page 82

Each menu i tem is descr ibed
in The settings library section.
The Audio settings menus
Applies to : 1700 MXP
D14033.06—AUGUST 2010
82
MXP Administrator Guide
Contents Introduction Getting started The menu structure The setti ngs librar y Using the sys tem Physica l interf aces Peripheral equipment Contact usAppendices
The menu structure
Page 83

Each menu i tem is descr ibed
in The settings library section.
The Vide o Name typ ed in will ap pear in the Pre sentation
menu. To find the Pres entation me nu, press the O K button
on the remote co ntrol and sel ect the Prese ntation but ton.
The Video settings menus
Applies to : 1700 MXP
D14033.06—AUGUST 2010
83
MXP Administrator Guide
Contents Introduction Getting started The menu structure The setti ngs librar y Using the sys tem Physica l interf aces Peripheral equipment Contact usAppendices
The menu structure
Page 84

Each menu i tem is descr ibed
in The settings library section.
The Security settings menus
Applies to : 1700 MXP
Password Protection of the Control Panel
Making ch anges to the Co ntrol Panel S ettings wi ll
change the b ehavior of th e system.
We recommen d password prote cting the acc ess to the
Control Panel Settings to prevent occasional users from
making cr ucial cha nges to the syste m.
Set an Admin istrator Passwo rd to control the ac cess to
these settings.
D14033.06—AUGUST 2010
84
MXP Administrator Guide
Contents Introduction Getting started The menu structure The setti ngs librar y Using the sys tem Physica l interf aces Peripheral equipment Contact usAppendices
The menu structure
Page 85

Each menu i tem is descr ibed
in The settings library section.
Describ ed on the following
pages.
Select SAVE AND RESTART after
making ch anges to IP Set tings
Select SAVE AND RESTART after
making ch anges to DNS S ettings
The Network settings menus - Part 1
Applies to : 1700 MXP
D14033.06—AUGUST 2010
85
MXP Administrator Guide
Contents Introduction Getting started The menu structure The setti ngs librar y Using the sys tem Physica l interf aces Peripheral equipment Contact usAppendices
The menu structure
Page 86

Each menu i tem is descr ibed
in The settings library section.
Describ ed on the following
pages.
Describ ed on the prev ious page.
The Network settings menus - Part 2
Applies to : 1700 MXP
D14033.06—AUGUST 2010
86
MXP Administrator Guide
Contents Introduction Getting started The menu structure The setti ngs librar y Using the sys tem Physica l interf aces Peripheral equipment Contact usAppendices
The menu structure
Page 87

Each menu i tem is descr ibed
in The settings library section.
Describ ed on the following
pages.
Describ ed on the prev ious page.
Applies to : 1700 MXP
The Network settings menus - Part 3
Select SAVE AND RESTART after
making ch anges to SIP Se ttings
D14033.06—AUGUST 2010
87
MXP Administrator Guide
Contents Introduction Getting started The menu structure The setti ngs librar y Using the sys tem Physica l interf aces Peripheral equipment Contact usAppendices
The menu structure
Page 88

Each menu i tem is descr ibed
in The settings library section.
Select SAVE AND RESTART after
making ch anges to IP Se rvice s
Describ ed on the following
pages.
Describ ed on the prev ious page.
The Network settings menus - Part 4
Applies to : 1700 MXP
D14033.06—AUGUST 2010
88
MXP Administrator Guide
Contents Introduction Getting started The menu structure The setti ngs librar y Using the sys tem Physica l interf aces Peripheral equipment Contact usAppendices
The menu structure
Page 89

Each menu i tem is descr ibed
in The settings library section.
Describ ed on the prev ious page.
The Network settings menus - Part 5
Applies to : 1700 MXP
D14033.06—AUGUST 2010
89
MXP Administrator Guide
Contents Introduction Getting started The menu structure The setti ngs librar y Using the sys tem Physica l interf aces Peripheral equipment Contact usAppendices
The menu structure
Page 90

Each menu i tem is descr ibed
in The settings library section.
INFO: Th e ISDN profil e, which is prof ile numbe r 2, does
not apply to the TANDB ERG 1700 MXP.
The Network settings menus - Part 6
Applies to : 1700 MXP
D14033.06—AUGUST 2010
90
MXP Administrator Guide
Contents Introduction Getting started The menu structure The setti ngs librar y Using the sys tem Physica l interf aces Peripheral equipment Contact usAppendices
The menu structure
Page 91

Each menu i tem is descr ibed
in The settings library section.
The other Control Panel menu buttons
Applies to : 1700 MXP
The Instal lation men u is descri bed in the
Getting started section.
D14033.06—AUGUST 2010
91
MXP Administrator Guide
Contents Introduction Getting started The menu structure The setti ngs librar y Using the sys tem Physica l interf aces Peripheral equipment Contact usAppendices
The menu structure
Page 92

Each menu i tem is descr ibed
in The settings library section.
Described overleaf.
Click on arrow
down/up to scroll.
The Diagnostics menus - Part 1
Applies to : 1700 MXP
D14033.06—AUGUST 2010
92
MXP Administrator Guide
Contents Introduction Getting started The menu structure The setti ngs librar y Using the sys tem Physica l interf aces Peripheral equipment Contact usAppendices
The menu structure
Page 93

Each menu i tem is descr ibed
in The settings library section.
Describ ed on the previous page.
The Diagnostics menus - Part 2
Applies to : 1700 MXP
Click on WARNINGS to see the warnings.
Click on IP ADDRESS CONFL ICT CHECK to see t he conflic ts.
Click on arrow
down/up to scroll.
D14033.06—AUGUST 2010
93
MXP Administrator Guide
Contents Introduction Getting started The menu structure The setti ngs librar y Using the sys tem Physica l interf aces Peripheral equipment Contact usAppendices
The menu structure
Page 94

Menu structure for 1000 MXP, Compass MXP, Utility MXP
Chapter 3 - 1000, Co mpass, Utility - Hidde n text ancho r
Each menu i tem is descr ibed
in The settings library section.
Control Panel menu structure for:
This guide describes the menu structure for the
systems disp layed on this pa ge, with all options
installed.
Descrip tions of each m enu item are fou nd in
The settings library section.
TANDBERG 1000 MXP TANDBERG
Compass MXP
TANDBERG
Utility MXP
D14033.06—AUGUST 2010
94
MXP Administrator Guide
Contents Introduction Getting started The menu structure The setti ngs librar y Using the sys tem Physica l interf aces Peripheral equipment Contact usAppendices
The menu structure
Page 95

Open the Control Panel
Press the OK key on the r emote control to wa ke up the system,
and to display t he Call menu.
In the Call me nu, use the arrow keys on the remote
control to navi gate to the Control Panel button and
press the OK key to dis play the Contro l Panel.
Each menu i tem is descr ibed in
The settings library section.
BACK
RE STA RT (the syste m switches it self Of f and On again )
AUDIO DEMO (demonstra tes the audio of th e system)
DIAGNOSTICS (see the system status and warn ings))
ON-LINE US ER GUIDE (open the online user guide).
Remote control shortcut keys
About the Control Panel
The dif ferent par ts of the Contro l Panel are exp lained on th e
following page s.
The menu structure section presen ts all the Contr ol Panel men us
by product. This section applies to:
• TANDBERG 1000 MXP
• TANDBERG Compass MXP
• TANDBERG Utility MXP
Password Protection
Making ch anges to the Co ntrol Panel S ettings wi ll change th e
behavior o f the system. We reco mmend pas sword protectin g the
access to the C ontrol Pane l Settings to pre vent occas ional use rs
from making crucial changes to the system. Set an Administrator
Password to cont rol the acces s to these settings.
Read more ab out passwo rd protection in t he Using the sys tem
section.
RE-DIAL: Double clic k on the green c all button o n the
remote contro l to start calling the las t number.
STANDBY: Double click on the red end call button on
the remote cont rol to set the system i nto standby.
SHOW SYSTEM INFORMATION: Open the call men u
and press th e arrow up key onc e to show the System
information page.
RESET MENU LANGUAGE: Click on the Phone B ook
button 5 time s and then pre ss the numb er key 1 to
reset the me nu languag e to English.
D14033.06—AUGUST 2010
95
MXP Administrator Guide
Contents Introduction Getting started The menu structure The setti ngs librar y Using the sys tem Physica l interf aces Peripheral equipment Contact usAppendices
The menu structure
Page 96

Each menu i tem is descr ibed
in The settings library section.
The Control Panel overview
Applies to : 1000 MXP, Compass MXP, Utility MXP
D14033.06—AUGUST 2010
96
MXP Administrator Guide
Contents Introduction Getting started The menu structure The setti ngs librar y Using the sys tem Physica l interf aces Peripheral equipment Contact usAppendices
The menu structure
Page 97

Each menu i tem is descr ibed
in The settings library section.
Described overleaf.
The General settings menus - Part 1
Applies to : 1000 MXP, Compass MXP, Utility MXP
D14033.06—AUGUST 2010
97
MXP Administrator Guide
Contents Introduction Getting started The menu structure The setti ngs librar y Using the sys tem Physica l interf aces Peripheral equipment Contact usAppendices
The menu structure
Page 98

Each menu i tem is descr ibed
in The settings library section.
Describ ed on the previous page.
The General settings menus - Part 2
Applies to : 1000 MXP, Compass MXP, Utility MXP
D14033.06—AUGUST 2010
98
MXP Administrator Guide
Contents Introduction Getting started The menu structure The setti ngs librar y Using the sys tem Physica l interf aces Peripheral equipment Contact usAppendices
The menu structure
Page 99

Each menu i tem is descr ibed
in The settings library section.
Kiosk Mode
Functionality will be heavily
restricte d in Kiosk Mo de!
Read more ab out Kiosk Mode
in the Appendices section.
The Menu settings menus
Applies to : 1000 MXP, Compass MXP, Utility MXP
D14033.06—AUGUST 2010
99
MXP Administrator Guide
Contents Introduction Getting started The menu structure The setti ngs librar y Using the sys tem Physica l interf aces Peripheral equipment Contact usAppendices
The menu structure
Page 100

Each menu i tem is descr ibed
in The settings library section.
The Presentation settings menus
Applies to : 1000 MXP, Compass MXP, Utility MXP
D14033.06—AUGUST 2010
100
MXP Administrator Guide
Contents Introduction Getting started The menu structure The setti ngs librar y Using the sys tem Physica l interf aces Peripheral equipment Contact usAppendices
The menu structure
 Loading...