


Notice Originale
Original Instructions
Originalbetriebsanleitung
A LIRE ATTENTIVEMENT AVANT D’UTILISER LE BOÎTIER
PLEASE READ CAREFULLY BEFORE USING THE CONTROL unit
VOR GEBRAUCH DES ELEKTRONIKGERÄTS SORGFÄLTIG LESEN
Réf: 400 444 - 02 - FR-GB-DE / SEM
Les Portes de Bretagne
P.A. de la Gaultière – 35220 CHATEAUBOURG France
Tél :(33)02-99-00-84-84 · Fax : (33)02-99-62-39-38
Site Internet : www.sulky-burel.com
E-Mail : info@sulky-burel.com
Adresse postale
SULKY-BUREL – CS 20005 – 35538 NOYAL SUR VILAINE CEDEX France

Consignes de sécurité
Safety instructions
Sicherheitsvorschriften
FR
-Respecter les instructions de cette notice.
-Respecter les instructions du manuel d’utilisation du semoir correspondant.
-Ne jamais quitter le poste de conduite lorsque le tracteur est en marche.
-Réaliser les réglages du Semoir tracteur à l’arrêt.
-Assurez-vous qu’il n’y ait personne autour de la machine avant d’effectuer l’étalonnage du PILOT.
Risque d’accident |
Risque d’endommager |
Faciliter le travail |
Ne pas jeter le boîtier |
|
la machine |
|
|
•Ces symboles sont utilisés dans cette notice chaque fois que des recommandations concernent votre sécurité, celle d’autrui ou le bon fonctionnement de la machine.
•Transmettez impérativement ces recommandations à tout utilisateur de la machine.
GB
-Follow the instructions contained in this manual.
-Follow the Seed drill User Manual recommendations.
-Never leave the driver’s position whilst the tractor is running.
-Carry out Seeddrill adjustments with the tractor stopped.
-Make sure no one is near the machine before calibrating the PILOT unit.
Risk of accident |
Risk of damage |
Operating tip |
Do not throw the unit away |
|
to the machine |
|
|
•These symbols are used in these instructions every time recommendations are provided concerning your safety, the safety of others or the correct operation of the machine.
•These recommendations must be given to all users of the machine.
DE
-Die Anweisungen dieser Anleitung einhalten.
-Die Anweisungen des Benutzerhandbuchs der entsprechenden Drillmaschine einhalten.
-Den Führerstand niemals bei laufendem Schleppermotor verlassen.
-Einstellungen des Drillmaschine bei ausgestelltem Schlepper vornehmen.
-Darauf achten, dass sich beim Kalibrieren des PILOTniemand im Maschinenbereich aufhält.
Unfallgefahr |
Gefahr, die Maschine zu |
Arbeitserleichterung |
Elektronikgerät nicht im Müll |
|
beschädigen |
|
entsorgen |
•Diese Symbole werden in dieser Anleitung jedes Mal dann benutzt, wenn Empfehlungen für Ihre und anderer Personen Sicherheit oder den einwandfreien Betrieb der Maschine gegeben werden.
•Es ist unerlässlich, diese Empfehlungen an alle Benutzer der Maschine weiterzugeben.

Français |
SOMMAIRE |
|
|
Pages |
|
PRÉSENTATION |
|
6-7 |
|
• A |
Présentation du système PILOT |
|
|||
8-9 |
|
• B |
Connexion au tracteur |
10-11 |
|
• C |
Boîtier de commande PILOT |
12-21 |
|
• D |
Présentation des fonctions |
Pages |
|
RÉGLAGE |
|
22-23 |
|
• A |
Choix de la semence |
|
|||
24-25 |
|
• B |
Modification de la dose en |
26-27 |
|
• C |
Kg/ha |
|
Réglage de la largeur |
||
28-33 |
|
• D |
Essai de débit |
34-35 |
|
• E |
Modulation de dose |
36-37 |
|
• F |
Réglage du jalonnage |
38-39 |
|
• G |
Calibrage de la vitesse |
|
|
|
d’avancement |
Pages |
|
INFORMATIONS |
|
|
|
|
|
40-41 |
|
• A |
Fonction pré-start |
50-51 |
|
• G |
Information pour Jalonnage |
|
|
||||||
42-43 |
|
• B |
Fonction Précharge |
52-53 |
|
• H |
Alarme |
44-45 |
|
• C |
Modulation |
54-55 |
|
• I |
Réglages alarme |
44-45 |
|
• D |
Vérins |
56-57 |
|
• J |
Réglages généraux |
46-47 |
|
• E |
Tramline |
58 |
|
• K |
Pannes - Remèdes |
48-49 |
|
• F |
Etalonnage du doseur/essai |
|
|
|
|
|
|
|
de débit/réglage manuel du |
|
|
|
|
|
|
|
Calibrage |
|
|
|
|
Lire attentivement la notice avant l’utilisation. Comprendre son boîtier électronique, c’est mieux l’utiliser. En français suivre le symbole. FR
1
2
3
3

|
|
|
|
|
|
|
|
|
|
|
|
|
|
|
|
|
|
|
|
|
|
|
|
|
English |
CONTENTS |
|
|
|
|
|
|
|
||
|
|
|
|
|
|
|
|
|
|
|
|
|
|
|
|
|
|
|
|
|
|
|
|
|
|
|
Pages |
|
PRESENTATION |
|
6-7 |
|
• A Presentation of the PILOT |
|
|
|||
8-9 |
|
• B |
system |
|
Tractor interface connections |
||
10-11 |
|
• C |
PILOT control unit |
12-21 |
|
• D |
Presentation of functions |
Pages |
|
SETTINGS |
|
22-23 |
|
• A |
Seed selection |
|
|||
24-25 |
|
• B |
Modifying the application rate |
26-27 |
|
• C |
in kg/ha |
|
Setting the working width |
||
28-33 |
|
• D |
Calibration test |
34-35 |
|
• E |
Adjusting the application rate |
36-37 |
|
• F |
Setting the tramlines |
38-39 |
|
• G |
Calibrating the forward speed |
Pages |
|
INFORMATION |
|
|
|
|
|
40-41 |
|
• A |
Pre-start function |
50-51 |
|
• G |
Tramlining information |
|
|
||||||
42-43 |
|
• B |
Pre-load function |
52-53 |
|
• H |
Alarm |
44-45 |
|
• C |
Adjustment |
54-55 |
|
• I |
Alarm settings |
44-45 |
|
• D |
Cylinders |
56-57 |
|
• J |
General settings |
46-47 |
|
• E |
Tramline |
58 |
|
• K |
Troubleshooting |
48-49 |
|
• F |
Calibrating the metering |
|
|
|
|
|
|
|
mechanism / calibration test / |
|
|
|
|
|
|
|
manual calibration settings |
|
|
|
|
Read the operator’s manual carefully before use. Understanding your electronic
unit will help you make better use of it. For English instructions, follow this
GB
symbol: GB
4

Deutsch |
INHALTSVERZEICHNIS |
|
|
Seite |
|
BESCHREIBUNG |
|
6-7 |
|
• A Beschreibung des Systems |
|
|
|||
8-9 |
|
• B |
PILOT |
|
Schlepperanschluss |
||
10-11 |
|
• C |
Bedienkonsole PILOT |
12-21 |
|
• D |
Beschreibung der Funktionen |
Seite |
|
EINSTELLUNGEN |
|
|
|
|
|
22-23 |
|
• A |
Saatwahl |
|
|
|
|
|
|
|
|
|
|||
24-25 |
|
• B |
Änderung der Saatmenge in |
|
|
|
|
26-27 |
|
• C |
kg/ha |
|
|
|
|
|
Einstellung der Breite |
|
|
|
|
||
28-33 |
|
• D |
Aussaatmengentest |
|
|
|
|
34-35 |
|
• E |
Änderung der Saatmenge |
|
|
|
|
36-37 |
|
• F |
Einstellung der |
|
|
|
|
38-39 |
|
• G |
Fahrgassenschaltung |
|
|
|
|
|
Kalibrierung der |
|
|
|
|
||
|
|
|
Fahrgeschwindigkeit |
|
|
|
|
|
|
|
|
|
|
|
|
Seite |
|
INFORMATIONEN |
|
|
|
|
|
40-41 |
|
• A |
Funktion Anlaufhilfe |
50-51 |
|
• G |
Informationen für die |
|
|
||||||
42-43 |
|
• B |
Funktion Vorfüllung |
52-53 |
|
|
Fahrgassenschaltung |
44-45 |
|
• C |
Änderung |
54-55 |
|
• H |
Alarm |
44-45 |
|
• D |
Zylinder (Stellmotoren) |
56-57 |
|
• I |
Alarmeinstellungen |
46-47 |
|
• E |
Tramline |
58 |
|
• J |
Allgemeine Einstellungen |
48-49 |
|
• F |
Kalibrierung Dosierer |
|
|
• K |
Störungen - Abhilfe |
|
|
|
/ Saatmengentest / |
|
|
|
|
|
|
|
Handeinstellung Kalibrierung |
|
|
|
|
|
|
|
|
|
|
|
|
1
2
3
Anleitung vor Benutzung sorgfältig durchlesen. Das Elektronikgerät richtig zu verstehen, heißt, es besser (aus)nutzen zu können. Die deutsche Fassung ist mit gekennzeichnet. DE
5

Présentation / Presentation / Beschreibung |
|
|
A |
|
|
|
SEMOIRS TRAINÉS |
|
|
TRAILED SEED DRILLS |
|
|
GESCHLEPPTE SÄMASCHINE |
|
4 |
3 |
|
|
|
|
1 |
|
|
|
5 |
|
2 |
|
|
2 |
|
|
OPTION |
8 |
|
OPTIONAL |
|
|
1 |
M |
OTEUR |
M |
||
|
OTOR |
|
|
M |
|
9 |
OTOR |
|
|
|
|
6 |
|
|
7 |
|
|
6

Présentation / Presentation / Beschreibung
|
|
|
|
FR |
|
|
|
|
|
|
|
||
|
Présentation du système PILOT |
|
|
|
||
A |
7 |
Capteur de vitesse (ou radar sur les versions trainées) |
|
|||
|
a) Introduction |
8 |
Alimentation moteur |
|
||
|
Le boîtier PILOT est un instrument de réglage et de |
9 |
Capteur de relevage |
|
||
|
contrôle. |
10 |
Electrovanne jalonneurs de prélevée (option) |
|
||
|
. LES INFORMATIONS DE POIDS ET DE SURFACE DONNÉES PAR LE |
|
||||
|
|
|
|
|||
|
PILOT, NE PEUVENT PAS ÊTRE UTILISÉES POUR DES TRANSACTIONS |
11 |
Capteur niveau de trémie |
|
||
|
COMMERCIALES. |
12 |
Connecteur console Pilot |
1 |
||
|
b) Présentation |
|||||
|
13 |
Prise cobo (alimentation console) |
||||
1 |
Console PILOT. |
|||||
14 |
Capteur fermeture boîte de vitesse |
|
||||
2 |
Boîtier électronique Pilot |
|
||||
15 |
Capteur vitesse turbine |
|
||||
3 |
Boîtier électronique interface moteur |
|
||||
|
|
|
||||
4 |
Connecteur d’alimentation de puissance du moteur |
|
|
|
||
5 |
Connection boîtier électronique |
|
|
|
||
6 |
Bouton d’amorçage distribution et essai de débit |
|
|
|
||
|
|
|
|
GB |
|
|
|
|
|
|
|
||
|
Presentation of the PILOT system |
|
|
|
||
A |
7 |
Speed sensor (or radar on trailed models) |
|
|||
|
a) Introduction |
8 |
Motor power supply |
|
||
|
The PILOT unit is a control and monitoring tool. |
9 |
Lifting mechanism sensor |
|
||
|
. THE WEIGHT AND SURFACE AREA INFORMATION PROVIDED BY THE |
10 |
Pre-emergence tramlining solenoid valve (optional) |
|
||
|
PILOT SHOULD NOT BE USED FOR COMMERCIAL TRANSACTIONS. |
11 |
Hopper level sensor |
|
||
|
b) Presentation |
|
||||
|
12 |
PILOT console connector |
|
|||
1 |
PILOT console |
|
||||
13 |
Cobo plug (console power supply) |
|
||||
2 |
PILOT electronic unit |
|
||||
14 |
Gearbox closure sensor |
|
||||
3 |
Electronic unit motor interface |
|
||||
15 |
Fan speed sensor |
|
||||
4 |
Motor power supply connector |
|
||||
|
|
|
||||
5 |
Electronic unit connection |
|
|
|
||
6 |
Distribution and calibration test start button |
|
|
|
||
|
|
|
|
DE |
|
|
|
|
|
|
|
||
|
Beschreibung des PILOT-Systems |
|
|
|
||
A |
7 |
Geschwindigkeitssensor (oder Radar bei gezogenen |
|
|||
|
a) Einführung |
|
Versionen) |
|
||
|
8 |
Stromversorgung Motor |
|
|||
|
Der Bordcomputer PILOT ist ein Gerät zur Einstellung und |
|
||||
|
|
|
|
|||
|
Kontrolle. |
9 |
Hubwerksensor |
|
||
|
. DIE VON PILOT ANGEGEBENEN INFORMATIONEN ÜBER GEWICHTE |
10 |
Magnetventil Vorauflaufmarkierer |
|
||
|
UND FLÄCHEN DÜRFEN NICHT FÜR HANDELSZWECKE VERWENDET |
|
|
|
||
|
WERDEN. |
11 |
Tank-Füllstandsensor |
|
||
|
b) Beschreibung |
12 |
Anschluss PILOT Konsole |
|
||
1 |
PILOT Bedienkonsole |
13 |
Cobo-Stecker (Stromversorgung Konsole) |
|
||
2 |
Pilot-Schalkasten |
14 |
Schließsensor Getriebe |
|
||
3 |
Steuergerät Motoranschluss |
15 |
Geschwindigkeitssensor Turbine |
|
||
4 |
Stromanschluss Motor |
|
|
|
||
5 |
Anschluss Steuergerät |
|
|
|
||
6 |
Knopf für Verteilerfüllung und Abdrehprobe |
|
|
|
||
7
Présentation / Presentation / Beschreibung
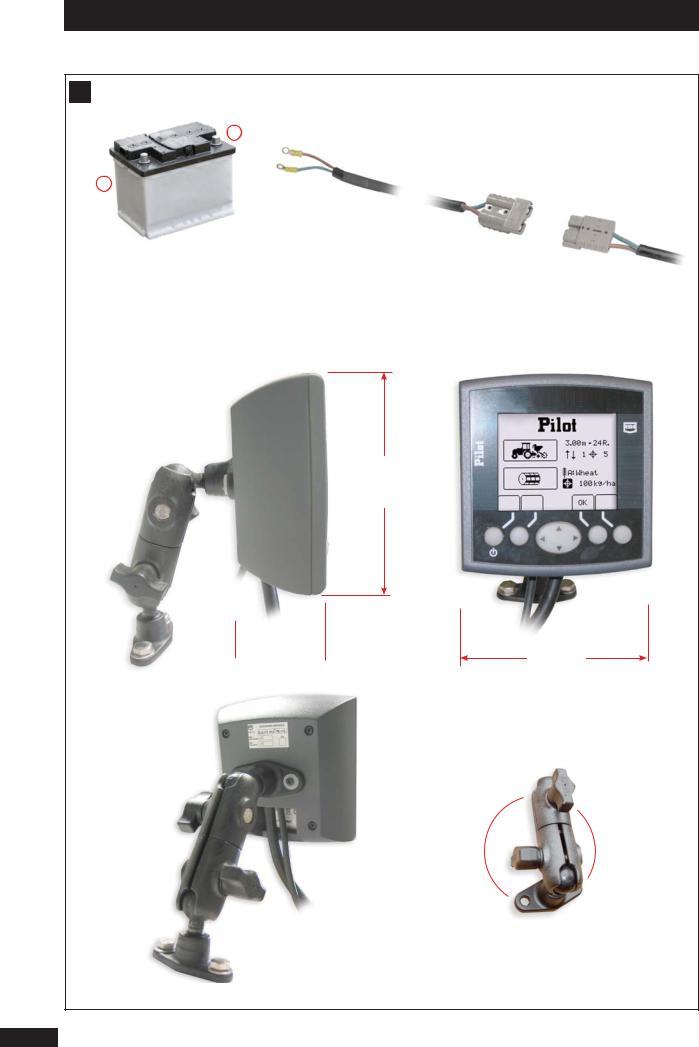
B
-
+
135 mm

 54 mm
54 mm 

128 mm
8

Présentation / Presentation / Beschreibung
|
|
|
|
FR |
|
|
|
|
|
|
|
|
Connexion au tracteur |
|
|
||
B |
|
Eteindre correctement le boîtier au moyen de la |
|||
|
|||||
|
INSTALLATION DU PILOT |
|
touche |
avant de le débrancher. |
|
|
|
Il est très important que l’alimentation du boîtier |
|||
|
. Il est impératif de brancher les alimentations électriques |
|
électronique Pilot et l’alimentation de puissance |
||
|
|
viennent directement de la batterie et aient une |
|||
|
directement à la batterie 12 volts du tracteur. |
|
masse commune. |
||
|
Lorsque les prises sont branchées, le boîtier peut être allumé. |
|
|
|
|
|
Le boîtier PILOT possède une mémoire des données pro- |
|
|
|
|
|
grammées. |
|
|
1 |
|
|
Le boîtier PILOT doit être protégé par des fusibles 5A sur |
|
|
||
son alimentation, et 40A pour l’alimentation électrique du moteur.
La console doit être positionnée de manière à ce qu’elle soit bien visible par le conducteur.
GB
BTractor interface connections
INSTALLING THE PILOT
.The power supply cables must be connected directly to the tractor’s 12 V battery.
Once the plugs have been connected, the unit can be switched on.
The PILOT unit has a memory for the programmed data.
The PILOT unit must be protected by 5 amp fuses on its power supply and 40 amp fuses for the motor’s electric power supply.
The console must be positioned so that it can be easily seen by the driver.
Switch off the unit properly using the  key before unplugging it.
It is very important that the power supply for the Pilot electronic unit and the power come directly from the battery and that they share the same earth.
|
|
DE |
|
|
|
|
Schlepperanschluss |
|
B |
Vor dem Unterbrechen der Verbindung, den |
|
|
INSTALLIERUNG DES PILOT |
Computer vorschriftmäßig mit der Taste |
|
ausschalten. |
|
|
. Die elektrischen Versorgungsleitungen des |
Es ist sehr wichtig, dass die Stromversorgung des |
|
Elektronikgeräts Pilot und die Spannung direkt aus |
|
|
Elektronikgerätes sind unbedingt direkt an die |
der Batterie kommen und eine gemeinsame Masse |
|
12-V-Batterie des Schleppers anzuschließen. |
haben. |
|
Wenn alle Stecker angeschlossen sind, kann der Computer |
|
|
eingeschaltet werden. |
|
|
Die Pilot-Konsole hat einen Speicher für programmierte |
|
|
Daten. |
|
|
Die Stromversorgung den PILOT-Konsole muss durch eine |
|
|
5-A-Sicherung und die Stromversorgung des Motors mit 40 |
|
|
A geschützt werden. |
|
|
Die Konsole muss für den Fahrer gut sichtbar angebracht |
|
|
werden. |
|
9

Présentation / Presentation / Beschreibung
C

 7
7
1


2 |
3 |
4 |
5 |
6 |
10
Présentation / Presentation / Beschreibung
FR
C Boîtier de commande PILOT
- |
1 |
- Bouton de choix de langue |
|
- 2 |
- Mise sous tension / Sélection des pages / extinction |
|
|
|
|
(3 secondes) |
|
- |
3 |
- Activation / Arrêt du moteur / Touche échappe / |
|
|
|
lancement pré-start (3 secondes). |
|
- |
4 |
- Flèches directionnelles |
1 |
- |
5 |
- Touche de validation ou d’arrêt / Mise en marche |
|
jalonnage
-6- Incrémentation jalonnage / Calibrage
-7- Récapitulatif des derniers réglages en cours
GB
CPILOT control unit
-1 - Language selection button
-2 - On button / page selection / off button (3 seconds)
-3 - Motor on/off / escape key / pre-start activation
(3 seconds)
-4 - Arrow keys
-5 - Confirm or stop key / tramlining start key
-6 - Tramlining increments / calibration
-7 - Summary of the latest settings
DE
CBedienkonsole PILOT
-1 - Sprachwahltaste
-2 - Einschalten / Seitenwahl / Abschalten (3 Sekunden)
-3 - Motor An- / Abschalten / Löschtaste / Start Anlaufhilfe (3 Sekunden)
-4 - Richtungspfeile
-5 - Taste für Bestätigung oder Stopp / Einschalten Fahrgassenschaltung
-6 - Inkrementierung Fahrgassenanlage / Kalibrierung
-7 - Übersicht der letzten Einstellungen
11

Présentation / Presentation / Beschreibung
D
12

Présentation / Presentation / Beschreibung
|
|
|
|
|
|
FR |
|
|
|
|
|
|
|
|
|
|
Présentation des fonctions |
|
|
|
|
|
|
D |
|
Remarque : |
|
|
|
||
|
Le contrôle de la console Pilot se fait à travers quatre menus. |
Les menus 3 et 4 se décomposent en sous menus. |
|
|
|||
|
Exemple : |
. |
|
|
|||
|
|
|
|
|
|
||
|
Le passage d’un menu à l’autre se fait en appuyant sur la |
Pour accéder à une fonction et la paramétrer, la logique de |
|
||||
|
touche |
. |
|
fonctionnement reste la même : |
|
|
|
|
Le retour au menu précédent se fait en appuyant sur la |
1. Positionner le symbole à gauche de l’écran sur la ligne à |
|
||||
|
touche |
. |
|
paraméter à l’aide des touches directionnelles |
. |
|
|
|
|
Menu semis: |
Utilisé au travail. |
2. Valider le choix de votre ligne avec la touche |
. |
1 |
|
|
|
|
|
|
|||
|
|
|
|
|
|||
|
|
Menu information: |
Vitesse de turbine et |
|
|
|
|
|
|
|
compteur de surface. |
|
|
|
|
|
|
Menu réglage: |
Réglage du semoir. |
|
|
|
|
|
|
Menu paramétrage: |
Réglage de la console. |
|
|
|
|
|
|
|
|
|
|
GB |
|
|
|
|
|
|
|
|
Presentation of functions |
|
|
|
|
|
D |
|
NB : |
|
|
||
|
The Pilot console has four control menus. |
Menus 3 and 4 break down into sub-menus. |
|
|
||
|
e.g.: |
|
|
|||
|
|
|
|
|
|
|
|
Press the |
key to move from one menu to another. |
The operating logic is the same for accessing and program- |
|||
|
Press the |
key to return to the previous screen. |
ming a function : |
|
|
|
|
1. Position the symbol on the left-hand side of the screen |
|||||
|
|
|
|
|||
|
|
Seeding menu: |
used when working. |
on the line to be programmed using the arrow keys |
. |
|
|
|
2. Confirm your line selection using the |
key. |
|
||
|
|
|
|
|
||
Information menu: fan speed and surface
area counter.
Settings menu: |
seed drill settings. |
Programming menu: console settings.
DE
D |
Beschreibung der Funktionen |
|
Hinweis: |
|
|
|
||
|
Das Pilot-Bedienkonsole wird mit Hilfe von vier Menüs |
Die Menüs 3 und 4 sind in Untermenüs aufgeteilt. |
||||||
|
|
|
|
|
||||
|
bedient. |
|
|
|
Beispiel : |
. |
|
|
|
|
|
|
|
Für den Zugriff auf eine Funktion und ihre Parametrierung |
|||
|
Der Wechsel zwischen den Menüs erfolgt durch drücken der |
bleibt die Funktionslogik gleich : |
|
|||||
|
Taste |
. |
|
|
1. Das Zeichen |
auf der linken Bildschirmseite mit Hilfe der |
||
|
|
|
|
|
||||
|
Die Rückkehr zum vorangegangenen Menü erfolgt durch |
Pfeiltasten |
|
auf die zu parametrierende Reihe stellen. |
||||
|
drücken auf |
. |
|
2. Die Auswahl der Reihe mit der Taste |
bestätigen. |
|||
|
|
|
|
|
||||
|
|
|
Menü Säen: |
Angewendet während |
|
|
|
|
|
|
|
|
der Arbeit |
|
|
|
|
|
|
|
Menü Information: |
Turbinengeschwindig- |
|
|
|
|
|
|
|
|
keit und Flächenzähler |
|
|
|
|
|
|
|
Menü Einstellung: |
Einstellung der Sä- |
|
|
|
|
|
|
|
|
maschine |
|
|
|
|
|
|
|
Menü Parametrierung: |
Einstellung den Konsole |
|
|
|
|
13

Présentation / Presentation / Beschreibung
D
2 |
3 |
4 |
5 |
18 |
a)
1


 6
6
8
9 


 7 10
7 10

11 |
12 |
13 |
14 |
15 |
16 |
17 |
14

Présentation / Presentation / Beschreibung
FR
D
a) Menu semis |
-10- |
||
- 1 - Indicateur de vitesse du moteur électrique. |
-11- |
||
- 2 - Heure. |
|
||
- 3 - Semence sélectionnée. |
-12- |
||
- 4 - Vitesse d’avancement. |
-13- |
||
|
(Peut être légèrement différente de celle affichée par |
||
|
le tracteur) |
|
|
- 5 - Débit instantané en Kg/ha ou en gr/m². |
-14- |
||
- 6 |
- Dose par Hectare programmée. |
-15- |
|
- 7 |
- Nombre de passage entre chaque jalonnage. |
-16- |
|
- 8 |
- Passage en cours. |
||
-17- |
|||
- 9 |
- Indicateur de jalonnage actif. |
||
-18- |
|||
|
|
||
Etat du système de jalonnage. |
|
|
Passage au menu 2. |
|
|
(ou uniquement dans ce menu, arrêt de la console |
|
|
avec appui prolongé). |
|
|
Rotor actif ou arrêté (lancement pré-start). |
|
|
(appui prolongé) |
|
|
Touche modulation -10% et modification du débit. |
1 |
|
(appui prolongé) |
||
|
||
Retour à la dose hectare prédéfinie. |
|
|
Touche modulation +10% et modification du débit. |
|
|
(appui prolongé) |
|
|
Arrêt comptage jalonnage. |
|
|
Incrémentation d’un passage pour le jalonnage. |
|
|
Vitesse de la turbine. |
|
GB
D
a) Drilling menu
- 1 - Electric motor speed indicator.
- 2 - Time.
- 3 - Selected seed.
- 4 - Forward speed.
(May be slightly different to that indicated by the tractor).
-5 - Current application rate in kg/ha or g/m2.
-6 - Programmed application rate per hectare.
-7 - Number of bouts between each tramline.
-8 - Bout in progress.
-9 - Active tramlining indicator.
-10- Status of tramlining system.
-11- Switch to menu 2
(or only in this menu, switch off the console by holding down).
-12- Rotor active or stopped (pre-start activation) (by holding down).
-13- -10% adjustment key and application rate modification (by holding down).
-14- Return to the pre-set rate per hectare.
-15- +10% adjustment key and rate modification (by holding down).
-16- Stop tramlining counter.
-17- Incrementation by one bout for tramlining.
-18- Fan speed.
DE
D
a) Menü Säen
- 1 - Geschwindigkeitsanzeige Elektromotor
- 2 - Uhrzeit
- 3 - Ausgewähltes Saatgut
- 4 - Fahrgeschwindigkeit
(Kann leicht von der vom Traktor angezeigten abweichen)
-5 - Momentane Aussaatmenge in kg/ha oder gr/m²
-6 - Programmierte Menge pro Hektar
-7 - Fahgassenschaltung-Rhytmus
-8 - Laufende Fahrt
-9 - Markierungsanzeige aktiv
-10- Status des Fahrgassensystems
-11- Übergang zum Menü 2
(oder nur in diesem Menü, Steuermodul abschalten durch anhaltendes Drücken).
-12- Kreisel läuft oder Stillstand (Start Anlaufhilfe) (anhaltendes Drücken)
-13- Änderungstaste – 10% und Mengenänderung (anhaltendes Drücken)
-14- Zurück zur vordefinierten Menge
-15- Änderungstaste + 10% und Mengenänderung (anhaltendes Drücken)
-16- Markierungszähler abschalten
-17- Einstellen der Fahrgassenschaltung-Zähler
-18- Turbinengeschwindigkeit
15

Présentation / Presentation / Beschreibung
D
b)

 1
1

 2
2

 37
37

 4
4
5 |
6 |
7 |
8 |
9 |
16

Présentation / Presentation / Beschreibung
|
|
|
|
|
FR |
|
|
|
|
|
|
|
|
|
|
|
|
|
|
|
D |
b) Menu informations |
Remarque : |
|
|
|
|
|
|
|
|
|||
|
- 1 - Vitesse de rotation de la turbine. |
Pour remettre un compteur surfacique à zéro, il suffit de |
||||
|
le sélectionner à l’aide des touches directionnelles |
et |
||||
|
- 2 - Compteur surfacique 1. |
d’appuyer sur la touche |
pendant 5 secondes. |
|
|
|
|
|
|
|
|
||
- 3 |
- Compteur surfacique 2. |
|
|
|
|
|
- 4 |
- Compteur surfacique 3. |
|
|
1 |
||
- 5 |
- Passage au menu 3 ou retour au menu principal |
|
|
|||
|
|
avec un appui prolongé. |
|
|
||
-6 - Retour au menu précédent.
-7 - Sélection du compteur surfacique.
-8 - Allumage des feux (version trémie frontale).
-9 - Remise à zéro du compteur sélectionné.
GB
D
b) Information menu
- 1 - Fan rotation speed.
- 2 - Surface area counter 1.
- 3 - Surface area counter 2.
- 4 - Surface area counter 3.
- 5 - Switch to menu 3 or return to the main menu by holding down.
- 6 - Return to previous menu.
- 7 - Surface area counter selection.
- 8 - Lights on (front hopper version).
- 9 - Reset selected counter to zero.
NB :
To reset a surface area counter to zero, all you need to do is select it using the arrow keys and then press the
key for 5 seconds.
DE
D
b) Menü Information |
Hinweis : |
|
|
|
- 1 - Drehzahl der Turbine |
Für das Zurückstellen eines Oberflächenzählers genügt es, |
|||
diesen mit Hilfe der Pfeiltasten |
auszuwählen und 5 |
|||
- 2 - Oberflächenzähler 1 |
Sekunden lang auf |
zu drücken. |
||
|
|
|
||
- 3 - Oberflächenzähler 2 |
|
|
|
|
- 4 - Oberflächenzähler 3 |
|
|
|
|
- 5 - Übergang zum Menü 3 oder zurück zum Hauptmenü |
|
|
|
|
|
durch anhaltendes Drücken. |
|
|
|
- 6 |
- Zurück zum vorherigen Menü |
|
|
|
- 7 |
- Oberflächenzähler-Auswahl |
|
|
|
- 8 |
- Einschalten der Beleuchtung (bei Frontaltank). |
|
|
|
- 9 |
- Zurückstellen des ausgewählten Zählers. |
|
|
|
17

Présentation / Presentation / Beschreibung
D
1 |
2 |
3 |
4 |
5 |
c)
6 |
7 |
8 |
9 |
10 |
18
 Loading...