

Page 1

Page 1
Page 2

© Soundcraft Electronics Ltd. 1991
All rights reserved
Issue 1
Part No. ZZ2727
Information in this manual is subject to change without notice and does not represent a
commitment on the part of the vendor. Soundcraft Electronics Ltd. shall not be liable for
any loss or damage whatsoever arising from the use of information or any error contained
in this manual.
No part of this manual may be reproduced, stored in a retrieval system, or transmitted, in
any form or by any means, electronic, electrical, mechanical, optical, chemical, including
photocopying and recording, for any purpose without the express written permission of
Soundcraft Electronics Ltd.
It is recommended that all maintenance and service on the product should be carried out
by Soundcraft Electronics Ltd. or its authorised agents. Soundcraft Electronics Ltd. cannot
accept any liability whatsoever for any loss or damage caused by service, maintenance or
repair by unauthorised personnel.
Soundcraft Electronics Ltd.
Unit 2
Borehamwood Ind Park
Rowley Lane
Borehamwood
Herts.
WD6 5PZ
England
Tel: 081 207 5050
Fax: 081 207 0194
Page 2
Page 3

User Guide
Contents
Introducti on . . . . . . . . . . . . . . . . . . . . . . . . . . . 4
Basic Princip les o f Monit or Mixing . . . . . . . . . . . . . 5
Getting Started . . . . . . . . . . . . . . . . . . . . . . . . . 8
Connections and Connectors . . . . . . . . . . . . . . . 8
Fault Finding Guide . . . . . . . . . . . . . . . . . . . 10
Getting to know your console . . . . . . . . . . . . . . . . 12
Facilities . . . . . . . . . . . . . . . . . . . . . . . . . 12
Input Channel . . . . . . . . . . . . . . . . . . . . . . 12
Output Section . . . . . . . . . . . . . . . . . . . . . . 16
Master Section . . . . . . . . . . . . . . . . . . . . . . 18
Using your SPIRI T Monitor Consol e . . . . . . . . . . . . 20
Initial Set Up . . . . . . . . . . . . . . . . . . . . . . . . . . 20
Application s . . . . . . . . . . . . . . . . . . . . . . . . . . 22
Care of your mixer . . . . . . . . . . . . . . . . . . . . . . 23
Glossary . . . . . . . . . . . . . . . . . . . . . . . . . . . . 23
Selectable Options . . . . . . . . . . . . . . . . . . . . . . 25
Specifications . . . . . . . . . . . . . . . . . . . . . . . . . 26
Dimensions . . . . . . . . . . . . . . . . . . . . . . . . . . 27
Block Diagram . . . . . . . . . . . . . . . . . . . . . . . . . 28
Front Panel Layo ut . . . . . . . . . . . . . fold out rear page
Page 3
Page 4

INTRODUCTION
Congratula tion s o n yo u r purc has e of a SPIRIT Monitor mixer.
Owning a Soundcraft console brings you the expertise and
support of one of the industry’s leading manufacturers and
the results o f over 17 yea rs exp erienc e suppo rting some of t he
biggest names in the business.
Designed by engine ers who understand the individua l needs
of musicians, SPIRIT Monitor has been built to the highest
standards using quality components and employing automated assembly techniques beyond the reach of most
manufacturers of compact mixers.
A rugged steel chassis is combined with moulded side trims
to give protection and distinctive appearance. Custommoulded controls, designed for the best ‘feel’ and visual
clarity complement the styling, resulting in a truly professional stage monitor mixer which is ideal for both touring and
fixed installations.
SPIRIT Monitor is available in 16 an d 24 channel frame s izes,
and is designed to complement the SPIRIT Live range of
front- of-house consoles.
SPIRIT Monitor incorporates circuit technology identical to
that used on some of the most sophisticated Soundcraft co nsoles. The input channe ls are able to accept a wide range of
Microphone and Line level signals from separate input sockets. Every channel features wide range gain control, phase
reverse switch, 3-band Equalisation with swept Mid and LF
range, plus a Hi-Pass Filter, 8 Monitor Sends, PFL(Pre Fade
Listen), Peak LED and a high-quality linear fader.
Each of the eight Monitor Outp ut sections is provided with a
variable high-pass filter, insert point, LED bargraph meter,
Talkback and Dim s witches, a variable s end to the enginee r’s
wedge and a high quality linear fader.
The master section comprises contro ls for PFL monitoring, engineer’s wedge, LED bargraph meter for Wedge/PFL and
master Talkback and Dim switches. The wedge output is provided with an insert point and high quality linear fader.
SPIRIT Monitor is des igned to be as user-friendly as possible,
but a few minutes spent reading through this manual will
help you become familiar with the product away from the
pressure of a live session, and allow you to gain full benefit
from the superb performance offered by your new mixer.
Page 4
Page 5

Above all, remember that your SPIRIT mixer is designed to
extend your creativity. The more you explore the controls
and the effect they have on the sound output, the more you
will apprec iate the flexibility offered by your SPIRIT Monitor
mixer.
BASIC PRINCIPLES OF MONITOR MIXING
There was a time when the P.A. system and the operator existed only to increa se t he ove rall volu me of the performers , s o
that they could be heard in a large room or abov e high ambient noise levels. This just isn’t true any more. The sound
system and the sound engineer have bec ome an integral part
of the performance, an d the artists are heavily dependent on
the operator’s skill and the quality of the equipment. While
the quality of the front-of-house PA mix is of prime importance, the ability of the artists to deliver the best performance
may be directly influenced by the quality of the stage m onitor
mix. Indeed, the monitor engineer may be required to provide a number of quite different individual monitor mixes,
often under the most adverse conditions.
The following introduction to the basics of mixing are included for the benefit of those users who may not have any
significant familiarity with sound equipment, and who are
baffled by the endless jargon used by engineers and artists
alike.
The Mixer As one would expect, the main purpose of the mixer is to
combine sounds, but under precise and smooth control. The
faders provide you with total control of the final sound at
your finger tips and like an artist play ing an instrument you
should listen to your fader movements, not look at your
hands.
Your SPIRIT Monitor mixer accepts a wide range of input sig-
nals via a microphone input, for very low level signa ls, or a
line input, for higher level s ignals from , for inst anc e, ta pe machines, effects processors, etc.
Page 5
Page 6

The mixer is split into two se ctions . The Inputs receive, match
and process individual source signals, and dist ributes them at
precise mix levels to a choic e of Monitor Outputs. The Mas-
ter section provides monitoring of the audio signal at many
points in the mixer, either o n headphones or meters and pro vides additional master control of talkback functions.
The Equaliser controls are the most flexible and potentially
destructive feature of th e mixer. They have a similar effect on
the frequenc y response o f the input ch annel as the tone controls on a hi-fi syst em, but with much greater pre cision, and
allow particular characteristics of the input signal to be emphasised or reduced. It is very important that you become
familiar with the effect each control has on the sound and this
is best achieved by spending time listening to the effect of each
control on a well-known track played through the mixer.
Phase Rever sal e nables the opera tor to revers e the polarity of
the signal entering the mixer, as a convenient way o f checking
for incorrect wiring or problems with microphone placement.
The Monitor Sends provide a way of routing the input sig-
nals to a number of outputs, to create individual mixes for
artists foldback or additional speake r outputs.
Pre-Fade-Listen(PFL) allows you to monitor the signal at
many points in the mixer. Pre ssing any P FL switc h places t he
signal at that particular point onto the headphones and the
PFL meter, to check the quality of the signal or to pin-point
problems. Using PFL will not affect the signals on the monitor outputs.
Each input channel and all outputs have an Insert ‘A’ gauge
jack socket, which is a break point in the signal pa th. It allows
the signal to be taken out of the mixer, through an external
piece of equ ipmen t an d then bac k into the mixer direct ly after
its original exit point. The Insert point is normally bypassed
by the ‘A’ gauge jack contacts, and is only brought into operation when a plug is inserted. Typical uses would include
Effects Processors, Limiters, additional Equalisers or Delay
units.
The terms PR E and POST are often used in the context of Inserts, Equalisers and Channel Sends, and describe whether
that facility is placed before (Pre) or after (Post) another particular section. This is explained further in the detailed
description of facilities.
Page 6
Page 7
The Wedge output refers to the engineer’s own monitoring
output, which will typically feed a floor-mounted ‘wedgeshaped’ speaker via a suitable power amplifier.
The Talkback system allows the m onitor engineer to talk back
to artists, either individually via selected monitor outputs, or
together using a switch on the master se ction.
Creating monitor m ixes on stage in close proximit y to microphones demands constant awareness of the problem of
acoustic feedback. The Dim buttons enable the engineer to in-
stantly lower the output level on any outputs to avoid this
problem while more precise level adjustments are made.
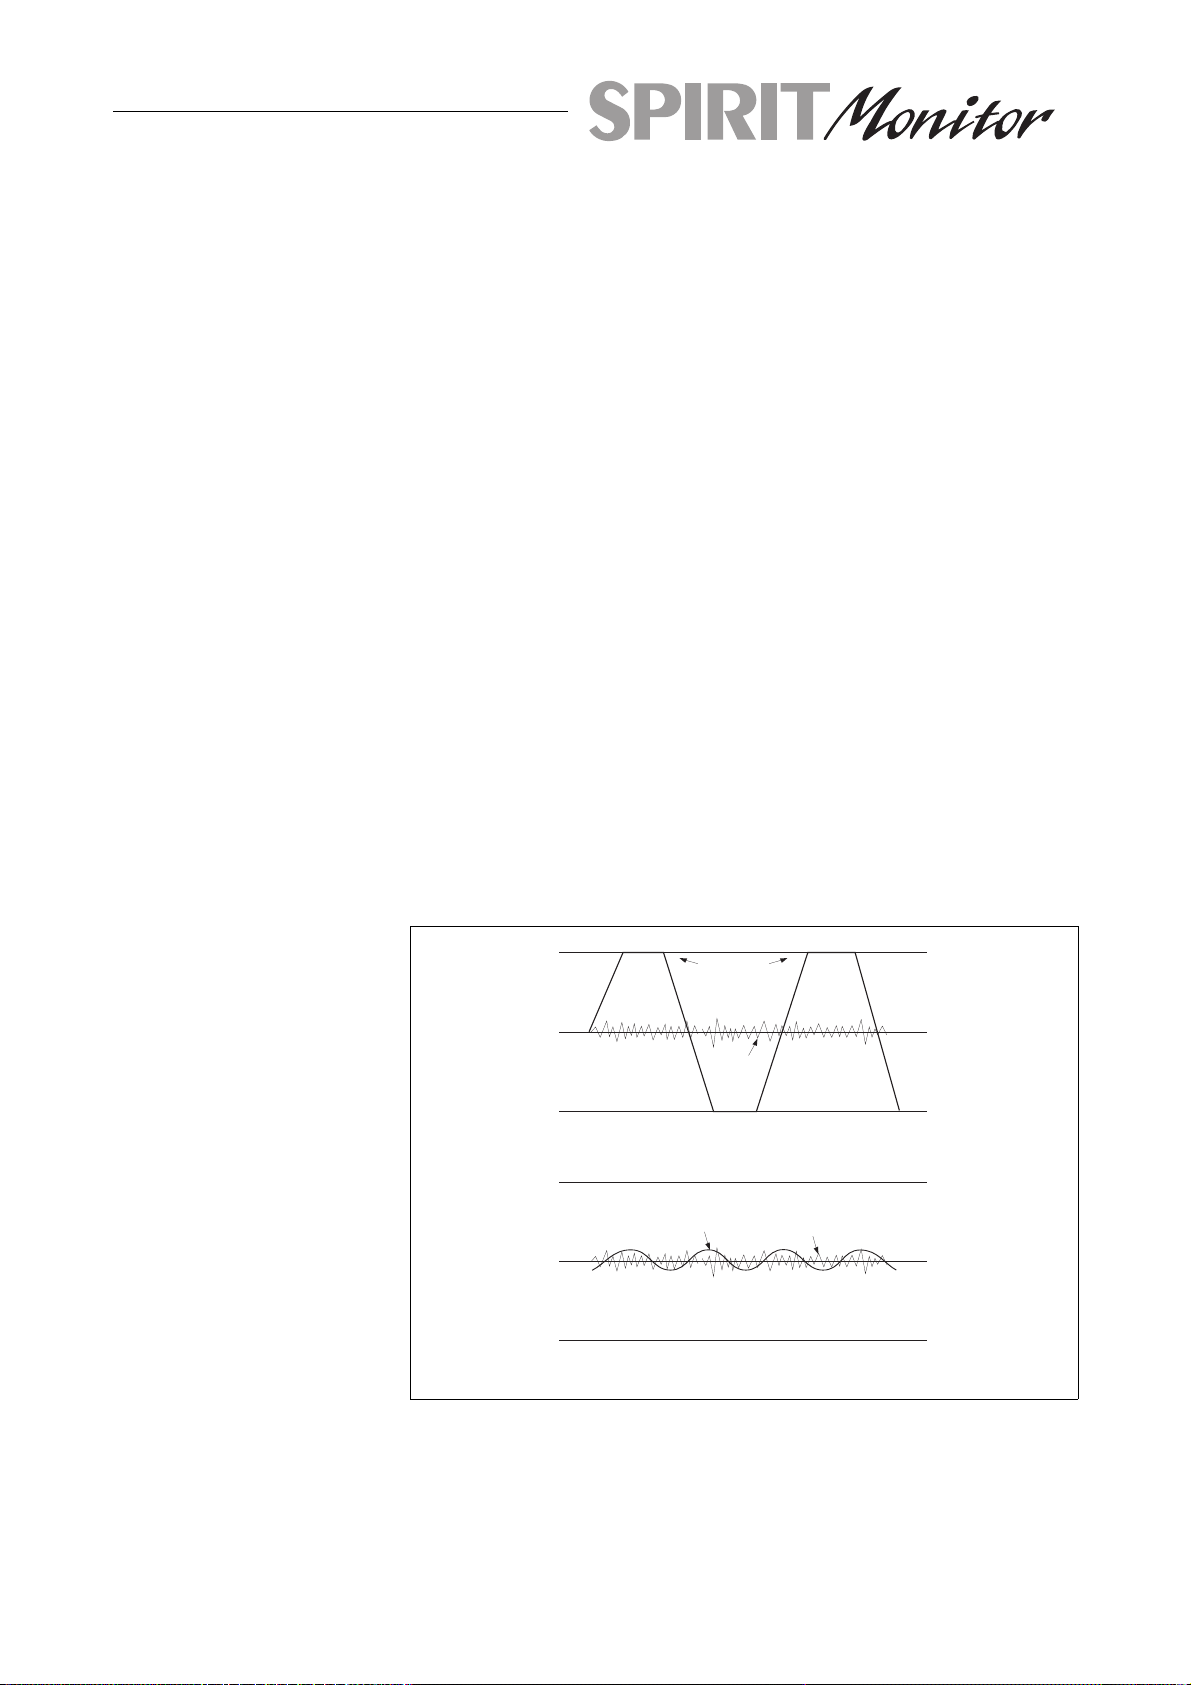
A mixer is often judged, amongst other factors, by the amount
of Headroom available. This is a measure of the reserve a vail-
able to cope with sudden peaks in the input signal, without
distortion caused by Clipping, when the signal becomes so
high that it would exceed the po wer supply rail voltages and
is as a res ult limited. This commonly occurs wh ere gain settings are incorrectly set or where sources are improperly
matched to the mixer input. If the source signal is too high,
clipping and distortion resu lts. If the signal is too low it becomes masked by the background noise which is present to
some degree in all mixers. The diagram below illustrat es this
point.
Clipped
Signal
Noise
If the signal level is too high, clipping dis tortion
may occur.
Signal
If the signal level is too low it may be masked
by the noise.
Noise
Page 7
Page 8

GETTING STARTED
CONNECTIONS AND
CONNECTORS
Although this may see m a simple subject, fa ul ty co nne ctors a nd
cabling are the source of most sound system problems. Correct ly-
made cables of the proper type, with the right connectors for
the job will ensure peak performance from your system with
minimum noise pick-up. The following section w ill help you
to connect SPIRIT Monitor correctly.
Two different types of audio c onnectors are u sed, 3-pin XLR
and 1⁄4" three pole (‘A’ gauge) jacks . These are used in severa l
configurations as shown in the diagrams below.
2. Hot(+ve)
3. Cold(-ve)
1. Screen
Balanced
Input
1. Screen
(ground)
3. Cold (ground sense)
2. Hot (In phase)
Ground Compensated
Output
3POLE(stereo)JACK
Send
Return
Screen
Tip
Ring
Insert Points Line Input Headphones
Tip
Ring
Sleeve
Sleeve
Hot(+ve)
Cold(-ve)
Screen
Page 8
Left Signal
Right Signal
Ground
Page 9

Balanced and
Unbalanced
All channel inputs are balanced, i.e. there are separate
+ve(hot) and -ve (cold) wires for each signal plus a ground.
The design of the d ifferential input amplifiers is such that interference picked up on these wires is cancelled out. This is
because, sinc e both wires are in close p roximity, the same interference will be p icked up on each wire and balance d input
amplifiers will only amplify the difference between +ve(hot)
and -ve(cold). Any signal on both hot an d c old (i.e. noise) will
not be amplified - this is known as common mode rejection
(CMR). Balanced inpu ts should always have both +ve and ve connect ed or if the source is u nbalanced sourc e, the signa l
should connect to +ve and the -ve pin of the input should be
shorted to ground.
Note: many modern audio/musical instruments have electronically balanced outputs which should not be unbalanced
by shorting one wire to ground. Always use yo ur inputs balanced where possible.
All of the outputs are ground compensated a technique which
provides a very effective way of optimising noise immunity,
without the cost and complexity of balanced outputs. These
outputs employ ground compensation to cancel out the effects
of variation in ground potential bet ween the mixer a nd other
equipment which would otherwise show up as hum. If the
output is driving a device or amplifier that has an unbalanced
input, connect the -ve(cold) signal to the ground.
Polarity You will probably be familiar with t he concept of polarity in
electrical signals and this is of particular importance to balanced audio signals. Just as a balanced signal is highly
effective at cancelling out unwanted int erference, so two microphones picking up the s ame signal can c ancel out, or cau se
serious degradation of the signal if one of the cables has the
+ve and -ve wires re vers ed. This phas e reversal can be a rea l
problem when microphones are close together and you
should therefore take care always to connect pins correctly
when wiring audio cables.
Grounding and
Shielding
For optimum performan ce it is vital that all signals are referenced to a solid, noise-free earth ing point and that all signal
cables have their screens c onn ect ed to groun d. To avo id ea rth
‘loops’, use balanced connections where po ssible and ensure
that all cable screens and othe r signal earths are connec ted to
ground only at their source and not at both ends.
Page 9
Page 10

Source
GROUND COMPENSATED TO BALANCED
Input
GND SENSE
GND
LINK
Source
GND
LINK
Source
GND
LINK
+
+
--
UNBALANCED TO BALANCED
+
Input
+
-
UNBALANCED TO UNBALANCED
+
If ground link absent, or mains earth isolated from
source ground, then connect shield at both ends
Input
+
Avoid running audio cables or placing audio equipment,
close to thyristor dimmer units or power cables.
Noise immunity is improved significantly by the use of low
impedance sources , such as good quality profes sional microphones or the outputs from most modern audio equipment.
Avoid cheaper high impe dance micro phones, which m ay suffer from interference over long cable runs, even with
well-made cables.
Fault Finding Guide Repairing a sound mixing console re quires sp ecialist skills, but
basic Fault Finding is within the s cope of any u ser if a few basic rules are followed.
• Get to know the Block Diagram of your console (see back
of this manual)
• Get to know what each component in the system is sup-
posed to do.
• Learn where to look for common trouble spots.
Page 10
Page 11

The Bloc k Diagram is a representative sketch of all the com-
ponents of the console, showing how they connect together
and how the signal flows through the s ystem. O nce yo u have
become fami liar with the various component bloc ks you will
find the Block Diagram quite easy to follow and you will have
gained a valuable understanding of the internal structure of
the console.
Each Component has a specific function and only by getting
to know what each part is s upposed to do will you be able to
tell if there is a genuine fault! Many ‘faults ’ are the resu lt of
incorrect connection o r control settings which may have been
overlooked.
Basic Troubleshooting is a process of applying logical
thought to the signal path through the console and tracking
down the problem by elimination.
• Swap input connections to check that the source is really
present. Check both Mic and Line inputs.
• Eliminate sections of the channel by using the insert point
to re-route the signal to other inputs that are known to be
working.
• Route channels to other outputs to identify problems on
particular outputs or the Master section.
• Compare a suspect channel with an adjacent channel
which has been set up identically. Use PFL to monitor the
signal in each section.
Page 11
Page 12

GETTING TO KNOW YOUR CONSOLE
FACILITIES
Refer to the fold-out front panel diagram at the rear of this
manual, which shows the control functions on the SPIRIT
Monitor. Each facility is described below, and is identified by
a reference number.
INPUT CHANNEL
1. MICROPHONE INPUT
The Microphone input is via a s tandar d female XLR- 3 connec tor and is available when the LINE switch is released. It is
designed to accept a wide range of balanced or unbalanced
low impedance input signals.
+48V Phantom Po wer is available on each input microphone
socket, with an overall ON/OFF sw itch at the right hand side
of the console, beside the power input socket.
Transformer-coupled dynamic microphones may be used
without causing damage, eve n when the +48V power is connected, but care must be taken when using unbalanced
sources, bec ause of the voltage pres ent on pins 2 and 3 of the
XLR connector.
NOTE: The microphone should always be plugged in before
switching the +48V on o r off. Also you should be aware that
some microphones draw an unusually large current which
may overload the po wer supply, res ult ing in distortion . C onsult your microphone supplier for gu idance if necessary.
2. INSERT
The INSERT is a break point in the input chan nel signal path.
It allows the signal to be taken out of the mixer, throu gh an
external piece of equipment and then back into the mixer to
continue through to the final output. The Insert is a 3-pole 1⁄4"
‘A’ gauge Jack, which is normally by-passed. When a jack
plug is inserte d, the signal path is broken at a po int just after
the Hi-Pass Filter, but before the EQ section. The signal from
the channel appears on the TIP of the plug and is returned
on the RING.
Page 12
Page 13

The insert point allows lim iters, compres sors and other signal
processing units to be added as required to particular input
channels and bec aus e it is located PRE EQ, noise gene rated by
the external equipm ent may be redu ced by a small amount of
H.F. cut in the Equaliser.
3. LINE INPUT
The LINE Input is a 3-po le 1⁄4"‘‘A’ gauge jack socket, to accept
balanced or unbalanced line level sources when the LINE
switch(5) is press ed. Unlike the low impedance Microphone
input, this stage p resents a high impedance(>10kΩ) to the input signal, enabling many type s of instru ments to b e plugged
straight in without D.I. boxes or external preamplifiers.
4. PHASE REVERSE(Ø)
The PHASE REVER SE switch reverses the polarity of the selected input , providing a conv enient m ethod o f compens ating
for incorrect wiring or microphone placement. In some circumstances it may be found that pressing PHASE REVERSE
will help with feedback avoidance. The switch should normally be released when not required.
5. LINE SELECT
The LINE switch selects Line input when pres sed, and Microphone input when released. When Line is s elected the Gain
range is reduced by 20dB(see 6 below).
6. GAIN CONTROL
When the Microp hone input is selected this control acts as a
SENSITIVITY control covering a 50dB range. Channel signa l
level increases as the control is turned cloc kwise. When the
Line input is selected it serves as a GAIN control, with the
scaling reduced by -20dB fro m the printed scale. A nominal
0dB input signal will pass through at unity gain, with the
knob set at the 20dB position. Some audio equipment, particularly that intended for domestic use, operat es at a nomina l
-10dBV level and an increased Gain setting will be required.
7. HI-PASS FILTER
Pressing this switch insert s a 12dB per octave 100Hz Hi-Pass
Filter in the signal path, immediately after the input amplifier.
This is particularly useful on live vocals, and its use is
strongly recommended, even on male vocals. It can also be
used for filtering out noise such as stage rumble.
Page 13
Page 14

dB
HI-Pass Filter
4.0
3.0
2.0
1.0
0.0
-1.0
-2.0
-3.0
-4.0
20 100
8. EQUALISER
The Equaliser(EQ) comprises three sections. The upper control provides H.F.(treble) boost and cut of +/-15dB. The
lower two pairs of knobs are arranged as a cut/boo st con trol
(lower knob) of +/- 15dB, and a SWEEP(frequency) control
which determines at which frequency the boost/cut action
will be centred. The LF sections are essentially Swept Low
Frequency controls, covering a range from 40 to 400Hz and
providing much greater flexibility than a conventional
LF(bass) control. The MID section, with a frequency range
from 250Hz to 8kHz is particularly versatile for vocals, enabling particular characteristics of the singer to be lifted or
Frequency/Hz
1k 10k 20k
dB
20.0
15.0
10.0
-10.0
-15.0
-20.0
dB
20.0
15.0
10.0
-10.0
-15.0
-20.0
5.0
0.0
-5.0
5.0
0.0
-5.0
LF Section
20
MID Section
20
100
100
Frequency/Hz
Frequency/Hz
1k 10k 20k
1k 10k 20k
Page 14
Page 15

HF Section
dB
20.0
15.0
10.0
5.0
0.0
-5.0
-10.0
-15.0
-20.0
20
100
Frequency/Hz
suppressed very precisely.
9. MONITOR SENDS
These controls route the input channel signal to any one or
more Monitor busses and the associat ed Monitor Outpu ts, allowing a number of completely different monitor mixes t o be
created. The sends are arranged as two groups of four (1-4
and 5-8) and both groups are normally fed after the channel
fader (POST FADE) and therefore follow any changes in fader
level. Either group may be reconfigure d with the feed before
the channel fader (PRE FADE) by changing intern al links, and
details of this modification will be found under Selectable Options on page 25. Any Monitor Sends configured as PRE
FADE will be unaffected by the input fader position. All
sends are muted when the ON switch (see 10 below) is released, regardless o f t he Pre/Post setting.
1k 10k 20k
10. ON
The ON switch routes the channel signal to the monitor sends,
and is positioned PRE FADER to mute all outputs from the respective channel. The associated LED is illuminated when the
switch is presse d, showing that the c hannel is active.
11. PFL/PEAK LED
When the PFL swit ch is pressed, the Pre -Fade signal is fed to
the headphones and wedge output, where it replaces the selected source. The PFL ACTIVE LED on the master section
illuminates to warn that the wedge/phones outputs and the
meter are now responding to the PFL selection and the PFL
LED on the input cha nnel lights to ident ify the active c hanne l.
This is a u seful way of listening to any re quired input signal
without interrupting the monitor mixes, so that adjustments
Page 15
Page 16

can be made or problems traced.
When the PFL switch is released the LED on the channel
serves as a PEAK indicat or, t o warn when an exc essive ly high
signal level is present in the ch annel. The s ignal is sampled at
two points in the channel, PRE INSERT (PRE Hi-PASS FILTER), and POST EQ. The Peak LED will illuminate
approximately 4dB before clipping and therefore give warning of a possible overload even if the peaks are removed by
external equipment plugged into the Insert.
12. CHANNEL FADER
This linear fader determ ines the proportion of the channel in
the mixes and provides a clear visual indication of channel
level. Normal operat ing position is a t the ‘0’ mark, provi ding
10dB of gain above that point if required.
OUTPUT SECTIONS
There are eight Monitor Outputs, arranged in pairs. Each
Output offers identical facilities.
1. MONITOR OUTPUTS
Each Monitor Outpu t is driven by a ground-compens ated am plifier and fed to standard male XLR-3 connectors.
2. MONITOR INSERTS
These allow external processing equipment to be ‘inserted’ into
the monitor s ignal path. The 1⁄4" 3 pole ‘A’ gauge jacks are bypassed except when a plug is inserted.
3. SUB
The SUB control and associated switch and LED feed the
monitor outp ut to the enginee r’s subm ix, which i s the norma l
source for the headphones and wedge ou tputs. The signal is
derived before the Talkback and Dim circuitry, and the submix is therefore unaffected by either of those functions in t he
Output section. The submix feed is enabled when the ON
Page 16
Page 17

switch is pressed (LED illuminated).
4. HI-PASS FILTER
A variable frequency filter is provided covering a range of
20Hz to 200Hz., and this is always in circuit. This may be
found useful to reduce the level of s tage-driven low frequency
feedback, or particularly to tailor the output frequency to
match more closely the frequency range of smaller wedge
monitor spe akers which may not be able to to lerate high levels of LF signal. Rotate the c ontrol fully anticlockwise when
the filter is not required.
5. TALKBACK
Pressing the TALKBACK switch routes the engineer’s talkback microphone signal t o the monito r output , at the level s et
on the T/B gain control on the Master section, and independent of the output fader level. At the same time the local
monitor mix is dimmed by approximately 6dB to allow the
engineer’s voice to be heard over the mix, and the Wedge output also dims to prevent feedback t hrough the talkback mic.
Note that Talkback is disabled when DIM is pressed.
6. DIM
Pressing the large DIM switch attenu ates the monitor output
by 6dB as an immediate way of eliminating feedback while
the source of the problem is identified.
7. PFL
When the PFL swit ch is pressed, the Pre -Fade signal is fed to
the headphones, replacing the normal submix signal. The
PFL ACTIVE LED on the master section illuminates to warn
that the wedge/phones outputs and the meter are now responding to the PFL selection and the PFL LED on the input
channel lights to ident ify the active channel. This is a usefu l
way of listening to any required signal so that adjustments
can be made or problems traced.
8. BARGRAPH METER
A sixteen segme nt, three colour bargraph meter monitors the
output signal. The meter has a peak response, and since it
reads the final output signal it will also be affected by the
DIM switch and include any talkback signal. The bargraph
may be calibrated by a trimmer accessed via a hole in the
panel above the meter. Adjustments may be made using a
Page 17
Page 18

small screwdriver, taking care not to damage the trimmer.
9. FADER
A linear fader controls the overall le vel of each output. Unity
gain is at the top of t he travel.
MASTER SECTION
1. D.C. POWER SOCKET
The cable from t he power supply connects to the console via
this 5- pin SRC connector. To the r ight of the power connector is the master switch for +48V Phantom Power to all inputs.
2. WEDGE OUTPUT
The WEDGE output normally drives the engineer’s monitor
speaker via a power amplifier, and when no PFL switches are
pressed this is fed by t he submix signal. The WEDGE output
automatically switches to the PFL signal when any PFL switch
is active.
The WEDGE output always listens to t he same source signal
as the headphones, but is also affected by DIM status and any
external connections to the Insert socket.
3. WEDGE INSERT
This is similar to the In put Chann el Inse rts and allow ext erna l
processing equipment to be ‘inserted’ into the output signal
path. The 1⁄4" 3 pole ‘A’ gauge jacks are by-passed except
when a plug is inserted.
4. PHONES
A standard 1⁄4" 3 pole‘A’ gauge jack for monitoring headphones. See the diagram on Page 8 for connection details.
This output is suitable for headphones with an impedance of
400Ω or greater.
5. TALKBACK MICROPHONE SOCKET
A standard female XLR-3 connector is provided for a low impedance dynamic talkback microphone on a gooseneck mount
Page 18
Page 19

or plugged in via a cable.
6. BARGRAPH METER
A sixteen segme nt, three colour bargraph meter pro vides visual monitoring of WEDGE/PF L level . Normally the post-fade
Wedge signal is displayed, unless any PFL switch is activ e, in
which case the PFL signal is shown. The level of the displayed Wedge signal follows the actual Wedge output,
including the effect of the Dim c ircuit if active . The bargraph
may be calibrated by a trimmer accessed via a hole in the
panel above the meter. Adjustments may be made using a
small screwdriver, taking care not to damage the trimmer.
7. TALKBACK GAIN
Sets the level of Talkback microphone signal which may be
routed to any Monitor Output.
8. ALL TALKBACK
Pressing the ALL T/B switch dims all monitor outputs and
adds the Talkback mic signal, also dimming the we dge output
to prevent feedback. Note that ALL T/B is disabled when
ALL DIM is pressed.
9. ALL DIM
Pressing ALL DIM attenuates all outputs, except the wedge
output. This provides an instant remedy for serious feedback,
while the source of the problem is identified.
10. PFL ACTIVE LED
The LED illuminates whenever a PFL switch is pressed to
show that the Wedge and Phones outputs and the
Wedge(PFL) bargraph are now receiving the PFL signal.
11. PFL TRIM
The rotary PFL TRIM c ontro l prov ides leve l a djustment o f the
PFL signal to allow for differences in operating levels. The
TRIM control has no effect on the level of PFL signal fed to the
Wedge(PFL) meter.
12. SUB TRIM
The rotary SUB TRIM control provides level a djustmen t of the
engineer’s Submix. The TRIM is pre-insert and pre-fader, and
will therefore affect both the level at the wedge output and
Page 19
Page 20

the bargraph reading.
13. HEADPHONE VOLUME
The master volum e control for the wedge or PFL signa l being
fed to the headphone socket (4).
14. WEDGE FADER
The master fader for the Submix or PFL signals feeding the
USING YOUR SPIRIT Monitor CONSOLE
Your choice of a SPIRIT Monitor console has provided you
with a profess iona l produ ct cap able of top qu ality s ound mixing. Good results will however only come through
experience and time spent understanding the facilities on
your console. Rehearsal sessions and live perform ances must
focus on the skill and creat ivity of the artists, which must not
be hindered by unfamiliarity and difficulty with the operation
of the console. It is impo rtant to recognise, and learn by experiment, the importance of correct choice of inputs,
microphone plac ement and co ntrol settings, part icularly with
respect to feedback avoidance.
Suitable initial control positions are shown on the front pane l
drawing inside the rear cover.
Initial Set Up The diagram on page 7 demon strate d how the matching o f in-
put gain to t he s ignal so urce was cru cial to avoid distortion at
one extreme and exc essive noise at the other. Set up individual input channel as follows:
• Connect the input required (microphone, keyboard etc.)
Note: Phantom powered mics should be connected before
the +48V is switched on.
• Set Output faders at 0, input faders at 0, channel monitor
sends fully anticlockwise (off) and set power amplifier levels to about 70%.
• With a typical performance level signal present, press the
PFL button on the particular channel, monitoring the level
on the Wedge(PFL) meter.
Page 20
Page 21

• Adjust the input gain until the meter is just reaching the
amber section (0dB) at a typical maximum source level.
This allows sufficient headroom to accommodate peaks
and establishes the maximum level for normal operation
(but see note below).
• Repeat this procedure on other channels as required.
• If you cannot obtain a satisfactory setting, e.g. the gain con-
trol is right at the extreme low end of the scale on
Microphone Input, and +48V powering is not required, try
using the Line Input instead to give an extra 20dB range.
• Listen carefully for the characteristic sound of ‘feedback’.
If you cannot achieve satisfactory input level setting without feedback, check microphone and speaker placement
and repeat the exercise.
• Build up the required individ ual moni tor mixes by feeding
the selected channels to the monitor outputs using the
channel monitor send controls. The corresponding output
faders should be initially set at the ‘0’ mark. Listen carefully for each component in the mix and watch the
respective output meter for any hint of overload. As more
channels are added to the mix, the meters may move into
the red section. Adjust the overall level using the Output
Faders if necessary, or back off the appropriate channel
faders until the level is out of the red segments.
Note: The level of any source signal in the final outp ut is affected by many factors, principally the Gain control, Channel
Fader and Output Fader. You should try t o use only as much
microphone gain as required to achieve a good balance between signals, with the faders set as described above. If the
input gain is set too high, the channel fader will need to be
pulled down too far in compensation to leave enough travel
for successful mixing and there is a greater risk of feedback
because small fader movements will have a very significant
effect on output lev el. If the gain is set too low, you will not
find enough gain on the faders to bring the signal up to an
adequate level.
Microphone Placement Careful microphone placement and the choice of a suitable
type of microphone for the job is one of the essentials of suc-
Page 21
Page 22

cessful sound mixing.
The aim should be to place the micro phone as close as physi-
cally possible to the sourc e, to cut out unwa nted surrounding
sounds, allow a lower gain setting on the mixer and avoid
feedback. Also a well-chosen and well-placed microphone
should not need any appreciable equalisation.
Input Connections The monitor mixer will often share inputs with a front-of-
house mixer and it is particu larly importan t t o ensu re that the
input connections provide complete isolation between the two
consoles to avoi d hum problems an d possible degradation of
the signal. The provision of balanced splitter trans formers or
isolating transform ers will ensure a c lean signal to both con-
APPLICATIONS
The diagram below shows a typical application of the SPIRIT
Monitor as a stage monito r console, with inputs shared via a
splitter box with the front-of-house console
MICROPHONE SPLITTER
MULTICORES TO
HOUSE CONSOLE
MIC INPUTS
STAGE MONITORS
POWER
AMP RACK
ENGINEER’S
WEDGE
Page 22
PHONES/
T/B
MIC
Page 23

CARE OF YOUR MIXER
General Precautions Avoid storing or using the mixer in conditions of excessive
heat or cold, or in p ositions where it is likely to be su bject to
vibration, dust or moisture.
Keep the mixer clean using a soft dry brush, and an occasional wipe with a damp cloth or ethyl alcohol. Do not use
any other solv ents which may ca use damage to paint or plastic parts.
Avoid placing drinks or smoking materials on or near the
mixer. Sticky drinks and cigarette ash are frequent causes of
damage to faders and switc hes.
Regular car e and inspection will be rewarded by a long life
Glossar y
balance the relative levels of the left and right channels of a stereo
signal.
clipping the onset of severe distortion in the signal path, usually caused
by the peak signal voltage being limite d by the circuit’s
power supply voltage.
dB (decibel) a ratio of two voltages or signal levels, expressed by the
equation dB=20Log10 (V1/V2). Adding the suffix ’u’ denotes
the ratio is relative to 0.775V RMS.
DI(direct injection) the practice of connecting an electric musical instrument directly t
the input of the mixing conso le, rather than to an amplifier
and loudspeaker which is covered by a microphone feeding
the console.
equaliser a device that allows the boosting or cutting of selected bands
of frequencies in the signal path.
feedback the ‘howling’ sound caused by bringing a microphone too close
to a loudspeaker driven from its amplified signal.
foldback a feed sent back to the artistes via loudspeakers or headphones
to enable them to monitor the sounds they are producing.
frequency response the variation in gain o f a dev ic e with frequency.
Page 23
Page 24

(sub) group an output into which a gro up of signals can be mixed.
headroom the available signal range above the nominal level before
clipping occurs.
highpass filt er a filter that rejects low frequencies.
line level signals at a nominal level of -10 to +6dBu, usua lly coming from a low
impedance source.
peaking an equaliser response curve affecting only a band of frequencies
i.e. based on a bandpass respo nse.
PFL (pre-fade listen) a function that allows the operator to monitor the pre-fade
signal in a channel independently of the main mix .
rolloff a fall in gain at the extremes of the frequ ency response.
shelving an equaliser resp onse affecting all frequencies above or
below the break frequency i.e. a highpass or lowpass derived
response.
spill acoustic interference from other sources.
talkback the operator speaking to the artistes or to tape via the
auxiliary or group outputs.
transient a momentary rise in the signal level.
Page 24
Page 25

Selectable Options
The eight channel Monitor Sends are factory set as POST
FADE, but may be altered to PRE FADE in blocks of four (1-4
and 5-8) by reposit ioning a link on the Inp ut PCB SC3005 as
shown below, after removing the PCB from the console.
INPUT BOARD SC3005
PRE
POST
J2
J1
L9
C28
C27
R48
C21
R56
R54
R51
R50
PRE
J1
POST
J2
J4
J3
R47
R45
R44
R55
POST
PRE
J4
POST
J3
PRE
To change Sends 1-4 to P RE FADE carefully unsolder link J4
using the minimum of heat to avoid the possibility of tracks
lifting on the PCB . Replace the link in position J3.
To change Sends 5-8 to P RE FADE carefully unsolder link J2
using the minimum of heat to avoid the possibility of tracks
lifting on the PCB . Replace the link in position J1.
This operation should only be carried out by competent
technicians who possess the necessary soldering skills.
Page 25
Page 26

E.I.N.
OUTPUT NOISE
C.M.R.R.
DISTORTION
SPECIFICATIONS
Typical Figures for a 24 Channel Console
Measured RMS, 22Hz to 22kHz Bandwidth
Microphone Input, -128.5dBu
max ga in, 150R
24 channel console, -80dBu
channels sends turned down
Measured at 1kHz
Microphone Input at maximum gain 80dB
Line Input at unity gain 50dB
THD measured 1kHz at +20dBu, 20Hz to 20kHz Bandwidth
Line in to Output < 0.006%
CROSSTALK
Measured 1kHz Sine Wave
Channel Send attenuation 90dB
Channel Fader Attenuation 85dB
Channel ‘ON’ switch isolation 100dB
Between any outputs 80dB
FREQUENCY RESPONSE
Any Input to Output -3dB @20Hz,
(Output hi-pass filter, which is always -1dB @ 20kHz
in circuit, turned fully anticlockwise)
INPUT & OUTPUT IMPEDANCES
Microphone Input > 2kΩ
Line Input > 10kΩ
Insert Sends 75Ω
Insert Returns 10kΩ
Page 26
Page 27

INPUT & OUTPUT LEVELS
METERING
Outputs 75Ω
Mic Input Maximum Level +10dBu
Line Input Maximum Level +30dBu
Any Output Maximum Level +21dBu
16 Segment LED Bargraphs
Accuracy Relative to 0dB +/- 1dB
Dimensions
1088
(24 ch)
Page 27
824
(16 ch)
82.8
590.5
Page 28

1
3
2
1
2
3
1
3
2
▲
▲
▲
▲
3
2
1
SSYYSSTTEEMM BBLLOOCCKK DDIIAAGGRRAAMM
Page 28
 Loading...