


 Loading...
User guide
Xperia™ SP
C5302/C5303/C5306
Contents
Xperia™ SP User guide.................................................................. |
6 |
Getting started............................................................................... |
7 |
Android™ – what and why?................................................................ |
7 |
Device overview.................................................................................. |
7 |
Assembly............................................................................................ |
8 |
Turning the device on and off ........................................................... |
10 |
Screen lock....................................................................................... |
11 |
Setup guide...................................................................................... |
11 |
Accounts and services...................................................................... |
11 |
Getting to know your device........................................................ |
13 |
Using the keys.................................................................................. |
13 |
Battery.............................................................................................. |
13 |
Using the touchscreen...................................................................... |
16 |
Using the lockscreen......................................................................... |
18 |
Home screen.................................................................................... |
19 |
Accessing and using applications...................................................... |
21 |
Status and notifications..................................................................... |
24 |
Settings menu................................................................................... |
25 |
Typing text........................................................................................ |
26 |
Customizing your device................................................................... |
30 |
Enhancing the sound output............................................................. |
33 |
Memory............................................................................................ |
34 |
Using a headset ............................................................................... |
34 |
Internet and messaging settings........................................................ |
35 |
Controlling data usage...................................................................... |
36 |
Mobile network settings.................................................................... |
36 |
Google Play™.............................................................................. |
38 |
Getting started with Google Play™.................................................... |
38 |
Downloading from Google Play™...................................................... |
38 |
Clearing your application data........................................................... |
38 |
Permissions...................................................................................... |
39 |
Installing applications not from Google Play™ .................................. |
39 |
Calling.......................................................................................... |
40 |
Emergency calls................................................................................ |
40 |
Call handling..................................................................................... |
40 |
Voicemail.......................................................................................... |
42 |
Multiple calls..................................................................................... |
42 |
Conference calls............................................................................... |
42 |
Call settings...................................................................................... |
43 |
|
2 |
This is an Internet version of this publication. © Print only for private use.
Contacts ...................................................................................... |
45 |
About Contacts................................................................................. |
45 |
Transferring contacts to your new device.......................................... |
45 |
Contacts screen overview................................................................. |
47 |
Managing your contacts.................................................................... |
47 |
Communicating with your contacts................................................... |
49 |
Sharing your contacts....................................................................... |
49 |
Backing up contacts......................................................................... |
50 |
Messaging.................................................................................... |
51 |
Using text and multimedia messaging............................................... |
51 |
Text and multimedia message options.............................................. |
52 |
Google Talk™ .................................................................................. |
53 |
Email............................................................................................. |
54 |
Getting started with Email................................................................. |
54 |
Using e-mail...................................................................................... |
55 |
Socialife™.................................................................................... |
58 |
Using the Socialife™ application....................................................... |
58 |
"WALKMAN" application ............................................................. |
59 |
About the "WALKMAN" application................................................... |
59 |
Transferring media files to your device .............................................. |
59 |
Using the "WALKMAN" application .................................................. |
60 |
Visualizer .......................................................................................... |
61 |
Getting more information about a track or artist................................ |
61 |
Using My music to organize your tracks ........................................... |
61 |
Managing playlists............................................................................. |
63 |
"WALKMAN" application widget ....................................................... |
64 |
Protecting your hearing..................................................................... |
64 |
Music services.............................................................................. |
65 |
TrackID technology........................................................................... |
65 |
Music Unlimited™............................................................................. |
66 |
About the PlayNow™ service............................................................ |
66 |
FM radio....................................................................................... |
67 |
About the FM radio........................................................................... |
67 |
Using your favorite radio channels..................................................... |
68 |
Sound settings.................................................................................. |
68 |
Identifying radio tracks using TrackID™............................................. |
69 |
Camera......................................................................................... |
70 |
About the camera............................................................................. |
70 |
Using the still camera........................................................................ |
70 |
Face detection.................................................................................. |
71 |
Using Smile Shutter™ to capture smiling faces................................. |
71 |
Adding the geographical position to your photos............................... |
72 |
3 |
|
This is an Internet version of this publication. © Print only for private use.
Using still camera settings................................................................. |
72 |
Using the video camera..................................................................... |
76 |
Album........................................................................................... |
80 |
About Album..................................................................................... |
80 |
Mobile BRAVIA® Engine................................................................... |
80 |
Viewing photos and videos in the Pictures tab .................................. |
80 |
Viewing photos and videos in the My albums tab ............................. |
81 |
Viewing your photos on a map.......................................................... |
85 |
Viewing online albums....................................................................... |
86 |
Movies.......................................................................................... |
88 |
About Movies.................................................................................... |
88 |
Using Movies.................................................................................... |
88 |
Video Unlimited™........................................................................ |
90 |
About Video Unlimited™................................................................... |
90 |
Renting or buying a video.................................................................. |
90 |
Watching a video from Video Unlimited™.......................................... |
91 |
Web browser................................................................................ |
92 |
About the web browser..................................................................... |
92 |
Connectivity................................................................................. |
93 |
Connecting to wireless networks....................................................... |
93 |
Sharing content with DLNA Certified™ devices................................. |
96 |
NFC.................................................................................................. |
98 |
Bluetooth™ wireless technology..................................................... |
101 |
Connecting your device to a computer............................................ |
103 |
Connecting your device to a TV set................................................. |
105 |
Screen mirroring.............................................................................. |
105 |
Scanning barcodes with the NeoReader™ application.................... |
106 |
Smart Connect................................................................................ |
106 |
Synchronizing data on your device............................................ |
108 |
About synchronizing data on your device........................................ |
108 |
Synchronizing with Google™.......................................................... |
108 |
Synchronizing your corporate email, calendar, and contacts........... |
109 |
Synchronizing with Facebook™...................................................... |
109 |
Maps and locations.................................................................... |
111 |
About location services................................................................... |
111 |
Using GPS...................................................................................... |
111 |
Google Maps™............................................................................... |
111 |
Using Google Maps™ to get directions........................................... |
112 |
Calendar and alarm clock.......................................................... |
113 |
Calendar......................................................................................... |
113 |
Alarm clock..................................................................................... |
113 |
4 |
|
This is an Internet version of this publication. © Print only for private use.
Support and maintenance.......................................................... |
116 |
Updating your device...................................................................... |
116 |
Backup and restore application....................................................... |
117 |
Resetting your device...................................................................... |
118 |
Locking and protecting your device................................................. |
119 |
Help application.............................................................................. |
119 |
Recycling your device..................................................................... |
119 |
Reference................................................................................... |
120 |
Settings overview............................................................................ |
120 |
Status and notification icons overview............................................. |
121 |
Application overview....................................................................... |
122 |
Important information................................................................. |
124 |
Important information leaflet............................................................ |
124 |
Limitations to services and features................................................. |
124 |
Legal information............................................................................. |
124 |
Index........................................................................................... |
125 |
5
This is an Internet version of this publication. © Print only for private use.

Xperia™ SP User guide
6
This is an Internet version of this publication. © Print only for private use.

Getting started
Android™ – what and why?
Your Xperia™ from Sony runs on the Android platform. Android devices can perform many of the same functions as a computer and you can customize them to your own needs. For example, you can add and delete applications, or enhance existing applications to improve functionality. On Google Play™, you can download a range of applications and games from a constantly growing collection. You can also integrate applications on your Android™ device with other applications and with online services that you use. For example, you can back up your contacts, access your different email accounts and calendars from one place, keep track of your appointments, and engage in social networking.
Android™ devices are constantly evolving. When a new software version is available and your device supports this new software, you can update your device to get new features and the latest improvements.
Your Android™ device is pre-loaded with Google™ services. To get the most out of the provided Google™ services, you should have a Google™ account and sign in to it when you first start your device. You also need to have Internet access to use many of the features in Android™.
New software releases may not be compatible with all devices.
Device overview
1Front camera lens
2Light sensor
3Proximity sensor
4Ear speaker
5Volume/Zoom key
6Power key
7Camera key
8Main microphone
7
This is an Internet version of this publication. © Print only for private use.
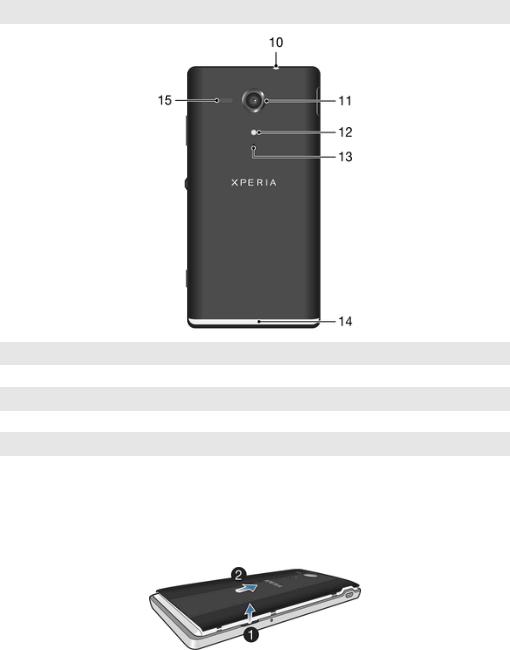
9 Port for charger/USB cable
10Headset jack
11Camera lens
12Camera light
13Second microphone
14Illuminating transparent band
15Speaker
Assembly
To remove the back cover
•Insert a thumbnail into the gap between the back cover and one side of your device, then lift up the cover.
8
This is an Internet version of this publication. © Print only for private use.

To insert the memory card and the micro SIM card
•Turn off your device and remove the back cover, then insert the memory card and the micro SIM card into the relevant slots.
The memory card may not be included at purchase in all markets.
Your device requires a micro SIM card. Inserting an incompatible SIM card in the micro SIM card slot could damage the card or your device, and Sony does not warrant and will not be responsible for any damage caused by use of incompatible or modified SIM cards.
To attach the back cover
1Place the back cover over the back of the device, then press down on the top corners to lock them into place.
2Moving from top to bottom, press down the sides of the cover. The clips on the inside of the cover make clicking noises as they lock into place.
Illuminating transparent band
The transparent band on your phone illuminates when you use certain applications, when an incoming call arrives, and when an alarm sounds. It then fades out after a few seconds to save power.
The color of the illuminated band varies depending on the theme you are using. When you view photos in Gallery, the color changes according to the photo you are viewing. When you play music with the music player, the color changes every time a new album cover is displayed. You can adjust these various light effects.
To set light effects for your device
1From your Home screen, tap  .
.
2Tap Settings > Display > Light effects.
3Select the effects that you want to use.
9
This is an Internet version of this publication. © Print only for private use.

Turning the device on and off
To turn on the device
Make sure that the battery is charged for at least 30 minutes before you turn on the device for the first time.
1Press and hold down the power key  until the device vibrates.
2If your screen goes dark, briefly press the power key  to activate the screen.
3To unlock the screen, drag  up or drag
  down.
down.
4Enter your SIM card PIN when requested, then select OK.
5Wait a while for the device to start.
Your SIM card PIN is initially supplied by your network operator, but you can change it later from the Settings menu. To correct a mistake made while entering your SIM card PIN, tap  .
.
To turn off the device
1Press and hold down the power key  until the options menu opens.
2In the options menu, tap Power off.
3Tap OK.
It may take a while for the device to shut down.
10
This is an Internet version of this publication. © Print only for private use.
To force the device to shut down
1Remove the back cover.
2Press and hold down the OFF button using the tip of a pen or a similar object. The device turns off automatically.
Do not use overly sharp objects that could damage the OFF button.
Screen lock
When your device is on and left idle for a set period of time, the screen darkens to save battery power, and locks automatically. This lock prevents unwanted actions on the touchscreen when you are not using it. On the lockscreen, you can still take photos and play audio tracks.
To activate the screen
•Briefly press the power key  .
.
To unlock the screen
•Drag  up or drag
  down.
down.
To lock the screen manually
•When the screen is active, briefly press the power key  .
.
Setup guide
The first time you start your device, a setup guide opens to explain basic functions and help you enter essential settings. This is a good time to configure the device to your specific needs. You can also access the setup guide later from the settings menu.
To access the setup guide manually
1From the Home screen, tap  .
.
2Tap Settings > Setup guide.
Accounts and services
Sign in to your online service accounts from your device to get easy access when you're on the move. For example, you can integrate contacts from your Google™ account into your phonebook, so you have everything in one place. You can sign up to new online services from your device as well as from a computer.
11
This is an Internet version of this publication. © Print only for private use.
Google™ account
Having a Google™ account is key to using a range of applications and services with your Android device. You need a Google™ account, for example, to use the Gmail™ application in your device, chat with friends using Google Talk™, and synchronize the calendar application on your device with your Google Calendar™. You also need a Google™ account to download applications and games, music, movies, and books from Google Play™.
Microsoft® Exchange ActiveSync® account
Synchronize your device with your corporate Microsoft® Exchange ActiveSync® account. This way, you keep your work email, contacts, and calendar events with you at all times.
Facebook™ account
Facebook™ is a social networking service that connects you with friends, family, and colleagues around the world. Set up Facebook to work on your device so that you can stay in touch from anywhere.
12
This is an Internet version of this publication. © Print only for private use.

Getting to know your device
Using the keys
Back
•Go back to the previous screen
•Close the on-screen keypad, a dialog box, an options menu, or the Notification panel
Home
•Go to the Home screen
Task
•Tap to open a window showing your most recently used applications and a small apps bar
Battery
Your device has an embedded battery.
Charging the battery
Your battery is partly charged when you buy the device. It may take a few minutes before the battery icon  appears on the screen when you connect the charger cable to a power source, such as a USB port or a charger. You can still use your device while it is charging. Charging your device over a long period of time, for example, overnight, does not damage the battery or the device.
The battery will start to discharge a little after it is fully charged and then charges again after a certain time when the charger is connected. This is to extend battery life and may result in the charge status showing a level below 100 percent.
13
This is an Internet version of this publication. © Print only for private use.

To charge your device
1Plug the charger into a power outlet.
2Plug one end of the USB cable into the charger (or into the USB port of a computer).
3Plug the other end of the cable into the micro USB port on your device, with the USB symbol facing up. The battery status LED lights up when charging starts.
4When the battery status LED is green, the device is fully charged. Disconnect the USB cable from your device by pulling it straight outward. Make sure not to bend the connector when removing the cable from the device.
Use the charger and USB cable provided with the device to ensure faster charging.
If the battery is completely discharged, it may take a few minutes before the LED lights up after you connect the charger cable to a power source.
Battery LED status
Green |
The battery is fully charged |
|
|
Red |
The battery level is low |
|
|
Orange |
The battery is charging. The battery level is between low and full |
|
|
To check the battery level
1From your Home screen, tap  .
.
2Find and tap Settings > About phone > Status > Battery level.
Improving battery performance
The following tips can help you improve battery performance:
•Charge your device often. This will not affect the lifetime of the battery.
•Downloading data from the Internet is power consuming. When you're not using the Internet, you can save power by disabling all data connections over mobile networks. This setting does not prevent your device from transmitting data over other wireless networks.
•Turn off Bluetooth™ and Wi-Fi® when you don't need these features. You can turn them on and off more easily by adding the Quick settings widget to your Home screen.
•Use the STAMINA mode and Low battery mode features to reduce battery consumption. You can select the power saving mode that best suits the way you use your device. You can also customize the settings of each power saving mode.
•Set your synchronization applications (used to synchronize your email, calendar, and contacts) to synchronize manually. You can also synchronize automatically, but increase the synchronization intervals.
•Check the battery usage menu in your device to see which applications use the most power. Your battery consumes more power when you use video and music streaming applications, such as YouTube™. Some applications downloaded from Google Play™ may also consume more power.
•Close and exit applications that you are not using.
•Lower the screen display brightness level.
14
This is an Internet version of this publication. © Print only for private use.

•Turn off your device or activate the Airplane mode setting if you are in an area with no network coverage. Otherwise, your device repeatedly scans for available networks, and this consumes power.
•Use a Sony original handsfree device to listen to music. Handsfree devices demand less battery power than your device's own loudspeakers.
•Keep your device in standby mode whenever possible. Standby time refers to the time during your device is connected to the network and is not being used.
•Disable any live wallpaper.
|
To access the battery usage menu |
1 |
From your Home screen, tap . |
2 |
Find and tap Settings > Power management > Battery usage. |
|
To add the Data traffic widget to your Home screen |
1 |
Tap and hold an empty area of your Home screen. |
2 |
Tap Widgets > Tools. |
3 |
Tap and hold the Mobile data widget, then drag it to an empty area of your Home |
|
screen. |
To add the Quick settings widget to your Home screen
1Tap and hold an empty area of your Home screen.
2Tap Widgets > Tools.
3Tap and hold the Quick settings widget, then drag it to an empty area of your
Home screen.
Using STAMINA mode
Activate the STAMINA mode feature to pause your Wi-Fi® connection, data traffic and several power consuming applications when your screen is inactive. When STAMINA mode is active, you can still receive phone calls, and text and multimedia messages. You can also set up an applications list to allow some applications to keep running when your screen is inactive. Once the screen becomes active again, all paused functions are resumed.
To activate STAMINA mode
1From your Home screen, tap  .
.
2Find and tap Settings > Power management.
3Tap  next to STAMINA mode, then tap Activate.
To deactivate STAMINA mode
1From your Home screen, tap  .
.
2Find and tap Settings > Power management.
3Tap  next to STAMINA mode.
To change the settings for STAMINA mode
1From your Home screen, tap  .
.
2Find and tap Settings > Power management.
3To open the settings menu, tap STAMINA mode.
4Add or remove applications, as desired.
5When you're finished, tap Done.
Estimating the standby time of your device
Standby time refers to the amount of time the battery can last when your device is connected to the network but is not in active use, for example, to receive or make phone calls. STAMINA mode, when activated, continuously evaluates the remaining standby time, which can vary depending on how you use your device. STAMINA mode is more effective in lengthening the standby time if you keep the screen of your device locked. If you rarely lock the screen, you may not see much improvement in battery performance.
When you use your device for the first time, the estimated standby time may not be accurate since there is no previous usage history to estimate from.
15
This is an Internet version of this publication. © Print only for private use.
To view the estimated standby time
1From your Home screen, tap  .
.
2Find and tap Settings > Power management.
Using Low battery mode
You can activate the Low battery mode feature when the battery level is low. This feature helps you to adjust the settings for screen brightness, data traffic and the vibrate function so that you can reduce battery consumption.
To activate Low battery mode
1From your Home screen, tap  .
.
2Find and tap Settings > Power management.
3Tap  next to Low battery mode, then tap Activate.
To deactivate Low battery mode
1From your Home screen, tap  .
.
2Find and tap Settings > Power management.
3Tap  next to Low battery mode.
To change the settings for Low battery mode
1From your Home screen, tap  .
.
2Find and tap Settings > Power management.
3To open the settings menu, tap Low battery mode.
4Adjust the settings as desired.
5When you're finished, tap  .
.
Using the touchscreen
A protective plastic sheet is already attached to the screen of your device when you buy it. You should peel off this sheet before using the touchscreen. Otherwise, the touchscreen might not function properly.
When your device is on and left idle for a set period of time, the screen darkens to save battery power, and locks automatically. This lock prevents unwanted actions on the touchscreen when you are not using it. You can also set personal locks to protect your subscription and make sure only you can access content on your device.
The device screen is made from glass. Do not touch the screen if the glass is cracked or shattered. Avoid trying to repair a damaged screen yourself. Glass screens are sensitive to drops and mechanical shocks. Cases of negligent care are not covered by the Sony warranty service.
To open or highlight an item
•Tap the item.
Marking options
Marked checkbox
Unmarked checkbox
Marked list option
Unmarked list option
To mark or unmark options
•Tap the relevant checkbox or list option.
Zooming
The zoom options available depend on the application you are using.
16
This is an Internet version of this publication. © Print only for private use.

To zoom
•Place two fingers on the screen at once and pinch them together (to zoom out) or spread them apart (to zoom in).
When you use two fingers on the screen to zoom, it is only possible to zoom if both fingers are within the zoomable area. If you, for example, want to zoom in on a photo, make sure that both fingers are within the photo frame area.
Scrolling
Scroll by moving your finger up or down on the screen. On some web pages you can also scroll to the sides.
Dragging or flicking will not activate anything on the screen.
To scroll
•Drag or flick your finger in the direction you want to scroll on the screen.
To scroll more quickly, flick your finger in the direction you want to go on the screen.
17
This is an Internet version of this publication. © Print only for private use.
To flick
•To scroll more quickly, flick your finger in the direction you want to go on the screen. You can wait for the scrolling movement to stop by itself, or you can stop it immediately by tapping the screen.
Sensors
Your device has sensors that detect both light and proximity. The light sensor detects the ambient light level and adjusts the brightness of the screen accordingly. The proximity sensor turns the touch screen off during voice calls when your ear is close to the screen. This prevents you from unintentionally activating other functions on your device when you are engaged in a call.
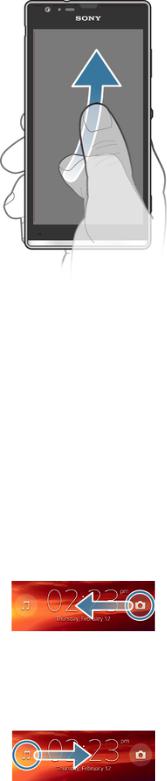
Using the lockscreen
On the lockscreen, you can play tracks, take photos and record videos without unlocking the screen.
To take a photo from the lockscreen
1To activate the screen, briefly press the power key  .
.
2To activate the camera controls, drag  to the left across the screen.
3Tap  .
.
To play an audio track from the lockscreen
1To activate the screen, briefly press the power key  .
.
2To display the music player controls, drag  to the right across the screen.
3Tap  .
.
To pause an audio track from the lockscreen
1To activate the screen, briefly press the power key  .
.
2When the music player controls appear, tap  .
.
18
This is an Internet version of this publication. © Print only for private use.

To change the currently playing audio track from the lockscreen
1To activate the screen, briefly press the power key  .
.
2When the music player controls appear, tap  or
or  .
.
Home screen
The Home screen is your gateway to the main features on your device. You can customize your Home screen with widgets, shortcuts, folders, themes, wallpaper, and other items.
The Home screen extends beyond the regular screen display width, so you need to flick left or right to view content in all of the Home screen's panes.  shows which part of the Home screen you are in. You can set a pane as the main Home screen pane, and add, or delete panes.
The items in the bar at the bottom of the screen are always available for quick access.
To go to the Home screen
•Press  .
.
To browse the Home screen
•Flick right or left.
To set a pane as the main Home screen pane
1Touch and hold an empty area on your Home screen until the device vibrates.
2Flick left or right to browse to the pane that you want to set as your main Home screen pane, then tap  .
.
To add a pane to your Home screen
1Touch and hold an empty area on your Home screen until the device vibrates.
2Flick left or right to browse the panes, then tap  .
.
19
This is an Internet version of this publication. © Print only for private use.

To delete a pane from your Home screen
1Touch and hold an empty area on your Home screen until the device vibrates.
2Flick left or right to browse to the pane that you want to delete, then tap  .
.
Widgets
Widgets are small applications that you can use directly on your Home screen. For example, the “WALKMAN” widget allows you to start playing music directly.
Some widgets are resizable, so you can expand them to view more content or shrink them to save space on your Home screen.
To add a widget to the Home screen
1Touch and hold an empty area on your Home screen until the device vibrates, then tap Widgets.
2Find and tap the widget that you want to add.
To resize a widget
1Touch and hold a widget until it magnifies and the device vibrates, then release the widget. If the widget can be resized, for example, the Calendar widget, then a highlighted frame and resizing dots appear.
2Drag the dots inward or outward to shrink or expand the widget.
3To confirm the new size of the widget, tap anywhere on the Home screen.
Rearranging your Home screen
Customize the appearance of your Home screen and change the features you can access from it. Change the screen background, move items around, create folders, and add shortcuts and widgets.
Customization options
When you touch and hold an empty area of your Home screen, the following customization options appear:
Add widgets to your Home screen.
Add applications and shortcuts.
Set a wallpaper for your Home screen.
Set a background theme.
To view customization options from the Home screen
•Touch and hold an empty area on your Home screen until the device vibrates and customization options appear at the bottom of the screen.
To add a shortcut to your Home screen
1Touch and hold an empty area on your Home screen until the device vibrates.
2Tap Apps > Shortcuts.
3Select a shortcut.
You can add an application shortcut directly from the Application screen by touching and holding the application.
To move an item on the Home screen
•Touch and hold the item until it magnifies and the device vibrates, then drag the item to the new location.
To delete an item from the Home screen
•Touch and hold an item until it magnifies and the device vibrates, then drag the item to  .
.
20
This is an Internet version of this publication. © Print only for private use.
To create a folder on the Home screen
1Touch and hold an application icon or a shortcut until it magnifies and the device vibrates, then drag and drop it on top of another application icon or shortcut.
2Enter a name for the folder and tap Done.
To add items to a folder on the Home screen
•Touch and hold an item until it magnifies and the device vibrates, then drag the item to the folder.
To rename a folder on the Home screen
1Tap the folder to open it.
2Tap the folder's title bar to show the Folder name field.
3Enter the new folder name and tap Done.
Changing the background of your Home screen
Adapt the Home screen to your own style using wallpapers and different themes.
To change your Home screen wallpaper
1Touch and hold an empty area on your Home screen until the device vibrates.
2Tap Wallpapers and select an option.
To set a theme for your Home screen
1Touch and hold an empty area on your Home screen until the device vibrates.
2Tap Themes, then select a theme.
When you change a theme, the background also changes in some applications.
Accessing and using applications
Open applications from shortcuts on your Home screen or from the Application screen.
Application screen
The Application screen, which you open from your Home screen, contains the applications that come pre-installed on your device, as well as the applications you download.
The Application screen extends beyond the regular screen width, so you need to flick left and right to view all content.
To open the Application screen
•From your Home screen, tap  .
.
To browse the Application screen
•From the Application screen, flick right or left.
21
This is an Internet version of this publication. © Print only for private use.

To create a shortcut to an application on the Home screen
1From your Home screen, tap  .
.
2Touch and hold an application icon until the screen vibrates, then drag the icon to the top of the screen. The Home screen opens.
3Drag the icon to the desired location on the Home screen, then release your finger.
To share an application from your Application screen
1From your Home screen, tap  .
.
2Tap  , then tap Share. All applications which can be shared are indicated by
  .
.
3Tap the application that you want to share, then select an option and confirm, if necessary. A link to a download of the application is sent to the people you have selected.
Opening and closing applications
To open an application
•From your Home screen or the Application screen, tap the application.
To close an application
•Press  .
.
Some applications are paused when you press  to exit, while other applications may continue to run in the background. In the first case, the next time you open the application, you can continue where you left off. Remember that some applications may cause data connection charges when they are running in the background, for example, social networking services.
Recently used applications window
You can switch between recently used applications from this window. You can also open small apps.
To open the recently used applications window
•Press  . The recently used applications window appears on the right of the screen.
Using small apps
From the recently used applications window, you can get quick access to several small apps at any time using the small apps bar. A small app only takes up a small area of your screen. So you can interact with a small app and another application at the same time on the same screen.
To open the small apps bar
•Press  . The small apps bar appears at the bottom of the screen.
To open a small app
1To make the small apps bar appear, press  .
.
2Tap the small app that you want to open. A small app window appears.
To close a small app
•Tap  on the small app window.
22
This is an Internet version of this publication. © Print only for private use.

To move a small app
•When the small app is open, touch and hold the top left corner of the small app, then move it to the desired location.
To minimize a small app
•When the small app is open, touch and hold the top left corner of the small app, then drag it to the right edge or to the bottom edge of the screen.
To rearrange your small apps
1To make the small apps bar appear, press  .
.
2Touch and hold a small app and drag it to the desired position in the small apps bar.
To remove a small app from the small apps bar
1To make the small apps bar appear, press  .
.
2Touch and hold a small app icon and drag it away from the small apps bar.
To restore a previously removed small app
1To make the small apps bar appear, press  .
.
2Tap  > Installed small apps.
3Select the small app that you want to restore.
To download a small app
1To make the small apps bar appear, press  .
.
2Tap  >
>  .
.
3Find a small app that you want to download, then follow the instructions to complete the installation.
Application menu
You can open a menu at any time when you are using an application. The menu will look different depending on which application you are using.
To open a menu in an application
•While using the application, press  .
.
A menu is not available in all applications.
Rearranging your Application screen
Move the applications around on the Application screen according to your preferences.
To arrange applications on the Application screen
1From your Home screen, tap  to go to the Application screen.
2Tap the drop-down list on the top left of the screen and select an option.
To move an application on the Application screen
1Open the Application screen.
2Touch and hold an item until it magnifies and the device vibrates, then drag the item to the new location.
You can only move your applications when Own order is selected.
To uninstall an application from the Application screen
1From your Home screen, tap  .
.
2Tap  , then tap Uninstall. All uninstallable applications are indicated by
  .
.
3Tap the application that you want to uninstall, then tap Uninstall.
23
This is an Internet version of this publication. © Print only for private use.

Status and notifications
The status bar at the top of your screen shows what's going on in your device. To the left you get notifications when there is something new or ongoing. For example, new message and calendar notifications appear here. The right side shows the signal strength, battery status, and other information.
The status bar allows you to adjust basic settings on your device, for example, Wi-Fi®, Bluetooth™, data traffic, and sound. You can also open the settings menu from the Notification panel to change other settings.
A notification light also gives you battery status information and some notifications. For example, a flashing blue light means there is a new message or a missed call. The notification light may not work when the battery level is low.
Checking notifications and ongoing activities
You can drag down the status bar to open the Notification panel and get more information. For example, you can use the panel to open a new message or view a calendar event. You can also open some applications that run in the background, such as the music player.
To open the Notification panel
•Drag the status bar downwards.
24
This is an Internet version of this publication. © Print only for private use.

To close the Notification panel
•Drag the tab at the bottom of the Notification panel upward.
To open a running application from the Notification panel
•Tap the icon for the running application to open it.
To dismiss a notification from the Notification panel
•Place your finger on a notification and flick left or right.
To clear the Notification panel
•From the Notification panel, tap Clear.
Setting your device from the Notification panel
You can open the settings menu from the Notification panel to adjust basic device settings. For example, you can turn on Wi-Fi®.
To open the device settings menu from the Notification panel
1Drag the status bar downward.
2Tap  .
.
To adjust sound settings from the Notification panel
1Drag the status bar downwards.
2Tap  .
.
To control the Bluetooth™ function from the Notification panel
1Drag the status bar downwards.
2Tap  .
.
To control the Wi-Fi® function from the Notification panel
1Drag the status bar downwards.
2Tap  .
.
To enable or disable data traffic from the Notification panel
1Drag the status bar downward.
2Tap  .
.
Settings menu
View and change settings for your device from the Settings menu.
25
This is an Internet version of this publication. © Print only for private use.
To access your device settings
1From your Home screen, tap  .
.
2Tap Settings.
You can also drag the status bar downward on the Home screen and tap  to access your device settings.
Typing text
You can select from a number of keyboards and input methods to type text containing letters, numbers and other characters.
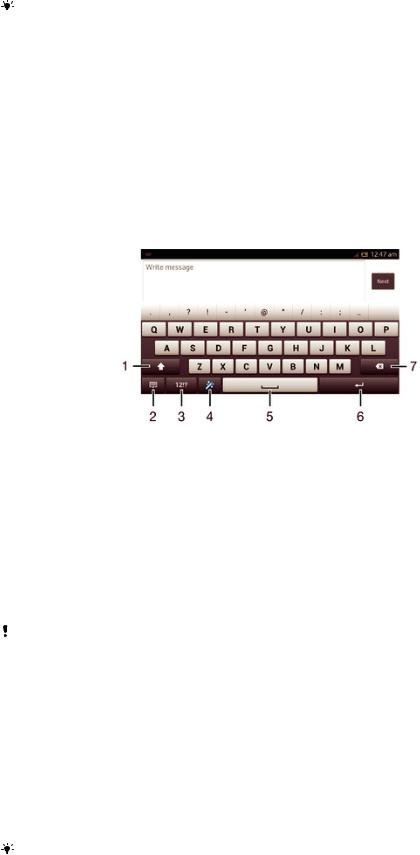
On-screen keyboard
Tap the keys of the on-screen QWERTY keyboard to enter text conveniently. Some applications open the on-screen keyboard automatically. You can also open this keyboard by touching a text field.
Using the on-screen keyboard
1Change the character case and turn on the caps lock. For some languages, this key is used to access extra characters in the language.
2Close the on-screen keyboard view. Note that this icon does not appear in portrait mode.
3Display numbers and symbols.
4Personalize your keyboard. This key disappears after the keyboard is personalized.
5Enter a space.
6Enter a carriage return or confirm text input.
7Delete a character before the cursor.
All illustrations are for illustration purposes only and may not accurately depict the actual device.
To display the on-screen keyboard to enter text
•Tap a text entry field.
To hide the on-screen keyboard
•When the on-screen keyboard is open, tap  .
.
To personalise the on-screen keyboard
1Open the on-screen keyboard, then tap  .
.
2Follow the instructions to personalise your on-screen keyboard, for example, mark the Smiley key checkbox.
If you don't mark the Smiley key checkbox when you personalise the on-screen keyboard, the smiley icon will not appear.
26
This is an Internet version of this publication. © Print only for private use.

To use the on-screen keyboard in landscape orientation
•When you enter text, turn the device sideways.
For the keyboard to support this feature, landscape mode must be supported by the application you are using, and your screen orientation settings must be set to automatic.
To enter text using the on-screen keyboard
•To enter a character visible on the keyboard, tap the character.
•To enter a character variant, touch and hold a regular keyboard character to get a list of available options, then select from the list. For example, to enter "é", touch and hold "e" until other options appear, then, while keeping your finger pressed on the keyboard, drag to and select "é".
To shift between upper-case and lower-case letters
•Before you enter a letter, tap  to switch to upper-case
  , or vice versa.
To turn on the caps lock
•Before you type a word, touch and hold  or
or  until
until  appears.
To enter numbers or symbols
•When you enter text, tap  . A keyboard with numbers and symbols appears. Tap
 to view more options.
To enter common punctuation marks
1When you finish entering a word, tap the space bar.
2Select a punctuation mark from the candidate bar. The selected mark is inserted before the space.
To quickly enter a full stop, tap the space bar twice when you finish entering a word.
To delete characters
•Tap to place the cursor after the character you want to delete, then tap  .
.
To enter a carriage return
•When you enter text, tap  to enter a carriage return.
To select text
1Enter some text, then double-tap the text. The word you tap gets highlighted by tabs on both sides.
2Drag the tabs to the left or right to select more text.
To edit text in landscape orientation
1Enter some text, then double-tap the entered text.
2Select the text you want to work with, then tap Edit... and select an option.
To paste text from the clipboard, double-tap the text field to make Paste appear, then tap
Paste.
To edit text in portrait orientation
1Enter some text, then double-tap the entered text to make the application bar appear.
2Select the text you want to edit, then use the application bar to make your desired changes.
To paste text from the clipboard, double-tap the text field to make Paste appear, then tap
Paste.
27
This is an Internet version of this publication. © Print only for private use.
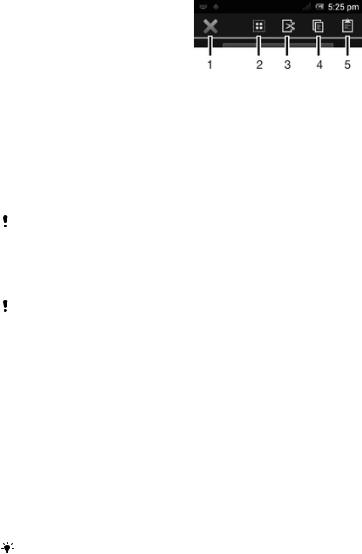
Application bar
1Close the application bar
2Select all text
3Cut text
4Copy text
5Paste text
 only appears when you have text stored on the clipboard.
Using the Gesture input function to write words
You can input text by sliding your finger from letter to letter on the on-screen keyboard.
Gesture input is only available when you use the on-screen keyboard.
To enter text using the Gesture input function
1When you enter text using the on-screen keyboard, slide your finger from letter to letter to trace the word you want to write.
2Lift up your finger when you’ve finished entering a word. A word is suggested based on the letters you have traced. If necessary, select the correct word in the candidate bar.
3To view more options, scroll right or left in the word candidate bar. If you cannot
find the desired word, tap  once to delete the entire word. Then try again to trace the word using the Gesture input function, or tap each letter to enter the word.
4If the Space between gestures setting is activated, trace the next word that you want to enter. If not, tap the space bar and then trace the next word you want to enter.
To enter joined compound words when the Space between gestures setting is activated, you may need to slide to enter the first part of the word, then tap each letter to enter the rest of the word.
To change the Gesture input settings
1When you enter text using the on-screen keyboard, tap  .
.
2Tap  , then tap Keyboard settings.
3Tap Text input settings.
4Mark or unmark the Gesture input checkbox.
5If you want to automatically add a space between gestures without having to tap the space bar each time, mark the Space between gestures checkbox.
Phonepad
The Phonepad is similar to a standard 12-key telephone keypad. It gives you predictive text and multi-tap input options. You can activate the Phonepad text input method via the keyboard settings. The Phonepad is only available in portrait orientation.
28
This is an Internet version of this publication. © Print only for private use.

Using the Phonepad
1Choose a text input option
2Change the character case and turn on the caps lock
3Display numbers
4Display symbols and smileys
5Enter a space
6Enter a carriage return or confirm text input
7Delete a character before the cursor
All illustrations are for illustration purposes only and may not accurately depict the actual device.
To open the Phonepad for the first time
1Tap a text entry field, then tap  .
.
2Tap  , then tap Keyboard settings.
3Tap Keyboard appearance > Keyboard layout.
4Select the Phonepad.
The Phonepad can only be used in portrait mode.
To enter text using the Phonepad
•When  appears in the Phonepad, tap each character key only once, even if the letter you want is not the first letter on the key. Tap the word that appears or tap
  to view more word suggestions and select a word from the list.
•When  appears in the Phonepad, tap the on-screen key for the character you want to enter. Keep pressing this key until the desired character is selected. Then do the same for the next character you want to enter, and so on.
To enter numbers using the Phonepad
•When the Phonepad is open, tap  . A Phonepad with numbers appears.
To insert symbols and smileys using the Phonepad
1When the Phonepad is open, tap  . A grid with symbols and smileys appears.
2Scroll up or down to view more options. Tap a symbol or smiley to select it.
Keyboard and Phonepad settings
You can select settings for the on-screen keyboard and the Phonepad, such as writing language and automatic correction.
29
This is an Internet version of this publication. © Print only for private use.

To access the on-screen keyboard and Phonepad settings
1When you enter text using the on-screen keyboard or Phonepad, tap  or
or  .
.
2Tap  , then tap Keyboard settings.
To add a writing language for text input
1When you enter text using the on-screen keyboard or Phonepad, tap  or
or  .
.
2Tap  , then tap Keyboard settings.
3Tap Languages > Writing languages and mark the relevant checkboxes. Tap OK to confirm.
Text input settings
When entering text using the on-screen keyboard or the Phonepad, you can access a text input settings menu that helps you set options for text prediction, automatic spacing, and quick fixes. For example, you can decide how word options are presented and how words get corrected as you type. You can also set the text input application to remember new words that you write.
To change the text input settings
1When you enter text using the on-screen keyboard or the Phonepad, tap  or
or  .
.
2Tap  , then tap Keyboard settings > Text input settings and select the relevant settings.
Entering text using voice input
When you enter text, you can use the voice input function instead of typing the words. Just speak the words that you want to enter. Voice input is an experimental technology from Google™, and is available for a number of languages and regions.
You must have a data connection on a mobile or Wi-Fi® network to use this service. Additional charges may apply.
To enable voice input
1When you enter text using the on-screen keyboard or the Phonepad, tap  or
or
 .
.
2Tap  , then tap Keyboard settings.
3Mark the Google voice typing key checkbox.
4Press  to save your settings. A microphone icon
  appears on your on-screen keyboard or Phonepad.
To enter text using voice input
1Make sure that the voice input function is enabled and that you have a working data connection.
2When  appears on your on-screen keyboard or Phonepad, tap it. When the input language key, for example,
  , appears, touch and hold it.
3When  appears, speak to enter text. When you're finished, tap
  again. The suggested text appears.
4Edit the text manually if necessary.
Customizing your device
You can adjust several device settings to suit your own needs. For example, you can change the language, add a personal ringtone, or change the screen brightness.
Adjusting the volume
You can adjust the ringtone volume for incoming calls and notifications as well as for music and video playback.
To adjust the ring volume with the volume key
•Press the volume key up or down.
30
This is an Internet version of this publication. © Print only for private use.
Loading...