


VAIO VGC-JS3E/S
User Guide
Personal Computer
VGC-JS series
N

Contents
2
nN
Before Use.......................................................................... 4
Finding More about Your VAIO Computer .................... 5
Ergonomic Considerations ............................................ 7
Getting Started.................................................................... 9
Locating Controls and Ports........................................ 10
About the Indicator Lights ........................................... 14
Setting Up Your Computer .......................................... 15
Shutting Down Your Computer Safely ........................ 18
Updating Your Computer ............................................ 19
Using Your VAIO Computer.............................................. 20
Using the Keyboard..................................................... 21
Using the Built-in MOTION EYE Camera.................... 23
Using the Optical Disc Drive ....................................... 24
Using the Memory Stick .............................................. 31
Using Other Modules / Memory Cards........................ 36
Using the Internet ........................................................ 39
Using the Network (LAN) ............................................ 40
Using the Wireless LAN .............................................. 41
Using the Bluetooth Function ...................................... 48
Using Peripheral Devices..................................................54
Connecting External Speakers or Headphones ..........55
Connecting a USB Device ...........................................56
Connecting an i.LINK Device.......................................58
Customizing Your VAIO Computer....................................60
Setting the Password...................................................61
Using the VAIO Control Center ...................................66
Using the Power Saving Mode ....................................67
Upgrading Your VAIO Computer.......................................69
Adding and Removing Memory ...................................70
Precautions .......................................................................76
Handling the LCD Screen ............................................77
Using the Power Source..............................................78
Handling Your Computer .............................................79
Handling the Built-in MOTION EYE Camera ...............81
Handling Discs.............................................................82
Using Headphones ......................................................83
Handling the Memory Stick..........................................84
Handling the Built-in Storage Device ...........................85

Troubleshooting ................................................................ 86
Computer .................................................................... 87
System Security .......................................................... 92
Built-in MOTION EYE Camera.................................... 93
Networking .................................................................. 95
Bluetooth Technology ............................................... 100
Optical Discs ............................................................. 103
Display ...................................................................... 107
Printing ...................................................................... 109
Microphone ............................................................... 110
Mouse ....................................................................... 111
Speakers ................................................................... 112
Keyboard................................................................... 113
Floppy Disks.............................................................. 114
Audio/Video ............................................................... 115
Memory Stick ............................................................ 118
Peripherals ................................................................ 119
Trademarks..................................................................... 120
Notice.............................................................................. 122
3
nN

Before Use >
nN
Before Use
Congratulations on your purchase of this Sony VAIO® computer, and welcome to the on-screen User Guide. Sony has
combined leading-edge technology in audio, video, computing, and communications to provide state-of-the-art personal
computing experience.
!
External views illustrated in this manual may look slightly different from those of your computer.
Information in the supplied manuals including this User Guide is intended for users of the VAIO computers with the Microsoft® Windows Vista®
32-bit operating system. You may find differences in the information when your computer comes preinstalled with the 64-bit operating system.
How to find specifications
Some features, options, and supplied items may not be available on your computer.
To find out about the configuration of your computer, visit the VAIO Link web site at http://www.vaio-link.com
.
4

Before Use >
Finding More about Your VAIO Computer
5
nN
Finding More about Your VAIO Computer
This section provides support information about your VAIO computer.
1. Printed Documentation
❑ Quick Start Guide — An overview of components connection, set-up information, etc.
❑ Troubleshooting and Recovery Guide
❑ Regulations, Guarantee, EULA and Service Support
2. On-screen Documentation
❑ User Guide (This manual) — Features of your computer and information about solving common problems.
To view this on-screen guide:
1 Double-click the Me&My VAIO icon on the desktop.
2 Click Menu, Me&My VAIO, I Need Help, and VAIO User Guide.
3 Open the folder for your language.
4 Select the guide you want to read.
✍
You can manually browse to the user guides by going to Computer > VAIO (C:) (your C drive) > Documentation > Documentation and opening the
folder for your language.
❑ Windows Help and Support — A comprehensive resource for practical advice, tutorials, and demonstrations to help you
learn to use your computer.
To access Windows Help and Support, click Start and Help and Support, or press and hold the Microsoft Windows
key and press the F1 key.

Before Use >
Finding More about Your VAIO Computer
6
nN
3. Support Web Sites
If you have any problem with the computer, you can visit the VAIO-Link web site at http://www.vaio-link.com for
troubleshooting.
Before contacting VAIO-Link by telephone, try to solve the problem by reading the printed and non-printed documentation
and visiting other Sony web sites.
❑ For more about VAIO and becoming part of the growing VAIO community, visit the web site at http://www.club-vaio.com
❑ For online purchases, visit the web site at http://www.sonystyle-europe.com
❑ For other Sony products, visit the web site at http://www.sony.net
Refer to the serial number of your VAIO computer when you call VAIO-Link help lines. The serial number is located on the
bottom, the back panel, or inside the battery compartment of your VAIO computer.
.
.
.
Before Use >
Ergonomic Considerations
Ergonomic Considerations
Whenever possible, you should attempt to take account of the following ergonomic considerations:
7
nN
❑ Position of your computer – Place the display directly in front of you (1). Keep your forearms horizontal (2), with your
wrists in a neutral, comfortable position (3) while using the keyboard, pointing device, or mouse. Let your upper arms hang
naturally at your sides. Take frequent breaks while using your computer. Excessive use of the computer may strain eyes,
muscles, or tendons.
❑ Furniture and posture – Sit in a chair with good back support. Adjust the level of the chair so your feet are flat on the
floor. A footrest may make you more comfortable. Sit in a relaxed, upright posture and avoid slouching forward or leaning
far backwards.
Before Use >
Ergonomic Considerations
8
nN
❑ Viewing angle of the display – Use the display's tilting feature to find the best position. You can reduce eye strain and
muscle fatigue by adjusting the tilt of the display to the proper position. Adjust the brightness level of the display as well.
!
While adjusting the viewing angle, do not exert excessive pressure on your computer to eliminate a risk of mechanical damage.
❑ Lighting – Choose a location where windows and lights do not cause glare and reflection on the display. Use indirect
lighting to avoid bright spots on the display. Proper lighting adds to your comfort and work efficiency.
❑ Venti lation – Make sure you leave at least 10 cm of space behind and at least 20 cm of space on each side of the main
unit.

Getting Started >
Getting Started
This section describes how to get started using your VAIO computer.
❑ Locating Controls and Ports (page 10)
❑ About the Indicator Lights (page 14)
❑ Setting Up Your Computer (page 15)
❑ Shutting Down Your Computer Safely (page 18)
❑ Updating Your Computer (page 19)
9
nN
Getting Started >
Locating Controls and Ports
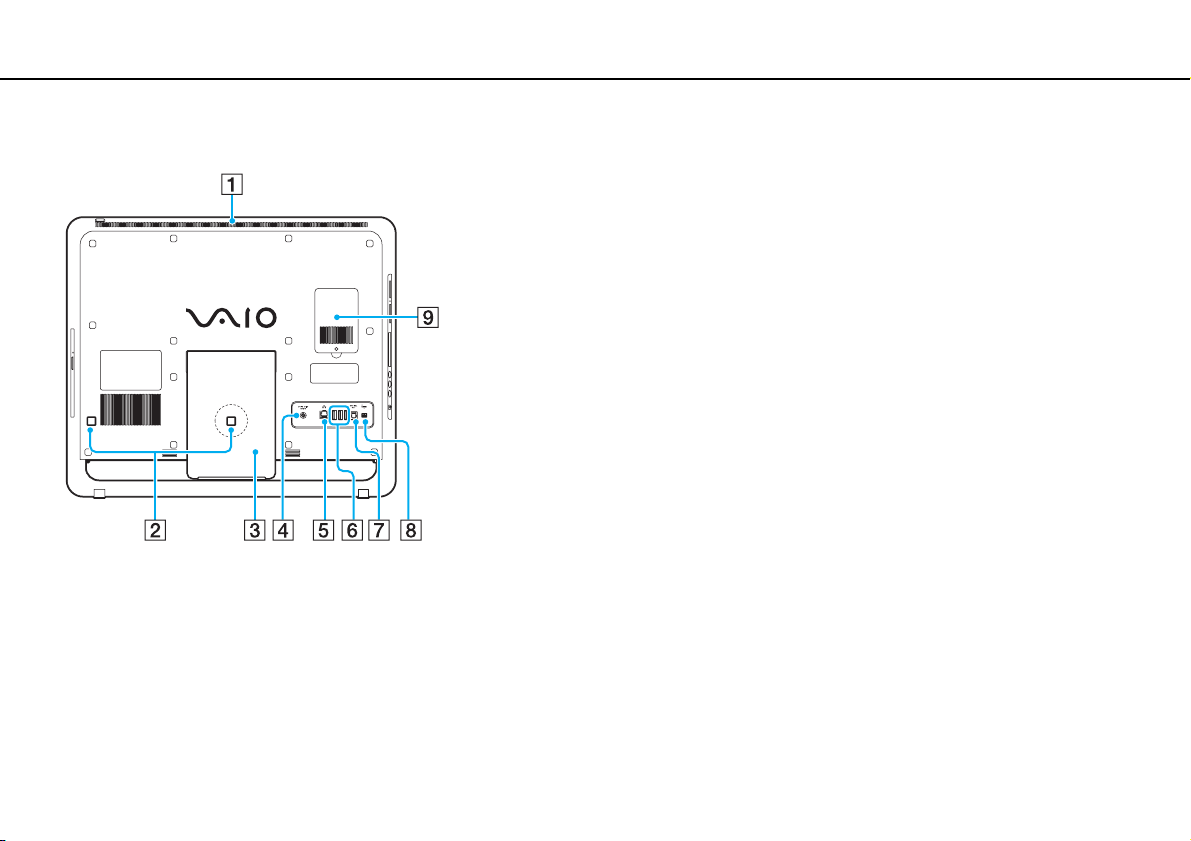
Locating Controls and Ports
Take a moment to identify the controls and ports shown on the following pages.
Front
A LCD screen (page 77)
B Built-in microphone (monaural)
C Built-in MOTION EYE camera indicator (page 14)
D Built-in MOTION EYE camera (page 23)
E WIRELESS indicator (page 14)
F Disc drive indicator (page 14)
G Power indic ator (page 14)
H Power button
I Built-in speakers (stereo)
J Bottom chassis frame (page 80)
10
nN
Getting Started >
Locating Controls and Ports
Back
!
The area around the air vent (1) becomes hot while your computer is on. Be sure to
wait until the computer cools down before you touch it.
A Air vent
B Cable clamps (page 15), (page 16)
C Prop-up stand (page 80)
D DC IN port (page 16)
E Network (Ethernet) port (page 40)
F Hi-Speed USB (USB 2.0) ports
G OPTICAL OUT port (page 55)
(Output Sampling Rate: 44.1 KHz/48.0 KHz/96.0 KHz)
H i.LINK 4-pin (S400) port (page 58)
I Memory module compartment cover (page 70)
* Support high-/full-/low- speeds.
*
(page 56)
11
nN
Getting Started >
Locating Controls and Ports
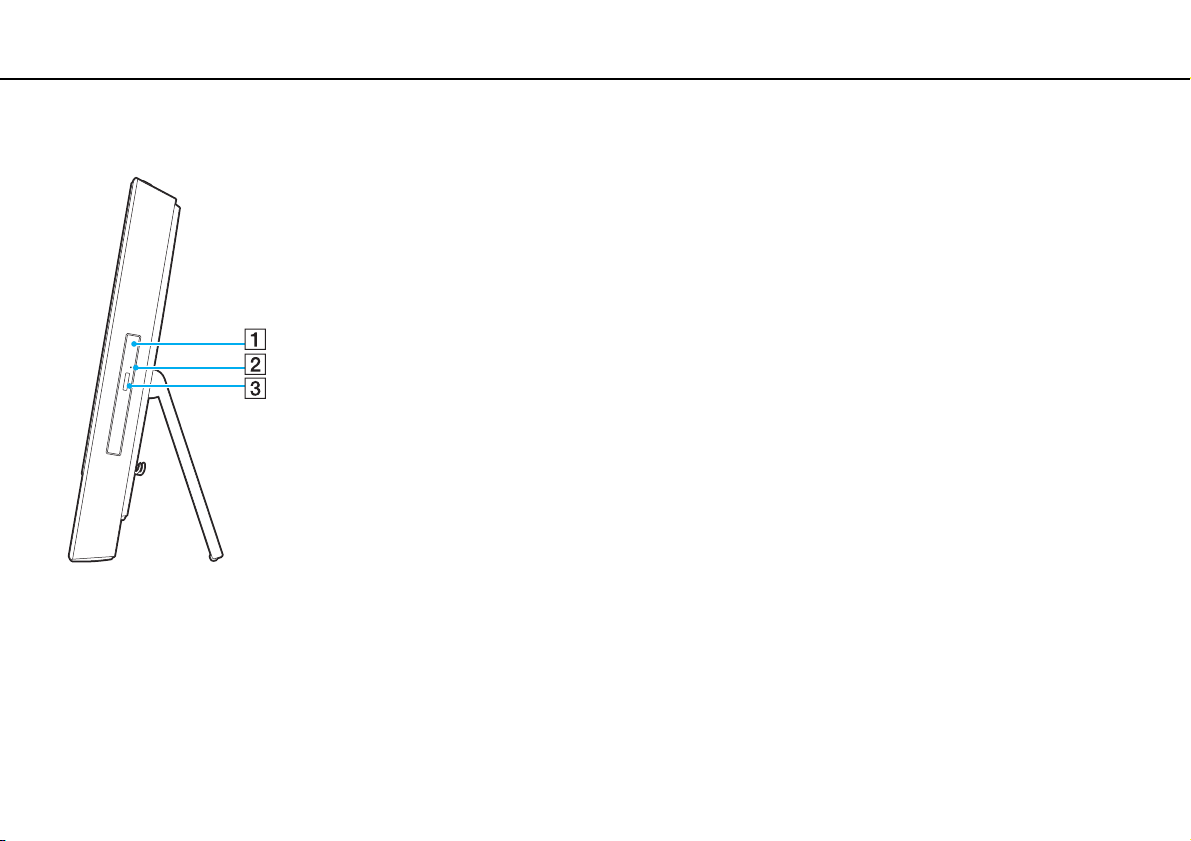
Right
A Optical disc drive (page 24)
B Manual eject hole (page 103)
C Drive eject button (page 24)
12
nN
Getting Started >
Locating Controls and Ports
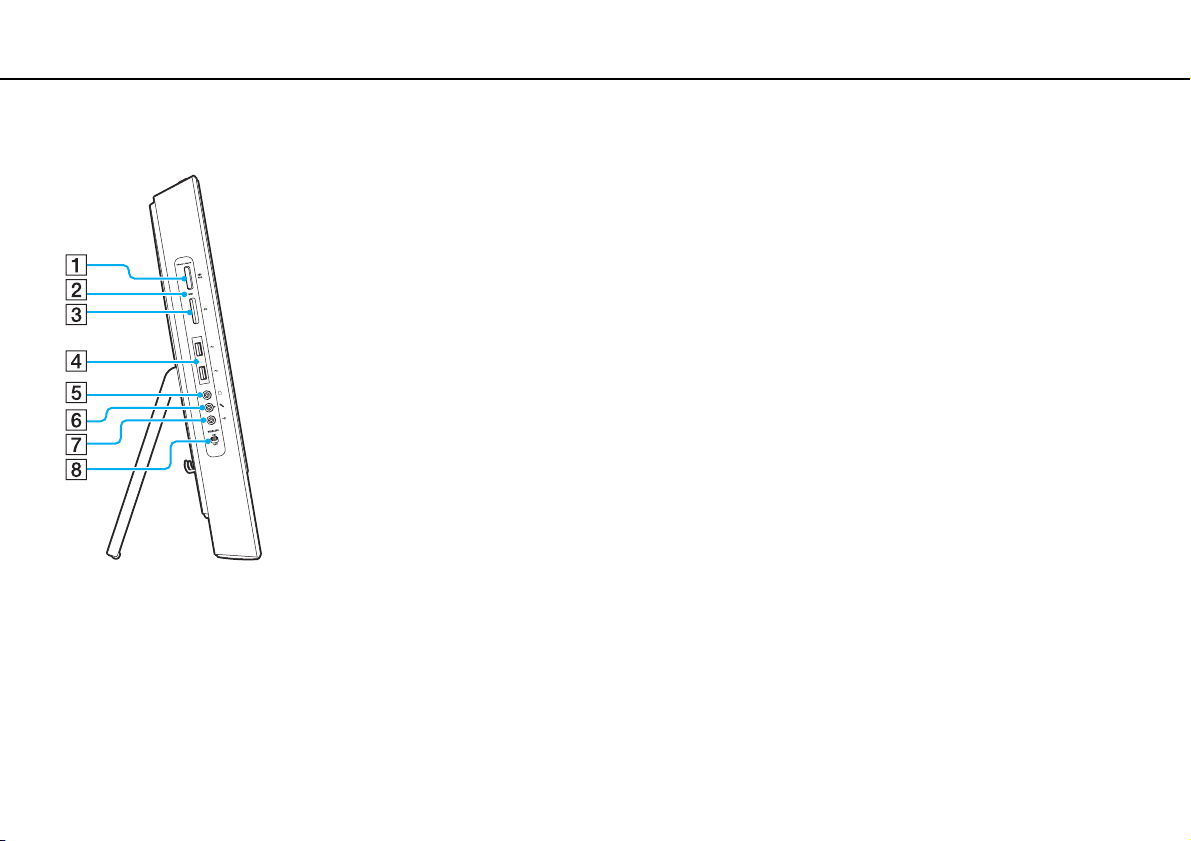
Left
13
nN
A Memory Stick slot
*1
(page 31)
B Media Access indicator (page 14)
C SD memory card slot (page 36)
D Hi-Speed USB (USB 2.0) ports
*2
(page 56)
E Headphones jack (page 55)
F Microphone jack
Connect an external microphone.
G Line In jack
Connect an external audio device for audio input.
H WIRELESS switch (page 41)
*1
Your computer supports both the standard-size Memory Stick and the Duosize Memory Stick.
*2
Support high-/full-/low- speeds.
Getting Started >
About the Indicator Lights
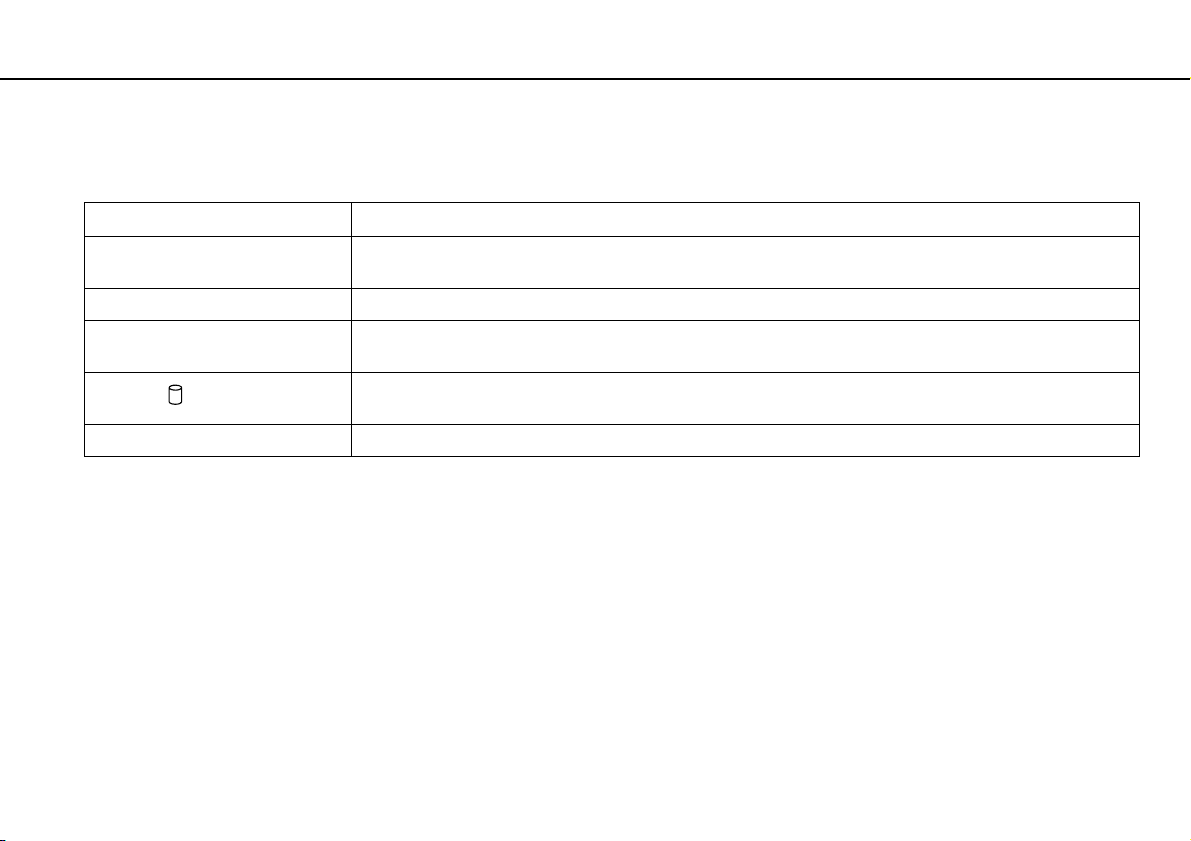
About the Indicator Lights
Your computer is equipped with the following indicator lights:
Indicator Functions
Power 1 Illuminates in green when the computer is on, illuminates in orange while the computer is in Sleep mode, and
Built-in MOTION EYE camera Illuminates while the built-in MOTION EYE camera is in use.
Media Access Illuminates when data is read from or written to a memory card. (Do not place the computer into Sleep mode or
Disc drive
WIRELESS Illuminates when one or more wireless options are enabled.
turns off when the computer is off.
turn it off when this indicator is lit.) When the indicator is unlit, the memory card is not in use.
Illuminates while the built-in storage device or the optical disc drive is running to read or write data.
Do not place the computer into Sleep mode or turn it off when this indicator is lit.
14
nN
Getting Started >
Setting Up Your Computer
Setting Up Your Computer
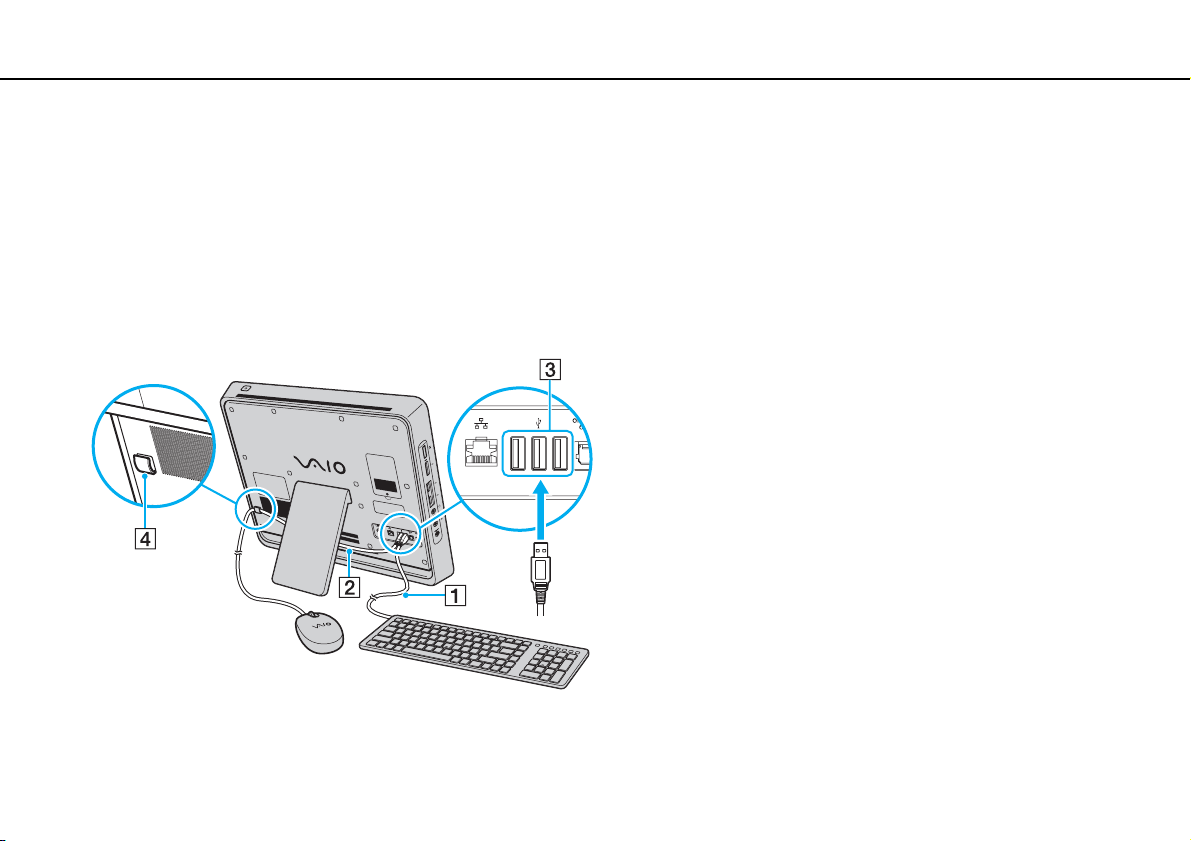
Connecting the Keyboard and the Mouse
A USB keyboard and a USB mouse are supplied with your computer.
To connect the keyboard and the mouse
1 Plug the keyboard cable (1) and the mouse cable (2) to your desired USB ports (3) on the back of the computer.
2 Route the mouse cable (2) through the cable clamp (4) on the back of your computer.
15
nN

Getting Started >
Setting Up Your Computer
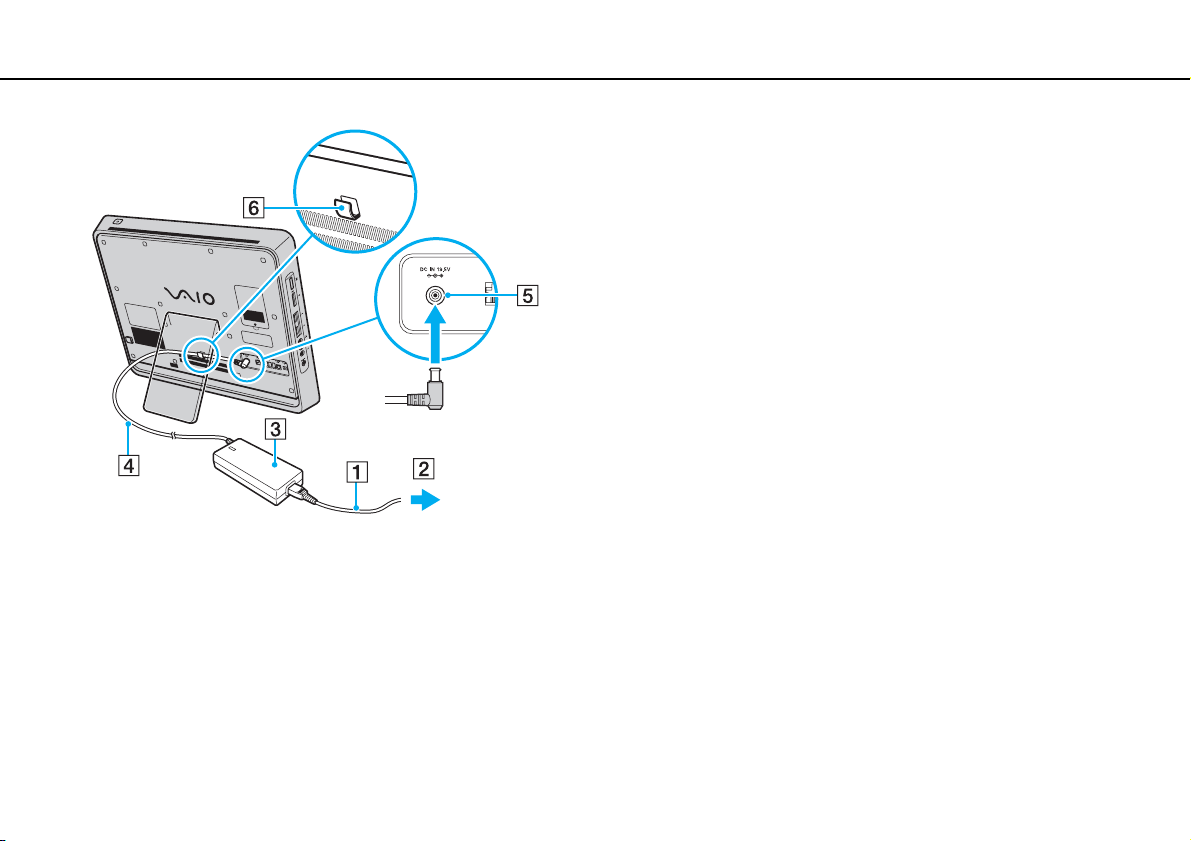
Connecting a Power Source
You need an AC adapter to connect your computer to an AC power source.
✍
Use only the supplied AC adapter for your computer.
To connect the AC adapter
1 Plug one end of the power cord (1) into the AC adapter (3).
2 Plug the other end of the power cord into an AC outlet (2).
3 Plug the AC adapter cable (4) into the DC IN port (5).
4 Route the AC adapter cable through the cable clamp (6).
16
nN
Getting Started >
Setting Up Your Computer
!
The shape of the DC In plug varies depending on the AC adapter.
✍
To disconnect your computer completely from AC power, unplug the AC adapter when the computer is off.
17
nN
Make sure that the AC outlets are easily accessible.
!
If you unplug the AC adapter from your computer while the computer is on or in Sleep mode, you may lose all unsaved data.

Getting Started >
Shutting Down Your Computer Safely
18
nN
Shutting Down Your Computer Safely
To avoid losing unsaved data, be sure to shut down your computer properly, as described below.
To shut down your computer
1 Turn off any peripherals connected to the computer.
2 Click Start, the arrow next to the Lock button, and then Shut Down.
3 Respond to any prompts warning you to save documents or to consider other users and wait for the computer to turn off
automatically.
The power indicator light turns off.

Getting Started >
Updating Your Computer
19
nN
Updating Your Computer
Be sure to install the latest updates on your computer with the following software applications so that the computer can run
more efficiently.
❑ Windows Update
Click Start, All Programs, and Windows Update and then follow the on-screen instructions.
❑ VAIO Update 4
Click Start, All Programs, VAIO Update 4, and VAIO Update Options and then follow the on-screen instructions.
!
Your computer must be connected to the Internet to download the updates.

Using Your VAIO Computer >
Using Your VAIO Computer
This section describes how to get the most out of using your VAIO computer.
❑ Using the Keyboard (page 21)
❑ Using the Built-in MOTION EYE Camera (page 23)
❑ Using the Optical Disc Drive (page 24)
❑ Using the Memory Stick (page 31)
❑ Using Other Modules / Memory Cards (page 36)
❑ Using the Internet (page 39)
❑ Using the Network (LAN) (page 40)
❑ Using the Wireless LAN (page 41)
❑ Using the Bluetooth Function (page 48)
20
nN
Using Your VAIO Computer >
Using the Keyboard
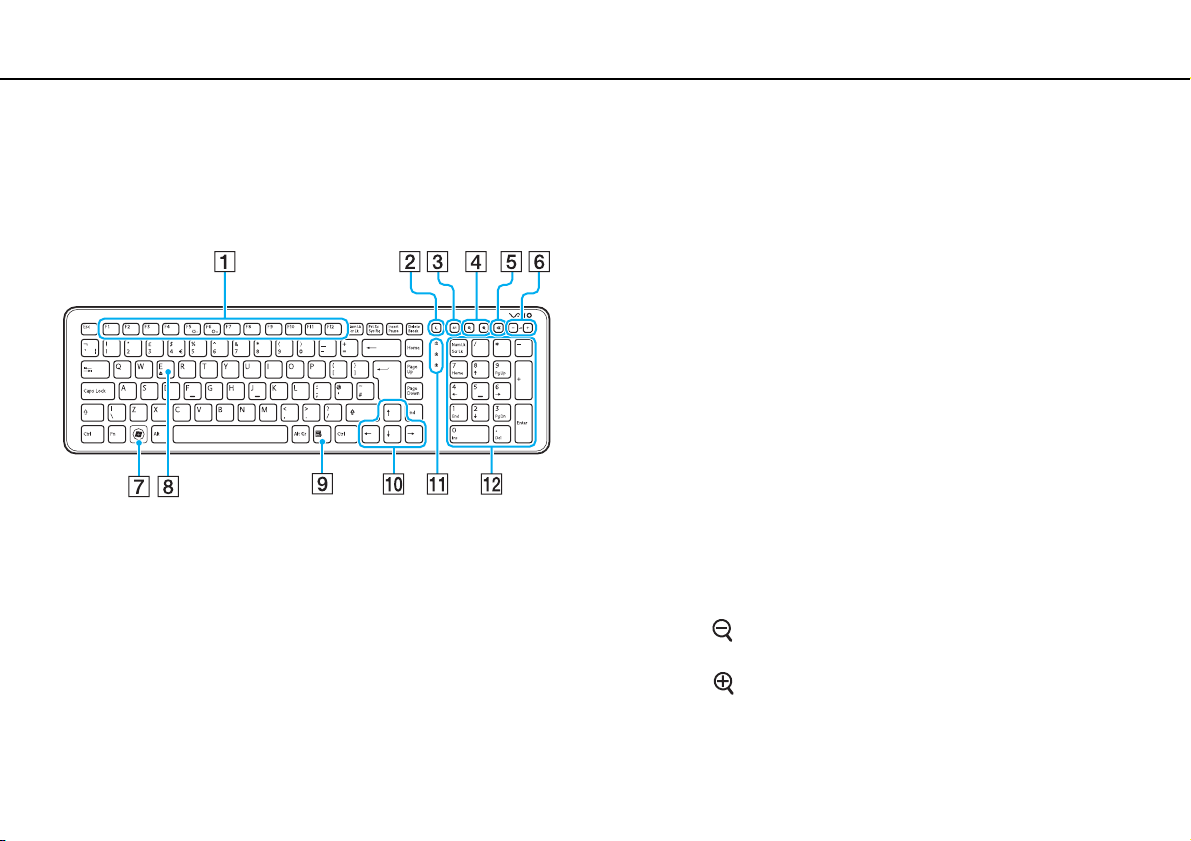
Using the Keyboard
A USB keyboard is supplied with your computer.
The keyboard uses a standard key arrangement with additional keys that perform specific functions.
A Function keys
Perform certain tasks. The task associated with each function
key varies among software applications except the following
combinations with the Fn key.
Fn+F5: Decreases lighting intensity of the LCD screen.
Fn+F6: Increases lighting intensity of the LCD screen.
B Sleep button
Provides for the lower level of power consumption.
For details on power management, see Using the Power
Saving Mode (page 67).
C S1 button
Executes the task that is assigned to the button by default.
✍
Illustrated above is the English keyboard as an example.
You can change the default assignment with the VAIO Control
Center.
D Zoom buttons
Changes the size of an image or a document displayed on
some software.
Press to make the view look smaller and further away (zoom
out).
Press
See the help file included with the VAIO Control Center for
more information.
to make the view look bigger and closer (zoom in).
21
nN
Using Your VAIO Computer >
Using the Keyboard
22
nN
E Muting button
Turns the volume on and off.
F Volume control buttons
Increase (+) or decrease (-) the volume.
G Windows key
Displays the Start menu.
H E key
Ejects the optical disc drive tray when used in combination with the
Fn key.
I Applications key
Displays a shortcut menu in certain software applications.
J Directional arrow keys
Move the pointer on the computer screen.
K Indicator lights
(Num Lk): Turns on while in the Num Lock state.
(Caps Lock): Turns on while in the Caps Lock state.
(Scr Lk): Turns on while in the Scroll Lock state.
L Numeric keypad
Use the numeric keypad to type numbers or to perform basic
math calculations.

Using Your VAIO Computer >
Using the Built-in MOTION EYE Camera
Using the Built-in MOTION EYE Camera
Your computer is equipped with a built-in MOTION EYE camera.
With the preinstalled image capture software, you can perform the following operations:
❑ Capturing still images and movies
❑ Sensing and capturing object movements for monitoring purposes
❑ Editing captured data
✍
Turning on the computer activates the built-in MOTION EYE camera.
Video conference is possible with the appropriate software.
!
Launching or exiting your instant messaging or video editing software does not activate or deactivate the built-in MOTION EYE camera.
Do not place your computer into Sleep mode while you are using the built-in MOTION EYE camera.
You cannot operate the built-in MOTION EYE camera with the Microsoft Windows Movie Maker software.
To use the preinstalled image capture software
1 Click Start, All Programs, ArcSoft WebCam Companion 2, and WebCam Companion 2.
2 Click the desired icon in the main window.
For detailed information on how to use the software, see the help file included with the software.
23
nN
✍
When capturing an image or a movie in a dark place, click the Capture icon or the Record icon in the main window, and then click the WebCam Settings
icon and select the low light or low light compensation option in the properties window.
Using Your VAIO Computer >
Using the Optical Disc Drive
24
nN
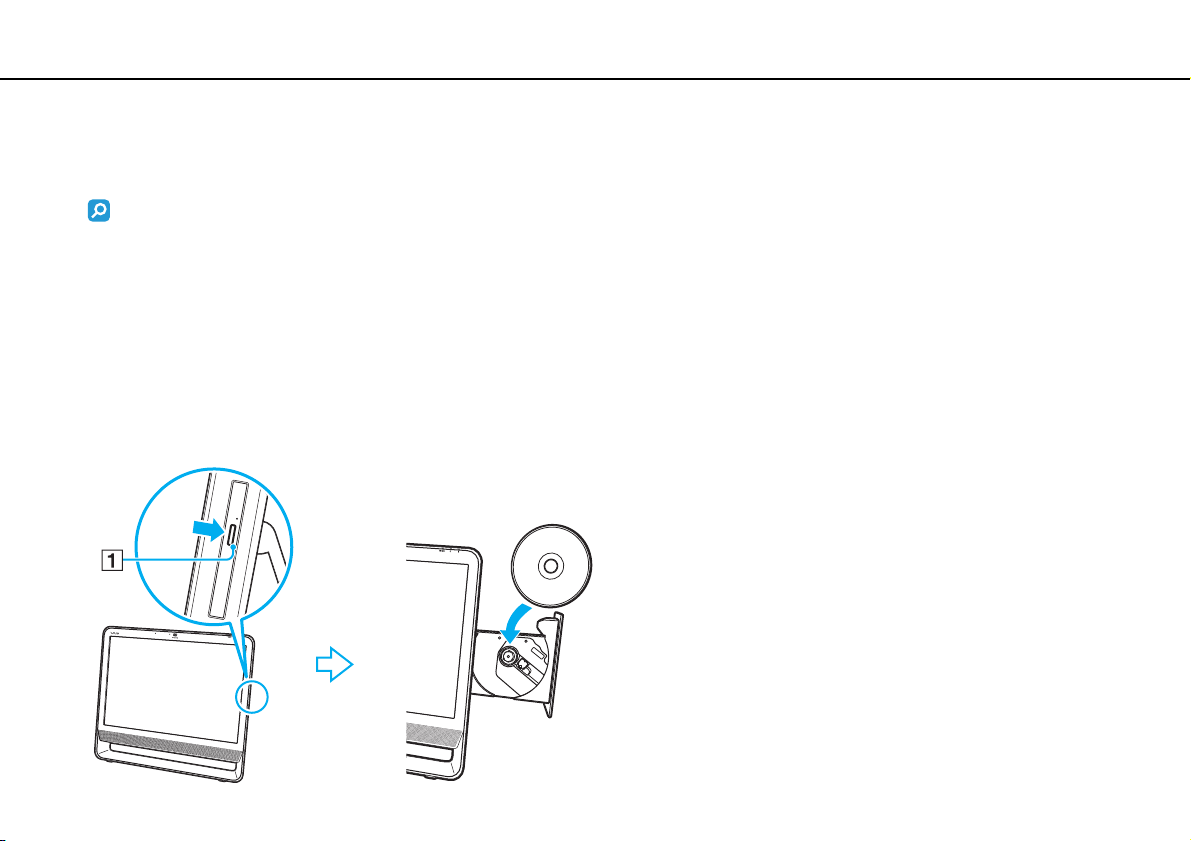
Using the Optical Disc Drive
Your computer is equipped with an optical disc drive.
Features and options in this section may not be available on your computer.
See the specifications to find out about the configuration of your computer.
To insert a disc
1 Turn on the computer.
2 Press the drive eject button (1) or the Fn+E keys to open the drive.
The drive tray slides out.
3 Hold the back of the drive tray with one hand, place a disc in the middle of the drive tray with the label side facing toward
you, and gently push it toward the drive tray until the disc clicks into place.

Using Your VAIO Computer >
Using the Optical Disc Drive
!
Do not exert pressure on the drive tray. Be sure to hold the back of the drive tray when placing/removing a disc onto/from the drive tray.
4 Close the drive tray by pushing it in gently.
!
Do not remove the optical disc when your computer is in Sleep mode. Be sure to bring the computer back into Normal mode before removing the disc.
25
nN
Using Your VAIO Computer >
Using the Optical Disc Drive
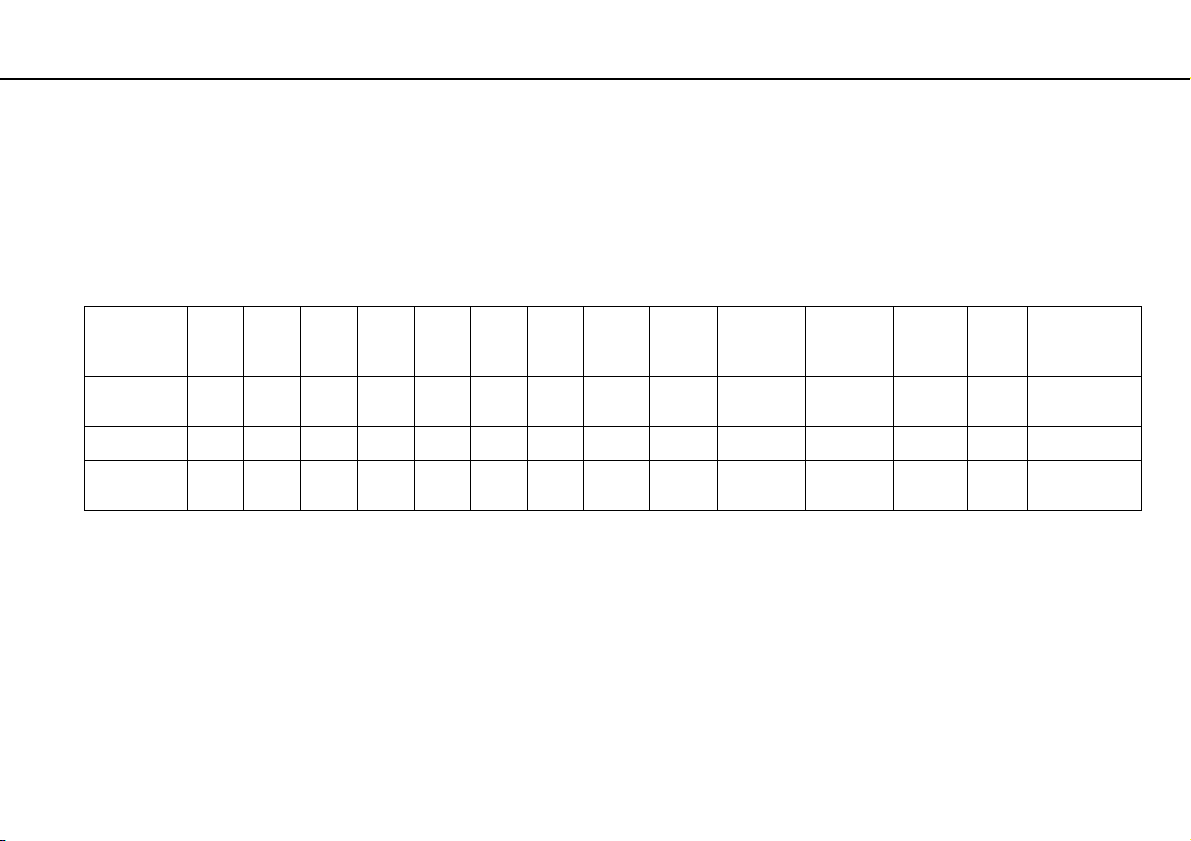
Supported Disc Media
Your computer plays and records CDs, DVDs, and Blu-ray Disc™ media, depending on the model you purchased.
See the reference chart below to find out which type of optical disc drive supports which types of media.
PR: playable and recordable
P: playable but not recordable
–: not playable or recordable
CD-
Video CDMusic CDCD
ROM
DVD±RW/
±R DL/RAM
Blu-ray DiscPPPPPRPPPRPRPR PR PR P
Blu-ray Disc
Combo
*1
The DVD±RW/RAM disc drive on your computer does not support the DVD-RAM cartridge. Use non-cartridge discs or discs with a removable cartridge.
*2
Writing data to single-sided DVD-RAM discs (2.6 GB) compliant with DVD-RAM Version 1.0 is not supported.
DVD-RAM Version 2.2/12X-SPEED DVD-RAM Revision 5.0 disc is not supported.
*3
The Blu-ray Disc drive on your computer does not support BD-RE Disc media in Version 1.0 format and Blu-ray Disc media with a cartridge.
*4
Supports writing data to BD-R Version 1.1/1.2/1.3 discs (single-layer discs with the capacity of 25 GB, dual-layer discs with the capacity of 50 GB) and BD-RE Version
2.1 discs (single-layer discs with the capacity of 25 GB, dual-layer discs with the capacity of 50 GB).
*5
Writing data to Ultra Speed CD-RW discs is not supported.
PPPPPRPPPRPRPR PR PR – –
PPPP
Extra
CD-R/RWDVD-
*5
PR
DVD-
ROM
P P PR PR PR PR PR P P
DVD-R/RWDVD+R/RWDVD+R DL
Video
(Double
Layer)
DVD-R DL
(Dual
Layer)
DVD-
RAM
*1 *2
BDROM
BD-R/RE
PR
26
nN
*3
*4

Using Your VAIO Computer >
Using the Optical Disc Drive
!
This product is designed to play back discs that conform to the Compact Disc Digital Audio standard specifications (CD Standard). A DualDisc is a two
sided disc product which mates DVD recorded material on one side with digital audio material on the other side. Be aware that the audio side (non-DVD
side) of a DualDisc may not play on this product because it does not conform to the CD Standard.
When you buy pre-recorded or blank discs for use with your VAIO computer, be sure to read the notices on the disc package carefully to check both
playback and recording compatibility with your computer's optical disc drives. Sony does NOT guarantee the compatibility of VAIO optical disc drives
with discs that are not compliant with the official "CD," "DVD," or "Blu-ray Disc" standard. USING NON-COMPLIANT DISCS CAN CAUSE FATAL DAMAGE
TO YOUR VAIO PC OR CREATE SOFTWARE CONFLICTS AND CAUSE SYSTEM HANGING.
For inquiries about disc formats, contact the individual publisher of the pre-recorded disc or the manufacturer of the recordable disc.
✍
8 cm disc writing is not supported.
!
To play copyright protected Blu-ray Disc media continually, update the AACS key. The AACS key update requires Internet access.
As with other optical media devices, circumstances may limit compatibility or prevent Blu-ray Disc media playback. VAIO computers may not support
movie playback on packaged media recorded in AVC or VC1 formats at high bit rates.
Region settings are required for some contents on DVD and BD-ROM Disc media. If the region setting on the optical disc drive does not match the
region coding on the disc, playback is not possible.
Some contents may restrict video output to standard definition or prohibit analog video output. It is strongly recommended that a digital HDCP
compliant environment be implemented for optimum compatibility and viewing quality.
27
nN
Do not use memory-resident utility software when playing or writing a disc. This may cause the computer to malfunction.

Using Your VAIO Computer >
Using the Optical Disc Drive
28
nN
Notes on Using the Optical Disc Drive
Notes on writing data to a disc
❑ Only use circular discs. Do not use discs in any other shape (star, heart, card, etc.), as this may damage the optical disc
drive.
❑ Do not strike or shake your computer while the optical disc drive is writing data to a disc.
❑ Do not plug or unplug the AC adapter while the optical disc drive is writing data to a disc.
Notes on playing discs
To achieve optimum performance when playing discs, you should follow these recommendations:
❑ Some CD players and computer optical disc drives may not be able to play audio CDs created with the CD-R or CD-RW
media.
❑ Some DVD players and computer optical disc drives may not be able to play DVDs created with the DVD+R DL, DVD-R
DL, DVD+R, DVD+RW, DVD-R, DVD-RW, or DVD-RAM media.
❑ Depending on system environment, you may find sound interruptions and/or dropped frames during AVC HD playback.
❑ Do not place your computer into the power saving mode while your computer is playing a disc.

Using Your VAIO Computer >
Using the Optical Disc Drive
29
nN
Notes on region codes
❑ Region code indicators are labeled on the discs or packages to indicate in which region and on what type of player you
can play the disc. Unless the region code indicates "2" (Europe belongs to region "2"), "5" (Russia belongs to region "5"),
or "all" (this means that you can play this disc in most regions of the world), you cannot play the disc on your computer.
!
If you change the region code while the WinDVD or WinDVD BD software is running, restart the software or eject the disc and re-insert it to make the
new setting effective.
❑ Do not try to change the region code settings of the drive. Any difficulties caused by changing the region code settings of
the drive are not covered by the warranty.

Using Your VAIO Computer >
Using the Optical Disc Drive
30
nN
Playing Discs
To play a disc
1 Insert a disc into the optical disc drive.
!
Close all running software applications before playing a disc.
2 If nothing appears on the desktop, click Start, All Programs, and the desired software to play the disc.
For instructions on how to use the software, see the help file included with the software.
Copying Files to Discs
To copy files to a disc
1 Insert a recordable disc into the optical disc drive.
!
Close all running software applications before copying files to a disc.
2 If nothing appears on the desktop, click Start, All Programs, and the desired disc burning software to copy files to the
disc.
For instructions on how to use the software, see the help file included with the software.
 Loading...