

Page 1
`PHI=`QHI=`RHI=`RH=qìêå
`~кЙ=~еЗ=ЕдЙ~ебеЦ=белнкмЕнбзел=Сзк=нЬЙ=йк~ЕнбЕЙ=нЙ~г
bеЦдблЬ
Page 2

General information Sirona Dental Systems GmbH
Care and cleaning instructions for the practice team C3
+
, C4+, C5+, C5+ Tur n
General information
Care and cleaning instructions for the practice team Dear user,
To maintain the value and safe functioning of your treatment center it is necessary to care for, clean and disinfect it regularly.
The work steps you have to perform are described in this
document.
Hygiene and disinfection The national requirements and recommendations for
hygiene and disinfection must be observed (e.g. RKI,
ADA, CDC etc).
Care and cleaning agents
Maintenance of the treatment center by the service
engineer
CAUTION
Use only cleaning and care agents which are approved
by SIRONA!
You will find a list of all agents approved at the time of
delivery in the documentation folder supplied with your
treatment center.
A continuously updated list of approved agents can be
downloaded from the Sirona Internet homepage under
REF 59 70 905 : Ö www.sirona.com
If you do not have Internet access, you can use one of
the following two ways to order the list:
• Order from your local dental depot
• Order from Sirona
Tel: ++49 (0) 62 51/16-16 16
FAX: ++49 (0) 62 51 / 16-18 18
Despite the outstanding quality of your treatment center
and the regular care performed by the practice team,
inspections and maintenance by the service engineer
are required at scheduled intervals to ensure its operational reliability and safety.
Please refer to your operating instructions for details.
Your C3
+
, C4+, C5+, C5+ Turn Team
59 06 453 D 3382
2 D 3382.103.01.10.02
Page 3

Sirona Dental Systems GmbH Contents
Ö
Care and cleaning instructions for the practice team C3
+
, C4+, C5+, C5+ Tur n
Contents
1 Connection box ........................................................................................................... 5
2 Cuspidor....................................................................................................................... 6
3 Vacuum system ........................................................................................................... 7
3.1 Care ................................................................................................................................................. 7
3.2 Disinfection with a dry suction system ............................................................................................. 7
3.3 Disinfection with a wet suction system............................................................................................. 8
3.4 Suction handpieces.......................................................................................................................... 9
3.5 Cleaning the suction hoses.............................................................................................................. 10
3.6 Thermodisinfecting the suction hoses.............................................................................................. 11
4 Amalgam separation................................................................................................... 12
4.1 Replacing the amalgam separator................................................................................................... 12
4.2 Cleaning the siphon ......................................................................................................................... 13
äáëÜ
bå
5 Instrument hoses ........................................................................................................ 14
5.1 Removal/Replacement of instrument hoses .................................................................................... 14
5.2 Checking the flow rate of the SPRAYVIT L...................................................................................... 15
5.3 Highspeed handpiece hose ............................................................................................................. 15
6 Disinfection system .................................................................................................... 17
6.1 Microbiological water test................................................................................................................. 17
6.2 Purge/Auto Purge function (purging the water paths)...................................................................... 18
6.3 Sanitation......................................................................................................................................... 21
7 Surfaces / O-rings ....................................................................................................... 27
8 Satelec MiniL.E.D. curing light ................................................................................... 32
8.1 Care and cleaning of the handpiece and the connecting cable ....................................................... 32
8.2 Care and cleaning of the light guide and the glare shield................................................................ 32
9 SIROCAM 3 / SIROCAM C video camera and monitor ............................................. 33
9.1 Care and cleaning of the SIROCAM 3 ............................................................................................. 33
9.2 Care and cleaning of the SIROCAM C ............................................................................................ 34
9.3 Care and cleaning of the monitor..................................................................................................... 34
10 Checking the safety switches .................................................................................... 35
59 06 453 D 3382
D 3382.103.01.10.02
3
Page 4
Overview Sirona Dental Systems GmbH
S
0
s
r
o
n
I
S
I
R
O
C
A
S
0
Care and cleaning instructions for the practice team C3
+
, C4+, C5+, C5+ Tur n
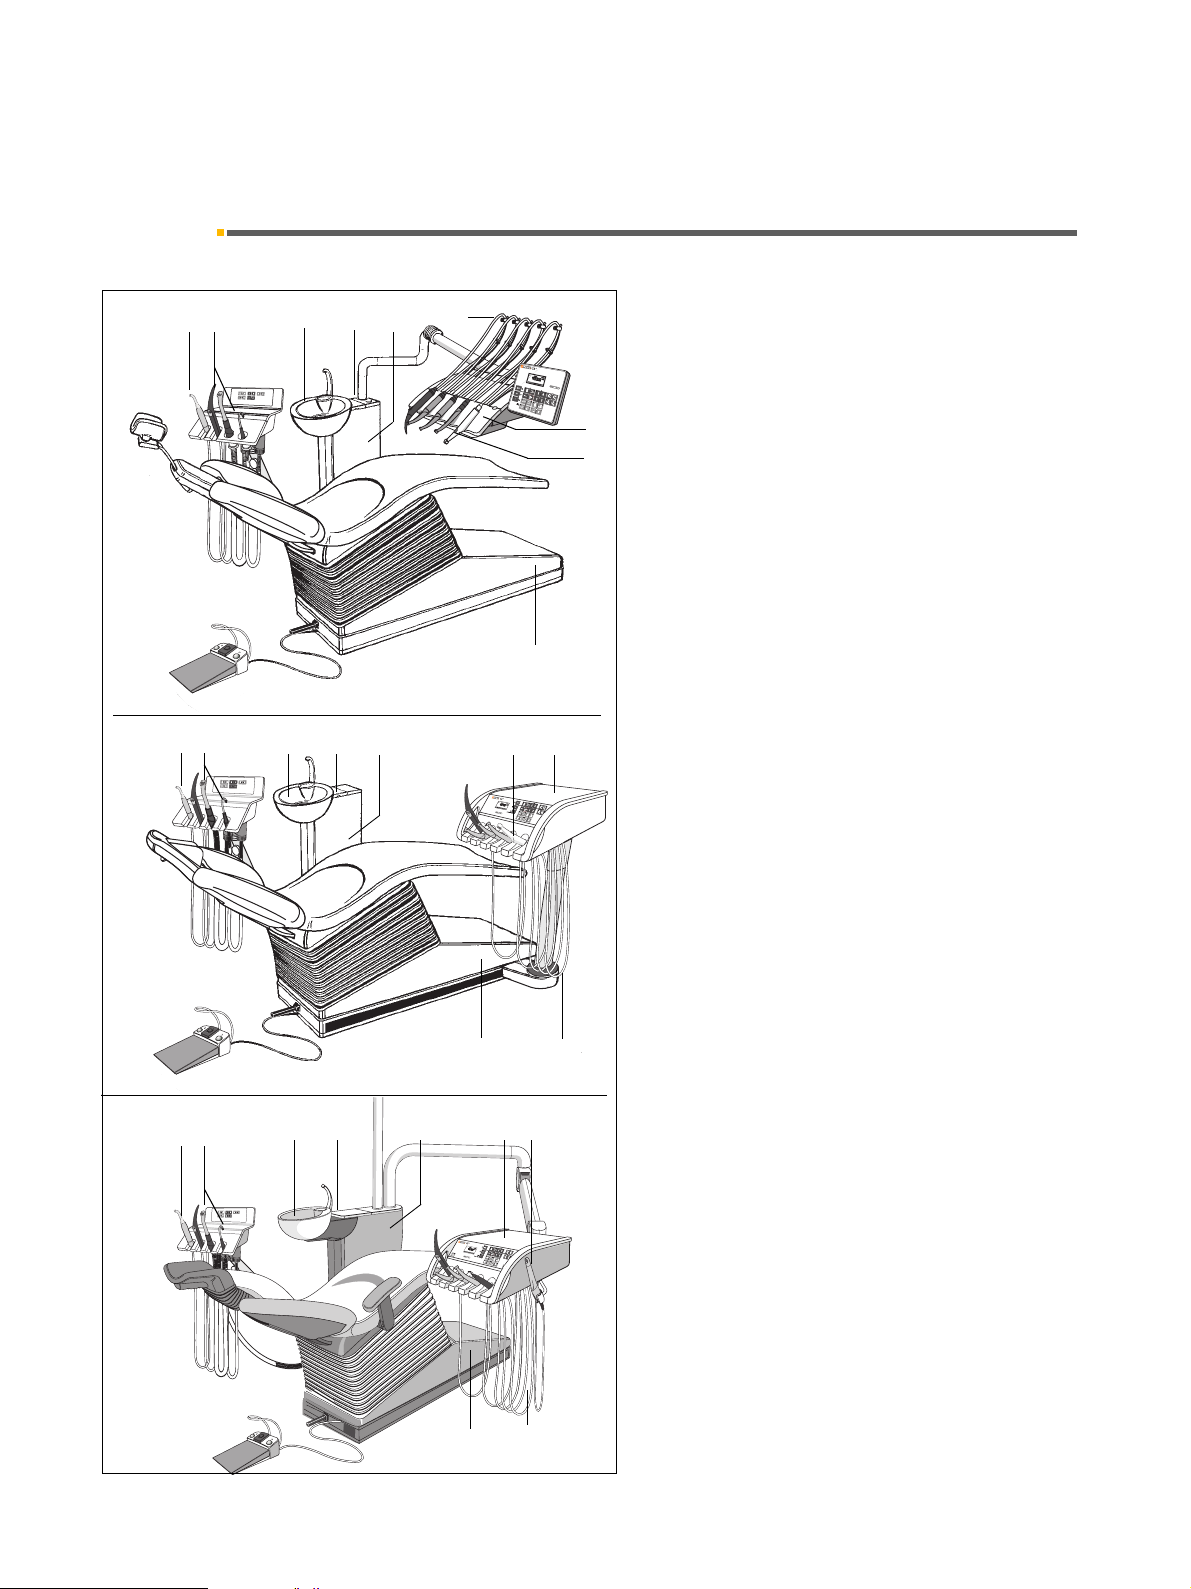
Overview
The numbers indicated in the overview correspond to
2
6
3
8
4
5
the chapter numbers in the table of contents.
Thus you can easily find the work to be performed in this
document.
7
9
1 Connection box
2 Cuspidor
3 Vacuum system
8
C5
S
0
C3
+
1
4 Amalgam separation
5 Instrument hoses
2
3
6
4
7
9
6 Disinfection system
7 Surfaces
8 Satelec Mini curing light
L.E.D
9 SIROCAM 3 / SIROCAM C / SIVISION 3
video camera
+
C4
1
23 46 78
5
9
10 Checking the safety switches
For care and maintenance of the following products,
please refer to the relevant operating instructions supplied:
• SPRAYVIT syringe
• T1 CLASSIC, T1 LINE and T1 TITAN straight and
contra-angle handpieces
• Electric motors
• Highspeed handpieces
• SIROSONIC L scaler
• SIROCAM 3 video camera
• SIROLUX FANTASTIC operation light
+
1 5
4 D 3382.103.01.10.02
59 06 453 D 3382
Page 5
Sirona Dental Systems GmbH 1 Connection box
Care and cleaning instructions for the practice team C3
+
, C4+, C5+, C5+ Tur n
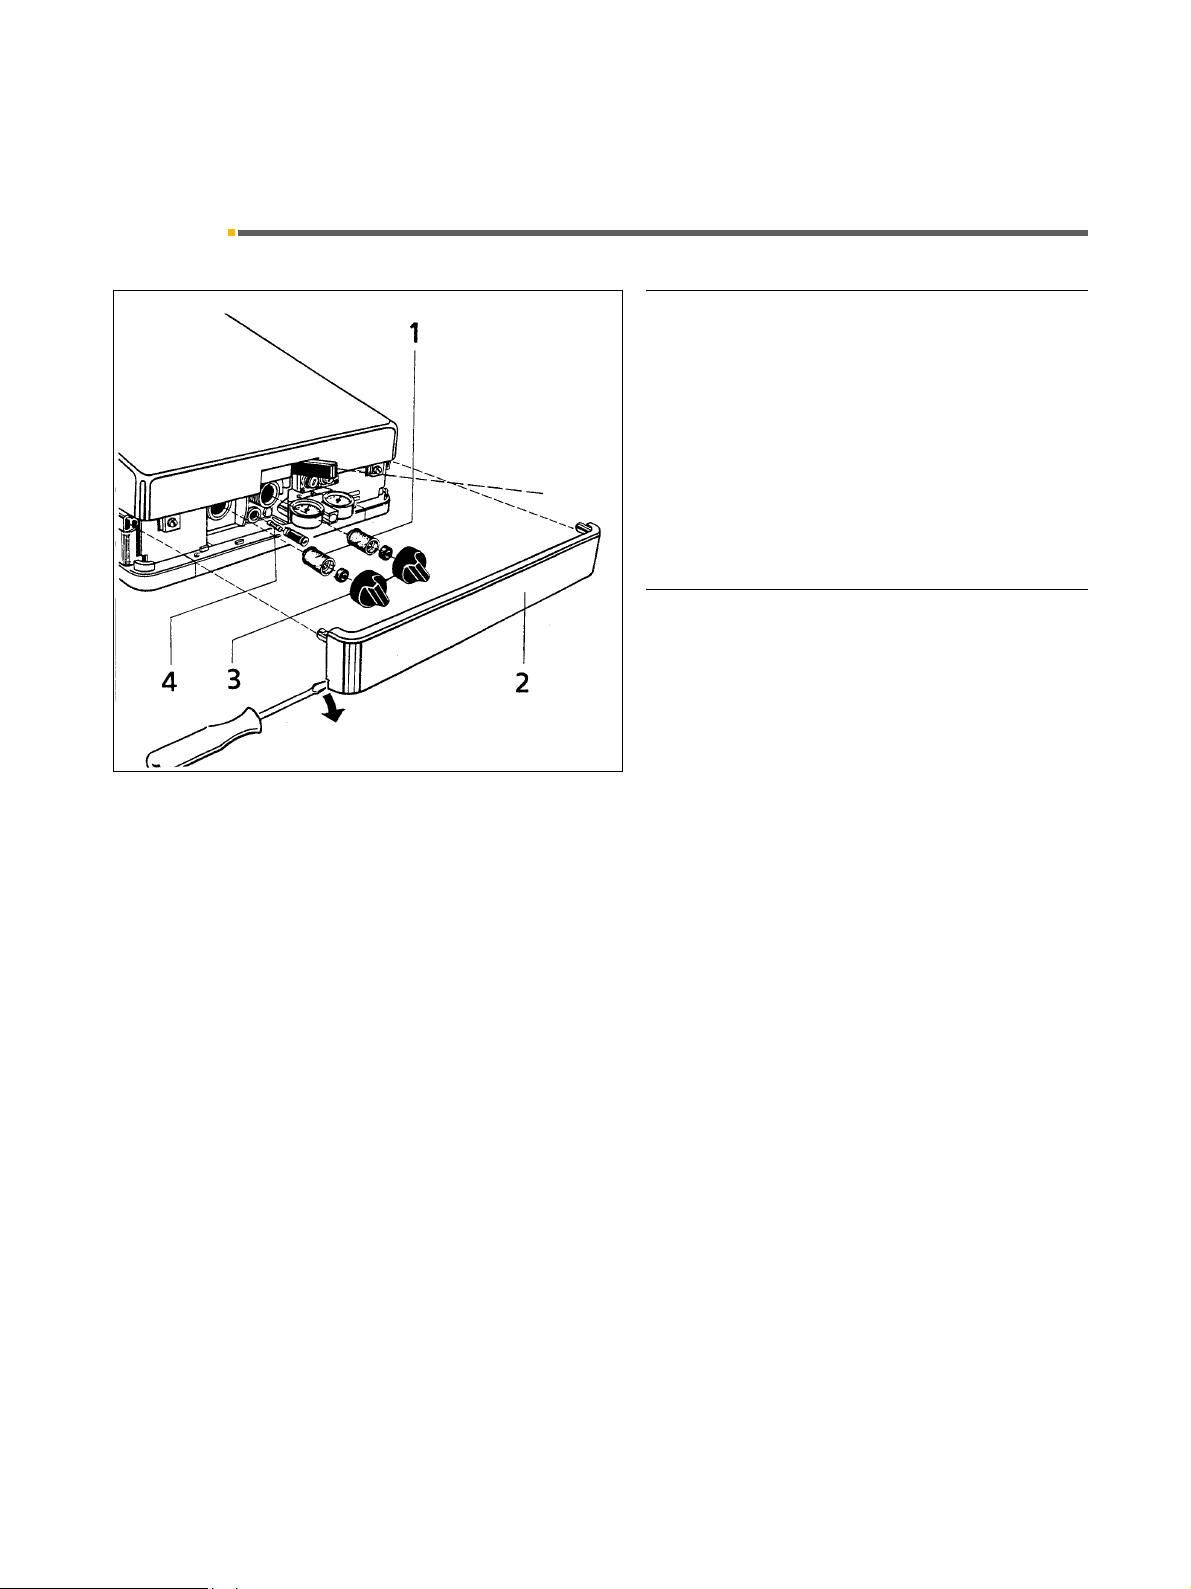
1 Connection box
Replacing the water and air filters
If you notice any changes in media flows, please check
the water and air filters (1) for permeability. Replace
them if necessary.
• Switch the main switch OFF.
• Pry off cover 2 with a screwdriver.
• Remove screw caps 3 and replace filters 1.
OFF
For reorders:
Filters: Order No. 14 43 436
Main fuse
The main fuse (4) is located below the air filter.
For reorders:
Unit main fuse for
230VAC:
Unit main fuse for
100VAC/115 VAC:
T 6.3AH, 250VAC,
Order No. 10 77 452
T 10A H, 250VAC,
Order No. 10 77 460
59 06 453 D 3382
D 3382.103.01.10.02
5
Page 6
2 Cuspidor Sirona Dental Systems GmbH
Care and cleaning instructions for the practice team C3
+
, C4+, C5+, C5+ Tur n
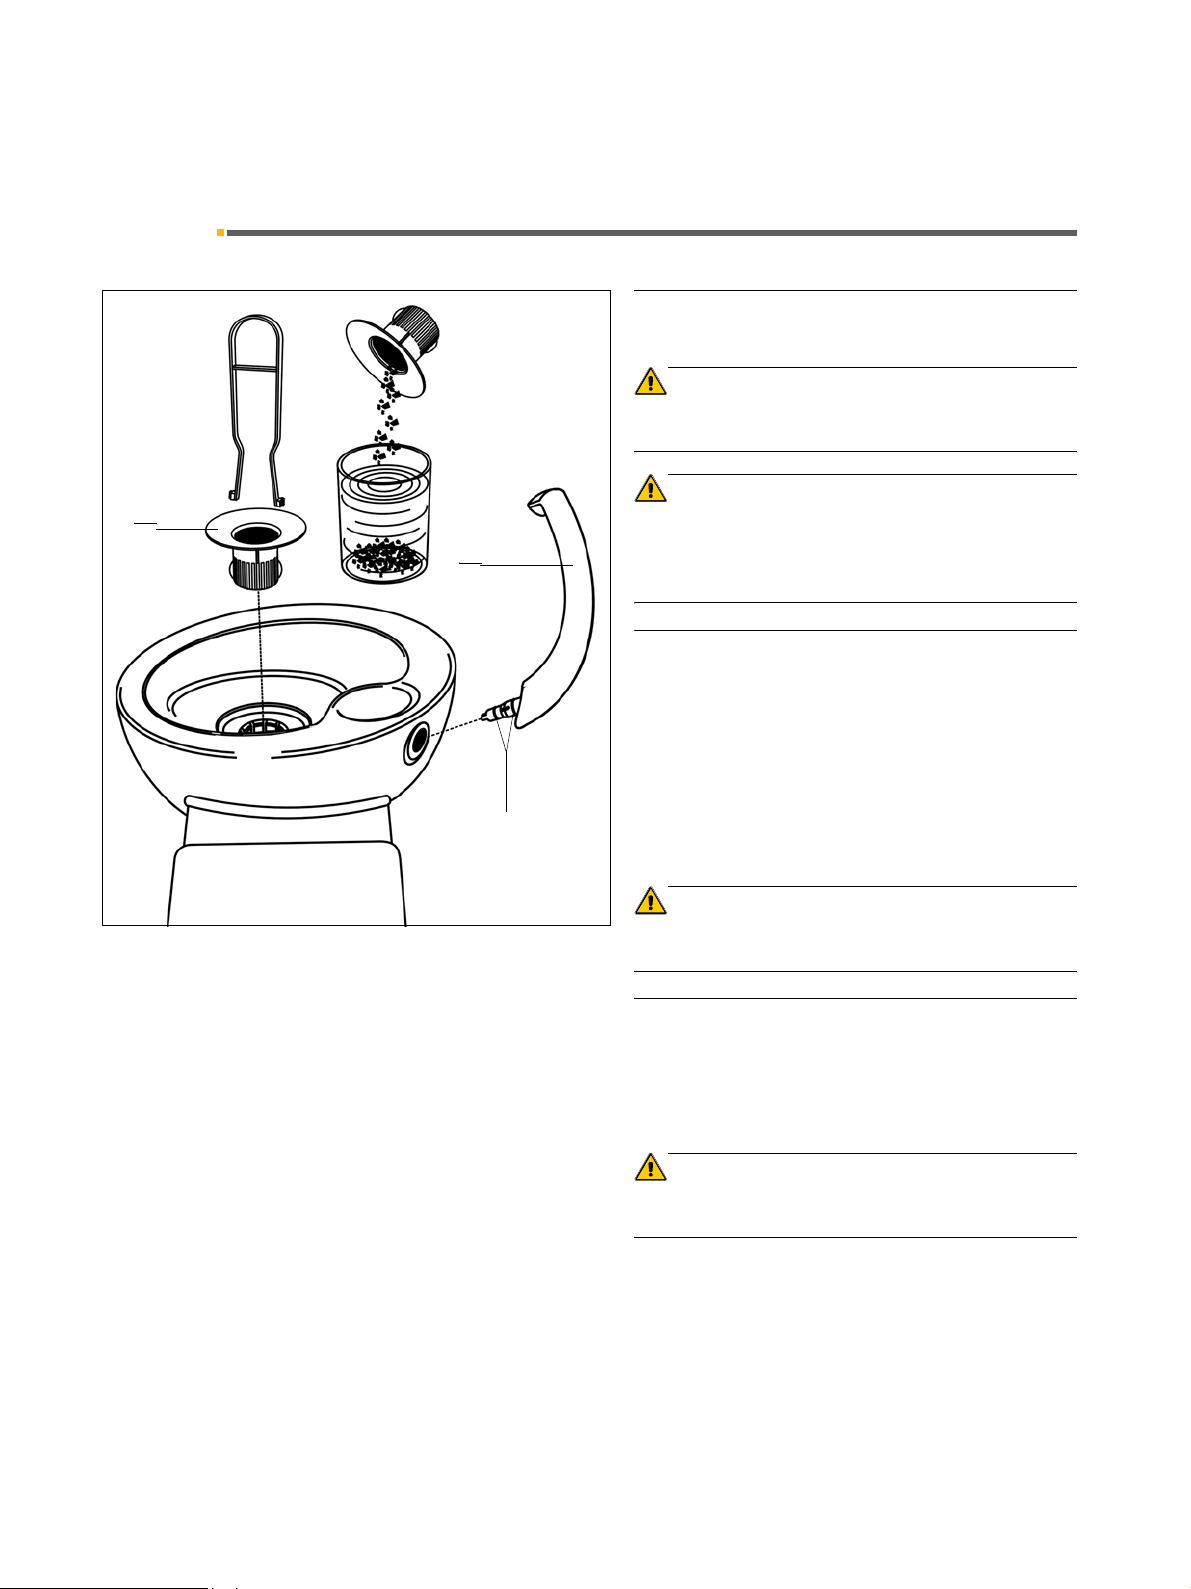
2 Cuspidor
After each patient
Clean the cuspidor.
CAUTION
Amalgam
5
6
Use only cleaning agents which have been approved by
Sirona (see page 2, General information)!
CAUTION
Do not use any domestic cleaning and care agents. Foaming domestic cleaning agents lead to foam and water
being drawn into the dry suction system, resulting in damage to the suction machine.
Daily during the noon break and at the end of
each workday
Grease
Remove the gold trap (5) and clean it.
Store the amalgam residues under water in a separate,
closed container. When replacing the amalgam rotor
(see page 12), put the residues into the rotor for disposal.
After the cleaning process, fill at least 1 liter of water into
the cuspidor for flushing.
CAUTION
Do not dispose of amalgam residues caught in the gold
trap in the cuspidor or the sink!
Weekly
Pull out the tumbler outlet (6) or the hydrocolloid adapter, if applicable, and clean it.
Before refitting the tumbler outlet or the hydrocolloid
adapter, lightly lubricate the O-rings.
CAUTION
Use only lubricants which have been approved by Sirona
(see page 2, General information)!
6 D 3382.103.01.10.02
59 06 453 D 3382
Page 7
Sirona Dental Systems GmbH 3 Vacuum system
Care and cleaning instructions for the practice team C3
+
, C4+, C5+, C5+ Turn 3.1 Care
3 Vacuum system
3.1 Care
After each patient
To ensure that the vacuum system is always ready for
use, you must aspirate a large glass of cold, clear water
through the suction hoses used after each patient,
especially after each intervention during which the patient loses blood and after using hydrogen peroxide
).
(H
2O2
During prolonged treatments, you must aspirate a
glass of water at least every 60 minutes.
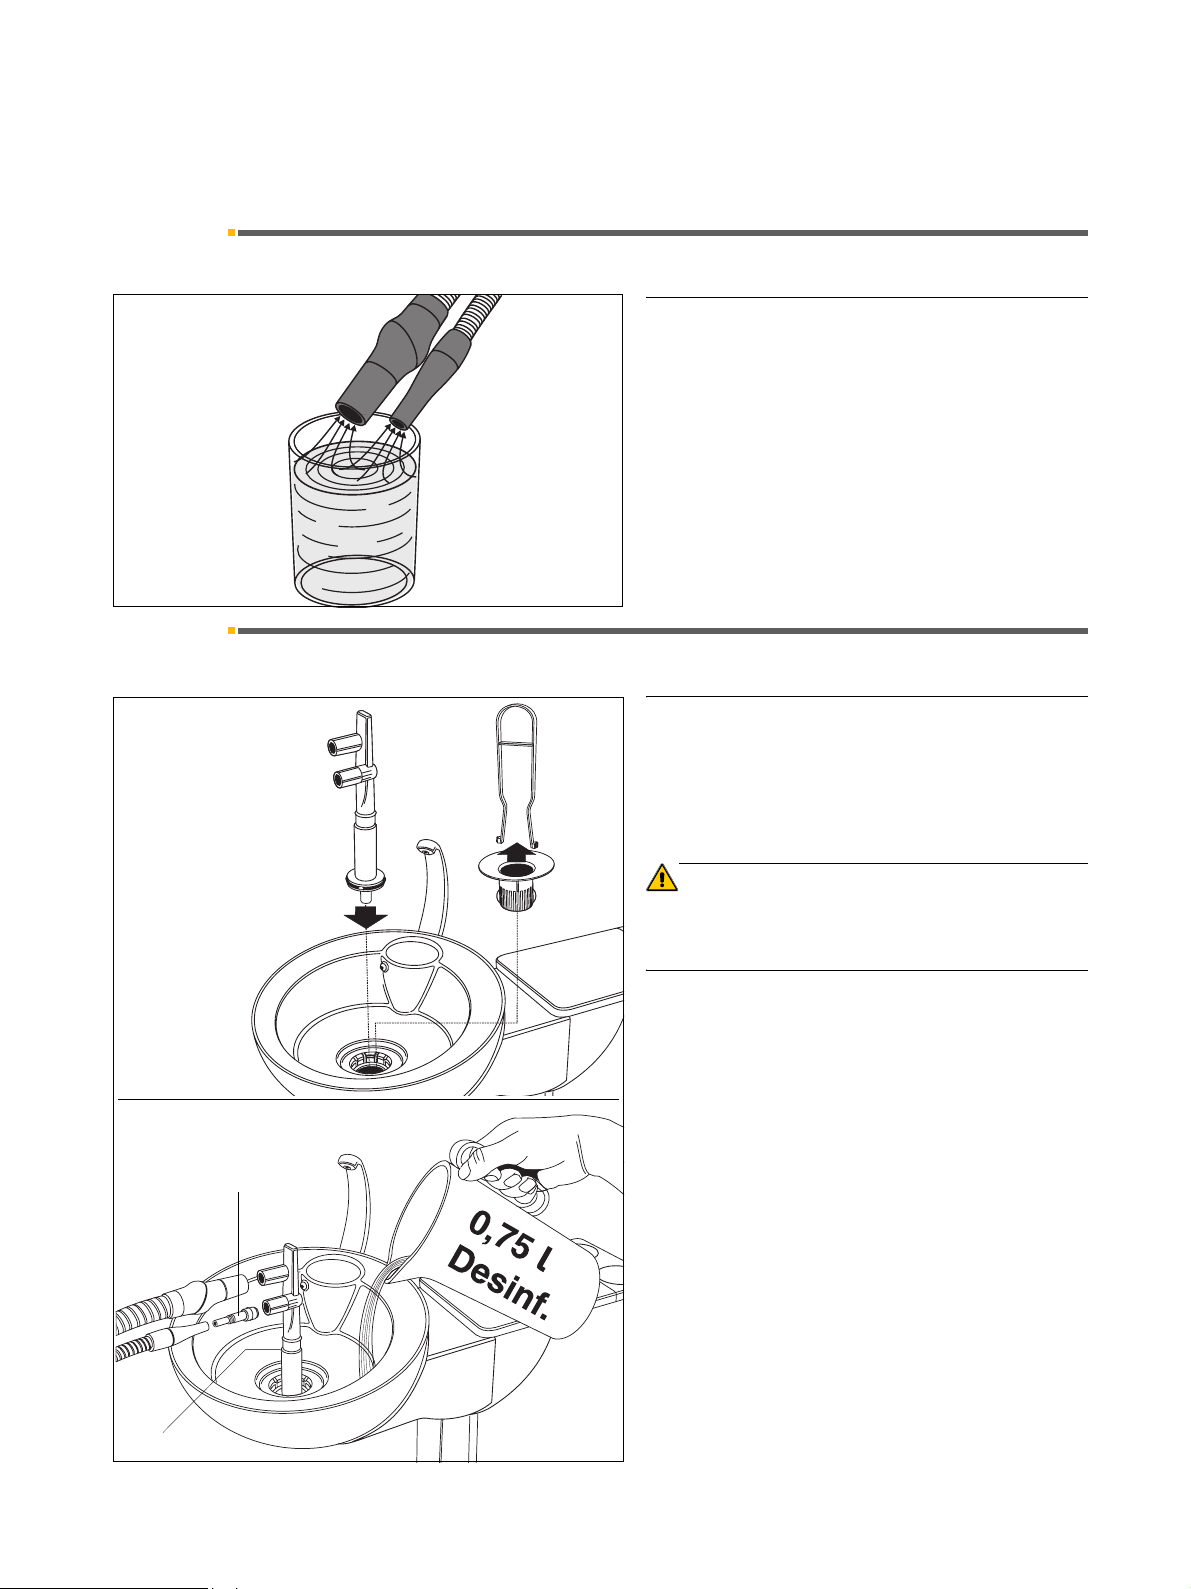
3.2 Disinfection with a dry suction system
A
Daily during the noon break and at the end of
each workday
The vacuum system is subjected daily to septic secretions, saliva and blood. For hygienic reasons the system
must therefore be disinfected with a detergent/disinfectant approved by Sirona.
CAUTION
Use only cleaning and disinfecting agents which have
been approved by Sirona (see page 2, General information)!
Do not use any washing powder or other disinfectants!
• Prepare the cleaning solution in a separate container according to the manufacturer’s instructions and
mix thoroughly.
• Remove the gold trap.
• Clean the cuspidor.
8
• Plug in the cleaning adapter up to the stop. For the
saliva ejector hose, insert the intermediate piece (8)
into the cleaning adapter.
• Fill the cleaning solution
the cuspidor (approx.0.75
• Remove the suction hoses from their holders and attach them to the side of the cleaning adapter, if possible all at once.
• The cleaning solution is aspirated.
Observe manufacturer’s instructions regarding the
reaction time!
up to the filling limit (A) in
liters).
59 06 453 D 3382
D 3382.103.01.10.02
7
Page 8
3 Vacuum system Sirona Dental Systems GmbH
3.3 Disinfection with a wet suction system Care and cleaning instructions for the practice team C3
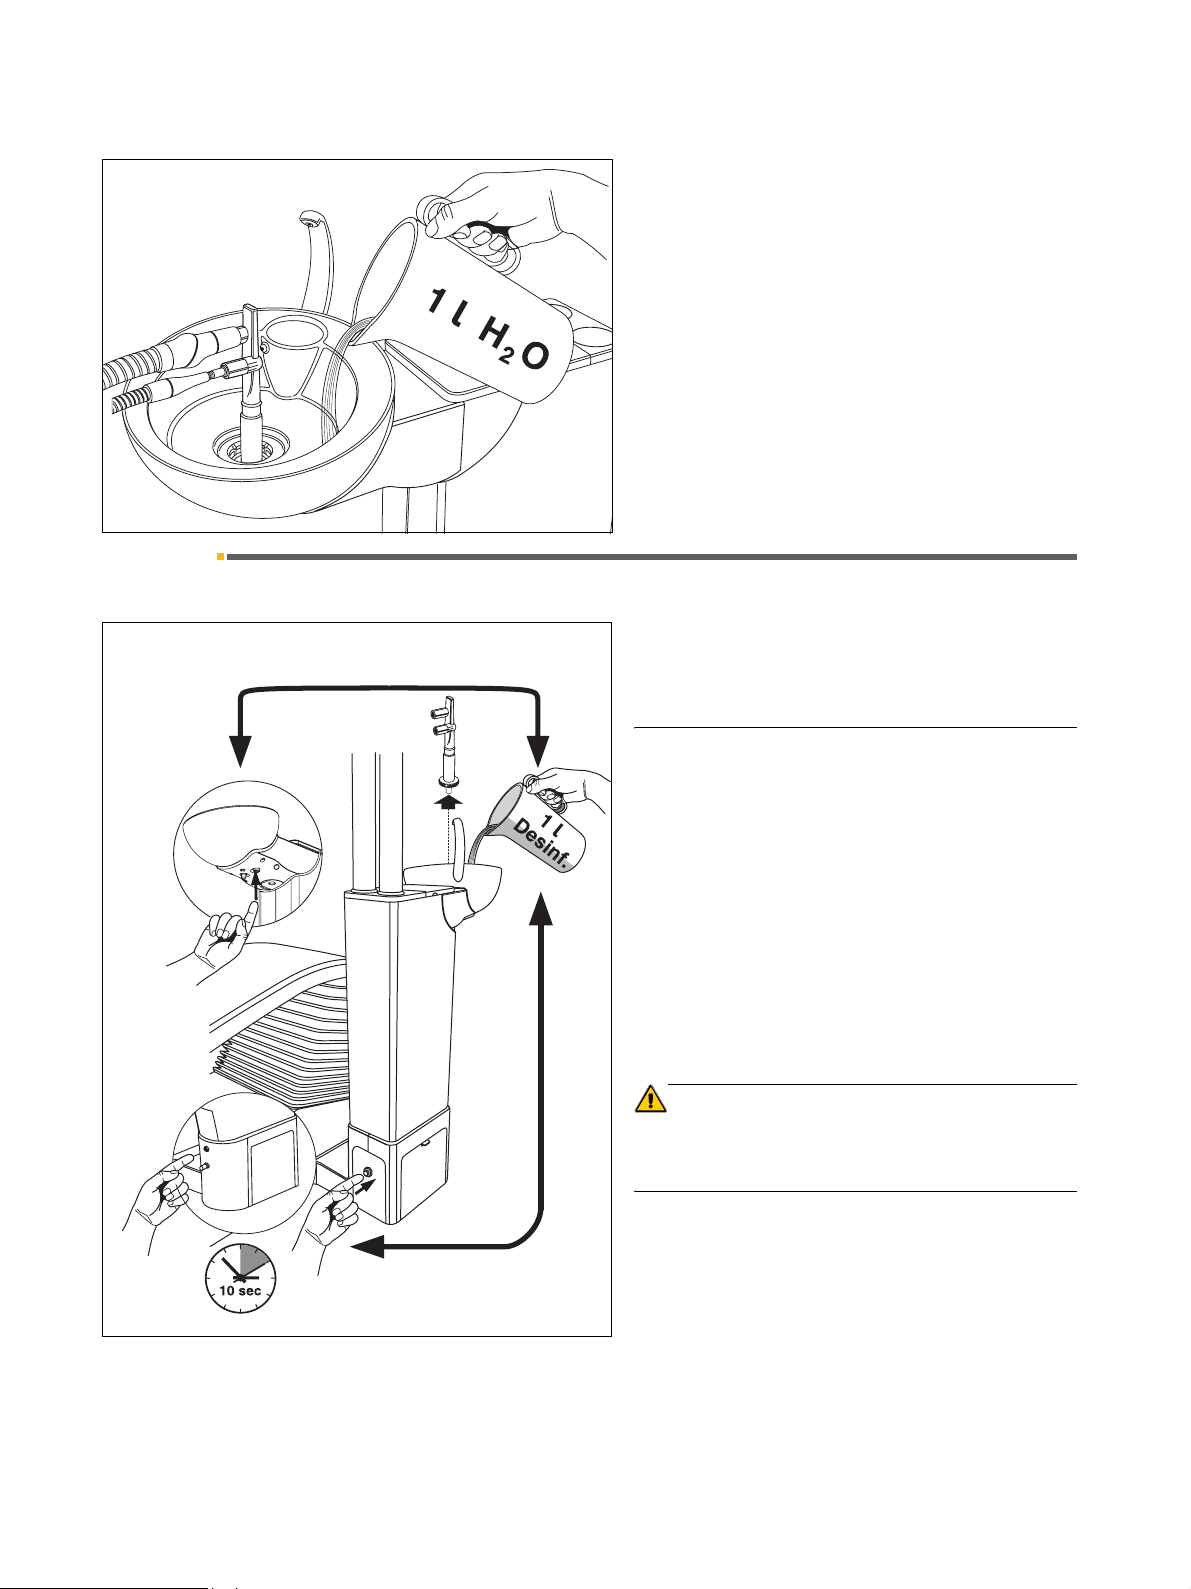
• After the cleaning process, you must fill at least
1 liter of water into the cuspidor and aspirate it in order to remove any disinfectant residues from the
suction hoses.
• At the end of the cleaning process, pull off the hoses
and put them back into their holders.
• Remove the cleaning adapter.
• Finally, reinsert the gold trap.
+
, C4+, C5+, C5+ Tur n
3.3 Disinfection with a wet suction system
With this system, the automatic separator and, where
simultaneously
appropriate, the amalgam separator are not integrated in
the water unit. Both separation processes are performed
centrally.
C5+ Turn
+
C5
C3+, C4
Daily during the noon break and at the end of
each workday
• Flush the vacuum system with a suitable cleaning
and disinfecting agent as described under 3.2 Disin-
fection with a dry suction system.
• After the liquid has been aspirated through the two
suction hoses, remove the cleaning adapter.
• Then pour 1 liter of disinfectant solution into the cuspidor while simultaneously pressing the button (ar-
row) for approx. 10 seconds.
Pressing the button enables the cleaning and disinfectant liquid from the cuspidor to reach the vacuum
line via the cuspidor valve.
• Finally, reinsert the gold trap.
CAUTION
Use only cleaning and disinfecting agents which have
been approved by Sirona (see page 2, General information)!
Do not use any washing powder or other disinfectants!
simultaneously
+
8 D 3382.103.01.10.02
59 06 453 D 3382
Page 9
Sirona Dental Systems GmbH 3 Vacuum system
Care and cleaning instructions for the practice team C3
+
, C4+, C5+, C5+ Turn 3.4 Suction handpieces
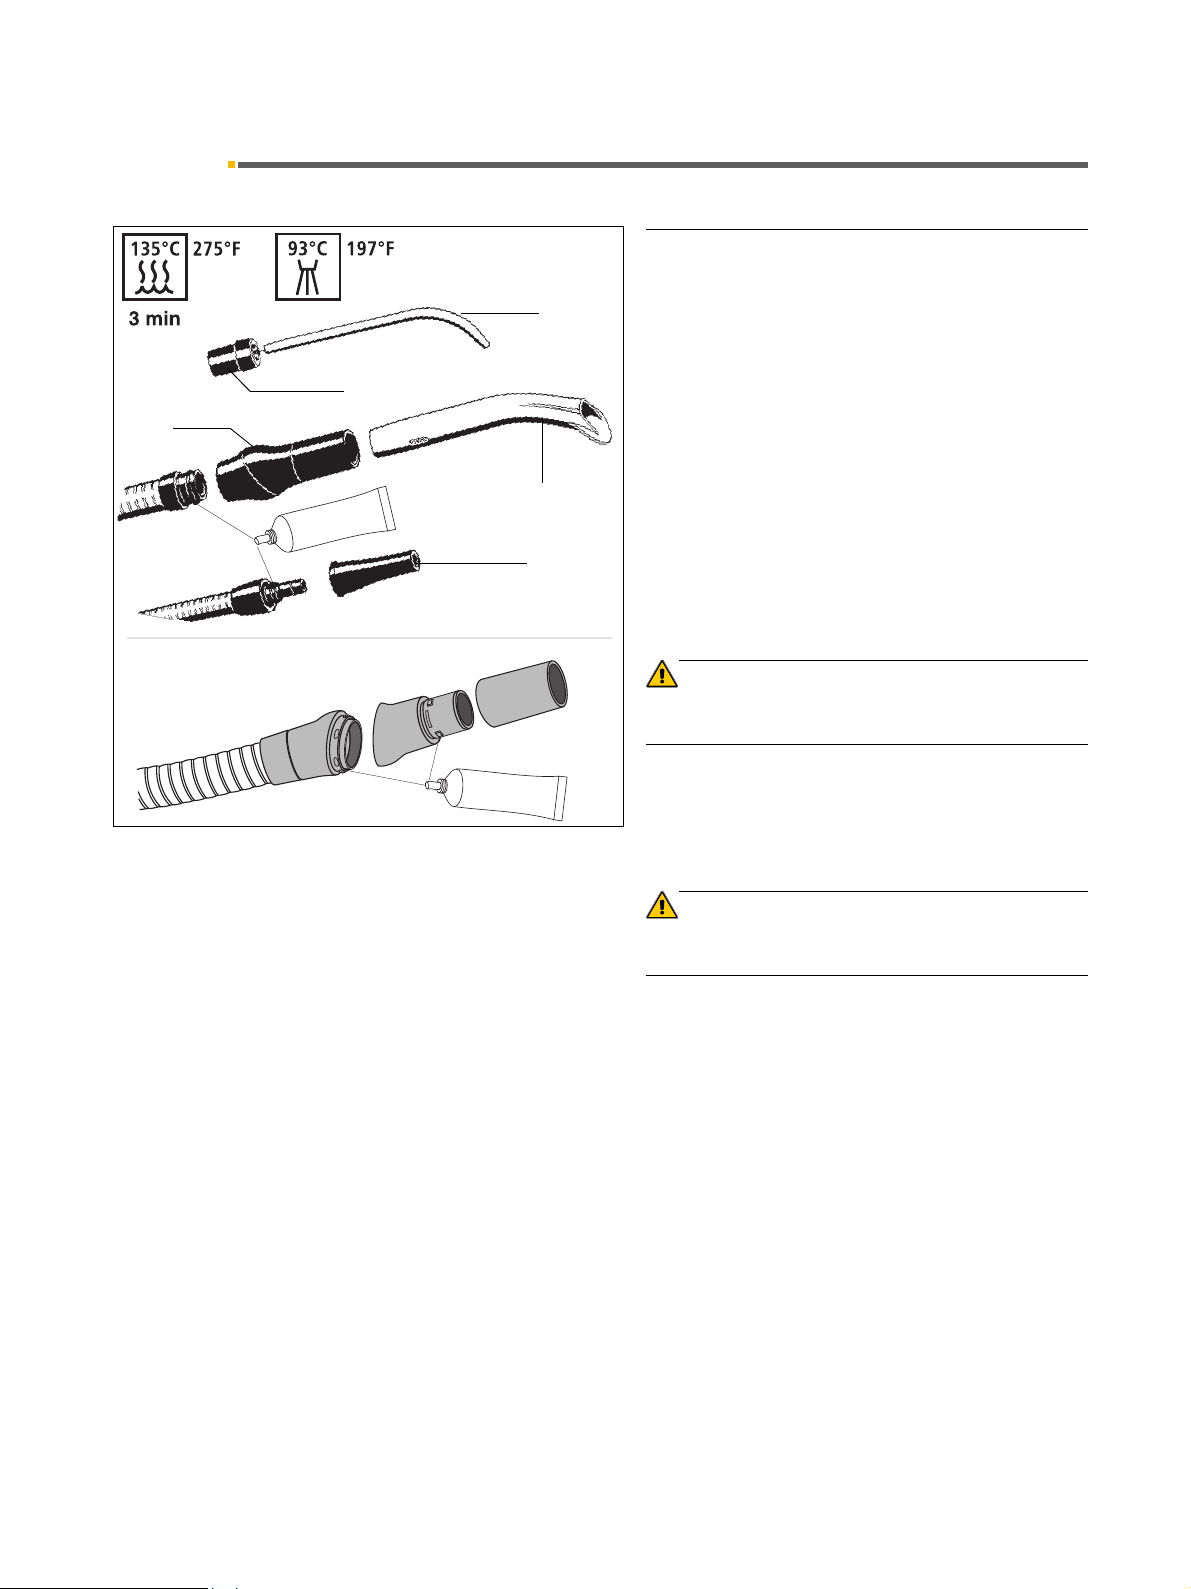
3.4 Suction handpieces
Sterilization
The following parts can be sterilized:
5
2
3
e
s
a
e
r
G
1
4
• the suction cannula (1)
• the intermediate piece (2)
• the suction handpiece (3)
• the saliva ejector handpiece (4)
• and the surgical suction cannula (5)
Sterilization only in the autoclave at 135°C (275°F), 2.1
bar, 3 min.
Thermodisinfection
All parts can be thermodisinfected at 93×C (197°F).
Disinfection
All parts can be sprayed or wiped with a disinfecting
solution.
3
G
r
e
a
s
e
CAUTION
Use only cleaning agents which have been approved by
Sirona (see page 2, General information)!
Grease the O-rings at the joints afterwards!
Weekly
Separate the suction handpiece at the joint, clean it and
and grease the joints.
CAUTION
Use only lubricants which have been approved by Sirona
(see page 2, General information)!
59 06 453 D 3382
D 3382.103.01.10.02
9
Page 10
3 Vacuum system Sirona Dental Systems GmbH
3.5 Cleaning the suction hoses Care and cleaning instructions for the practice team C3
+
, C4+, C5+, C5+ Tur n
3.5 Cleaning the suction hoses
The hoses of the saliva ejector and suction cannula as
well as the connection hose to the water unit can be
pulled off from the assistant element for rinsing under
running water or thermodisinfection.
• Switch the treatment center OFF!
• Unscrew the suction hoses from the top parts (5) of
the filter housings.
• Rinse the hoses under running water.
Thoroughly clean the top parts of the housings (5) with
the filter inserts every day.
Grease
5
6
7
The top parts of the filter housings can be thermodisinfected.
Remove the amalgam residue collectors (6) from the
lower parts (7) if the suction power decreases, otherwise
once a day. Store the amalgam residues under water in
a separate, closed container. When replacing the amalgam rotor (see page 12), put the residues into the rotor
for disposal.
Grease
CAUTION
Do not dispose of amalgam residues in the cuspidor or
the sink!
When the hose surfaces have become sticky from the
disinfectants, wipe the hoses with a commercial dishwashing agent .
Before refitting the hoses, grease the O-rings on the
connection pieces.
CAUTION
Use only lubricants which have been approved by Sirona
(see page 2, General information)!
The hoses must engage firmly.
If the unit is equipped with a 3rd suction hose, clean it the
same way.
5
If the suction hose and saliva ejector hose holders are
closed at the front, the two handpieces must be pulled off
first, so that the suction hoses can be removed downwards.
6
7
10 D 3382.103.01.10.02
59 06 453 D 3382
Page 11
Sirona Dental Systems GmbH 3 Vacuum system
Care and cleaning instructions for the practice team C3
+
, C4+, C5+, C5+ Turn 3.6 Thermodisinfecting the suction hoses
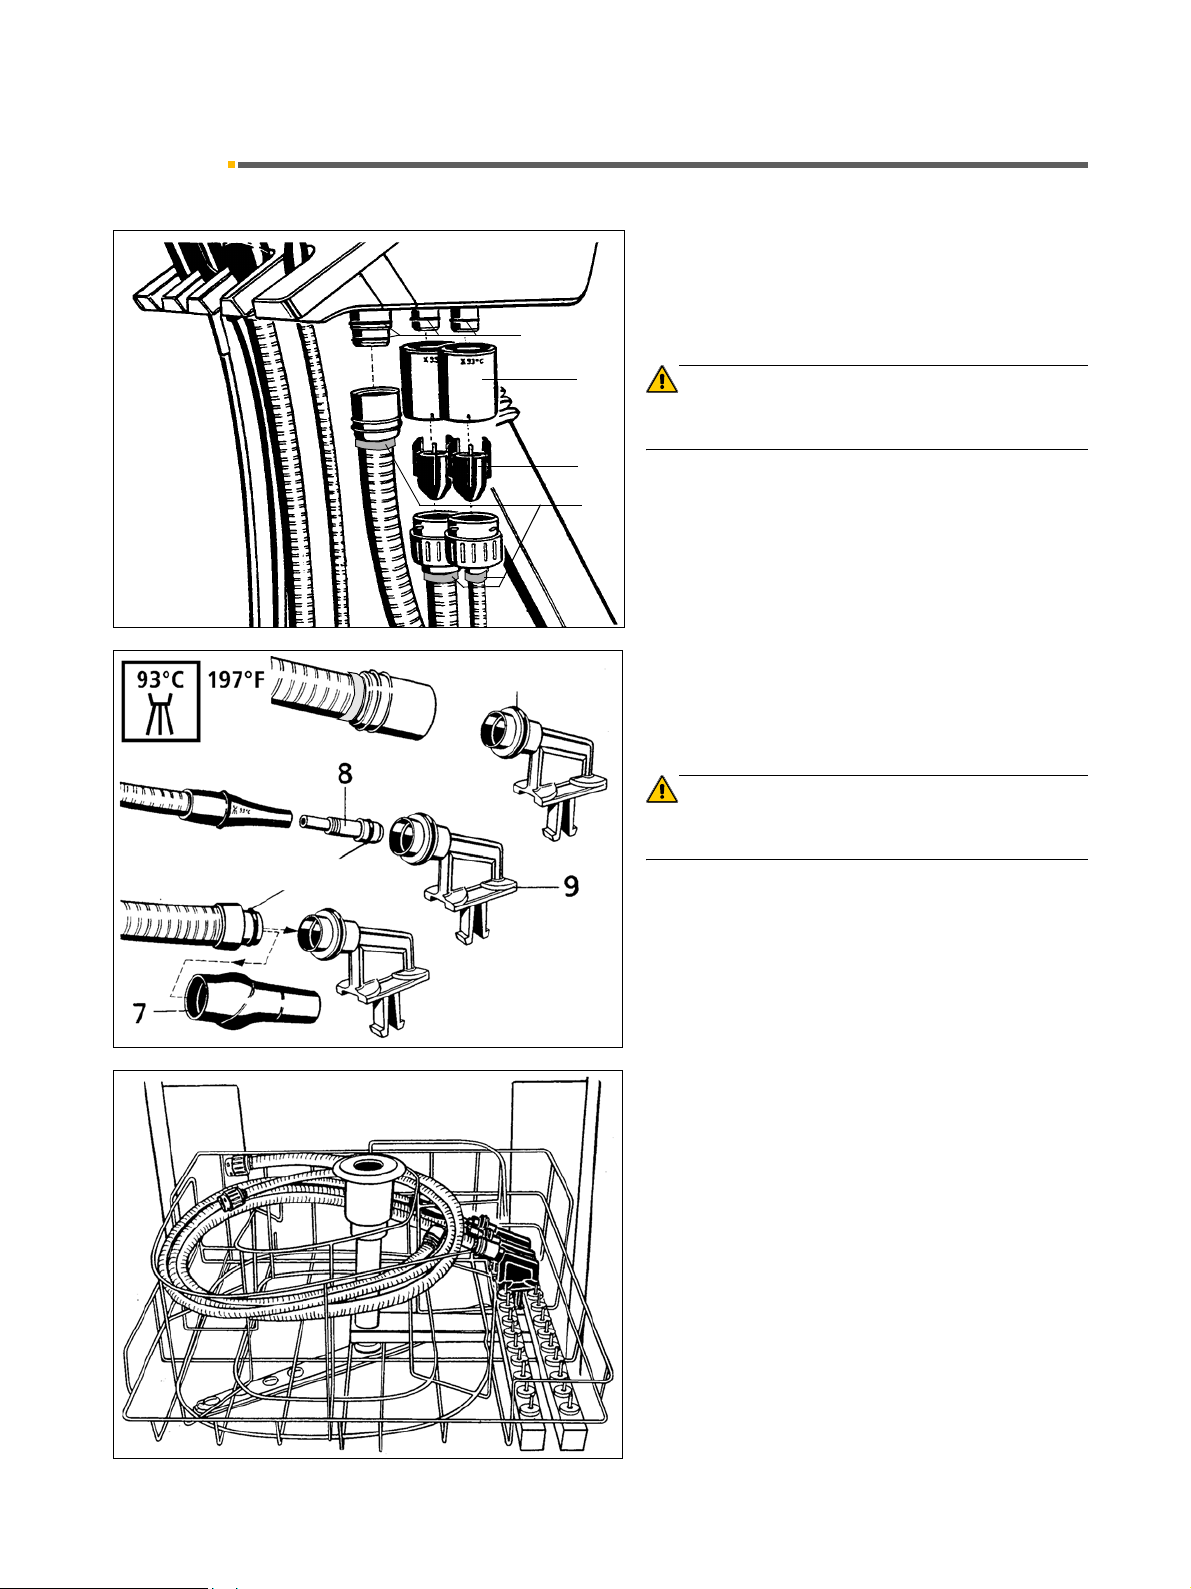
3.6 Thermodisinfecting the suction hoses
The unit is usually equipped with suction hoses that cannot be thermodisinfected.
However, it may have suction hoses that can be thermodisinfected as special accessories. These are mar-
Grease
ked in turquoise color (10).
Grease
Grease
5
6
10
CAUTION
Only hoses marked with a turquoise ring (10) can be
thermodisinfected!
• Switch the treatment center OFF.
• Pull off the suction hoses and the connection hose
from the assistant element and the water unit.
• Remove the top parts of the filter housings 5 and the
amalgam residue collector 6.
Pull off the handpiece (7) from the suction hose.
For the saliva ejector hose, insert the intermediate piece
(8) in the hose holder (9).
Lubricate the O-rings.
CAUTION
Use only lubricants which have been approved by Sirona
(see page 2, General information)!
59 06 453 D 3382
D 3382.103.01.10.02
Fit the hose holders onto the rails in the thermodisinfector (by Miele) as illustrated.
Connect the suction hoses to the hose holders and place
them in the wire basket (by Miele) intended for thermodisinfection.
Thermodisinfect at max. 93×C (197°F).
Before refitting the hoses, grease the O-rings on the
connection pieces.
The hoses must engage firmly.
Hose holder for Miele thermodisinfector
Order No. 89 18 757
11
Page 12

4 Amalgam separation Sirona Dental Systems GmbH
4.1 Replacing the amalgam separator Care and cleaning instructions for the practice team C3
+
, C4+, C5+, C5+ Tur n
4 Amalgam separation
4.1 Replacing the amalgam separator
+
C5 Turn
AMALG
DESINFAB
RPM
3
2
When AMALG lights up on the display on the dentist ele-
ment, the amalgam separator must be replaced.
To replace the amalgam separator, proceed as follows:
• Perform a disinfection as described in chapter 3
“Vacuum system”.
i
NOTICE
Always wear work gloves when performing these tasks!
• Open flap (1) at the base of the water unit.
Do NOT turn the unit off!
• Turn the lower part (2) of the amalgam separator
with rotor (3) in the direction of the arrow until it can
be removed easily.
; AMALG starts flashing on the dentist element
display and an audible signal sounds.
1
• Put any amalgam residues from the suction hoses
and the cuspidor into the dismantled rotor for disposal (see pages 6 and 10).
• Hold the bottom part upright and click on the
transport cap (4). This releases a bonding agent.
Therefore, do not remove the transport cap
again!
• Remove the rotor with the cap from the lower part
and place it in the special packaging for disposal
• Insert the new rotor (3) in the lower part (2).
Do not install a used or recycled rotor!
• Reinstall the lower part and turn it in the opposite direction of the arrow up to the stop. The bar (7)
should point to the chair at the start and to the siphon
(6) after it is screwed tight.
; If, after the rotor is inserted, AMALG still flashes
on the display and the audible signal continues,
the lower part is not correctly locked into place.
• Close the flap (1) again.
.
Amalgam
7
2
Grease
4
O-ring
3
Use Sirona
Replacement amalgam
rotor
Order No.: 14 34 138
only!
!
Disposal
12 D 3382.103.01.10.02
59 06 453 D 3382
Page 13

Sirona Dental Systems GmbH 4 Amalgam separation
Care and cleaning instructions for the practice team C3
+
, C4+, C5+, C5+ Turn 4.2 Cleaning the siphon
i
NOTICE
Regardless of whether AMALG lights up on the display
or not, the rotor (3) in the amalgam separator must be replaced at least once a year. Otherwise unpleasant odors
can develop.
4.2 Cleaning the siphon
i
+++
C3 , C4 , C5
NOTICE
Always wear work gloves when performing these tasks!
Clean the siphon (6) in case of poor drainage of the cuspidor, otherwise once a month.
• Open flap (1) at the base of water the unit.
• Unscrew the cap (5).
• Have a collector ready to catch the contents!
• Screw the cap back on and close the flap (1).
6
5
1
+
C5 Turn
6
5
1
59 06 453 D 3382
D 3382.103.01.10.02
13
Page 14

5 Instrument hoses Sirona Dental Systems GmbH
5.1 Removal/Replacement of instrument hoses Care and cleaning instructions for the practice team C3
+
, C4+, C5+, C5+ Tur n
5 Instrument hoses
5.1 Removal/Replacement of instrument hoses
Switch the unit OFF before removing the hoses!
C4+ and C5+:
Unscrew the cap nut (1) and then simply pull off the
instrument supply hoses.
i
NOTICE
After replacement, make sure to equip all holders with
the right instruments!
Possible equipment of the instrument holder at the right:
• Highspeed handpiece as 4th burr drive (only with up-
1
grade kit) or
• SIROSONIC L or
• Satelec Mini L.E.D. curing light or
• SIROCAM 3 / SIROCAM C
Possible equipment of the second instrument holder
from the right:
• SIROSONIC L or a
• 3rd burr drive (highspeed handpiece or motor) or
• Satelec Mini L.E.D. curing light.
+
:
3
2
3
C3
• Remove the instrument rack (2) by pressing the latches (3) on the side.
• Unscrew the cap nut (4).
• Press together the supply hoses at the guide rollers
(5) of the swivel arms and push them out through the
gap.
• Clean the hose surfaces with talcum powder so that
they can glide back smoothly.
i
NOTICE
After replacement, make sure to equip all holders with
the right instruments!
4
Possible equipment of the instrument holder at the right:
5
• SIROSONIC L or
• Satelec Mini L.E.D. curing light or
• SIROCAM 3 / SIROCAM C
Possible equipment of the second instrument holder
from the right:
• SIROSONIC L or a
• 3rd burr drive (highspeed handpiece or motor) or
• Satelec Mini L.E.D. curing light.
14 D 3382.103.01.10.02
59 06 453 D 3382
Page 15

Sirona Dental Systems GmbH 5 Instrument hoses
Care and cleaning instructions for the practice team C3
+
, C4+, C5+, C5+ Turn 5.2 Checking the flow rate of the SPRAYVIT L
CAUTION
Risk of scalding! After replacement of the SPRAYVIT
hose, no cooling water for the heating cartridge flows un-
til the hose is completely filled. Boiling hot water may escape for a short while!
In order to prevent a hazard to the patient, proceed as
follows:
• Briefly press buttons several times until water and air
are available.
5.2 Checking the flow rate of the SPRAYVIT L
If the flow rate is less than 135 ml/min with the water button fully actuated, there is a risk of excessively hot water
being emitted.
You should therefore perform the following measurement every 4 weeks to exclude a patient risk:
• Fill a measuring cup up to the 100 ml mark with the
water button fully actuated.
• Stop the filling time.
; The filling time must be less than 45 seconds.
CAUTION
Risk of burning! The SPRAYVIT L must not be used on
the patient if the filling time is longer than 45 seconds. In
this case:
• Clean the Sprayvit nozzle according to the operating in-
structions or
• Have the dental unit checked by a service engineer.
4 APRIL
1324567
81091112 13 14
3 MARCH
15 1716 18 19 20 21
1324567
22 2423 25 26 27 28
81091112 13 14
29 3130
2 FEB
15 1716 18 19 20 21
1324567
22 2423 25 26 27 28
81091112 13 14
29 3130
1JAN
15 1716 18 19 20 21
1324567
22 2423 25 26 27 28
81091112 13 14
29 3130
15 1716 18 19 20 21
22 2423 25 26 27 28
29 3130
....
1x
100ml
max.45 sec
5.3 Highspeed handpiece hose
59 06 453 D 3382
D 3382.103.01.10.02
For C4+ and C5+
At the unit end of the highspeed handpiece hose, return
air which carries a small amount of handpiece oil with it
leaks out. This oil is absorbed by the cotton wool roll in
the transparent collecting cup.
We recommend replacing the cotton wool roll every
week.
To do so, push the cup down and remove the cotton
wool roll.
Cut off a new cotton wool roll and place it in the cup.
Push the cup back into place.
15
Page 16

5 Instrument hoses Sirona Dental Systems GmbH
5.3 Highspeed handpiece hose Care and cleaning instructions for the practice team C3
+
For C3
At the unit end of the highspeed handpiece hose, return
air which carries a small amount of handpiece oil with it
leaks out. This oil is absorbed by the oil absorber (6).
Check it from time to time for oil saturation and replace
it as required.
For this purpose open the lid (7) e.g. with a coin and
remove it.
Oil absorber (20 pcs.)
Order No.: 54 33 201
+
, C4+, C5+, C5+ Tur n
6
7
16 D 3382.103.01.10.02
59 06 453 D 3382
Page 17

Sirona Dental Systems GmbH 6 Disinfection system
Care and cleaning instructions for the practice team C3
+
, C4+, C5+, C5+ Turn 6.1 Microbiological water test
6 Disinfection system
6.1 Microbiological water test
Must be performed after a working pause of more than
one week. Use a “Total Count Tester” for this purpose.
The first three testers will be supplied free of charge if
you return the attached voucher.
Please indicate your address and the serial number
of the chair (see “Installation Report / Warranty
Passport”).
Für Nachbestellungen:
Total Count Tester Order No. 58 53 775
CAUTION
The “Total Count Tester” has a maximum durability of 1
year after its date of delivery.
The cardboard disk contains a dehydrated nutrient
medium. It is activated by the sample and serves as culture medium for a number of bacteria. The number of
germs provides information on the hygienic condition of
the water.
Performing the test
• Allow water to run out of the SPRAYVIT syringe for
about 1 minute.
• Then take a water sample from this syringe.
Fill in water up to the upper mark on the container. To
neutralize the disinfecting agent of the water sample,
add approx. 1.5 g of fixing salt (sodium thiosulfate).
Do not touch the inside of the container or the part of
the tester to be immersed.
• Immerse the tester in the filled container for 30 seconds.
The cardboard disk with the nutrient medium will
now absorb 1 ml of the water sample.
• Remove the tester and shake off the excess water.
Empty the container completely.
• Place the tester into the empty container for incubation: Keep either for two days at room temperature or
for 24 hours at a temperature of 35⎦C.
• Then count all germs found on the surface of the tester.
If the number of germs significantly exceeds 100,
then sanitation is required (see section"6.3 Sanita-
tion "on page 21).
59 06 453 D 3382
D 3382.103.01.10.02
17
Page 18

6 Disinfection system Sirona Dental Systems GmbH
A
SELECT MODE
PURGE / APURGE / SAN
A
SELECT ITEMS
FOR PURGING
6.2 Purge/Auto Purge function (purging the water paths) Care and cleaning instructions for the practice team C3
+
, C4+, C5+, C5+ Tur n
6.2 Purge/Auto Purge function (purging the water paths)
PURGE function
(only for dentist element)
SELECT MODE
PURGE / APURGE / SAN
SELECT ITEMS
FOR PURGING
1
The purge function enables you to flush the water paths.
To do this, press the quick setting key 1 (> 3 s) when
all instruments are in their holders.
You will be prompted to choose between PURGE/
APURGE and SANITATION1.
Select PURGE with the
On pressing quick setting key 1 briefly (< 3 s), the fol-
lowing prompt appears if all instruments are deposited in
their holders:
SELECT ITEMS FOR PURGING
Pick up the instruments you want to flush and hold them
above the cuspidor.
The maximum water flow must be set on the instru-
ments.
Press quick setting key 1 again (< 3 s)), the instru-
ments are then purged one after the other.
– or + key. PURGE must flash.
The purging time in seconds set previously in the Mode
dialog () runs down for each instrument individually.
An audible signal sounds after the last instrument has
been flushed.
Finally place the instruments back in their holders.
1. The SANITATION function is described in the instructions
“Care and Cleaning by the Practice Team”.
18 D 3382.103.01.10.02
59 06 453 D 3382
Page 19

Sirona Dental Systems GmbH 6 Disinfection system
A
SELECT MODE
PURGE / APURGE / SAN
Care and cleaning instructions for the practice team C3
+
, C4+, C5+, C5+ Turn 6.2 Purge/Auto Purge function (purging the water paths)
Auto Purge (APURGE) function
The Auto Purge function offers possibility of automated
purging of all water carrying instruments in the dentist
element, of the assistant Sprayvit and of the tumbler filling unit.
All of the instruments inserted in the sanitation bowl will
be purged when APURGE is activated. If the instruments remain in the sanitation bowl after the treatment
center is switched off, the purging process will automatically be started again the next time the treatment center
is switched on.
We recommend the APURGE function in the following
cases:
• APURGE function before starting and at the end of
each workday:
A complete purge cycle is performed following activation. The instruments remain in the sanitation
bowl and the treatment center can be switched off.
On the next day, the APURGE function is automatically performed again on all of the instruments remaining in the sanitation bowl as well as on the
tumbler filling unit immediately after the treatment
center is switched on.
Then you can prepare the treatment center for daily
practice operation.
SELECT MODE
PURGE / APURGE / SAN
0.2
rpm x 1000
1
• APURGE function after longer periods of disuse:
A complete purge cycle is performed following activation. The instruments remain in the sanitation
bowl and the treatment center can be switched off.
Now you can switch on the treatment center briefly
every day and then switch it off again after the purging process.
Setting the APURGE function
Activate the selection dialog box by pressing quick set-
ting key 1 (> 3 s) when all of the instruments are depo-
sited in their holders.
You will be prompted to choose between PURGE/
APURGE and SANITATION1.
Select APURGE with the – or + key. APURGE must
flash.
59 06 453 D 3382
D 3382.103.01.10.02
1. The SANITATION function is described in the instructions
“Care and Cleaning by the Practice Team”.
19
Page 20

6 Disinfection system Sirona Dental Systems GmbH
A
SELECT ITEMS
FOR PURGING
6.2 Purge/Auto Purge function (purging the water paths) Care and cleaning instructions for the practice team C3
On pressing quick setting key 1 briefly (< 3 s), the fol-
lowing prompt appears if all instruments are deposited in
their holders:
+
, C4+, C5+, C5+ Tur n
SELECT ITEMS
FOR PURGING
1
wrong
SELECT ITEMS FOR PURGING
Remove the instruments to be purged from the dentist
and assistant elements and insert them in the adapters
of the sanitation bowl as far as they will go.
CAUTION
Be careful not to snap off the instrument hoses when inserting the instruments.
The maximum water flow must be set on the instru-
ments.
Press quick setting key 1 again (< 3 s); the instruments
are then purged one after the other.
The purging time in seconds set previously in the Mode
dialog (11.14) runs down for each instrument individually.
An audible signal sounds after the last instrument has
been flushed.
You now can continue in either of the following ways:
•
Leave the instruments in the sanitation bowl:
right
The instruments will automatically be purged as
soon as the treatment center is switched on
again. The treatment center can then be switched off again.
ª The APURGE function remains activated.
•
The instruments are returned to their holders:
The treatment center can be prepared for daily
practice operation.
ª The APURGE function is completed.
Canceling the APURGE function
The purging process can be canceled as follows
•Press intensity key 1 for > 3 seconds
or
• Place the instruments in their holders
20 D 3382.103.01.10.02
59 06 453 D 3382
Page 21

Sirona Dental Systems GmbH 6 Disinfection system
Care and cleaning instructions for the practice team C3
+
, C4+, C5+, C5+ Turn 6.3 Sanitation
6.3 Sanitation
Sanitation intervals Perform sanitation every 4 weeks or whenever the
germination index significantly exceeds 100 germs
per ml (see section 6.1 “Microbiological water test”).
This is the only way to combat the formation of biofilm in the water paths safely and effectively.
Special measures for additional devices Special devices that are connected to the chair via the
media block are treated with disinfected water with a higher hydrogen peroxide concentration (1.4%) during
sanitation.
CAUTION
If the connected devices are not suitable for this higher
sanitation concentration, Sirona recommends disconnecting them from the treatment center during sanitation
and performing separate sanitation in accordance with
the manufacturer’s specifications.
Preparations
Preparation for sanitation takes approx. 10 minutes.
A
DESINF
•If DESINF flashes on the dentist element display, fill
1 liter of DENTOSEPT P into the unit (see Operating
Instructions).
The flashing DESINF message then disappears.
For reorders:
DENTOSEPT P 1 case = 6x1 liter,
Order No. 33 18 156
For Canada/Japan
only:
• Maximum water flow must be set on all burr drives
as well as on the SIROSONIC L. Check this before
every sanitation procedure.
• All instruments and suction hoses must then be
placed in their holders.
1 case = 6 x 1 liter,
Order No. 59 69 535
59 06 453 D 3382
D 3382.103.01.10.02
21
Page 22

6 Disinfection system Sirona Dental Systems GmbH
6.3 Sanitation Care and cleaning instructions for the practice team C3
+
, C4+, C5+, C5+ Tur n
Sanitation
The sanitation process can be controlled either from the
dentist or assistant element.
The instructions for the assistant element are indicated
in parentheses.
•Press intensity key 1 for > 3 s
(assistant element:press SAN key for > 3 seconds).
A
SELECT MODE
PURGE / SANITATION
SAN
; SELECT MODE appears.
• Select SAN using the
• Confirm by briefly pressing intensity key 1 (assistant element: briefly press the SAN key).
; The LED of the SAN key on the assistant element
lights up.
i
NOTICE
Activation is only possible if there is sufficient DENTOSEPT P in the refill container and if all instruments are
placed in their holders.
– / + keys.
A
RETURN INSTR.
A
SELECT ITEMS
FOR SANITIZING
Error messages
If the instruments are not in place, the message
RETURN INSTR appears. Check that the instruments
are fitted firmly in their holders.
If there is not enough DENTOSEPT P in the refill container, the DESINF message flashes. Replenish the container.
In both cases, an acoustic signal sounds five times in
addition.
During the sanitation procedure, the display indicates
the individual phases.
Sanitation phase 1:
; The following message appears on the display:
SELECT ITEMS FOR SANITIZING
22 D 3382.103.01.10.02
59 06 453 D 3382
Page 23

Sirona Dental Systems GmbH 6 Disinfection system
Care and cleaning instructions for the practice team C3
+
, C4+, C5+, C5+ Turn 6.3 Sanitation
• Place the sanitation bowl with cover on the cuspidor.
The sanitation bowl container must always be clean!
3
4
1
2
3
4
1
2
• Insert the cleaning adapters for the instrument couplings (1), SPRAYVIT valve bodies (2) and suction
hoses (3) up to the stop in the sanitation bowl as illustrated.
The adapters for the instrument couplings are marked in
the same colors as the hose couplings:
Instrument Color
SL motor green
Electric motors with interface acc. to ISO
3964, e.g. EL 1 motor
Highspeed handpiece white
SIROSONIC L red
• For the saliva ejector hose, insert the intermediate
piece (4) in the cleaning adapter.
i
NOTICE
To prevent the hoses from twisting and stretching, the arrangement of the cleaning adapters from left to right
should correspond to the arrangement of the instruments
on the dentist element.
blue
10
11
CAUTION
Be careful not to snap off the instrument hoses when inserting the instruments.
The water paths must always be sanitized without
8
6
7
9
5
5
11
11
the treatment instruments attached!
• Pull the treatment instruments off the couplings and
the SPRAYVIT sleeves off the valve bodies.
• Insert the SPRAYVIT hoses with the valve bodies (5)
from the dentist element and assistant element up to
the stop in the adapters on the right and left (valve lever facing up, locking button facing down).
• Insert the following couplings in the corresponding
color-coded adapters up to the end stop or until they
lock in place:
– SL motors (6)
– Electric motors with interface acc. to ISO 3964,
e.g. EL 1 motor (7),
– Highspeed handpiece (8) and
– SIROSONIC L (9)
The color ring on the instrument hose is located on
the cap nut.
• Pull off the suction nozzles.
,
59 06 453 D 3382
D 3382.103.01.10.02
23
Page 24

6 Disinfection system Sirona Dental Systems GmbH
6.3 Sanitation Care and cleaning instructions for the practice team C3
• Attach the suction hose (10) and the saliva ejector
hose and, if available, the 3rd suction hose (11) to
the side of the cleaning adapter (3).
When the sanitation bowl is completely fitted, briefly
press intensity key 1 to initiate the sanitation process.
(assistant element: briefly press the SAN key).
+
, C4+, C5+, C5+ Tur n
SAN
Sanitation phase 2:
A
SAN
TESTING FLOW
First the program checks whether there is water flow at
the instrument couplings.
; During this time, the SAN key on the assistant
element flashes approx. once a second.
Any instruments that are not withdrawn or do not conduct any water are excluded from the sanitation process.
A
INSTR. HOSE # 3 AE
HAS NO FLOW
SAN
Error messages in sanitation phase 2
If there is no water flow, an acoustic signal sounds continuously and a message appears on the display to indicate which instrument has no water flow. The instrument
number refers to the holders in ascending order from left
to right.
AE refers to the instrument holders on the dentist element and HE to those on the assistant element.
The SAN key on the assistant element flashes approx. 4
times per second.
In this case open the water regulator of the corresponding instrument on the instrument coupling. Leave the
corresponding instrument plugged into the adapter. As
soon as the system detects that water is flowing, the
sanitation process automatically continues.
However, if the acoustic signal sounds and you press
intensity key 1 briefly without opening the water regulator, the sanitation program continues without sanitizing
the corresponding water path (assistant element: briefly
press the SAN key).
Sanitation phase 3:
Then the water is pumped out of the water tank of the
water unit via the tumbler filler.
24 D 3382.103.01.10.02
59 06 453 D 3382
Page 25

Sirona Dental Systems GmbH 6 Disinfection system
Care and cleaning instructions for the practice team C3
+
, C4+, C5+, C5+ Turn 6.3 Sanitation
A
SANITIZING
A
SANITIZING
DESIN
DESINF
SAN
SAN
Sanitation phase 4:
The water tank is automatically filled with DENTOSEPT
P subsequently.
; The SAN key on the assistant element lights up.
This activates flushing of the instrument hoses, the
SPRAYVIT hoses and the tumbler filler.
Sanitation phase 5:
; The remaining sanitation time now appears on the
display, e.g. 23 hours and 57 minutes.
• Now the unit must be switched off for at least 24
hours, but not longer than three days (max. sanitation time). Leave all instruments plugged into
their adapters.
CAUTION
If you turned off the treatment center water and air supplies following sanitation phase 5, you must turn them on
again before using the treatment center again – i.e. after
24 hours have expired. Switch the unit back on after this
period. However, leave the instruments in the adapters of
the sanitation bowl.
A
PLACE ALL INSTR.
IN SANIT. BOWL
A
PURGING
DESINF
DESINF
SAN
• Switch the treatment center back ON after the minimum sanitation time has expired and before the end
of the maximum sanitation time has been reached.
If an instrument is erroneously returned to its holder, the
following message appears:
PLACE ALL INSTR. IN SANIT. BOWL. The sanitation
program then automatically runs to its completion.
If you switch on the treatment center before the 24 hours
have elapsed (the remaining time is then indicated on
the display), you must briefly activate intensity key 1 for
> 3s after switching the unit on (assistant element: press
SAN key for 3 seconds). Pressing the key means aborting sanitation (refer to section 6.3). The sanitation program then runs to its completion.
Sanitation phase 6:
The instrument hoses, SPRAYVIT hoses and the tumbler filler are flushed with water. This takes several minutes.
; During this time, the SAN key on the assistant
element flashes.
59 06 453 D 3382
D 3382.103.01.10.02
25
Page 26

6 Disinfection system Sirona Dental Systems GmbH
6.3 Sanitation Care and cleaning instructions for the practice team C3
+
, C4+, C5+, C5+ Tur n
A
PROCESS COMPLETE
RETURN INSTR.
DESINF
SAN
SAN
As soon as the message
PROCESS COMPLETE RETURN INSTR.
appears on the display the instruments can be returned
to their holders.
The unit is now ready for operation again.
i
NOTICE
If there is no assistant element on the water unit, no rinsing cycle occurs and it takes approx. 90 s until the message PROCESS COMPLETE appears.
Aborting the sanitation process
The sanitation process can be aborted in all phases by
pressing intensity key 1 for > 3s
(assistant element:press SAN key for 3 seconds).
Depending on the sanitation phase involved, sanitation
stops immediately, or the hoses are flushed with water
as described. Once the flushing process is complete and
the instruments have been returned to their holders, the
unit is ready for operation again.
26 D 3382.103.01.10.02
59 06 453 D 3382
Page 27

Sirona Dental Systems GmbH 7 Surfaces / O-rings
S
0
Care and cleaning instructions for the practice team C3
+
, C4+, C5+, C5+ Tur n
7 Surfaces / O-rings
Protection against medicaments
Due to their high concentrations and the substances
they contain, many medicaments can dissolve, etch,
bleach or discolor surfaces.
The only way to prevent damage is to wipe off medicaments immediately with a damp cloth!
Disinfecting the surfaces
The surfaces can be spray and wipe disinfected with surface disinfectants.
CAUTION
Use only disinfectants which have been approved by Sirona (see page 2, General information)!
Cleaning the surfaces
Remove any dirt and disinfectant residues regularly
using a mild commercial cleaning agent.
Do not use any colored cloths for cleaning, since they
may cause discoloration of the unit surfaces, e.g. in
combination with disinfectants!
Do not allow liquids to penetrate into the ventilation slots!
Pedal (foot switch)
Clean the bottom of the base plate using a damp cloth
moistened in water.
Upholstery
Care and cleaning: Care and cleaning of the synthetic
leather upholstery must be performed weekly. The cleaning agent also performs care simultaneously.
CAUTION
Use only cleaning agents which have been approved by
Sirona (see page 2, General information)!
59 06 453 D 3382
D 3382.103.01.10.02
Disinfection:
CAUTION
Use only disinfectants which have been approved by Sirona (see page 2, General information)!
27
Page 28

7 Surfaces / O-rings Sirona Dental Systems GmbH
G
Care and cleaning instructions for the practice team C3
+
, C4+, C5+, C5+ Tur n
Disinfecting the surfaces
The surfaces can be spray and wipe disinfected with surface disinfectants.
Intensive cleaning and disinfection of the head
support
The contact surface of the headrest can be removed to
facilitate intensive cleaning and disinfecting if neces-
sary.
The surfaces can be spray and wipe disinfected with surface disinfectants.
¾ Press one side of head pad G inward from the
outside (to unlock it) and remove it in a upward
direction.
i
NOTICE
Fast and frequent removal of the head pad from the front
or rear can damage the snap-in noses.
¾ Clean and disinfect the head pad and headrest.
¾ Hook on the head pad again laterally.
CAUTION
Damaged pads, e.g. with scratched surfaces, must be
replaced.
For reorders:
Contact surface: REF 61 82 047
28 D 3382.103.01.10.02
59 06 453 D 3382
Page 29

Sirona Dental Systems GmbH 7 Surfaces / O-rings
Care and cleaning instructions for the practice team C3
C3+, C4+, C5
+
+
, C4+, C5+, C5+ Tur n
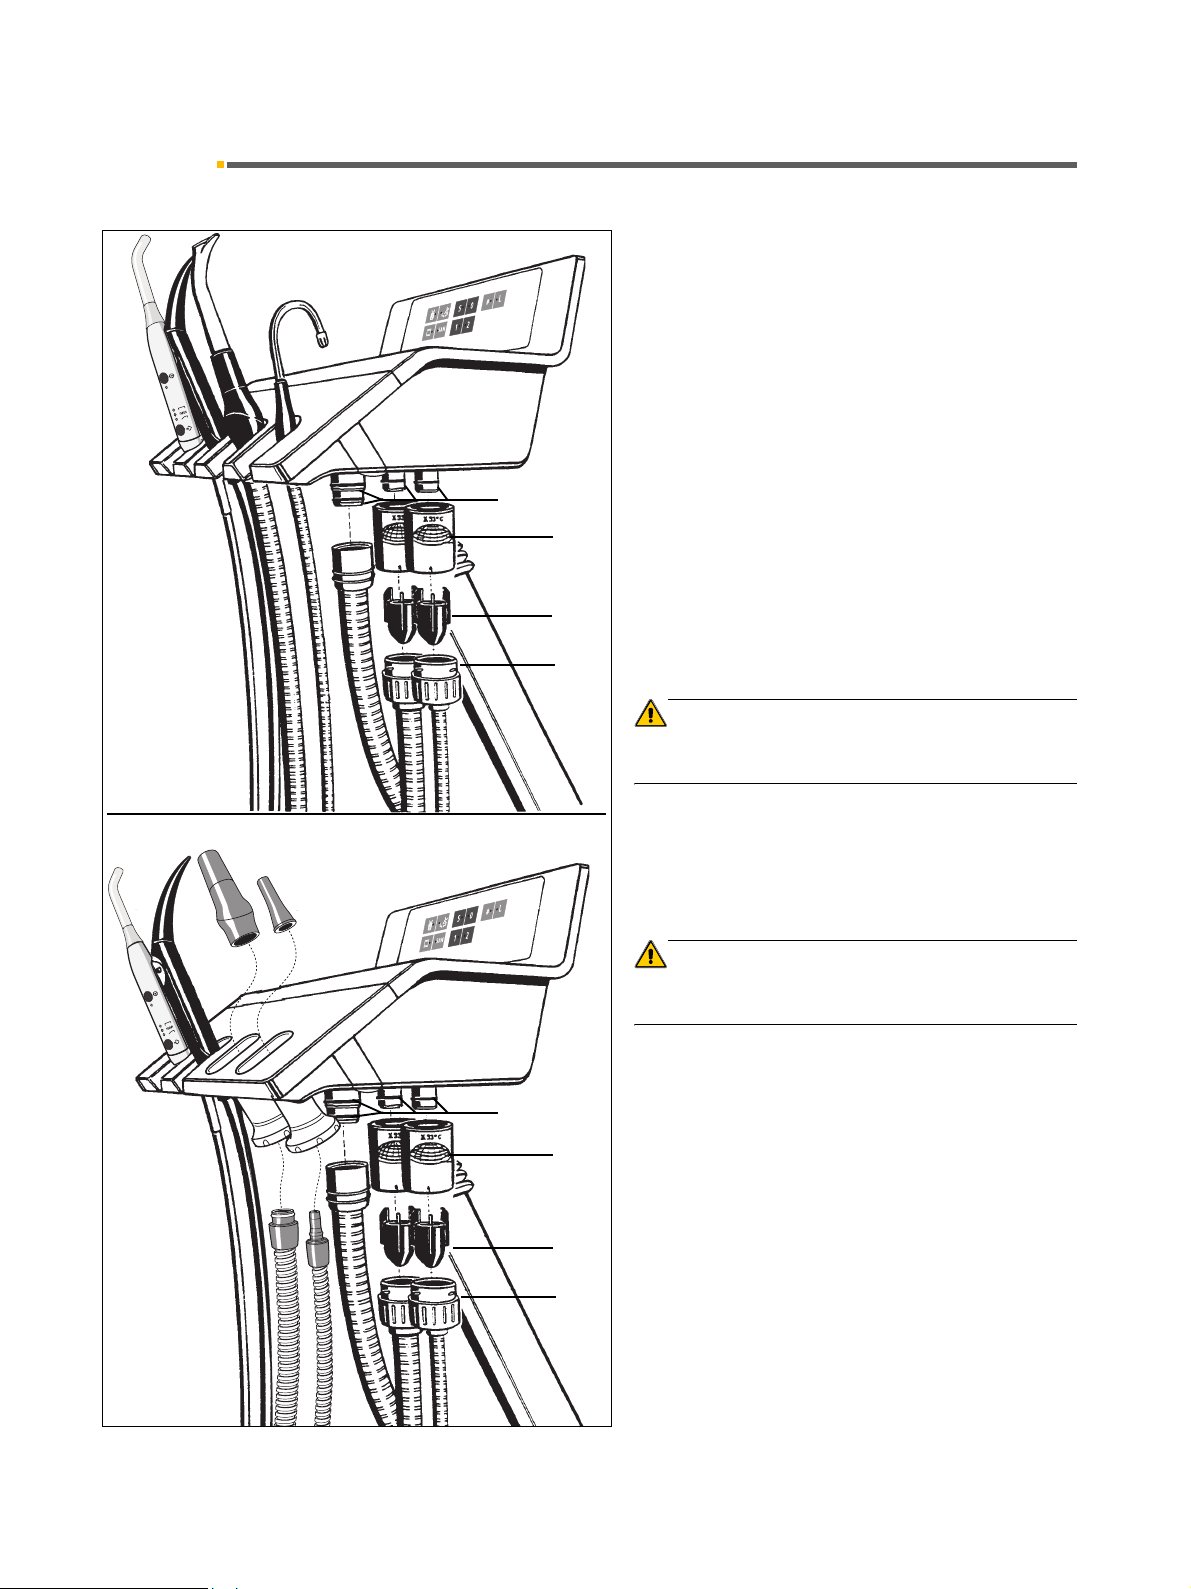
Dentist and assistant element
To facilitate cleaning or thermodisinfecting at 93°C
(197°F), the instrument racks on the dentist and assistant elements can be removed.
CAUTION
Use only cleaning agents which have been approved by
Sirona (see page 2, General information)!
Assistant element C3+, C4+, C5+:
The instrument rack can be removed after pulling the
two tabs apart.
C3+, C4+, C5
+
6
9
8
Assistant element C3+, C4+, C5+:
Removing an instrument rack with suction hose and
saliva ejector hose holders that are closed at the
front:
To do so, you must withdraw the two suction handpieces
(6) and pull the suction hoses (7) downward first.
After unscrewing the two guide sleeves (8) and pulling
the two tabs (9) apart, you can remove the instrument
rack, e.g. for thermodisinfection.
The guide sleeves (8) and the instrument rack can be
thermodisinfected.
CAUTION
Use only cleaning agents which have been approved by
Sirona (see page 2, General information)!
7
59 06 453 D 3382
D 3382.103.01.10.02
29
Page 30

7 Surfaces / O-rings Sirona Dental Systems GmbH
11
B
A
Care and cleaning instructions for the practice team C3
C4+, C5+ dentist elements:
The silicone mat (11) can be sterilized.To remove the
instrument rack from the dentist element, swivel the two
levers (1) towards A.
To refit the rack, first place the front recesses on the two
bolts (2), press the rack on at the top and swivel the two
levers (1) towards B. Finally, make sure that the rack is
firmly seated.
If there is a ball stopper (12) fitted in an unused instrument holder, it can be pushed out of the holder from the
rear for cleaning or thermodisinfection.
+
, C4+, C5+, C5+ Tur n
12
2
B
1
A
C3+ dentist element:
5
To remove the instrument rack (3) from the dentist element, press the two buttons (4) simultaneously.
3
4
CAUTION
The instrument rack (3) must not be thermally disinfected.
Use only spray or wipe disinfection!
4
The silicone mat (5) can be sterilized.
4
Tray C4+, C5+:
The instrument tray can be removed to facilitate cleaning
or thermodisinfection at 93°C (197°F).
CAUTION
Use only cleaning agents which have been approved by
Sirona (see page 2, General information)!
30 D 3382.103.01.10.02
59 06 453 D 3382
Page 31

Sirona Dental Systems GmbH 7 Surfaces / O-rings
Care and cleaning instructions for the practice team C3
+
, C4+, C5+, C5+ Tur n
C3+ tray:
The swiveling instrument tray can be thermodisinfected
at 93°C (197°F).
To remove it swing the locking lever (10) in the direction
of the arrow.
10
Care of the O-rings
• Use only approved lubricants (see page 2, General
information)
•Do not use vaseline or silicone grease. They cause
damage to the O-rings!
59 06 453 D 3382
D 3382.103.01.10.02
31
Page 32

8 Satelec MiniL.E.D. curing light Sirona Dental Systems GmbH
8.1 Care and cleaning of the handpiece and the connecting cable Care and cleaning instructions for the practice team C3
Tu r n
+
, C4+, C5+, C5+
8 SatelecMiniL.E.D. curing light
8.1 Care and cleaning of the handpiece and the connecting cable
The Mini L.E.D. and its accessories can be cleaned and
disinfected with cleaning and disinfecting agents that are
recommended by Sirona.
3 min
CAUTION
Use only cleaning and disinfecting agents which have
been approved by Sirona (see page 2, General information)!
The connecting cable at the end of the handpiece can be
removed by turning it (see illustration below).
The Mini L.E.D. can be installed in holder 1 of the assistant element (C3
tist element (C4
+
to C5+) and in holder 4 or 5 of the den-
+
, C5+, C5+ Turn only).
8.2 Care and cleaning of the light guide and the glare shield
Clean and sterilize the light guide and the glare shield
before every patient treatment (135 °C; 2bar; 3 min).
Check the light guide after each use.
• There should be no traces of composite material on
3 min
the light guide.
• Immediately remove any residue.
• Make sure that the light guide is in perfect condition.
• If you find any damage, immediately remove the light
guide, since damage will have a significant impact
on its performance.
Always use the glare shield to protect your eyes.
32 D 3382.103.01.10.02
59 06 453 D 3382
Page 33

Sirona Dental Systems GmbH 9 SIROCAM 3 / SIROCAM C video camera and monitor Care and cleaning instructions for the practice team C3
+
, C4+, C5+, C5+ Turn 9.1 Care and cleaning of the SIROCAM 3
9 SIROCAM 3 / SIROCAM C video camera
and monitor
9.1 Care and cleaning of the SIROCAM 3
The ergonomically shaped titanium sleeve of the camera
has only few joints. Its shape takes hygienic requirements into account and has no spots that are difficult to
reach.
Cleaning
Remove any dirt and disinfectant residues regularly
using a mild commercial cleaning agent.
Do not use any colored cloths for cleaning, since they
may cause discoloration of the surfaces, e.g. in combination with disinfectants!
Disinfecting
The camera can be disinfected by wiping.
CAUTION
Use only cleaning agents which have been approved by
Sirona (see page 2, General information)!
Protect the lens window against scratching and clean it
with a lint-free soft cloth.
CAUTION
The camera handpiece with the cable CANNOT be sterilized or thermodisinfected!
The camera MUST NOT be sprayed or dipped in liquids!
59 06 453 D 3382
D 3382.103.01.10.02
33
Page 34

9 SIROCAM 3 / SIROCAM C video camera and monitor Sirona Dental Systems GmbH
9.2 Care and cleaning of the SIROCAM C Care and cleaning instructions for the practice team C3
+
, C4+, C5+, C5+ Tur n
9.2 Care and cleaning of the SIROCAM C
Cleaning
Remove any dirt and disinfectant residues regularly
using a mild commercial cleaning agent.
Do not use any colored cloths for cleaning, since they
may cause discoloration of the surfaces, e.g. in combination with disinfectants!
Disinfecting
CAUTION
Use only cleaning agents which have been approved by
Sirona (see page 2, General information)!
Wipe the SIROCAM C with a soft cloth.
CAUTION
The camera handpiece with the cable CANNOT be sterilized or thermodisinfected!
The camera MUST NOT be sprayed or dipped in alcohol!
9.3 Care and cleaning of the monitor
Cleaning
Remove any dirt and disinfectant residues regularly
using a mild commercial cleaning agent.
Do not use any colored cloths for cleaning, since they
may cause discoloration of the surfaces, e.g. in combination with disinfectants!
Disinfecting
The glass screen and housing of the monitor can be disinfected by wiping them with a soft cloth.
Use only cleaning agents which have been approved by
Sirona (see page 2, General information)!
Never spray the monitor with a disinfecting or cleaning
agent!
CAUTION
CAUTION
34 D 3382.103.01.10.02
59 06 453 D 3382
Page 35

Sirona Dental Systems GmbH 10 Checking the safety switches
Care and cleaning instructions for the practice team C3
+
, C4+, C5+, C5+ Tur n
10 Checking the safety switches
To ensure the safety of the practice team and the patients, please check the safety switches installed in the
unit every 6 months.
Move the chair or the backrest down for this purpose.
• Lift the leg support:
The chair movement stops, then there is a corrective
movement upwards for about 3s.
• Lift the backrest:
The backrest movement stops, then there is a corrective movement upwards for about 3s.
• Lift the motor-driven headrest (option):
The backrest movement stops, then there is a corrective movement upwards for about 3s.
• Lift the assistant element:
The chair movement stops.
• Press strongly on the assistant element:
The chair movement stops.
• Swing in the swiveling cuspidor (option):
The chair movement stops.
•Only for C5+ Turn: Lift the cuspidor:
The chair movement stops.
C5+ Turn
•Only for C5+ Turn: Press down the cuspidor:
The chair movement stops.
CAUTION
If one of the safety switches does not stop the chair or
backrest movement, the treatment center must not be
used for dental work!
Please contact your service engineer.
59 06 453 D 3382
D 3382.103.01.10.02
35
Page 36

10 Checking the safety switches Sirona Dental Systems GmbH
Care and cleaning instructions for the practice team C3
+
, C4+, C5+, C5+ Tur n
36 D 3382.103.01.10.02
59 06 453 D 3382
Page 37

Page 38

tЙ=кЙлЙкоЙ=нЬЙ=кбЦЬн=нз=г~вЙ=~еу=~днЙк~нбзел=пЬбЕЬ=г~у=ДЙ=кЙимбкЙЗ=ЗмЙ=нз=нЙЕЬебЕ~д=бгйкзоЙгЙенлK
«=pбкзе~=aЙен~д=pулнЙгл=dгДe=OMMNJOMMT pйк~ЕЬЙW=ЙеЦдблЕЬ= mкбенЙЗ=бе=dЙкг~еу
a=PPUOKNMPKMNKNMKMO======MRKOMMT ûKJkêKW= NMU=PUV fгйкбг¨=Йе=^ддЙг~ЦеЙ
pбкзе~=aЙен~д=pулнЙгл=dгДe
få=íÜÉ=rp^W få=`~å~Ç~W
c~Дкбвлнк~ллЙ=PN
SQSOR=_ЙелЬЙбг
dЙкг~еу
пппKлбкзе~KЕзг
pбкзе~=aЙен~д=pулнЙгл=ii`
QUPR=pбкзе~=aкбоЙI=pмбнЙ=NMM
`Ь~кдзннЙI=k`=OUOTP
rp^
pбкзе~=`~е~З~
PORM=oбЗЦЙп~у=aкбоЙ=J=rебн=R
jбллблл~мЦ~I=lен~кбз=iRi=RvS
`~е~З~
lêÇÉê=kçK
RV=MS=QRP=a=PPUO
 Loading...