

Page 1
WAFFLE MAKER SWEW 750 A1
WAFFLE MAKER
Operating instructions
PEKAČ ZA VAFLJE
Navodila za uporabo
VAFLOVAČ
Návod na obsluhu
IAN 93556
GOFROWNICA
Instrukcja obsługi
VAFLOVAČ
Návod k obsluze
WAFFELEISEN
Bedienungsanleitung
Page 2
Before reading, unfold the page containing the illustrations and familiarise yourself with all functions of
the device.
Przed przeczytaniem proszę rozłożyć stronę z ilustracjami, a następnie proszę zapoznać się z wszystkimi
funkcjami urządzenia.
Pred branjem odprite stran s slikami in se nato seznanite z vsemi funkcijami naprave.
Před čtením si otevřete stranu s obrázky a potom se seznamte se všemi funkcemi přístroje.
Pred čítaním si odklopte stranu s obrázkami a potom sa oboznámte so všetkými funkciami prístroja.
Klappen Sie vor dem Lesen die Seite mit den Abbildungen aus und machen Sie sich anschließend mit allen
Funktionen des Gerätes vertraut.
GB Operating instructions Page 1
PL Instrukcja obsługi Strona 17
SI Navodila za uporabo Stran 33
CZ Návod k obsluze Strana 49
SK Návod na obsluhu Strana 65
DE / AT / CH Bedienungsanleitung Seite 81
Page 3
A
B
C
E
D
Page 4
Index
Introduction . . . . . . . . . . . . . . . . . . . . . . . . . . . . . . . . . . . . . . . . . . . . . . . . . . . 2
Copyright . . . . . . . . . . . . . . . . . . . . . . . . . . . . . . . . . . . . . . . . . . . . . . . . . . . . . . . . . . . . . . . 2
Limited liability . . . . . . . . . . . . . . . . . . . . . . . . . . . . . . . . . . . . . . . . . . . . . . . . . . . . . . . . . . . 2
Intended use . . . . . . . . . . . . . . . . . . . . . . . . . . . . . . . . . . . . . . . . . . . . . . . . . . . . . . . . . . . . 2
Items supplied . . . . . . . . . . . . . . . . . . . . . . . . . . . . . . . . . . . . . . . . . . . . . . . . . 3
Disposal of the packaging . . . . . . . . . . . . . . . . . . . . . . . . . . . . . . . . . . . . . . . . . . . . . . . . . . 3
Appliance description . . . . . . . . . . . . . . . . . . . . . . . . . . . . . . . . . . . . . . . . . . . 4
Technical data . . . . . . . . . . . . . . . . . . . . . . . . . . . . . . . . . . . . . . . . . . . . . . . . . 4
Safety instructions . . . . . . . . . . . . . . . . . . . . . . . . . . . . . . . . . . . . . . . . . . . . . 5
Exchanging the removable plates . . . . . . . . . . . . . . . . . . . . . . . . . . . . . . . . . 7
Placement of the removable plates . . . . . . . . . . . . . . . . . . . . . . . . . . . . . . . . . . . . . . . . . . . 7
Extracting the removable plate . . . . . . . . . . . . . . . . . . . . . . . . . . . . . . . . . . . . . . . . . . . . . . 8
Commissioning . . . . . . . . . . . . . . . . . . . . . . . . . . . . . . . . . . . . . . . . . . . . . . . . 8
Operation . . . . . . . . . . . . . . . . . . . . . . . . . . . . . . . . . . . . . . . . . . . . . . . . . . . . 9
Making nut waffl es/patterned waffl es . . . . . . . . . . . . . . . . . . . . . . . . . . . . . 9
Making waffl es . . . . . . . . . . . . . . . . . . . . . . . . . . . . . . . . . . . . . . . . . . . . . . . . . . . . . . . . . 10
Cleaning . . . . . . . . . . . . . . . . . . . . . . . . . . . . . . . . . . . . . . . . . . . . . . . . . . . . . 11
GB
Storage . . . . . . . . . . . . . . . . . . . . . . . . . . . . . . . . . . . . . . . . . . . . . . . . . . . . . 11
Troubleshooting . . . . . . . . . . . . . . . . . . . . . . . . . . . . . . . . . . . . . . . . . . . . . .12
Recipes . . . . . . . . . . . . . . . . . . . . . . . . . . . . . . . . . . . . . . . . . . . . . . . . . . . . . . 12
Waffl es . . . . . . . . . . . . . . . . . . . . . . . . . . . . . . . . . . . . . . . . . . . . . . . . . . . . . . . . . . . . . . . 12
Chocolate waffl es . . . . . . . . . . . . . . . . . . . . . . . . . . . . . . . . . . . . . . . . . . . . . . . . . . . . . . . 13
Basic batter for nut waffl es/patterned waffl es . . . . . . . . . . . . . . . . . . . . . . . . . . . . . . . . . . 13
Sweet batter for nut waffl es/patterned waffl es . . . . . . . . . . . . . . . . . . . . . . . . . . . . . . . . . 14
Savoury batter for nut waffl es/patterned waffl es . . . . . . . . . . . . . . . . . . . . . . . . . . . . . . . 15
Disposal . . . . . . . . . . . . . . . . . . . . . . . . . . . . . . . . . . . . . . . . . . . . . . . . . . . . . 15
Warranty and Service . . . . . . . . . . . . . . . . . . . . . . . . . . . . . . . . . . . . . . . . . 16
Importer . . . . . . . . . . . . . . . . . . . . . . . . . . . . . . . . . . . . . . . . . . . . . . . . . . . . . 16
SWEW 750 A1
1
Page 5

GB
Introduction
Congratulations on the purchase of your new appliance!
You have clearly decided in favour of a modern, high quality product. These
operating instructions are a component of this product. They contain important
information in regard to safety, use and disposal. Before using the product,
familiarise yourself with all of these operating and safety instructions. Use this
appliance only as described and only for the purposes indicated. In addition,
pass these documents on, together with the product, to any future owner.
Copyright
This documentation is copyright protected.
Any copying or reproduction of it, including as extracts, as well as the reproduction
of images, also in an altered state, is only permitted with the written authorisation
of the manufacturer.
Limited liability
All technical information, data and instructions for the installation, connection
and operation contained in these operating instructions correspond to the latest
available at the time of printing and, to the best of our knowledge, take into
account our previous experience and know-how.
No claims can be derived from the details, illustrations and descriptions in these
instructions.
The manufacturer assumes no responsibility for damage caused by failure to observe these instructions, improper use, incompetent repairs, making unauthorised
modifi cations or for using unapproved replacement parts.
Intended use
2
This appliance is exclusively intended for making waffl es, nut waffl es and
patterned waffl es.
This appliance is intended exclusively for use in domestic households. Do not use
the appliance for commercial applications!
SWEW 750 A1
Page 6
Items supplied
The appliance is delivered with the following components as standard:
▯ Waffl e
▯ 2 Removable plates “Waffl es”
▯ 2 Removable plates “Nut waffl es”
▯ 2 Removable plates “Patterned waffl es”
▯ Operating instructions
1)
2) Remove all packing material.
NOTICE
Disposal of the packaging
The packaging protects the appliance from transport damage. The packaging
materials are selected from the point of view of their environmental friendliness
and disposal technology and are therefore recyclable.
The recirculation of packaging into the material circuit saves on raw material and
reduces the amount of waste generated. Dispose of packaging material that is
no longer needed as per the regionally established regulations.
Maker
Remove the appliance, the removable plates and the operating instructions
from the carton.
► Check the contents to ensure everything is present and for visible damage.
► If the delivery is not complete or has been damaged due to defective
aging or transportation, contact the Service Hotline (see section
pack
Warranty and Service).
GB
SWEW 750 A1
NOTICE
► If possible preserve the appliance's original packaging during the warranty
period so that, in the e
ance ideally for its return.
vent of a warranty claim, you can pack the appli-
3
Page 7

GB
Appliance description
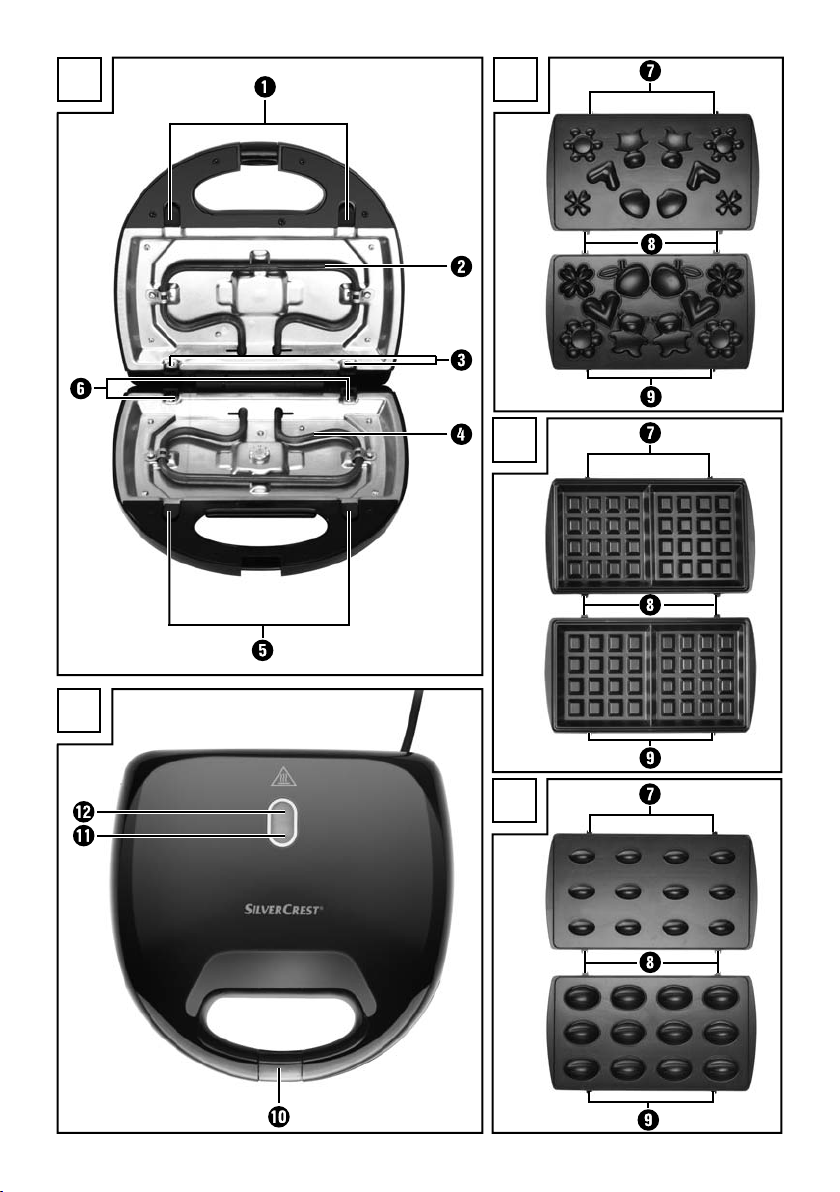
Illustration A:
1 Locking device
2 Heating coil
3 Lower mountings
4 Heating coil
5 Locking devices
6 Rear mountings
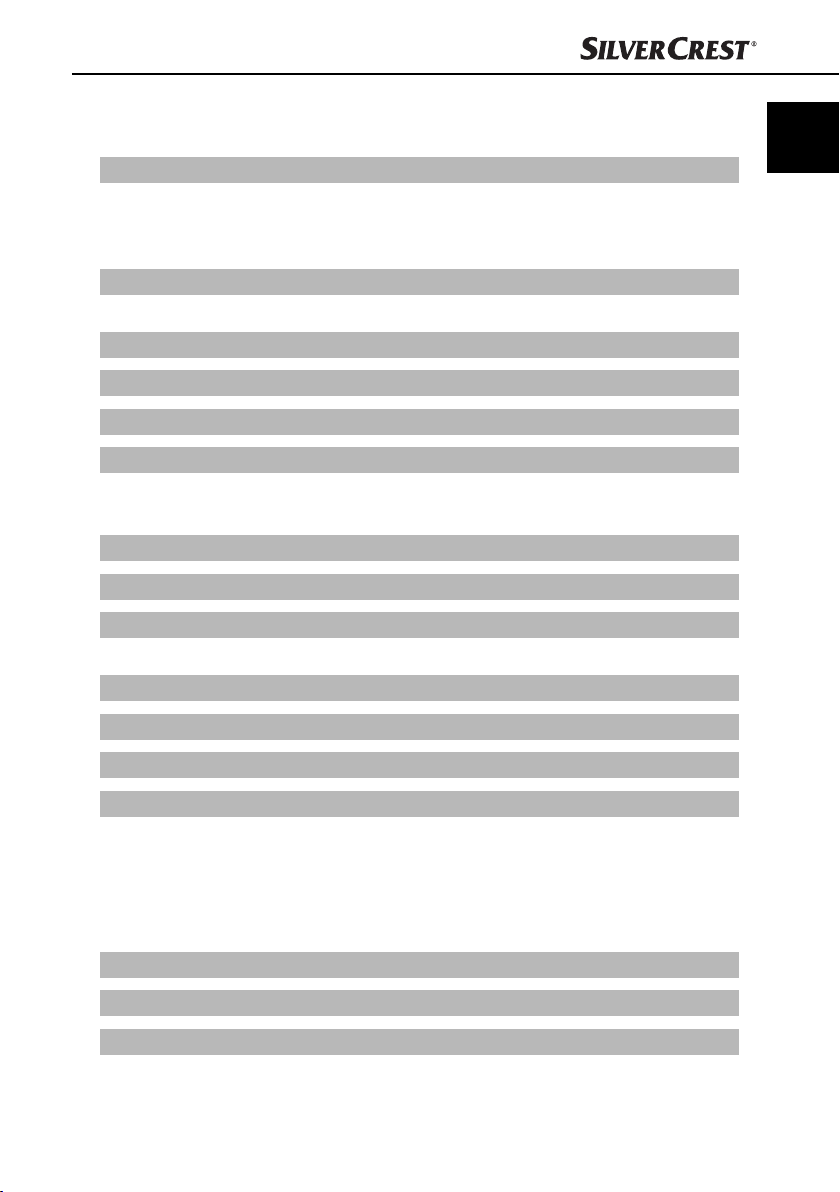
Illustration B (Nut waffl es):
7 Upper latches
8 Lower and rear latches
9 Front latches
Illustration C (Waffl es):
7 Upper latches
8 Lower and rear latches
9 Front latches
Illustration D (Patterned waffl es):
7 Upper latches
8 Lower and rear latches
9 Front latches
Illustration E:
0 Lid locking device
q Control lamp “Power”
w Control lamp “Ready”
Technical data
Voltage 220 - 240 V ∼, 50 Hz
Power consumption 750 W
4
SWEW 750 A1
Page 8
Safety instructions
WARNING! RISK OF ELECTRIC SHOCK!
► Arrange for damaged power cables and/or plugs to be replaced as
soon as possible by a qualifi ed specialist or by Customer Services.
► Use the appliance only in dry indoor areas, not outdoors.
NEVER submerse the appliance in water or other liquids!
If you do, then you could receive a potentially fatal electric shock.
► When cleaning, ensure that water cannot permeate into the appli-
ance. NEVER clean the appliance under running water.
► Ensure that the appliance can never come into contact with water.
NEVER use the appliance adjacent to water or close to vessels
containing liquids.
► Ensure that the power cable never gets wet or moist when the
appliance is in use. Lay the cable such that it cannot be clamped
or otherwise damaged.
► After use, disconnect the power cable from the mains power
socket to turn off the unit.
GB
► NEVER open the housing of the appliance.
WARNING! RISK OF INJURY!
► This appliance may be used by children of at least 8 years of age
and persons with reduced physical, sensory or mental capabilities
or lack of experience and/or knowledge if they are supervised
by a person responsible for their safety or receive from this person instruction in how the appliance is to be used, and they have
understood the potential risks.
► Children should not play with the appliance.
SWEW 750 A1
5
Page 9
GB
WARNING! RISK OF INJURY!
► Cleaning and user maintenance should not be performed by
children, unless they are older than 8 years of age and are supervised. Children younger than 8 years of age are to be kept away
from the appliance and the power cable.
► The appliance can become hot when it is in use. Therefore, only
touch the handles.
► Let the appliance cool down completely before cleaning it, ex-
changing the removable plates or putting it into storage.
► Be careful when taking out the prepared food. Both the appliance
and the food will be extremely hot.
► Use the appliance only on a stable, non-slippery and level surface.
► Do not use an external timing switch or a separate remote control
system to operate the appliance.
Attention! Hot surfaces!
CAUTION - RISK OF FIRE!
► This appliance may not be used in close vicinity to fl ammable material.
► Do not leave the appliance unattended at any time when it is in use.
► Operate the appliance only on heat resistant surface.
► Do not operate the appliance unsupervised.
CAUTION - PROPERTY DAMAGE!
► To avoid damaging the non-stick coating of the Sandwich Maker,
remove your cooked foods only with a plastic or wooden spatula
or some other suitable, non-metallic implement.
► Do not use abrasive cleansers or sharp objects for cleaning.
6
SWEW 750 A1
Page 10

Exchanging the removable plates
You can choose between 3 diff erent removable plates:
– “Nut waffl
which can then be fi lled and fi tted together.
– “Waffl
– “Patterned waffl
waffl e halves which can then be fi lled and fi tted together.
WARNING! RISK OF ELECTRIC SHOCK
► Disconnect the plug from the mains power socket before exchanging the
emovable plates.
r
WARNING! RISK OF INJURY!
► Let the appliance cool down before exchanging the removable plates!
Risk of Burns!
NOTE
► When using the "nut waffl
please always ensure that the top removable plate is installed in the top
section of the appliance, and that the bottom removable plate is installed
in the bottom section of the appliance. Use the illustrations in the fold-out
page for orientation.
Placement of the removable plates
1) Open the waffl e iron by releasing the lid locking device 0 and lifting the lid.
2) Upper removable plate: First slide the lower latches 8 into the lower mountings 3.
3) Now press the upper latches 7 onto the locking devices 1, so that the
upper latches 7 spring under the locking devices 1 and the removable
plate is fi rmly seated.
4) Lower removable plate: First slide the rear latches 8 into the rear mountings 6.
5) Now press the front latches 9 onto the locking devices 5 so that the
latches 9 spring under the locking devices 5 and the removable plate is
fi rmly seated.
6) Press fi rmly once in the centre of the lower removable plate to ensure that it
is securely inserted.
es” removable plates: for preparing hollow nut waffl e halves,
es” removable plates: for making waffl es.
es” removable plates: for preparing hollow patterned
es" and "patterned waffl es" removable plates,
GB
SWEW 750 A1
7
Page 11
GB
Extracting the removable plate
1) Upper removable plate: Slide the locking devices 1 upwards and simul-
taneously tilt the removable plate forward so that you can lift it out from
underneath the lower mountings 3.
2) Lower removable plate: Pull the locking devices 5 forward and lift the
removable plate so that you can pull it out from the rear mountings 6.
Commissioning
Carry out the following procedure with each of the 3 pairs of removable plates.
■ Smear the non-stick coating on the removable plates with oil suitable for
cooking.
WARNING! RISK OF INJURY!
► Let the appliance cool down before exchanging the removable plates!
Risk of Bur
■ Install a pair of removable plates into the appliance.
■ Insert the plug into a mains power socket.
■ Close the appliance and lock it with the lid locking device 0.
■ Let the appliance heat up for about 10 minutes.
NOTICE
► With the fi rst usage a slight smell can arise (minimal smoke development is
also possible). This is nor
suffi cient ventilation. For example, open a window.
■ Disconnect the plug and allow the appliance to cool down.
■ Clean the removable plates and the appliance as described in the chapter
“Cleaning”.
The appliance is no
ns!
mal and dissipates after a short time. Provide for
w ready for use.
8
SWEW 750 A1
Page 12

Operation
Making nut waffl es/patterned waffl es
1) Select the “nut waffl es” or “patterned waffl es” removable plates and insert
them. Always ensure that you insert the top removable plate in the top half
of the appliance and the bottom removable plate in the bottom half.
CAUTION – PROPERTY DAMAGE!
► Never use two diff erent removable plates at the same time.
Close the lid and lock it with the lid locking device 0.
2)
3) Insert the plug into a mains power socket. The orange “Power” indicator
lamp q illuminates.
4) As soon as the appliance has heated up, the green “Ready” indicator
lamp w illuminates.
5) Undo the lid locking device 0, open the lid and put approximately 1/2 tsp.
of batter (see “Recipes” chapter for recipes for nut waffl es and patterned
waffl es) into each of the moulds/patterns in the bottom removable plates.
NOTE
► When using patterned waffl
across all parts of the pattern. Otherwise, parts of the pattern may subsequently be missing.
6) Close the lid and lock it with the lid locking device 0.
es, ensure that the batter has been distributed
GB
7) The nut waffl es/patterned waffl es are ready after about 3 - 4 minutes.
8) If you have fi nished preparing your nut waffl es/patterned waffl es, please
9) Allow the nut waffl es/patterned waffl es to cool down a little and trim any
10) Fill the nut waffl es/patterned waffl es with the required fi lling. Spread a little
SWEW 750 A1
CAUTION – PROPERTY DAMAGE!
► To avoid damaging the non-stick coating of the nut waffl es/patterned
always remove your waffl es with a plastic or wooden spoon or some other
suitable, non-metallic implement.
Undo the lid locking device 0, open the cover and remove the nut waffl es/
patterned waffl es.
disconnect the mains plug from the mains socket.
excess from the edge of the nut waffl es/patterned waffl es with a knife.
of the fi lling towards the edge of the nut waffl es/patterned waffl es and place
the matching counterpart on top so that both halves stick together, creating
a hollow form.
waffl es,
9
Page 13

GB
Making waffl es
1) Select the “waffl es” removable plates and install them.
CAUTION – PROPERTY DAMAGE!
► Never use two diff erent removable plates at the same time.
Close the lid and lock it with the lid locking device 0.
2)
3) Insert the plug into a mains power socket. The orange “Power” indicator
lamp q illuminates.
4) As soon as the appliance has heated up, the green “Ready” indicator
lamp w illuminates.
5) Open the lid and place about 2 - 3 large tablespoons of batter into the centre
of each of the two waffl e baking surfaces on the lower removable plate.
6) Close the lid and lock it with the lid locking device 0.
CAUTION – PROPERTY DAMAGE!
► To avoid damaging the non-stick coating of the appliance, always remove
our waffl es with a plastic or wooden spatula or some other suitable, non-
y
metallic implement.
7) The waffl es are ready after about 3 - 4 minutes. This time may vary depending
on the type of batter used and personal preferences. Undo the lid locking
device 0, open the cover and remove the nut waffl es/patterned waffl es.
8) If you have fi nished preparing your waffl es, disconnect the plug from the
mains power socket.
10
SWEW 750 A1
Page 14
Cleaning
CAUTION - PROPERTY DAMAGE!
NOTICE
WARNING! RISK OF ELECTRIC SHOCK
► Disconnect the plug from the mains power socket before cleaning the
appliance.
NEVER submer
do, then you could receive a potentially fatal electric shock .
WARNING! RISK OF INJURY!
► Let the appliance cool down before cleaning it. Risk of Burns!
► Do not use aggressive or abrasive cleaning agents. These can damage the
upper sur
► Under no circumstances should you clean the removable grill plates or the
appliance in the dishw
► Do not wait too long to start with the cleaning. Wait until the appliance
has cooled do
burnt. Then the food particles can be removed more easily.
■ Clean the appliance housing only with a dry or lightly moistened cloth.
■ Detach the removable plates and clean them in warm water with a little
deter
■ If fats or food should be under the removable plates and in the space in
which the heating coils 2 4 ar
■ Dry all parts well before re-use.
faces of the appliance.
gent added.
– Dab the fats or other liquids with a piece of kitchen paper.
– Remove stuck-on burnt residues with a wooden spatula or small wooden
sk
ewers.
se the appliance in water or other liquids! If you
asher!
wn suffi ciently that you can touch it without the risk of being
e located, proceed as follows:
GB
Storage
SWEW 750 A1
■ Store the appliance in a dry location.
■ Clean the appliance as described in the chapter “Cleaning”.
11
Page 15

GB
Troubleshooting
Problem Cause Remedy
Recipes
Waffl es
The plug is not inserted into
The appliance
does not function.
The nut waffl es/
patterned waffl es /
waffl es are too
dark.
Ingredients:
♦ 250 g margarine or butter
♦ approx. 200 g sugar
♦ 2 packets of vanilla sugar
♦ 5 eggs
♦ 500 g fl our
♦ 2 tsp of baking powder
♦ 350 - 400 ml milk
1)
Whisk the eggs until foamy.
2) Add the sugar and vanilla sugar, then mix everything together.
3) Then add the melted butter or margarine.
4) Blend in the baking powder.
5) Under constant stirring, gradually add the milk and fl our alternately.
6) Whisk everything at maximum speed with a hand blender until a smooth
batter mixture is produced.
a mains power socket.
The appliance is defective.
The nut waffl es/patterned
waffl es/waffl es were in the
appliance for too long.
Connect the power cable
into a mains power socket.
In this case, contact
Customer Services.
Remove the nut waffl es/
patterned waffl es/waffl es
sooner.
12
SWEW 750 A1
Page 16

Chocolate waffl es
Ingredients:
♦ 150 g soft butter
♦ 3 eggs
♦ 150 g sugar
♦ 100 g grated white chocolate
♦ 250 g fl our
♦ 1 tsp cinnamon
♦ 50 ml milk
1)
Whisk the eggs until foamy.
2) Add the sugar and cinnamon, then mix everything together.
3) Then add the melted butter or margarine.
4) Under constant stirring, gradually add the milk and fl our alternately.
5) Now fold in the grated chocolate.
6) Whisk everything at maximum speed with a hand blender until a smooth
batter mixture is produced.
Basic batter for nut waffl es/patterned waffl es
Ingredients:
♦ 400 g fl our
♦ 100 g sugar
♦ 100 g soft butter
♦ 2 eggs
♦ 100 ml milk
♦ ¼ tsp baking powder
GB
1)
2) Mix the fl our and baking powder together and add to the mixture.
3) Now add the milk.
4) Whisk everything at maximum speed with a hand blender.
SWEW 750 A1
Whisk the butter, the sugar and the eggs.
13
Page 17

GB
NOTE
► The nut waffl es/patterned
diff erent ingredients, such as jam, icing, nut-nougat spreads, custard,
yoghurt, apple purée, caramel, cream or, for savoury fi llings, cream
cheese, herb curd cheese, aioli, tzatziki, melted Gouda cheese etc.
► You can also cover the nut waffl es/patterned
glaze or icing, or sprinkle icing sugar on them.
waffl es can be fi lled with a wide variety of
waffl es with chocolate
Sweet batter for nut waffl es/patterned waffl es
Ingredients:
♦ 500 g fl our
♦ 200 g sugar
♦ 200 g Butter or margarine
♦ 200 g sour cream
♦ 3 eggs
♦ 1 tsp of baking powder
♦ 1 packets of vanilla sugar
1)
Separate the white and the yolk of two eggs. The yolk is not required.
2) Now whisk the butter/margarine, the sugar, the vanilla sugar, the 2 egg
whites and one whole egg (yolk and white).
3) Stir in the sour cream.
4) Mix the fl our and baking powder together and add to the mixture.
5) Whisk everything at maximum speed with a hand blender.
14
NOTE
► The sweet nut waffl e/patterned
of diff erent ingredients, such as jam, icing, nut-nougat spread, custard,
yoghurt, apple purée, caramel or cream.
► You can also cover the nut waffl es/patterned
glaze or icing, or sprinkle icing sugar on them.
waffl es can be fi lled with a wide variety
waffl es with chocolate
SWEW 750 A1
Page 18
Savoury batter for nut waffl es/patterned waffl es
Ingredients:
♦ 200 g fl our
♦ 125 g margarine
♦ 1 egg
♦ ¼ tsp baking powder
♦ 1 pinch sugar
♦ 1 pinch of salt
1)
Whisk the margarine, the sugar, the egg and the salt.
2) Mix the fl our and baking powder together and add this.
3) Whisk everything at maximum speed with a hand blender.
NOTE
► The savoury nut waffl e/patterned
of diff erent ingredients, such as cream cheese, herb curd cheese, aioli,
tzatziki, melted Gouda cheese etc.
waffl es can be fi lled with a wide variety
Disposal
Do not dispose of this appliance in your normal domestic waste.
This product is subject to the provisions of European Directive
2012/19/EU. (Waste Electrical and Electronic Equipment).
Dispose of the appliance through an approved disposal centre or at your community waste facility. Observe the currently applicable regulations. In case of
doubt, please contact your waste disposal centre.
GB
SWEW 750 A1
15
Page 19
GB
Warranty and Service
The warranty for this appliance is for 3 years from the date of purchase. The appliance has been manufactured with care and meticulously examined before delivery.
Please retain your receipt as proof of purchase. In the case of a warranty claim,
please make contact by telephone with our Customer Service Department. Only
in this way can a post-free despatch for your goods be assured.
NOTICE
► The warranty covers only claims for material and manufacturing defects,
but not for tr
components, e.g. buttons or batteries.
This product is for domestic use only and is not intended for commercial use. The
warranty is void in the case of abusive and improper handling, use of force and
internal tampering not carried out by our authorised service branch.
Your statutory rights are not restricted in any way by this warranty. The warranty
period is not extended by repairs made under the warranty. This applies also to
replaced and repaired parts.
Damages and defects extant at the time of purchase must be reported immediately after unpacking, resp. no later than two days after the date of purchase.
Repairs made after the lapse of the warranty period are subject to charge.
Service Great Britain
Tel.: 0871 5000 720 (£ 0.10/Min.)
E-Mail: kompernass@lidl.co.uk
IAN 93556
Hotline availability: Monday to Friday 08:00 - 20:00 (CET)
ansport damage, wearing parts or for damage to fragile
Importer
16
KOMPERNASS HANDELS GMBH
BURGSTRASSE 21
44867 BOCHUM
GERMANY
www.kompernass.com
SWEW 750 A1
Page 20
Spis treści
Wprowadzenie . . . . . . . . . . . . . . . . . . . . . . . . . . . . . . . . . . . . . . . . . . . . . . .18
Prawo autorskie . . . . . . . . . . . . . . . . . . . . . . . . . . . . . . . . . . . . . . . . . . . . . . . . . . . . . . . . . 18
Ograniczenie odpowiedzialności . . . . . . . . . . . . . . . . . . . . . . . . . . . . . . . . . . . . . . . . . . . 18
Użytkowanie zgodne z przeznaczeniem . . . . . . . . . . . . . . . . . . . . . . . . . . . . . . . . . . . . . 18
Zakres dostawy . . . . . . . . . . . . . . . . . . . . . . . . . . . . . . . . . . . . . . . . . . . . . . 19
Utylizacja opakowania . . . . . . . . . . . . . . . . . . . . . . . . . . . . . . . . . . . . . . . . . . . . . . . . . . . 19
Opis urządzania . . . . . . . . . . . . . . . . . . . . . . . . . . . . . . . . . . . . . . . . . . . . . . 20
Dane techniczne . . . . . . . . . . . . . . . . . . . . . . . . . . . . . . . . . . . . . . . . . . . . . . 20
Wskazówki dotyczące bezpieczeństwa . . . . . . . . . . . . . . . . . . . . . . . . . . . 21
Wymiana płytek wymiennych . . . . . . . . . . . . . . . . . . . . . . . . . . . . . . . . . . 23
Montaż płytek wymiennych . . . . . . . . . . . . . . . . . . . . . . . . . . . . . . . . . . . . . . . . . . . . . . . . 23
Demontaż płytek wymiennych . . . . . . . . . . . . . . . . . . . . . . . . . . . . . . . . . . . . . . . . . . . . . . 24
Pierwsze uruchomienie . . . . . . . . . . . . . . . . . . . . . . . . . . . . . . . . . . . . . . . . 24
Obsługa . . . . . . . . . . . . . . . . . . . . . . . . . . . . . . . . . . . . . . . . . . . . . . . . . . . . . 25
Pieczenie wafl i nadziewanych/wafl i z motywem . . . . . . . . . . . . . . . . . . . 25
Pieczenie gofrów . . . . . . . . . . . . . . . . . . . . . . . . . . . . . . . . . . . . . . . . . . . . . . . . . . . . . . . . 26
Czyszczenie . . . . . . . . . . . . . . . . . . . . . . . . . . . . . . . . . . . . . . . . . . . . . . . . . . 27
PL
Przechowywanie . . . . . . . . . . . . . . . . . . . . . . . . . . . . . . . . . . . . . . . . . . . . . 27
Usuwanie usterek . . . . . . . . . . . . . . . . . . . . . . . . . . . . . . . . . . . . . . . . . . . . . 28
Przepisy . . . . . . . . . . . . . . . . . . . . . . . . . . . . . . . . . . . . . . . . . . . . . . . . . . . . . 28
Gofry . . . . . . . . . . . . . . . . . . . . . . . . . . . . . . . . . . . . . . . . . . . . . . . . . . . . . . . . . . . . . . . . . 28
Gofry czekoladowe . . . . . . . . . . . . . . . . . . . . . . . . . . . . . . . . . . . . . . . . . . . . . . . . . . . . . . 29
Podstawowe ciasto na nadziewane wafl e/wafl e z motywem . . . . . . . . . . . . . . . . . . . . . . 29
Słodkie ciasto na wafl e nadziewane/wafl e z motywem . . . . . . . . . . . . . . . . . . . . . . . . . . 30
Słone ciasto na wafl e nadziewane/wafl e z motywem . . . . . . . . . . . . . . . . . . . . . . . . . . . 31
Utylizacja . . . . . . . . . . . . . . . . . . . . . . . . . . . . . . . . . . . . . . . . . . . . . . . . . . . . 31
Gwarancja i serwis . . . . . . . . . . . . . . . . . . . . . . . . . . . . . . . . . . . . . . . . . . . . 32
Importer . . . . . . . . . . . . . . . . . . . . . . . . . . . . . . . . . . . . . . . . . . . . . . . . . . . . . 32
SWEW 750 A1
17
Page 21

PL
Wprowadzenie
Gratulujemy zakupu nowego urządzenia!
Jest to nowoczesny i wartościowy produkt. Instrukcja obsługi stanowi element
składowy produktu. Zawiera ona ważne wskazówki na temat bezpieczeństwa,
użytkowania i utylizacji. Przed przystąpieniem do użytkowania produktu zapoznaj
się ze wszystkimi wskazówkami dotyczącymi obsługi i bezpieczeństwa.
Produkt należy użytkować wyłącznie zgodnie z zamieszczonym tu opisem oraz
w podanym zakresie zastosowań. W przypadku przekazania urządzenia następnej osobie, nie zapomnij dołączyć również instrukcji obsługi.
Prawo autorskie
Niniejsza dokumentacja jest chroniona prawem autorskim.
Wszelkie rozpowszechnianie, wzgl. każdy przedruk, także we fragmentach,
jak również odtwarzanie ilustracji, także w zmienionym stanie, jest dozwolone
wyłącznie po uzyskaniu pisemnej zgody producenta.
Ograniczenie odpowiedzialności
Wszystkie zawarte w niniejszej instrukcji obsługi informacje techniczne, dane,
wskazówki montażu i podłączania oraz obsługi, są aktualne na dzień przekazania do druku i uwzględniają nasze dotychczasowe doświadczenie oraz
spostrzeżenia zgodnie z najlepszą wiedzą.
Na podstawie zawartych tu informacji, ilustracji i opisów nie można wysuwać
żadnych roszczeń.
Producent nie ponosi żadnej odpowiedzialności za szkody spowodowane nieprzestrzeganiem instrukcji, użytkowaniem urządzenia niezgodnie z przeznaczeniem, niefachowymi naprawami, niedozwolonymi przeróbkami ani używaniem
niedozwolonych części zamiennych.
Użytkowanie zgodne z przeznaczeniem
Niniejsze urządzenie zostało przewidziane wyłącznie do pieczenia gofrów,
wafl i nadziewanych oraz wafl i z motywami.
Urządzenie to przeznaczone jest wyłącznie do zastosowania w gospodarstwach
domowych. Nie używaj urządzenia do celów komercyjnych!
18
SWEW 750 A1
Page 22

Zakres dostawy
Urządzenie dostarczane jest standardowo z następującymi elementami:
▯ Gofrownica
▯ 2 wymienne płytki „Gofry“
▯ 2 wymienne płytki „Wafl e nadziewane“
▯ 2 wymienne płytki „Motywy“
▯ Instrukcja obsługi
1)
Wyjmij urządzenie, płytki wymienne oraz instrukcję obsługi z kartonu.
2) Usuń wszystkie opakowania.
WSKAZÓWKA
► Po rozpakowaniu nowego urządzenia sprawdź, czy w środku znajdują
szystkie części oraz czy nie ma żadnych widocznych uszkodzeń.
się w
► W przypadku niekompletnej dostawy lub wystąpienia uszkodzeń na skutek
adliwego opakowania, bądź podczas transportu należy skontaktować
w
się infolinią serwisową (patrz rozdział Gwarancja i serwis).
Utylizacja opakowania
Opakowanie chroni urządzenie przed uszkodzeniami podczas transportu.
W trosce o ochronę środowiska, wszystkie zastosowane elementy opakowania
mogą zostać poddane recyklingowi.
Zwracanie opakowania do obiegu materiałów oszczędza surowce naturalne
i zmniejsza zanieczyszczenie odpadami. Zbędne materiały opakowania utylizować zgodnie z miejscowo obowiązującymi przepisami.
PL
SWEW 750 A1
WSKAZÓWKA
► W miarę możliwości zachowaj oryginalne opakowanie na czas trwania
arancji, by w razie odsyłania urządzenia móc je prawidłowo zapakować.
gw
19
Page 23

PL
Opis urządzania
Rysunek A:
1 blokady
2 grzałka
3 dolne uchwyty
4 grzałka
5 blokady
6 tylne uchwyty
Rysunek B (wafl e nadziewane):
7 górne noski blokad
8 dolne i tylne noski blokad
9 przednie noski blokad
Rysunek C (płytki do gofrów):
7 górne noski blokad
8 dolne i tylne noski blokad
9 przednie noski blokad
Rysunek D (wafl e z motywami):
7 górne noski blokad
8 dolne i tylne noski blokad
9 przednie noski blokad
Rysunek E:
0 zamek pokrywy
q kontrolka „Power“
w kontrolka „Gotowy do pracy“
Dane techniczne
Napięcie 220 - 240 V ∼, 50 Hz
Pobór mocy 750 W
20
SWEW 750 A1
Page 24
Wskazówki dotyczące bezpieczeństwa
OSTRZEŻENIE! NIEBEZPIECZEŃSTWO PORAŻENIA
PRĄDEM ELEKTRYCZNYM!
► By uniknąć zagrożeń, uszkodzone kable sieciowe i wtyki oddawaj
do naprawy wyłącznie specjaliście.
► Urządzenie wolno stosować wyłącznie w suchych pomieszcze-
niach. Nie wolno stosować go na otwartej przestrzeni.
Nigdy nie wolno zanurzać urządzenia w wodzie ani w innych cieczach. Grozi to śmiertelnym wypadkiem na skutek
porażenia prądem elektrycznym.
► W czasie czyszczenia uważać, aby woda nie dostała się do wnę-
trza obudowy. Nigdy nie czyścić urządzenia pod strumieniem wody.
► Dopilnuj, aby urządzenie nie miało kontaktu z wodą. Nigdy nie uży-
waj urządzenia w pobliżu wody ani pojemników zawierających płyny.
► Dopilnuj, by kabel sieciowy podczas pracy nigdy nie został za-
wilgocony ani zamoczony. Kabel układaj w taki sposób, aby nie
został on zakleszczony ani uszkodzony w inny sposób.
PL
► Po każdym użyciu urządzenia należy wyjąć wtyk z gniazda
sieciowego, aby wyłączyć urządzenie.
► Nigdy nie otwierać obudowy urządzenia.
OSTRZEŻENIE! ZAGROŻENIE ODNIESIENIEM OBRAŻEŃ!
► To urządzenie może być używane przez dzieci od 8 roku życia
oraz przez osoby o zmniejszonych zdolnościach fi zycznych,
sensorycznych lub umysłowych lub też osoby nieposiadające
odpowiedniego doświadczenia i/lub wiedzy, wyłącznie pod
nadzorem lub po przeszkoleniu w zakresie bezpiecznego używania urządzenia oraz wynikających z niego zagrożeń.
► Dzieci nie mogą bawić się urządzeniem.
SWEW 750 A1
21
Page 25
PL
OSTRZEŻENIE! ZAGROŻENIE ODNIESIENIEM OBRAŻEŃ!
► Czyszczenia ani konserwacji przez użytkownika nie mogą
wykonywać dzieci, chyba że ukończyły 8 lat i są pod nadzorem.
Dzieci w wieku poniżej 8 lat należy trzymać z dala od urządzenia i kabla zasilającego.
► Elementy urządzenia w czasie pracy mogą być bardzo gorące.
Z tego powodu chwytaj wyłącznie za uchwyty urządzenia.
► Przed czyszczeniem, przed wymianą płytek wymiennych oraz
przed schowaniem urządzenia odczekaj do całkowitego ostygnięcia urządzenia.
► Podczas wyjmowania gotowych potraw należy zachować ostroż-
ność. Urządzenie, jak również potrawy są bardzo gorące.
► Urządzenie użytkować wyłącznie na stabilnym, nie śliskim i pła-
skim podłożu.
► Do sterowania pracą urządzenia nie próbuj używać żadnych
zewnętrznych zegarów sterujących ani innego systemu zdalnego
sterowania.
Uwaga! Gorąca powierzchnia!
UWAGA – NIEBEZPIECZEŃSTWO POŻARU!
► Nie używaj urządzenia w pobliżu łatwopalnych materiałów!
► Nigdy nie przykrywaj urządzenia w czasie pracy.
► Urządzenie można ustawiać wyłącznie na
podłożu odpornym na wysoką temperaturę.
► Nigdy nie zostawiaj włączonego urządzenia bez nadzoru.
UWAGA – SZKODY MATERIALNE!
► Aby nie uszkodzić tefl onowej powłoki urządzenia, potrawy wyjmuj
zawsze z opiekacza plastikową lub drewnianą łopatką lub innym
odpowiednim, niemetalowym przedmiotem.
► Nie używaj do czyszczenia żadnych ostrych środków czyszczą-
cych ani ostrych przedmiotów.
22
SWEW 750 A1
Page 26
Wymiana płytek wymiennych
Możesz wybierać spośród 3 różnych płytek wymiennych.
– Wymienne płyty „Wafl e nadziewane“: do przygotowywania pustych
odku połówek gofrów, które można następnie napełnić i połączyć.
w śr
– Płytki wymienne „Gofry“: do pieczenia gofrów.
– Wymienne płyty „Wafl e z motywem“: do przygotowywania pustych
odku połówek gofrów z motywem, które można następnie napełnić
w śr
i połączyć.
OSTRZEŻENIE! NIEBEZPIECZEŃSTWO PORAŻENIA
PRĄDEM ELEKTRYCZNYM!
► Przed wymianą płytek wymiennych wyciągnij wtyk z gniazda sieciowego.
OSTRZEŻENIE! ZAGROŻENIE ODNIESIENIEM OBRAŻEŃ!
► Zanim przystąpisz do wymiany płytek wymiennych, odczekaj aż urządzenie
ygnie! Niebezpieczeństwo poparzenia!
ost
WSKAZÓWKA
► W przypadku wymiennych płyt „Wafl e nadziewane“ oraz „Wafl e z
ywem“ należy uważać zawsze na to, by w górnej części urządzenia
mot
zainstalować odpowiednio górną płytę wymienną, natomiast dolną płytę
wymienną zamontować w dolnej części urządzenia. Zorientować się
można na podstawie ilustracji na rozkładanej stronie.
PL
Montaż płytek wymiennych
1) Otwórz urządzenie, zwalniając przycisk pokrywy 0, jednocześnie podnosząc
pokrywę.
2) Górna płytka wymienna: Wsuń najpierw dolne noski blokady 8 w dolne
uchwyty 3.
3) Wciśnij teraz górne noski blokad 7 na blokady 1, w taki sposób, aby noski
blokad 7 wskoczyły pod blokady 1, a płytka została zablokowana.
4) Dolna płytka wymienna: Wsuń najpierw tylne noski blokady 8 w tylne
uchwyty 6.
5) Wciśnij teraz dolne noski blokad 9 na blokady 5, w taki sposób, aby noski
blokad 9 wskoczyły pod blokady 5, a płytka została zablokowana.
6) Przyciśnij mocno na środku dolnej płytki wymiennej, aby się upewnić, że
została ona prawidłowo zamontowana.
SWEW 750 A1
23
Page 27
PL
Demontaż płytek wymiennych
1) Górna płytka wymienna: Przesuń blokady 1 do góry i jednocześnie przechyl
płytkę wymienną do przodu, aby można ją było wyjąć z dolnych uchwytów 3.
2) Dolna płytka wymienna: Pociągnij blokady 5 do przodu i podważ płytkę
wymienną, aby można ją było wysunąć z tylnych uchwytów 6.
Pierwsze uruchomienie
Z każdą z 3 par płytek wymiennych przeprowadź następującą procedurę.
■ Przetrzyj powłokę przeciw przyleganiu płytek wymiennych jeden raz olejem
czym.
spożyw
OSTRZEŻENIE! ZAGROŻENIE ODNIESIENIEM OBRAŻEŃ!
► Zanim przystąpisz do wymiany płytek wymiennych, odczekaj aż urządzenie
ygnie! Niebezpieczeństwo poparzenia!
ost
■ Włóż parę płytek wymiennych do urządzenia.
■ Podłącz wtyk do gniazda sieciowego.
■ Zamknij urządzenie i zablokuj zamek pokrywy 0.
■ Odczekaj około 10 minut do rozgrzania się urządzenia.
WSKAZÓWKA
► Przy pierwszym użyciu może wystąpić lekki zapach spalenizny (może
e wydzielić się niewielka ilości dymu). Jest to objaw normalny, który
takż
z czasem ustępuje. Zadbaj o dostateczne przewietrzenie pomieszczenia.
Na przykład otwórz okno.
■ Następnie wyciągnij wtyczkę z gniazda i pozostaw urządzenie do ostygnięcia.
■ Oczyść dokładnie płytki wymienne oraz urządzenie w sposób opisany w
r
ozdziale „Czyszczenie”.
Teraz urządzenie jest gotowe do pracy.
24
SWEW 750 A1
Page 28

Obsługa
Pieczenie wafl i nadziewanych/wafl i z motywem
1) Wybierz płytki wymienne „Wafl e nadziewane“ lub „Wafl e z motywem“ i
zamontuj je. Należy przy tym uważać, by górna płyta wymienna zamontowana została w górnej części urządzenia, natomiast dolna płyta wymienna
została zamontowana w dolnej części.
UWAGA – SZKODY MATERIALNE!
► Nigdy nie używaj jednocześnie dwóch różnych płytek wymiennych.
Zamknij pokrywę i zablokuj jej zamek 0.
2)
3) Włóż wtyk sieciowy do gniazda sieciowego. Zapala się pomarańczowa
kontrolka „Power” q.
4) Gdy urządzenie się rozgrzeje, zapali się zielona kontrolka „Gotowy do
pracy“ w.
5) Zwolnij zamek pokrywy 0, otwórz pokrywę i dodaj ok. 1/2 łyżeczki ciasta
(przepisy na wafl e nadziewane patrz rozdział „Przepisy“) do każdej z
form/każdego motywu dolnych płyt wymiennych.
WSKAZÓWKA
► Przy wafl ach z motywem należy uważać na to, by rozprowadzić ciasto po
szystkich częściach motywu. W przeciwnym razie może się zdarzyć, że
w
niektóre części motywu nie zostaną wypełnione.
6) Zamknij pokrywę i zablokuj jej zamek 0.
PL
7) Po ok. 3 - 4 minutach wafl e nadziewane/wafl e z motywem są gotowe.
8) Jeśli nie chcesz już przygotowywać kolejnych wafl i nadziewanych/wafl i
9) Odczekaj do ostygnięcia wafl i nadziewanych/wafl i z motywem i odetnij
10) Wypełnij wafl e nadziewane/wafl e z motywem odpowiednim nadzieniem.
SWEW 750 A1
UWAGA – SZKODY MATERIALNE!
► Aby nie uszkodzić tefl onowej powłoki urządzenia, wafl e nadziewane/
afl e z motywem wyjmuj zawsze plastikową lub drewnianą łopatką lub
w
innym odpowiednim, niemetalowym przedmiotem.
Zwolnij zamek pokrywy 0, otwórz pokrywę i wyjmij wafl e nadziewane/
wafl e z motywem.
z motywem, wyjmij wtyk z gniazda sieciowego.
resztki ciasta z krawędzi wafl i nadziewanych/wafl i z motywem nożem
(usunięcie nierówności).
Niewielką ilość nadzienia rozprowadź na krawędzi wafl i nadziewanych/
wafl i z motywem i nałóż na nie pasującą drugą połówkę, aby obie części
się ze sobą skleiły oraz powstała fi gura z pustym wnętrzem.
25
Page 29

PL
Pieczenie gofrów
1) Wybierz płytki wymienne „Gofry” i zamontuj je.
UWAGA – SZKODY MATERIALNE!
► Nigdy nie używaj jednocześnie dwóch różnych płytek wymiennych.
Zamknij pokrywę i zablokuj jej zamek 0.
2)
3) Włóż wtyk sieciowy do gniazda sieciowego. Zapala się pomarańczowa
kontrolka „Power” q.
4) Gdy urządzenie się rozgrzeje, zapali się zielona kontrolka „Gotowy do
pracy“ w.
5) Otwórz pokrywę i nalej około 2-3 duże łyżki stołowe ciasta na gofry na
każdą z dwóch powierzchni do pieczenia gofrów dolnej płytki wymiennej.
6) Zamknij pokrywę i zablokuj jej zamek 0.
UWAGA – SZKODY MATERIALNE!
► Aby nie uszkodzić tefl onowej powłoki urządzenia, gofry wyjmuj zawsze
acza plastikową lub drewnianą łopatką lub innym odpowiednim,
z opiek
niemetalowym przedmiotem.
7) Po ok. 3 - 4 minutach gofry są gotowe. W zależności od zastosowanego
ciasta oraz indywidualnych preferencji czas ten może być różny. Zwolnij
zamek pokrywy 0,otwórz pokrywę i wyjmij gofry.
8) Jeśli nie chcesz już przygotowywać kolejnych gofrów, wyciągnij wtyk
z gniazda sieciowego.
26
SWEW 750 A1
Page 30
Czyszczenie
OSTRZEŻENIE! NIEBEZPIECZEŃSTWO PORAŻENIA
PRĄDEM ELEKTRYCZNYM!
► Przed czyszczeniem urządzenia wyciągnij wtyk z gniazda sieciowego.
OSTRZEŻENIE! ZAGROŻENIE ODNIESIENIEM OBRAŻEŃ!
► Przed czyszczeniem należy odczekać na schłodzenie się urządzenia.
Niebezpiecz
UWAGA – SZKODY MATERIALNE!
► Nie używaj ostrych ani szorujących środków czyszczących. Mogą one
wodować zarysowanie powierzchni urządzenia.
po
► Płyt wymiennych ani urządzenia nie wolno myć w zmywarce!
WSKAZÓWKA
► Nie czekaj z czyszczeniem zbyt długo. Odczekaj, aż urządzenie ostygnie
do tego stopnia, ab
Wtedy łatwiej jest usuwać pozostałości produktów spożywczych.
■ Obudowę czyść suchą lub lekko zwilżoną szmatką.
■ Zdejmij płytki wymienne i umyj je w ciepłej wodzie z niewielką ilością płynu
do m
■ Gdyby tłuszcz lub produkty spożywcze przedostały się pod płytki wymienne
do pr
sposób:
– Wytrzyj tłuszcz lub inne ciecze kawałkiem papieru kuchennego.
– Przypalone pozostałości usuwaj drewnianą łopatką lub drewnianym
■ Przed ponownym użyciem urządzenia dokładnie wysusz wszystkie jego
element
Nigdy nie w
cieczach. Grozi to śmiertelnym wypadkiem na skutek porażenia
prądem elektrycznym.
ycia naczyń.
zestrzeni, w której znajdują się grzałki 2 4, postępuj w następujący
pat
ykiem.
y.
olno zanurzać urządzenia w wodzie ani w innych
eństwo poparzenia!
y można je było dotknąć bez ryzyka poparzenia się.
PL
Przechowywanie
■ Przechowuj urządzenie w suchym miejscu.
■ Oczyść dokładnie wszystkie elementy urządzenia w sposób opisany w
ozdziale „Czyszczenie”.
r
SWEW 750 A1
27
Page 31

Usuwanie usterek
Usterka Przyczyna Środek zaradczy
PL
Urządzenie nie
działa.
Wafl e nadziewane/wafl e z
motywem/gofry
robią się ciemne.
Przepisy
Gofry
Składniki:
1)
2) Dodać cukier i cukier waniliowy, a następnie wszystko wymieszać.
3) Dodać rozpuszczone masło lub margarynę.
4) Dodać proszek do pieczenia i wymieszać.
5) Mieszając dodawać stopniowo mleko i mąkę na przemian.
6) Zmieszać wszystko na najszybszym ustawieniu miksera, aż powstanie
Wtyk nie jest podłączony
do gniazda sieciowego.
Urządzenie jest uszkodzone.
Wafl e nadziewane/wafl e z
motywem/gofry znajdowały się zbyt długo w
urządzeniu.
♦ 250 g margaryny lub masła
♦ ok. 200 g cukru
♦ 2 opakowania cukru waniliowego
♦ 5 jaj
♦ 500 g mąki
♦ 2 łyżeczki proszku do pieczenia
♦ 350 - 400 ml mleka
Utrzeć jaja na pianę.
gładkie ciasto.
Podłącz wtyk o do
gniazda.
W takim przypadku zwróć
się do serwisu.
Wyjmij wafl e nadziewane/wafl e z motywem/
gofry wcześniej z urządzenia.
28
SWEW 750 A1
Page 32

Gofry czekoladowe
Składniki:
♦ 150 g miękkiego masła
♦ 3 jaja
♦ 150 g cukru
♦ 100 g startej białej czekolady
♦ 250 g mąki
♦ 1 łyżeczka cynamonu
♦ 50 ml mleka
1)
Utrzeć jajka na pianę.
2) Dodać cukier i cynamon, a następnie wszystko wymieszać.
3) Dodać rozpuszczone masło lub margarynę.
4) Mieszając dodawać stopniowo mleko i mąkę na przemian.
5) Na końcu dodać tartą czekoladę.
6) Zmieszać wszystko na najszybszym ustawieniu miksera, aż powstanie
gładkie ciasto.
Podstawowe ciasto na nadziewane wafl e/
wafl e z motywem
Składniki:
♦ 400 g mąki
♦ 100 g cukru
♦ 100 g miękkiego masła
♦ 2 jaja
♦ 100 ml mleka
♦ ¼ łyżeczki proszku do pieczenia
PL
1)
2) Zmieszaj mąkę i proszek do pieczenia, a następnie dodaj je.
3) Dolej mleka.
4) Zmieszaj wszystko na najwyższym stopniu ustawienia przy pomocy miksera
SWEW 750 A1
Zmieszaj masło, cukier i jajka.
ręcznego.
29
Page 33

PL
WSKAZÓWKA
► Wafl e nadziewane/wafl e z motywem można wypełnić różnym nadzie-
niem:
zykład marmoladą, lukrem, kremem orzechowo-nugatowym,
Na pr
budyniem, jogurtem, musem jabłkowym, karmelem, śmietaną lub innymi
nadzieniami, jak świeżym serem, twarożkiem ziołowym, aioli, tzatziki,
topionym serem gouda itd.
► Wafl e nadziewane/wafl e z motywem można również polać polewą
ekoladową lub lukrem, albo posypać cukrem pudrem.
cz
Słodkie ciasto na wafl e nadziewane/wafl e z motywem
Składniki:
♦ 500 g mąki
♦ 200 g cukru
♦ 200 g masła lub margaryny
♦ 200 g śmietany
♦ 3 jaja
♦ 1 łyżeczka proszku do pieczenia
♦ 1 opakowanie cukru waniliowego
1)
Od dwóch jaj oddzielić żółtko i białko. Żółtko nie będzie potrzebne.
2) Zmieszać masło/margarynę, cukier, cukier waniliowy, 2 białka oraz całe
jajko (żółtko i białko).
3) Dodać śmietanę i wymieszać.
4) Zmieszaj mąkę i proszek do pieczenia, a następnie dodaj je.
5) Zmieszaj wszystko na najwyższym stopniu ustawienia przy pomocy miksera
ręcznego.
30
WSKAZÓWKA
► Słodkie wafl e nadziewane/wafl e z motywem można wypełnić różnym
nadzieniem:
zykład marmoladą, lukrem, kremem orzechowo-nugatowym,
Na pr
budyniem, jogurtem, musem jabłkowym, karmelem lub śmietaną.
► Wafl e nadziewane/wafl e z motywem można również polać polewą
ekoladową lub lukrem, albo posypać cukrem pudrem.
cz
SWEW 750 A1
Page 34

Słone ciasto na wafl e nadziewane/wafl e z motywem
Składniki:
♦ 200 g mąki
♦ 125 g margaryny
♦ 1 jajko
♦ ¼ łyżeczki proszku do pieczenia
♦ 1 szczypta cukru
♦ 1 szczypta soli
1)
Zmieszać margarynę, cukier, jajko i sól.
2) Zmieszaj mąkę i proszek do pieczenia, a następnie dodaj je.
3) Zmieszaj wszystko na najwyższym stopniu ustawienia przy pomocy miksera
ręcznego.
WSKAZÓWKA
► Słone wafl e nadziewane/wafl e z motywem można wypełnić różnym
nadzieniem:
a przykład świeżym serem, twarożkiem ziołowym, aioli, tzatziki, topionym
N
serem gouda itd.
Utylizacja
Nie należy wyrzucać urządzenia do normalnych śmieci
domowych.
Ten produkt podlega dyrektywie europejskiej 2012/19/EU.
(Waste Electrical and Electronic Equipment).
Urządzenie utylizować przez dostarczenie go do specjalistycznego zakładu
utylizacji odpadów lub do komunalnego zakładu utylizacji odpadów.
Przestrzegać aktualnie obowiązujących przepisów. W razie pytań i wątpliwości
odnośnie zasad utylizacji skontaktować się z najbliższym zakładem utylizacji.
PL
SWEW 750 A1
31
Page 35

PL
Gwarancja i serwis
Urządzenie objęte jest trzyletnią gwarancją, licząc od daty zakupu. Urządzenie
zostało przed dostarczeniem starannie wyprodukowane i poddane skrupulatnej
kontroli.
Paragon zachowaj jako dowód dokonania zakupu. W przypadku napraw gwarancyjnych skontaktuj się telefonicznie z najbliższym punktem serwisowym. Tylko
w ten sposób można zagwarantować bezpłatną wysyłkę zakupionego produktu.
WSKAZÓWKA
► Gwarancja obejmuje wyłącznie wady materiałowe i fabryczne, natomiast
nie obejmuje szk
dzeń części łatwo łamliwych, np. wyłącznika lub akumulatorów.
Produkt przeznaczony jest wyłącznie do użytku domowego, a nie do zastosowań przemysłowych i profesjonalnych. Gwarancja traci ważność w przypadku
niewłaściwego używania urządzenia, używania niezgodnego z przeznaczeniem,
użycia siły lub ingerencji w urządzenie dokonywanej poza naszymi autoryzowanymi punktami serwisowymi.
Niniejsza gwarancja nie ogranicza ustawowych praw nabywcy urządzenia.
Wykonanie usługi gwarancyjnej nie przedłuża czasu gwarancji. Dotyczy to
również części wymienionych i naprawionych.
Wszelkie szkody i wady wykryte podczas zakupu należy zgłosić bezpośrednio
po rozpakowaniu urządzenia, nie później niż po upływie dwóch dni od daty
zakupu.
Po upływie czasu gwarancji wszelkie naprawy będą wykonywane odpłatnie.
Wykonanie usługi gwarancyjnej nie przedłuża czasu gwarancji. Dotyczy to
również części wymienionych i naprawionych.
ód transportowych, części ulegających zużyciu ani uszko-
Importer
32
Serwis Polska
Tel.: 22 397 4996
E-Mail: kompernass@lidl.pl
IAN 93556
Czas pracy infolinii: od poniedziałku do piątku, w godzinach 08:00 - 20:00
czasu środkowoeuropejskiego
KOMPERNASS HANDELS GMBH
BURGSTRASSE 21
44867 BOCHUM
GERMANY
www.kompernass.com
SWEW 750 A1
Page 36

Kazalo
Uvod . . . . . . . . . . . . . . . . . . . . . . . . . . . . . . . . . . . . . . . . . . . . . . . . . . . . . . . . 34
Avtorske pravice . . . . . . . . . . . . . . . . . . . . . . . . . . . . . . . . . . . . . . . . . . . . . . . . . . . . . . . . 34
Omejitev odgovornosti . . . . . . . . . . . . . . . . . . . . . . . . . . . . . . . . . . . . . . . . . . . . . . . . . . . . 34
Predvidena uporaba . . . . . . . . . . . . . . . . . . . . . . . . . . . . . . . . . . . . . . . . . . . . . . . . . . . . . 34
Vsebina kompleta . . . . . . . . . . . . . . . . . . . . . . . . . . . . . . . . . . . . . . . . . . . . . 35
Odstranitev embalaže med odpadke . . . . . . . . . . . . . . . . . . . . . . . . . . . . . . . . . . . . . . . . 35
Opis naprave. . . . . . . . . . . . . . . . . . . . . . . . . . . . . . . . . . . . . . . . . . . . . . . . . 36
Tehnični podatki . . . . . . . . . . . . . . . . . . . . . . . . . . . . . . . . . . . . . . . . . . . . . .36
Varnostni napotki . . . . . . . . . . . . . . . . . . . . . . . . . . . . . . . . . . . . . . . . . . . . . 37
Menjava plošč pekača . . . . . . . . . . . . . . . . . . . . . . . . . . . . . . . . . . . . . . . . . 39
Vstavljanje plošč za zamenjavo . . . . . . . . . . . . . . . . . . . . . . . . . . . . . . . . . . . . . . . . . . . . . 39
Odstranjevanje plošč za zamenjavo . . . . . . . . . . . . . . . . . . . . . . . . . . . . . . . . . . . . . . . . . 40
Pred prvo uporabo . . . . . . . . . . . . . . . . . . . . . . . . . . . . . . . . . . . . . . . . . . . . 40
Uporaba . . . . . . . . . . . . . . . . . . . . . . . . . . . . . . . . . . . . . . . . . . . . . . . . . . . . 41
Peka vafl jev za polnjenje/vafl jev za polnjenje z motivi . . . . . . . . . . . . . .41
Peka vafl jev . . . . . . . . . . . . . . . . . . . . . . . . . . . . . . . . . . . . . . . . . . . . . . . . . . . . . . . . . . . . 42
Čiščenje . . . . . . . . . . . . . . . . . . . . . . . . . . . . . . . . . . . . . . . . . . . . . . . . . . . . . 43
Shranjevanje . . . . . . . . . . . . . . . . . . . . . . . . . . . . . . . . . . . . . . . . . . . . . . . . . 43
Odprava napak . . . . . . . . . . . . . . . . . . . . . . . . . . . . . . . . . . . . . . . . . . . . . . 44
Recepti . . . . . . . . . . . . . . . . . . . . . . . . . . . . . . . . . . . . . . . . . . . . . . . . . . . . . . 44
Vafl ji . . . . . . . . . . . . . . . . . . . . . . . . . . . . . . . . . . . . . . . . . . . . . . . . . . . . . . . . . . . . . . . . . . 44
Čokoladni vafl ji . . . . . . . . . . . . . . . . . . . . . . . . . . . . . . . . . . . . . . . . . . . . . . . . . . . . . . . . . 45
Osnovno testo za vafl je za polnjenje/vafl je za polnjenje z motivi . . . . . . . . . . . . . . . . . . . 45
Sladko testo za vafl je za polnjenje/vafl je za polnjenje z motivi . . . . . . . . . . . . . . . . . . . . 46
Slano testo za vafl je za polnjenje/vafl je za polnjenje z motivi . . . . . . . . . . . . . . . . . . . . . 47
SI
Odstranjevanje med odpadke . . . . . . . . . . . . . . . . . . . . . . . . . . . . . . . . . . . 47
Proizvajalec . . . . . . . . . . . . . . . . . . . . . . . . . . . . . . . . . . . . . . . . . . . . . . . . . . 47
Servis . . . . . . . . . . . . . . . . . . . . . . . . . . . . . . . . . . . . . . . . . . . . . . . . . . . . . . . 48
Garancijski list . . . . . . . . . . . . . . . . . . . . . . . . . . . . . . . . . . . . . . . . . . . . . . . . 48
SWEW 750 A1
33
Page 37

SI
Uvod
Iskrene čestitke ob nakupu vaše nove naprave!
Odločili ste se za sodoben in kakovosten izdelek. Navodila za uporabo so
sestavni del izdelka. Vsebujejo pomembne napotke za varnost, uporabo in
odstranjevanje naprave med odpadke. Preden začnete izdelek uporabljati, se
seznanite z vsemi napotki o njegovi uporabi in varnosti. Izdelek uporabljajte
samo na opisani način in le za navedena področja uporabe. Ob predaji
izdelka tretji osebi zraven priložite vso dokumentacijo.
Avtorske pravice
Ta dokumentacija je zaščitena z avtorskimi pravicami.
Vsakršno razmnoževanje oz. ponatis, tudi deloma, ter predvajanje slik, tudi
v spremenjenem stanju, so dovoljeni le s pisnim dovoljenjem proizvajalca.
Omejitev odgovornosti
Vse tehnične informacije, podatki in napotki za priključitev in uporabo naprave,
ki so navedeni v teh navodilih, ustrezajo zadnjemu stanju informacij neposredno
pred tiskanjem in so rezultat naših dosedanjih izkušenj in ugotovitev ter v skladu
z našim najboljšim znanjem.
Iz podatkov, slik in opisov v teh navodilih za uporabo ni mogoče izpeljevati
nikakršnih zahtevkov.
Proizvajalec ne prevzame nikakršne odgovornosti za škodo, nastalo zaradi
neupoštevanja teh navodil za uporabo, nepredvidene uporabe, nestrokovnih
popravil, nedovoljenih sprememb ali uporabe nedovoljenih nadomestnih delov.
Predvidena uporaba
Ta naprava je predvidena izključno za peko vafl jev, vafl jev za polnjenje in vafl jev
za polnjenje z motivi.
Naprava je namenjena izključno za uporabo v zasebnih gospodinjstvih.
Naprave ne uporabljajte v poslovne namene!
34
SWEW 750 A1
Page 38

Vsebina kompleta
Naprava ob nakupu standardno vsebuje naslednje sestavne dele:
▯ Pekač za vafl je
▯ 2 plošči za zamenjavo „vafl ji“
▯ 2 plošči za zamenjavo „vafl ji za polnjenje“
▯ 2 plošči za zamenjavo „motivi“
▯ Navodila za uporabo
1)
Napravo, plošče za zamenjavo in navodila za uporabo vzemite iz škatle.
2) Odstranite ves embalažni material.
NAPOTEK
► Preverite, ali komplet vsebuje vse sestavne dele in ali ti nimajo vidnih
odb.
pošk
► V primeru nepopolne dobave ali poškodb zaradi pomanjkljive embalaže
ansporta se obrnite na telefonsko servisno službo (glejte poglavje
ali tr
Garancija in servis).
Odstranitev embalaže med odpadke
Embalaža napravo varuje pred poškodbami med prevozom. Embalažni materiali
so izbrani v skladu z njihovo ekološko primernostjo in tehničnimi vidiki odstranjevanja, zato jih je mogoče reciklirati.
Povratek embalaže v krogotok materialov pomeni prihranek surovin in manj
odpadkov. Nepotrebne embalažne materiale odstranite med odpadke v skladu
z veljavnimi lokalnimi predpisi.
SI
SWEW 750 A1
NAPOTEK
► Po možnosti originalno embalažo v času garancijske dobe naprave shranite,
o napravo v primeru uveljavljanja garancije pravilno zapakirate.
da lahk
35
Page 39

SI
Opis naprave
Slika A:
1 zaskočna nastavka
2 grelna tuljava
3 spodnji držali
4 grelna tuljava
5 zaskočna nastavka
6 zadnji držali
Slika B (vafl ji za polnjenje):
7 zgornja pritrdilna jezička
8 spodnja in zadnja pritrdilna jezička
9 sprednja pritrdilna jezička
Slika C (plošče za vafl je):
7 zgornja pritrdilna jezička
8 spodnja in zadnja pritrdilna jezička
9 sprednja pritrdilna jezička
Slika D (vafl ji za polnjenje z motivi):
7 zgornja pritrdilna jezička
8 spodnja in zadnja pritrdilna jezička
9 sprednja pritrdilna jezička
Slika E:
0 zapah pokrova
q kontrolna lučka „Power“
w kontrolna lučka „pripravljen za uporabo“
Tehnični podatki
Napetost 220 - 240V ~, 50Hz
Vhodna moč 750 W
36
SWEW 750 A1
Page 40

Varnostni napotki
OPOZORILO! NEVARNOST ELEKTRIČNEGA UDARA!
► Poškodovane električne kable ali električne vtiče naj vam takoj za-
menja pooblaščeno strokovno osebje, da se izognete nevarnosti.
► Napravo uporabljajte samo v suhih prostorih in ne na prostem.
Naprave nikoli ne potopite pod vodo ali druge tekočine!
V nasprotnem primeru lahko pride do smrtno nevarnega
električnega udara.
► Pri čiščenju pazite na to, da v notranjost naprave ne zaide voda.
Naprave nikoli ne čistite pod tekočo vodo.
► Zagotovite, da naprava nikakor ne more priti v stik z vodo.
Naprave nikoli ne uporabljajte v bližini vode ali poleg posode,
ki vsebuje tekočino.
► Pazite, da se električni kabel med delovanjem nikoli ne navlaži ali
omoči. Kabel speljite tako, da se nikjer ne zatika in da se ga ne
da poškodovati na kak drugačen način.
► Po vsaki uporabi električni vtič povlecite iz električne vtičnice, da
napravo izklopite.
► Ohišja naprave nikoli ne odpirajte.
OPOZORILO! NEVARNOST TELESNE POŠKODBE!
► Otroci od 8 let starosti naprej in osebe z zmanjšanimi fi zičnimi,
zaznavnimi ali duševnimi sposobnostmi ali s pomanjkljivimi izkušnjami in/ali znanjem to napravo lahko uporabljajo le, če jih pri
tem nekdo nadzoruje ali jih je poučil o varni uporabi naprave in
so razumeli nevarnosti, ki izhajajo iz uporabe naprave.
SI
► Otroci se ne smejo igrati z napravo.
SWEW 750 A1
37
Page 41

SI
OPOZORILO! NEVARNOST TELESNE POŠKODBE!
► Otroci ne smejo naprave čistiti ali je vzdrževati kot uporabniki,
razen če so starejši od 8 let in dela izvajajo pod nadzorom.
Otrokom, ki so mlajši od 8 let, približevanje napravi in priključni
napeljavi ni dovoljeno.
► Deli naprave se lahko med delovanjem segrejejo. Zato se dotikajte
samo ročaja.
► Preden napravo začnete čistiti, preden zamenjate plošče ali
napravo shranite, počakajte, da se popolnoma ohladi.
► Pri jemanju pečenih jedi iz naprave bodite previdni. Naprava ter
jedi so zelo vroče.
► Napravo uporabljajte samo na stabilni, nedrseči in ravni površini.
► Naprave ne uporabljajte z zunanjo stikalno uro ali ločenim daljin-
skim sistemom.
Pozor! Vroča površina!
POZOR ‒ NEVARNOST POŽARA!
► Naprave ne smete uporabljati v bližini gorečih predmetov.
► Naprave med njenim delovanjem ne pokrivajte.
► Napravo uporabljajte samo na podlagi, odporni proti vročini.
► Naprave nikoli ne pustite delovati nenadzorovane.
POZOR – MATERIALNA ŠKODA!
► Jedi jemljite iz naprave samo z lopatko iz umetne snovi ali lesa
ali z drugim primernim, nekovinskim predmetom, da ne uničite
obloge proti sprijemanju pri pekaču za vafl je.
► Ne uporabljajte nobenih ostrih čistil ali koničastih predmetov.
38
SWEW 750 A1
Page 42

Menjava plošč pekača
Izbirate lahko med 3 različnimi ploščami za zamenjavo:
– Plošči za zamenjavo „vafl ji za polnjenje“: za izdelavo votlih polovičk
afl jev, ki jih potem lahko napolnite in stisnete skupaj.
v
– Plošči za zamenjavo „vafl ji“: za peko vafl jev.
– Plošči za zamenjavo „vafl ji za polnjenje z motivi“: za izdelavo votlih
afl jev z motivi, ki jih potem lahko napolnite in stisnete skupaj.
v
OPOZORILO! NEVARNOST ELEKTRIČNEGA UDARA
► Pred menjavanjem plošč vedno prej povlecite električni vtič iz električne
vtičnice.
OPOZORILO! NEVARNOST TELESNE POŠKODBE!
► Pred menjavanjem plošč napravo pustite, da se ohladi! Nevarnost opeklin!
NAPOTEK
► Pri ploščah za zamenjavo „vafl ji za polnjenje“ in „vafl ji za polnjenje z motivi“
edno pazite na to, da zgornjo ploščo za zamenjavo vedno namestite
v
v zgornji del naprave, spodnjo ploščo za zamenjavo pa v spodnji del
naprave. Pomagajte si s slikami na razklopni strani.
Vstavljanje plošč za zamenjavo
1) Odprite napravo, tako da sprostite zapah pokrova 0 in dvignete pokrov.
2) Zgornja plošča za zamenjavo: Najprej potisnite spodnja pritrdilna jezička 8
v spodnji držali 3.
3) Sedaj potisnite zgornja pritrdilna jezička 7 na zaskočna nastavka 1, tako
da se pritrdilna jezička 7 zatakneta pod zaskočna nastavka 1 in je plošča
za zamenjavo trdno pritrjena.
4) Spodnja plošča za zamenjavo: Najprej potisnite zadnja pritrdilna jezička 8
v zadnji držali 6.
5) Sedaj potisnite sprednja pritrdilna jezička 9 na zaskočna nastavka 5, tako
da se pritrdilna jezička 9 zatakneta pod zaskočna nastavka 5 in je plošča
za zamenjavo trdno pritrjena.
6) Enkrat krepko pritisnite na sredino spodnje plošče za zamenjavo, da zagotovite, da je ta varno vstavljena.
SI
SWEW 750 A1
39
Page 43

SI
Odstranjevanje plošč za zamenjavo
1) Zgornja plošča za zamenjavo: Potisnite zaskočna nastavka 1 navzgor in
istočasno pomaknite ploščo za zamenjavo naprej, tako da jo lahko odmaknete iz spodnjih držal 3.
2) Spodnja plošča za zamenjavo: Povlecite zaskočna nastavka 5 naprej in istočasno dvignite ploščo za zamenjavo, tako da jo lahko izvlečete iz zadnjih
držal 6.
Pred prvo uporabo
Z vsakim od 3 parov plošč za zamenjavo izvedite naslednji postopek.
■ Oblogo proti sprijemanju na ploščah za zamenjavo enkrat zdrgnite z oljem,
primernim za k
OPOZORILO! NEVARNOST TELESNE POŠKODBE!
► Pred menjavanjem plošč za zamenjavo pustite, da se naprava ohladi!
varnost opeklin!
Ne
■ Par plošč za zamenjavo vstavite v napravo.
■ Električni vtič priklopite v električno vtičnico.
■ Zaprite napravo in jo zapahnite z zapahom pokrova 0.
■ Napravo pustite pribl. 10 minut, da se segreje.
NAPOTEK
► Pri prvi uporabi lahko nastane rahel smrad (možen je tudi rahel nastanek
dima). T
za zadostno prezračenje. Na primer tako, da odprete okno.
■ Električni vtič izvlecite iz električne vtičnice in počakajte, da se naprava
ohladi.
■ Plošče za zamenjavo očistite, kot je opisano v poglavju „Čiščenje“.
Napr
ava je zdaj pripravljena za uporabo.
uhanje.
a je normalen in se čez nekaj časa porazgubi. Prosimo, poskrbite
40
SWEW 750 A1
Page 44

Uporaba
Peka vafl jev za polnjenje/
vafl jev za polnjenje z motivi
1) Izberite ploščo za zamenjavo za „vafl je za polnjenje“ ali „vafl je za polnjenje
z motivi“ in jo vstavite. Pri tem pazite na to, da zgornjo ploščo za zamenjavo
montirate v zgornji polovici naprave, spodnjo ploščo za zamenjavo pa v
spodnji polovici.
POZOR – MATERIALNA ŠKODA!
► Nikoli ne uporabljajte dveh različnih plošč za zamenjavo istočasno.
Zaprite pokrov in ga zapahnite z zapahom pokrova 0.
2)
3) Električni vtič priklopite v električno vtičnico. Oranžna kontrolna lučka
„Power“ q sveti.
4) Kakor hitro je naprava segreta, zelena kontrolna lučka „pripravljen za
uporabo“ w zasveti.
5) Sprostite zapah pokrova 0, pokrov odprite in dajte pribl. 1/2 žličke testa
(recepte za vafl je za polnjenje in vafl je za polnjenje z motivi najdete v poglavju „Recepti“) v vsak modelček/motiv na spodnji plošči za zamenjavo.
NAPOTEK
► Pri vafl jih za polnjenje z motivi pazite na to, da testo porazdelite čez vse
dele motiv
6) Zaprite pokrov in ga zapahnite z zapahom pokrova 0.
a. Drugače se lahko zgodi, da deli motiva niso zapolnjeni.
SI
7) Čez pribl. 3–4 minute so vafl ji za polnjenje/vafl ji za polnjenje z motivi pečeni.
8) Ko ne želite več peči vafl jev za polnjenje/vafl jev za polnjenje z motivi, elek-
9) Pustite vafl je za polnjenje/vafl je za polnjenje z motivi, naj se malce ohladijo,
SWEW 750 A1
POZOR – MATERIALNA ŠKODA!
► Vafl je za polnjenje/vafl je za polnjenje z motivi jemljite iz naprave samo
o iz umetne snovi ali lesa ali z drugim primernim, nekovinskim
z lopatk
predmetom, da ne uničite obloge proti sprijemanju pri pekaču za vafl je.
Sprostite zapah pokrova 0, pokrov odprite in vafl je za polnjenje/vafl je za
polnjenje z motivi vzemite ven.
trični vtič potegnite iz električne vtičnice.
in odrežite odvečno testo z roba vafl jev za polnjenje/vafl jev za polnjenje z
motivi z nožem (odstranite zarobke).
41
Page 45

SI
10) Napolnite vafl je za polnjenje/vafl je za polnjenje z motivi z želenim nadevom.
Porazdelite malce nadeva tudi po robu vafl jev za polnjenje/vafl jev za polnjenje z motivi in na spodnji del položite primeren zgornji del, tako da se
obe polovici zlepita in nastane votla fi gurica.
Peka vafl jev
1) Izberite ploščo za zamenjavo za „vafl je“ in jo vstavite.
POZOR – MATERIALNA ŠKODA!
► Nikoli ne uporabljajte dveh različnih plošč za zamenjavo istočasno.
Zaprite pokrov in ga zapahnite z zapahom pokrova 0.
2)
3) Električni vtič priklopite v električno vtičnico. Oranžna kontrolna lučka
„Power“ q sveti.
4) Kakor hitro je naprava segreta, zelena kontrolna lučka „pripravljen za
uporabo“ w zasveti.
5) Odprite pokrov in dajte pribl. 2–3 velike žlice testa za vafl je na sredino
vsake od plošč za peko vafl jev na spodnji plošči za zamenjavo.
6) Zaprite pokrov in ga zapahnite z zapahom pokrova 0.
POZOR – MATERIALNA ŠKODA!
► Vafl je jemljite iz naprave samo z lopatko iz umetne snovi ali lesa ali z
drugim primernim, nek
sprijemanju pri pekaču za vafl je.
7) Čez pribl. 3–4 minute so vafl ji pečeni. Ta čas je lahko pri vas drugačen,
odvisno od testa za vafl je, ki ste ga uporabili, in vašega osebnega okusa.
Sprostite zapah pokrova 0, pokrov odprite in vafl je vzemite ven.
8) Ko ne želite več peči vafl jev, električni vtič izvlecite iz električne vtičnice.
ovinskim predmetom, da ne uničite obloge proti
42
SWEW 750 A1
Page 46

Čiščenje
OPOZORILO! NEVARNOST ELEKTRIČNEGA UDARA
► Pred čiščenjem naprave vedno prej povlecite električni vtič iz električne
vtičnice.
ave nikoli ne potopite pod vodo ali druge tekočine! V nasprot-
Napr
nem primeru lahko pride do smrtno nevarnega električnega udara.
OPOZORILO! NEVARNOST TELESNE POŠKODBE!
► Pred čiščenjem naj se naprava dovolj ohladi. Nevarnost opeklin!
POZOR – MATERIALNA ŠKODA!
► Ne uporabljajte ostrih ali grobih čistilnih sredstev. Ta lahko poškodujejo
vršino naprave.
po
► Plošč za zamenjavo ali naprave nikoli ne čistite v pomivalnem stroju!
NAPOTEK
► S čiščenjem ne čakajte predolgo. Počakajte, da se naprava toliko ohladi,
da se je lahk
odstranili ostanke živil.
■ Ohišje očistite s suho krpo ali z rahlo navlaženo krpo.
■ Odstranite plošči za zamenjavo in plošči za zamenjavo očistite v topli vodi
z malce sr
■ Če bi vam v prostor pod ploščo za zamenjavo, kjer se nahajata grelni
tuljavi 2 4, stekla mašč
– Na košček kuhinjske papirnate krpe nakapljajte maščobo ali druge
tek
– Odstranite zažgane ostanke z leseno lopatko ali majhnim lesenim
nabodalom.
■ Vse dele pred ponovno uporabo temeljito osušite.
o dotaknete, ne da bi pri tem dobili opekline. Tako boste lažje
edstva za pomivanje.
oba ali živila, ravnajte, kot sledi:
očine.
SI
Shranjevanje
SWEW 750 A1
■ Napravo shranite na suhem mestu.
■ Napravo očistite, kot je opisano v poglavju „Čiščenje“.
43
Page 47

Odprava napak
Motnja Vzrok Odprava
SI
Recepti
Vafl ji
Električni vtič ni vtaknjen
Naprava ne
deluje.
Vafl ji za polnjenje/vafl ji za
polnjenje z motivi/
vafl ji so pretemni.
Sestavine:
♦ 250 g margarine ali masla
♦ približno 200 g sladkorja
♦ 2 zavojčka vanilijevega sladkorja
♦ 5 jajc
♦ 500 g moke
♦ 2 žlički pecilnega praška
♦ 350 - 400ml mleka
1)
Jajca penasto zamešajte.
2) Dodajte sladkor in vanilijev sladkor ter vse skupaj zmešajte.
3) Potem dodajte stopljeno maslo ali margarino.
4) Primešajte pecilni prašek.
5) Med neprekinjenim mešanjem počasi in izmenjaje dodajajte mleko in moko.
6) Vse skupaj zmešajte z ročnim mešalnikom na najvišji stopnji, tako da nastane
gladko testo.
v električno vtičnico.
Naprava je okvarjena.
Vafl ji za polnjenje/vafl ji za
polnjenje z motivi/vafl ji so
bili predolgo v napravi.
Električni vtič povežite
z električnim omrežjem.
Obrnite se na servisno
službo.
Vzemite vafl je za polnjenje/vafl je za polnjenje
z motivi/vafl je prej iz
naprave.
44
SWEW 750 A1
Page 48

Čokoladni vafl ji
Sestavine:
♦ 150 g mehkega masla
♦ 3 jajca
♦ 150 g sladkorja
♦ 100 g nastrgane bele čokolade
♦ 250 g moke
♦ 1 žlička cimeta v prahu
♦ 50 ml mleka
1)
Jajca penasto zamešajte.
2) Dodajte sladkor in cimet ter vse skupaj zmešajte.
3) Potem dodajte stopljeno maslo ali margarino.
4) Med neprekinjenim mešanjem počasi in izmenjaje dodajajte mleko in moko.
5) Nazadnje pa dodajte še nastrgano čokolado.
6) Vse skupaj zmešajte z ročnim mešalnikom na najvišji stopnji, tako da nastane
gladko testo.
Osnovno testo za vafl je za polnjenje/
vafl je za polnjenje z motivi
Sestavine:
♦ 400 g moke
♦ 100 g sladkorja
♦ 100 g mehkega masla
♦ 2 jajci
♦ 100 ml mleka
♦ ¼ žličke pecilnega praška
SI
1)
2) Pomešajte moko in pecilni prašek in ju dodajte maslu z jajci.
3) Potem dodajte mleko.
4) Vse skupaj na najvišji stopnji zmešajte z ročnim mešalnikom.
SWEW 750 A1
Zmešajte maslo, sladkor in jajca.
45
Page 49

SI
NAPOTEK
► Vafl je za polnjenje/vafl je za polnjenje z motivi lahko napolnite z različnimi
sestavinami:
na primer z mar
pudingom, jogurtom, jabolčno čežano, karamelo, smetano, ali pa z nadevi
iz svežega sira, zeliščne skute, česnove omake, omake tzatziki, staljene
gavde itd.
► Vafl je za polnjenje/vafl je za polnjenje z motivi lahko prelijete tudi s čoko-
ladno glazur
melado, sladkornim oblivom, nugatovo kremo z lešniki,
o ali jih potresete s sladkorjem v prahu.
Sladko testo za vafl je za polnjenje/
vafl je za polnjenje z motivi
Sestavine:
♦ 500 g moke
♦ 200 g sladkorja
♦ 200 g masla ali margarine
♦ 200 g kisle smetane
♦ 3 jajca
♦ 1 žlička pecilnega praška
♦ 1 zavojček vanilijevega sladkorja
1)
Pri dveh jajcih rumenjak ločite od beljaka. Rumenjakov ne potrebujete.
2) Zmešajte maslo/margarino, sladkor, vanilijev sladkor, 2 beljaka in 1 celo
jajce (rumenjak in beljak).
3) Primešajte kislo smetano.
4) Pomešajte moko in pecilni prašek in ju dodajte masi.
5) Vse skupaj na najvišji stopnji zmešajte z ročnim mešalnikom.
46
NAPOTEK
► Sladke vafl je za polnjenje/vafl je za polnjenje z motivi lahko napolnite
azličnimi sestavinami:
z r
na primer z marmelado, sladkornim oblivom, nugatovo kremo z lešniki,
pudingom, jogurtom, jabolčno čežano, karamelo ali smetano.
► Vafl je za polnjenje/vafl je za polnjenje z motivi lahko prelijete tudi
oladno glazuro ali jih potresete s sladkorjem v prahu.
s čok
SWEW 750 A1
Page 50
Slano testo za vafl je za polnjenje/
vafl je za polnjenje z motivi
Sestavine:
♦ 200 g moke
♦ 125 g margarine
♦ 1 jajce
♦ ¼ žličke pecilnega praška
♦ 1 ščepec sladkorja
♦ 1 noževa konica soli
1)
Zmešajte margarino, sladkor, jajce in sol.
2) Pomešajte moko in pecilni prašek in ju dodajte masi.
3) Vse skupaj na najvišji stopnji zmešajte z ročnim mešalnikom.
NAPOTEK
► Slane vafl je za polnjenje/vafl je za polnjenje z motivi lahko napolnite z
azličnimi sestavinami:
r
na primer s svežim sirom, zeliščno skuto, česnovo omako, omako tzatziki,
staljeno gavdo itd.
Odstranjevanje med odpadke
Naprave nikakor ne odvrzite med običajne gospodinjske
odpadke. Za izdelek velja evropska direktiva 2012/19/EU.
(ang. Waste Electrical and Electronic Equipment).
Napravo oddajte pri podjetju, registriranem za odstranjevanje odpadkov, ali pri
svojem komunalnem podjetju za odstranjevanje odpadkov. Upoštevajte trenutno
veljavne predpise. V primeru dvoma se obrnite na najbližje podjetje za odstranjevanje odpadkov.
SI
Proizvajalec
KOMPERNASS HANDELS GMBH
BURGSTRASSE 21
44867 BOCHUM
GERMANY
www.kompernass.com
SWEW 750 A1
47
Page 51

SI
Servis
Servis Slovenija
Tel.: 080080917
E-Mail: kompernass@lidl.si
IAN 93556
Dosegljivost telefonske službe za stranke:
Od ponedeljka do petka od 8:00 do 20:00 (po srednjeevropskem času)
Garancijski list
1. S tem garancijskim listom jamčimo Kompernass Handels GmbH, da bo izdelek v garancijskem roku ob normalni in pravilni uporabi brezhibno deloval in
se zavezujemo, da bomo ob izpolnjenih spodaj navedenih pogojih odpravili
morebitne pomanjkljivosti in okvare zaradi napak v materialu ali izdelavi oz.
po svoji presoji izdelek zamenjali ali vrnili kupnino.
2. Garancija je veljavna na ozemlju Republike Slovenije.
3. Garancijski rok za proizvod je 3 leta od dneva nabave.
4. Kupec je dolžan okvaro javiti pooblaščenemu servisu oz. se informirati o
nadaljnjih postopkih na zgoraj navedeni telefonski številki. Svetujemo vam,
da pred tem natančno preberete navodila o sestavi in uporabi izdelka.
5. Kupec je dolžan pooblaščenemu servisu predložiti garancijski list in račun,
kot potrdilo in dokazilo o nakupu.
6. V primeru, da proizvod popravlja nepooblaščeni servis ali oseba, kupec ne
more uveljavljati zahtevkov iz te garancije.
7. Vzroki za okvaro oz. nedelovanje izdelka morajo biti lastnosti stvari same, in ne
vzroki, ki so zunaj proizvajalčeve oz. prodajalčeve sfere. Kupec ne more uveljavljati zahtevkov iz te garancije, če se ni držal priloženih navodil za sestavo in
uporabo izdelka ali, če je izdelek kakorkoli spremenjen ali nepravilno vzdrževan.
8. Jamčimo servisiranje in rezervne dele za minimalno dobo, ki je zahtevana s
strani zakonodaje.
9. Obrabni deli oz. potrošni material so izvzeti iz garancije.
10. Vsi potrebni podatki za uveljavljanje garancije se nahajajo na dveh ločenih
dokumentih (garancijski list, račun).
11. Ta garancija proizvajalca ne izključuje pravic potrošnika, ki izhajajo iz odgovornosti prodajalca za napake na blagu.
48
Prodajalec:
Lidl d.o.o.k.d., Pod lipami 1, SI-1218 Komenda
SWEW 750 A1
Page 52

Obsah
Úvod . . . . . . . . . . . . . . . . . . . . . . . . . . . . . . . . . . . . . . . . . . . . . . . . . . . . . . . . 50
Autorské právo . . . . . . . . . . . . . . . . . . . . . . . . . . . . . . . . . . . . . . . . . . . . . . . . . . . . . . . . . . 50
Omezení ručení . . . . . . . . . . . . . . . . . . . . . . . . . . . . . . . . . . . . . . . . . . . . . . . . . . . . . . . . . 50
Použití dle předpisů . . . . . . . . . . . . . . . . . . . . . . . . . . . . . . . . . . . . . . . . . . . . . . . . . . . . . . 50
Rozsah dodávky . . . . . . . . . . . . . . . . . . . . . . . . . . . . . . . . . . . . . . . . . . . . . . 51
Likvidace obalu . . . . . . . . . . . . . . . . . . . . . . . . . . . . . . . . . . . . . . . . . . . . . . . . . . . . . . . . . 51
Popis přístroje . . . . . . . . . . . . . . . . . . . . . . . . . . . . . . . . . . . . . . . . . . . . . . . .52
Technická data . . . . . . . . . . . . . . . . . . . . . . . . . . . . . . . . . . . . . . . . . . . . . . . 52
Bezpečnostní pokyny . . . . . . . . . . . . . . . . . . . . . . . . . . . . . . . . . . . . . . . . . .53
Výměna vyměnitelných plotniček . . . . . . . . . . . . . . . . . . . . . . . . . . . . . . . . 55
Nasazení vyměnitelných plotniček . . . . . . . . . . . . . . . . . . . . . . . . . . . . . . . . . . . . . . . . . . 55
Vyjmutí vyměnitelných plotniček . . . . . . . . . . . . . . . . . . . . . . . . . . . . . . . . . . . . . . . . . . . . 56
První uvedení do provozu . . . . . . . . . . . . . . . . . . . . . . . . . . . . . . . . . . . . . . 56
Obsluha . . . . . . . . . . . . . . . . . . . . . . . . . . . . . . . . . . . . . . . . . . . . . . . . . . . . . 57
Pečení vafl ových ořechů/ vafl í s motivem . . . . . . . . . . . . . . . . . . . . . . . . . 57
Pečení vafl í . . . . . . . . . . . . . . . . . . . . . . . . . . . . . . . . . . . . . . . . . . . . . . . . . . . . . . . . . . . . . 58
Čištění . . . . . . . . . . . . . . . . . . . . . . . . . . . . . . . . . . . . . . . . . . . . . . . . . . . . . . . 59
Uložení . . . . . . . . . . . . . . . . . . . . . . . . . . . . . . . . . . . . . . . . . . . . . . . . . . . . . . 59
Odstranění závad . . . . . . . . . . . . . . . . . . . . . . . . . . . . . . . . . . . . . . . . . . . . . 60
Recepty . . . . . . . . . . . . . . . . . . . . . . . . . . . . . . . . . . . . . . . . . . . . . . . . . . . . .60
Vafl e . . . . . . . . . . . . . . . . . . . . . . . . . . . . . . . . . . . . . . . . . . . . . . . . . . . . . . . . . . . . . . . . . . 60
Čokoládové vafl e . . . . . . . . . . . . . . . . . . . . . . . . . . . . . . . . . . . . . . . . . . . . . . . . . . . . . . . . 61
Základní těsto pro vafl ové ořechy/vafl e s motivem . . . . . . . . . . . . . . . . . . . . . . . . . . . . . . 61
Sladké těsto na vafl ové ořechy/vafl e s motivem . . . . . . . . . . . . . . . . . . . . . . . . . . . . . . . . 62
Slané těsto na vafl ové ořechy/vafl e s motivem . . . . . . . . . . . . . . . . . . . . . . . . . . . . . . . . . 63
CZ
Likvidace . . . . . . . . . . . . . . . . . . . . . . . . . . . . . . . . . . . . . . . . . . . . . . . . . . . . 63
Záruka a servis . . . . . . . . . . . . . . . . . . . . . . . . . . . . . . . . . . . . . . . . . . . . . . . 64
Dovozce . . . . . . . . . . . . . . . . . . . . . . . . . . . . . . . . . . . . . . . . . . . . . . . . . . . . . 64
SWEW 750 A1
49
Page 53

Úvod
Gratulujeme Vám k zakoupení nového přístroje!
Vaším nákupem jste si vybrali moderní a kvalitní výrobek. Návod k obsluze je
součástí tohoto výrobku. Obsahuje důležité pokyny a upozornění ohledně bezpečnosti, použití a likvidace. Před použitím výrobku si dobře přečtěte provozní
a bezpečnostní pokyny. Tento výrobek používejte pouze předepsaným způsobem
a v uvedených oblastech použití. Při předávání výrobku třetím osobám předávejte
i tyto podklady.
CZ
Autorské právo
Tato dokumentace je chráněná autorským právem.
Jakékoli rozmnožování, resp. dotisk, i jenom částečně, a reprodukce ilustrací
i ve změněném stavu, je dovolené pouze za výslovného písemného souhlasu
výrobce.
Omezení ručení
Všechny technické informace, obsažené v tomto návodu k obsluze, jakož i údaje
a pokyny pro instalaci a připojení a obsluhu, odpovídají poslednímu stavu techniky
v době tisku a byly provedené s přihlédnutím na naše dosavadní zkušenosti
a poznatky podle nejlepšího vědomí.
Z údajů, obrázků a popisů v tomto návodu nelze odvodit žádné nároky.
Výrobce nepřebírá ručení za škody, vzniklé na základě nedodržení návodu, na
základě použití ne dle předpisů, neodborných oprav, nedovoleně provedených
změn nebo na základě použití nedovolených náhradních dílů.
Použití dle předpisů
Tento přístroj je určen výhradně pro pečení vafl í, vafl ových ořechů a vafl í
s motivem.
Tento přístroj je určen výlučně pro použití v oblasti soukromých domácností.
Nepoužívejte přístroj pro komerční účely!
50
SWEW 750 A1
Page 54

Rozsah dodávky
Přístroj se standarně dodává s následujícími komponenty:
▯ Vafl ovač
▯ 2 vyměnitelné plotničky „vafl e“
▯ 2 vyměnitelné plotničky „vafl ové ořechy“
▯ 2 vyměnitelné plotničky „vafl e s motivem“
▯ Návod k obsluze
1)
Vyjměte přístroj, výměnitelné plotničky a návod k obsluze z krabice.
2) Odstraňte veškerý obalový materiál.
UPOZORNĚNÍ
► Zkontrolujte dodávku na kompletnost a viditelné poškození.
► V případě neúplné dodávky nebo poškození, vzniklé v důsledku vadného
obalu nebo dopr
servis).
Likvidace obalu
Obal chrání přístroj před poškozením při přepravě. Obalový materiál je zvolen
podle ekologického a likvidačně technického hlediska, a proto jej lze recyklovat.
Navrácení obalu do oběhu zpracování materiálu šetří suroviny a sníží produkci odpadů. Více nepotřebný obalový materiál zlikvidujte dle místně platných předpisů.
UPOZORNĚNÍ
► Pokud možno, uschovejte originální balení během záruční doby přístroje,
y bylo možné, v případě záruky přístroj řádně zabalit.
ab
CZ
avou, kontaktujte servisní Hotline (viz kapitolu Záruka a
SWEW 750 A1
51
Page 55

CZ
Popis přístroje
Obrázek A:
1 aretace
2 topné těleso
3 spodní přidržení
4 topné těleso
5 aretace
6 zadní přidržení
Obrázek B (vafl e ořechové):
7 horní západky
8 spodní a zadní západky
9 přední západky
Obrázek C (vafl ové plotničky):
7 horní západky
8 spodní a zadní západky
9 přední západky
Obrázek D (vafl e s motivem):
7 horní západky
8 spodní a zadní západky
9 přední západky
Obrázek E:
0 zablokování víka
q kontrolní světlo "Power"
w kontrolní světlo "připraveno k provozu"
Technická data
Napětí 220 - 240 V ∼, 50 Hz
Příkon 750 W
52
SWEW 750 A1
Page 56

Bezpečnostní pokyny
VÝSTRAHA!
NEBEZPEČÍ ÚRAZU ELEKTRICKÝM PROUDEM!
► Nechte poškozený síťový kabel nebo síťovou zástrčku okamžitě
vyměnit autorizovaným odborným personálem, abyste zabránili
ohrožení.
► Přístroj používejte jen v suchých prostorách, ne venku.
Přístroj nikdy neponořujte do vody či jiných tekutin! V opačném případě hrozí nebezpečí ohrožení života elektrickým
proudem.
► Při čištění dbejte na to, aby se do vnitřní části spotřebiče nedosta-
la voda. Spotřebič nikdy nečistěte pod tekoucí vodou.
► Ujistěte se, zda přístroj nemůže nikdy přijít do styku s vodou. Nepo-
užívejte přístroj nikdy v blízkosti vody nebo nádob, které obsahují
kapaliny.
► Dbejte na to, aby přívodní kabel během provozu nikdy nenavlhnul.
Veďte jej tak, aby se nikde nemohl zachytit nebo jinak poškodit.
► K vypnutí přístroje vytáhněte po každém použití zástrčku ze
zásuvky.
► Kryt přístroje nikdy neotevírejte.
CZ
VÝSTRAHA! NEBEZPEČÍ PORANĚNÍ!
► Tento přístroj smí používat děti ve věku od 8 let a osoby s ome-
zenými fyzickými, smyslovými nebo duševními schopnostmi, nebo
nedostatkem zkušeností a/nebo znalostí, pokud jsou pod dozorem, nebo pokud byly poučeny o bezpečném používání přístroje
a pochopily rizika, vyplývající z používá í přístroje.
► Děti si nesmí hrát s přístrojem.
SWEW 750 A1
53
Page 57

CZ
VÝSTRAHA! NEBEZPEČÍ PORANĚNÍ!
► Čištění a údržbu uživatele nesmí provádět děti, ledaže jsou starší
než 8 let a jsou pod dohledem.
Děti mladší než 8 let nesmí mít přístup k přístroji
a přívodnímu kabelu.
► Součásti přístroje mohou být během provozu horké. Proto přístroj
uchopte pouze za rukojetě.
► Před čištěním přístroje, výměnou vyměnitelných plotniček nebo
před uložením přístroje jej nechte úplně ochladit.
► Buďte opatrní při vyjímání hotových pokrmů. Přístroj i pokrmy jsou
velmi horké.
► Přístroj provozujte pouze na stabilní a rovné ploše, která není kluzká.
► K provozu přístroje nepoužívejte externí minutník ani zvláštní
dálkové ovládání.
Pozor! Horký povrch!
POZOR - NEBEZPEČÍ POŽÁRU!
► Přístroj nesmí být nikdy použit v blízkosti hořlavých materiálů
► Během provozu přístroj nikdy nezakrývejte.
► Provozujte přístroj pouze na tepelně odolném podkladu.
► Přístroj nikdy neuvádějte do provozu bez dozoru.
POZOR-VĚCNÉ ŠKODY!
► Hotové pokrmy vyjímejte pouze špachtlí z umělé hmoty nebo
ze dřeva nebo jiným vhodným nekovovým předmětem, aby jste
nezničili nepřilnavý povrch Vašeho sendvičovače.
► K čištění nepoužívejte žádné agresivní čistící prostředky a ostré
předměty.
54
SWEW 750 A1
Page 58

Výměna vyměnitelných plotniček
Můžete volit mezi 3 druhy vyměnitelných plotniček:
– Vyměnitelné plotničky „vafl ové ořechy“: Pro přípravu dutých polovin
afl ových ořechů, které pak můžete naplnit a spojit.
v
– Vyměnitelné plotničky „vafl e“: K pečení vafl í.
– Vyměnitelné plotničky „vafl e s motivem“: Pro přípravu dutých polovin
afl í s motivem, které pak můžete naplnit a spojit.
v
VÝSTRAHA! NEBEZPEČÍ ÚDERU ELEKTRICKÝM PROUDEM
► Nejprve vytáhněte zástrčku ze zásuvky, než se pustíte do výměny vyměni-
telných plotnič
VÝSTRAHA! NEBEZPEČÍ PORANĚNÍ!
► Před vyjmutím vyměnitelné plotničky nechte přístroj vychladnout!
Nebezpečí popálení!
UPOZORNĚNÍ
► U vyměnitelných plotniček „vafl ové ořechy“ a „vafl e s motivem“ dbejte
vždy na to, ab
lovaná do horní části přístroje a příslušná spodní vyměnitelná plotnička ve
spodní části přístroje. Orientujte se podle obrázků na vyklápěcí straně.
Nasazení vyměnitelných plotniček
1) Přístroj otevřete uvolněním zablokování víka 0 a jeho vyklopením.
2) Horní vyměnitelná plotnička: Spodní západky 8 zasuňte nejdříve do spodního přidržení 3.
3) Nyní zatlačte horní západky 7 na aretace 1 tak, aby západky 7 zaskočily
pod aretace 1 a vyměnitelná plotnička dosedala napevno.
4) Spodní vyměnitelné plotničky: Zadní západky 8 zasuňte nejdříve do zadního
přidržení 6.
5) Nyní zatlačte přední západky 9 na aretace 5 tak, aby západky 9 zaskočily pod aretace 5 a vyměnitelná plotnička dosedala napevno.
6) Ke zjištění, zda je plotnička bezpečně a správne vsazená, tlačte jednou silně
na střed spodní vyměnitelné plotničky.
ek.
y příslušná horní vyměnitelná plotnička byla vždy nainsta-
CZ
SWEW 750 A1
55
Page 59

CZ
Vyjmutí vyměnitelných plotniček
1) Horní vyměnitelná plotnička: Aretace 1 vysuňte směrem nahoru a současně
vyklopte vyměnitelnou plotničku dopředu tak, abyste ji mohli vysunout ze
spodního přidržení 3.
2) Spodní vyměnitelné plotničky: Aretace 5 vytáhněte dopředu a vyměnitelnou
plotničku nadzvedněte tak, abyste tuto mohli vytáhnout ze zadního přidržení 6.
První uvedení do provozu
Následující postup proveďte s každou ze tří párů vyměnitelných plotniček.
■ Antiadhézní povrch vyměnitelných plotniček k vaření potřete vhodným olejem.
VÝSTRAHA! NEBEZPEČÍ PORANĚNÍ!
► Před výměnou vyměnitelné plotničky nechte přístroj vychladnout! Nebezpečí
opálení!
p
■ Do přístroje vsaďte pár vyměnitelných plotniček.
■ Zapojte zástrčku do zásuvky.
■ Přístroj zavřete a zablokujte zablokování víka 0.
■ Přístroj nechte 10 minut rozehřát.
UPOZORNĚNÍ
► Při prvním použití může dojít ke vzniku lehkého zápachu (možný nepatrný
ouře). Toto je normální a po určité době to zmizí. Postarejte se o
únik k
dostatečné větrání. Otevřte například okno.
■ Vytáhněte zástrčku ze zásuvky a nechte přístroj ochladnout.
■ Vyměnitelné plotničky a přístroj očistěte, jak je popsáno v kapitole "Čištění".
Nyní je př
ístroj připravený k provozu.
56
SWEW 750 A1
Page 60

Obsluha
Pečení vafl ových ořechů/ vafl í s motivem
1) Zvolte vyměnitelnou plotničku „vafl ové ořechy“ nebo „vafl e s motivem“ a
tuto nasaďte. Dbejte při tom na to, aby horní vyměnitelná plotnička byla
nainstalovaná v horní polovině přístroje a spodní vyměnitelná plotnička ve
spodní polovině přístroje.
POZOR – VĚCNÉ ŠKODY!
► Nikdy nepoužívejte současně dvě různé vyměnitelné plotničky.
Zavřete víko a zablokujte jej zablokováním víka 0.
2)
3) Zasuňte zástrčku do síťové zásuvky. Svítí oranžová kontrolka „Power“ q.
4) Jakmile je přístroj zahřátý, rozsvítí se zelená kontrolka „připraveno k provozu“ w.
5) Uvolněte zablokování víka 0, otevřete víko a dejte cca 1/2 čajové lžičky
těsta (recepty pro vafl ové ořechy a vafl e s motivem viz kapitola „Recepty“)
do každé z forem/do každého motivu spodních vyměnitelných plotniček.
UPOZORNĚNÍ
► U vafl í s motivem dbejte na to, aby bylo těsto na všech částech motivu.
V opačném př
6) Zavřete víko a zajistěte jej zablokováním víka 0.
POZOR – VĚCNÉ ŠKODY!
► Vafl ové ořechy/vafl e s motivem vyjímejte pouze lžící z umělé hmoty nebo
e dřeva nebo jiným vhodným nekovovým předmětem, abyste nezničili
z
nepřilnavý povrch Vašeho přístroje.
7) Po cca 3 - 4 minutách jsou vafl ové ořechy/vafl e s motivem hotové. Uvolněte
zablokování víka 0, otevřete víko a vyjměte vafl ové ořechy/vafl e s motivem.
8) Pokud již nechcete připravovat další vafl ové ořechy/vafl e s motivem, vytáhněte zástrčku ze zásuvky.
ípadě se může stát, že některé části motivu se nevyplní.
CZ
SWEW 750 A1
57
Page 61

9) Nechte vafl ové ořechy/vafl e s motivem trochu vychladnout a odřežte nožem
přebytek těsta z okraje vafl ových ořechů/vafl í s motivem (odstranění otřepů).
10) Naplňte vafl ové ořechy/vafl e s motivem požadovanou náplní. Dejte trochu
náplně také na okraj vafl ových ořechů/vafl í s motivem a položte na ně odpovídající druhou polovinu tak, aby se obě poloviny slepily a vznikla fi gurka
s dutým vnitřkem.
Pečení vafl í
1) Zvolte vyměnitelnou plotničku „vafl e“ a tuto nasaďte.
CZ
POZOR – VĚCNÉ ŠKODY!
► Nikdy nepoužívejte současně dvě různé vyměnitelné plotničky.
Zavřete víko a zajistěte jej zablokováním víka 0.
2)
3) Zasuňte zástrčku do síťové zásuvky. Svítí oranžová kontrolka „Power“ q.
4) Jakmile je přístroj zahřátý, rozsvítí se zelená kontrolka „připraveno k provozu“ w.
5) Otevřete víko a na obě pečící plochy na vafl e spodní vyměnitelné plotničky
dejte do středu cca 2 - 3 velké polévkové lžíce vafl ového těsta.
6) Zavřete víko a zajistěte jej zablokováním víka 0.
POZOR – VĚCNÉ ŠKODY!
► Vafl e vyjímejte pouze špachtlí z umělé hmoty nebo ze dřeva nebo jiným
vhodným nek
Vašeho přístroje.
7) Po cca 3 - 4 minutách jsou vafl e hotové. Tento časový údaj se může lišit
podle použitého vafl ového těsta a osobní chuti. Uvolněte zablokování víka 0
otevřete víko a vyjměte vafl e.
8) Pokud již nechcete péct další vafl e, vytáhněte zástrčku ze zásuvky.
ovovým předmětem, aby jste nezničili nepřilnavý povrch
58
SWEW 750 A1
Page 62
Čištění
VÝSTRAHA! NEBEZPEČÍ ÚDERU ELEKTRICKÝM PROUDEM
► Nejprve vytáhněte zástrčku ze zásuvky, než se pustíte do čištění přístroje.
ístroj nikdy neponořujte do vody či jiných tekutin! V opačném
Př
případě hrozí nebezpečí ohrožení života elektrickým proudem.
VÝSTRAHA! NEBEZPEČÍ PORANĚNÍ!
► Před začátkem čištění nechte přístroj dostatečně zchladit. Nebezpečí
popálení!
POZOR-VĚCNÉ ŠKODY!
► K čištění nepoužívejte ostré předměty nebo abrazivní čisticí prostředky.
Jimi se po
► Neumývejte výměnné desky nebo přístroj v žádném případě v myčce!
UPOZORNĚNÍ
► S čištěním nečekejte příliš dlouho.Počkejte, až přístroj vychladne natolik,
ž
potravin lépe odstranit.
■ Otřete povrch krytu suchým hadříkem nebo mírně navlhčeným hadříkem.
■ Vyměnitelné plotničky vyjměte a vymyjte je v teplé vodě s trochou mycího
pr
■ Pokud se vnikly tuk nebo potraviny pod vyměnitelné plotničky do prostoru,
v
e kterém se nachází topná tělesa 2 4, postupujte následujícím způsobem:
■ Před opětovným použitím všechny díly dobře vytřete do sucha.
vrch přístroje poškodí.
e se jej můžete dotknout i bez nebezpečí popálení. Poté se dají zbytky
ostředku.
– Tuk nebo jiné kapaliny vytřete kusem kuchyňské papírové utěrky.
– Připečené zbytky potravin odstraňte dřevěnou špachtlí nebo malou
dř
evěnou špejlí.
CZ
Uložení
SWEW 750 A1
■ Uchovávejte přístroj na suchém místě.
■ Přístroj vyčistěte, jak je uvedeno v kapitole "Čištění ".
59
Page 63

Odstranění závad
CZ
Recepty
Vafl e
Suroviny:
Porucha Příčina
Zástrčka není zastrčená
Spotřebič
nefunguje.
Vafl ové ořechy/
vafl e s motivem
jsou příliš tmavé.
♦ 250 g margarínu nebo másla
♦ cca 200 g cukru
♦ 2balíčky vanilkového cukru
♦ 5vejce
♦ 500 g mouky
♦ 2ČL prášku do pečiva
♦ 350 - 400 ml mléka
do zásuvky.
Přístroj je vadný.
Vafl ové ořechy/vafl e s motivem/vafl e byly příliš dlouho
v přístroji.
Odstranění
problému
Zapojte zástrčku do sítě.
Obraťte se na zákaznický
servis.
Vafl ové ořechy /vafl e
s motivem/vafl e vyjměte
z přístroje dříve.
60
1) V
yšlehejte vejce.
2) Přidejte cukr a vanilkový cukr a vše dobře promíchejte.
3) Přimíchejte rozpuštěné máslo nebo margarín.
4) Přimíchejte prášek do pečiva.
5) Za stálého míchání střídavě a postupně přidávejte mléko a mouku.
6) Vše dobře promíchejte ručním mixérem, nastaveným na nejvyšší stupeň,
dokud nevznikne hladké těsto.
SWEW 750 A1
Page 64

Čokoládové vafl e
Suroviny:
♦ 150g měkkého másla
♦ 3vejce
♦ 150 g cukru
♦ 100g nastrouhané bílé čokolády
♦ 250 g mouky
♦ 1ČL skořice
♦ 50 ml mléka
1) V
yšlehejte vejce.
2) Přidejte cukr a skořici a vše dobře promíchejte.
3) Přimíchejte rozpuštěné máslo nebo margarín.
4) Za stálého míchání střídavě a postupně přidávejte mléko a mouku.
5) Nakonec přidejte strouhanou čokoládu.
6) Vše dobře promíchejte ručním mixérem, nastaveným na nejvyšší stupeň,
dokud nevznikne hladké těsto.
Základní těsto pro vafl ové ořechy/vafl e s motivem
Suroviny:
♦ 400 g mouky
♦ 100 g cukru
♦ 100 g měkkého másla
♦ 2vejce
♦ 100 ml mléka
♦ ¼ČL prášku do pečiva
CZ
1)
2) Smíchejte mouku s práškem do pečiva a přidejte to k tomu.
3) Potom přilijte mléko.
4) Vše dobře promíchejte ručním mixérem, nastaveným na nejvyšší stupeň.
SWEW 750 A1
Smíchejte máslo, cukr a vejce.
61
Page 65

CZ
UPOZORNĚNÍ
► Vafl ové ořechy/vafl e s motivem můžete naplnit různými surovinami:
íklad marmeládou, cukrovou náplní, ořechovo-nugátovým krémem,
Např
pudinkem, jogurtem, jablečným pyré, karamelem, šlehačkou nebo pro
chutné pikantní náplně smetanovým sýrem, bylinkovým tvarohem, aioli,
caciky, taveným sýrem Gouda, atd.
► Vafl ové ořechy/vafl e s motivem můžete také polít čokoládovou nebo
ovou polevou nebo posypat práškovým cukrem.
cukr
Sladké těsto na vafl ové ořechy/vafl e s motivem
Suroviny:
♦ 500 g mouky
♦ 200 g cukru
♦ 200 g másla nebo margarínu
♦ 200 g zakysané smetany
♦ 3vejce
♦ 1ČL prášku do pečiva
♦ 1balíčky vanilkového cukru
1)
Z dvou vajec oddělte žloutky od bílku. Žloutek není potřebný.
2) Smíchejte máslo/margarín, cukr, vanilkový cukr, 2 bílky a celé vejce
(žloutek a bílek).
3) Přimíchejte zakysanou smetanu.
4) Smíchejte mouku s práškem do pečiva a přidejte to k tomu.
5) Vše dobře promíchejte ručním mixérem, nastaveným na nejvyšší stupeň.
62
UPOZORNĚNÍ
► Sladké vafl ové ořechy/vafl e s motivem můžete naplnit různými surovinami:
íklad marmeládou, cukrovou náplní, ořechovo-nugátovým krémem,
Např
pudinkem, jogurtem, jablečným pyré, karamelem nebo šlehačkou.
► Vafl ové ořechy/vafl e s motivem můžete také polít čokoládovou nebo
ovou polevou nebo posypat práškovým cukrem.
cukr
SWEW 750 A1
Page 66

Slané těsto na vafl ové ořechy/vafl e s motivem
Suroviny:
♦ 200 g mouky
♦ 125 g margarínu
♦ 1 vejce
♦ ¼ČL prášku do pečiva
♦ 1 špetka cukru
♦ 1 špetka soli na špičku nože
1)
Smíchejte margarín, cukr, vejce a sůl.
2) Smíchejte mouku s práškem do pečiva a přidejte to k tomu.
3) Vše dobře promíchejte ručním mixérem, nastaveným na nejvyšší stupeň.
UPOZORNĚNÍ
► Slané vafl ové ořechy/vafl e s motivem můžete naplnit různými surovinami:
íklad smetanovým sýrem, bylinkovým tvarohem, aioli, caciky, taveným
Např
sýrem Gouda atd..
Likvidace
V žádném případě nevyhazujte přístroj do normálního domovního
odpadu.
Tento výrobke podléhá evropské směrnici č. 2012/19/EU (Waste
Electrical and Electronic Equipment).
Přístroj předejte k likvidaci odborné fi rmě nebo jej odevzdejte ve Vašem místním
recyklačním zařízení. Dodržujte aktuálně platné předpisy. V případě pochyb se
poraďte s recyklační fi rmou.
CZ
SWEW 750 A1
63
Page 67

CZ
Záruka a servis
Na tento přístroj platí 3 letá záruka od data zakoupení. Přístroj byl vyroben
s nejvyšší pečlivostí a před odesláním prošel výstupní kontrolou.
Uschovejte si, prosím, pokladní lístek jako doklad o nákupu. Budete-li uplatňovat
záruku, spojte se prosím telefonicky se servisní provozovnou. Pouze tak vám
můžeme zajistit bezplatné zaslání vašeho zboží.
UPOZORNĚNÍ
► Záruční plnění se vztahuje pouze na vady materiálu nebo výrobní závady,
oliv však na opotřebované díly nebo poškození, vzniklé při dopravě
nik
a na poškození rozbitných součástí, např. spínačů nebo akumulátorů.
Výrobek je určen výhradně pro soukromé použití, nikoliv pro podnikatelské účely. Při
nesprávném a neodborném využívání, při použití násilí a při zásazích, které nebyly
provedeny našimi autorizovanými servisními provozovnami, záruční nároky zanikají.
Vaše práva vyplývající ze zákona touto zárukou nejsou omezena. Záručním plněním
se záruční doba neprodlouží. To platí jak pro nahrazené, tak i pro opravené díly.
Případné škody a nedostatky, zjištěné už při koupě, se musí hlásit hned po vybalení
výrobku, nejpozdějí však do dvou dnů od data nákupu.
Po uplynutí záruční doby podléhají veškerá opravy poplatkům.
Servis Česko
Tel.: 800143873
E-Mail: kompernass@lidl.cz
IAN 93556
Dovozce
64
Dostupnost horké linky: pondělí až pátek 8:00 hod. – 20:00 hod. (SEČ)
KOMPERNASS HANDELS GMBH
BURGSTRASSE 21
44867 BOCHUM
GERMANY
www.kompernass.com
SWEW 750 A1
Page 68

Obsah
Úvod . . . . . . . . . . . . . . . . . . . . . . . . . . . . . . . . . . . . . . . . . . . . . . . . . . . . . . . . 66
Autorské právo . . . . . . . . . . . . . . . . . . . . . . . . . . . . . . . . . . . . . . . . . . . . . . . . . . . . . . . . . . 66
Obmedzenie ručenia . . . . . . . . . . . . . . . . . . . . . . . . . . . . . . . . . . . . . . . . . . . . . . . . . . . . . 66
Používanie v súlade surčením . . . . . . . . . . . . . . . . . . . . . . . . . . . . . . . . . . . . . . . . . . . . . . 66
Rozsah dodávky . . . . . . . . . . . . . . . . . . . . . . . . . . . . . . . . . . . . . . . . . . . . . . 67
Zneškodnenie obalových materiálov . . . . . . . . . . . . . . . . . . . . . . . . . . . . . . . . . . . . . . . . . 67
Popis prístroja . . . . . . . . . . . . . . . . . . . . . . . . . . . . . . . . . . . . . . . . . . . . . . . . 68
Technické údaje . . . . . . . . . . . . . . . . . . . . . . . . . . . . . . . . . . . . . . . . . . . . . . . 68
Bezpečnostné upozornenia . . . . . . . . . . . . . . . . . . . . . . . . . . . . . . . . . . . . . 69
Výmena vymeniteľných diskov . . . . . . . . . . . . . . . . . . . . . . . . . . . . . . . . . . 71
Nasadenie vymeniteľných platní . . . . . . . . . . . . . . . . . . . . . . . . . . . . . . . . . . . . . . . . . . . . 71
Vyberanie vymeniteľných platní . . . . . . . . . . . . . . . . . . . . . . . . . . . . . . . . . . . . . . . . . . . . . 72
Prvé uvedenie do prevádzky . . . . . . . . . . . . . . . . . . . . . . . . . . . . . . . . . . . 72
Obsluha . . . . . . . . . . . . . . . . . . . . . . . . . . . . . . . . . . . . . . . . . . . . . . . . . . . . . 73
Pečenie vafl ových orechov/vafl í s motívom . . . . . . . . . . . . . . . . . . . . . . . . 73
Pečenie vafl í . . . . . . . . . . . . . . . . . . . . . . . . . . . . . . . . . . . . . . . . . . . . . . . . . . . . . . . . . . . . 74
Čistenie . . . . . . . . . . . . . . . . . . . . . . . . . . . . . . . . . . . . . . . . . . . . . . . . . . . . . 75
Uskladnenie . . . . . . . . . . . . . . . . . . . . . . . . . . . . . . . . . . . . . . . . . . . . . . . . . 75
Odstraňovanie porúch . . . . . . . . . . . . . . . . . . . . . . . . . . . . . . . . . . . . . . . . . 76
Recepty . . . . . . . . . . . . . . . . . . . . . . . . . . . . . . . . . . . . . . . . . . . . . . . . . . . . .76
Vafl e . . . . . . . . . . . . . . . . . . . . . . . . . . . . . . . . . . . . . . . . . . . . . . . . . . . . . . . . . . . . . . . . . . 76
Čokoládové vafl e . . . . . . . . . . . . . . . . . . . . . . . . . . . . . . . . . . . . . . . . . . . . . . . . . . . . . . . . 77
Základné cesto na vafl ové orechy/vafl e s motívom . . . . . . . . . . . . . . . . . . . . . . . . . . . . . 77
Sladké cesto na vafl ové orechy/vafl e s motívom . . . . . . . . . . . . . . . . . . . . . . . . . . . . . . . . 78
Slané cesto na vafl ové orechy/vafl e s motívom . . . . . . . . . . . . . . . . . . . . . . . . . . . . . . . . . 79
Zneškodnenie . . . . . . . . . . . . . . . . . . . . . . . . . . . . . . . . . . . . . . . . . . . . . . . . 79
SK
Zárukaaservis . . . . . . . . . . . . . . . . . . . . . . . . . . . . . . . . . . . . . . . . . . . . . . . 80
Dovozca . . . . . . . . . . . . . . . . . . . . . . . . . . . . . . . . . . . . . . . . . . . . . . . . . . . . . 80
SWEW 750 A1
65
Page 69

SK
Úvod
Srdečne vám gratulujeme ku kúpe tohto nového prístroja.
Rozhodli ste sa tým pre vysokokvalitný výrobok. Návod na používanie je súčasťou
tohto výrobku. Obsahuje dôležité upozornenia týkajúce sa bezpečnosti, používania azneškodnenia. Pred používaním výrobku sa oboznámte so všetkými
pokynmi na obsluhu abezpečnostnými upozorneniami. Výrobok používajte iba
tak, ako je tu opísané aiba vtých oblastiach použitia, ktoré sú tu uvedené.
Pri postúpení výrobku tretej osobe odovzdajte sním aj všetky podklady.
Autorské právo
Táto dokumentácia je chránenáautorským právom.
Akékoľvek rozmnožovanie alebo dotlač, aj čiastková, ako aj reprodukcia obrázkov,
aj vzmenenej podobe, je povolená len spísomným súhlasom výrobcu.
Obmedzenie ručenia
Všetky technické informácie, uvedené vtomto návode na obsluhu, údaje apokyny
pre pripojenie aobsluhu zodpovedajú, pri odovzdávaní do tlače, najnovšiemu
stavu azohľadňujú snajlepším vedomím naše doterajšie skúsenosti aznalosti.
Zúdajov, zobrazení apopisov vtomto návode nemožno odvodzovať žiadne
nároky.
Výrobca nepreberá žiadnu záruku za škody, ktoré vzniknú nedodržaním tohto
návodu, nesprávnym používaním, neodbornými opravami, nepovolenými zmenami
alebo použitím nepovolených náhradných dielov.
Používanie v súlade surčením
Tento prístroj je určený výlučne na pečenie vafl í, vafl ových orechov a vafl í
s motívom.
Tento prístroj je určený výlučne na používanie vdomácnosti. Nepoužívajte
prístroj na podnikateľské účely!
66
SWEW 750 A1
Page 70

Rozsah dodávky
Prístroj sa štandardne dodáva snasledujúcimi komponentmi:
▯ Vafl ovač
▯ 2 vymeniteľné platne „vafl e“
▯ 2 vymeniteľné platne „vafl ový orech“
▯ 2 vymeniteľné platne „motívy“
▯ Návod na obsluhu
1)
Vyberte zo škatule prístroj, vymeniteľné platničky a návod na obsluhu.
2) Odstráňte všetok obalový materiál.
UPOZORNENIE
► Prekontrolujte kompletnosť dodávky a prípadné viditeľné poškodenia.
► Vprípade nekompletnej dodávky alebo poškodení spôsobených zlým
balením alebo pr
kapitolu Záruka aservis).
Zneškodnenie obalových materiálov
Obal chráni prístroj pred poškodením počas prepravy. Voľba obalových materiálov
zohľadňuje aspekty ekologického a technického zneškodnenia, apreto sú tieto
materiály recyklovateľné.
Vrátenie obalových materiálov späť do obehu šetrí suroviny aznižuje náklady
na odpad. Nepotrebné obalové materiály zneškodnite podľa miestne platných
predpisov.
epravou sa obráťte na zákaznícku linku servisu (pozri
SK
SWEW 750 A1
UPOZORNENIE
► Podľa možnosti obalové materiály počas záručnej doby prístroja odložte,
y ste mohli prístroj vprípade uplatňovania záruky správne zabaliť.
ab
67
Page 71

SK
Popis prístroja
Obrázok A:
1 aretácie
2 ohrievacie teleso
3 dolné držiaky
4 ohrievacie teleso
5 aretácie
6 zadné držiaky
Obrázok B (Vafl ové orechy):
7 horné západky
8 dolné a zadné západky
9 predné západky
Obrázok C (Disky na vafl e):
7 horné západky
8 dolné a zadné západky
9 predné západky
Obrázok D (Vafl e s motívom):
7 horné západky
8 dolné a zadné západky
9 predné západky
Obrázok E:
0 zámok veka
q kontrolka „Power“
w kontrolka „Pripravený na prevádzku“
Technické údaje
Napätie 220 - 240 V ∼, 50 Hz
Príkon 750 W
68
SWEW 750 A1
Page 72

Bezpečnostné upozornenia
VAROVANIE! NEBEZPEČENSTVO
ZASIAHNUTIA ELEKTRICKÝM PRÚDOM!
► Poškodený prívodný kábel alebo zástrčku nechajte ihneď vymeniť
autorizovaným odborným personálom, aby ste zamedzili nebezpečenstvu.
► Prístroj používajte len vsuchých auzavretých priestoroch, nie
vonku.
Nikdy neponárajte prístroj do vody ani do iných tekutín!
Vopačnom prípade hrozí smrteľné nebezpečenstvo úrazu
elektrickým prúdom.
► Pri čistení dbajte na to, aby sa do vnútra prístroja nedostala žiad-
na voda. Nikdy nečistite prístroj pod tečúcou vodou.
► Zabezpečte, aby tento prístroj nikdy nemohol prísť do styku svo-
dou. Nikdy nepoužívajte prístroj v blízkosti vody ani pri žiadnych
nádobách, ktoré obsahujú vodu.
► Dbajte na to, aby počas prevádzky nemohol prí-vodný kábel nik-
dy navlhnúť. Veďte ho tak, aby sa nikde nezachytil alebo sa iným
spôsobom nepoškodil.
► Po každom používaní vytiahnite zástrčku z elektrickej zásuvky,
aby sa prístroj vypol.
► Otvorte veko prístroja.
SK
VAROVANIE! NEBEZPEČENSTVO PORANENIA!
► Tento prístroj môžu používať deti od 8 rokov, ako aj osoby so zní-
ženými fyzickými, senzorickými alebo mentálnymi schopnosťami,
prípadne snedostatočnými skúsenosťami alebo znalosťami, ak
sú pod dohľadom alebo boli dostatočne poučené obezpečnom
používaní prístroja apochopili ztoho vyplývajúce riziká.
► Deti sa s prístrojom nesmú hrať.
SWEW 750 A1
69
Page 73

SK
VAROVANIE! NEBEZPEČENSTVO PORANENIA!
► Čistenie aužívateľskú údržbu nesmú vykonávať deti, okrem prípa-
dov, ak sú staršie než 8 rokov asú pod dozorom.
Deti mladšie ako 8 rokov sa musia zdržiavať mimo dosahu zariadenia a prípojného kábla.
► Časti prístroja môžu byť počas prevádzky horúce. Preto sa dotýkaj-
te len držadiel.
► Pred čistením prístroja, výmenou vymeniteľných platní alebo odlo-
žením nechajte prístroj najprv celkom vychladiť.
► Pri vyberaní hotových jedál buďte opatrní. Prístroj, ako aj jedlá sú
veľmi horúce.
► Prístroj používajte len na stabilnom, nešmykľavom arovnom povrchu.
► Na zapínanie avypínanie prístroja nepoužívajte žiadny externý
časový spínač ani samostatný systém diaľkového ovládania.
Pozor! Horúci povrch!
POZOR - NEBEZPEČENSTVO POŽIARU!
► Prístroj sa nesmie používať vblízkosti horľavých materiálov.
► Neotvárajte prístroj, kým je v prevádzke.
► Prístroj používajte len na žiaruvzdornej podložke.
► Nikdy nenechávajte prístroj zapnutý bez dozoru.
POZOR - VECNÉ ŠKODY!
► Jedlá vyberajte len lopatkou z plastu alebo dreva alebo iným
vhodným, nekovovým predmetom, aby ste nepoškodili nepriľnavú
povrchovú úpravu sendvičovača.
► Pri čistení nepoužívajte žiadne abrazívne čistiace prostriedky a
ostré predmety.
70
SWEW 750 A1
Page 74

Výmena vymeniteľných diskov
Môžete si vyberať medzi 3 vymeniteľnými platňami:
– Vymeniteľné platne „vafl ové orechy“: na prípravu dutých polovíc vafl í,
é sa môžu potom naplniť a spojiť.
ktor
– Vymeniteľné platne „vafl e“: na pečenie vafl í.
– Vymeniteľné platne „vafl e s motívom“: na prípravu dutých polovíc vafl í,
é sa môžu potom naplniť a spojiť.
ktor
VAROVANIE!
NEBEZPEČENSTVO ZASIAHNUTIA ELEKTRICKÝM PRÚDOM
► Pred výmenou vymeniteľných platní najprv vytiahnite zástrčku z elektrickej
.
zásuvky
VAROVANIE! NEBEZPEČENSTVO PORANENIA!
► Pred výmenou vymeniteľných platní nechajte prístroj vychladiť!
Nebezpeč
UPOZORNENIE
► Pri vymeniteľných platniach „vafl ové orechy“ a „vafl e s motívom“ dávajte
vždy poz
hornej časti prístroja a dolnú vymeniteľnú platňu do dolnej časti prístroja.
Orientujte sa podľa obrázkov na vyklápacej strane.
enstvo popálenia!
or na to, aby ste hornú vymeniteľnú platňu inštalovali vždy do
Nasadenie vymeniteľných platní
1) Otvorte prístroj tak, že uvoľníte zámok veka 0 a vyklopíte veko.
2) Horná vymeniteľná platňa: Najprv zasuňte dolné západky 8 do dolných
držiakov 3.
3) Teraz tlačte horné západky 7 na aretácie 1 tak, že západky 7 zaskočia
pod aretácie 1 a vymeniteľná platňa je upevnená.
4) Spodná vymeniteľná platňa: Najprv zasuňte zadné západky 8 do zadných
držiakov 6.
5) Teraz tlačte predné západky 9 na aretácie 5 tak, že západky 9 zaskočia
pod aretácie 5 a vymeniteľná platňa je upevnená.
6) Raz silno zatlačte na stred spodnej vymeniteľnej platne, aby ste sa uistili, že
je bezpečne nasadená.
SK
SWEW 750 A1
71
Page 75

Vyberanie vymeniteľných platní
1) Horná vymeniteľná platňa: Aretácie 1 posuňte smerom hore a súčasne
vyklopte vymeniteľnú platňu dopredu, aby ste ju mohli vybrať z dolných
držiakov 3.
2) Spodná vymeniteľná platňa: Aretácie 5 ťahajte smerom dopredu a nadvihnite
vymeniteľnú platňu tak, aby ste ju mohli vytiahnuť zo zadných držiakov 6.
Prvé uvedenie do prevádzky
Tento postup vykonajte s každým z 3 párov vymeniteľných platní.
■ Nepriľnavý povrch vymeniteľných platní jednorazovo natrite olejom vhodným
a varenie.
n
SK
VAROVANIE! NEBEZPEČENSTVO PORANENIA!
► Pred výmenou vymeniteľných platní nechajte prístroj vychladiť!
Nebezpeč
■ Do prístroja nasaďte pár vymeniteľných platní.
■ Zástrčku zasuňte do elektrickej zásuvky.
■ Zatvorte prístroj a zablokujte ho zámkom veka 0.
■ Prístroj nechajte nahriať cca 10 minút.
UPOZORNENIE
► Pri prvom použití môže vznikať mierny zápach (možný je aj mierny dym).
o je celkom normálne apo krátkom čase tento jav zmizne. Zabezpečte
T
dostatočné vetranie. Napríklad otvorte okno.
■ Vytiahnite sieťovú zástrčku a prístroj nechajte vychladiť.
■ Vyčistite vymeniteľné platne a prístroj ako je popísané v kapitole „Čistenie“.
Prístr
oj je teraz pripravený na prevádzku.
enstvo popálenia!
72
SWEW 750 A1
Page 76

Obsluha
Pečenie vafl ových orechov/vafl í s motívom
1) Vyberte si vymeniteľné platne „vafl ové orechy“ alebo „vafl e s motívom“
a nasaďte ich. Dávajte pozor na to, aby ste hornú vymeniteľnú platňu namontovali do hornej polovice prístroja a dolnú vymeniteľnú platňu do dolnej
polovice prístroja.
POZOR - VECNÉ ŠKODY!
► Nikdy nepoužívajte dve rozdielne vymeniteľné platne súčasne.
Zatvorte veko a zablokujte ho pomocou zámku veka 0.
2)
3) Zasuňte zástrčku do elektrickej zásuvky. Oranžová kontrolka „Power“ q
svieti.
4) Keď je prístroj nahriaty, rozsvieti sa zelená kontrolka „Pripravený na prevádzku“ w.
5) Uvoľnite zámok veka 0, otvorte veko a dajte cca 1/2 čajové lyžičky cesta
(recepty pre vafl ové orechy a vafl e s motívom pozri v kapitole „Recepty“)
do každej z foriem/motívov dolných vymeniteľných platní.
UPOZORNENIE
► Pri vafl iach s motívom dávajte pozor na to, aby bolo cesto rozdelené cez
všetky časti motívu. Inak sa môž
6) Zatvorte veko a zablokujte ho pomocou zámku veka 0.
e stať, že sa časti motívu nevyplnia.
SK
7) Po cca 3 - 4 minútach sú vafl ové orechy/vafl e s motívom hotové. Uvoľnite
8) Ak už nechcete pripravovať ďalšie vafl ové orechy/vafl e s motívom, vytiahnite
9) Vafl ové orechy/vafl e s motívom nechajte trochu vychladiť a odrežte nožom
10) Vafl ové orechy/vafl e s motívom naplňte želanou plnkou. Trochu plnky rozdeľte
SWEW 750 A1
POZOR - VECNÉ ŠKODY!
► Vafl ové orechy/vafl e s motívom vyberajte len lyžicou z plastu alebo dreva
alebo iným vhodným, nek
vú povrchovú úpravu prístroja.
zámok veka 0, otvorte veko a vyberte vafl ové orechy/vafl e s motívom.
zástrčku z elektrickej zásuvky.
nadbytočné cesto z okraja vafl ových orechov/vafl í s motívom (odstráňte
pretečenia).
aj na okraji vafl ových orechov/vafl í s motívom a položte na ne vhodný protikus
tak, aby sa obidve polovice zlepili a vznikla dutá fi gúrka.
ovovým predmetom, aby ste nepoškodili nepriľna-
73
Page 77

SK
Pečenie vafl í
1) Vyberte vymeniteľné platne „vafl e“ a nasaďte ich.
POZOR - VECNÉ ŠKODY!
► Nikdy nepoužívajte dve rozdielne vymeniteľné platne súčasne.
Zatvorte veko a zablokujte ho pomocou zámku veka 0.
2)
3) Zasuňte zástrčku do elektrickej zásuvky. Oranžová kontrolka „Power“ q
svieti.
4) Keď je prístroj nahriaty, rozsvieti sa zelená kontrolka „Pripravený na prevádzku“ w.
5) Otvorte veko a naplňte približne 2 - 3 polievkové lyžice vafl ového cesta do
stredu každej z oboch plôch na pečenie vafl í spodnej vymeniteľnej platne.
6) Zatvorte veko a zablokujte ho pomocou zámku veka 0.
POZOR - VECNÉ ŠKODY!
► Vafl e vyberajte len lopatkou z plastu alebo dreva alebo iným vhodným,
nek
prístroja.
7) Po cca 3 - 4 minútach sú vafl e hotové. Tento časový údaj sa môže odlišovať
podľa používaného cesta na vafl e a osobnej chuti. Uvoľnite zámok veka 0,
otvorte veko a vyberte vafl e.
8) Ak už nechcete piecť ďalšie vafl e, vytiahnite zástrčku z elektrickej zásuvky.
ovovým predmetom, aby ste nepoškodili nepriľnavú povrchovú úpravu
74
SWEW 750 A1
Page 78

Čistenie
VAROVANIE!
NEBEZPEČENSTVO ZASIAHNUTIA ELEKTRICKÝM PRÚDOM
► Pred čistením zariadenia najprv vytiahnite zástrčku zo sieťovej zásuvky.
Nikdy neponár
prípade hrozí smrteľné nebezpečenstvo úrazu elektrickým prúdom.
VAROVANIE! NEBEZPEČENSTVO PORANENIA!
► Pred čistením nechajte prístroj vychladnúť. Nebezpečenstvo popálenia!
POZOR - VECNÉ ŠKODY!
► Nepoužívajte žiadne ostré alebo abrazívne čistiace prostriedky. Poškodili
y ste nimi povrch prístroja.
b
► Vymeniteľné disky alebo prístroj v žiadnom prípade nečistite v umývačke
riadu!
UPOZORNENIE
► S čistením nečakajte príliš dlho. Počkajte, kým je prístroj tak vychladený,
e s ním môžete zaobchádzať bez nebezpečenstva popálenia. Potom je
ž
možné ľahšie odstrániť zbytky potravín.
■ Kryt čistite suchou utierkou alebo vlhkou handričkou.
■ Vyberte vymeniteľné platne a vyčistite ich v teplej vode s pridaním malého
mno
žstva čistiaceho prostriedku.
■ Ak sa pod vymeniteľné platne do priestoru, v ktorom sa nachádzajú ohrievacie
telesá
2 4, dostal tuk alebo potraviny, postupujte nasledovne:
– Tuk alebo iné tekutiny zotrite kúskom kuchynskej utierky.
– Pevne pripálené zbytky odstráňte drevenou lopatkou alebo malým
dr
eveným špáradlom.
■ Pred novým používaním všetky časti dobre osušte.
ajte prístroj do vody ani do iných tekutín! Vopačnom
SK
Uskladnenie
SWEW 750 A1
■ Prístroj uschovávajte na suchom mieste.
■ Prístroj vyčistite tak, ako je uvedené vkapitole „Čistenie“.
75
Page 79

Odstraňovanie porúch
Porucha Príčina Odstránenie
SK
Recepty
Vafl e
Prísady:
1)
2) Pridáme cukor a vanilkový cukor a všetko zmiešame.
3) Pridáme rozpustené maslo alebo margarín.
4) Primiešame prášok do pečiva
5) Za stáleho miešania striedavo pridávame mlieko a múku.
6) Všetko spolu miešame ručným mixérom na najvyššom stupni, kým nevznikne
Zástrčka nie je zasunutá
Prístroj nefunguje.
Vafl ové orechy/
vafl e s motívom/
vafl e sú príliš
tmavé.
♦ 250 g margarínu alebo masla
♦ cca 200 g cukru
♦ 2 balíčky vanilkového cukru
♦ 5 vajec
♦ 500 g múky
♦ 2 ČL prášku do pečiva
♦ 350 - 400 ml mlieka
Vajcia vymiešame do peny.
hladké cesto.
vzásuvke.
Prístroj je pokazený.
Vafl ové orechy/vafl e s
motívom/vafl e boli príliš
dlho v prístroji.
Zasuňte sieťovú zástrčku
do zásuvky.
Obráťte sa na zákaznícky
servis.
Vafl ové orechy/vafl e s
motívom/vafl e vyberte
von skôr.
76
SWEW 750 A1
Page 80

Čokoládové vafl e
Prísady:
♦ 150 g mäkkého masla
♦ 3 vajcia
♦ 150 g cukru
♦ 100 g strúhanej bielej čokolády
♦ 250 g múky
♦ 1 ČL škorice
♦ 50 ml mlieka
1)
Vajcia vymiešame do peny.
2) Pridáme cukor a škoricu a všetko zmiešame.
3) Pridáme rozpustené maslo alebo margarín.
4) Za stáleho miešania striedavo pridávame mlieko a múku.
5) Ako poslednú pridáme strúhanú čokoládu.
6) Všetko spolu miešame ručným mixérom na najvyššom stupni, kým nevznikne
hladké cesto.
Základné cesto na vafl ové orechy/vafl e s motívom
Prísady:
♦ 400 g múky
♦ 100 g cukru
♦ 100 g mäkkého masla
♦ 2 vajcia
♦ 100 ml mlieka
♦ ¼ ČL prášku do pečiva
SK
1)
2) Zmiešame múku a prášok do pečiva a pridáme ich k zmesi.
3) Pridáme mlieko.
4) Všetko miešame ručným mixérom na najvyššom stupni.
SWEW 750 A1
Zmiešame maslo, cukor a vajcia.
77
Page 81

SK
UPOZORNENIE
► Vafl ové orechy/vafl e s motívom môžete naplniť najrozmanitejšími prísadami:
Napríklad marmeládou, cukr
pudingom, jogurtom, jablkovou kašou, karamelom, šľahačkou alebo pre
odvážne plnky čerstvým syrom, bylinkovým tvarohom, aioli, zaziki, roztaveným syrom Gouda atď.
► Vafl ové orechy/vafl e s motívom môžete tiež poliať čokoládovou glazúrou
alebo cukr
ovou polevou alebo posypať práškovým cukrom.
ovou polevou, orieškovo-nugátovým krémom,
Sladké cesto na vafl ové orechy/vafl e s motívom
Prísady:
♦ 500 g múky
♦ 200 g cukru
♦ 200 g masla alebo margarínu
♦ 200 g kyslej smotany
♦ 3 vajcia
♦ 1 ČL prášku do pečiva
♦ 1 balíčky vanilkového cukru
1)
Rozdelíme dve vajcia na žĺtky a bielky. Žĺtky nebudú potrebné.
2) Zmiešame maslo/margarín, cukor, vanilkový cukor, 2 bielka a celé vajce
(žĺtok a bielko).
3) Primiešame kyslú smotanu.
4) Zmiešame múku a prášok do pečiva a pridáme ich k zmesi.
5) Všetko miešame ručným mixérom na najvyššom stupni.
78
UPOZORNENIE
► Sladké vafl ové orechy/vafl e s motívom môžete naplniť najrozmanitejšími
prísadami:
Napríklad marmeládou, cukr
pudingom, jogurtom, jablkovou kašou, karamelom alebo šľahačkou.
► Vafl ové orechy/vafl e s motívom môžete tiež poliať čokoládovou glazúrou
alebo cukr
ovou polevou alebo posypať práškovým cukrom.
ovou polevou, orieškovo-nugátovým krémom,
SWEW 750 A1
Page 82

Slané cesto na vafl ové orechy/vafl e s motívom
Prísady:
♦ 200 g múky
♦ 125 g margarínu
♦ 1 vajce
♦ ¼ ČL prášku do pečiva
♦ 1 štipka cukru
♦ trochu soli na špičku noža
1)
Zmiešame margarín, cukor, vajce a soľ.
2) Zmiešame múku a prášok do pečiva a pridáme ich k zmesi.
3) Všetko miešame ručným mixérom na najvyššom stupni.
UPOZORNENIE
► Slané vafl ové orechy/vafl e s motívom môžete naplniť najrozmanitejšími
prísadami:
Napríklad č
syrom Gouda atď.
erstvým syrom, bylinkovým tvarohom, aioli, zaziki, roztaveným
Zneškodnenie
Prístroj vžiadnom prípade nevyhadzujte do bežného
komunálneho odpadu.
Tento produkt podlieha európskej smernici 2012/19/EU.
(Waste Electrical and Electronic Equipment).
Prístroj zneškodnite vautorizovanej prevádzke na zneškodňovanie odpadu alebo
vkomunálnej inštitúcii na zneškodňovanie odpadov. Dodržiavajte pritom aktuálne
platné predpisy. V prípade pochybností kontaktujte inštitúciu na zneškodnenie
odpadov.
SK
SWEW 750 A1
79
Page 83

SK
Zárukaaservis
Natoto prístroj máte záruku 3roky od dátumu zakúpenia. Prístroj bolo starostlivo
vyrobené apred expedíciou dôkladne odskúšané.
Pokladničný blok si uschovajte ako dôkaz ozakúpení. Vprípade uplatneniazáruky telefonicky kontaktujte servis. Len tak sadá zabezpečiť bezplatné zaslanie
Vášho tovaru.
UPOZORNENIE
► Záruka platí len na chyby materiálu avýroby, nie na škody spôsobené
epravou alebo opotrebením, ani na poškodenia krehkých častí, ako sú
pr
napr. spínače alebo akumulátory.
Výrobok je určený len nasúkromné použitie anie nakomerčné použitie. Záruka
strácaplatnosť pri nesprávnom zaobchádzaní apri neodbornom zaobchádzaní,
pri použití násiliaapri zásahoch, ktoré neboli vykonané naším autorizovaným
servisom.
Vaše práva, vyplývajúce zo zákona, nie sú touto zárukou obmedzené. Záručná
dobasanepredlžuje záručnou opravou. To platí tiež pre náhradné aopravené
diely.
Prípadné chyby anedostatky, zistené už pri zakúpení, musíte nahlásiť ihneď po
vybalení, najneskoršie však do dvoch dní od dátumu zakúpenia.
Opravy, vykonané po uplynutí záručnej doby, samusiazaplatiť.
Záručná dobasanepredlžuje záručnou opravou. To platí tiež pre náhradné
aopravené diely.
Servis Slovensko
Tel. 0850 232001
E-Mail: kompernass@lidl.sk
IAN 93556
Dovozca
80
Dostupnosť hotline: pondelok až piatok od 8:00 hod. – 20:00 hod. (SEČ)
KOMPERNASS HANDELS GMBH
BURGSTRASSE 21
44867 BOCHUM
GERMANY
www.kompernass.com
SWEW 750 A1
Page 84

Inhaltsverzeichnis
Einführung . . . . . . . . . . . . . . . . . . . . . . . . . . . . . . . . . . . . . . . . . . . . . . . . . . . 82
Urheberrecht . . . . . . . . . . . . . . . . . . . . . . . . . . . . . . . . . . . . . . . . . . . . . . . . . . . . . . . . . . . 82
Haftungsbeschränkung . . . . . . . . . . . . . . . . . . . . . . . . . . . . . . . . . . . . . . . . . . . . . . . . . . . 82
Bestimmungsgemäße Verwendung . . . . . . . . . . . . . . . . . . . . . . . . . . . . . . . . . . . . . . . . . . 82
Lieferumfang . . . . . . . . . . . . . . . . . . . . . . . . . . . . . . . . . . . . . . . . . . . . . . . . . 83
Entsorgung der Verpackung . . . . . . . . . . . . . . . . . . . . . . . . . . . . . . . . . . . . . . . . . . . . . . . 83
Gerätebeschreibung . . . . . . . . . . . . . . . . . . . . . . . . . . . . . . . . . . . . . . . . . . . 84
Technische Daten . . . . . . . . . . . . . . . . . . . . . . . . . . . . . . . . . . . . . . . . . . . . . . 84
Sicherheitshinweise . . . . . . . . . . . . . . . . . . . . . . . . . . . . . . . . . . . . . . . . . . . 85
Austauschen der Wechselplatten . . . . . . . . . . . . . . . . . . . . . . . . . . . . . . . . 87
Einsetzen der Wechselplatten . . . . . . . . . . . . . . . . . . . . . . . . . . . . . . . . . . . . . . . . . . . . . . 87
Herausnehmen der Wechselplatten . . . . . . . . . . . . . . . . . . . . . . . . . . . . . . . . . . . . . . . . . . 88
Erste Inbetriebnahme . . . . . . . . . . . . . . . . . . . . . . . . . . . . . . . . . . . . . . . . . . 88
Bedienen . . . . . . . . . . . . . . . . . . . . . . . . . . . . . . . . . . . . . . . . . . . . . . . . . . . . 89
Waff elnüsse/Motiv-Waff eln backen . . . . . . . . . . . . . . . . . . . . . . . . . . . . . . 89
Waff eln backen . . . . . . . . . . . . . . . . . . . . . . . . . . . . . . . . . . . . . . . . . . . . . . . . . . . . . . . . . 90
Reinigen . . . . . . . . . . . . . . . . . . . . . . . . . . . . . . . . . . . . . . . . . . . . . . . . . . . . . 91
Aufbewahren . . . . . . . . . . . . . . . . . . . . . . . . . . . . . . . . . . . . . . . . . . . . . . . .91
Fehlerbehebung . . . . . . . . . . . . . . . . . . . . . . . . . . . . . . . . . . . . . . . . . . . . . . 92
Rezepte . . . . . . . . . . . . . . . . . . . . . . . . . . . . . . . . . . . . . . . . . . . . . . . . . . . . . 92
Waff eln . . . . . . . . . . . . . . . . . . . . . . . . . . . . . . . . . . . . . . . . . . . . . . . . . . . . . . . . . . . . . . . 92
Schokoladenwaff eln . . . . . . . . . . . . . . . . . . . . . . . . . . . . . . . . . . . . . . . . . . . . . . . . . . . . . 93
Basisteig für Waff elnüsse/Motiv-Waff eln . . . . . . . . . . . . . . . . . . . . . . . . . . . . . . . . . . . . . 93
Süßer Teig für Waff elnüsse/Motiv-Waff eln . . . . . . . . . . . . . . . . . . . . . . . . . . . . . . . . . . . . 94
Salziger Teig für Waff elnüsse/Motiv-Waff eln . . . . . . . . . . . . . . . . . . . . . . . . . . . . . . . . . . 95
Entsorgung. . . . . . . . . . . . . . . . . . . . . . . . . . . . . . . . . . . . . . . . . . . . . . . . . . . 95
Garantie und Service . . . . . . . . . . . . . . . . . . . . . . . . . . . . . . . . . . . . . . . . . . 96
DE
AT
CH
Importeur . . . . . . . . . . . . . . . . . . . . . . . . . . . . . . . . . . . . . . . . . . . . . . . . . . . 97
SWEW 750 A1
81
Page 85

DE
AT
CH
Einführung
Herzlichen Glückwunsch zum Kauf Ihres neuen Gerätes!
Sie haben sich damit für ein modernes und hochwertiges Produkt entschieden.
Die Bedienungsanleitung ist Bestandteil dieses Produktes. Sie enthält wichtige
Hinweise für Sicherheit, Gebrauch und Entsorgung. Machen Sie sich vor der
Benutzung des Produkts mit allen Bedien- und Sicherheitshinweisen vertraut.
Benutzen Sie dieses Produkt nur wie beschrieben und für die angegebenen
Einsatzbereiche. Händigen Sie alle Unterlagen bei Weitergabe des Produkts an
Dritte mit aus.
Urheberrecht
Diese Dokumentation ist urheberrechtlich geschützt.
Jede Vervielfältigung, bzw. jeder Nachdruck, auch auszugsweise, sowie die
Wiedergabe der Abbildungen, auch im veränderten Zustand, ist nur mit
schriftlicher Zustimmung des Herstellers gestattet.
Haftungsbeschränkung
Alle in dieser Bedienungsanleitung enthaltenen technischen Informationen, Daten
und Hinweise für den Anschluss und die Bedienung entsprechen dem letzten
Stand bei Drucklegung und erfolgen unter Berücksichtigung unserer bisherigen
Erfahrungen und Erkenntnisse nach bestem Wissen.
Aus den Angaben, Abbildungen und Beschreibungen in dieser Bedienungsanleitung können keine Ansprüche hergeleitet werden.
Der Hersteller übernimmt keine Haftung für Schäden aufgrund von Nichtbeachtung der Bedienungsanleitung, nicht bestimmungsgemäßer Verwendung,
unsachgemäßen Reparaturen, unerlaubt vorgenommenen Veränderungen oder
Verwendung nicht zugelassener Ersatzteile.
Bestimmungsgemäße Verwendung
Dieses Gerät ist ausschließlich vorgesehen für das Backen von Waff eln, Waff elnüssen und Motiv-Waff eln.
Dieses Gerät ist ausschließlich für die Benutzung in privaten Haushalten bestimmt. Benutzen Sie das Gerät nicht gewerblich!
82
SWEW 750 A1
Page 86

Lieferumfang
Das Gerät wird standardmäßig mit folgenden Komponenten geliefert:
▯ Waff eleisen
▯ 2 Wechselplatten „Waff eln“
▯ 2 Wechselplatten „Waff elnuss“
▯ 2 Wechselplatten „Motive“
▯ Bedienungsanleitung
1)
Entnehmen Sie das Gerät, die Wechselplatten und die Bedienungsanleitung
aus dem Karton.
2) Entfernen Sie sämtliches Verpackungsmaterial.
HINWEIS
► Prüfen Sie die Lieferung auf Vollständigkeit und auf sichtbare Schäden.
► Bei einer unvollständigen Lieferung oder Schäden infolge mangelhafter
erpackung oder durch Transport wenden Sie sich an die Service-Hotline
V
(siehe Kapitel Garantie und Service).
Entsorgung der Verpackung
Die Verpackung schützt das Gerät vor Transportschäden. Die Verpackungsmaterialien sind nach umweltverträglichen und entsorgungstechnischen Gesichtspunkten ausgewählt und deshalb recyclebar.
Die Rückführung der Verpackung in den Materialkreislauf spart Rohstoff e und
verringert das Abfallaufkommen. Entsorgen Sie nicht mehr benötigte Verpackungsmaterialien gemäß den örtlich geltenden Vorschriften.
DE
AT
CH
SWEW 750 A1
HINWEIS
► Heben Sie wenn möglich die Originalverpackung während der Garan-
eit des Gerätes auf, um das Gerät im Garantiefall ordnungsgemäß
tiez
verpacken zu können.
83
Page 87

DE
AT
CH
Gerätebeschreibung
Abbildung A:
1 Arretierungen
2 Heizschlange
3 untere Halterungen
4 Heizschlange
5 Arretierungen
6 hintere Halterungen
Abbildung B (Waff elnüsse):
7 obere Rastnasen
8 untere und hintere Rastnasen
9 vordere Rastnasen
Abbildung C (Waff elplatten):
7 obere Rastnasen
8 untere und hintere Rastnasen
9 vordere Rastnasen
Abbildung D (Motiv-Waff eln):
7 obere Rastnasen
8 untere und hintere Rastnasen
9 vordere Rastnasen
Abbildung E:
0 Deckelverriegelung
q Kontrollleuchte „Power“
w Kontrollleuchte „Betriebsbereit“
Technische Daten
Spannung 220 - 240 V ∼, 50 Hz
Leistungsaufnahme 750 W
84
SWEW 750 A1
Page 88

Sicherheitshinweise
WARNUNG! STROMSCHLAGGEFAHR!
► Lassen Sie beschädigte Netzkabel oder Netzstecker sofort von
autorisiertem Fachpersonal ersetzen, um Gefährdungen zu vermeiden.
► Verwenden Sie das Gerät nur in trockenen Räumen, nicht im Freien.
Tauchen Sie das Gerät niemals in Wasser oder andere
Flüssigkeiten! Andernfalls besteht Lebensgefahr durch
elektrischen Schlag.
► Achten Sie beim Reinigen darauf, dass kein Wasser in das Innere
des Gerätes gelangt. Reinigen Sie das Gerät nie unter fl ießendem
Wasser.
► Stellen Sie sicher, dass das Gerät niemals mit Wasser in Berüh-
rung kommen kann. Betreiben Sie das Gerät niemals in der Nähe
von Wasser oder neben Gefäßen, die Flüssigkeit enthalten.
► Achten Sie darauf, dass im Betrieb das Netzkabel niemals nass
oder feucht wird. Führen Sie es so, dass es nicht eingeklemmt
oder anderweitig beschädigt werden kann.
DE
AT
CH
► Ziehen Sie nach jedem Gebrauch den Netzstecker aus der Netz-
steckdose, um das Gerät auszuschalten.
► Öff nen Sie nie das Gehäuse des Gerätes.
WARNUNG! VERLETZUNGSGEFAHR!
► Dieses Gerät kann von Kindern ab 8 Jahren sowie von Personen
mit reduzierten physischen, sensorischen oder mentalen Fähigkeiten oder Mangel an Erfahrung und/oder Wissen benutzt werden,
wenn sie beaufsichtigt oder bezüglich des sicheren Gebrauchs
des Gerätes unterwiesen wurden und die daraus resultierenden
Gefahren verstanden haben.
► Kinder dürfen nicht mit dem Gerät spielen.
SWEW 750 A1
85
Page 89

DE
AT
CH
WARNUNG! VERLETZUNGSGEFAHR!
► Reinigung und Benutzer-Wartung dürfen nicht durch Kinder
durchgeführt werden, es sei denn, sie sind älter als 8 Jahre und
beaufsichtigt. Kinder jünger als 8 Jahre sind vom Gerät und der
Anschlussleitung fernzuhalten.
► Die Geräteteile können im Betrieb heiß werden. Fassen Sie daher
nur den Griff an.
► Lassen Sie das Gerät erst vollständig abkühlen, bevor Sie es reini-
gen, die Wechselplatten austauschen oder es verstauen.
► Seien Sie vorsichtig beim Herausnehmen der fertigen Speisen.
Das Gerät, sowie die Speisen sind sehr heiß.
► Betreiben Sie das Gerät nur auf einer stabilen, rutschfesten und
ebenen Stellfl äche.
► Benutzen Sie keine externe Zeitschaltuhr oder ein separates Fern-
wirksystem, um das Gerät zu betreiben.
Achtung! Heiße Oberfl äche!
ACHTUNG - BRANDGEFAHR!
► Das Gerät darf nicht in der Nähe von brennbaren Materialien
verwendet werden.
► Decken Sie das Gerät nicht ab, solange es in Betrieb ist.
► Betreiben Sie das Gerät nur auf einer hitzebeständigen Unterlage.
► Betreiben Sie das Gerät niemals unbeaufsichtigt.
ACHTUNG - SACHSCHADEN!
► Entnehmen Sie die Speisen nur mit einem Kunststoff - oder Holzspatel
oder einem anderen geeigneten, nichtmetallischen Gegenstand,
um die Antihaftbeschichtung des Waff eleisens nicht zu zerstören.
► Benutzen Sie zur Reinigung keine scharfen Putzmittel und spitze
Gegenstände.
86
SWEW 750 A1
Page 90
Austauschen der Wechselplatten
Sie können zwischen 3 verschiedenen Wechselplatten wählen:
– Wechselplatten „Waff elnüsse“: zur Zubereitung von hohlen Waff elnuss-
ten, die man dann füllen und zusammenfügen kann.
Hälf
– Wechselplatten „Waff eln“: zum Backen von Waff eln.
– Wechselplatten „Motiv-Waff eln“: zur Zubereitung von hohlen Waff elmo-
-Hälften, die man dann füllen und zusammenfügen kann.
tiv
WARNUNG! STROMSCHLAGGEFAHR
► Ziehen Sie erst den Netzstecker aus der Netzsteckdose, bevor Sie die
echselplatten austauschen.
W
WARNUNG! VERLETZUNGSGEFAHR!
► Lassen Sie das Gerät vor dem Austauschen der Wechselplatten abkühlen!
erbrennungsgefahr!
V
HINWEIS
► Achten Sie bei den Wechselplatten „Waff elnüsse“ und „Motiv-Waff eln“
immer dar
rätes zu installieren und die jeweils untere Wechselplatte in den unteren Teil
des Gerätes. Orientieren Sie sich an den Abbildungen der Ausklappseite.
Einsetzen der Wechselplatten
1) Öff nen Sie das Gerät, indem Sie die Deckelverriegelung 0 lösen und den
Deckel aufklappen.
2) Obere Wechselplatte: Schieben Sie zuerst die unteren Rastnasen 8 in die
unteren Halterungen 3.
3) Drücken Sie nun die oberen Rastnasen 7 auf die Arretierungen 1, so dass
die Rastnasen 7 unter die Arretierungen 1 springen und die Wechselplatte
fest sitzt.
4) Untere Wechselplatte: Schieben Sie zuerst die hinteren Rastnasen 8 in die
hinteren Halterungen 6.
5) Drücken Sie nun die vorderen Rastnasen 9 auf die Arretierungen 5, so
dass die Rastnasen 9 unter die Arretierungen 5 springen und die Wechselplatte fest sitzt.
6) Drücken Sie einmal kräftig auf die Mitte der unteren Wechselplatte, um
sicherzustellen, dass diese sicher eingesetzt ist.
auf, die jeweils obere Wechselplatte in den oberen Teil des Ge-
DE
AT
CH
SWEW 750 A1
87
Page 91

DE
AT
CH
Herausnehmen der Wechselplatten
1) Obere Wechselplatte: Schieben Sie die Arretierungen 1 nach oben und
kippen Sie gleichzeitig die Wechselplatte nach vorne, so dass Sie diese aus
den unteren Halterungen 3 herausheben können.
2) Untere Wechselplatte: Ziehen Sie die Arretierungen 5 nach vorne und heben Sie die Wechselplatte an, so dass Sie diese aus den hinteren Halterungen 6 herausziehen können.
Erste Inbetriebnahme
Führen Sie die folgende Prozedur mit jedem der 3 Wechselplattenpaare durch.
■ Reiben Sie einmalig die Antihaftbeschichtung der Wechselplatten mit zum
ochen geeignetem Öl ein.
K
WARNUNG! VERLETZUNGSGEFAHR!
► Lassen Sie das Gerät vor dem Wechseln der Wechselplatten abkühlen!
erbrennungsgefahr!
V
■ Setzen Sie ein Paar der Wechselplatten in das Gerät ein.
■ Stecken Sie den Netzstecker in eine Netzsteckdose.
■ Schließen Sie das Gerät und verriegeln Sie es mit der Deckelverriegelung 0.
■ Lassen Sie das Gerät ca. 10 Minuten aufheizen.
HINWEIS
► Beim ersten Gebrauch kann ein leichter Geruch entstehen (auch geringe
auchentwicklung möglich). Dieser ist normal und verliert sich nach kurzer
R
Zeit. Sorgen Sie bitte für ausreichende Entlüftung. Öff nen Sie zum Beispiel
ein Fenster.
■ Ziehen Sie den Netzstecker und lassen Sie das Gerät abkühlen.
■ Reinigen Sie die Wechselplatten und das Gerät wie im Kapitel „Reinigen“
beschrieben.
Das Ger
ät ist nun betriebsbereit.
88
SWEW 750 A1
Page 92

Bedienen
Waff elnüsse/Motiv-Waff eln backen
1) Wählen Sie die Wechselplatten „Waff elnüsse“ oder „Motiv-Waff eln“ und
setzen Sie diese ein. Achten Sie dabei darauf die obere Wechselplatte in
der oberen Hälfte des Gerätes zu montieren und die untere Wechselplatte in
der unteren Hälfte.
ACHTUNG - SACHSCHADEN!
► Benutzen Sie niemals zwei verschiedene Wechselplatten gleichzeitig.
Schließen Sie den Deckel und verriegeln Sie ihn mit der Deckelverriegelung 0.
2)
3) Stecken Sie den Netzstecker in eine Netzsteckdose. Die orangene Kontrollleuchte „Power“ q leuchtet.
4) Sobald das Gerät aufgeheizt ist, leuchtet die grüne Kontrollleuchte „Betriebsbereit“ w auf.
5) Lösen Sie die Deckelverriegelung 0, öff nen Sie den Deckel und geben Sie
ca, 1/2 TL Teig (Rezepte für Waff elnüsse und Motiv-Waff eln siehe Kapitel
„Rezepte“) in jede der Formen/Motive der unteren Wechselplatten.
HINWEIS
► Achten Sie bei den Motiv-Waff eln darauf, dass Sie den Teig über alle Teile
des Motiv
nicht ausgefüllt werden.
6) Schließen Sie den Deckel und verriegeln Sie ihn mit der Deckelverriegelung 0.
s verteilen. Ansonsten kann es passieren, dass Teile des Motivs
DE
AT
CH
7) Nach ca. 3 - 4 Minuten sind die Waff elnüsse/Motiv-Waff eln fertig. Lösen
8) Wenn Sie keine weiteren Waff elnüsse/Motiv-Waff eln mehr zubereiten wol-
9) Lassen Sie die Waff elnüsse/Motiv-Waff eln etwas abkühlen und schneiden
SWEW 750 A1
ACHTUNG - SACHSCHADEN!
► Entnehmen Sie die Waff elnüsse/Motiv-Waff eln nur mit einem Kunststoff -
oder Holzlöff
stand, um die Antihaftbeschichtung des Gerätes nicht zu zerstören.
Sie die Deckelverriegelung 0, öff nen Sie den Deckel und entnehmen Sie die
Waff elnüsse/Motiv-Waff eln.
len, ziehen Sie den Netzstecker aus der Netzsteckdose.
Sie überschüssigen Teig vom Rand der Waff elnüsse/Motiv-Waff eln mit einem
Messer ab (entgraten).
el oder einem anderen geeigneten, nichtmetallischen Gegen-
89
Page 93

DE
AT
CH
10) Füllen Sie die Waff elnüsse/Motiv-Waff eln mit der gewünschten Füllung.
Verteilen Sie ein wenig der Füllung auch auf dem Rand der Waff elnüsse/
Motiv-Waff eln und legen Sie das passende Gegenstück darauf, so dass die
beiden Hälften zusammen kleben und eine Hohlkörperfi gur entsteht.
Waff eln backen
1) Wählen Sie die Wechselplatten „Waff eln“ und setzen Sie diese ein.
ACHTUNG - SACHSCHADEN!
► Benutzen Sie niemals zwei verschiedene Wechselplatten gleichzeitig.
Schließen Sie den Deckel und verriegeln Sie ihn mit der Deckelverriegelung 0.
2)
3) Stecken Sie den Netzstecker in eine Netzsteckdose. Die orangene Kontrollleuchte „Power“ q leuchtet.
4) Sobald das Gerät aufgeheizt ist, leuchtet die grüne Kontrollleuchte „Betriebsbereit“ w auf.
5) Öff nen Sie den Deckel und füllen Sie etwa 2 - 3 große EL Waff elteig mittig in
jede der beiden Waff elbackfl ächen der unteren Wechselplatte.
6) Schließen Sie den Deckel und verriegeln Sie ihn mit der Deckelverriegelung 0.
ACHTUNG - SACHSCHADEN!
► Entnehmen Sie die Waff eln nur mit einem Kunststoff - oder Holzspatel oder
einem ander
beschichtung des Gerätes nicht zu zerstören.
7) Nach ca. 3 - 4 Minuten sind die Waff eln fertig. Diese Zeitangabe kann,
je nach verwendetem Waff elteig und persönlichem Geschmack, variieren.
Lösen Sie die Deckelverriegelung 0, öff nen Sie den Deckel und entnehmen
Sie die Waff eln.
8) Wenn Sie keine weiteren Waff eln mehr backen wollen, ziehen Sie den Netzstecker aus der Netzsteckdose.
en geeigneten, nichtmetallischen Gegenstand, um die Antihaft-
90
SWEW 750 A1
Page 94

Reinigen
ACHTUNG - SACHSCHADEN!
HINWEIS
WARNUNG! STROMSCHLAGGEFAHR
► Ziehen Sie erst den Netzstecker aus der Netzsteckdose, bevor Sie das
ät reinigen.
Ger
Tauchen Sie das Gerät niemals in Wasser oder andere Flüssigkeiten!
Andernfalls besteht Lebensgefahr durch elektrischen Schlag.
WARNUNG! VERLETZUNGSGEFAHR!
► Lassen Sie das Gerät vor der Reinigung abkühlen. Verbrennungsgefahr!
► Keine scharfen oder scheuernden Reinigungsmittel verwenden. Das greift
die Oberfl
► Reinigen Sie die Wechselplatten oder das Gerät keinesfalls in der
Spülmaschine!
► Warten Sie mit der Reinigung nicht zu lange. Warten Sie, bis sich das Ge-
ät soweit abgekühlt hat, dass Sie es ohne Verbrennungsgefahr anfassen
r
können. Dann lassen sich die Lebensmittelreste besser entfernen.
■ Das Gehäuse reinigen Sie mit einem trockenen Tuch oder einem leicht ange-
feuchteten Lappen.
■ Nehmen Sie die Wechselplatten ab und reinigen Sie die Wechselplatten in
w
■ Sollten Fett oder Lebensmittel unter die Wechselplatten in den Raum, in
w
folgendermaßen vor:
■ Trocknen Sie alle Teile vor dem erneuten Gebrauch gut ab.
äche des Gerätes an.
armem Wasser und geben Sie etwas Spülmittel hinzu.
elchem sich die Heizschlangen 2 4 befi nden, gelaufen sein, gehen Sie
– Tupfen Sie Fett oder andere Flüssigkeiten mit einem Stück Küchenpapier ab.
– Entfernen Sie festgebrannte Rückstände mit einem Holzspatel oder
kleinem Holzspieß.
DE
AT
CH
Aufbewahren
■ Bewahren Sie den Gerät an einem trockenen Ort auf.
■ Reinigen Sie das Gerät wie im Kapitel „Reinigen“ beschrieben.
SWEW 750 A1
91
Page 95

Fehlerbehebung
Störung Ursache Abhilfe
DE
AT
CH
Rezepte
Waff eln
Zutaten:
1)
2) Geben Sie den Zucker und den Vanillezucker hinzu und verrühren Sie alles.
3) Geben Sie die zerlassene Butter oder Margarine hinzu.
4) Rühren Sie das Backpulver unter.
5) Geben Sie unter ständigem Rühren die Milch und das Mehl abwechselnd
6) Vermengen Sie alles auf höchster Stufe mit dem Handmixer, bis ein glatter
Der Netzstecker steckt nicht
Das Gerät funktioniert nicht.
Die Waff elnüsse/
Motiv-Waff eln/
Waff eln werden
zu dunkel.
♦ 250 g Margarine oder Butter
♦ ca. 200 g Zucker
♦ 2 Päckchen Vanillezucker
♦ 5 Eier
♦ 500 g Mehl
♦ 2 TL Backpulver
♦ 350 - 400 ml Milch
Rühren Sie die Eier schaumig.
nach und nach hinzu.
Teig entsteht.
in der Netzsteckdose.
Das Gerät ist defekt.
Die Waff elnüsse/MotivWaff eln/Waff eln waren zu
lange im Gerät.
Verbinden Sie den Netzstecker mit dem Stromnetz.
Wenden Sie sich an den
Kundendienst.
Nehmen Sie die Waff elnüsse/Motiv-Waff eln/
Waff eln eher heraus.
92
SWEW 750 A1
Page 96

Schokoladenwaff eln
Zutaten:
♦ 150 g weiche Butter
♦ 3 Eier
♦ 150 g Zucker
♦ 100 g geriebene weiße Schokolade
♦ 250 g Mehl
♦ 1 TL Zimt
♦ 50 ml Milch
1)
Rühren Sie die Eier schaumig.
2) Geben Sie den Zucker und den Zimt hinzu und verrühren Sie alles.
3) Geben Sie die zerlassene Butter oder Margarine hinzu.
4) Geben Sie unter ständigem Rühren die Milch und das Mehl abwechselnd
nach und nach hinzu.
5) Als letztes heben Sie die geriebene Schokolade unter.
6) Vermengen Sie alles auf höchster Stufe mit dem Handmixer, bis ein glatter
Teig entsteht.
Basisteig für Waff elnüsse/Motiv-Waff eln
Zutaten:
♦ 400 g Mehl
♦ 100 g Zucker
♦ 100 g weiche Butter
♦ 2 Eier
♦ 100 ml Milch
♦ ¼ TL Backpulver
DE
AT
CH
1)
2) Vermischen Sie das Mehl und das Backpulver und geben Sie es hinzu.
3) Geben Sie die Milch hinzu.
4) Vermengen Sie alles auf höchster Stufe mit dem Handmixer.
SWEW 750 A1
Vermengen Sie die Butter, den Zucker und die Eier.
93
Page 97

DE
AT
CH
HINWEIS
► Die Waff elnüsse/Motiv-Waff eln können Sie mit verschiedensten Zutaten
füllen:
Zum Beispiel mit Mar
Joghurt, Apfelmus, Karamell, Sahne oder für herzhafte Füllungen Frischkäse, Kräuterquark, Aioli, Tzatziki, geschmolzener Gouda usw.
► Sie können die Waff elnüsse/Motiv-Waff eln auch mit Schokoladenglasur
oder Zuck
erguss überziehen oder Puderzucker darüber streuen.
melade, Zuckerguss, Nuss-Nougat-Creme, Pudding,
Süßer Teig für Waff elnüsse/Motiv-Waff eln
Zutaten:
♦ 500 g Mehl
♦ 200 g Zucker
♦ 200 g Butter oder Margarine
♦ 200 g Schmand
♦ 3 Eier
♦ 1 TL Backpulver
♦ 1 Päckchen Vanillezucker
1)
Trennen Sie von zwei Eiern das Eigelb und das Eiweiß. Das Eigelb wird nicht
benötigt.
2) Vermengen Sie die Butter/Margarine, den Zucker, den Vanillezucker, die 2
Eiweiße und das ganze Ei (Eigelb und Eiweiß).
3) Rühren Sie den Schmand unter.
4) Vermischen Sie das Mehl und das Backpulver und geben Sie es hinzu.
5) Vermengen Sie alles auf höchster Stufe mit dem Handmixer.
94
HINWEIS
► Die süßen Waff elnüsse/Motiv-Waff eln können Sie mit verschiedensten
Zutaten füllen:
Zum Beispiel mit Mar
Joghurt, Apfelmus, Karamell oder Sahne.
► Sie können die Waff elnüsse/Motiv-Waff eln auch mit Schokoladenglasur
oder Zuck
erguss überziehen oder Puderzucker darüber streuen.
melade, Zuckerguss, Nuss-Nougat-Creme, Pudding,
SWEW 750 A1
Page 98

Salziger Teig für Waff elnüsse/Motiv-Waff eln
Zutaten:
♦ 200 g Mehl
♦ 125 g Margarine
♦ 1 Ei
♦ ¼ TL Backpulver
♦ 1 Prise Zucker
♦ 1 Messerspitze Salz
1)
Vermengen Sie die Margarine, den Zucker, das Ei und das Salz.
2) Vermischen Sie das Mehl und das Backpulver und geben Sie es hinzu.
3) Vermengen Sie alles auf höchster Stufe mit dem Handmixer.
HINWEIS
► Die salzigen Waff elnüsse/Motiv-Waff eln können Sie mit verschiedensten
Zutaten füllen:
Zum Beispiel mit F
Gouda usw..
rischkäse, Kräuterquark, Aioli, Tzatziki, geschmolzenem
Entsorgung
Werfen Sie das Gerät keinesfalls in den normalen Hausmüll.
Dieses Produkt unterliegt der europäischen Richtlinie 2012/19/EU.
(Waste Electrical and Electronic Equipment).
Entsorgen Sie das Gerät über einen zugelassenen Entsorgungsbetrieb oder über
Ihre kommunale Entsorgungseinrichtung. Beachten Sie die aktuell geltenden
Vorschriften. Setzen Sie sich im Zweifelsfall mit Ihrer Entsorgungseinrichtung in
Verbindung.
DE
AT
CH
SWEW 750 A1
95
Page 99

DE
AT
CH
Garantie und Service
Sie erhalten auf dieses Gerät 3 Jahre Garantie ab Kaufdatum. Das Gerät wurde
sorgfältig produziert und vor Anlieferung gewissenhaft geprüft.
Bitte bewahren Sie den Kassenbon als Nachweis für den Kauf auf. Bitte setzen
Sie sich im Garantiefall mit Ihrer Servicestelle telefonisch in Verbindung. Nur so
kann eine kostenlose Einsendung Ihrer Ware gewährleistet werden.
HINWEIS
► Die Garantieleistung gilt nur für Material- oder Fabrikationsfehler, nicht
aber für T
zerbrechlichen Teilen, z. B. Schalter oder Akkus.
Das Produkt ist lediglich für den privaten und nicht für den gewerblichen
Gebrauch bestimmt. Bei missbräuchlicher und unsachgemäßer Behandlung,
Gewaltanwendung und bei Eingriff en, die nicht von unserer autorisierten ServiceNiederlassung vorgenommen wurden, erlischt die Garantie.
Ihre gesetzlichen Rechte werden durch diese Garantie nicht eingeschränkt. Die
Garantiezeit wird durch die Gewährleistung nicht verlängert. Dies gilt auch für
ersetzte und reparierte Teile.
Eventuell schon beim Kauf vorhandene Schäden und Mängel müssen sofort nach
dem Auspacken gemeldet werden, spätestens aber zwei Tage nach Kaufdatum.
Nach Ablauf der Garantiezeit anfallende Reparaturen sind kostenpfl ichtig.
Die Garantiezeit wird durch die Gewährleistung nicht verlängert. Dies gilt auch
für ersetzte und reparierte Teile.
Service Deutschland
Tel.: 0800 5435 111
E-Mail: kompernass@lidl.de
IAN 93556
ransportschäden, Verschleißteile oder für Beschädigungen an
96
Service Österreich
Tel.: 0820 201 222 (0,15 EUR/Min.)
E-Mail: kompernass@lidl.at
IAN 93556
Service Schweiz
Tel.: 0842 665566 (0,08 CHF/Min., Mobilfunk max. 0,40 CHF/Min.)
E-Mail: kompernass@lidl.ch
IAN 93556
Erreichbarkeit Hotline: Montag bis Freitag von 8:00 Uhr – 20:00 Uhr (MEZ)
SWEW 750 A1
Page 100

Importeur
KOMPERNASS HANDELS GMBH
BURGSTRASSE 21
44867 BOCHUM
GERMANY
www.kompernass.com
DE
AT
CH
SWEW 750 A1
97
 Loading...