


English .................................................................................... 2
Deutsch ................................................................................. 40
V 1.1

SilverCrest SWDR 500 B1
Contents
Intended use ............................................................................. 4
Package contents ..................................................................... 5
Technical specifications ............................................................. 6
Safety instructions .................................................................... 7
Copyright ............................................................................... 12
Operating environment .......................................................... 12
Overview of controls and button functions ............................. 13
Display icons ..................................................................................................... 15
Stand .................................................................................................................. 16
Before you start ..................................................................... 16
External power / battery power operation .................................................... 17
Inserting the batteries ........................................................................................ 17
Connecting the power adapter ....................................................................... 18
Getting started ....................................................................... 18
Display illumination ........................................................................................... 18
Switching the device on/off ............................................................................. 18
Setting the time zone ........................................................................................ 19
Setting the date and time ................................................................................. 21
Automatic synchronisation via RDS ............................................................. 21
Manual setting .............................................................................................. 21
Displaying the world clock ............................................................................... 23
The "MODE" button functions .......................................................................... 24
SDA (Special Date Alarm) ............................................................................... 24
NAP timer .......................................................................................................... 25
Stop watch ........................................................................................................ 26
Setting the AM reception spacing ................................................................... 26
Adjusting the volume ........................................................................................ 27
Setting the sensitivity ......................................................................................... 27
Enabling bass amplification ............................................................................. 27
Selecting a station ............................................................................................. 27
2 - English

SilverCrest SWDR 500 B1
Automatic station search and automatic store ................................................ 27
Manual station search ...................................................................................... 28
Manually tuning a station ................................................................................ 29
Fine tuning ......................................................................................................... 29
Saving a station manually ................................................................................ 29
Recalling a saved station ................................................................................. 30
Stereo output ..................................................................................................... 30
SLEEP timer ........................................................................................................ 31
Setting the alarm ............................................................................................... 31
Enabling the alarm ............................................................................................ 33
Enabling/disabling the button lock ................................................................. 34
Connecting earphones ..................................................................................... 35
Storage when not using the product ............................................................... 35
Troubleshooting ..................................................................... 35
Environmental regulations and disposal information ............. 36
Conformity notes .................................................................... 37
Warranty and Service Information ......................................... 38
English - 3

SilverCrest SWDR 500 B1
Congratulations!
By purchasing the SilverCrest SWDR 500 B1 multi-band radio, hereinafter
referred to as multi-band radio, you have opted for a high-quality product.
Familiarise yourself with the multi-band radio before using it for the first time
and read these operating instructions carefully. Observe the safety instructions
and only use the multi-band radio in the manner described in these operating
instructions and for the indicated fields of application.
Keep these operating instructions in a safe place. Hand over all documents in
the event that you pass on the multi-band radio to a third party.
Intended use
This device is a consumer electronics device. It has been designed to receive
and play back radio stations. The device can also be used as a clock and as
an alarm clock. It is suitable only for private use, not for industrial or
commercial purposes. The device may also not be used in tropical climates.
The manufacturer is not liable for any damage or problems caused by
unauthorised modifications. Only use accessories recommended by the
manufacturer. Observe the regulations and laws in the country of use.
Please note that country-specific regulations may exist with respect to the
frequency bands that can be received. Any information received from
frequency bands outside those that are explicitly free for public use may not be
used, nor may its contents be forwarded to any third parties.
4 - English

SilverCrest SWDR 500 B1
Package contents
Remove the device and all the accessories from the packaging. Remove the
packaging material and check whether all the parts are complete and
undamaged. If you find anything missing or damaged, please contact the
manufacturer.
A Multi-band tuner SilverCrest SWDR 500 B1
B Wall plug power adapter
C These operating instructions (lineart illustration)
English - 5

SilverCrest SWDR 500 B1
Technical specifications
This information describes the technical characteristics of your
device. Different national regulations may apply in different
countries with respect to the frequency bands that are free for
public use. Please note that receiving any information from
bands outside these frequency bands will be illegal and may
be punishable by law.
Multi-band tuner
Power supply supplied power adapter
optional 4x AA 1.5V (LR6) batteries
Power consumption in radio mode: approx. 0.7 W
in Standby mode: < 0.2 W
Audio output power 500mW
Frequency bands
Please note that the given tuning
bands may slightly vary upwards
or downwards because of
product tolerances.
Station presets 400 (100 per band)
Dimensions approx. 17.7 x 4.1 x 11 cm (W x D x H)
Weight approx. 320 g (without batteries)
FM 87.5 - 108 MHz
AM 522 - 1620 KHz
SW1 4.75 - 5.94 MHz
SW2 5.95 - 7.09 MHz
SW3 7.10 - 9.49 MHz
SW4 9.50 - 11.64 MHz
SW5 11.65 - 13.59 MHz
SW6 13.60 - 15.09 MHz
SW7 15.10 - 17.49 MHz
SW8 17.50 – 21.44 MHz
SW9 21.45 – 21.85 MHz
LW 153 – 279 KHz
6 - English

SilverCrest SWDR 500 B1
Max. output voltage on
earphones jack
Battery life approx. 28 hours
Operating temperature 5 °C to 35 °C
Storage conditions -10 °C to 50 °C
Operating humidity max. 85% rel. humidity
Power adapter
Manufacturer Taiyiie Technology Hong Kong Ltd.
Type
Input voltage, frequency /
input current
Output voltage / output
current
The technical data and design may be changed without prior notice.
approx. 110mV
Note: Do not store the device at hot places
(e.g. inside a car in summer)
TYTM0590060VK
100 to 240 V , 50/60 Hz / 0.2 A
5.9 V / 0.6 A,
Safety instructions
Before you use this device for the first time, please read the following notes in
this manual and heed all warnings, even if you are familiar with handling
electronic devices. Keep this manual in a safe place for future reference. If you
sell the device or pass it on, it is essential that you also hand over this manual.
The User Manual is part of the product.
Explanation of used symbols
DANGER! This symbol and the word "Danger" denote a
potentially dangerous situation. Ignoring it can lead to severe
injury or even death.
English - 7

SilverCrest SWDR 500 B1
WARNING! This symbol and the word “Warning” denote
important information required for the safe operation of the
product and for the safety of its users.
This symbol denotes possible danger due to electric shock.
This icon on the multi-band radio indicates that the operating
instructions must be observed.
This symbol denotes further information on the topic.
DANGER! Make sure that:
there is free circulation of air (do not place the device on shelves, on a
carpet, on a bed, or anywhere that obstructs the ventilation slots and leave
at least 10 cm clearance on all sides);
the device is not exposed to direct heat sources (e.g. radiators);
no direct sunlight or bright artificial light reaches the device;
contact with water spray and drops and aggressive fluids is avoided and the
device is never operated near water, and the device is never submerged (do
not place any items containing liquids, such as drinks, vases, etc. on or near
the device);
the device is never placed near magnetic fields (e.g. speakers);
no naked flames (e.g. burning candles) are placed on or near the device;
no foreign bodies can penetrate into the device;
the device is not subject to major great temperature fluctuations as this can
cause condensation and short-circuits. If the device has been exposed to
strong temperature variations, wait for it to reach the ambient temperature
before switching it on (about 2 hours);
8 - English

SilverCrest SWDR 500 B1
the device is not subjected to excessive shocks or vibrations;
the device or the wall plug power adapter is not used during thunder and
lightning storms. When there is the possibility of thunderstorms, disconnect
the wall plug power adapter from the power socket.
when using an optional wall plug power adapter the power socket used
must be easily accessible at all times and cables should be laid so they do
not present a trip hazard.
DANGER! Batteries
Insert the batteries with the correct polarity. Refer to the diagram inside the
battery compartment. Do not attempt to recharge the batteries and do not
dispose of the batteries in a fire. Do not mix battery types (old and new or
carbon and alkaline, etc.). Remove the batteries when the device is not to be
used for an extended period. Improper use could cause explosions or leaks.
Batteries must never be opened or deformed, as this could result in chemicals
leaking out which could cause injuries. If the battery fluid comes into contact
with the skin or eyes, rinse immediately with plenty of water and seek medical
aid.
Do not allow children to play with the batteries as they represent potential
choking hazards. Keep batteries out of reach of children. If a battery is
swallowed, seek medical help immediately.
DANGER! Children and persons with
disabilities
Electrical devices are not suitable for children. Also persons with reduced
physical, sensory or mental capabilities should only use electrical devices in
appropriate circumstances. Never allow children or persons with disabilities to
use electrical devices unsupervised, unless they are instructed accordingly and
English - 9

SilverCrest SWDR 500 B1
supervised by a competent person responsible for their safety. Children should
always be supervised to ensure that they do not play with the product. Small
parts can represent choking hazards. If small parts are swallowed, seek
medical help immediately.
Keep the packaging away from children and persons with
disabilities.
Danger of suffocation!
DANGER! Wall plug power
adapter
Only plug the wall plug power adapter into a suitable and easily accessible
power socket. Do not touch the power adapter with wet hands as this could
cause an electric shock. Unplug the wall plug power adapter from the mains in
the following circumstances:
in any dangerous situation
if the wall plug power adapter makes an unusual noise or gives off smoke
before a storm and/or thunderstorm
if the wall plug power adapter is damaged
if the wall plug power adapter has been exposed to rain, liquids or high
levels of humidity
when you wish to clean it
The wall plug power adapter consumes electricity even in Standby mode. In
order to completely disconnect the device from the mains, the wall plug
power adapter must be pulled out from the power socket.
Please follow these instructions to avoid risk of potential fatal injury or fire!
Never cover the wall plug power adapter, otherwise there is a risk of fire. Do
not attempt to open the housing of the wall plug power adapter. This could
result in potentially fatal electrocution.
10 - English

SilverCrest SWDR 500 B1
DANGER! Cables
Unplug all cables by holding the plugs and never pull on the cables
themselves. Never place pieces of furniture or other heavy objects on the
cables and take care that they do not become damaged, especially at the
plugs and sockets. Never install the cables around hot or sharp objects to
avoid damaging them. Never tie knots in cables and do not tie them to other
cables. All cables should be positioned so that nobody can trip over them or
be obstructed by them.
DANGER! Display
Do not apply any pressure to the screen and keep sharp objects away from the
screen. A broken screen represents a risk of injury. Wear gloves when
collecting the broken parts and contact the manufacturer if necessary. In the
case of scratches or other damage to the display, take extreme care to ensure
that no fluid escapes from the display.
If fluid does escape, proceed as follows:
If the fluid comes into contact with the skin, wipe off with a clean cloth
and rinse with plenty of water. Contact a doctor if necessary.
If the fluid comes into contact with the eyes, rinse them under running
water for at least 15 minutes and contact a doctor immediately.
If the fluid is swallowed, first rinse the mouth out with water and then
drink plenty of water. Contact a doctor immediately!
DANGER! Repairs
Repairs are required when this device has been damaged in any way, for
example, when the power adapter or device housing is damaged, when
English - 11

SilverCrest SWDR 500 B1
liquids or objects have entered the device or when the product has been
exposed to rain or moisture. Repairs are also necessary if the product is not
working properly or has been dropped. If you notice any smoke, unusual noise
or strange smells, switch off the device immediately, disconnect the wall plug
power adapter from the power supply and remove any inserted batteries. If this
occurs, do not continue to use the device and have it checked out by an
expert. All repairs must be carried out by qualified service personnel. Never
open the housing of the device or the wall plug power adapter.
DANGER! Cleaning
Disconnect the device from the mains. Only use a clean, dry cloth for cleaning
the multi-band tuner. Never use any corrosive liquids. Do not attempt to open
the housing of the device, this will void your warranty.
If the batteries leak, contact a technician for a professional cleaning.
Copyright
All the contents of this user manual are protected by copyright and provided to
the reader for information only.
Copying data and information without the prior explicit written consent of the
author is strictly forbidden. This also applies to any commercial use of the
contents and information.
All texts and diagrams are up-to-date as of the date of printing.
Operating environment
The device is not designed for use in environments with high temperatures or
humidity (e.g. bathrooms) or those with above-average levels of dust.
Operating temperature and operating humidity: 5°C to 35°C, max. 85% rel.
humidity.
12 - English

SilverCrest SWDR 500 B1
Overview of controls and button functions
These operating instructions have a fold-out cover. Fold-out the cover so you
can refer to the relevant controls at any time.
English - 13

SilverCrest SWDR 500 B1
1
Telescopic antenna
2
SNOOZE/BASS button (delay the alarm for 5 to 120
minutes/amplify low-frequency sound)
3
LOCK button (button lock)
4
VOL + button (increase the sound volume)
5
DISPLAY button (show the time zone)
6
Display
7
BAND button (select the frequency band)
8
POWER/SLEEP button (switch on/off; set the sleep timer)
9
SET/STORE button (set time, store a station)
10
M+/AL2 button (tune in the next station preset, Alarm 2)
11
TUNE+ button (station scan to increasing frequencies, set minutes +)
12
VOL - button (reduce the sound volume)
13
TUNE- button (station scan to decreasing frequencies, set minutes -)
14
M- / AL1 button (tune in the previous station preset, Alarm 1)
15
MODE button
16
Speaker
17
Strap
18
Stand (on the back)
19
Battery compartment (on the back)
20 (receptacle for optional wall plug power adapter)
21 (earphones receptacle)
22
DX/LOCAL button (set the reception sensitivity)
14 - English

SilverCrest SWDR 500 B1
Display icons
23 Stop watch
24 CITY
25 SDA (Special Date Alarm)
26 VOL (sound volume)
27 MEM (station preset)
28 RDS (Radio Data System)
29 Different indicators: station name, date, station preset
30 ST (STEREO - only for earphones mode)
31 BASS (bass amplification enabled)
32 SLEEP (sleep timer)
33 Alarm 1/2 enabled (buzzer)
34 Alarm 1/2 enabled (radio)
35 LOCK (button lock)
36 Afternoon indicator (PM)
37 Frequency unit
38 Low battery indicator
39 Clock/frequency display
English - 15

SilverCrest SWDR 500 B1
40 Day of the week indication
41 Frequency band
42 NAP timer
Stand
On the back panel of the device you’ll find a stand (18) that allows to install
the multi-band tuner in an inclined position. To do this, fold-out the retractile
stand (18).
Before you start
You can power the device on either by using the supplied power adapter (B)
or by using 4 optional AA-sized (LR6) batteries. The batteries are not included
in the package.
16 - English

SilverCrest SWDR 500 B1
External power / battery power operation
When disconnecting the multi-band tuner (A) from the power supply, different
settings (time and alarm time) are lost. To avoid this, insert batteries before
disconnecting the device from the mains. This guarantees that the mentioned
settings are preserved.
Any stored stations are preserved even if there are no batteries inserted when
disconnecting the device from the mains.
Inserting the batteries
Open the battery compartment cover (19) on the back panel of the device by
sliding it towards the bottom and remove it. Insert the batteries with the correct
polarity (+ and -), as shown in the following figure. The correct polarity is
labelled on the batteries and inside the battery compartment. Re-insert the
cover of the battery compartment (19) and slide it upwards until it locks in
place.
If the display (6) indicates a low battery level (38), the batteries are almost
empty. When this happens, replace the batteries with new batteries of the
same type.
English - 17

SilverCrest SWDR 500 B1
WARNING! Remove the batteries when the device is not to be
used for an extended period. The batteries could leak and cause
damage to the device.
Connecting the power adapter
Plug the wall plug power adapter plug (B) into the receptacle (20) of the multiband tuner (A). Plug the wall plug power adapter (B) into an easily accessible
power socket.
While the wall plug power adapter (B) is connected, the device is powered
from the mains and not from any inserted batteries. When powering the device
via the wall plug power adapter (B) for a long time, you should remove the
batteries to avoid any leakage.
Getting started
Display illumination
Press any button to switch the display illumination on for approx. 10 seconds. It
automatically switches back off after this time.
Switching the device on/off
To power the device on, press the "POWER/SLEEP" button (8) once. When
powered on, the currently tuned in frequency, the frequency band and the day
of the week are shown on the display (6):
FM
MW
SW
LW
For the "FM" band, the name of the station is also shown, if broadcast. When
the station transmits no name or when the signal is too weak, the current date is
shown instead.
VHF FM band
Medium wave band
Short wave band
Long wave band
18 - English
SilverCrest SWDR 500 B1
For the "MW", "SW", and "LW" bands, the current date is shown there.
To power the device off, press the POWER/SLEEP button (8) again. When
powered off, the current date and time, and the day of the week are shown on
the display (6).
It is recommended to start configuring the multi-band tuner with
setting the time zone. To do so, see the "Setting the time zone"
section below.
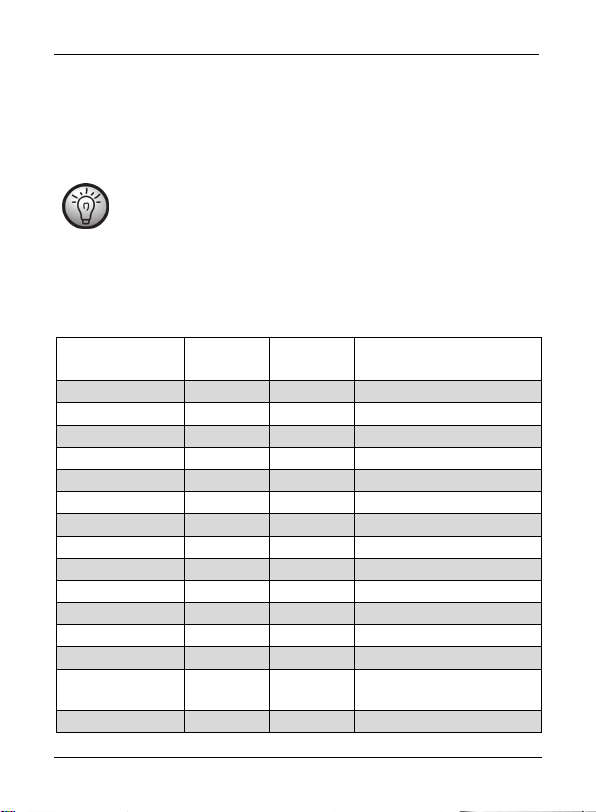
Setting the time zone
The following table contains an overview of the abbreviated city names for the
different time zones. The table also lets you check the time offset and, if
applicable, a daylight saving.
Abbreviation UTC
offset*
HNL
ANC
YVR
LAX
DEN
CHI
MEX
NYC
YYZ
YUL
CCS
RIO
BUE
UTC*
LON
-10:00h no Honolulu / USA
-9:00h yes Anchorage / USA
-8:00h yes Vancouver / Canada
-8:00h yes Los Angeles / USA
-7:00h yes Denver / USA
-6:00h yes Chicago / USA
-6:00h yes Mexico City / Mexico
-5:00h yes New York / USA
-5:00h yes Toronto / Canada
-5:00h yes Montreal / Canada
-4:30h no Caracas / Venezuela
-3:00h yes Rio de Janeiro / Brazil
-3:00h no Buenos Aires / Argentina
0:00h no Universal Time
0:00h yes London / United Kingdom
Daylight
saving
City / country
Coordinated
English - 19

SilverCrest SWDR 500 B1
BER
PAR
ROM
CAI
IST
MOW
KWI
DXB
KHI
DAC
BKK
SIN
HKG
PEK
SHA
TYO
SYD
NOU
+1:00h yes Berlin / Germany
+1:00h yes Paris / France
+1:00h yes Rome / Italy
+2:00h yes Cairo / Egypt
+2:00h yes Istanbul / Turkey
+3:00h yes Moscow / Russia
+3:00h no Kuwait City / Kuwait
+4:00h no Dubai / Saudi Arabia
+5:00h no Karachi / Pakistan
+6:00h yes Dacca / Bangladesh
+7:00h no Bangkok / Thailand
+8:00h no Singapore
+8:00h no Hong Kong
+8:00h no Beijing / China
+8:00h no Shanghai / China
+9:00h no Tokyo / Japan
+10:00h yes Sydney / Australia
+11:00h no Noumea / New
Caledonia
AKL
+12:00h yes Auckland / New Zealand
*UTC: Universal Time Coordinated
UTC is the abbreviation for "Universal Time Coordinated", formerly also called
GMT (Greenwich Mean Time). UTC is the base for time zone calculation. The
corresponding offset is shown in the 2nd column of the table.
To set the time zone, proceed as follows:
While powered off, press and hold the "SET/STORE" button (9) until the
display (6) reads "US" or "EU". Then press the "SET/STORE" button (9)
briefly to go to the time zone setting. The currently set city abbreviation and
20 - English

SilverCrest SWDR 500 B1
the corresponding local time are shown in the upper part to the display (6).
The default setting is "UTC".
Press the "VOL-" (12) or "VOL+" (4) button to set the city abbreviation for
your current time zone, e.g. BER for Berlin. You can find the city abbreviation
in the table above. With each city abbreviation, the displayed time is
changed.
When finished, set the correct time as described in the following section.
Setting the date and time
Automatic synchronisation via RDS
Upon factory delivery time synchronisation via RDS is enabled. If the device
receives an RDS signal after powering on, the date and time are synchronised
and shown correctly after a few moments.
The multi-band radio is only set automatically if the selected station
transmits an RDS signal and the reception quality is strong enough
to receive the RDS signal. If an RDS signal is received, the RDS
indicator (28) appears on the display.
Time synchronisation and the correct time setting also depend on the set time
zone. Therefore it is mandatory to set the correct time zone first. To do so, see
the "Setting the time zone" section above.
Manual setting
First disable automatic time synchronisation via RDS. To do so, while powered
off, press the "MODE" button (15) four times until "TS ON" (Time
Synchronisation ON) appears in the upper part of the display (6). Press the
"VOL-" (12) or "VOL+" (4) button to set it to “TS OFF” (Time Synchronisation
OFF).
Now set the correct time zone.
English - 21

SilverCrest SWDR 500 B1
The time can only be set while the device is powered off. If it is powered on,
press the POWER/SLEEP button (8) to power the device off.
If no button is pressed for approx. 7 seconds while changing the setting, the
settings are applied and the unit exits the setting mode. You can keep the
buttons "VOL-" (12) or "VOL+" (4) pressed to accelerate the digits count.
While powered off, press and hold the "SET/STORE" button (9) until the
display (6) reads "US" or "EU". Now press the "VOL-" (12) or "VOL+" (4)
button to select your preferred date format.
Example:
EU DD.MM.YYYY
US MM.DD.YYYY
Press the "SET/STORE" button (9) to confirm your selection.
Please remember that the tuning spacing for the AM band is also changed
with this setting.
Now set the correct time zone as described in the previous chapter and
press the "SET/STORE" button (9) to confirm the setting. The set time format
flashes.
Now you can press the "VOL-" (12) or "VOL+" (4) buttons to set the desired
time format. Upon factory delivery the time format is set to 24 hours. You
have the choice between 12H and 24H. Press the "SET/STORE" button (9)
to confirm the setting. The hour digit flashes.
Press the "VOL-" (12) and "VOL +" (4) buttons to set the hour. Press the
"SET/STORE" button (9) to confirm the setting. The minutes digit flashes.
Press the "VOL-" (12) and "VOL +" (4) buttons to set the minute. Press the
"SET/STORE" button (9) to confirm the setting. The year digit flashes.
Press the "VOL-" (12) or "VOL+" (4) buttons to set the correct year. Press the
"SET/STORE" button (9) to confirm the setting. The month digit flashes.
22 - English

SilverCrest SWDR 500 B1
Press the "VOL-" (12) and "VOL +" (4) buttons to set the month. Press the
"SET/STORE" button (9) to confirm the setting. The day digit flashes.
Press the "VOL-" (12) and "VOL +" (4) buttons to set the day. Press the
"SET/STORE" button (9) to confirm the setting.
The day of the week (40) is calculated automatically and shown on the display
(6).
Display Day of the week
MON Monday
TUE Tuesday
WED Wednesday
THU Thursday
FRI Friday
SAT Saturday
SUN Sunday
You have finished the setting.
If you have selected the 12-hour clock format, the "PM" icon (36) appears
on the display (6) for post meridian clock hours.
Please note that you should adjust the clock when you move into a
different time zone.
Displaying the world clock
Press the "DISPLAY" button (5). The time is shown in large digits on the display
(6). Additionally, you can show the time for a specific time zone in the upper
part of the display. Use the "TUNE-" (13) or " TUNE+" (11) button to select the
time zone for which you want to know the current time. After this, with each
press of the "DISPLAY" button (5) the selected time zone and the corresponding
time are displayed.
Please remember that the time zone is being displayed only. To set the time
zone, proceed as described in the "Setting the time zone" chapter.
English - 23

SilverCrest SWDR 500 B1
The "MODE" button functions
While the device is powered off the "MODE" button (15) lets you access the
setting mode for different functions.
Press once SDA (Special Date Alarm)
Press twice NAP timer
Press 3 times Stop watch
Press 4 times RDS time synchronisation ON/OFF
In radio mode the "MODE" button (15) has the following functions:
Press once To show and change the tuning mode
Press twice
FM: To show and change the "MONO"
and "AUTO-ST" settings
SW: Quick selection of the different short
wave bands
SDA (Special Date Alarm)
This function lets you program up to 10 yearly-recurring date alarms. The
procedure is as follows:
While the device is powered off, press the "MODE" button (15) once. The
display (6) reads "SDA". 01 (for the first SDA) and the associated date in
month.day format flash. If the alarm is disabled, the "SDA" icon (25) will
also flash. While an SDA is enabled, the "SDA" icon (25) illuminates. In this
case, the "SDA" icon (25) is also shown in clock mode.
Press the "VOL-" (12) or "VOL+" (4) buttons to set the desired date. You can
keep the buttons pressed to accelerate the digits count.
Press the "SET/STORE" button (9) briefly to enable or disable the set SDA.
You can enable or disable each SDA independently from the others. The
setting will be saved automatically.
24 - English
 Loading...