

Page 1
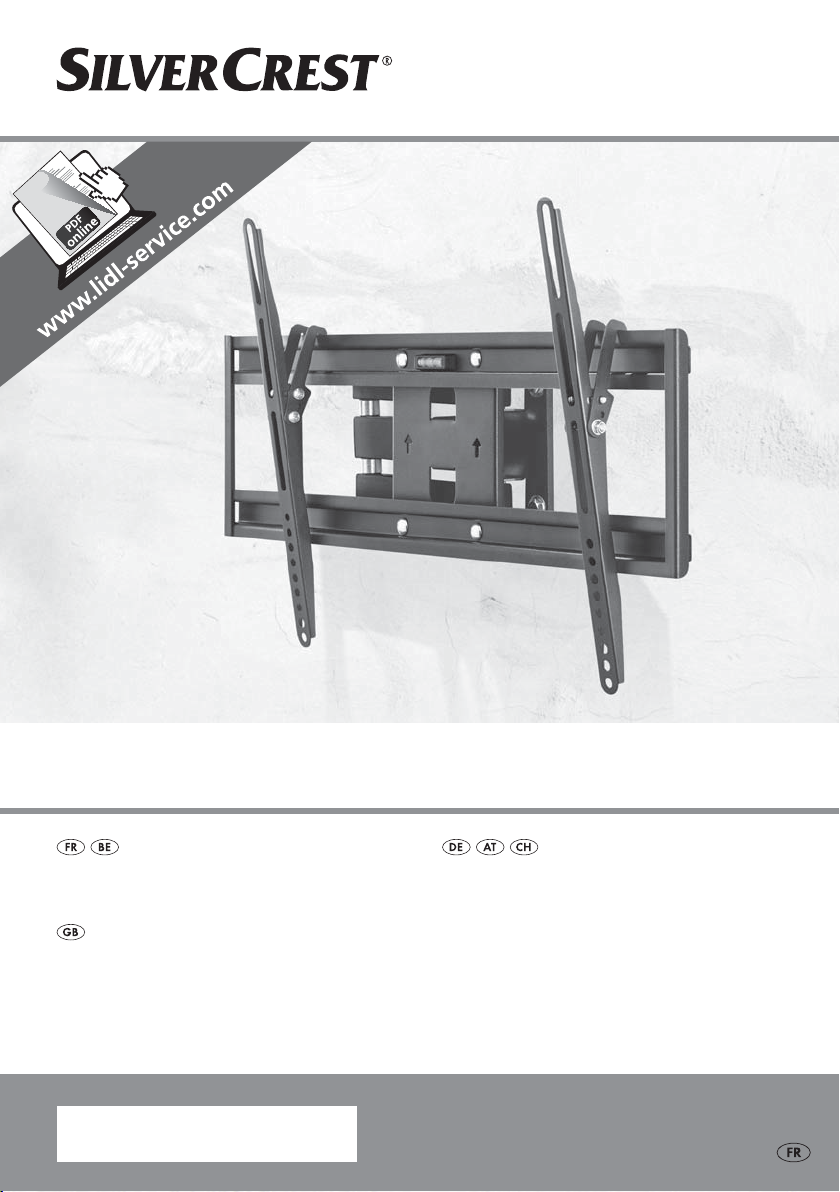
SUPPORT MURAL TV STW 32 - 60" A1
SUPPORT MURAL TV
Notice de montage
TV WALL BRACKET
Assembly Instructions
IAN 106956
TV-WANDHALTERUNG
Montageanleitung
Page 2

FR / BE Notice de montage Page 1
DE / AT / CH Montageanleitung Seite 13
GB Assembly Instructions Page 25
Page 3
Table des matières
Introduction . . . . . . . . . . . . . . . . . . . . . . . . . . . . . . . . . . . . . . . . . . . . . . . . . . . 2
Informations relatives à ces instructions de montage . . . . . . . . . . . . . . . . . . . . . . . . . . . . . . 2
Usage conforme . . . . . . . . . . . . . . . . . . . . . . . . . . . . . . . . . . . . . . . . . . . . . . . . . . . . . . . . . 2
Avertissements utilisés . . . . . . . . . . . . . . . . . . . . . . . . . . . . . . . . . . . . . . . . . . . . . . . . . . . . . 2
Sécurité . . . . . . . . . . . . . . . . . . . . . . . . . . . . . . . . . . . . . . . . . . . . . . . . . . . . . . 3
Consignes de sécurité fondamentales . . . . . . . . . . . . . . . . . . . . . . . . . . . . . . . . . . . . . . . . . 3
Matériel livré . . . . . . . . . . . . . . . . . . . . . . . . . . . . . . . . . . . . . . . . . . . . . . . . . . 4
Matériel de montage . . . . . . . . . . . . . . . . . . . . . . . . . . . . . . . . . . . . . . . . . . . 4
Montage . . . . . . . . . . . . . . . . . . . . . . . . . . . . . . . . . . . . . . . . . . . . . . . . . . . . . 4
Préparer le montage . . . . . . . . . . . . . . . . . . . . . . . . . . . . . . . . . . . . . . . . . . . . . . . . . . . . . . 4
Outils nécessaires . . . . . . . . . . . . . . . . . . . . . . . . . . . . . . . . . . . . . . . . . . . . . . . . . . . . . . . . 5
Étapes de montage . . . . . . . . . . . . . . . . . . . . . . . . . . . . . . . . . . . . . . . . . . . . . . . . . . . . . . . 6
Entretien . . . . . . . . . . . . . . . . . . . . . . . . . . . . . . . . . . . . . . . . . . . . . . . . . . . . . 10
Nettoyage . . . . . . . . . . . . . . . . . . . . . . . . . . . . . . . . . . . . . . . . . . . . . . . . . . . 10
Mise au rebut . . . . . . . . . . . . . . . . . . . . . . . . . . . . . . . . . . . . . . . . . . . . . . . . 10
Annexe . . . . . . . . . . . . . . . . . . . . . . . . . . . . . . . . . . . . . . . . . . . . . . . . . . . . . . 10
Caractéristiques techniques . . . . . . . . . . . . . . . . . . . . . . . . . . . . . . . . . . . . . . . . . . . . . . . . 10
Garantie . . . . . . . . . . . . . . . . . . . . . . . . . . . . . . . . . . . . . . . . . . . . . . . . . . . . . . . . . . . . . . 11
Service après-vente . . . . . . . . . . . . . . . . . . . . . . . . . . . . . . . . . . . . . . . . . . . . . . . . . . . . . . 11
Importateur . . . . . . . . . . . . . . . . . . . . . . . . . . . . . . . . . . . . . . . . . . . . . . . . . . . . . . . . . . . . 11
FR
BE
STW 32 - 60" A1
1
Page 4
FR
BE
Introduction
Informations relatives à ces instructions de montage
Félicitations!
Avec cet achat vous avez choisi un produit haut de gamme. Familiarisez-vous avec
le produit avant le montage et la première mise en service. A cette fi n, veuillez
lire attentivement les instructions de montage suivantes ainsi que les consignes
de sécurité. N'utilisez le produit que conformément aux consignes et pour les
domaines d'utilisation prévus. Conservez soigneusement ces instructions de
montage. En cas de transfert du produit à un tiers, remettez-lui également ces
instructions de montage.
Usage conforme
Le support mural TV sert uniquement à la fi xation murale d'écrans plats avec
une diagonale d'écran d'env. 81 cm – 152 cm (32" – 60") pour une utilisation
domestique non commerciale. Le support mural est uniquement prévu pour une
utilisation à l'intérieur de bâtiments.
Aucune garantie n'est assurée pour les dommages résultant d'un traitement abusif
ou non conforme, du recours à la force et d'une modifi cation non autorisée.
L'utilisateur assume seul la responsabilité des risques encourus.
Avertissements utilisés
Les avertissements suivants sont utilisés dans les instructions de montage présentes:
AVERTISSEMENT
Un avertissement à ce niveau de danger signale une situation
potentiellement dangereuse.
Si la situation dangereuse ne peut pas être évitée, ceci peut entraîner des
blessures ou des dommages matériels.
► Observer les instructions données dans cet avertissement afi n d'éviter toute
blessure ou dommage matériel.
REMARQUE
Une remarque contient des informations supplémentaires facilitant le manie-
►
ment de l'appareil.
2
STW 32 - 60" A1
Page 5

Sécurité
Ce chapitre contient des consignes de sécurité importantes visant la manipulation
de l'appareil. Tout usage non conforme peut entraîner des dommages corporels
et des dégâts matériels.
Consignes de sécurité fondamentales
Veuillez vous conformer aux consignes de sécurité ci-dessous afi n de garantir
une utilisation en toute sécurité de l'appareil:
■ Ne montez pas le produit à des endroits dans lesquels des personnes pourraient
se tenir.
■ Après le montage du produit et de la charge fi xée, vérifi ez-en la solidité et la
sûreté de fonctionnement suffi santes. Ce contrôle doit être répété à intervalles
réguliers (au moins chaque trimestre).
■ Veillez à ne pas dépasser la force porteuse maximale autorisée du produit et à
ne pas fi xer de charge qui dépasse la dimension maximale autorisée.
■ Respectez une distance de sécurité autour de la charge accrochée (en fonction
du modèle).
■ En cas de détériorations du produit, retirez immédiatement la charge mise en
place et n'utilisez plus le produit.
■ Vu la diversité des téléviseurs disponibles sur le marché et des constructions
murales, le kit de montage livré ne peut pas couvrir toutes les possibilités.
■ Dans de rares cas, il peut arriver que les vis de fi xation du téléviseur sur le support
mural TV soient trop longues. Utilisez dans ce cas les écarteurs livrés.
■ Tenez compte du fait que les chevilles livrées sont uniquement adaptées aux
murs en béton et en brique pleine.
■ Lisez la notice d'utilisation avant le montage de votre téléviseur. Elle fournit en
règle générale des informations sur le genre et la dimension des matériaux de
fi xation adaptés.
■ Achetez un matériel de fi xation adapté dans le commerce spécialisé pour le
montage de votre téléviseur, dans la mesure où il ne fait pas partie du kit de
montage livré.
■ Achetez un matériel de montage adapté dans le commerce spécialisé en cas de
types de construction ou de matériaux diff érents du mur prévu pour l'installation.
■ Ne faites jamais usage de brutalité ou de force lors du montage. Ceci peut
endommager votre téléviseur ou le support mural TV.
■ En cas de doute, adressez-vous à du personnel spécialisé pour le montage du
produit et n'essayez pas vous-même!
FR
BE
STW 32 - 60" A1
3
Page 6
FR
BE
Matériel livré
▯ 1 x support mural TV
▯ 2 x rails porteurs
▯ 1 x bande velcro
▯ Matériel de montage
▯ Ces instructions de montage
REMARQUE
Vérifi ez si la livraison est au complet et ne présente aucun dommage visible.
►
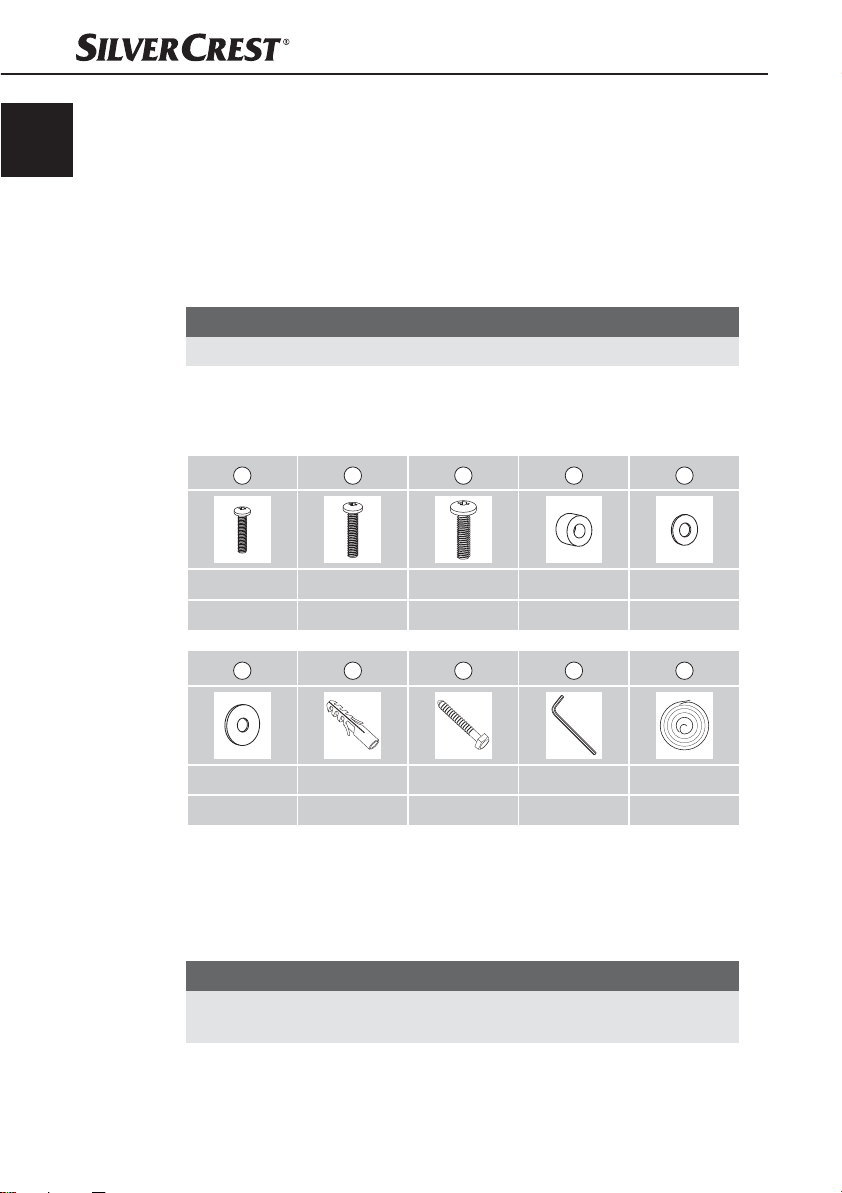
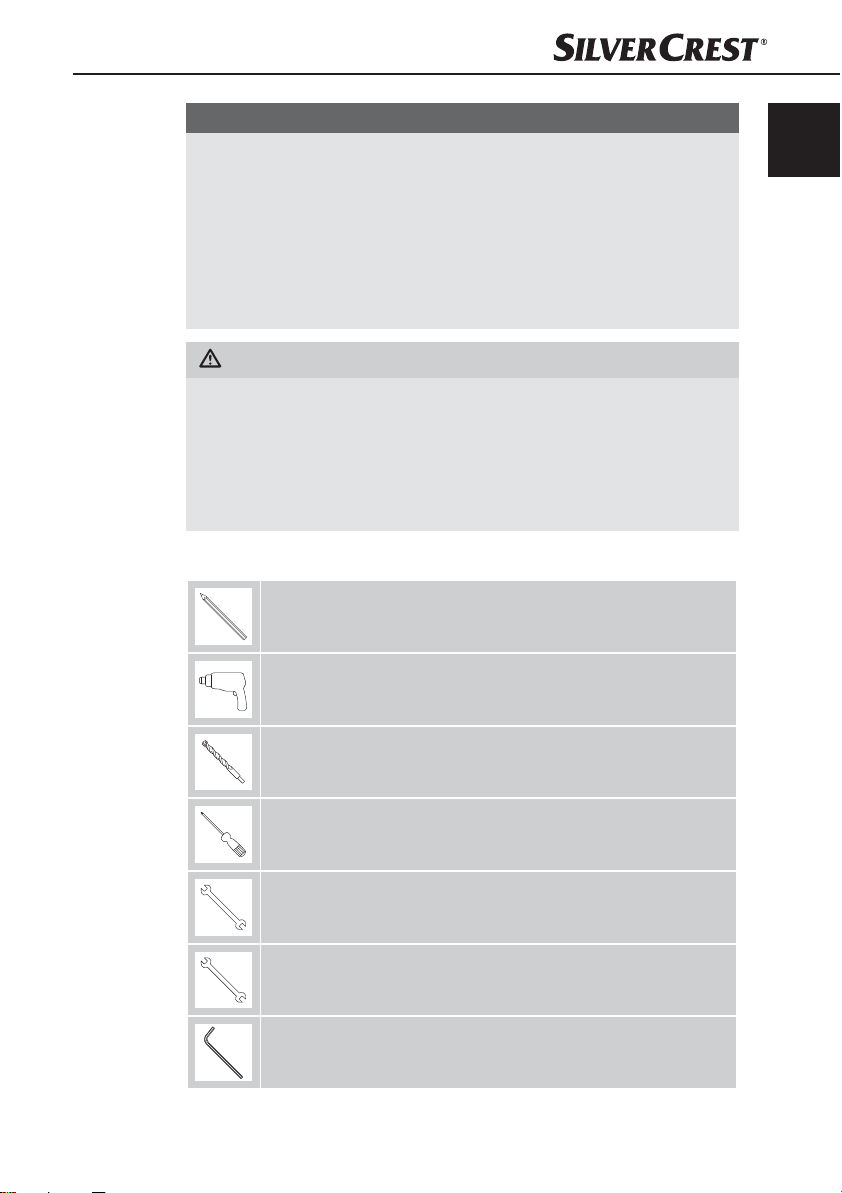
Matériel de montage
A B C D E
M4 x 20 M6 x 25 M8 x 25 Ø18xØ8,5x10 Ø 18 x Ø 7
4 x 4 x 4 x 4 x 4 x
F
Ø 22 x Ø 8 S10 x 50 mm M8 x 65 mm 5 x 5
4 x 4 x 4 x 1 x 1 x
Montage
Préparer le montage
REMARQUE
Prenez suffi samment de temps pour le montage du support mural TV.
►
► Enlevez toutes les pièces de l'emballage et gardez-les à portée de main.
4
G
H I J
STW 32 - 60" A1
Page 7
REMARQUE
Montez le support mural TV uniquement à deux!
►
► Les diff érents téléviseurs ont diff érentes possibilités de branchement pour
le câblage et d'autres appareils. Vérifi ez avant l'installation si les raccordements nécessaires sont encore accessibles après le montage.
► En fonction du téléviseur et du type de montage, vous n'avez pas besoin
du kit de montage complet. Il est de ce fait possible qu'il reste des petites
pièces non utilisées même lorsque le montage est correct. Conservez-les
ensemble avec ces instructions de montage à un endroit sûr pour une utilisation ultérieure (vente du support mural TV, nouveau téléviseur, etc.).
AVERTISSEMENT
► Avant l'installation, contrôlez absolument que le mur prévu soit approprié
au poids à fi xer et assurez-vous qu'aucun câble électrique et aucune
conduite d'eau, de gaz ou autre ne se trouvent dans le mur à l'endroit du
montage.
► Tenez compte du fait que les chevilles livrées sont uniquement adaptées
aux murs en béton et en brique pleine. Si vous n'êtes pas sûr de la nature
de votre mur, veuillez demander conseil à un technicien spécialisé.
Outils nécessaires
Crayon
Perceuse
FR
BE
STW 32 - 60" A1
Forêt Ø 10 mm
Tournevis cruciforme
Clé plate de 13 mm
Clé plate de 10 mm
Clé à six pans creux 5 x 5 mm (comprise dans le matériel livré)
5
Page 8
FR
BE
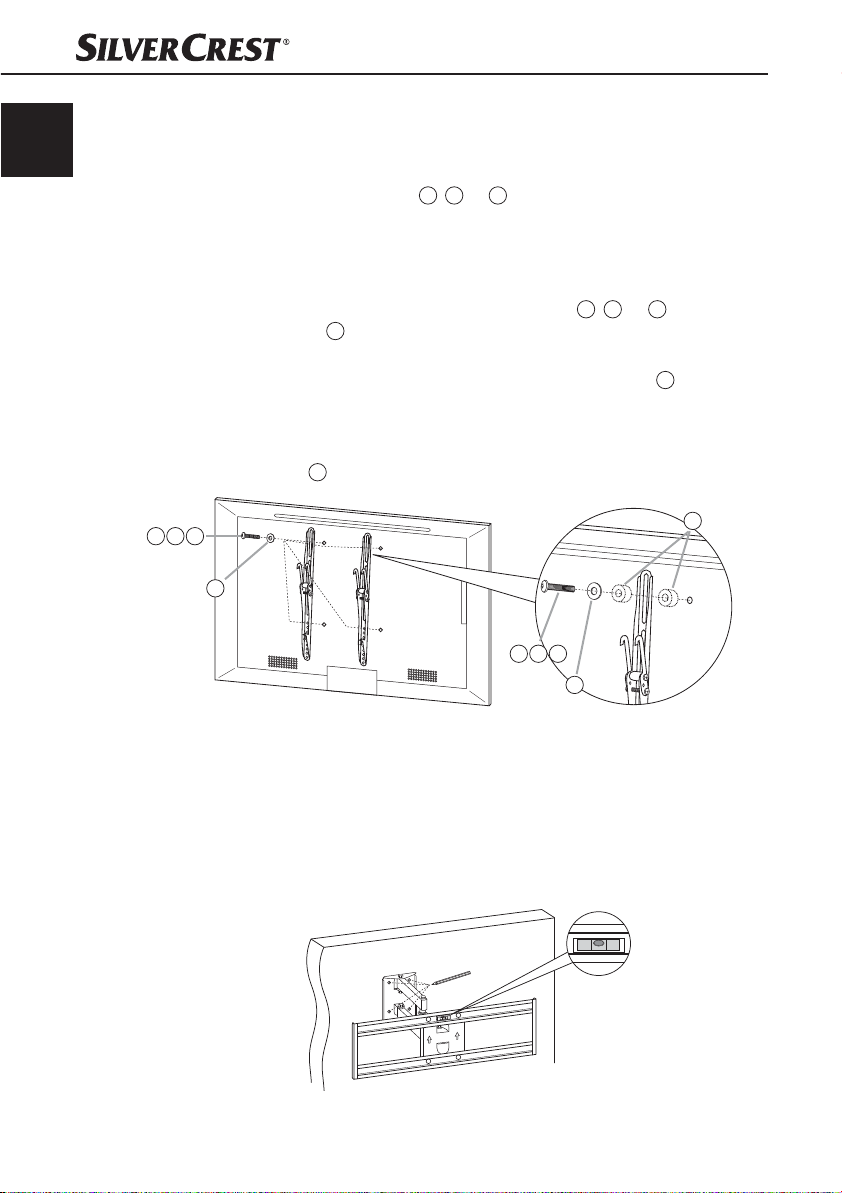
Étapes de montage
1ère étape: Fixer les rails porteurs sur le téléviseur
♦ Vérifi ez d'abord si la visserie ( A, B ou C) livrée est adaptée aux alésages
prévus au dos de votre téléviseur. Si ce n'est pas le cas, veuillez utiliser des
vis et des rondelles adaptées.
♦ Placez les rails porteurs de manière à ce que les têtes des vis pointent vers
l'extérieur pour le réglage de l'angle d'inclinaison, et que les crochets pointent
vers le bas. Vissez les rails porteurs avec la visserie (
E
et les rondelles
hauteur identique.
♦ Pour les téléviseurs avec une face arrière droite, aucun écarteur D n'est en
règle générale nécessaire. Fixez les rails porteurs avec les vis et rondelles
adaptées directement au dos de l'appareil.
♦ Pour les téléviseurs à face arrière bombée, il peut s'avérer nécessaire d'utiliser
les écarteurs
de manière à ce qu'elles soient parallèles et alignées à
D
livrés entre le téléviseur et les rails porteurs.
A, B
ou C) adaptée
A B C
E
A B C
E
2e étape: Fixer le support mural TV au mur
♦ Choisissez d'abord une hauteur de montage adaptée. La hauteur idéale
pour un téléviseur est parallèle à la hauteur des yeux d'une personne assise.
♦ Tenez le support mural TV comme gabarit à l'endroit souhaité du mur et
alignez-le à l'aide d'un niveau à bulle. Marquez les 4 trous d'alésage à
l'aide d'un crayon.
D
6
STW 32 - 60" A1
Page 9

♦ Percez les trous aux endroits marqués avec un diamètre de 10 mm et une
profondeur d'au moins 60 mm.
F
G
60 mm
10 mm
♦ Placez les chevilles G livrées dans les trous. Vissez le support mural TV au
H
mur à l'aide des vis
et rondelles F jointes.
Si le support mural TV n'est pas totalement horizontal après le montage, vous
pouvez l'ajuster dans une certaine limite.
♦ Desserrez un peu les quatre vis de la plaque porteuse à l'aide d'une clé
plate (de 13).
♦ Alignez les supports transversaux à l'aide du niveau à bulle et serrez ensuite
à nouveau bien les quatre vis de la plaque porteuse.
FR
BE
H
STW 32 - 60" A1
7
Page 10
FR
BE
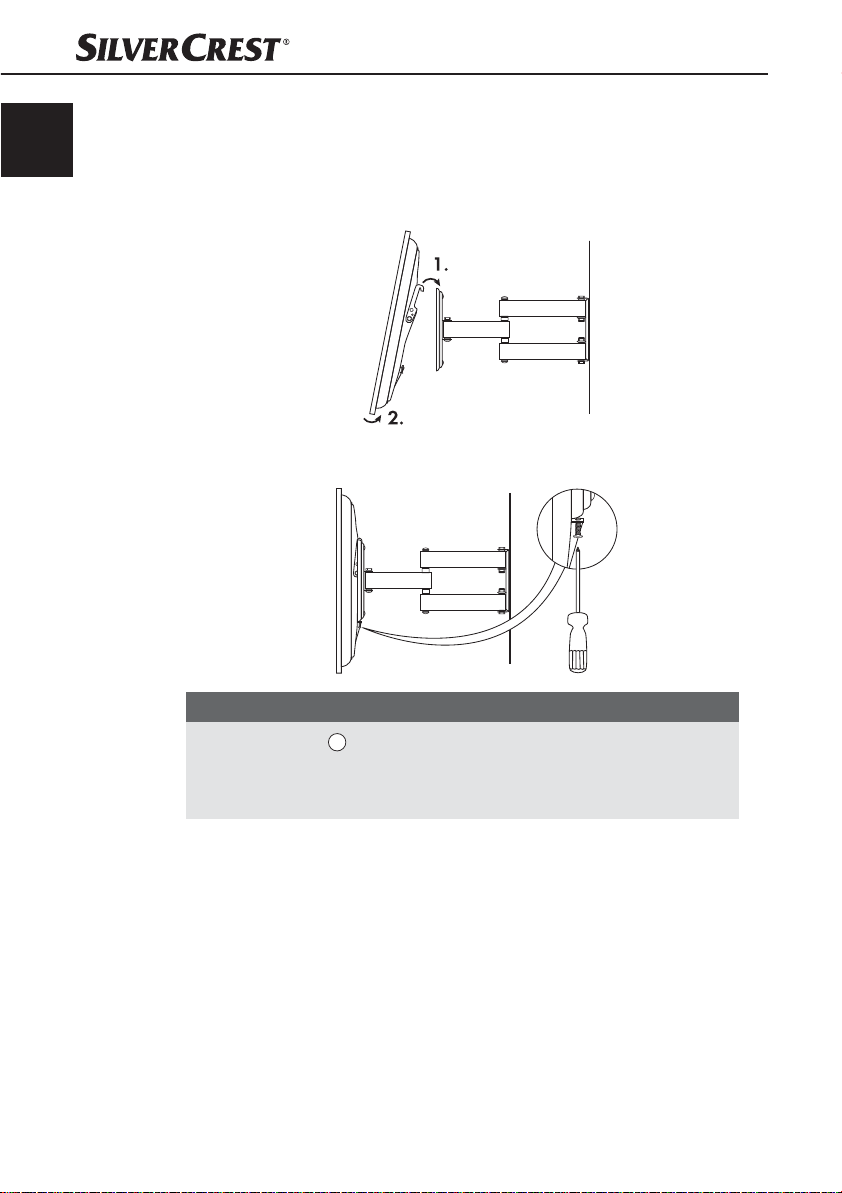
3e étape: Accrocher le téléviseur au support mural TV
♦ Accrochez maintenant votre téléviseur comme le montre l'illustration, au
milieu du support mural TV.
♦ Accrochez d'abord le téléviseur en haut, puis en bas. Relâchez ensuite le
téléviseur lentement et prudemment.
♦ Si le téléviseur est correctement accroché dans le support, sécurisez-le avec
les deux vis de sûreté.
REMARQUE
La bande velcro J livrée vous permet de guider le câble de votre téléviseur
►
de manière ordonnée et sûre.
► Laissez toujours suffi samment de jeu pour le câble et assurez-vous que ce
dernier ne soit pas coincé lorsque vous déplacez le support mural TV.
8
STW 32 - 60" A1
Page 11
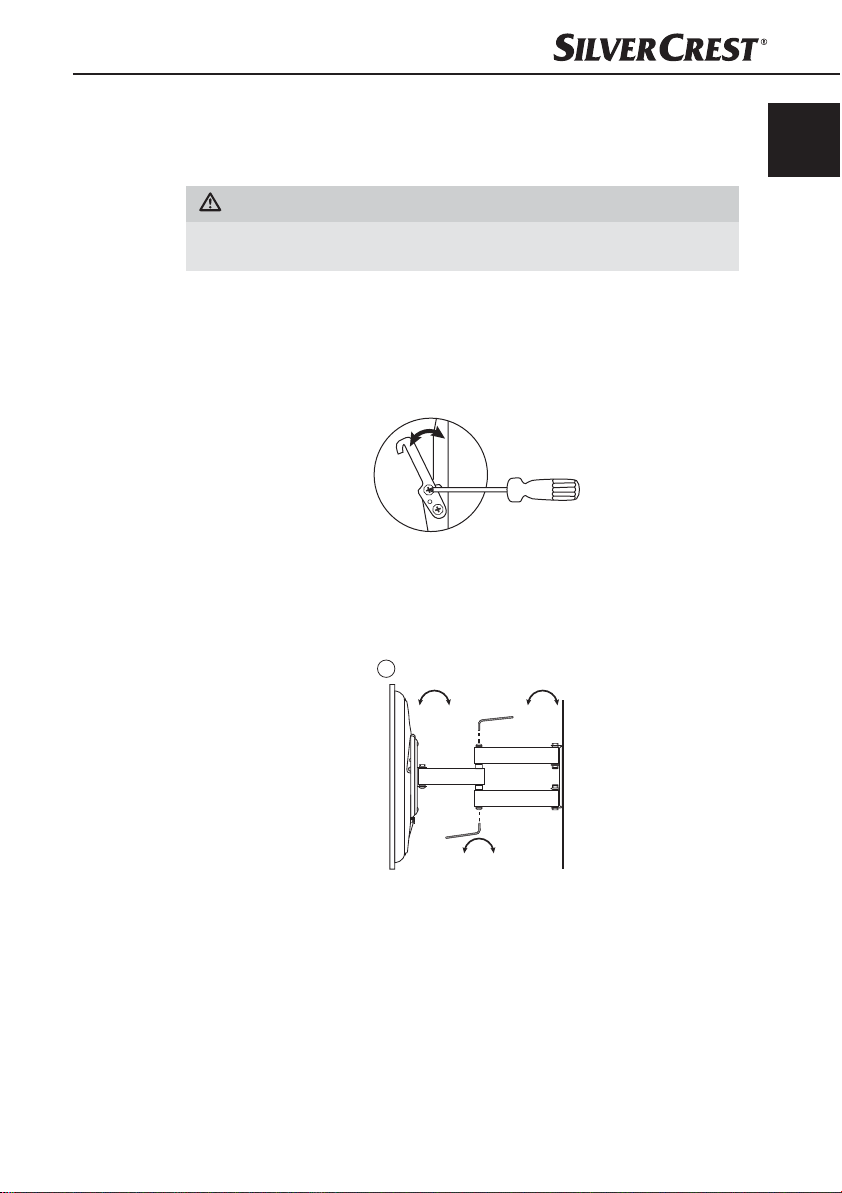
4e étape: Régler la position optimale
0-12°
♦ Le support mural TV possède quelques possibilités de réglage, qui permettent
d'aligner le téléviseur sur une position idéale.
AVERTISSEMENT
► Eff ectuez tous les mouvements avec prudence pour ne pas endommager le
câble.
Angle d'inclinaison vertical
♦ L'angle d'inclinaison vertical peut être réglé entre 0° et 12° (en fonction du
téléviseur).
♦ Orientez le téléviseur en fonction de vos besoins et fi xez ensuite les vis sur
les articulations des rails porteurs à l'aide d'un tournevis cruciforme.
Plage de pivotement et de rotation droite-gauche
♦ Vous pouvez faire pivoter et tourner votre téléviseur sur le support mural
TV ± 90° à droite et à gauche.
♦ Réglez la position souhaitée et fi xez ensuite les vis sur le bras porteur avec
I
la clé à six pans creux
.
FR
BE
STW 32 - 60" A1
±90° ±90°
±90°
9
Page 12
FR
BE
Entretien
♦ Vérifi ez à intervalles réguliers (au moins trimestriellement) la solidité et la sécu-
rité de fonctionnement du support mural TV et de la charge qui y est fi xée.
♦ Le cas échéant, resserrez toutes les visseries du support mural TV.
Nettoyage
AVERTISSEMENT
► N'utilisez pas de produit de nettoyage agressif ou abrasif, ces derniers
pouvant attaquer la surface du support mural TV.
♦ Nettoyez le support mural TV avec un chiff on légèrement humidifi é et un
nettoyant ménager disponible dans le commerce.
Mise au rebut
Mettez le support mural TV au rebut en passant par une déchetterie agréée ou
par votre centre de mise au rebut communal. Respectez les consignes en vigueur.
En cas de doute, veuillez contacter votre centre de recyclage.
Mettez tous les matériaux d'emballage au rebut de manière respectueuse de
l'environnement.
Annexe
Caractéristiques techniques
Capacité de charge maximale 35 kg (77 lbs)
Diagonale de l'écran 32" – 60" (env. 81 cm – env. 152 cm)
Fixation conforme au standard
VESA
Angle d'inclinaison 0°-12°
Plage de pivotement et de rotation ± 90°
Distance avec le mur jusqu'au dos
du téléviseur
Poids env. 4,5 kg
10
100 x 100 jusqu'à 600 x 400
env. 7 cm – env. 42 cm
STW 32 - 60" A1
Page 13

Garantie
Cet appareil bénéfi cie de 3 ans de garantie à compter de la date d’achat. L’appareil a été fabriqué avec soin et consciencieusement contrôlé avant sa distribution.
Veuillez conserver le ticket de caisse en guise de preuve d’achat. Dans le cas où la
garantie s’applique, veuillez appeler le service après-vente compétent. Cette condition doit être respectée pour assurer l’expédition gratuite de votre marchandise.
REMARQUE
Cette garantie concerne uniquement les vices de fabrication et ne couvre
►
pas les dommages de transport, les pièces d'usure ou les dommages subis
par des éléments fragiles, par ex. le commutateur ou les accus.
Ce matériel est exclusivement destiné à un usage privé et non commercial.
La garantie est annulée en cas d’utilisation incorrecte et inappropriée, d’utilisation
brutale et en cas d’intervention qui n’aurait pas été réalisée par un centre de
service après-vente agréé.
Cette garantie ne constitue pas une restriction de vos droits légaux. La période
sous garantie n’est pas prolongée par la garantie du fabricant. Ceci vaut également pour les pièces remplacées et réparées.
Tous dommages et défauts éventuellement déjà présents à l’achat doivent être notifi és
immédiatement après le déballage, au plus tard deux jours après la date d’achat.
Toutes réparations eff ectuées après la période sous garantie sont payantes.
Indépendamment de la garantie commerciale souscrite, le vendeur reste tenu des
défauts de conformité du bien et des vices rédhibitoires dans les conditions prévues
aux articles L211-4 et suivants du Code de la consommation et aux articles 1641
et suivants du Code Civil.
Service après-vente
Service France
Tel.: 0800 919270
E-Mail: kompernass@lidl.fr
IAN 106956
FR
BE
Service Belgique
Tel.: 070 270 171 (0,15 EUR/Min.)
E-Mail: kompernass@lidl.be
IAN 106956
Heures de service de notre hotline : du lundi au vendredi de 8 h à 20 h (HEC)
Importateur
KOMPERNASS HANDELS GMBH
BURGSTRASSE 21
44867 BOCHUM
GERMANY
www.kompernass.com
STW 32 - 60" A1
11
Page 14

12
STW 32 - 60" A1
Page 15

Inhaltsverzeichnis
Einführung . . . . . . . . . . . . . . . . . . . . . . . . . . . . . . . . . . . . . . . . . . . . . . . . . . . 14
Informationen zu dieser Montageanleitung . . . . . . . . . . . . . . . . . . . . . . . . . . . . . . . . . . . . 14
Bestimmungsgemäße Verwendung . . . . . . . . . . . . . . . . . . . . . . . . . . . . . . . . . . . . . . . . . . 14
Verwendete Warnhinweise . . . . . . . . . . . . . . . . . . . . . . . . . . . . . . . . . . . . . . . . . . . . . . . . 14
Sicherheit . . . . . . . . . . . . . . . . . . . . . . . . . . . . . . . . . . . . . . . . . . . . . . . . . . . . 15
Grundlegende Sicherheitshinweise . . . . . . . . . . . . . . . . . . . . . . . . . . . . . . . . . . . . . . . . . . 15
Lieferumfang . . . . . . . . . . . . . . . . . . . . . . . . . . . . . . . . . . . . . . . . . . . . . . . . . 16
Montagematerial . . . . . . . . . . . . . . . . . . . . . . . . . . . . . . . . . . . . . . . . . . . . . 16
Montage . . . . . . . . . . . . . . . . . . . . . . . . . . . . . . . . . . . . . . . . . . . . . . . . . . . . 16
Montage vorbereiten . . . . . . . . . . . . . . . . . . . . . . . . . . . . . . . . . . . . . . . . . . . . . . . . . . . . . 16
Benötigtes Werkzeug . . . . . . . . . . . . . . . . . . . . . . . . . . . . . . . . . . . . . . . . . . . . . . . . . . . . . 17
Montageschritte . . . . . . . . . . . . . . . . . . . . . . . . . . . . . . . . . . . . . . . . . . . . . . . . . . . . . . . . . 18
Wartung . . . . . . . . . . . . . . . . . . . . . . . . . . . . . . . . . . . . . . . . . . . . . . . . . . . . . 22
Reinigung . . . . . . . . . . . . . . . . . . . . . . . . . . . . . . . . . . . . . . . . . . . . . . . . . . . . 22
Entsorgung. . . . . . . . . . . . . . . . . . . . . . . . . . . . . . . . . . . . . . . . . . . . . . . . . . . 22
Anhang . . . . . . . . . . . . . . . . . . . . . . . . . . . . . . . . . . . . . . . . . . . . . . . . . . . . . 22
Technische Daten . . . . . . . . . . . . . . . . . . . . . . . . . . . . . . . . . . . . . . . . . . . . . . . . . . . . . . . . 22
Garantie . . . . . . . . . . . . . . . . . . . . . . . . . . . . . . . . . . . . . . . . . . . . . . . . . . . . . . . . . . . . . . 23
Service . . . . . . . . . . . . . . . . . . . . . . . . . . . . . . . . . . . . . . . . . . . . . . . . . . . . . . . . . . . . . . . . 23
Importeur . . . . . . . . . . . . . . . . . . . . . . . . . . . . . . . . . . . . . . . . . . . . . . . . . . . . . . . . . . . . . . 23
DE
AT
CH
STW 32 - 60" A1
13
Page 16

Einführung
DE
AT
CH
Informationen zu dieser Montageanleitung
Herzlichen Glückwunsch!
Mit Ihrem Kauf haben Sie sich für ein hochwertiges Produkt entschieden. Machen
Sie sich vor der Montage und der ersten Inbetriebnahme mit dem Produkt vertraut.
Lesen Sie hierzu aufmerksam die nachfolgende Montageanleitung und die
Sicherheitshinweise. Benutzen Sie das Produkt nur wie beschrieben und für die
angegebenen Einsatzbereiche. Bewahren Sie diese Montageanleitung gut auf.
Händigen Sie alle Unterlagen bei Weitergabe des Produkts an Dritte ebenfalls
mit aus.
Bestimmungsgemäße Verwendung
Die Wandhalterung dient ausschließlich der Wandbefestigung von Flachbildschirmen mit einer Bildschirmdiagonale von ca. 81 cm – 152 cm (32" – 60") für
den privaten, nichtgewerblichen Hausgebrauch. Die Wandhalterung ist nur für
den Gebrauch innerhalb von Gebäuden vorgesehen.
Für Schäden, die von missbräuchlicher oder unsachgemäßer Behandlung, von
Gewaltanwendung oder unautorisierter Modifi kation herrühren, wird keine
Haftung übernommen. Das Risiko trägt allein der Benutzer.
Verwendete Warnhinweise
In der vorliegenden Montageanleitung werden folgende Warnhinweise verwendet:
WARNUNG
Ein Warnhinweis dieser Gefahrenstufe kennzeichnet eine
mögliche gefährliche Situation.
Falls die gefährliche Situation nicht vermieden wird, kann dies zu Verletzungen
oder Sachschäden führen.
► Die Anweisungen in diesem Warnhinweis befolgen, um Verletzungen von
Personen oder Sachschäden zu vermeiden.
14
HINWEIS
Ein Hinweis kennzeichnet zusätzliche Informationen, die den Umgang mit
►
dem Gerät erleichtern.
STW 32 - 60" A1
Page 17

Sicherheit
In diesem Kapitel erhalten Sie wichtige Sicherheitshinweise im Umgang mit dem
Gerät. Ein unsachgemäßer Gebrauch kann zu Personen- und Sachschäden führen.
Grundlegende Sicherheitshinweise
Beachten Sie für einen sicheren Umgang mit dem Gerät die folgenden Sicherheitshinweise:
■ Montieren Sie das Produkt nicht an Orten, unter denen sich Personen aufhalten
könnten.
■ Überprüfen Sie nach der Montage des Produktes und der daran befestigten Last,
diese auf ausreichende Festigkeit und Betriebssicherheit. Diese Prüfung ist in
regelmäßigen Abständen zu wiederholen (mindestens vierteljährlich).
■ Achten Sie darauf, dass die maximal zulässige Tragfähigkeit des Produktes nicht
überschritten wird und keine Last angebracht wird, die die maximal zulässigen
Maße überschreitet.
■ Halten Sie einen Sicherheitsabstand um die angebrachte Last ein (abhängig vom
Modell).
■ Entfernen Sie bei Beschädigungen des Produkts sofort die angebrachte Last und
benutzen Sie das Produkt nicht weiter.
■ Bei der Vielfalt der auf dem Markt erhältlichen TV-Geräte und Wandkonstruktionen
kann der mitgelieferte Montagesatz nicht alle Möglichkeiten abdecken.
■ In seltenen Fällen kann es vorkommen, dass die Schrauben zur Anbringung des
TV-Gerätes an der Wandhalterung zu lang sind. Verwenden Sie in diesem Fall
die mitgelieferten Abstandhalter.
■ Beachten Sie, dass die mitgelieferten Dübel nur für Beton- und Vollziegelwände
zugelassen sind.
■ Lesen Sie vor der Montage die Bedienungsanleitung Ihres TV-Gerätes. Diese gibt
in der Regel Informationen über die Art und die Maße der geeigneten Befestigungsmaterialien.
■ Beschaff en Sie sich geeignetes Befestigungsmaterial zur Montage des TV-Gerätes
im Fachhandel, sofern es kein Bestandteil des mitgelieferten Montagesatzes ist.
■ Besorgen Sie sich geeignetes Montagematerial im Fachhandel bei anderen
Material- und Konstruktionsarten der für die Installation vorgesehenen Wand.
■ Wenden Sie bei der Montage niemals Gewalt oder hohe Kräfte an. Dies kann
Ihr TV-Gerät oder die Wandhalterung beschädigen.
■ Im Zweifel wenden Sie sich für die Montage dieses Produktes an dazu ausgebil-
dete Fachkräfte und versuchen Sie es nicht selbst!
DE
AT
CH
STW 32 - 60" A1
15
Page 18

DE
AT
CH
Lieferumfang
▯ 1 x Wandhalterung
▯ 2 x Trageschiene
▯ 1 x Klettband
▯ Montagematerial
▯ Diese Montageanleitung
HINWEIS
Prüfen Sie die Lieferung auf Vollständigkeit und auf sichtbare Schäden.
►
Montagematerial
A B C D E
M4 x 20 M6 x 25 M8 x 25 Ø18xØ8,5x10 Ø18 x Ø7
4 x 4 x 4 x 4 x 4 x
F
Ø22 x Ø8 S10 x 50 mm M8 x 65 mm 5 x 5
4 x 4 x 4 x 1 x 1 x
Montage
Montage vorbereiten
HINWEIS
Nehmen Sie sich ausreichend Zeit für die Montage der Wandhalterung.
►
► Entnehmen Sie alle Einzelteile der Verpackung und legen Sie die Teile in
Griff nähe bereit.
16
G
H I J
STW 32 - 60" A1
Page 19

HINWEIS
Montieren Sie die Wandhalterung nur zu zweit!
►
► Unterschiedliche TV-Geräte haben unterschiedliche Anschlussmöglichkeiten
für Verkabelung und weitere Geräte. Prüfen Sie vor der Installation, ob sich
die benötigten Anschlüsse nach der Montage noch erreichen lassen.
► Sie benötigen je nach TV-Gerät und Montageart nicht den kompletten
Montagesatz. Es ist daher möglich, dass auch bei korrekter Montage
nicht benötigte Kleinteile übrig bleiben. Bewahren Sie diese zusammen
mit dieser Montageanleitung an einem sicheren Platz für einen späteren
Gebrauch (Verkauf der Wandhalterung, neues TV-Gerät, etc.) auf.
WARNUNG
► Prüfen Sie unbedingt vor der Installation die Eignung der vorgesehenen
Wand für das anzubringende Gewicht und vergewissern Sie sich, dass sich
an der Montagestelle in der Wand keine elektrischen Leitungen, Wasser-,
Gas- oder sonstige Leitungen befi nden.
► Beachten Sie, dass die mitgelieferten Dübel nur für Beton- und Vollziegel-
wände zugelassen sind. Wenn Sie sich über die Beschaff enheit Ihrer Wand
nicht sicher sind, ziehen Sie bitte einen Fachmann zu Rate.
Benötigtes Werkzeug
Bleistift
Bohrmaschine
DE
AT
CH
STW 32 - 60" A1
Bohrer Ø 10 mm
Kreuzschlitzschraubendreher
Maulschlüssel SW 13 mm
Maulschlüssel SW 10 mm
Innensechskantschlüssel 5x5 mm (im Lieferumfang enthalten)
17
Page 20

DE
AT
CH
Montageschritte
Schritt 1: Trageschienen am TV-Gerät befestigen
♦ Überprüfen Sie zuerst, ob die mitgelieferten Schrauben ( A, B oder C) in
die vorbereiteten Schraublöcher an der Rückseite Ihres TV-Gerätes passen.
Ist dies nicht der Fall, verwenden Sie bitte andere geeignete Schrauben und
Unterlegscheiben.
♦ Bringen Sie die Trageschienen so an, dass die Schraubenköpfe zur Einstel-
lung des Neigungswinkels nach außen zeigen und die Haken nach unten
zeigen. Schrauben Sie die Trageschienen mit den passenden Schrauben
A, B
(
oder C) und Unterlegscheiben E so fest, dass sie parallel
verlaufen und auf die gleiche Höhe ausgerichtet sind.
♦ Bei TV-Geräten mit gerader Rückseite wird in der Regel kein Abstandshalter
D
benötigt. Befestigen Sie die Trageschienen mit den passenden Schrauben
und Unterlegscheiben direkt an der Rückwand des Gerätes.
♦ Bei TV-Geräten mit gebogener Rückwand, kann es nötig sein, die mitgelieferten
Abstandshalter
D
zwischen TV-Gerät und Trageschiene zu verwenden.
A B C
E
A B C
E
Schritt 2: Wandhalterung an der Wand befestigen
♦ Wählen Sie zuerst eine geeignete Montagehöhe aus. Die ideale Höhe für
ein TV-Gerät ist parallel zur Augenhöhe einer sitzenden Person.
♦ Halten Sie die Wandhalterung als Schablone an die gewünschte Stelle der
Wand und richten Sie sie mit Hilfe der Wasserwaage gerade aus. Markieren
Sie die 4 Bohrlöcher mit einem Bleistift.
D
18
STW 32 - 60" A1
Page 21

♦ Bohren Sie an den markierten Stellen Löcher mit einem Durchmesser von
10 mm und einer Tiefe von mindestens 60 mm.
F
G
60 mm
10 mm
♦ Setzen Sie die mitgelieferten Dübel G in die Löcher ein. Schrauben Sie die
Wandhalterung mit Hilfe der beiliegenden Schrauben
F
ben
an die Wand.
H
und Unterlegschei-
Sollte die Wandhalterung nach der Wandmontage nicht absolut waagerecht
hängen, können Sie die Schiefl age in gewissem Umfang ausgleichen.
♦ Lösen Sie ein wenig die vier Schrauben der Trägerplatte mit Hilfe eines
Maulschlüssels (SW 13).
♦ Richten Sie den Querträger mit Hilfe der Wasserwaage gerade aus und
ziehen Sie anschließend die vier Schrauben der Trägerplatte wieder fest.
H
DE
AT
CH
STW 32 - 60" A1
19
Page 22

DE
AT
CH
Schritt 3: TV-Gerät an die Wandhalterung hängen
♦ Hängen Sie nun Ihr TV-Gerät, wie in der Abbildung gezeigt, mittig an die
Wandhalterung.
♦ Hängen Sie das TV-Gerät zuerst oben und dann unten ein. Lassen Sie das
TV-Gerät nur vorsichtig und langsam los.
♦ Wenn das TV-Gerät korrekt in die Halterung eingehängt ist, sichern Sie es
mit den beiden Sicherungsschrauben.
20
HINWEIS
Mit dem mitgelieferten Klettband J können Sie die Kabel Ihres TV-Gerätes
►
ordentlich und sicher führen.
► Lassen Sie immer genug Spielraum für die Kabel und stellen Sie sicher, dass
diese nicht eingeklemmt werden, wenn Sie die Wandhalterung bewegen.
STW 32 - 60" A1
Page 23

Schritt 4: Optimale Position einstellen
0-12°
♦ Die Wandhalterung hat einige Einstellmöglichkeiten, mit deren Hilfe das TV-
Gerät auf die optimale Position ausgerichtet werden kann.
WARNUNG
► Führen Sie alle Bewegungen stets vorsichtig aus, damit die Kabel nicht
beschädigt werden.
Vertikaler Neigungswinkel
♦ Der vertikale Neigungswinkel kann zwischen 0° und 12° (je nach TV-Gerät)
eingestellt werden.
♦ Richten Sie das TV-Gerät nach Ihren Bedürfnissen aus und fi xieren Sie dann
die Schrauben an den Gelenken der Trageschienen mit einem Kreuzschlitzschraubendreher.
Links-Rechts Schwenk- und Drehbereich
♦ Sie können Ihr TV-Gerät an der Wandhalterung ± 90° nach links und rechts
schwenken und drehen.
♦ Stellen Sie die gewünschte Position ein und fi xieren Sie dann die Schrauben
am Haltearm mit dem Innensechskantschlüssel
DE
AT
CH
I
.
STW 32 - 60" A1
±90° ±90°
±90°
21
Page 24

DE
AT
CH
Wartung
♦ Überprüfen Sie in regelmäßigen Abständen (mindestens vierteljährlich)
die Festigkeit und Betriebssicherheit der Wandhalterung und der daran
befestigten Last.
♦ Ziehen Sie ggf. alle Schraubverbindungen der Wandhalterung nach.
Reinigung
WARNUNG
► Verwenden Sie keine aggressiven oder scheuernden Reinigungsmittel, da
diese die Oberfl äche der Wandhalterung angreifen können.
♦ Reinigen Sie die Wandhalterung mit einem leicht angefeuchteten Tuch und
handelsüblichen Haushaltsreiniger.
Entsorgung
Entsorgen Sie die Wandhalterung über einen zugelassenen Entsorgungsbetrieb
oder über Ihre kommunale Entsorgungseinrichtung. Beachten Sie die geltenden
Vorschriften. Setzen Sie sich im Zweifelsfall mit Ihrer Entsorgungseinrichtung in
Verbindung.
Führen Sie alle Verpackungsmaterialien einer umweltgerechten Entsorgung zu.
Anhang
Technische Daten
Maximale Tragkraft 35 kg (77 lbs)
Bildschirmdiagonale 32" – 60" (ca. 81 cm – ca. 152 cm)
Befestigung gemäß VESA-Standard 100 x 100 bis 600 x 400
Neigungswinkel 0°-12°
Schwenk- und Drehbereich ± 90°
Wandabstand bis zur Rückseite des
TV-Gerätes
Gewicht ca. 4,5 kg
22
ca. 7 cm – ca. 42 cm
STW 32 - 60" A1
Page 25

Garantie
Sie erhalten auf dieses Gerät 3 Jahre Garantie ab Kaufdatum. Das Gerät wurde
sorgfältig produziert und vor Auslieferung gewissenhaft geprüft. Bitte bewahren
Sie den Kassenbon als Nachweis für den Kauf auf. Bitte setzen Sie sich im
Garantiefall mit Ihrer Servicestelle telefonisch in Verbindung. Nur so kann eine
kostenlose Einsendung Ihrer Ware gewährleistet werden.
HINWEIS
Das Produkt ist nur für den privaten und nicht für den gewerblichen Gebrauch
bestimmt. Bei missbräuchlicher und unsachgemäßer Behandlung, Gewaltanwendung
und bei Eingriff en, die nicht von unserer autorisierten Service-Niederlassung vorgenommen wurden, erlischt die Garantie. Ihre gesetzlichen Rechte werden durch
diese Garantie nicht eingeschränkt. Die Garantiezeit wird durch die Gewährleistung nicht verlängert. Dies gilt auch für ersetzte und reparierte Teile. Eventuell
schon beim Kauf vorhandene Schäden und Mängel müssen sofort nach dem
Auspacken gemeldet werden, spätestens aber zwei Tage nach Kaufdatum. Nach
Ablauf der Garantiezeit anfallende Reparaturen sind kostenpfl ichtig.
Service
Service Deutschland
Tel.: 0800 5435 111 (Kostenfrei aus dem dt. Festnetz/Mobilfunknetz)
E-Mail: kompernass@lidl.de
IAN 106956
Die Garantieleistung gilt nur für Material- oder Fabrikationsfehler, nicht
►
aber für Transportschäden, Verschleißteile oder für Beschädigungen an
zerbrechlichen Teilen, z. B. Schalter oder Akkus.
DE
AT
CH
Service Österreich
Tel.: 0820 201 222 (0,15 EUR/Min.)
E-Mail: kompernass@lidl.at
IAN 106956
Service Schweiz
Tel.: 0842 665566 (0,08 CHF/Min., Mobilfunk max. 0,40 CHF/Min.)
E-Mail: kompernass@lidl.ch
IAN 106956
Erreichbarkeit Hotline: Montag bis Freitag von 8:00 Uhr – 20:00 Uhr (MEZ)
Importeur
KOMPERNASS HANDELS GMBH
BURGSTRASSE 21
44867 BOCHUM
GERMANY
www.kompernass.com
STW 32 - 60" A1
23
Page 26

24
STW 32 - 60" A1
Page 27

Contents
Introduction . . . . . . . . . . . . . . . . . . . . . . . . . . . . . . . . . . . . . . . . . . . . . . . . . . 26
Information about these assembly instructions . . . . . . . . . . . . . . . . . . . . . . . . . . . . . . . . . . 26
Intended use . . . . . . . . . . . . . . . . . . . . . . . . . . . . . . . . . . . . . . . . . . . . . . . . . . . . . . . . . . . 26
Warnings used . . . . . . . . . . . . . . . . . . . . . . . . . . . . . . . . . . . . . . . . . . . . . . . . . . . . . . . . . . 26
Safety. . . . . . . . . . . . . . . . . . . . . . . . . . . . . . . . . . . . . . . . . . . . . . . . . . . . . . . 27
Basic safety guidelines . . . . . . . . . . . . . . . . . . . . . . . . . . . . . . . . . . . . . . . . . . . . . . . . . . . . 27
Package contents . . . . . . . . . . . . . . . . . . . . . . . . . . . . . . . . . . . . . . . . . . . . . 28
Mounting kit . . . . . . . . . . . . . . . . . . . . . . . . . . . . . . . . . . . . . . . . . . . . . . . . . 28
Installation . . . . . . . . . . . . . . . . . . . . . . . . . . . . . . . . . . . . . . . . . . . . . . . . . . . 28
Preparing for assembly . . . . . . . . . . . . . . . . . . . . . . . . . . . . . . . . . . . . . . . . . . . . . . . . . . . 28
Required tools . . . . . . . . . . . . . . . . . . . . . . . . . . . . . . . . . . . . . . . . . . . . . . . . . . . . . . . . . . 29
Assembly steps . . . . . . . . . . . . . . . . . . . . . . . . . . . . . . . . . . . . . . . . . . . . . . . . . . . . . . . . . 30
Maintenance . . . . . . . . . . . . . . . . . . . . . . . . . . . . . . . . . . . . . . . . . . . . . . . . . 34
Cleaning . . . . . . . . . . . . . . . . . . . . . . . . . . . . . . . . . . . . . . . . . . . . . . . . . . . . . 34
Disposal . . . . . . . . . . . . . . . . . . . . . . . . . . . . . . . . . . . . . . . . . . . . . . . . . . . . . 34
Appendix . . . . . . . . . . . . . . . . . . . . . . . . . . . . . . . . . . . . . . . . . . . . . . . . . . . . 34
Technical data . . . . . . . . . . . . . . . . . . . . . . . . . . . . . . . . . . . . . . . . . . . . . . . . . . . . . . . . . . 34
Warranty . . . . . . . . . . . . . . . . . . . . . . . . . . . . . . . . . . . . . . . . . . . . . . . . . . . . . . . . . . . . . . 35
Service . . . . . . . . . . . . . . . . . . . . . . . . . . . . . . . . . . . . . . . . . . . . . . . . . . . . . . . . . . . . . . . . 35
Importer . . . . . . . . . . . . . . . . . . . . . . . . . . . . . . . . . . . . . . . . . . . . . . . . . . . . . . . . . . . . . . . 35
GB
STW 32 - 60" A1
25
Page 28

GB
Introduction
Information about these assembly instructions
Congratulations!
You have purchased a high-quality product. Familiarise yourself with the product
before assembly and before using it for the fi rst time. Please read the following
assembly instructions and safety notices carefully. Use the product only as described
and for the range of applications specifi ed. Retain these instructions for future
reference. Please also pass all associated documents on to any future owner(s).
Intended use
This wall bracket is designed exclusively for wall mounting fl at-panel displays
with a screen diagonal of approx. 81 cm–152 cm (32"–60") in private, noncommercial households. The wall bracket is only intended for use inside buildings.
No liability will be assumed for damage caused by misuse or improper handling,
the use of force or unauthorised modifi cation. The risk shall be borne solely by
the user.
Warnings used
In these assembly instructions, the following warnings are used:
WARNING
A warning at this hazard level indicates a potentially hazardous
situation.
If the hazardous situation is not avoided, there is a risk of injury or property
damage.
► Follow the instructions in this warning to avoid injuries or property damage.
26
NOTE
A note provides additional information that will assist you in using the device.
►
STW 32 - 60" A1
Page 29

Safety
In this section, you will fi nd important safety instructions for using the device.
Improper use may result in personal injury and property damage.
Basic safety guidelines
To ensure safe operation of the device, follow the safety guidelines set out below:
■ Do not install the product in places under which people might stand.
■ After mounting the product, check its stability and operational reliability as well
as that of the mounted load. This check should be repeated at regular intervals
(at least quarterly).
■ Ensure that you do not exceed the maximum permissible load capacity of the
product and no load is applied that exceeds the maximum allowable dimensions.
■ Maintain a safe distance around the mounted load (depending on the model).
■ In the case of damage, remove the mounted load and stop using the product.
■ Bearing in mind the wide variety of TV sets and wall mountings available on the
market, the supplied mounting kit may not cover all the possibilities.
■ In rare cases, it is possible that the screws for attaching the TV set may be too
long. If this is the case, use the supplied spacers.
■ Ensure that the supplied wall plugs are only suitable for concrete and brick walls.
■ Before mounting, read the operating instructions for your TV set. This will gener-
ally provide information about the type and dimensions of the suitable mounting
materials.
■ If the mounting material necessary for your TV set is not provided in the supplied
mounting kit, please purchase the items you require from a specialist shop.
■ If your wall is made of diff erent types of materials and construction than that
intended for the installation, purchase suitable materials from a specialist shop.
■ Never use violence or excessive force for assembly. This could damage your TV
set or wall bracket.
■ If in doubt, contact a suitable specialist for information on mounting this product
and do not try to mount the product yourself.
GB
STW 32 - 60" A1
27
Page 30

GB
Package contents
▯ 1 x wall bracket
▯ 2 x mounting rails
▯ 1 x Velcro strip
▯ Mounting materials
▯ These assembly instructions
NOTE
Check the package for completeness and for signs of visible damage.
►
Mounting kit
A B C D E
M4 x 20 M6 x 25 M8 x 25 Ø18xØ8.5x10 Ø18 x Ø7
4 x 4 x 4 x 4 x 4 x
F
Ø22 x Ø8 S10 x 50 mm M8 x 65 mm 5 x 5
4 x 4 x 4 x 1 x 1 x
Installation
Preparing for assembly
NOTE
Allow plenty of time for the assembly of the wall bracket.
►
► Remove the individual parts from the packaging and place them within
easy reach.
28
G
H I J
STW 32 - 60" A1
Page 31

NOTE
Do not install the wall bracket on your own!
►
► Diff erent TV sets have diff erent connectivity options for wiring and other
devices. Before installation, check that the required connections will still be
accessible after assembly.
► Depending on your TV set and the type of mounting, you may not need
the complete mounting kit. It is therefore possible that there may be some
small parts left over even if the assembly has been carried out correctly.
Store these carefully together with these assembly instructions for later use
(sale of the wall bracket, new TV set, etc.).
WARNING
► Before installation, check the suitability of the proposed wall for supporting
the weight that is to be mounted and ensure that there are no electrical cables,
water or gas pipes or other lines in the wall at the mounting location.
► Ensure that the supplied wall plugs are only suitable for concrete and brick
walls. If you are unsure about the suitability of your wall, please consult an
expert.
Required tools
GB
Pencil
Drill
STW 32 - 60" A1
Drill bit Ø 10 mm
Phillips head screwdriver
Open-ended spanner SW 13 mm
Open-ended spanner SW 10 mm
Allen key 5 x 5 (supplied)
29
Page 32

GB
Assembly steps
Step 1: Attaching the mounting rails
♦ Check whether the supplied screws ( A, B or C) fi t in the prepared holes
on the back of your TV set. If this is not the case, please use other suitable
screws and washers.
♦ Attach the mounting rail so that the screw heads for adjusting the tilt angle
face outwards and the hooks are facing downward. Screw the mounting rail
tight using the suitable screws (
run parallel and are aligned at the same height.
♦ For TV sets with a fl at back, no spacers D are usually required. Fasten the
mounting rails with the appropriate screws and washers directly onto the
rear panel of the device.
♦ For TV sets with a curved rear panel, it may be necessary to use the supplied
D
spacers
between the TV set and the mounting rail.
A, B
or C) and washers E so that they
A B C
E
A B C
E
Step 2: Attaching the wall bracket to the wall
♦ Start by selecting a suitable mounting height. The ideal height for a TV set is
parallel to the eye-level of a seated person.
♦ Hold the wall bracket up to the to the desired position on the wall to use
as a template and align it with the aid of a spirit level. Mark the 4 holes
with a pencil.
D
30
STW 32 - 60" A1
Page 33

♦ Drill holes at the marked positions with a diameter of 10 mm and a depth of
at least 60 mm.
F
H
G
60 mm
10 mm
♦ Insert the wall plugs G into the holes. Screw the wall bracket to the wall
H
using the supplied screws
and the washers F.
If the wall bracket is not absolutely straight after mounting on the wall, you can
correct the tilt to a certain extent.
♦ Undo the four screws of the mounting plate a little bit using an open-ended
spanner (SW 13).
♦ Align the cross member with the aid of the spirit level and then retighten the
four screws of the mounting plate.
GB
STW 32 - 60" A1
31
Page 34

GB
Step 3: Hanging the TV set on the wall bracket
♦ Now hang your TV set centred on the wall bracket as shown in the illustration.
♦ Hang the TV set at the top fi rst and then at the bottom. Let go of your TV set
slowly and carefully.
♦ If the TV set is correctly mounted on the bracket, fi x it in place with the two
retaining screws.
NOTE
32
Using the supplied Velcro strip J, you can route the cables of your TV set
►
safely and tidily.
► Always allow enough room for the cables and make sure they cannot get
caught when you move the wall bracket.
STW 32 - 60" A1
Page 35

Step 4: Setting the optimum position
0-12°
♦ The wall bracket has various setting options with which the TV set can be
aligned to the best position.
WARNING
► Always carry out all movements carefully so that the cables are not damaged.
Vertical tilt angle
♦ The vertical tilt angle can be set between 0° and 12° (depending on the
TV set).
♦ Align the TV set as per your requirements and then tighten the screws on
the joint of the mounting rails using a Phillips screwdriver.
Left/right pan and rotation
♦ You can pan and rotate your TV set on the wall bracket ± 90° to the left
or right.
♦ Set the required position and tighten the screws on the mounting arm using
I
an Allen key
.
±90° ±90°
±90°
GB
STW 32 - 60" A1
33
Page 36

Maintenance
♦ Check the stability and operational reliability of the wall bracket and the
attached load at regular intervals (at least quarterly).
♦ If necessary, tighten all of the wall bracket's screw connections.
GB
Cleaning
WARNING
► Do not use any aggressive or abrasive cleaning agents, as these may
damage the surface of the wall bracket.
♦ Clean the wall bracket using a moistened cloth and a standard commercial
household cleaning fl uid.
Disposal
Dispose of the wall bracket via an approved disposal centre or your community
waste facility. Observe the currently applicable regulations. Please contact your
waste disposal facility if you are in any doubt.
Dispose of all packaging materials in an environmentally friendly manner.
Appendix
Technical data
Maximal load capacity 35 kg (77 lbs)
Screen size (diagonal)
Attachment as per VESA standard 100 x 100 to 600 x 400
32"–60"
(approx. 81 cm to approx. 152 cm)
34
Tilt angle 0°–12°
Pan and rotation ± 90°
Wall clearance to the back of the
TV set
Weight approx. 4.5 kg
approx. 7 cm to approx. 42 cm
STW 32 - 60" A1
Page 37

Warranty
The warranty for this appliance is for 3 years from the date of purchase.
The appliance has been manufactured with care and meticulously examined
before delivery.
Please retain your receipt as proof of purchase. In the case of a warranty claim,
please make contact by telephone with our Customer Service Department.
Only in this way can a post-free despatch for your goods be assured.
NOTICE
►
This product is for domestic use only and is not intended for commercial use.
The warranty is void in the case of abusive and improper handling, use of force
and internal tampering not carried out by our authorised service branch.
Your statutory rights are not restricted in any way by this warranty. The warranty
period is not extended by repairs made under the warranty. This applies also to
replaced and repaired parts.
Damages and defects extant at the time of purchase must be reported immediately after unpacking, resp. no later than two days after the date of purchase.
Repairs made after the lapse of the warranty period are subject to charge.
Service
Service Great Britain
Tel.: 0871 5000 720 (£ 0.10/Min.)
E-Mail: kompernass@lidl.co.uk
IAN 106956
GB
The warranty covers only claims for material and manufacturing defects,
but not for transport damage, wearing parts or for damage to fragile
components, e.g. buttons or batteries.
Hotline availability: Monday to Friday 08:00 - 20:00 (CET)
Importer
KOMPERNASS HANDELS GMBH
BURGSTRASSE 21
44867 BOCHUM
GERMANY
www.kompernass.com
STW 32 - 60" A1
35
Page 38

KOMPERNASS HANDELS GMBH
BURGSTRASSE 21
44867 BOCHUM
DEUTSCHLAND / GERMANY
www.kompernass.com
Version des informations · Stand der Informationen
Last Information Update: 12 / 2014
Ident.-No.: STW32-60"A1-102014-2
IAN 106956
2
 Loading...