

DE
NL
GR
DE
GB
NI
FR
NL
BE
FR
DK
GB
NI
IE
BE
GR
TÅRNVENTILATOR
Betjeningsvejledning
TORENVENTILATOR
CY
DK
IE
BE
TURMVENTILATOR
Gebruiksaanwijzing
Bedienungsanleitung
TOWER FAN STV|50|A1
IE
BE
TOWER FAN
Operating instructions
CY
VENTILATEUR COLONNE
Mode d'emploi
ǹȃǼȂǿȈȉdzȇǹȈ
ȅįȘȖȓĮ ȤȡȒıȘȢ
CY
NL
DK
NI
GB
HOYER Handel GmbH
T asköprüstraße 3
DE-22761 Hamburg
DEUTSCHLAND
Status of information · Informationernes stand · Version des informations
Stand van de informatie · ǾȝİȡȠȝȘȞȓĮ ȑțįȠıȘȢ ʌȜȘȡȠijȠȡȚȫȞ · Stand de r In f ormationen:
10/2018 ID: STV|50|A1_18_V1.3
IAN 312846 IAN 312846

English..................................................................................... 2
Dansk.................................................................................... 10
Français................................................................................. 18
Nederlands............................................................................ 28
ƧnjnjLjǎNJNjƽ ............................................................................... 38
Deutsch.................................................................................. 48
Overview / Oversigt / Aperçu de l'appareil / Overzicht /
7
4
11
3
56
21
8
10
9
12
A
11
10
B
1
8
13
9
12
ƧǑNJǔNjǝǑLjǔLj
/
Übersicht
9

Contents
1. Overview ........................................................................................ 2
2. Intended purpose ............................................................................ 3
3. Safety information ........................................................................... 3
4. Items supplied ................................................................................. 5
5. Assemble appliance ......................................................................... 5
6. Operation ................... ....................................... .............................. 5
6.1 Start and switch off the appliance ........................................................... 5
6.2 Set blower setting ................................................................................. 5
6.3 Set running time.................................................................................... 6
6.4 Oscillation function ............................................................................... 6
7. Cleaning .......................................................................................... 6
8. Disposal .......................................................................................... 6
9. Technical specifications .................................................................... 7
10.Warranty of the HOYER Handel GmbH ............................................. 8
1. Overview
1 Tower fan
2 Off button (OFF)
3 Button for oscillation function
4 Button 3: high blower setting
5 Button 2: moderate blower setting
6 Rotary switch and timer
7 Button 1: low blower setting
8 Base
9 Recess for the mains power cable
10 Rear half of base
11 Front half of base
12 Mains power cable and mains plug
13 Knob screw
Not shown: 2 crosshead screws
2
GB

Thank you for your trust!
Congratulations on your new Tower fan.
For a safe handling of the device and in or-
der to get to know the entire scope of features:
• Thoroughly read these operating instructions prior to first use.
• Above all, observe the safety instructions!
• The device should only be used
as described in these operating
instructions.
• Keep these operating instructions for reference.
• If you pass the device on to
someone else, please include
these operating instructions. The
operating instructions are a part
of the product.
We hope you enjoy your new Tower fan!
2. Intended purpose
Use this Tower fan to circulate air in dry indoor areas.
The device is designed for private, domestic
use. The device must only be used indoors.
This device must not be used for commer cial
purposes.
3. Safety information
Warnings
If necessary, the following warnings will be used in these operating instructions:
DANGER! High risk: failure to observe this warning may result in injury to life and
limb.
WARNING! Moderate risk: failure to observe this warning may result in injury or serious
material damage.
CAUTION: low risk: failure to observe this warning may result in minor injury or material
damage.
NOTE: circumstances and specifics that must be observed when handling the device.
Instructions for safe operation
~
This device can be used by childr en fr om the age of 8 and people
with restricted physical, sensory or intellectual abilities or people
without adequate experience and/or understanding, if they are supervised or instructed on how to use this device safely and if they
are aware of the resulting danger. Childr en must not play with the
device. Cleaning and user maintenance must not be performed by
children unless they are supervised.
GB
3

~ If the mains power cable of this device should become damaged,
it must be replaced by the manufacturer, the manufacturer's customer service department or a similarly qualified specialist, in order to avoid any hazards.
This device is not inten ded to be oper ated usin g an external tim er
~
clock or a separate remote c ontr ol system.
DANGER! Risk of electric
DANGER for children
~ Packing materials are not children's
toys. Children should not be allowed to
play with the plastic bags: there is a risk
of suffocation!
~ Keep the device out of the r each of chil-
dren.
DANGER to and from pets
and livestock
~ Electrical devices can represent a haz-
ard to pets and livestock. In addition,
animals can also cause damage to the
device. For this reason you should keep
animals away from electrical devices at
all times.
DANGER! Risk of electric
shock due to moisture
~ The device, the cable and the mains
plug must not be immersed in water or
any other liquids.
~ Protect the device from moisture, water
drops and water spray. Failure to observe this instruction may result in an
electrical shock hazard.
~ If liquid gets into the device, remove the
mains plug immediately. Have the device checked before reusing.
~ Never touch the device with wet hands.
~ If the device has fallen into water, pull
out the mains plug immediately, and
only then remove the device from the
water. Do not use the device again, and
have it checked by a specialist.
~ Never put the device into operation if
~
~ Ensure that the power cable cannot be
~ When using the device, ensure that the
~ The device is not fully disconnected from
~ When removing the mains plug from the
~ Disconnect the mains plug from the wall
~ To avoid any risk, do not make modifi-
~ Fully unwind the mains cable during u se
~ When using an extension cable, this
shock
there are visible damages to the device
or the power cable or if the device has
been dropped before.
Only connect the mains plug to a properly installed and easily accessible wall
socket whose voltage corr esponds to the
specifications on the rating plate. The
wall socket must continue to be easily accessible after the device is plugged in.
damaged by sharp edges or hot surfaces.
power cable cannot be trapped or
crushed.
the power supply, even after it is
switched off. In order to fully disc onnect
it, pull out the mains plug.
wall socket, always pull the plug and
never the cable.
socket...
…if there is a fault,
… when you are not using the device,
… before you clean the device and
… during thunderstorms.
cations to the product.
to avoid overheating and scorching.
must correspond to the applicable safe-
ty regulations.
4
GB
WARNING! Risk of material
damage
~ Never place the device on hot surfaces
(e.g. hob plates) or near heat sources or
open fire.
~ Only use the original accessories.
~ Do not use any astringent or abrasive
cleaning agents.
4. Items supplied
1tower fan|1
1 base (consisting of 2 parts)|8
1knob screw|13
2 crosshead screws
1 set of operating instructions
in the base|8 and mount the base on
the tower fan|1.
3. Fix the base|8 and the tower fan|1 to-
gether using the supplied knob
screw|13. Place the tower fan|1 on its
base|8 and ensure it is standing in a
stable location.
4. Select a location which complies with
the safety instructions (see “Safety information” on page 3).
5. Insert the mains plug|12 into a mains
socket corresponding to the te chnical
data.
6. Operation
Unpacking
1. Remove all parts from the packaging.
2. Check that all parts are present and intact.
5. Assemble appliance
Before the device can be used, the base|8
must be screwed on:
1. Figure A: put the rear half of the
base|10 and the front half of the
base|11 together. Ensure that the connection audibly clicks into place. Fix
the two halves from below using the
supplied crosshead screws.
NOTES:
• The rear half of the base|10 can be
identified by the recess for the mains
power cable|9.
• Ensure that the mains power cable|12 is
lying in the rec ess for the mains power cable|9.
2. Figure B: fully unscrew the knob
screw|13 at the bottom of the fan.
Press the mains power cable|12 into
the recess for the mains power cable|9
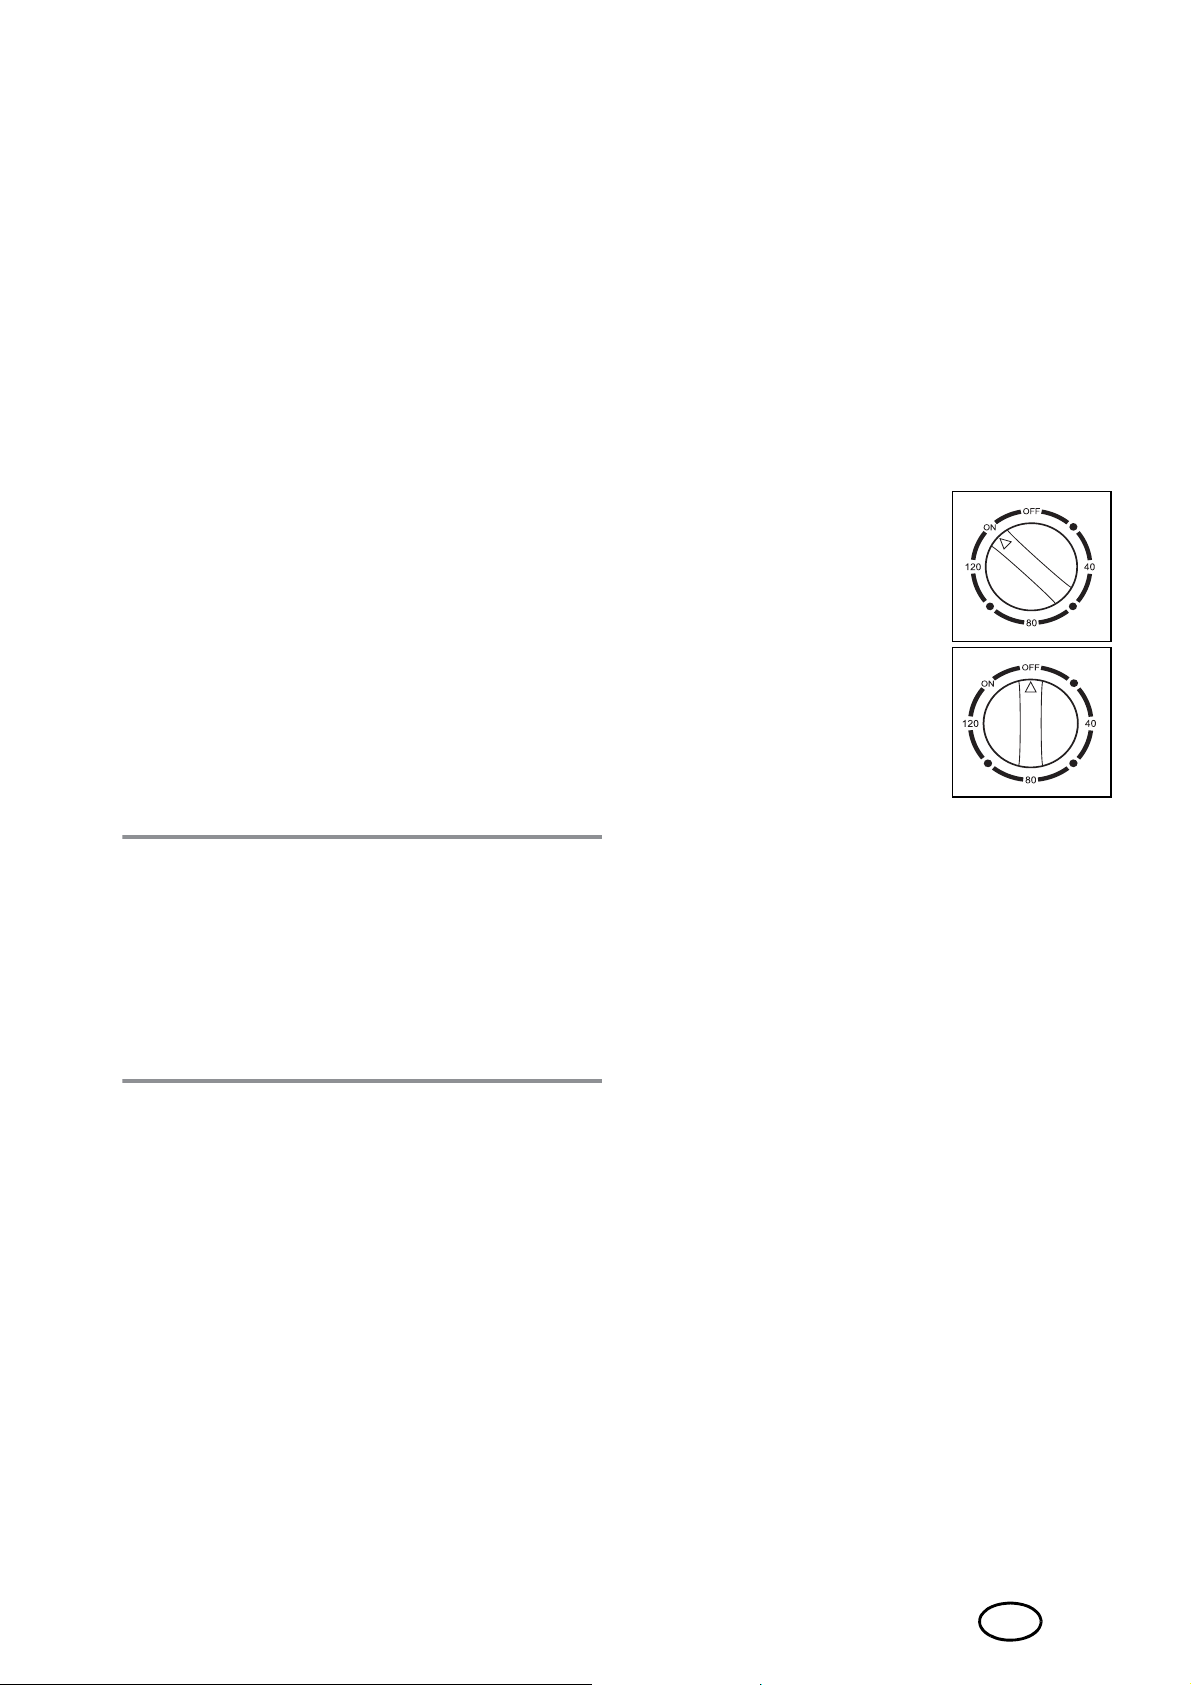
6.1 Start and switch off the
appliance
1. Plug the power plug into a power sup-
ply socket which meets the technical
data requirements.
2. Switch on the power
supply by turning rotary switch|6 to ON.
The appliance is now
operational.
3. Switch off the power
supply by turning rotary switch|6 to OFF.
6.2 Set blower setting
The blower settings are used to select how
fast the appliance circulates air in the room.
The appliance has three blower settings:
- 1, low: press button|7;
- 2, moderate: press button|5;
- 3, high: press button|4.
Press the |2 OFF button to stop the appliance
working.
GB
5
6.3 Set running time
7. Cleaning
The device has a timer, which allows you to
set the desired running time of up to 120
minutes. A to-the-minute setting is not possible.
1. Switch the timer on by
rotating the dial|6 to
any position between 0
and 120 minutes.
2. To switch off the timer,
set rotary switch|6 to
OFF.
NOTE: If you want the applianc e to operate
continuously, set rotary switch|6 to ON.
6.4 Oscillation function
The appliance has an oscillation function.
This causes the appliance to move to and
fro, distributing the air produced evenly
throughout the room.
To ensure your appliance gives you lasting
service, you should clean it regularly.
DANGER! Risk of electric
shock!
Remove the mains plug before each clean.
~
~ Never immerse the appliance in water.
~ Never allow water or cleaning agent to
run into the appliance.
W ARNING! Risk of material damage!
~ Do not use any astringent or abrasive
cleaning agents.
1. Carefully remove major dust deposits
with a vacuum cleaner.
2. Clean the outside of the appliance with
a damp cloth. You could also use a little washing-up liquid.
3. Wipe the appliance with a cloth moistened with clear water.
4. Do not use the appliance again until it
has dried completely.
1. Switch on the oscillation function by
pressing button for oscillation function|3.
2. Switch off the oscillation function by
pressing button for oscillation function|3 again.
8. Disposal
This product is subject to the
provisions of Eur opean Dire ctive 2012/19/EC. The symbol showing a wheelie bin
crossed through indicates
that the product requires separate refuse collection in the European Union. This applies to the product and all
accessories marked with this symbol. Products identified with this symbol may not be
discarded with normal household waste, but
must be taken to a collection point for recycling electric and electronic appliances. Recycling helps to reduce the consumption of
raw materials and protect the environment.
Packaging
When disposing of the packaging, make
sure you comply with the environmental re gulations applicable in your country.
6
GB
9. Technical
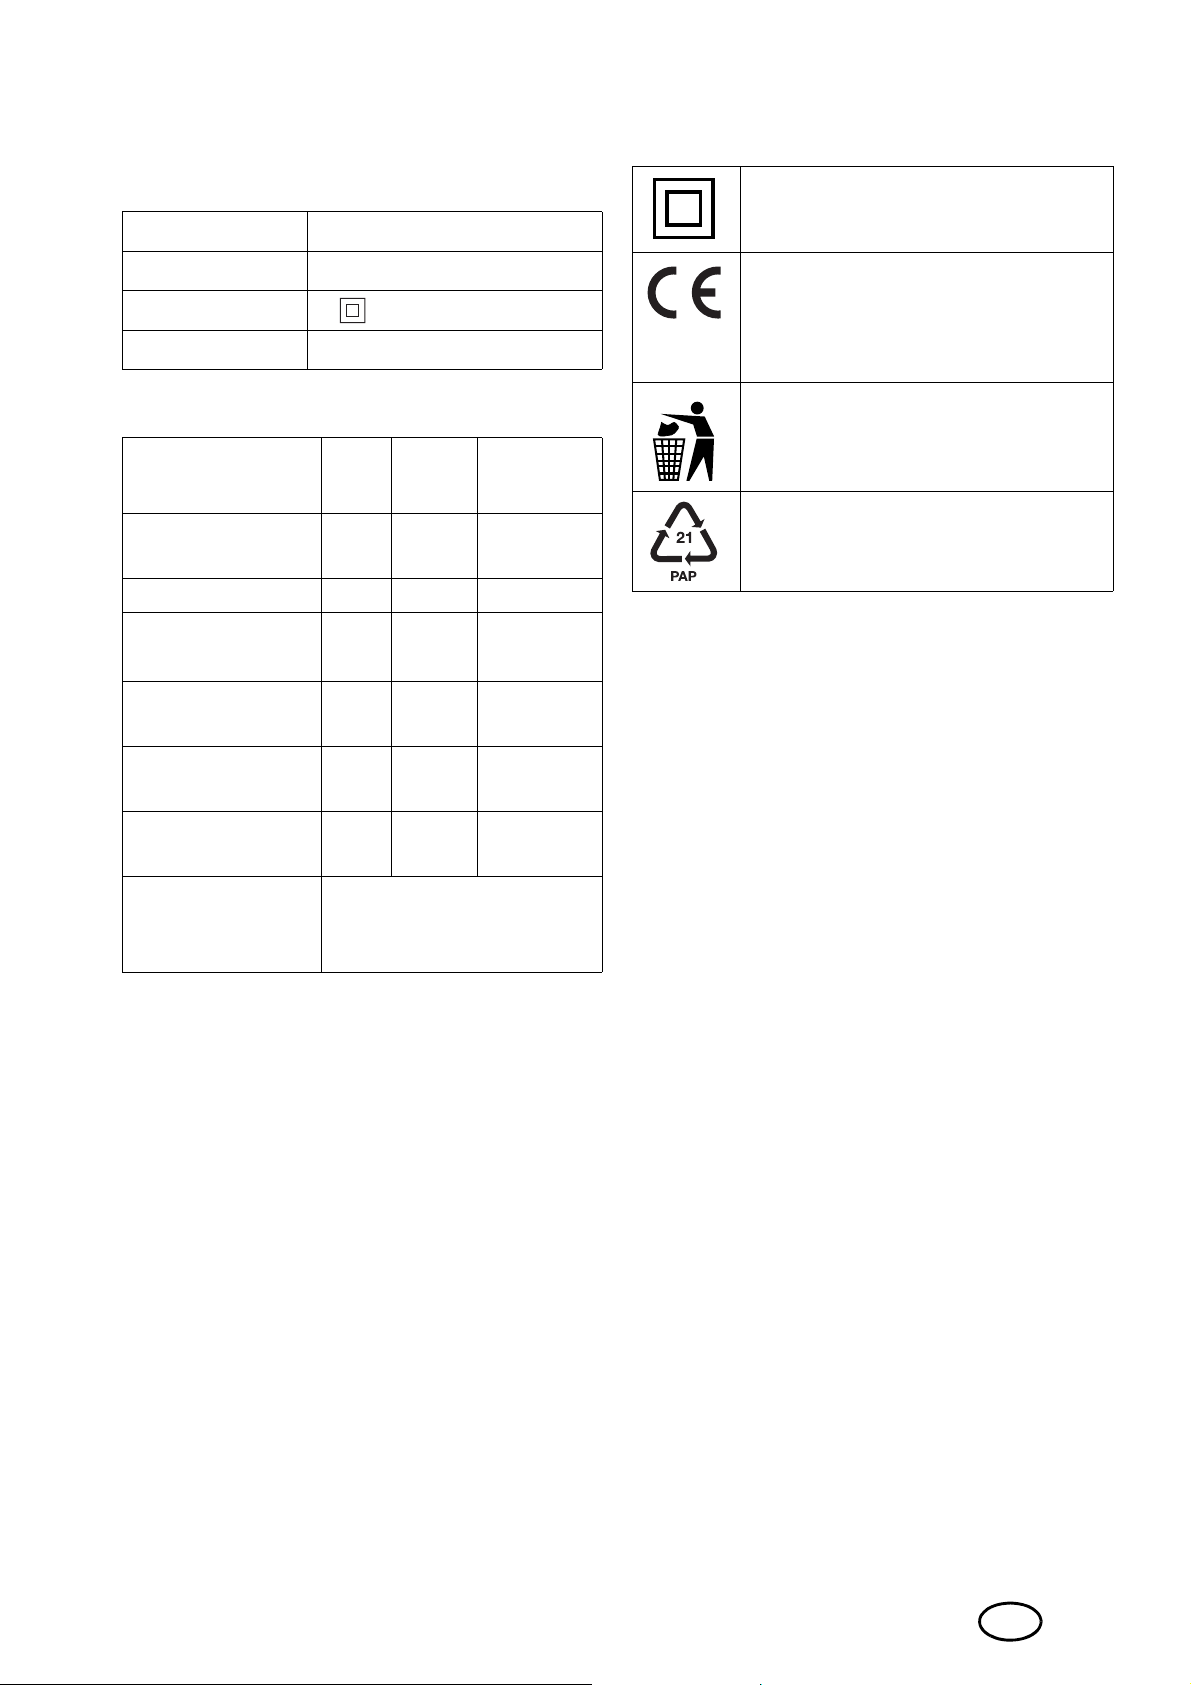
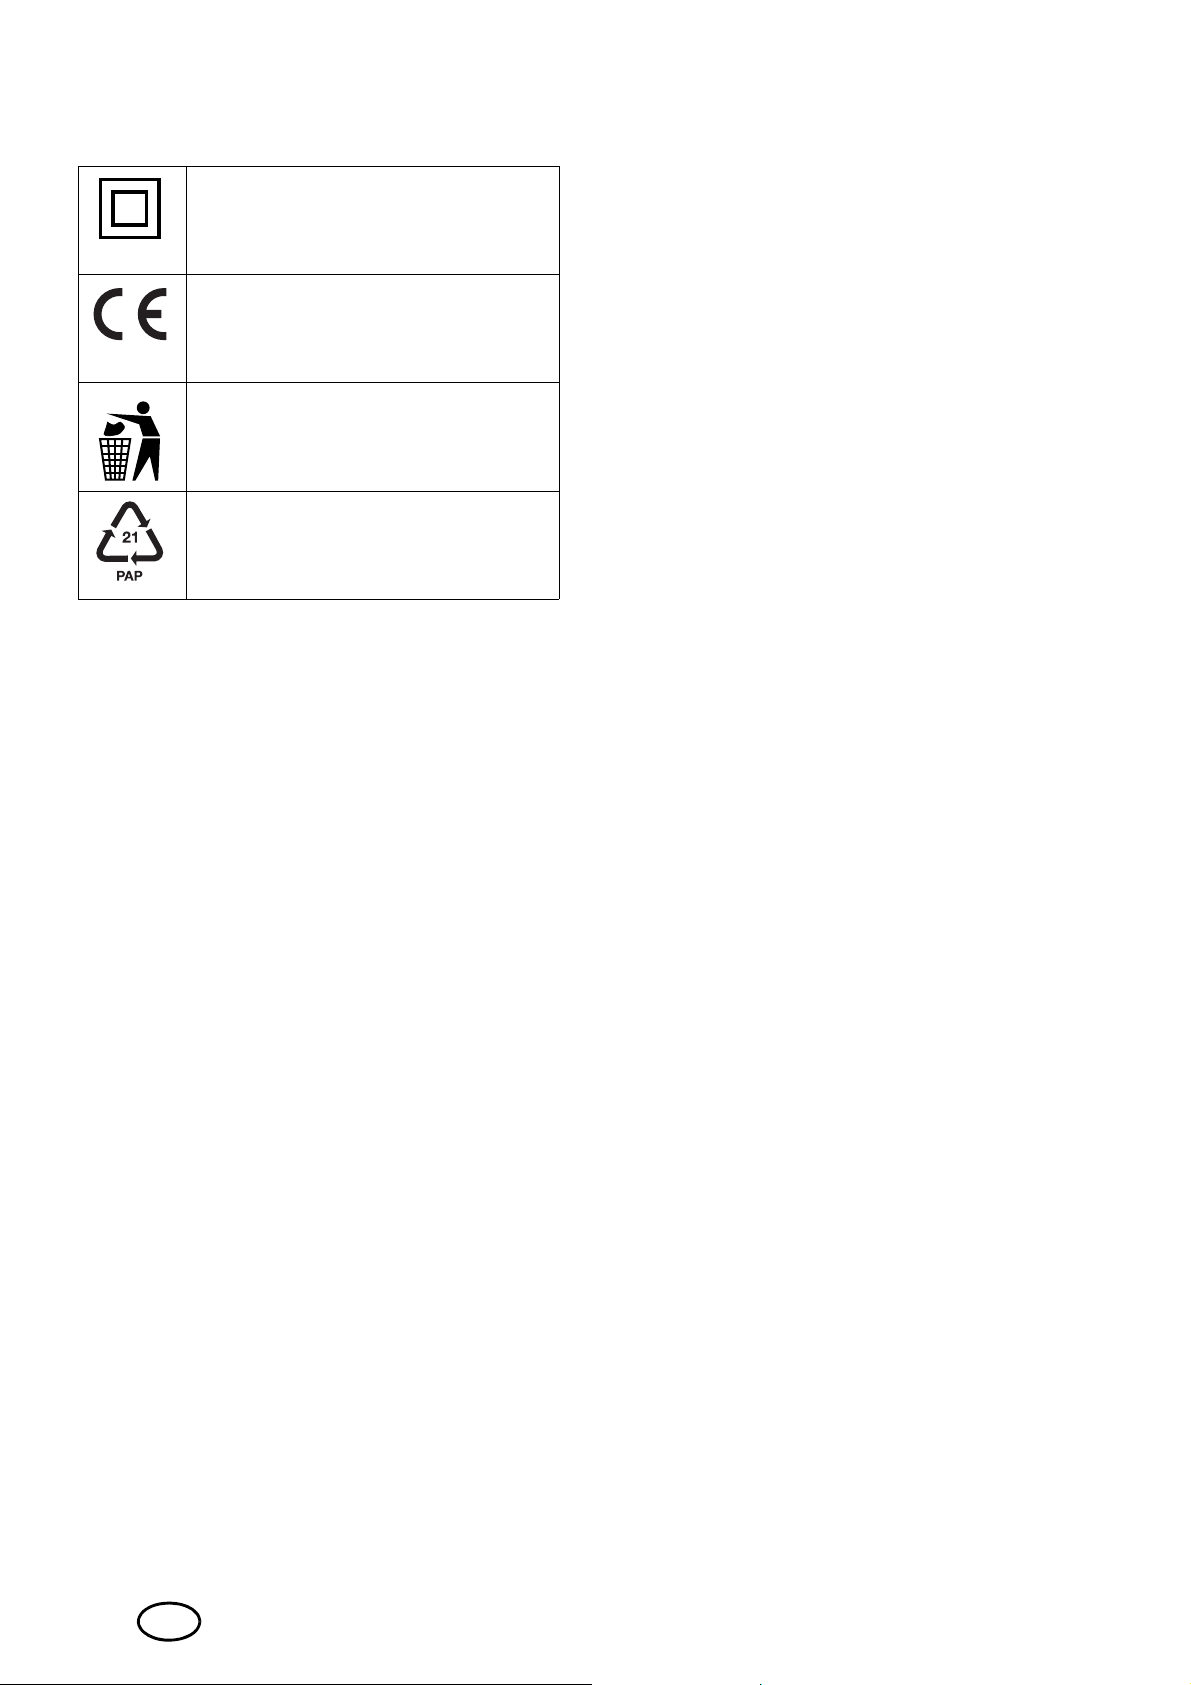
Symbols used
specifications
Model: STV|50|A1
Mains voltage: 220|- 240 V ~ 50/60 Hz
Protection class: II
Power rating: 50 W
Description
Maximum fan
flow rate
Fan power input P 35,44 W
Service value SV 0,60
Standby power
consumption
Fan sound pow-
er level
Maximum air
velocity
Measurement
standard for service value
Sym
bol
F21,18
P
SB
L
WA
c2,50m/s
IEC 60879:1986
+(cor1:1992)
Val-
ue
Ű
0,50
61,33 dB(A)
Unit
3
m
/min
(m3/min)/
W
W
Double insulation
With the CE marking,
HOYER|Handel GmbH declares
the conformity with EU guidelines.
This symbol reminds you to dispose of the packaging in an environmentally friendly manner.
Recyclable materials: cardboard
(except corrugated cardboard)
Subject to technical modifications.
GB
7

10. Warranty of the
HOYER Handel GmbH
Dear Customer,
your device is provided with a 3 year warranty starting with the purchase date. In the
event of product defects, you are entitled to
statutory rights against the vendor. These
statutory rights are not restricted by our warranty presented in the following.
Warranty conditions
The warranty period starts with the pur chase
date. Please keep the original purchase receipt in a safe place. This document is required to verify the purchase.
If within three years from the pur chase date
of this product a material or factory defect
occurs, the product will be repaired or replaced by us – at our discretion – free of
charge to you. This warranty implies that
within the period of three years the defective
device and the purchase receipt are presented, including a brief written description of
the defect and the time it occurred.
If the defect is covered by our warranty, the
repaired or a new product will be returned
to you. No new warranty period starts with
a repair or replacement of the product.
Warranty period and statutory
claims for defects
The warranty period is not extended when
the warranty has been claimed. T his also applies to replaced and repaired parts. Any
damages and defects alread y existing at the
time of purchase must be reported immediately upon unpacking. Repairs arising after
the expiration of the warranty period are
subject to a charge.
Warranty coverage
The device was pr oduced carefully according
to strict quality guidelines and tested diligently prior to delivery.
The warranty applies to ma terial or factory
defects.
Excluded from the warranty are
wear parts subject to normal wear
and damages to fragile parts, e.g.
switches, batteries, lamps or other
parts manufactured from glass.
This warranty expires if the product is damaged, not used as intended or not serviced.
For the pr oper operation of the product, all instructions listed in the operating instructions
must be observed carefully. Any form of use
and handling that is advised against in the
operating instructio ns or warned agai nst
must always be avoided.
The product is only intended for priv ate and
not for commercial use. In the case of incorrect and improper tr eatment, use of force and
interventions not performed by our authorised Service Centre, the warranty shall cease.
Handling in case of a warranty
claim
In order to ensur e prompt processing of your
matter, please observe the following notes:
• Please keep the article number
IAN: 312846
as a purchase verification for all inquiries.
• The article number can be found on the
rating plate, an engraving, the title
page of your instructions (in the bottom
left), or as a label on the rear or underside of the device.
• If faulty operation or other defects occur ,
first contact the Service Centre listed in
the following by telephone or email.
• Then, you are able to send a product r eported as defective free of charge to the
service address specified to you, including the purchase receipt and the information on the defect and when it
occurred.
Please visit www.lidl-service.com to
download this and many other
manuals, product videos and software.
and the purchase r eceipt
8
GB
Service Centre
GB
IE
MT
CY
Service Great Britain
Tel.: 0871 5000 720 (£ 0.10/Min.)
E-Mail: hoyer@lidl.co.uk
Service Ireland
Tel.: 1890 930 034
(0,08 EUR/Min., (peak))
(0,06 EUR/Min., (off peak))
E-Mail: hoyer@lidl.ie
Service Malta
Tel.: 80062230
E-Mail: hoyer@lidl.com.mt
Service Cyprus
Tel.: 8009 4409
E-Mail: hoyer@lidl.com.cy
IAN: 312846
Supplier
Please note that the following address is no
service address. First contact the afore-
mentioned Service Centre.
HOYER Handel GmbH
Tasköprüstraße 3
DE-22761 Hamburg
GERMANY
GB
9

Indhold
1. Oversigt .......................................................................................10
2. Brug i overensstemmelse med formålet ........................................11
3. Sikkerhedsanvisninger .................................................................11
4. Leveringsomfang..........................................................................13
5. Montering af apparatet ............................................ ....................13
6. Betjening ......................................................................................13
6.1 Apparatet tages i brug og slukkes.......................................................13
6.2 Indstilling af blæsetrinnet ...................................................................13
6.3 Indstilling af funktionstid.....................................................................14
6.4 Drejefunktion.................................................................................... 14
7. Rengøring.....................................................................................14
8. Bortskaffelse ................................................................................15
9. Tekniske data...............................................................................15
10.HOYER Handel GmbHs garanti .....................................................16
1. Oversigt
1 Tower-ventilator
2 Off-tast (OFF)
3 Tast drejefunktion
4 Tast 3: kraftigt blæsetrin
5 Tast 2: middelt blæsetrin
6 Drejekontakt og timer
7 Tast 1: svagt blæsetrin
8 Fod
9 Fordybning til nettilslutningsledning
10 Fodens bageste halvdel
11 Fodens forr este halvdel
12 Nettilslutningsledning med netstik
13 Knapskrue
Ikke afbildet: 2 Krydskærvskruer
10
DK
Mange tak for din tillid!
Tillykke med din nye tower-ventilator.
tjeningsvejledning vedlægges.
Betjeningsvejledningen er del af
produktet.
For at opnå en sikker omgang med apparatet og for at lære ydelsesomfanget at kende :
• Læs denne betjeningsvejledning
grundigt igennem, før apparatet
tages i brug første gang.
• Følg frem for alt sikkerhedsan-
visningerne!
• Apparatet må kun betjenes som
beskrevet i denne betjeningsvejledning.
• Opbevar denne betjeningsvej-
ledning.
• Hvis apparatet gives videre til
anden bruger, bedes denne be-
Vi ønsker dig god fornøjelse med din nye
tower-ventilator!
2. Brug i overensstemmelse med formålet
Denne tower-ventilator egnet sig til cirkulation af luft i tørre undendørs rum.
Apparatet er konstrueret til den private husholdning. Apparatet må kun benyttes indendørs.
Dette apparat må ikke anvendes til erhvervsmæssige formål.
3. Sikkerhedsanvisninger
Advarselshenvisninger
Hvor det er påkrævet, anvendes følgende advarselshenvisninger i denne betjeningsvejledning:
FARE! Høj risiko: manglende overholdelse af advarslen kan forårsage skader på
liv og lemmer.
ADVARSEL! Middel risiko: manglende overholdelse af advarslen kan forårsage kvæstelser eller alvorlige materielle skader.
FORSIGTIG: lav risiko: manglende overholdelse af advarsle n kan forårs age kvæstelser eller alvorlige materielle skader.
ANVISNING: forhold og særlige detaljer, som skal overholdes ved brug af apparatet.
Anvisninger om sikker brug
~
Dette apparat kan benyttes af børn fra 8 år og af personer med
indskrænkede fysiske, sensoriske eller psykiske evner eller manglende erfaring og/eller manglende viden, hvis disse er under opsyn eller er blevet undervist i en sikker brug af apparatet og har
forstået de deraf resulterende far er. Børn må ikke lege med apparatet. Rengøring og brugervedligeholdelse må ikke udføres af
børn, undtagen, hvis de er under opsyn.
~
Hvis nettilslutningsledningen på dette apparat bliver beskadiget,
skal den udskiftes af producenten eller hans k undeservice eller af
en lignende kvalificeret person for at undgå risici.
DK
11

~
Dette apparat er ikke beregnet til at blive brugt sammen med en
ekstern timer eller en separat fjernbetjening.
~ Pas på, at netkablet ikke kan blive be-
FARE for børn
~ Emballage er ikke legetøj. Børn må ikke
lege med plastikposerne. Der er fare for
at blive kvalt.
~
Opbevar apparatet utilgængeligt for børn.
FARE for og på grund af
kæle- og husdyr
~ Elektriske apparater kan udgøre en fare
for kæle- og husdyr. Desuden kan dyr
også forårsage skader på apparatet.
Hold derfor principielt dyr væk fra elektriske apparater.
FARE for elektrisk stød
pga. fugtighed
~ Apparatet, ledningen og netstikket må
ikke dyppes i vand eller andre væsker.
~ Beskyt apparatet mod fugt, dråber eller
stænkvand: der er fare for elektris k stød.
~ Hvis væske skulle vær e trængt ind i ap-
paratet, skal netstikket omgående trækkes ud. F å apparatet k ontroller et, før det
tages i brug igen.
~ Brug ikke apparatet med våde hænder.
~ Skulle apparatet alligevel vær e faldet i
vandet, skal du straks trække netstikket
ud og først derefter tage apparatet op.
Undlad i dette tilfælde at anvende apparatet, og lad et autoriser et værksted
kontrollere det.
FARE for elektrisk stød
~ Tag ikke apparatet i brug, hvis appara-
tet eller netkablet har synlige skader, eller hvis apparatet har været faldet på
gulvet.
~ Sæt kun netstikket i en k orrekt installeret,
let tilgængelig stikkontakt, hvis spænding svarer til den på typeskiltet. Stikkontakten skal også være let tilgængelig
efter tilslutningen.
skadiget af skarpe kanter eller meget
varme steder.
~ Vær ved brugen af apparatet opmærk-
som på, at tilslutningsledningen ikke
kommer i klemme.
Apparatet er stadig ikke helt afbrudt fra
~
nettet, efter at det er blevet slukket. For at
gøre dette, skal du træk k e netstikk et ud.
~ Træk altid i stikket, aldrig i ledningen,
når du trækker netstikket ud af stikkontakten.
~ Træk netstikket ud af stikkontakten, ...
… hvis der opstår en fejl,
… hvis du ikke bruger apparatet,
… før du rengør apparatet og
… ved tordenvejr.
~ For at undgå farer må der ikke foreta-
ges ændringer på apparatet.
~ Rul netledningen helt ud ved brug, for at
undgå at ledningen overophedes og
brænder over.
~ Ved brug af en forlængerledning skal
denne opfylde de gældende sikkerhedsbestemmelser.
ADVARSEL mod materielle
skader
~ Stil aldrig apparatet på varme flader
(f.eks. kogeplader) eller i nærheden af
varmekilder eller åben ild.
~ Anvend kun det originale tilbehør.
~ Brug aldrig aggressive eller skurende
rengøringsmidler.
12
DK
4. Leveringsomfang
1 tower-ventilator|1
1 fod (i 2 dele)|8
1Knapskrue|13
2 Krydskærvskruer
1 brugsanvisning
5. Sæt netstikket|12 i en stikkontakt, som
svarer til de tekniske data.
6. Betjening
6.1 Apparatet tages i brug
Udpakning
1. Tag alle dele ud af emballagen.
2. Kontrollér, om alle delene forefinde s og
derefter, om delene er ubeskadiget.
5. Montering af
apparatet
Inden apparatet kan tages i brug, skal foden|8 skrues på:
1. Fig. A : saml fodens bageste halvdel|10 og fodens forreste halvdel|11.
Sørg for, at de klikker hørbart sammen.
Fastgør de to halvdele nedenfra med
de medfølgende krydskærvskruer.
ANVISNINGER:
• Fodens bageste halvdel|10 genkender
du på fordybningen til nettilslutningsledningen|9.
• Sørg for, at nettilslutningsledningen|12
ligger i fordybningen til nettilslutningsledningen|9.
2. Fig. B: drej knapskruen|13 helt af forneden på ventilatoren. Tryk nettilslutningsledningen|12 ind i fordybningen
til nettilslutningsledningen|9 på foden|8 og sæt foden på tower-ventilatoren|1.
3. Fastgør foden|8 og tower-ventilatoren|1 med den medfølgende knapskrue|13. Sæt tower-ventilatoren|1 på
foden|8 og sørg for, at den står sikkert.
4. Vælg en placering, som svarer til sikkerhedshenvisningerne (se “Sikkerhedsanvisninger” på side 11).
og slukkes
1. Sæt stikket i en stikkontakt, der er i
overensstemmelse med de tekniske data.
2. Tænd for strømforsyningen ved at stille drejekontakten|6 på ON.
Nu er apparatet klart til
brug.
3. Sluk for strømforsyningen ved at stille drejekontakten|6 på OFF.
6.2 Indstilling af
blæsetrinnet
Med blæsetrinnene vælges, hvor hurtigt apparatet opvarmer.
Apparatet har tre blæsetrin:
- Trin 1, svagt: Tryk på tast|7;
- Trin 2, middel: Tryk på tast|5;
- Trin 3, stærkt: Tryk på tast|4.
Hvis du trykker på OFF-tasten|2 OFF, holder
apparatet op med at arbejde.
DK
13

6.3 Indstilling af
funktionstid
Apparatet har en timer, hvormed du kan indstille den ønskede driftstid op til 120 minutter. Det er ikke muligt at indstille på minuttet.
1. Slå timeren til ved at stil-
le drejeknappen|6 på
den ønskede position
mellem 0 og 120 minutter. Samtidig tændes for
strømforsyningen.
2. For at slukke for timer en stilles dr ejekon-
takten|6 på OFF.
7. Rengøring
Hvis du gerne vil have glæde af apparatet i
lang tid, bør du rengøre det regelmæssigt.
FARE for elektrisk stød!
~ Træk stikket ud før hver rengøring.
~ Dyp aldrig apparatet i vand.
~ Der må ikke komme vand eller
rengøringsmiddel ind i apparatet.
ADVARSEL mod materielle skader!
~ Brug aldrig aggressive eller skurende
rengøringsmidler.
ANVISNING: Hvis du vil lade apparatet
arbejde i konstant drift, skal du stille drejekontakt|6 på ON.
6.4 Drejefunktion
Apparatet har en drejefunktion.
Det betyder , at det drejer fra side til side, og
at luften dermed fordeles mere ensartet i lokalet:
1. Tænd for drejefunktionen ved at trykke
på tasten for drejefunktion|3.
2. Sluk for drejefunktionen ved at trykke
på tasten for drejefunktion|3 igen.
1. Fjern forsigtigt store støvaflejringer med
en støvsuger.
2. Apparatet skal rengøres udvendigt med
en fugtig klud. Du må gerne bruge lidt
opvaskemiddel.
3. Tør efter med en klud vædet med rent
vand.
4. T ag først apparatet i brug igen, når det
er helt tørt.
14
DK
8. Bortskaffelse
9. Tekniske data
Dette produkt er underlagt
det europæiske direktiv
2012/19/EU. S
med den overstregede skraldespand på hjul betyder, at
produktet inden for den Europæiske Union skal tilføres en separat affaldsindsamling. Det gælder produktet og alt
tilbehør, som er markeret med symbolet.
Mærkede produkter må ikk e bortskaffes med
det normale husholdningsaffald, men skal afleveres til et modtagelsessted for genbrug af
elektriske og elektronisk e apparater. Genbrug er med til at reducere forbruget af råstoffer og aflaste miljøet.
ymbolet
Emballage
Når du vil bortskaffe emballagen, skal du
være opmærksom på de tilsvarende miljøbestemmelser i landet.
Model: STV|50|A1
Netspænding:
Beskyttelsesklasse:
Effekt: 50 W
Beskrivelse
Maksimal ventilatorluftstrøm
Ventilatorens effektoptag
Nytteværdi SV 0,60
Elforbrug i stand-
bytilstand
Ventilatorlydeffekt-
niveau
Maksimal luftha-
stighed
Målestandard for
nytteværdi
220|- 240 V ~ 50/60 Hz
II
Sym-
bol
F 21,18
P 35,44 W
P
SB
L
WA
c2,50m/s
IEC 60879:1986
+(cor1:1992)
Vær-
di
Ű
0,50
61,33 dB(A)
Enhed
3
/min
m
(m3/
min)/W
W
DK
15
Anvendte symboler
10. HO YER Handel
Beskyttelsesisolering
Med CE-mærkning erklærer
HOYER Handel GmbH EU-konformiteten.
Dette symbol minder om, at bortskaffe emballagen miljøvenligt.
Genbrugelige materialer: pap
(undtaget bølgepap)
Ret til tekniske ændringer forbeholdes.
GmbHs garanti
Kære kunde.
Du har 3 års garanti fra købsdatoen på dette apparat. I tilfælde af mangler på dette
produkt gælder de lovpligtige rettigheder
for dig i forhold til sælgeren af produktet.
Disse lovpligtige rettigheder bliver ikke begrænset af vores i efterfølgende nævnte stillede garanti.
Garantibetingelser
Garantifristen starter på købsdatoen. Den
originale kvittering bedes opbevaret godt.
Dette bilag er nødvendigt for dokumentering
af købet.
Hvis der inden for 3 år fra købsdatoen skulle
opstå en materiale- eller fabrikationsfejl på
dette produkt, vil produktet – ud fra vores
vurdering – blive repareret eller udskiftet af
os uden udgifter for dig. Denne garantiydelse forudsætter, at det defekte apparat og
købsbilaget (kvitteringen) foreligger inden
for den 3-årige tidsfrist, og at det skriftligt
bliver kortfattet beskrevet, hvori fejlen består, og hvornår denne er opstået.
Hvis defekten er dækket af vores garanti,
modtager du det reparerede pr odukt retur eller et helt nyt produkt. I forbindelse med reparation eller udskiftning af produktet starter
der ikke en ny garantiperiode.
16
Garantiperiode og lovpligtige
krav ved fejl
Garantiperioden bliver ikke forlænget som
følge af garantiydelsen. Dette gælder også
for udskiftede og reparerede dele. Eventuelle skader og mangler, der allerede forefindes ved købet, skal omgående meddeles
efter udpakningen. Reparationer, der indtræffer efter garantiperiodens udløb, er for
kundens regning.
DK

Garantidækning
DK
Apparatet er blevet omhyggeligt fremstillet efter strenge kvalitetsretningslinjer og kontrolleret samvittighedsfuldt inden leveringen.
Garantien gælder for materiale- eller fabrikationsfej l .
Denne garanti omfatter ikke sliddele, der er udsat for normalt slid og
for skader på skrøbelige dele, f.eks.
kontakter, batterier, lyskilder eller
dele, der er fremstillet af glas.
Denne garanti dækker ikk e, hvis det besk adigede produkt ikke er blevet anvendt til formålet eller ikke er blevet passet. For at anvende
produktet korrekt, skal alle de anførte anvisninger i betjeningsvejledningen nøje overholdes. Anvendelsesformål og handlinger, der
frarådes i betjeningsvejledningen, eller som
der advares imod, skal ubetinget undgås.
Produktet er udelukkende bestemt til privat
brug og ikke til erhvervsmæssigt brug. Ved
misligholdelse og uhensigtsmæssig behandling, brug af vold og ved indgreb, som ikke er
blevet udført af vores autoriserede servicecenter, ophører garantien.
med vedhæftning af købsbilaget (kvitteringen) og angivelse af, hvori fejlen består, samt hvornår denne er opstået.
På www.lidl-service.com kan du
downloade denne og mange flere
håndbøger, produktvideoer og software.
Service-center
Service Danmark
Tel.: 32 710005
E-Mail: hoyer@lidl.dk
IAN: 312846
Leverandør
Bemærk venligst, at den følgende adresse
ikke er en service-adresse. Kontakt
først det ovennævnte service-center.
HOYER Handel GmbH
Tasköprüstraße 3
DE-22761 Hamburg
TYSKLAND
Afvikling af en garantisag
For at sikre en hurtig behandling af dit anliggende, bedes du gå frem efter følgende anvisninger:
• Hav i forbindelse med alle forespør gsler
artikelnummeret
ringen som dokumentering for købe t parat.
• V arenummeret finder du på typeskiltet, som
en gravering, på forsiden af din vejledning
(forneden til venstre) eller som etiket apparatets bag- eller underside.
•
Hvis der skulle for
ler specielle mangler, skal du først kontakte efterfølgende nævnte servicecenter telefonisk eller pr. e-mail.
• Et defekt produkt, der er dækket af garantien, kan du derefter portofrit fremsende til den oplyste service-adresse,
IAN: 312846
ekomme funktionsfejl el-
og kvitte-
DK
17

Sommaire
1. Aperçu de l'appareil ....................................................................18
2. Utilisation conforme .....................................................................19
3. Consignes de sécurité ...................................................................19
4. Éléments livrés ............ ....................... ........................ ..................21
5. Montage de l'appareil .............................. ....................................21
6. Utilisation ....................................................................................22
6.1 Mise en service et à l'arrêt de l'appareil .............................................22
6.2 Réglage de la puissance de ventilation ...............................................22
6.3 Réglage de la durée de fonctionnement .............................................. 22
6.4 Fonction de pivotement ..................................................................... 22
7. Nettoyage ...................................................................................23
8. Mise au rebut ..............................................................................23
9. Caractéristiques techniques ..........................................................24
10.Garantie de HOYER Handel GmbH ...............................................25
1. Aperçu de l'appareil
1 Ventilateur tour
2 Bouton arrêt (OFF)
3 Bouton de la fonction de pivotement
4 Bouton 3|: niveau de ventilation maximal
5 Bouton 2|: niveau de ventilation moyen
6 Bouton rotatif et minuteur
7 Bouton 1|: niveau de ventilation faible Bouton rotatif et minuteur
8 Pied
9 Renfoncement destiné au câble de raccordement au secteur
10 Moitié arrière du pied
11 Moitié avant du pied
12 Câble de raccordement au secteur avec fiche secteur
13 Vis à poignée
Non illustré : 2 vis cruciformes
18
FR

Merci beaucoup pour
votre confiance !
Nous vous félicitons pour l’achat de votre
nouvelle ventilateur tour.
Pour manipuler l'appareil en toute sécurité et
vous familiariser avec le volume de
livraison :
• Si vous transmettez l'appareil à
un tiers, n'oubliez pas d'y joindre
ce mode d'emploi. Le mode
d'emploi fait partie intégrante du
produit.
Nous vous souhaitons beaucoup de plaisir
avec votre nouvelle ventilateur tour !
2. Utilisation conforme
• Lisez attentivement ce mode d’ emploi avant la première utilisation.
• Respectez en priorité les
consignes de sécurité !
• L'appareil ne doit être utilisé
qu'aux fins décrites dans ce
mode d'emploi.
• Conservez ce mode d'emploi.
Ce ventilateur tour est destiné au brassage
de l'air dans des espaces fermés secs.
L'appareil est conçu pour un usage domestique. L'appareil doit être utilisé uniquement
à l'intérieur.
Cet appareil ne peut pas être utilisé à des
fins professionnelles.
3. Consignes de sécurité
Avertissements
Les avertissements suivants sont utilisés si nécessaire dans le présent mode d’ emploi :
DANGER ! Risque élevé : le non-respect de l’avertissement peut provoquer des
blessures graves, voire la mort.
AVERTISSEMENT ! Risque moyen : le non-respect de l’avertissement peut provoquer des
blessures ou des dommages matériels graves.
A TTENTION : risque faible : le non-respect de l’avertissement peut provoquer des blessures légères ou entraîner des dommages matériels.
REMARQUE : remarques et particularités dont il faut tenir compte en manipulant l’appareil.
Instructions pour une utilisation en toute sécurité
~
Cet appareil peut êtr e utilisé par des enfants de plus de 8 ans et
des personnes ayant des capacités physiques, sensorielles ou mentales réduites ou un manque d'expérience et/ou de c onnaissance
lorsqu'ils sont surveillés ou qu'ils ont été informés de l'utilisation
sûre de l'appar eil et ont compris les risques qui en r ésultent. Les enfants ne doivent pas jouer avec l'appareil. Les enfants ne doivent
pas effectuer le nettoyage et l’ entr etien normal de cet appar eil,
sauf sous surveillance.
FR
19

~
Si le câble de raccordement au secteur de cet appareil est endommagé, il faut le faire remplac er par le fabricant, son service aprèsvente ou une personne ayant une qualification similaire pour éviter
les mises en danger.
~
Cet appareil n'est pas conçu pour êtr e utilisé avec une minuterie externe ou un système de commande à distance séparé.
cas, cessez d'utiliser l'appareil, faites-le
DANGER pour les enfants
~ Le matériel d'emballage n'est pas un
jouet. Les enfants ne doivent pas jouer
avec les sachets en plastique. Ceux-ci
présentent un risque d'asphyxie.
~ Conservez l’appar eil hors de portée des
enfants.
DANGER pour et provoqué
par les animaux
domestiques et d'élevage
~ Les appareils électriques peuvent pré-
senter des dangers pour les animaux
domestiques et d'élevage. De plus,
ceux-ci peuvent endommager l'appareil. Maintenez par conséquent les animaux éloignés des appareils
électriques.
DANGER ! Risque d'électrocution en raison de l’humidité
~ Ne plongez pas l'appareil ni la fiche
secteur dans l'eau ou dans un autre liquide.
~ Protégez l'appar eil contre l'humidité, les
gouttes et les éclaboussures : il e xiste un
risque d’électrocution.
~ Si du liquide pénètre dans l'appareil,
débranchez immédiatement la fiche secteur. Faites contrôler l'appar eil avant de
le remettre en service.
~ N'utilisez pas l'appareil avec les mains
mouillées.
~
En cas de chute de l'appareil dans l'eau,
débranchez immédiatement la fiche secteur avant de retirer l'appareil. Dans ce
vérifier par un atelier spécialisé.
DANGER ! Risque
d'électrocution
~ Ne mettez pas l’ appareil en service, si
l’appareil ou le câble d’alimentation
présente des dommages visibles ou si
l’appareil a subi une chute.
~ Raccordez la fiche secteur uniquement
à une prise de courant conforme et facilement accessible, dont la tension correspond aux indications figurant sur la
plaque signalétique. Après avoir branché l'appareil, la prise de courant doit
rester facilement accessible.
~ Veillez à ce que le câble d'alimentation
ne soit pas endommagé par les bords
coupants ou les zones chaudes.
~ Lors de l'utilisation de l'appareil, le
câble de raccordement ne doit pas être
coincé ou écrasé.
~ L’appareil n’est pas complètement isolé
du secteur même après l’avoir éteint
avec l’interrupteur marche/arrêt. Pour
ce faire, débranchez la fiche secteur.
~ Pour débrancher l'appareil, tirez tou-
jours sur la fiche, jamais sur le câble.
~ Débranchez la fiche secteur de la prise
de courant,
… lorsqu'une panne survient,
… quand vous n’utilisez pas l'appareil,
… avant de nettoyer l'appareil et
…en cas d'orage.
~ Afin d'éviter tout risque d'accident, n'ef-
fectuez aucune modification au niveau
de l'article.
20
FR

~ Pendant l'utilisation, déroulez entière-
ment le câble secteur afin d'éviter la surchauffe ou la fonte du caoutchouc.
~ Si le câble d'alimentation est endomma-
gé, il doit être remplacé par le fabricant, son service après vente ou des
personnes de qualification similaire afin
d'éviter un danger.
~ Si vous utilisez une rallonge, cette der-
nière doit être co nforme aux exigences
de sécurité en vigueur.
AVERTISSEMENT : risque de
dommages matériels
~ Ne placez jamais l'appareil sur des sur-
faces très chaudes (comme les plaques
de cuisson) ni à proximité de sourc es de
chaleur ou d'un feu ouvert.
~ Utilisez uniquement les accessoires
d’origine.
~ N’utilisez pas de produit de nettoyage
corrosif ou abrasif.
5. Montage de l'appareil
Le pied|8 doit être vissé avant que l'appareil
ne puisse être mis en service :
1. Figure A : assemblez ensemble la
moitié arrière du pied|10 et la moitié
avant du pied|11. Veillez à ce que la
connexion s'encrante de façon audible. Fixez les deux moitiés par le bas
à l'aide des vis cruciformes fournies
avec l'appareil.
REMARQUES :
• Vous reconnaîtrez la moitié arrière du
pied|10 au renfoncement destiné au
câble de raccordement au secteur|9.
• Veillez à ce que le câble de raccorde-
ment au secteur|12 repose dans le renfoncement destiné au câble de
raccordement au secteur|9.
4. Éléments livrés
1 ventilateur tour|1
1 pied (composé de 2|parties)|8
1 vis à poignée|13
2 vis cruciformes
1 notice d'utilisation
Déballage de l'appareil
1. Sortez toutes les pièces de l'emballage.
2. Vérifiez que toutes les pièces sont présentes et en bon état.
2. Figure B : dévissez entièrement la vis
à poignée|13 se trouvant sur le des-
sous du ventilateur. Enfoncez le câble
de raccordement au secteur|12 dans
l’encoche pour le câble de raccordement au secteur|9 prévue sur le pied|8
et placez le pied sur le ventilateur
tour|1.
3. Fixez le pied|8 et le ventilateur tour|1
au moyen de la vis à poignée|13 fournie avec celui-ci. Placez le ventilateur
tour|1 sur le pied|8 et veillez à ce qu’il
soit bien stable.
4. Choisissez un emplacement qui satisfasse les consignes de sécurité (voir
« Consignes de sécurité » à la
page 19).
5. Branchez la fiche secteur|12 dans une
prise de secteur qui correspond aux caractéristiques techniques.
FR
21

6. Utilisation
6.3 Réglage de la durée de
fonctionnement
6.1 Mise en service et à
l'arrêt de l'appareil
1. Insérer la fiche secteur dans une prise
secteur après vérification des caractéristiques techniques.
2. Mettre l'appareil sous
tension en plaçant le
bouton rotatif|6 sur
ON.
L’appareil est à présent
opérationnel.
3. Mettre l'appareil hors
tension en plaçant le
bouton rotatif|6 sur
OFF.
6.2 Réglage de la puissance
L'appareil est muni d'une minuterie avec laquelle vous pouvez régler la durée de fonctionnement que vous souhaitez jusqu'à 120
minutes. Un réglage précis des minutes n'e st
pas possible.
1. Réglez la minuterie en
tournant le bouton rotatif|6 sur une position à
choisir entre 0 et 120
minutes.
L'appareil s'allume automatiquement.
2. Pour désactiver le minuteur, il suffit de
mettre le bouton rotatif|6 sur OFF.
REMARQUE|: Si vous souhaitez faire fonctionner l'appareil en continu, vous devez
mettre le bouton rotatif|6 sur ON.
de ventilation
En choisissant le niveau de ventilation, vous
modifiez la vitesse de brassage de l'air
dans la pièce.
L'appareil possède trois niveaux de ventilation|:
- Niveau 1, puissance faible|:
Appuyer sur le bouton|7|;
- Niveau 2, puissance moyenne|:
Appuyer sur le bouton|5|;
- Niveau 3, puissance forte|:
Appuyer sur le bouton|4.
Si vous appuyez sur le bouton d'arrêt|2 OFF,
l'appareil arrête de fonctionner.
6.4 Fonction de pivotement
L’appareil possède une fonction de pivotement.
Elle permet à l'appareil de pivoter et de répartir ainsi l'air soufflé de manière homogène dans la pièce|:
1. Pour enclencher la fonction de pivotement, appuyez sur la touche de fonction de pivotement|3.
2. Pour désactiver la fonction de pivotement, appuyez de nouveau sur la
touche de fonction de pivotement|3.
22
FR

7. Nettoyage
8. Mise au rebut
Afin que puissiez profiter à long terme de
votre appareil, vous devez le nettoyer régulièrement.
DANGER ! Risque d'électrocution !
~ Avant chaque nettoyage, débranchez
la fiche secteur.
~ N’immergez jamais l’appareil dans
l’eau.
~ Ne laissez pas pénétrer l’eau ou du pro-
duit de nettoyage dans l’appareil.
AVERTISSEMENT ! Risque de dommages matériels !
~ N’utilisez pas de produit de nettoyage
corrosif ou abrasif.
1. Retirez avec précaution les dépôts de
poussière importants à l’aide d’un aspirateur.
2. Nettoyez l’appareil à l’extérieur avec
un chiffon humide. Vous pouvez également utiliser un peu de produit de vaisselle.
3. Nettoyez l'appareil avec un chiffon humidifié à l'eau claire.
4. Ne réutilisez l’appareil qu’une fois ce
dernier totalement sec.
Ce produit est soumis aux
exigences de la directive
2012/19/UE.
de la poubelle sur roues barrée signifie que, dans l’Union
européenne, le produit doit
faire l’objet d’une collecte séparée des déchets. Cela s’applique au produit et à tous
les accessoires portant ce symbole. Les produits portant ce symbole ne doivent pas être
éliminés avec les déchets ménagers normaux, mais doivent être déposés dans un
point de collecte chargé du recyclage des
appareils électriques et électroniques. Le recyclage contribue à réduire l’utilisation de
matières premières et à protéger l’environnement.
Le produit est r ecyclable, soumis à la responsabilité élargie du producteur et doit
faire l'objet d'un tri sélectif.
Le symbole
Emballage
Si vous souhaitez mettre l’emballage au rebut, respectez les prescriptions environnementales correspondantes de votre pays.
FR
23

9. Caractéristiques
Symboles utilisés
techniques
Modèle : STV|50|A1
Tension secteur :
Classe de
protection : II
Puissance : 50 W
Description
Débit d'air maximal
Puissance absorbée
Valeur de service
Consommation
d'électricité en
mode « veille »
Niveau de puissance acoustique
Vitesse maximale
de l'air
Norme de mesure de la valeur
de service
220|- 240 V ~ 50/60 Hz
Sym-
bole
F21,18
P35,44W
SV 0,60
P
SB
L
WA
c2,50m/s
IEC 60879:1986
+(cor1:1992)
Va-
leur
Ű
0,50
61,33 dB(A)
Unité
3
m
/
min
3
(m
/
min)/
W
W
Isolation de protection
Avec ce marquage CE, la société
HOYER Handel GmbH déclare la
conformité avec la règlementation de l'Union européenne.
Ce symbole rappelle qu'il faut éliminer l'emballage en respectant
l'environnement.
Matériaux recyclables : carton
(hormis le carton ondulé)
Sous réserves de modifications techniques.
24
FR

10. Garantie de
HOYER Handel GmbH
Chère cliente, cher client,
V ous obtenez pour cet appareil une garantie
de 3 ans à compter de la date d’achat. En
cas de défauts de ce produit, vous dispos ez
de droits légaux contre le vendeur de ce produit. Ces droits ne sont pas limités par notr e
garantie présentée par la suite.
Indépendamment de la garantie commerciale souscrite, le vendeur reste tenu des défauts de conformité du bien et des vices
rédhibitoires dans les conditions prévues
aux articles L217-4 à L217-13 du Code de
la consommation et aux articles 1641 à
1648 et 2232 du Code Civil.
Article L217-16 du Code de la
consommation
Lorsque l‘acheteur demande au vendeur,
pendant le cours de la garantie commerciale qui lui a été consentie lors de l‘acquisition ou de la réparation d‘un bien meuble,
une remise en état couverte par la garantie,
toute période d‘immobilisation d‘au moins
sept jours vient s‘ajouter à la durée de la garantie qui restait à courir. Cette période
court à compter de la demande d‘intervention de l‘acheteur ou de la mise à disposition
pour réparation du bien en cause, si cette
mise à disposition est postérieure à la demande d‘intervention.
Article L217-4 du Code de la
consommation
Le vendeur livre un bien conforme au contrat
et répond des défauts de conformité existant
lors de la délivrance.
Article L217-5 du Code de la
consommation
Le bien est conforme au contrat :
1. S´il est propre à l‘usage habituellement
attendu d‘un bien semblable et, le cas
échéant :
- s‘il correspond à la description don-
née par le vendeur et posséder les
qualités que celui-ci a présentées à
l‘acheteur sous forme d‘échantillon ou
de modèle ;
- s‘il présente les qualités qu‘un ache-
teur peut légitimement attendre eu
égard aux déclarations publiques
faites par le vendeur, par le producteur ou par son représentant, notamment dans la publicité ou
l‘étiquetage|;
2. Ou s‘il présente les caractéristique s définies d‘un commun accord par les parties ou être propre à tout usage spécial
recherché par l‘acheteur, porté à la
connaissance du vendeur et que ce dernier a accepté.
Article L217-12 du Code de la
consommation
L ‘action r ésultant du défaut de conformité se
prescrit par deux ans à compter de la délivrance du bien.
Article 1641 du Code civil
Le vendeur est tenu de la garantie à raison
des défauts cachés de la chose vendue qui
la rendent impropre à l‘usage auquel on la
destine, ou qui diminuent tellement cet
usage que l‘ acheteur ne l‘aurait pas acquise, ou n‘en aurait donné qu‘un moindre
prix, s‘il les avait connus.
Il répond également des défauts de conformité résultant de l‘emballage, des instructions de montage ou de l‘installation lorsque
celle-ci a été mise à sa charge par le contrat
ou a été réalisée sous sa responsabilité.
Article 1648 1er alinéa du Code
civil
L ‘action r ésultant des vices rédhibitoires doit
être intentée par l‘acquéreur dans un délai
de deux ans à compter de la découverte du
vice.
FR
25

Conditions de garantie
Le délai de garantie commenc e à la date
d’achat. Conservez le ticket de caisse d’origine. Ce document sert de justificatif d’ achat.
Si au cours des trois années suivant la date
d’ achat, des défauts de matériel ou de fabrication apparaissent sur ce produit, celui-ci
vous est, à notre discrétion, réparé ou remplacé gratuitement. Les conditions pour faire
valoir la garantie sont que l’appareil et la
preuve d’achat (ticket de caisse) soient présentés dans un délai de trois ans et que le
défaut ainsi que le moment où il est survenu
soient brièvement décrits par écrit.
Si le défaut est couvert par notre garantie,
nous vous renvoyons le produit réparé ou
neuf. La réparation ou l’ échange du pr oduit
ne constitue pas un nouveau commencement
de période de la garantie.
Les pièces détachées indispensables à l’utilisation du produit sont disponibles pendant
la durée de la garantie du produit.
Durée de garantie et requêtes légales pour vices de construction
La durée de garantie n’est pas prolongée
par son application. Ceci est également valable sur les pièces réparées et r emplacées.
Les dommages et les vices déjà présents au
moment de l’achat doivent être signalés immédiatement après le déballage. Apr ès l’expiration de la garantie, les réparations à
effectuer sont payantes.
Etendue de la garantie
L’appareil a été fabriqué selon des prescriptions de qualité rigoureuses et a été vérifié
minutieusement avant livraison.
La garantie s’ applique aux défauts de matériel ou de fabrication.
Sont exclus de la garantie les pièces
d'usure qui sont soumises à une
usure normale et les dommages
subis par des pièces fragiles, par ex.
les interrupteurs, batteries, sources
d'éclairage ou d'autres pièces en
verre.
Cette garantie est perdue si l’ appareil n’ a pas
été utilisé ou entretenu de ma nière conforme.
Pour une utilisation conforme du produit, r especter précisément toutes les c ons igne s pr ésentées dans le mode d’emploi. Les fins
d’utilisation et les actions contre-indiquées ou
déconseillées dans le mode d’ emploi doivent
impérativement être évitées.
Le produit est exclusivement conçu pour un
usage privé non commercial. La manipulation non autorisée et non conforme, l'utilisation de force et les interventions non
effectuées par notre centr e de service autorisé entraînent la perte de garantie.
Déroulement en cas de garantie
Pour assurer un traitement rapide de votre
demande, respectez les éléments suivants :
• Pour toute demande, tenez à disposition
le numéro d’article IAN : 312846 et
le ticket de caisse comme preuve
d’achat.
• Vou s trouverez les numéros d'article sur
la plaque signalétique, une gravure, la
page de titre de votre notice (en bas, à
gauche) ou sur l'autocollant apposé à
l’ arrièr e ou sur le dessous de l'appareil.
• En cas d’erreur de fonctionnement ou
autres pannes, contactez d’abord par
téléphone ou par e-Mail le centre de
service cité ci-dessous.
• Envoyez ensuite gratuitement à l’ adresse
de service qu’on vous a donnée le produit considéré comme défectueux en y
joignant la preuve d’achat (ticket de
caisse) et l’indication du défaut ainsi que
du moment où il est survenu.
Sur www .lidl-service.com, vous pouvez télécharger ce mode d’emploi
ainsi que ceux d’autr es produits, des
vidéos sur les produits et des logiciels.
26
FR

Centre de service
FR
BE
Service France
Tel.: 0800 919270
E-Mail: hoyer@lidl.fr
Service Belgique
Tel.: 070 270 171 (0,15 EUR/Min.)
E-Mail: hoyer@lidl.be
IAN : 312846
Fournisseur
Attention ! L’adresse suivante n’est pas
une adresse de service. Contactez
d’abord le centre de service cité plus haut.
HOYER Handel GmbH
Tasköprüstraße 3
DE-22761 Hamburg
ALLEMAGNE
FR
27

Inhoud
1. Overzicht ..................................................................................... 28
2. Correct gebruik .................................................................. ..........29
3. Veiligheidsinstructies ...................................................................29
4. Levering ......................................................................................31
5. Apparaat monteren .....................................................................31
6. Bediening ....................................................................................32
6.1 Apparaat in werking zetten en uitschakelen ........................................ 32
6.2 Ventilatorstand instellen .................................................................... 32
6.3 Werkingsduur instellen ..................................................................... 32
6.4 Zwenkfunctie................................................................ ....... ....... ..... 32
7. Reiniging .....................................................................................33
8. Weggooien .............. .......................................... ..........................33
9. Technische gegevens ....................................................................34
10.Garantie van HOYER|Handel GmbH ........................... ..................35
1. Overzicht
1 Torenventilator
2 Uit-toets (OFF)
3 Toets zwenkfunctie
4 Toets 3: sterke ventilatorstand
5 Toets 2: middelste ventilatorstand
6 Draaischakelaar en timer
7 Toets 1: zwakke ventilatorstand
8 Standvoet
9 Uitsparing voor netaansluitsnoer
10 Achterste helft standvoet
11 Voorste helft standvoet
12 Netaansluitsnoer met stekker
13 Vierkantmoer
Zonder afbeelding: 2 kruiskopschroeven
28
NL

Hartelijk dank voor uw
vertrouwen!
Hartelijk gefeliciteerd met uw nieuwe torenventilator.
• Wanneer u het apparaat ooit
aan iemand doorgeeft, dient u
deze handleiding bij te voegen.
De handleiding maakt deel uit
van het product.
Om het apparaat veilig te gebruiken en om
alle functies van het apparaat te leren kennen:
Wij wensen u veel plezier met uw nieuwe torenventilator!
2. Correct gebruik
• Dient u deze handleiding vóór de
eerste ingebruikname grondig
door te lezen.
• Neemt u steeds de veiligheidsinstructies in acht!
• Het apparaat mag alleen worden bediend zoals in deze handleiding wordt beschreven.
• Bewaar deze handleiding goed.
De torenventilator is geschikt voor het doen
circuleren van lucht in droge binnenruimtes.
Het apparaat is ontworpen voor particuliere
huishoudens. Het apparaat mag uitsluitend
binnenshuis worden gebruikt.
Dit apparaat mag niet voor commerciële
doeleinden worden gebruikt.
3. Veiligheidsinstructies
Waarschuwingen
Indien nodig vindt u de volgende waarschuwingen in deze handleiding:
GEVAAR! Hoog risico: het niet in acht nemen van de waarschuwing kan tot letsel
leiden.
WAARSCHUWING! Matig risico: het niet in acht nemen van de waarschuwing kan verwondingen of ernstige materiële schade veroorzaken.
LET OP: gering risic o: het niet in acht nemen van de waarschuwing kan lichte verwondingen of materiële schade veroorzaken.
AANWIJZING: toedrachten en bijzonderheden waarop tijdens het gebruik van het apparaat moet worden gelet.
Instructies voor een veilig gebruik
~
Dit apparaat kan worden gebruikt door kinderen vanaf 8 jaar en
door personen met verminderde fysieke, sensorische of mentale capaciteiten of een gebrek aan ervaring en/of kennis, wanneer zij
onder toezicht staan of met betre kking tot het ve ilige gebruik va n
het apparaat instructies hebben gekregen en de daaruit voortvloeiende risico's hebben begrepen. Kinder en mogen niet m et het apparaat spelen. Reiniging en onderhoud mogen niet door kinder en
uitgevoerd word en, tenzij ze onder toezicht staan.
NL
29

~
Wanneer het netaansluitsnoer van dit apparaat beschadigd is,
moet dit door de fabrikant of diens klantenservice of een gelijkwaardig gekwalific eer de persoon wor den vervangen, om gevaar
te voorkomen.
~
Dit apparaat is niet bedoeld om te gebruiken met een externe tijdschakelklok of een afzonderlijk op afstand bestuurbaar systeem.
het apparaat in dat geval niet meer,
GEVAAR voor kinderen
~ Verpakkingsmateriaal is geen speel-
goed. Kinderen mogen niet met de plastic zakken spelen. Er bestaat
verstikkingsgevaar.
~ Bewaar het apparaat buiten bereik van
kinderen.
GEVAAR voor en door
huis- en gebruiksdieren
~ Er kunnen gevaren voor huis- en ge-
bruiksdieren van elektrische apparaten
uitgaan. Verder kunnen dieren ook
schade aan het apparaat veroorzaken.
Houd dieren daarom altijd uit de buurt
van elektrische apparaten.
GEVAAR van een
elektrische schok door
vocht
~ Het apparaat, het aansluitsnoer en de
stekker mogen niet in water of andere
vloeistoffen worden gedompeld.
~ Bescherm het apparaat tegen vocht,
druppel- of spatwater: anders bestaat er
gevaar voor een elektrische schok.
~ Wanneer er vloeistof in het apparaat te-
rechtkomt, moet de stekk er direct uit het
stopcontact worden getrokken. Voor
een volgende ingebruikname het apparaat laten controleren.
~ Bedien het apparaat niet met vochtige
handen.
~ Mocht het apparaat toch ooit in het wa-
ter vallen, trek dan onmiddellijk de stekker uit het stopcontact en pak daarna
het apparaat pas uit het water. Gebruik
maar laat het door een gespecialiseerd
bedrijf controleren.
GEVAAR door een
elektrische schok
~ Neem het apparaat niet in gebruik,
wanneer het apparaat of het snoer
zichtbaar beschadigd is of wanneer het
apparaat voorheen is gevallen.
~ Sluit de stekker alleen aan op een op de
juiste wijze geïnstalleerd, gemakkelijk
toegankelijk stopcontact, waarvan de
spanning overeenkomt met de gegevens
op het typeplaatje. Het stopcontact
moet ook na het aansluiten gemakkelijk
toegankelijk blijven.
~ Let erop, dat het snoer niet door scher-
pe randen of hete plaatsen kan worden
beschadigd.
~ Let er bij gebruik van het apparaat op,
dat het aansluitsnoer niet vastgeklemd
wordt of bekneld raakt.
~ De stroomtoevoer naar het apparaat is
ook na het uitschakelen niet volledig onderbroken. Hiertoe moet u de stekker uit
het stopcontact trekken.
~ Trek de stekker altijd aan de stekker uit
het stopcontact en nooit aan het snoer.
~ Trek de stekker uit het stopcontact, ...
… wanneer zich een storing voordoet,
… wanneer u het apparaat niet ge-
bruikt,
… voordat u het apparaat reinigt en
… bij onweer.
~ Om gevaar te voorkomen, brengt u
geen veranderingen aan het artikel
aan.
30
NL

~ Wikkel het netsnoer tijdens het gebruik
helemaal af om oververhitting en doorbranden te voorkomen.
~ Wanneer een verlengsnoer wordt ge-
bruikt, moet dit voldoen aan de geldige
veiligheidsbepalingen.
WAARSCHUWING voor
materiële schade
~ Plaats het apparaat nooit op hete op-
pervlakken (bijv. fornuisplaten) of in de
buurt van warmtebronnen of open vuur.
~ Gebruik uitsluitend de originele acces-
soires.
~ Gebruik geen scherpe of schurende
schoonmaakmiddelen.
4. Levering
1 torenventilator|1
1 standvoet (bestaande uit 2 delen)|8
1 vierkantmoer|13
2 kruiskopschroeven
1 gebruiksaanwijzing
Uitpakken
1. Haal alle onderdelen uit de verpakking.
2. Controleer of alle onderdelen volledig
zijn en of ze onbeschadigd zijn.
5. Apparaat monteren
Voordat het apparaat in gebruik kan worden genomen, moet de standvoet|8 erop
worden geschroefd:
1. Afbeelding A: zet de achterste helft
van de standvoet|10 en de voorste
helft van de standvoet|11 in elkaar. Let
erop dat de verbinding hoorbaar vastklikt. Bevestig de beide helften aan de
onderkant met de meegeleverde kruiskopschroeven.
AANWIJZINGEN:
• De achterste helft van de standvoet|10
is te herkennen aan de uitsparing voor
het netaansluitsnoer|9.
• Let erop dat het netaansluitsnoer|12 in
de uitsparing voor het netaansluitsnoer|9
zit.
2. Afbeelding B: draai de vierkantmoer|13 er aan de onderkant van de
ventilator volledig af. Druk het netaansluitsnoer|12 in de uitsparing voor het
netaansluitsnoer|9 in de standvoet|8
en plaats de standvoet op de torenventilator|1.
3. Bevestig de standvoet|8 en de torenventilator|1 met de meegeleverde vierkantmoer|13. Plaats de tor enventilator|1 op
de standvoet|8 en let erop dat deze stabiel staat.
4. Kies een standplaats die voldoet aan
de veiligheidsinstructies (zie “Veiligheidsinstructies” op pagina 29).
5. Steek de stekker|12 in een stopcontact
dat voldoet aan de technische gegevens.
NL
31

6. Bediening
6.1 Apparaat in werking
zetten en uitschakelen
1. Steek de netstekker in een stopcontact
die voldoet aan de technische gegevens.
2. Schakel de stroomvoor-
ziening in door de
draaischakelaar|6 op
ON te zetten.
Het apparaat is nu gereed voor gebruik.
3. Schakel de stroomvoor-
ziening uit door de
draaischakelaar|6 op
OFF te zetten.
6.3 Werkingsduur instellen
Het apparaat heeft een timer , waarmee u de
gewenste looptijd tot en met 120 minuten
kunt instellen. Een instelling tot op de minuut
nauwkeurig is niet mogelijk.
1. Schakel de timer in door
de draaischakelaar|6
op een gewenste stand
tussen 0 en 120 minuten
te zetten. Tegelijkertijd
wordt de stroomvoorziening ingeschakeld.
2. Om de timer uit te schakelen zet u de
draaischakelaar|6 op OFF.
AANWIJZING: wanneer u het apparaat
continu wilt laten werken, moet u de
draaischakelaar|6 op ON zetten.
6.2 V entilatorstand instellen
Met de ventilatorstanden kiest u hoe snel het
apparaat de lucht in de ruimte laat circuleren.
Het apparaat heeft drie ventilatorstanden:
- stand 1, zwak: toets|7 indrukken;
- stand 2, middelst: toets|5 indrukken;
- stand 3, sterk: toets|4 indrukken.
W anneer u de Uit-toets|2 OFF indrukt, stopt
het apparaat met werken.
6.4 Zwenkfunctie
Het apparaat beschikt over een zwenkfunctie.
Deze zorgt ervoor dat het apparaat heen en
weer zwenkt, zodat de uitgeblazen lucht gelijkmatiger over de ruimte wordt verdeeld:
1. Schakel de zwenkfunctie in door de
toets voor de zwenkfunctie|3 in te druk-
ken.
2. Schakel de zwenkfunctie uit door de
toets voor de zwenkfunctie|3 opnieuw
in te drukken.
32
NL

7. Reiniging
8. Weggooien
U moet het apparaat regelmatig reinigen om
lang plezier van uw apparaat te hebben.
GEV AAR door een elektrische
schok!
~ Trek voor elke reiniging de stekker uit
het stopcontact.
~ Dompel het apparaat nooit onder in
water.
~ Laat geen water of reinigingsmiddel in
het apparaat lopen.
WAARSCHUWING voor materiële
schade!
~ Gebruik geen scherpe of schurende
schoonmaakmiddelen.
1. Verwijder grote stofophopingen voorzichtig met een stofzuiger.
2. Reinig de buitenkant van het apparaat
met een vochtige doek. U kunt ook een
beetje afwasmiddel nemen.
3. Afvegen met een doek die vochtig
werd gemaakt met helder water.
4. Gebruik het apparaat pas opnieuw , als
het weer volledig droog is.
Dit product valt onder de Europese richtlijn 2012/19/EU.
Het symbool van de doorgestreepte afvalton op wieltjes
betekent dat het product in de
Europese Unie gescheiden
moet worden wegg egooid. Dat geldt voor het
product en alle met dit symbool aangeduide
accessoires. Aldus aangeduide producten
mogen niet met het normale huisvuil worden
weggegooid, maar moeten bij een innamepunt voor recycling van elektrische en elektronische apparaten worden afgegeven.
Recycling help het verbruik van grondstoffen
te reducer e n en het milieu te ontlasten.
Verpakking
Als u de verpakking wilt weggooien, houdt
u dan aan de betreffende milieuvoorschriften in uw land.
NL
33

9. Technische gegevens
Gebruikte symbolen
Model: STV|50|A1
Netspanning: 220|- 240 V ~ 50/60 Hz
Beschermings-
klasse: II
Vermogen: 50 W
Omschrijving
Maximaal ventilatordebiet
Opgenomen
vermogen
Bedrijfswaarde
Elektriciteitsverbruik in de
stand-by-stand
Geluidsvermogensniveau van
de ventilator
Maximale
luchtsnelheid
Meetnorm voor
bedrijfswaarde
Sym-
bool
F 21,18
P 35,44 W
SV 0,60
P
SB
L
WA
c2,50m/s
IEC 60879:1986
+(cor1:1992)
Waar-
de
Ű
0,50
61,33 dB(A)
Eenheid
3
/min
m
(m3/min)
W
W
Randaarde
Met het CE-keurmerk verklaart
HOYER Handel GmbH de EUconformiteit.
Dit symbool herinnert u eraan om
de verpakking op een milieuvriendelijke manier weg te gooien.
Herbruikbare materialen: karton
(behalve golfkarton)
Technische wijzigingen voorbehouden.
/
34
NL

10.Garantie van
HOYER|Handel GmbH
Geachte klant,
U heeft op dit apparaat 3 jaar garantie vanaf de koopdatum. Wanneer dit product onvolkomenheden vertoont, heeft u wettelijke
rechten ten opzichte van de verkoper van
het product. Deze wettelijke r echten worden
niet beperkt door onze hiernavolgend beschreven garantie.
Garantievoorwaarden
De garantietermijn begint op de koopdatum.
Bewaar de originele kassabon goed. Deze
bon is nodig als bewijs dat u het apparaat
heeft gekocht.
W ann eer zich binnen drie jaar na de koop datum van dit product een materiaal- of fabricagefout voordoet, wordt het pr oduct door
ons – naar onze keus – gratis voor u gerepareerd of vervangen. Deze garantie stelt als
voorwaarde, dat het defecte apparaat en het
koopbewijs (kassabon) binnen de termijn van
drie jaar wordt overlegd en dat er kort schriftelijk wordt beschreven, waaruit de onvolkomenheid bestaat en wanneer deze zich heeft
voorgedaan.
W anneer het defect door onze garantie
wordt gedekt, ontvangt u het gerepareer de
product terug of u krijgt een nieuw exemplaar .
Met reparatie of vervanging van het product
begint geen nieuwe garantieperiode.
Garantieperiode en wettelijke
garantieaanspraken wegens
gebreken
De garantieperiode wordt door de vrijwaring niet verlengd. Dat geldt ook voor vervangen en gerepareerde onderdelen.
Schades en onvolkomenheden die eventueel
al bij de koop aanwezig waren, moeten direct na het uitpakken worden gemeld. Aan
reparaties die zich voordoen na het verstrijken van de garantieperiode zijn kosten verbonden.
Omvang van de garantie
Het apparaat werd zorgvuldig geproduceerd
volgens strenge kwaliteitsrichtlijnen en nauwgezet gecontroleerd vóór leveri ng.
De garantie geldt voor materiaal- of fabricagefouten.
Van de garantie uitgesloten zijn slijtonderdelen die onderhevig zijn aan
normale slijtage en beschadigingen
van breekbare onderdelen, bijv.
schakelaars, accu's, lichtbronnen of
andere onderdelen die van glas zijn
gemaakt.
Deze garantie vervalt, wanneer het product
werd beschadigd of ondeskundig werd gebruikt of onderhouden. V oor een juist gebruik
van het product moeten alle instructies die in
de handleiding staan vermeld, nauwkeurig
worden nageleefd. Gebruiksdoeleinden en
handelingen die in de handleiding worden
afgeraden of waarvoor wordt gewaarschuwd, moeten beslist worden vermeden.
Het product is uitsluitend bedoeld voor particulier gebruik en niet voor commercieel gebruik. Bij een oneigenlijke of ondeskundige
behandeling, bij gebruikmaking van geweld
en bij ingrepen die niet werden uitgevoer d
door ons erkende servicecenter, vervalt de
garantie.
Afhandeling in geval van
garantie
Om een snelle behandeling van uw verzoek
te waarborgen, dient u de volgende aanwijzingen te volgen:
• Houd voor alle aanvragen het artikelnummer IAN: 312846 en de kassabon als bewijs voor de koop bij de
hand.
• Het artikelnummer vindt u op het typeplaatje, ingegraveerd, op de tite lpagina
van uw handleiding (linksonder) of als
sticker op de achter- of onderkant van
het apparaat.
NL
35

• Wanneer zich functiestoringen of ande-
NL
BE
re onvolkomenheden voordoen, neemt u
eerst telefonisch of per e-mail contact op met het hierna genoemde servicecenter.
• Een product dat geregistreerd staat als
defect, kunt u dan met bijvoeging van
de aankoopnota (kassabon) en de vermelding waaruit de onvolkomenheid bestaat en wanneer deze zich heeft
voorgedaan, franco naar het serviceadres sturen dat u is meegedeeld.
Op www.lidl-service.com kunt u
deze en nog veel meer handleidingen, productvideo's en software
downloaden.
Servicecenters
Service Nederland
Tel.: 0900 0400223 (0,10 EUR/Min.)
E-Mail: hoyer@lidl.nl
Service België
Tel.: 070 270 171 (0,15 EUR/Min.)
E-Mail: hoyer@lidl.be
IAN: 312846
Leverancier
Let erop, dat het onderstaande adr es geen
serviceadres is. Neem eerst contact op
met het bovengenoemde servicecenter.
HOYER Handel GmbH
Tasköprüstraße 3
DE-22761 Hamburg
DUITSLAND
36
NL

NL
37

ȆİȡȚİȤȩȝİȞĮ
1. ǼʌȚıțȩʌȘıȘ ..................................................................................................... 38
2. ȋȡȒıȘ ıȪȝijȦȞĮ ȝİ IJȠȞ ʌȡȠȠȡȚıȝȩ............................................................... 39
3. ȅįȘȖȓİȢ ĮıijȐȜİȚĮȢ ........................................................................................... 39
4. ȆİȡȚİȤȩȝİȞĮ ıȣıțİȣĮıȓĮȢ............................................................................... 41
5. ȈȣȞĮȡȝȠȜȩȖȘıȘ ıȣıțİȣȒȢ .............................................................................. 41
6. ȋİȚȡȚıȝȩȢ........................................................................................................... 42
6.1 ĬȑıȘ IJȘȢ ıȣıțİȣȒȢ ıİ ȜİȚIJȠȣȡȖȓĮ țĮȚ ĮʌİȞİȡȖȠʌȠȓȘıȘ........................... 42
6.2 ȇȪșȝȚıȘ ȕĮșȝȓįĮȢ ĮȑȡĮ............................................................................ 42
6.3 ȇȪșȝȚıȘ įȚȐȡțİȚĮȢ ȜİȚIJȠȣȡȖȓĮȢ ................................................................. 42
6.4 ȁİȚIJȠȣȡȖȓĮ ʌİȡȚıIJȡȠijȒȢ ........................................................................... 42
7. ȀĮșĮȡȚıȝȩȢ ....................................................................................................... 43
8. ǹʌȩȡȡȚȥȘ .......................................................................................................... 43
9. ȉİȤȞȚțȐ įİįȠȝȑȞĮ ............................................................................................. 44
10. ǼȖȖȪȘıȘ IJȘȢ İIJĮȚȡȓĮȢ HOYER Handel GmbH ................................................ 45
1. ǼʌȚıțȩʌȘıȘ
1 ǹȞİȝȚıIJȒȡĮȢ
2 ȆȜȒțIJȡȠ ĮʌİȞİȡȖȠʌȠȓȘıȘȢ (OFF)
3 ȆȜȒțIJȡȠ ȜİȚIJȠȣȡȖȓĮȢ ʌİȡȚıIJȡȠijȒȢ
4 ȆȜȒțIJȡȠ 3: ǻȣȞĮIJȒ ȕĮșȝȓįĮ ĮȑȡĮ
5 ȆȜȒțIJȡȠ 2: ȂİıĮȓĮ ȕĮșȝȓįĮ ĮȑȡĮ
6 ȆİȡȚıIJȡİijȩȝİȞȠȢ įȚĮțȩʌIJȘȢ țĮȚ ȤȡȠȞȩȝİIJȡȠ
7 ȆȜȒțIJȡȠ 1: dzʌȚĮ ȕĮșȝȓįĮ ĮȑȡĮ
8 ȆȩįȚ ȑįȡĮıȘȢ
9 ǼıȠȤȒ ȖȚĮ țĮȜȫįȚȠ ȘȜİțIJȡȚțȒȢ ıȪȞįİıȘȢ
10 ȆȓıȦ ȝȚıȩ ȝȑȡȠȢ ʌȠįȚȠȪ ȑįȡĮıȘȢ
11 ȂʌȡȠıIJȚȞȩ ȝȚıȩ ȝȑȡȠȢ ʌȠįȚȠȪ ȑįȡĮıȘȢ
12 ȀĮȜȫįȚȠ ȘȜİțIJȡȚțȒȢ ıȪȞįİıȘȢ ȝİ ijȚȢ įȚțIJȪȠȣ
13 ȋİȚȡȩȕȚįĮ
ȋȦȡȓȢ ĮʌİȚțȩȞȚıȘ: 2 ıIJĮȣȡȩȕȚįİȢ
38
GR

ǼȣȤĮȡȚıIJȠȪȝİ ȖȚĮ IJȘȞ
İȝʌȚıIJȠıȪȞȘ ıĮȢ!
ȈĮȢ ıȣȖȤĮȓȡȠȣȝİ ȖȚĮ IJȘȞ ĮȖȠȡȐ IJȠȣ ȞȑȠȣ
ıĮȢ ĮȞİȝȚıIJȒȡĮ.
• ǹȞ ȤȡİȚĮıIJİȓ ȞĮ ʌĮȡĮįȫıİIJİ IJȘ ıȣıțİȣȒ ıİ IJȡȓIJȠȣȢ, ıȣȝʌİȡȚȜȐȕİIJİ
țĮȚ IJȚȢ ʌĮȡȠȪıİȢ ȠįȘȖȓİȢ ȤȡȒıȘȢ.
ȅȚ ȠįȘȖȓİȢ ȤȡȒıȘȢ ĮʌȠIJİȜȠȪȞ ĮȞĮʌȩıʌĮıIJȠ ȝȑȡȠȢ IJȠȣ ʌȡȠȧȩȞIJȠȢ.
īȚĮ IJȠȞ ĮıijĮȜȒ ȤİȚȡȚıȝȩ țĮȚ ȖȚĮ ȞĮ ȖȞȦȡȓıİIJİ IJȠ ıȪȞȠȜȠ IJȦȞ įȣȞĮIJȠIJȒIJȦȞ IJȘȢ ıȣıțİȣȒȢ:
ǼȣȤȩȝĮıIJİ ȞĮ ĮʌȠȜĮȪıİIJİ IJȠ ȞȑȠ ıĮȢ ĮȞİȝȚıIJȒȡĮ!
2. ȋȡȒıȘ ıȪȝijȦȞĮ ȝİ
• ȆȡȚȞ IJȘȞ ʌȡȫIJȘ șȑıȘ ıİ ȜİȚIJȠȣȡȖȓĮ,
įȚĮȕȐıIJİ ʌȡȠıİțIJȚțȐ ĮȣIJȑȢ IJȚȢ ȠįȘȖȓİȢ ȤȡȒıȘȢ.
• ȉȘȡȒ ıIJ İ ȠʌȦıįȒʌȠIJİ IJȚȢ ȠįȘȖȓİȢ
ĮıijȐȜİȚĮȢ!
• Ǿ ȤȡȒıȘ IJȘȢ ıȣıțİȣȒȢ İʌȚIJȡȑʌİIJĮȚ
ȝȩȞȠ
IJĮȚ ıIJȚȢ ʌĮȡȠȪıİȢ ȠįȘȖȓİȢ ȤȡȒıȘȢ.
• ĭȣȜȐȟIJİ IJȚȢ ȠįȘȖȓİȢ ȤȡȒıȘȢ.
ȝİ IJȠȞ IJȡȩʌȠ ʌȠȣ ʌİȡȚȖȡȐijİ-
ȅ ĮȞİȝȚıIJȒȡĮȢ İȓȞĮȚ țĮIJȐȜȜȘȜȠȢ ȖȚĮ IJȘȞ
ĮȞĮțȓȞȘıȘ IJȠȣ ĮȑȡĮ ıİ ȟȘȡȠȪȢ İıȦIJİȡȚțȠȪȢ ȤȫȡȠȣȢ.
Ǿ ıȣıțİȣȒ ʌȡȠȠȡȓȗİIJĮȚ ȝȩȞȠ ȖȚĮ ȚįȚȦIJȚțȒ
ȠȚțȚĮțȒ ȤȡȒıȘ. Ǿ ȤȡȒıȘ IJȘȢ ıȣıțİȣȒȢ İʌȚIJȡȑʌİIJĮȚ ȝȩȞȠ ıİ İıȦIJİȡȚțȠȪȢ ȤȫȡȠȣȢ.
ǹʌĮȖȠȡİȪİIJĮȚ Ș ȤȡȒıȘ IJȘȢ ıȣıțİȣȒȢ ȖȚĮ
İʌĮȖȖİȜȝĮIJȚțȠȪȢ ıțȠʌȠȪȢ.
IJȠȞ ʌȡȠȠȡȚıȝȩ
3. ȅįȘȖȓİȢ ĮıijȐȜİȚĮȢ
ȆȡȠİȚįȠʌȠȚȒıİȚȢ
ȈIJȚȢ ʌĮȡȠȪıİȢ ȠįȘȖȓİȢ ȤȡȒıȘȢ ȤȡȘıȚȝȠʌȠȚȠȪȞIJĮȚ ȠȚ ĮțȩȜȠȣșİȢ ʌȡȠİȚįȠʌȠȚȒıİȚȢ, ȖȚĮ IJȘȞ ʌİȡȓʌIJȦıȘ ĮȞȐȖțȘȢ:
ȀǿȃǻȊȃȅȈ! ȂİȖȐȜȠȢ țȓȞįȣȞȠȢ: Ș ȝȘ IJȒȡȘıȘ IJȘȢ ʌȡȠİȚįȠʌȠȓȘıȘȢ ȝʌȠȡİȓ ȞĮ ȠįȘȖȒıİȚ ıİ ȕȜȐȕİȢ IJȘȢ ıȦȝĮIJȚțȒȢ ĮțİȡĮȚȩIJȘIJĮȢ țĮȚ IJȘȢ ȗȦȒȢ.
ȆȇȅǼǿǻȅȆȅǿǾȈǾ! ȂȑIJȡȚȠȢ țȓȞįȣȞȠȢ: Ș ȝȘ IJȒȡȘıȘ IJȘȢ ʌȡȠİȚįȠʌȠȓȘıȘȢ ȝʌȠȡİȓ ȞĮ ȠįȘȖȒıİȚ ıİ IJȡĮȣȝĮIJȚıȝȠȪȢ Ȓ ıİ ıȠȕĮȡȑȢ ȣȜȚțȑȢ ȗȘȝȚȑȢ.
ȆȇȅȈȅȋǾ: ȝȚțȡȩȢ țȓȞįȣȞȠȢ: Ș ȝȘ IJȒȡȘıȘ IJȘȢ ʌȡȠİȚįȠʌȠȓȘıȘȢ ȝʌȠȡİȓ ȞĮ ȠįȘȖȒıİȚ
İȜĮijȡȠȪȢ IJȡĮȣȝĮIJȚıȝȠȪȢ Ȓ ȣȜȚțȑȢ ȗȘȝȚȑȢ.
ȊȆȅǻǼǿȄǾ: ʌİȡȚıIJĮIJȚțȐ țĮȚ ȚįȚĮȚIJİȡȩIJȘIJİȢ ʌȠȣ ʌȡȑʌİȚ ȞĮ ȜȐȕİIJİ ȣʌȩȥȘ ȩIJĮȞ ȤİȚȡȓȗİıIJİ
IJȘ ıȣıțİȣȒ.
ıİ
ȅįȘȖȓİȢ ȖȚĮ IJȘȞ ĮıijĮȜȒ ȜİȚIJȠȣȡȖȓĮ
~
Ǿ ıȣıțİȣȒ ĮȣIJȒ ȝʌȠȡİȓ ȞĮ ȤȡȘıȚȝȠʌȠȚȘșİȓ Įʌȩ ʌĮȚįȚȐ ȘȜȚțȓĮȢ
ȐȞȦ IJȦȞ 8 İIJȫȞ, țĮșȫȢ țĮȚ Įʌȩ ȐIJȠȝĮ ȝİ ȝİȚȦȝȑȞİȢ ıȦȝĮIJȚțȑȢ,
ĮȚıșȘIJȒȡȚİȢ Ȓ įȚĮȞȠȘIJȚțȑȢ ȚțĮȞȩIJȘIJİȢ Ȓ/țĮȚ Įʌȩ ȐIJȠȝĮ ȤȦȡȓȢ
İȝʌİȚȡȓĮ Ȓ/țĮȚ ȖȞȫıȘ ȝȩȞȠ İȐȞ İʌȚȕȜȑʌȠȞIJĮȚ Ȓ țĮșȠįȘȖȠȪȞIJĮȚ ȖȚĮ
IJȘȞ ĮıijĮȜȒ ȤȡȒıȘ IJȘȢ ıȣıțİȣȒȢ țĮȚ ȑȤȠȣȞ țĮIJĮȞȠȒıİȚ IJȠȣȢ țȚȞįȪȞȠȣȢ ʌȠȣ İȞȑȤİȚ
șĮ ʌȡȑʌİȚ ȞĮ ȤȡȘıȚȝȠʌȠȚİȓIJĮȚ Įʌȩ IJĮ ʌĮȚįȚȐ ȦȢ ʌĮȚȤȞȓįȚ. ȅȅ țĮ-
Ș ȤȡȒıȘ IJȘȢ ıȣıțİȣȒȢ ĮȣIJȒȢ. Ǿ ıȣıțİȣȒ įİȞ
GR
39

șĮȡȚıȝȩȢ țĮȚ Ș ıȣȞIJȒȡȘıȘ ȤȡȒıIJȘ įİȞ İʌȚIJȡȑʌİIJĮȚ ȞĮ įȚİȟȐȖȠȞIJĮȚ
Įʌȩ ʌĮȚįȚȐ, İțIJȩȢ țĮȚ ĮȞ ĮȣIJȐ İʌȚIJȘȡȠȪȞIJĮȚ.
~
ǵIJĮȞ ȣʌȠıIJİȓ ȕȜȐȕȘ IJȠ țĮȜȫįȚȠ ȘȜİțIJȡȚțȒȢ ıȪȞįİıȘȢ IJȘȢ ıȣıțİȣȒȢ ĮȣIJȒȢ, ĮʌĮȚIJİȓIJĮȚ Ș ĮȞIJȚțĮIJȐıIJĮıȘ Įʌȩ IJȠȞ țĮIJĮıțİȣĮıIJȒ
Ȓ Įʌȩ IJȠ ȀȑȞIJȡȠ ȈȑȡȕȚȢ Ȓ Įʌȩ țȐʌȠȚȠ ȐIJȠȝȠ ȝİ ʌĮȡȩȝȠȚĮ ʌȡȠıȩȞIJĮ, ȫıIJİ ȞĮ ĮʌȠijİȣȤșȠȪȞ ȠȚ țȓȞįȣȞȠȚ.
~
Ǿ ıȣıțİȣȒ ĮȣIJȒ įİȞ ʌȡȠȠȡȓȗİIJĮȚ ȖȚĮ IJȘ ȜİȚIJȠȣȡȖȓĮ ȝİ İȟȦIJİȡȚțȩ
ȤȡȠȞȠįȚĮțȩʌIJȘ Ȓ ȝİ ȟİȤȦȡȚıIJȩ ıȪıIJȘȝĮ IJȘȜİȤİȚȡȚıȝȠȪ.
IJȠ ijȚȢ įȚțIJȪȠȣ țĮȚ ıIJȘ ıȣȞȑȤİȚĮ ȕȖȐȜIJİ
ȀǿȃǻȊȃȅȈ ȖȚĮ ʌĮȚįȚȐ
~ ȉĮ ȣȜȚțȐ ıȣıțİȣĮıȓĮȢ įİȞ İȓȞĮȚ ʌĮȚȤȞȓ-
įȚĮ ȖȚĮ ʌĮȚįȚȐ. ȉĮ ʌĮȚįȚȐ ĮʌĮȖȠȡİȪİIJĮȚ
ȞĮ ʌĮȓȗȠȣȞ ȝİ IJȚȢ ʌȜĮıIJȚțȑȢ ıĮțȠȪȜİȢ.
ȊijȓıIJĮIJĮȚ țȓȞįȣȞȠȢ ĮıijȣȟȓĮȢ.
~ ĭȣȜȐȟIJİ IJȘ ıȣıțİȣȒ ȝĮțȡȚȐ Įʌȩ IJĮ
ʌĮȚįȚȐ.
ȀǿȃǻȊȃȅȈ ȖȚĮ țĮȚ Įʌȩ
țĮIJȠȚțȓįȚĮ ȗȫĮ țĮȚ ȗȫ Į
İțȝİIJȐȜȜİȣıȘȢ
~ ȅȚ ȘȜİțIJȡȚțȑȢ ıȣıțİȣȑȢ ȝʌȠȡİȓ ȞĮ
ĮʌȠIJİȜȑıȠȣȞ ʌȘȖȒ țȚȞįȪȞȦȞ ȖȚĮ țĮIJȠȚțȓįȚĮ ȗȫĮ țĮȚ ȗȫĮ İțȝİIJȐȜȜİȣıȘȢ. ǼʌȓıȘȢ, IJĮ ȗȫĮ ȝʌȠȡİȓ ȞĮ ʌȡȠțĮȜȑıȠȣȞ
ȗȘȝȚȐ ıIJȘ ıȣıțİȣȒ. īȚĮ IJȠ ȜȩȖȠ ĮȣIJȩ
ʌȡȑʌİȚ ȖİȞȚțȐ ȞĮ ʌĮȡĮȝȑȞȠȣȞ ȝĮțȡȚȐ
Įʌȩ ȘȜİțIJȡȚțȑȢ ıȣıțİȣȑȢ.
ȀǿȃǻȊȃȅȈ ȘȜİțIJȡȠʌȜȘȟȓĮȢ
ȜȩȖȦ ȣȖȡĮıȓĮȢ
~ ǹʌĮȖȠȡİȪİIJĮȚ Ș ȕȪșȚıȘ IJȘȢ ıȣıțİȣȒȢ,
IJȠȣ țĮȜȦįȓȠȣ țĮȚ IJȠȣ ijȚȢ įȚțIJȪȠȣ ıİ
Ȟİȡȩ Ȓ ȐȜȜĮ ȣȖȡȐ.
~ ȆȡȠıIJĮIJȑȥIJİ IJȘ ıȣıțİȣȒ Įʌȩ ȣȖȡĮıȓĮ
țĮȚ Ȟİȡȩ ʌȠȣ ıIJȐȗİȚ Ȓ ȥİțȐȗİIJĮȚ: ȣijȓıIJĮIJĮȚ țȓȞįȣȞȠȢ ȘȜİțIJȡȠʌȜȘȟȓĮȢ.
~
Ȉİ ʌİȡȓʌIJȦıȘ ʌȠȣ İȚıȤȦȡȒıİȚ ȣȖȡȩ ıIJȘ
ıȣıțİȣȒ, ĮijĮȚȡȑıIJİ ĮȝȑıȦȢ IJȠ ijȚȢ įȚțIJȪȠȣ. ȆȡȚȞ Įʌȩ IJȘȞ İț ȞȑȠȣ șȑıȘ ıİ ȜİȚIJȠȣȡȖȓĮ ĮȞĮșȑıIJİ IJȠȞ ȑȜİȖȤȠ IJȘȢ ıȣıțİȣȒȢ.
~ ȂȘ ȤİȚȡȓȗİıIJİ IJȘ ıȣıțİȣȒ ȝİ ȕȡİȖȝȑȞĮ
ȤȑȡȚĮ.
~ Ȉİ ʌİȡȓʌIJȦıȘ ʌȠȣ Ș ıȣıțİȣȒ ʌȑıİȚ
ȝȑıĮ ıIJȠ Ȟİȡȩ, ĮʌȠıȣȞįȑıIJİ ĮȝȑıȦȢ
IJȘ ıȣıțİȣȒ Įʌȩ IJȠ Ȟİȡȩ. ǹȞ ıȣȝȕİȓ
țȐIJȚ IJȑIJȠȚȠ, ȝȘȞ ȟĮȞĮȤȡȘıȚȝȠʌȠȚȒıİIJİ
IJȘ ıȣıțİȣȒ, ʌĮȡȐ įȫıIJİ IJȘ ȖȚĮ ȑȜİȖȤȠ
ıİ ȑȞĮ İȟİȚįȚțİȣȝȑȞȠ ıȣȞİȡȖİȓȠ.
ȀǿȃǻȊȃȅȈ ȘȜİțIJȡȠʌȜȘȟȓĮȢ
~ ȂȘ șȑIJİIJİ IJȘ ıȣıțİȣȒ ıİ ȜİȚIJȠȣȡȖȓĮ, ĮȞ
Ș ȓįȚĮ Ș ıȣıțİȣȒ Ȓ IJȠ țĮȜȫįȚȠ įȚțIJȪȠȣ
ʌĮȡȠȣıȚȐȗȠȣȞ İȝijĮȞİȓȢ ȗȘȝȚȑȢ Ȓ ĮȞ Ș
ıȣıțİȣȒ ȑȤİȚ ʌȡȠȘȖȠȣȝȑȞȦȢ ʌȑıİȚ țȐIJȦ.
~
ȈȣȞįȑıIJİ IJȠ ijȚȢ įȚțIJȪȠȣ ȝȩȞȠ ıİ ʌȡȓȗĮ
ʌȠȣ ȑȤİȚ İȖțĮIJĮıIJĮșİȓ țĮȞȠȞȚțȐ, İȓȞĮȚ İȪțȠȜĮ ʌȡȠıȕȐıȚȝȘ țĮȚ Ș IJȐıȘ IJȘȢ ĮȞIJȚıIJȠȚȤİȓ ıIJȘȞ IJȐıȘ IJȘȢ ʌȚȞĮțȓįĮȢ IJȪʌȠȣ. Ǿ
ʌȡȓȗĮ ʌȡȑʌİȚ ȞĮ ıȣȞİȤȓıİȚ ȞĮ İȓȞĮȚ İȪțȠȜĮ
ʌȡȠıȕȐıȚȝȘ țĮȚ ȝİIJȐ IJȘ ıȪȞįİıȘ.
~ ĭȡȠȞIJȓıIJİ ȫıIJİ IJȠ țĮȜȫįȚȠ įȚțIJȪȠȣ ȞĮ
ȝȘȞ ȝʌȠȡİȓ ȞĮ ȣʌȠıIJİȓ ȗȘȝȚȑȢ Įʌȩ ĮȚȤȝȘȡȑȢ ĮțȝȑȢ Ȓ țĮȣIJȑȢ ʌİȡȚȠȤȑȢ.
ȀĮIJȐ IJȘ ȤȡȒıȘ IJȘȢ ıȣıțİȣȒȢ ʌȡȠıȑȤİIJİ
~
ȫıIJİ IJȠ țĮȜȫįȚȠ ȘȜİțIJȡȚțȒȢ ıȪȞįİıȘȢ
ȞĮ ȝȘȞ İȓȞĮȚ ȝĮȖțȦȝȑȞȠ Ȓ ʌȚİıȝȑȞȠ.
~ ǹțȩȝȘ țĮȚ ȝİIJȐ IJȘȞ ĮʌİȞİȡȖȠʌȠȓȘıȘ Ș
ıȣıțİȣȒ įİȞ İȓȞĮȚ İȞIJİȜȫȢ ĮʌȠȝȠȞȦȝȑȞȘ Įʌȩ IJȠ ȘȜİțIJȡȚțȩ įȓțIJȣȠ. īȚĮ ȞĮ IJȠ
İʌȚIJȪȤİIJİ ĮȣIJȩ, ȕȖȐȜIJİ IJȠ ijȚȢ įȚțIJȪȠȣ
Įʌȩ IJȘȞ ʌȡȓȗĮ.
~ īȚĮ ȞĮ ȕȖȐȜİIJİ IJȠ ijȚȢ įȚțIJȪȠȣ Įʌȩ IJȘȞ
ʌȡȓȗĮ, IJȡĮȕȐIJİ ʌȐȞIJĮ Įʌȩ IJȠ ijȚȢ, ʌȠIJȑ
Įʌȩ IJȠ țĮȜȫįȚȠ.
40
GR

~
ǺȖȐȗİIJİ IJȠ ijȚȢ įȚțIJȪȠȣ Įʌȩ IJȘȞ ʌȡȓȗĮ,…
… ıİ ʌİȡȓʌIJȦıȘ ʌȠȣ İȝijĮȞȚıIJİȓ ȕȜȐȕȘ,
… ȩIJĮȞ įİ ȤȡȘıȚȝȠʌȠȚİȓIJİ IJȘ ıȣıțİȣȒ,
… ʌȡȚȞ IJȠȞ țĮșĮȡȚıȝȩ IJȘȢ ıȣıțİȣȒȢ
… ıİ ʌİȡȓʌIJȦıȘ țĮIJĮȚȖȓįĮȢ.
~ ȆȡȠȢ ĮʌȠijȣȖȒ țȚȞįȪȞȦȞ, ȝȘȞ ʌȡĮȖȝĮ-
IJȠʌȠȚİȓIJİ ĮȜȜĮȖȑȢ ıIJȠ ʌȡȠȧȩȞ.
~ ȀĮIJȐ IJȘ ȜİȚIJȠȣȡȖȓĮ ȟİIJȣȜȓȖİIJİ IJİȜİȓȦȢ
IJȠ țĮȜȫįȚȠ IJȡȠijȠįȠıȓĮȢ, ʌȡȠȢ ĮʌȠijȣȖȒ ȣʌİȡșȑȡȝĮȞıȘȢ țĮȚ țĮȥȓȝĮIJȠȢ.
~ ȀĮIJȐ IJȘ ȤȡȒıȘ ȝȚĮȢ ʌȡȠȑțIJĮıȘȢ țĮȜȦ-
įȓȠȣ, Ș ʌȡȠȑțIJĮıȘ ĮȣIJȒ șĮ ʌȡȑʌİȚ
ĮȞIJĮʌȠțȡȓȞİIJĮȚ ıIJȚȢ ȚıȤȪȠȣıİȢ įȚĮIJȐȟİȚȢ ĮıijĮȜİȓĮȢ.
ȞĮ
ȆȇȅǼǿǻȅȆȅǿǾȈǾ ȖȚĮ ȣȜȚțȑȢ ȗȘȝȚȑȢ
~ ȂȘȞ IJȠʌȠșİIJİȓIJİ IJȘ ıȣıțİȣȒ ʌȠIJȑ
ʌȐȞȦ ıİ țĮȣIJȑȢ İʌȚijȐȞİȚİȢ (ʌ.Ȥ. İıIJȓİȢ
țȠȣȗȓȞĮȢ) Ȓ țȠȞIJȐ ıİ ʌȘȖȑȢ șİȡȝȩIJȘIJĮȢ
Ȓ ĮȞȠȚȤIJȒ ijȦIJȚȐ.
~ ȋȡȘıȚȝȠʌȠȚİȓIJİ ȝȩȞȠ ĮȣșİȞIJȚțȐ ĮȞIJĮȜ-
ȜĮțIJȚțȐ.
~ ȂȘ ȤȡȘıȚȝȠʌȠȚİȓIJİ ȚıȤȣȡȐ ȝȑıĮ țĮșĮ-
ȡȚıȝȠȪ Ȓ ȝȑıĮ țĮșĮȡȚıȝȠȪ ʌȠȣ ȝʌȠȡİȓ
ȞĮ ȖȡĮIJȗȠȣȞȓıȠȣȞ IJȘȞ İʌȚijȐȞİȚĮ IJȠȣ
ʌȡȠȧȩȞIJȠȢ.
4. ȆİȡȚİȤȩȝİȞĮ
ıȣıțİȣĮıȓĮȢ
1 ĮȞİȝȚıIJȒȡĮȢ 1
1 ʌȩįȚ ȑįȡĮıȘȢ (ĮʌȠIJİȜİȓIJĮȚ Įʌȩ 2 ȝȑȡȘ) 8
1 ȤİȚȡȩȕȚįĮ 13
2 ıIJĮȣȡȩȕȚįİȢ
1 ȠįȘȖȓİȢ ȤİȚȡȚıȝȠȪ
ǹijĮȓȡİıȘ ıȣıțİȣĮıȓĮȢ
1. ǹijĮȚȡȑıIJİ ȩȜĮ IJĮ İȟĮȡIJȒȝĮIJĮ Įʌȩ IJȘ
ıȣıțİȣĮıȓĮ.
2. ǼȜȑȖȟIJİ ĮȞ ʌĮȡĮȜȐȕĮIJİ ȩȜĮ IJĮ IJȝȒȝĮ-
IJĮ țĮȚ ĮȞ ȩȜĮ IJĮ IJȝȒȝĮIJĮ İȓȞĮȚ ıİ ȐȥȠȖȘ țĮIJȐıIJĮıȘ.
5. ȈȣȞĮȡȝȠȜȩȖȘıȘ
ıȣıțİȣȒȢ
ȆȡȚȞ ȝʌȠȡȑıİȚ Ș ıȣıțİȣȒ ȞĮ IJİșİȓ ıİ ȜİȚIJȠȣȡȖȓĮ, ʌȡȑʌİȚ ȞĮ ȕȚįȦșİȓ IJȠ ʌȩįȚ ȑįȡĮıȘȢ 8:
1. ǼȚțȩȞĮ A: IJȠʌȠșİIJȒıIJİ ȝĮȗȓ IJȠ ʌȓıȦ
ȝȚıȩ ʌȠįȚȠȪ ȑįȡĮıȘȢ 10 țĮȚ IJȠ ȝʌȡȠıIJȚȞȩ ȝȚıȩ ʌȠįȚȠȪ ȑįȡĮıȘȢ 11. ĭȡȠȞIJȓıIJİ ȫıIJİ Ș ıȪȞįİıȘ ȞĮ ĮıijĮȜȓıİȚ
țȐȞȠȞIJĮȢ șȩȡȣȕȠ. ȈIJİȡİȫıIJİ IJĮ įȪȠ
ȝȚıȐ Įʌȩ țȐIJȦ ȝİ
ıIJĮȣȡȩȕȚįİȢ.
ȊȆȅǻǼǿȄǼǿȈ:
• ȉȠ ʌȓıȦ ȝȚıȩ ʌȠįȚȠȪ ȑįȡĮıȘȢ 10 IJȠ
ĮȞĮȖȞȦȡȓȗİIJİ Įʌȩ IJȘȞ İıȠȤȒ ȖȚĮ țĮȜȫįȚȠ ȘȜİțIJȡȚțȒȢ ıȪȞįİıȘȢ 9.
• ĭȡȠȞIJȓıIJİ ȫıIJİ IJȠ țĮȜȫįȚȠ ȘȜİțIJȡȚ-
țȒȢ ıȪȞįİıȘȢ 12 ȞĮ ȕȡȓıțİIJĮȚ ıIJȘȞ İıȠȤȒ ȖȚĮ țĮȜȫįȚȠ ȘȜİțIJȡȚțȒȢ ıȪȞįİıȘȢ 9.
2. ǼȚțȩȞĮ B: ȟİȕȚįȫıIJİ IJİȜİȓȦȢ IJȘ ȤİȚȡȩ-
ȕȚįĮ 13 țȐIJȦ Įʌȩ IJȠȞ ĮȞİȝȚıIJȒȡĮ.
ȆȚȑıIJİ IJȠ țĮȜȫįȚȠ ȘȜİțIJȡȚțȒȢ ıȪȞįİıȘȢ 12 ıIJȘȞ țȠȚȜȩIJȘIJĮ ȖȚĮ IJȠ țĮȜȫįȚȠ
ȘȜİțIJȡȚțȒȢ ıȪȞįİıȘȢ 9 ıIJȠ ʌȩįȚ ȑįȡĮıȘȢ 8 țĮȚ IJȠʌȠșİIJȒıIJİ IJȠ ʌȩįȚ ȑįȡĮıȘȢ ıIJȠȞ ĮȞİȝȚıIJȒȡĮ 1.
3. ȈIJİȡİȫıIJİ IJȠ ʌȩįȚ ȑįȡĮıȘȢ
ĮȞİȝȚıIJȒȡĮ 1 ȝİ IJȘ ȤİȚȡȩȕȚįĮ 13 ʌȠȣ
ȣʌȐȡȤİȚ ıIJȘ ıȣıțİȣĮıȓĮ. ȉȠʌȠ șİ IJȒ ıIJİ IJȠȞ ĮȞİȝȚıIJȒȡĮ 1 ıIJȠ ʌȩįȚ ȑįȡĮıȘȢ 8 țĮȚ ȕİȕĮȚȦșİȓIJİ ȩIJȚ ȑȤİȚ țĮȜȒ
İȣıIJȐșİȚĮ.
4. ǼʌȚȜȑȟIJİ ȑȞĮ ȝȑȡȠȢ ʌȠȣ ȞĮ ĮȞIJĮʌȠțȡȓȞİIJĮȚ ıIJȚȢ ȣʌȠįİȓȟİȚȢ ĮıijȐȜİȚĮȢ (ȕȜȑʌİ “ȅįȘȖȓİȢ ĮıijȐȜİȚĮȢ” ıİȜȓįĮ 39).
5. ǼȚıȐȖİIJİ IJȠ ijȚȢ įȚțIJȪȠȣ 12 ıİ
ȗĮ įȚțIJȪȠȣ ʌȠȣ ĮȞIJĮʌȠțȡȓȞİIJĮȚ ıIJĮ IJİȤȞȚțȐ įİįȠȝȑȞĮ.
IJȚȢ ĮʌİıIJĮȜȝȑȞİȢ
8 țĮȚ IJȠȞ
ȝȚĮ ʌȡȓ-
GR
41

6. ȋİȚȡȚıȝȩȢ
6.3 ȇȪșȝȚıȘ įȚȐȡțİȚĮȢ
ȜİȚIJȠȣȡȖȓĮȢ
6.1 ĬȑıȘ IJȘȢ ıȣıțİȣȒȢ ıİ
ȜİȚIJȠȣȡȖȓĮ țĮȚ
ĮʌİȞİȡȖȠʌȠȓȘıȘ
1. ǼȚıȐȖİIJİ IJȠ ȕȪıȝĮ ıİ ȘȜİțIJȡȚțȒ ʌȡȓȗĮ,
Ș ȠʌȠȓĮ ĮȞIJĮʌȠțȡȓȞİIJĮȚ ıIJĮ IJİȤȞȚțȐ
įİįȠȝȑȞĮ.
2. ǼȞİȡȖȠʌȠȚİȓIJİ IJȘȞ IJȡȠ-
ijȠįȠıȓĮ ȡİȪȝĮIJȠȢ ȝİIJĮțȚȞȫȞIJĮȢ IJȠȞ
ʌİȡȚıIJȡİijȩȝİȞȠ įȚĮțȩʌIJȘ 6 ıIJȘ șȑıȘ ON.
ȈIJȠ ıȘȝİȓȠ ĮȣIJȩ, Ș ıȣıțİȣȒ ȕȡȓıțİIJĮȚ ıİ țĮIJȐıIJĮıȘ ȜİȚIJȠȣȡȖȚțȒȢ İIJȠȚȝȩIJȘIJĮȢ.
3. ǹʌİȞİȡȖȠʌȠȚİȓIJİ IJȘȞ
IJȡȠijȠįȠıȓĮ ȡİȪȝĮIJȠȢ
ȝİIJĮțȚȞȫȞIJĮȢ IJȠȞ ʌİȡȚıIJȡİijȩȝİȞȠ įȚĮțȩʌIJȘ 6
ıIJȘ șȑıȘ OFF.
6.2 ȇȪșȝȚıȘ ȕĮșȝȓįĮȢ ĮȑȡĮ
Ǿ ıȣıțİȣȒ įȚĮșȑIJİȚ ȑȞĮ ȤȡȠȞȩȝİIJȡȠ, ȝİ IJȠ
ȠʌȠȓȠ ȝʌȠȡİȓIJİ ȞĮ ȡȣșȝȓȗİIJİ IJȘȞ İʌȚșȣȝȘIJȒ
įȚȐȡțİȚĮ ȜİȚIJȠȣȡȖȓĮȢ ȑȦȢ țĮȚ 120 ȜİʌIJȐ. Ǿ
ȡȪșȝȚıȘ ȝİ ĮțȡȓȕİȚĮ ȜİʌIJȠȪ įİȞ İȓȞĮȚ įȣȞĮIJȒ.
1. ǼȞİȡȖȠʌȠȚȒıIJİ IJȠȞ
ȤȡȠȞȠįȚĮțȩʌIJȘ, șȑIJȠȞIJĮȢ IJȠȞ ʌİȡȚıIJȡȠijȚțȩ
įȚĮțȩʌIJȘ 6 ıİ ȩʌȠȚĮ
șȑıȘ İʌȚșȣȝİȓIJİ ȝİIJĮȟȪ
0 țĮȚ 120 ȜİʌIJȫȞ. ȉĮȣ IJȩȤȡȠȞĮ İȞİȡȖȠʌȠȚİȓIJĮȚ Ș ȘȜİțIJȡȚțȒ
IJȡȠijȠįȠıȓĮ.
īȚĮ IJȘȞ ĮʌİȞİȡȖȠʌȠȓȘıȘ IJȠȣ ȤȡȠȞȠȝȑ-
2.
IJȡȠȣ, ȡȣșȝȓıIJİ IJȠȞ ʌİȡȚıIJȡİijȩȝİȞȠ
įȚĮțȩʌIJȘ 6 ıIJȘ șȑıȘ OFF.
ȊȆOǻǼǿȄǾ: ǼȐȞ İʌȚșȣȝİȓIJİ ȞĮ ȡȣșȝȓıİIJİ
IJȘ ıȣıțİȣȒ ıİ ȜİȚIJȠȣȡȖȓĮ įȚĮȡțİȓĮȢ, ʌȡȑʌİȚ ȞĮ ȡȣșȝȓıİIJİ IJȠȞ ʌİȡȚıIJȡİijȩȝİȞȠ įȚĮțȩʌIJȘ 6 ıIJȘ șȑıȘ ON.
Ȃİ IJȚȢ ȕĮșȝȓįİȢ ĮȑȡĮ ȝʌȠȡİȓIJİ ȞĮ İʌȚȜȑȟİIJİ
ʌȩıȠ ȖȡȒȖȠȡĮ șĮ ĮȜȜȐȗİȚ Ș ıȣıțİȣȒ IJȠȞ
ĮȑȡĮ ȝȑıĮ ıİ ȑȞĮ ȤȫȡȠ.
Ǿ ıȣıțİȣȒ įȚĮșȑIJİȚ IJȡİȚȢ ȕĮșȝȓįİȢ ĮȑȡĮ:
- ǺĮșȝȓįĮ 1, ȒʌȚĮ: ȆĮIJȒıIJİ IJȠ ʌȜȒțIJȡȠ 7.
- ǺĮșȝȓįĮ 2, ȝİıĮȓĮ: ȆĮIJȒıIJİ IJȠ ʌȜȒțIJȡȠ 5.
- ǺĮșȝȓįĮ 3, įȣȞĮIJȒ: ȆĮIJȒıIJİ IJȠ ʌȜȒțIJȡȠ 4.
ǵIJĮȞ ʌĮIJȒıIJİ IJȠ
ıȘȢ 2 OFF, ıIJĮȝĮIJȐİȚ Ș ȜİȚIJȠȣȡȖȓĮ IJȘȢ ıȣıțİȣȒȢ.
ʌȜȒțIJȡȠ ĮʌİȞİȡȖȠʌȠȓȘ-
6.4 ȁİȚIJȠȣȡȖȓĮ ʌİȡȚıIJȡȠijȒȢ
Ǿ ıȣıțİȣȒ įȚĮșȑIJİȚ ȜİȚIJȠȣȡȖȓĮ ʌİȡȚıIJȡȠijȒȢ.
Ǿ ȜİȚIJȠȣȡȖȓĮ ĮȣIJȒ ijȡȠȞIJȓȗİȚ ȖȚĮ IJȘȞ ʌİȡȚıIJȡȠijȒ IJȘȢ ıȣıțİȣȒȢ țĮȚ ıȣȞİʌȫȢ ȖȚĮ IJȘȞ
ȠȝȠȚȩȝȠȡijȘ țĮIJĮȞȠȝȒ IJȠȣ İȟİȡȤȩȝİȞȠȣ
ĮȑȡĮ ȝȑıĮ ıIJȠ ȤȫȡȠ:
1. ǼȞİȡȖȠʌȠȚȒıIJİ IJȘ ȜİȚIJȠȣȡȖȓĮ ʌİȡȚıIJȡȠijȒȢ, ʌȚȑȗȠȞIJĮȢ IJȠ ʌȜȒțIJȡȠ ȜİȚIJȠȣȡȖȓĮȢ ʌİȡȚıIJȡȠijȒȢ 3.
2. ǹʌİȞİȡȖȠʌȠȚȒıIJİ IJȘ ȜİȚIJȠȣȡȖȓĮ ʌİȡȚıIJȡȠijȒȢ, ʌȚȑȗȠȞIJĮȢ İț ȞȑȠȣ IJȠ ʌȜȒ
țIJȡȠ ȜİȚIJȠȣȡȖȓĮȢ ʌİȡȚıIJȡȠijȒȢ 3.
-
42
GR

7. ȀĮșĮȡȚıȝȩȢ
8. ǹʌȩȡȡȚȥȘ
īȚĮ ȞĮ ȤĮȡİȓIJİ ʌȠȜȜȐ ȤȡȩȞȚĮ IJȘ ıȣıțİȣȒ
ıĮȢ, șĮ ʌȡȑʌİȚ ȞĮ IJȘȞ țĮșĮȡȓȗİIJİ IJĮțIJȚțȐ.
ȀǿȃǻȊȃȅȈ ȘȜİțIJȡȠʌȜȘȟȓĮȢ!
~ ǹʌȠıȣȞįȑİIJİ ʌȡȚȞ Įʌȩ țȐșİ țĮșĮȡȚ-
ıȝȩ IJȠ ȕȪıȝĮ.
~ ȂȘȞ ȕȣșȓȗİIJİ ʌȠIJȑ IJȘ ıȣıțİȣȒ ȝȑıĮ ıİ
Ȟİȡȩ.
~ ȂȘȞ ĮijȒȞİIJİ ȞĮ İȚıȤȦȡİȓ ıIJȘ ıȣıțİȣȒ
Ȟİȡȩ Ȓ ĮʌȠȡȡȣʌĮȞIJȚțȐ.
ȆȇȅǼǿǻȅȆȅǿǾȈǾ ȖȚĮ ȣȜȚțȑȢ ȗȘȝȚȑȢ!
~ ȂȘ ȤȡȘıȚȝȠʌȠȚİȓIJİ ȚıȤȣȡȐ ȝȑıĮ țĮșĮ-
ȡȚıȝȠȪ Ȓ ȝȑıĮ țĮșĮȡȚıȝȠȪ ʌȠȣ ȝʌȠȡİȓ
ȞĮ ȖȡĮIJȗȠȣȞȓıȠȣȞ IJȘȞ İʌȚijȐȞİȚĮ IJȠȣ
ʌȡȠȧȩȞIJȠȢ.
1. ǹʌȠȝĮțȡȪȞİIJİ ȝİȖȐȜİȢ ĮʌȠșȑıİȚȢ
ıțȩȞȘȢ ʌȡȠıİțIJȚțȐ ȝİ ȘȜİțIJȡȚțȒ
ıțȠȪʌĮ.
2. ȀĮșĮȡȓȗİIJİ IJȘ ıȣıțİȣȒ İȟȦIJİȡȚțȐ ȝİ
ȑȞĮ ȞȦʌȩ ʌĮȞȓ. ȂʌȠȡİȓIJİ ȞĮ ȤȡȘıȚȝȠʌȠȚȒıİIJİ İʌȓıȘȢ țĮȚ ȜȓȖȠ ĮʌȠȡȡȣʌĮȞIJȚțȩ ʌȚȐIJȦȞ.
3. ȀĮșĮȡȓıIJİ ȝİ ȑȞĮ ʌĮȞȓ, IJȠ ȠʌȠȓȠ ȑȤİIJİ
ȣȖȡȐȞİȚ ȝİ țĮșĮȡȩ Ȟİȡȩ.
4. ĬĮ ʌȡȑʌİȚ ȞĮ ȤȡȘıȚȝȠʌȠȚİȓIJİ IJȘ ıȣıțİȣȒ ȟĮȞȐ, ȝȩȞȠ ȩIJĮȞ ıIJİȖȞȫȞİȚ
İȞIJİȜȫȢ.
ȉȠ ʌȡȠȧȩȞ ĮȣIJȠ ȣʌȩțİȚIJĮȚ
ıIJȘȞ ǼȣȡȦʌĮȧțȒ ȅįȘȖȓĮ
2012/19/EǼ. ȉȠ ıȪȝȕȠȜȠ ȝİ
IJȠ įȚĮȖȡĮȝȝȑȞȠ țȐįȠ ĮʌȠȡȡȚȝȝȐIJȦȞ ʌȐȞȦ ıİ IJȡȠȤȠȪȢ
ıȘȝĮȓȞİȚ ȩIJȚ IJȠ ʌȡȠȧȩȞ ʌȡȑʌİȚ ȞĮ ȠįȘȖȘșİȓ ıİ ȟİȤȦȡȚıIJȒ ıȣȜȜȠȖȒ
ĮʌȠȡȡȚȝȝȐIJȦȞ ıȪȝijȦȞĮ ȝİ IJȘȞ ǼȣȡȦʌĮȧțȒ DzȞȦıȘ. ȉȠ ȓįȚȠ ȚıȤȪİȚ ȖȚĮ IJȠ ʌȡȠȧȩȞ țĮȚ
ȩȜĮ IJĮ İȟĮȡIJȒȝĮIJĮ ȝİ IJȠ ıȪȝȕȠȜȠ
İʌȚıȘȝĮıȝȑȞĮ ʌȡȠȧȩȞIJĮ ĮʌĮȖȠȡİȪİIJĮȚ ȞĮ
ĮʌȠȡȡȚijșȠȪȞ ȝĮȗȓ ȝİ IJĮ ȠȚțȚĮțȐ ĮʌȠȡȡȓȝȝĮIJĮ, ĮȜȜȐ ʌȡȑʌİȚ ȞĮ ʌĮȡĮįȠșȠȪȞ ıİ ȝȓĮ
șȑıȘ ıȣȜȜȠȖȒȢ ȖȚĮ IJȘȞ ĮȞĮțȪțȜȦıȘ ȘȜİțIJȡȚțȫȞ țĮȚ ȘȜİțIJȡȠȞȚțȫȞ ıȣıțİȣȫȞ. Ǿ
ĮȞĮțȪțȜȦıȘ ıȣȝȕȐȜȜİȚ ıIJȘ ȝİȓȦıȘ țĮIJĮȞȐȜȦıȘȢ ʌȡȫIJȦȞ ȣȜȫȞ țĮȚ ıIJȘȞ ʌȡȠıIJĮıȓĮ IJȠȣ ʌİȡȚȕȐȜȜȠȞIJȠȢ.
ĮȣIJȩ. ȉĮ
ȈȣıțİȣĮıȓĮ
ǵIJĮȞ șİȜȒıİIJİ ȞĮ ĮʌȠȡȡȓȥİIJİ IJȘ ıȣıțİȣĮıȓĮ, ʌȡȑʌİȚ ȞĮ ȜȐȕİIJİ ȣʌȩȥȘ ıĮȢ IJȚȢ ĮȞIJȓıIJȠȚȤİȢ ʌİȡȚȕĮȜȜȠȞIJȚțȑȢ įȚĮIJȐȟİȚȢ IJȘȢ
ȤȫȡĮȢ ıĮȢ.
GR
43

9. ȉİȤȞȚțȐ įİįȠȝȑȞĮ
ȈȪȝȕȠȜĮ ʌȠȣ ȤȡȘıȚȝȠʌȠȚȠȪȞIJĮȚ
ȂȠȞIJȑȜȠ:STV 50 A1
ȉȐıȘ įȚțIJȪȠȣ: 220 - 240 V ~ 50/60 Hz
ȀĮIJȘȖȠȡȓĮ
ʌȡȠıIJĮıȓĮȢ: II
ǹʌȩįȠıȘ:50W
ȆİȡȚȖȡĮijȒ
ȈȪȝ-
ȕȠȜȠ
ȉȚȝȒ
ȂȠȞȐ-
įĮ
ȂȑȖȚıIJȘ ʌĮȡȠȤȒ
ĮȑȡĮ Įʌȩ ĮȞİȝȚ-
F 21,18
m
3
/min
ıIJȒȡĮ
ǿıȤȪȢ İȚıȩįȠȣ
ĮȞİȝȚıIJȒȡĮ
ȉȚȝȒ ȜİȚIJȠȣȡȖȓĮȢ SV 0,60
P35,44W
3
/
(m
min)/W
ȀĮIJĮȞȐȜȦıȘ
ȚıȤȪȠȢ ıİ țĮIJȐ-
P
SB
0,50
W
ıIJĮıȘ ĮȞĮȝȠȞȒȢ
ȈIJȐșȝȘ ȘȤȘIJȚțȒȢ
ȚıȤȪȠȢ ĮȞİȝȚıIJȒȡĮ
ȂȑȖȚıIJȘ IJĮȤȪIJȘIJĮ
ĮȑȡĮ
ȆȡȩIJȣʌȠ ȝȑIJȡȘıȘȢ IJȘȢ IJȚȝȒȢ ȜİȚ-
IJȠȣȡȖȓĮȢ
L
WA
61,33 dB(A)
c2,50m/s
IEC 60879:1986
+(cor1:1992)
ȆȡȠıIJĮIJİȣIJȚțȒ ȝȩȞȦıȘ
Ȃİ IJȘ ıȒȝĮȞıȘ CE Ș
HOYER Handel GmbH įȘȜȫȞİȚ
IJȘ ıȣȝȝȩȡijȦıȒ IJȘȢ ȝİ IJȘȞ ǼǼ.
ǹȣIJȩ IJȠ ıȪȝȕȠȜȠ ıĮȢ ȣʌİȞșȣȝȓȗİȚ ȞĮ ĮʌȠȡȡȓȥİIJİ IJȘ ıȣıțİȣĮıȓĮ ȝİ IJȡȩʌȠ ijȚȜȚțȩ ʌȡȠȢ IJȠ
ʌİȡȚȕȐȜȜȠȞ.
ǹȞĮțȣțȜȫıȚȝĮ ȣȜȚțȐ: ȤĮȡIJȩȞȚ
(ʌȜȘȞ țȣȝĮIJȠİȚįȠȪȢ ȤĮȡIJȠȞȚȠȪ)
ǻȚĮIJȘȡȠȪȝİ IJȠ įȚțĮȓȦȝĮ IJİȤȞȚțȫȞ ĮȜȜĮȖȫȞ.
44
GR

10. ǼȖȖȪȘıȘ IJȘȢ İIJĮȚȡȓĮȢ
HOYER Handel GmbH
ǹȟȚȩIJȚȝȘ ʌİȜȐIJȚııĮ, ĮȟȚȩIJȚȝİ ʌİȜȐIJȘ,
ȖȚĮ IJȘ ıȣıțİȣȒ ĮȣIJȒ ȜĮȝȕȐȞİIJİ İȖȖȪȘıȘ
3 İIJȫȞ Įʌȩ IJȘȞ ȘȝİȡȠȝȘȞȓĮ ĮȖȠȡȐȢ. Ȉİ ʌİȡȓʌIJȦıȘ İȜĮIJIJȫȝĮIJȠȢ IJȠȣ ʌȡȠȧȩȞIJȠȢ ĮȣIJȠȪ ȑȤİIJİ ȞȠȝȚțȐ įȚțĮȚȫȝĮIJĮ ȑȞĮȞIJȚ IJȠȣ
ʌȦȜȘIJȒ IJȠȣ ʌȡȠȧȩȞIJȠȢ. ǹȣIJȐ IJĮ ȞȠȝȚțȐ įȚțĮȚȫȝĮIJĮ įİȞ ʌİȡȚȠȡȓȗȠȞIJĮȚ Įʌȩ IJȘȞ İȖȖȪȘıȘ ʌȠȣ ʌĮȡȠȣıȚȐȗİIJĮȚ ʌĮȡĮțȐIJȦ.
ǵȡȠȚ İȖȖȪȘıȘȢ
Ǿ ʌȡȠșİıȝȓĮ IJȘȢ İȖȖȪȘıȘȢ ȟİțȚȞȐ ȝİ IJȘȞ
ȘȝİȡȠȝȘȞȓĮ ĮȖȠȡȐȢ. ȆĮȡĮțĮȜȠȪȝİ, ijȣȜȐȟIJİ țĮȜȐ IJȘȞ ʌȡȦIJȩIJȣʌȘ ĮʌȩįİȚȟȘ ĮȖȠȡȐȢ.
ȉȠ ȑȖȖȡĮijȠ ĮȣIJȩ İȓȞĮȚ ĮʌĮȡĮȓIJȘIJȠ ȦȢ ĮʌȠįİȚțIJȚțȩ ıIJȠȚȤİȓȠ ĮȖȠȡȐȢ.
ǹȞ İȞIJȩȢ IJȦȞ IJȡȚȫȞ İIJȫȞ Įʌȩ IJȘȞ ȘȝİȡȠȝȘȞȓĮ
ĮȖȠȡȐȢ IJȠȣ ʌȡȠȧȩȞIJȠȢ ĮȣIJȠȪ İȝijĮȞȚıIJİȓ İȜȐIJIJȦȝĮ ʌȠȣ ȠijİȓȜİIJĮȚ ıIJȠ ȣȜȚțȩ Ȓ IJȘȞ țĮIJĮıțİȣȒ, șĮ İʌȚıțİȣȐıȠȣȝİ Ȓ șĮ
ĮȞIJȚțĮIJĮıIJȒıȠȣȝİ IJȠ ʌȡȠȧȩȞ – țĮIJȐ IJȘȞ țȡȓıȘ
ȝĮȢ – įȦȡİȐȞ. ȆȡȠȨʌȩșİıȘ ȖȚĮ IJȘȞ ʌĮȡȠȤȒ
İȖȖȪȘıȘȢ İȓȞĮȚ ʌȦȢ İȞIJȩȢ IJȘȢ ʌȡȠșİıȝȓĮȢ
IJȦȞ IJȡȚȫȞ İIJȫȞ IJȠ İȜĮIJIJȦȝĮIJȚțȩ ʌȡȠȧȩȞ
ʌĮȡȠȣıȚĮıIJİȓ ıȣȞȠįİȣȩȝİȞȠ Įʌȩ IJȘȞ ĮʌȩįİȚȟȘ ĮȖȠȡȐȢ, țĮȚ ʌȦȢ Ƞ ʌİȜȐIJȘȢ șĮ įȫıİȚ ıȪȞIJȠȝȘ ȖȡĮʌIJȒ ʌİȡȚȖȡĮijȒ IJȠȣ İȓįȠȣȢ IJȘȢ
ȕȜȐȕȘȢ țĮȚ IJȘȢ ȤȡȠȞȚțȒȢ ıIJȚȖȝȒȢ ʌȠȣ ʌĮȡȠȣıȚȐıIJȘțİ.
ǹȞ IJȠ İȜȐIJIJȦȝĮ țĮȜȪʌIJİIJĮȚ Įʌȩ IJȘȞ İȖȖȪȘıȒ
ȝĮȢ, IJȠ ʌȡȠȧȩȞ șĮ ıȐȢ İʌȚıIJȡĮijİȓ İʌȚıțİȣĮıȝȑȞȠ Ȓ șĮ ĮȞIJȚțĮIJĮıIJĮșİȓ. Ǿ İʌȚıțİȣȒ Ȓ
ĮȞIJȚțĮIJȐıIJĮıȘ IJȠȣ ʌȡȠȧȩȞIJȠȢ įİ ıȣȞİʌȐȖİIJĮȚ
ĮȞĮȞȑȦıȘ IJȠȣ ȤȡȩȞȠȣ İȖȖȪȘıȘȢ.
ȋȡȩȞȠȢ İȖȖȪȘıȘȢ țĮȚ ȞȠȝȚțȑȢ ĮȟȚȫıİȚȢ ȑȞĮȞIJȚ İȜĮIJIJȫȝĮIJȠȢ
ȅ ȤȡȩȞȠȢ İȖȖȪȘıȘȢ įİȞ ʌĮȡĮIJİȓȞİIJĮȚ ȝȑıȦ
IJȘȢ İȣșȪȞȘȢ IJȠȣ ʌȦȜȘIJȒ. ȉĮ ʌĮȡĮʌȐȞȦ ȚıȤȪȠȣȞ țĮȚ ȖȚĮ IJĮ IJİȝȐȤȚĮ ʌȠȣ ĮȞIJȚțĮIJĮıIJȐșȘțĮȞ
Ȓ İʌȚıțİȣȐıIJȘțĮȞ. ȉȣȤȩ Ȟ ȗȘȝȚȑȢ țĮȚ İȜĮIJIJȫȝĮIJĮ ʌȠȣ ȣijȓıIJĮȞIJĮȚ țĮIJȐ IJȘȞ ĮȖȠȡȐ ʌȡȑʌİȚ
ȞĮ įȘȜȫȞȠȞIJĮȚ ĮȝȑıȦȢ ȝİIJȐ IJȘȞ ĮijĮȓȡİıȘ IJȘȢ
ıȣıțİȣĮıȓĮȢ. ǼʌȚıțİȣȑȢ ʌȠȣ İțIJİȜȠȪȞIJĮȚ
ȝİIJȐ IJȘ ȜȒȟȘ IJȘȢ İȖȖȪȘıȘȢ İȓȞĮȚ ʌȜȘȡȦIJȑİȢ
șĮ
Ș
.
ǼȪȡȠȢ İȖȖȪȘıȘȢ
Ǿ ıȣıțİȣȒ ĮȣIJȒ țĮIJĮıțİȣȐıIJȘțİ ıȪȝijȦȞĮ ȝİ ĮȣıIJȘȡȠȪȢ țĮȞȠȞȚıȝȠȪȢ ʌȠȚȩIJȘIJĮȢ
țĮȚ ȣʌȠȕȜȒșȘțİ ıİ ıȤȠȜĮıIJȚțȩ ȑȜİȖȤȠ ʌȡȚȞ
IJȘȞ ʌĮȡȐįȠıȘ.
Ǿ İȖȖȪȘıȘ ʌİȡȚȜĮȝȕȐȞİȚ İȜĮIJIJȫȝĮIJĮ ʌȠȣ
ȠijİȓȜȠȞIJĮȚ IJȩıȠ ıIJȠ ȣȜȚțȩ, ȩıȠ țĮȚ ıIJȘȞ țĮIJĮıțİȣȒ.
ȈIJȘȞ İȖȖȪȘıȘ įİȞ ʌİȡȚȜĮȝȕȐȞȠȞIJĮȚ
ĮȞĮȜȫıȚȝĮ IJȝȒȝĮIJĮ ʌȠȣ ȣʌȩțİȚȞIJĮȚ ıİ
ijȣıȚȠȜȠȖȚțȒ ijșȠȡȐ țĮȚ ȗȘȝȚȑȢ ʌȠȣ ʌȡȠțȜȒșȘțĮȞ ıİ İȪșȡĮȣıIJĮ IJȝȒȝĮIJĮ
įȚĮțȩʌIJİȢ, ıȣııȦȡİȣIJȑȢ, ijȦIJȚıIJȚțȐ
ȝȑıĮ Ȓ ȐȜȜĮ ȖȣȐȜȚȞĮ IJİȝȐȤȚĮ.
Ǿ İȖȖȪȘıȘ ĮȣIJȒ İțʌȓʌIJİȚ, ıİ ʌİȡȓʌIJȦıȘ
ʌȠȣ IJȠ ʌȡȠȧȩȞ ȣʌȑıIJȘ ȗȘȝȚȐ Įʌȩ ĮʌȡȠıİȟȓĮ, ĮțĮIJȐȜȜȘȜȘ ȤȡȒıȘ Ȓ ıȣȞIJȒȡȘıȘ ȝİ
ʌȡȦIJȠȕȠȣȜȓĮ IJȠȣ ĮȖȠȡĮıIJȒ. īȚĮ ȞĮ ȖȓȞİIJĮȚ
ıȦıIJȒ ȤȡȒıȘ IJȠȣ ʌȡȠȧȩȞIJȠȢ ʌȡȑʌİȚ ȞĮ IJȘȡȠȪȞIJĮȚ ȩȜİȢ ȠȚ ȣʌȠįİȓȟİȚȢ ʌȠȣ ĮȞĮijȑȡȠȞIJĮȚ ıIJȚȢ ȠįȘȖȓİȢ ȤİȚȡȚıȝȠȪ. ǹʌȠijİȪȖİIJİ
ȠʌȦıįȒʌȠIJİ ȤȡȒıİȚȢ țĮȚ ȤİȚȡȚıȝȠȪȢ, ȖȚĮ IJĮ
ȠʌȠȓĮ ȠȚ ȠįȘȖȓİȢ ȤİȚȡȚıȝȠȪ ʌȡȠİȚįȠʌȠȚȠȪȞ
ʌȦȢ ʌȡȑʌİȚ ȞĮ ĮʌȠijİȪȖȠȞIJĮȚ.
ȉȠ ʌȡȠȧȩȞ ʌȡȠȠȡȓȗİIJĮȚ ȝȩȞȠ ȖȚĮ ȚįȚȦIJȚțȒ țĮȚ
ȩȤȚ ȖȚĮ İʌĮȖȖİȜȝĮIJȚțȒ ȤȡȒıȘ. Ȉİ ʌİȡȓʌIJȦıȘ țĮțȠȪ țĮȚ ĮțĮIJȐȜȜȘȜȠȣ ȤİȚȡȚıȝȠȪ țĮȚ
ȤȡȒıȘȢ ȕȓĮȢ, țĮșȫȢ țĮȚ ıIJȘȞ ʌİȡȓʌIJȦıȘ
İʌȑȝȕĮıȘȢ ıIJȘ ıȣıțİȣȒ, Ș ȠʌȠȓĮ įİ įȚİȟȒȤșȘ Įʌȩ IJȠ įȚĮʌȚıIJİȣȝȑȞȠ țȑȞIJȡȠ ıȑȡȕȚȢ
ȝĮȢ, Ș İȖȖȪȘıȘ İțʌȓʌIJİȚ.
, ʌ.Ȥ.
ǻȚĮįȚțĮıȓĮ ıİ ʌİȡȓʌIJȦıȘ ĮȟȓȦıȘȢ
İȖȖȪȘıȘȢ
īȚĮ ȞĮ ȝʌȠȡȑıȠȣȝİ ȞĮ İʌİȟİȡȖĮıIJȠȪȝİ IJȠ
ĮȓIJȘȝȐ ıĮȢ IJȠ ıȣȞIJȠȝȩIJİȡȠ įȣȞĮIJȩ, ʌĮȡĮțĮȜȠȪȝİ, ĮțȠȜȠȣșȒıIJİ IJȚȢ ʌĮȡĮțȐIJȦ ȣʌȠįİȓȟİȚȢ:
• DzȤİIJİ ʌȐȞIJĮ įȚĮșȑıȚȝĮ, ȖȚĮ ȩʌȠIJİ ıĮȢ
ȗȘIJȘșȠȪȞ, IJȠȞ ĮȡȚșȝȩ ʌȡȠȧȩȞIJȠȢ
IAN: 312846 țĮȚ IJȘȞ ĮʌȩįİȚȟȘ ȦȢ
ĮʌȠįİȚțIJȚțȩ ıIJȠȚȤİȓȠ ĮȖȠȡȐȢ.
• ĬĮ ȕȡİȓIJİ IJȠȞ ĮȡȚșȝȩ ʌȡȠȧȩȞIJȠȢ ıIJȘȞ
ʌȚȞĮțȓįĮ IJȪʌȠȣ, ıİ țȐʌȠȚĮ İȖȤȐȡĮȟȘ,
ıIJȠ İȟȫijȣȜȜȠ
IJȦȞ ȠįȘȖȚȫȞ ȤİȚȡȚıȝȠȪ
GR
45

(țȐIJȦ ĮȡȚıIJİȡȐ) Ȓ ȦȢ ĮȣIJȠțȩȜȜȘIJȠ
GR
CY
ıIJȘȞ ʌȓıȦ Ȓ țȐIJȦ ʌȜİȣȡȐ IJȘȢ ıȣıțİȣȒȢ.
• ǹȞ İȝijĮȞȚıIJȠȪȞ ȜİȚIJȠȣȡȖȚțȑȢ ȕȜȐȕİȢ Ȓ
ȐȜȜĮ İȜĮIJIJȫȝĮIJĮ, İʌȚțȠȚȞȦȞȒıIJİ ʌȡȫIJĮ ȝİ IJȠ ĮțȩȜȠȣșȠ țȑȞIJȡȠ ıȑȡȕȚȢ IJȘȜİ-
ijȦȞȚțȐ Ȓ ȝİ email.
• ȈIJȘ ıȣȞȑȤİȚĮ, țĮȚ İijȩıȠȞ IJȠ ʌȡȠȧȩȞ șİ-
ȦȡȘșİȓ İȜĮIJIJȦȝĮIJȚțȩ, ȝʌȠȡİȓIJİ ȞĮ IJȠ
ĮʌȠıIJİȓȜİIJİ ıIJȘ įȚİȪșȣȞıȘ ʌȠȣ
įȩșȘțİ, İȜİȪșİȡȠ Įʌȩ IJĮȤȣįȡȠȝȚțȐ IJȑȜȘ, ıȣȞȠįİȣȩȝİȞȠ Įʌȩ IJȘȞ ĮʌȩįİȚȟȘ
ĮȖȠȡȐȢ țĮȚ ȑȞĮ ıȘȝİȓȦȝĮ ıȤİIJȚțȐ ȝİ IJȠ
İȓįȠȢ IJȘȢ ȕȜȐȕȘȢ țĮȚ IJȘ ȤȡȠȞȚțȒ ıIJȚȖȝȒ
ʌȠȣ İȝijĮȞȓıIJȘțİ.
ȈIJȘȞ ȚıIJȠıİȜȓįĮ www.lidl-service.com
ȝʌȠȡİȓIJİ ȞĮ ȜȐȕİIJİ IJȠ ʌĮȡȩȞ İȖȤİȚȡȓįȚȠ, țĮșȫȢ țĮȚ ʌȠȜȜȐ ʌİȡĮȚIJȑȡȦ İȖȤİȚȡȓįȚĮ, ȕȓȞIJİȠ țĮȚ ȜȠȖȚıȝȚțȩ.
ıĮȢ
ȀȑȞIJȡȠ ıȑȡȕȚȢ
ȈȑȡȕȚȢ ǼȜȜȐįĮ
Tel.: 801 5000 019 (0,03 EUR/Min.)
E-Mail: hoyer@lidl.gr
ȈȑȡȕȚȢ ȀȪʌȡȠȢ
Tel.: 8009 4409
E-Mail: hoyer@lidl.com.cy
IAN: 312846
ȆȡȠȝȘșİȣIJȒȢ
ȆĮȡĮțĮȜȠȪȝİ, ȜȐȕİIJİ ȣʌȩȥȘ ıĮȢ ʌȦȢ Ș
ĮțȩȜȠȣșȘ įȚİȪșȣȞıȘ įİȞ İȓȞĮȚ įȚİȪșȣȞıȘ
ıȑȡȕȚȢ. ǼʌȚțȠȚȞȦȞȒıIJİ ʌȡȫIJĮ ȝİ IJȠ țȑȞIJȡȠ ıȑȡȕȚȢ ʌȠȣ ĮȞĮȖȡȐijİIJĮȚ ʌĮȡĮʌȐȞȦ.
HOYER Handel GmbH
Tasköprüstraße 3
DE-22761 Hamburg
īǼȇȂǹȃIǹ
46
GR

GR
47

Inhalt
1. Übersicht ....................................................................................... 48
2. Bestimmungsgemäßer Gebrauch .................................................... 49
3. Sicherheitshinweise ....................................................................... 49
4. Lieferumfang ................................................................................. 51
5. Gerät montieren ............................................................................ 51
6. Bedienen ....................................................................................... 52
6.1 Gerät in Betrieb nehmen und ausschalten ............................................... 52
6.2 Gebläsestufe einstellen .................... ....... ....... ........ .............................. 52
6.3 Laufdauer einstellen ............................................................................. 52
6.4 Schwenkfunktion ................................................................................. 52
7. Reinigen ........................................................................................ 52
8. Entsorgen ...................................................................................... 53
9. Technische Daten ........................................................................... 53
10.Garantie der HOYER|Handel GmbH ................................................ 54
1. Übersicht
1 Tower-Ventilator
2 Aus-Taste (OFF)
3 Taste Schwenkfunktio n
4 Taste 3: starke Gebläsestufe
5 Taste 2: mittlere Gebläsestufe
6 Drehschalter und Timer
7 Taste 1: schwache Gebläsestufe
8 Standfuß
9 Vertiefung für Netzanschlussleitung
10 Hintere Hälfte Standfuß
11 Vordere Hälfte Standfuß
12 Netzanschlussleitung mit Netzstecker
13 Knaufschraube
Ohne Abbildung: 2 Kreuzschlitzschrauben
48
DE

Herzlichen Dank für Ihr
Vertrauen!
Bedienungsanleitung dazu. Die
Bedienungsanleitung ist Bestandteil des Produktes.
Wir gratulieren Ihnen zu Ihrem neuen T ower Ventilator.
Für einen sicheren Umgang mit dem Gerät
und um den ganzen Leistungsumfang kennenzulernen:
• Lesen Sie vor der ersten Inbetriebnahme diese Bedienungsanleitung gründlich durch.
• Befolgen Sie vor allen Dingen die
Sicherheitshinweise!
• Das Gerät darf nur so bedient
werden, wie in dieser Bedienungsanleitung beschrieben.
• Bewahren Sie diese Bedienungsanleitung auf.
• Falls Sie das Gerät einmal weitergeben, legen Sie bitte diese
Wir wünschen Ihnen viel Freude mit Ihrem
neuen Tower-Ventilator!
2. Bestimmungsgemäßer
Gebrauch
Der Tower-Ventilator eignet sich für das Umwälzen von Luft in trockenen Innenräumen.
Das Gerät ist für den privaten Haushalt konzipiert. Das Gerät darf nur in Innenräumen
benutzt werden.
Dieses Gerät darf nicht für gewerbliche
Zwecke eingesetzt werden.
3. Sicherheitshinweise
Warnhinweise
Falls erforderlich, wer d en fo lgende Warnhinweise in dieser Bedienungsanleitung verwendet:
GEFAHR! Hohes Risiko: Missachtung der W arnung kann Schaden für Leib und Leben verursachen.
WARNUNG! Mittleres Risiko: Missachtung der W arnung kann V erletzungen oder schwer e
Sachschäden verursachen.
VORSICHT: Geringes Risiko: Missachtung der W arnung kann leichte Verletzungen oder
Sachschäden verursachen.
HINWEIS: Sachverhalte und Besonderheiten, die im Umgang mit dem Gerät beachtet werden sollten.
Anweisungen für den sicheren Betrieb
~
Dieses Gerät kann von Kindern ab 8|Jahren und von Personen mit
reduzierten physischen, sensorischen oder mentalen Fähigk eiten
oder Mangel an Erfahrung und/oder Wissen benutzt werden,
wenn sie beaufsichtigt oder bezüglich des sicheren Gebr auches
des Gerätes unterwiesen wurden und die daraus resultier enden
DE
49

Gefahren verstanden haben. Kinder dürfen nicht mit dem Gerät
spielen. Reinigung und Benutzer-W artung dürfen nicht von Kindern
ohne Beaufsichtigung durchgeführt werden.
~
Wenn die Netzanschlussleitung dieses Gerätes beschädigt wird,
muss sie durch den Hersteller oder seinen K undendienst oder eine
ähnlich qualifizierte Person ersetz t wer d en, um G efähr dun gen zu
vermeiden.
~
Dieses Gerät ist nicht dafür bestimmt, mit einer externen Zeitschaltuhr oder einem separaten F ernwirksystem betrieben zu wer d en.
~ Sollte das Gerät doch einmal ins Was-
GEFAHR für Kinder
~ Verpackungsmaterial ist kein Kinder-
spielzeug. Kinder dürfen nicht mit den
Kunststoffbeuteln spielen. Es besteht Erstickungsgefahr.
~ Bewahren Sie das Gerät außerhalb der
Reichweite von Kindern auf.
GEFAHR für und durch
Haus- und Nutztiere
~ V on Elektrogeräten k önnen Gefahren für
Haus- und Nutztiere ausgehen. Des
Weiteren können Tiere auch einen
Schaden am Gerät verursachen. Halten
Sie deshalb Tiere grundsätzlich von
Elektrogeräten fern.
GEFAHR von Stromschlag
durch Feuchtigkeit
~ Das Gerät, die Netzanschlussleitung
und der Netzstecker dürfen nicht in
Wasser oder andere Flüssigkeiten getaucht werden.
~ Schützen Sie das Gerät vor Feuchtig-
keit, Tropf- oder Spritzwasser: Es besteht
die Gefahr eines elektrischen Schlages.
~ Sollte Flüssigkeit in das Gerät gelangen,
sofort den Netzstecker ziehen. V or einer
erneuten Inbetriebnahme das Gerät prüfen lassen.
~ Bedienen Sie das Gerät nicht mit feuch-
ten Händen.
ser gefallen sein, ziehen Sie sofort den
Netzstecker und nehmen Sie erst danach das Gerät heraus. Benutzen Sie
das Gerät in diesem Fall nicht mehr,
sondern lassen Sie es von einer Fachwerkstatt überprüfen.
GEFAHR durch
Stromschlag
~ Nehmen Sie das Gerät nicht in Betrieb,
wenn das Gerät oder die Netzanschlussleitung sichtbare Schäden aufweist oder wenn das Gerät zuvor fallen
gelassen wurde.
~ Schließen Sie den Netzstecker nur an
eine ordnungsgemäß installierte, leicht
zugängliche Steckdose an, deren Spannung der Angabe auf dem Typenschild
entspricht. Die Steckdose muss auch
nach dem Anschließen weiterhin leicht
zugänglich sein.
~ Achten Sie darauf, dass die Netzan-
schlussleitung nicht durch scharfe Kanten oder heiße Stellen beschädigt
werden kann.
~ Achten Sie beim Gebrauch des Gerätes
darauf, dass die Netzanschlussleitung
nicht eingeklemmt oder gequetscht
wird.
~ Das Gerät ist auch nach Ausschalten
nicht vollständig vom Netz getrennt. Um
dies zu tun, ziehen Sie den Netzstecker.
50
DE

~ Um den Netzstecker aus der Steckdose
zu ziehen, immer am Stecker, nie am
Kabel ziehen.
~ Ziehen Sie den Netzstecker aus der
Steckdose, ...
… wenn eine Störung auftritt,
… wenn Sie das Gerät nicht benutzen,
… bevor Sie das Gerät reinigen und
… bei Gewitter.
~ Um Gefährdungen zu vermeiden, neh-
men Sie keine Veränderungen am Artikel vor.
~ Wickeln Sie die Netzanschlussleitung
im Betrieb vollständig ab, um eine Überhitzung und Durchschmoren zu verhindern.
~ Bei Verwendung eines V erlängerungska-
bels muss dieses den gültigen Sicherheitsbestimmungen entsprechen.
WARNUNG vor Sachschäden
~ Stellen Sie das Gerät niemals auf heiße
Oberflächen (z. B. Herdplatten) oder in
die Nähe von Wärmequellen oder offenem Feuer.
Verwenden Sie nur das Originalzubehör.
~
~ Verwenden Sie keine scharfen oder
kratzenden Reinigungsmittel.
4. Lieferumfang
1 Tower-Ventilator|1
1 Standfuß (bestehend aus 2 Teilen)|8
1 Knaufschraube|13
2 Kreuzschlitzschrauben
1 Bedienungsanleitung
Auspacken
1. Entnehmen Sie alle Teile aus der Verpackung.
2. Prüfen Sie die Teile auf Vollständigkeit
und darauf, ob alle Teile unversehrt
sind.
5. Gerät montieren
Bevor das Gerät in Betrieb genommen
werden kann, muss der Standfuß|8 angeschraubt werden:
1. Bild A: Setzen Sie die hintere Hälfte
des Standfußes|10 sowie die vordere
Hälfte des Standfußes|11 zusammen.
Achten Sie darauf, dass die Verbindung hörbar einrastet. Fixieren Sie die
beiden Hälften von unten mit den mitgelieferten Kreuzschlitzschrauben.
HINWEISE:
• Die hintere Hälfte des Standfußes|10
erkennen Sie an der Vertiefung für die
Netzanschlussleitung|9.
• Achten Sie darauf, dass die Netzan-
schlussleitung|12 in der V ertiefung für die
Netzanschlussleitung|9 liegt.
2. Bild B: Drehen Sie die Knaufschraube|13 unten am V e ntilator komplett ab.
Drücken Sie die Netzanschlussleitung|12 in die Vertiefung für die Netzanschlussleitung|9 am Standfuß|8
und setzen Sie den Standfuß auf den
Tower Ventilator|1.
3. Fixieren Sie den Standfuß|8 und den
Tower Ventilator|1 mit der mitgelieferten Knaufschraube|13. Stellen Sie den
Tower Ventilator|1 auf den Standfuß|8
und achten Sie auf einen sicheren
Stand.
4. Wählen Sie einen Standort, der den Sicherheitshinweisen entspricht (siehe
“Sicherheitshinweise” auf Seite 49).
5. Stecken Sie den Netzstecker|12 in eine
Netzsteckdose, die den technischen
Daten entspricht.
DE
51

6. Bedienen
2. Um den Timer auszuschalten, stellen
Sie den Drehschalter|6 auf OFF.
6.1 Gerät in Betrieb nehmen und ausschalten
1. Stecken Sie den Netzstecker in eine
Netzsteckdose, die den technischen
Daten entspricht.
2. Schalten Sie die Strom-
versorgung ein, indem
Sie den Drehschalter|6
auf ON stellen.
Das Gerät ist nun betriebsbereit.
3. Schalten Sie die Strom-
versorgung aus, indem
Sie den Drehschalter|6
auf OFF stellen.
6.2 Gebläsestufe einstellen
HINWEIS: Wenn Sie das Ger ät im Dauerbetrieb arbeiten lassen wollen, müssen Sie
den Drehschalter|6 auf ON stellen.
6.4 Schwenkfunktion
Das Gerät besitzt eine Schwenkfunktion.
Diese bewirkt, dass das Gerät hin und her
schwenkt und dadurch die austretende Luft
gleichmäßiger im Raum verteilt wird:
1. Schalten Sie die Schwenkfunktion ein,
indem Sie die Taste für die Schwenkfunktion|3 drücken.
2. Schalten Sie die Schwenkfunktion aus,
indem Sie die Taste für die Schwenkfunktion|3 erneut drücken.
Mit den Gebläsestufen wählen Sie, wie
schnell das Gerät die Luft im Raum umwälzt.
Das Gerät besitzt drei Gebläsestufen:
- Stufe 1, schwach: Taste|7 drücken;
- Stufe 2, mittel: Taste|5 drücken;
- Stufe 3, stark: Taste|4 drücken.
Wenn Sie die Aus-Taste|2 (OFF) drücken,
hört das Gerät auf, zu arbeiten.
6.3 Laufdauer einstellen
Das Gerät besitzt einen Timer, mit dem Sie
die gewünschte Laufdauer bis zu 120 Minuten einstellen können. Eine minutengenaue
Einstellung ist nicht möglich.
1. Schalten Sie den Timer
ein, indem Sie den
Drehschalter|6 auf eine
beliebige Position zwischen 0 und 120 Minuten stellen. Gleichzeitig
wird die Stromversorgung eingeschaltet.
7. Reinigen
Damit Sie lange Freude an Ihrem Gerät haben, sollten Sie es regelmäßig reinigen.
GEFAHR durch Stromschlag!
~ Ziehen Sie vor jeder Reinigung den
Netzstecker.
~ Tauchen Sie das Gerät nie in Wasser.
~ Lassen Sie kein Wasser oder
Reinigungsmittel in das Gerät laufen.
WARNUNG vor Sachschäden!
~ Verwenden Sie keine scharfen oder
kratzenden Reinigungsmittel.
1. Entfernen Sie grobe Staubablagerungen vorsichtig mit einem Staubsauger.
2. Reinigen Sie das Gerät außen mit einem feuchten Lappen. Sie können auch
etwas Spülmittel nehmen.
3. Wischen Sie mit einem Lappen, der mit
klarem Wasser angefeuchtet ist, nach.
52
DE

4. Benutzen Sie das Gerät erst wieder,
wenn es vollständig getrocknet ist.
9. Technische Daten
Modell: STV|50|A1
8. Entsorgen
Dieses Produkt unterliegt der
europäischen Richtlinie
2012/19/EU. Das Symbol
der durchgestrichenen Abfalltonne auf Rädern bedeutet, dass das Produkt in der
Europäischen Union einer getrennten Müllsammlung zugeführt werden muss. Dies gilt
für das Produkt und alle mit diesem Symbol
gekennzeichneten Zubehörteile. Gekennzeichnete Produkte dürfen nicht über den
normalen Hausmüll entsorgt werden, sondern müssen an einer Annahmestelle für das
Recycling von elektrischen und elektronischen Geräten abgegeben werden. Recycling hilft, den Verbrauch von Rohstoffen zu
reduzieren und die Umwelt zu entlasten. Informationen zur Entsorgung und der Lage
des nächsten Recyclinghofes erhalten Sie
z.|B. bei Ihrer Stadtreinigung oder in den
Gelben Seiten.
Verpackung
Wenn Sie die Verpackung entsorgen möchten, achten Sie auf die entsprechenden Umweltvorschriften in Ihrem Land.
Netzspannung: 220|- 240 V ~ 50/60 Hz
Schutzklasse: II
Leistung: 50 W
Bezeich-
nung
Maximaler
Volumenstrom
Ventilator
Leistungsaufnahme
Serviceverhältnis
Leistungsaufnahme im
Bereitschaftszustand
Ventilator
Schallleistungspegel
Maximale
Luftgeschwindigkeit
Messnorm für
Ermittlung
Serviceverhältnis
Sym-
bol
F 21,18
P 35,44 W
SV 0,60
P
SB
L
WA
c2,50m/s
IEC 60879:1986
+(cor1:1992)
Wert Einheit
3
m
/min
3
(m
/min)/W
Ű
0,50
61,33 dB(A)
W
DE
53

Verwendete Symbole
10. Garantie der
Schutzisolierung
Mit der CE-Kennzeichnung erklärt
die HOYER Handel GmbH die
EU-Konformität.
Dieses Symbol erinnert daran,
die V erpackung umweltfreundlich
zu entsorgen.
Wiederverwertbare Materialien:
Pappe (außer Wellpappe)
Technische Änderungen vorbehalten.
HOYER|Handel GmbH
Sehr geehrte Kundin, sehr geehrter Kunde,
Sie erhalten auf dieses Gerät 3|Jahre Garantie ab Kaufdatum. Im Falle von Mängeln
dieses Pr odukts stehen Ihnen gegen den Verkäufer des Produkts gesetzliche Rechte zu.
Diese gesetzlichen Rechte werden dur ch unsere im Folgenden dargestellte Garantie
nicht eingeschränkt.
Garantiebedingungen
Die Garantiefrist beginnt mit dem Kaufdatum. Bitte bewahren Sie den Original Kassenbon gut auf. Diese Unterlage wird als
Nachweis für den Kauf benötigt.
Tritt innerhalb von drei Jahren ab dem Kaufdatum dieses Produkts ein Material- oder
Fabrikationsfehler auf, wir d das Produkt von
uns – nach unserer Wahl – für Sie kostenlos
repariert oder ersetzt. Diese Garantieleistung
setzt voraus, dass innerhalb der Dreijahresfrist das defekte Gerät und der Kaufbeleg
(Kassenbon) vorgelegt und schriftlich kurz beschrieben wird, worin der Mangel besteht
und wann er aufgetreten ist.
W enn der Defekt von unserer Garantie gedeckt ist, erhalten Sie das reparierte oder ein
neues Produkt zurück. Mit R epar atur oder
Austausch des Produkts beginnt kein neuer
Garantiezeitraum.
54
Garantiezeit und gesetzliche
Mängelansprüche
Die Garantiezeit wird durch die Gewä hrleistung nicht verlängert. Dies gilt auch für ersetzte und reparierte Teile. Eventuell schon beim
Kauf vorhandene Schäden und Mängel müssen sofort nach dem Auspacken gemeldet
werden. Nach Ablauf der Garantiezeit anfallende Reparaturen sind kostenp ƃichtig.
Garantieumfang
Das Gerät wurde nach strengen Qualitätsrichtlinien sorgfältig produziert und vor Auslieferung gewissenhaft geprüft.
DE

Die Garantieleistung gilt für Material- oder
DE
AT
CH
Fabrikationsfehler.
Von der Garantie ausgeschlossen
sind Verschleißteile, die norma ler
Abnutzung ausgesetzt sind und Beschädigungen an zerbrechlichen
Teilen, z. B. Schalter, Akkus,
Leuchtmittel oder andere Teile, die
aus Glas gefertigt sind.
Diese Garantie verfällt, wenn das Produkt
beschädigt, nicht sachgemäß benutzt oder
gewartet wurde. Für eine sachgemäße Benutzung des Produkts sind alle in der Bedienungsanleitung aufgeführten Anweisungen
genau einzuhalten. Verwendungszwecke
und Handlungen, von denen in der Bedienungsanleitung abgeraten oder vor denen
gewarnt wird, sind unbedingt zu vermeiden.
Das Produkt ist lediglich für den privaten und
nicht für den gewerblichen Gebrauch bestimmt. Bei missbräuchlicher und unsachgemäßer Behandlung, Gewaltanwendung und
bei Eingriffen, die nicht von unserem autorisierten Service-Center vorgenommen wurden, erlischt die Garantie.
Abwicklung im Garantiefall
Um eine schnelle Bearbeitung Ihres Anliegens zu gewährleisten, folgen Sie bitte den
folgenden Hinweisen:
• Bitte halten Sie für alle Anfragen die Ar-
tikelnummer IAN:|312846 und de n
Kassenbon als Nachweis für den Kauf
bereit.
• Die Artikelnummer finden Sie auf dem
Typenschild, einer Gravur, auf dem Titelblatt Ihrer Anleitung (unten links) oder
als Aufkleber auf der Rück- oder Unterseite des Gerätes.
• Sollten Funktionsfehler oder sonstige Män-
gel auftreten, kontaktier en Sie zunächst
das nachfolgend benannte Service-Center
telefonisch oder per E-Mail.
• Ein als defekt erfasstes Produkt können
Sie dann unter Beifügung des Kaufbelegs (Kassenbon) und der Angabe, worin der Mangel besteht und wann er
aufgetreten ist, für Sie portofrei an die
Ihnen mitgeteilte Service Anschrift übersenden.
Auf www.lidl-service.com können
Sie diese und viele weitere Handbücher, Produktvideos und Software
herunterladen.
Service-Center
Service Deutschland
Tel.: 0800 5435 111
(kostenfrei)
E-Mail: hoyer@lidl.de
Service Österreich
Tel.: 0820 201 222
(0,15 EUR/Min.)
E-Mail: hoyer@lidl.at
Service Schweiz
Tel.: 0842 665566
(0,08 CHF/Min.,
Mobilfunk max. 0,40 CHF/Min.)
E-Mail: hoyer@lidl.ch
IAN: 312846
Lieferant
Bitte beachten Sie, dass die folgende Anschrift
Kontaktieren Sie zunächst das genannte
Service-Center.
HOYER Handel GmbH
Tasköprüstraße 3
DE-22761 Hamburg
DEUTSCHLAND
keine Serviceanschrift
ist.
DE
55
 Loading...