


BLENDER SSM 550 D1
BLENDER
Operating instructions
БЛЕНДЕР
Ръководство за експлоатация
IAN 113065
BLENDER
Upute za upotrebu
STANDMIXER
Bedienungsanleitung
Before reading, unfold the page containing the illustrations and familiarise yourself with all functions of
the device.
Prije nego što pročitate tekst, otvorite stranicu sa slikama i upoznajte se na osnovu toga sa svim funkcijama
uređaja.
Преди да прочетете отворете страницата с фигурите и след това се запознайте с всички функции
на уреда.
Klappen Sie vor dem Lesen die Seite mit den Abbildungen aus und machen Sie sich anschließend mit
allen Funktionen des Gerätes vertraut.
GB / CY Operating instructions Page 1
HR Upute za upotrebu Stranica 13
BG Ръководство за експлоатация Cтраница 25
DE / AT / CH Bedienungsanleitung Seite 37


Content Page
Introduction 2
Intended Use 2
Items supplied 2
Appliance description 2
Technical data 2
Safety Notices 3
Unpacking 5
Preparing for use 5
Operation 5
Filling and mounting the mixer jug..................................................................................................5
Selecting operating speeds.............................................................................................................5
Filling when in use............................................................................................................................6
Removing the mixer..........................................................................................................................6
Useful tips 6
Recipes 7
Banana Shake ..................................................................................................................................7
Vanilla Shake ....................................................................................................................................7
Cappucino Shake.............................................................................................................................7
Tropical Mix .....................................................................................................................................7
Nut-Nougat Shake ...........................................................................................................................7
Carrot Shake.....................................................................................................................................7
Blackcurrant Mix ..............................................................................................................................7
Hawaii Shake....................................................................................................................................8
Fruity Pineapple-Strawberry Mix ....................................................................................................8
Andalusian Cold Soup (Gazpacho) ..............................................................................................8
Cleaning 8
Cleaning the mixer ..........................................................................................................................9
Cleaning the motor block..............................................................................................................10
After cleaning.................................................................................................................................10
Storage 10
Disposal 10
Warranty & Service 10
Importer 11
- 1 -

Blender
Introduction
Congratulations on the purchase of your new appliance.
You have clearly decided in favour of a quality
product. These operating instructions are a part of
this product. They contain important information in
regard to safety, use and disposal. Before using the
product, familiarise yourself with all of these operating and safety instructions. Use the product only as
described and only for the specified areas of application. In addition, pass these documents on, together
with the product, to any future owner.
Intended Use
This appliance is intended for ...
– the mixing, blending and stirring of foodstuffs
as well as the crushing of ice cubes,
– exclusively for normal domestic amounts and
only for private use in a domestic environment
in dry rooms.
This appliance is not intended for ...
– the hacking of hard foodstuffs, such as nuts,
seeds, large kernels or stalks,
– the processing of materials that are not foodstuffs,
– utilisation for commercial or industrial purposes,
– for use in moist environments or outdoors,
– processing hot/boiling liquids.
Use only the accessories and spare parts that are
specified for this appliance. Other parts are possibly
not sufficiently suitable or safe!
Items supplied
After unpacking, check to ensure all items are
available. Being supplied are:
1 x Motor block, with power cable and plug
1 x Mixer jug, with permanently assembled cutters
1 x Lid
1 x Filling cap
1 x Operating instruction
Appliance description
Filling cap
q
Cover
w
Mixer jug
e
Cutter
r
Switch
t
Power cable
y
Motor block
u
Cable storage
i
Scale
o
Technical data
Nominal voltage: 220 - 240 V ~, 50 Hz
Nominal power
consumption: 550 Watt
Max. capacity: 1.75 l
Protection class: II
CO time: 3 Minutes
The C.O. Time (Continuous Operation) details how
long an appliance may be used without the motor
overheating and being damaged. When the specified
C.O. Time has been reached, the appliance must be
switched off until the motor has cooled itself down.
- 2 -

Safety Notices
To avoid the risk of a potentially fatal electric shock:
• Ensure that the motor block, the power cable and the power plug are never
submersed in water or other fluids.
• Only use the appliance in dry rooms, never use it outdoors or in moist
environments.
• Make sure that the power cable never becomes wet or damp during operation.
Lay the cable such that it does not get clamped or otherwise damaged.
• Arrange for defective power plugs and/or cables to be replaced as soon as
possible by a qualified technician or by our Customer Service Department to
avoid the risk of injury.
• Always remove the plug from the power socket after use. Switching off the
appliance is not sufficient because the appliance receives power as long as
the power plug is connected to the socket.
• Check to ensure that the appliance is in a service-able condition before taking it
into use. The appliance may not be used if there is recognisable damage on it,
especially to the motor block and the glass mixing jug.
• Immediately remove the plug from the socket should you hear or smell any-
thing unexpected from the appliance when it is in use or there is an evident
malfunction.
To avoid overheating and the risk of fire:
• Do not use the appliance in locations with direct sunlight or in the vicinity of
heat generating appliances.
• NEVER fill the mixing jug with boiling fluids or other foods!
Allow these to cool to a handwarm temperature. Otherwise, the appliance
could overheat and/ or the glass of the mixing jug could crack!
• NEVER operate the appliance when it is empty, i.e. without ingredients in the
mixing attachment.
- 3 -

To reduce the risk of fire or injury:
• NEVER insert your hand or fingers in the mixing jug, especially when it is in
use. The cutters are extremely sharp!
• DO NOT open the cover when the appliance is in operation. Should you do
so, pieces of the foodstuff could be thrown out at high speeds!
• Do not insert cutlery items or mixing tools into the mixing jug when the appliance
is in use. There is a considerable risk of injury should these make contact with
the swiftly rotating cutters!
• In order to be able to react immediately in the event of danger, always have
the appliance under supervision when it is in use.
• Children should be supervised to ensure that they do not play with the appliance.
• Never use the appliance for purposes other than those described in these
instructions.
• The appliance should always be disconnected from the mains when not super-
vised and before assembly, disassembly or cleaning.
• This appliance shall not be used by children.
• The appliance and its connecting cable must be kept away from children.
• This appliance may be used by people with reduced physical, sensory or men-
tal capabilities or lack of experience and/or knowledge if they are supervised
and have been instructed in how to use the appliance safely and have under-
stood the potential risks.
• Children must not play with the appliance.
• Be careful when handling the appliance. The blades are very sharp!
• Take care when emptying the blender jug! The blades are very sharp!
• Take care when cleaning the appliance! The blades are very sharp!
• Switch the appliance off and disconnect the plug from the power supply before
changing accessories or getting hold of parts that move during operation.
• Use the mixer jug only with the supplied motor block!
• Always make sure that the blender is switched off before removing the mixer
jug from the motor block!
- 4 -

Unpacking
Operation
• Remove all packaging materials or protective fo-
ils from the appliance. Retain the packaging, so
that you can store the appliance with protection
or send it by post, e.g. should it need repair.
• Before taking the appliance into use, check to
ensure that it is free of damage, check also that
the power cable and plug as well as all accesso-
ries and appliance parts are undamaged.
• Carefully clean all components before
taking the appliance into use for the first time
(see “Cleaning”).
Preparing for use
When all components have been cleaned as described
under “Cleaning”:
Position the appliance such that, ...
– that the power cable
cess at the rear of the appliance,
– the power plug is immediately accessible, so that
it can be quickly withdrawn in the event of danger,
– that it is stable and not liable to slip, and such
that the suction cups find a firm hold so that the
appliance cannot tip over due to vibration,
– that the power cable
area and thus not presenting a risk of being inad-
vertently snagged and tipping the appliance
over.
passes through the re-
y
is not in the working
y
Warning!
The motor switches itself off as soon as the mixer
jug
is removed from the motor block u. It could
e
then be overlooked that the appliance is still switched on. The motor will thus start of its own accord
as soon as the mixer jug
Therefore:
• First insert the power plug into the wall socket
when the mixer jug
its lid fitted and closed.
• Before mounting the mixing jug always check to
see that the appliance is switched off or that the
power plug has been removed.
• Before removing the mixer jug
pliance off, remove the power plug and wait for
the motor to stop revolving.
is replaced on it:
e
is filled and mounted with
e
, switch the ap-
e
Filling and mounting the mixer jug
Take the mixer jug efrom the motor block
and remove the cover w.
Fill the mixer jug eand then press the cover
firmly back onto the mixer jug e. Ensure that the
pourer nose on the mixer jug
Insert the filling cap qinto the lid opening and
secure it by turning it clockwise.
Place the ready filled and sealed mixer jug
onto the motor block u. Lightly turn the mixer
jug
until you can press it down. The motor
e
can start only when the mixer jug
positioned.
is also closed.
e
e
u
w
e
is securely
Selecting operating speeds
When the mixer jug eis filled, completely sealed
and securely fitted to the motor block
then switch the appliance on.
- 5 -
u
, you can

Place the switch ton ...
– Level 1 - 3
for fluid or soft foodstuffs, for mixing, blending
and stirring
– Level 3 - 5
for firmer foodstuffs or for hacking
– Level Ice Crush/Clean
for short, powerful impulse operation, e.g. for
crushing icecubes or when cleaning. So as not
to overburden the motor, the switch
engage in this position. Hence, hold the switch
in this position for short periods only.
t
does not
t
Note
Fill the mixer jug ewith a maximum of 180 g of
ice cubes. If filled with more than this, the appliance
cannot optimally crush them.
Filling when in use
Warning!
Should you wish to insert further foodstuffs during
operation, you may ONLY open the filling cap
provided for this purpose.
• Under no circumstance should you open the cover w. Pieces of the foodstuff could be thrown
out at high speeds!
• Do not insert cutlery items or mixing tools into
the mixer jug
There is a considerable risk of injury should these
make contact with the swiftly rotating cutters
when the apliance is in use.
e
q
r
Removing the mixer
When the processing of the foodstuffs is complete:
Always first place the switch tinto the OFF
position ("OFF") and remove the power plug.
Wait until the motor has come to a complete
standstill before lifting the mixer jug
up. The mixer jug
does not need to be turned.
e
Useful tips
– The best results when blending firm ingredients
are achieved by placing small portions one after
the other into the mixer jug
ting a single large portion.
– When processing firm ingredients, cut them into
small pieces (2-3 cm).
– When mixing liquid ingredients begin first of all
with a small measure of fluids. Gradually add
more fluids to the mixture through the filling cap.
– The appliance can be stabilised by placing your
hand on top of the closed liquidiser during operation.
– For the stirring of firm or very viscous foodstuffs
it can be beneficial to use the impulse-operation,
which helps avoid a blocking of the cutters
Note
Do not use the appliance to crush grains of cooking
salt, refined sugar or white sugar. For example, to
make powdered sugar.
!
instead of inser-
e
e
straight
r
.
To insert something when the appliance is in
operation, ...
turn the filling cap qanti-clockwise and remove it.
Fill in the ingredients.
Afterwards, replace the filling cap qinto the lid
and secure it by turning it clockwise.
- 6 -

Recipes
Banana Shake
2 Bananas
approx. 2 Tbsp. Sugar (depending on the ripeness
of the bananas and personal taste)
1/2 l. Milk
1 Dash of lemon juice
Peel the bananas and liquidise them with Level 2.
First gradually add the milk, then the sugar and
lemon juice. Continue mixing everything until a
smooth and uniform liquid results.
Serve the shake chilled.
Vanilla Shake
1/4 l. milk
250 g Vanilla ice cream
125 ml Icecubes
1 1/2 Tsp Sugar
Crush the ice cubes with the level Ice Crush/Clean.
Place the remaining ingredients into the mixer.
Mix everything at Level 2 until the liquid has a
smooth consistency
Cappucino Shake
65 ml cold Espresso (or a very strong coffee)
65 ml Milk
15 g Sugar
65 ml Vanilla ice cream
100 ml crushed Icecubes
Crush the ice cubes with the level Ice Crush/Clean.
Add the espresso, milk and sugar. Mix everything
together with level 2 until the sugar has dissolved.
Finally, add the vanilla ice cream and then briefly
mix everything together using level 1.
Tropical Mix
125 ml Pineapple juice
60 ml Papaya juice
50 ml Orange juice
1/2 small tin of Peaches with juice
125 ml Icecubes
Crush the ice cubes with the level Ice Crush/Clean.
Place all ingredients into the mixer and blend them
together using level 3.
Nut-Nougat Shake
1/2 l. Milk
200 g Nut-Nougat spread
1 ball of Vanilla ice cream
50 ml cream
Combine all ingredients in a mixer and use level 3
until everything is evenly blended together.
Carrot Shake
300 ml Apple juice
500 ml Carrot juice
4 Tbsp Cooking oil (Wheat germ oil or rapeseed oil)
4 Tbsp of Lemon juice
Ginger powder
Pepper
Place the apple juice, cooking oil and lemon juice
into the mixer and blend everything together using
level 2. Then, add the carrot juice and mix it all together using level 2. To finish, add the ginger powder and pepper to taste.
Blackcurrant Mix
2 Tsp Honey
2 Bananas
1/4 l. Buttermilk
1/4 l. Blackcurrant juice
Place all ingredients into the mixer and blend them
together using level 3.
- 7 -

Hawaii Shake
4 Bananas
1/4 l. Pineapple juice
1/2 l. Milk
2 tbsp. Honey
1/4 l. Rum
Peel the bananas and liquidise them using Level 2.
Then add the other ingredients and mix everything
together using level 1.
Fruity Pineapple-Strawberry Mix
250 ml Pineapple juice
200 g Strawberries
300 ml Apple juice
4 Ice cubes
Crush the ice cubes with the level Ice Crush/Clean.
Wash the strawberries and remove the green parts.
Liquidise them using level 2. Then add the remaining
ingredients and mix everything together using level 1.
Andalusian Cold Soup (Gazpacho)
1/2 Cucumber
1 Beef tomato
1 Green pepper
1/2 Onion
1 Garlic clove
1/2 White bread roll
1/2 Tsp Salt
1 Tsp Red wine vinegar
1 Tbsp Olive oil
Cut the vegetables into pieces approx. 2 cm
in size. First place the tomatoes and then the cucumber into the mixer. Liquidise them using level 3.
Add the remaining ingredients and then liquidise/
blend them all together at level 3 until a smooth
soup is created.
Serve the soup with bread.
Note
These recipes are provided subject to change. All
ingredients and preparation information are guiding
values. Expand these recipe suggestions based on
your personal experiences.
Note
For cases of lactose intolerance, we recommend
you use a lactose-free milk. Keep in mind, however,
that lactose-free milk is a little sweeter.
Cleaning
Caution!
Before starting to clean the liquidiser and its
components:
• Ensure that the motor is switched off and the
power plug removed from the socket.
Under no circumstance may the motor block
be submersed in water or other fluids.This
could result in you receiving a fatal electric
shock and the appliance could be damaged.
• Never open the housing of the appliance. This
brings with it the risk of receiving a fatal electric
shock.
• Never disassemble the cutters
ach into the mixer jug
tremely sharp!
• Do not use solvents or abrasive cleaners on the
plastic surfaces, they could be damaged by them.
. The cutters rare ex-
e
and never re-
r
u
- 8 -
Cleaning the mixer
So that you do not injure yourself on the cut-
ters
, clean the mixer jug eonly with a long
r
handled dishwasher brush.
In a case of stubborn soiling, the mixer jug
can also be cleaned in a dishwasher. For this,
always take the mixer jug
described later.
Clean the cover wand the filling cap qin a
dishwasher or with the normal washing up.
If you clean the liquidiser directly after use, you can
often achieve a satisfactory and hygienic level of
cleaning with the following alternative:
If you clean the liquidiser directly after use, you can
often achieve a satisfactory and hygienic level of
cleaning with the following alternative:
Fill the mixer jug ewith 750 ml of water and
add a few drops of mild detergent. Close the
cover
block
Insert the plug into a mains power socket and
activate the Ice Crush/Clean operation a few times, such that the cutter
water at full speed.
Afterwards, rinse the mixer jug
clean water to ensure that all detergent residues
have been removed.
and fit the mixer jug eonto the motor
w
.
u
apart, as
e
ploughs through the
r
e
e
out with lots of
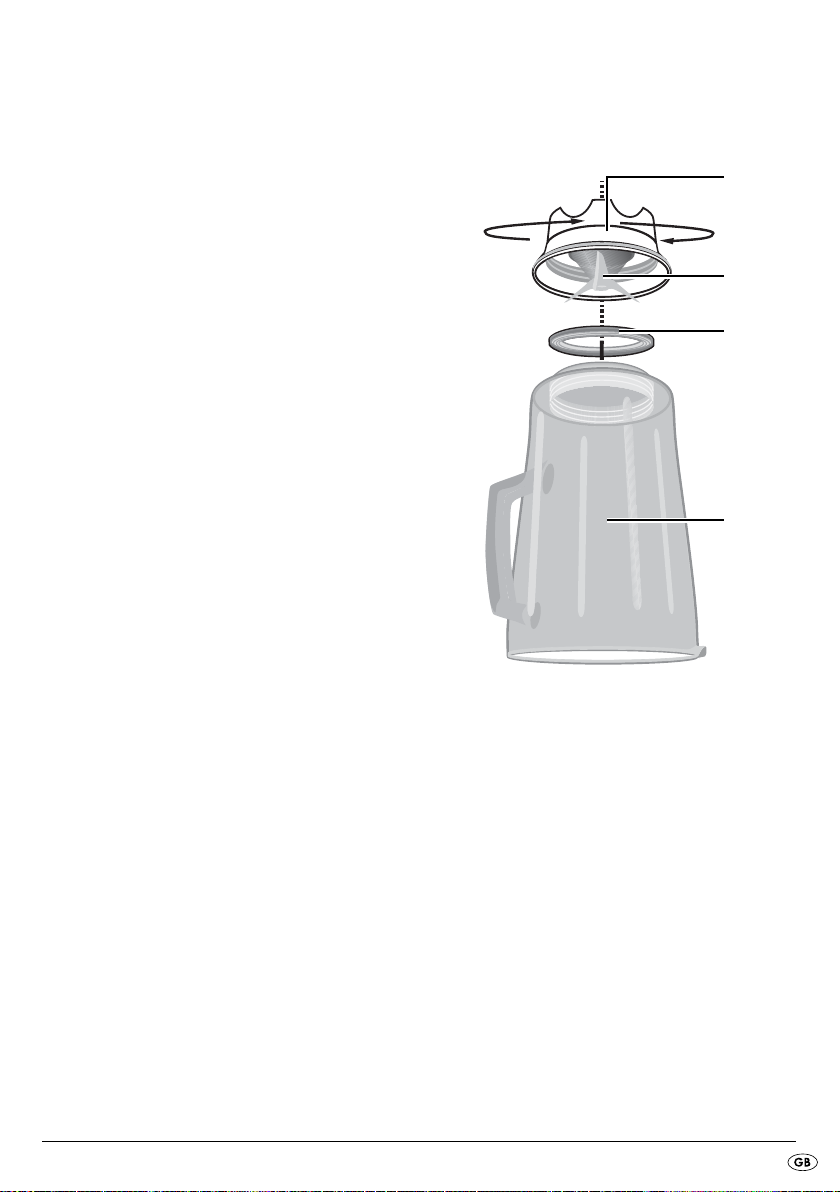
Should this not dislodge the soiling, you can separate
the lower plastic part of the mixer jug
ters
) from the the glass part of the mixer jug e:
r
(with the cut-
e
Glass element
Sealing ring
Cutting blade
Plastic element
Remove the mixer jug efrom the motor block u.
Turn the plastic element of the mixer jug
anti-clockwise, such that it allows itself to be released from the glass element of the mixer jug
- 9 -
e
e
.
Attention!
Take care with the cutting blades . They are very
sharp. Risk of injury!
Clean both parts thoroughly in a mild soapy
solution or in a dishwasher.
Replace the plastic element of the mixer jug
back onto the glass element . Ensure that the
sealing ring is correctly fitted.
e
Cleaning the motor block
Use a dry cloth or, at the most, a lightly moistened
one for cleaning the plastic surfaces.
At every cleaning check that the contact switch
in the receptor for the mixer jug
ked by soiling residues. If you cannot dislodge
any blockages with the corner of a piece of paper, make contact with Customer Services. Under no circumstances should you use a hard object, this could damage the contact switch.
Remove any possible residues on the underside
of the motor block
stiff bristled brush. Ensure that nothing can enter
through the ventilation opening of the appliance.
only with a dry cloth or a
u
is not blok-
e
After cleaning
Allow all parts to dry well before re-assembling and
re-using the liquidiser.
Storage
If you do not intend to use the liquidiser for an
extended period, clean it thoroughly (see chapter
"Cleaning").
Wrap the power cable yaround the cable sto-
rage
Store the liquidiser at a cool and dry location.
on the base of the motor block u.
i
Disposal
Do not dispose of the appliance in your
normal domestic waste. This product is
subject to the European guideline
2012/19/EU.
Dispose of the appliance through an approved disposal centre or at your community waste facility.
Observe the currently applicable regulations.
In case of doubt, please contact your waste disposal
centre.
Dispose of all packaging materials in an
environmentally responsible manner.
Warranty & Service
The warranty for this appliance is for 3 years from
the date of purchase. The appliance has been
manufactured with care and meticulously examined
before delivery.
Please retain your receipt as proof of purchase. In
the event of a warranty claim, please make contact
by telephone with our Service Department. Only in
this way can a post-free despatch for your goods be
assured.
The warranty covers only claims for material and
maufacturing defects, but not for transport damage,
for wearing parts or for damage to fragile components, e.g. buttons or batteries. This product is for private use only and is not intended for commercial use.
The warranty is void in the case of abusive and improper handling, use of force and internal tampering
not carried out by our authorized service branch.
Your statutory rights are not restricted in any way by
this warranty.
- 10 -

The warranty period will not be extended by repairs
made under warranty. This applies also to replaced
and repaired parts. Any damage and defects extant
on purchase must be reported immediately after unpacking the appliance, at the latest, two days after
the purchase date. Repairs made after the expiration of the warranty period are subject to payment.
Service Great Britain
Tel.: 0871 5000 720 (£ 0.10/Min.)
E-Mail: kompernass@lidl.co.uk
IAN 113065
Hotline availability:
Monday to Friday 08:00 - 20:00 (CET)
Importer
KOMPERNASS HANDELS GMBH
BURGSTRASSE 21
44867 BOCHUM
GERMANY
www.kompernass.com
- 11 -

- 12 -

Sadrˇzaj Strana
Uvod 14
Uporaba u skladu sa namjenom 14
Obim isporuke 14
Opis uređaja 14
Tehnički podaci 14
Sigurnosne napomene 15
Raspakiranje 17
Postavljanje 17
Rukovanje 17
Punjenje i montiranje nastavka miksera . . . . . . . . . . . . . . . . . . . . . . . . . . . . . . . . . . . . . . . . .17
Odabir stupnja brzine . . . . . . . . . . . . . . . . . . . . . . . . . . . . . . . . . . . . . . . . . . . . . . . . . . . . . . .17
Umetanje u pogonu . . . . . . . . . . . . . . . . . . . . . . . . . . . . . . . . . . . . . . . . . . . . . . . . . . . . . . . .18
Skidanje nastavka miksera . . . . . . . . . . . . . . . . . . . . . . . . . . . . . . . . . . . . . . . . . . . . . . . . . . .18
Korisni savjeti 18
Recepti 19
Shake od banana . . . . . . . . . . . . . . . . . . . . . . . . . . . . . . . . . . . . . . . . . . . . . . . . . . . . . . . . . .19
Shake od vanilije . . . . . . . . . . . . . . . . . . . . . . . . . . . . . . . . . . . . . . . . . . . . . . . . . . . . . . . . . . .19
Cappucino-Shake . . . . . . . . . . . . . . . . . . . . . . . . . . . . . . . . . . . . . . . . . . . . . . . . . . . . . . . . . .19
Tropski miks . . . . . . . . . . . . . . . . . . . . . . . . . . . . . . . . . . . . . . . . . . . . . . . . . . . . . . . . . . . . . . .19
Shake sa lješnjakom i nugatom . . . . . . . . . . . . . . . . . . . . . . . . . . . . . . . . . . . . . . . . . . . . . . .19
Shake od mrkve . . . . . . . . . . . . . . . . . . . . . . . . . . . . . . . . . . . . . . . . . . . . . . . . . . . . . . . . . . .19
Miks od ribizle . . . . . . . . . . . . . . . . . . . . . . . . . . . . . . . . . . . . . . . . . . . . . . . . . . . . . . . . . . . .19
Hawaii-Shake . . . . . . . . . . . . . . . . . . . . . . . . . . . . . . . . . . . . . . . . . . . . . . . . . . . . . . . . . . . . .20
Vośni miks sa ananasom i jagodom . . . . . . . . . . . . . . . . . . . . . . . . . . . . . . . . . . . . . . . . . . . .20
Andaluzijska hladna juha (Gazpacho) . . . . . . . . . . . . . . . . . . . . . . . . . . . . . . . . . . . . . . . . .20
Čišćenje 20
Čišćenje nastavka miksera . . . . . . . . . . . . . . . . . . . . . . . . . . . . . . . . . . . . . . . . . . . . . . . . . . .21
Čišćenje bloka motora . . . . . . . . . . . . . . . . . . . . . . . . . . . . . . . . . . . . . . . . . . . . . . . . . . . . . .22
Nakon čišćenja . . . . . . . . . . . . . . . . . . . . . . . . . . . . . . . . . . . . . . . . . . . . . . . . . . . . . . . . . . . .22
Čuvanje uređaja 22
Zbrinjavanje 22
Jamstvo & servis 22
Uvoznik 23
- 13 -
 Loading...