


BLENDER SSM 550 D1
BLENDER
Operating instructions
BLENDER
Instrucţiuni de utilizare
ΜΠΛΕΝΤΕΡ
Οδηүίες χρήσης
IAN 100484
BLENDER
Upute za upotrebu
БЛЕНДЕР
Ръководство за експлоатация
STANDMIXER
Bedienungsanleitung

Before reading, unfold the page containing the illustrations and familiarise yourself with all functions of
the device.
Prije nego što pročitate tekst, otvorite stranicu sa slikama i upoznajte se na osnovu toga sa svim funkcijama
uređaja.
Înainte de a citi instrucţiunile, priviţi imaginile şi familiarizaţi-vă cu toate funcţiile aparatului.
Преди да прочетете отворете страницата с фигурите и след това се запознайте с всички функции
на уреда.
Πριν ξεκινήσετε την ανάγνωση, ανοίξτε τη σελίδα με τις εικόνες και εξοικειωθείτε με όλες τις λειτουργίες
της συσκευής.
Klappen Sie vor dem Lesen die Seite mit den Abbildungen aus und machen Sie sich anschließend mit allen
Funktionen des Gerätes vertraut.
GB Operating instructions Page 1
HR Upute za upotrebu Stranica 13
RO Instrucţiuni de utilizare Pagina 25
BG Ръководство за експлоатация Cтраница 37
GR Οδηүίες χρήσης Σελίδα 49
DE / AT / CH Bedienungsanleitung Seite 61


Content Page
Introduction 2
Intended Use 2
Items supplied 2
Appliance description 2
Technical data 2
Safety Notices 3
Unpacking 5
Preparing for use 5
Operation 5
Filling and mounting the mixer jug..................................................................................................5
Selecting operating speeds.............................................................................................................5
Filling when in use............................................................................................................................6
Removing the mixer..........................................................................................................................6
Useful tips 6
Recipes 7
Banana Shake ..................................................................................................................................7
Vanilla Shake ....................................................................................................................................7
Cappucino Shake.............................................................................................................................7
Tropical Mix .....................................................................................................................................7
Nut-Nougat Shake ...........................................................................................................................7
Carrot Shake.....................................................................................................................................7
Blackcurrant Mix ..............................................................................................................................7
Hawaii Shake....................................................................................................................................8
Fruity Pineapple-Strawberry Mix ....................................................................................................8
Andalusian Cold Soup (Gazpacho) ..............................................................................................8
Cleaning 8
Cleaning the mixer ..........................................................................................................................9
Cleaning the motor block..............................................................................................................10
After cleaning.................................................................................................................................10
Storage 10
Disposal 10
Warranty & Service 10
Importer 11
- 1 -
Blender
Introduction
Congratulations on the purchase of your new appliance.
You have clearly decided in favour of a quality
product. These operating instructions are a part of
this product. They contain important information in
regard to safety, use and disposal. Before using the
product, familiarise yourself with all of these operating and safety instructions. Use the product only as
described and only for the specified areas of application. In addition, pass these documents on, together
with the product, to any future owner.
Intended Use
This appliance is intended for ...
– the mixing, blending and stirring of foodstuffs
as well as the crushing of ice cubes,
– exclusively for normal domestic amounts and
only for private use in a domestic environment
in dry rooms.
This appliance is not intended for ...
– the hacking of hard foodstuffs, such as nuts,
seeds, large kernels or stalks,
– the processing of materials that are not foodstuffs,
– utilisation for commercial or industrial purposes,
– for use in moist environments or outdoors,
– processing hot/boiling liquids.
Use only the accessories and spare parts that are
specified for this appliance. Other parts are possibly
not sufficiently suitable or safe!
Items supplied
After unpacking, check to ensure all items are
available. Being supplied are:
1 x Motor block, with power cable and plug
1 x Mixer jug, with permanently assembled cutters
1 x Lid
1 x Filling cap
1 x Operating instruction
Appliance description
Filling cap
q
Cover
w
Mixer jug
e
Cutter
r
Switch
t
Power cable
y
Motor block
u
Cable storage
i
Scale
o
Technical data
Nominal voltage: 220 - 240 V ~, 50 Hz
Nominal power
consumption: 550 Watt
Max. capacity: 1.75 l
Protection class: II
CO time: 3 Minutes
The C.O. Time (Continuous Operation) details how
long an appliance may be used without the motor
overheating and being damaged. When the specified
C.O. Time has been reached, the appliance must be
switched off until the motor has cooled itself down.
- 2 -

Safety Notices
To avoid the risk of a potentially fatal electric shock:
• Ensure that the motor block, the power cable and the power plug are never sub-
mersed in water or other fluids.
• Only use the appliance in dry rooms, never use it outdoors or in moist environ-
ments.
• Make sure that the power cable never becomes wet or damp during operation.
Lay the cable such that it does not get clamped or otherwise damaged.
• Arrange for defective power plugs and/or cables to be replaced as soon as
possible by a qualified technician or by our Customer Service Department to
avoid the risk of injury.
• Always remove the plug from the power socket after use. Switching off the
appliance is not sufficient because the appliance receives power as long as
the power plug is connected to the socket.
• Check to ensure that the appliance is in a service-able condition before taking it
into use. The appliance may not be used if there is recognisable damage on it,
especially to the motor block and the glass mixing jug.
• Immediately remove the plug from the socket should you hear or smell anything
unexpected from the appliance when it is in use or there is an evident malfunc-
tion.
To avoid overheating and the risk of fire:
• Do not use the appliance in locations with direct sunlight or in the vicinity of
heat generating appliances.
• NEVER fill the mixing jug with boiling fluids or other foods!
Allow these to cool to a handwarm temperature. Otherwise, the appliance
could overheat and/ or the glass of the mixing jug could crack!
• NEVER operate the appliance when it is empty, i.e. without ingredients in the
mixing attachment.
- 3 -

To reduce the risk of fire or injury:
• NEVER insert your hand or fingers in the mixing jug, especially when it is in
use. The cutters are extremely sharp!
• DO NOT open the cover when the appliance is in operation. Should you do
so, pieces of the foodstuff could be thrown out at high speeds!
• Do not insert cutlery items or mixing tools into the mixing jug when the appliance
is in use. There is a considerable risk of injury should these make contact with
the swiftly rotating cutters!
• In order to be able to react immediately in the event of danger, always have
the appliance under supervision when it is in use.
• Children should be supervised to ensure that they do not play with the appliance.
• Never use the appliance for purposes other than those described in these
instructions.
• The appliance should always be disconnected from the mains when not super-
vised and before assembly, disassembly or cleaning.
• This appliance shall not be used by children.
• The appliance and its connecting cable must be kept away from children.
• This appliance may be used by people with reduced physical, sensory or men-
tal capabilities or lack of experience and/or knowledge if they are supervised
and have been instructed in how to use the appliance safely and have under-
stood the potential risks.
• Children must not play with the appliance.
• Be careful when handling the appliance. The blades are very sharp!
• Take care when emptying the blender jug! The blades are very sharp!
• Take care when cleaning the appliance! The blades are very sharp!
• Switch the appliance off and disconnect the plug from the power supply before
changing accessories or getting hold of parts that move during operation.
• Use the mixer jug only with the supplied motor block!
• Always make sure that the blender is switched off before removing the mixer
jug from the motor block!
- 4 -

Unpacking
Operation
• Remove all packaging materials or protective fo-
ils from the appliance. Retain the packaging, so
that you can store the appliance with protection
or send it by post, e.g. should it need repair.
• Before taking the appliance into use, check to
ensure that it is free of damage, check also that
the power cable and plug as well as all accesso-
ries and appliance parts are undamaged.
• Carefully clean all components before
taking the appliance into use for the first time
(see “Cleaning”).
Preparing for use
When all components have been cleaned as described
under “Cleaning”:
Position the appliance such that, ...
➩
– that the power cable
cess at the rear of the appliance,
– the power plug is immediately accessible, so that
it can be quickly withdrawn in the event of danger,
– that it is stable and not liable to slip, and such
that the suction cups find a firm hold so that the
appliance cannot tip over due to vibration,
– that the power cable
area and thus not presenting a risk of being inad-
vertently snagged and tipping the appliance
over.
passes through the re-
y
is not in the working
y
Warning!
The motor switches itself off as soon as the mixer
jug
is removed from the motor block u. It could
e
then be overlooked that the appliance is still switched on. The motor will thus start of its own accord
as soon as the mixer jug
Therefore:
• First insert the power plug into the wall socket
when the mixer jug
its lid fitted and closed.
• Before mounting the mixing jug always check to
see that the appliance is switched off or that the
power plug has been removed.
• Before removing the mixer jug
pliance off, remove the power plug and wait for
the motor to stop revolving.
is replaced on it:
e
is filled and mounted with
e
, switch the ap-
e
Filling and mounting the mixer jug
Take the mixer jug efrom the motor block
➩
and remove the cover w.
Fill the mixer jug eand then press the cover
➩
firmly back onto the mixer jug e. Ensure that the
pourer nose on the mixer jug
Insert the filling cap qinto the lid opening and
➩
secure it by turning it clockwise.
Place the ready filled and sealed mixer jug
➩
onto the motor block u. Lightly turn the mixer
jug
until you can press it down. The motor
e
can start only when the mixer jug
positioned.
is also closed.
e
e
u
w
e
is securely
Selecting operating speeds
When the mixer jug eis filled, completely sealed
and securely fitted to the motor block
then switch the appliance on.
- 5 -
u
, you can

Place the switch ton ...
➩
– Level 1 - 3
for fluid or soft foodstuffs, for mixing, blending
and stirring
– Level 3 - 5
for firmer foodstuffs or for hacking
– Level Ice Crush/Clean
for short, powerful impulse operation, e.g. for
crushing icecubes or when cleaning. So as not
to overburden the motor, the switch
engage in this position. Hence, hold the switch
in this position for short periods only.
t
does not
t
Note
Fill the mixer jug ewith a maximum of 180 g of
ice cubes. If filled with more than this, the appliance
cannot optimally crush them.
Filling when in use
Warning!
Should you wish to insert further foodstuffs during
operation, you may ONLY open the filling cap
provided for this purpose.
• Under no circumstance should you open the cover w. Pieces of the foodstuff could be thrown
out at high speeds!
• Do not insert cutlery items or mixing tools into
the mixer jug
There is a considerable risk of injury should these
make contact with the swiftly rotating cutters
when the apliance is in use.
e
q
r
Removing the mixer
When the processing of the foodstuffs is complete:
Always first place the switch tinto the OFF
➩
position ("OFF") and remove the power plug.
Wait until the motor has come to a complete
➩
standstill before lifting the mixer jug
up. The mixer jug
does not need to be turned.
e
Useful tips
– The best results when blending firm ingredients
are achieved by placing small portions one after
the other into the mixer jug
ting a single large portion.
– When processing firm ingredients, cut them into
small pieces (2-3 cm).
– When mixing liquid ingredients begin first of all
with a small measure of fluids. Gradually add
more fluids to the mixture through the filling cap.
– The appliance can be stabilised by placing your
hand on top of the closed liquidiser during operation.
– For the stirring of firm or very viscous foodstuffs
it can be beneficial to use the impulse-operation,
which helps avoid a blocking of the cutters
Note
Do not use the appliance to crush grains of cooking
salt, refined sugar or white sugar. For example, to
make powdered sugar.
!
instead of inser-
e
e
straight
r
.
To insert something when the appliance is in
operation, ...
turn the filling cap qanti-clockwise and remove it.
➩
Fill in the ingredients.
➩
Afterwards, replace the filling cap qinto the lid
➩
and secure it by turning it clockwise.
- 6 -

Recipes
Banana Shake
2 Bananas
approx. 2 Tbsp. Sugar (depending on the ripeness
of the bananas and personal taste)
1/2 l. Milk
1 Dash of lemon juice
Peel the bananas and liquidise them with Level 2.
First gradually add the milk, then the sugar and
lemon juice. Continue mixing everything until a
smooth and uniform liquid results.
Serve the shake chilled.
Vanilla Shake
1/4 l. milk
250 g Vanilla ice cream
125 ml Icecubes
1 1/2 Tsp Sugar
Crush the ice cubes with the level Ice Crush/Clean.
Place the remaining ingredients into the mixer.
Mix everything at Level 2 until the liquid has a
smooth consistency
Cappucino Shake
65 ml cold Espresso (or a very strong coffee)
65 ml Milk
15 g Sugar
65 ml Vanilla ice cream
100 ml crushed Icecubes
Crush the ice cubes with the level Ice Crush/Clean.
Add the espresso, milk and sugar. Mix everything
together with level 2 until the sugar has dissolved.
Finally, add the vanilla ice cream and then briefly
mix everything together using level 1.
Tropical Mix
125 ml Pineapple juice
60 ml Papaya juice
50 ml Orange juice
1/2 small tin of Peaches with juice
125 ml Icecubes
Crush the ice cubes with the level Ice Crush/Clean.
Place all ingredients into the mixer and blend them
together using level 3.
Nut-Nougat Shake
1/2 l. Milk
200 g Nut-Nougat spread
1 ball of Vanilla ice cream
50 ml cream
Combine all ingredients in a mixer and use level 3
until everything is evenly blended together.
Carrot Shake
300 ml Apple juice
500 ml Carrot juice
4 Tbsp Cooking oil (Wheat germ oil or rapeseed oil)
4 Tbsp of Lemon juice
Ginger powder
Pepper
Place the apple juice, cooking oil and lemon juice
into the mixer and blend everything together using
level 2. Then, add the carrot juice and mix it all together using level 2. To finish, add the ginger powder and pepper to taste.
Blackcurrant Mix
2 Tsp Honey
2 Bananas
1/4 l. Buttermilk
1/4 l. Blackcurrant juice
Place all ingredients into the mixer and blend them
together using level 3.
- 7 -
Hawaii Shake
4 Bananas
1/4 l. Pineapple juice
1/2 l. Milk
2 tbsp. Honey
1/4 l. Rum
Peel the bananas and liquidise them using Level 2.
Then add the other ingredients and mix everything
together using level 1.
Fruity Pineapple-Strawberry Mix
250 ml Pineapple juice
200 g Strawberries
300 ml Apple juice
4 Ice cubes
Crush the ice cubes with the level Ice Crush/Clean.
Wash the strawberries and remove the green parts.
Liquidise them using level 2. Then add the remaining
ingredients and mix everything together using level 1.
Andalusian Cold Soup (Gazpacho)
1/2 Cucumber
1 Beef tomato
1 Green pepper
1/2 Onion
1 Garlic clove
1/2 White bread roll
1/2 Tsp Salt
1 Tsp Red wine vinegar
1 Tbsp Olive oil
Cut the vegetables into pieces approx. 2 cm
in size. First place the tomatoes and then the cucumber into the mixer. Liquidise them using level 3.
Add the remaining ingredients and then liquidise/
blend them all together at level 3 until a smooth
soup is created.
Serve the soup with bread.
Note
These recipes are provided subject to change. All
ingredients and preparation information are guiding
values. Expand these recipe suggestions based on
your personal experiences.
Note
For cases of lactose intolerance, we recommend
you use a lactose-free milk. Keep in mind, however,
that lactose-free milk is a little sweeter.
Cleaning
Caution!
Before starting to clean the liquidiser and its
components:
• Ensure that the motor is switched off and the
power plug removed from the socket.
Under no circumstance may the motor block
be submersed in water or other fluids.This
could result in you receiving a fatal electric
shock and the appliance could be damaged.
• Never open the housing of the appliance. This
brings with it the risk of receiving a fatal electric
shock.
• Never disassemble the cutters
ach into the mixer jug
tremely sharp!
• Do not use solvents or abrasive cleaners on the
plastic surfaces, they could be damaged by them.
. The cutters rare ex-
e
and never re-
r
u
- 8 -
Cleaning the mixer
So that you do not injure yourself on the cut-
➩
ters
, clean the mixer jug eonly with a long
r
handled dishwasher brush.
In a case of stubborn soiling, the mixer jug
➩
can also be cleaned in a dishwasher. For this,
always take the mixer jug
described later.
Clean the cover wand the filling cap qin a
➩
dishwasher or with the normal washing up.
If you clean the liquidiser directly after use, you can
often achieve a satisfactory and hygienic level of
cleaning with the following alternative:
If you clean the liquidiser directly after use, you can
often achieve a satisfactory and hygienic level of
cleaning with the following alternative:
Fill the mixer jug ewith 750 ml of water and
➩
add a few drops of mild detergent. Close the
cover
block
Insert the plug into a mains power socket and
activate the Ice Crush/Clean operation a few times, such that the cutter
water at full speed.
Afterwards, rinse the mixer jug
clean water to ensure that all detergent residues
have been removed.
and fit the mixer jug eonto the motor
w
.
u
apart, as
e
ploughs through the
r
e
e
out with lots of
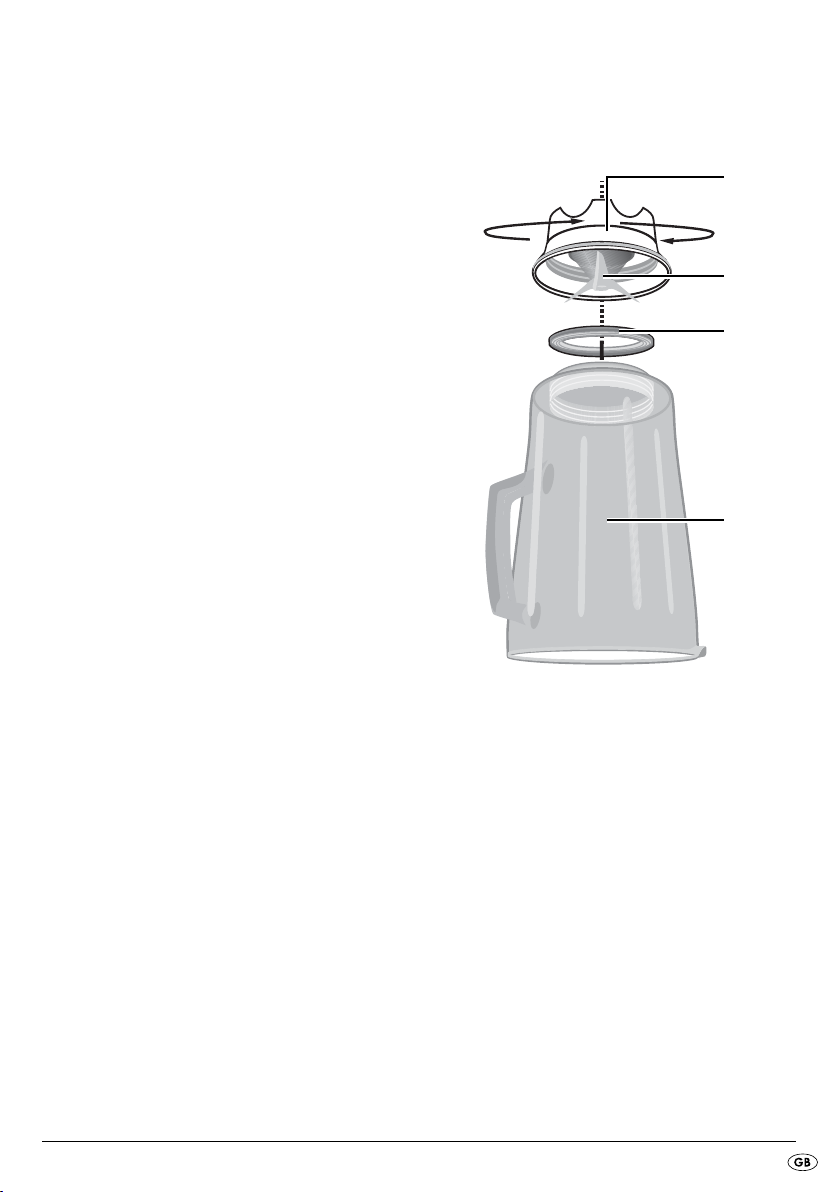
Should this not dislodge the soiling, you can separate
the lower plastic part of the mixer jug
ters
) from the the glass part of the mixer jug e:
r
(with the cut-
e
Glass element
Sealing ring
Cutting blade
Plastic element
Remove the mixer jug efrom the motor block u.
➩
Turn the plastic element of the mixer jug
➩
anti-clockwise, such that it allows itself to be released from the glass element of the mixer jug
- 9 -
e
e
.
Attention!
Take care with the cutting blades . They are very
sharp. Risk of injury!
Clean both parts thoroughly in a mild soapy
➩
solution or in a dishwasher.
Replace the plastic element of the mixer jug
➩
back onto the glass element . Ensure that the
sealing ring is correctly fitted.
e
Cleaning the motor block
Use a dry cloth or, at the most, a lightly moistened
➩
one for cleaning the plastic surfaces.
At every cleaning check that the contact switch
➩
in the receptor for the mixer jug
ked by soiling residues. If you cannot dislodge
any blockages with the corner of a piece of paper, make contact with Customer Services. Under no circumstances should you use a hard object, this could damage the contact switch.
Remove any possible residues on the underside
➩
of the motor block
stiff bristled brush. Ensure that nothing can enter
through the ventilation opening of the appliance.
only with a dry cloth or a
u
is not blok-
e
After cleaning
Allow all parts to dry well before re-assembling and
re-using the liquidiser.
Storage
If you do not intend to use the liquidiser for an
➩
extended period, clean it thoroughly (see chapter
"Cleaning").
Wrap the power cable yaround the cable sto-
➩
rage
Store the liquidiser at a cool and dry location.
➩
on the base of the motor block u.
i
Disposal
Do not dispose of the appliance in your
normal domestic waste. This product is
subject to the European guideline
2012/19/EU.
Dispose of the appliance through an approved disposal centre or at your community waste facility.
Observe the currently applicable regulations.
In case of doubt, please contact your waste disposal
centre.
Dispose of all packaging materials in an
environmentally responsible manner.
Warranty & Service
The warranty for this appliance is for 3 years from
the date of purchase. The appliance has been manufactured with care and meticulously examined before delivery.
Please retain your receipt as proof of purchase. In
the event of a warranty claim, please make contact
by telephone with our Service Department. Only in
this way can a post-free despatch for your goods be
assured.
The warranty covers only claims for material and
maufacturing defects, but not for transport damage,
for wearing parts or for damage to fragile components, e.g. buttons or batteries. This product is for private use only and is not intended for commercial use.
The warranty is void in the case of abusive and improper handling, use of force and internal tampering
not carried out by our authorized service branch.
Your statutory rights are not restricted in any way by
this warranty.
- 10 -

The warranty period will not be extended by repairs
made under warranty. This applies also to replaced
and repaired parts. Any damage and defects extant
on purchase must be reported immediately after unpacking the appliance, at the latest, two days after
the purchase date. Repairs made after the expiration of the warranty period are subject to payment.
Service Great Britain
Tel.: 0871 5000 720 (£ 0.10/Min.)
E-Mail: kompernass@lidl.co.uk
IAN 100484
Hotline availability:
Monday to Friday 08:00 - 20:00 (CET)
Importer
KOMPERNASS HANDELS GMBH
BURGSTRASSE 21
44867 BOCHUM
GERMANY
www.kompernass.com
- 11 -

- 12 -

Sadrˇzaj Strana
Uvod 14
Uporaba u skladu sa namjenom 14
Obim isporuke 14
Opis uređaja 14
Tehnički podaci 14
Sigurnosne napomene 15
Raspakiranje 17
Postavljanje 17
Rukovanje 17
Punjenje i montiranje nastavka miksera . . . . . . . . . . . . . . . . . . . . . . . . . . . . . . . . . . . . . . . . .17
Odabir stupnja brzine . . . . . . . . . . . . . . . . . . . . . . . . . . . . . . . . . . . . . . . . . . . . . . . . . . . . . . .17
Umetanje u pogonu . . . . . . . . . . . . . . . . . . . . . . . . . . . . . . . . . . . . . . . . . . . . . . . . . . . . . . . .18
Skidanje nastavka miksera . . . . . . . . . . . . . . . . . . . . . . . . . . . . . . . . . . . . . . . . . . . . . . . . . . .18
Korisni savjeti 18
Recepti 19
Shake od banana . . . . . . . . . . . . . . . . . . . . . . . . . . . . . . . . . . . . . . . . . . . . . . . . . . . . . . . . . .19
Shake od vanilije . . . . . . . . . . . . . . . . . . . . . . . . . . . . . . . . . . . . . . . . . . . . . . . . . . . . . . . . . . .19
Cappucino-Shake . . . . . . . . . . . . . . . . . . . . . . . . . . . . . . . . . . . . . . . . . . . . . . . . . . . . . . . . . .19
Tropski miks . . . . . . . . . . . . . . . . . . . . . . . . . . . . . . . . . . . . . . . . . . . . . . . . . . . . . . . . . . . . . . .19
Shake sa lješnjakom i nugatom . . . . . . . . . . . . . . . . . . . . . . . . . . . . . . . . . . . . . . . . . . . . . . .19
Shake od mrkve . . . . . . . . . . . . . . . . . . . . . . . . . . . . . . . . . . . . . . . . . . . . . . . . . . . . . . . . . . .19
Miks od ribizle . . . . . . . . . . . . . . . . . . . . . . . . . . . . . . . . . . . . . . . . . . . . . . . . . . . . . . . . . . . .19
Hawaii-Shake . . . . . . . . . . . . . . . . . . . . . . . . . . . . . . . . . . . . . . . . . . . . . . . . . . . . . . . . . . . . .20
Vośni miks sa ananasom i jagodom . . . . . . . . . . . . . . . . . . . . . . . . . . . . . . . . . . . . . . . . . . . .20
Andaluzijska hladna juha (Gazpacho) . . . . . . . . . . . . . . . . . . . . . . . . . . . . . . . . . . . . . . . . .20
Čišćenje 20
Čišćenje nastavka miksera . . . . . . . . . . . . . . . . . . . . . . . . . . . . . . . . . . . . . . . . . . . . . . . . . . .21
Čišćenje bloka motora . . . . . . . . . . . . . . . . . . . . . . . . . . . . . . . . . . . . . . . . . . . . . . . . . . . . . .22
Nakon čišćenja . . . . . . . . . . . . . . . . . . . . . . . . . . . . . . . . . . . . . . . . . . . . . . . . . . . . . . . . . . . .22
Čuvanje uređaja 22
Zbrinjavanje 22
Jamstvo & servis 22
Uvoznik 23
- 13 -

Blender
Uvod
Srdačno čestitamo na kupnji Vašeg novog uređaja.
Time ste se odlučili za visokovrijedan proizvod.
Upute za rukovanje predstavljaju sastavni dio ovog
proizvoda. One sadrže važne napomene za sigurnost, uporabu i zbrinjavanje proizvoda. Prije korištenja proizvoda se upoznajte sa svim napomenama
za rukovanje i sa svim sigurnosnim napomenama.
Proizvod koristite isključivo na opisani način i u navedenim područjima primjene. Svu dokumentaciju u
slučaju predaje proizvoda trećim osobama priložite
i takođe predajte.
Uporaba u skladu sa namjenom
Ovaj uređaj je namijenjen...
– za miješanje, piriranje i miksanje namirnica, kao
i usitnjavanje kocki leda (postupak koji se naziva
"crushing"),
– isključivo za preradu količina uobičajenih u do-
maćinstvima, te isključivo za primjenu u privatnim
domaćinstvima i u suhim prostorijama.
Ovaj uređaj nije namijenjen za ...
– usitnjavanje tvrdih sastojaka namirnica, kao što
su lješnjaci, koštice, velika zrna ili peteljke,
– prerađivanje sastojaka, koji ne predstavljaju
namirnice,
– uporabu u gospodarske ili industrijske svrhe,
– korištenje u vlažnom okruženju ili na otvorenom
prostoru,
– preradu vrućih/ključajućih tekućina.
Koristite samo dijelove opreme i zamjenske dijelove
namijenjene za ovaj uređaj. Drugi dijelovi možda
nisu dovoljno prikladni ili dovoljno sigurni!
Obim isporuke
Nakon raspakiranja provjerite cjelovitost pošiljke.
U obimu isporuke su sadržani:
1 x Blok motora sa mrežnim kabelom i mrežnim
utikačem
1 x Nastavak miksera, sa čvrsto montiranim nožem
1 x Poklopac
1 x Kapa za punjenje
1 x Upute za uporabu
Opis uređaja
Kapa za punjenje
q
Poklopac
w
Nastavak za mikser
e
Nož
r
Prekidač
t
Mrežni kabel
y
Blok motora
u
Namatač za kabel
i
Skala
o
Tehnički podaci
Nominalni napon: 220 - 240 V~, 50 Hz
Nominalna snaga: 550 W
Maksimalna
količina punjenja: 1,75 l
Zaštitna klasa: II
KB-vrijeme: 3 minute
KB-vrijeme (vrijeme kratkotrajnog pogona) označava,
koliko dugo uređaj može biti u pogonu, bez da se
motor pregrije i pretrpi oštećenje. Nakon navedenog
KB-vremena uređaj mora biti isključen toliko dugo,
dok se motor ne ohladi i dostigne sobnu temperaturu.
Izjava o sukladnosti za ovaj proizvod dostupna je
na internet stranici www.lidl.hr.
- 14 -

Sigurnosne napomene
Da biste izbjegli opasnost po život uslijed strujnog udara:
• Osigurajte da blok motora, mrežni kabel i mrežni utikač nikada ne budu zaronjeni u vodu ili druge tekućine.
• Uređaj koristite isključivo u suhim prostorijama, nikada na otvorenom ili u vlažnom okruženju.
• Obratite pažnju na to, da napojni kabel u pogonu nikada ne bude vlažan ili
mokar. Provodite ga na taj način, da ne može biti ugnječen ili oštećen na drugi
način.
• Oštećene mrežne utikače ili oštećen mrežni kabel neizostavno dajte zamijeniti
od strane autorizi-ranog stručnog osoblja ili servisa za kupce, kako biste
izbjegli nastanak opasnosti.
• Nakon upotrebe uvijek izvucite utikač iz utičnice. Samo isključivanje uređaja
nije dovoljno, jer je još uvijek prisutan mrežni napon u uređaju, dok se mrežni
utikač nalazi u utičnici.
• Prije svake uporabe prekontrolirajte besprijekorno stanje uređaja. Uređaj ne smije
biti korišten, ako postoje vidljiva oštećenja, pogotovo na bloku motora ili na
staklenom nastavku miksera.
• Neizostavno izvucite mrežni utikač iz utičnice, kada primijetite nastanak neobičnih zvukova ili mirisa, ili kada dođe do vidne pogreške u funkciji.
Da biste izbjegli pregrijavanje i opasnost od požara:
• Ne koristite uređaj u području neposrednog utjecaja sunčeve svjetlosti, niti u
području djelovanja topline grijačih uređaja.
• Nikada ne umetnite kipuće tekućine u nastavak miksera! Ove tekućine prethodno pustite da se dovoljno ohlade. U protivnom može doći do pregrijavanja uređaja i do prskanja stakla na nastavku miksera!
• Nikada ne radite sa uređajem u praznom stanju, dakle bez sastojaka u nastavku za miksanje.
- 15 -

Da biste izbjegli opasnost od nezgode i ozljeđivanja:
• Nikada rukom ne hvatajte u nastavak miksera, posebno ne dok je mikser u
pogonu. Noževi su krajnje oštri!
• Ne otvarajte poklopac kada je uređaj u pogonu. U protivnom može doći do izbacivanja namirnica iz miksera velikom brzinom!
• Nikada ne umetnite dijelove pribora za jelo ili predmete za miješanje u nastavak miksera, dok je mikser u pogonu. Postoji znatna opasnost od ozljeđivanja,
ako ovi predmeti dodirnu nož koji rotira vrlo velikom brzinom!
• Ne pustite uređaj da radi bez nadzora, kako biste u slučaju opasnosti odmah
mogli reagirati.
• Djeca bi trebala biti pod nadzorom, čime treba biti osigurano da se ne mogu
igrati ovim uređajem.
• Ne koristite uređaj za druge svrhe od onih koje su opisane u ovim uputama.
• Ovaj uređaj mora biti odvojen od mreže napajanja uvijek kada nije pod nadzorom, prije sklapanja, rastavljanja ili čišćenja.
• Uređaj ne smiju koristiti djeca.
• Uređaj i njegov priključni vod morate držati podalje od djece.
• Ovaj uređaj mogu koristiti osobe sa smanjenim fizičkim, senzornim ili mentalnim sposobnostima ili osobe sa pomanjkanjem iskustva i/ili znanja, ukoliko ih
se prilikom uporabe nadzire ili ukoliko su upućene u sigurno rukovanje
uređajem, te ukoliko su shvatile opasnosti koje iz tog rukovanja proizlaze.
• Djeca se ne smiju igrati uređajem.
• Budite oprezni prilikom rukovanja uređajem. Noževi su vrlo oštri!
• Postupite oprezno prilikom pražnjenja nastavka za miksanje! Noževi su vrlo oštri!
• Postupite oprezno prilikom čišćenja uređaja! Noževi su vrlo oštri!
• Isključite uređaj i izvucite mrežni utikač prije nego vršite zamjenu opreme ili
dodirujete dijelove koji se za vrijeme rada uređaja pokreću.
• Nastavak za mikser koristite isključivo sa zajedno isporučenim blokom motora!
• Osigurajte, da mikser uvijek bude isključen, prije nego podignete nastavak za
mikser s bloka motora!
- 16 -

Raspakiranje
Rukovanje
• Uklonite sve materijale pakiranja i zaštitne folije
sa uređaja. Pakiranje čuvajte, da biste uređaj
mogli zaštićeno uskladištiti ili poslati servisu, na
primjer u slučaju potrebe za popravkom.
• Prije uporabe uređaja provjerite, da li je uređaj
neoštećen, kao i mrežni kabel sa utikačem, te svi
dijelovi opreme i dijelovi uređaja.
• Savjesno očistite sve sastavne dijelove prije prve
uporabe stajaćeg miksera (vidi poglavlje „Čišćenje“).
Postavljanje
Nakon što ste sve dijelove očistili na način opisan
u poglavlju "Čišćenje":
Postavite uređaj tako, ...
➩
– da mrežni kabel
joj strani uređaja,
– da mrežni utikač bude lako dostupan, kako biste
ga u slučaju opasnosti mogli izvući iz utičnice.
– da stoji stabilno i ne klizi i da gumeni čepovi imaju
čvrst oslonac, tako da se kod vibracija uređaj ne
može prevrnuti i pasti.
– da kabel
uređaj ne bi mogao biti prevrnut uslijed nehotičnog povlačenja.
y
prolazi kroz utore na stražn-
y
ne strši u područje rada, kako
Upozorenje!
Motor se automatski isključuje, čim nastavak miksera
uklonimo sa bloka motorau. U tom slučaju mo-
e
žete previdjeti, da je stroj još uvijek uključen. Motor
se može onda neočekivano pokrenuti, čim montirate
nastavak miksera
Zbog toga:
• Mrežni utikač utaknite tek onda u utičnicu, kada
ste nastavak miksera
montirali.
• Prije montiranja uvijek provjerite, da je uređaj
isključen ili mrežni utikač izvučen iz utičnice.
• Prvo isključite uređaj, izvucite mrežni utikač i
pričekajte da motor miruje, a tek onda skinite
nastavak miksera
e
:
napunili i zatvorenog
e
.
e
Punjenje i montiranje nastavka miksera
Skinite nastavak miksera esa bloka motora ui
➩
odstranite poklopac
Napunite nastavak miksera ei nakon toga
➩
poklopac
miksera
odlijevanje na nastavku za miksanje
zatvoren.
Utaknite kapu za punjenjequ otvor poklopca,
➩
a njega nakon toga zatvorite okretanjem u smjeru kazaljke na satu.
Postavite napunjeni i zatvoreni nastavak miksera
➩
na blok motorau. Nastavak mikseraeblago
e
okrenite, dok ga možete pritisnuti prema dolje.
Samo kada je nastavak miksera
jednoj ravni, motor može biti pokrenut.
ponovo čvrsto pritisnite na nastavak
w
. Obratite pažnju i na to, da ispust za
e
w
.
bude
e
postavljen u
e
Odabir stupnja brzine
Kada je nastavak mikseraenapunjen, potpuno
zatvoren i postavljen na blok motora
uključiti uređaj.
- 17 -
u
, možete

Postavite prekidačtna ...
➩
– Stupanj 1-3
za tekuće ili srednje čvrste namirnice, za miješanje i piriranje
– Stupanj 3-5
za čvršće namirnice ili za usitnjavanje
– Stupanj Ice Crush/Clean
rövid, erőteljes impulzus üzemmódhoz, pl.
jégkocka aprításához vagy tisztításhoz.
Prekidač
motor ne bi bio preopterećen. Prekidač
toga držite samo kratko u položaju za pogon.
u tom položaju ne može ostati, kako
t
t
zbog
Napomena
Nastavak za miksanje enapunite sa maksimalno
180 g kocki leda. U protivnom uređaj ne može na
optimalan način usitniti kocke leda.
Umetanje u pogonu
Upozorenje!
Ako za vrijeme pogona želite umetnuti namirnice,
smijete otvoriti isključivo za to predviđenu kapu za
umetanje
• Nikako ne otvarajte poklopac
se dogoditi, da namirnice budu izbačene iz
uređaja velikom brzinom!
• Nikada ne umetnite dijelove pribora za jelo ili
predmete za miješanje u nastavak miksera
dok je mikser u pogonu. Postoji znatna opasnost
od ozljeđivanja, ako ovi predmeti dodirnu nož
r
.
q
w
koji rotira vrlo velikom brzinom!
. Moglo bi
e
Skidanje nastavka miksera
Kada je obrada umetnutih namirnica okončana:
Prekidačtuvijek postavite u položaj "Isklj"
➩
(„OFF“) izvucite mrežni utikač.
Pričekajte dok se motor ne umiri, prije nego što
➩
nastavak miksera
vak miksera
izdignete prema gore. Nasta-
e
pritom ne morate okretati.
e
Korisni savjeti
– Da biste prilikom piriranja čvrstih namirnica ost-
varili bolje rezultate, redom umetnite tek male
porcije u nastavak miksera
nom umetnete jednu veliku količinu.
– Kada prerađujete čvrste sastojke, prethodno ih
izrežite u male komadiće (2-3 cm).
– Prilikom miksanja tekućih namirnica započnite
sa malom količinom. Zatim polako dodajte sve
veću količinu tekućine kroz otvor poklopca.
– Kada za vrijeme pogona uređaja postavite ruku
na gornju stranu stajaćeg miksera, možete na taj
način dobro stabilizirati uređaj.
– Za miješanje čvrstih ili vrlo gustih tečnih namirnica
može biti korisna uporaba pulsnog pogona,
kako biste izbjegli zastajanje noža
Napomena
Ne koristite uređaj za promjenu zrnatog svojstva
kuhinjske soli, rafiniranog ili bijelog šećera. Na
,
primjer za izradu šećera u prahu.
, umjesto da odjed-
e
r
.
Da biste mogli vršiti umetanje za vrijeme pogona, ...
Kapu za punjenjeqodvrnite okretanjem u smje-
➩
ru protivnom kazaljci na satu, te je izvadite.
Ispunite sastojke.
➩
Nakon toga ponovo umetnite kapu za punjenje
➩
u otvor poklopca, te je zavrnite u smjeru kazalj-
q
ke na satu.
- 18 -

Recepti
Shake od banana
2 banane
ca. 2 velike žlice šečera
(ovisno o zrelosti banana i osobnom ukusu)
1/2 litre mlijeka
1 mala količina limunovog soka
Ogulite banane i pirirajte ih na stupnju 2. Postupno
dodajte mlijeko, šečer i na koncu limunov sok. Sve
zajedno miješajte tako dugo, dok ne nastane ujednačeno izmiješana tekučina.
Poslužite shake u rashlađenom stanju.
Shake od vanilije
1/4 litre mlijeka
250 g sladoleda od vanilije
125 ml kockice leda
1 1/2 male žlice šečera
Usitnite kocke leda na stupnju Ice Crush/Clean. Umetnite ostale sastojke u mikser. Miješajte sve zajedno na stupnju 2, sve dok ne nastane ravnomjerna
tekućina.
Cappucino-Shake
65 ml hladne espresso-kave (ili vrlo jake kave)
65 ml mlijeka
15 g šeśera
65 ml sladoleda od vanilije
100 ml usitnjene kocke leda
Usitnite kocke leda na stupnju Ice Crush/Clean. Dodajte espresso-kavu, mlijeko i šeśer. Miješajte sve
zajedno na stupnju 2, sve dok se šeśer ne istopi.
Na koncu dodajte sladoled od vanilije i sve zajedno kratko promiješajte na stupnju 1.
Tropski miks
125 ml soka od ananasa
60 ml soka od papaje
50 ml soka od naranče
1/2 mala limenka bresaka u soku
125 ml kockice leda
Usitnite kocke leda na stupnju Ice Crush/Clean.
Umetnite sve sastojke u mikser i sve zajedno promiješajte na stupnju 3.
Shake sa lješnjakom i nugatom
1/2 litre mlijeka
200 g kreme od lješnjaka i nugata
1 kugla sladoleda od vanilije
50 ml tučenog vrhnja
Miješajte sve sastojke zajedno u mikseru na stupnju
3, sve dok ne nastane ujednačena mješavina.
Shake od mrkve
300 ml soka od jabuke
500 ml soka od mrkve
4 velike žlice ulja (od pšeničnih klica ili repice)
4 velike žlice soka od limuna -umbir u prahu
đumbir u prahu
Papar
Dodajte sok od jabuke, ulje i sok od limuna u mikser
i sve zajedno miješajte na stupnju 2. Nakon toga
dodajte sok od mrkve i još jednom promiješajte sve
na stupnju 2. Zatim po ukusu u shake dodajte đumbir u prahu i papar.
Miks od ribizle
2 male žlice meda
2 banane
1/4 litre mlaśenice
1/4 litre soka od ribizle (crne)
Umetnite sve sastojke u mikser i sve zajedno promiješajte na stupnju 3.
- 19 -

Hawaii-Shake
4 banane
1/4 litre soka od ananasa
1/2 litre mlijeka
2 velike žlice meda
1/4 litre ruma
Ogulite banane i pirirajte ih na stupnju 2. Dodajte
ostale sastojke i sve zajedno pomiješajte na
stupnju 1.
Vośni miks sa ananasom i jagodom
250 ml soka od ananasa
200 g jagoda
300 ml soka od jabuke
4 kocke leda
Usitnite kocke leda na stupnju Ice Crush/Clean.
Operite jagode i odstranite zelene dijelove i listove.
Pirirajte plodove na stupnju 2. Zatim dodajte ostale
sastojke i sve zajedno miješajte na stupnju 1.
Andaluzijska hladna juha (Gazpacho)
1/2 krastavca
1 mesnata rajčica
1 zelena paprika
1/2 Luk
1 češanj češnjaka
1/2 bijele žemlje
1/2 male žlice soli
1 mala žlica vinskog octa
1 velika žlica maslinovog ulja
Napomena
Recepti bez jamstva. Svi podaci glede sastojaka i
pripremanja su okvirni podaci. Dopunite ove prijedloge recepata svojim osobnim iskustvima.
Napomena
Za osobe koje ne podnose laktozu preporučujemo
korištenje mlijeka bez sadržaja laktoze. Molimo vodite pritom računa o tome, da je mlijeko bez laktoze nešto slađe od običnog mlijeka.
Čišćenje
Oprez!
Prije čišćenja stajaćeg miksera i njegovih dijelova:
• Osigurajte da uređaj bude isključen, a mrežni
utikač izvučen.
Niukom slučaju ne smijete blok motora
niti u vodu ili u neku drugu tekućinu. Na taj
način može doći do opasnosti po život uslijed
strujnog udara, a i uređaj može biti oštećen.
• Nikada ne otvorite kućište uređaja. U protivnom
može doći do opasnosti po život uslijed strujnog
udara.
• Nikada ne demontirajte noževe
tajte rukom u nastavak miksera
krajnje oštri!
• Ne koristite otapala ili ribajuća sredstva za plastične
površine, koje bi na taj način mogle biti oštećene.
; nikada ne hva-
r
. Noževirsu
e
u
uro-
Povrśe narežite u ca. 2 cm velike komade. U mikser
umetnite prvo rajčice, a zatim krastavce. Pirirajte
povrśe na stupnju 3. Dodajte ostale sastojke i pirirajte/pomiješajte sve zajedno na stupnju 3, dok ne nastane homogena juha. Juhu poslužite sa kruhom.
- 20 -

Čišćenje nastavka miksera
Nastavak mikseraečistite isključivo pomoću
➩
četke za posuđe sa dugom drškom, tako da isključite mogućnost ozljeđivanja uslijed kontakta sa
noževima
U slučaju tvrdokornog onečišćenja nastavak
➩
miksera
pranje posuđa. U tu svrhu nastavak za miksanje
uvijek rastavite na način opisan u nastavku.
e
Očistite poklopacwi kapuqza punjenje po-
➩
moću stroja za pranje posuđa ili ručnim pranjem.
Ako stajaći mikser čistite neposredno nakon uporabe,
u većini slučajeva ćete postići dostatno higijensko
čišćenje pomoću slijedeće alternative:
Napunite u nastavak za miksanje e750 ml
➩
vode i dodajte nekoliko kapi blagog sredstva za
pranje posuđa. Zatvorite poklopac
nastavak za miksanje
Utaknite mrežni utikač u utičnicu i u nekoliko navrata aktivirajte pogonski modus Ice Crush/Clean
(usitnjavanje leda/čišćenje), tako da nož
maksimalnim brojem okretaja prolazi kroz vodu.
Nakon toga nastavak za miksanje
likom količinom bistre vode, tako da svi ostaci
sredstva za pranje posuđa budu uklonjeni.
.
r
možete očistiti i pomoću stroja za
e
w
na blok motora u.
e
e
i postavite
sa
r
isperite ve-
Ukoliko se onečišćenje ne odvoji, donji plastični dio
nastavka miksera
jiti pomoću noževa
od staklenog dijela možete odvo-
e
:
r
Stakleni element
Prsten za brtvljenje
NoÏ
Plastiãni dio
Skinite nastavak mikseraesa bloka motorau.
➩
Okrenite plastični dio nastavka mikserae,
➩
tako da ga od staklenog dijela nastavka
miksera
- 21 -
možete odvojiti.
e

Oprez!
Oprezno rukujte sa noževima . Krajnje su oštri.
Opasnost od ozljeđivanja!
Očistite oba dijela temeljito pomoću blage sapunice
➩
ili u stroju za pranje posuđa.
Postavite plastični dio nastavka miksera
➩
ponovo na stakleni dio nastavka mikserae.
Obratite pažnju na to, da prsten brtvila bude
umetnut.
e
Čišćenje bloka motora
Upotrijebite suhu ili tek blago navlaženu krpu,
➩
da biste očistili plastične površine.
Prilikom svakog čišćenja kontrolirajte, da li je
➩
kontaktni prekidač u elementu za prihvat nastavka
miksera
Ako eventualna onečišćenja, koja blokiraju prekidač, ne možete odvojiti pomoću ivice lista
papira, obratite se servisu za kupce.Niukom slučaju ne koristite tvrde predmete, jer bi oni mogli
oštetiti kontaktni prekidač.
Odstranite eventualna onečišćenja na donjoj
➩
strani motora
moću kista za prašinu. Obratite pažnju na to, da
ništa ne dospije u unutrašnjost uređaja kroz
ventilacijske otvore.
blokiran preostalim onečišćenjima.
e
isključivo pomoću suhe krpe ili po-
u
Nakon čišćenja
Ostavite da se svi dijelovi dobro osuše, prije nego
što stajaći mikser ponovo sastavite i koristite.
Čuvanje uređaja
Kada stajaći mikser duže vrijeme ne koristite,
➩
temeljito ga očistite (vidi poglavlje „Čišćenje“).
Mrežni kabelynamotajte na namatač za ka-
➩
bel
, koji se nalazi na dnu bloka motorau.
i
Stajaći mikser čuvajte na hladnom i suhom mjestu.
➩
Zbrinjavanje
Uređaj nikako ne bacajte u obično
kućno smeće. Ovaj pzoizvod spada u
važnost uredbe evropske direktive
2012/19/EU.
Uređaj zbrinite preko autoriziranog poduzeća za
zbrinjavanje otpada ili preko Vašeg komunalnog
poduzeća.
Obratite pažnju na aktualno važeće propise. U
slučaju dvojbe se povežite sa svojim mjesnim
poduzećem za zbrinjavanje otpada.
Sve materijale ambalaže zbrinite na način
neškodljiv za okoliš.
Jamstvo & servis
Na ovaj uređaj vrijedi jamstvo u trajanju od 3 godine od datuma kupovine. Uređaj je pažljivo proizveden i prije isporuke brižljivo kontroliran. Molimo sačuvajte blagajnički račun kao dokaz o kupnji.
Molimo da se u slučaju ostvarivanja prava na jamstvo telefonski povežete sa Vašom servisnom ispostavom. Samo na taj način vaša roba može biti besplatno uručena.
Jamstvo vrijedi samo za greške materijala i izrade,
a ne za transportne štete, potrošne dijelove ili oštećenja lomljivih dijelova, na primjer prekidača ili baterija.
Proizvod je namijenjen isključivo za privatnu, a ne
za gospodarstvenu uporabu.
U slučaju nestručnog rukovanja, rukovanja protivnog namjeni uređaja, primjene sile i zahvata, koji
nisu izvršeni od strane našeg ovlaštenog servisnog
predstavništva, važenje jamstva prestaje. Vaša zakonska prava ovim jamstvom ostaju netaknuta.
- 22 -

Jamstveni rok se ne produžava uslijed ostvarivanja
prava na jamstvo. To vrijedi i za zamijenjene i popravljene dijelove. Eventualno već prilikom kupovine prisutna oštećenja i nedostaci moraju biti javljena neposredno nakon raspakiranja, ali najkasnije
dva dana nakon datuma kupovine. Popravke vršene
nakon isteka jamstvenog roka podliježu obavezi
plaćanja.
Servis Hrvatska
Tel.: 0800 777 999
E-Mail: kompernass@lidl.hr
IAN 100484
Dostupnost deÏurne telefonske linije:
Ponedjeljak do petak od 8:00 - 20:00 sati (SEV)
Uvoznik
Lidl Hrvatska d.o.o. k.d.,
p.p. 61
10020 Novi Zagreb
Proizvođač:
KOMPERNASS HANDELS GMBH
BURGSTRASSE 21
44867 BOCHUM
GERMANY
www.kompernass.com
- 23 -

- 24 -

CUPRINS PAGINA
Introducere 26
Utilizarea conform destinaţiei 26
Furnitura 26
Descrierea aparatului 26
Date tehnice 26
Indicaţii de siguranţă 27
Dezambalarea 29
Amplasarea 29
Operarea 29
Umplerea şi montarea recipientului de amestecare . . . . . . . . . . . . . . . . . . . . . . . . . . . . . . . .29
Selectarea treptei de viteză . . . . . . . . . . . . . . . . . . . . . . . . . . . . . . . . . . . . . . . . . . . . . . . . . . .29
Umplerea în timpul funcţionării . . . . . . . . . . . . . . . . . . . . . . . . . . . . . . . . . . . . . . . . . . . . . . . .30
Demontarea recipientului de amestecare . . . . . . . . . . . . . . . . . . . . . . . . . . . . . . . . . . . . . . . .30
Sfaturi utile 30
Reţete 31
Shake de banane . . . . . . . . . . . . . . . . . . . . . . . . . . . . . . . . . . . . . . . . . . . . . . . . . . . . . . . . . .31
Shake de vanilie . . . . . . . . . . . . . . . . . . . . . . . . . . . . . . . . . . . . . . . . . . . . . . . . . . . . . . . . . . .31
Shake de cappucino . . . . . . . . . . . . . . . . . . . . . . . . . . . . . . . . . . . . . . . . . . . . . . . . . . . . . . . .31
Tropical-Mix . . . . . . . . . . . . . . . . . . . . . . . . . . . . . . . . . . . . . . . . . . . . . . . . . . . . . . . . . . . . . .31
Shake de nucă şi nuga . . . . . . . . . . . . . . . . . . . . . . . . . . . . . . . . . . . . . . . . . . . . . . . . . . . . . .31
Shake de morcovi . . . . . . . . . . . . . . . . . . . . . . . . . . . . . . . . . . . . . . . . . . . . . . . . . . . . . . . . . .31
Mix de coacăze . . . . . . . . . . . . . . . . . . . . . . . . . . . . . . . . . . . . . . . . . . . . . . . . . . . . . . . . . . .31
Shake Hawaii . . . . . . . . . . . . . . . . . . . . . . . . . . . . . . . . . . . . . . . . . . . . . . . . . . . . . . . . . . . . .32
Mix de fructe ananas şi căpşuni . . . . . . . . . . . . . . . . . . . . . . . . . . . . . . . . . . . . . . . . . . . . . . .32
Supă andaluză rece (Gazpacho) . . . . . . . . . . . . . . . . . . . . . . . . . . . . . . . . . . . . . . . . . . . . . .32
Curăţarea 32
Curăţarea recipientului de amestecare . . . . . . . . . . . . . . . . . . . . . . . . . . . . . . . . . . . . . . . . .33
Curăţarea blocului motor . . . . . . . . . . . . . . . . . . . . . . . . . . . . . . . . . . . . . . . . . . . . . . . . . . . .34
După curăţare . . . . . . . . . . . . . . . . . . . . . . . . . . . . . . . . . . . . . . . . . . . . . . . . . . . . . . . . . . . . .34
Depozitarea 34
Eliminarea aparatelor uzate 34
Garanţia şi service-ul 34
Importator 35
- 25 -
R

Blender
Introducere
Felicitări pentru cumpărarea noului dumneavoastră
aparat!
Acum deţineţi un produs de calitate excepţională.
Instrucţiunile de utilizare sunt parte integrantă a
produsului. Acestea conţin indicaţii importante
privind siguranţa, modul de utilizare şi de eliminare
a aparatelor uzate. Înainte de a utiliza produsul,
familiarizaţi-vă cu toate indicaţiile de operare şi de
siguranţă. Utilizaţi acest produs numai în modul
descris şi doar pentru domeniile de utilizare specificate. Dacă înmânaţi produsul altor persoane,
predaţi, de asemenea, şi documentele aferente.
Utilizarea conform destinaţiei
Acest aparat este destinat ...
– amestecării şi zdrobirii alimentelor şi pentru
măcinarea cuburilor de gheaţă (aşa-numitul
„Crushen”),
– utilizării pentru cantităţi reduse procesate în
bucătăria de acasă, şi numai în spaţii uscate.
Acest aparat nu este destinat ...
– mărunţirii alimentelor dure, de exemplu, nuci,
sâmburi, boabelor mari sau tijelor de plante,
– procesării de materiale care nu se încadrează
în categoria alimente,
– utilizării profesionale sau industriale,
– utilizării în medii umede sau în aer liber,
– prelucrării lichidelor fierbinţi/în fierbere.
Utilizaţi numai accesoriile şi piesele de schimb destinate acestui aparat. Este posibil ca celelalte componente să nu fie suficient de adecvate sau sigure!
Furnitura
După dezambalare verificaţi dacă furnitura este
completă. Furnitura conţine:
1 x bloc motor cu cablu de alimentare şi ştecăr
1 x recipient de amestecare şi cuţite montate fix
1 x capac
1 x dop de umplere
1 x manual de utilizare
Descrierea aparatului
Dop de umplere
q
Capac
w
Recipient de amestecare
e
Cuţite
r
Întrerupător
t
Cablu de alimentare
y
Bloc motor
u
Mosor cablu
i
Scală gradată
o
Date tehnice
Tensiune nominală: 220 - 240 V ~, 50 Hz
Putere nominală: 550 W
Capacitate max.: 1,75 l
Clasa de protecţie: II
Timpul de operare
continuă: 3 de minute
Timpul de operare continuă indică pentru cât timp un
aparat poate fi operat fără ca motorul să se supraîncălzească şi să se defecteze. După terminarea duratei
de funcţionare continuă specificată, aparatul trebuie
oprit până când motorul atinge din nou temperatura
camerei.
R
- 26 -

Indicaţii de siguranţă
Pentru a evita pericolul de electrocutare:
• Asiguraţi-vă că blocul motor, cablul de alimentare sau ştecărul nu sunt niciodată
introduse în apă sau în alte lichide.
• Utilizaţi aparatul numai în încăperi uscate, niciodată în aer liber sau în medii
umede.
• Evitaţi contactul cablului cu lichide sau umezirea acestuia atât timp cât este în
funcţiune. Ghidaţi cablul astfel încât să nu se blocheze sau să se deterioreze
într-un alt mod.
• Dacă ştecărul sau cablul de alimentare se defectează, solicitaţi imediat repara-
rea de către personal specializat sau de către serviciul clienţi, pentru a evita
periclitările.
• După utilizare, scoateţi totdeauna ştecărul din priză. Simpla oprire nu este sufi-
cientă, deoarece în aparat mai există încă tensiune, atât timp cât ştecărul este în
priză.
• Înainte de fiecare utilizare, verificaţi dacă aparatul este în stare de funcţionare
ireproşabilă. Aparatul nu poate fi utilizat dacă observaţi deteriorări, în special
deteriorări ale blocului motor sau ale recipientului de amestecare.
• Scoateţi ştecărul din priză dacă percepeţi zgomote neobişnuite sau în cazul
defecţiunilor de funcţionare sesizabile.
Pentru a evita supraîncălzirea sau pericolul de incendiu:
• Nu utilizaţi aparatul într-un loc expus radiaţiei solare directe sau în aria de
influenţă a aparatelor generatoare de căldură;
• Nu introduceţi niciodată lichide clocotite sau alimente foarte fierbinţi în reci-
pientul de amestecare! Înainte de a le introduce în recipient, aşteptaţi să se ră-
cească la temperatura camerei. În caz contrar aparatul se poate supraîncălzi,
iar sticla recipientului poate plezni!
• Nu utilizaţi aparatul dacă recipientul de amestecare este gol.
- 27 -
R

Pentru a evita pericolul de accidente sau răniri:
• Nu introduceţi niciodată mâna în recipientul de amestecare, mai ales în timpul
funcţionării. Cuţitele sunt extrem de ascuţite!
• nu deschideţi capacul în timpul funcţionării aparatului. În caz contrar, din reci-
pient pot fi aruncate cu viteză mare bucăţi de alimente!
• Nu introduceţi tacâmuri sau obiecte de amestecat în interiorul recipientului de
amestecare, atât timp cât aparatul este în funcţiune. Pericol considerabil de rănire
la contactul cu cuţitele la o viteză de rotaţie ridicată!
• Pentru a putea interveni prompt în caz de pericol, nu lăsaţi aparatul să funcţio-
neze nesupravegheat;
• Copiii trebuie supravegheaţi, pentru a împiedica utilizarea aparatului ca jucărie.
• Nu utilizaţi aparatul în alte scopuri decât cele descrise în aceste instrucţiuni.
• Atunci când nu este posibilă supravegherea şi înaintea asamblării,
dezasamblării sau curăţării, aparatul se va scoate întotdeauna din priză.
• Nu este permisă utilizarea de către copii a acestui aparat.
• Aparatul şi cablul de conexiune nu se vor păstra la îndemâna copiilor.
• Acest aparat poate fi utilizat de persoane cu abilităţi fizice, senzoriale
sau mentale reduse sau fără experienţă şi/sau fără cunoştinţe
necesare dacă sunt supravegheate sau dacă au fost instruite cu privire
la utilizarea sigură a acestui aparat şi au înţeles pericolele cu privire
la acesta.
• Copiii nu au voie să se joace cu aparatul.
• Manevraţi aparatul cu atenţie. Cuţitele sunt foarte de ascuţite!
• Procedaţi cu atenţie la golirea accesoriului de mixare!
Cuţitele sunt foarte de ascuţite!
• Procedaţi cu atenţie la curăţarea aparatului! Cuţitele sunt foarte de ascuţite.
• Opriţi aparatul şi scoateţi ştecărul din priză înaintea schimbării accesoriilor sau
manevrării componentelor care se mişcă în timpul funcţionării.
• Utilizaţi recipientul de amestecare numai împreună cu blocul motor livrat!
• Asiguraţi-vă că mixerul este întotdeauna deconectat înaintea ridicării recipientului
de amestecare de la blocul motor!
R
- 28 -

Dezambalarea
Operarea
• Îndepărtaţi toate ambalajele şi foliile de protecţie
de pe aparat. Păstraţi ambalajul pentru depozita-
rea aparatului sau pentru expedierea acestuia în
cazul în care trebuie reparat.
• Înainte de punerea în funcţiune a aparatului, asi-
guraţi-vă că aparatul nu este defect, la fel şi cablul
de alimentare cu ştecăr şi accesoriile sau celelalte
componente ale aparatului.
• Curăţaţi bine toate părţile componente
înainte de prima utilizare a mixerului vertical
(vezi „Curăţarea”).
Amplasarea
După curăţarea tuturor componentelor în modul
descris în secţiunea „Curăţarea”:
Amplasaţi aparatul astfel încât ...
➩
– cablul
– ştecărul să fie uşor accesibil, pentru a-l putea
scoate din priză în caz de pericol,
– să fie aşezat stabil şi să nu alunece, astfel încât
ventuzele să adere bine pentru a evita răsturna-
rea aparatului în caz de vibraţii,
– cablul
răsturnaţi aparatul în caz de tragere involuntară.
să poată fi ghidat în spate prin decupaj,
y
să nu ajungă în perimetrul de lucru şi să
y
Avertizare!
Motorul se opreşte în momentul în care aţi demontat
recipientul de amestecare
Se poate să fi uitat după aceea că aparatul este
încă pornit. Motorul porneşte pe nepregătite după
montarea recipientului de amestecare
De aceea:
• introduceţi ştecărul în priză doar după ce aţi umplut, montat şi închis recipientul
• înainte de montare, asiguraţi-vă totdeauna că
aparatul este oprit sau că ştecărul este scos din
priză;
• opriţi aparatul, scoateţi ştecărul din priză şi aşteptaţi oprirea completă a aparatului înainte de
demontarea recipientului
de pe blocul motor u.
e
.
e
;
e
.
e
Umplerea şi montarea recipientului de
amestecare
Demontaţi recipientul ede pe blocul motor
➩
şi îndepărtaţi capacul w.
Umpleţi recipientul eşi apăsaţi apoi capacul
➩
bine pe recipient e. Asiguraţi-vă că şi vârful recipientului
Introduceţi dopul qîn deschizătura din capac şi
➩
rotiţi-l în sens orar.
Aşezaţi recipientul eumplut şi închis pe blocul
➩
motor
puteţi apăsa în jos. Motorul porneşte numai
dacă recipientul de amestecare
pe blocul motor.
este închis.
e
. Rotiţi uşor recipientul epână când îl
u
este aşezat fix
e
u
w
Selectarea treptei de viteză
Când recipientul egata umplut şi închis complet este
poziţionat pe blocul motor
- 29 -
puteţi porni aparatul.
u
R

Poziţionaţi întrerupătorul la t...
➩
– Treapta 1-3
alimente lichide sau semidure pentru amestecare
sau zdrobire
– Treapta 3-5
pentru alimente mai dure sau pentru mărunţire
– Treapta Ice Crush/Clean
pentru funcţionare scurtă prin impulsuri, de exemplu, pentru măcinarea cuburilor de gheaţă sau
pentru curăţare. Nu lăsaţi întrerupătorul
această poziţie, pentru a evita suprasolicitarea
motorului. De aceea, ţineţi întrerupătorul
această poziţie numai pentru un timp scurt.
t
t
în
în
Indicaţie
Umpleţi recipientul de amestecare ecu maxim
180 g de gheaţă. Aparatul nu va măcina optim o
cantitate mai mare de gheaţă.
Umplerea în timpul funcţionării
Avertizare!
Dacă doriţi să introduceţi ceva în recipient în timpul
funcţionării aparatului, utilizaţi numai dopul de umplere
• Nu deschideţi capacul
• Nu introduceţi tacâmuri sau obiecte de amestecat
prevăzut în acest scop.
q
sub niciun pretext.
w
Din recipient pot fi aruncate cu viteză mare
bucăţi de alimente!
în interiorul recipientului
este în funcţiune. Pericol considerabil de rănire la
contactul cu cuţitele
cată!
atât timp cât aparatul
e
la o viteză de rotaţie ridi-
r
Demontarea recipientului de
amestecare
După terminarea procesării alimentelor:
Mai întâi, comutaţi întotdeauna întrerupătorul
➩
în poziţia oprit („OFF“) şi scoateţi ştecărul din
priză.
aşteptaţi până la oprirea completă a motorului
➩
înainte de demontarea recipientului de umplere
Pentru aceasta, nu este nevoie să rotiţi recipientul
t
e
e
Sfaturi utile
– Pentru a obţine rezultate mai bune la zdrobirea
ingredientelor mai consistente, introduceţi pe rând
porţii mici în recipient
cantitate mare dintr-o dată.
– Când procesaţi ingrediente consistente, tăiaţi-le
în bucăţi mici (2-3 cm).
– La amestecarea ingredientelor lichide începeţi cu o
cantitate redusă de lichid. Apoi introduceţi treptat
restul prin deschizătura din dop.
– Dacă, în timpul funcţionării, ţineţi cu mâna de
mixerul închis, puteţi asigura o stabilitate mai
mare a aparatului.
– Pentru amestecarea lichidelor consistente este utilă
funcţionarea prin impulsuri, pentru a evita blocarea
cuţitelor
r
.
Indicaţie
Nu utilizaţi aparatul pentru a măcina sare, zahăr tos
sau zahăr candel. De exemplu, pentru a obţine zahăr
pudră.
, în loc de a umple o
e
.
.
Pentru a adăuga ceva în timpul mersului ...
rotiţi dopul de umplere qîn sens antiorar şi sco-
➩
ateţi-l afară;
Completaţi ingrediente.
➩
după umplere aşezaţi la loc dopul qşi rotiţi-l în
➩
sens orar.
R
- 30 -

Reţ ete
Shake de banane
2 banane
cca 2 linguri de zahăr (în funcţie de cât sunt de coapte
bananele şi după gust)
1/2 de litru de lapte
1 vârf de suc de lămâie
Decojiţi bananele şi zdrobiţi-le cu treapta a 2-a.
Adăugaţi treptat laptele, apoi zahărul şi sucul de
lămâie. Amestecaţi toate ingredientele până obţineţi
un lichid omogen.
Serviţi băutura frapată.
Shake de vanilie
1/4 de litru de lapte
250 g de îngheţată de vanilie
125 ml de cuburi de gheaţă
1 1/2 linguriţe de zahăr
Zdrobiţi cuburile de gheaţă cu treapta Ice Crush/
Clean. Adăugaţi restul ingredientelor în mixer.
Amestecaţ i totul la treapta 2 până când apare un lichid
uniform.
Shake de cappucino
65 ml de espresso rece (sau o cafea foarte tare)
65 ml de lapte
15 g de zahăr
65 ml de îngheţată de vanilie
100 ml de gheaţă zdrobită
Zdrobiţi cuburile de gheaţă cu treapta Ice Crush/
Clean. Adăugaţi cafeaua espresso, laptele şi zahărul.
Amestecaţi toate ingredientele cu treapta a 2-a până
se dizolvă zahărul. La final adăugaţi îngheţata de
vanilie şi amestecaţi puţin cu 1 treaptă.
Tropical-Mix
125 ml de suc de ananas
60 ml de suc de papaya
50 ml de suc de portocale
1/2 cutie mică cu suc de piersică
125 ml de cuburi de gheaţă
Zdrobiţi cuburile de gheaţă cu treapta Ice Crush/
Clean. Adăugaţi ingredientele în mixer şi amestecaţi-le cu treapta a 3-a.
Shake de nucă şi nuga
1/2 de litru de lapte
200 g de cremă de nucă şi nuga
1 cupă de îngheţată de vanilie
50 ml de smântână
Amestecaţi toate ingredientele în mixer la treapta
a 3-a până se omogenizează.
Shake de morcovi
300 ml de suc de mere
500 ml de suc de morcovi
4 linguriţe de ulei (din germeni de grâu sau rapiţă)
4 linguri de suc de lămâie
Praf de ghimbir
Piper
Adăugaţi sucul de mere, uleiul şi sucul de lămâie în
mixer şi amestecaţi cu treapta a 2-a.
Adăugaţi apoi sucul de morcovi şi amestecaţi cu treapta a 2-a. Condimentaţi apoi Shake-ul cu praf de
ghimbir şi piper.
Mix de coacăze
2 linguriţe de miere
2 banane
1/4 litri de zer
1/4 litri suc de coacăze (negre)
Adăugaţi toate ingredientele în mixer şi amestecaţi
cu treapta a 3-a.
- 31 -
R

Shake Hawaii
4 banane
1/4 litri de suc de ananas
1/2 litri de lapte
2 linguri de miere
1/4 litri de rom
Decojiţi bananele ţi zdrobiţi-le cu treapta a 2-a.
Adăugaţi restul ingredientelor şi amestecaţi cu
1 treaptă.
Mix de fructe ananas şi căpşuni
250 ml de suc de ananas
200 g de căpşuni
300 ml de suc de mere
4 cuburi de gheaţă
Zdrobiţi cuburile de gheaţă cu treapta Ice Crush/
Clean. Spălaţi căpşunii şi îndepărtaţi miezul verde.
Zdrobiţi-i cu treapta a 2-a.
Adăugaţi restul ingredientelor şi amestecaţi cu
1 treaptă.
Supă andaluză rece (Gazpacho)
1/2 castraveţ i
1 roşie
1 ardei verde
1/2 cepe
1 căţel de usturoi
1/2 chifle albe
1/2 linguriţe de sare
1 linguriţă de oţet de vin roşu
1 lingură de ulei de măsline
Indicaţie
Reţete fără garanţie. Toate datele privind ingredientele şi informaţiile de preparare sunt orientative.
Completaţi aceste sugestii cu date din experienţa
personală.
Indicaţie
În cazul în care manifestaţi intoleranţă la lactoză,
vă recomandăm să utilizaţi lapte fără lactoză.
Aveţi totuşi în vedere că laptele fără lactoză este
puţin mai dulce.
Curăţarea
Atenţie!
Înainte de a curăţa mixerul şi componentele:
• Asiguraţi-vă că aparatul este oprit şi ştecărul
este scos din priză.
Blocul motor
în alte lichide sub niciun pretext. Acest lucru
presupune pericol de moarte prin electrocutare
şi duce la defectarea aparatului.
• Nu deschideţi niciodată carcasa aparatului.
Pericol de moarte prin electrocutare.
• Nu demontaţi niciodată cuţitele
ceţi mâna în recipientul de amestecare
Cuţitele
r
• Nu utilizaţi solvenţi sau substanţe abrazive pentru
suprafeţele de plastic deoarece se deteriorează.
nu trebuie introdus în apă sau
u
r
sunt extrem de ascuţite!
şi nu introdu-
;
e
Tăiaţi legumele în bucăţi de cca 2 cm. Adăugaţi
mai întâi roşiile şi apoi castraveţii în mixer. Zdrobiţi-le
cu treapta a 3-a. Adăugaţi restul ingredientelor şi
amestecaţi cu treapta a 3-a până obţineţi o supă
omogenă. Serviţi cu pâine.
R
- 32 -

Curăţarea recipientului de amestecare
Curăţaţi recipientul enumai cu o perie cu coadă
➩
lungă, pentru a evita rănirile la contactul mâinilor
cu cuţitele
Pentru depunerile persistente, recipientul epoate fi
➩
spălat în maşina de spălat vase. Pentru aceasta,
demontaţi întotdeauna recipientul
descris mai târziu.
Curăţaţi capacul wşi dopul de umplere qîn
➩
maşina de spălat vase cu programul normal de
spălat vase.
Dacă curăţaţi mixerul imediat după utilizare, veţ i
obţine, în cele mai multe cazuri, o igienizare suficientă apelând la următoarea alternativă:
Umpleţi recipientul ecu 750 ml apă şi adău-
➩
gaţi câteva picături de detergent delicat. Închideţi capacul
pe blocul motor u.
Introduceţi ştecărul în priză şi acţionaţide câteva
ori comanda Ice Crush/Clean astfel încât cuţitul
de tăiat
Clătiţi apoi unitatea de mixare
din abundenţa, astfel încât să fie înlăturate toate
resturile de detergent.
.
r
în modul
e
şi aşezaţi unitatea de mixare
w
să treacă prin apă la viteză maximă.
r
cu apă curată
e
e
Dacă depunerile nu se desprind, desfaceţi componenta de plastic de sub recipient
la vasul de sticlă al recipientului
şi cuţitele rde
e
:
e
Componentă de sticlă
Inel de etanşare
Cuţit
Componentă de plastic
demontaţi recipientul ede pe blocul motor u;
➩
Rotiţi componenta de plastic a recipientului
➩
în sens antiorar pentru a desface vasul de sticlă
al recipientului
Atenţie!
Manipulaţi cuţitele atent. Acestea sunt foarte
ascuţite. Pericol de rănire!
Curăţaţi temeinic ambele componente în apă
➩
cu detergent sau în maşina de spălat vase;
Aşezaţi din nou componenta de plastic a re-ci-
➩
pientului
e
Verificaţi dacă aţi introdus inelul de etanşare .
- 33 -
.
e
pe vasul de sticlă a recipientului e.
e
R

Curăţarea blocului motor
Pentru curăţarea suprafeţelor utilizaţi un prosop
➩
uscat sau cel mult puţin umed.
La fiecare curăţare, verificaţi dacă pe comutatorul
➩
de contact din suportul pentru recipient
depus resturi şi este blocat. Dacă nu puteţi îndepărta resturile cu un colţ de hârtie, adresaţi-vă
serviciului pentru clienţi. Nu utilizaţi obiecte solide - comutatorul de contact se poate defecta.
Curăţaţi eventualele depuneri de sub blocul
➩
motor
mătuf de praf. Asiguraţi-vă ca prin orificiile de
aerisire nu vor intra obiecte străine în aparat.
numai cu un prosop uscat sau cu un pă-
u
e
s-au
După curăţare
Uscaţi bine toate componentele înainte de o nouă
utilizare a mixerului.
Depozitarea
Dacă nu utilizaţi aparatul un timp mai îndelungat,
➩
curăţaţi-l temeinic (vezi secţiunea „Curăţarea“).
Înfăşuraţi cablul de alimentare ype mosorul
➩
aflat sub blocul motor u.
Depozitaţi mixerul într-un loc uscat şi răcoros.
➩
Eliminarea aparatelor uzate
Garanţia şi service-ul
Pentru acest aparat, se acordă o garanţie de 3 ani
începând cu data cumpărării. Aparatul a fost produs
cu grijă şi verificat cu scrupulozitate înaintea livrării.
Păstraţi bonul de casă pentru a dovedi cumpărarea.
Dacă aveţi solicitări privind garanţia, contactaţi telefonic centrul dumneavoastră de service. Numai astfel
poate fi asigurată o expediere gratuită a produsului
dumneavoastră.
Garanţia acoperă numai defectele de material sau
de fabricaţie, nu şi deteriorările rezultate în urma
transportului, piesele de uzură sau deteriorările apărute la componentele fragile, de ex. comutatoare sau
acumulatoare. Aparatul este destinat numai pentru
uz privat şi nu pentru o utilizare profesională.
În cazul manevrării abuzive sau necorespunzătoare,
uzului de forţă şi intervenţiilor care nu au fost realizate de către filiala noastră autorizată de service,
garanţia îşi pierde valabilitatea. Drepturile dumneavoastră legale nu sunt limitate prin această garanţie.
Perioada de garanţie nu este prelungită după realizarea reparaţiilor realizate în perioada garanţie.
Acest lucru este valabil şi pentru piesele înlocuite şi
i
reparate. Deteriorările şi deficienţele prezente deja
la cumpărare trebuie semnalate imediat după dezambalare sau cel târziu în două zile de la data
cumpărării. Reparaţiile necesare după expirarea
perioadei de garanţie se efectuează contra cost.
Nu aruncaţi aparatul sub nicio formă
în gunoiul menajer obişnuit. Acest
produs cade sub incidenţa directivei
europene 2012/19/EU.
Eliminaţi aparatul prin intermediul unei firmei specializate şi autorizate sau prin intermediul serviciului
local de eliminare a deşeurilor.
Respectaţi reglementările actuale în vigoare.
Dacă aveţi nelămuriri, contactaţi serviciul dumneavoastră local de eliminare a deşeurilor.
Eliminaţi toate materialele de ambalare
într-un mod ecologic.
R
R
Service România
Tel.: 0800896637
E-Mail: kompernass@lidl.ro
IAN 100484
Acces linie telefonică directă:
De luni până vineri, între orele 8:00 - 20:00 (CET)
- 34 -

Importator
KOMPERNASS HANDELS GMBH
BURGSTRASSE 21
44867 BOCHUM
GERMANY
www.kompernass.com
- 35 -
R

- 36 -

Cъдържание Cтраница
Въведение 38
Употреба по предназначение 38
Окомплектовка на доставката 38
Описание на уреда 38
Технически характеристики 38
Указания за безопасност 39
Разопаковане 41
Инсталиране 41
Обслужване 41
Напълване и монтиране на пристав-ката на миксера . . . . . . . . . . . . . . . . . . . . . . . . . . . .41
Избиране на степента на скорост . . . . . . . . . . . . . . . . . . . . . . . . . . . . . . . . . . . . . . . . . . . .41
Пълнене по време на експлоатация . . . . . . . . . . . . . . . . . . . . . . . . . . . . . . . . . . . . . . . . . .42
Сваляне на приставката . . . . . . . . . . . . . . . . . . . . . . . . . . . . . . . . . . . . . . . . . . . . . . . . . . . .42
Полезни указания 42
Рецепти 43
Бананов шейк . . . . . . . . . . . . . . . . . . . . . . . . . . . . . . . . . . . . . . . . . . . . . . . . . . . . . . . . . . . .43
Ванилов шейк . . . . . . . . . . . . . . . . . . . . . . . . . . . . . . . . . . . . . . . . . . . . . . . . . . . . . . . . . . . .43
Капучино шейк . . . . . . . . . . . . . . . . . . . . . . . . . . . . . . . . . . . . . . . . . . . . . . . . . . . . . . . . . . .43
Тропически микс . . . . . . . . . . . . . . . . . . . . . . . . . . . . . . . . . . . . . . . . . . . . . . . . . . . . . . . . . .43
Лешников шейк . . . . . . . . . . . . . . . . . . . . . . . . . . . . . . . . . . . . . . . . . . . . . . . . . . . . . . . . . . .43
Морковен шейк . . . . . . . . . . . . . . . . . . . . . . . . . . . . . . . . . . . . . . . . . . . . . . . . . . . . . . . . . . .43
Микс с касис . . . . . . . . . . . . . . . . . . . . . . . . . . . . . . . . . . . . . . . . . . . . . . . . . . . . . . . . . . . . .43
Шейк "Хавай" . . . . . . . . . . . . . . . . . . . . . . . . . . . . . . . . . . . . . . . . . . . . . . . . . . . . . . . . . . . . .44
Плодов микс с ананас и ягода . . . . . . . . . . . . . . . . . . . . . . . . . . . . . . . . . . . . . . . . . . . . . . .44
Испанска студена супа (Гаспачо) . . . . . . . . . . . . . . . . . . . . . . . . . . . . . . . . . . . . . . . . . . . .44
Почистване 44
Почистване на приставката . . . . . . . . . . . . . . . . . . . . . . . . . . . . . . . . . . . . . . . . . . . . . . . .45
Почистване на двигателния блок . . . . . . . . . . . . . . . . . . . . . . . . . . . . . . . . . . . . . . . . . . . . .46
След почистването . . . . . . . . . . . . . . . . . . . . . . . . . . . . . . . . . . . . . . . . . . . . . . . . . . . . . . . .46
Съхранение 46
Изхвърляне 46
Гаранция и сервиз 46
Вносител 47
- 37 -

Блендер
Въведение
Поздравяваме ви за покупката на вашия нов
уред.
Избрали сте висококачествен продукт.
Ръководството за потребителя е неразделна част
от този продукт. То съдържа важни указания за
безопасността, употребата и предаването за
отпадъци. Преди да използвате продукта се
запознайте с всички указания за обслужване и
безопасност. Използвайте продукта, само както
е описано и за посочените области на приложение. Предавайте продукта на трети лица заедно
с цялата документация.
Употреба по предназначение
Този уред е предназначен за ...
– смесване, пюриране и бъркане на хранителни
продукти, както и за разтрошаване на лед
(т. нар. "Crushen"),
– само в домашни количества и само за лична
употреба в сухи помещения.
Този уред не е предназначен за ...
– раздробяване на твърди хранителни продукти,
като напр. орехи, ядки, големи зърна или
стебла,
– преработването на материали, които не са
хранителни продукти,
– използване за стопански и промишлени цели,
– използването във влажна среда или на открито,
– преработка на горещи/врящи течности.
Използвайте само аксесоари и резервни части,
които са предназначени за този уред. Възможно
е другите части да не са достатъчно подходящи
или сигурни!
Окомплектовка на доставката
След като разопаковате, контролирайте доставката
за комплектност. Обемът на доставката съдържа:
1 x двигателен блок с кабел и щепсел
1 x приставка с неподвижно монтирани ножове
1 x капак
1 x капачка за пълнене
1 x ръководство за експлоатация
Описание на уреда
Капачка за пълнене
q
Капак
w
Приставка
e
Нож
r
Прекъсвач
t
Кабел
y
Двигателен блок
u
Навиване на кабела
i
Скала
o
Технически характеристики
Номинално напрежение: 220 - 240 V ~, 50 Hz
Номинална мощност: 550 Watt
Макс. количество на
запълване: 1,75 л.
Клас на защита: II
Кратковременен режим: 3 минути
Кратковременният режим на работа показва
колко време може да се използва уредът без
двигателят да прегрее и да се повреди. След като
изтече посоченото за кратковременния режим
време, уредът трябва да се изключи, докато
двигателят се охлади на стайна температура.
- 38 -

Указания за безопасност
За да се предотврати опасност за живота от токов уред
• Уверете се, че двигателният блок, кабелът или щепселът не могат да се
потопят никога във вода или други течности.
• Използвайте уреда само в сухи помещения, никога на открито или във
влажна среда.
• По време на работа внимавайте мрежовият кабел никога да не се мокри
или навлажнява. Прекарайте го така, че никога да не се притиска или
поврежда по друг начин.
• За да избегнете опасности, веднага дайте повредения щепсел или кабел
за смяна от оторизиран електротехник или сервиз.
• След употреба изключвайте винаги щепсела от контакта. Не е достатъчно
само да го из-ключите от бутона, тъй като в уреда все още има мрежово
напрежение, докато щепселът е включен в контакта.
• Преди всяка употреба контролирайте уреда за безупречното му състояние.
Уредът не трябва да се използва, ако той е видимо повреден, особено
двигателният блок или стъклената приставка.
• Изключете веднага щепсела от контакта, ако доловите необикновен шум
или мирис или когато ясно се вижда, че уредът е повреден.
:
За да предотвратите прегряване и опасност от пожар
:
• Не използвайте уреда директно при слънчево облъчване или
въздействието на топлина от произвеждащи топлина уреди.
• Не пълнете никога врящи течности или много горещи хранителни продукти
в миксера! Изчакайте докато те се охладят на температу-рата на ръката. В
противен случай уредът може да прегрее и стъклото на миксера да
се пръсне!
• Не използвайте уреда никога, когато е празен, тоест без хранителни
продукти в приставката.
- 39 -

За да предотвратите опасността от злополука или нараняване:
• Не посягайте никога към приставката, особено по време на експлоатация.
Ножовете са изклю-чително остри.
• Не отваряйте капака, когато уредът работи. В противен случай е възможно
хранителните продукти да изхвърчат навън с висока скорост.
• Не поставяйте никога прибори или бъркалки в приставката на миксера,
докато той е вклю-чен и работи. Налице е значителна опасност от
нараняване, когато те се докоснат до бързо въртящите се ножове!
• Не оставяйте уреда без надзор по време на работа, за да можете да
реагирате бързо в случай на опасност.
• Децата трябва да се наблюдават, за да е сигурно, че не играят с уреда.
• Не използвайте уреда за други цели, освен за описаните в настоящото
ръководство.
• Когато уредът не е под наблюдение и преди сглобяване, разглобяване или
почистване винаги го изключвайте от мрежата.
• Уредът не трябва да се използва от деца.
• Уредът и захранващият кабел трябва да се държат далече от деца.
• Този уред може да се използва от лица с ограничени физически, сетивни
или умствени възможности или без опит и/или знания, ако са под
наблюдение или са инструктирани по отношение на безопасната
употреба на уреда и са разбрали опасностите, произтичащи от работата
с него.
• Не допускайте деца да играят с уреда.
• Бъдете предпазливи при работа с уреда. Ножовете са много остри!
• Действайте внимателно при изпразване на приставката за миксиране!
Ножовете са много остри!
• Действайте внимателно при почистване на уреда! Ножовете са много остри!
• Изключете уреда и издърпайте щепсела от контакта, преди да смените
принадлежности или да докоснете части, които се движат по време на
работа.
• Използвайте приставката единствено с включения в окомплектовката на
доставката двигателен блок!
• Уверете се, че миксерът е винаги изключен, преди да отстраните
приставката от двигателния блок!
- 40 -

Разопаковане
Обслужване
• Отстранете опаковъчните части или защитното
фолио от уреда. Запазете опаковката, за да
предпазвате уреда при съхранение или да
можете да го изпратите, напр. на ремонт.
• Преди да използвате уреда се убедете, че той
не е повреден, това се отнася и до кабела с
щепсела и всички други аксесоари и части
на уреда.
• Почистете внимателно всички основни части,
преди да използвате блендера за първи път
(виж "Почистване").
Инсталиране
Когато почистите всички части така, както е
описано в "Почистване":
поставете уреда така, че ...
➩
– кабелът
обратната страна.
– щепселът да бъде веднага достъпен, за да
може той да се изключи веднага при нали-
чието на опасност.
– той да е стабилен и да не се хлъзга, а вакуу-
мните вендузи да намерят опора, за да не се
обърне уредът при вибрации.
– кабелът
че уредът да не се обърне при неволното му
дръпване.
да преминава през процепа на
y
да не стърчи в работната зона така,
y
Предупреждение!
Двигателят се изключва, веднага щом приставката
се свали от двигателния блок u. След
e
това вероятно може да се забрави, че машината
е включена. Двигателят стартира неочаквано,
щом се монтира приставката
Затова:
• Включете щепсела в контакта, едва след като
приставката
• Преди монтирането се уверявайте винаги, че
уредът е изключен или щепселът не е пъхнат
в контакта.
• Първо изключете, след това издърпайте щепсела
и изчакайте спирането на двигателя, преди да
свалите приставката
се напълни и затвори.
e
e
:
e
.
Напълване и монтиране на приставката на миксера
Вземете приставката eот двигателния блок
➩
и свалете капака w.
Напълнете приставката eи натиснете силно
➩
капака
чучурът на приставката
Пъхнете капачката qв отвора на капака и я
➩
завъртете по посока на часовниковата стрелка.
Поставете запълнената и затворена пристав-
➩
ка
леко приставката
натиснете надолу. Само когато приставката
се намира в една и съща равнина, двигателят
може да стартира.
върху приставката e. Внимавайте
w
да е затворен.
e
върху двигателния блок u. Завъртете
e
, докато можете да я
e
u
e
Избиране на степента на скорост
Когато се напълни приставката eи се постави
плътно затворена върху двигателния блок
Вие можете да включите уреда.
- 41 -
u
,

Поставете превключвателя tна ...
➩
–– ссттееппеенн 11--33
за течни и средно твърди хранителни продукти,
за смесване, пюриране и бъркане
–– ссттееппеенн 33--55
за по-твърди хранителни продукти или за
раздр-бяване
–– ссттееппеенн ттрроошшееннее ннаа ллеедд//ппооччииссттввааннее
за кратко и мощно импулсно включване, напр.
за разтрошаване на лед и почистване.
Прекъсвачът
ние, за да не се претоварва двигателят. Затова
оставете прекъсвача
жение само за кратко време.
Указани
Сложете в приставката eмаксимум 180 гр. бучки
лед. В противен случай уредът няма да разтроши
леда оптимално.
не се фиксира в това положе-
t
натиснат в това поло-
t
е
Пълнене по време на експлоатация
Предупреждение!
Ако желаете да поставите нещо по време на
експлоатация, трябва да отворите само предвидената специално за това капачка за пълнене
• В никакъв случай не отваряйте капака
В противен случай е възможно хранителните
продукти да изхвърчат навън с висока скорост.
• Не поставяйте никога прибори или бъркалки
в приставката на миксера
включен и работи. Налице е значителна
опасност от нараняване, когато те се докоснат
до бързо въртящите се ножове!
За да поставите нещо по време на експлоатация, ...
завъртете капачката qв посока противополо-
➩
жна на часовниковата стрелка и я издърпайте.
Попълнете съставки.
➩
След това пъхнете капачката qотново в отво-
➩
ра и я завъртете в посока на часовниковата
стрелка.
, докато той е
e
w
q
.
r
Сваляне на приставката
Когато приключи обработването на напълнените
хранителни продукти:
поставяйте винаги първо прекъсвача tна по-
➩
ложение изкл. („OFF“) и издърпайте щепсела.
изчакайте първо пълното спиране на двигателя,
➩
преди да извадите направо нагоре приставката
. Тук не е необходимо да се завърта
e
приставката
e
.
Полезни указания
– За да постигнете възможно най-добри резултати
при пюриране на твърди хранителни продукти,
поставяйте в приставката
порции вместо да напълните наведнъж голямо
количество.
– Когато преработвате твърди хранителни проду-
кти, нарежете ги на малки парчета (2-3 см.).
– При бъркане на течни съставки започнете
първо с малко количество течност. След това
прибавяйте постепенно допълнително течност
през отвора на капака.
– Ако поставите ръката си по време на експлоа-
тация отгоре върху затворения блендер, Вие
.
можете да стабилизирате по този начин самия
уред.
– За бъркане на твърди или гъсти хранителни
продукти може да е от полза да използвате
импулсния режим на работа, за да предотвратите блокирането на ножа
Указани
Не използвайте уреда за разбиване на едра
готварска сол, рафинирана или бяла захар.
Например да правите пудра захар.
е
постепенно малки
e
.
r
- 42 -

Рецепти
Бананов шейк
2 банана
ок. 2 супени лъжици захар (според степента на
зрялост на бананите и личните предпочитания)
1/2 литър мляко
малко лимонов сок
Обелете бананите и ги пюрирайте на степен 2.
Добавете постепенно млякото, след това захарта
и лимоновия сок. Разбърквайте всичко, докато
се получи хомогенна течност.
Сервирайте шейка охладен.
Ванилов шейк
1/4 литър мляко
250 гр. ванилов сладолед
125 мл кубчета лед
1 1/2 чаени лъжици захар
Разтрошете леда на степен Ice Crush/Clean.
Добавете останалите съставки в миксера. Mixen
Миксирайте всичко на степен 2 до получаване на
еднородна смес.
Капучино шейк
65 мл студено еспресо (или много силно кафе)
65 мл мляко
15 гр. захар
65 мл ванилов сладолед
100 мл натрошени кубчета лед
Разтрошете леда на степен Ice Crush/Clean.
Добавете еспресото, млякото и захарта.
Разбъркайте всичко на степен 2, докато захарта
се разтвори. Накрая добавете ваниловия сладолед
и разбъркайте всичко за кратко на степен 1.
Тропически микс
125 мл сок от ананас
60 мл сок от папая
50 мл портокалов сок
1/2 малка консерва праскови със сок
125 мл кубчета лед
Разтрошете леда на степен Ice Crush/Clean.
Добавете всички съставки в миксера и смесете
всичко на степен 3.
Лешников шейк
1/2 литър мляко
200 гр. лешников крем
1 топка ванилов сладолед
50 мл сметана
Размесете всички съставки в миксера на степен
3, докато се получи хомогенна течност.
Морковен шейк
300 мл ябълков сок
500 мл сок от моркови
4 супени лъжици масло (масло от пшенични
кълнове или рапично масло)
4 супени лъжици лимонов сок
джинджифил на прах
черен пипер
Добавете ябълковия сок, маслото и лимоновия
сок в миксера и размесете всичко на степен 2.
Добавете сока от моркови и разбъркайте всичко
на степен 2. Овкусете шейка с джинджифил на
прах и черен пипер.
Микс с касис
2 чаени лъжици мед
2 банана
1/4 литър мътеница
1/4 литър сок от касис
Добавете всички съставки в миксера и размесете
всичко на степен 3.
- 43 -

Шейк "Хавай"
4 банана
1/4 литър сок от ананас
1/2 литър мляко
2 СЛ мед
1/4 литър ром
Обелете бананите и ги пюрирайте на степен 2.
Добавете останалите съставки и размесете
всичко на степен 1.
Плодов микс с ананас и ягода
250 мл сок от ананас
200 гр. ягоди
300 мл ябълков сок
4 кубчета лед
Разтрошете леда на степен Ice Crush/Clean.
Измийте ягодите и ги почистете. Пюрирайте ги
на степен 2. Добавете останалите съставки и
смесете всичко на степен 1.
Испанска студена супа (Гаспачо)
1/2 краставица
1 месест домат
1 зелена чушка
1/2 лук
1 скилидка чесън
1/2 бяло хлебче
1/2 чаена лъжица сол
1 чаена лъжица винен оцет
1 супена лъжица зехтин
Нарежете зеленчуците на парчета от около 2 см.
Добавете в миксера първо доматите, а след това
и краставиците. Пюрирайте ги на степен 3.
Добавете останалите съставки и пюрирайте/
размесете всичко на степен 3, докато се получи
хомогенна супа. Сервирайте с хляб.
Указани
Рецепти без гаранция. Всички данни за продуктите
и тяхното приготвяне са приблизителни стойности.
Допълнете и обогатете тези с Вашите собствени
рецепти.
Указани
При непоносимост към лактоза препоръчваме
използването на мляко без лактоза. Имайте
предвид, че млякото без лактоза е леко сладко.
е
е
Почистване
Внимание!
Преди да почистете блендера и неговите части:
• Уверете се, че уредът е изключен и щепселът
е дръпнат.
Двигателният блок
никакъв случай във вода или други течности.
Това би представлявало опасност за живота
от електрически удар, при което може да
се повреди и самият уред.
• Не отваряйте никога корпуса на уреда.
В противен случай е налице опасност за живо-
та от електрически удар.
• Не демонтирайте никога ножа
никога в приставката
чително остър!
• Не използвайте разтворители и търкащи препа-
рати за пластмасовите повърхности, в противен
случай те могат да се повредят.
не трябва да се потапя в
u
и не посягайте
r
. Ножът rе изклю-
e
- 44 -

Почистване на приставката
Почистете приставката eсамо с четка с дълга
➩
дръжка, за да не можете да се нараните на
ножа
При упорити замърсявания е възможно да
➩
измиете приставката
на чинии. За целта разглобете приставката
както това е описано по-долу.
Измийте капака wи капачката qв машина
➩
за миене на чинии или като измиете по обикновения начин.
Ако измиете блендера веднага след неговото използване, ще получите в повечето случаи достатъчно хигиенично почистване и по следния алтернативен начин:
Налейте 750 мл вода в наставката на
➩
миксера
миещ препарат. Затворете капака
поставете наставката на миксера
двигателния блок
Включете щепсела в контакта и натиснете
няколко пъти бутон за Crush/Clean, така че
режещият нож
обороти във водата.
Изплакнете след това наставката
вода, така че да се премахнат всички
остатъци от миещият препарат.
.
r
в машина за миене
e
и прибавете няколко капки мек
e
.
u
да се завърти с максимални
r
w
e
e
e
и
върху
с чиста
Ако замърсяванията не могат да се отделят, ъзможно да отделите долната пластмасова част
ножа
,
от стъклената част на приставката e:
r
стъклена част
уплътнителен пръстен
нож
пластмасова част
e
с
Свалете приставката eот двигателния блок u.
➩
Завъртете пластмасовата част на пристав-
➩
ката
в посока обратна на часовниковата
e
стрелка, така че стъклената част на пристав-
ката
да се отдели.
e
- 45 -

Внимание
Бъдете внимателни при боравене с ножовете .
Те са много остри. Опасност от нараняване!
Измийте основно двете части в мека сапу-
➩
нена вода или в машината за миене на чинии.
Поставете пластмасовата част на пристав-
➩
ката
e
ката
e
телният пръстен .
!
върху стъклената част на пристав-
. Внимавайте да поставен уплътни-
Почистване на двигателния блок
Използвайте суха или леко навлажнена кърпа,
➩
за да почистите повърхностите.
Контролирайте при всяко почистване контакт-
➩
ният прекъсвач в държача на приставката
да не е блокиран от замърсявания. Ако не
можете да отстраните евентуалните замърсявания с ъгълчето на лист хартия, обърнете се
към клиентския сервиз. В никакъв случай не
използвайте твърд предмет, контактният прекъсвач може да се повреди по този начин.
Отстранете евентуалните замърсявания от
➩
долната страна на двигателния блок
със суха кърпа или четка за прах. Внимавайте
нищо да не попада в уреда през вентилационните отвори.
u
e
само
След почистването
Оставете всички части да изсъхнат добре, преди
да сглобите отново блендер и да го използвате.
Съхранение
Ако не използвате за по-продължително време
➩
блендера, почистете го основно (виж глава
„Почистване").
Завийте кабела yв предназначеното за това
➩
място
Съхранявайте блендера на хладно и сухо
➩
място.
на дъното на двигателния блок u.
i
Изхвърляне
В никакъв случай не изхвърляйте
уреда с обикновените битови отпадъци.
Този уред подлежи на европейската
Директива 2012/19/EU.
Изхвърляйте уреда чрез лицензирана фирма за
изхвърляне на отпадъци или общинската служба
за изхвърляне на отпадъци.
Спазвайте актуално валидните разпоредби.
В случай на съмнение се свържете със службата
за изхвърляне на отпадъци.
Предавайте опаковъчните материали за
екологично изхвърляне.
Гаранция и сервиз
За този уред вие получавате гаранция от 3 години
от датата на закупуване. Уредът е произведен
старателно и е проверен добросъвестно преди
доставката.
Запазете касовата бележка като доказателство
за покупката. В гаранционен случай се свържете
по телефона с вашия сервиз. Само по този начин
може да се осигури безплатното изпращане на
вашата стока.
Даването на гаранция важи само за материални
или фабрични дефекти, но не и за транспортни
щети, износващи се части или при повреда на
лесно чупливи части, напр. ключове или акумулаторни батерии. Продуктът е предназначен единствено за домашна, а не за професионална употреба.
При непозволена и неправилна употреба, при
прилагане на сила или интервенции, които не
са извършени от нашия оторизиран сервизен
филиал, гаранцията отпада. Законните ви права
не се ограничават от тази гаранция.
- 46 -

Гаранционният срок не се удължава от гаранцията.
Това важи и за сменени и ремонтирани части. За
евентуалните, налични още при закупуването
повреди и недостатъци трябва да се съобщи веднага след разопаковането, но най-късно два дена
след датата на закупуване. След като изтече
гаранционният срок, ремонтите трябва да се
заплащат.
Сервизно обслужване България
Тел.:00800 111 4920
Е-мейл: kompernass@lidl.bg
IAN 100484
Работно време на горещата линия:
понеделник до петък от 8:00 ч. – 20:00 ч.
(централноевропейско време)
Вносител
KOMPERNASS HANDELS GMBH
BURGSTRASSE 21
44867 BOCHUM
GERMANY
www.kompernass.com
- 47 -

- 48 -

Περιεχόμενα Σελίδα
Εισαγωγή 50
Χρήση σύμφωνη με τους κανονισμούς 50
Σύνολο αποστολής 50
Περιγραφή συσκευής 50
Τεχνικές πληροφορίες 50
Υποδείξεις ασφαλείας 51
Αποσυσκευασία 53
Τοποθέτηση 53
Χειρισμός 53
Τροφοδοσία εξαρτήματος ανάμειξης και μοντάρισμα................................................................53
Επιλογή βαθμίδας ταχύτητας........................................................................................................54
Γέμισμα κατά τη λειτουργία ............................................................................................................54
Απομάκρυνση εξαρτήματος ανάμειξης ........................................................................................54
Χρήσιμες υποδείξεις 54
Συνταγές 55
Μιλκ-σέϊκ μπανάνα.........................................................................................................................55
Μιλκ-σέϊκ βανίλια ...........................................................................................................................55
Μιλκ-σέϊκ καπουτσίνο.....................................................................................................................55
Τροπικό μίγμα ................................................................................................................................55
Μιλκ-σέϊκ καρύδια - νουγκά...........................................................................................................55
Μιλκ-σέϊκ καρότο............................................................................................................................55
Μιλκ-σέϊκ φραγκοστάφυλο............................................................................................................55
Μιλκ-σέϊκ Χαβάη.............................................................................................................................56
Φρουτώδες μίγμα ανανά - φράουλας ..........................................................................................56
Κρύα σούπα της Ανδαλουσίας (Γκασπάτσο) ..............................................................................56
Καθαρισμός 56
Καθαρισμός εξαρτήματος ανάμειξης ...........................................................................................57
Καθαρισμός μονάδας μοτέρ.........................................................................................................58
Μετά τον καθαρισμό......................................................................................................................58
Φύλαξη 58
Απομάκρυνση 58
Εγγύηση & Σέρβις 59
Εισαγωγέας 59
- 49 -

ΜΜππλλέέννττεερρ
Εισαγωγή
Συγχαρητήρια για την αγορά της νέας σας
συσκευής.
Αποφασίσατε έτσι την απόκτηση ενός προϊόντος
υψηλής ποιότητας. Οι οδηγίες χειρισμού είναι τμήμα
αυτού του προϊόντος. Περιέχουν σημαντικές
υποδείξεις για την ασφάλεια, τη χρήση και την
απόρριψη.Πριν από τη χρήση του προϊόντος εξοικειωθείτε με όλες τις υποδείξεις χειρισμού και
ασφάλειας. Χρησιμοποιείτε το προϊόν μόνο όπως
περιγράφεται και για τα αναφερόμενα πεδία χρήσης.
Σε περίπτωση παράδοσης του προϊόντος σε
τρίτους, παραδίδετε και όλα τα έγγραφα.
Χρήση σύμφωνη με τους
κανονισμούς
Αυτή η συσκευή προορίζεται για ...
– την ανάμειξη, δημιουργία πολτών και το
ανακάτεμα τροφίμων καθώς και για κομμάτιασμα
για παγάκια (το λεγόμενο “Crushen”),
– αποκλειστικά για οικιακές ποσότητες και μόνο για
την ιδιωτική οικιακή χρήση σε στεγνούς χώρους.
Αυτή η συσκευή δεν προορίζεται για ...
– το κομμάτιασμα σκληρών τροφίμων όπως π.χ.
ξηροί καρποί, κουκούτσια, μεγάλοι σπόροι ή
κοτσάνια,
– επεξεργασία υλικών τα οποία δεν είναι τρόφιμα,
– τη χρήση για επαγγελματικούς ή βιομηχανικούς
σκοπούς,
– τη χρήση σε υγρό περιβάλλον ή σε εξωτερικό
χώρο,
– την επεξεργασία καυτών υγρών/υγρών που
βράζουν.
Χρησιμοποιείτε μόνο αξεσουάρ ή ανταλλακτικά τα
οποία προορίζονται για αυτή τη συσκευή. Άλλα
εξαρτήματα είναι πιθανώς ανεπαρκή ή επισφαλή!
Σύνολο αποστολής
Ελέγχετε μετά την αποσυσκευασία την αποστολή
για την πληρότητά της. Στο σύνολο αποστολής
περιλαμβάνονται:
1 x Μονάδα μοτέρ με καλώδιο δικτύου και βύσμα
1 x Εξάρτημα ανάμειξης με σταθερά μονταρισμένη
λεπίδα κοπής
1 x Καπάκι
1 x Καπάκι τροφοδοσίας
1 x Οδηγία χρήσεως
Περιγραφή συσκευής
Καπάκι τροφοδοσίας
q
Καπάκι
w
Εξάρτημα ανάμειξης
e
Λεπίδα κοπής
r
Διακόπτης
t
Καλώδιο δικτύου
y
Μονάδα μοτέρ
u
Τύλιξη καλωδίου
i
Διαβάθμιση
o
Τεχνικές πληροφορίες
Ονομαστική τάση: 220 - 240 V ~, 50 Hz
Ονομαστική απόδοση: 550 Watt
Μεγ. ποσότητα πλήρωσης: 1,75 l
Κατηγορία προστασίας : II
Χρόνος KB (σύντομης
λειτουργίας): 3 λεπτά
Ο χρόνος σύντομης λειτουργίας δείχνει για πόσο
χρόνο μπορεί κανείς να λειτουργεί μια συσκευή χωρίς
να υπερθερμανθεί το μοτέρ και χωρίς να πάθει βλάβες.
Μετά τον δοθέντα χρόνο ΚΒ (σύντομος χρόνος
λειτουργίας) πρέπει η συσκευή να απενεργοποιηθεί
τόσο έως ότου το μοτέρ φτάσει σε θερμοκρασία
δωματίου.
- 50 -

Υποδείξεις ασφαλείας
Για την αποφυγή κινδύνου ζωής μέσω ηλεκτροπληξίας:
• Βεβαιώνεστε ότι η μονάδα μοτέρ, το καλώδιο δικτύου ή το βύσμα δεν βυθίζονται
ποτέ σε νερό ή σε άλλα υγρά.
• Χρησιμοποιείτε τη συσκευή αποκλειστικά σε στεγνούς χώρους, ποτέ σε εξωτερικό
χώρο ή σε υγρό περιβάλλον.
• Να προσέχετε το καλώδιο τροφοδοσίας να μην βρέχεται ή υγραίνεται ποτέ
κατά τη διάρκεια λειτουργίας. Να το τοποθετείτε έτσι, ώστε να μην υφίσταται
περίπτωση να μαγκωθεί ή να υποστεί άλλου είδους ζημιά.
• Τα βύσματα ή καλώδια δικτύου με βλάβη πρέπει να αντικαθίστανται αμέσως
από εξουσιοδοτημένο ειδικό προσωπικό ή από το τμήμα εξυπηρέτησης
πελατών, ώστε να αποφεύγονται κίνδυνοι.
• Τραβάτε πάντα μετά τη χρήση το βύσμα από την πρίζα. Η απενεργοποίηση δεν
αρκεί διότι υπάρχει ακόμα τάση στη συσκευή, όσο το βύσμα βρίσκεται στην
υποδοχή.
• Πριν από κάθε χρήση ελέγχετε τη συσκευή για την άψογή της κατάσταση. Η
συσκευή δεν επιτρέπεται να χρησιμοποιείται όταν ανιχνεύονται βλάβες, κυρίως
στη μονάδα μοτέρ ή στο γυάλινο εξάρτημα ανάμειξης.
• Τραβήξτε αμέσως το βύσμα δικτύου από την πρίζα όταν αντιλαμβάνεστε
ασυνήθιστους θορύβους ή οσμές ή σε περίπτωση εμφανούς δυσλειτουργίας.
Προς αποφυγή υπερθέρμανσης και κινδύνου πυρκαγιάς:
• Μη χρησιμοποιείτε τη συσκευή σε σημεία με απευθείας ηλιακή ακτινοβολία ή
δημιουργία θερμότητας συσκευών που παράγουν θερμότητα.
• Ποτέ μη γεμίζετε το εξάρτημα ανάμειξης με υγρά που βράζουν! Αφήστε πρώτα
αυτά τα υγρά να φτάσουν σε θερμοκρασία σώματος. Αλλιώς μπορεί η συσκευή
να υπερθερμανθεί και να ραγίσει το γυαλί από το εξάρτημα ανάμειξης!
• Μη λειτουργείτε τη συσκευή εάν είναι άδεια, δηλαδή χωρίς τα συστατικά στο
εξάρτημα ανάμειξης.
- 51 -

Προς αποφυγή κινδύνου ατυχημάτων και τραυματισμού:
• Ποτέ μην πιάνετε στο εξάρτημα ανάμειξης, κυρίως όχι εν λειτουργία. Οι λεπίδες είναι
εξαιρετικά αιχμηρές!
• Μην ανοίγετε το κάλυμμα όταν η συσκευή είναι εν λειτουργία. Αλλιώς μπορεί να
πεταχτούν προς τα έξω τμήματα τροφίμων με υψηλή ταχύτητα!
• Ποτέ μην εισάγετε μέσα στο εξάρτημα ανάμειξης τμήματα από μαχαιροπίρουνα ή
εξαρτήματα ανάμειξης, όσο η συσκευή είναι σε λειτουργία. Υπάρχει αυξημένος
κίνδυνος τραυματισμού όταν αυτά αγγίξουν τη λεπίδα που γυρνάει πολύ γρήγορα!
• Όταν η συσκευή λειτουργεί μην την αφήνετε ανεπιτήρητη, ώστε να μπορείτε να
αντιδράσετε αμέσως σε περίπτωση κινδύνου.
• Τα παιδιά πρέπει να επιτηρούνται ώστε να εξασφαλίζεται ότι δεν παίζουν με τη
συσκευή.
• Μη χρησιμοποιείτε τη συσκευή για άλλους σκοπούς από τους
περιγραφόμενους στις παρούσες οδηγίες.
• Η συσκευή πρέπει να αποσυνδέεται πάντα από το δίκτυο όταν δεν επιτηρείται
και πριν από τη συναρμολόγηση, την αποσυναρμολόγηση ή τον καθαρισμό.
• Η συσκευή δεν επιτρέπεται να χρησιμοποιείται από παιδιά.
• Η συσκευή και το καλώδιο σύνδεσής της πρέπει να φυλάσσονται μακριά από παιδιά.
• Μπορεί να γίνεται χρήση αυτής της συσκευής από άτομα με μειωμένες φυσικές,
αισθητηριακές ή νοητικές ικανότητες ή με έλλειψη εμπειρίας και/ή γνώσεων,
εφόσον επιτηρούνται ή έχουν εκπαιδευτεί αναφορικά με την ασφαλή χρήση της
συσκευής και έχουν κατανοήσει τους επακόλουθους κινδύνους.
• Τα παιδιά δεν επιτρέπεται να παίζουν με τη συσκευή.
• Να είστε προσεκτικοί κατά το χειρισμό της συσκευής. Οι λεπίδες είναι πολύ αιχμηρές!
• Να είστε προσεκτικοί κατά το άδειασμα του προσαρτήματος ανάμειξης!
Οι λεπίδες είναι πολύ αιχμηρές!
• Να είστε προσεκτικοί κατά τον καθαρισμό της συσκευής! Οι λεπίδες είναι πολύ
αιχμηρές!
• Απενεργοποιήστε τη συσκευή και αποσυνδέστε το βύσμα, προτού αλλάξετε
εξαρτήματα ή πιάσετε μέρη που κινούνται κατά τη διάρκεια λειτουργίας.
• Χρησιμοποιείτε το εξάρτημα ανάμειξης μόνο με την απεσταλμένη μονάδα μοτέρ!
• Εξασφαλίζετε ότι το μπλέντερ είναι πάντα απενεργοποιημένο προτού σηκώσετε
το εξάρτημα ανάμειξης από τη μονάδα μοτέρ!
- 52 -

Αποσυσκευασία
Χειρισμός
• Απομακρύνετε όλα τα μέρη συσκευασίας ή τις
μεμβράνες προστασίας από τη συσκευή. Φυλάτε
τη συσκευασία για να αποθηκεύσετε τη συσκευή
προστατευμένη ή για να μπορέσετε να την
αποστείλετε π.χ. σε περίπτωση επισκευής.
• Προτού χρησιμοποιήσετε τη συσκευή βεβαιωθείτε
ότι η συσκευή όπως επίσης και το καλώδιο
δικτύου με το φις και όλα τα αξεσουάρ και μέρη
της συσκευής δεν έχουν φθαρεί.
• Καθαρίζετε με προσοχή όλα τα μέρη της
συσκευής πριν από την πρώτη χρήση του
επιτραπέζιου μίξερ (βλέπε «Καθαρισμός»).
Τοποθέτηση
Όταν έχετε καθαρίσει όλα τα εξαρτήματα, όπως
περιγράφηκε στον “Καθαρισμό”:
Τοποθετήστε τη συσκευή έτσι, ...
➩
– ώστε το καλώδιο δικτύου
οδηγηθεί μέσω της εσοχής στην πίσω πλευρά,
– ώστε το βύσμα δικτύου να είναι άμεσα προσβάσιμο
ώστε να μπορείτε να το τραβήξετε από την πρίζα
σε περίπτωση κινδύνου,
– ώστε να εδράζεται σταθερά χωρίς να γλιστρά και
να ακουμπάνε καλά οι βεντούζες ώστε να μην
αναποδογυρίσει η συσκευή σε περίπτωση
κραδασμών,
– ώστε το καλώδιο να
εργασίας και να μην μπορεί να πέσει σε
περίπτωση κατά λάθος τραβήγματος.
y
να μπορεί να
y
μην κρέμεται στο πεδίο
Προειδοποίηση!
Το μοτέρ απενεργοποιείται μόλις απομακρυνθεί το
εξάρτημα ανάμειξης
ίσως παραβλέπεται το γεγονός ότι το μηχάνημα είναι
ακόμα ενεργοποιημένο. Στη συνέχεια το μοτέρ εκκινείται ξαφνικά, μόλις το εξάρτημα ανάμειξης
μονταριστεί:
Για το λόγο αυτό:
• Εισάγετε το βύσμα στη πρίζα μόνο μόλις το
εξάρτημα ανάμειξης
έχει μονταριστεί με ασφάλεια.
• Βεβαιώνεστε πριν από το μοντάρισμα πάντα ότι
η συσκευή είναι απενεργοποιημένη ή ότι έχει
τραβηχτεί το βύσμα.
• Πρώτα απενεργοποιήστε τη, τραβήξτε το βύσμα
και περιμένετε για την ακινητοποίηση του μοτέρ
πριν απομακρύνετε το εξάρτημα ανάμειξης
από το σώμα μοτέρ u. Τότε
e
είναι γεμάτο εντελώς και
e
e
e
.
Τροφοδοσία εξαρτήματος ανάμειξης και
μοντάρισμα
Αφαιρέστε το εξάρτημα ανάμειξης eαπό τη
➩
μονάδα μοτέρ
Γεμίστε το εξάρτημα ανάμειξης eκαι πιέστε στη
➩
συνέχεια το καπάκι
ανάμειξης
έγχυσης να είναι ασφαλισμένη στο εξάρτημα
ανάμειξης
Εισάγετε το καπάκι qπλήρωσης στο άνοιγμα
➩
καπακιού και κλείστε περοστρέφοντας το
δεξιόστροφα.
Τοποθετήστε το έτοιμο γεμισμένο και ασφαλισμένο
➩
εξάρτημα ανάμειξης
Περιστρέψτε το εξάρτημα ανάμειξης
ότου μπορείτε να το πιέσετε προς τα κάτω. Μόνο
όταν το εξάρτημα ανάμειξης
σωστά και πλήρως, μπορεί να εκκινηθεί το μοτέρ.
και απομακρύνετε το καπάκι w.
u
πάλι σφιχτά στο εξάρτημα
w
. Προσέξτε ώστε η προεξοχή
e
.
e
στο σώμα του μοτέρ u.
e
έχει τοποθετηθεί
e
e
λίγο έως
- 53 -

Επιλογή βαθμίδας ταχύτητας
Όταν το εξάρτημα ανάμειξης eέχει γεμίσει εντελώς
και στέκεται εντελώς ασφαλισμένο στο σώμα μοτέρ
, μπορείτε να ενεργοποιήσετε τη συσκευή.
u
Θέστε το διακόπτη tστη ...
➩
– βαθμίδα 1-3
για υγρά ή μεσαίας σκληρότητας τρόφιμα, για
ανάμειξη, δημιουργία πολτών και ανακάτεμα
– βαθμίδα 3-5
για πιο σκληρά τρόφιμα ή για κομμάτιασμα
– βαθμίδα Ice Crush/Clean (Θρυμματισμός
πάγου/Καθαρισμός)
για σύντομη, δυνατή παλμική λειτουργία, π. χ.
για θρυμματισμό κύβων πάγου ή για καθαρισμό.
Ο διακόπτης
να μην υπερφορτωθεί το μοτέρ. Για αυτό
κρατήστε το διακόπτη
τη θέση.
κουμπώνει σε αυτή τη θέση, ώστε
t
μόνο για λίγο, σε αυτή
t
Υπόδειξη
Γεμίστε το εξάρτημα ανάμειξης eμε το μέγιστο 180
γρ. παγάκια. Αλλιώς η συσκευή δεν κομματιάζει τα
παγάκια με τον καλύτερο τρόπο.
Γέμισμα κατά τη λειτουργία
Προειδοποίηση!
Όταν θέλετε να γεμίσετε κατά τη διάρκεια της
λειτουργίας, επιτρέπεται να ανοίξετε αποκλειστικά μόνο
το για αυτή την εργασία, προβλεπόμενο καπάκι
πλήρωσης.
• Σε καμία περίπτωση μην ανοίξετε το καπάκι
Μπορεί να πεταχτούν προς τα έξω τμήματα
τροφίμων με υψηλή ταχύτητα!
• Ποτέ μην εισάγετε μέσα στο εξάρτημα ανάμειξης
τμήματα από μαχαιροπίρουνα ή εξαρτήματα ανάμειξης, όσο η συσκευή είναι σε λειτουργία. Υπάρχει
αυξημένος κίνδυνος τραυματισμού όταν αυτά
αγγίξουν τη λεπίδα
που γυρνάει πολύ γρήγορα!
r
w
q
.
e
Συμπληρώστε τα συστατικά.
➩
Στη συνέχεια εισάγετε το καπάκι qπλήρωσης
➩
πάλι στο άνοιγμα καπακιού και κλείστε
περιστρέφοντας το δεξιόστροφα.
Απομάκρυνση εξαρτήματος ανάμειξης
Όταν η επεξεργασία των τροφίμων έχει ολοκληρωθεί:
Θέτετε πάντα πρώτα το διακόπτη tστη θέση Off
➩
(„OFF“) και τραβάτε το βύσμα.
Περιμένετε πρώτα έως ότου ακινητοποιηθεί το
➩
μοτέρ, πριν σηκώσετε ίσια επάνω το εξάρτημα
ανάμειξης
χρειάζεται να περιστραφεί για αυτό.
. Το δοχείο ανάμειξης eδεν
e
Χρήσιμες υποδείξεις
– Κατά την πολτοποίηση σφιχτών υλικών για να
έχετε καλύτερα αποτελέσματα, βάζετε συνεχώς
μόνο μικρές μερίδες στο εξάρτημα ανάμειξης
αντί για μεγάλη ποσότητα μια μόνο φορά.
– Όταν επεξεργάζεστε σφιχτά υλικά, κόψτε τα σε
μικρά τεμάχια (2-3 εκ.).
– Κατά την ανάμειξη υγρών συστατικών ξεκινήστε
πρώτα με μια ελάχιστη ποσότητα υγρού. Στη
συνέχεια βάζετε λίγο-λίγο περισσότερο υγρό
από το άνοιγμα του καπακιού.
– Όταν κατά τη λειτουργία θέτετε το χέρι σας πάνω
από το κλειστό μπλέντερ, μπορείτε να σταθεροποιείτε
καλά τη συσκευή.
– Για το ανακάτεμα σκληρών ή πολύ πηχτών τροφίμων
ίσως είναι χρήσιμο να χρησιμοποιείτε την παλμική
λειτουργία ώστε να εμποδίσετε ένα κόλλημα της
λεπίδας κοπής
r
.
Υπόδειξη
Μη χρησιμοποιείτε τη συσκευή για μειώσετε την
κόκκωση αλατιού μαγειρικής, ραφιναρισμένης
ζάχαρης ή άσπρης ζάχαρης. Για να δημιουργήσετε
π.χ. ζάχαρη άχνη.
e
Για να μπορείτε να γεμίσετε κάτι εν λειτουργία, ...
περιστρέψτε το καπάκι qπλήρωσης
➩
αριστερόστροφα και βγάλτε το έξω.
- 54 -

Συνταγές
Μιλκ-σέϊκ μπανάνα
2 μπανάνες
περ. 2 ΚΣ (κουταλιά σούπας) ζάχαρη (ανάλογα με
το βαθμό ωρίμανσης των μπανανών και την
προσωπική γεύση)
1/2 λίτρο γάλα
1 πρέζα χυμό λεμόνι
Καθαρίστε τις μπανάνες και πολτοποιήστε τις στη
βαθμίδα 2. Προσθέτετε λίγο - λίγο το γάλα, στη
συνέχεια τη ζάχαρη και το χυμό λεμόνι. Αναμείξτε τα
όλα τόσο έως ότου δημιουργηθεί ένα ομοιόμορφο
υγρό.
Σερβίρετε το μιλκ-σέϊκ παγωμένο.
Μιλκ-σέϊκ βανίλια
1/4 λίτρο γάλα
250 γρ. παγωτό βανίλια
125 ml παγάκια
1 1/2 κγ (κουταλιά γλυκού) ζάχαρη
Θρυμματίστε τα παγάκια στη βαθμίδα Ice
Crush/Clean. Γεμίστε με τα υπόλοιπα υλικά το μίξερ.
Ανακατεύετε τα πάντα στη βαθμίδα 2, έως ότου
προκύψει ένα ομοιόμορφο υγρό.
Μιλκ-σέϊκ καπουτσίνο
65 ml κρύο εσπρέσσο (ή πολύ δυνατό καφέ)
65 ml γάλα
15 γρ. ζάχαρη
65 ml παγωτό βανίλια
100 ml θρυμματισμένα παγάκια
Τροπικό μίγμα
125 ml χυμός ανανά
60 ml χυμός παπάγια
50 ml χυμός πορτοκάλι
1/2 μικρή κονσέρβα ροδάκινα με χυμό
125 ml παγάκια
Θρυμματίστε τα παγάκια στη βαθμίδα Ice Crush/
Clean.
Βάλτε όλα τα υλικά στο μίξερ και αναμείξτε τα όλα
στη βαθμίδα 3.
Μιλκ-σέϊκ καρύδια - νουγκά
1/2 λίτρο γάλα
200 γρ. Κρέμα καρύδια - νουγκά
1 μπάλα παγωτό βανίλια
50 ml κρέμα
Αναμείξτε όλα τα υλικά στο μίξερ στη βαθμίδα 3,
έως ότου δημιουργηθεί μια ομοιόμορφη ποσότητα.
Μιλκ-σέϊκ καρότο
300 ml χυμό μύλου
500 ml χυμό καρότων
4 ΚΣ λάδι (λάδι φύτρων σίτου ή κραμβέλαιο)
4 ΚΣ χυμού λεμονιού
Σκόνη πιπερόριζας
πιπέρι
Βάλτε το χυμό μύλου, το λάδι και το χυμό λεμονιού
στο μίξερ και αναμείξτε τα όλα στη βαθμίδα 2. Στη
συνέχεια προσθέστε το χυμό καρότου και αναμείξτε τα
όλα στη βαθμίδα 2. Στη συνέχεια προσθέστε σύμφωνα
με την προτίμηση σας σκόνη πιπερόριζας και πιπέρι.
Θρυμματίστε τα παγάκια στη βαθμίδα Ice
Crush/Clean. Προσθέτετε τον εσπρέσσο, το γάλα
και τη ζάχαρη. Αναμείξτε τα όλα στη βαθμίδα 2, έως
ότου διαλυθεί η ζάχαρη. Προσθέστε τέλος το
παγωτό βανίλια και αναμείξτε τα όλα για λίγο στη
βαθμίδα 1.
Μιλκ-σέϊκ φραγκοστάφυλο
2 κγ μέλι
2 μπανάνες
1/4 λίτρου βουτυρόγαλα
1/4 λίτρου χυμό φραγκοστάφυλου (μαύρα)
Βάλτε όλα τα υλικά στο μίξερ και αναμείξτε τα όλα
στη βαθμίδα 3.
- 55 -

Μιλκ-σέϊκ Χαβάη
4 μπανάνες
1/4 λίτρου χυμό ανανά
1/2 λίτρου γάλα
2 κουταλιές σούπας μέλι
1/4 λίτρου ρούμι
Καθαρίστε τις μπανάνες και πολτοποιήστε τις στη
βαθμίδα 2. Προσθέστε τα υπόλοιπα υλικά και
ανακατέψτε τα όλα στη βαθμίδα 1.
Φρουτώδες μίγμα ανανά - φράουλας
250 ml χυμός ανανά
200 γρ. φράουλες
300 ml χυμό μύλου
4 παγάκια
Θρυμματίστε τα παγάκια στη βαθμίδα Ice
Crush/Clean. Πλύντε τις φράουλες και
απομακρύνετε τα πράσινα φύλλα.
Πολτοποιήστε τις στη βαθμίδα 2. Στη συνέχεια
προσθέστε τα υπόλοιπα υλικά και αναμείξτε στη
βαθμίδα 1.
Κρύα σούπα της Ανδαλουσίας
(Γκασπάτσο)
1/2 Αγγούρι
1 μεγάλη τομάτα
1 πράσινη πιπεριά
1/2 κρεμμύδι
1 σκελίδα σκόρδο
1/2 λευκό ψωμάκι
1/2 κγ αλάτι
1 κγ ξίδι από κόκκινο κρασί
1 ΚΣ ελαιόλαδο
Υπόδειξη
Συνταγές χωρίς εγγύηση. Όλα τα υλικά και τα
στοιχεία ετοιμασίας είναι τιμές βάσης. Διορθώστε
αυτές τις προτάσεις συνταγών σύμφωνα με τις
ατομικές σας εμπειρίες.
Υπόδειξη
Σε περίπτωση δυσανεξίας στη λακτόζη σας
προτείνουμε να χρησιμοποιείτε γάλα χωρίς λακτόζη.
Λάβετε όμως υπόψη ότι το γάλα χωρίς λακτόζη είναι
λίγο πιο γλυκό.
Καθαρισμός
Προσοχή!
Πριν καθαρίσετε το μπλέντερ και τα εξαρτήματά του:
• Εξασφαλίστε ότι η συσκευή είναι απενεργοποιημένη
και ότι το βύσμα έχει τραβηχτεί.
Σε καμία περίπτωση δεν επιτρέπεται το σώμα
του μοτέρ ν
υγρά. Έτσι μπορεί να προκληθεί κίνδυνος
θανάτου μέσω ηλεκτροπληξίας και να πάθει
βλάβη η συσκευή.
• Μην ανοίγετε ποτέ το περίβλημα της συσκευής.
Αλλιώς ίσως προκληθεί κίνδυνος θανάτου μέσω
ηλεκτροπληξίας.
• Ποτέ μην αποσυναρμολογείτε τη λεπίδα
επίσης ποτέ μην πιάνετε στο εξάρτημα ανάμειξης
Οι λεπίδες είναι
• Μη χρησιμοποιείτε διαλυτικά ή τριβικά μέσα για
τις πλαστικές επιφάνειες, αλλιώς αυτές μπορεί να
χαλάσουν.
α βυθιστεί σε νερό ή άλλα
u
εξαιρετικά αιχμηρές!
r
r
και
e
.
Κόψτε τα λαχανικά σε κομμάτια μεγέθους περ. 2 εκ.
Βάλτε πρώτα τις τομάτες και στη συνέχεια τα αγγούρια
στο μίξερ. Πολτοποιήστε στη βαθμίδα 3. Προσθέστε
τα υπόλοιπα υλικά και πολτοποιήστε/αναμείξτε τα
όλα στη βαθμίδα 3, έως ότου δημιουργηθεί μια
ομοιόμορφη σούπα.
Σερβίρετε την με ψωμί.
- 56 -

Καθαρισμός εξαρτήματος ανάμειξης
Καθαρίζετε το εξάρτημα ανάμειξης eμόνο με
➩
μια βούρτσα καθαρισμού με μεγάλη λαβή, έτσι
ώστε να μην τραυματίζεστε στις λεπίδες
Σε σκληρές ακαθαρσίες μπορείτε επίσης να
➩
καθαρίσετε το εξάρτημα ανάμειξης
πλυντήριο πιάτων. Γι’ αυτό αποσυναρμολογείτε
πάντα το εξάρτημα ανάμειξης,
περιγράφεται παρακάτω.
Καθαρίζετε το καπάκι και το καπάκι
➩
πλήρωσης στο πλυντήριο πιάτων ή όπως πλένετε
φυσιολογικά τα πιάτα
Όταν καθαρίζετε το μπλέντερ αμέσως μετά τη χρήση,
επιτυγχάνετε στις περισσότερες περιπτώσεις έναν
επαρκή υγιεινό καθαρισμό μέσω της ακόλουθης
εναλλακτικής:
Γεμίστε το εξάρτημα ανάμειξης eμε 750 ml
➩
νερό και προσθέστε μερικές σταγόνες ενός ήπιου
καθαριστικού μέσου. Κλείστε το καπάκι
τοποθετήστε το εξάρτημα ανάμειξης
μπλοκ κινητήρα
Εισάγετε το βύσμα στην πρίζα και πιέστε μερικές
φορές το κουμπί λειτουργίας Ice Crush/Clean
(Θρυμματισμός πάγου/ Καθαρισμός), έτσι ώστε
η λεπίδα κοπής
αριθμό στροφών μέσα από το νερό.
Στη συνέχεια ξεπλύνετε το εξάρτημα ανάμειξης
πολύ καθαρό νερό, έτσι ώστε να απομακρυνθούν
όλα τα υπολείμματα καθαριστικού μέσου.
q
.
u
να περνάει με το μέγιστο
r
e
.
e
όπως
w
e
.
r
και στο
και
w
στο
e
Εάν η βρομιά δε διαλύεται, μπορείτε να λασκάρετε το
κάτω πλαστικό τμήμα του εξαρτήματος ανάμειξης
με τις λεπίδες rαπό το γυάλινο τμήμα e:
Γυάλινο τμήμα
με
Δακτύλιος στεγανοποίησης
Μαχαίρι
Πλαστικό τμήμα
e
Παίρνετε το εξάρτημα ανάμειξης e από το
➩
σώμα μοτέρ
Περιστρέψτε το πλαστικό τμήμα του εξαρτήματος
➩
ανάμειξης
να λασκάρει από το γυάλινο τμήμα του
εξαρτήματος ανάμειξης
- 57 -
.
u
αριστερόστροφα, έτσι ώστε να μπορεί
e
.
e

Προσοχή!
Να είστε προσεκτικοί με τις λεπίδες . Είναι πολύ
αιχμηρές. Κίνδυνος τραυματισμού!
Καθαρίζετε και τα δύο τμήματα λεπτομερώς σε
➩
ήπιο διάλυμα νερού με σαπούνι ή στο πλυντήριο
πιάτων.
Τοποθετήστε πάλι το πλαστικό τμήμα του
➩
εξαρτήματος ανάμειξης
τμήμα του εξαρτήματος ανάμειξης
Προσέχετε ώστε ο δακτύλιος στεγανοποίησης
να έχει τοποθετηθεί.
επάνω στο γυάλινο
e
e
.
Φύλαξη
Όταν δε χρησιμοποιείτε το μπλέντερ για μεγάλο
➩
χρονικό διάστημα, καθαρίζετέ το λεπτομερώς
(βλέπε Κεφάλαιο “Καθαρισμός“).
Τυλίξτε το καλώδιο δικτύου yγύρω από τη
➩
διάταξη τύλιξης καλωδίου
μονάδας μοτέρ
Φυλάτε το μπλέντερ σε ένα ψυχρό, στεγνό χώρο.
➩
u
.
στο δάπεδο της
i
Απομάκρυνση
Καθαρισμός μονάδας μοτέρ
Χρησιμοποιείτε ένα στεγνό ή το πολύ ελαφρά
➩
νωπό πανί, για να καθαρίζετε τις πλαστικές
επιφάνειες.
Ελέγχετε σε κάθε καθαρισμό ότι ο διακόπτης επαφής
➩
στην υποδοχή για το εξάρτημα ανάμειξης
είναι μπλοκαρισμένος μέσω υπολείμμάτων από
βρομιές. Όταν δεν μπορείτε να διαλύσετε
ενδεχόμενα μπλοκαρίσματα με τη γωνία ενός
φύλλου χαρτιού, απευθυνθείτε στο τμήμα
εξυπηρέτησης πελατών. Σε καμία περίπτωση μη
χρησιμοποιείτε σκληρό αντικείμενο διότι ο
διακόπτης επαφής θα μπορούσε έτσι να χαλάσει.
Απομακρύνετε ενδεχόμενες ακαθαρσίες στην
➩
κάτω πλευρά της μονάδας μοτέρ
με ένα στεγνό πανί ή με ένα πινέλο
απομάκρυνσης σκόνης. Προσέχετε ώστε τίποτα
να μην φτάνει μέσα από τα ανοίγματα αερισμού
στη συσκευή.
u
e
αποκλειστικά
Μετά τον καθαρισμό
Αφήνετε όλα τα εξαρτήματα να στεγνώνουν πάλι
καλά, πριν συναρμολογήσετε και χρησιμοποιήσετε
το μπλέντερ.
Σε καμία περίπτωση μην πετάξετε τη
συσκευή στα οικιακά απορρίμματα.
Αυτό το προϊόν υπόκειται στην
Ευρωπαϊκή Οδηγία 2012/19/EU.
Απομακρύνετε τη συσκευή μέσω μιας εγκεκριμένης
δεν
επιχείρησης απόρριψης ή μέσω της κοινοτικής
επιχείρησης απόρριψης.
Προσέχετε τις τρέχουσες ισχύουσες προδιαγραφές.
Σε περίπτωση αμφιβολιών ελάτε σε επαφή με την
επιχείρηση απόρριψης.
Απομακρύνετε όλα τα υλικά συσκευασίας
με έναν φιλικό προς το περιβάλλον τρόπο.
- 58 -

Εγγύηση & Σέρβις
Έχετε για αυτή τη συσκευή 3 χρόνια εγγύηση από
την ημερομηνία αγοράς. Η συσκευή κατασκευάστηκε
και ελέγχθηκε προσεκτικά πριν από την αποστολή.
Παρακαλούμε φυλάξτε την απόδειξη ταμείου ως
απόδειξη για την αγορά. Παρακαλούμε επικοινωνήστε
τηλεφωνικά με την υπηρεσία σέρβις σε περίπτωση
εγγύησης. Μόνο έτσι μπορεί να εξασφαλιστεί μια
δωρεάν αποστολή του εμπορεύματός σας.
Η απόδοση εγγύησης ισχύει μόνο για σφάλματα
υλικού ή κατασκευής, όχι όμως για ζημιές από τη
μεταφορά, για εξαρτήματα φθοράς ή για βλάβες σε
εύθραυστα εξαρτήματα, π.χ. διακόπτες ή
συσσωρευτές. Το προϊόν προορίζεται μόνο για την
ιδιωτική και όχι για την επαγγελματική χρήση.
Σε περίπτωση κακής μεταχείρισης και ακατάλληλης
χρήσης, σε χρήση βίας και σε παρεμβάσεις οι
οποίες δεν διεξήχθησαν από το εξουσιοδοτημένο
μας τμήμα σέρβις, η εγγύηση παύει να ισχύει. Τα νομικά σας δικαιώματα δεν περιορίζονται μέσω αυτής
της εγγύησης.
Ο χρόνος εγγύησης δεν επεκτείνεται μέσω της
απόδοσης εγγύησης. Αυτό ισχύει και για
εξαρτήματα τα οποία έχουν αντικατασταθεί ή
επισκευαστεί. Ενδεχόμενες ήδη υπάρχουσες κατά
την αγορά, ζημιές και ελλείψεις πρέπει να
αναφέρονται αμέσως μετά την αποσυσκευασία, το
αργότερο όμως δύο ημέρες μετά την ημερομηνία
αγοράς. Επισκευές που εμφανίζονται μετά τη λήξη
του χρόνου εγγύησης χρεώνονται.
Σέρβις Ελλάδα
Tel.: 801 5000 019 (0,03 EUR/Min.)
E-Mail: kompernass@lidl.gr
IAN 100484
Τηλεφωνικό κέντρο (Hotline):
Δευτέρα έως Παρασκευή, 8:00 – 20:00 (CET)
Εισαγωγέας
KOMPERNASS HANDELS GMBH
BURGSTRASSE 21
44867 BOCHUM
GERMANY
www.kompernass.com
- 59 -

- 60 -

Inhaltsverzeichnis Seite
Einleitung 62
Bestimmungsgemäßer Gebrauch 62
Lieferumfang 62
Gerätebeschreibung 62
Technische Daten 62
Sicherheitshinweise 63
Auspacken 65
Aufstellen 65
Bedienen 65
Mixaufsatz befüllen und montieren..............................................................................................65
Geschwindigkeitsstufe wählen......................................................................................................65
Einfüllen im Betrieb ........................................................................................................................66
Mixaufsatz abnehmen...................................................................................................................66
Nützliche Hinweise 66
Rezepte 67
Bananen-Shake ..............................................................................................................................67
Vanille-Shake ..................................................................................................................................67
Cappucino-Shake...........................................................................................................................67
Tropical-Mix ...................................................................................................................................67
Nuss-Nougat-Shake.......................................................................................................................67
Möhren-Shake................................................................................................................................67
Johannisbeer-Mix...........................................................................................................................67
Hawaii-Shake .................................................................................................................................68
Fruchtiger Ananas-Erdbeer-Mix ....................................................................................................68
Andalusische kalte Suppe (Gazpacho).......................................................................................68
Reinigen 68
Mixaufsatz reinigen ......................................................................................................................69
Motorblock reinigen ......................................................................................................................70
Nach dem Reinigen.......................................................................................................................70
Aufbewahren 70
Entsorgen 70
Garantie und Service 70
Importeur 71
- 61 -

Standmixer
Einleitung
Herzlichen Glückwunsch zum Kauf Ihres neuen
Gerätes.
Sie haben sich damit für ein hochwertiges Produkt
entschieden. Die Bedienungsanleitung ist Bestandteil dieses Produkts. Sie enthält wichtige Hinweise
für Sicherheit, Gebrauch und Entsorgung. Machen
Sie sich vor der Benutzung des Produkts mit allen
Bedien- und Sicherheitshinweisen vertraut. Benutzen
Sie das Produkt nur wie beschrieben und für die angegebenen Einsatzbereiche. Händigen Sie alle
Unterlagen bei Weitergabe des Produkts an Dritte
mit aus.
Bestimmungsgemäßer
Gebrauch
Dieses Gerät ist ausschließlich bestimmt für ...
– das Mischen, Pürieren und Rühren von Lebens-
mitteln sowie Zerkleinern von Eiswürfeln (sog.
“Crushen”),
– haushaltsübliche Mengen und nur in privaten
Haushalten in trockenen Räumen.
Dieses Gerät ist nicht bestimmt für ...
– das Zerkleinern von harten Lebensmittelanteilen
wie z.B. Nüsse, Kerne, große Körner oder Stiele,
– das Verarbeiten von Materialien, die nicht
Lebensmittel sind,
– den Einsatz für gewerbliche oder industrielle
Zwecke,
– die Verwendung in feuchter Umgebung oder im
Freien,
– das Verarbeiten von heißen/kochenden Flüssig-
keiten.
Lieferumfang
Kontrollieren Sie nach dem Auspacken die Lieferung
auf Vollständigkeit. Im Lieferumfang enthalten ist:
1 x Motorblock, mit Netzkabel und Netzstecker
1 x Mixaufsatz, mit fest montiertem Schneidmesser
1 x Deckel
1 x Dosierkappe
1 x Bedienungsanleitung
Gerätebeschreibung
Dosierkappe
q
Deckel
w
Mixaufsatz
e
Schneidmesser
r
Schalter
t
Netzkabel
y
Motorblock
u
Kabelaufwicklung
i
Skala
o
Technische Daten
Nennspannung: 220 - 240 V~, 50 Hz
Nennleistung: 550 Watt
Max. Einfüllmenge: 1,75 l
Schutzklasse: II
KB-Zeit: 3 Minuten
Die KB-Zeit (Kurzbetriebszeit) gibt an, wie lange
man ein Gerät betreiben kann, ohne dass der
Motor überhitzt und Schaden nimmt. Nach der
angegebenen KB-Zeit muss das Gerät solange
ausgeschaltet werden, bis sich der Motor auf
Raumtemperatur abgekühlt hat.
Verwenden Sie nur Zubehör- und Ersatzteile, die für
dieses Gerät bestimmt sind. Andere Teile sind möglicherweise nicht ausreichend geeignet oder sicher!
- 62 -

Sicherheitshinweise
Um Lebensgefahr durch elektrischen Schlag zu vermeiden:
• Stellen Sie sicher, dass der Motorblock, das Netzkabel oder der Netzstecker
niemals in Wasser oder andere Flüssigkeiten getaucht wird.
• Verwenden Sie das Gerät ausschließlich in trockenen Räumen, niemals im
Freien oder in feuchter Umgebung.
• Achten Sie darauf, dass im Betrieb das Netzkabel niemals nass oder feucht
wird. Führen Sie es so, dass es nicht eingeklemmt oder anderweitig beschädigt
werden kann.
• Lassen Sie beschädigte Netzstecker oder Netzkabel sofort von autorisiertem
Fachpersonal oder dem Kundenservice austauschen, um Gefährdungen zu
vermeiden.
• Ziehen Sie nach Gebrauch immer den Stecker aus der Steckdose. Ausschalten
alleine genügt nicht, weil noch immer Netzspannung im Gerät anliegt, solange
der Netzstecker in der Steckdose steckt.
• Kontrollieren Sie vor jedem Gebrauch das Gerät auf seinen einwandfreien
Zustand. Das Gerät darf nicht verwendet werden, wenn Schäden erkennbar
sind, insbesondere an dem Motorblock oder gläsernen Mixaufsatz.
• Ziehen Sie sofort den Netzstecker aus der Steckdose, wenn Sie eine ungewöhnliche Geräusch- oder Geruchsentwicklung wahrnehmen oder bei erkennbarer Fehlfunktion.
Um Überhitzung und Brandgefahr zu vermeiden:
• Verwenden Sie das Gerät nicht im Bereich direkter Sonneneinstrahlung oder
Wärmeeinwirkung hitzeerzeugender Geräte.
• Füllen Sie niemals kochende Flüssigkeiten oder sehr heiße Lebensmittel in den
Mixaufsatz! Lassen Sie diese erst auf handwarme Temperatur abkühlen.
Andernfalls kann das Gerät überhitzen und auch das Glas des Mixaufsatzes
springen!
• Betreiben Sie das Gerät niemals im Leerzustand, d.h. ohne Zutaten im Mixaufsatz.
- 63 -

Um Unfall- und Verletzungsgefahr zu vermeiden:
• Greifen Sie niemals in den Mixaufsatz, insbesondere nicht im Betrieb.
Die Messer sind extrem scharf!
• Öffnen Sie nicht den Deckel, wenn das Gerät in Betrieb ist. Andernfalls können
Lebensmittelteile mit hoher Geschwindigkeit herausfliegen!
• Führen Sie niemals Besteckteile oder Rührgegenstände in den Mixaufsatz,
solange das Gerät in Betrieb ist. Es besteht erhebliche Verletzungsgefahr,
wenn diese das sich sehr schnell drehende Messer berühren!
• Lassen Sie das Gerät nicht unbeaufsichtigt arbeiten, um bei Gefahr sofort
reagieren zu können.
• Kinder sollten beaufsichtigt werden, um sicherzustellen, dass sie nicht mit dem
Gerät spielen.
• Missbrauchen Sie das Gerät nicht für andere Zwecke, als in dieser Anleitung
beschrieben.
• Das Gerät ist bei nicht vorhandener Aufsicht und vor dem Zusammenbau, dem
Auseinandernehmen oder Reinigen stets vom Netz zu trennen.
• Das Gerät darf nicht von Kindern benutzt werden.
• Das Gerät und seine Anschlussleitung sind von Kindern fernzuhalten.
• Dieses Gerät kann von Personen mit reduzierten physischen, sensorischen oder
mentalen Fähigkeiten oder Mangel an Erfahrung und/oder Wissen benutzt werden, wenn sie beaufsichtigt oder bezüglich des sicheren Gebrauchs des Gerätes
unterwiesen wurden und die daraus resultierenden Gefahren verstanden haben.
• Kinder dürfen nicht mit dem Gerät spielen.
• Seien Sie vorsichtig beim Umgang mit dem Gerät. Die Messer sind sehr scharf!
• Gehen Sie vorsichtig beim Leeren des Mixaufsatzes vor! Die Messer sind sehr
scharf!
• Gehen Sie vorsichtig beim Reinigen des Gerätes vor! Die Messer sind sehr scharf!
• Schalten Sie das Gerät aus und ziehen Sie den Netzstecker, bevor Sie Zubehör
wechseln oder Teile anfassen, die sich während des Betriebs bewegen.
• Verwenden Sie den Mixaufsatz nur mit dem mitgelieferten Motorblock!
• Stellen Sie sicher, dass der Mixer immer ausgeschaltet ist, bevor Sie ihn vom
Motorblock heben!
- 64 -

Auspacken
Bedienen
• Entfernen Sie alle Verpackungsteile oder Schutzfolien vom Gerät. Bewahren Sie die Verpackung
auf, um das Gerät geschützt lagern oder einsenden zu können, z.B. im Reparaturfall.
• Bevor Sie das Gerät verwenden, überzeugen
Sie sich davon, dass das Gerät unbeschädigt ist,
ebenso das Netzkabel mit Netzstecker und alle
Zubehör- und Geräteteile.
• Reinigen Sie sorgfältig alle Bestandteile vor dem ersten Gebrauch des Standmixers (siehe “Reinigen”).
Aufstellen
Wenn Sie alle Teile gereinigt haben, wie unter
“Reinigen” beschrieben:
Stellen Sie das Gerät so auf, ...
➩
– dass das Netzkabel
an der Rückseite geführt wird,
– dass der Netzstecker sofort erreichbar ist, um
diesen bei Gefahr aus der Steckdose ziehen zu
können,
– dass es stabil und rutschfest steht, so dass die
Saugnäpfe Halt finden, damit bei Vibrationen
das Gerät nicht umkippt,
– dass das Netzkabel
bereich ragt und durch versehentliches Ziehen
daran das Gerät umkippen kann.
durch die Aussparung
y
nicht in den Arbeits-
y
Warnung!
Der Motor schaltet sich aus, sobald der Mixaufsatz
vom Motorblock uentfernt wird. Es wird dann
vielleicht übersehen, dass die Maschine noch eingeschaltet ist. Der Motor startet dann unvermutet,
sobald der Mixaufsatz
Deshalb:
• Stecken Sie den Netzstecker erst dann in die
Steckdose, sobald der Mixaufsatz
füllt und verschlossen montiert ist.
• Vergewissern Sie sich vor dem Montieren stets,
dass das Gerät ausgeschaltet oder der Netzstecker gezogen ist.
• Schalten Sie erst aus, ziehen Sie den Netzstecker
und warten Sie den Stillstand des Motors ab,
bevor Sie den Mixaufsatz
montiert wird:
e
e
e
abnehmen.
e
fertig be-
Mixaufsatz befüllen und montieren
Nehmen Sie den Mixaufsatz evom Motor-
➩
block
Befüllen Sie den Mixaufsatz eund drücken Sie
➩
anschließend den Deckel
Mixaufsatz
Ausgießnase am Mixaufsatz
Stecken Sie die Dosierkappe qin die Deckelöff-
➩
nung und drehen Sie diese im Uhrzeigersinn zu.
Setzen Sie den fertig befüllten und verschlosse-
➩
nen Mixaufsatz
hen Sie den Mixaufsatz
herunter drücken können. Nur wenn der Mixaufsatz
starten.
und entfernen Sie den Deckel w.
u
wieder fest auf den
w
. Achten Sie darauf, dass auch die
e
verschlossen ist.
e
auf den Motorblock u. Dre-
e
leicht, bis Sie diesen
e
bündig aufgesetzt ist, kann der Motor
e
Geschwindigkeitsstufe wählen
Wenn der Mixaufsatz efertig befüllt und vollständig
verschlossen auf dem Motorblock
Sie das Gerät einschalten.
- 65 -
steht, können
u

Stellen Sie den Schalter tauf ...
➩
– Stufe 1-3
für flüssige oder mittelfeste Lebensmittel, zum
Mischen, Pürieren und Rühren
– Stufe 3-5
für festere Lebensmittel oder zum Zerkleinern
– Stufe Ice Crush/Clean
für kurzen, kraftvollen Impulsbetrieb, z.B. zum
Crushen von Eiswürfeln oder zur Reinigung. Der
Schalter
den Motor nicht zu überlasten. Halten Sie den
Schalter
rastet in dieser Stellung nicht ein, um
t
deshalb nur kurz in dieser Stellung.
t
Hinweis
Befüllen Sie den Mixaufsatz emit maximal 180 g
Eiswürfeln. Ansonsten zerkleinert das Gerät die Eiswürfel nicht optimal.
Einfüllen im Betrieb
Warnung!
Wenn Sie bei laufendem Betrieb etwas einfüllen
möchten, dürfen Sie ausschließlich die dafür
eigens vorgesehene Dosierkappe
• Öffnen Sie keinesfalls den Deckel
Lebensmittelteile mit hoher Geschwindigkeit
herausfliegen!
• Führen Sie niemals Besteckteile oder Rührgegenstände in den Mixaufsatz
in Betrieb ist. Es besteht erhebliche
Verletzungsgefahr, wenn diese das sich sehr
schnell drehende Schneidmesser
Um bei laufendem Betrieb etwas einfüllen zu
können, ...
drehen Sie die Dosierkappeqentgegen dem
➩
Uhrzeigersinn auf und nehmen diese heraus.
Füllen Sie die Zutaten ein.
➩
Anschließend stecken Sie die Dosierkappe
➩
wieder in die Deckelöffnung und drehen Sie
diese im Uhrzeigersinn zu.
öffnen.
q
. Es können
w
, solange das Gerät
e
berühren!
r
q
Mixaufsatz abnehmen
Wenn die Bearbeitung der eingefüllten Lebensmittel
beendet ist:
Stellen Sie immer erst den Schalter tin Aus-
➩
Stellung („OFF“) und ziehen Sie den
Netzstecker.
Warten Sie erst den Stillstand des Motors ab,
➩
bevor Sie den Mixaufsatz
herausheben. Der Mixaufsatz
nicht gedreht zu werden.
gerade nach oben
e
braucht dabei
e
Nützliche Hinweise
– Um beim Pürieren fester Zutaten beste Ergeb-
nisse zu erzielen, geben Sie nach und nach nur
kleine Portionen in den Mixaufsatz
eine große Menge auf einmal einzufüllen.
– Wenn Sie feste Zutaten verarbeiten, schneiden
Sie diese in kleine Stücke (2-3 cm).
– Beim Mixen flüssiger Zutaten beginnen Sie zu-
nächst mit einer geringen Menge Flüssigkeit. Geben Sie dann nach und nach mehr Flüssigkeit
durch die Deckelöffnung hinzu.
– Wenn Sie bei laufendem Betrieb Ihre Hand
oben auf den verschlossenen Standmixer legen,
können Sie das Gerät damit gut stabilisieren.
– Für das Rühren von festen oder sehr dickflüssi-
gen Lebensmitteln kann es nützlich sein, die Stufe
Ice Crush/Clean zu verwenden, um ein Festsetzen des Schneidmessers
zu verhindern.
r
Hinweis
Benutzen Sie das Gerät nicht, um die Körnung von
Speisesalz, Raffinadezucker oder weißem Zucker
zu verringern. Zum Beispiel, um Puderzucker herzustellen.
, anstatt
e
- 66 -

Rezepte
Bananen-Shake
2 Bananen
ca. 2 Esslöffel Zucker (je nach Reifegrad der Bananen und persönlichem Geschmack)
1/2 Liter Milch
1 Spritzer Zitronensaft
Schälen Sie die Bananen und pürieren Sie sie auf
Stufe 2. Geben Sie nach und nach die Milch, dann
den Zucker und den Zitronensaft hinzu. Mixen Sie
alles so lange, bis eine gleichmäßige Flüssigkeit entsteht.
Servieren Sie den Shake eisgekühlt.
Vanille-Shake
1/4 Liter Milch
250 g Vanilleeis
125 ml Eiswürfel
1 1/2 Teelöffel Zucker
Crushen Sie die Eiswürfel mit der Stufe Ice
Crush/Clean. Füllen Sie die restlichen Zutaten in
den Mixer. Mixen Sie alles so lange auf Stufe 2, bis
eine gleichmäßige Flüssigkeit entsteht.
Cappucino-Shake
65 ml kalten Espresso (oder sehr starken Kaffee)
65 ml Milch
15 g Zucker
65 ml Vanille Eis
100 ml gecrushte Eiswürfel
Crushen Sie die Eiswürfel mit der Stufe Ice
Crush/Clean. Geben Sie den Espresso, die Milch
und den Zucker hinzu. Mixen Sie alles auf der Stufe
2, bis sich der Zucker aufgelöst hat. Geben Sie zum
Schluss das Vanilleeis hinzu und mixen Sie alles
kurz auf der Stufe 1 durch.
Tropical-Mix
125 ml Ananassaft
60 ml Papayasaft
50 ml Orangensaft
1/2 kleine Dose Pfirsiche mit Saft
125 ml Eiswürfel
Crushen Sie die Eiswürfel mit der Stufe Ice
Crush/Clean.
Geben Sie alle Zutaten in den Mixer und mischen
Sie alles auf Stufe 3 durch.
Nuss-Nougat-Shake
1/2 Liter Milch
200 g Nuss-Nougat-Creme
1 Kugel Vanilleeis
50 ml Sahne
Vermengen Sie alle Zutaten im Mixer auf Stufe 3,
bis alles gleichmäßg vermengt ist.
Möhren-Shake
300 ml Apfelsaft
500 ml Möhrensaft
4 Esslöffel Öl (Weizenkeim- oder Rapsöl)
4 Esslöffel Zitronensaft
Ingwerpulver
Pfeffer
Geben Sie den Apfelsaft, das Öl und den Zitronensaft in den Mixer und mischen Sie alles auf Stufe 2.
Geben Sie dann den Möhrensaft hinzu und mixen
Sie alles auf Stufe 2 durch. Schmecken Sie dann
den Shake mit Ingwerpulver und Pfeffer ab.
Johannisbeer-Mix
2 Teelöffel Honig
2 Bananen
1/4 Liter Buttermilch
1/4 Liter Johannisbeersaft (schwarz)
Geben Sie alle Zutaten in den Mixer und mixen Sie
alles auf Stufe 3 durch.
- 67 -

Hawaii-Shake
4 Bananen
1/4 Liter Ananassaft
1/2 Liter Milch
2 EL Honig
1/4 Liter Rum
Schälen Sie die Bananen und pürieren Sie sie auf
Stufe 2. Geben Sie die weiteren Zutaten hinzu und
vermengen Sie alles auf Stufe 1.
Fruchtiger Ananas-Erdbeer-Mix
250 ml Ananassaft
200 g Erdbeeren
300 ml Apfelsaft
4 Eiswürfel
Crushen Sie die Eiswürfel mit der Stufe Ice
Crush/Clean. Waschen Sie die Erdbeeren und entfernen Sie das Grün. Pürieren Sie sie auf Stufe 2.
Geben Sie dann die restlichen Zutaten hinzu und
mixen Sie alles auf Stufe 1.
Andalusische kalte Suppe (Gazpacho)
1/2 Gurke
1 Fleischtomate
1 Grüne Paprika
1/2 Zwiebel
1 Knoblauchzehe
1/2 weißes Brötchen
1/2 Teelöffel Salz
1 Teelöffel Rotweinessig
1 Esslöffel Olivenöl
Schneiden Sie das Gemüse in ca. 2 cm große
Stücke. Geben Sie zuerst die Tomatenstücke und
danach die Gurke in den Mixer. Pürieren Sie diese
auf Stufe 3. Fügen Sie die restlichen Zutaten hinzu
und pürieren/durchmengen Sie alles auf Stufe 3,
bis eine gleichmäßige Suppe entsteht.
Servieren Sie das ganze mit Brot.
Hinweis
Rezepte ohne Gewähr. Alle Zutaten- und Zubereitungsangaben sind Anhaltswerte. Ergänzen Sie diese Rezeptvorschläge um Ihre persönlichen Erfahrungswerte.
Hinweis
Bei Laktose-Intoleranz empfehlen wir Ihnen laktosefreie Milch zu verwenden. Bedenken Sie dabei jedoch, dass laktosefreie Milch ein wenig süßer ist.
Reinigen
Vorsicht!
Bevor Sie den Standmixer und seine Teile reinigen:
• Stellen Sie sicher, dass das Gerät ausgeschaltet
und der Netzstecker gezogen ist.
Auf keinen Fall darf der Motorblock
Wasser oder andere Flüssigkeiten getaucht
werden. Hierdurch kann Lebensgefahr durch
elektrischen Schlag entstehen und das Gerät
kann beschädigt werden.
• Öffnen Sie niemals das Gehäuse des Gerätes.
Andernfalls kann Lebensgefahr bestehen durch
elektrischen Schlag.
• Demontieren Sie niemals das Schneidmesser
und greifen Sie auch niemals in den Mixaufsatz
. Das Schneidmesser rist extrem scharf!
e
• Verwenden Sie keine Lösungs- oder Scheuermittel für die Kunststoffflächen, diese können
andernfalls beschädigt werden.
u
in
r
- 68 -

Mixaufsatz reinigen
Reinigen Sie den Mixaufsatz enur mit einer
➩
langstieligen Spülbürste, so dass Sie sich nicht
am Schneidmesser
Bei hartnäckiger Verschmutzung können Sie den
➩
Mixaufsatz
gen lassen. Demontieren Sie dafür immer den
Mixaufsatz
Reinigen Sie den Deckel wund die Dosierkap-
➩
pe
q
Geschirrspülen.
Wenn Sie direkt nach der Benutzung den Standmixer reinigen, erzielen Sie eine in den meisten
Fällen ausreichende hygienische Reinigung durch
folgende Alternative:
Füllen Sie den Mixaufsatz emit 750 ml Wasser
➩
und geben Sie einige Tropfen eines milden Spülmittels dazu. Schließen den Deckel
den Mixaufsatz
Stecken Sie den Netzstecker in die Steckdose
und betätigen Sie ein paar Mal den Ice Crush/
Clean-Betrieb, so dass das Schneidmesser
maximaler Drehzahl durch das Wasser pflügt.
Spülen Sie danach den Mixaufsatz
klarem Wasser aus, so dass alle Spülmittelreste
beseitigt sind.
e
e
in der Spülmaschine oder beim normalen
verletzen können.
r
auch in der Spülmaschine reini-
, wie später beschrieben.
und setzen
w
auf den Motorblock u.
e
r
mit viel
e
Sollte sich der Schmutz nicht lösen, können Sie den unteren Plastikteil des Mixaufsatzes
messer
mit
vom Glasteil des Mixaufsatzes elösen:
r
Glasteil
Dichtungsring
Messer
Plastikteil
mit dem Schneid-
e
Nehmen Sie den Mixaufsatz evom Motor-
➩
block
.
u
Drehen Sie das Plastikteil des Mixaufsatzes
➩
gegen den Uhrzeigersinn, so dass es sich
e
vom Glasteil des Mixaufsatzes
- 69 -
lösen lässt.
e

Achtung!
Gehen Sie vorsichtig mit den Messern um. Sie
sind sehr scharf. Verletzungsgefahr!
Reinigen Sie beide Teile gründlich in milder Sei-
➩
fenlauge oder in der Spülmaschine.
Setzen Sie das Plastikteil des Mixaufsatzes
➩
wieder auf den Glasteil des Mixaufsatzes e.
Achten Sie darauf, dass der Dichtungsring
eingesetzt ist.
e
Motorblock reinigen
Verwenden Sie ein trockenes oder höchstens
➩
leicht angefeuchtetes Tuch, um die Oberflächen
zu reinigen.
Kontrollieren Sie bei jeder Reinigung, dass der
➩
Kontaktschalter in der Aufnahme für den Mixaufsatz
nicht durch Schmutzreste blockiert ist.
e
Wenn Sie eventuelle Blockierungen nicht mit der
Ecke von einem Blatt Papier lösen können, wenden
Sie sich an den Kundendienst. Verwenden Sie auf
keinen Fall einen harten Gegenstand, der Kontaktschalter könnte dadurch beschädigt werden.
Entfernen Sie eventuelle Verschmutzungen an der
➩
Unterseite des Motorblocks
einem trockenen Tuch oder einem Staubpinsel.
Achten Sie darauf, dass nichts durch die Lüftungsöffnungen in das Gerät gelangt.
ausschließlich mit
u
Nach dem Reinigen
Lassen Sie alle Teile wieder gut trocknen, bevor Sie
den Standmixer wieder zusammensetzen und verwenden.
Aufbewahren
Wenn Sie den Standmixer längere Zeit nicht ver-
➩
wenden, reinigen Sie ihn gründlich (siehe Kapitel
„Reinigen“).
Wickeln Sie das Netzkabel yum die Kabelauf-
➩
wicklung
Bewahren Sie den Standmixer an einem kühlen,
➩
trockenen Ort auf.
am Boden des Motorblocks u.
i
Entsorgen
Werfen Sie das Gerät keinesfalls in den
normalen Hausmüll. Dieses Produkt
unterliegt der europäischen Richtlinie
2012/19/EU.
Entsorgen Sie das Gerät über einen zugelassenen
Entsorgungsbetrieb oder über Ihre kommunale
Entsorgungseinrichtung.
Beachten Sie die aktuell geltenden Vorschriften.
Setzen Sie sich im Zweifelsfall mit Ihrer Entsorgungseinrichtung in Verbindung.
Führen Sie alle Verpackungsmaterialien
einer umweltgerechten Entsorgung zu.
Garantie und Service
Sie erhalten auf dieses Gerät 3 Jahre Garantie ab
Kaufdatum. Das Gerät wurde sorgfältig produziert
und vor Anlieferung gewissenhaft geprüft.
Bitte bewahren Sie den Kassenbon als Nachweis
für den Kauf auf. Bitte setzen Sie sich im Garantiefall mit Ihrer Servicestelle telefonisch in Verbindung.
Nur so kann eine kostenlose Einsendung Ihrer Ware
gewährleistet werden.
Die Garantieleistung gilt nur für Material- oder
Fabrikationsfehler, nicht aber für Transportschäden,
Verschleißteile oder für Beschädigungen an zerbrechlichen Teilen, z. B. Schalter oder Akkus. Das
Produkt ist lediglich für den privaten und nicht für
den gewerblichen Gebrauch bestimmt.
Bei missbräuchlicher und unsachgemäßer Behandlung, Gewaltanwendung und bei Eingriffen, die
nicht von unserer autorisierten Service-Niederlassung vorgenommen wurden, erlischt die Garantie.
Ihre gesetzlichen Rechte werden durch diese
Garantie nicht eingeschränkt.
- 70 -

Die Garantiezeit wird durch die Gewährleistung
nicht verlängert. Dies gilt auch für ersetzte und reparierte Teile. Eventuell schon beim Kauf vorhandene
Schäden und Mängel müssen sofort nach dem
Auspacken gemeldet werden, spätestens aber zwei
Tage nach Kaufdatum. Nach Ablauf der Garantiezeit anfallende Reparaturen sind kostenpflichtig.
Service Deutschland
Tel.: 0800 5435 111
(Kostenfrei aus dem dt. Festnetz/Mobilfunknetz)
E-Mail: kompernass@lidl.de
IAN 100484
Service Österreich
Tel.: 0820 201 222 (0,15 EUR/Min.)
E-Mail: kompernass@lidl.at
IAN 100484
Service Schweiz
Tel.: 0842 665566 (0,08 CHF/Min.,
Mobilfunk max. 0,40 CHF/Min.)
E-Mail: kompernass@lidl.ch
IAN 100484
Erreichbarkeit Hotline:
Montag bis Freitag von 8:00 Uhr - 20:00 Uhr (MEZ)
Importeur
KOMPERNASS HANDELS GMBH
BURGSTRASSE 21
44867 BOCHUM
GERMANY
www.kompernass.com
- 71 -

KOMPERNASS HANDELS GMBH
BURGSTRASSE 21
44867 BOCHUM
DEUTSCHLAND / GERMANY
www.kompernass.com
Last Information Update · Stanje informacija · Versiunea informaţiilor
Актуалност на информацията · Έκδοση των πληροφοριών
Stand der Informationen: 04 / 2014 · Ident.-No.: SSM550D1-032014-1
IAN 100484
 Loading...