


STANDMIXER SSM 550 D1
STANDMIXER
Bedienungsanleitung
FRULLATORE
Istruzioni per l'uso
IAN 100484
BLENDER
Mode d'emploi
BLENDER
Operating instructions

Klappen Sie vor dem Lesen die Seite mit den Abbildungen aus und machen Sie sich anschließend mit allen
Funktionen des Gerätes vertraut.
Avant de lire le mode d'emploi, ouvrez la page contenant les illustrations et familiarisez-vous ensuite avec
toutes les fonctions de l'appareil.
Prima di leggere aprire la pagina con le immagini e prendere confi denza con le diverse funzioni
dell'apparecchio.
Before reading, unfold the page containing the illustrations and familiarise yourself with all functions of
the device.
DE / AT / CH Bedienungsanleitung Seite 1
FR / CH Mode d'emploi Page 13
IT / CH Istruzioni per l'uso Pagina 25
GB Operating instructions Page 37


INHALTSVERZEICHNIS SEITE
Einleitung 2
Bestimmungsgemäßer Gebrauch 2
Lieferumfang 2
Gerätebeschreibung 2
Technische Daten 2
Sicherheitshinweise 3
Auspacken 5
Aufstellen 5
Bedienen 5
Mixaufsatz befüllen und montieren ................................................................................................5
Geschwindigkeitsstufe wählen ........................................................................................................5
Einfüllen im Betrieb...........................................................................................................................6
Mixaufsatz abnehmen .....................................................................................................................6
Nützliche Hinweise 6
Rezepte 7
Bananen-Shake.................................................................................................................................7
Vanille-Shake.....................................................................................................................................7
Cappucino-Shake .............................................................................................................................7
Tropical-Mix .....................................................................................................................................7
Nuss-Nougat-Shake..........................................................................................................................7
Möhren-Shake...................................................................................................................................7
Johannisbeer-Mix..............................................................................................................................7
Hawaii-Shake....................................................................................................................................8
Fruchtiger Ananas-Erdbeer-Mix.......................................................................................................8
Andalusische kalte Suppe (Gazpacho).........................................................................................8
Reinigen 8
Mixaufsatz reinigen ........................................................................................................................9
Motorblock reinigen ......................................................................................................................10
Nach dem Reinigen.......................................................................................................................10
Aufbewahren 10
Entsorgen 10
Garantie und Service 10
Importeur 11
- 1 -

Standmixer
Einleitung
Herzlichen Glückwunsch zum Kauf Ihres neuen
Gerätes.
Sie haben sich damit für ein hochwertiges Produkt
entschieden. Die Bedienungsanleitung ist Bestandteil dieses Produkts. Sie enthält wichtige Hinweise
für Sicherheit, Gebrauch und Entsorgung. Machen
Sie sich vor der Benutzung des Produkts mit allen
Bedien- und Sicherheitshinweisen vertraut. Benutzen
Sie das Produkt nur wie beschrieben und für die angegebenen Einsatzbereiche. Händigen Sie alle
Unterlagen bei Weitergabe des Produkts an Dritte
mit aus.
Bestimmungsgemäßer
Gebrauch
Dieses Gerät ist ausschließlich bestimmt für ...
– das Mischen, Pürieren und Rühren von Lebens-
mitteln sowie Zerkleinern von Eiswürfeln (sog.
“Crushen”),
– haushaltsübliche Mengen und nur in privaten
Haushalten in trockenen Räumen.
Dieses Gerät ist nicht bestimmt für ...
– das Zerkleinern von harten Lebensmittelanteilen
wie z.B. Nüsse, Kerne, große Körner oder Stiele,
– das Verarbeiten von Materialien, die nicht
Lebensmittel sind,
– den Einsatz für gewerbliche oder industrielle
Zwecke,
– die Verwendung in feuchter Umgebung oder im
Freien,
– das Verarbeiten von heißen/kochenden Flüssig-
keiten.
Lieferumfang
Kontrollieren Sie nach dem Auspacken die Lieferung
auf Vollständigkeit. Im Lieferumfang enthalten ist:
1 x Motorblock, mit Netzkabel und Netzstecker
1 x Mixaufsatz, mit fest montiertem Schneidmesser
1 x Deckel
1 x Dosierkappe
1 x Bedienungsanleitung
Gerätebeschreibung
Dosierkappe
q
Deckel
w
Mixaufsatz
e
Schneidmesser
r
Schalter
t
Netzkabel
y
Motorblock
u
Kabelaufwicklung
i
Skala
o
Technische Daten
Nennspannung: 220 - 240 V~, 50 Hz
Nennleistung: 550 Watt
Max. Einfüllmenge: 1,75 l
Schutzklasse: II
KB-Zeit: 3 Minuten
Die KB-Zeit (Kurzbetriebszeit) gibt an, wie lange
man ein Gerät betreiben kann, ohne dass der
Motor überhitzt und Schaden nimmt. Nach der
angegebenen KB-Zeit muss das Gerät solange
ausgeschaltet werden, bis sich der Motor auf
Raumtemperatur abgekühlt hat.
Verwenden Sie nur Zubehör- und Ersatzteile, die für
dieses Gerät bestimmt sind. Andere Teile sind möglicherweise nicht ausreichend geeignet oder sicher!
- 2 -

Sicherheitshinweise
Um Lebensgefahr durch elektrischen Schlag zu vermeiden:
• Stellen Sie sicher, dass der Motorblock, das Netzkabel oder der Netzstecker
niemals in Wasser oder andere Flüssigkeiten getaucht wird.
• Verwenden Sie das Gerät ausschließlich in trockenen Räumen, niemals im
Freien oder in feuchter Umgebung.
• Achten Sie darauf, dass im Betrieb das Netzkabel niemals nass oder feucht
wird. Führen Sie es so, dass es nicht eingeklemmt oder anderweitig beschädigt
werden kann.
• Lassen Sie beschädigte Netzstecker oder Netzkabel sofort von autorisiertem
Fachpersonal oder dem Kundenservice austauschen, um Gefährdungen zu
vermeiden.
• Ziehen Sie nach Gebrauch immer den Stecker aus der Steckdose. Ausschalten
alleine genügt nicht, weil noch immer Netzspannung im Gerät anliegt, solange
der Netzstecker in der Steckdose steckt.
• Kontrollieren Sie vor jedem Gebrauch das Gerät auf seinen einwandfreien
Zustand. Das Gerät darf nicht verwendet werden, wenn Schäden erkennbar
sind, insbesondere an dem Motorblock oder gläsernen Mixaufsatz.
• Ziehen Sie sofort den Netzstecker aus der Steckdose, wenn Sie eine ungewöhnliche Geräusch- oder Geruchsentwicklung wahrnehmen oder bei erkennbarer Fehlfunktion.
Um Überhitzung und Brandgefahr zu vermeiden:
• Verwenden Sie das Gerät nicht im Bereich direkter Sonneneinstrahlung oder
Wärmeeinwirkung hitzeerzeugender Geräte.
• Füllen Sie niemals kochende Flüssigkeiten oder sehr heiße Lebensmittel in den
Mixaufsatz! Lassen Sie diese erst auf handwarme Temperatur abkühlen.
Andernfalls kann das Gerät überhitzen und auch das Glas des Mixaufsatzes
springen!
• Betreiben Sie das Gerät niemals im Leerzustand, d.h. ohne Zutaten im Mixaufsatz.
- 3 -

Um Unfall- und Verletzungsgefahr zu vermeiden:
• Greifen Sie niemals in den Mixaufsatz, insbesondere nicht im Betrieb.
Die Messer sind extrem scharf!
• Öffnen Sie nicht den Deckel, wenn das Gerät in Betrieb ist. Andernfalls können
Lebensmittelteile mit hoher Geschwindigkeit herausfliegen!
• Führen Sie niemals Besteckteile oder Rührgegenstände in den Mixaufsatz,
solange das Gerät in Betrieb ist. Es besteht erhebliche Verletzungsgefahr,
wenn diese das sich sehr schnell drehende Messer berühren!
• Lassen Sie das Gerät nicht unbeaufsichtigt arbeiten, um bei Gefahr sofort
reagieren zu können.
• Kinder sollten beaufsichtigt werden, um sicherzustellen, dass sie nicht mit dem
Gerät spielen.
• Missbrauchen Sie das Gerät nicht für andere Zwecke, als in dieser Anleitung
beschrieben.
• Das Gerät ist bei nicht vorhandener Aufsicht und vor dem Zusammenbau, dem
Auseinandernehmen oder Reinigen stets vom Netz zu trennen.
• Das Gerät darf nicht von Kindern benutzt werden.
• Das Gerät und seine Anschlussleitung sind von Kindern fernzuhalten.
• Dieses Gerät kann von Personen mit reduzierten physischen, sensorischen oder
mentalen Fähigkeiten oder Mangel an Erfahrung und/oder Wissen benutzt werden, wenn sie beaufsichtigt oder bezüglich des sicheren Gebrauchs des Gerätes
unterwiesen wurden und die daraus resultierenden Gefahren verstanden haben.
• Kinder dürfen nicht mit dem Gerät spielen.
• Seien Sie vorsichtig beim Umgang mit dem Gerät. Die Messer sind sehr scharf!
• Gehen Sie vorsichtig beim Leeren des Mixaufsatzes vor! Die Messer sind sehr
scharf!
• Gehen Sie vorsichtig beim Reinigen des Gerätes vor! Die Messer sind sehr scharf!
• Schalten Sie das Gerät aus und ziehen Sie den Netzstecker, bevor Sie Zubehör
wechseln oder Teile anfassen, die sich während des Betriebs bewegen.
• Verwenden Sie den Mixaufsatz nur mit dem mitgelieferten Motorblock!
• Stellen Sie sicher, dass der Mixer immer ausgeschaltet ist, bevor Sie ihn vom
Motorblock heben!
- 4 -

Auspacken
Bedienen
• Entfernen Sie alle Verpackungsteile oder Schutzfolien vom Gerät. Bewahren Sie die Verpackung
auf, um das Gerät geschützt lagern oder einsenden zu können, z.B. im Reparaturfall.
• Bevor Sie das Gerät verwenden, überzeugen
Sie sich davon, dass das Gerät unbeschädigt ist,
ebenso das Netzkabel mit Netzstecker und alle
Zubehör- und Geräteteile.
• Reinigen Sie sorgfältig alle Bestandteile vor dem ersten Gebrauch des Standmixers (siehe “Reinigen”).
Aufstellen
Wenn Sie alle Teile gereinigt haben, wie unter
“Reinigen” beschrieben:
Stellen Sie das Gerät so auf, ...
➩
– dass das Netzkabel
an der Rückseite geführt wird,
– dass der Netzstecker sofort erreichbar ist, um
diesen bei Gefahr aus der Steckdose ziehen zu
können,
– dass es stabil und rutschfest steht, so dass die
Saugnäpfe Halt finden, damit bei Vibrationen
das Gerät nicht umkippt,
– dass das Netzkabel
bereich ragt und durch versehentliches Ziehen
daran das Gerät umkippen kann.
durch die Aussparung
y
nicht in den Arbeits-
y
Warnung!
Der Motor schaltet sich aus, sobald der Mixaufsatz
vom Motorblock uentfernt wird. Es wird dann
vielleicht übersehen, dass die Maschine noch eingeschaltet ist. Der Motor startet dann unvermutet,
sobald der Mixaufsatz
Deshalb:
• Stecken Sie den Netzstecker erst dann in die
Steckdose, sobald der Mixaufsatz
füllt und verschlossen montiert ist.
• Vergewissern Sie sich vor dem Montieren stets,
dass das Gerät ausgeschaltet oder der Netzstecker gezogen ist.
• Schalten Sie erst aus, ziehen Sie den Netzstecker
und warten Sie den Stillstand des Motors ab,
bevor Sie den Mixaufsatz
montiert wird:
e
e
e
abnehmen.
e
fertig be-
Mixaufsatz befüllen und montieren
Nehmen Sie den Mixaufsatz evom Motor-
➩
block
Befüllen Sie den Mixaufsatz eund drücken Sie
➩
anschließend den Deckel
Mixaufsatz
Ausgießnase am Mixaufsatz
Stecken Sie die Dosierkappe qin die Deckelöff-
➩
nung und drehen Sie diese im Uhrzeigersinn zu.
Setzen Sie den fertig befüllten und verschlosse-
➩
nen Mixaufsatz
hen Sie den Mixaufsatz
herunter drücken können. Nur wenn der Mixaufsatz
starten.
und entfernen Sie den Deckel w.
u
wieder fest auf den
w
. Achten Sie darauf, dass auch die
e
verschlossen ist.
e
auf den Motorblock u. Dre-
e
leicht, bis Sie diesen
e
bündig aufgesetzt ist, kann der Motor
e
Geschwindigkeitsstufe wählen
Wenn der Mixaufsatz efertig befüllt und vollständig
verschlossen auf dem Motorblock
Sie das Gerät einschalten.
- 5 -
steht, können
u

Stellen Sie den Schalter tauf ...
➩
– Stufe 1-3
für flüssige oder mittelfeste Lebensmittel, zum
Mischen, Pürieren und Rühren
– Stufe 3-5
für festere Lebensmittel oder zum Zerkleinern
– Stufe Ice Crush/Clean
für kurzen, kraftvollen Impulsbetrieb, z.B. zum
Crushen von Eiswürfeln oder zur Reinigung. Der
Schalter
den Motor nicht zu überlasten. Halten Sie den
Schalter
rastet in dieser Stellung nicht ein, um
t
deshalb nur kurz in dieser Stellung.
t
Hinweis
Befüllen Sie den Mixaufsatz emit maximal 180 g
Eiswürfeln. Ansonsten zerkleinert das Gerät die Eiswürfel nicht optimal.
Einfüllen im Betrieb
Warnung!
Wenn Sie bei laufendem Betrieb etwas einfüllen
möchten, dürfen Sie ausschließlich die dafür
eigens vorgesehene Dosierkappe
• Öffnen Sie keinesfalls den Deckel
Lebensmittelteile mit hoher Geschwindigkeit
herausfliegen!
• Führen Sie niemals Besteckteile oder Rührgegenstände in den Mixaufsatz
in Betrieb ist. Es besteht erhebliche
Verletzungsgefahr, wenn diese das sich sehr
schnell drehende Schneidmesser
Um bei laufendem Betrieb etwas einfüllen zu
können, ...
drehen Sie die Dosierkappeqentgegen dem
➩
Uhrzeigersinn auf und nehmen diese heraus.
Füllen Sie die Zutaten ein.
➩
Anschließend stecken Sie die Dosierkappe
➩
wieder in die Deckelöffnung und drehen Sie
diese im Uhrzeigersinn zu.
öffnen.
q
. Es können
w
, solange das Gerät
e
berühren!
r
q
Mixaufsatz abnehmen
Wenn die Bearbeitung der eingefüllten Lebensmittel
beendet ist:
Stellen Sie immer erst den Schalter tin Aus-
➩
Stellung („OFF“) und ziehen Sie den
Netzstecker.
Warten Sie erst den Stillstand des Motors ab,
➩
bevor Sie den Mixaufsatz
herausheben. Der Mixaufsatz
nicht gedreht zu werden.
gerade nach oben
e
braucht dabei
e
Nützliche Hinweise
– Um beim Pürieren fester Zutaten beste Ergeb-
nisse zu erzielen, geben Sie nach und nach nur
kleine Portionen in den Mixaufsatz
eine große Menge auf einmal einzufüllen.
– Wenn Sie feste Zutaten verarbeiten, schneiden
Sie diese in kleine Stücke (2-3 cm).
– Beim Mixen flüssiger Zutaten beginnen Sie zu-
nächst mit einer geringen Menge Flüssigkeit. Geben Sie dann nach und nach mehr Flüssigkeit
durch die Deckelöffnung hinzu.
– Wenn Sie bei laufendem Betrieb Ihre Hand
oben auf den verschlossenen Standmixer legen,
können Sie das Gerät damit gut stabilisieren.
– Für das Rühren von festen oder sehr dickflüssi-
gen Lebensmitteln kann es nützlich sein, die Stufe
Ice Crush/Clean zu verwenden, um ein Festsetzen des Schneidmessers
zu verhindern.
r
Hinweis
Benutzen Sie das Gerät nicht, um die Körnung von
Speisesalz, Raffinadezucker oder weißem Zucker
zu verringern. Zum Beispiel, um Puderzucker herzustellen.
, anstatt
e
- 6 -

Rezepte
Bananen-Shake
2 Bananen
ca. 2 Esslöffel Zucker (je nach Reifegrad der Bananen und persönlichem Geschmack)
1/2 Liter Milch
1 Spritzer Zitronensaft
Schälen Sie die Bananen und pürieren Sie sie auf
Stufe 2. Geben Sie nach und nach die Milch, dann
den Zucker und den Zitronensaft hinzu. Mixen Sie
alles so lange, bis eine gleichmäßige Flüssigkeit entsteht.
Servieren Sie den Shake eisgekühlt.
Vanille-Shake
1/4 Liter Milch
250 g Vanilleeis
125 ml Eiswürfel
1 1/2 Teelöffel Zucker
Crushen Sie die Eiswürfel mit der Stufe Ice
Crush/Clean. Füllen Sie die restlichen Zutaten in
den Mixer. Mixen Sie alles so lange auf Stufe 2, bis
eine gleichmäßige Flüssigkeit entsteht.
Cappucino-Shake
65 ml kalten Espresso (oder sehr starken Kaffee)
65 ml Milch
15 g Zucker
65 ml Vanille Eis
100 ml gecrushte Eiswürfel
Crushen Sie die Eiswürfel mit der Stufe Ice
Crush/Clean. Geben Sie den Espresso, die Milch
und den Zucker hinzu. Mixen Sie alles auf der Stufe
2, bis sich der Zucker aufgelöst hat. Geben Sie zum
Schluss das Vanilleeis hinzu und mixen Sie alles
kurz auf der Stufe 1 durch.
Tropical-Mix
125 ml Ananassaft
60 ml Papayasaft
50 ml Orangensaft
1/2 kleine Dose Pfirsiche mit Saft
125 ml Eiswürfel
Crushen Sie die Eiswürfel mit der Stufe Ice
Crush/Clean.
Geben Sie alle Zutaten in den Mixer und mischen
Sie alles auf Stufe 3 durch.
Nuss-Nougat-Shake
1/2 Liter Milch
200 g Nuss-Nougat-Creme
1 Kugel Vanilleeis
50 ml Sahne
Vermengen Sie alle Zutaten im Mixer auf Stufe 3,
bis alles gleichmäßg vermengt ist.
Möhren-Shake
300 ml Apfelsaft
500 ml Möhrensaft
4 Esslöffel Öl (Weizenkeim- oder Rapsöl)
4 Esslöffel Zitronensaft
Ingwerpulver
Pfeffer
Geben Sie den Apfelsaft, das Öl und den Zitronensaft in den Mixer und mischen Sie alles auf Stufe 2.
Geben Sie dann den Möhrensaft hinzu und mixen
Sie alles auf Stufe 2 durch. Schmecken Sie dann
den Shake mit Ingwerpulver und Pfeffer ab.
Johannisbeer-Mix
2 Teelöffel Honig
2 Bananen
1/4 Liter Buttermilch
1/4 Liter Johannisbeersaft (schwarz)
Geben Sie alle Zutaten in den Mixer und mixen Sie
alles auf Stufe 3 durch.
- 7 -

Hawaii-Shake
4 Bananen
1/4 Liter Ananassaft
1/2 Liter Milch
2 EL Honig
1/4 Liter Rum
Schälen Sie die Bananen und pürieren Sie sie auf
Stufe 2. Geben Sie die weiteren Zutaten hinzu und
vermengen Sie alles auf Stufe 1.
Fruchtiger Ananas-Erdbeer-Mix
250 ml Ananassaft
200 g Erdbeeren
300 ml Apfelsaft
4 Eiswürfel
Crushen Sie die Eiswürfel mit der Stufe Ice
Crush/Clean. Waschen Sie die Erdbeeren und entfernen Sie das Grün. Pürieren Sie sie auf Stufe 2.
Geben Sie dann die restlichen Zutaten hinzu und
mixen Sie alles auf Stufe 1.
Andalusische kalte Suppe (Gazpacho)
1/2 Gurke
1 Fleischtomate
1 Grüne Paprika
1/2 Zwiebel
1 Knoblauchzehe
1/2 weißes Brötchen
1/2 Teelöffel Salz
1 Teelöffel Rotweinessig
1 Esslöffel Olivenöl
Schneiden Sie das Gemüse in ca. 2 cm große
Stücke. Geben Sie zuerst die Tomatenstücke und
danach die Gurke in den Mixer. Pürieren Sie diese
auf Stufe 3. Fügen Sie die restlichen Zutaten hinzu
und pürieren/durchmengen Sie alles auf Stufe 3,
bis eine gleichmäßige Suppe entsteht.
Servieren Sie das ganze mit Brot.
Hinweis
Rezepte ohne Gewähr. Alle Zutaten- und Zubereitungsangaben sind Anhaltswerte. Ergänzen Sie diese Rezeptvorschläge um Ihre persönlichen Erfahrungswerte.
Hinweis
Bei Laktose-Intoleranz empfehlen wir Ihnen laktosefreie Milch zu verwenden. Bedenken Sie dabei jedoch, dass laktosefreie Milch ein wenig süßer ist.
Reinigen
Vorsicht!
Bevor Sie den Standmixer und seine Teile reinigen:
• Stellen Sie sicher, dass das Gerät ausgeschaltet
und der Netzstecker gezogen ist.
Auf keinen Fall darf der Motorblock
Wasser oder andere Flüssigkeiten getaucht
werden. Hierdurch kann Lebensgefahr durch
elektrischen Schlag entstehen und das Gerät
kann beschädigt werden.
• Öffnen Sie niemals das Gehäuse des Gerätes.
Andernfalls kann Lebensgefahr bestehen durch
elektrischen Schlag.
• Demontieren Sie niemals das Schneidmesser
und greifen Sie auch niemals in den Mixaufsatz
. Das Schneidmesser rist extrem scharf!
e
• Verwenden Sie keine Lösungs- oder Scheuermittel für die Kunststoffflächen, diese können
andernfalls beschädigt werden.
u
in
r
- 8 -

Mixaufsatz reinigen
Reinigen Sie den Mixaufsatz enur mit einer
➩
langstieligen Spülbürste, so dass Sie sich nicht
am Schneidmesser
Bei hartnäckiger Verschmutzung können Sie den
➩
Mixaufsatz
gen lassen. Demontieren Sie dafür immer den
Mixaufsatz
Reinigen Sie den Deckel wund die Dosierkap-
➩
pe
q
Geschirrspülen.
Wenn Sie direkt nach der Benutzung den Standmixer reinigen, erzielen Sie eine in den meisten
Fällen ausreichende hygienische Reinigung durch
folgende Alternative:
Füllen Sie den Mixaufsatz emit 750 ml Wasser
➩
und geben Sie einige Tropfen eines milden Spülmittels dazu. Schließen den Deckel
den Mixaufsatz
Stecken Sie den Netzstecker in die Steckdose
und betätigen Sie ein paar Mal den Ice Crush/
Clean-Betrieb, so dass das Schneidmesser
maximaler Drehzahl durch das Wasser pflügt.
Spülen Sie danach den Mixaufsatz
klarem Wasser aus, so dass alle Spülmittelreste
beseitigt sind.
e
e
in der Spülmaschine oder beim normalen
verletzen können.
r
auch in der Spülmaschine reini-
, wie später beschrieben.
und setzen
w
auf den Motorblock u.
e
mit viel
e
r
Sollte sich der Schmutz nicht lösen, können Sie den unteren Plastikteil des Mixaufsatzes
messer
mit
vom Glasteil des Mixaufsatzes elösen:
r
Glasteil
Dichtungsring
Messer
Plastikteil
mit dem Schneid-
e
Nehmen Sie den Mixaufsatz evom Motor-
➩
block
Drehen Sie das Plastikteil des Mixaufsatzes
➩
e
vom Glasteil des Mixaufsatzes
- 9 -
.
u
gegen den Uhrzeigersinn, so dass es sich
lösen lässt.
e

Achtung!
Gehen Sie vorsichtig mit den Messern um. Sie
sind sehr scharf. Verletzungsgefahr!
Reinigen Sie beide Teile gründlich in milder Sei-
➩
fenlauge oder in der Spülmaschine.
Setzen Sie das Plastikteil des Mixaufsatzes
➩
wieder auf den Glasteil des Mixaufsatzes e.
Achten Sie darauf, dass der Dichtungsring
eingesetzt ist.
e
Motorblock reinigen
Verwenden Sie ein trockenes oder höchstens
➩
leicht angefeuchtetes Tuch, um die Oberflächen
zu reinigen.
Kontrollieren Sie bei jeder Reinigung, dass der
➩
Kontaktschalter in der Aufnahme für den Mixaufsatz
nicht durch Schmutzreste blockiert ist.
e
Wenn Sie eventuelle Blockierungen nicht mit der
Ecke von einem Blatt Papier lösen können, wenden
Sie sich an den Kundendienst. Verwenden Sie auf
keinen Fall einen harten Gegenstand, der Kontaktschalter könnte dadurch beschädigt werden.
Entfernen Sie eventuelle Verschmutzungen an der
➩
Unterseite des Motorblocks
einem trockenen Tuch oder einem Staubpinsel.
Achten Sie darauf, dass nichts durch die Lüftungsöffnungen in das Gerät gelangt.
ausschließlich mit
u
Nach dem Reinigen
Lassen Sie alle Teile wieder gut trocknen, bevor Sie
den Standmixer wieder zusammensetzen und verwenden.
Aufbewahren
Wenn Sie den Standmixer längere Zeit nicht ver-
➩
wenden, reinigen Sie ihn gründlich (siehe Kapitel
„Reinigen“).
Wickeln Sie das Netzkabel yum die Kabelauf-
➩
wicklung
Bewahren Sie den Standmixer an einem kühlen,
➩
trockenen Ort auf.
am Boden des Motorblocks u.
i
Entsorgen
Werfen Sie das Gerät keinesfalls in den
normalen Hausmüll. Dieses Produkt
unterliegt der europäischen Richtlinie
2012/19/EU.
Entsorgen Sie das Gerät über einen zugelassenen
Entsorgungsbetrieb oder über Ihre kommunale
Entsorgungseinrichtung.
Beachten Sie die aktuell geltenden Vorschriften.
Setzen Sie sich im Zweifelsfall mit Ihrer Entsorgungseinrichtung in Verbindung.
Führen Sie alle Verpackungsmaterialien
einer umweltgerechten Entsorgung zu.
Garantie und Service
Sie erhalten auf dieses Gerät 3 Jahre Garantie ab
Kaufdatum. Das Gerät wurde sorgfältig produziert
und vor Anlieferung gewissenhaft geprüft.
Bitte bewahren Sie den Kassenbon als Nachweis
für den Kauf auf. Bitte setzen Sie sich im Garantiefall mit Ihrer Servicestelle telefonisch in Verbindung.
Nur so kann eine kostenlose Einsendung Ihrer Ware
gewährleistet werden.
Die Garantieleistung gilt nur für Material- oder
Fabrikationsfehler, nicht aber für Transportschäden,
Verschleißteile oder für Beschädigungen an zerbrechlichen Teilen, z. B. Schalter oder Akkus. Das
Produkt ist lediglich für den privaten und nicht für
den gewerblichen Gebrauch bestimmt.
Bei missbräuchlicher und unsachgemäßer Behandlung, Gewaltanwendung und bei Eingriffen, die
nicht von unserer autorisierten Service-Niederlassung vorgenommen wurden, erlischt die Garantie.
Ihre gesetzlichen Rechte werden durch diese
Garantie nicht eingeschränkt.
- 10 -

Die Garantiezeit wird durch die Gewährleistung
nicht verlängert. Dies gilt auch für ersetzte und reparierte Teile. Eventuell schon beim Kauf vorhandene
Schäden und Mängel müssen sofort nach dem
Auspacken gemeldet werden, spätestens aber zwei
Tage nach Kaufdatum. Nach Ablauf der Garantiezeit anfallende Reparaturen sind kostenpflichtig.
Service Deutschland
Tel.: 0800 5435 111
(Kostenfrei aus dem dt. Festnetz/Mobilfunknetz)
E-Mail: kompernass@lidl.de
IAN 100484
Service Österreich
Tel.: 0820 201 222 (0,15 EUR/Min.)
E-Mail: kompernass@lidl.at
IAN 100484
Service Schweiz
Tel.: 0842 665566 (0,08 CHF/Min.,
Mobilfunk max. 0,40 CHF/Min.)
E-Mail: kompernass@lidl.ch
IAN 100484
Erreichbarkeit Hotline:
Montag bis Freitag von 8:00 Uhr - 20:00 Uhr (MEZ)
Importeur
KOMPERNASS HANDELS GMBH
BURGSTRASSE 21
44867 BOCHUM
GERMANY
www.kompernass.com
- 11 -

- 12 -

SOMMAIRE PAGE
Introduction 14
Usage en bonne et due forme 14
Accessoires fournis 14
Description de l'appareil 14
Caractéristiques techniques 14
Instructions relatives à la sécurité 15
Déballage 17
Installation 17
Utilisation 17
Remplir et monter le bol mixeur....................................................................................................17
Sélectionner le niveau de vitesse .................................................................................................17
Remplissage en marche.................................................................................................................18
Déposer le bol mixeur...................................................................................................................18
Remarques utiles 18
Recettes 19
Shake à la banane........................................................................................................................19
Shake à la vanille ..........................................................................................................................19
Shake au cappucino......................................................................................................................19
Mix tropical ....................................................................................................................................19
Shake à la nougatine ....................................................................................................................19
Shake aux carottes ........................................................................................................................19
Mix de cassis..................................................................................................................................19
Shake Hawaii.................................................................................................................................20
Mix fruité ananas-fraise.................................................................................................................20
Soupe froide andalouse (gazpacho) ..........................................................................................20
Nettoyage 20
Nettoyage du bloc mixeur ...........................................................................................................21
Nettoyage du bloc moteur............................................................................................................22
Après nettoyage.............................................................................................................................22
Rangement de l'appareil 22
Mise au rebut 22
Garantie & service après-vente 22
Importateur 23
- 13 -

Blender
Introduction
Toutes nos félicitations pour l'achat de votre nouvel
appareil.
Vous avez choisi un produit de grande qualité.
Le mode d'emploi fait partie de ce produit. Il contient
des remarques importantes concernant la sécurité, l'utilisation et la mise au rebut. Veuillez vous familiariser
avec l'ensemble des consignes d'opération et de sécurité avant l'usage du produit. N'utilisez le produit que
conformément aux consignes et pour les domaines d'utilisation prévus. En cas de transfert du produit à un
tiers, remettez-lui également tous les documents.
Usage en bonne et due forme
Cet appareil est prévu ...
– pour mélanger, mettre en purée et malaxer
les aliments et pour broyer les glaçons en cube
(glace broyée),
– exclusivement pour des quantités habituelles
pour un usage domestique et uniquement pour
un usage privé dans des locaux secs.
Cet appareil n'est pas prévu pour ...
– hacher des morceaux d'aliments durs tels que
des noix, des noyaux, des grandes graines ou
des tiges,
– travailler des matériaux autres que des denrées
alimentaires,
– une utilisation commerciale ou industrielle,
– une utilisation en environnement humide ou
à l'extérieur,
– traiter des liquides chauds/bouillants.
Utilisez uniquement les accessoires et les pièces de
rechange destinés à cet appareil. D'autres pièces
risquent de ne pas convenir ou de ne pas être
suffisamment sûres !
Accessoires fournis
Vérifiez après déballage que toutes les pièces sont
fournies. Les accessoires fournis sont les suivants :
1 x bloc moteur avec cordon d'alimentation
et fiche secteur
1 x bol mixeur avec le couteau monté
1 x couvercle
1 x bouchon doseur
1 x Mode d'emploi
Description de l'appareil
Bouchon doseur
q
Couvercle
w
Bol mixeur
e
Lame
r
Interrupteur
t
Cordon d'alimentation
y
Bloc moteur
u
Enroulement du cordon d'alimentation
i
Graduation
o
Caractéristiques techniques
Tension nominale : 220 - 240 V ~, 50 Hz
Puissance nominale : 550 watts
Niveau de remplissage
maxi : 1,75 l
Classe de protection : II
Durée d'utilisation
par intermittence : 3 minutes
La durée d'utilisation par intermittence indique pendant combien de temps l'appareil peut être opéré,
sans que le moteur ne surchauffe ou subisse de
dommages. Une fois la période d'utilisation par
intermittence écoulée, l'appareil doit rester éteint
jusqu'à ce que le moteur ait refroidi à température
ambiante.
- 14 -

Instructions relatives à la sécurité
Pour éviter tout accident corporel résultant d'un choc électrique :
• Veillez à ne pas immerger le bloc moteur, le cordon d'alimentation ou la fiche
secteur dans l'eau ou tout autre liquide.
• Utilisez l'appareil uniquement dans des pièces sèches, et jamais à l'extérieur
ou dans un environnement humide.
• Assurez-vous que le cordon d'alimentation ne soit jamais humide ou mouillé
lorsque l'appareil est en marche. Disposez le cordon de manière
à éviter qu'il ne soit coincé ou endommagé.
• Faites immédiatement remplacer la fiche secteur ou le cordon d'alimentation
endommagé par un technicien spécialisé ou par le service après-vente afin
d'éviter tout danger.
• Après utilisation, veuillez retirer la fiche de la prise secteur. Il ne suffit pas
d'éteindre l'appareil, en raison de la présence de courant dans l'appareil si
celui-ci reste branché.
• Avant toute utilisation, vérifiez que l'appareil est en parfait état. N'utilisez pas
l'appareil si vous constatez des dommages, en particulier sur le bloc moteur
ou sur le bol mixeur en verre.
• Débranchez immédiatement la fiche secteur de la prise si vous constatez une
fumée ou une odeur inhabituelle ou un dysfonctionnement identifiable.
Pour éviter les risques de surchauffe et d'incendie :
• N'utilisez pas l'appareil sous l'exposition directe du soleil ou de la chaleur
émise par des appareils chauffants.
• Ne versez jamais de liquides brûlants dans le bol mixeur. Laissez-les refroidir
auparavant à température ambiante. Dans le cas contraire,
l'appareil risque de surchauffer et le verre du bol mixeur risque d'éclater !
• N’opérez jamais l’appareil lorsqu’il est vide, c’est-à-dire sans ingrédients dans
le bol mixeur.
- 15 -

Pour éviter les risques d'accident et de blessures :
• Ne mettez jamais les doigts dans le bol mixeur. Les lames sont extrêmement
tranchantes !
• N'ouvrez pas le couvercle lorsque l'appareil est en marche. Dans le cas
contraire, les morceaux d'aliments risquent d'être projetés à toute vitesse.
• Ne mettez jamais de couvert ou d'ustensile pour remuer à l'intérieur du bol
mixeur lorsque l'appa-reil est en marche. Vous risquez de graves blessures
s'ils entrent en contact avec la lame en rotation rapide !
• Ne les laissez pas utiliser l'appareil sans surveillance afin de pouvoir réagir
immédiatement en cas de danger.
• Les enfants doivent être surveillés afin d'éviter qu'ils ne jouent avec l'appareil.
• N'utilisez pas l'appareil à d'autres fins que celles décrites dans cette notice.
• En cas d'absence de surveillance et avant l'assemblage, le désassemblage ou
le nettoyage, l'appareil doit toujours être débranché du secteur.
• L'appareil ne doit pas être utilisé par des enfants.
• Tenir l'appareil et son cordon de raccordement à l'écart des enfants.
• Cet appareil peut être utilisé par des personnes ayant des capacités physiques,
sensorielles ou mentales réduites ou disposant de peu d'expérience et/ou
de connaissances, à condition qu'elles soient surveillées ou qu'elles aient été
initiées à l'utilisation sécurisée de l'appareil et qu'elles aient compris les
dangers en résultant.
• Ne pas laisser les enfants jouer avec l'appareil.
• Soyez prudent en manipulant l'appareil. Les lames sont très aiguisées !
• Procédez avec la plus grande prudence lorsque vous videz la pièce rapportée
de batteur. Les lames sont très aiguisées !
• Procédez avec la plus grande prudence lorsque vous nettoyez l'appareil !
Les lames sont très aiguisées !
• Éteignez l’appareil et débranchez la fiche réseau avant de remplacer des
accessoires ou de saisir des pièces mobiles lors du fonctionnement.
• Utilisez le bol mixeur exclusivement avec le bloc moteur compris dans la livraison !
• Assurez-vous que le mixer soit toujours éteint avant de retirer le bol mixeur du
bloc moteur !
- 16 -

Déballage
Utilisation
• Retirez tous les éléments d’emballage ou films de
protection de l’appareil. Conservez l’emballage,
pour pouvoir entreposer ou expédier l’appareil
en toute sécurité, par ex. en cas de réparation.
• Avant d’utiliser l‘appareil, assurez-vous qu’il ne
présente pas de dommages, et que le cordon
d’alimentation avec fiche secteur et tous les accessoires et composants de l’appareil ne sont
pas endommagés.
• Nettoyez soigneusement tous les composants avant
le premier usage du mixeur (voir « Nettoyage »)
Installation
Lorsque vous avez nettoyé toutes les pièces comme
indiqué sous « Nettoyage » :
Disposez l'appareil de telle manière ...
➩
– le cordon d’alimentation
travers l’évidement au dos,
– que la fiche secteur soit immédiatement accessible
pour pouvoir la débrancher de la prise en cas
de danger.
– qu'il soit stable et ne dérape pas, afin que les
ventouses se maintiennent et ne se renversent
pas en cas de vibrations.
– que le cordon d'alimentation
sur la zone de travail et ne risque pas de faire
basculer l'appareil en tirant dessus involontairement.
soit acheminé à
y
ne dépasse pas
y
Avertissement !
Le moteur s'arrête dès que le bol mixeur eest retiré
du bloc moteur
que l'appareil est resté en marche. Le moteur se remet en marche de manière inattendue dès que le
bol mixeur
Pour éviter cela :
• Attendez pour brancher la fiche secteur dans la
prise que le bol mixeur
rempli et soit monté fermé.
• Avant de procéder au montage, assurez-vous
que l'appareil est éteint ou que la fiche secteur
est débranchée.
• Eteignez tout d'abord l'appareil, débranchez la
fiche secteur et attendez que le moteur soit arrêté
complètement avant de déposer le bol mixeur
. On risque alors de ne pas voir
u
est monté.
e
soit complètement
e
e
Remplir et monter le bol mixeur
Enlever le bol mixeur edu bloc moteur uet en-
➩
lever le couvercle
Remplir le bol mixeur epuis remettre en place le
➩
couvercle
que le bec verseur sur le bol mixeur
aussi fermé.
Introduisez le bouchon doseur qdans l'ouvertu-
➩
re du couvercle et tournez-le dans le sens antihoraire.
Placez ensuite sur le bol mixeur erempli et fer-
➩
mé sur le bloc moteur
bol mixeur
faire descendre. Le moteur ne peut se mettre en
marche que si le bol mixeur
en place.
w
e
.
w
sur le bol mixeur e. Assurez-vous
soit lui
e
. Tournez légèrement le
u
jusqu'à ce que vous puissiez le
est correctement mis
e
.
Sélectionner le niveau de vitesse
Vous pouvez mettre en marche l'appareil une fois le
bol mixeur
- 17 -
rempli et verrouillé sur le bloc moteur u.
e

Réglez le commutateur tsur ...
➩
– la position 1-3
pour les aliments liquides ou semi-solides pour
mélanger, mettre en purée et malaxer
– la position 3-5
pour les aliments solides ou pour mettre en morceaux
– Niveau Ice Crush/Clean
pour un mode d'opération à impulsions court et
puissant, par ex. pour broyer les glaçons ou
pour le nettoyage. L'interrupteur
pas dans cette position, pour ne pas surcharger
le moteur. Par conséquent, ne maintenez pas
longtemps l’interrupteur
t
ne s’enclenche
t
dans cette position.
Remarque
Remplissez le bol mixeur eavec 180 g de glaçons
au maximum. Sinon, l’appareil ne parviendra pas
au broyage optimal des glaçons.
Remplissage en marche
Avertissement !
Pour ajouter quelque chose lorsque l'appareil est en
marche, utilisez uniquement le bouchon doseur
prévu à cet effet.
• N'ouvrez pas le couvercle
d'aliments risquent d'être projetés violemment à
l'extérieur !
• N'introduisez pas de couvert ou d'ustensile pour
remuer à l'intérieur du bol mixeur
l'appa-reil est en marche. Vous risquez de graves blessures si elles entrent en contact avec la
lame
en rotation rapide !
r
. Les morceaux
w
e
q
lorsque
Déposer le bol mixeur
Lorsque les aliments sont prêts :
Réglez à nouveau l’interrupteur ten position
➩
arrêt ("OFF")et débranchez la fiche secteur.
Attendez l'arrêt du moteur avant de sortir le bol
➩
mixeur
nécessaire de tourner le bol mixeur
en le tirant vers le haut. Il n'est pas
e
e
.
Remarques utiles
– Afin d'atteindre de meilleurs résultats lors de la
mise en purée, ajoutez petit à petit des petites portions dans la pièce rapportée du bol mixeur
au lieu de remplir une grande quantité d'un seul
coup.
– Si vous travaillez avec des aliments solides, coupez
ces derniers en petits morceaux (2-3 cm).
– Si vous mélangez des aliments liquides, com-
mencez avec un petit volume liquide. Rajoutez
petit à petit de plus en plus de liquide à travers
l'ouverture du couvercle.
– Pour stabiliser l'appareil lorsqu'il est en marche,
posez la main sur le batteur-mélangeur fermé.
– Pour malaxer des aliments solides ou liquides
épais, il est recommandé d'utiliser le mode pulsation pour éviter que la lame
ne bloque.
r
Remarque
N’utilisez pas l’appareil pour réduire la granularité
du sel alimentaire, du sucre cristallisé ou du sucre
blanc, par exemple pour obtenir du sucre en poudre.
e
,
Pour pouvoir verser quelque chose alors que l'appareil est en marche, ...
tournez le bouchon doseur qdans le sens anti-
➩
horaire et sortez-le.
Remplissez les ingrédients.
➩
Remettez à nouveau le bouchon doseur qdans
➩
l'ouverture du couvercle et tournez-le dans le
sens anti-horaire.
- 18 -

Recettes
Shake à la banane
2 bananes
env. 2 c-à-s de sucre (selon le degré de maturité des
bananes et les préférences personnelles)
1/2 l de lait
1 goutte de jus de citron
Pelez les bananes et réduisez-les en purée à niveau 2.
Ajoutez progressivement le lait, puis le sucre et le
jus de citron. Mixez le tout jusqu'à obtenir un liquide
homogène.
Servez le shake glacé.
Shake à la vanille
1/4 l de lait
250 g de glace à la vanille
125 ml de glaçons
1 1/2 c-à-c de sucre
Mix tropical
125 ml de jus d'ananas
60 ml de jus de papaye
50 ml de jus d'orange
1/2 petite boîte de pêches au sirop dans leur jus
125 ml de glaçons
Concassez les glaçons en mettant le mixeur sur le
niveau Ice Crush/Clean.
Mettez tous les ingrédients dans le mixeur et
mélangez le tout à niveau 3.
Shake à la nougatine
1/2 l de lait
200 g de crème de nougatine
1 boule de glace à la vanille
50 ml de crème fraîche
Mélangez tous les ingrédients dans le mixeur à niveau 3, jusqu'à obtenir un mélange homogène.
Concassez les glaçons en mettant le mixeur sur le
niveau Ice Crush/Clean. Remplissez le reste d'ingrédients dans le mixeur. Mixez sur niveau 2 jusqu'à
obtention d'un liquide uniforme.
Shake au cappucino
65 ml d'espresso froid (ou de café très serré)
65 ml de lait
15 g de sucre
65 ml de glace à la vanille
100 ml de glaçons concassés
Concassez les glaçons en mettant le mixeur sur le
niveau Ice Crush/Clean. Ajoutez l'espresso, le lait
et le sucre. Mixez le tout à niveau 2, jusqu'à ce que
le sucre se soit dissous. Pour finir, ajoutez la glace à
la vanille et mixez le tout brièvement à niveau 1.
Shake aux carottes
300 ml de jus de pomme
500 ml de jus de carotte
4 c-à-s d'huile
(huile de germe de blé ou huile de colza)
4 c-à-s de jus de citron
Gingembre en poudre
Poivre
Mettez le jus de pomme, l'huile et le jus de citron
dans le mixeur et mélangez le tout à niveau 2.
Ajoutez ensuite le jus de carottes et mélangez bien
le tout à niveau 2. Relevez ensuite le shake à la
poudre de gingembre et au poivre.
Mix de cassis
2 c-à-c de miel
2 bananes
1/4 l de petit-lait
1/4 l de jus de cassis (noir)
Mettez tous les ingrédients dans le mixeur et mélangez le tout à niveau 3.
- 19 -

Shake Hawaii
4 bananes
1/4 l de jus d'ananas
1/2 l de lait
2 c-à-s de miel
1/4 l de rhum
Pelez les bananes et réduisez-les en purée à niveau 2.
Ajoutez les autres ingrédients et mélangez le tout à
niveau 1.
Mix fruité ananas-fraise
250 ml de jus d'ananas
200 g de fraises
300 ml de jus de pomme
4 glaçons
Concassez les glaçons en mettant le mixeur sur le
niveau Ice Crush/Clean. Lavez les fraises et retirez
les éléments de verdure. Réduisez-les en purée à niveau 2.
Ajoutez ensuite les autres ingrédients et mélangez
le tout à niveau 1.
Soupe froide andalouse (gazpacho)
1/2 concombre
1 tomate charnue
1 poivron vert
1/2 oignon
1 gousse d'ail
1/2 petit pain blanc
1/2 c-à-c de sel
1 c-à-c de vinaigre de vin rouge
1 c-à-s d'huile d'olive
Coupez les légumes en morceaux d'env. 2 cm.
Mettez tout d'abord les tomates, puis les concombres dans le mixeur. Réduisez-les en purée à niveau
3. Ajoutez les autres ingrédients et réduisez-en
purée/mélangez le tout à niveau 3, jusqu'à obtenir
une soupe homogène.
Servez le tout avec du pain.
Remarque
Recettes sans garantie. Toutes les indications relatives aux ingrédients et aux préparations sont des
valeurs d'orientation. Complétez ces propositions
de recette avec vos expériences personnelles.
Remarque
En cas d'intolérance au lactose, nous vous recommandons d'utiliser du lait sans lactose. Toutefois,
n'oubliez pas que le lait sans lactose est un peu
plus sucré.
Nettoyage
Prudence !
Avant de nettoyer le batteur-mélangeur et ses pièces :
• Veillez à ce que l'appareil soit éteint et que la
fiche secteur soit débranchée.
Veillez à ne pas immerger le bloc moteur
cordon d'alimentation ou la fiche secteur dans
l'eau ou tout autre liquide. Vous risquez un choc
électrique susceptible de provoquer un accident mortel et d'endommager l'appareil.
• N'ouvrez jamais le capot de l'appareil. Vous
risquez autrement un choc électrique potentiellement mortel.
• Ne démontez jamais les lames
jamais l'intérieur du bol mixeur
sont extrêmement tranchantes !
• N'utilisez pas de produit solvant ou récurant
pour les surfaces en plastique afin de ne pas
les endommager.
et ne manipulez
r
. Les lames
e
u
, le
r
- 20 -

Nettoyage du bloc mixeur
Nettoyez le bol mixeur euniquement avec une
➩
brosse vaisselle manche long afin de ne pas
vous blesser sur les lames
En cas de saletés fortement incrustées, vous pouvez
➩
laver le bol mixeur
Démontez toujours le bol mixeur
indiqué ci-après.
Nettoyez le couvercle wet le bouchon doseur
➩
au lave-vaisselle ou avec la vaisselle normale.
Si vous nettoyez le batteur-mélangeur juste après
utilisation, vous obtenez un nettoyage hygiénique
généralement suffisant avec l'alternative suivante :
Remplissez le bol mixeur eavec 750 ml d’eau
➩
et ajoutez quelques gouttes de détergent doux.
Refermez le couvercle
sur le bloc moteur u.
e
Insérez la fiche secteur dans la prise secteur et
actionnez plusieurs fois le mode Ice Crush/Clean,
afin que la lame
maximal.
Rincez ensuite le bol mixeur
d’eau claire, afin d’éliminer tous les restes de détergent.
e
r
.
r
au lave-vaisselle.
, comme
e
et placez le bol mixeur
w
brasse l’eau à régime
avec beaucoup
e
Si vous n'arrivez pas à enlever les saletés, retirez de
la pièce de verre du bol mixeur
sous le bol mixeur
avec les lames r:
e
la pièce plastique
e
q
Pièce en verre
Joint d’étanchéité
Lames
Pièce en plastique
Déposez le bol mixeur edu bloc moteur u.
➩
Tourner la pièce plastique de l‘ensemble mi-
➩
xeur
dans le sens horaire inverse, en vérifiant
e
qu‘elle se détache de la pièce en verre du
bol mixeur
- 21 -
e
.

Attention !
Manipulez les lames avec précaution. Elles sont
très tranchantes. Risque de blessures !
Nettoyez soigneusement les pièces à l'eau
➩
additionnée de produit à vaisselle doux ou au
lave-vaisselle.
Replacez la pièce plastique du bol mixeur
➩
sur la pièce de verre du bol mixeur e. Veillez
à mettre en place correctement le joint d'étanchéité .
Nettoyage du bloc moteur
Utilisez un chiffon sec ou légèrement humecté
➩
pour nettoyer les surfaces en plastique.
Vérifiez après chaque nettoyage que le contac-
➩
teur du bol mixeur
résidus alimentaires. Si vous ne pouvez pas retirer les morceaux bloqués à l'aide d'un coin de feuille de papier, adressez-vous au service aprèsvente. N'utilisez pas d'objet dur qui risquerait
d'endommager le contacteur.
Eliminez les saletés éventuellement présentes
➩
sous le bloc moteur
ment un chiffon sec ou un pinceau anti-poussières. Assurez-vous que rien ne pénètre dans l'appareil à travers les ouvertures d'aération.
n'est pas bloqué par des
e
en utilisant exclusive-
u
Après nettoyage
Faites bien sécher toutes les pièces avant de remonter
le batteur-mélangeur et de le réutiliser.
Rangement de l'appareil
Si vous laissez l'appareil inutilisé pendant une
➩
durée prolongée, nettoyez-le soigneusement
(voir chapitre "Nettoyage").
Enroulez le cordon d’alimentation y secteur
➩
autour de l’enroulement du cordon d’alimentation
sur le bas du bloc-moteur u.
i
Rangez le batteur-mélangeur dans un endroit
➩
sec et frais.
Mise au rebut
L’appareil ne doit jamais être jeté dans
la poubelle domestique normale. Ce
produit est soumis à la directive
européenne 2012/19/EU.
Eliminez l’appareil par l’intermédiaire d’une entre-
e
prise de traitement des déchets autorisée ou via le
service de recyclage de votre commune.
Veuillez respecter les règlements actuellement en
vigueur. En cas de doutes, contactez votre organisation de recyclage.
Procédez à une élimination des matériaux
d’emballage respectueuse de l’environnement.
Garantie & service
après-vente
Cet appareil bénéficie de 3 ans de garantie à
compter de la date d'achat. L'appareil a été fabriqué avec soin et consciencieusement contrôlé avant
sa distribution.
Veuillez conserver le ticket de caisse en guise de
preuve d'achat. Si la garantie devait s'appliquer,
contactez par téléphone votre interlocuteur du service
après-vente. Cette condition doit être respectée pour
assurer l'expédition gratuite de votre marchandise.
La prestation de garantie s'applique uniquement
pour les erreurs de matériaux et de fabrication, pas
pour les dommages de transport, les pièces d'usure
ou les dommages subis par les pièces fragiles, comme par ex. les interrupteurs ou les batteries. Le produit est exclusivement destiné à un usage privé et
non commercial.
La garantie est annulée en cas de manipulation incorrecte et inappropriée, d'utilisation brutale et en
cas d'intervention qui n'aurait pas été réalisée par
notre centre de service après-vente agréé. Cette garantie ne constitue pas une restriction de vos droits
légaux.
- 22 -

La durée de la garantie n'est pas prolongée par la
garantie du fabricant. Ceci vaut également pour les
pièces remplacées et réparées. Tous dommages et
défauts présents dès l'achat doivent être notifiés dès
que le produit est déballé, et au plus tard deux
jours après la date d'achat. Toutes réparations survenant après la période sous garantie ne seront pas
prises en charge.
Service France
Tel.: 0800 919270
E-Mail: kompernass@lidl.fr
IAN 100484
Service Suisse
Tel.: 0842 665566 (0,08 CHF/Min.,
mobile max. 0,40 CHF/Min.)
E-Mail: kompernass@lidl.ch
IAN 100484
Heures de service de notre hotline :
du lundi au vendredi de 8 h à 20 h (HEC)
Importateur
KOMPERNASS HANDELS GMBH
BURGSTRASSE 21
44867 BOCHUM
GERMANY
www.kompernass.com
- 23 -

- 24 -

INDICE PAGINA
Introduzione 26
Uso conforme 26
Fornitura 26
Descrizione dell'apparecchio 26
Dati tecnici 26
Indicazioni di sicurezza 27
Disimballaggio 29
Montaggio 29
Funzionamento 29
Riempimento e montaggio del bicchiere del frullatore..............................................................29
Selezione della velocità................................................................................................................29
Riempimento durante il funzionamento .......................................................................................30
Rimozione del bicchiere................................................................................................................30
Indicazioni utili 30
Ricette 31
Frullato di banane..........................................................................................................................31
Frullato alla vaniglia......................................................................................................................31
Frullato al cappuccino...................................................................................................................31
Tropical-Mix ...................................................................................................................................31
Frullato alla noce e nougat...........................................................................................................31
Frullato alle carotine......................................................................................................................31
Mix al ribes ....................................................................................................................................31
Frullato Hawaii...............................................................................................................................32
Mix alla frutta con ananas e fragole...........................................................................................32
Minestra fredda andalusa (gazpacho).......................................................................................32
Pulizia 32
Pulizia del bicchiere del frullatore ..............................................................................................33
Pulizia del blocco motorino ..........................................................................................................34
Operazioni successive alla pulizia ..............................................................................................34
Conservazione 34
Smaltimento 34
Garanzia & assistenza 34
Importatore 35
- 25 -

Frullatore
Introduzione
Congratulazioni per l'acquisto del nuovo apparecchio.
Lei ha scelto un prodotto di alta qualità. Il manuale di
istruzioni è parte integrante del presente prodotto.
Esso contiene importanti indicazioni per la sicurezza,
l'uso e lo smaltimento. Prima di utilizzare il prodotto,
si familiarizzi con tutte le indicazioni relative ai comandi e alla sicurezza.Utilizzi il prodotto solo come
descritto e per i campi di impiego indicati.
In caso di cessione del prodotto a terzi, consegni
anche tutta la documentazione relativa.
Uso conforme
Questo apparecchio è progettato per ...
– miscelare, frullare e agitare alimenti nonché tritu-
rare cubetti di ghiaccio (cosiddetto “crushen”),
– quantità esclusivamente ad uso domestico e sol-
tanto per l'impiego domestico privato in ambienti
asciutti.
Questo apparecchio non è progettato per ...
– la triturazione di ingredienti duri, ad esempio
noci, semi, grani grossi o steli,
– la lavorazione di materiali diversi dai generi
alimentari,
– l'impiego a scopo commerciale o industriale,
– l'utilizzo in ambiente umido o all'aperto,
– l'elaborazione di liquidi molto caldi/bollenti.
Impiegare soltanto accessori e ricambi specifici per
questo apparecchio. Altri componenti potrebbero
non essere sufficientemente idonei o sicuri!
Fornitura
Dopo aver aperto la confezione, verificare la completezza della fornitura. Della dotazione standard
fanno parte:
1 x blocco motorino, con cavo di rete e spina di
rete
1 x bicchiere frullatore, con lame fisse
1 x coperchio
1 x coperchio di riempimento
1 x manuale di istruzioni
Descrizione dell'apparecchio
Coperchio di riempimento
q
Coperchio
w
Bicchiere frullatore
e
Lame
r
Interruttore
t
Cavo di rete
y
Blocco motorino
u
Avvolgicavo
i
Bicchiere graduato
o
Dati tecnici
Tensione nominale: 220 - 240 V~, 50 Hz
Potenza nominale: 550 Watt
Capacità max. di
riempimento: 1,75 l
Classe di protezione: II
Funzionamento continuato:3 minuti
Il tempo di funzionamento abbreviato indica il tempo
di funzionamento dell'apparecchio senza pericolo
di surriscaldamento e di guasti al motore. In base al
tempo di funzionamento abbreviato, l'apparecchio
dev'essere spento fino al completo raffreddamento
del motore a temperatura ambiente.
- 26 -

Indicazioni di sicurezza
Per evitare il pericolo di morte a causa di scossa elettrica:
• Accertarsi che il blocco motore, il cavo di allacciamento alla rete o la spina
non vengano immersi in acqua o altri liquidi.
• Utilizzare l'apparecchio esclusivamente in ambienti asciutti, mai all'aperto o in
ambiente umido.
• Impedire che il cavo di rete si bagni o inumidisca durante l'uso. Disporlo in
modo tale che non si incastri o si danneggi in altro modo.
• Fare sostituire immediatamente la spina o il cavo di rete danneggiato da
personale specializzato autorizzato o dal centro di assistenza ai clienti, per
evitare possibili danni.
• Dopo l'uso estrarre sempre la spina dalla presa. Non è sufficiente spegnere
l'apparecchio poiché esso è ancora sotto tensione fino a quando la spina è
inserita nella presa.
• Prima dell'uso, controllare sempre che il prodotto sia in condizioni perfette.
Non si può utilizzare l'apparecchio nel caso in cui siano riconoscibili dei
danni, in particolare al blocco motore o al bicchiere in vetro del mixer.
• Staccare subito la spina di rete dalla presa se si sente un odore o un rumore
insolito o in caso di guasto visibile.
Per evitare surriscaldamento e pericolo di incendio:
• Non esporre l'apparecchio all'irradiazione solare o al calore proveniente da
altri apparecchi
• Non introdurre mai liquidi bollenti nel bicchiere del frullatore! Lasciarli dapprima
raffreddare a temperatura ambiente. In caso contrario l'apparecchio può surriscaldarsi e il bicchiere può saltare!
• Non azionare mai l'apparecchio a vuoto, ovvero senza ingredienti nel supporto alimenti.
- 27 -

Per evitare incidenti e infortuni:
• Non introdurre mai le mani nel bicchiere del frullatore, in particolar modo con
l'apparecchio in funzione. Le lame sono estremamente affilate!
• Non aprire il coperchio durante il funzionamento dell'apparecchio. In caso
contrario alcuni pezzi di alimenti potrebbero schizzare fuori ad alta velocità!
• Non introdurre mai posate o oggetti per mescolare nel bicchiere del frullatore
mentre quest'ultimo è in funzione. Sussiste notevole pericolo di lesioni in caso
di contatto con lame che ruotano a velocità molto elevata!
• Sorvegliare i bambini per assicurarsi che non giochino con l'apparecchio.
• Tenere sempre l'apparecchio sotto controllo quando è in funzione, per poter
reagire immediatamente in caso di pericolo
• Non utilizzare l'apparecchio per scopi diversi da quelli descritti nelle istruzioni
per l'uso.
• Staccare sempre l'apparecchio dalla rete in caso di mancata sorveglianza e
prima del montaggio, dello smontaggio o della pulizia.
• Questo apparecchio non deve venire utilizzato da bambini.
• Tenere lontani i bambini dall'apparecchio e dal relativo cavo.
• Questo apparecchio può essere utilizzato da persone con capacità fisiche,
sensoriali o mentali ridotte o insufficiente esperienza o conoscenza, solo se
sorvegliate o istruite sull'uso sicuro dell'apparecchio e qualora ne abbiano
compreso i pericoli associati.
• I bambini non devono giocare con l'apparecchio.
• Fare molta attenzione quando si utilizza dell'apparecchio. I coltelli sono molto
affilati!
• Procedere con cautela quando si svuota il bicchiere del frullatore! I coltelli
sono molto affilati!
• Procedere con cautela durante la pulizia dell'apparecchio! I coltelli sono molto affilati!
• Spegnere l’apparecchio e staccare la spina prima di sostituire l’accessorio o
di afferrare dei componenti che durante il funzionamento si muovono.
• Utilizzare il bicchiere del frullatore solo con il blocco motorino accluso!
• Badare che il frullatore sia sempre spento prima di sollevare il bicchiere del
frullatore dal blocco motorino!
- 28 -

Disimballaggio
Funzionamento
• Rimuovere tutte le parti dell'imballaggio o le pellicole protettive dall'apparecchio. Conservare la
confezione, per riporre l'apparecchio o per poterlo inviare al centro riparazioni in caso di guasti.
• Prima di utilizzare l'apparecchio, assicurarsi che
esso sia in perfette condizioni, incluso il cavo di
rete e relativa spina, nonché tutti gli accessori e
componenti.
• Pulire accuratamente tutti i componenti prima del
primo impiego del mixer con base.
(v. sezione “Pulizia”).
Montaggio
Una volta puliti tutti i pezzi, procedere come descritto
al paragrafo “Pulizia”:
Montare l'apparecchio in modo tale che ...
➩
– che il cavo di retel
intaglio sul retro,
– la spina di rete sia subito raggiungibile, per
consentirne l'estrazione dalla presa in caso di
pericolo;
– -posizionarlo stabilmente e su un piano antis-
drucciolevole, per consentire alle ventose di fare
presa, e impedire che l'apparecchio si rovesci
con l'effetto delle vibrazioni.
– il cavo di retel
lavoro e si possa far ribaltare l'apparecchio qualora venisse tirato inavvertitamente.
passi attraverso l'apposito
y
non interferisca con la zona di
y
Avvertenza!
Il motore si spegne non appena il bicchiere del frullatore
Non si noterà probabilmente che l'apparecchio è
ancora acceso. Il motore si avvia in modo imprevisto non appena viene montato il bicchiere del frullatore
Per questo motivo:
• Inserire la spina di rete nella presa soltanto
• Prima del montaggio accertarsi che l'apparecchio
• Disinserire dapprima l'apparecchio, estrarre la
viene rimosso dal blocco motorino u.
e
:
e
dopo aver montato il bicchiere del frullatore
pieno e chiuso.
sia disinserito o che la spina di rete sia estratta.
spina e attendere l'arresto del motore prima di
rimuovere il bicchiere del frullatore
e
e
.
Riempimento e montaggio del
bicchiere del frullatore
Prelevare il bicchiere del frullatore edal blocco
➩
motore
Riempire il bicchiere del frullatore e e premere
➩
quindi il coperchio
mixer
del mixer
Inserire il coperchio di riempimento qnell'aper-
➩
tura del coperchio e chiuderlo ruotando in senso
orario.
Posizionare il bicchiere del frullatore epieno e
➩
chiuso sul blocco motorino
mente il bicchiere del frullatore
finché è possibile premerlo
verso il basso. Soltanto quando il bicchiere del
frullatore
torino può avviarsi.
e rimuovere il coperchio w.
u
nuovamente sull'inserto
w
. Assicurarsi che il beccuccio dell'inserto
e
sia chiuso.
e
. Ruotare legger-
u
del frullatore
e
è correttamente posizionato, il mo-
e
Selezione della velocità
Non appena il bicchiere del frullatore eè del tutto
pieno, completamente chiuso e ben posizionato sul
blocco motorino
recchio.
- 29 -
, è possibile accendere l'appa-
u

Posizionare l'interruttore tsu ...
➩
– Velocità 1-3
per alimenti liquidi o di media solidità, per miscelare, frullare e agitare
– Velocità 3-5
per alimenti più solidi o per triturare
– Livello Ice Crush/Clean
per un funzionamento breve a impulsi, ad es.
per tritare cubetti di ghiaccio o per la pulizia.
Affinché il motore non venga sovraccaricato,
l’interruttore
modo operativo. Per questo motivo si prega di
tenere l’interruttore
posizione.
non scatta in posizione in questo
t
solo brevemente in questa
t
Avviso
Riempite il bicchiere del frullatore econ 180 g di
cubetti di ghiaccio al massimo. Altrimenti l’apparecchio non riesce a triturarli in modo ottimalel.
Riempimento durante il
funzionamento
Attenzione!
Qualora si voglia riempire l'apparecchio mentre è
in funzione, aprire esclusivamente il coperchio di
riempimento
• Non aprire in nessun caso il coperchio
caso contrario alcuni alimenti potrebbero schizzare fuori ad alta velocità!
• Non introdurre mai posate o oggetti per mescolare nel bicchiere del frullatore
quest'ultimo è in funzione. Sussiste notevole
pericolo di lesioni in caso di contatto con lame
che ruotano a velocità molto elevata!
appositamente previsto.
q
e
w
mentre
. In
r
Rimozione del bicchiere
Se la lavorazione degli alimenti introdotti è terminata:
Posizionare sempre l'interruttore tsu Off
➩
("OFF“) prima di estrarre la spina.
Attendere prima l'arresto del motorino prima di
➩
rimuovere il bicchiere del frullatore
dolo diritto verso l'alto. Per staccare il bicchiere
del frullatore
, non è necessario ruotarlo.
e
e
estraen-
Indicazioni utili
– Per ottenere i migliori risultati di frullatura di in-
gredienti solidi, aggiungere gli alimenti nel bicchiere del frullatore
di versare tutto il quantitativo in un'unica soluzione.
– In caso di elaborazione di ingredienti solidi,
tagliarli in piccoli pezzi (2-3 cm).
– Nel mescolare ingredienti solidi, partire inizial-
mente da una piccola quantità di liquido. Continuare quindi a versare progressivamente il liquido
tramite l'apertura situata nel coperchio.
– Poggiando la mano sopra il frullatore chiuso du-
rante il funzionamento, lo si stabilizza in modo
appropriato.
– Per agitare ingredienti solidi o molto densi, può
essere utile impiegare la funzione "pulse" al fine
di impedire un bloccaggio della lama
Avviso
Non utilizzare l'apparecchio per ridurre la granulazione di sale da cucina, zucchero raffinato o zucchero, ad es. per la produzione di zucchero a velo.
un po' alla volta, invece
e
r
.
Per introdurre qualcosa con l'apparecchio in
funzione, ...
aprire il coperchio di riempimento qin senso
➩
antiorario ed estrarlo.
Compila gli ingredienti.
➩
Inserire infine di nuovo il coperchio di riempi-
➩
mento
ruotando in senso orario.
nell'apertura del coperchio e chiuderlo
q
- 30 -

Ricette
Frullato di banane
2 banane
Circa 2 cucchiai di zucchero (a seconda del grado
di maturazione delle banane e dei gusti personali)
1/2 litro di latte
1 spruzzata di succo di limone
Sbucciare le banane e ridurle in purea utilizzando il
livello 2. Versare il latte un poco alla volta, aggiungere
quindi lo zucchero e poi il succo di limone. Mescolare
il tutto fino a ottenere un liquido omogeneo.
Servire il frullato ghiacciato.
Frullato alla vaniglia
1/4 litro di latte
250 g di gelato alla vaniglia
125 ml di cubetti di ghiaccio
1 1/2 cucchiaini di zucchero
Tropical-Mix
125 ml di succo d'ananas
60 ml di succo di papaya
50 ml di succo di arancia
1/2 barattolino di pesche con il relativo liquido
125 ml di cubetti di ghiaccio
Tritare i cubetti di ghiaccio con il livello Ice Crush/
Clean.
Versare tutti gli ingredienti nel mixer e mescolare tutto
al livello 3.
Frullato alla noce e nougat
1/2 litro di latte
200 g di crema alla noce e nougat
1 pallina di gelato alla vaniglia
50 ml di panna
Mescolare tutti gli ingredienti nel mixer al livello 3,
fino a ottenere un liquido omogeneo.
Tritare i cubetti di ghiaccio con il livello Ice Crush/
Clean. Versare il resto degli ingredienti nel mixer.
Mescolare tutto al livello 2 fino ad ottenere un liquido omogeneo.
Frullato al cappuccino
65 ml di espresso freddo (o caffè molto forte)
65 ml di latte
15 g di zucchero
65 ml di gelato alla vaniglia
100 ml di cubetti di ghiaccio tritato
Tritare i cubetti di ghiaccio con il livello Ice Crush/
Clean. Versare l'espresso, il latte e lo zucchero. Mescolare tutto utilizzando il livello 2 fino a sciogliere
lo zucchero. Aggiungere infine il gelato alla vaniglia
e mescolare tutto brevemente utilizzando il livello 1.
Frullato alle carotine
300 ml di succo di mela
500 ml di succo di carotine
4 cucchiai di olio (olio di germe di grano o di colza)
4 cucchiai da tavola di succo di limone
Zenzero in polvere
Pepe
Versare il succo di mela, l'olio e il succo di limone
nel mixer e mescolare tutto al livello 2. Aggiungere
quindi il succo di carotine e mescolare tutto al livello 2. Insaporire il frullato con lo zenzero in polvere
e il pepe.
Mix al ribes
2 cucchiaini di miele
2 banane
1/4 di litro di latticello
1/4 di litro di succo di ribes (nero)
Versare tutti gli ingredienti nel mixer e mescolare tutto al livello 3.
- 31 -

Frullato Hawaii
4 banane
1/4 di litro di succo di ananas
1/2 litro di latte
2 cucchiai di miele
1/4 di litro di rum
Sbucciare le banane e ridurle in purea utilizzando il
livello 2. Aggiungere gli altri ingredienti e mescolare tutto utilizzando il livello 1.
Mix alla frutta con ananas e fragole
250 ml di succo d'ananas
200 g di fragole
300 ml di succo di mela
4 cubetti di ghiaccio
Tritare i cubetti di ghiaccio con il livello Ice
Crush/Clean. Rimuovere i piccioli e lavare le fragole.Sbucciare le banane e ridurle in purea utilizzando il livello 2. Aggiungere gli altri ingredienti e mescolare tutto al livello 1.
Minestra fredda andalusa (gazpacho)
1/2 cetriolo
1 pomodoro da insalata
1 peperone verde
1/2 cipolla
1 spicchio d'aglio
1/2 panino bianco
1/2 cucchiaino di sale
1 cucchiaino di aceto di vino rosso
1 cucchiaio da tavola di olio di oliva
Affettare le verdure in pezzi grandi circa 2 cm
Aggiungere prima il pomodoro e poi il cetriolo nel
mixer. Ridurre il tutto in purea utilizzando il livello 3.
Aggiungere il resto degli ingredienti e ridurre il tutto
in purea utilizzando il livello 3, fino a ottenere una
minestra omogenea.
Servire con il pane.
Avvertenza
Ricette senza garanzia di riuscita. Tutti i dati relativi
a ingredienti e preparazione sono indicativi. Integrare questi suggerimenti di ricette con i propri valori derivanti dall'esperienza.
Avvertenza
In caso di intolleranza al lattosio consigliamo l'impiego di latte privo di lattosio. Ricordare comunque
che il latte privo di lattosio è un po' meno dolce.
Pulizia
Attenzione!
Prima di pulire il frullatore e i suoi componenti:
• Assicurarsi che l'apparecchio sia spento e la spina
sia staccata.
Non immergere assolutamente il blocco motorino
dell'apparecchio in acqua o altri liquidi.
u
Ciò può comportare pericolo di morte a causa di una scossa elettrica e l'apparecchio può
essere danneggiato.
• Non aprite mai l'involucro dell'apparecchio.
Altrimenti si corre pericolo di morte per scossa
elettrica.
• Non smontare mai le lame
mai le mani nel bicchiere del frullatore
lame
• Non utilizzare solventi o sostanze abrasive per
le superfici in plastica, che altrimenti potrebbero
esserne danneggiate.
sono estremamente affilate!
r
e non introdurre
r
e
. Le
- 32 -
Pulizia del bicchiere del frullatore
Pulire il bicchiere del frullatore esoltanto con
➩
uno scovolino con manico lungo in modo tale
da non potersi ferire con le lame
In caso di sporco ostinato è possibile lavare il
➩
bicchiere del frullatore
glie. Smontare sempre il bicchiere del frullatore
come descritto di seguito.
Pulire il coperchio we il coperchio di riempi-
➩
mento
lavaggio delle stoviglie.
In caso di pulizia del frullatore subito dopo l'impiego,
si raggiunge un grado di igiene sufficiente nella
maggior parte dei casi attraverso le seguenti
alternative:
Riempire il bicchiere del frullatore econ 750
➩
ml di acqua e aggiungere qualche goccia di detergente delicato. Chiudere il coperchio
collocare il bicchiere del frullatore
motore
Inserire la spina nella presa di corrente e azionare un paio di volte la modalità Ice Crush/Clean, per ottenere che il coltello di taglio
nell'acqua al massimo numero di giri.
Risciacquare quindi il bicchiere del frullatore
con abbondante acqua pulita per eliminare tutti
i resti di detergente.
nella lavastoviglie o durante il normale
q
.
u
anche nella lavastovi-
e
r
.
e
e
w
sul blocco
ruoti
r
e
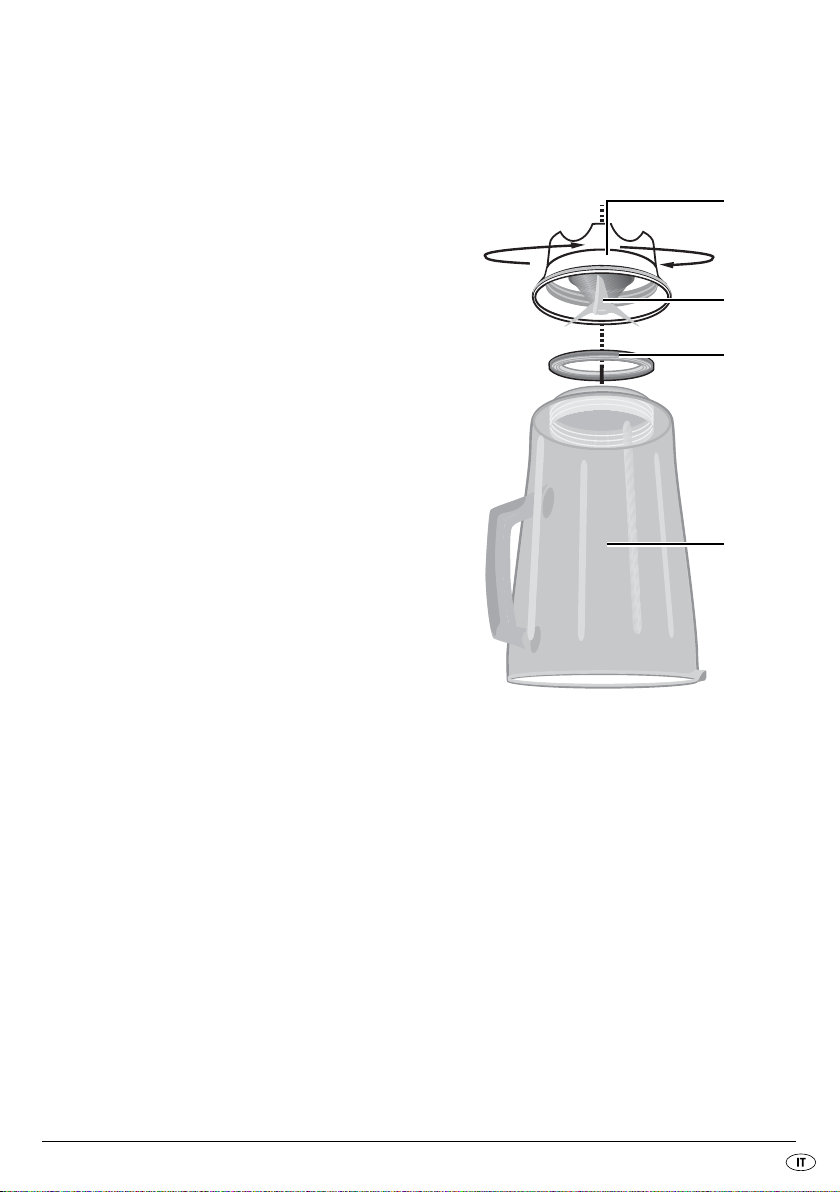
Nel caso in cui lo sporco non si staccasse, è possibile
staccare la parte inferiore in plastica del bicchiere del
frullatore
bicchiere del frullatore
con le lame rdalla parte in vetro del
e
:
e
e
Parte in vetro
Anello di tenuta
Lame
Parte in plastica
Rimuovere il bicchiere del frullatore edal bloc-
➩
co motorino
Ruotare la parte in plastica dell'inserto mixer
➩
in senso antiorario, per staccarlo dalla parte in
vetro dell'inserto mixer
- 33 -
u
.
.
e
e

Attenzione!
Procedere con cautela con le lame . Sono molto
affilate. Pericolo di lesioni!
Pulire a fondo entrambi i componenti in una deli-
➩
cata lisciva di sapone o nella lavastoviglie.
Posizionare di nuovo la parte in plastica del
➩
bicchiere del frullatore
del bicchiere del frullatore
l'anello di tenuta sia correttamente posizionato.
sulla parte in vetro
e
. Accertarsi che
e
Pulizia del blocco motorino
Utilizzare un panno asciutto o al massimo legger-
➩
mente inumidito per pulire le superfici di plastica.
Ad ogni operazione di pulizia, controllare che
➩
l'interruttore di contatto nell'alloggiamento del
bicchiere
co. Nel caso in cui non si riescano a rimuovere
eventuali blocchi con l'angolo di un foglio di carta,
rivolgersi al Servizio assistenza. Non utilizzare
in nessun caso un oggetto duro, l'interruttore di
contatto potrebbe subire un danno.
Rimuovere eventuali tracce di sporco sulla parte
➩
inferiore del blocco motorino
con un panno asciutto o con un pennello per la
polvere. Accertarsi che non possa penetrare nulla nell'apparecchio attraverso le aperture di
ventilazione.
non sia bloccato da tracce di spor-
e
esclusivamente
u
Operazioni successive alla pulizia
Far asciugare di nuovo tutti i componenti prima di
montare di nuovo e utilizzare il frullatore.
Conservazione
In caso di prolungato inutilizzo del frullatore,
➩
pulirlo accuratamente (v. capitolo "Pulizia“).
Avvolgere il cavo di rete yintorno all'avvolgi-
➩
cavo
Conservare il frullatore in un luogo fresco e
➩
asciutto.
alla base del blocco motorino u.
i
Smaltimento
Non gettare per alcun motivo l’apparecchio insieme ai normali rifiuti
domestici. Questo prodotto sottostà
alla direttiva europea 2012/19/EU.
Smaltire l’apparecchio presso un’azienda autorizzata o presso l’ente comunale di smaltimento.
Rispettare le norme attualmente in vigore. In caso
di dubbi, contattare l’azienda di smaltimento
competente.
Smaltire tutti i materiali d’imballo in conformità alle norme per il rispetto dell’ambiente.
Garanzia & assistenza
Questo apparecchio è garantito per tre anni a
partire dalla data di acquisto. L'apparecchio
è stato prodotto con cura e debitamente collaudato
prima della consegna.
Conservare lo scontrino come prova d'acquisto. In
caso di interventi in garanzia, contattare telefonicamente il proprio centro di assistenza. Solo in questo
modo è possibile
garantire una spedizione gratuita della merce.
La garanzia vale solo per i difetti di materiale o
fabbricazione, non per i danni da trasporto, parti
soggette a usura o danni a parti fragili come ad es.
interruttori o accumulatori. Il prodotto è destinato
esclusivamente all'uso domestico e non a quello
commerciale.
La garanzia decade in caso di impiego improprio o
manomissione, uso della forza e interventi non eseguiti dalla nostra filiale di assistenza autorizzata. Questa
garanzia non costituisce alcun limite ai diritti legali del
consumatore. Il periodo di garanzia non viene prolungato in caso di un intervento in garanzia.
- 34 -

Ciò vale anche per le componenti sostituite e riparate.
I danni e difetti presenti già all'acquisto devono essere
comunicati immediatamente dopo il disimballaggio, e
non oltre due giorni dalla data di acquisto. Le riparazioni effettuate dopo la scadenza del periodo di
garanzia sono a pagamento.
Assistenza Italia
Tel.: 02 36003201
E-Mail: kompernass@lidl.it
IAN 100484
Assistenza Svizzera
Tel.: 0842 665566 (0,08 CHF/Min.,
telefonia mobile max. 0,40 CHF/Min.)
E-Mail: kompernass@lidl.ch
IAN 100484
Raggiungibilità della hotline:
dal lunedì al venerdì, dalle 8.00 alle 20.00 (CET)
Importatore
KOMPERNASS HANDELS GMBH
BURGSTRASSE 21
44867 BOCHUM
GERMANY
www.kompernass.com
- 35 -

- 36 -

CONTENT PAGE
Introduction 38
Intended Use 38
Items supplied 38
Appliance description 38
Technical data 38
Safety Notices 39
Unpacking 41
Preparing for use 41
Operation 41
Filling and mounting the mixer jug...............................................................................................41
Selecting operating speeds...........................................................................................................41
Filling when in use..........................................................................................................................42
Removing the mixer........................................................................................................................42
Useful tips 42
Recipes 43
Banana Shake................................................................................................................................43
Vanilla Shake..................................................................................................................................43
Cappucino Shake ..........................................................................................................................43
Tropical Mix ..................................................................................................................................43
Nut-Nougat Shake.........................................................................................................................43
Carrot Shake ..................................................................................................................................43
Blackcurrant Mix............................................................................................................................43
Hawaii Shake.................................................................................................................................44
Fruity Pineapple-Strawberry Mix..................................................................................................44
Andalusian Cold Soup (Gazpacho)............................................................................................44
Cleaning 44
Cleaning the mixer .......................................................................................................................45
Cleaning the motor block..............................................................................................................46
After cleaning.................................................................................................................................46
Storage 46
Disposal 46
Warranty & Service 46
Importer 47
- 37 -

Blender
Introduction
Congratulations on the purchase of your new appliance.
You have clearly decided in favour of a quality
product. These operating instructions are a part of
this product. They contain important information in
regard to safety, use and disposal. Before using the
product, familiarise yourself with all of these operating and safety instructions. Use the product only as
described and only for the specified areas of application. In addition, pass these documents on, together
with the product, to any future owner.
Intended Use
This appliance is intended for ...
– the mixing, blending and stirring of foodstuffs
as well as the crushing of ice cubes,
– exclusively for normal domestic amounts and
only for private use in a domestic environment
in dry rooms.
This appliance is not intended for ...
– the hacking of hard foodstuffs, such as nuts,
seeds, large kernels or stalks,
– the processing of materials that are not foodstuffs,
– utilisation for commercial or industrial purposes,
– for use in moist environments or outdoors,
– processing hot/boiling liquids.
Use only the accessories and spare parts that are
specified for this appliance. Other parts are possibly
not sufficiently suitable or safe!
Items supplied
After unpacking, check to ensure all items are
available. Being supplied are:
1 x Motor block, with power cable and plug
1 x Mixer jug, with permanently assembled cutters
1 x Lid
1 x Filling cap
1 x Operating instruction
Appliance description
Filling cap
q
Cover
w
Mixer jug
e
Cutter
r
Switch
t
Power cable
y
Motor block
u
Cable storage
i
Scale
o
Technical data
Nominal voltage: 220 - 240 V ~, 50 Hz
Nominal power
consumption: 550 Watt
Max. capacity: 1.75 l
Protection class: II
CO time: 3 Minutes
The C.O. Time (Continuous Operation) details how
long an appliance may be used without the motor
overheating and being damaged. When the specified
C.O. Time has been reached, the appliance must be
switched off until the motor has cooled itself down.
- 38 -

Safety Notices
To avoid the risk of a potentially fatal electric shock:
• Ensure that the motor block, the power cable and the power plug are never sub-
mersed in water or other fluids.
• Only use the appliance in dry rooms, never use it outdoors or in moist environ-
ments.
• Make sure that the power cable never becomes wet or damp during opera-
tion. Lay the cable such that it does not get clamped or otherwise damaged.
• Arrange for defective power plugs and/or cables to be replaced at once by
qualified technicians or our Customer Service Department.
• Always remove the plug from the power socket after use. Switching off the ap-
pliance is not sufficient because the appliance receives power as long as the
power plug is connected to the socket.
• Check to ensure that the appliance is in a service-able condition before taking it
into use. The appliance may not be used if there is recognisable damage on it,
especially to the motor block and the glass mixing jug.
• Immediately remove the plug from the socket should you hear or smell any-
thing unexpected from the appliance when it is in use or there is
an evident malfunction.
To avoid overheating and the risk of fire:
• Do not use the appliance in locations with direct sunlight or in the vicinity of
heat generating appliances.
• NEVER fill the mixing jug with boiling fluids or other foods!
Allow these to cool to a handwarm temperature. Otherwise, the appliance
could overheat and/ or the glass of the mixing jug could crack!
• NEVER operate the appliance when it is empty, i.e. without ingredients in the
mixing attachment.
- 39 -

To reduce the risk of fire or injury:
• NEVER insert your hand or fingers in the mixing jug, especially when it is in
use. The cutters are extremely sharp!
• DO NOT open the cover when the appliance is in operation. Should you do
so, pieces of the foodstuff could be thrown out at high speeds!
• Do not insert cutlery items or mixing tools into the mixing jug when the appliance
is in use. There is a considerable risk of injury should these make contact with
the swiftly rotating cutters!
• In order to be able to react immediately in the event of danger, always have
the appliance under supervision when it is in use.
• Children should be supervised to ensure that they do not play with the appliance.
• Never use the appliance for purposes other than those described in these
instructions.
• The appliance should always be disconnected from the mains when not super-
vised and before assembly, disassembly or cleaning.
• This appliance shall not be used by children.
• The appliance and its connecting cable must be kept away from children.
• This appliance may be used by people with reduced physical, sensory or men-
tal capabilities or lack of experience and/or knowledge if they are supervised
and have been instructed in how to use the appliance safely and have under-
stood the potential risks.
• Children must not play with the appliance.
• Be careful when handling the appliance. The blades are very sharp!
• Take care when emptying the blender jug! The blades are very sharp!
• Take care when cleaning the appliance! The blades are very sharp!
• Switch the appliance off and disconnect the plug from the power supply before
changing accessories or getting hold of parts that move during operation.
• Use the mixer jug only with the supplied motor block!
• Always make sure that the blender is switched off before removing the mixer
jug from the motor block!
- 40 -

Unpacking
Operation
• Remove all packaging materials or protective fo-
ils from the appliance. Retain the packaging, so
that you can store the appliance with protection
or send it by post, e.g. should it need repair.
• Before taking the appliance into use, check to
ensure that it is free of damage, check also that
the power cable and plug as well as all accesso-
ries and appliance parts are undamaged.
• Carefully clean all components before
taking the appliance into use for the first time
(see “Cleaning”).
Preparing for use
When all components have been cleaned as described
under “Cleaning”:
Position the appliance such that, ...
➩
– that the power cable
cess at the rear of the appliance,
– the power plug is immediately accessible, so that
it can be quickly withdrawn in the event of danger,
– that it is stable and not liable to slip, and such
that the suction cups find a firm hold so that the
appliance cannot tip over due to vibration,
– that the power cable
area and thus not presenting a risk of being inad-
vertently snagged and tipping the appliance
over.
passes through the re-
y
is not in the working
y
Warning!
The motor switches itself off as soon as the mixer
jug
is removed from the motor block u. It could
e
then be overlooked that the appliance is still switched on. The motor will thus start of its own accord
as soon as the mixer jug
Therefore:
• First insert the power plug into the wall socket
when the mixer jug
its lid fitted and closed.
• Before mounting the mixing jug always check to
see that the appliance is switched off or that the
power plug has been removed.
• Before removing the mixer jug
pliance off, remove the power plug and wait for
the motor to stop revolving.
is replaced on it:
e
is filled and mounted with
e
, switch the ap-
e
Filling and mounting the mixer jug
Take the mixer jug efrom the motor block
➩
and remove the cover w.
Fill the mixer jug eand then press the cover
➩
firmly back onto the mixer jug e. Ensure that the
pourer nose on the mixer jug
Insert the filling cap qinto the lid opening and
➩
secure it by turning it clockwise.
Place the ready filled and sealed mixer jug
➩
onto the motor block u. Lightly turn the mixer
jug
until you can press it down. The motor
e
can start only when the mixer jug
positioned.
is also closed.
e
e
u
w
e
is securely
Selecting operating speeds
When the mixer jug eis filled, completely sealed
and securely fitted to the motor block
then switch the appliance on.
- 41 -
u
, you can

Place the switch ton ...
➩
– Level 1 - 3
for fluid or soft foodstuffs, for mixing, blending
and stirring
– Level 3 - 5
for firmer foodstuffs or for hacking
– Level Ice Crush/Clean
for short, powerful impulse operation, e.g. for
crushing icecubes or when cleaning. So as not
to overburden the motor, the switch
engage in this position. Hence, hold the switch
in this position for short periods only.
t
does not
t
Note
Fill the mixer jug ewith a maximum of 180 g of
ice cubes. If filled with more than this, the appliance
cannot optimally crush them.
Filling when in use
Warning!
Should you wish to insert further foodstuffs during
operation, you may ONLY open the filling cap
provided for this purpose.
• Under no circumstance should you open the cover w. Pieces of the foodstuff could be thrown
out at high speeds!
• Do not insert cutlery items or mixing tools into
the mixer jug
There is a considerable risk of injury should these
make contact with the swiftly rotating cutters
when the apliance is in use.
e
q
r
Removing the mixer
When the processing of the foodstuffs is complete:
Always first place the switch tinto the OFF
➩
position ("OFF") and remove the power plug.
Wait until the motor has come to a complete
➩
standstill before lifting the mixer jug
up. The mixer jug
does not need to be turned.
e
Useful tips
– The best results when blending firm ingredients
are achieved by placing small portions one after
the other into the mixer jug
ting a single large portion.
– When processing firm ingredients, cut them into
small pieces (2-3 cm).
– When mixing liquid ingredients begin first of all
with a small measure of fluids. Gradually add
more fluids to the mixture through the filling cap.
– The appliance can be stabilised by placing your
hand on top of the closed liquidiser during operation.
– For the stirring of firm or very viscous foodstuffs
it can be beneficial to use the impulse-operation,
which helps avoid a blocking of the cutters
Note
Do not use the appliance to crush grains of cooking
salt, refined sugar or white sugar. For example, to
make powdered sugar.
!
instead of inser-
e
e
straight
r
.
To insert something when the appliance is in
operation, ...
turn the filling cap qanti-clockwise and remove it.
➩
Fill in the ingredients.
➩
Afterwards, replace the filling cap qinto the lid
➩
and secure it by turning it clockwise.
- 42 -

Recipes
Banana Shake
2 Bananas
approx. 2 Tbsp. Sugar (depending on the ripeness
of the bananas and personal taste)
1/2 l. Milk
1 Dash of lemon juice
Peel the bananas and liquidise them with Level 2.
First gradually add the milk, then the sugar and
lemon juice. Continue mixing everything until a
smooth and uniform liquid results.
Serve the shake chilled.
Vanilla Shake
1/4 l. milk
250 g Vanilla ice cream
125 ml Icecubes
1 1/2 Tsp Sugar
Crush the ice cubes with the level Ice Crush/Clean.
Place the remaining ingredients into the mixer.
Mix everything at Level 2 until the liquid has a
smooth consistency
Cappucino Shake
65 ml cold Espresso (or a very strong coffee)
65 ml Milk
15 g Sugar
65 ml Vanilla ice cream
100 ml crushed Icecubes
Crush the ice cubes with the level Ice Crush/Clean.
Add the espresso, milk and sugar. Mix everything
together with level 2 until the sugar has dissolved.
Finally, add the vanilla ice cream and then briefly
mix everything together using level 1.
Tropical Mix
125 ml Pineapple juice
60 ml Papaya juice
50 ml Orange juice
1/2 small tin of Peaches with juice
125 ml Icecubes
Crush the ice cubes with the level Ice Crush/Clean.
Place all ingredients into the mixer and blend them
together using level 3.
Nut-Nougat Shake
1/2 l. Milk
200 g Nut-Nougat spread
1 ball of Vanilla ice cream
50 ml cream
Combine all ingredients in a mixer and use level 3
until everything is evenly blended together.
Carrot Shake
300 ml Apple juice
500 ml Carrot juice
4 Tbsp Cooking oil (Wheat germ oil or rapeseed oil)
4 Tbsp of Lemon juice
Ginger powder
Pepper
Place the apple juice, cooking oil and lemon juice
into the mixer and blend everything together using
level 2. Then, add the carrot juice and mix it all together using level 2. To finish, add the ginger powder and pepper to taste.
Blackcurrant Mix
2 Tsp Honey
2 Bananas
1/4 l. Buttermilk
1/4 l. Blackcurrant juice
Place all ingredients into the mixer and blend them
together using level 3.
- 43 -

Hawaii Shake
4 Bananas
1/4 l. Pineapple juice
1/2 l. Milk
2 tbsp. Honey
1/4 l. Rum
Peel the bananas and liquidise them using Level 2.
Then add the other ingredients and mix everything
together using level 1.
Fruity Pineapple-Strawberry Mix
250 ml Pineapple juice
200 g Strawberries
300 ml Apple juice
4 Ice cubes
Crush the ice cubes with the level Ice Crush/Clean.
Wash the strawberries and remove the green parts.
Liquidise them using level 2. Then add the remaining
ingredients and mix everything together using level 1.
Andalusian Cold Soup (Gazpacho)
1/2 Cucumber
1 Beef tomato
1 Green pepper
1/2 Onion
1 Garlic clove
1/2 White bread roll
1/2 Tsp Salt
1 Tsp Red wine vinegar
1 Tbsp Olive oil
Cut the vegetables into pieces approx. 2 cm
in size. First place the tomatoes and then the cucumber into the mixer. Liquidise them using level 3.
Add the remaining ingredients and then liquidise/
blend them all together at level 3 until a smooth
soup is created.
Serve the soup with bread.
Note
These recipes are provided subject to change. All
ingredients and preparation information are guiding
values. Expand these recipe suggestions based on
your personal experiences.
Note
For cases of lactose intolerance, we recommend
you use a lactose-free milk. Keep in mind, however,
that lactose-free milk is a little sweeter.
Cleaning
Caution!
Before starting to clean the liquidiser and its
components:
• Ensure that the motor is switched off and the
power plug removed from the socket.
Under no circumstance may the motor block
be submersed in water or other fluids.This
could result in you receiving a fatal electric
shock and the appliance could be damaged.
• Never open the housing of the appliance. This
brings with it the risk of receiving a fatal electric
shock.
• Never disassemble the cutters
ach into the mixer jug
tremely sharp!
• Do not use solvents or abrasive cleaners on the
plastic surfaces, they could be damaged by them.
e
and never re-
r
. The cutters rare ex-
u
- 44 -

Cleaning the mixer
So that you do not injure yourself on the cut-
➩
ters
, clean the mixer jug eonly with a long
r
handled dishwasher brush.
In a case of stubborn soiling, the mixer jug
➩
can also be cleaned in a dishwasher. For this,
always take the mixer jug
described later.
Clean the cover wand the filling cap qin a
➩
dishwasher or with the normal washing up.
If you clean the liquidiser directly after use, you can
often achieve a satisfactory and hygienic level of
cleaning with the following alternative:
If you clean the liquidiser directly after use, you can
often achieve a satisfactory and hygienic level of
cleaning with the following alternative:
Fill the mixer jug ewith 750 ml of water and
➩
add a few drops of mild detergent. Close the
cover
block
Insert the plug into a mains power socket and
activate the Ice Crush/Clean operation a few times, such that the cutter
water at full speed.
Afterwards, rinse the mixer jug
clean water to ensure that all detergent residues
have been removed.
and fit the mixer jug eonto the motor
w
.
u
apart, as
e
ploughs through the
r
out with lots of
e
e
Should this not dislodge the soiling, you can separate
the lower plastic part of the mixer jug
ters
) from the the glass part of the mixer jug e:
r
(with the cut-
e
Glass element
Sealing ring
Cutting blade
Plastic element
Remove the mixer jug efrom the motor block u.
➩
Turn the plastic element of the mixer jug
➩
anti-clockwise, such that it allows itself to be released from the glass element of the mixer jug
- 45 -
e
e
.

Attention!
Take care with the cutting blades . They are very
sharp. Risk of injury!
Clean both parts thoroughly in a mild soapy
➩
solution or in a dishwasher.
Replace the plastic element of the mixer jug
➩
back onto the glass element . Ensure that the
sealing ring is correctly fitted.
e
Cleaning the motor block
Use a dry cloth or, at the most, a lightly moistened
➩
one for cleaning the plastic surfaces.
At every cleaning check that the contact switch
➩
in the receptor for the mixer jug
ked by soiling residues. If you cannot dislodge
any blockages with the corner of a piece of paper, make contact with Customer Services. Under no circumstances should you use a hard object, this could damage the contact switch.
Remove any possible residues on the underside
➩
of the motor block
stiff bristled brush. Ensure that nothing can enter
through the ventilation opening of the appliance.
only with a dry cloth or a
u
is not blok-
e
After cleaning
Allow all parts to dry well before re-assembling and
re-using the liquidiser.
Storage
If you do not intend to use the liquidiser for an
➩
extended period, clean it thoroughly (see chapter
"Cleaning").
Wrap the power cable yaround the cable sto-
➩
rage
on the base of the motor block u.
i
Store the liquidiser at a cool and dry location.
➩
Disposal
Do not dispose of the appliance in your
normal domestic waste. This product is
subject to the European guideline
2012/19/EU.
Dispose of the appliance through an approved disposal centre or at your community waste facility.
Observe the currently applicable regulations.
In case of doubt, please contact your waste disposal
centre.
Dispose of all packaging materials in an
environmentally responsible manner.
Warranty & Service
The warranty for this appliance is for 3 years from
the date of purchase. The appliance has been manufactured with care and meticulously examined before delivery.
Please retain your receipt as proof of purchase. In
the event of a warranty claim, please make contact
by telephone with our Service Department. Only in
this way can a post-free despatch for your goods be
assured.
The warranty covers only claims for material and
maufacturing defects, but not for transport damage,
for wearing parts or for damage to fragile components, e.g. buttons or batteries. This product is for private use only and is not intended for commercial use.
The warranty is void in the case of abusive and improper handling, use of force and internal tampering
not carried out by our authorized service branch.
Your statutory rights are not restricted in any way by
this warranty.
- 46 -

The warranty period will not be extended by repairs
made under warranty. This applies also to replaced
and repaired parts. Any damage and defects extant
on purchase must be reported immediately after unpacking the appliance, at the latest, two days after
the purchase date. Repairs made after the expiration of the warranty period are subject to payment.
Service Great Brita
Tel.: 0871 5000 720 (£ 0.10/Min.)
E-Mail: kompernass@lidl.co.uk
IAN 100484
Hotline availability:
Monday to Friday 08:00 - 20:00 (CET)
Importer
KOMPERNASS HANDELS GMBH
BURGSTRASSE 21
44867 BOCHUM
GERMANY
www.kompernass.com
- 47 -

KOMPERNASS HANDELS GMBH
BURGSTRASSE 21
44867 BOCHUM
DEUTSCHLAND / GERMANY
www.kompernass.com
Stand der Informationen · Version des informations
Versione delle informazioni · Last Information Update:
04 / 2014 · Ident.-No.: SSM550D1-032014-1
IAN 100484
1
 Loading...