

Page 1
KITCHEN TOOLS
Blender SSM 550 B1
KOMPERNASS GMBH
BURGSTRASSE 21 · D-44867 BOCHUM
www.kompernass.com
ID-Nr.: SSM 550 B1-09/11-V1
IAN: 71495
Blender
Operating instructions
ΜΜππλλέέννττεερρ
Οδηγίες χρήσης
Page 2
SSM 550 B1
q
w
e
o
i
r
t
y
u
Page 3

CONTENT PAGE
Safety Notices 2
Intended Use 3
Technical data 3
Unpacking 3
Items supplied 3
Appliance description 3
Preparing for use 4
Operation 4
Filling and mounting the mixer jug..................................................................................................4
Selecting operating speeds .............................................................................................................4
Filling when in use ............................................................................................................................5
Removing the mixer..........................................................................................................................5
Useful tips 5
Recipes 6
Banana Shake ..................................................................................................................................6
Vanilla Shake ....................................................................................................................................6
Cappucino Shake.............................................................................................................................6
Tropical Mix .....................................................................................................................................6
Nut-Nougat Shake ...........................................................................................................................6
Carrot Shake.....................................................................................................................................6
Blackcurrant Mix ..............................................................................................................................6
Hawaii Shake....................................................................................................................................7
Fruity Pineapple-Strawberry Mix ....................................................................................................7
Andalusian Cold Soup (Gazpacho) ..............................................................................................7
Cleaning 7
Cleaning the mixer ..........................................................................................................................8
Cleaning the motor block ................................................................................................................9
After cleaning ...................................................................................................................................9
Storage 9
Disposal 9
Warranty & Service 9
Importer 10
Read the operating instructions carefully before using the device for the first time and preserve this booklet
for later reference. Pass this manual on to whoever might acquire the device at a future date.
- 1 -
Page 4

Blender
Safety Notices
To avoid the risk of a potentially
fatal electric shock:
• Ensure that the motor block, the power cable and
the power plug are never submersed in water or
other fluids.
• Only use the appliance in dry rooms, never use
it outdoors or in moist environments.
• Make sure that the power cable never becomes
wet or damp during operation. Lay the cable
such that it does not get clamped or otherwise
damaged.
• Arrange for defective power plugs and/or cables
to be replaced at once by qualified technicians
or our Customer Service Department.
• Always remove the plug from the power socket
after use. Switching off the appliance is not sufficient because the appliance receives power as
long as the power plug is connected to the socket.
• Check to ensure that the appliance is in a serviceable condition before taking it into use. The appliance may not be used if there is recognisable
damage on it, especially to the motor block and
the glass mixing jug.
• Immediately remove the plug from the socket
should you hear or smell anything unexpected
from the appliance when it is in use or there is
an evident malfunction.
To avoid overheating and the
risk of fire:
• Do not use the appliance in locations with direct
sunlight or in the vicinity of heat generating appliances.
• NEVER fill the mixing jug with boiling fluids or other foods!
Allow these to cool to a handwarm temperature.
Otherwise, the appliance could overheat and/
or the glass of the mixing jug could crack!
• NEVER operate the appliance when it is empty,
i.e. without ingredients in the mixing attachment.
To reduce the risk of fire or injury:
• NEVER insert your hand or fingers in the mixing
jug, especially when it is in use. The cutters are
extremely sharp!
• DO NOT open the cover when the appliance is
in operation. Should you do so, pieces of the
foodstuff could be thrown out at high speeds!
• Do not insert cutlery items or mixing tools into
the mixing jug when the appliance is in use.
There is a considerable risk of injury should these
make contact with the swiftly rotating cutters!
• In order to be able to react immediately in the
event of danger, always have the appliance
under supervision when it is in use.
• This appliance is not intended for use by individuals (including children) with restricted physical,
physiological or intellectual abilities or deficiences
in experience and/or knowledge unless they are
supervised by a person responsible for their safety
or receive from this person instruction in how the
appliance is to be used.
• Children should be supervised to ensure that
they do not play with the appliance.
- 2 -
Page 5

Intended Use
Unpacking
This appliance is intended for ...
– the mixing, blending and stirring of foodstuffs
as well as the crushing of ice cubes,
– exclusively for normal domestic amounts and
only for private use in a domestic environment
in dry rooms.
This appliance is not intended for ...
– the hacking of hard foodstuffs, such as nuts,
seeds, large kernels or stalks,
– the processing of materials that are not foodstuffs,
– utilisation for commercial or industrial purposes,
– for use in moist environments or outdoors.
Use only the accessories and spare parts that are
specified for this appliance. Other parts are possibly
not sufficiently suitable or safe!
Technical data
Nominal voltage: 220 - 240 V~, 50 Hz
Nominal power
consumption: 550 Watt
Max. capacity: 1.75 l
Protection class: II
CO time: 3 Minutes
The C.O. Time (Continuous Operation) details how
long an appliance may be used without the motor
overheating and being damaged. When the specified
C.O. Time has been reached, the appliance must be
switched off until the motor has cooled itself down.
• Remove all packaging materials or protective foils from the appliance. Retain the packaging, so
that you can store the appliance with protection
or send it by post, e.g. should it need repair.
• Before taking the appliance into use, check to
ensure that it is free of damage, check also that
the power cable and plug as well as all accessories and appliance parts are undamaged.
• Carefully clean all components before taking the
appliance into use for the first time
(see “Cleaning”).
Items supplied
After unpacking, check to ensure all items are
avail-able. Being supplied are:
1 x Motor block, with power cable and plug
1 x Mixer jug, with permanently assembled cutters
1 x Lid
1 x Filling cap
1 x Operating instruction
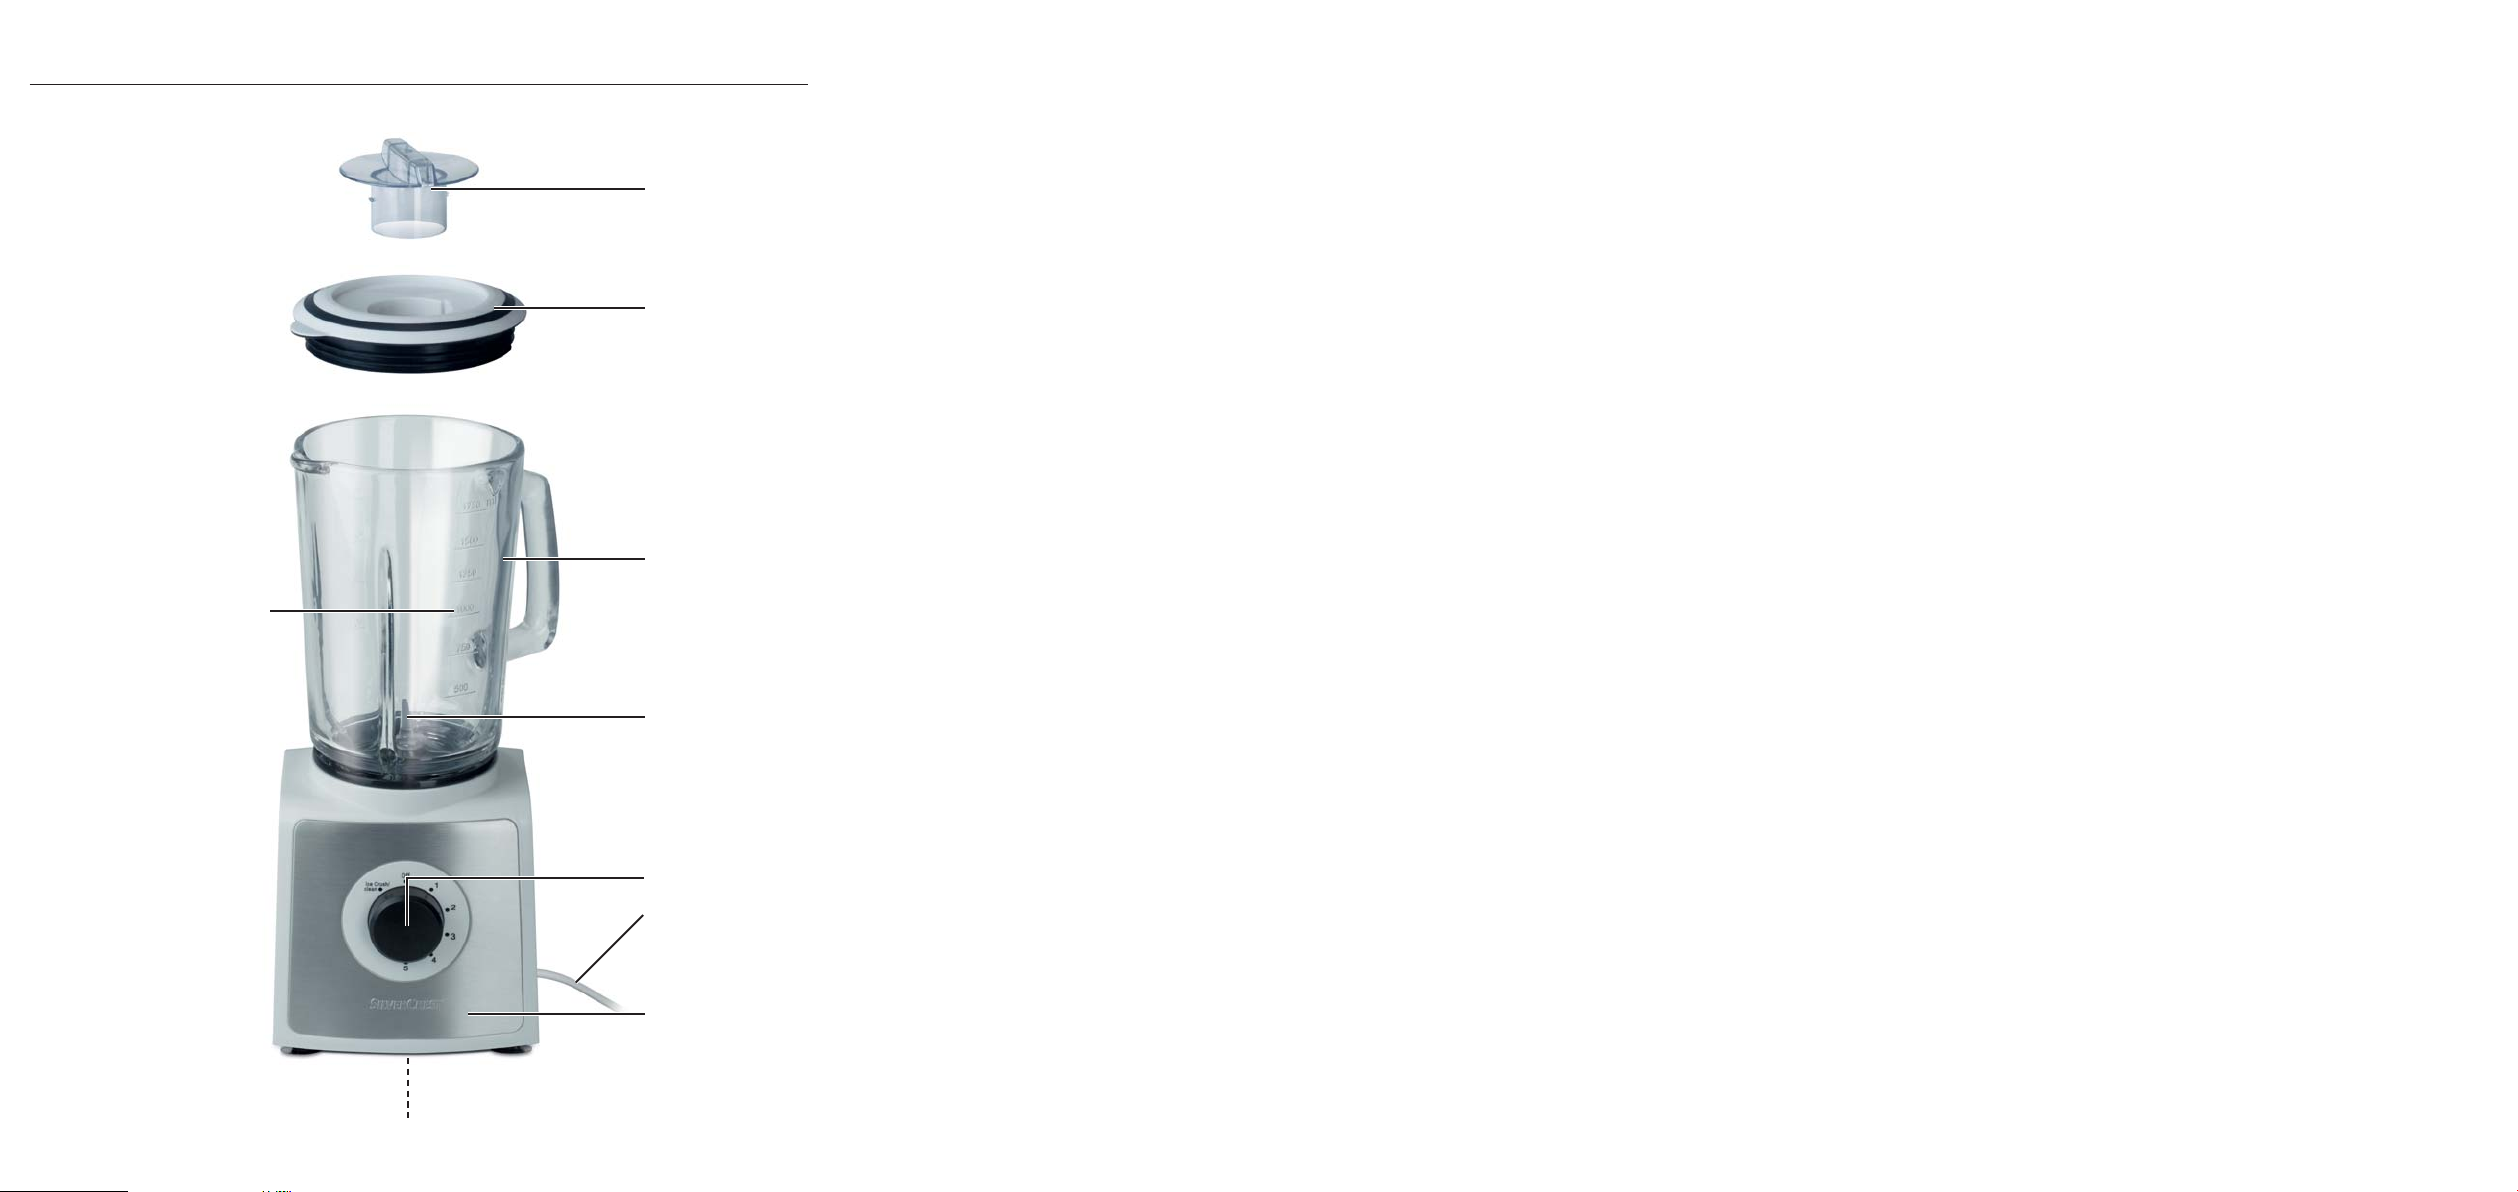
Appliance description
Filling cap
q
Cover
w
Mixer jug
e
Cutter
r
Switch
t
Power cable
y
Motor block
u
Cable storage
i
Scale
o
- 3 -
Page 6

Preparing for use
When all components have been cleaned as described
under “Cleaning”:
Position the appliance such that, ...
➩
– that the power cable
cess at the rear of the appliance,
– the power plug is immediately accessible, so that
it can be quickly withdrawn in the event of
danger.
– that it is stable and not liable to slip, and such
that the suction cups find a firm hold so that the
appliance cannot tip over due to vibration.
– that the power cable
area and thus not presenting a risk of being inadvertently snagged and tipping the appliance
over.
passes through the re-
y
is not in the working
y
Filling and mounting the mixer jug
Take the mixer attachment efrom the motor unit
➩
and remove the lid w.
u
Fill the mixer attachment eand then press the
➩
lid
firmly back onto the mixer attachment e.
w
Ensure that the pourer nose on the mixer attachment
Insert the filling cap qinto the lid opening and
➩
secure it by turning it clockwise.
Place the ready filled and sealed mixer jug
➩
onto the motor block u. Lightly turn the mixer
jug
can start only when the mixer jug
positioned.
is also closed.
e
until you can press it down. The motor
e
e
e
is securely
Selecting operating speeds
When the mixer jug eis filled, completely sealed
and securely fitted to the motor block
then switch the appliance on.
, you can
u
Operation
Warning!
The motor switches itself off as soon as the mixing
jug
is removed from the motor block u. It could
e
then be overlooked that the appliance is still switched on. The motor will thus start of its own accord
as soon as the mixing jug
Therefore:
• First insert the power plug into the wall socket
when the mixer jug
its lid fitted and closed.
• Before mounting the mixing jug always check to
see that the appliance is switched off or that the
power plug has been removed.
• Before removing the mixer jug
pliance off, remove the power plug and wait for
the motor to stop revolving.
is replaced on it:
e
is filled and mounted with
e
, switch the ap-
e
Place the switch ton ...
➩
– Level 1-3
for fluid or soft foodstuffs, for mixing, blending
and stirring
– Level 3-5
for firmer foodstuffs or for hacking
– Level Ice Crush/Clean
for short, powerful impulse operation, e.g. for
crushing icecubes or when cleaning. So as not
to overburden the motor, the switch
engage in this position. Hence, hold the switch
in this position for short periods only.
t
t
does not
Notice
Fill the mixer attachment ewith a maximum of
180 g of ice cubes. If filled with more than this, the
appliance cannot optimally crush them.
- 4 -
Page 7

Filling when in use
Warning!
Should you wish to insert further foodstuffs during
operation, you may ONLY open the filling cap
provided for this purpose.
• Under no circumstance should you open the lid
. Pieces of the foodstuff could be thrown out at
w
high speeds!
• Do not insert cutlery items or mixing tools into
the mixing jug
There is a considerable risk of injury should these
make contact with the swiftly rotating cutters
To insert something when the appliance is in
operation, ...
turn the filling cap qanti-clockwise and remove
➩
it.
Fill in the ingredients.
➩
Afterwards, replace the filling cap qinto the
➩
lid and secure it by turning it clockwise.
when the appliance is in use.
e
q
r
Removing the mixer
When the processing of the foodstuffs is complete:
Always first place the switch tinto the OFF
➩
position ("0") and remove the power plug.
Wait until the motor has come to a complete
➩
standstill before lifting the mixer jug
up. It does not need to be turned.
e
straight
Useful tips
– The best results when blending firm ingredients
are achieved by placing small portions one after
the other into the mixer jug
ting a single large portion.
– When processing firm ingredients, cut them into
small pieces (2-3 cm).
– When mixing liquid ingredients begin first of all
with a small measure of fluids. Gradually add
more fluids to the mixture through the filling cap.
– The appliance can be stabilised by placing your
!
hand on top of the closed liquidiser during operation.
– For the stirring of firm or very viscous foodstuffs
it can be beneficial to use the impulse-operation,
which helps avoid a blocking of the cutters
Notice
Do not use the appliance to crush grains of cooking
salt, refined sugar or white sugar. For example, to
make powdered sugar.
instead of inser-
e
r
.
- 5 -
Page 8

Recipes
Banana Shake
2 Bananas
approx. 2 Tbsp. Sugar (Depending on the ripeness
of the bananas and personal taste)
1/2 l. Milk
1 Dash of lemon juice
Peel the bananas and liquidise them with Level 2.
First gradually add the milk, then the sugar and
lemon juice. Continue mixing everything until a
smooth and uniform liquid results.
Serve the shake chilled.
Vanilla Shake
1/4 l. milk
250 g Vanilla ice cream
125 ml Icecubes
1 1/2 Tsp Sugar
Crush the ice cubes with the level Ice Crush/Clean.
Place the remaining ingredients into the mixer. Continue mixing everything until a smooth and uniform
liquid results.
Cappucino Shake
65 ml cold Espresso (or a very strong coffee)
65 ml Milk
15 g Sugar
65 ml Vanilla ice cream
100 ml crushed Icecubes
Crush the ice cubes with the level Ice Crush/Clean.
Add the espresso, milk and sugar. Mix everything
together with level 2 until the sugar has dissolved.
Finally, add the vanilla ice cream and then briefly
mix everything together using level 1.
Tropical Mix
125 ml Pineapple juice
60 ml Papaya juice
50 ml Orange juice
1/2 small tin of Peaches with juice
125 ml Icecubes
Crush the ice cubes with the level Ice Crush/Clean.
Place all ingredients into the mixer and blend them
together using level 3.
Nut-Nougat Shake
1/2 l. Milk
200 g Nut-Nougat spread
1 ball of Vanilla ice cream
50 ml cream
Combine all ingredients in a mixer and use level 3
until everything is evenly blended together.
Carrot Shake
300 ml Apple juice
500 ml Carrot juice
4 Tbsp Cooking oil (Wheat germ oil or rapeseed
oil)
4 Tbsp of Lemon juice
Ginger powder
Pepper
Place the apple juice, cooking oil and lemon juice
into the mixer and blend everything together using
level 2. Then, add the carrot juice and mix it all together using level 2. To finish, add the ginger powder and pepper to taste.
Blackcurrant Mix
2 Tsp Honey
2 Bananas
1/4 l. Buttermilk
1/4 l. Blackcurrant juice
Place all ingredients into the mixer and blend them
together using level 3.
- 6 -
Page 9

Hawaii Shake
4 Bananas
1/4 l. Pineapple juice
1/2 l. milk
2 tbsp. honey
1/4 l. Rum
Peel the bananas and liquidise them using Level 2.
Then add the other ingredients and mix everything
together using level 1.
Fruity Pineapple-Strawberry Mix
250 ml Pineapple juice
200 g Strawberries
300 ml Apple juice
4 Ice cubes
Crush the ice cubes with the level Ice Crush/Clean.
Wash the strawberries and remove the green parts.
Liquidise them using level 2. Then add the remaining ingredients and mix everything together using
level 1.
Andalusian Cold Soup (Gazpacho)
1/2 Cucumber
1 Beef tomato
1 Green pepper
1/2 Onion
1 Garlic clove
1/2 White bread roll
1/2 Tsp Salt
1 Tsp Red wine vinegar
1 Tbsp Olive oil
Note
These recipes are provided subject to change. All
ingredients and preparation information are guiding
values. Expand these recipe suggestions based on
your personal experiences.
Note
For cases of lactose intolerance, we recommend
you use a lactose-free milk. Keep in mind, however,
that lactose-free milk is a little sweeter.
Cleaning
Caution!
Before starting to clean the liquidiser and its
components:
• Ensure that the motor is switched off and the
power plug removed from the socket.
Under no circumstance may the motor block
be submersed in water or other fluids.This
u
could result in you receiving a fatal electric
shock and the appliance could be damaged.
• Never open the housing of the appliance. This
brings with it the risk of receiving a fatal electric
shock.
• Never disassemble the cutters
ach into the mixer jug
tremely sharp!
• Do not use solvents or abrasive cleaners on the
plastic surfaces, they could be damaged by them.
. The cutters rare ex-
e
and never re-
r
Cut the vegetables into pieces approx. 2 cm
in size. First place the tomatoes and then the cucumber into the mixer. Liquidise them using level 3.
Add the remaining ingredients and then
liquidise/blend them all together at level 3 until a
smooth soup is created.
Serve the soup with bread.
- 7 -
Page 10

Cleaning the mixer
So that you do not injure yourself on the cutters
➩
, clean the mixer jug eonly with a long
r
handled dishwasher brush.
In a case of stubborn soiling, the mixer jug
➩
can also be cleaned in a dishwasher. For this,
always take the mixing jug
described later.
Clean the lid wand the filling cap qin a dish-
➩
washer or with the normal washing up.
If you clean the liquidiser directly after use, you can
often achieve a satisfactory and hygienic level of
cleaning with the following alternative:
If you clean the liquidiser directly after use, you can
often achieve a satisfactory and hygienic level of
cleaning with the following alternative:
Fill the blender ewith 750 ml of water and
➩
add a few drops of mild detergent. Close the lid
and fit the blender eonto the motor block u.
w
Insert the plug into a mains power socket and
activate the Ice Crush/Clean operation a few times, such that the cutting blade
through the water at full speed.
Afterwards, rinse the blender
clean water to ensure that all detergent residues
have been removed.
apart, as
e
r
out with lots of
e
e
ploughs
Should this not dislodge the soiling, you can separate
the lower plastic part of the mixer jug
ters
) from the the glass part:
r
(with the cut-
e
Glass element
Sealing ring
Cutting blade
Plastic element
Remove the mixer jug efrom the motor block
➩
.
u
Turn the plastic element of the mixer attach-
➩
ment
be released from the glass element .
anti-clockwise, such that it allows itself to
e
Attention!
Take care with the cutters . They are very sharp.
Risk of injury!
Clean both parts thoroughly in a mild soapy
➩
solution or in a dishwasher.
Replace the plastic part of the mixer jug
➩
back onto the glass part . Ensure that the sea-
ling ring is correctly fitted.
- 8 -
e
Page 11

Cleaning the motor block
Use a dry cloth or, at the most, a lightly moistened
➩
one for cleaning the plastic surfaces.
At every cleaning check that the contact switch
➩
in the receptor for the mixer jug
ked by soiling residues. If you cannot dislodge
any blockages with the corner of a piece of paper, make contact with Customer Services. Under no circumstances should you use a hard object, this could damage the contact switch.
Remove any possible residues on the underside
➩
of the motor block
stiff bristled brush. Ensure that nothing can enter
through the ventilation opening of the appliance.
only with a dry cloth or a
u
is not blok-
e
After cleaning
Allow all parts to dry well before re-assembling and
re-using the liquidiser.
Storage
If you do not intend to use the liquidiser for an
➩
extended period, clean it thoroughly (see chapter
"Cleaning").
Wrap the power cable yaround the cable sto-
➩
rage
on the base of the motor block u.
i
Store the liquidiser at a cool and dry location.
➩
Disposal
Do not dispose of the appliance in your
normal domestic waste. This product is
subject to the European guideline
2002/96/EC.
Dispose of the appliance through an approved disposal centre or at your community waste facility.
Observe the currently applicable regulations.
In case of doubt, please contact your waste disposal
centre.
Dispose of all packaging materials in an
environmentally responsible manner.
Warranty & Service
The warranty for this appliance is for 3 years from
the date of purchase. The appliance has been manufactured with care and meticulously examined before delivery. Please retain your receipt as proof of
purchase. In the event of a warranty claim, please
make contact by telephone with our Service Department. Only in this way can a post-free despatch for
your goods be assured.
The warranty covers only claims for material and
maufacturing defects, but not for transport damage,
for wearing parts or for damage to fragile components, e.g. buttons or batteries. This product is for
private use only and is not intended for commercial
use. The warranty is void in the case of abusive and
improper handling, use of force and internal tampering not carried out by our authorized service
branch. Your statutory rights are not restricted in
any way by this warranty.
The warranty period will not be extended by repairs
made under warranty. This applies also to replaced
and repaired parts. Any damage and defects extant
on purchase must be reported immediately after unpacking the appliance, at the latest, two days after
the purchase date. Repairs made after the expiration of the warranty period are subject to payment.
- 9 -
Page 12

Service Great Britain
Tel.: 0871 5000 720 (£ 0.10/Min.)
E-Mail: kompernass@lidl.co.uk
IAN 71495
Service Ireland
Tel.: 1890 930 034
(0,08 EUR/Min., (peak))
(0,06 EUR/Min., (off peak))
E-Mail: kompernass@lidl.ie
IAN 71495
CY
Service Cyprus
Tel.: 8009 4409
E-Mail: kompernass@lidl.com.cy
IAN 71495
Importer
KOMPERNASS GMBH
BURGSTRASSE 21
44867 BOCHUM, GERMANY
www.kompernass.com
- 10 -
Page 13

Περιεχόμενα Σελίδα
Υποδείξεις ασφαλείας 12
Χρήση σύμφωνη με τους κανονισμούς 13
Τεχνικές πληροφορίες 13
Αποσυσκευασία 13
Σύνολο αποστολής 13
Περιγραφή συσκευής 13
Τοποθέτηση 14
Χειρισμός 14
Τροφοδοσία εξαρτήματος ανάμειξης και μοντάρισμα................................................................14
Επιλογή βαθμίδας ταχύτητας ........................................................................................................14
Γέμισμα κατά τη λειτουργία ............................................................................................................15
Απομάκρυνση εξαρτήματος ανάμειξης ........................................................................................15
Χρήσιμες υποδείξεις 15
Συνταγές 15
Μιλκ-σέϊκ μπανάνα .........................................................................................................................15
Μιλκ-σέϊκ βανίλια............................................................................................................................16
Μιλκ-σέϊκ καπουτσίνο .....................................................................................................................16
Τροπικό μίγμα ................................................................................................................................16
Μιλκ-σέϊκ καρύδια - νουγκά...........................................................................................................16
Μιλκ-σέϊκ καρότο............................................................................................................................16
Μιλκ-σέϊκ φραγκοστάφυλο.............................................................................................................16
Μιλκ-σέϊκ Χαβάη .............................................................................................................................16
Φρουτώδες μίγμα ανανά - φράουλας...........................................................................................17
Κρύα σούπα της Ανδαλουσίας (Γκασπάτσο)...............................................................................17
Καθαρισμός 17
Καθαρισμός εξαρτήματος ανάμειξης ...........................................................................................18
Καθαρισμός μονάδας μοτέρ .........................................................................................................19
Μετά τον καθαρισμό......................................................................................................................19
Φύλαξη 19
Απομάκρυνση 19
Εγγύηση & Σέρβις 20
Εισαγωγέας 20
Διαβάστε το εγχειρίδιο χειρισμού πριν από την πρώτη χρήση προσεκτικά και φυλάξτε το για μια μελλοντική
χρήση. Παραδώστε το εγχειρίδιο σε όποιον παραδοθεί στη συνέχεια η συσκευή.
- 11 -
Page 14

ΜΜππλλέέννττεερρ
Υποδείξεις ασφαλείας
Για την αποφυγή κινδύνου ζωής μέσω
ηλεκτροπληξίας:
• Βεβαιώνεστε ότι η μονάδα μοτέρ, το καλώδιο
δικτύου ή το βύσμα δεν βυθίζονται ποτέ σε νερό
ή σε άλλα υγρά.
• Χρησιμοποιείτε τη συσκευή αποκλειστικά σε στεγνούς
χώρους, ποτέ σε εξωτερικό χώρο ή σε υγρό
περιβάλλον.
• Να προσέχετε το καλώδιο τροφοδοσίας να μην
βρέχεται ή υγραίνεται ποτέ κατά τη διάρκεια
λειτουργίας. Να το τοποθετείτε έτσι, ώστε να μην
υφίσταται περίπτωση να μαγκωθεί ή να υποστεί
άλλου είδους ζημιά.
• Τα βύσματα ή καλώδια δικτύου με βλάβη πρέπει
να αντικαθίστανται αμέσως από εξουσιοδοτημένο
ειδικό προσωπικό ή από το τμήμα εξυπηρέτησης
πελατών, ώστε να αποφεύγονται κίνδυνοι.
• Τραβάτε πάντα μετά τη χρήση το βύσμα από την
πρίζα. Η απενεργοποίηση δεν αρκεί διότι
υπάρχει ακόμα τάση στη συσκευή, όσο το βύσμα
βρίσκεται στην υποδοχή.
• Πριν από κάθε χρήση ελέγχετε τη συσκευή για την
άψογή της κατάσταση. Η συσκευή δεν επιτρέπεται
να χρησιμοποιείται όταν ανιχνεύονται βλάβες,
κυρίως στη μονάδα μοτέρ ή στο γυάλινο εξάρτημα
ανάμειξης.
• Τραβήξτε αμέσως το βύσμα δικτύου από την
πρίζα όταν αντιλαμβάνεστε ασυνήθιστους
θορύβους ή οσμές ή σε περίπτωση εμφανούς
δυσλειτουργίας.
Προς αποφυγή υπερθέρμανσης και
κινδύνου πυρκαγιάς:
• Μη χρησιμοποιείτε τη συσκευή σε σημεία με
απευθείας ηλιακή ακτινοβολία ή δημιουργία
θερμότητας συσκευών που παράγουν θερμότητα.
• Ποτέ μη γεμίζετε το εξάρτημα ανάμειξης με υγρά
που βράζουν! Αφήστε πρώτα αυτά τα υγρά να
φτάσουν σε θερμοκρασία σώματος. Αλλιώς
μπορεί η συσκευή να υπερθερμανθεί και να
ραγίσει το γυαλί από το εξάρτημα ανάμειξης!
• Μη λειτουργείτε τη συσκευή εάν είναι άδεια,
δηλαδή χωρίς τα συστατικά στο εξάρτημα ανάμειξης.
Προς αποφυγή κινδύνου ατυχημάτων
και τραυματισμού
• Ποτέ μην πιάνετε στο εξάρτημα ανάμειξης, κυρίως
όχι εν λειτουργία. Οι λεπίδες είναι εξαιρετικά
αιχμηρές!
• Μην ανοίγετε το κάλυμμα όταν η συσκευή είναι εν
λειτουργία. Αλλιώς μπορεί να πεταχτούν προς τα
έξω τμήματα τροφίμων με υψηλή ταχύτητα!
• Ποτέ μην εισάγετε μέσα στο εξάρτημα ανάμειξης
τμήματα από μαχαιροπίρουνα ή εξαρτήματα ανάμειξης, όσο η συσκευή είναι σε λειτουργία. Υπάρχει
αυξημένος κίνδυνος τραυματισμού όταν αυτά
αγγίξουν τη λεπίδα που γυρνάει πολύ γρήγορα!
• Όταν η συσκευή λειτουργεί μην την αφήνετε
ανεπιτήρητη, ώστε να μπορείτε να αντιδράσετε
αμέσως σε περίπτωση κινδύνου.
• Αυτή η συσκευή δεν προορίζεται για χρήση από
άτομα (συμπεριλαμβανομένων παιδιών) με
περιορισμένες, φυσικές, αισθητηριακές ή
πνευματικές δυνατότητες ή με έλλειψη εμπειρίας και/
ή με έλλειψη γνώσεων, εκτός εάν επιτηρούνται μέσω
ενός υπεύθυνου ατόμου για την ασφάλειά τους ή
εάν αυτά τα άτομα έχουν λάβει υποδείξεις για το
πως χρησιμοποιείται η συσκευή.
• Τα παιδιά πρέπει να επιτηρούνται ώστε να
εξασφαλίζεται ότι δεν παίζουν με τη συσκευή.
:
- 12 -
Page 15

Χρήση σύμφωνη με τους
κανονισμούς
Αυτή η συσκευή προορίζεται για ...
– την ανάμειξη, δημιουργία πολτών και το
ανακάτεμα τροφίμων καθώς και για κομμάτιασμα
για παγάκια (το λεγόμενο “Crushen”),
– αποκλειστικά για οικιακές ποσότητες και μόνο για
την ιδιωτική οικιακή χρήση σε στεγνούς χώρους.
Αυτή η συσκευή δεν προορίζεται για ...
– το κομμάτιασμα σκληρών τροφίμων όπως π.χ.
ξηροί καρποί, κουκούτσια, μεγάλοι σπόροι ή
κοτσάνια,
– επεξεργασία υλικών τα οποία δεν είναι τρόφιμα,
– τη χρήση για επαγγελματικούς ή βιομηχανικούς
σκοπούς,
– τη χρήση σε υγρό περιβάλλον ή σε εξωτερικό
χώρο.
Χρησιμοποιείτε μόνο αξεσουάρ ή ανταλλακτικά τα
οποία προορίζονται για αυτή τη συσκευή. Άλλα
εξαρτήματα είναι πιθανώς ανεπαρκή ή επισφαλή!
Τεχνικές πληροφορίες
Ονομαστική τάση: 220 - 240 V~, 50 Hz
Ονομαστική απόδοση: 550 Watt
Μεγ. ποσότητα πλήρωσης: 1,75 l
Κατηγορία προστασίας : II
Χρόνος KB (σύντομης
λειτουργίας): 3 λεπτά
Ο χρόνος σύντομης λειτουργίας δείχνει για πόσο
χρόνο μπορεί κανείς να λειτουργεί μια συσκευή χωρίς
να υπερθερμανθεί το μοτέρ και χωρίς να πάθει βλάβες.
Μετά τον δοθέντα χρόνο ΚΒ (σύντομος χρόνος
λειτουργίας) πρέπει η συσκευή να απενεργοποιηθεί
τόσο έως ότου το μοτέρ φτάσει σε θερμοκρασία
δωματίου.
Αποσυσκευασία
• Απομακρύνετε όλα τα μέρη συσκευασίας ή τις
μεμβράνες προστασίας από τη συσκευή. Φυλάτε
τη συσκευασία για να αποθηκεύσετε τη συσκευή
προστατευμένη ή για να μπορέσετε να την
αποστείλετε π.χ. σε περίπτωση επισκευής.
• Προτού χρησιμοποιήσετε τη συσκευή βεβαιωθείτε
ότι η συσκευή όπως επίσης και το καλώδιο
δικτύου με το φις και όλα τα αξεσουάρ και μέρη
της συσκευής δεν έχουν φθαρεί.
• Καθαρίζετε με προσοχή όλα τα μέρη της
συσκευής πριν από την πρώτη χρήση του
επιτραπέζιου μίξερ. (βλέπε «Καθαρισμός»).
Σύνολο αποστολής
Ελέγχετε μετά την αποσυσκευασία την αποστολή
για την πληρότητά της. Στο σύνολο αποστολής
περιλαμβάνονται:
1 x Μονάδα μοτέρ με καλώδιο δικτύου και βύσμα
1 x Εξάρτημα ανάμειξης με σταθερά μονταρισμένη
λεπίδα κοπής
1 x Καπάκι
1 x Καπάκι τροφοδοσίας
1 x Οδηγία χρήσεως
Περιγραφή συσκευής
Καπάκι τροφοδοσίας
q
Καπάκι
w
Εξάρτημα ανάμειξης
e
Λεπίδα κοπής
r
Διακόπτης
t
Καλώδιο δικτύου
y
Μονάδα μοτέρ
u
Τύλιξη καλωδίου
i
Διαβάθμιση
o
- 13 -
Page 16

Τοποθέτηση
Όταν έχετε καθαρίσει όλα τα εξαρτήματα, όπως
περιγράφηκε στον “Καθαρισμό”:
Τοποθετήστε τη συσκευή έτσι, ...
➩
– ώστε το καλώδιο δικτύου
οδηγηθεί μέσω της εσοχής στην πίσω πλευρά,
– ώστε το βύσμα δικτύου να είναι άμεσα προσβάσιμο
ώστε να μπορείτε να το τραβήξετε από την πρίζα
σε περίπτωση κινδύνου.
– ώστε να εδράζεται σταθερά χωρίς να γλιστρά και
να ακουμπάνε καλά οι βεντούζες ώστε να μην
αναποδογυρίσει η συσκευή σε περίπτωση
κραδασμών.
– ώστε το καλώδιο να
εργασίας και να μην μπορεί να πέσει σε
περίπτωση κατά λάθος τραβήγματος.
y
να μπορεί να
y
μην κρέμεται στο πεδίο
Τροφοδοσία εξαρτήματος ανάμειξης και
μοντάρισμα
Αφαιρέστε το εξάρτημα ανάμειξης eαπό τη
➩
μονάδα μοτέρ
.
w
Γεμίστε το εξάρτημα ανάμειξης eκαι πιέστε στη
➩
συνέχεια το καπάκι
ανάμειξης
έγχυσης να είναι ασφαλισμένη στο εξάρτημα
ανάμειξης
Εισάγετε το καπάκι qπλήρωσης στο άνοιγμα
➩
καπακιού και κλείστε περοστρέφοντας το
δεξιόστροφα.
Τοποθετήστε το έτοιμο γεμισμένο και ασφαλισμένο
➩
εξάρτημα ανάμειξης
Περιστρέψτε το εξάρτημα ανάμειξης
ότου μπορείτε να το πιέσετε προς τα κάτω. Μόνο
όταν το εξάρτημα ανάμειξης
σωστά και πλήρως, μπορεί να εκκινηθεί το μοτέρ.
και απομακρύνετε το καπάκι
u
πάλι σφιχτά στο εξάρτημα
w
. Προσέξτε ώστε η προεξοχή
e
.
e
στο σώμα του μοτέρ u.
e
έχει τοποθετηθεί
e
e
λίγο έως
Χειρισμός
Προειδοποίηση!
Το μοτέρ απενεργοποιείται μόλις απομακρυνθεί το
εξάρτημα ανάμειξης
ίσως παραβλέπεται το γεγονός ότι το μηχάνημα είναι
ακόμα ενεργοποιημένο. Στη συνέχεια το μοτέρ εκκινείται ξαφνικά, μόλις το εξάρτημα ανάμειξης
μονταριστεί:
Για το λόγο αυτό:
• Εισάγετε το βύσμα στη πρίζα μόνο μόλις το
εξάρτημα ανάμειξης
έχει μονταριστεί με ασφάλεια.
• Βεβαιώνεστε πριν από το μοντάρισμα πάντα ότι
η συσκευή είναι απενεργοποιημένη ή ότι έχει
τραβηχτεί το βύσμα.
• Πρώτα απενεργοποιήστε τη, τραβήξτε το βύσμα
και περιμένετε για την ακινητοποίηση του μοτέρ
πριν απομακρύνετε το εξάρτημα ανάμειξης
από το σώμα μοτέρ u. Τότε
e
είναι γεμάτο εντελώς και
e
e
e
.
Επιλογή βαθμίδας ταχύτητας
Όταν το εξάρτημα ανάμειξης eέχει γεμίσει εντελώς
και στέκεται εντελώς ασφαλισμένο στο σώμα μοτέρ
, μπορείτε να ενεργοποιήσετε τη συσκευή.
u
Θέστε το διακόπτη tστη ...
➩
– βαθμίδα 1-3
για υγρά ή μεσαίας σκληρότητας τρόφιμα, για
ανάμειξη, δημιουργία πολτών και ανακάτεμα
– βαθμίδα 3-5
για πιο σκληρά τρόφιμα ή για κομμάτιασμα
– Βαθμίδα Ice Crush/Clean (Θρυμματισμός
πάγου/Καθαρισμός)
για σύντομη, δυνατή παλμική λειτουργία, π. χ.
για θρυμματισμό κύβων πάγου ή για καθαρισμό.
Ο διακόπτης
να μην υπερφορτωθεί το μοτέρ. Για αυτό
κρατήστε το διακόπτη
τη θέση.
κουμπώνει σε αυτή τη θέση, ώστε
t
μόνο για λίγο, σε αυτή
t
Υπόδειξη:
Γεμίστε το εξάρτημα ανάμειξης eμε το μέγιστο 180
γρ. παγάκια. Αλλιώς η συσκευή δεν κομματιάζει τα
παγάκια με τον καλύτερο τρόπο.
- 14 -
Page 17

Γέμισμα κατά τη λειτουργία
Προειδοποίηση!
Όταν θέλετε να γεμίσετε κατά τη διάρκεια της
λειτουργίας, επιτρέπεται να ανοίξετε αποκλειστικά
μόνο το για αυτή την εργασία, προβλεπόμενο καπάκι
πλήρωσης.
q
• Σε καμία περίπτωση μην ανοίξετε το καπάκι
Μπορεί να πεταχτούν προς τα έξω τμήματα
τροφίμων με υψηλή ταχύτητα!
• Ποτέ μην εισάγετε μέσα στο εξάρτημα ανάμειξης
τμήματα από μαχαιροπίρουνα ή εξαρτήματα
e
ανάμειξης, όσο η συσκευή είναι σε λειτουργία.
Υπάρχει αυξημένος κίνδυνος τραυματισμού όταν
αυτά αγγίξουν τη λεπίδα
γρήγορα!
Για να μπορείτε να γεμίσετε κάτι εν λειτουργία, ...
περιστρέψτε το καπάκι qπλήρωσης
➩
αριστερόστροφα και βγάλτε το έξω.
Συμπληρώστε τα συστατικά.
➩
Στη συνέχεια εισάγετε το καπάκι qπλήρωσης
➩
πάλι στο άνοιγμα καπακιού και κλείστε
περιστρέφοντας το δεξιόστροφα.
που γυρνάει πολύ
r
w
.
Απομάκρυνση εξαρτήματος ανάμειξης
Όταν η επεξεργασία των τροφίμων έχει ολοκληρωθεί:
Θέτετε πάντα πρώτα το διακόπτη tστη θέση Off
➩
(„0“) και τραβάτε το βύσμα.
Περιμένετε πρώτα έως ότου ακινητοποιηθεί το
➩
μοτέρ, πριν σηκώσετε ίσια επάνω το εξάρτημα
ανάμειξης
χρειάζεται να περιστραφεί για αυτό.
. Το δοχείο ανάμειξης eδεν
e
Χρήσιμες υποδείξεις
– Κατά την ανάμειξη υγρών συστατικών ξεκινήστε
πρώτα με μια ελάχιστη ποσότητα υγρού. Στη
συνέχεια βάζετε λίγο-λίγο περισσότερο υγρό
από το άνοιγμα του καπακιού.
– Όταν κατά τη λειτουργία θέτετε το χέρι σας πάνω
από το κλειστό μπλέντερ, μπορείτε να σταθεροποιείτε
καλά τη συσκευή.
– Για το ανακάτεμα σκληρών ή πολύ πηχτών τροφίμων
ίσως είναι χρήσιμο να χρησιμοποιείτε την παλμική
λειτουργία ώστε να εμποδίσετε ένα κόλλημα της
λεπίδας κοπής
r
.
Υπόδειξη
Μη χρησιμοποιείτε τη συσκευή για μειώσετε την
κόκκωση αλατιού μαγειρικής, ραφιναρισμένης
ζάχαρης ή άσπρης ζάχαρης. Για να δημιουργήσετε
π.χ. ζάχαρη άχνη.
Συνταγές
Μιλκ-σέϊκ μπανάνα
2 μπανάνες
περ. 2 ΚΣ (κουταλιά σούπας) ζάχαρη (ανάλογα με
το βαθμό ωρίμανσης των μπανανών και την
προσωπική γεύση)
1/2 λίτρο γάλα
1 πρέζα χυμό λεμόνι
Καθαρίστε τις μπανάνες και πολτοποιήστε τις στη
βαθμίδα 2. Προσθέτετε λίγο - λίγο το γάλα, στη
συνέχεια τη ζάχαρη και το χυμό λεμόνι. Αναμείξτε τα
όλα τόσο έως ότου δημιουργηθεί ένα ομοιόμορφο
υγρό.
Σερβίρετε το μιλκ-σέϊκ παγωμένο.
– Κατά την πολτοποίηση σφιχτών υλικών για να
έχετε καλύτερα αποτελέσματα, βάζετε συνεχώς
μόνο μικρές μερίδες στο εξάρτημα ανάμειξης
αντί για μεγάλη ποσότητα μια μόνο φορά.
– Όταν επεξεργάζεστε σφιχτά υλικά, κόψτε τα σε
μικρά τεμάχια (2-3 εκ.).
e
- 15 -
Page 18

Μιλκ-σέϊκ βανίλια
1/4 λίτρο γάλα
250 γρ. παγωτό βανίλια
125 ml παγάκια
1 1/2 κγ (κουταλιά γλυκού) ζάχαρη
Μιλκ-σέϊκ καρύδια - νουγκά
1/2 λίτρο γάλα
200 γρ. Κρέμα καρύδια - νουγκά
1 μπάλα παγωτό βανίλια
50 ml κρέμα
Θρυμματίστε τα παγάκια στη βαθμίδα Ice
Crush/Clean. Γεμίστε με τα υπόλοιπα υλικά το μίξερ.
Αναμείξτε τα όλα τόσο έως ότου δημιουργηθεί ένα
ομοιόμορφο υγρό.
Μιλκ-σέϊκ καπουτσίνο
65 ml κρύο εσπρέσσο (ή πολύ δυνατό καφέ)
65 ml γάλα
15 γρ. ζάχαρη
65 ml παγωτό βανίλια
100 ml θρυμματισμένα παγάκια
Θρυμματίστε τα παγάκια στη βαθμίδα Ice
Crush/Clean. Προσθέτετε τον εσπρέσσο, το γάλα
και τη ζάχαρη. Αναμείξτε τα όλα στη βαθμίδα 2, έως
ότου διαλυθεί η ζάχαρη. Προσθέστε τέλος το
παγωτό βανίλια και αναμείξτε τα όλα για λίγο στη
βαθμίδα 1.
Τροπικό μίγμα
125 ml χυμός ανανά
60 ml χυμός παπάγια
50 ml χυμός πορτοκάλι
1/2 μικρή κονσέρβα ροδάκινα με χυμό
125 ml παγάκια
Θρυμματίστε τα παγάκια στη βαθμίδα Ice Crush/
Clean. Βάλτε όλα τα υλικά στο μίξερ και αναμείξτε τα
όλα στη βαθμίδα 3.
Αναμείξτε όλα τα υλικά στο μίξερ στη βαθμίδα 3,
έως ότου δημιουργηθεί μια ομοιόμορφη ποσότητα.
Μιλκ-σέϊκ καρότο
300 ml χυμό μύλου
500 ml χυμό καρότων
4 ΚΣ λάδι (λάδι φύτρων σίτου ή κραμβέλαιο)
4 ΚΣ χυμού λεμονιού
Σκόνη πιπερόριζας
πιπέρι
Βάλτε το χυμό μύλου, το λάδι και το χυμό λεμονιού
στο μίξερ και αναμείξτε τα όλα στη βαθμίδα 2. Στη
συνέχεια προσθέστε το χυμό καρότου και αναμείξτε
τα όλα στη βαθμίδα 2. Στη συνέχεια προσθέστε
σύμφωνα με την προτίμηση σας σκόνη πιπερόριζας
και πιπέρι.
Μιλκ-σέϊκ φραγκοστάφυλο
2 κγ μέλι
2 μπανάνες
1/4 λίτρου βουτυρόγαλα
1/4 λίτρου χυμό φραγκοστάφυλου (μαύρα)
Βάλτε όλα τα υλικά στο μίξερ και αναμείξτε τα όλα
στη βαθμίδα 3.
Μιλκ-σέϊκ Χαβάη
4 μπανάνες
1/4 λίτρου χυμό ανανά
1/2 λίτρου γάλα
2 κουταλιές σούπας μέλι
1/4 λίτρου ρούμι
Καθαρίστε τις μπανάνες και πολτοποιήστε τις στη
βαθμίδα 2. Προσθέστε τα υπόλοιπα υλικά και
ανακατέψτε τα όλα στη βαθμίδα 1.
- 16 -
Page 19

Φρουτώδες μίγμα ανανά - φράουλας
250 ml χυμός ανανά
200 γρ. φράουλες
300 ml χυμό μύλου
4 παγάκια
Θρυμματίστε τα παγάκια στη βαθμίδα Ice
Crush/Clean. Πλύντε τις φράουλες και
απομακρύνετε τα πράσινα φύλλα.
Πολτοποιήστε τις στη βαθμίδα 2. Στη συνέχεια
προσθέστε τα υπόλοιπα υλικά και αναμείξτε στη
βαθμίδα 1.
Κρύα σούπα της Ανδαλουσίας
(Γκασπάτσο)
1/2 Αγγούρι
1 μεγάλη τομάτα
1 πράσινη πιπεριά
1/2 κρεμμύδι
1 σκελίδα σκόρδο
1/2 λευκό ψωμάκι
1/2 κγ αλάτι
1 κγ ξίδι από κόκκινο κρασί
1 ΚΣ ελαιόλαδο
Κόψτε τα λαχανικά σε κομμάτια μεγέθους περ. 2
εκ. Βάλτε πρώτα τις τομάτες και στη συνέχεια τα
αγγούρια στο μίξερ. Πολτοποιήστε στη βαθμίδα 3.
Προσθέστε τα υπόλοιπα υλικά και πολτοποιήστε/
αναμείξτε τα όλα στη βαθμίδα 3, έως ότου
δημιουργηθεί μια ομοιόμορφη σούπα.
Σερβίρετε την με ψωμί.
Υπόδειξη:
Σε περίπτωση δυσανεξίας στη λακτόζη σας
προτείνουμε να χρησιμοποιείτε γάλα χωρίς λακτόζη.
Λάβετε όμως υπόψη ότι το γάλα χωρίς λακτόζη είναι
λίγο πιο γλυκό.
Καθαρισμός
Προσοχή!
Πριν καθαρίσετε το μπλέντερ και τα εξαρτήματά του:
• Εξασφαλίστε ότι η συσκευή είναι
απενεργοποιημένη και ότι το βύσμα έχει
τραβηχτεί.
Σε καμία περίπτωση δεν επιτρέπεται το σώμα
του μοτέρ ν
υγρά. Έτσι μπορεί να προκληθεί κίνδυνος
θανάτου μέσω ηλεκτροπληξίας και να πάθει
βλάβη η συσκευή.
• Μην ανοίγετε ποτέ το περίβλημα της συσκευής.
Αλλιώς ίσως προκληθεί κίνδυνος θανάτου μέσω
ηλεκτροπληξίας.
• Ποτέ μην αποσυναρμολογείτε τη λεπίδα
επίσης ποτέ μην πιάνετε στο εξάρτημα ανάμειξης
. Οι λεπίδες είναι rεξαιρετικά αιχμηρές!
e
• Μη χρησιμοποιείτε διαλυτικά ή τριβικά μέσα για
τις πλαστικές επιφάνειες, αλλιώς αυτές μπορεί να
χαλάσουν.
α βυθιστεί σε νερό ή άλλα
u
r
και
Υπόδειξη
Συνταγές χωρίς εγγύηση. Όλα τα υλικά και τα
στοιχεία ετοιμασίας είναι τιμές βάσης. Διορθώστε
αυτές τις προτάσεις συνταγών σύμφωνα με τις
ατομικές σας εμπειρίες.
- 17 -
Page 20

Καθαρισμός εξαρτήματος ανάμειξης
Καθαρίζετε το εξάρτημα ανάμειξης eμόνο με
➩
μια βούρτσα καθαρισμού με μεγάλη λαβή, έτσι
ώστε να μην τραυματίζεστε στις λεπίδες
Σε σκληρές ακαθαρσίες μπορείτε επίσης να
➩
καθαρίσετε το εξάρτημα ανάμειξης
πλυντήριο πιάτων. Γι’ αυτό αποσυναρμολογείτε
πάντα το εξάρτημα ανάμειξης,
περιγράφεται παρακάτω.
Καθαρίζετε το καπάκι και το καπάκι
➩
πλήρωσης στο πλυντήριο πιάτων ή όπως πλένετε
φυσιολογικά τα πιάτα
q
.
e
e
όπως
w
r
και στο
Εάν η βρομιά δε διαλύεται, μπορείτε να λασκάρετε το
κάτω πλαστικό τμήμα του εξαρτήματος ανάμειξης
με τις λεπίδες rαπό το γυάλινο τμήμα:
.
e
Όταν καθαρίζετε το μπλέντερ αμέσως μετά τη χρήση,
επιτυγχάνετε στις περισσότερες περιπτώσεις έναν
επαρκή υγιεινό καθαρισμό μέσω της ακόλουθης
εναλλακτικής:
Γεμίστε το εξάρτημα ανάμειξης eμε 750 ml
➩
νερό και προσθέστε μερικές σταγόνες ενός ήπιου
καθαριστικού μέσου. Κλείστε το καπάκι
τοποθετήστε το εξάρτημα ανάμειξης
μπλοκ κινητήρα
Εισάγετε το βύσμα στην πρίζα και πιέστε μερικές
φορές το κουμπί λειτουργίας Ice Crush/Clean
(Θρυμματισμός πάγου/ Καθαρισμός), έτσι ώστε
η λεπίδα κοπής
αριθμό στροφών μέσα από το νερό.
Στη συνέχεια ξεπλύνετε το εξάρτημα ανάμειξης
με πολύ καθαρό νερό, έτσι ώστε να
e
απομακρυνθούν όλα τα υπολείμματα
καθαριστικού μέσου.
.
u
να περνάει με το μέγιστο
r
e
w
στο
και
Γυάλινο τμήμα
Δακτύλιος στεγανοποίησης
Μαχαίρι
Πλαστικό τμήμα
Παίρνετε το εξάρτημα ανάμειξης eαπό το σώμα
➩
μοτέρ
Περιστρέψτε το πλαστικό τμήμα του εξαρτήματος
➩
ανάμειξης
να λασκάρει από το γυάλινο τμήμα του
εξαρτήματος ανάμειξης
Να είστε προσεκτικοί με τις λεπίδες . Είναι πολύ
αιχμηρές. Κίνδυνος τραυματισμού!
.
u
e
Προσοχή!
αριστερόστροφα, έτσι ώστε να μπορεί
.
e
- 18 -
Page 21

Καθαρίζετε και τα δύο τμήματα λεπτομερώς σε
➩
ήπιο διάλυμα νερού με σαπούνι ή στο πλυντήριο
πιάτων.
Τοποθετήστε πάλι το πλαστικό τμήμα του
➩
εξαρτήματος ανάμειξης
τμήμα του εξαρτήματος ανάμειξης
Προσέχετε ώστε ο δακτύλιος στεγανοποίησης
να έχει τοποθετηθεί.
επάνω στο γυάλινο
e
e
Καθαρισμός μονάδας μοτέρ
Χρησιμοποιείτε ένα στεγνό ή το πολύ ελαφρά
➩
νωπό πανί, για να καθαρίζετε τις πλαστικές
επιφάνειες.
Ελέγχετε σε κάθε καθαρισμό ότι ο διακόπτης επαφής
➩
στην υποδοχή για το εξάρτημα ανάμειξης
είναι μπλοκαρισμένος μέσω υπολείμμάτων από
βρομιές. Όταν δεν μπορείτε να διαλύσετε
ενδεχόμενα μπλοκαρίσματα με τη γωνία ενός
φύλλου χαρτιού, απευθυνθείτε στο τμήμα
εξυπηρέτησης πελατών. Σε καμία περίπτωση μη
χρησιμοποιείτε σκληρό αντικείμενο διότι ο
διακόπτης επαφής θα μπορούσε έτσι να χαλάσει.
Απομακρύνετε ενδεχόμενες ακαθαρσίες στην
➩
κάτω πλευρά της μονάδας μοτέρ
με ένα στεγνό πανί ή με ένα πινέλο
απομάκρυνσης σκόνης. Προσέχετε ώστε τίποτα
να μην φτάνει μέσα από τα ανοίγματα αερισμού
στη συσκευή.
αποκλειστικά
u
Φύλαξη
Όταν δε χρησιμοποιείτε το μπλέντερ για μεγάλο
➩
χρονικό διάστημα, καθαρίζετέ το λεπτομερώς
(βλέπε Κεφάλαιο “Καθαρισμός“).
.
Τυλίξτε το καλώδιο δικτύου yγύρω από τη
➩
διάταξη τύλιξης καλωδίου
μονάδας μοτέρ
Φυλάτε το μπλέντερ σε ένα ψυχρό, στεγνό χώρο.
➩
u
.
στο δάπεδο της
i
Απομάκρυνση
e
δεν
Απομακρύνετε τη συσκευή μέσω μιας εγκεκριμένης
επιχείρησης απόρριψης ή μέσω της κοινοτικής
επιχείρησης απόρριψης.
Προσέχετε τις τρέχουσες ισχύουσες προδιαγραφές.
Σε περίπτωση αμφιβολιών ελάτε σε επαφή με την
επιχείρηση απόρριψης.
Σε καμία περίπτωση μην πετάξετε τη
συσκευή στα οικιακά απορρίμματα.
Αυτό το προϊόν υπόκειται στην
Ευρωπαϊκή Οδηγία 2002/96/EC.
Απομακρύνετε όλα τα υλικά συσκευασίας
με έναν φιλικό προς το περιβάλλον τρόπο.
Μετά τον καθαρισμό
Αφήνετε όλα τα εξαρτήματα να στεγνώνουν πάλι
καλά, πριν συναρμολογήσετε και χρησιμοποιήσετε
το μπλέντερ.
- 19 -
Page 22

Εγγύηση & Σέρβις
Εισαγωγέας
Έχετε για αυτή τη συσκευή 3 χρόνια εγγύηση από
την ημερομηνία αγοράς. Η συσκευή κατασκευάστηκε
και ελέγχθηκε προσεκτικά πριν από την αποστολή.
Παρακαλούμε φυλάξτε την απόδειξη ταμείου ως
απόδειξη για την αγορά. Παρακαλούμε
επικοινωνήστε τηλεφωνικά με την υπηρεσία σέρβις σε
περίπτωση εγγύησης. Μόνο έτσι μπορεί να
εξασφαλιστεί μια δωρεάν αποστολή του
εμπορεύματός σας.
Η απόδοση εγγύησης ισχύει μόνο για σφάλματα
υλικού ή κατασκευής, όχι όμως για ζημιές από τη
μεταφορά, για εξαρτήματα φθοράς ή για βλάβες σε
εύθραυστα εξαρτήματα, π.χ. διακόπτες ή
συσσωρευτές. Το προϊόν προορίζεται μόνο για την
ιδιωτική και όχι για την επαγγελματική χρήση.
Σε περίπτωση κακής μεταχείρισης και ακατάλληλης
χρήσης, σε χρήση βίας και σε παρεμβάσεις οι
οποίες δεν διεξήχθησαν από το εξουσιοδοτημένο
μας τμήμα σέρβις, η εγγύηση παύει να ισχύει. Τα νομικά σας δικαιώματα δεν περιορίζονται μέσω αυτής
της εγγύησης.
Ο χρόνος εγγύησης δεν επεκτείνεται μέσω της
απόδοσης εγγύησης. Αυτό ισχύει και για
εξαρτήματα τα οποία έχουν αντικατασταθεί ή
επισκευαστεί. Ενδεχόμενες ήδη υπάρχουσες κατά
την αγορά, ζημιές και ελλείψεις πρέπει να
αναφέρονται αμέσως μετά την αποσυσκευασία, το
αργότερο όμως δύο ημέρες μετά την ημερομηνία
αγοράς. Επισκευές που εμφανίζονται μετά τη λήξη
του χρόνου εγγύησης χρεώνονται.
KOMPERNASS GMBH
BURGSTRASSE 21
44867 BOCHUM, GERMANY
www.kompernass.com
Σέρβις Ελλάδα
Tel.: 801 5000 019 (0,03 EUR/Min.)
E-Mail: kompernass@lidl.gr
IAN 71495
CY
Σέρβις Κύπρος
Tel.: 8009 4409
E-Mail: kompernass@lidl.com.cy
IAN 71495
- 20 -
 Loading...