

Page 1
5
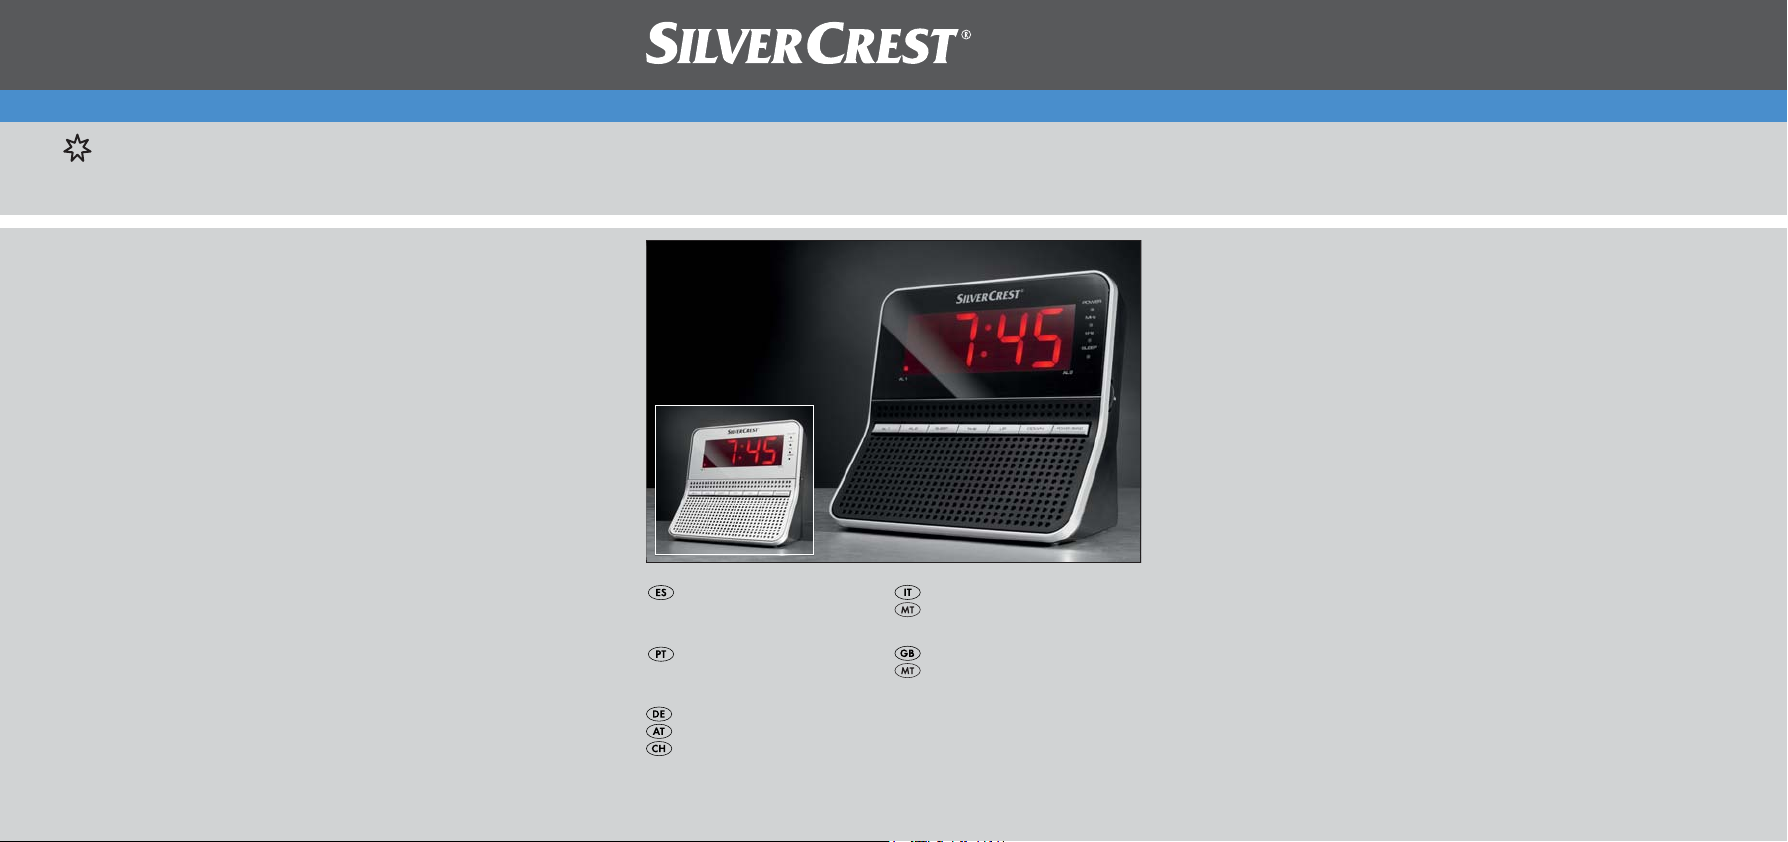
Radio despertador SRD 250 A1
Radiosveglia
KOMPERNASS GMBH
BURGSTRASSE 21 · D-44867 BOCHUM
www.kompernass.com
ID-Nr.: SRD 250 A1-01/11-V2
IAN: 61030
Radio despertador
Instrucciones de uso
Rádio-despertador
Manual de instruções
Radiowecker
Bedienungsanleitung
Radiosveglia
Istruzioni per l‘uso
Clock Radio
Operating instructions
Page 2
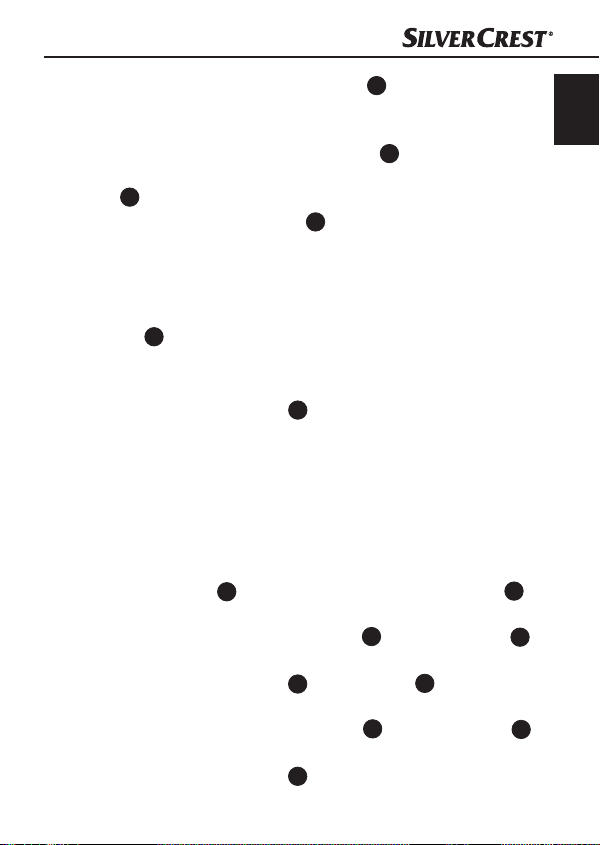
SRD 250 A1
o
12
3
4
5
6
i
u
7
8
q
wertz
90
Page 3
Indice
Introducción . . . . . . . . . . . . . . . . . . . . . . . . . . . . . . . . . . 3
Información sobre estas instrucciones de uso . . . . . . . . . . . . . . . . 3
Derechos de autor . . . . . . . . . . . . . . . . . . . . . . . . . . . . . . . . . . . . 3
Finalidad de uso . . . . . . . . . . . . . . . . . . . . . . . . . . . . . . . . . . . . . . 3
Seguridad . . . . . . . . . . . . . . . . . . . . . . . . . . . . . . . . . . . 5
Peligros por corriente eléctrica . . . . . . . . . . . . . . . . . . . . . . . . . . . 5
Manejo de las baterías . . . . . . . . . . . . . . . . . . . . . . . . . . . . . . . . . 6
Advertencias de seguridad básicas . . . . . . . . . . . . . . . . . . . . . . . 6
Elementos de operación . . . . . . . . . . . . . . . . . . . . . . . . 8
Colocación y conexión . . . . . . . . . . . . . . . . . . . . . . . . . 9
Volumen de suministro e inspección de transporte . . . . . . . . . . . . 9
Requisitos al lugar de ubicación . . . . . . . . . . . . . . . . . . . . . . . . . . 9
Conexión eléctrica . . . . . . . . . . . . . . . . . . . . . . . . . . . . . . . . . . . 10
Colocar las pilas . . . . . . . . . . . . . . . . . . . . . . . . . . . . . . . . . . . . . 10
Alimentación de corriente . . . . . . . . . . . . . . . . . . . . . . . . . . . . . . 11
Antena fl exible de FM . . . . . . . . . . . . . . . . . . . . . . . . . . . . . . . .11
Manejo y funcionamiento . . . . . . . . . . . . . . . . . . . . . . 11
Ajustar la hora . . . . . . . . . . . . . . . . . . . . . . . . . . . . . . . . . . . . . .11
Funcionamiento de la radio . . . . . . . . . . . . . . . . . . . . . . . . . . . . 12
Programación de la hora y tipo de despertador . . . . . . . . . . . .13
Conectar la función de alarma . . . . . . . . . . . . . . . . . . . . . . . . . . 14
Desconectar la alarma . . . . . . . . . . . . . . . . . . . . . . . . . . . . . . . . 14
Desconectar la función de alarma . . . . . . . . . . . . . . . . . . . . . . .14
ES
SRD 250 A1
1
Page 4

Función de repetición de alarma (función “SNOOZE“) . . . . . . . 14
ES
Apagado automático (función SLEEP) . . . . . . . . . . . . . . . . . . . . 14
Ajuste de la iluminación de pantalla . . . . . . . . . . . . . . . . . . . . . . 15
Limpieza . . . . . . . . . . . . . . . . . . . . . . . . . . . . . . . . . . . . 15
Solución de fallos . . . . . . . . . . . . . . . . . . . . . . . . . . . . 16
Causas y solución de fallos. . . . . . . . . . . . . . . . . . . . . . . . . . . . . 16
Almacenamiento . . . . . . . . . . . . . . . . . . . . . . . . . . . . . 17
Evacuación . . . . . . . . . . . . . . . . . . . . . . . . . . . . . . . . . . 17
Evacuación del aparato . . . . . . . . . . . . . . . . . . . . . . . . . . . . . . . 17
¡Evacuar las pilas! . . . . . . . . . . . . . . . . . . . . . . . . . . . . . . . . . . . . 17
Anexo . . . . . . . . . . . . . . . . . . . . . . . . . . . . . . . . . . . . . . 18
Características técnicas . . . . . . . . . . . . . . . . . . . . . . . . . . . . . . . . 18
Indicaciones sobre la declaración de conformidad CE . . . . . . . 19
Garantía . . . . . . . . . . . . . . . . . . . . . . . . . . . . . . . . . . . . . . . . . . .19
Asistencia técnica . . . . . . . . . . . . . . . . . . . . . . . . . . . . . . . . . . . . 20
Importador . . . . . . . . . . . . . . . . . . . . . . . . . . . . . . . . . . . . . . . . . 20
2
SRD 250 A1
Page 5

Introducción
Introducción
Información sobre estas instrucciones de uso
Estas instrucciones de uso forman parte del radio despertador
SRD 250 A1 (denominado en adelante el aparato) y proporcionan informaciones importantes para el uso conforme a lo previsto,
la seguridad, la conexión así como el manejo del aparato. Estas
instrucciones de uso deben estar disponibles siempre cerca del
aparato. Deben ser leídas y comprendidas por todas las personas
encargadas del montaje, el manejo, y la solución de averías del
aparato. Conserve estas instrucciones de uso y entréguelas junto
con el aparato a cualquier posible propietario futuro.
Derechos de autor
Esta documentación está protegida por derechos de autor.
Cualquier copia total o parcial de su contenido así como la reproducción de las ilustraciones incluso en estado modifi cado, debe
contar con la autorización expresa por escrito del fabricante.
Finalidad de uso
Este aparato está indicado para escuchar programas de radio y
servir como despertador mediante alarma o radio en el ámbito
doméstico. Cualquier uso diferente o que supere lo indicado se
considera contrario a lo dispuesto. El fabricante no se responsabiliza de los daños que de ello resulten, reparaciones indebidas,
cambios no autorizados o la aplicación de repuestos no autorizados. El riesgo lo correrá únicamente el usuario.
ES
SRD 250 A1
3
Page 6
ES
Introducción
En estas instrucciones de uso se utilizan las advertencias siguientes:
PELIGRO
Una advertencia de este nivel de peligro indica una
posible exis
Si no se puede evitar la situación de peligro, puede conllevar
lesiones muy graves e incluso muerte.
Siga las instrucciones de las indicaciones de advertencia para ►
prevenir el riesgo de muerte o lesiones graves de las personas.
ADVERTENCIA
Una advertencia de este nivel de peligro indica una
posible situación de peligro.
Si no puede evitarse la situación de peligro, pueden producirse
lesiones.
Deben seguirse las instrucciones de esta advertencia para ►
evitar lesiones a personas.
ATENCIÓN
Una advertencia de este nivel de peligro indica un
posible daño material.
Si no puede e
materiales.
Deben seguirse las instrucciones de esta advertencia para ►
evitar daños materiales.
tencia de peligro.
vitarse la situación, pueden producirse daños
4
SRD 250 A1
Page 7
Seguridad
NOTA
Una indicación advierte de informaciones adicionales que ►
facilitan el manejo del aparato.
Seguridad
En este capítulo obtendrá indicaciones de seguridad importantes
para manejar el aparato. Este aparato cumple las normas de
seguridad prescritas. El uso inadecuado puede causar daños
personales y materiales.
Peligros por corriente eléctrica
PELIGRO
¡Peligro de muerte por descarga eléctrica!
¡Al entrar en cont
sometidos a tensión existe peligro de muerte!
Para prevenir un riesgo derivados de la corriente eléctrica, siga
fi elmente las instrucciones de seguridad siguientes:
No utilice el aparato si la clavija de red o bien el cable de ►
conexión están dañados.
Queda totalmente prohibido abrir la car
tocan conexiones sometidas a tensión y se modifi ca su estructura
mecánica y eléctrica, existe riesgo de descarga eléctrica.
El aparato sigue consumiendo corriente en modo en espera. Para ►
desconectar el aparato completamente de la red es necesario
aer la clavija de red de la base de enchufe. Por ello, el apa-
extr
rato debe instalarse de forma que quede garantizado el acceso
sin obstáculos a la base de enchufe, de modo que pueda
extraerse la clavija de red de inmediato en caso de emergencia.
acto con cables o componentes
casa del aparato. Si se ►
ES
SRD 250 A1
5
Page 8
Manejo de las baterías
ES
ADVERTENCIA
¡Peligro debido al uso incorrecto!
Para manejar con seguridad las pilas, debe tener en cuenta las
indicaciones de seguridad siguientes:
No tire nunca las pilas al fuego. ►
No cortocircuite nunca las pilas. ►
No intente recargar las pilas. ►
No abrir, soldar o estañar las pilas. Existe riesgo de explosión ►
y de lesiones.
Compruebe las pilas de forma regular
derramado puede causar un daño permanente en el aparato.
Debe tenerse precaución especial en el manejo de una pila
dañada o reventada. ¡Peligro de abrasión! Usar guantes
protectores.
Guardar las pilas fuera del alcance de los niños. ►
En caso de ingestión, solicitar asistencia médica inmediata.
Cuando no vaya a utilizar el aparato durante un periodo ►
prolongado, extraiga las pilas.
Advertencias de seguridad básicas
Para manejar con seguridad el aparato deben tenerse en cuenta
las indicaciones de seguridad siguientes:
Antes de usar el aparato, compruebe si hay signos de datos ■
externos visibles. No ponga en servicio un aparato dañado o que
haya caído.
Si se daña el cable o las cone
personal técnico autorizado o al servicio técnico al cliente.
xiones, encargue su sustitución a ■
Seguridad
. El ácido de las pilas ►
6
SRD 250 A1
Page 9

Seguridad
Las personas que debido a sus capacidades físicas, mentales ■
o motrices no puedan manejar con seguridad el aparato, sólo
deben usarlo bajo la supervisión o instrucción de una per
responsable.
Los niños sólo deben usar el aparato bajo supervisión. ■
Las reparaciones en el aparato deben ser realizadas sólo por ■
talleres autorizados o por el servicio al cliente. En caso de reparaciones indebidas se pueden pr
Además expirará la garantía.
La reparación del aparato durante el periodo de garantía debe ■
ser realizada exclusivamente por un servicio al cliente autorizado
por el fabricante, de lo contrario, los posibles daños posterior
no estarán cubiertos por la garantía.
Los componentes defectuosos deben cambiarse sólo por recambios ■
originales. Sólo estos recambios garantizan que se cumplen los
requisitos de seguridad.
Pr
oteja el aparato de la humedad y contra la entrada de líquidos. ■
No sumerja el aparato nunca en agua, no coloque el aparato
cerca del agua ni ponga objetos (p. ej. jarr
líquidos sobre el aparato.
No coloque objetos sobre el aparato. ■
No utilizar el aparto cerca de llamas abiertas (p. ej. velas). ■
Evite la radiación solar directa. ■
Extraer la alimentación de la base de enchufe siempre tirando de ■
la clavija y no del cable de conexión.
En caso de anomalías y tormentas, e
de enchufe.
iesgos para los usuarios.
oducir r
aiga la clavija de la base ■
xtr
ones) que contenga
sona
ES
es
SRD 250 A1
7
Page 10

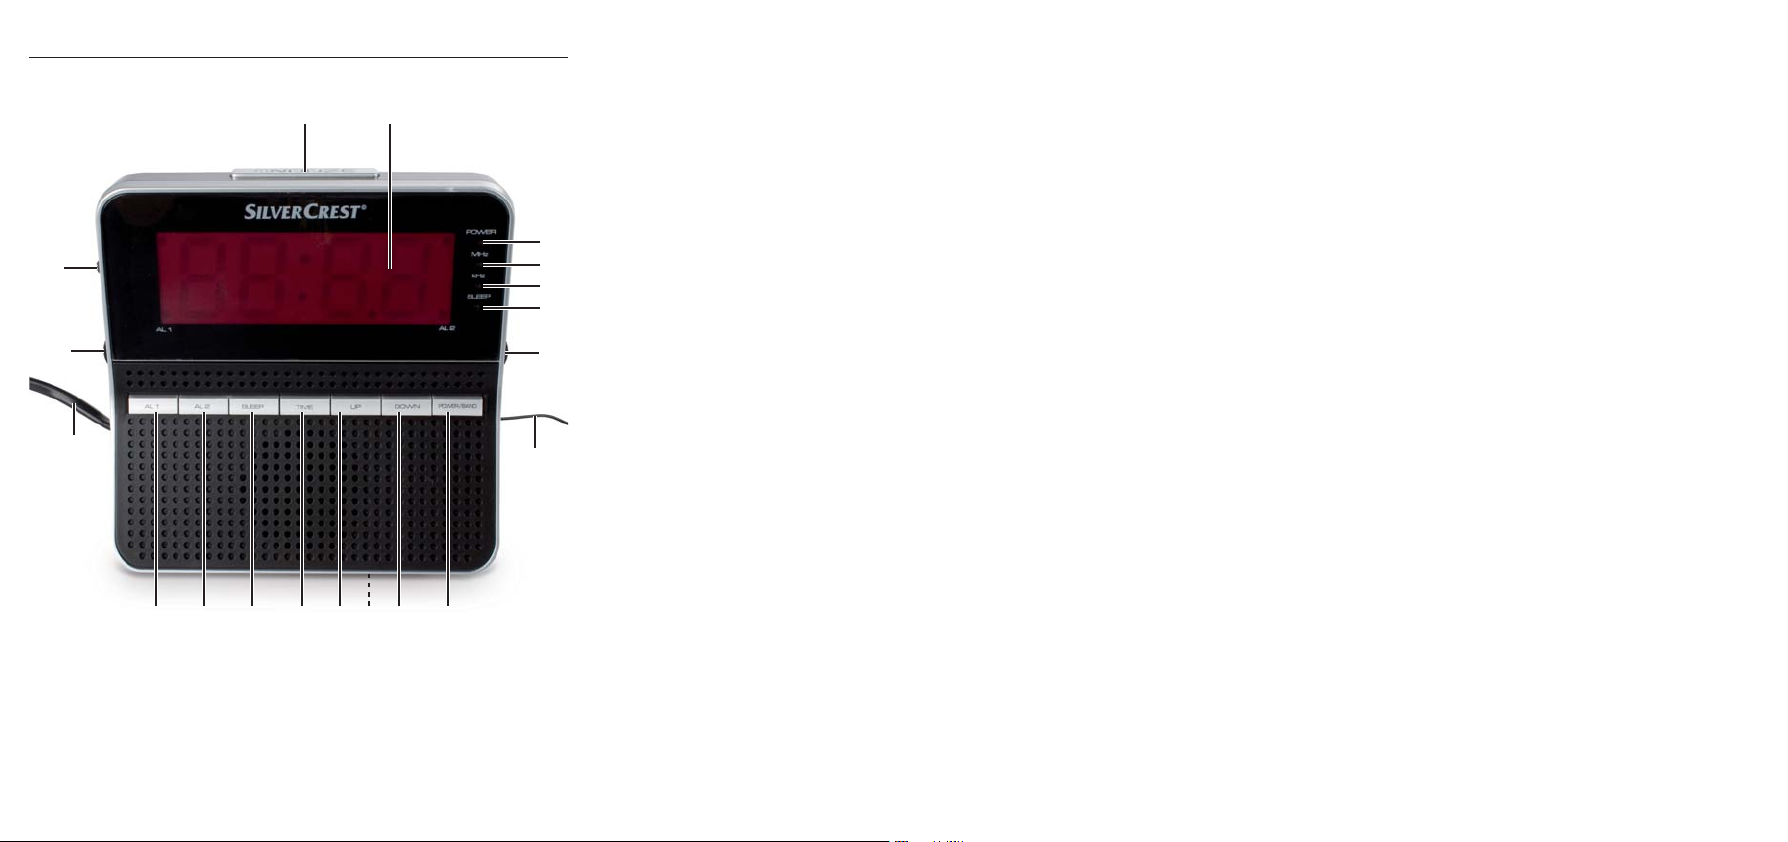
Elementos de operación
ES
Tecla SNOOZE: Interrumpir la alarma
2
Pantalla
3
LED POWER: Luce cuando el aparato está encendido
4
LED MHz: Luce cuando la recepción se realiza en FM
5
LED kHz: Luce cuando la recepción se realiza en AM
6
LED SLEEP: Luce cuando la función SLEEP está activada
7
Regulador TUNING: Selección de emisora
8
Antena fl exible
9
Tecla POWER/BAND: Encender y apagar / Seleccionar banda
10
Tecla DOWN: Ajustes hacia abajo
11
Compartimiento de pilas
12
Tecla UP: Ajustes hacia arriba
Tecla TIME: Ajustar la hora
13
Tecla SLEEP: Ajuste de la desconexión automática
14
Tecla AL2: Ajuste del tiempo de alarma 2
15
Tecla AL1: Ajuste del tiempo de alarma 1
16
Cable de red
17
Regulador VOL: Regulación del volumen
18
Interruptor DIMMER: Ajuste de la iluminación de pantalla
19
Elementos de operación
de frecuencia
8
SRD 250 A1
Page 11

Colocación y conexión
Colocación y conexión
Volumen de suministro e inspección de
transporte
El aparato se suministra de serie con los componentes siguientes:
Radio despertador ●
Instrucciones de uso ●
Extraiga el aparato y las instrucciones de uso del cartón y retire
todo el material de embalaje.
NOTA
Compruebe la integridad del suministro y si se aprecian daños ►
visibles.
Si el suministro es incompleto o hay daños debido a un embalaje
defi ciente o al transporte, póngase en contacto con la línea
directa de asistencia (véase capítulo asistencia técnica).
Requisitos al lugar de ubicación
Para un funcionamiento seguro y libre de anomalías, el lugar de
ubicación deberá cumplir con los requisitos siguientes:
Coloque el aparato sobre una base horizontal, plana y fi rme. ■
Coloque el aparato de modo que los huecos de ventilación no ■
queden obstruidos.
No coloque el aparato en entornos muy calientes, mojados o muy
■
húmedos o cerca de material infl amable.
ES
►
SRD 250 A1
9
Page 12

Las superfi cies de los muebles pueden contener ingredientes que ■
ES
puedan atacar los apoyos de goma del aparato y ablandarlos.
Si fuera necesario coloque algo debajo de los apoyos de goma
una base.
La base de enchufe deberá quedar fácilmente accesible con el fi n de ■
poder extraer con facilidad la clavija de red en caso de emergencia.
Conexión eléctrica
Antes de conectar el aparato compare los datos de conexión ■
(tensión y frecuencia) en la placa de característica con la de su
red eléctrica. Estos datos han de concordar con el fi n de que no
se produzcan daños en el aparato.
Asegúrese que el cable de conexión del aparato no se encuentre ■
dañado y no se coloque sobre superfi cies calientes y/o bordes
afi lados.
Pr
este atención que el cable de conexión no sea tensado o doblado. ■
No deje colgar el cable de conexión sobre esquinas ■
(peligro donde tropezar).
Colocar las pilas
Introduciendo dos pilas de 1,5V de tipo Mignon (R6/LR6/AA)
evitará que, en caso de corte de la corriente, se borren la hora y
la hora del despertador. La batería consigue que la hora interna
siga funcionando durante el fallo de corriente. Al restablecerse
la corriente eléctrica aparece en la pantalla 2 la hora correcta
automáticamente.
Colocación y conexión
ADVERTENCIA
El despertador, la radio y la pantalla no funcionan en servicio ►
de emergencia.
10
SRD 250 A1
Page 13
Manejo y funcionamiento
Abra la tapa del compartimento de pilas ♦
del aparato.
Introduzca dos pilas de 1,5 V de tipo R6/LR6/AA/Mignon (no ♦
incluidas) en el compartimento de las pilas
los símbolos de polaridad marcados en el compartimento de las
11
.
pilas
Cierre el compartimento de pilas ♦
hasta que encastre.
11
11
en el lado inferior
11
. Tenga en cuenta
, colocando la tapa y presione
Alimentación de corriente
Introduzca la clavija de red en una base de enchufe. En la ♦
pantalla
2
se muestra la hora (- -:- -).
Antena fl exible de FM
Desenrrolle la antena fl exible ♦
completo.
8
para la recepción de FM por
Manejo y funcionamiento
En este capítulo se proporcionan indicaciones importantes sobre
el manejo y funcionamiento del aparato.
Ajustar la hora
Pulse la tecla TIME ♦
parpadea.
Pulse y mantenga presionada la tecla UP ♦
para ajustar la hora de despertador.
Vuelva a pulsar la tecla TIME ♦
indicación de los minutos.
Pulse o mantenga presionada la tecla UP ♦
para ajustar los minutos.
Vuelva a pulsar la tecla TIME ♦
. La indicación de horas de la pantalla 2
13
12
o la tecla DOWN 10,
. En la pantalla 2 parpadea la
13
12
o la tecla DOWN 10,
. Se adoptará la hora ajustada.
13
ES
SRD 250 A1
11
Page 14
Manejo y funcionamiento
ES
ADVERTENCIA
La hora volverá a situarse en - -:- -, cuando se desenchufe el ►
aparato de la corriente y no se hayan introducido pilas en el
compartimento.
Funcionamiento de la radio
Pulse la tecla POWER/BAND ♦
Ajuste con el regulador VOL ♦
Para ajustar la frecuencia deseada, pulse brevemente la tecla ♦
POWER/BAND
el LED MHz
Ajuste con el regulador TUNING ♦
Para apagar el aparato, pulse durante unos dos segundos la ♦
tecla POWER/BAND
NOTA
Las características técnicas del aparato posibilitan el ajuste de un ►
rango de frecuencias fuera del rango de frecuencias admisibles
de FM 87,5–108 MHz o bien AM 526,5–1606,5 kHz. En
entes países pueden existir regulaciones nacionales diver-
difer
gentes a las gamas de frecuencia de radio existentes. Preste
atención de que queda prohibida transmitir a terceros o para
fi nes distintos las informaciones recibidas que queden fuera de
la gama de frecuencia radioeléctricas asignada.
9
. Si la recepción se confi gura en FM, lucirá
4
, si se confi gura en AM, el LED kHz 5.
9
para encender el aparato.
la intensidad de volumen deseada.
18
7
la emisora deseada.
9
.
12
SRD 250 A1
Page 15
Manejo y funcionamiento
Programación de la hora y tipo de despertador
Al programar las horas de despertador puede elegir si desea
que suene a la hora programada una señal acústica o que se
encienda la radio. Puede programar dos horas de despertador
diferentes (Alarma 1/ Alarma 2).
Pulse y mantenga presionada la tecla AL1 ♦
La indicación de horas de la pantalla 2 parpadea.
Pulse y mantenga presionada la tecla UP ♦
para ajustar la hora de despertador.
Pulse y mantenga presionada la tecla AL1 ♦
En la pantalla 2 parpadea la indicación de los minutos.
Pulse o mantenga presionada la tecla UP ♦
para ajustar los minutos.
Pulse y mantenga presionada la tecla AL1 ♦
La hora del despertador queda programada y en la pantalla 2
aparece el símbolo del tipo de despertador seleccionado.
Pulse la tecla UP ♦
tono de alarma o = radio).
Vuelva a pulsar la tecla AL1 ♦
la confi guración.
ADVERTENCIA
Si desea que suene la radio a modo de alarma, además de ►
programar la hora del despertador, también deberá seleccionar la emisora y el v
Funcionamiento de la radio).
12
, para ajustar el tipo de despertador ( =
o la tecla AL2 15, para guardar
16
olumen deseado (consulte el capítulo
o la tecla AL2 15.
16
12
o la tecla DOWN 10,
o la tecla AL2 15.
16
12
o la tecla DOWN 10,
o la tecla AL2 15.
16
ES
SRD 250 A1
13
Page 16
Manejo y funcionamiento
Conectar la función de alarma
ES
Pulse brevemente la tecla AL1 ♦
2
lla
aparece un punto a la izquierda o a la derecha. La función
de despertador ahora está activada.
o la tecla AL2 15. En la panta-
16
Desconectar la alarma
Pulse mientras que se escuche una alarma la tecla POWER/ ♦
9
BAND
, para desconectar la alarma durante 24 horas.
Desconectar la función de alarma
Pulse brevemente la tecla AL1 ♦
de alarma se apagan en la pantalla
o la tecla AL2 15. Las indicaciones
16
Función de repetición de alarma
(función “SNOOZE“)
Pulse mientras que se escuche la alarma la tecla SNOOZE ♦ ,
para desconectar la alarma transitoriamente. Transcurridos unos
6 minutos suena de nuevo la alarma.
ADVERTENCIA
Cuando la función de repetición de alarma esté activada, ►
el punto de la alarma correspondiente parpadeará en la
2
pantalla
.
Apagado automático (función SLEEP)
Con la función Sleep se apaga el aparato transcurrida la temporización ajustada entre 60 y 10 minutos.
9
Pulse la tecla POWER/BAND ♦
Pulse la tecla SLEEP ♦
de desconexión de 60 minutos y el LED SLEEP
encendido. Cada vez que pulse la tecla SLEEP
desconexión se reducirá en 10 minutos.
. En la pantalla 2 aparece el tiempo
14
14
para encender el aparato.
2
.
6
se encuentra
, el tiempo de
14
SRD 250 A1
Page 17
Limpieza
Pulse la tecla SLEEP ♦
que en la pantalla 2 aparezca el tiempo de desconexión
deseado.
Para desconectar la función Sleep, pulse la tecla SLEEP ♦
veces como sea necesario, hasta que la pantalla 2 indique lo
siguiente
. El LED SLEEP 6 se apaga.
tantas veces como sea necesario, hasta
14
Ajuste de la iluminación de pantalla
Sitúe el interruptor DIMMER ♦
ciones de la pantalla 2 aparezcan más brillantes.
Sitúe el interruptor DIMMER ♦
ciones de la pantalla
19
en HIGH, si desea que las indica-
19
en LOW, si desea que las indica-
2
aparezcan menos brillantes.
Limpieza
PELIGRO
¡Peligro de muerte por descarga eléctrica!
Re
tire la clavija de red de la base de enchufe antes de iniciar ►
la limpieza.
Al realizar la limpieza, asegúr
en la carcasa del aparato.
No utilice productos de limpieza o disolventes agresivos. ►
Podrían dañar la superfi cie del aparato.
Limpie la superfi
cie del aparato con un paño suave y seco. ■
ese de que no penetre humedad ►
14
ES
tantas
SRD 250 A1
15
Page 18
Solución de fallos
ES
En este capítulo se proporcionan indicaciones importantes para la
localización y solución de fallos. Tenga en cuenta las indicaciones
para evitar peligros y daños.
Causas y solución de fallos
La tabla siguiente ayuda a la localización y solución de averías
menores:
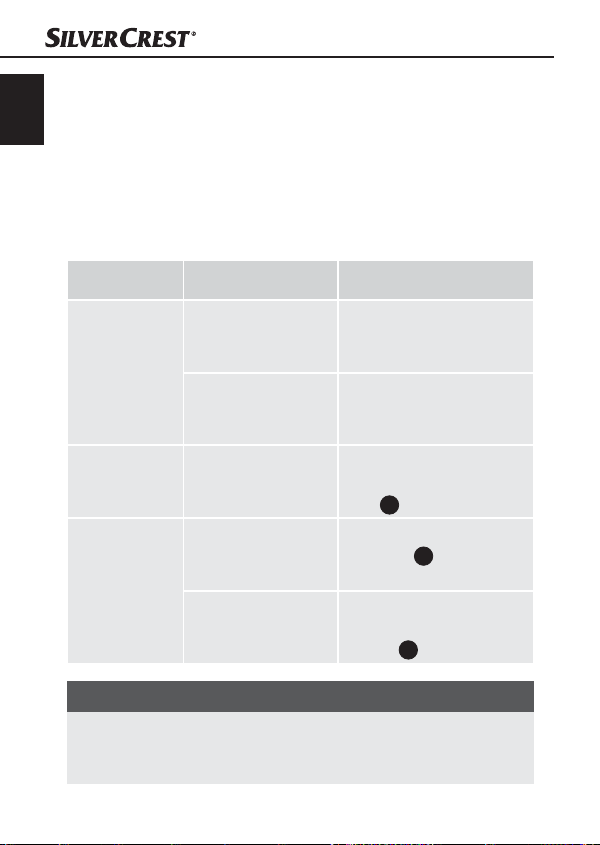
Error Posible causa Reparación
Solución de fallos
La clavija de red no
El aparato
no se puede
conectar.
No hay
sonido
Interferencias
en la recepción de radio
NOTA
Si no puede solucionar el problema con los pasos indicados ►
anteriormente, le rogamos se ponga en contacto con el
servicio al cliente.
está insertada.
La base de enchufe
no suministra ninguna tensión.
El volumen está
al mínimo.
La emisora no está
ajustada correctamente.
La recepción es
demasiado débil.
Introduzca la clavija
de red en la base de
enchufe.
Compruebe los fusibles
de la casa.
Aumente el volumen
con el regulador de
VOL
Ajuste con el regulador
TUNING
correcta.
Intente mejorar la recepción movimiento la antena
fl exible
16
18
.
7
la emisora
8
.
SRD 250 A1
Page 19
Almacenamiento/Evacuación
Almacenamiento
Si no va a usar el aparato durante un tiempo prolongado, desconecte la alimentación de corriente, extraiga la pila y almacénelo
en un lugar limpio y seco sin radiación solar directa.
Evacuación
Evacuación del aparato
En ningún caso deberá tirar el aparato a la
basura doméstica. Este producto está sujeto
a la directiva europea 2002/96/EC.
Evacue el aparato en un centro de evacuación autorizado a través
de las instalaciones de evacuación comunitarias. Preste atención a
las normas en vigor. En caso de duda póngase en contacto con las
instalaciones municipales de evacuación de residuos.
¡Evacuar las pilas!
Las pilas no deben evacuarse en la basura doméstica normal.
Cada consumidor está obligado legalmente a entregar las pilas/
baterías en un punto de recogida de residuos de su municipio,
barrio o en un establecimiento. Esta obligatoriedad tiene el
objetivo de que se evacuen las pilas favorables al medio
ambiente. Devuelva las pilas sólo en estado descargado.
ES
SRD 250 A1
17
Page 20
Anexo
ES
Características técnicas
Tensión de servicio 220 - 240 V / 50 Hz
2 Pilas de 1,5 V
Pilas para reserva de marcha
Consumo de potencia
Funcionamiento 10 W
En espera aprox. 1,5 W
Potencia de salida
máx. de altavoz
Frecuencia FM (UKW) 87,5 - 108 MHz
Frecuencia AM (MW) 526,5 - 1606,5 kHz
Temperatura de servicio +5 - +40 °C
Humedad
(sin condensación)
Tipo AA/Mignon/R6/LR6
(No incluidas en el volumen
de suministro)
5 - 90 %
Anexo
250 mW
Medidas (L x Al x A) 14,3 x 13,3 x 8,3 cm
Peso aprox. 435 g
Clase de protección
II
18
SRD 250 A1
Page 21

Anexo
Indicaciones sobre la declaración de
conformidad CE
Este aparato cumple con los requisitos esenciales y demás
normativas relevantes de la directiva europea acerca de la compatibilidad electromagnética 2004/108/EC, la directiva de baja
tensión 2006/95/EC así como directiva de diseño ecológico
2009/125/EC (disposición 1275/2008 Anexo II, Nº 1).
La declaración de conformidad original completa la puede solicitar
a la empresa de importación.
Garantía
Este aparato tiene 3 años de garantía desde la fecha de compra.
El aparato ha sido fabricado cuidadosamente y ha sido probado
antes de su entrega.
Guarde el comprobante de caja como justifi cante de compra.
Si necesitara hacer uso de la garantía, póngase en contacto por
teléfono con su punto de servicio habitual. Éste es el único modo
de garantizar un envío gratuito.
NOTA
La garantía cubre los defectos de fabricación o del material, ►
pero no los daños de transporte, las piezas sujetas a desgaste
y los daños sufridos por las piezas frágiles (p. ej. el interruptor
o las pilas).
ES
oducto ha sido diseñado exclusivamente para el uso
Este pr
particular y no para el uso industrial. En caso de manipulación
indebida e incorrecta, uso de la fuerza y en caso de abrir el aparato personas extrañas a nuestros centros de asistencia técnica
autorizados, la garantía pierde su validez.
SRD 250 A1
19
Page 22
Sus derechos legales no se ven limitados por esta garantía.
ES
El tiempo de garantía no se prolonga por hace uso de la garantía.
Es aplicable también a piezas sustituidas y reparadas.
Los posibles o defectos detectados al desembalar el aparato
después de la compra, se han de notifi car de inmediato como
más tardar dos días después de la fecha de compra.
Transcurrido el tiempo de garantía las reparaciones originadas se
han de pagar.
Asistencia técnica
Importador
KOMPERNASS GMBH
BURGSTRASSE 21
44867 BOCHUM, GERMANY
www.kompernass.com
Service España
Tel.: 902 59 99 22
(0,078 EUR/Min. + 0,105 EUR/llamada (peak))
(0,047 EUR/Min. + 0,105 EUR/llamada (off peak))
E-Mail: kompernass@lidl.es
Anexo
20
SRD 250 A1
Page 23
Indice
Introduzione . . . . . . . . . . . . . . . . . . . . . . . . . . . . . . . . 23
Informazioni sul presente manuale di istruzioni . . . . . . . . . . . . .23
Diritto d'autore . . . . . . . . . . . . . . . . . . . . . . . . . . . . . . . . . . . . . .23
Uso conforme . . . . . . . . . . . . . . . . . . . . . . . . . . . . . . . . . . . . . . . 23
Sicurezza . . . . . . . . . . . . . . . . . . . . . . . . . . . . . . . . . . . 25
Pericolo di folgorazione elettrica . . . . . . . . . . . . . . . . . . . . . . . . 25
Uso delle pile . . . . . . . . . . . . . . . . . . . . . . . . . . . . . . . . . . . . . . . 26
Avvertenze di sicurezza di base . . . . . . . . . . . . . . . . . . . . . . . . . 26
Elementi di comando . . . . . . . . . . . . . . . . . . . . . . . . . . 28
Installazione e collegamento . . . . . . . . . . . . . . . . . . . 29
Volume della fornitura e ispezione per eventuali danni da trasporto . .29
Requisiti del luogo di installazione . . . . . . . . . . . . . . . . . . . . . . . 29
Connessione elettrica . . . . . . . . . . . . . . . . . . . . . . . . . . . . . . . . .30
Inserimento delle pile . . . . . . . . . . . . . . . . . . . . . . . . . . . . . . . . . 30
Connessione all'alimentazione di corrente . . . . . . . . . . . . . . . . .31
Antenna lineare FM . . . . . . . . . . . . . . . . . . . . . . . . . . . . . . . . . . 31
Comandi e funzionamento . . . . . . . . . . . . . . . . . . . . . 31
Impostazione dell'ora . . . . . . . . . . . . . . . . . . . . . . . . . . . . . . . . . 31
Funzionamento della radio . . . . . . . . . . . . . . . . . . . . . . . . . . . . . 32
Programmazione dei tempi e modalità di sveglia . . . . . . . . . . . . 33
Attivazione della funzione di sveglia . . . . . . . . . . . . . . . . . . . . . 34
Spegnimento dell’allarme . . . . . . . . . . . . . . . . . . . . . . . . . . . . . .34
Disattivazione della funzione di sveglia . . . . . . . . . . . . . . . . . . . 34
IT
MT
SRD 250 A1
21
Page 24

Funzione di disattivazione temporanea dell’allarme
(funzione “SNOOZE”) . . . . . . . . . . . . . . . . . . . . . . . . . . . . . . . .34
Disattivazione automatica (funzione “SLEEP”) . . . . . . . . . . . . . . 34
Impostazione dell’illuminazione del display . . . . . . . . . . . . . . . .35
IT
Pulizia . . . . . . . . . . . . . . . . . . . . . . . . . . . . . . . . . . . . . . 35
MT
Guasti e possibili rimedi . . . . . . . . . . . . . . . . . . . . . . . 36
Cause ed eliminazione dei guasti . . . . . . . . . . . . . . . . . . . . . . . . 36
Conservazione . . . . . . . . . . . . . . . . . . . . . . . . . . . . . . . 37
Smaltimento. . . . . . . . . . . . . . . . . . . . . . . . . . . . . . . . . 37
Smaltimento dell'apparecchio . . . . . . . . . . . . . . . . . . . . . . . . . . . 37
Smaltimento delle pile! . . . . . . . . . . . . . . . . . . . . . . . . . . . . . . . . 37
Appendice . . . . . . . . . . . . . . . . . . . . . . . . . . . . . . . . . . 38
Dati tecnici . . . . . . . . . . . . . . . . . . . . . . . . . . . . . . . . . . . . . . . . .38
Avviso sulla dichiarazione di conformità CE . . . . . . . . . . . . . . . . . .39
Garanzia . . . . . . . . . . . . . . . . . . . . . . . . . . . . . . . . . . . . . . . . . . . 39
Assistenza . . . . . . . . . . . . . . . . . . . . . . . . . . . . . . . . . . . . . . . . . .40
Importatore . . . . . . . . . . . . . . . . . . . . . . . . . . . . . . . . . . . . . . . . .40
22
SRD 250 A1
Page 25

Introduzione
Introduzione
Informazioni sul presente manuale di istruzioni
Il presente manuale di istruzioni è parte integrante della radiosveglia
SRD 250 A1 (di seguito denominata l’apparecchio) e fornisce informazioni importanti per l’uso conforme, la sicurezza, l’installazione
e il collegamento nonché l’uso dell’apparecchio. Il manuale di
istruzioni dev’essere sempre disponibile nelle vicinanze dell’apparecchio. Esso dev’essere letto e applicato da tutti coloro che sono
incaricati dell’uso e dell’eliminazione dei guasti dell’apparecchio.
Conservare il presente manuale di istruzioni e consegnarlo insieme
all’apparecchio in caso di cessione dello stesso a terzi.
Diritto d’autore
La presente documentazione è tutelata dal diritto d’autore.
Qualsiasi riproduzione o ristampa, anche parziale nonché la
riproduzione delle illustrazioni anche se modifi cate è possibile
solo previo consenso scritto da parte del produttore.
Uso conforme
Questo apparecchio è indicato esclusivamente per l’ascolto dei
programmi radiofonici e per la sveglia tramite un segnale acustico
di allarme o la radio in ambiente privato domestico. Un uso diverso
o esulante da quanto sopra è considerato non conforme. Si escludono rivendicazioni di qualsiasi tipo derivanti da danni causati da
uso non conforme, riparazioni non professionali, modifi che non
autorizzate all’apparecchio o dall’uso di parti di ricambio non
omologate. Il rischio è esclusivamente a carico dell’utente.
IT
MT
SRD 250 A1
23
Page 26
IT
MT
Introduzione
Nel presente manuale di istruzioni vengono utilizzate le seguenti
avvertenze:
PERICOLO
Un'avvertenza contrassegnata da questo livello
di pericolo indica una situazione pericolosa.
Qualora sia impossibile e
può dare luogo a decesso o gravi lesioni.
Seguire le indicazioni contenute in queste avvertenze per ►
evitare il pericolo di morte o di lesioni gravi.
AVVISO
Un'avvertenza contrassegnata da questo livello
di pericolo indica una situazione potenzialmente
pericolosa.
Qualora sia impossibile evitare tale situazione pericolosa, essa
può dare luogo a lesioni.
Seguire le istruzioni contenute in questa avvertenza per evitare ►
lesioni personali.
ATTENZIONE
Un'avvertenza contrassegnata da questo livello
di pericolo indica la possibilità di riport
materiali.
Qualora sia impossibile evitare tale situazione pericolosa, essa
può dare luogo a danni materiali.
Seguire le istruzioni contenute in questa avvertenza, per evitare ►
danni materiali.
vitare tale situazione pericolosa, essa
are danni
24
SRD 250 A1
Page 27
Sicurezza
AVVERTENZA
Un avviso contrassegna ulteriori informazioni volte a facilitare ►
l'uso dell'apparecchio.
Sicurezza
In questo capitolo sono riportate importanti indicazioni di sicurezza
per l’uso dell’apparecchio. Questo apparecchio corrisponde
alle disposizioni di sicurezza prescritte. L’uso non conforme può
tuttavia comportare danni a persone e cose.
Pericolo di folgorazione elettrica
PERICOLO
Pericolo di folgorazione elettrica!
Il contatt
comportare il pericolo di morte!
Rispettare le seguenti avvertenze di sicurezza per evitare il rischio
di folgorazione elettrica:
o con linee o componenti sotto tensione può
Non utilizzare l'apparecchio in presenza di danni al cavo o ►
alla spina di rete.
Non aprir
In caso di contatto con connessioni sotto tensione e di modifi ca
della struttura elettrica e meccanica, sussiste il pericolo di
folgor
L'apparecchio, inoltre, assorbe corrente in modalità di standby. ►
Per scollegare completamente l'apparecchio dalla rete elettrica,
è necessario staccare la spina dalla pr
l'apparecchio in modo da garantire costantemente l'accesso
libero alla presa di corrente, al fi ne di poter staccare la spina
in situazioni di emergenza.
e assolutamente l'alloggiamento dell'appar
azione elettrica.
esa. Collocare quindi
IT
MT
ecchio. ►
SRD 250 A1
25
Page 28
Uso delle pile
AVVISO
Pericolo derivante da uso non conforme!
IT
MT
Per l'uso sicuro delle pile, rispettare le seguenti avvertenze di
sicurezza:
Non gettare le pile nel fuoco. ►
Non mettere in cortocircuito le pile. ►
Non tentare di ricaricare le pile. ►
Non aprire, saldare o fondere le pile. Pericolo di esplosione e ►
lesioni.
Controllar
può causare danni permanenti all'apparecchio. Esercitare
particolare cautela in presenza di pile deteriorate. Pericolo di
ustione chimica! Indossare guanti di protezione.
Tenere i bambini lontani dalle pile. ►
In caso di ingestione, consultare immediatamente un medico.
Se non si utilizza l'apparecchio per lungo tempo, rimuovere ►
le pile.
e regolarmente le pile. L'acido fuoriuscito dalle pile ►
Avvertenze di sicurezza di base
Per l’uso sicuro dell’apparecchio, rispettare le seguenti avvertenze
di sicurezza:
Controllare l’apparecchio prima dell’uso per rilevare eventuali ■
danni visibili. Non mettere in funzione un apparecchio danneggiato o caduto.
In caso di danni al cavo o ai collegamenti, fare eseguire le ripara- ■
zioni a personale specializzato autorizzato o al servizio clienti.
Sicurezza
26
SRD 250 A1
Page 29

Sicurezza
Le persone che a motivo di impedimenti di natura fi sica, psichica o ■
motoria non fossero in grado di utilizzare l’apparecchio in sicurezza
ono utilizzarlo solo sotto sorveglianza o istruzioni da parte di
dev
una persona responsabile.
Consentire l’uso dell’apparecchio ai bambini solo se sotto sorve- ■
glianza.
Far
e eseguire le riparazioni solo da aziende specializzate o ■
dall’assistenza ai clienti. Le riparazioni eff ettuate in modo non
conforme possono causare pericoli per l’utente. In caso contr
la garanzia decade.
La riparazione dell’apparecchio in periodo di garanzia può avere ■
luogo solo tramite l’assistenza ai clienti autorizzata dal produttore;
in caso contrario, in pr
sarà ritenuta valida.
I componenti guasti devono essere sostituiti esclusivamente da ■
pezzi di ricambio originali. Solo con questi pezzi di ricambio è
garantita la conformità ai r
Proteggere l’apparecchio dall’umidità e dalla penetrazione di ■
liquidi. Non immergere mai l’apparecchio in acqua, non collocare
l’apparecchio nelle vicinanz
esso oggetti pieni di liquidi (ad es. vasi).
Non collocare alcun oggetto sull’apparecchio. ■
Non azionare l’apparecchio nelle vicinanze di fi amme libere ■
(ad es. candele).
E
e l’esposizione diretta ai raggi solari. ■
vitar
Per la disconnessione dalla rete elettrica, tirare sempre la spina ■
dalla presa, mai dal cavo.
In caso di guasti e tempor
presa.
esenza di successivi danni, la garanzia non
equisiti di sicurezza.
e dell’acqua e non collocare su di
ali, staccar
e sempre la spina dalla ■
IT
MT
ario,
SRD 250 A1
27
Page 30
Elementi di comando
Tasto SNOOZE: interruzione dell’allarme
2
Display
IT
3
MT
POWER-LED: si accende ad apparecchio acceso
4
MHz-LED: si accende con la ricezione delle onde ultracorte
5
kHz-LED: si accende con la ricezione delle onde medie
6
SLEEP-LED: si accende con la funzione SLEEP attivata
7
Rotella TUNING: selezione delle emittenti
8
Antenna lineare
9
Tasto POWER/BAND: accensione/spegnimento apparecchio /
10
Tasto DOWN: impostazioni a ritroso
11
Vano pile
12
Tasto UP: impostazioni in avanti
Tasto TIME: impostazione dell’ora
13
Tasto SLEEP impostazione dello spegnimento automatico
14
Tasto AL2: impostazione dell’allarme 2
15
Tasto AL1: impostazione dell’allarme 1
16
Cavo di rete
17
Regolatore VOL: regolazione del volume
18
Selettore DIMMER: impostazione dell’illuminazione del display
19
Elementi di comando
selezione banda di frequenza
28
SRD 250 A1
Page 31

Installazione e collegamento
Installazione e collegamento
Volume della fornitura e ispezione per
eventuali danni da trasporto
La fornitura standard dell’apparecchio comprende i seguenti
componenti:
Radiosveglia ●
Istruzioni per l’uso ●
Prelevare l’apparecchio e le istruzioni per l’uso dalla confezione e
rimuo
v
ere tutto il materiale di imballaggio.
AVVERTENZA
Controllare la completezza e integrità della fornitura in relazione ►
ai danni visibili.
In caso di fornitura incompleta o in pr
da imballaggio insuffi ciente o causati dal trasporto, rivolgersi
alla Hotline di assistenza (v. capitolo Assistenza).
Requisiti del luogo di installazione
Per l’uso sicuro e privo di malfunzionamenti dell’apparecchio, il
luogo di installazione deve adempiere ai seguenti prerequisiti:
Collocare l’apparecchio su un sottofondo solido, piatto e orizzontale. ■
Collocare l’apparecchio in modo da non coprirne le aperture di ■
aerazione.
Non collocare l’appar
o molto umido o nelle vicinanze di materiale infi ammabile.
ecchio in un ambiente surriscaldato, bagnato ■
esenza di danni derivanti ►
IT
MT
SRD 250 A1
29
Page 32

Le superfi ci dei mobili potrebbero contenere componenti in grado ■
di attaccare i piedini in gomma dell’apparecchio, ammorbidendoli.
Collocare eventualmente un tappetino antisdrucciolo sotto i piedini
di gomma dell’apparecchio.
IT
MT
La presa di rete dev’essere facilmente accessibile per poter staccare ■
la spina facilmente in caso di emergenza.
Connessione elettrica
Prima di connettere l’apparecchio, confrontare i dati di connessione ■
(tensione e frequenza) riportati sulla targhetta dell’apparecchio
con quelli della rete elettrica. I dati devono coincidere, per evitare
danni all’apparecchio.
Assicurarsi che il cavo di connessione dell’apparecchio sia integro ■
e non venga posato su superfi ci bollenti e/o bordi acuminati.
Assicurar
eccessivamente.
Non far pendere il cav
inciampo).
si che il cavo di connessione non venga teso o piegato ■
Inserimento delle pile
Inserendo due pile da 1,5V tipo Mignon (R6/LR6/AA), si evita
che le impostazioni programmate in relazione all’orario e alla
sveglia vadano perdute in caso di possibile caduta di tensione.
Le pile consentono all’orologio interno di continuare a funzionare
anche in caso di interruzione della corrente. Con il ripristino della
tensione di rete, sul display
corretto.
Installazione e collegamento
o di connessione dagli angoli (pericolo di ■
2
compare automaticamente l’orario
AVVERTENZA
Il display, la radio e la sveglia non sono alimentati dalla pila. ►
30
SRD 250 A1
Page 33

Comandi e funzionamento
Aprire il coperchio del vano pile ♦
Collocare due pile da 1,5 V di tipo R6/LR6/AA/Mignon (non ♦
incluse nella fornitura) nel vano pile
della polarità riportata nel vano pile
Chiudere il vano pile ♦
11
inserendo il coperchio fi no all’arresto.
11
sul retro dell’apparecchio.
11
. Rispettare l’indicazione
11
.
Connessione all’alimentazione di corrente
Inserire la spina elettrica in una presa di corrente. Sul display ♦
viene visualizzato il tempo di spegnimento impostato (- -:- -).
Antenna lineare FM
Svolgere completamente l’antenna lineare ♦
delle onde ultracorte.
8
per la ricezione
Comandi e funzionamento
In questo capitolo sono riportate indicazioni importanti relative ai
comandi e al funzionamento dell’apparecchio.
Impostazione dell’ora
Premere il tasto TIME ♦
delle ore.
Premere o mantenere premuto il tasto UP ♦
per impostare le ore.
Premere nuovamente il tasto TIME ♦
l’indicazione dei minuti.
Premere o mantenere premuto il tasto UP ♦
per impostare i minuti.
Premere nuovamente il tasto TIME ♦
salvato.
. Nel display 2 lampeggia l’indicazione
13
12
o il tasto DOWN 10
. Nel display 2 lampeggia
13
12
o il tasto DOWN 10
. L’orario impostato viene
13
IT
MT
2
SRD 250 A1
31
Page 34

AVVERTENZA
L'orario viene riportato a - -:- - se l'apparecchio viene discon- ►
nesso dalla rete elettrica ed è privo di pile.
IT
Funzionamento della radio
MT
Premere il tasto POWER/BAND ♦
Con il regolatore VOL ♦
Premere brevemente il tasto POWER/BAND ♦
la banda di frequenza desiderata. In caso di ricezione di onde
ultracorte (FM) si accende il LED MHz 4, in caso di ricezione di
onde medie (AM) si accende il LED kHz
Con il regolatore di sintonia TUNING ♦
desiderata.
Premere per circa due secondi il tasto POWER/BAND ♦
spegnere l’apparecchio.
AVVERTENZA
Le caratteristiche tecniche dell'apparecchio consentono un ►
campo di frequenze regolabili al di fuori del campo di frequenze
consentito per le onde ultracor
medie (AM) 526,5–1606,5 kHz. A seconda delle nazioni
potrebbero esistere regolamenti diff erenti in relazione ai campi
di frequenza radiofonici attribuiti. Si ricorda che è vietato utilizzare, inoltrare a terzi o abusare delle informazioni ricevute al
di fuori del campo di frequenza attribuito.
Comandi e funzionamento
9
per accendere l’apparecchio.
impostare il volume desiderato.
18
9
per impostare
5
.
7
impostare l’emittente
9
per
te (FM) 87,5–108 MHz ovvero
32
SRD 250 A1
Page 35

Comandi e funzionamento
Programmazione dei tempi e modalità di
sveglia
Nella programmazione degli orari di sveglia si può decidere se
la sveglia deve emettere un segnale acustico o un programma
radiofonico. Si possono programmare due diversi orari di sveglia
(Allarme 1/Allarme 2).
Premere e tenere premuto il tasto AL1 ♦
lampeggia l’indicazione delle ore.
Premere o mantenere premuto il tasto UP ♦
per impostare le ore.
Premere nuovamente il tasto AL1 ♦
lampeggia l’indicazione dei minuti.
Premere o mantenere premuto il tasto UP ♦
per impostare i minuti.
Premere nuovamente il tasto AL1 ♦
di sveglia verrà memorizzato e nel display 2 comparirà l’indicazione del tipo di sveglia.
Premere il tasto UP ♦
( = segnale di allarme o = radio).
Premere nuovamente il tasto AL1 ♦
impostazioni.
12
, per impostare il tipo di sveglia desiderato
o AL2 15. Nel display 2
16
12
o il tasto DOWN 10
o AL2 15. Nel display 2
16
12
o il tasto DOWN 10
o AL2 15. L’orario impostato
16
o AL2 15, per salvare le
16
IT
MT
AVVERTENZA
Se si desidera essere svegliati con la radio, oltre alla programma- ►
zione dell'orario di sveglia, impostare anche l'emittente desiderata
e il volume (v
. capitolo Funzionamento della radio).
SRD 250 A1
33
Page 36

Comandi e funzionamento
Attivazione della funzione di sveglia
Premere brevemente il tasto AL1 ♦
appare un punto a sinistra o a destra. La funzione di sveglia è ora
attivata.
IT
Spegnimento dell’allarme
MT
Mentre risuona l’allarme, premere il tasto POWER/BAND ♦
per disattivare temporaneamente l’allarme per 24 ore.
Disattivazione della funzione di sveglia
Premere brevemente il tasto AL1 ♦
relativi all’allarme scompaiono dal display
Funzione di disattivazione temporanea
dell’allarme (funzione “SNOOZE”)
Mentre risuona l’allarme, premere il tasto SNOOZE ♦ , per
disattivare temporaneamente l’allarme. Dopo 6 minuti l’allarme
risuona nuovamente.
AVVERTENZA
Se è attivata la funzione di spegnimento ritardato, il puntino ►
dell'allarme lampeggia nel display
Disattivazione automatica (funzione “SLEEP”)
Con la funzione Sleep, l’apparecchio si spegne da solo dopo un
periodo di tempo impostato dall’utente e compreso fra 60 e 10
minuti.
Premere il tasto POWER/BAND ♦
Premere il tasto SLEEP ♦
di 60 minuti lampeggia e si accende il LED SLEEP
nuovamente il tasto SLEEP
di 10 minuti.
34
. Nel display 2 il tempo di spegnimento
14
o il tasto AL2 15. Nel display
16
o il tasto AL2 15. I messaggi
16
2
.
2
.
9
per accendere l’apparecchio.
si abbrevia il tempo di spegnimento
14
9
,
6
. Premendo
SRD 250 A1
2
Page 37

Pulizia
Premere il tasto SLEEP ♦
mento desiderato nel display 2.
Per disattivare la funzione Sleep premere il tasto SLEEP ♦
visualizzare nel display 2 .
6
Lo SLEEP-LED
si spegne.
fi no a visualizzare il tempo di spegni-
14
14
fi no a
Impostazione dell’illuminazione del display
Impostare il selettore DIMMER ♦
lizzare i messaggi nel display 2 con una luminosità più elevata.
Impostare il selettore DIMMER ♦
zare i messaggi nel display
19
su HIGH, se si desidera visua-
19
su LOW, se si desidera visualiz-
2
con una luminosità meno elevata.
Pulizia
PERICOLO!
Rischio di folgorazione!
Prima di cominciare la pulizia, staccar
presa.
Assicurar
nell'apparecchio.
Non utilizzare detergenti o abrasivi aggressivi. Essi possono ►
attaccare la superfi cie dell'apparecchio.
Pulire le superfi ci dell’alloggiamento della pompa solo con un ■
panno morbido e asciutto.
si che durante la pulizia non penetri alcuna umidità ►
e sempre la spina dalla ►
IT
MT
SRD 250 A1
35
Page 38

Guasti e possibili rimedi
In questo capitolo sono riportate importanti informazioni per
localizzare ed eliminare i guasti. Rispettare le indicazioni per
IT
MT
evitare pericoli e danneggiamenti.
Cause ed eliminazione dei guasti
La seguente tabella è di ausilio nella localizzazione ed
eliminazione dei guasti minori:
Guasto Possibile causa Rimedio
Guasti e possibili rimedi
La spina di rete non
Non si riesce
ad accendere
l'apparecchio.
Nessun
sonoro
Rumori durante
la ricezione
dei segnali
radio
AVVERTENZA
Se non si riesce a risolvere il problema con le istruzioni prece- ►
dentemente riportate, rivolgersi al servizio di assistenza ai clienti.
è stata inserita.
La presa di rete
non fornisce alcuna
tensione.
Il volume è al
minimo.
L'emittente non è
stata impostata
correttamente.
La ricezione è
troppo debole.
Inserire la spina elettrica
nella presa di corrente.
Controllare i fusibili.
Aumentare il volume
con il regolatore del
VOL
18
Con il regolatore di
sintonia TUNING
impostare correttamente
l'emittente.
Tentare di migliorare
la ricezione spostando
l'antenna lineare
36
.
SRD 250 A1
7
8
.
Page 39

Conservazione/Smaltimento
Conservazione
Qualora non si utilizzasse l’apparecchio per un periodo di tempo
prolungato, staccarlo dall’alimentazione di corrente, rimuovere la
pila e conservarlo in un luogo fresco e asciutto senza irradiazione
solare diretta.
Smaltimento
Smaltimento dell’apparecchio
Non gettare per alcun motivo l’apparecchio
insieme ai normali rifi uti domestici. Questo
prodotto è soggetto alla direttiva europea
2002/96/EC.
Smaltire l’apparecchio presso un’azienda autorizzata o presso
l’ente comunale di smaltimento. Rispettare le prescrizioni attualmente in vigore. In caso di dubbi, mettersi in contatto con l’ente
di smaltimento competente.
Smaltimento delle pile!
Le pile scariche non devono essere smaltite con i normali rifi uti
domestici. Ogni utente è obbligato per legge a consegnare le
pile presso gli appositi centri di raccolta della propria città o
del proprio quartiere o presso i punti vendita. Questo obbligo
è fi nalizzato allo smaltimento ecologico delle pile. Consegnare
le pile solo se scariche.
IT
MT
SRD 250 A1
37
Page 40

Appendice
Dati tecnici
IT
Tensione di esercizio 220-240 V / 50 Hz
MT
Pile per riserva di carica
Assorbimento di potenza
Funzionamento 10 W
Standby ca. 1,5 W
Potenza massima in uscita
altoparlante
Frequenza FM
(onde ultra corte)
Frequenza AM (onde medie) 526,5 - 1606,5 kHz
Temperatura di esercizio +5 - +40 °C
Umidità (nessuna condensa) 5 - 90 %
Dimensioni (L x P x A) 14,3 x 13,3 x 8,3 cm
2 pile da 1,5 V
tipo AA/Mignon/R6/LR6
(non incluse nella fornitura)
87,5 - 108 MHz
Appendice
250 mW
Peso ca. 435 g
Classe di protezione
II
38
SRD 250 A1
Page 41

Appendice
Avviso sulla dichiarazione di conformità CE
Questo apparecchio è conforme ai requisiti fondamentali e alle
altre norme rilevanti della Direttiva europea di compatibilità
elettromagnetica 2004/108/EC, alla Direttiva bassa tensione
2006/95/EC nonché alla Direttiva ecodesign 2009/125/EC
(Ordinamento 1275/2008 Appendice II, n. 1).
La dichiarazione di conformità originale e completa è a disposizione presso l’importatore.
Garanzia
Questo apparecchio è garantito per tre anni a partire dalla data
di acquisto. L’apparecchio è stato prodotto con cura e debitamente
collaudato prima della consegna.
Conservare lo scontrino come prova d’acquisto. Nei casi contemplati dalla garanzia, mettersi in comunicazione telefonicamente
con il centro di assistenza più vicino. Solo in tal modo è possibile
garantire una spedizione gratuita della merce.
AVVERTENZA
La garanzia vale solo per difetti del materiale o di fabbricazione, ►
non per i danni da trasporto, alle parti soggette a usura o per i
danni alle parti fr
agili, ad es. interruttori o accumulatori.
IT
MT
Il prodotto è destinato esclusivamente all’uso domestico e non a
quello commerciale. La garanzia decade in caso di impiego improprio o manomissione, uso della forza e interventi non eseguiti
dalla nostra fi liale di assistenza autorizzata.
SRD 250 A1
39
Page 42

IT
MT
Assistenza
Importatore
Appendice
Questa garanzia non costituisce alcun limite ai diritti legali del
consumatore.
Il periodo di garanzia non viene prolungato da interventi in
garanzia. Ciò vale anche per le parti sostituite e riparate.
I danni eventualmente presenti già all’atto dell’acquisto devono
essere segnalati immediatamente dopo il disimballaggio, entro
e non oltre due giorni dalla data di acquisto.
Le riparazioni eseguite dopo la scadenza del periodo di garanzia
sono a pagamento.
Service Italia
Tel.: 02 36003201
E-Mail: kompernass@lidl.it
Service Malta
Tel.: 80062230
E-Mail: kompernass@lidl.mt
KOMPERNASS GMBH
BURGSTRASSE 21
44867 BOCHUM, GERMANY
www.kompernass.com
40
SRD 250 A1
Page 43

Índice
Introdução . . . . . . . . . . . . . . . . . . . . . . . . . . . . . . . . . . 43
Informações acerca deste manual de instruções . . . . . . . . . . . . 43
Direitos de autor . . . . . . . . . . . . . . . . . . . . . . . . . . . . . . . . . . . . .43
Utilização correcta . . . . . . . . . . . . . . . . . . . . . . . . . . . . . . . . . . . 43
Segurança . . . . . . . . . . . . . . . . . . . . . . . . . . . . . . . . . . 45
Perigo por choque eléctrico . . . . . . . . . . . . . . . . . . . . . . . . . . . . 45
Manuseamento de pilhas . . . . . . . . . . . . . . . . . . . . . . . . . . . . . .46
Indicações importantes de segurança . . . . . . . . . . . . . . . . . . . .46
Elementos de comando . . . . . . . . . . . . . . . . . . . . . . . . 48
Instalação e ligação . . . . . . . . . . . . . . . . . . . . . . . . . . 49
Material fornecido e inspecção de transporte . . . . . . . . . . . . . . 49
Requisitos do local de instalação . . . . . . . . . . . . . . . . . . . . . . . . 49
Ligação eléctrica . . . . . . . . . . . . . . . . . . . . . . . . . . . . . . . . . . . . . 50
Colocar as pilhas . . . . . . . . . . . . . . . . . . . . . . . . . . . . . . . . . . . . 50
Estabelecer a alimentação de corrente . . . . . . . . . . . . . . . . . . .51
Antena de fi o FM . . . . . . . . . . . . . . . . . . . . . . . . . . . . . . . . . . . . 51
Operação e funcionamento . . . . . . . . . . . . . . . . . . . . 51
Ajustar a hora . . . . . . . . . . . . . . . . . . . . . . . . . . . . . . . . . . . . . . . 51
Modo de rádio . . . . . . . . . . . . . . . . . . . . . . . . . . . . . . . . . . . . . .52
Programar as horas e os tipos de alarme . . . . . . . . . . . . . . . . . . 53
Ligar a função de despertar . . . . . . . . . . . . . . . . . . . . . . . . . . . . 54
Desactivar alarme . . . . . . . . . . . . . . . . . . . . . . . . . . . . . . . . . . . . 54
Desligar a função de despertar . . . . . . . . . . . . . . . . . . . . . . . . . 54
SRD 250 A1
PT
41
Page 44

Função “SNOOZE” . . . . . . . . . . . . . . . . . . . . . . . . . . . . . . . . . . 54
Desactivação automática (função SLEEP) . . . . . . . . . . . . . . . . . . 54
Ajustar a iluminação do visor . . . . . . . . . . . . . . . . . . . . . . . . . . . 55
Limpeza . . . . . . . . . . . . . . . . . . . . . . . . . . . . . . . . . . . . 55
Resolução de avarias . . . . . . . . . . . . . . . . . . . . . . . . . 56
Causas e resolução de avarias . . . . . . . . . . . . . . . . . . . . . . . . . . 56
PT
Armazenamento . . . . . . . . . . . . . . . . . . . . . . . . . . . . . 57
Eliminação . . . . . . . . . . . . . . . . . . . . . . . . . . . . . . . . . . 57
Eliminar o aparelho . . . . . . . . . . . . . . . . . . . . . . . . . . . . . . . . . . . 57
Eliminação das pilhas . . . . . . . . . . . . . . . . . . . . . . . . . . . . . . . . . 57
Anexo . . . . . . . . . . . . . . . . . . . . . . . . . . . . . . . . . . . . . . 58
Dados técnicos . . . . . . . . . . . . . . . . . . . . . . . . . . . . . . . . . . . . . . 58
Indicações acerca da Declaração de conformidade CE . . . . . .59
Garantia . . . . . . . . . . . . . . . . . . . . . . . . . . . . . . . . . . . . . . . . . . .59
Assistência técnica . . . . . . . . . . . . . . . . . . . . . . . . . . . . . . . . . . . 60
Importador . . . . . . . . . . . . . . . . . . . . . . . . . . . . . . . . . . . . . . . . . 60
42
SRD 250 A1
Page 45

Introdução
Introdução
Informações acerca deste manual de instruções
Este manual de instruções é parte integrante do rádio-despertador
SRD 250 A1 (daqui em diante designado como aparelho) e
fornece--lhe indicações importantes para a utilização correcta,
a segurança, a ligação e o comando do aparelho. O manual
de instruções deve estar sempre disponível nas imediações do
aparelho. Deve ser lido e aplicado por todos aqueles encarregues do comando e resolução de avarias do aparelho. Conserve
o manual de instruções e entregue-o a terceiros juntamente com o
aparelho.
Direitos de autor
Esta documentação está protegida por direitos de autor.
Qualquer cópia ou reprodução, ainda que parcial, do texto ou
das fi guras, mesmo que alterados, é autorizada apenas com
consentimento por escrito do fabricante.
Utilização correcta
Este aparelho serve exclusivamente para ouvir programas de rádio
e para despertar através de som de alarme ou rádio para uso
doméstico. Qualquer utilização para além da descrita é considerada incorrecta. Estão excluídas reclamações de qualquer tipo por
danos resultantes de utilização incorrecta, reparações indevidas,
alterações não autorizadas ou utilização de peças de reposição
não homologadas. O risco é inteiramente da responsabilidade
do proprietário.
PT
SRD 250 A1
43
Page 46

PT
Introdução
No presente manual de instruções são utilizadas as seguintes
indicações de aviso:
PERIGO
Uma indicação de aviso deste nível de perigo indica
uma situação potencialment
Se esta situação perigosa não for evitada, existe perigo de morte
ou ferimentos graves.
Siga as instruções neste aviso para evitar perigo de morte ou ►
de ferimentos graves de pessoas.
AVISO
Uma indicação de aviso deste nível de perigo indica
uma situação potencialmente perigosa.
Se esta situação não for evitada, existe perigo de ferimentos.
Siga as indicações neste aviso, a fi m de evitar ferimentos. ►
ATENÇÃO
Uma indicação de aviso deste nível de perigo indica
possív
eis danos materiais.
Se esta situação não for evitada, existe perigo de danos materiais.
Siga as indicações neste aviso, a fi m de evitar danos materiais. ►
e perigosa.
44
SRD 250 A1
Page 47

Segurança
NOTA
A nota fornece informações adicionais para facilitar o manu- ►
seamento do aparelho.
Segurança
Este capítulo contém indicações de segurança importantes para o
manuseamento do aparelho. Este aparelho está em conformidade
com as normas de segurança em vigor. Uma utilização indevida
pode provocar ferimentos e danos materiais.
Perigo por choque eléctrico
PERIGO
Perigo de morte por choque eléctrico!
Em caso de contact
tensão, existe perigo de morte!
Respeite as seguintes indicações de segurança para evitar risco
por choque eléctrico:
Não utilize o aparelho, caso a fi cha de rede ou o cabo de ►
alimentação estejam danifi cados.
Nunca abra a caix
de tensão sejam tocadas e a estrutura eléctrica e mecânica
sejam alteradas, existe perigo de choque eléctrico.
O aparelho consome tensão em modo de standby. Para desli- ►
gar o aparelho totalmente da rede, a fi cha de rede tem de ser
tirada da tomada. Por isso, o aparelho deve ser instalado
re
de modo que seja sempre garantido um acesso desimpedido
à tomada para que, em situações de emergência, a fi cha de
rede possa ser imediatamente retirada.
o com cabos ou componentes sob
a do aparelho. Caso as ligações condutoras ►
PT
SRD 250 A1
45
Page 48

Manuseamento de pilhas
AVISO
Perigo resultante de uma utilização indevida!
Tenha em consideração as seguintes indicações de segurança
para um manuseamento seguro das pilhas:
PT
Não atire as pilhas para o fogo. ►
Nunca coloque as pilhas em curto-circuito. ►
Não tente recarregar as pilhas. ►
Nunca tente abrir ou soldar as pilhas. Existe o perigo de ►
explosão e de ferimentos.
Verifi
que regularmente as pilhas. O ácido das pilhas derrama- ►
do pode provocar danos permanentes no aparelho. O manuseamento de pilhas danifi cadas ou que tenham derramado ácido
requer especial precaução. Perigo de ferimentos! Utilizar luvas
de protecção.
Manter as pilhas fora do alcance das crianças. ►
Em caso de ingestão, procurar imediatamente auxílio médico.
Caso não pretenda utilizar o aparelho por um período de ►
tempo prolongado, retire as pilhas.
Indicações importantes de segurança
Para um manuseamento seguro do aparelho, tenha em consideração as seguintes indicações de segurança:
Antes da utilização, verifi que o aparelho quanto a danos exteriores ■
visíveis. Não tente colocar em funcionamento um aparelho avariado
ou que foi sujeito a uma queda.
Em caso de danos no cabo ou ligações, estes dev
dos por pessoal técnico autorizado ou pela assistência técnica.
Segurança
em ser substituí- ■
46
SRD 250 A1
Page 49

Segurança
As pessoas que, devido às suas capacidades físicas, mentais ou ■
motoras, não se encontrem em posição de comandar o aparelho
com segurança de
ou instrução por uma pessoa responsável.
As crianças apenas podem utilizar o aparelho se forem supervi- ■
sionadas por um adulto.
Solicite a repar
ou ao serviço de assistência técnica. Reparações indevidas
podem acarretar perigos par
garantia é anulada.
A reparação do aparelho dentro do período de garantia deve ■
ser efectuada apenas pelo serviço de assistência técnica do
fabricante.
Os componentes avariados de
peças de reposição originais. Apenas a utilização destas peças
garante o cumprimento dos r
Proteja o aparelho da humidade e da entrada de líquidos. Nunca ■
mergulhe o aparelho em água, não o instale próximo de água e
não coloque quaisquer objectos com líquido (por ex. jarr
o aparelho.
Não coloque quaisquer objectos sobre o aparelho. ■
Não opere o aparelho nas proximidades de chamas desprotegidas ■
(por ex. v
E
Retire a alimentação sempre pela fi cha de rede da tomada e não ■
pelo cabo de alimentação.
Em caso de ocorr
retire a fi cha de rede da tomada.
elas).
vite a luz solar directa. ■
vem utilizar o aparelho apenas sob supervisão
ação do aparelho apenas a empresas autorizadas ■
a o utilizador. Adicionalmente, a
ve ser substituídos apenas por ■
equisitos de segurança.
ência de av
arias e em caso de intempéries, ■
PT
as) sobre
SRD 250 A1
47
Page 50

Elementos de comando
Botão SNOOZE: Interromper alarme
2
Visor
3
LED POWER: Acende com o aparelho ligado
4
MHz-LED: Acende com recepção UKW
5
PT
kHz-LED: Acende com recepção FM
6
SLEEP-LED: Acende com função SLEEP ligada
7
Sintonizador TUNING: Selecção da emissora
8
Antena de fi o
9
Botão POWER/BAND: Ligar/Desligar o aparelho /
10
Botão DOWN: Reduzir confi gurações
11
Compartimento para as pilhas
12
Botão UP: Aumentar confi gurações
Botão TIME: Ajustar a hora
13
Botão SLEEP: Confi gurar desactivação automática
14
Botão AL2: Confi gurar hora de alarme 2
15
Botão AL1: Confi gurar hora de alarme 1
16
Cabo de alimentação
17
Dispositivo de regulação VOL: Regulação do volume
18
Interruptor DIMMER: Ajustar a iluminação do visor
19
Elementos de comando
seleccionar a banda de frequências
48
SRD 250 A1
Page 51

Instalação e ligação
Instalação e ligação
Material fornecido e inspecção de transporte
Por norma, o aparelho é fornecido com os seguintes componentes:
Rádio-despertador ●
Manual de instruções ●
Retire o aparelho e o manual de instruções da caixa de cartão e
remo
va todo o material de embalagem.
NOTA
Verifi que o material fornecido quanto à sua integridade e ►
danos visíveis.
Caso o material fornecido esteja incompleto devido a embalagem
insufi ciente ou ao transporte, entre em contacto com a linha
directa de assistência (ver capítulo Assistência Técnica).
Requisitos do local de instalação
Para um funcionamento seguro e perfeito do aparelho, o local de
instalação deve cumprir as seguintes condições:
Coloque o aparelho sobre uma superfície estável, plana e horizontal. ■
Instale o aparelho de modo a que os orifícios de ventilação não ■
sejam cobertos.
Não instale o aparelho num ambiente quente, molhado ou muito
■
húmido nas proximidades de material infl amável.
PT
►
SRD 250 A1
49
Page 52

As superfícies de mobiliário contêm possivelmente componentes que ■
agridem e podem amolecer os pés de borracha do aparelho. Se
necessário, coloque uma base sob os pés de borracha do aparelho.
A tomada deve encontrar-se num local bem acessível de modo ■
que a fi cha de rede possa ser facilmente retirada.
Ligação eléctrica
PT
Antes da ligação do aparelho, compare os dados de ligação ■
(tensão e frequência) na placa de identifi cação com os da sua
rede eléctrica. Estes dados de
danos no aparelho.
Certifi que-se de que o cabo de alimentação do aparelho está ■
intacto e não é disposto sobre superfícies quentes e/ou arestas
afi adas.
Cer
tifi que-se de que o cabo de alimentação não é esticado ou ■
dobrado.
Não deixe o cabo de alimentação pendur
(risco de tropeçar).
Colocar as pilhas
Colocando duas pilhas 1,5 V do tipo Mignon (R6/LR6/AA) evita a
perda da hora e da hora de alarme ajustadas, no caso de falhar a
corrente eléctrica. As pilhas permitem que o relógio interno continue
a funcionar mesmo em caso de falha de corrente eléctrica. Em caso
de reactivação da corrente eléctrica é automaticamente exibida no
visor
2
a hora correcta.
Instalação e ligação
vem coincidir para que não ocorram
ado sobre esquinas ■
50
NOTA
O visor, rádio e despertador não funcionam em modo de ►
emergência.
SRD 250 A1
Page 53

Operação e funcionamento
Abra a tampa do compartimento para as pilhas ♦
inferior do aparelho.
Coloque duas pilhas 1,5 V do tipo Mignon R6/LR6/AA/ (não ♦
incluído no volume de fornecimento) no compartimento para
as pilhas
compartimento para as pilhas
Feche o compartimento para as pilhas ♦
encaixando-a.
11
. Tenha em atenção a marcação da polaridade no
11
.
11
11
na parte
colocando a tampa e
Estabelecer a alimentação de corrente
Insira a fi cha de rede numa tomada. No visor ♦
hora (- -:- -).
2
é exibida a
Antena de fi o FM
Desenrole totalmente a antena de fi o ♦
8
para a recepção FM.
Operação e funcionamento
Este capítulo contém informações importantes acerca da operação
e do funcionamento do aparelho.
Ajustar a hora
Prima o botão TIME ♦
Prima ou mantenha premido o botão UP ♦
confi gurar as horas.
Prima novamente a tecla TIME ♦
dos minutos.
Prima ou mantenha premido o botão UP ♦
confi gurar os minutos.
Prima novamente a tecla TIME ♦
. No visor 2 pisca a indicação das horas.
13
12
ou DOWN 10 para
. No visor 2 pisca a indicação
13
12
ou DOWN 10 para
. A hora ajustada é assumida.
13
PT
SRD 250 A1
51
Page 54

NOTA
A hora é reposta para - -:- -, se o aparelho for desconectado ►
da alimentação de corrente e não estiverem colocadas pilhas.
Modo de rádio
Prima o botão POWER/BAND ♦
PT
Com o dispositivo de regulação VOL ♦
Prima brevemente o botão POWER/BAND ♦
banda de frequências pretendida. Em caso de recepção UKW
acende o LED MHz 4, em caso de recepção MW acende o LED
kHz
Ajuste com o regulador TUNING ♦
Prima durante aprox. dois segundos o botão POWER/BAND ♦
para desligar o aparelho.
NOTA
As características técnicas do aparelho permitem um intervalo ►
de frequências ajustável fora do intervalo permitido de UKW
(FM) 87,5–108 MHz ou MW (AM) 526,5–1606,5 kHz.
Noutros países podem e
relativamente às gamas de frequência de rádio mencionadas.
Tenha em atenção que não pode utilizar as informações recebidas fora da área de frequência de radiodifusão, transmitir a
terceiros ou utilizar para outros fi ns de modo indevido.
Operação e funcionamento
9
para ligar o aparelho.
ajuste o volume pretendido.
18
9
para confi gurar a
5
.
7
a emissora pretendida.
9
xistir regulamentos nacionais diferentes
52
SRD 250 A1
Page 55

Operação e funcionamento
Programar as horas e os tipos de alarme
Durante a programação das horas de alarme pode escolher se
deverá soar um sinal de alarme à hora programada ou se deverá
ligar-se o rádio. Podem ser programadas duas horas de alarme
diferentes (Alarme 1/Alarme 2).
Prima e mantenha premido o botão AL1 ♦
No visor 2 pisca a indicação das horas.
Prima ou mantenha premido o botão UP ♦
confi gurar as horas.
Prima novamente o botão AL1 ♦
No visor 2 pisca a indicação dos minutos.
Prima ou mantenha premido o botão UP ♦
confi gurar os minutos.
Prima novamente o botão AL1 ♦
alarme confi gurada é memorizada e no visor 2 surge a indicação do tipo de alarme.
Prima o botão UP ♦
( = som de alarme ou = rádio).
Prima novamente o botão AL1 ♦
rizar as confi gurações.
NOTA
Se pretender ser despertado/a com o rádio, confi gure adi- ►
cionalmente a programação da hora de alarme, da emissora
pretendida e do v
12
para confi gurar o tipo de alarme pretendido
olume (ver capítulo Modo de rádio).
ou o botão AL2 15.
16
ou o botão AL2 15. A hora de
16
ou o botão AL2 15 para memo-
16
ou o botão AL2 15.
16
12
ou DOWN 10 para
12
ou DOWN 10 para
PT
SRD 250 A1
53
Page 56

Operação e funcionamento
Ligar a função de despertar
Prima brevemente o botão AL1 ♦
No visor
de despertar é agora ligada.
2
surge um ponto à esquerda ou à direita. A função
Desactivar alarme
Enquanto o alarme soa, prima o botão POWER/BAND ♦
PT
desactivar o alarme por 24 horas.
Desligar a função de despertar
Prima brevemente o botão AL1 ♦
As indicações de alarme apagam-se no visor
Função “SNOOZE”
Enquanto o alarme soa, prima o botão SNOOZE ♦ para des-
ligar temporariamente o alarme. Após 6 minutos, o alarme soa
novamente.
NOTA
Quando a função SNOOZE estiver activada, pisca o respectivo ►
ponto de alarme no visor
Desactivação automática (função SLEEP)
Com a função Sleep, o aparelho desliga-se após um período
confi gurado por si entre 60 e 10 minutos..
Prima o botão POWER/BAND ♦
Prima o botão SLEEP ♦
ção 60 minutos e o LED SLEEP
o botão SLEEP 14 a hora de desactivação é reduzida em 10 minutos.
. No visor 2 surge a hora de desactiva-
14
ou o botão AL2 15.
16
ou o botão AL2 15.
16
2
.
9
para ligar o aparelho.
6
acende. Ao premir novamente
9
, para
2
.
54
SRD 250 A1
Page 57

Limpeza
Prima o botão SLEEP repetidamente ♦
ção 2 pretendida ser exibida no visor.
Para desligar a função Sleep, prima repetidamente o botão ♦
14
SLEEP
, até surgir 2 no visor. O LED SLEEP 6 apaga-se.
até a hora de desactiva-
14
Ajustar a iluminação do visor
Ajuste o interruptor DIMMER ♦
que as indicações no visor 2 sejam exibidas mais claras.
Ajuste o interruptor DIMMER ♦
as indicações no visor 2 sejam exibidas mais escuras.
19
para HIGH, se for necessário
19
para LOW, se for necessário que
Limpeza
PERIGO
Perigo de morte por choque eléctrico!
Re
tire a fi cha de rede da tomada, antes de iniciar a limpeza. ►
Aquando da limpeza, certifi que-se de que não entra humidade ►
no aparelho.
Não utilize deter
ser agressivos para a superfície do aparelho
Limpe as superfícies do apar
gentes agressivos ou abrasivos. Estes podem ►
elho com um pano macio e seco. ■
PT
SRD 250 A1
55
Page 58

Resolução de avarias
Neste capítulo poderá encontrar indicações importantes acerca
da localização de avarias e resolução de avarias. Tenha em
atenção as indicações para evitar perigos e danos.
Causas e resolução de avarias
PT
A seguinte tabela permite determinar e eliminar com mais facilidade
anomalias de menor dimensão:
Erro Causa possível Resolução
Resolução de avarias
Não é
possível ligar
o aparelho.
Sem som
Ruídos de
interferências
na recepção
de rádio
NOTA
Caso não seja possível resolver o problema com os passos ►
anteriormente mencionados, entre em contacto com o serviço
de apoio ao cliente.
A fi cha de rede não
está inserida.
A tomada não
fornece tensão.
O volume está no
mínimo.
A emissora não
está correctamente
regulada.
A recepção é demasiado fraca.
Insira a fi cha de rede na
tomada.
Verifi que os fusíveis
domésticos.
Aumente o volume com o
dispositivo de regulação
de VOL
Ajuste correctamente a
emissora com o regulador
TUNING
Procure melhorar a
recepção movendo a
antena de fi o.
56
.
18
7
.
SRD 250 A1
8
Page 59

Armazenamento/Eliminação
Armazenamento
Caso não pretenda utilizar o aparelho durante um período
prolongado, desligue-o da alimentação de tensão, retire a pilha e
armazene-o num local limpo e seco, sem exposição solar directa.
Eliminação
Eliminar o aparelho
Nunca deposite o aparelho no lixo doméstico
comum. Este produto está sujeito à Directiva
Europeia 2002/96/EC.
Elimine o aparelho através de um serviço de eliminação autorizado
ou das entidades de eliminação locais. Respeite os regulamentos
actualmente em vigor. Em caso de dúvida, entre em contacto com
a entidade de eliminação de resíduos.
Eliminação das pilhas
As pilhas não devem ser eliminadas juntamente com o lixo doméstico. Todos os consumidores devem entregar as pilhas/pilhas
recarregáveis num ponto de recolha da sua freguesia/região ou
num estabelecimento comercial. Este dever permite garantir que
as pilhas são eliminadas de modo ecológico. Devolva as pilhas/
pilhas recarregáveis apenas quando estas estiverem vazias.
SRD 250 A1
PT
57
Page 60

Anexo
Dados técnicos
Tensão de serviço 220-240 V / 50 Hz
2 pilhas de 1,5 V
Pilhas de reserva
PT
Consumo de energia
Funcionamento 10 W
Standby aprox. 1,5 W
Potência máx. de saída
da coluna
Frequência FM (VHF) 87,5 - 108 MHz
Frequência AM (MW) 526,5 - 1606,5 kHz
Temperatura de
funcionamento
Humidade
(sem condensação)
tipo AA/Mignon/R6/LR6
(não incluída no volume de
fornecimento)
+5 - +40 °C
5 - 90 %
Anexo
250 mW
Dimensões (L x A x P) 14,3 x 13,3 x 8,3 cm
Peso aprox. 435 g
Classe de protecção
II
58
SRD 250 A1
Page 61

Anexo
Indicações acerca da Declaração de
conformidade CE
Este aparelho está em conformidade com os requisitos fundamentais e as outras normas relevantes da Directiva europeia Compatibilidade Electromagnética 2004/108/EC, a Directiva Baixa
tensão 2006/95/EC e a Directiva de concepção ecológica
2009/125/EC (Portaria 1275/2008 Anexo II, n.º 1).
Pode obter a versão completa e original da declaração de
conformidade junto do importador.
Garantia
Este aparelho tem 3 anos de garantia a partir da data de
aquisição. Este aparelho foi fabricado com o máximo cuidado e
escrupulosamente testado antes da sua distribuição.
Guarde o talão como comprovativo da compra. Em caso de
reclamação de garantia, entre em contacto com o seu ponto de
assistência técnica por telefone. Apenas deste modo pode ser
garantido um envio gratuito do seu produto.
NOTA
A garantia abrange apenas defeitos de material e de fabrico, ►
mas não peças de desgaste ou danos em peças frágeis, p.ex.
interruptores ou baterias.
PT
oduto destina-se apenas ao uso privado e não ao uso comer-
O pr
cial. Em caso de utilização indevida e incorrecta, exercício de
força excessiva e intervenções não efectuadas pela nossa fi lial de
Assistência Técnica autorizada, perderá o direito à garantia.
SRD 250 A1
59
Page 62

Os seus direitos legais não são limitados por esta garantia.
O tempo de garantia não é prolongado pela reclamação de garantia. Isto também é válido para peças substituídas e reparadas.
Eventuais danos e avarias já existentes antes da compra têm de
ser comunicados imediatamente depois de retirar o aparelho da
embalagem, o mais tardar dois dias após a compra.
Após a expiração do tempo de garantia as reparações necessárias
PT
são cobradas.
Assistência técnica
Importador
KOMPERNASS GMBH
BURGSTRASSE 21
44867 BOCHUM, GERMANY
www.kompernass.com
Service Portugal
Tel.: 70778 0005
E-Mail: kompernass@lidl.pt
(0,123 EUR/Min.)
Anexo
60
SRD 250 A1
Page 63

Index
Introduction . . . . . . . . . . . . . . . . . . . . . . . . . . . . . . . . . 63
Information for these operating instructions . . . . . . . . . . . . . . . .63
Copyright . . . . . . . . . . . . . . . . . . . . . . . . . . . . . . . . . . . . . . . . . . 63
Intended use . . . . . . . . . . . . . . . . . . . . . . . . . . . . . . . . . . . . . . . . 63
Safety . . . . . . . . . . . . . . . . . . . . . . . . . . . . . . . . . . . . . . 65
Danger from electric shock . . . . . . . . . . . . . . . . . . . . . . . . . . . . .65
Interaction with batteries . . . . . . . . . . . . . . . . . . . . . . . . . . . . . . . 66
Basic Safety Instructions . . . . . . . . . . . . . . . . . . . . . . . . . . . . . . .66
Operating components . . . . . . . . . . . . . . . . . . . . . . . . 68
Setting up and connecting . . . . . . . . . . . . . . . . . . . . . 69
Package contents and transport inspection . . . . . . . . . . . . . . . . . 69
Set-up location requirements . . . . . . . . . . . . . . . . . . . . . . . . . . . . 69
Electrical connection . . . . . . . . . . . . . . . . . . . . . . . . . . . . . . . . . .70
Inserting the batteries . . . . . . . . . . . . . . . . . . . . . . . . . . . . . . . . . 70
Providing mains power . . . . . . . . . . . . . . . . . . . . . . . . . . . . . . . . 71
VHF wire antenna . . . . . . . . . . . . . . . . . . . . . . . . . . . . . . . . . . . 71
Handling and operation . . . . . . . . . . . . . . . . . . . . . . . 71
Setting the time . . . . . . . . . . . . . . . . . . . . . . . . . . . . . . . . . . . . . . 71
Radio operation . . . . . . . . . . . . . . . . . . . . . . . . . . . . . . . . . . . . . 72
Programming the wake time and method . . . . . . . . . . . . . . . . . .73
Switching the alarm function on . . . . . . . . . . . . . . . . . . . . . . . . .74
Switching the alarm off . . . . . . . . . . . . . . . . . . . . . . . . . . . . . . . . 74
Switching the alarm function off . . . . . . . . . . . . . . . . . . . . . . . . . 74
GB
MT
SRD 250 A1
61
Page 64

Snooze function (“SNOOZE” function) . . . . . . . . . . . . . . . . . . . 74
Automatic Switch-off (“SLEEP” function) . . . . . . . . . . . . . . . . . . . 74
Setting the display illumination . . . . . . . . . . . . . . . . . . . . . . . . . . 75
Cleaning . . . . . . . . . . . . . . . . . . . . . . . . . . . . . . . . . . . . 75
Troubleshooting . . . . . . . . . . . . . . . . . . . . . . . . . . . . . 76
Malfunction causes and remedies. . . . . . . . . . . . . . . . . . . . . . . .76
Storage . . . . . . . . . . . . . . . . . . . . . . . . . . . . . . . . . . . . 77
Disposal . . . . . . . . . . . . . . . . . . . . . . . . . . . . . . . . . . . . 77
GB
MT
Disposal of the appliance . . . . . . . . . . . . . . . . . . . . . . . . . . . . . . 77
Disposing of the batteries . . . . . . . . . . . . . . . . . . . . . . . . . . . . . . 77
Appendix . . . . . . . . . . . . . . . . . . . . . . . . . . . . . . . . . . . 78
Technical data . . . . . . . . . . . . . . . . . . . . . . . . . . . . . . . . . . . . . . . 78
Information regarding the EG Conformity Declaration . . . . . . . . 79
Warranty . . . . . . . . . . . . . . . . . . . . . . . . . . . . . . . . . . . . . . . . . . . 79
Service . . . . . . . . . . . . . . . . . . . . . . . . . . . . . . . . . . . . . . . . . . . .80
Importer. . . . . . . . . . . . . . . . . . . . . . . . . . . . . . . . . . . . . . . . . . . . 80
62
SRD 250 A1
Page 65

Introduction
Introduction
Information for these operating instructions
These operating instructions are a component of the SRD 250 A1
Clock Radio (henceforth designated as the appliance) and they
supply you with important information about the intended use,
safety and connection as well as operation of the appliance.
These operating instructions must be kept available close to the
appliance. They are to be read and used by anyone assigned to
operate and repair faults in the appliance. Retain these operating
instructions and pass them on to any future owners with the appliance.
Copyright
This documentation is copyright protected.
Any copying and/or reproduction, wholly or partially, as well as
rendition of the illustrations, also in a modifi ed form, is permitted
only with written consent from the manufacturer.
Intended use
This device is intended exclusively for listening to radio programmes
and for waking by an alarm tone or radio in a domestic environment.
This appliance is not intended for any other use or for uses beyond
those mentioned. Claims of any kind for damage caused by improper
use, incompetent repair, unauthorized modifi cation or the use of
unauthorized parts are excluded. The risks from these are borne
entirely by the user.
GB
MT
SRD 250 A1
63
Page 66

Introduction
In these operating instructions the following warnings are used:
DANGER
A warning at this danger level indicates a threatening
da
ngerous situation.
In the event that the hazardous situation is not avoided it can lead
to death or serious injury.
Compliance to the instructions in this warning are necessary ►
to avoid the danger of death or serious injury.
GB
MT
WARNING
A warning at this danger level indicates a potentially
dangerous situation.
If the dangerous situation is not avoided it can lead to injuries.
The directives in this warning are there to avoid personal injuries. ►
IMPORTANT
A warning of this danger level signifi es possible
pr
operty damage.
If the situation is not avoided it can lead to property damage.
The directives in this warning are there to avoid property damage. ►
NOTE
A notice signifi es additional information that assists in the ►
handling of the appliance.
64
SRD 250 A1
Page 67

Safety
Safety
In this chapter you receive important safety information regarding
handling of the appliance. This appliance complies with the statutory safety regulations. Incorrect usage can lead to injuries and
property damage.
Danger from electric shock
DANGER
Life-threatening situation from electric shock!
A life-t
hreatening situation can arise from contact
with live wires or components!
Observe the following safety instructions to avoid electric shock
hazards:
Do not use the appliance if the mains power plug or the ►
connection cable are damaged.
Do not, under any cir
The risk of an electric shock is present if the power carrying
connections are touched and the electrical and mechanical
construction is changed.
The appliance consumes power when in standby-mode. ►
To completely separate the appliance from mains power, the
er plug MUST be removed from the mains power socket.
pow
The appliance should be positioned so that you have unrestricted
access to the mains power socket at all times, thus enabling
the plug to be immediately withdrawn should an emergency
situation arise.
cumstances, open the appliance housing. ►
GB
MT
SRD 250 A1
65
Page 68

Interaction with batteries
WARNING
Danger from improper use!
For safe handling of batteries observe the following safety
instructions:
Do not throw batteries into a fi re. ►
Do not short circuit batteries. ►
Do not attempt to recharge batteries. ►
GB
MT
Never open, solder or weld batteries. The risk of explosions ►
and injuries exists.
Regularly check the condition of the batteries. Leaking batter
acid can cause permanent damage to the appliance. Special
caution should be shown when handling damaged or leaking
batteries. Danger from acid burns! Wear protective gloves.
Store batteries in a place inaccessible to children. ►
When swallowed seek immediate medical attention.
If you do not intend to use the appliance for an extended ►
period of time, remove the batteries.
Basic Safety Instructions
For safe handling of the appliance observe the following safety
information:
Before use check the appliance for visible external damage. Do ■
not put into operation an appliance that is damaged or has been
dropped.
Damaged cables or connections should be replaced by authorised ■
qualifi ed persons or by the customer service department.
Safety
y ►
66
SRD 250 A1
Page 69

Safety
Persons who, due to their physical, intellectual or motor abilities, ■
are incapable of operating the appliance safely may only use the
device under super
Only permit children to use the appliance under supervision. ■
Repairs should only be carried out by authorised specialist companies ■
or by the customer service department. Incorrect repairs can result in
danger to the user
A repair to the appliance during the warranty period may only ■
be carried out by a customer service department authorised by
the manufacturer other
be considered for subsequent damages.
Defective components may only be replaced with original replace- ■
ment parts. Only by using original replacement parts can you
guarantee that the safet
Protect the appliance from moisture and liquid penetration. Never ■
submerge the appliance in water, do not place the appliance in
the vicinity of w
(i.e. vases) on the appliance.
Do not place any objects on the appliance. ■
Do not operate the appliance in the vicinity of open fl ames ■
(i.e. candles).
A
oid direct sunlight. ■
v
Always pull on the power plug when disconnecting from the wall ■
socket, never pull on the connection cable.
If malfunctions occur or thunder storms thr
plug from the wall socket.
vision or direction from a responsible person.
. In addition w
ater and do not stand any object fi lled with liquid
arranty claims become void.
wise no additional warranty claims can
y requirements are complied with.
eaten pull the po
GB
MT
wer ■
SRD 250 A1
67
Page 70

Operating components
SNOOZE Button: Alarm interupt
2
Display
3
POWER-LED: Lights up when the device is switched on
4
MHz-LED: Lights up with VHF reception
5
kHz-LED: Lights up with MW reception
6
SLEEP-LED: Lights up when the SLEEP function is switched on
7
TUNING regulator: Station selection
GB
8
MT
Wire antenna
9
POWER/BAND button: Switch device on / off /
10
DOWN button: Adjustments downwards
11
Battery compartment
12
UP button: Adjustments upwards
TIME button: Set the time
13
SLEEP button: Set the automatic switch off
14
AL2 button: Set Alarm time 2
15
AL1 button: Set Alarm time 1
16
Power Cable
17
VOL control: Volume control
18
DIMMER switch: Set the display illumination
19
Operating components
select frequency band
68
SRD 250 A1
Page 71

Setting up and connecting
Setting up and connecting
Package contents and transport inspection
The appliance is delivered with the following components as
standard:
Clock Radio ●
Operating instructions ●
Extract the appliance and the instruction manual from the carton
and remo
NOTE
Set-up location requirements
For safe and fault free operation of the appliance the set-up
location must comply with the following provisions:
Place the appliance on a fi rm, fl at and even surface . ■
Place the appliance so that the ventilation slots are not covered. ■
Do not place the appliance in a hot, wet or very humid location ■
or in the vicinity of fl ammable materials.
ve all packaging material.
Check the contents to ensure everything is present and there ►
are no signs of visible damage.
If the contents are not complete or ar
of defective packaging or through transportation, contact the
Service Hotline (see chapter Service).
e damaged as a result ►
GB
MT
SRD 250 A1
69
Page 72

The surfaces of furniture may contain components that can aff ect ■
the rubber pads of the appliance and could soften them. If necessary, place a covering under the appliance's rubber pads.
The mains power socket must be easily accessible so that, in an ■
emergency, the plug can be quickly withdrawn from the socket.
Electrical connection
Before connecting the appliance compare the connection data ■
(Voltage and frequency) on the rating plate with that of the mains
GB
MT
electric source. This data must be compatible to av
damage to the appliance.
Make sure that the appliance's connection cable is not damaged ■
and is not laying over hot surfaces and/or sharp edges.
Make sur
Do not allow the connection cable to hang over edges ■
(Trip wire eff ect).
e that the connection cable is not tightly stretched or bent. ■
Inserting the batteries
By inserting two 1.5 V batteries (type R6/LR6/AA/Mignon) you
avoid losing the programmed time of day and wake time in the
event of mains power loss. The batteries make sure that the internal
clock continues to run even during a power outage.
When power is restored the correct time appears automatically
in the display 2.
Setting up and connecting
oid possible
70
NOTICE
The display, radio and alarm do not function with battery- ►
power alone.
SRD 250 A1
Page 73

Handling and operation
Open the cover of the battery compartment ♦
the device.
Insert two 1.5 V batteries type R6/LR6/AA/Mignon (not supplied) ♦
11
11
. For correct polarity make sure
.
11
by replacing the cover and
into the battery compartment
that the batteries are inserted according to the diagram in the
battery compartment
Close the battery compartment ♦
allowing it to lock into place.
11
on the bottom of
Providing mains power
Plug the mains power plug into a wall socket. The time of day ♦
2
(- -:- -) will be shown in the display
.
VHF wire antenna
For VHF reception completely unfold the wire antenna ♦
Handling and operation
In this chapter you receive important information for the handling
and operation of the appliance.
Setting the time
Press and hold the TIME button ♦
indicator blinks.
Press or hold down the UP button ♦
to set the hour.
Press the TIME button ♦
indicator blinks.
Press or hold down the UP button ♦
to set the minutes.
Press the TIME button ♦
SRD 250 A1
again. In the display 2 the minute
13
again. The set time of day will be accepted.
13
. In the display 2 the hour
13
12
and/or DOWN button 10
12
and/or DOWN button 10
GB
MT
8
.
71
Page 74

NOTICE
The time of day will revert back to - -:- - if the device is discon- ►
nected from the mains power supply and no batteries have
been inserted.
Radio operation
Press the POWER/BAND button ♦
With the VOL control ♦
GB
MT
Press briefl y the POWER/BAND button ♦
frequency band. With VHF reception the MHz-LED 4 lights up,
with MW reception the kHz-LED
With the TUNING control ♦
Press for approx. two seconds the POWER/BAND button ♦
switch the device off .
NOTE
The technical realities of the appliance permit an adjustable ►
frequency range outside the permitted frequency ranges
of VHF (FM) 87.5 - 108 MHz and/or MW (AM) 526,5 1606,5 kHz. In some countries, diff
may apply to the assigned radio frequency ranges. Please
note that information received outside of the assigned radio
frequency ranges may not be used, passed on to third parties
or otherwise misused.
Handling and operation
9
to switch the device on.
set the desired sound level.
18
9
to set the desired
5
lights up.
7
set the desired radio station.
erent national regulations
9
to
72
SRD 250 A1
Page 75

Handling and operation
Programming the wake time and method
When programming the alarm times, you can select whether,
at the programmed time, alarm tones should sound or the radio
should start playing. Two diff erent alarm times (Alarm 1/Alarm 2)
can be programmed.
Press and hold the AL1 button ♦
the hour indicator blinks.
Press or hold down the UP button ♦
to set the hour.
Press the AL1 button ♦
the minute indicator blinks.
Press or hold down the UP button ♦
to set the minutes.
Press the AL1 button ♦
time is accepted and in the display 2 appears the wake method
indicator.
Press the UP button ♦
Alarm tone or = Radio).
Press the AL1 button ♦
setting.
NOTICE
If you want to be awakened with the radio, apart from the wake ►
time programming you must also set, additionally, the desired
adio station and volume (see section Radio operation).
r
16
16
12
to set the desired wake method ( =
16
or AL2 button 15. In the display 2
16
12
or DOWN button 10
or AL2 button 15 again. In the display 2
12
or DOWN button 10
or AL2 button 15 again. The set wake
or AL2 button 15 again to accept the
GB
MT
SRD 250 A1
73
Page 76

Handling and operation
Switching the alarm function on
Press briefl y the AL1 button ♦
2
play
a point appears to the left and/or to the right. The alarm
function is now activated.
Switching the alarm off
Whilst the alarm is sounding press the POWER/BAND button ♦
to switch the alarm off for 24 hours.
Switching the alarm function off
GB
MT
Press briefl y the AL1 button ♦
indicators go out in the display
Snooze function (“SNOOZE” function)
Whilst the alarm is sounding press the SNOOZE button ♦ to tempo-
rarily switch off the alarm. After 6 minutes the alarm sounds again.
NOTICE
If the snooze function is activated the corresponding alarm ►
point blinks in the display
Automatic Switch-off (“SLEEP” function)
With the “Sleep” function the device switches itself off after a time
lapse of between 60 and 10 minutes.
Press the POWER/BAND button ♦
Press the SLEEP button ♦
time 60 minutes and the SLEEP-LED
ing of the SLEEP button 14 shortens the switch off time by
10 minutes respectively.
and/or AL2 button 15. In the dis-
16
and/or AL2 button 15. The alarm
16
2
.
2
.
9
to switch the device on.
. In the display 2 appears the switch off
14
6
lights up. Repeated press-
9
,
74
SRD 250 A1
Page 77

Cleaning
Press repeatedly the SLEEP button ♦
switch of time is shown in the display 2.
To switch off the sleep function press repeatedly the SLEEP button ♦
2
until in the display
is shown. The SLEEP-LED 6 goes out.
until the desired
14
Setting the display illumination
Set the DIMMER switch ♦
the display 2 to appear brighter.
Set the DIMMER switch ♦
the display 2 to appear darker.
19
to HIGH if you want the indicators in
19
to LOW if you want the indicators in
Cleaning
DANGER
Risk of fatal electrocution!
Remo
ve the plug from the mains power socket before cleaning. ►
Whilst cleaning make sure that no moisture is allowed to enter ►
the device.
Do not use aggressiv
These can aff ect the surfaces of the device.
Clean the surfaces of the device with a soft, dry cloth. ■
e cleaning agents or scouring powder. ►
14
,
GB
MT
SRD 250 A1
75
Page 78

Troubleshooting
Troubleshooting
In this chapter you will receive important information for the localisation of malfunctions and their remedies. Observe the instructions
in order to avoid danger and damage.
Malfunction causes and remedies
The following table will help with localizing and remedying minor
malfunctions:
GB
MT
Defect Possible cause Solution
The plug is not
Appliance
does not
switch on.
No sound
Noisy radio
reception
NOTE
If you cannot solve the problem with the aforementioned ►
methods, please contact Customer Service .
inserted.
Mains power socket
is not supplying
power.
The volume is set to
minimum.
The radio station
is not properly
tuned in.
Reception is
too weak.
76
Insert the plug into the
mains power socket.
Check the circuit fuse.
Increase the sound
volume with the
VOLUME regulator
Tune in the radio station
properly with the TUNING
7
controller
Try to improve reception
by moving the wire
antenna
.
8
.
18
.
SRD 250 A1
Page 79

Storage/Disposal
Storage
If you do not intend to use the appliance for an extended period
of time, disconnect it from the mains power supply, remove the
battery and store it at a clean, dry location that is not subjected
to direct sunlight.
Disposal
Disposal of the appliance
Do not dispose of the appliance in your normal
domestic waste. This product is subject to the
provisions of European Directive 2002/96/EC.
Dispose of the appliance through an approved disposal centre or
at your community waste facility. Observe the currently applicable
regulations. In case of doubt, please contact your waste disposal
centre.
Disposing of the batteries
Do not dispose of the batteries with household waste. Every consumer is legally obligated to hand in batteries at a collection centre
in his/her community/district or a dealer. This obligation is intended
to ensure that batteries are disposed of in an environmentally safe
fashion. Hand batteries in only when they are fully discharged.
GB
MT
SRD 250 A1
77
Page 80

Appendix
Technical data
Operational voltage 220-240 V / 50 Hz
2 x 1.5 V battery
Batteries for power reserve
Power consumption
GB
Operation 10 W
MT
Standby approx. 1.5 W
Max. Loudspeaker
Output Power
Frequency FM (USW) 87.5 - 108 MHz
Frequency AM (MW) 526.5 - 1606.5 kHz
Operating temperature +5 - +40 °C
Humidity (no condensation) 5 - 90 %
Measurements (W x H x D) 14.3 x 13.3 x 8.3 cm
Type AA/Mignon/R6/LR6
(Batteries not supplied)
Appendix
250 mW
Weight approx. 435 g
Protection class
II
78
SRD 250 A1
Page 81

Appendix
Information regarding the EG Conformity
Declaration
This appliance complies with, in regard to conformance to the basic
requirements and other relevent regulations, the European Directive
for Electromagnetic Compatibility 2004/108/EC, the Low Voltage
Directive 2006/95/EC as well as the Eco-Design Directive
2009/125/EC (Supplement 1275/2008 Appendix II, Nr.1).
The complete original declaration of conformity can be obtained
from the importer.
Warranty
You receive a 3-year warranty for this appliance as of the purchase
date. This appliance has been manufactured with care and meticulously examined before delivery.
Please retain your receipt as proof of purchase. In the case of a
warranty claim, please get in touch, by telephone, with our service
department. Only in this way can a post-free dispatch for your
goods be assured.
NOTE
The warranty adjustment is valid only for material or manu- ►
facturing defects not, however, for transport damage, wear
and tear or for damage to break
rechargeable batteries.
able parts, i.e. switches or
GB
MT
This product is for private use only and is not intended for commercial use. The warranty is void in the case of abusive and improper
handling, use of force and internal tampering not carried out by
our authorised service branch.
SRD 250 A1
79
Page 82

GB
MT
Appendix
Your statutory rights are not restricted in any way by this warranty.
The warranty period will not be extended as a result of warranty
adjustments. This applies also to replacement and repaired parts.
Damage and defects potentially present at the time of purchase
must be reported immediately after unpacking or, at the very least,
two days after date of purchase.
After expiry of the warranty period incidental repairs are subject
to payment.
Service
Service Great Britain
Tel.: 0871 5000 720 (0.10 £/Min.)
E-Mail: kompernass@lidl.gb
Service Malta
Tel.: 80062230
E-Mail: kompernass@lidl.mt
Importer
KOMPERNASS GMBH
BURGSTRASSE 21
44867 BOCHUM, GERMANY
www.kompernass.com
80
SRD 250 A1
Page 83

Inhaltsverzeichnis
Einführung . . . . . . . . . . . . . . . . . . . . . . . . . . . . . . . . . . 83
Informationen zu dieser Bedienungsanleitung . . . . . . . . . . . . . .83
Urheberrecht . . . . . . . . . . . . . . . . . . . . . . . . . . . . . . . . . . . . . . . . 83
Bestimmungsgemäße Verwendung . . . . . . . . . . . . . . . . . . . . . . . 83
Sicherheit . . . . . . . . . . . . . . . . . . . . . . . . . . . . . . . . . . . 85
Gefahr durch elektrischen Strom . . . . . . . . . . . . . . . . . . . . . . . . . 85
Umgang mit Batterien . . . . . . . . . . . . . . . . . . . . . . . . . . . . . . . . .86
Grundlegende Sicherheitshinweise . . . . . . . . . . . . . . . . . . . . . . . 86
Bedienelemente. . . . . . . . . . . . . . . . . . . . . . . . . . . . . . 88
Aufstellen und Anschließen . . . . . . . . . . . . . . . . . . . . 89
Lieferumfang und Transportinspektion . . . . . . . . . . . . . . . . . . . . . 89
Anforderungen an den Aufstellort . . . . . . . . . . . . . . . . . . . . . . . . 89
Elektrischer Anschluss . . . . . . . . . . . . . . . . . . . . . . . . . . . . . . . . . 90
Batterien einlegen . . . . . . . . . . . . . . . . . . . . . . . . . . . . . . . . . . . . 90
Stromversorgung herstellen . . . . . . . . . . . . . . . . . . . . . . . . . . . . .91
UKW-Wurfantenne . . . . . . . . . . . . . . . . . . . . . . . . . . . . . . . . . . 91
Bedienung und Betrieb . . . . . . . . . . . . . . . . . . . . . . . . 91
Uhrzeit einstellen . . . . . . . . . . . . . . . . . . . . . . . . . . . . . . . . . . . . . 91
Radiobetrieb . . . . . . . . . . . . . . . . . . . . . . . . . . . . . . . . . . . . . . . .92
Weckzeiten und Weckart programmieren . . . . . . . . . . . . . . . . . 93
Weckfunktion einschalten . . . . . . . . . . . . . . . . . . . . . . . . . . . . . .94
Alarm abschalten . . . . . . . . . . . . . . . . . . . . . . . . . . . . . . . . . . . . 94
Weckfunktion ausschalten . . . . . . . . . . . . . . . . . . . . . . . . . . . . . . 94
SRD 250 A1
DE
AT
CH
81
Page 84

Schlummerfunktion („SNOOZE“-Funktion) . . . . . . . . . . . . . . . . .94
Automatisches Abschalten (SLEEP-Funktion) . . . . . . . . . . . . . . . . 94
Displaybeleuchtung einstellen . . . . . . . . . . . . . . . . . . . . . . . . . . . 95
Reinigung . . . . . . . . . . . . . . . . . . . . . . . . . . . . . . . . . . . 95
Fehlerbehebung . . . . . . . . . . . . . . . . . . . . . . . . . . . . . 96
Fehlerursachen und -behebung . . . . . . . . . . . . . . . . . . . . . . . . . . 96
Lagerung . . . . . . . . . . . . . . . . . . . . . . . . . . . . . . . . . . . 97
Entsorgung . . . . . . . . . . . . . . . . . . . . . . . . . . . . . . . . . . 97
Gerät entsorgen . . . . . . . . . . . . . . . . . . . . . . . . . . . . . . . . . . . . . 97
Batterien entsorgen . . . . . . . . . . . . . . . . . . . . . . . . . . . . . . . . . . . 97
DE
AT
Anhang . . . . . . . . . . . . . . . . . . . . . . . . . . . . . . . . . . . . . 98
CH
Technische Daten . . . . . . . . . . . . . . . . . . . . . . . . . . . . . . . . . . . . 98
Hinweise zur Konformitätserklärung . . . . . . . . . . . . . . . . . . . . . .99
Garantie . . . . . . . . . . . . . . . . . . . . . . . . . . . . . . . . . . . . . . . . . . . 99
Service . . . . . . . . . . . . . . . . . . . . . . . . . . . . . . . . . . . . . . . . . . .100
Importeur . . . . . . . . . . . . . . . . . . . . . . . . . . . . . . . . . . . . . . . . . .100
82
SRD 250 A1
Page 85

Einführung
Einführung
Informationen zu dieser Bedienungsanleitung
Diese Bedienungsanleitung ist Bestandteil des Radioweckers
SRD 250 A1 (nachfolgend als Gerät bezeichnet) und gibt Ihnen
wichtige Hinweise für den bestimmungsgemäßen Gebrauch, die
Sicherheit, den Anschluss sowie die Bedienung des Gerätes. Die
Bedienungsanleitung muss ständig in der Nähe des Gerätes verfügbar sein. Sie ist von jeder Person zu lesen und anzuwenden, die
mit der Bedienung und Störungsbehebung des Gerätes beschäftigt
ist. Bewahren Sie diese Bedienungsanleitung auf und geben Sie
diese mit dem Gerät an Nachbesitzer weiter.
Urheberrecht
Diese Dokumentation ist urheberrechtlich geschützt.
Jede Vervielfältigung, bzw. jeder Nachdruck, auch auszugsweise,
sowie die Wiedergabe der Abbildungen, auch im veränderten
Zustand ist nur mit schriftlicher Zustimmung des Herstellers gestattet.
Bestimmungsgemäße Verwendung
Dieses Gerät ist ausschließlich zum Hören von Radioprogrammen
und zum Wecken durch Alarmton oder Radio im Hausgebrauch
bestimmt. Eine andere oder darüber hinausgehende Benutzung
gilt als nicht bestimmungsgemäß. Ansprüche jeglicher Art wegen
Schäden aus nicht bestimmungsgemäßer Verwendung, unsachgemäßen Reparaturen, unerlaubt vorgenommenen Veränderungen
oder Verwendung nicht zugelassener Ersatzteile sind ausgeschlossen.
Das Risiko trägt allein der Betreiber.
DE
AT
CH
SRD 250 A1
83
Page 86

Einführung
In der vorliegenden Bedienungsanleitung werden folgende
Warnhinweise verwendet:
GEFAHR
Ein Warnhinweis dieser Gefahrenstufe kennzeichnet
eine drohende g
Falls die gefährliche Situation nicht vermieden wird, kann dies
zum Tod oder zu schweren Verletzungen führen.
Die Anweisungen in diesem Warnhinweis befolgen, um die ►
Gefahr des Todes oder schwerer Verletzungen von Personen
rmeiden.
zu ve
efährliche Situation.
DE
AT
CH
WARNUNG
Ein Warnhinweis dieser Gefahrenstufe kennzeichnet
eine mögliche gefährliche Situation.
Falls die gefährliche Situation nicht vermieden wird, kann dies zu
Verletzungen führen.
Die Anweisungen in diesem Warnhinweis befolgen, um ►
Verletzungen von Personen zu vermeiden.
ACHTUNG
Ein Warnhinweis dieser Gefahrenstufe kennzeichnet
einen möglic
Falls die Situation nicht vermieden wird, kann dies zu Sachschäden führen.
Die Anweisungen in diesem Warnhinweis befolgen, um Sach- ►
schäden zu vermeiden.
hen Sachschaden.
84
SRD 250 A1
Page 87

Sicherheit
HINWEIS
Ein Hinweis kennzeichnet zusätzliche Informationen, die den ►
Umgang mit dem Gerät erleichtern.
Sicherheit
In diesem Kapitel erhalten Sie wichtige Sicherheitshinweise im
Umgang mit dem Gerät. Dieses Gerät entspricht den vorgeschriebenen Sicherheitsbestimmungen. Ein unsachgemäßer Gebrauch
kann zu Personen- und Sachschäden führen.
Gefahr durch elektrischen Strom
GEFAHR
Lebensgefahr durch elektrischen Strom!
Beim Kont
Leitungen oder Bauteilen besteht Lebensgefahr!
Beachten Sie die folgenden Sicherheitshinweise um eine
Gefährdung durch elektrischen Strom zu vermeiden:
Benutzen Sie das Gerät nicht, wenn der Netzstecker oder ►
das Anschlusskabel beschädigt sind.
Öff
spannungsführende Anschlüsse berührt und der elektrische und
mechanische Aufbau verändert, besteht Stromschlaggefahr.
Das Gerät nimmt im Standby-Betrieb Strom auf. Um das Gerät ►
vollständig vom Netz zu trennen, muss der Netzstecker aus
der Netzsteckdose gezogen w
so aufgestellt werden, dass stets ein unbehinderter Zugang zur
Netzsteckdose gewährleistet ist, damit in Notsituationen der
Netzstecker sofort abgezogen werden kann.
akt mit unter Spannung stehenden
nen Sie auf keinen Fall das Gehäuse des Gerätes. Werden ►
erden. Daher sollte das Gerät
SRD 250 A1
DE
AT
CH
85
Page 88

Umgang mit Batterien
WARNUNG
Gefahr durch nicht ordnungsgemäße Verwendung!
Für den sicheren Umgang mit Batterien beachten Sie folgende
Sicherheitshinweise:
Werfen Sie Batterien nicht ins Feuer. ►
Schließen Sie Batterien nicht kurz. ►
Versuchen Sie nicht Batterien wieder aufzuladen. ►
Batterien niemals öff nen, löten oder schweißen. Es besteht ►
Explosions- und Verletzungsgefahr.
DE
AT
CH
Überprüfen Sie regelmäßig die Batterien. Ausgetr
Batteriesäure kann dauerhafte Schäden am Gerät verursachen.
Im Umgang mit beschädigten oder ausgelaufenen Batterien
besondere Vorsicht walten lassen. Verätzungsgefahr! Schutzhandschuhe tragen.
Batterien für Kinder unzugänglich aufbewahren. ►
Bei Verschlucken umgehend einen Arzt aufsuchen.
Entnehmen Sie die Batterien, wenn Sie das Gerät längere Zeit ►
nicht benutzen.
Grundlegende Sicherheitshinweise
Beachten Sie für einen sicheren Umgang mit dem Gerät die
folgenden Sicherheitshinweise:
Kontrollieren Sie das Gerät vor der Verwendung auf äußere ■
sichtbare Schäden. Nehmen Sie ein beschädigtes oder heruntergefallenes Gerät nicht in Betrieb.
Bei Beschädigung der K
autorisiertem Fachpersonal oder dem Kundenservice austauschen.
abel oder Anschlüsse lassen Sie diese von ■
Sicherheit
etene ►
86
SRD 250 A1
Page 89

Sicherheit
Personen, die aufgrund ihrer körperlichen, geistigen oder motori- ■
schen Fähigkeiten nicht in der Lage sind das Gerät sicher zu bedienen, dürfen das Ger
verantwortliche Person benutzen.
Gestatten Sie Kindern die Benutzung des Gerätes nur unter Aufsicht. ■
Lassen Sie Reparaturen am Gerät nur von autorisierten Fachbetrie- ■
ben oder dem Kundenservice durchführen. Durch unsachgemäße
R
aturen können Gefahren für den Benutzer entstehen. Zudem
epar
erlischt der Garantieanspruch.
Eine Reparatur des Gerätes während der Garantiezeit darf nur ■
von einem vom Hersteller autorisierten Kundendienst vorgenommen wer
den, sonst besteht bei nachfolgenden Schäden kein
Garantieanspruch mehr.
Defekte Bauteile dürfen nur gegen Original-Ersatzteile ausge- ■
tauscht werden. Nur bei diesen Teilen ist gewährleistet, dass sie
die Sicherheitsanforderungen er
Schützen Sie das Gerät vor Feuchtigkeit und dem Eindringen von ■
Flüssigkeiten. Tauchen Sie das Gerät niemals unter Wasser, stellen
Sie das Gerät nicht in der Nähe v
keine mit Flüssigkeit gefüllten Gegenstände (z. B. Vasen) auf das
Gerät.
Stellen Sie keine Gegenstände auf das Gerät. ■
Das Gerät nicht in der Nähe von off enen Flammen (z. B. Kerzen) ■
betreiben.
V
ermeiden Sie dir
Die Zuleitung immer am Anschlussstecker aus der Steckdose ■
ziehen, nicht am Anschlusskabel.
Ziehen Sie bei auf
Netzstecker aus der Steckdose.
ät nur unter Aufsicht oder Anweisung durch eine
füllen werden.
on Wasser auf und stellen Sie
ekte Sonneneinstrahlung. ■
etenden Störungen und bei Gewitter den ■
tr
DE
AT
CH
SRD 250 A1
87
Page 90

Bedienelemente
SNOOZE-Taste: Alarm unterbrechen
2
Display
3
POWER-LED: Leuchtet bei eingeschaltetem Gerät
4
MHz-LED: Leuchtet bei UKW-Empfang
5
kHz-LED: Leuchtet bei MW-Empfang
6
SLEEP-LED: Leuchtet bei eingeschalteter SLEEP-Funktion
7
TUNING-Regler: Senderauswahl
8
Wurfantenne
9
POWER/BAND-Taste: Gerät ein-/ausschalten / Frequenzband
DE
10
AT
CH
DOWN-Taste: Einstellungen abwärts
11
Batteriefach
12
UP-Taste: Einstellungen aufwärts
TIME-Taste: Uhrzeit einstellen
13
SLEEP-Taste: Automatisches Abschalten einstellen
14
AL2-Taste: Alarmzeit 2 einstellen
15
AL1-Taste: Alarmzeit 1 einstellen
16
Netzkabel
17
VOL-Regler: Lautstärkeregelung
18
DIMMER-Schalter: Displaybeleuchtung einstellen
19
Bedienelemente
wählen
88
SRD 250 A1
Page 91

Aufstellen und Anschließen
Aufstellen und Anschließen
Lieferumfang und Transportinspektion
Das Gerät wird standardmäßig mit folgenden Komponenten
geliefert:
Radiowecker ▯
Bedienungsanleitung ▯
Entnehmen Sie das Gerät und die Bedienungsanleitung aus dem
Kar
ton und entfernen sie sämtliches Verpackungsmaterial.
HINWEIS
Prüfen Sie die Lieferung auf Vollständigkeit und auf sichtbare ►
Schäden.
Bei einer unv
mangelhafter Verpackung oder durch Transport wenden Sie
sich an die Service-Hotline (siehe Kapitel Service).
Anforderungen an den Aufstellort
Für einen sicheren und fehlerfreien Betrieb des Gerätes muss der
Aufstellort folgende Voraussetzungen erfüllen:
Stellen Sie das Gerät auf eine feste, fl ache und waagerechte ■
Unterlage.
Stellen Sie das Gerät so auf, dass v
nicht verdeckt werden.
Stellen Sie das Gerät nicht in einer heißen, nassen oder sehr feuch-
■
ten Umgebung oder in der Nähe von brennbarem Material auf.
ollständigen Lieferung oder Schäden infolge ►
orhandene Lüftungsöff nungen ■
DE
AT
CH
SRD 250 A1
89
Page 92

Die Oberfl ächen von Möbeln enthalten möglicherweise Bestand- ■
teile, die die Gummifüße des Gerätes angreifen und aufweichen
können. Legen Sie gegebenenfalls eine Unterlage unter die Gummifüße des Gerätes.
Die Steckdose muss leicht zugänglich sein, so dass der Netz- ■
stecker notfalls leicht abgezogen werden kann.
Elektrischer Anschluss
Vergleichen Sie vor dem Anschließen des Gerätes die ■
Anschlussdaten (Spannung und Frequenz) auf dem Typenschild
mit denen Ihres Elektronetzes. Diese Daten müssen übereinstimmen, damit keine Schäden am Gerät auftreten.
DE
AT
CH
Vergewissern Sie sich, dass das Anschlusskabel des Gerätes ■
unbeschädigt ist und nicht über heiße Flächen und/oder scharfe
Kanten v
erlegt wird.
Achten Sie darauf, dass das Anschlusskabel nicht straff gespannt ■
oder geknickt wird.
Lassen Sie das Anschlusskabel nicht über Eck
fallen).
Batterien einlegen
Durch Einlegen von zwei 1,5 V-Batterien (Typ R6/LR6/AA/
Mignon) vermeiden Sie, dass bei einem möglichen Netzausfall
die programmierte Uhrzeit und Weckzeit verloren gehen.
Die Batterien bewirken, dass die interne Uhr auch während des
Netzausfalls weiterläuft. Bei Wiedereinschalten des Netzstroms
erscheint auf dem Display 2 automatisch die korrekte Zeit.
Aufstellen und Anschließen
en hängen (Stolper- ■
90
HINWEIS
Display, Radio und Wecker funktionieren im Notbetrieb nicht. ►
SRD 250 A1
Page 93

Bedienung und Betrieb
Öff nen Sie die Abdeckung des Batteriefachs ♦
unterseite.
Legen Sie zwei 1,5 V Batterien vom Typ R6/LR6/AA/ ♦
Mignon (nicht im Lieferumfang enthalten) in das Batteriefach
11
ein. Beachten Sie dabei die Kennzeichnung der Polarität im
11
Batteriefach
Schließen Sie das Batteriefach ♦
aufsetzen und einrasten lassen.
.
11
, indem Sie die Abdeckung
11
auf der Geräte-
Stromversorgung herstellen
Stecken Sie den Netzstecker in eine Steckdose. Im Display ♦
wird die Uhrzeit (- -:- -) angezeigt.
UKW-Wurfantenne
Wickeln Sie die Wurfantenne ♦
8
für den UKW-Empfang ganz ab.
Bedienung und Betrieb
In diesem Kapitel erhalten Sie wichtige Hinweise zur Bedienung
und Betrieb des Gerätes.
Uhrzeit einstellen
Drücken Sie die TIME-Taste ♦
anzeige.
Drücken oder halten Sie die UP-Taste ♦
um die Stunden einzustellen.
Drücken Sie erneut die TIME-Taste ♦
Minutenanzeige.
Drücken oder halten Sie die UP-Taste ♦
um die Minuten einzustellen.
Drücken Sie erneut die TIME-Taste ♦
wird übernommen.
SRD 250 A1
. Im Display 2 blinkt die Stunden-
13
12
bzw. DOWN-Taste 10,
. Im Display 2 blinkt die
13
12
bzw. DOWN-Taste 10,
. Die eingestellte Uhrzeit
13
2
DE
AT
CH
91
Page 94

HINWEIS
Radiobetrieb
DE
AT
CH
HINWEIS
Bedienung und Betrieb
Die Uhrzeit wird auf - -:- - zurückgesetzt, wenn das Gerät ►
von der Stromversorgung getrennt wird und keine Batterien
eingelegt sind.
Drücken Sie die POWER/BAND-Taste ♦
Gerätes.
Stellen Sie mit dem VOL-Regler ♦
Drücken Sie kurz die POWER/BAND-Taste ♦
Frequenzband einzustellen. Bei UKW-Empfang leuchtet die MHzLED 4, bei MW-Empfang leuchtet die kHz-LED 5.
Stellen Sie mit dem TUNING-Regler ♦
ein.
Drücken Sie für ca. zwei Sekunden die POWER/BAND-Taste ♦
zum Ausschalten des Gerätes.
Die technischen Gegebenheiten des Gerätes ermöglichen ►
einen einstellbaren Frequenzbereich außerhalb des zulässigen Bereiches v
(AM) 526,5–1606,5 kHz. In verschiedenen Ländern können
abweichende nationale Regelungen zu den zugewiesenen
Rundfunkfrequenzbereichen bestehen. Beachten Sie, dass Sie
die außerhalb des zugewiesenen Rundfunkfrequenzbereiches
empfangenen Informationen nicht verwerten, an Dritte weiterleiten oder zweckentfremdet missbräuchlich verwenden dürfen.
on UKW (FM) 87,5–108 MHz bzw. MW
9
zum Einschalten des
die gewünschte Lautstärke ein.
18
9
, um das gewünschte
7
den gewünschten Sender
9
92
SRD 250 A1
Page 95

Bedienung und Betrieb
Weckzeiten und Weckart programmieren
Beim Programmieren der Weckzeiten können Sie wählen, ob
zur programmierten Zeit ein Alarmton erklingen soll oder ob das
Radio angehen soll. Es können zwei unterschiedliche Weckzeiten
(Alarm 1/Alarm 2) programmiert werden.
Drücken und halten Sie die AL1-Taste ♦
Display 2 blinkt die Stundenanzeige.
Drücken oder halten Sie die UP-Taste ♦
um die Stunden einzustellen.
Drücken Sie erneut die AL1-Taste ♦
2
blinkt die Minutenanzeige.
Drücken oder halten Sie die UP-Taste ♦
um die Minuten einzustellen.
Drücken Sie erneut die AL1-Taste ♦
Die eingestellte Weckzeit wird übernommen und im Display 2
erscheint die Anzeige der Weckart.
Drücken Sie die UP-Taste ♦
Alarmton oder = Radio) einzustellen.
Drücken Sie erneut die AL1-Taste ♦
Einstellungen zu übernehmen.
HINWEIS
Wenn Sie mit dem Radio geweckt werden möchten, stellen ►
Sie zusätzlich zum Programmieren der Weckzeit noch den
gewünschten Sender und Lautstärk
betrieb).
12
, um die gewünschte Weckart ( =
bzw. AL2-Taste 15. Im
16
12
bzw. DOWN-Taste 10,
bzw. AL2-Taste 15. Im Display
16
12
bzw. DOWN-Taste 10,
bzw. AL2-Taste 15.
16
bzw. AL2-Taste 15, um die
16
e ein (siehe Kapitel Radio-
DE
AT
CH
SRD 250 A1
93
Page 96

Bedienung und Betrieb
Weckfunktion einschalten
Drücken Sie kurz die AL1-Taste ♦
2
erscheint links bzw. rechts ein Punkt. Die Weckfunktion ist nun
eingeschaltet.
Alarm abschalten
Drücken Sie während der Alarm ertönt die POWER/BAND-Taste ♦
um den Alarm für 24 Stunden abzuschalten.
Weckfunktion ausschalten
Drücken Sie kurz die AL1-Taste ♦
zeigen erlöschen im Display
Schlummerfunktion („SNOOZE“-Funktion)
DE
AT
CH
Drücken Sie während der Alarm ertönt die SNOOZE-Taste ♦ , um
den Alarm vorübergehend auszuschalten. Nach 6 Minuten ertönt
der Alarm erneut.
HINWEIS
Wenn die Schlummerfunktion aktiviert ist, blinkt der ►
entsprechende Alarmpunkt im Display
Automatisches Abschalten (SLEEP-Funktion)
Mit der Sleep-Funktion stellt sich das Gerät nach einer von Ihnen
eingestellten Zeit zwischen 60 und 10 Minuten aus.
Drücken Sie die POWER/BAND-Taste ♦
Gerätes.
Drücken Sie die SLEEP-Taste ♦
Abschaltzeit 60 Minuten und die SLEEP-LED
Drücken der SLEEP-Taste 14 verkürzt die Abschaltzeit um jeweils
10 Minuten.
bzw. AL2-Taste 15. Im Display
16
bzw. AL2-Taste 15.Die Alarman-
16
2
.
2
.
9
zum Einschalten des
. Im Display 2 erscheint die
14
6
leuchtet. Erneutes
9
,
94
SRD 250 A1
Page 97

Reinigung
Drücken Sie so oft die SLEEP-Taste ♦
Abschaltzeit im Display 2 angezeigt wird.
Um die Sleep-Funktion auszuschalten, drücken Sie so oft die ♦
SLEEP-Taste
Die SLEEP-LED
14
, bis im Display 2 angezeigt wird.
6
erlischt.
, bis die gewünschte
14
Displaybeleuchtung einstellen
Stellen Sie den DIMMER-Schalter ♦
Anzeigen im Display 2 heller erscheinen sollen.
Stellen Sie den DIMMER-Schalter ♦
Anzeigen im Display
2
abdunkeln möchten.
19
auf HIGH, wenn die
19
auf LOW, wenn Sie die
Reinigung
GEFAHR
Lebensgefahr durch elektrischen Strom!
Ziehen Sie den Netzstecker aus der Steckdose, be
der Reinigung beginnen.
Stellen Sie sicher, dass bei der R
das Gerät eindringt.
Verwenden Sie keine aggressiven Reinigungs- oder Scheuer- ►
mittel. Diese können die Geräteoberfl äche angreifen
Reinigen Sie die Oberfl ächen des Gerätes mit einem weichen, ■
trockenen Tuch.
einigung keine Feuchtigkeit in ►
DE
AT
CH
vor Sie mit ►
SRD 250 A1
95
Page 98

Fehlerbehebung
Fehlerbehebung
In diesem Kapitel erhalten Sie wichtige Hinweise zur Störungslokalisierung und Störungsbehebung. Beachten Sie die Hinweise um
Gefahren und Beschädigungen zu vermeiden.
Fehlerursachen und -behebung
Die nachfolgende Tabelle hilft bei der Lokalisierung und Behebung
kleinerer Störungen:
DE
AT
CH
Fehler
Gerät lässt
sich nicht
einschalten.
Kein Ton
Störgeräusche
beim Radioempfang
HINWEIS
Wenn Sie mit den vorstehend genannten Schritten das Problem ►
nicht lösen können, wenden Sie sich bitte an den Kundendienst.
Mögliche
Ursache
Der Netzstecker ist
nicht eingesteckt.
Steckdose liefert
keine Spannung.
Die Lautstärke steht
auf Minimum.
Der Sender ist nicht
richtig eingestellt.
Der Empfang ist zu
schwach.
Behebung
Stecken Sie den Netzstecker in die Steckdose.
Überprüfen Sie die Haussicherungen.
Erhöhen Sie die Lautstärke
mit dem VOL-Regler
Stellen Sie den Sender mit
dem TUNING-Regler
richtig ein.
Versuchen Sie durch Bewegen der Wurfantenne
den Empfang zu verbessern.
96
.
18
7
8
SRD 250 A1
Page 99

Lagerung/Entsorgung
Lagerung
Sollten Sie das Gerät längere Zeit nicht benutzen, trennen Sie es
von der Stromversorgung, entnehmen Sie die Batterie und lagern
Sie es an einem sauberen, trockenen Ort ohne direkte Sonneneinstrahlung.
Entsorgung
Gerät entsorgen
Werfen Sie das Gerät keinesfalls in den
normalen Hausmüll. Dieses Produkt unterliegt
der europäischen Richtlinie 2002/96/EC.
Entsorgen Sie das Gerät über einen zugelassenen Entsorgungsbetrieb oder über Ihre kommunale Entsorgungseinrichtung. Beachten
Sie die aktuell geltenden Vorschriften. Setzen Sie sich im Zweifelsfall mit Ihrer Entsorgungseinrichtung in Verbindung.
Batterien entsorgen
Batterien dürfen nicht im Hausmüll entsorgt werden. Jeder Verbraucher ist gesetzlich verpfl ichtet, Batterien bei einer Sammelstelle
seiner Gemeinde/seines Stadtteils oder im Handel abzugeben.
Diese Verpfl ichtung dient dazu, dass Batterien einer umweltschonenden Entsorgung zugeführt werden können. Geben Sie
Batterien nur im entladenen Zustand zurück.
DE
AT
CH
SRD 250 A1
97
Page 100

Anhang
Technische Daten
Betriebsspannung 220-240 V / 50 Hz
2 x 1,5 V Batterie
Batterien für Gangreserve
Leistungsaufnahme
Betrieb 10 W
Standby ca. 1,5 W
DE
AT
Max. Ausgangsleistung
CH
Lautsprecher
Frequenz FM (UKW) 87,5 - 108 MHz
Frequenz AM (MW) 526,5 - 1606,5 kHz
Betriebstemperatur +5 - +40 °C
Feuchtigkeit
(keine Kondensation)
Abmessungen (B x H x T) 14,3 x 13,3 x 8,3 cm
Typ AA/Mignon/R6/LR6
(nicht im Lieferumfang enthalten)
5 - 90 %
Anhang
250 mW
Gewicht ca. 435 g
Schutzklasse
II
98
SRD 250 A1
 Loading...