

Page 1
SVEGLIA CON PROIEZIONE ORA 900 A2
SVEGLIA CON PROIEZIONE ORA
Istruzioni per l‘uso
PROJECTION ALARM CLOCK
Operating instructions
IAN 90514
DESPERTADOR COM PROJEÇÃO DA HORA
Manual de instruções
PROJEKTIONSWECKER
Bedienungsanleitung
Page 2
Prima di leggere aprire la pagina con le immagini e prendere confidenza con le diverse funzioni
dell’apparecchio.
Antes de começar a ler abra na página com as imagens e, de seguida, familiarize-se com todas as
funções do aparelho.
Before reading, unfold the page containing the illustrations and familiarise yourself with all functions of
the device.
Klappen Sie vor dem Lesen die Seite mit den Abbildungen aus und machen Sie sich anschließend mit allen
Funktionen des Gerätes vertraut.
IT / MT Istruzioni per l‘uso Pagina 1
PT Manual de instruções Página 15
GB
/ MT Operating instructions Page 29
DE / AT / CH Bedienungsanleitung Seite 41
Page 3
SPU 900 A2
Page 4

INDICE PAGINA
Uso conforme 2
Volume di fornitura 2
Dati tecnici 2
Avvertenze di sicurezza 2
Componenti dell'apparecchio 5
Messa in funzione dell'apparecchio 5
Funzionamento della radio: 9
Pulizia 11
Eliminazione dei guasti 12
Avvertenza sulla conformità 12
Importatore 12
Smaltimento 12
Garanzia & assistenza 12
Leggere attentamente le istruzioni per l'uso prima del primo utilizzo e conservarle per il
successivo impiego. In caso di cessione dell'apparecchio a terzi, consegnare anche le
istruzioni.
- 1 -
Page 5
Sveglia con proiezione ora
dell'ora SPU 900 A2
Introduzione
Congratulazioni per l‘acquisto del nuovo
apparecchio. Lei ha scelto un prodotto di alta
qualità. Il manuale di istruzioni è parte integrante del presente prodotto. Esso contiene
importanti indicazioni per la sicurezza, l‘uso
e lo smaltimento. Prima di utilizzare il prodotto, si familiarizzi con tutte le indicazioni
relative ai comandi e alla sicurezza.Utilizzi il
prodotto solo come descritto e per i campi di
impiego indicati. Conservi con cura il manuale. In caso di cessione del prodotto a terzi,
consegni anche tutta la documentazione
relativa.
Diritto d’autore
La presente documentazione è tutelata dal
diritto d'autore. Tutti i diritti, nonché la riproduzione fotomeccanica, la copia e la diffusione tramite procedimenti particolari (ad es.
elaborazione dei dati, supporto dati
e reti di dati) anche parziale, nonché le
modifiche ai contenuti e le modifiche tecniche
sono riservati.
Uso conforme
La sveglia a proiezione è destinata all’indicazione dell’ora e alla ricezione dei programmi
radio in onde ultracorte.. Inoltre, l'apparecchio è provvisto di una funzione di sveglia
tramite radio e segnale acustico.
La radiosveglia non è prevista per l'impiego
in ambito commerciale o industriale. Non
si assume alcuna responsabilità per i danni
derivanti da uso non conforme dell'apparecchio!
Volume di fornitura
1 Sveglia con proiezione ora SPU 900 A2
1 manuale di istruzioni per l'uso
Dati tecnici
Connessione di rete: 220–240 V
Assorbimento di potenza della
modalità di funzionamento
radio: 5 Watt
Standby: < 1 Watt
Potenza in uscita: 2 x 700 mW
con il 10% di
distorsione
Gamma di frequenze: Onde ultracorte (FM)
87,5 – 108 MHz
Temperatura di
esercizio: + 5 – +35° C
Temperatura di
conservazione : -20 – +50 °C
Umidità:
(senza condensa)
Dimensioni (L x P x A): 21 x 7,1 x 14,4 cm
Peso : ca. 850 g
Classe di protezione: II /
Pile di backup 2 x 1,5 V, tipo AAA/
5 – 90%
Micro (non incluse
nella fornitura)
, 50 Hz
~
Avvertenze di sicurezza
Avviso
Un'avvertenza contrassegnata da questo
livello di pericolo indica una situazione potenzialmente pericolosa. Qualora sia impossibile evitare tale situazione pericolosa, essa
può dare luogo a lesioni. Seguire le istruzioni
contenute in questa avvertenza per evitare
lesioni personali.
Attenzione
Un'avvertenza contrassegnata da questo
livello di pericolo indica la possibilità di riportare danni materiali. Qualora sia impossibile
evitare tale situazione pericolosa, essa può
dare luogo a danni materiali. Seguire le
istruzioni contenute in questa avvertenza, per
evitare danni materiali.
- 2 -
Page 6
Avvertenza
Un avviso contrassegna ulteriori informazioni
volte a facilitare l'uso dell'apparecchio.
Avvertenza: pericolo di scossa
elettrica!
• Collegare l'apparecchio esclusivamente
a una presa installata a norma e provvista di messa a terra. La tensione di rete
deve corrispondere ai dati riportati sulla
targhetta tipo dell'apparecchio.
• Fare immediatamente riparare o sostituire
dal servizio di assistenza i cavi o gli apparecchi non perfettamente funzionanti
o danneggiati.
• Tenere i bambini lontano dal cavo di
connessione e dall'apparecchio. I bambini spesso sottovalutano i rischi collegati all'uso di apparecchi elettrici.
• Non immergere mai l'apparecchio in
acqua. Ripulirlo semplicemente con un
panno leggermente inumidito.
• Non esporre l'apparecchio alla pioggia
e non utilizzarlo in ambienti umidi o
bagnati.
• Afferrare il cavo di rete sempre dalla
spina. Non tirare mai dal cavo e non
toccare mai il cavo con le mani umide,
poiché ciò potrebbe dare luogo a cortocircuito o scossa elettrica.
• Non collocare l'apparecchio, mobili o
altri oggetti sul cavo di rete e impedirne
lo schiacciamento.
• Impedire che il cavo di connessione alla
rete elettrica si bagni o inumidisca durante l'uso.
• Non tentare di aprire l'alloggiamento
dell'apparecchio e non tentare di riparare l'apparecchio. In caso di alloggiamento aperto, sussiste il pericolo di
morte per scossa elettrica e la garanzia
si estingue.
• Proteggere l'apparecchio da spruzzi e
gocce d'acqua. Non collocare pertanto
alcun oggetto pieno di liquidi (ad es. vasi
di fiori) su o accanto all'apparecchio.
• Controllare che l'apparecchio e tutte le
sue parti non presentino danni visibili. La
sicurezza dell'apparecchio è garantita
solo se esso è in perfetto stato.
• Prima di pulire l'apparecchio, staccare
sempre la spina dalla presa di corrente.
Avvertenza: pericolo di lesioni!
• Non annodare mai il cavo di rete e non
unirlo ad altri cavi. Collocare il cavo di
rete in modo tale che non costituisca
intralcio o inciampo.
• La spina deve essere sempre facilmente
raggiungibile, in modo da poter scollegare rapidamente l'apparecchio dalla
rete elettrica in caso di emergenza.
• Questo prodotto non è indicato per l'uso
da parte di persone (inclusi bambini)
con limitate capacità fisiche, sensoriali
o mentali o prive dell'esperienza e/o
della conoscenza necessaria, a meno
che tali persone non vengano sorvegliate
da un responsabile per la sicurezza o
abbiano ricevuto indicazioni sull'impiego
dell'apparecchio. Sorvegliare i bambini
per assicurarsi che non giochino con l'apparecchio.
• Provvedere a un posizionamento stabile
dell'apparecchio.
• Se l'apparecchio avesse subìto cadute
o danni, non metterlo più in funzione.
L'apparecchio dev'essere sottoposto a
controllo da parte di personale specializzato e all'occorrenza riparato.
• Impedire ai bambini di entrare in possesso delle pile. I bambini potrebbero
mettere in bocca le pile e ingoiarle.
• In caso di ingestione di una pila, consultare immediatamente un medico.
Avvertenza: pericolo di
esplosione!
• Non gettare le pile nel fuoco.
Non ricaricare le pile.
• Non aprire, saldare o sciogliere le pile.
Pericolo di esplosione e lesioni!
- 3 -
Page 7
Attenzione: pericolo di incendio!
• Non utilizzare l'apparecchio nelle
vicinanze di superfici surriscaldate.
• Non posizionare l'apparecchio in luoghi
direttamente irradiati dal sole. In caso
contrario, esso potrebbe surriscaldarsi e
danneggiarsi irreparabilmente.
• Non coprire mai le aperture di aerazione
dell'apparecchio acceso.
• Non collocare fiamme libere, come
ad es. candele, su o accanto all'apparecchio.
Attenzione in caso di temporale!
• In caso di temporale, gli apparecchi collegati alla rete elettrica potrebbero subire dei danni. In tal caso, quindi, staccare
sempre la spina dalla presa.
Attenzione nell'uso delle pile
L'apparecchio utilizza delle pile per il salvataggio dei dati in memoria. Per il corretto uso delle pile osservare quanto segue:
• Se non si utilizza l'apparecchio per
lungo tempo, rimuovere le pile.
• Controllare regolarmente le pile. Le pile
che presentano fuoriuscita di acidi possono causare danni all'apparecchio.
• In caso di fuoriuscita di acidi dalle pile,
indossare guanti protettivi e ripulire il vano
pile e i contatti con un panno asciutto.
Inoltre, l'apparecchio assorbe corrente
in modalità di standby. Per disconnettere completamente l'apparecchio dalla
rete elettrica, è necessario staccare la
spina dalla presa.
Indicazioni sulle tensioni a
impulsi (EFT / transitori elettrici
veloci) e scariche elettrostatiche:
In caso di malfunzionamenti a seguito
di transitori elettrici veloci (tensione a
impulsi) o scariche elettrostatiche, il
prodotto deve essere reimpostato per
ripristinarne il normale funzionamento.
Si consiglia di scollegare l'alimentazione elettrica e collegarla di nuovo. Le
pile (se presenti) devono essere estratte
e reinserite.
Avvertenza
L'azienda declina ogni responsabilità
per i danni alla radiosveglia provocati
dalla penetrazione di acqua nell'apparecchio, dal surriscaldamento o da
modifiche eseguite dall'utente!
Avviso!
• Non esporre mai le pile a calore eccessivo (ad es. sole diretto, fuoco).
Attenzione!
• Rischio di esplosione in caso di sostituzione non conforme delle pile. Sostituire
solo con pile dello stesso tipo o di tipo
analogo.
Avvertenza sulla sospensione
della tensione
Il tasto
del presente apparecchio
non lo disconnette dalla rete elettrica.
- 4 -
Page 8
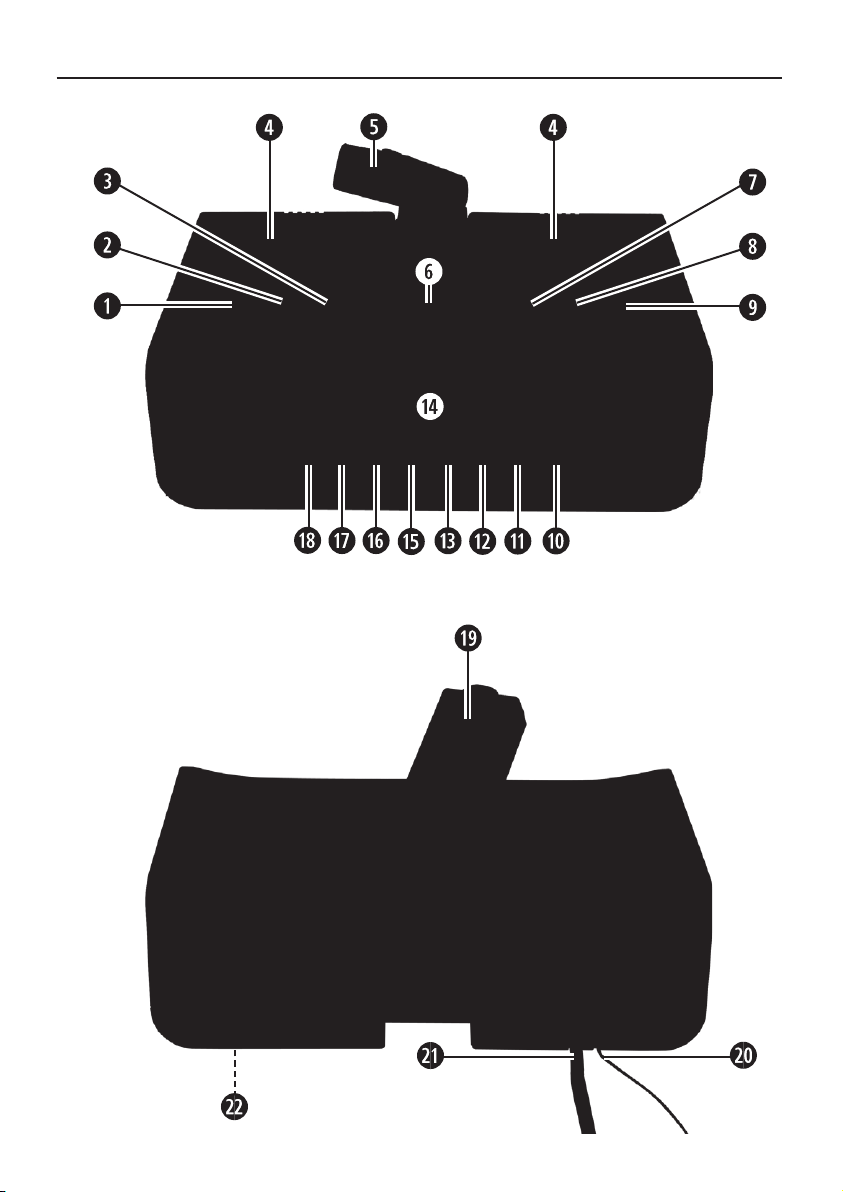
Componenti dell'apparecchio
Messa in funzione dell'apparecchio
q VOL— - abbassamento volume
VOL + - aumento volume
w
MODE/LOCK - richiamo dei parametri
e
regolabili/Blocco tasti
Altoparlante
r
t Proiettore - proietta l’orario sulle
paret
SNOOZE/ - tasto di ritardo sveglia,
y
DIMMER commutatore di lumino-
sità
PROJECTION - accensione/spegnimen-
u
to della proiezione
dell’ora
i DOWN - tasto di selezione a ri-
troso
UP - tasto di selezione in
o
avanti
AL.SET - richiama la funzione di
a
allarme
s PRESET/ALARM + - memoria stazioni/
allarme avanti/
PRESET/ALARM – - memoria stazioni/allar-
d
me indietro
PAGE - commuta le pagine di
f
memoria
g Display - messaggio
h A.M.S. MEMORY - memorizzazione
autom. emittenti
SLEEP - regolazione del tempo
j
di spegnimento
NAP|USER - commutazione utente,
k
funzione Timer
- interruttore On/Off
l
della funzione radio
Regolatore di - per la messa a fuoco del-
1(
messa a fuoco la proiezione dell’orario
2) Antenna - per la ricezione di onde
lineare ultracorte
2! Cavo di rete
Vano pile - per la pila di backup
2@
Prelevare prima tutti i componenti dell'apparecchio dalla confezione e rimuovere tutti i
materiali di imballaggio. Controllare l'apparecchio per rilevare eventuali danni.
Inserimento delle pile di backup
Le pile di back-up mantengono le impostazioni
individuali anche in caso di interruzione della
corrente elettrica. A tale scopo sono necessarie due pile da 1,5 V tipo AAA/Micro. Esse
non sono incluse nella fornitura.
1. Aprire lo sportello del vano pile 2@ sul
lato inferiore della radiosveglia.
2. Inserire le pile rispettando la corretta
polarità.
3. Chiudere lo sportello del vano pile 2@.
Lo sportello deve inserirsi udibilmente.
Avvertenza:
le pile di backup devono essere controllate almeno una volta all'anno ed
eventualmente sostituite.
Connessione all'alimentazione di corrente
• Inserire la spina in una presa di rete.
Nel display g compare un messaggio
di benvenuto „PLEASE WAIT FOR
SETTING THANKS“. Nel frattempo,
la radiosveglia cerca di aggiornare le
impostazioni per ora e data con l'ausilio
del segnale RDS. Se si desidera interrompere la procedura, premere un tasto
a piacere. Se l'aggiornamento
automatico non riesce, eseguire manualmente le impostazioni su indicate.
Impostazione dell'ora
Per poter impostare l'orario e i seguenti parametri, è necessario che la modalità radio
sia disattivata. Se non si preme alcun tasto
entro circa 15 secondi, l'apparecchio salva
l'impostazione ed esce dalla modalità di impostazione.
1. Premere il tasto MODE/LOCK e. La visualizzazione dell'orario lampeggia.
- 5 -
Page 9
2. Premere i tasti DOWN/UP i/o, per
impostare l'orario a intervalli di minuti.
Tenendo premuto uno dei tasti si modifica
l’orario in sequenza più rapida.
Impostazione della data
1. Premere nuovamente il tasto MODE/
LOCK e. Nel display g appare l'indicazione della data „01.01.2013“.
2. Premere i tasti DOWN/UP i/o, per
impostare la data in intervalli di giorni.
Tenendo premuto uno dei tasti si cambia
la data in sequenza più rapida.
Impostazione della città
1. Premere nuovamente il tasto MODE/
LOCK e. Nel display g lampeggia il
messaggio per la sigla della città, sotto
l'indicazione „LOCAL CITY“.
2. Premere i tasti DOWN/UP i/o, per
impostare il fuso orario in base a una città
o alla propria area di residenza.Tenendo
premuto uno dei tasti si cambia il messaggio in sequenza più rapida.Qui di seguito
è riportata una panoramica delle città
presenti nelle impostazioni e delle differenze orarie:
Abbr. Diff. Città
HNL -10 Honolulu /USA
ANC -9 Anchorage /USA
YVR -8 Vancouver /Canada
LAX -8 Los Angeles /USA
DEN -7 Denver /USA
CHI -6 Chicago /USA
MEX -6 Mexico City / Mexico
NYC -5 New York / USA
YYZ -5 Toronto / Canada
YUL -5 Montreal / Canada
CCS -4 Caracas / Venezuela
RIO -3 Rio De Janeiro / Brazil
BUE -3 Buenos Aires / Argentina
UTC 0 Universal Time
LON 0 London / UK
BER 1
PAR 1 Paris / France
ROM 1 Rome / Italy
Coordinated
Berlin /
Germania
Abbr. Diff. Città
CAI 2 Cairo / Egypt
IST 2 Istanbul / Turkey
MOW 3 Moscow / Russia
KWI 3 Kuwait City / Kuwait
DXB 4 Dubai / Saudi Arabia
KHI 5 Karachi / Pakistan
DAC 6 Dacca / Bangladesh
BKK 7 Bangkok / Thailand
SIN 8 Singapore
HKG 8 Hong Kong
PEK 8 Beijing /China
SHA +8 Shanghai / Cina
TYO 9 Tokyo / Japan
SYD 10 Sydney / Australia
NOU 11 Noumea / New
Caledonia
AKL 12 Auckland / New Zealand
3. Premere il tasto SNOOZE/DIMMER y,
per attivare o disattivare l’ora legale per il
fuso orario selezionato. Il display g mostrerà „SUM ON“ o „SUM OFF“.
Impostazione dell'ora mondiale
1. Premere nuovamente il tasto MODE/
LOCK e. Nel display g lampeggia il
messaggio per la sigla della città, sotto
l'indicazione „WORLD CITY“.
2. Premere il tasto DOWN/UP i/o, per
impostare l'ora mondiale desiderata.
Tenendo premuto uno dei tasti si cambia
il messaggio in sequenza più rapida. Anche in tal caso vale la panoramica delle
città presenti nelle impostazioni e delle
differenze orarie precedentemente riportate.
3. Premere ripetutamente il tasto SNOOZE/
DIMMER y, per impostare l‘ora legale
per l‘orario mondiale selezionato.
- 6 -
Page 10
Sposta-
mento
Display Spiegazione
orario
1 OFFSET 1Nel fuso orario dell'utente
(Local City) è inverno mentre
l'ora mondiale impostata è
in estate.
0 OFFSET 0Nel fuso orario dell'utente
(Local City) e l'ora mondiale
impostata è in estate.
-1 OFFSET -1Nel fuso orario dell'utente
(Local City) è estate mentre
l'ora mondiale impostata
è in inverno o non ha l'ora
legale.
Impostazione della funzione promemoria
Si possono programmare fino a 10 date di
promemoria nell'apparecchio.
1. Premere nuovamente il tasto MODE/
LOCK e. Nel display g lampeggia una
data e il messaggio SDA 1 per la data da
ricordare 1.
2. Premere i tasti DOWN/UP i/o, per
impostare la prima data da ricordare.
Tenendo premuto uno dei tasti si cambia
il messaggio in sequenza più rapida.
3. Tenendo premuto il tasto SNOOZE/DIMMER y, si disattiva l'indicazione dell'anno e in tal modo questa data verrà fissata
come promemoria per ogni anno.
4. Se si desiderasse programmare ulteriori
date, premere il tasto PAGE f, per selezionare la posizione di memoria preferita
fra le restanti da 2 a 10.
5. Procedere analogamente con le ulteriori
date.
6. Per disattivare la funzione di promemoria,
programmare una data che si trovi nel
passato.
Impostare la funzione Update
Tramite questa funzione, l'apparecchio può
attualizzare automaticamente le impostazioni
per l'ora in base ai dati RDS.
Premere nuovamente il tasto MODE/
1.
LOCK e. Nel display g appare l'indicazione della data „UPDATE ON“.
2. Premere il tasto DOWN i, per disattivare la funzione di aggiornamento. Il
display g mostra quindi „UPDATE OFF“.
3. Premere il tasto UP o, per attivare nuovamente la funzione di aggiornamento.
Impostazione del tempo per la funzione
di ritardo della sveglia
1.
Premere nuovamente il tasto MODE/
LOCK e. Nel display g appare il messaggio „SNOOZE 09“.
2. Premere i tasti DOWN/UP i/o, per
impostare il periodo di tempo desiderato,
compreso fra 1 e 59 minuti, per la funzione di spegnimento ritardato.
Impostazione della modalità 12 o 24 ore
1.
Premere nuovamente il tasto MODE/
LOCK e. Nel display g appare il messaggio „24HR“.
2. Premere il tasto DOWN i, per impostare
la modalità 12 ore. Nel display g compare „12HR“.
3. Premere il tasto UP o, per passare nuovamente alla modalità 24 ore.
Impostazione della durata della proiezione
1. Premere nuovamente il tasto MODE/
LOCK e. Nel display g appare il messaggio „PROJ-T OFF“.
2. Premere i tasti DOWN/UP i/o, per
impostare la durata della proiezione da
1 a 59 minuti. Nell’impostazione „OFF“ la
proiezione è accesa costantemente e può
essere accesa p spenta premendo il tasto
PROJECTION u.
Proiezione per l’allarme
1. Premere nuovamente il tasto MODE/
LOCK e. Il display g indica “PROJ-AL
OFF”.
2. Premere il tasto UP o, se durante l’allarme
si desidera attivare automaticamente il
display.
3. Premere il tasto DOWN i per disattivare
nuovamente questa funzione.
Dimmer automatico per il display
1. Premere nuovamente il tasto MODE/
LOCK e. Il display g indica „DIM-T OFF“.
- 7 -
Page 11
2. Premere il tasto UP o, se si desidera
smorzare automaticamente il display in
determinati orari. Il display g indica quindi
„DIM-T ON“.
3. Premere il tasto DOWN i per disattivare
nuovamente questa funzione.
Impostare l’orario di dimmer per il display
1. Premere nuovamente il tasto MODE/
LOCK e. Il display g indica „DT 23:00
ON“ come orario in cui si aziona automaticamente il dimmer per il display.
2. Premere i tasti DOWN/UP i/o, per
impostare un orario diverso.
3. Premere nuovamente il tasto MODE/
LOCK e. Il display g indica „DT 6:00 OFF“
come orario in cui il display ritorna alla
normale luminosità.
4. Premere i tasti DOWN/UP i/o, per
impostare un orario diverso.
Premere nuovamente il tasto MODE/LOCK
e, per completare queste impostazioni.
Funzione Timer
1. Premere il tasto NAP/USER k. Nel display g compare il messaggio NAP e
l’indicazione dei minuti 10 lampeggia.
2. Con i tasti DOWN/UP i/o impostare il
numero di minuti desiderato (tra 1 e 120
min.).
3. Premere nuovamente il tasto NAP/USER
k, per avviare il timer. Nel display g viene visualizzato il tempo restante.
4. A tempo scaduto, risuona il segnale del
timer per circa 10 minuti, il messaggio NAP
lampeggia e viene visualizzato l’orario.
5. Premere un qualsiasi tasto per disattivare
l'allarme.
6. Se si desidera disattivare la funzione
Timer prima dell'allarme, tenere premuto il
tasto NAP/USER k per un secondo.
Funzione di sveglia (allarme da 1 a 4)
Con la radiosveglia si possono programmare
fino a quattro programmi di sveglia. Se non
si preme alcun tasto entro circa 15 secondi,
l'apparecchio salva l'impostazione ed esce
dalla modalità di impostazione.
1. Con la radio spenta premere il tasto
AL.SET a, per richiamare la funzione
di sveglia. Con i tasti PRESET/ALARM
+/– s/d selezionare la posizione di
memoria allarme desiderata. Nel display
g lampeggia l‘orario di sveglia impostato
di recente e il simbolo per il tipo di allarme
(radio o segnale acustico).
2. Premere i tasti DOWN/UP i/o, per
impostare l'orario di sveglia desiderato.
Tenendo premuto uno dei tasti DOWN/
UP i/o si modifica l‘orario di sveglia in
sequenza più rapida.
3. Premere il tasto AL.SET a, fino a ottenere
la funzione di sveglia desiderata (v. tabella) nel display g.
Funzione di sveglia Simbolo nel
display g
Segnali acustici
Radio
Spenta Nessun
simbolo
4. Premere il tasto SNOOZE/DIMMER y,
per impostare i giorni della settimana in cui
si desidera essere svegliati: Si può scegliere fra „Giorni feriali“ (MON, TUE, WED,
THU, FRI), „Fine settimana“ (SAT, SUN) e
„Ogni giorno“ (MON, TUE, WED, THU,
FRI, SAT, SUN).
5. Tenere premuto il tasto SNOOZE/DIMMER y per 2 secondi se si desidera essere svegliati in un determinato giorno della
settimana. Per impostare questo giorno,
premere ripetutamente il tasto SNOOZE/
DIMMER y. Orientarsi in tal caso all’indicazione dei giorni della settimana, riportata a destra in alto nel display:
MON = Lunedì
TUE = Martedì
WED = Mercoledì
THU = Giovedì
- 8 -
Page 12

FRI = Venerdì
SAT = Sabato
SUN = Domenica
6. Per ritornare alla selezione dei giorni feriali, fine settimana o di tutta la settimana,
tenere nuovamente premuto il tasto SNOOZE/DIMMER y per due secondi.
7. Dopo circa 15 secondi, il display g
passa nuovamente alla visualizzazione
dell'ora. Le impostazioni per la funzione
di sveglia sono così salvate e verranno
visualizzate.
8. Programmare eventualmente le posizioni
di memoria restanti per ulteriori orari di
sveglia.
9. Se si desidera essere svegliati con la
funzione radio, accendere la radio e selezionare l’emittente desiderata. Impostare
quindi il volume massimo che si deve
raggiungere durante la sveglia. Poi rispegnere la radio. La funzione radio viene
spiegata nelle pagine seguenti.
Quando suona l'allarme...
• ...ed è stata selezionata la funzione di sve-
glia „Radio“ , la radio si accende con volume crescente e con l'emittente impostata
per ultima, e resta accesa per un'ora.
• ... ed è stata selezionata la funzione di
sveglia „Segnale acustico“, il segnale acustico risuona per 10 minuti con intensità
crescente.
Per terminare la rispettiva funzione di sveglia,
premere un tasto a piacere, a eccezione del
tasto SNOOZE/DIMMER y.
Funzione di allarme ritardato
Premendo il tasto SNOOZE/DIMMER y,
l'allarme attivo per l' orario selezionato viene
ritardato per un periodo di tempo corrispondente a quello impostato per tale funzione
(v. sezione „Impostazione del tempo per la
funzione di allarme ritardato“, 1 - 59 min.,
valore standard = 9 min.). Nel frattempo, nel
display g lampeggia il messaggio SNZ. Per
interrompere definitivamente l’allarme, premere una volta brevemente il tasto AL.SET a.
Funzione di promemoria
L'apparecchio attiverà una funzione di promemoria in una data per la quale essa è stata impostata. In tal caso, in tale giorno verrà
emesso un segnale di allarme di promemoria,
ogni ora, dalle 8:00 alle 23:00, con una
durata di 10 minuti. Inoltre, nel display g
lampeggia il messaggio SDA.
Premere un qualsiasi tasto per disattivare l'allarme di promemoria.
Impostazione di messaggi intermittenti
sul display
Se l'apparecchio si trova in standby, premere
il tasto DOWN i. Nel display compare „
(per l'ora e la data). Premere nuovamente il
tasto DOWN i, e nel display apparirà „
(orario e ora mondiale). Premere nuovamente
il tasto DOWN i, e nel display apparirà
DW“ (orario, data e ora mondiale a intermit-
„
tenza). Premere nuovamente il tasto DOWN
i, e nel display apparirà „
––“ (solo orario).
Funzionamento della radio:
Le caratteristiche tecniche dell'apparecchio
consentono un campo di frequenze regolabile che supera il campo di frequenze consentito di 87,5 - 108 MHz. A seconda delle
nazioni, possono sussistere norme diverse
in relazione al campo di frequenze radio
attribuito. Si ricorda che è vietato utilizzare,
inoltrare a terzi o abusare delle informazioni
ricevute al di fuori della gamma di frequenza
attribuita. Per la ricezione radio delle frequenze ultracorte, svolgere completamente
l'antenna lineare 2) e cercare una posizione
favorevole con la radio in funzione.
Accensione/spegnimento funzione radio
1. Premere il tasto l. Nel display g viene visualizzata la frequenza corrente e il
simbolo di accensione
peggia il simbolo dell’orologio a indicare
che l’apparecchio attende la trasmissione
dell’orario corrente da un’emittente RDS.
- 9 -
. Accanto lam-
D–“
–W“
Page 13
2. Premere nuovamente il tasto l per interrompere la funzione radio e impostare
l'apparecchio nella modalità di Standby.
Impostazione manuale delle emittenti
1. Premere il tasto UP o, per cercare emittenti con frequenza superiore a quella
visualizzata nel display.
2. Premere il tasto DOWN i, per cercare
emittenti con frequenza inferiore a quella
visualizzata nel display.
3. Se l'emittente appena impostata invia dati
RDS, nel display g compare il messaggio
. Quindi il display g mostra il
nome dell'emittente radio, e l'orario viene aggiornato (se le impostazioni sono
attivate, v. sezione „Impostazione della
funzione Update“).
Ricerca automatica delle emittenti
È possibile impostare l'apparecchio perché
ricerchi le emittenti automaticamente. La
radiosveglia esegue la scansione della
banda di frequenza selezionata, fino a
trovare un'emittente.
1. Tenere premuto per due secondi il tasto UP
o. La radiosveglia cerca l'emittente con la
frequenza immediatamente superiore.
2. Tenere premuto per due secondi il tasto
DOWN i. La radiosveglia cerca l'emittente con la frequenza immediatamente
inferiore.
Ripetere questi passi fino a trovare l'emittente
cercata.
Memorizzazione dell'emittente
Nell’apparecchio possibile salvare per ognuno dei 2 utenti 20 emittenti come preferite. La
memorizzazione viene ripartita su varie pagine, che possono essere richiamate tramite il
tasto PAGE f. Su ogni pagina vengono collocate 4 emittenti, che si possono consultare
con i tasti PRESET/ALARM+/- s/ d.
1. Con la radio accesa premere il tasto PAGE
f, per richiamare la pagina di memoria
1-5 desiderata. Nel display g appare il
numero della pagina di memorizzazione
selezionata, alla voce „PAGE“.
2. Impostare l'emittente desiderata.
3. Premere brevemente il tasto A.M.S. MEMORY h. Nel display g lampeggiano
le cifre e il messaggio relativo alla posizione di memoria „MEM“.
4. Con i tasti PRESET/ALARM +/— s/d
selezionare la posizione di memoria in
cui salvare l‘emittente. Confermare con il
tasto A.M.S. MEMORY h. L'emittente è
stata così salvata e viene visualizzata.
5. Poiché l'apparecchio può essere usato
da più persone, dispone di una funzione
di commutazione dell'utente. Entrambi gli
utenti possono quindi memorizzare diverse emittenti come preferiti. Per passare da
un utente all'altro, tenere premuto per due
secondi il tasto NAP|USER k per due
secondi. L’utente attivo “A” o “B” viene
visualizzato nel display g.
6. Ripetere i passaggi 1 - 4 (per entrambi gli
utenti), fino a memorizzare tutte le emittenti desiderate.
AMS (Automatic Memory System)
Con la funzione AMS la radio cerca automaticamente le emittenti e le salva nelle posizioni
di memoria disponibili.
• Tenere premuto il tasto A.M.S. MEMORY
h per due secondi. La radiosveglia cerca
automaticamente le emittenti con la sintonia migliore e le memorizza.
Richiamo dell'emittente
1. Per richiamare le emittenti salvate, nella
modalità Radio selezionare prima l'utente
desiderato.
2. Quindi selezionare la pagina di memoria
desiderata con il tasto PAGE f.
3. Con i tasti PRESET/ALARM +/— s/d
selezionare la posizione di memoria
dell‘emittente desiderata.
Impostazione del volume
• In modalità radio premere ripetutamente il
tasto Vol. — q, per diminuire il volume. A
destra nel display g viene rappresentato il
volume corrente in passi di V 0 - 18.
- 10 -
Page 14

• Premere ripetutamente il tasto Vol + w,
per aumentare il volume di riproduzione.
Timer di spegnimento
L'apparecchio dispone di un timer di spegnimento per un tempo massimo di 90 minuti.
1. Premere il tasto SLEEP j, per richiamare
la funzione ed eventualmente accendere
la radio.
2. Premere ripetutamente il tasto SLEEP j,
per inserire il tempo rimanente in passi di
10 minuti. Dopo qualche secondo, viene
nuovamente visualizzata la frequenza di
ricezione.
3. Nel display g lampeggia il messaggio
Sleep
.
4. Premere in qualsiasi momento il tasto SLE-
EP j, per visualizzare per alcuni secondi
il tempo residuo di funzionamento.
5. Alla scadenza del tempo, l'apparecchio si
spegnerà.
6. Per disattivare il tempo di spegnimento
anticipatamente, premere il tasto l.
Funzione dimmer e spegnimento del
display
La luminosità del display può essere impostata
in tre diversi livelli, premendo il tasto SNOOZE/
DIMMER y: chiara, media, disattivata. Maggiore è la luminosità, maggiore sarà l’assorbimento di potenza dell’apparecchio.
Premendo brevemente il tasto MODE/LOCK
e in modalità radio, si può commutare dalla
visualizzazione della frequenza a quella
dell’orario e viceversa.
Proiezione
L'orario può essere proiettato dall'apparecchio su una parete o sul soffitto. Questa funzione è stata pensata per la lettura dell'orario in ambiente buio. Durante il giorno, in
ambiente ben illuminato, sarà quasi impossibile poter utilizzare tale funzione. Con la proiezione attivata, il simbolo della proiezione
compare nel display g.
1. Aprire in tal caso il proiettore t.
2. Attivare la funzione con il tasto PROJEC-
TION u.
3. Dirigere il proiettore t sul punto desiderato. Prima di ruotare lateralmente il proiettore t, se lo si desidera, è necessario
sollevare cautamente la base dall’alloggiamento dell’apparecchio.
4. Con il regolatore di messa a fuoco 1( aggiustare la nitidezza della proiezione.
5. L'orario verrà quindi proiettato sul punto
desiderato per il periodo di tempo preimpostato (v. sezione „Impostazione della
durata della proiezione“).
6. Per ottenere una proiezione invertita,
tenere premuto il tasto PROJECTION u
per un secondo. Premendo ancora una
volta il tasto, si ottiene nuovamente una
proiezione normale.
7. Se si desidera disattivare anticipatamente
questa funzione, premere il tasto PROJECTION u e chiudere il proiettore t.
Blocco dei tasti
Tenere premuto il tasto MODE/LOCK e
fino a ottenere il simbolo della chiave nel
display g. Le normali funzioni dei tasti sono
così bloccate. I tasti mantengono tuttavia la
funzione „Termina allarme“. Inoltre, il tasto
SNOOZE/DIMMER y mantiene la propria
funzione di tasto Snooze e per l’impostazione
della luminosità del display. Per eliminare il
blocco, mantenere premuto nuovamente il
tasto MODE/LOCK e fino alla scomparsa
del simbolo della chiave.
Pulizia
Attenzione!
Prima di pulire l'apparecchio, staccare
sempre la spina dalla presa di corrente!
L'infiltrazione di umidità nella radio da
cucina comporta il pericolo di scarica
elettrica! L'apparecchio può subire danni irreparabili!
Pulire l'alloggiamento della radiosveglia solo
con un panno leggermente umido e un detergente delicato. Impedire la penetrazione di
umidità nell'apparecchio durante la pulizia!
- 11 -
Page 15

Eliminazione dei guasti
Smaltimento
L'apparecchio non funziona.
> La spina del cavo di rete 2! è stata salda-
mente inserita nella presa di rete?
> È stato disattivato il fusibile automatico, se
necessario?
> Si è interrotta la corrente?
Cattiva ricezione di onde ultracorte.
> Modificare l'orientamento dell'antenna
lineare 2) Eventualmente, fissarla con del
nastro adesivo.
Perdita di tutte le impostazioni a causa
di interruzione di corrente.
> Non sono state inserite le pile per il man-
tenimento della memoria.
> Le pile inserite per il mantenimento della
memoria sono scariche. Sostituirle.
L'orario proiettato è poco leggibile.
> Con il regolatore di messa a fuoco 1( ag-
giustare la nitidezza della proiezione.
Avvertenza sulla conformità
Questo apparecchio è conforme ai requisiti
fondamentali e alle altre norme rilevanti
della Direttiva europea per la compatibilità
elettromagnetica 2004/108/EC, la Direttiva
bassa tensione 2006/95/EC, la Direttiva
ecodesign 2009/125/EC (Regolamento
1275/2008 Appendice II, n. 1) nonché la
Direttiva sulla restrizione dell’uso di determinate sostanze pericolose 2011/65/EU.
La dichiarazione di conformità originale e
completa è a disposizione presso l’importatore.
Importatore
KOMPERNASS HANDELS GMBH
BURGSTRASSE 21
44867 BOCHUM
DEUTSCHLAND/GERMANY
www.kompernass.com
Non gettare per alcun motivo
l'apparecchio insieme ai normali
rifiuti domestici. Questo prodotto è soggetto alla Direttiva Europea
2012/19/EC.
Smaltimento dell'apparecchio
• Smaltire il prodotto o relativi componenti
tramite un ente di smaltimento autorizzato
o tramite un'istituzione comunale di smaltimento.
• Rispettare le prescrizioni attualmente in vi-
gore. In caso di dubbi, mettersi in contatto
con l'ente di smaltimento competente.
Smaltimento pile/accumulatori
• Pile e/o accumulatori non devono essere
smaltiti insieme ai rifiuti domestici.
• Le pile/gli accumulatori possono conte-
nere sostanze velenose che danneggiano
l'ambiente. Smaltire pertanto le pile/gli
accumulatori unicamente in conformità
alle leggi vigenti.
• Ogni utente è obbligato per legge a resti-
tuire le pile/gli accumulatori a un centro
di raccolta comunale, locale o presso il
rivenditore. Questo obbligo è finalizzato
allo smaltimento ecologico delle pile e/o
degli accumulatori.
• Restituire pile/accumulatori solo se com-
pletamente scarichi.
Smaltimento dell'imballaggio
Smaltire tutti i materiali dell'imballaggio
in modo ecologicamente conforme.
Garanzia & assistenza
Questo apparecchio è garantito per tre anni a
partire dalla data di acquisto. L'apparecchio
è stato prodotto con cura e debitamente collaudato prima della consegna. Conservare
lo scontrino come prova d'acquisto. Nei casi
contemplati dalla garanzia, mettersi in comunicazione telefonicamente con il centro di assistenza più vicino. Solo in tal modo è possibile
garantire una spedizione gratuita della merce.
- 12 -
Page 16
La prestazione della garanzia vale solo per
difetti del materiale o di fabbricazione, ma
non per i danni derivanti dal trasporto, danni
a parti sottoposte a usura o a parti fragili,
come ad esempio interruttori o accumulatori.
Il prodotto è destinato esclusivamente all'uso
domestico e non a quello commerciale. La
garanzia decade in caso di impiego improprio o manomissione, uso della forza e
interventi non eseguiti dalla nostra filiale di
assistenza autorizzata.
Questa garanzia non costituisce alcun limite
ai diritti legali del consumatore.
Il periodo di garanzia non è prolungato da
eventuali interventi in garanzia. Ciò vale anche per le parti sostituite e riparate. I danni
e difetti presenti all'atto dell'acquisto devono
essere indicati immediatamente dopo il disimballaggio, e comunque entro e non oltre due
giorni dalla data di acquisto. Le riparazioni
effettuate dopo la scadenza del periodo di
garanzia sono a pagamento.
Assistenza Italia
Tel.: 02 36003201
E-Mail: kompernass@lidl.it
IAN 90514
Assistenza Malta
Tel.: 80062230
E-Mail: kompernass@lidl.com.mt
IAN 90514
Disponibilità della hotline telefonica: dal
lunedì al venerdì dalle 8.00 alle 20.00 (CET)
- 13 -
Page 17

- 14 -
Page 18

ÍNDICE PÁGINA
Utilização correcta 16
Material fornecido 16
Dados técnicos 16
Indicações de segurança 16
Peças do aparelho 19
Colocação do aparelho em funcionamento 19
Modo de rádio 23
Limpeza 25
Eliminação de erros 26
Indicação de conformidade 26
Importador 26
Eliminação 26
Garantia & Assistência Técnica 26
Leia atentamente o manual de instruções antes da primeira utilização e guarde-o para consulta futura. Ao entregar o aparelho a terceiros, entregue também o manual.
- 15 -
Page 19

Despertador com projecção da
hora SPU 900 A2
Introdução
Parabéns pela compra do seu aparelho
novo. Decidiu-se, assim, por um produto de
elevada qualidade. O manual de instruções
é constituinte deste produto. Este contém
indicações importantes para a segurança,
utilização e eliminação. Antes da utilização
do produto, famializa-se com todas as indicações de utilização e de segurança. Utilize
o produto apenas como descrito e nas áreas
de aplicação indicadas. Guarde bem este
manual. Ao entregar o aparelho a terceiros
entregue todos os documentos.
Direitos de autor
Esta documentação está protegida por direitos de autor. Todos os direitos reservados,
bem como a reprodução fotomecânica e a
divulgação através de processos especiais
(por exemplo processamento de dados,
suportes e redes de dados) e alterações parciais, técnicas e ao nível do conteúdo.
Dados técnicos
Ligação de rede: 220–240 V
Consumo de energia
no modo de rádio: 5 Watts
Standby: < 1 Watts
Potência de saída: 2 x 700 mW
com 10% de THD
Gama de
frequências: UKW (FM)
87,5 – 108 MHz
Temperatura
de serviço: + 5 – +35 °C
Temperatura de
armazenamento: -20 – +50 °C
Humidade: 5–90%
(sem condensação)
Dimensões
(L x A x P): 21 x 7,1 x 14,4 cm
Peso: aprox. 850 g
Classe de
protecção: II /
Pilhas de reserva: 2 x 1,5 V, tipo AAA/
Micro (não incluídas
no material fornecido)
, 50 Hz
~
Utilização correcta
O despertador de projeção destina-se à indicação da hora e à receção de programas
de rádio FM. Além disso, está equipado com
uma função de alarme através de rádio e de
toque.
O despertador não se destina ao uso comercial ou industrial. Não é assumida qualquer
responsabilidade por danos resultantes de
uma utilização indevida!
Material fornecido
1 Despertador com projecção da hora
SPU 900 A2
1 manual de instruções
Indicações de segurança
Aviso
Uma indicação deste nível alerta para uma
situação potencialmente perigosa. Se esta
situação não for evitada, existe perigo de
ferimentos. Siga as indicações neste aviso
para evitar ferimentos.
Atenção
Uma indicação deste nível alerta para a
possibilidade de danos materiais. Se esta
situação não for evitada, existe perigo de
danos materiais. Siga as indicações neste
aviso para evitar danos materiais.
Nota
A nota fornece informações adicionais para
facilitar o manuseamento do aparelho.
- 16 -
Page 20

Aviso: Perigo de choques
eléctricos!
• Ligue o aparelho apenas a uma tomada
de rede devidamente instalada e ligada
à terra. A tensão de rede deve coincidir
com os dados da placa de identificação
do aparelho.
• Mande reparar ou substituir imediatamnte cabos de ligação ou aparelhos que
não funcionem em perfeitas condições
ou que tenham sido danificados.
• Mantenha o cabo de ligação e o aparelho fora do alcance das crianças. Estas
frequentemente subestimam os riscos
dos aparelhos eléctricos.
• Nunca mergulhe o aparelho em água.
Limpe-o apenas com um pano ligeiramente humedecido.
• Não exponha o aparelho a chuva,
nem o utilize em ambientes húmidos
ou molhados.
• Nunca puxe pelo cabo alimentação,
mas sim pela ficha. Nunca toque no
cabo de alimentação com as mãos
molhadas, pois isso pode provocar um
curto-circuito ou choque eléctrico.
• Não coloque o aparelho, móveis ou semelhantes sobre o cabo de alimentação
e certifique-se de que este último não
fica entalado.
• Certifique-se de que o cabo de ligação
não entra em contacto com água ou humidade durante o funcionamento.
• Não deve abrir a estrutura do aparelho, nem deve repará-lo ou modificá-lo.
Caso contrário, existe perigo de morte
por choque eléctrico e a garantia perde
a validade.
• Proteja o aparelho contra salpicos e
pingos de água. Por isso, não coloque
qualquer objecto com líquidos (p. ex.
jarras com flores) sobre ou junto ao
aparelho.
• Verifique o aparelho e todos os seus
componentes quanto a danos visíveis. O
conceito de segurança funciona
apenas caso o aparelho se encontre em
perfeitas condições.
• Antes de cada limpeza, retire a ficha da
tomada.
Aviso: Perigo de ferimentos!
• Nunca faça nós no cabo de alimentação nem o ate a outros cabos. O cabo
de alimentação deve ser colocado
de tal modo que ninguém o pise,
nem tropece no mesmo.
• A ficha de rede deve estar sempre bem
acessível para que seja possível desligála rapidamente da corrente eléctrica em
caso de emergência.
• Este aparelho não deve ser utilizado por
pessoas (incluindo crianças) com capacidades físicas, sensoriais ou mentais
limitadas ou falta de experiência e/ou
de conhecimento, a não ser que estas
sejam supervisionadas por uma pessoa
responsável pela sua segurança ou que
recebam desta instruções acerca do funcionamento do aparelho. As crianças
devem ser supervisionadas,
de modo a garantir que não brincam
com o aparelho.
• Certifique-se de que o aparelho é
instalado sobre uma base segura.
• Se o aparelho tiver caído ou estiver
danificado, não o coloque novamente
em funcionamento. O aparelho deve ser
verificado por um técnico especializado
e se necessário reparado.
• Mantenha as pilhas fora do alcance
de crianças. Estas poderiam colocar
as pilhas na boca e engoli-las.
• Em caso de ingestão de uma pilha,
procure imediatamente assistência médica.
Aviso: Perigo de explosão!
• Não lance as pilhas para o fogo.
Não recarregue as pilhas.
• Nunca abra, nem tente soldar as pilhas.
Existe perigo de explosão e de ferimentos!
- 17 -
Page 21

Atenção: Perigo de incêndio!
• Não utilize o aparelho nas proximidades
de superfícies quentes.
• Não coloque o aparelho em locais
expostos à radiação solar directa. Caso
contrário, este poderia sobreaquecer
e ficar irreparavelmente danificado.
• Nunca cubra as ranhuras de ventilação
do aparelho enquanto este estiver ligado.
• Não coloque fontes de ignição, como por
ex. velas, sobre ou junto ao aparelho.
Atenção em caso de trovoada!
• Em caso de trovoada, os aparelhos ligados à corrente eléctrica podem sofrer
danos. Por isso, neste caso, retire sempre a ficha de rede da tomada.
Atenção durante a substituição
das pilhas
O aparelho utiliza pilhas para a protecção da memória. Para um manuseamento correcto das pilhas, respeite as
seguintes indicações:
• Caso não pretenda utilizar o aparelho
por um período de tempo mais prolongado, retire as pilhas.
• Verifique regularmente as pilhas. As
pilhas com fuga de líquido podem
danificar o aparelho.
• Se houver fuga de líquido das pilhas, utilize luvas de protecção e limpe o compartimento das pilhas com um pano seco.
Indicação relativa à desconexão
da rede
A tecla
deste aparelho não separa o
aparelho da rede eléctrica. Além disso,
o aparelho consome energia no modo
de Standby. Para desligar totalmente o
aparelho da rede, a ficha de rede tem
de ser retirada da tomada.
Indicação sobre tensões
transitórias (EFT/processos de
transição rápidos eléctricos)
e descargas electrostáticas:
No caso de uma anomalia devido a
processos de transição rápidos eléctricos (tensão transitória) ou descargas
electrostáticas, o produto deve ser
reposto às definições de origem para
regressar ao modo de funcionamento
normal. Poderá ser necessário desligar a
alimentação de tensão e voltar a ligá-la.
As pilhas (caso existam) devem ser removidas e novamente colocadas.
Nota
Não é assumida qualquer responsabilidade/garantia por danos no despertador resultantes da acção da humidade,
da infiltração de água no aparelho, do
sobreaquecimento ou de conversões
independentes!
Aviso!
Nunca exponha as pilhas a calor excessivo
(por ex. luz solar intensa, fogo).
Atenção!
Perigo de explosão devido a substituição
incorrecta da pilha. Substituir apenas por pilhas do mesmo tipo ou equivalente.
- 18 -
Page 22

Peças do aparelho
q VOL— - Reduz o volume
VOL + - Aumenta o volume
w
MODE/LOCK - Acede a parâmetros
e
configuráveis/
Bloqueio das teclas
Alto-falante
r
t Projector - Projecta a hora nas
paredes
SNOOZE/ - Tecla snooze/
y
DIMMER Regulador de luminosi-
dade
PROJECTION - Ligar/desligar projeção
u
da hora
i DOWN - Tecla de selecção para
baixo
UP - Tecla de selecção para
o
cima
AL.SET - consulta a função do
a
alarme
s PRESET/ALARM + - Memória de estações/
alarmes para cima/
PRESET/ALARM – - Memória de estações/
d
alarmes para baixo
PAGE - comuta as páginas da
f
memória
g Display - Visor
h A.M.S. MEMORY - Memorizador de emis-
soras autom.
SLEEP - Comanda o temporiza-
j
dor de desconexão
NAP/USER - Alterna o de utilizador,
k
função de
temporizador
l - Interruptor para ligar/
desligar a função de
rádio
Regulador de
1(
focalização - Para focalização da
projecção da hora
Antena de fio - Para recepção FM
2)
2! Cabo de alimentação
Compartimento
2@
para as pilhas - Para pilhas de reserva
Colocação do aparelho em
funcionamento
Em primeiro lugar, retire todas as peças do
aparelho da embalagem e remova todos os
materiais de embalagem. Verifique o aparelho quanto a eventuais danos.
Colocação das pilhas de reserva
Através das pilhas de reserva, mantêm-se
todas as configurações individuais do aparelho em caso de falha de corrente. Para
isso, necessita de duas pilhas de 1,5 V do tipo
AAA/Micro. Estas não estão incluídas no material fornecido.
1. Abra a tampa do compartimento para as
pilhas 2@ na parte inferior do despertador.
2. Insira as pilhas. Certifique-se de que
a polaridade é a correcta.
3. Feche a tampa do compartimento para
as pilhas 2@. A tampa deve encaixar de
forma audível.
Nota:
As pilhas de reserva devem ser testadas
pelo menos uma vez por ano e, se necessário, substituídas.
Estabelecer a alimentação de corrente
• Insira a ficha de rede numa tomada. No
visor g é exibida a mensagem de boas-
-vindas "PLEASE WAIT FOR SETTING
THANKS". Entretanto, o despertador procura actualizar as suas configurações de
hora e data com a ajuda do sinal RDS.
Caso pretenda cancelar este processo,
prima qualquer tecla. Caso a actualização automática falhe, efectue as configurações mencionadas manualmente.
Ajustar a hora
Para que possa ajustar a hora e os seguintes
parâmetros, deve desactivar o modo de
rádio. Caso não seja premida qualquer tecla
dentro de aprox. 15 segundos, o aparelho
memoriza a configuração e fecha o modo
de ajuste.
- 19 -
Page 23

1. Prima a tecla MODE/LOCK e. A indicação da hora fica intermitente.
2. Prima as teclas DOWN/UP i/o para
ajustar a hora em intervalos de minutos.
Manter premido um dos botões altera
a hora em sequência rápida.
Ajustar a data
1. Prima novamente a tecla MODE/LOCK
e. No visor g a indicação da data fica
intermitente "01.01.2013".
2. Prima as teclas DOWN/UP i/o para
ajustar a data em intervalos de dias.
Mantendo uma das teclas premida,
altera a data em modo rápido.
Ajustar cidade
1. Prima novamente a tecla MODE/LOCK
e. No visor g fica intermitente a indi-
cação da abreviatura da cidade sob a
indicação "LOCAL CITY".
2. Prima as teclas DOWN/UP i/o para
ajustar o fuso horário com base numa
cidade ou no seu local de residência aproximado. Mantendo uma das teclas premida, altera a indicação rapidamente. Aqui
poderá encontrar uma vista geral das cidades ajustáveis e das diferenças horárias:
Abr. Dif. Cidade
HNL -10 Honolulu / EUA
ANC -9 Anchorage / EUA
YVR -8 Vancouver / Canadá
LAX -8 Los Angeles / EUA
DEN -7 Denver / EUA
CHI -6 Chicago / EUA
MEX -6 Cidade do México /
México
NYC -5 Nova Iorque / EUA
YYZ -5 Toronto / Canadá
YUL -5 Montreal / Canadá
CCS -4 Caracas / Venezuela
RIO -3 Rio De Janeiro / Brasil
BUE -3 Buenos Aires / Argentina
UTC 0 Universal Time
Coordinated
LON 0 Londres / Reino Unido
BER +1 Berlin / Alemanha
Abr. Dif. Cidade
PAR +1 Paris / França
ROM +1 Roma / Itália
CAI +2 Cairo / Egipto
IST +2 Istambul / Turquia
MOW +3 Moscovo / Rússia
KWI +3 Kuwait City / Kuwait
DXB +4 Dubai / Arábia Saudita
KHI +5 Karachi / Paquistão
DAC +6 Dacca / Bangladesh
BKK +7 Banguecoque / Tailândia
SIN +8 Singapura
HKG +8 Hong Kong
PEK +8 Pequim / China
SHA +8 Shanghai / China
TYO +9 Tóquio / Japão
SYD +10 Sydney / Austrália
NOU +11 Nouméa / Nova
Caledónia
AKL +12 Auckland / Nova Zelândia
3. Prima a tecla SNOOZE/DIMMER y
para ligar ou desligar o horário de Verão
para o fuso horário seleccionado. O visor
g exibe respectivamente “SUM ON” ou
“SUM OFF”.
Ajustar hora universal
1. Prima novamente a tecla MODE/LOCK
e. No visor g a indicação da abreviatu-
ra da cidade sob a indicação "WORLD
CITY" fica intermitente.
2. Prima as teclas DOWN/UP i/o para
ajustar a hora universal pretendida. Mantendo uma das teclas premida, altera a
indicação rapidamente. Também aqui se
aplica a vista geral acima exibida das
cidades ajustáveis e diferenças horárias.
3. Prima repetidamente o botão SNOOZE/
DIMMER y para ajustar um desvio da
hora de verão para o tempo universal
seleccionado.
- 20 -
Page 24

Desvio
de
Visor Explicação
tempo
1 OFFSET 1 Na sua zona horária
(Local City) é hora de
inverno e no tempo universal ajustado é agora hora
de verão.
0 OFFSET 0 Na sua zona horária
(Local City) e no tempo
universal ajustado é agora hora de verão ou de
inverno.
-1 OFFSET -1Na sua zona horária
(Local City) é hora de verão e no tempo universal
ajustado é agora hora
de inverno ou não possui
hora de verão.
Ajustar função de lembrança
Pode programar até 10 datas, das quais
o aparelho deverá recordá-lo.
1. Prima novamente a tecla MODE/LOCK
e. No visor g fica intermitente uma data
e a indicação SDA 1 para a data da lembrança 1.
2. Prima as teclas DOWN/UP i/o para
ajustar a primeira data de lembrança
pretendida. Mantendo uma das teclas
premida, altera a indicação rapidamente.
3. Caso prima a tecla SNOOZE/DIMMER
y, o ano é desactivado e, deste modo,
será recordado desta data todos os anos.
4. Caso pretenda programar outras datas,
prima a tecla PAGE f para seleccionar a
posição de memória pretendida 2-10.
5. Proceda do mesmo modo com as outras
datas.
6. Para desactivar a função de lembrança,
programe uma data passada.
Ajustar função de actualização
Através desta função o aparelho pode actualizar as configurações de hora automaticamente com base em dados RDS.
1. Prima novamente a tecla MODE/LOCK
e. O visor g exibe "UPDATE ON".
2. Prima a tecla DOWN i para desactivar
a função de actualização. O visor g
exibe então "UPDATE OFF".
3. Prima a tecla UP o para activar novamente a função de actualização.
Ajustar tempo para a função snooze
1.
Prima novamente a tecla MODE/LOCK
e. O visor g exibe "SNOOZE 09".
2. Prima os botões DOWN/UP i/o para
definir o intervalo de tempo desejado
para a função snooze, entre 1 e 59 minutos.
Ajustar o modo de 12 ou 24 horas
1.
Prima novamente a tecla MODE/LOCK
e. O visor g exibe "24HR".
2. Prima a tecla DOWN i para regular
o modo de indicação de 12 horas.
No visor
gé exibido "12HR".
3. Prima a tecla UP o para comutar novamente para o modo de 24 horas.
Ajustar duração da projecção
1.
Prima novamente a tecla MODE/LOCK
e. O visor g exibe "PROJ-T OFF".
2.
Prima as teclas DOWN/UP i/o para
ajustar a duração da projecção de 1 - 59
minutos. No ajuste “OFF” acende a projecção continuamente e pode ser ligada
ou desligada premindo o botão PROJECTION u.
Projecção durante o alarme
1. Prima novamente a tecla MODE/LOCK e.
O visor g indica “PROJ-AL OFF”.
2. Prima a tecla UP o se pretender que a
projecção se ligue automaticamente com
o soar do alarme.
3. Prima a tecla DOWN i para desactivar
esta função novamente.
Regulador de luz automático do visor
1. Prima novamente o botão MODE/LOCK
e. O visor g indica “DIM-T OFF”.
2. Prima o botão UP o se a luz do visor
tiver de ser regulada automaticamente
para determinados períodos. O visor g
indica então “DIM-T ON”.
- 21 -
Page 25

3. Prima o botão DOWN i para desactivar
esta função novamente.
Ajustar o tempo de regulação de luz
do visor
1. Prima novamente o botão MODE/LOCK
e. O visor g indica “DT 23:00 ON” como
a hora para a qual a luz do visor é regulada automaticamente.
2. Prima os botões DOWN/UP i/o, para
ajustar outra hora.
3. Prima novamente o botão MODE/LOCK
e. O visor g indica “DT 6:00 OFF” como
a hora para a qual o visor é apresentado
novamente com luminosidade normal.
4. Prima os botões DOWN/UP i/o para
ajustar outra hora.
Prima novamente a tecla MODE/LOCK e
para concluir estas configurações.
Função de temporizador
1. Prima o botão NAP/USER k. No visor g
surge a indicação NAP e a indicação dos
minutos 10 fica intermitente.
2. Regule com os botões DOWN/UP i/o
os minutos pretendidos (1 a 120 min.).
3. Prima novamente a tecla NAP/USER k
para iniciar o temporizador. No visor g é
exibido o tempo restante.
4. Se o tempo terminar, soa um sinal de temporizador durante aprox. 10 minutos, a
indicação NAP fica intermitente e a hora
é exibida.
5. Prima então qualquer tecla para fechar o
alarme.
6. Caso pretenda fechar a função do temporizador antes do alarme, mantenha
a tecla NAP/USER k premida durante
um segundo.
Função de despertar (alarme 1 a 4)
Pode programar até quatro alarmes com o
seu despertador. Caso não seja premida
qualquer tecla dentro de aprox. 15 segundos, o aparelho memoriza a configuração e
fecha o modo de ajuste.
1. No caso de rádio desligado, prima o
botão AL.SET a para aceder à função
de despertar. Os botões PRESET/ALARM
+/– s/d permitem-lhe seleccionar a posição de memória de alarme pretendida.
No visor g fica intermitente a última hora
de despertar ajustada e o símbolo para o
tipo de alarme (rádio ou sinal de aviso).
2. Prima as teclas DOWN/UP i/o para
ajustar a hora de alarme pretendida.
Manter premido um dos botões DOWN/
UP i/o altera a hora de despertar em
sequência rápida.
3. Prima o botão AL.SET a até ser exibida a
função de despertar pretendida (ver tabela) no visor g.
Função de alarme Símbolo no
visor g
Toque
Rádio
Desligado sem símbolo
4. Prima a tecla SNOOZE/DIMMER y
para ajustar os dias da semana nos quais
pretende que o alarme toque: Pode escolher entre “dia útil” (MON, TUE, WED,
THU, FRI), “fim-de-semana” (SAT, SUN) e
“todos os dias” (MON, TUE, WED, THU,
FRI, SAT, SUN).
5. Mantenha a tecla SNOOZE/DIMMER y
premida durante 2 segundos, caso pretenda ser despertado num dia de semana específico. Para ajustar este dia de semana,
prima repetidamente a tecla SNOOZE/
DIMMER y. Oriente-se aqui pelas indica-
ções de dia da semana no canto superior
direito do visor:
MON = Segunda-feira
TUE = Terça-feira
WED = Quarta-feira
THU = Quinta-feira
FRI = Sexta-feira
- 22 -
Page 26

SAT = Sábado
SUN = Domingo
6. Para retroceder à selecção de dias úteis,
fim-de-semana ou semana completa,
mantenha a tecla SNOOZE/DIMMER y
premida novamente durante 2 segundos.
7.
Após aprox. 15 segundos o visor g re-
trocede à indicação da hora. As configurações da função de alarme estão agora
memorizadas e são exibidas.
8. Programe, se necessário, as restantes posições de memória para horas de alarme.
9. Se pretender despertar com a função de
rádio, ligue agora o rádio e seleccione
a emissora pretendida. Ajuste depois o
volume máximo que deverá ser atingido
com o despertador. Depois desligue novamente o rádio. A função de rádio
é explicada nas próximas páginas.
Quando o alarme toca...
• ... e a função de despertar "Rádio" está
seleccionada, o rádio liga-se com volume
crescente e na última emissora ajustada
durante uma hora.
• ... e a função de despertar “sinais de aviso”
é seleccionada, soam os sinais de aviso du-
rante 10 minutos com volume crescente.
Para fechar a respectiva função de despertar
prima qualquer tecla com excepção da tecla
SNOOZE/DIMMER y.
A função snooze
Caso prima a tecla SNOOZE/DIMMER
y, o alarme activo é adiado pelo tempo
predefinido para esta função (ver parágrafo
"Ajustar tempo para a função snooze", 1 59 min., predefinição = 9 min.). Entretanto a
indicação SNZ acende-se no visor g. Para
parar definitivamente um alarme descontínuo, prima brevemente uma vez o botão
AL.SET a.
A função de lembrança
O aparelho recorda-lhe uma data ajustada
com a função de lembrança. Neste caso, o
alarme soa neste dia todas as horas certas
das 8:00 - 23:00 durante 10 minutos. Para
isso, a indicação SDA fica intermitente no
visor g. Prima qualquer tecla para fechar o
alarme.
Ajustar indicações do visor alternáveis
Caso o aparelho se encontre em Standby,
prima a tecla DOWN i. No visor é exibido
D–" (para hora e data). Prima novamente a
"
tecla DOWN i, é exibido "
e hora universal) no visor. Prima novamente a
tecla DOWN i, é exibido "
- data - hora universal alternadas) no visor.
Prima novamente a tecla DOWN i,
é exibido "
––" (apenas hora) no visor.
–W" (para hora
DW" (para hora
Modo de rádio
Os dados técnicos do aparelho permitem
uma gama de frequências regulável fora
da gama de frequências permitida de 87,5
- 108 MHz. Noutros países podem haver
regulamentos nacionais divergentes relativamente às gamas de frequências de radiodifusão predefinidas. Tenha em atenção que
não pode utilizar, transmitir a terceiros nem
utilizar para outros fins de forma abusiva
as informações recebidas fora da área de
frequência de radiodifusão. Para a recepção
de rádio, desenrole totalmente a antena de
fio 2) e determine o melhor direccionamento
durante o funcionamento.
Ligar/desligar o rádio
1. Prima a tecla l. No visor g é
exibida a frequência actual e o símbolo
de ligação
intermitente e é exibido de modo que o
aparelho aguarde pela transmissão da
hora actual de uma emissora RDS.
2. Prima novamente a tecla l para fechar a função de rádio e colocar o aparelho em modo de Standby.
Configurar manualmente a emissora
1. Prima a tecla UP o para procurar por
emissoras com uma frequência mais
elevada do que a exibida no visor.
. O símbolo de hora fica
- 23 -
Page 27

2. Prima a tecla DOWN i para procurar
por emissoras com uma frequência mais
reduzida do que a exibida no visor.
3. Caso a emissora agora ajustada transmita dados RDS, a indicação
acende-se no visor g. De seguida, é exibido no visor g o nome da emissora de
rádio e a hora é actualizada (desde que
activado nas configurações, ver parágrafo "Ajustar função de actualização").
Procurar emissora automaticamente
O aparelho também pode procurar por
emissoras automaticamente. O despertador
percorre então a banda de frequências
seleccionada até encontrar uma emissora.
1. Mantenha a tecla UP o premida durante
dois segundos: o despertador procura
pela emissora com a próxima frequência
acima da exibida.
2. Mantenha a tecla DOWN i premida
durante dois segundos: o despertador
procura pela emissora com a próxima
frequência abaixo da exibida.
Repita estas operações, até ter encontrado a
emissora procurada.
Memorizar emissora
Pode memorizar 20 emissoras como favoritas no aparelho por cada um dos 2 utilizadores. Estas posições de memória distribuem-se
por várias páginas às quais pode aceder
através da tecla PAGE f. Em cada página
encontra 4 emissoras que pode activar com
as teclas PRESET/ALARM +/- s/ d.
1. No caso de rádio ligado, prima o botão
PAGE f para aceder à página de memória 1-5 pretendida. No visor g é exibido
o número da página de memória agora
seleccionada sob "PAGE".
2 Ajuste a emissora desejada.
3. Prima brevemente a tecla A.M.S. MEMORY h. No visor g fica intermitente o
algarismo e a indicação da posição de
memória "MEM".
4. Com os botões PRESET/ALARM +/— s/
d seleccione então a posição na qual
a emissora deve ser memorizada. Confirme com a tecla A.M.S. MEMORY h.
Agora a emissora está memorizada e é
exibida permanentemente.
5. Visto que o aparelho pode ser utilizado
por várias pessoas, este dispõe de uma
comutação de utilizador. Ambos os utilizadores podem, deste modo, memorizar
diferentes emissoras como favoritas. Para
comutar para o respectivo utilizador,
mantenha a tecla NAP|USER
kpremida
durante dois segundos. O utilizador que
se encontra activo “A” ou “B” é apresentado no visor g.
6. Repita os passos 1 - 4 (para ambos os
utilizadores) até que todas as emissoras
pretendidas estejam memorizadas.
AMS (Automatic Memory System)
Com a função AMS, a rádio procura automaticamente por emissoras e memoriza-as
nas posições de memória disponíveis.
• Mantenha a tecla A.M.S. MEMORY h
premida durante dois segundos. O despertador procura automaticamente por
emissoras com boa recepção e memorizaas sequencialmente.
Aceder a uma emissora
1. Para aceder à emissora memorizada,
seleccione no modo de rádio em primeiro
lugar o utilizador pretendido.
2. Agora seleccione a página de memória
pretendida com a tecla PAGE f.
3. Com os botões PRESET/ALARM +/— s/
d seleccione a posição de memória da
emissora pretendida.
Ajustar o volume
• Prima repetidamente em modo de rádio a
tecla Vol. — q para reduzir o volume. No
lado direito do visor g é exibido o volume actual em intervalos de V 0 - 18.
• Prima repetidamente a tecla Vol. + w
para aumentar o volume.
Temporizador de desactivação
O aparelho dispõe e um temporizador de
desconexão para até 90 minutos.
- 24 -
Page 28

1. Prima a tecla SLEEP j para aceder à
função e, se necessário, ligar o rádio.
2. Prima repetidamente a tecla SLEEP j
para introduzir o tempo restante em intervalos de 10 minutos. Após alguns segundos é novamente exibida a frequência de
recepção.
3. No visor gacende-se a indicação
Sleep
.
4. Prima a qualquer momento a tecla SLEEP
j para exibir durante alguns segundos o
actual tempo restante.
5. Depois de decorrido o tempo, o aparelho
desliga-se.
6. Para desligar o temporizador de desconexão antecipadamente, prima a tecla
l.
Regular a luz do visor e alternar o visor
Pode regular a luminosidade do visor em
três níveis premindo a tecla SNOOZE/
DIMMER y: brilhante, média, desligada.
Quanto maior for a luminosidade, mais elevado é o consumo de energia do aparelho.
Se premir brevemente o botão MODE/LOCK
e no modo de rádio, alterna entre a indicação de frequência e de hora.
Projecção
A hora pode ser projectada pelo aparelho
numa parede ou no tecto. Esta função foi
concebida para a leitura da hora na escuridão. Durante o dia, em divisões bem
iluminadas, não poderá praticamente utilizar
a projecção. No caso de projecção ligada,
acende-se o símbolo de projecção no visor
g.
1. Feche para isso o projector t.
2. Active a função com a tecla PROJECTION
u.
3. Dirija o projector u para o local pretendido. Antes de poder rodar o projector
t para o lado pretendido, deve retirar
cuidadosamente a sua base da estrutura
do aparelho.
4. Foque a indicação com o regulador de
focalização 1(.
5. A hora é agora projectada para o local
pretendido durante o período predefinido
(ver parágrafo "Ajustar duração de projecção").
6. Para apresentar uma projecção invertida, mantenha a tecla PROJECTION u
premida durante um segundo. Uma nova
acção de premir e manter premida a
tecla faz com que a projecção volte a ser
apresentada de forma normal.
7. Caso pretenda desligar esta função antecipadamente, prima a tecla PROJECTION
u e abra o projector t.
Bloqueio das teclas
Mantenha premido o botão MODE/LOCK
e até surgir o símbolo de chave no visor
g. Agora, as funções de botões normais
estão bloqueadas. Os botões mantêm a
função “terminar alarme”. Além disso, a tecla
SNOOZE/DIMMER y mantém a sua função
enquanto tecla de modo de adormecer e
para ajuste da luminosidade do visor. Para
remover o bloqueio das teclas, mantenha premido o botão MODE/LOCK e até o
símbolo da chave desaparecer.
Limpeza
Aviso!
Retire a ficha da tomada antes de efectuar qualquer limpeza! Se houver infiltraçã de humidade no aparelho, existe
perigo de choque eléctrico! Além disso,
o aparelho pode também sofrer danos
irreparáveis!
Limpe a caixa do despertador exclusivamente com um pano ligeiramente humedecido e
um detergente suave. Certifique-se de que,
ao proceder à limpeza, não há infiltraçã humidade na caixa!
- 25 -
Page 29

Eliminação de erros
Eliminação
O aparelho não trabalha.
> A ficha do cabo de alimentação 2!
está bem encaixada na tomada?
> O disjuntor está desligado?
> A corrente falhou?
Má recepção FM.
> Altere a direcção da antena de fio 2).
Se necessário, fixe-a com fita adesiva.
Perda de todas as configurações após
falha de corrente.
> Não inseriu pilhas para a manutenção da
memória.
> As pilhas inseridas para manutenção
da memória estão gastas. Substitua-as.
A hora projectada está praticamente
ilegível.
> Foque a indicação com o regulador
de focalização 1(.
Indicação de conformidade
Este aparelho está em conformidade com os
requisitos fundamentais e outras prescrições
relevantes da diretiva europeia de compatibilidade eletromagnética 2004/108/EC,
da diretiva de baixa tensão 2006/95/EC e
da diretiva ecodesign 2009/125/EC (regulamento 1275/2008, anexo II, n.º 1), bem
como, a diretiva RoHS 2011/65/EU.
Pode obter a versão completa e original da
Declaração de Conformidade junto do importador.
Nunca deposite o aparelho no
lixo doméstico comum. Este produto está em conformidade com
a Directiva Europeia 2012/19/EC.
Eliminação do aparelho
• Elimine o produto ou as suas peças através de um serviço autorizado de recolha
de resíduos ou através da instituição de
recolha do seu município.
• Tenha atenção aos regulamentos actualmente em vigor. Em caso de dúvida, entre
em contacto com a entidade de eliminação de resíduos.
Eliminação de pilhas/pilhas recarregáveis
• As pilhas/pilhas recarregáveis não podem ser depositadas no lixo doméstico.
• As pilhas/pilhas recarregáveis podem
conter substâncias tóxicas, que prejudiquem o ambiente. Por isso, elimine-as de
acordo com as estipulações legais válidas.
• Os consumidores devem depositar as pilhas/recarregáveis num ecoponto do seu
município ou num estabelecimento comercial. Esta obrigação tem como finalidade
garantir uma eliminação ecológica das
pilhas/pilhas recarregáveis.
• Devolva as pilhas/pilhas recarregáveis
apenas quando estas estiverem vazias.
Eliminação da embalagem
Elimine todos os materiais da embalagem de modo ecológico.
Importador
KOMPERNASS HANDELS GMBH
BURGSTRASSE 21
44867 BOCHUM
DEUTSCHLAND/GERMANY
www.kompernass.com
- 26 -
Page 30

Garantia & Assistência Técnica
Este aparelho tem 3 anos de garantia a
partir da data de compra. Este aparelho foi
fabricado com o máximo cuidado e escrupulosamente testado antes da sua distribuição.
Guarde o talão como comprovativo da compra. Em caso de reclamação de garantia,
entre em contacto com o seu ponto de assistência técnica por telefone. Apenas deste
modo pode ser garantido um envio gratuito
do seu produto.
A garantia abrange apenas defeitos de
material e de fabrico, mas não danos provocados pelo transporte, peças de desgaste ou
danos em peças frágeis, por ex. interruptores
ou baterias.
O produto foi concebido apenas para uso privado e não para uso comercial. A garantia extingue-se no caso de utilização incorrecta e de
intervenções que não foram efectuadas pelo
nossa filial de assistência técnica autorizada.
Os seus direitos legais não são limitados por
esta garantia.
O período de garantia não é prolongado
pela reivindicação da garantia. Isto aplica-se
também a peças substituídas e reparadas.
Danos e falhas eventualmente já existentes
na altura da aquisição devem ser comunicados imediatamente após o desembalamento
ou, o mais tardar, dois dias após a data de
aquisição. Reparações realizadas após o
final da validade da garantia são cobradas.
Assistência Portugal
Tel.: 70778 0005 (0,12 EUR/Min.)
E-Mail: kompernass@lidl.pt
IAN 90514
Horário de atendimento da linha de apoio:
Segunda a sexta das 8:00 horas – 20:00 horas
(HEC)
- 27 -
Page 31

- 28 -
Page 32

INDEX PAGE
Intended Use 30
Items supplied 30
Technical Data 30
Safety information 30
The appliance components 33
Putting the appliance into use 33
Radio operation 37
Cleaning 39
Troubleshooting 39
Notice regarding conformity 39
Importer 40
Disposal 40
Warranty & Service 40
Read the operating instructions carefully before using the appliance for the first time and preserve this booklet for later reference. Pass this booklet on to whoever might acquire the appliance at a future date.
- 29 -
Page 33

Projection Alarm Clock
SPU 900 A2
Introduction
Congratulations on the purchase of your new
appliance.
You have clearly decided in favour of a quality product. These operating instructions are
a part of this product. They contain important
information in regard to safety, use and disposal. Before using the product, familiarise
yourself with all of these operating and safety
instructions. Use the product only as described
and only for the specified areas of application. Retain these instructions for future reference. In addition, pass these documents on,
together with the product, to any future owner.
Copyright
This documentation is copyright protected.
All rights including those of photographic
reproduction, duplication and distribution by
means of particular methods (for example
data processing, data carriers and data networks), wholly or partially as well as substantive and technical changes are reserved.
Intended Use
This projection alarm is intended for displaying the time and for the reception of VHF radio programmes. Additionally, the appliance
is fitted with an alarm function using either
radio or a signal tone.
This radio alarm is not intended for use in
commercial or industrial applications. No
warranty is provided for damages resulting
from improper use of the appliance!
Items supplied
1 Projection Alarm Clock SPU 900 A2
1 Operating manual
Technical Data
Power supply: 220-240 V
Power consumption
in radio operation: 5 Watt
Standby: < 1 Watt
Output level: 2 x 700 mW
bei 10% THD
Frequency range : VHF (FM)
87.5 – 108 MHz
Operating
temperature: + 5 – +35 °C
Storage
temperature : -20 – +50 °C
Humidity: 5 – 90 %
(No condensation)
Dimensions
(W x H x D): 21 x 7.1 x 14.4 cm
Weight : 850 g approx.
Protection class: II /
Backup Batteries 2 x 1.5 V, Type AAA/
Micro (not supplied)
, 50 Hz
~
Safety information
Warning
A warning of this danger level signifies a possible dangerous situation. If the dangerous
situation is not avoided it can lead to injuries.
Follow the directives in this warning notice, so
as to avoid personal injuries.
Important
A warning of this danger level signifies possible property damage. If the situation is not
avoided it can lead to property damage. The
directives in this warning are there to avoid
property damage.
Notice
A notice signifies additional information that
assists in the handling of the appliance.
Warning: Risk of electric shocks.
• Connect the appliance only to correctly
installed and earthed mains power sock-
- 30 -
Page 34

ets. Ensure that the rating of the local
power supply tallies completely with the
details given on the rating plate of the
appliance.
• Arrange for Customer Services to repair
or replace connecting cables and/or
appliances that are not functioning properly or have been damaged.
• Keep the power cable and appliance
away from children. Children frequently
underestimate the dangers of electrical
appliances.
• NEVER submerse the appliance in water.
Wipe it only with a slightly damp cloth.
• Do not expose the appliance to rain and
never use it in a humid or wet environment.
• Always take hold of the power cable by
the plug. Do not pull on the cable itself
and never touch the power cable with
wet hands, this could result in either a
short circuit or you receiving an electric
shock.
• Do NOT place the appliance itself,
furniture items or similar objects on the
power cable and take steps to ensure it
cannot become jammed or trapped in
any way.
• Make sure that the power cable does
not become wet during operation.
• You are not permitted to open the appliance housing or to repair or modify
the appliance. If the housing is opened
or irregular modifications are made, you
run the risk of receiving a potentially fatal
electric shock and the warranty lapses.
• Protect the appliance against drip and
spray water. Do not place any waterfilled vessels (e.g. flower vases) on or
near the appliance.
• Check the appliance and all parts for
visible damages. The safety concept can
work only if the appliance is in
a faultless condition.
• Always remove the power plug before
cleaning the appliance.
Warning: Injury hazard!
• NEVER make a knot in the power cable
and do NOT bind it together with other
cables. The power cable must be laid so
that co one can step on or trip over it.
• The power plug must always be easily
accessible, so that in the event of an
emergency the appliance can be quickly
disconnected from the mains power supply.
• This appliance is not intended for use
by individuals (including children) with
restricted physical, physiological or intellectual abilities or deficiences in experience and/or knowledge unless they are
supervised by a person responsible for
their safety or receive from this person
instruction in how the appliance is to be
used. Children should be supervised to
ensure that they do not play with the appliance.
• Provide a stable location for the appliance.
• Do not operate the appliance if it has
sustained a fall or is damaged. Arrange
for the appliance to be checked and,
if necessary, repaired by qualified technicians.
• Keep batteries well away from children.
Children could put batteries into their
mouths and swallow them.
• If a battery is swallowed, seek medical
assistance IMMEDIATELY.
Warning: Explosion hazard!
• Do not throw batteries into a fire.
Do not recharge the batteries.
• Never open batteries, never solder or
weld batteries. The risk of explosions
and injuries exists!
Warning: Risk of fire!
• Do not use the appliance near hot surfaces.
• Do not place the appliance in locations
that are subject to direct sunlight. If you
- 31 -
Page 35

do, it may overheat and become irreparably damaged.
• Never cover the ventilation slots of the
appliance while it is switched on.
• Do not place open fire sources, such
as candles, on or near the appliance.
Caution with thunderstorms!
• Equipment connected to a power supply
can be damaged during a thunderstorm.
You should therefore always pull the
power plug from the power socket when
there is a storm.
Warnings about interaction with
batteries
The appliance uses batteries for memory
storage. When handling batteries,
please observe the following:
• If you do not intend to use the appliance
for an extended period, remove the
batteries.
• Regularly check the condition of the batteries. Leaking batteries can cause damage to the appliance.
• Should the batteries leak, put on a pair
of protective gloves and clean the battery compartment and terminals with
a dry cloth.
ance from mains power, the plug MUST
be removed from the wall socket.
Notice regarding electrical
power surges (EFT / electrical
fast transient) and electrostatic
discharges:
In a case of malfunction due to an electrical fast transient (power surge) and/
or electrostatic discharge, the appliance
must be returned to default settings in
order to re-establish normal operation.
This could mean that it must be disconnected from the power supply and then
reconnected. The batteries (if present)
must be removed and then reinserted.
Notice
No liability/warranty claims will be considered for damage to the appliance
caused by the effects of moisture, water
penetration, overheating or due to unauthorised modifications!
Caution!
Never subject the batteries to excessive heat
(i.e. bright sunlight, fire, etc.).
Attention!
There is a risk of explosion if the batteries are
improperly replaced. Only replace with the
same or equivalent types.
Notice regarding separation
from mains-power
button on this appliance does not
The
completely disconnect it from the mains
power network. Additionally, the appliance consumes power when in standbymode. To completely separate the appli-
- 32 -
Page 36

The appliance components
q VOL— - Volume decrease
VOL + - Volume increase
w
MODE/LOCK - Recalls the adjustable
e
parameters/Button lock
Loudspeaker
r
t Projektor - projects the time onto
a wall
SNOOZE/ - Snooze button,/
y
DIMMER Brightness switch
PROJECTION - switch time projection
u
on/off
i DOWN - Selector button down-
wards
UP - Selector button up-
o
wards
AL.SET - call up alarm function
a
s PRESET/ALARM + - Radio station/alarm
memory upwards/
PRESET/ALARM – - Radio station/alarm
d
memory downwards
PAGE - switches between
f
memory pages
g Display - Indicator
h A.M.S. MEMORY - Autom. radio station
save
SLEEP - Controls the switch-off
j
timer
NAP/USER - User switching, Timer
k
function
l - On/Off switch for
radio functions
1( Focus adjuster - for focussing the time
projection
2) Wire aerial - for VHF reception
2! Power cable
Battery
2@
compartment - for the backup batteries
Putting the appliance into use
First take all appliance components from the
packaging and remove all packing foil and
tape. Check the appliance for signs of visble
damage.
Inserting the back-up batteries
With the backup batteries all individual device settings are retained in the event of a
power failure. For this you require two 1.5 V
batteries of the type AAA/Micro. They are
not supplied.
1. Open the lid of the battery compartment
2@ on the underside of the radio alarm.
2. Insert the batteries. Ensure the polarities
are correct.
3. Close the lid of the battery compartment
2@. The lid must audibly engage.
Note:
The back-up batteries must be checked
at least once per year and, if necessary,
exchanged for new ones.
Providing mains power
• Insert the plug into a mains power
socket. In the display g the welcome
"PLEASE WAIT FOR SETTING THANKS"
appears. During this period the radio
alarm attempts to update its settings
for time and date with the help of RDS
signals. Should you wish to interrupt this
process, press any button. Should the
automatic update fail, make the required
adjustments manually.
Setting the time
To programme in the time and the following parameters, radio operation must be
switched off. If a button is not pressed within
approx. 15 seconds, the appliance saves the
adjustment and then leaves the programming
mode.
1. Press theMODE/LOCK button e. The
time display blinks.
2. Press the buttons DOWN/UP i/o to set
the time at minute intervals. Pressing and
holding down one of button changes the
time in quick succession.
Setting the date
1. Press the MODE/LOCK button e once
again. In the display g the date indication "01.01.2013“ blinks.
- 33 -
Page 37

2. Press the buttons DOWN/UP i/o to
set the date in day intervals. Pressing and
holding one of the buttons changes the
date in a fast sequence.
Programme City
1. Press the MODE/LOCK button e once
again. In the display g the indicator for
the city sign blinks below the "LOCAL
CITY“ display.
2. Press the buttons DOWN/UP i/o to
programme in the time zone for a city
resp. your general place of residence.
Pressing and holding one of the buttons
changes the indicator faster. Here is an
overview of the programmable cities and
the time differences:
Abbr. Diff. City
HNL -10 Honolulu / USA
ANC -9 Anchorage / USA
YVR -8 Vancouver / Canada
LAX -8 Los Angeles / USA
DEN -7 Denver / USA
CHI -6 Chicago / USA
MEX -6 Mexico City / Mexico
NYC -5 New York / USA
YYZ -5 Toronto / Canada
YUL -5 Montreal / Canada
CCS -4 Caracas / Venezuela
RIO -3 Rio De Janeiro / Brazil
BUE -3 Buenos Aires /Argentina
UTC 0 Universal Time
Coordinated
LON 0 London / UK
BER +1 Berlin / Germany
PAR +1 Paris / France
ROM +1 Rome / Italy
CAI +2 Cairo / Egypt
IST +2 Istanbul / Turkey
MOW +3 Moscow / Russia
KWI +3 Kuwait City / Kuwait
DXB +4 Dubai / Saudi Arabia
KHI +5 Karachi / Pakistan
DAC +6 Dacca / Bangladesh
BKK +7 Bangkok / Thailand
Abbr. Diff. City
SIN +8 Singapore
HKG +8 Hong Kong
PEK +8 Beijing / China
SHA +8 Shanghai / China
TYO +9 Tokyo / Japan
SYD +10 Sydney / Australia
NOU +11 Noumea /
New Caledonia
AKL +12 Auckland /
New Zealand
3. Press the button SNOOZE/DIMMER y
to switch the daylight saving time for the
selected time zone either on or off. The
display g indicates “SUM ON” resp.
“SUM OFF” accordingly.
Programme World Time
1. Press the MODE/LOCK button e once
again. In the display g the indicator for
the city signs blinks below the "WORLD
CITY“ display.
2. Press the buttons DOWN/UP i/o to
set the desired world time. Pressing and
holding one of the buttons changes the
indicator faster. Also here, the above listing of programmable cities and their time
difference is valid.
3. Repeatedly press the SNOOZE/DIMMER
button y to adjust for a summer time offset in the selected world time.
Time
offset
Display Explanation
1 OFFSET 1 In your time zone (local
city) it is winter time and in
the adjusted world time it
is currently summer time.
0 OFFSET 0 In your time zone (local
city) and in the adjusted
world time it is currently
winter time resp. summer
time.
-1 OFFSET -1In your time zone (local
city) it is summer time and
in the adjusted world time
it is currently winter time
resp. they have no summer
time.
- 34 -
Page 38

Programme the reminder function
You can programme in up to 10 dates on
which the appliance can give you a reminder
when they arrive.
1. Press the MODE/LOCK button e once
again. In the display g a date and the
SDA 1 indicator for the memory date 1
blinks.
2. Press the buttons DOWN/UP i/o to
programme in the first desired memory
date. Pressing and holding one of the buttons changes the indicator faster.
3. If you press the SNOOZE/DIMMER button y, the year number will be deactivated and you will thus receive a reminder
on this date every year.
4. Should you wish to programme in further
dates, press the PAGE button f to select
a memory slot from 2-10.
5. Proceed as above with further dates.
6. To deactivate the memory function, programme in a date that lies in the past.
Programme the Update function
With this function the appliance can automatically up-date the time by using RDS-Data.
1. Press the MODE/LOCK button e once
again. The display g indicates "UPDATE
ON".
2. Press the button DOWN i to deactivate
the up-date function. The display g then
shows "UPDATE OFF".
3. Press the button UP o to reactivate the
up-date function.
Programme time for the slumber
function
1.
Press the MODE/LOCK button e once
again. The display g indicates "SNOOZE
09".
2. Press the DOWN/UP i/o button to set
the desired time frame for the sleep function between 1 and 59 minutes.
Selecting 12 or 24 hour time display
1.
Press the MODE/LOCK button e once
again. The display g indicates "24HR“.
2. Press the button DOWN i to select the
12 hour modus. In the display g appears
"12HR".
3. Press the button UP o to return to the
24 hour modus.
Adjusting the projection duration
1.
Press the MODE/LOCK button e once
again. The display g indicates "PROJ-T
OFF".
2. Press the buttons DOWN/UP i/o to
adjust the projection duration to between
01 and 59 minutes. When set to “OFF”
the projection lights up permanently and
can be switched on or off by pressing the
PROJECTION button u.
Projection with the alarm
1. Press the button MODE/LOCK e once
more. The display g indicates “PROJ-AL
OFF”.
2. Press the UP button o when the projection
is to be switched on automatically during
an alarm.
3. Press the DOWN button i to deactivate
this function.
Automatic Display Dimmer
1. Press the button MODE/LOCK e once
more. The display g indicates “DIM-T OFF”.
2. Press the UP button o if the display is to
be automatically dimmed at specified
times. The display g then indicates “DIM-T
ON”.
3. Press the DOWN button i to deactivate
this function.
Setting the Display-Dimmer Time
1. Press the button MODE/LOCK e once
more. The display g shows “DT 23:00 ON”
as the time at which the display is to be
automatically dimmed.
2. Press the buttons DOWN / UP i/o to
set a different time.
3. Press the button MODE/LOCK e once
more. The display g shows “DT 6:00 OFF”
as the time at which the display is to return
to its normal brightness.
- 35 -
Page 39

4. Press the buttons DOWN/UP i/o to set
a different time.
Press the MODE/LOCK button
eonce
again to close adjustment.
Timer function
1. Press the NAP/USER k button. The NAP
display appears in display g and the
minute display 10 flashes.
2. Use the DOWN/UP i/o button to set
the required number of minutes (1 to 120
min.).
3. Press the button NAP/USER k once
again to start the Timer. In the display g
the remaining time is indicated.
4. Should the time be expired, the timer
signal will sound for about 10 minutes,
the NAP indicator flashes and the time is
displayed.
5. Press any button to end the alarm.
6. If you wish to end the Timer function
before the alarm, press and hold the
button NAP/USER k for one second.
Alarm function (Alarm 1 to 4)
You can programme in up to four alarm
times on your radio alarm. If a button is not
pressed within approx. 15 seconds, the appliance saves the adjustment and then leaves
the programming mode.
1. With the radio switched off, press the
AL.SET button a to call up the alarm
function. Using the PRESET/ALARM +/–
buttons s/d, select the desired alarm
memory position. In the display g the last
set alarm time and the symbol for the type
of alarm (radio or signal tone) blinks.
2. Press the buttons DOWN/UP i/o to set
the desired alarm time. Pressing and holding down one of the buttons DOWN/UP
i/o changes the alarm time in quick succession.
3. Press the button AL.SET a until the desired
alarm function (see table) is indicated in
the display g.
Alarm function Symbol in the
display g
Acoustic signal
Radio
Switched off no symbol
4. Press the button SNOOZE/DIMMER y
to set the weekdays on which you require
the alarm function: You can choose between “workdays” (MON, TUE, WED,
THU, FRI), “weekends” (SAT, SUN) and
“every day” (MON, TUE, WED, THU,
FRI, SAT, SUN).
5. Hold the button SNOOZE/DIMMER y
pressed down for 2 seconds when you
want to be woken on a specific weekday.
To programme this weekday, repeatedly
press the SNOOZE/DIMMER button y.
Orientate yourself on the weekday indicator at the top right in the display:
MON: = Monday
TUE = Tuesday
WED = Wednesday
THU = Thursday
FRI = Friday
SAT = Saturday
SUN = Sunday
6. To return to the selection of workdays,
weekends or whole weeks, once again
hold the SNOOZE/DIMMER button y
pressed down for 2 seconds.
7. After approx. 15 seconds the display g
returns to time indication. The adjustment
for the alarm function is now saved and
will be shown.
8. If needed, programme the other memory
positions for alarm times as detailed above.
9. If you wish to be woken by the radio function, switch the radio on now and select
the desired radio station. Then adjust the
sound volume to the maximum to be
achieved during the alarm procedure.
- 36 -
Page 40

Now switch the radio off again. The radio
function is explained on the following
pages.
When the alarm signal sounds...
• ... and the alarm function "Radio" is selected, the radio switches itself on with
increasing sound volume and the last
adjusted radio station for one hour.
• ... and the selected alarm function is “signal tone”, the signal tone sounds with an
increasing volume for 10 minutes.
To close the individual alarm function press
any button except the SNOOZE/DIMMER
button y.
The Slumber function
When you press the SNOOZE/DIMMER button y, the presently active alarm is cancelled
for the time that is programmed for this function (see Section "Programme time for the
slumber function“, 1 - 59 min., standard value
= 9 min.). Meanwhile the SNZ indicator
glows in the display g. To permanently stop
an interrupted alarm, briefly press the AL.SET
button a.
The Reminder function
The appliance will remind you of the dates
that you have programmed in with the reminder function. In these cases and on these
days, from 08:00 - 23:00 and on every
full hour, the reminder alarm will sound for
10 minutes. Additionally, the SDA indicator
blinks in the display g. Press any button to
end the reminder alarm.
Adjusting changing display indicators
When the appliance is in Standby, press the
button DOWN i. In the display appears
D–" (for Time and Date). Press the button
"
DOWN i once again, "
display (for Time and World Time). Press the
button DOWN i once again, "
in the display (for Time, Date and World
Time in rotation). Press the button DOWN
i once again, "
(only Time).
––" appears in the display
–W" appears in the
DW" appears
Radio operation
The technical data of the appliance makes
possible an adjustable frequency range wider
than the permitted frequency ranges of 87,5
- 108 MHz. In some countries, different national regulations may apply to the assigned
radio frequency ranges. Please note that information received outside of the assigned radio
frequency ranges may not be used, passed on
to third parties or otherwise misused. For VHF
radio reception, completely unwind the wire
aeriel 2) and, with the radio switched on, de-
termine the most favourable positioning for it.
Switching the radio on and off
1. Press the button
the current frequency and the switch-on
symbol
clock symbol blinks and thus indicates
that the device is waiting for the reception
of the current time from an RDS station.
2. Press the button
switch the radio function off and return the
appliance to the standby mode.
Manual station selection
1. Press the button UP o to search for radio
stations with a frequency higher than the
one indicated in the display.
2. Press the button DOWN i to search for
radio stations with a frequency lower than
the one indicated in the display.
3. If the found radio station transmits RDSData, the indicator in the display g glows. The display g indicates
the name of the radio station and the time
is updated (insofar as this adjustment is
activated, see the section "Programme the
Update function").
Automatic station search
You can also let the appliance search for
radio stations. The radio alarm then searches
the selected frequency range until it has
found a radio station.
is indicated. Next to it, the
l. In the display g
lonce again to
- 37 -
Page 41

1. Press and hold the button UP o for two
seconds: The radio alarm searches for the
station with the next highest frequency.
2. Press and hold the button DOWN i for
two seconds: The radio alarm searches for
the station with the next lowest frequency.
Repeat these steps until you have found a
radio station to your liking.
Programming stations
You can save 20 VHF stations for 2 users as
favourites in the appliance. These memory
slots are spread over several pages, which
can be called up via the PAGE button f.
On each page there are 4 Sender slots, they
can be addressed with the PRESET/ALARM
+/-buttons s/d.
1. With the radio switched on, press the
PAGE button f to call up the desired
memory page 1-5. In the display g the
number of the just selected memory page
appears below "PAGE".
2. Tune in to the desired station.
3. Briefly press the button A.M.S. MEMORY
h. In the display g the number and the
memory slot indicator "MEM" blink.
4. Now, using the PRESET/ALARM +/— buttons s/d, select the place at which the
radio station is to be saved. Confirm it
with the A.M.S. MEMORY button h. The
radio station is now saved and will be
permanently indicated.
5. As the appliance can be used by several
people, it is equipped with user switching.
Both users can thus save different radio
stations as favourites. To switch over to
the individual user, press and hold the
NAP|USER button k for two seconds.
The currently active user, “A” or “B”, is
indicated on the display g.
6. Repeat the steps 1 - 4 (for both users) until
all desired radio stations have been saved.
AMS (Automatic Memory System)
With the AMS function the radio searches automatically for radio stations and then saves
them to the memory positions.
• Press and hold the button A.M.S. MEMORY h for two seconds. The radio alarm
automatically searches for sufficiently
powerful radio stations and saves them in
the memory.
Accessing the station
1. To recall a saved radio station, in Radio
mode first select the desired user.
2. Now select the required memory page
with the PAGE button f.
3. Using the PRESET/ALARM +/- button s/
d, select the desired memory space for
the radio station.
Adjusting the volume.
• In radio modus, repeatedly press the button VOL — q to reduce the sound volume.
To the right in the display g the current
sound volume setting is indicated in steps
from V 0 - 18.
• Repeatedly press the button Vol. + w to
increase the sound volume.
Switch-off Timer
This appliance is fitted with a switch-off timer
for up to 90 minutes.
1. Press the button SLEEP j to call the func-
tion up and, if need be, to switch the radio on.
2. Repeatedly press the button SLEEP j to
enter in the remaining playing time in steps
of 10 minutes. After a few seconds, the
frequency is indicated once again.
3. In the display g the Sleep indicator ap-
pears
.
4. At any time you can press the SLEEP
button j to blend in the remaining
countdown time for a few seconds.
5. On expiry of the time period the ap-
pliance switches itself off.
6. To switch the timer off prematurely,
press the
l button.
Switching and dimming the display
You can adjust the display brightness by
pressing the SNOOZE / DIMMER button y
to one of three settings: bright, medium, off.
- 38 -
Page 42

The higher the brightness, the greater is the
power consumption of the device.
When you briefly press the MODE/LOCK
button e during radio operation, you can
toggle between frequency and time display.
Projection
The time can be projected from the appliance
onto a wall or the ceiling. This function is intended for reading the time in darkness.
During the day in well lit rooms you will
hardly be able to use the projection facility.
When projection is switched on, the projection
symbol glows in the display g.
1. For this, first fold the projector t out.
2. Switch the function on with the PROJECTION button u.
3. Direct the projector t onto the desired
surface area. Before you can turn the projector t - if so desired - to the side, you
must carefully pull its base up from the
device housing.
4. Using the focus regulator 1( sharpen the
image.
5. The time will now be projected onto the
desired surface area for the pre-adjusted
timespan (see section "Adjusting the Projection duration").
6. To display the projection back to front,
press and hold the button PROJECTION u
for one second. Pressing and holding it once
again lets the projection appear as normal.
7. Should you wish to switch this function off
prematurely, press the PROJECTION button u and fold the Projector t in.
Button lock
Press and hold the MODE/LOCK button e
until the key symbol is indicated in the display g. The normal key functions are now
blocked. The buttons retain, however, the
function “Alarm stop”. In addition, the button
SNOOZE/DIMMER y as the snooze button
and for setting the display brightness. To disable the button lock function, press and hold
the MODE/LOCK button e once again until
the key symbol extinguishes.
Cleaning
Warning!
Always remove the mains power plug
before cleaning the appliance! Moisture
penetrating into the appliance creates the
risk of electric shock! Additionally, the appliance could become irreparably damaged!
Clean the housing of the radio alarm only
with a slightly moist cloth and a mild detergent. Ensure that moisture cannot permeate
into the appliance during cleaning!
Troubleshooting
The appliance doesn't work.
> Is the plug of the power cable 2! inserted
firmly into the power socket?
> Has the circuit breaker tripped?
> Is there a power cut?
Poor VHF reception.
> Change the alignment of the wire aerial
2). If necessary, firmly position it with
adhesive tape.
Loss of all programming after a power cut.
> Batteries were not inserted to retain the
memory.
> The batteries inserted for memory reten-
tion are exhausted. Replace them.
The projected time is difficult to read.
> Using the focus regulator 1( sharpen the
image.
Notice regarding conformity
In regard to compliance with essential requirements and other relevant provisions,
this device complies with the European
Electromagnetic Compatibility Directive
2004/108/EC, the Low Voltage Directive
2006/95/EC and the Ecodesign Directive
2009/125/EC (Ordinance 1275/2008
Annex II, No. 1) as well as RoHS directive
2011/65/EU.
- 39 -
Page 43

The full original Declaration of Conformity is
available from the importer.
Importer
KOMPERNASS HANDELS GMBH
BURGSTRASSE 21
44867 BOCHUM
DEUTSCHLAND/GERMANY
www.kompernass.com
Disposal
Do not dispose of the appliance
in your normal domestic waste.
This product is subject to the
provisions of European Directive
2012/19/EU.
Disposing of the appliance
• Arrange for the product, or parts of it, to be
disposed of by a professional disposal company or by your communal waste facility.
• Observe the currently applicable regulations. In case of doubt, please contact
your waste disposal centre.
Disposal of batteries/accumulators
• Used batteries/rechargeable batteries may
not be disposed of in household waste.
• Batteries/rechargeable batteries can contain toxic substances which may damage
the environment. Therefore, dispose of the
batteries/rechargeable batteries in accordance with statutory regulations.
• Every consumer is legally obliged to surrender batteries/rechargeable batteries
to a community collection centre in their
district or to a dealer. The purpose of this
obligation is to ensure that batteries are
disposed of in a non-polluting manner.
• Only dispose of batteries when they are
fully discharged.
Disposal of packaging
Dispose of the packaging materials in
an environmentally responsible manner.
Warranty & Service
You receive a 3-year warranty for this appliance as of the purchase date. This appliance
has been manufactured with care and meticulously examined before delivery.
Please retain your receipt as proof of purchase. In the case of a warranty claim, please
make contact by telephone with our service
department. Only in this way can a post-free
despatch for your goods be assured.
The warranty covers only claims for material
and manufacturing defects, but not for transport damage, wearing parts or for damage to
fragile components, e.g. buttons or batteries.
This product is for private use only and is not
intended for commercial use. The warranty is
void in the case of abusive and improper
handling, use of force and internal modifications not carried out by our authorized Service Centre.
Your statutory rights are not restricted in any
way by this warranty.
The warranty period is not extended through
repairs made under warranty. This applies
also for replaced or repaired parts. Any
damages or deficiencies found on purchase
must be reported as soon as possible after
unpacking, at the latest two days after purchase. On expiry of the warranty, all repairs
carried out are subject to payment.
Service Great Britain
Tel.: 0871 5000 720 (£ 0.10/Min.)
E-Mail: kompernass@lidl.co.uk
IAN 90514
Assistenza Malta
Tel.: 80062230
E-Mail: kompernass@lidl.com.mt
IAN 90514
Hotline availability:
Monday to Friday 08:00 - 20:00 (CET)
- 40 -
Page 44

INHALTSVERZEICHNIS SEITE
Bestimmungsgemäßer Gebrauch 42
Lieferumfang 42
Technische Daten 42
Sicherheitshinweise 42
Die Geräteteile 45
Das Gerät in Betrieb nehmen 45
Radiobetrieb 49
Reinigen 51
Fehlerhilfe 52
Hinweis zur Konformität 52
Importeur 52
Entsorgen 52
Garantie & Service 53
Lesen Sie die Bedienungsanleitung vor der ersten Verwendung aufmerksam durch und heben
Sie diese für den späteren Gebrauch auf. Händigen Sie bei Weitergabe des Gerätes an Dritte
auch die Anleitung aus.
- 41 -
Page 45

Projektionswecker
SPU 900 A2
Einführung
Herzlichen Glückwunsch zum Kauf Ihres
neuen Gerätes. Sie haben sich damit für
ein hochwertiges Produkt entschieden. Die
Bedienungsanleitung ist Bestandteil dieses
Produkts. Sie enthält wichtige Hinweise für
Sicherheit, Gebrauch und Entsorgung. Machen Sie sich vor der Benutzung des Produkts
mit allen Bedien- und Sicherheitshinweisen
vertraut. Benutzen Sie das Produkt nur wie
beschrieben und für die angegebenen Einsatzbereiche. Bewahren Sie diese Anleitung
gut auf. Händigen Sie alle Unterlagen bei
Weitergabe des Produkts an Dritte mit aus.
Urheberrecht
Diese Dokumentation ist urheberrechtlich
geschützt. Alle Rechte, auch die der fotomechanischen Wiedergabe, der Vervielfältigung
und der Verbreitung mittels besonderer
Verfahren (zum Beispiel Datenverarbeitung,
Datenträger und Datennetze), auch teilweise,
sowie inhaltliche und technische Änderungen
vorbehalten.
Bestimmungsgemäßer Gebrauch
Der Projektionswecker ist zur Anzeige der
Uhrzeit und zum Empfang von UKW-Radioprogrammen bestimmt. Darüberhinaus ist das
Gerät mit einer Weckfunktion durch Radio
und Signalton ausgestattet.
Der Projektionswecker ist nicht zur Verwendung in gewerblichen oder industriellen
Bereichen vorgesehen. Für Schäden, die aus
nicht bestimmungsgemäßem Gebrauch des
Gerätes resultieren, wird keine Gewährleistung übernommen!
Lieferumfang
1 Projektionswecker SPU 900 A2
1 Bedienungsanleitung
Technische Daten
Netzanschluss: 220–240 V
Leistungsaufnahme
Radiobetrieb: 5 Watt
Standby: < 1 Watt
Ausgangsleistung: 2 x 700 mW
bei 10% THD
Frequenzbereich: UKW (FM)
87,5 – 108 MHz
Betriebstemperatur: + 5 – +35°C
Lagertemperatur: -20 – +50 °C
Feuchtigkeit: 5 – 90 %
(keine Kondensation)
Abmessungen
(B x H x T): 21 x 7,1 x 14,4 cm
Gewicht: ca. 850 g
Schutzklasse: II /
Backup-Batterien 2 x 1,5 V, Typ AAA/
Micro (nicht mitgeliefert)
, 50 Hz
~
Sicherheitshinweise
Warnung
Ein Warnhinweis dieser Gefahrenstufe kennzeichnet eine mögliche gefährliche Situation.
Falls die gefährliche Situation nicht vermieden wird, kann dies zu Verletzungen führen.
Die Anweisungen in diesem Warnhinweis
befolgen, um Verletzungen von Personen zu
vermeiden.
Achtung
Ein Warnhinweis dieser Gefahrenstufe kennzeichnet einen möglichen Sachschaden. Falls
die Situation nicht vermieden wird, kann dies
zu Sachschäden führen. Die Anweisungen in
diesem Warnhinweis befolgen, um Sachschäden zu vermeiden.
Hinweis
Ein Hinweis kennzeichnet zusätzliche Informationen, die den Umgang mit dem Gerät
erleichtern.
- 42 -
Page 46

Warnung: Gefahr durch
elektrischen Schlag!
• Schließen Sie das Gerät nur an eine vorschriftsmäßig installierte und geerdete
Netzsteckdose an. Die Netzspannung
muss mit den Angaben auf dem Typenschild des Gerätes übereinstimmen.
• Lassen Sie Anschlussleitungen bzw. Geräte, die nicht einwandfrei funktionieren
oder beschädigt wurden, sofort vom
Kundendienst reparieren oder austauschen.
• Halten Sie Kinder von Anschlussleitung
und Gerät fern. Kinder unterschätzen
häufig die Gefahren von Elektrogeräten.
• Tauchen Sie das Gerät niemals in Wasser ein. Wischen Sie es nur mit einem
leicht feuchten Tuch ab.
• Setzen Sie das Gerät nicht dem Regen
aus und benutzen Sie es auch niemals in
feuchter oder nasser Umgebung.
• Fassen Sie das Netzkabel immer am
Stecker an. Ziehen Sie nicht am Kabel
selbst, und fassen Sie das Netzkabel
niemals mit nassen Händen an, da dies
einen Kurzschluss oder elektrischen
Schlag verursachen kann.
• Stellen Sie weder das Gerät, Möbelstücke o.ä. auf das Netzkabel und
achten Sie darauf, dass es nicht eingeklemmt wird.
• Achten Sie darauf, dass die Anschlussleitung während des Betriebs niemals nass
oder feucht wird.
• Sie dürfen das Gerätegehäuse nicht
öffnen, das Gerät nicht reparieren oder
modifizieren. Bei geöffnetem Gehäuse
oder eigenmächtigen Umbauten besteht
Lebensgefahr durch elektrischen Schlag
und die Gewährleistung erlischt.
• Schützen Sie das Gerät vor Tropf- und
Spritzwasser. Stellen Sie deshalb keine
mit Flüssigkeit gefüllten Gegenstände
(z. B. Blumenvasen) auf oder neben das
Gerät.
• Prüfen Sie das Gerät und alle Teile auf
sichtbare Schäden. Nur in einwandfreiem
Zustand kann das Sicherheitskonzept
des Gerätes funktionieren.
• Ziehen Sie vor jeder Reinigung den
Netzstecker.
Warnung: Verletzungsgefahr!
• Machen Sie niemals einen Knoten in
das Netzkabel, und binden Sie es nicht
mit anderen Kabeln zusammen. Das
Netzkabel muss so gelegt werden, dass
niemand darauf tritt oder darüber stolpern kann.
• Der Netzstecker muss immer leicht zugänglich sein, so dass im Notfall das
Gerät schnell vom Stromnetz getrennt
werden kann.
• Dieses Produkt ist nicht dafür bestimmt,
durch Personen (einschließlich Kinder)
mit eingeschränkten physischen, sensorischen oder geistigen Fähigkeiten oder
mangels Erfahrung und/oder mangels
Wissen benutzt zu werden, es sei denn,
sie werden durch eine für ihre Sicherheit
zuständige Person beaufsichtigt oder
erhielten von ihr Anweisungen, wie das
Produkt zu benutzen ist. Kinder sollten beaufsichtigt werden, um sicher zu stellen,
dass sie nicht mit dem Produkt spielen.
• Sorgen Sie für einen sicheren Stand des
Gerätes.
• Falls das Gerät heruntergefallen oder
beschädigt ist, dürfen Sie es nicht mehr
in Betrieb nehmen. Lassen Sie das Gerät
von qualifiziertem Fachpersonal überprüfen und gegebenenfalls reparieren.
• Batterien dürfen nicht in die Hände
von Kindern gelangen. Kinder könnten
Batterien in den Mund nehmen und verschlucken.
• Wurde eine Batterie verschluckt, muss
sofort medizinische Hilfe in Anspruch
genommen werden.
- 43 -
Page 47

Warnung: Explosionsgefahr!
• Werfen Sie keine Batterien ins Feuer.
Laden Sie Batterien nicht wieder auf.
• Öffnen Sie die Batterien niemals, löten
oder schweißen Sie nie an Batterien. Es
besteht Explosions- und Verletzungsgefahr!
Achtung: Brandgefahr!
• Benutzen Sie das Gerät nicht in der
Nähe von heißen Oberflächen.
• Stellen Sie das Gerät nicht an Orten auf,
die direkter Sonnenstrahlung ausgesetzt
sind. Andernfalls kann es überhitzen und
irreparabel beschädigt werden.
• Decken Sie niemals die Lüftungsschlitze
des Gerätes ab, wenn es eingeschaltet ist.
• Stellen Sie keine offenen Brandquellen,
wie z. B. Kerzen auf oder neben das
Gerät.
Achtung bei Gewitter!
• Bei einem Gewitter können am Stromnetz angeschlossene Geräte Schaden
nehmen. Ziehen Sie bei Gewitter deshalb immer den Netzstecker aus der
Steckdose.
Achtung beim Umgang mit
Batterien
Das Gerät verwendet zur Speichersicherung Batterien. Für den Umgang mit
Batterien beachten Sie bitte Folgendes:
• Wenn Sie das Gerät längere Zeit nicht
benutzen, entnehmen Sie die Batterien.
• Überprüfen Sie regelmäßig die Batterien. Auslaufende Batterien können Beschädigungen am Gerät verursachen.
• Bei ausgelaufenen Batterien, ziehen Sie
Schutzhandschuhe an und reinigen das
Batteriefach und die Batteriekontakte mit
einem trockenen Tuch.
Warnung!
• Setzen Sie die Batterien niemals übermäßiger Hitze (z.B. pralle Sonne, Feuer)
aus.
Achtung!
• Explosionsgefahr bei unsachgemäßem
Auswechseln der Batterie. Ersatz nur
durch den selben oder gleichwertigen
Typ.
Hinweis zur Netztrennung
Die -Taste dieses Gerätes trennt das
Gerät nicht vom Stromnetz. Außerdem
nimmt das Gerät im Standby-Betrieb
Strom auf. Um das Gerät vollständig
vom Netz zu trennen, muss der Netzstecker aus der Netzsteckdose gezogen
werden.
Hinweis zu Stoßspannungen
(EFT/elektrischer schneller
Übergangsvorgang) und
elektrostatischen Entladungen:
Im Falle einer Fehlfunktion aufgrund
elektrischer schneller Übergangsvorgänge (Stoßspannung) bzw. elektrostatischer Entladungen muss das Produkt
zurückgesetzt werden, um den normalen Betrieb wieder herzustellen. Möglicherweise muss die Stromversorgung
getrennt und wieder neu angeschlossen
werden. Die Batterien (falls vorhanden)
müssen entnommen und wieder eingesetzt werden.
Hinweis
Für Schäden am Projektionswecker, die
durch Feuchtigkeitseinwirkung, in das
Gerät eingedrungenes Wasser, durch
Überhitzung oder durch eigenmächtige
Umbauten entstanden sind, wird keine
Haftung/Gewährleistung übernommen!
- 44 -
Page 48

Die Geräteteile
Das Gerät in Betrieb nehmen
q VOL— - Lautstärke verringern
w VOL + - Lautstärke erhöhen
e MODE/LOCK - ruft die einstellbaren
Parameter auf/
Tastensperre
r Lautsprecher
t Projektor - projiziert die Uhrzeit an
Wände
y SNOOZE/ - Schlummertaste/
DIMMER Helligkeitsumschalter
u PROJECTION - Uhrzeitprojektion ein-/
ausschalten
i DOWN - Auswahltaste abwärts
o UP - Auswahltaste aufwärts
a AL.SET - ruft die Alarm-Funktion
auf
s PRESET/ALARM + - Stations-/Alarmspeicher
aufwärts/
d PRESET/ALARM – - Stations-/Alarmspeicher
abwärts
f PAGE - schaltet die Speicher-
seiten um
g Display - Anzeige
h A.M.S. MEMORY - autom. Senderspeichern
j SLEEP - steuert den
Ausschalttimer
k NAP/USER - Benutzerumschaltung,
Timerfunktion
l - Ein-/Ausschalter der
Radiofunktion
1( Fokusregler - zur Fokussierung der
Zeitprojektion
2) Wurfantenne - für UKW-Empfang
2! Netzkabel
2@ Batteriefach - für Backup-Batterien
Nehmen Sie zunächst alle Geräteteile aus
der Verpackung und entfernen Sie alle Verpackungsmaterialien. Überprüfen Sie das Gerät
auf eventuelle Beschädigungen.
Einlegen der Backup-Batterien
Durch die Backup-Batterien bleiben bei einem
Stromausfall alle individuellen Geräteeinstellungen erhalten. Sie benötigen hierfür zwei
1,5 V Batterien des Typs AAA/Micro. Diese
sind nicht im Lieferumfang enthalten.
1. Öffnen Sie die Klappe des Batteriefachs 2@
an der Unterseite des Projektionsweckers.
2. Legen Sie die Batterien ein. Achten Sie
dabei auf die richtige Polarität.
3. Schließen Sie die Klappe des Batteriefachs
2@. Die Klappe muss hörbar einrasten.
Hinweis:
Die Backup-Batterien sollten mindestens
einmal jährlich überprüft und gegebenenfalls ausgewechselt werden.
Stromversorgung herstellen
• Stecken Sie den Netzstecker in eine
Netzsteckdose. Im Display g erscheint
die Willkommensmeldung „PLEASE
WAIT FOR SETTING THANKS“. Währenddessen versucht der Projektionswecker, seine Einstellungen für Uhrzeit
und Datum mit Hilfe des RDS-Signals zu
aktualisieren. Falls Sie diesen Vorgang
abbrechen wollen, drücken Sie eine
beliebige Taste. Sollte die automatische
Aktualisierung fehlschlagen, nehmen Sie
die genannten Einstellungen manuell vor.
Uhrzeit einstellen
Um die Uhrzeit und die folgenden Parameter
einstellen zu können, muss der Radiobetrieb
ausgeschaltet sein. Wenn innerhalb von ca.
15 Sekunden keine Taste gedrückt wird, speichert das Gerät die Einstellung und verlässt
den Einstell-Modus.
1. Drücken Sie die MODE/LOCK-Taste e.
Die Uhrzeitanzeige blinkt.
- 45 -
Page 49

2. Drücken Sie die Tasten DOWN/UP i/o,
um die Uhrzeit in Minutenintervallen einzustellen. Das Gedrückthalten einer der Tasten ändert die Uhrzeit in schneller Folge.
Datum einstellen
1. Drücken Sie erneut die MODE/LOCKTaste e. Im Display g blinkt die Datumsanzeige „01.01.2013“.
2. Drücken Sie die Tasten DOWN/UP i/o,
um das Datum in Tagesintervallen einzustellen. Das Gedrückthalten einer der Tasten ändert das Datum in schneller Folge.
Stadt einstellen
1. Drücken Sie erneut die MODE/LOCK-Taste e. Im Display g blinkt die Anzeige für
das Städtekürzel unterhalb der „LOCAL
CITY“-Anzeige.
2. Drücken Sie die Tasten DOWN/UP i/o,
um die Zeitzone anhand einer Stadt bzw.
Ihres groben Aufenthaltsort einzustellen.
Das Gedrückthalten einer der Tasten
ändert die Anzeige schnell. Hier finden
Sie eine Übersicht über die einstellbaren
Städte und der Zeitdifferenzen:
Abk. Diff. Stadt
HNL -10 Honolulu / USA
ANC -9 Anchorage / USA
YVR -8 Vancouver / Canada
LAX -8 Los Angeles / USA
DEN -7 Denver / USA
CHI -6 Chicago / USA
MEX -6 Mexico City / Mexico
NYC -5 New York / USA
YYZ -5 Toronto / Canada
YUL -5 Montreal / Canada
CCS -4 Caracas / Venezuela
RIO -3 Rio de Janeiro / Brazilien
BUE -3 Buenos Aires / Argentinen
UTC 0 Universal Time Coordinated
LON 0 London / UK
BER +1 Berlin / Deutschland
PAR +1 Paris / Frankreich
ROM +1 Rom / Italien
CAI +2 Kairo / Ägypten
Abk. Diff. Stadt
IST +2 Istanbul /Türkei
MOW +3 Moskau / Russland
KWI +3 Kuwait City/Kuwait
DXB +4 Dubai / Saudi Arabien
KHI +5 Karachi / Pakistan
DAC +6 Dacca / Bangladesch
BKK +7 Bangkok / Thailand
SIN +8 Singapur
HKG +8 Hong Kong
PEK +8 Peking / China
SHA +8 Shanghai / China
TYO +9 Tokyo / Japan
SYD +10 Sydney / Australien
NOU +11 Noumea /
Neukaledonien
AKL +12 Auckland /
Neuseeland
3. Drücken Sie die SNOOZE/DIMMERTaste y, um für die gewählte Zeitzone
die Sommerzeit ein- oder auszuschalten.
Das Display g zeigt entsprechend „SUM
ON“ bzw. „SUM OFF“ an.
Weltzeit einstellen
1. Drücken Sie erneut die MODE/LOCK-Taste e. Im Display g blinkt die Anzeige für
das Städtekürzel unterhalb der „WORLD
CITY“-Anzeige.
2. Drücken Sie die Tasten DOWN/UP i/o,
um die gewünschte Weltzeit einzustellen.
Das Gedrückthalten einer der Tasten ändert die Anzeige schnell. Auch hier gilt
die oben gezeigte Übersicht über die einstellbaren Städte und der Zeitdifferenzen.
3. Drücken Sie wiederholt die SNOOZE/
DIMMER Taste y, um für die gewählte
Weltzeit einen Sommerzeitversatz einzustellen.
- 46 -
Page 50

Zeitver-
Display Eklärung
satz
1 OFFSET 1 In Ihrer Zeitzone (Local
City) ist Winterzeit und in
der eingestellten Weltzeit
ist gerade Sommerzeit.
0 OFFSET 0 In Ihrer Zeitzone (Local
City) und in der eingestellten Weltzeit ist gerade
Sommer- bzw. Winterzeit.
-1 OFFSET -1In Ihrer Zeitzone (Local
City) ist Sommerzeit und in
der eingestellten Weltzeit
ist gerade Winterzeit bzw.
hat keine Sommerzeit.
Erinnerungsfunktion einstellen
Sie können bis zu 10 Daten programmieren,
an die Sie das Gerät bei deren Erreichen
erinnern kann.
1. Drücken Sie erneut die MODE/LOCK-Taste
e. Im Display g blinkt ein Datum und die
SDA 1-Anzeige für das Erinnerungsdatum 1.
2. Drücken Sie die Tasten DOWN/UP i/o,
um das erste gewünschte Erinnerungsdatum einzustellen. Das Gedrückthalten einer der Tasten ändert die Anzeige schnell.
3. Wenn Sie die SNOOZE/DIMMER-Taste
y drücken, wird die Jahreszahl deaktiviert und somit in jedem Jahr an dieses
Datum erinnert.
4. Möchten Sie weitere Daten programmieren, drücken Sie die PAGE-Taste f, um
den gewünschten Speicherplatz 2-10 auszuwählen.
5. Verfahren Sie mit den weiteren Daten entsprechend.
6. Um die Erinnerungsfunktion zu deaktivieren, programmieren Sie ein Datum, das in
der Vergangenheit liegt.
Update-Funktion einstellen
Über diese Funktion kann das Gerät die
Einstellungen für die Uhrzeit automatisch anhand der RDS-Daten aktualisieren.
1. Drücken Sie erneut die MODE/LOCKTaste e. Das Display g zeigt „UPDATE
ON“ an.
2. Drücken Sie die Taste DOWN i, um die
Aktualisierungsfunktion zu deaktivieren. Das
Display g zeigt dann „UPDATE OFF“ an.
3. Drücken Sie die Taste UP o, um die Aktualisierungsfunktion wieder zu aktivieren.
Zeit für die Schlummerfunktion einstellen
1. Drücken Sie erneut die MODE/LOCKTaste e. Das Display g zeigt „SNOOZE
09“ an.
2. Drücken Sie die Tasten DOWN/UP i/o,
um die gewünschte Zeitspanne für die
Schlummerfunktion zwischen 1 - 59 Minuten einzustellen.
12- oder 24-Stundenmodus einstellen
1. Drücken Sie erneut die MODE/LOCKTaste e. Das Display g zeigt „24HR“ an.
2. Drücken Sie die Taste DOWN i, um den
12-Stundenmodus einzustellen. Im Display
g erscheint „12HR“.
3. Drücken Sie die Taste UP o, um wieder
auf den 24-Stundenmodus umzuschalten.
Projektionsdauer einstellen
1. Drücken Sie erneut die MODE/LOCK-Taste e. Das Display g zeigt „PROJ-T OFF“.
2. Drücken Sie die Tasten DOWN/UP i/o,
um die Projektionsdauer von 1 - 59 Minuten einzustellen. In der Einstellung „OFF“
leuchtet die Projektion dauerhaft und kann
durch Drücken der PROJECTION- Taste u
ein- bzw. ausgeschaltet werden.
Projektion bei Alarm
1. Drücken Sie erneut die MODE/LOCK-Taste e. Das Display g zeigt „PROJ-AL OFF“.
2. Drücken Sie die UP-Taste o, wenn während eines Alarms die Projektion automatisch eingeschaltet werden soll.
3. Drücken Sie die DOWN-Taste i, um diese Funktion wieder zu deaktivieren.
Automatischer Display-Dimmer
1. Drücken Sie erneut die MODE/LOCKTaste e. Das Display g zeigt „DIM-T OFF“.
2. Drücken Sie die UP-Taste o, wenn das
Display automatisch zu bestimmten Zeiten gedimmt werden soll. Das Display g
zeigt dann „DIM-T ON“.
- 47 -
Page 51

3. Drücken Sie die DOWN-Taste i, um diese Funktion wieder zu deaktivieren.
Display-Dimmerzeit einstellen
1. Drücken Sie erneut die MODE/LOCKTaste e. Das Display g zeigt „DT 23:00
ON“ als die Uhrzeit an, zu der das Display
automatisch gedimmt wird.
2. Drücken Sie die Tasten DOWN/UP i/o,
um eine andere Uhrzeit einzustellen.
3. Drücken Sie erneut die MODE/LOCK-Taste e. Das Display g zeigt „DT 6:00 OFF“
als die Uhrzeit an, zu der das Display
wieder mit normaler Helligkeit dargestellt
wird.
4. Drücken Sie die Tasten DOWN/UP i/o,
um eine andere Uhrzeit einzustellen.
Drücken Sie erneut die MODE/LOCK-Taste
e, um diese Einstellungen abzuschließen.
Timerfunktion
1. Drücken Sie die Taste NAP/USER k. Im
Display g erscheint die NAP-Anzeige
und die Minutenanzeige 10 blinkt.
2. Stellen Sie mit den Tasten DOWN/UP
i/o die gewünschte Minutenzahl ein (1
bis 120 min.).
3. Drücken Sie die Taste NAP/USER k erneut, um den Timer zu starten. Im Display
g wird die verbleibende Zeit angezeigt.
4. Ist die Zeit abgelaufen, ertönt das Timersignal für ca. 10 Minuten, die NAP-Anzeige blinkt und die Uhrzeit wird angezeigt.
5. Drücken Sie dann eine beliebige Taste,
um den Alarm zu beenden.
6. Wollen Sie die Timerfunktion vor dem
Alarm beenden, halten Sie die Taste
NAP/USER k eine Sekunde lang gedrückt.
Weckfunktion (Alarm 1 bis 4)
Sie können mit Ihrem Projektionswecker bis
zu vier Weckzeiten programmieren. Wenn
innerhalb von ca. 15 Sekunden keine Taste
gedrückt wird, speichert das Gerät die Einstellung und verlässt den Einstell-Modus.
1. Drücken Sie bei ausgeschaltetem Radio
die AL.SET-Taste a, um die Weckfunktion
aufzurufen. Mit den PRESET/ALARM +/–
s/d Tasten wählen Sie den gewünschten
Alarmspeicherplatz aus. Im Display g
blinken die zuletzt eingestellte Weckzeit
und das Symbol für den Typ des Alarms
(Radio oder Signalton).
2. Drücken Sie die Tasten DOWN/UP i/o,
um die gewünschte Weckzeit einzustellen. Das Gedrückthalten einer der Tasten
DOWN/UP i/o ändert die Weckzeit in
schneller Folge.
3. Drücken Sie die AL.SET-Taste a, bis die
gewünschte Weckfunktion (siehe Tabelle)
im Display g angezeigt wird.
Weckfunktion
Symbol im Display g
Signaltöne
Radio
Abgeschaltet kein Symbol
4. Drücken Sie die Taste SNOOZE/DIMMER y, um die Wochentage, an denen
Sie geweckt werden wollen, einzustellen:
Sie können wählen zwischen „werktags“
(MON, TUE, WED, THU, FRI), „Wochenende“ (SAT, SUN) und „an jedem Tag“
(MON, TUE, WED, THU, FRI, SAT, SUN).
5. Halten Sie die Taste SNOOZE/DIMMER
y 2 Sekunden lang gedrückt, wenn
Sie an einem bestimmten Wochentag
geweckt werden wollen. Um diesen
Wochentag einzustellen, drücken Sie
wiederholt die SNOOZE/DIMMER-Taste
y. Orientieren Sie sich dabei an der Wochentagsanzeige oben rechts im Display:
MON = Montag
TUE = Dienstag
WED = Mittwoch
THU = Donnerstag
FRI = Freitag
SAT = Samstag
SUN = Sonntag
- 48 -
Page 52

6. Um wieder zurück zur Auswahl von Werktagen, Wochenende oder ganzer Woche
zu gelangen, halten Sie die SNOOZE/
DIMMER-Taste y erneut 2 Sekunden
lang gedrückt.
7. Nach ca. 15 Sekunden kehrt das Display
g zur Uhrzeitanzeige zurück. Die Einstellungen zur Weckfunktion sind nun gespeichert und werden angezeigt.
8. Programmieren Sie ggf. die übrigen Speicherplätze für Weckzeiten entsprechend.
9. Wenn Sie mit der Radiofunktion geweckt
werden möchten, schalten Sie jetzt das
Radio ein und wählen den gewünschten
Sender. Dann stellen Sie die Lautstärke
ein, die beim Wecken maximal erreicht
werden soll. Dann schalten Sie das Radio
wieder aus. Die Radiofunktion wird auf
den nächsten Seiten erklärt.
Wenn der Alarm ertönt...
• ... und die Weckfunktion „Radio“ gewählt
ist, schaltet sich das Radio mit ansteigender Lautstärke und dem zuletzt eingestellten Sender für eine Stunde ein.
• ... und die Weckfunktion „Signaltöne“ ge-
wählt ist, ertönen die Signaltöne 10 Minu-
ten lang mit ansteigender Lautstärke.
Zum Beenden der jeweiligen Weckfunktion
drücken Sie eine beliebige Taste mit Ausnahme der SNOOZE/DIMMER-Taste y.
Die Schlummerfunktion
Wenn Sie die SNOOZE/DIMMER-Taste y
drücken, wird der gerade aktive Alarm für
die Zeit ausgesetzt, die für diese Funktion
eingestellt ist (siehe Abschnitt „Zeit für die
Schlummerfunktion einstellen“, 1 - 59 min.,
Standardwert = 9 min.). Währenddessen
leuchtet die SNZ-Anzeige im Display g. Um
einen unterbrochenen Alarm endgültig abzubrechen, drücken Sie einmal kurz die AL.SETTaste a.
Die Erinnerungsfunktion
Das Gerät wird Sie an ein Datum erinnern,
das Sie mit der Erinnerungsfunktion eingestellt
haben. In diesem Falle wird an diesem Tag
von 8:00 - 23:00 zu jeder vollen Stunde für
10 Minuten der Erinnerungsalarm gegeben.
Dazu blinkt die SDA-Anzeige im Display g.
Um den Erinnerungsalarm zu beenden, drücken Sie eine beliebige Taste.
Wechselnde Displayanzeigen einstellen
Wenn das Gerät im Standby-Zustand ist,
drücken Sie die Taste DOWN i. Im Display
erscheint „
Drücken Sie erneut die Taste DOWN i, so
erscheint „
im Display. Drücken Sie erneut die Taste
DOWN i, so erscheint „
- Datum - Weltzeit im Wechsel) im Display.
Drücken Sie erneut die Taste DOWN i, so
erscheint „
D–“ (für Uhrzeit und Datum).
–W“ (für Uhrzeit und Weltzeit)
DW“ (für Uhrzeit
––“ (nur Uhrzeit) im Display.
Radiobetrieb
Die technischen Gegebenheiten des Gerätes
ermöglichen einen einstellbaren Frequenzbereich außerhalb des zulässigen Frequenzbereichs von 87,5 - 108 MHz. In verschiedenen Ländern können abweichende nationale
Regelungen zu den zugewiesenen Rundfunkfrequenzbereichen bestehen. Beachten Sie,
dass Sie die außerhalb des zugewiesenen
Rundfunkfrequenzbereiches empfangenen Informationen nicht verwerten, an Dritte weiterleiten oder zweckentfremdet missbräuchlich
verwenden dürfen. Für UKW-Radioempfang
wickeln Sie bitte die Wurfantenne 2) ganz
ab und ermitteln im Betrieb eine günstige
Ausrichtung.
Radiofunktion ein-/ausschalten
1. Drücken Sie die Taste l. Im Display
g wird die aktuelle Frequenz und das
Einschaltsymbol
blinkt das Uhrensymbol und zeigt so an,
dass das Gerät auf die Übertragung der
aktuellen Uhrzeit von einem RDS-Sender
wartet.
2. Drücken Sie die Taste l erneut, um
die Radiofunktion zu beenden und das
Gerät in den Standby-Modus zu versetzen.
- 49 -
angezeigt. Daneben
Page 53

Sender manuell einstellen
1. Drücken Sie die Taste UP o, um nach
Sendern mit einer höheren Frequenz als
der im Display angezeigten zu suchen.
2. Drücken Sie die Taste DOWN i, um nach
Sendern mit einer niedrigeren Frequenz als
der im Display angezeigten zu suchen.
3. Überträgt der gerade eingestellte Sender
RDS-Daten, leuchtet die -Anzeige im Display g. Dann zeigt das Display
g den Namen des Radiosenders an, und
die Uhrzeit wird aktualisiert (sofern bei
den Einstellungen aktiviert, siehe Abschnitt
„Update-Funktion einstellen“).
Sender automatisch suchen
Sie können auch das Gerät nach Sendern
suchen lassen. Der Projektionswecker durchsucht dann das ausgewählte Frequenzband,
bis es einen Sender gefunden hat.
1. Halten Sie die Taste UP o zwei Sekunden
gedrückt: Der Projektionswecker sucht
nach dem Sender mit der nächsthöheren
Frequenz.
2. Halten Sie die Taste DOWN i zwei Sekunden gedrückt: Der Projektionswecker
sucht nach dem Sender mit der nächstniedrigeren Frequenz.
Wiederholen Sie diese Schritte, bis Sie den
gesuchten Sender gefunden haben.
Sender speichern
Sie können für 2 Benutzer je 20 Sender im
Gerät als Favoriten abspeichern. Diese Speicher verteilen sich auf mehrere Seiten, die Sie
über die PAGE-Taste f aufrufen. Auf jeder
Seite finden 4 Sender Platz, die Sie mit den
PRESET/ALARM +/— Tasten s/d ansprechen können.
1. Drücken Sie bei eingeschaltetem Radio
die PAGE-Taste f, um die gewünschte
Speicherseite 1-5 aufzurufen. Im Display
g erscheint unterhalb von „PAGE“ die
Nummer der gerade angewählten Speicherseite.
2. Stellen Sie den gewünschten Sender ein.
3. Drücken Sie kurz die Taste A.M.S. MEMORY h. Im Display g blinken die Ziffer
und die Speicherplatzanzeige „MEM“.
4. Wählen Sie nun mit den PRESET/ALARM
+/— Tasten s/d den Platz aus, auf dem
der Sender gespeichert werden soll. Bestätigen Sie mit der A.M.S. MEMORY-Taste
h. Nun ist der Sender gespeichert und
wird dauerhaft angezeigt.
5. Da das Gerät von mehreren Personen
benutzt werden kann, verfügt es über eine
Benutzerumschaltung. Beide Benutzer
können somit unterschiedliche Sender als
Favoriten abspeichern. Um auf den jeweiligen Benutzer umzuschalten, halten Sie
die NAP/USER-Taste k zwei Sekunden
lang gedrückt. Der jeweils aktive Benutzer
„A“ oder „B“ wird im Display g angezeigt.
6. Wiederholen Sie die Schritte 1 - 4 (für
beide Benutzer), bis alle gewünschten
Sender gespeichert sind.
AMS (Automatic Memory System)
Mit der AMS-Funktion sucht das Radio automatisch nach Sendern und speichert diese
auf den verfügbaren Speicherplätzen.
• Halten Sie die Taste A.M.S. MEMORY h
für zwei Sekunden gedrückt. Der Projektionswecker sucht automatisch nach ausreichend stark einfallenden Sendern und
speichert diese nacheinander ab.
Sender aufrufen
1. Um gespeicherte Sender aufzurufen,
wählen Sie im Radio-Modus zunächst den
gewünschten Benutzer aus.
2. Nun wählen Sie die gewünschte Speicherseite mit der PAGE-Taste f aus.
3. Wählen Sie mit den PRESET/ALARM
+/— Tasten s/d den Speicherplatz des
gewünschten Senders aus.
Lautstärke einstellen
• Drücken Sie im Radiobetrieb wiederholt
die Taste VOL. — q, um die Lautstärke zu
verringern. Rechts im Display g wird die
aktuelle Lautstärke in Schritten von V 0 - 18
angezeigt.
- 50 -
Page 54

• Drücken Sie wiederholt die Taste VOL. +
w, um die Lautstärke zu erhöhen.
Ausschalttimer
Das Gerät verfügt über einen Ausschalttimer
für bis zu 90 Minuten.
1. Drücken Sie die SLEEP-Taste j, um die
Funktion aufzurufen und ggf. das Radio
einzuschalten.
2. Drücken Sie wiederholt die SLEEP-Taste
j, um die Restlaufzeit in Schritten von
10 Minuten einzugeben. Nach einigen
Sekunden wird wieder die Empfangsfrequenz angezeigt.
3. Im Display g leuchtet die Sleep-Anzeige
.
4. Drücken Sie jederzeit die SLEEP-Taste j,
um für einige Sekunden die aktuelle Restlaufzeit einblenden zu lassen.
5. Nach Ablauf der Zeit wird sich das Gerät
abschalten.
6. Um den Ausschalttimer vorzeitig auszu-
schalten, drücken Sie die Taste
l.
Display dimmen und umschalten
Sie können die Display-Helligkeit durch Drücken der SNOOZE/DIMMER-Taste y in drei
Stufen einstellen: hell, mittel, aus. Je größer
die Helligkeit, umso höher ist die Leistungsaufnahme des Gerätes.
Wenn Sie im Radiobetrieb kurz die MODE/
LOCK-Taste e drücken, schalten Sie zwischen Frequenz- und Uhrzeitanzeige um.
drehen können, müssen Sie dessen Sockel
vorsichtig aus dem Gerätegehäuse hoch
ziehen.
4. Stellen Sie mit dem Fokusregler 1( die Anzeige scharf.
5. Die Uhrzeit wird nun für die voreingestellte Zeit auf die gewünschte Stelle projiziert
(siehe Abschnitt „Projektionsdauer einstellen“).
6. Um die Projektion spiegelverkehrt anzeigen zu lassen, halten Sie die PROJECTION-Taste u eine Sekunde lang gedrückt. Ein erneutes Gedrückthalten lässt
die Projektion wieder normal erscheinen.
7. Wenn Sie diese Funktion vorzeitig abschalten wollen, drücken Sie die PROJECTIONTaste u und klappen den Projektor t ein.
Tastensperre
Halten Sie die MODE/LOCK-Taste e solange gedrückt, bis das Schlüsselsymbol im Display g erscheint. Die normalen Tastenfunktionen sind nun blockiert. Die Tasten behalten
aber die Funktion „Alarm beenden“. Darüberhinaus behält die SNOOZE/DIMMERTaste y ihre Funktion als Schlummertaste
und zum Einstellen der Display-Helligkeit. Um
die Tastensperre aufzuheben, halten Sie die
MODE/LOCK-Taste e erneut gedrückt, bis
das Schlüsselsymbol erlischt.
Reinigen
Projektion
Sie können die Uhrzeit vom Gerät an eine
Wand oder die Decke projizieren lassen.
Diese Funktion ist für die Zeitablesung bei
Dunkelheit gedacht. Tagsüber in gut beleuchteten Räumen werden Sie die Projektion kaum
nutzen können. Bei eingeschalteter Projektion
leuchtet das Projektions-Symbol im Display g.
1. Klappen Sie dazu den Projektor t aus.
2. Schalten Sie die Funktion mit der PROJECTION-Taste u ein.
3. Richten Sie den Projektor t auf die
gewünschte Stelle aus. Bevor Sie den
Projektor t -falls gewünscht- zur Seite
Warnung!
Ziehen Sie vor jeder Reinigung den
Netzstecker! Dringt Feuchtigkeit in das
Gerät ein, besteht die Gefahr eines
elektrischen Schlages! Außerdem kann
das Gerät dabei irreparabel beschädigt werden!
Reinigen Sie das Gehäuse des Projektionsweckers ausschließlich mit einem leicht feuchten
Tuch und einem milden Spülmittel. Achten Sie
darauf, dass bei der Reinigung keine Feuchtigkeit in das Gerät gelangt!
- 51 -
Page 55

Fehlerhilfe
Entsorgen
Das Gerät arbeitet nicht.
> Steckt der Stecker des Netzkabels 2! fest
in der Steckdose?
> Ist der Sicherungsautomat evtl. ausge-
schaltet?
> Ist der Strom ausgefallen?
Schlechter UKW-Empfang.
> Ändern Sie die Ausrichtung der Wurf-
antenne 2). Ggf. arretieren Sie sie mit
Klebeband.
Verlust aller Einstellungen nach Stromausfall.
> Sie haben keine Batterien zum Speiche-
rerhalt eingelegt.
> Die eingelegten Batterien zum Speicherer-
halt sind erschöpft. Ersetzen Sie sie.
Projizierte Uhrzeit ist schlecht lesbar.
> Stellen Sie mit dem Fokusregler 1( die An-
zeige scharf.
Hinweis zur Konformität
Dieses Gerät entspricht hinsichtlich Übereinstimmung mit den grundlegenden Anforderungen und den anderen relevanten Vorschriften der europäischen Richtlinie für elektromagnetische Verträglichkeit 2004/108/EC, der
Niederspannungsrichtlinie 2006/95/EC, der
Ökodesign-Richtlinie 2009/125/EC (Verordnung 1275/2008 Anhang II, Nr. 1) sowie
der RoHS-Richtlinie 2011/65/EU.
Die vollständige Original-Konformitätserklärung ist beim Importeur erhältlich.
Werfen Sie das Gerät keinesfalls
in den normalen Hausmüll. Dieses Produkt unterliegt der europäischen Richtlinie 2012/19/EU.
Gerät entsorgen
• Entsorgen Sie das Produkt oder Teile
davon über einen zugelassenen Entsorgungsbetrieb oder über Ihre kommunale
Entsorgungseinrichtung.
• Beachten Sie die aktuell geltenden Vorschriften. Setzen Sie sich im Zweifelsfall mit
Ihrer Entsorgungseinrichtung in Verbindung.
Batterien/Akkus entsorgen
• Batterien/Akkus dürfen nicht im Hausmüll
entsorgt werden.
• Batterien/Akkus können Giftstoffe enthalten, die die Umwelt schädigen. Entsorgen
Sie die Batterien/Akkus deshalb unbedingt
entsprechend der geltenden gesetzlichen
Bestimmungen.
• Jeder Verbraucher ist gesetzlich verpflichtet, Batterien/Akkus bei einer Sammelstelle
seiner Gemeinde, seines Stadtteils oder im
Handel abzugeben. Diese Verpflichtung
dient dazu, dass Batterien/Akkus einer
umweltschonenden Entsorgung zugeführt
werden können.
• Geben Sie Batterien/Akkus nur im entladenen Zustand zurück.
Verpackung entsorgen
Führen Sie alle Verpackungsmaterialien
einer umweltgerechten Entsorgung zu.
Importeur
KOMPERNASS HANDELS GMBH
BURGSTRASSE 21
44867 BOCHUM
DEUTSCHLAND/GERMANY
www.kompernass.com
- 52 -
Page 56

Garantie & Service
Sie erhalten auf dieses Gerät 3 Jahre Garantie ab Kaufdatum. Das Gerät wurde
sorgfältig produziert und vor Anlieferung
gewissenhaft geprüft. Bitte bewahren Sie den
Kassenbon als Nachweis für den Kauf auf.
Bitte setzen Sie sich im Garantiefall mit Ihrer
Servicestelle telefonisch in Verbindung. Nur
so kann eine kostenlose Einsendung Ihrer
Ware gewährleistet werden.
Die Garantieleistung gilt nur für Material- oder
Fabrikationsfehler, nicht aber für Transportschäden, Verschleißteile oder für Beschädigungen an zerbrechlichen Teilen, z. B. Schalter
oder Akkus.
Das Produkt ist lediglich für den privaten
und nicht für den gewerblichen Gebrauch
bestimmt. Bei missbräuchlicher und unsachgemäßer Behandlung, Gewaltanwendung und
bei Eingriffen, die nicht von unserer autorisierten Service-Niederlassung vorgenommen
wurden, erlischt die Garantie.
Ihre gesetzlichen Rechte werden durch diese
Garantie nicht eingeschränkt.
Kompernaß Service Schweiz
Tel.: 0842 665 566 (0,08 CHF/Min., Mobilfunk max.
0,40 CHF/Min.)
E-Mail: kompernass@lidl.ch
IAN 90514
Erreichbarkeit Hotline: Montag bis Freitag von
8:00 Uhr - 20:00 Uhr (MEZ)
Die Garantiezeit wird durch die Gewährleistung nicht verlängert. Dies gilt auch für
ersetzte und reparierte Teile. Eventuell schon
beim Kauf vorhandene Schäden und Mängel
müssen sofort nach dem Auspacken gemeldet
werden, spätestens aber zwei Tage nach
Kaufdatum. Nach Ablauf der Garantiezeit
anfallende Reparaturen sind kostenpflichtig.
Kompernaß Service Deutschland
Tel.: 0800 5435 111
E-Mail: kompernass@lidl.de
IAN 90514
Kompernaß Service Österreich
Tel.: 0820 201 222 (0,15 EUR/Min.)
E-Mail: kompernass@lidl.at
IAN 90514
- 53 -
Page 57

KOMPERNASS HANDELS GMBH
BURGSTRASSE 21
44867 BOCHUM
DEUTSCHLAND/GERMANY
Versione delle informazioni · Estado das informações
Last Information Update
Ident.-No.: SPU 900 A2 062013-2
· Stand der Informationen: 07 / 2013 ·
5
 Loading...