


MINI TRIMMER SPS 1.5 A1
MINI TRIMMER
Operating instructions
MINI-TONDEUSE
POUR FEMME
Mode d’emploi
MINI-TRIMMER
Bedienungsanleitung
IAN 298780
MINI-TRIMMER
Betjeningsvejledning
MINI-TRIMMER
Gebruiksaanwijzing

Before reading, unfold the page containing the
illustrations and familiarise yourself with all functions of the device.
Før du læser, vend siden med billeder frem og bliv
bekendt med alle apparatets funktioner.
Avant de lire le mode d’emploi, ouvrez la page
contenant les illustrations et familiarisez-vous
ensuite avec toutes les fonctions de l’appareil.
Vouw vóór het lezen de pagina met de afbeeldingen open en maak u vertrouwd met alle functies
van het apparaat.
Klappen Sie vor dem Lesen die Seite mit den Abbildungen aus und machen Sie sich anschließend mit
allen Funktionen des Gerätes vertraut.
GB / IE / NI Operating instructions Page 1
DK Betjeningsvejledning Side 31
FR / BE Mode d’emploi Page 63
NL / BE Gebruiksaanwijzing Pagina 95
DE / AT / CH Bedienungsanleitung Seite 129

Contents
Introduction .............2
Intended use ............2
Package contents ........3
Operating elements ......4
Technical data ...........4
Safety instructions .......5
Inserting the battery ....12
Tips and tricks ..........13
Using the appliance .....14
Removing and connecting the
attachments ...............14
Using the bikini line trimmer ....16
Using the eyebrow trimmer ....19
Cleaning and care .......22
Storage ...............23
Troubleshooting ........24
Disposal ...............24
Kompernass Handels
GmbH warranty .......26
Service ...................30
Importer ..................30
GB│IE│NI │ 1 ■

Introduction
Congratulations on the purchase of
your new appliance.
You have selected a high-quality
product. The operating instructions
are part of this product. They contain
important information about safety,
usage and disposal. Before using
the product, please familiarise yourself with all operating and safety
instructions. Use the product only as
described and for the range of
applications specified. Please also
pass these operating instructions on
to any future owner.
Intended use
This appliance is intended solely for
trimming eyebrows, the bikini line and
the underarm area in private households. It is not suitable for commercial
use! The device is not intended for
any other purpose, nor for use beyond
the scope described.
Claims of any kind for damages
resulting from misuse, improper
repairs, unauthorised modifications
or the use of unauthorised spare
parts are excluded.
The risk shall be borne solely by the
user.
■ 2 │ GB│IE│NI

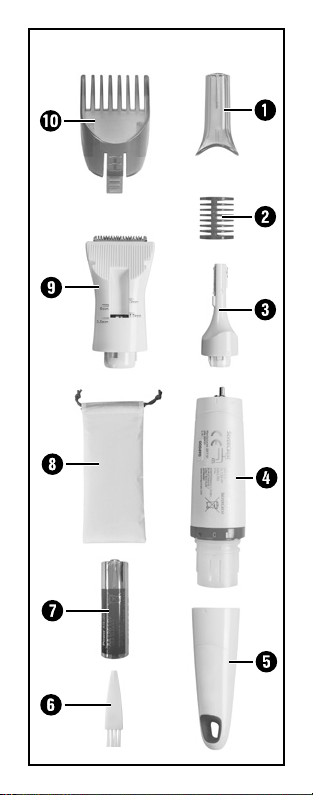
Package contents
■ Mini Trimmer
■ Protective cap for the eyebrow
trimmer
■ Eyebrow trimmer
■ Eyebrow comb
■ Trimmer
■ Trimmer comb
■ Storage pouch
■ Cleaning brush
■ AA battery
■ Operating instructions
Extract all parts of the appliance
from the carton and remove all
packaging material. Check the
package for completeness and signs
of visible damage.
NOTES
► If the delivery is incomplete
or damage has occurred as a
result of defective packaging
or during transport, contact
the Service hotline (see section
Service).
GB│IE│NI │ 3 ■

Operating elements
See fold-out page for illustrations:
Protective cap for the
eyebrow trimmer
Eyebrow trimmer comb
Eyebrow trimmer
Handset
Battery compartment cover
Cleaning brush
AA battery
Storage pouch
Bikini line trimmer
Bikini line trimmer comb
Technical data
Appliance
1 x 1.5 V,
Voltage supply
Voltage 1.5 V
Protection type
type AA/LR6/
Mignon
(DC)
IPX4
Protection
against water
splashes from
any direction.
■ 4 │ GB│IE│NI

Safety instructions
► Check the device for
visible external damage before use. Do not
operate an appliance
which has been damaged or dropped.
► DANGER! Do not
allow children to play
with the packaging
material! Keep all
packaging materials
away from children.
There is a risk of
suffocation!
► Hair trimmers may be
used by children aged 8
and above and persons
with limited physical,
sensory or mental capabilities or lack of experience and knowledge,
GB│IE│NI │ 5 ■

provided that they are
under supervision or
have been told how
to use the appliance
safely and are aware
of the potential risks.
Do not allow children
to use the appliance
as a toy. Cleaning and
maintenance may not
be carried out by unsupervised children.
► Hair trimmers may be
used by children aged
3 and above if they are
supervised.
► Do not expose the
device to direct sunlight
or high temperatures.
Otherwise it may overheat and be irreparably
damaged.
■ 6 │ GB│IE│NI
► DANGER! Do not
operate the device
close to naked flames
(e.g. candles) and do not
place burning candles
on or next to the device.
This will help to prevent
fires.
► To avoid personal injury,
do not use the appliance
with a damaged or
faulty attachment.
► Switch the device off
immediately if you hear
any unusual noises,
smell fumes or notice
any smoke. Have the
device checked by
a qualified specialist
before using it again.
GB│IE│NI │ 7 ■
► All repairs must be car-
ried out by authorised
specialist companies or
by the customer service
department. Improper
repairs may put the user
at risk. It will also invalidate any warranty
claims.
► Do not make any unau-
thorised modifications
or alterations to the
appliance. This appliance may not be
opened by the user.
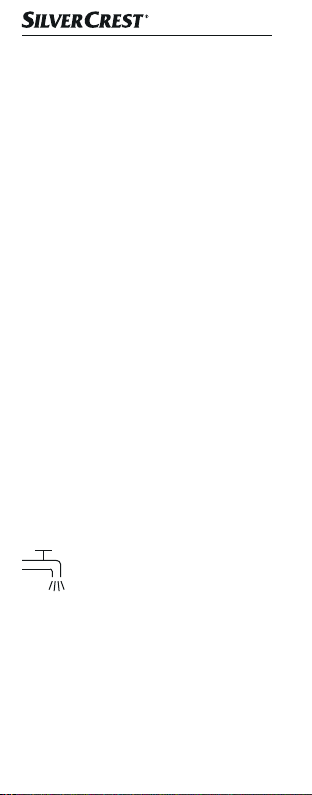
Can be cleaned
under running water.
■ 8 │ GB│IE│NI

DANGER
Mishandling the
batteries can cause
fires, explosions,
leakages or other
hazards!
► Do not throw the bat-
teries into a fire and
do not subject them
to high temperatures.
► Do not open, deform
or short-circuit batteries,
since this can lead to
chemical leakage.
► Do not attempt to
recharge the batteries.
Do not charge batteries unless they are
explicitly labelled as
"rechargeable". There
is a risk of explosion!
GB│IE│NI │ 9 ■

DANGER
► Check the condition
of the batteries at regular intervals. Leaking
chemicals can cause
permanent damage
to the appliance. Take
particular care when
handling damaged or
leaking batteries. Risk
of acid burns! Wear
protective gloves.
► Chemicals that leak
from a battery can
cause skin irritation.
If it contacts your skin,
rinse off with plenty of
water. If the chemicals
get into your eyes,
rinse thoroughly with
water, do not rub
and consult a doctor
immediately.
■ 10 │ GB│IE│NI

DANGER
► Do not mix different
types of batteries.
► Always insert the bat-
teries the right way
round (observe correct polarity) otherwise
there is a danger that
they could explode.
► If you do not intend to
use the appliance for
a long time, remove
the batteries.
► Keep batteries out of
the reach of children.
Children might put
batteries into their
mouths and swallow
them. If a battery has
been swallowed, seek
medical assistance
immediately.
GB│IE│NI │ 11 ■

Inserting the battery
1) Turn the battery compartment
cover clockwise until the
marking on the battery
compartment cover points
towards the marking on the
handset .
2) Pull the battery compartment
cover off the housing.
3) Insert the AA battery into
the handset with the positive terminal (+) first.
4) Reattach the battery compartment cover to the handset
with the
battery compartment cover
pointing towards the marking
on the handset .
5) Turn the battery compartment
cover anticlockwise until
the
compartment cover points
towards the 0 marking on the
handset .
marking on the
marking on the battery
■ 12 │ GB│IE│NI

Tips and tricks
NOTE
► Do not use the appliance if...
― You have sunburn on the
specific part of the body.
― You have skin irritation or
redness.
― You have a skin disease such
as neurodermatitis.
― You have pimples, moles or
warts on the affected parts
of the body.
― You have wounds, open
sores or raised scars on the
affected parts of the body.
► Test the appliance in a small,
usually covered spot first in
order to establish skin compatibility.
GB│IE│NI │ 13 ■

■ Before using the appliance, treat
the skin with a scrub treatment
or a massage glove. This helps
remove dead skin cells, prevents
ingrowing hair and make fine
hair stand up. This enables the
appliance to cut the hair better.
■ Only use the appliance on dry,
clean hair.
■ After using the appliance, treat
the skin with a moisturising lotion
or cream. Ideally, use a cream
containing aloe vera or camomile
extracts to soothe and maintain
the skin.
Using the appliance
Removing and connecting the
attachments
The supplied attachments (bikini line
trimmer and eyebrow trimmer )
are connected and removed in the
same way. Ensure the correct orientation of the attachment to the handset .
■ 14 │ GB│IE│NI

▯ Removing the attachment:
1) Turn the attachment anticlockwise until the
marking on the
attachment points towards the
marking on the handset .
2) Remove the attachment from the
handset .
▯ Connecting the attachment:
(Fig. 1)
1) Fix the attachment to the handset
such that the marking on
the attachment faces towards the
marking on the handset
(see Fig. 1).
2) Turn the attachment clockwise
until the
marking on the attachment points towards the marking
on the handset (see Fig. 1).
GB│IE│NI │ 15 ■

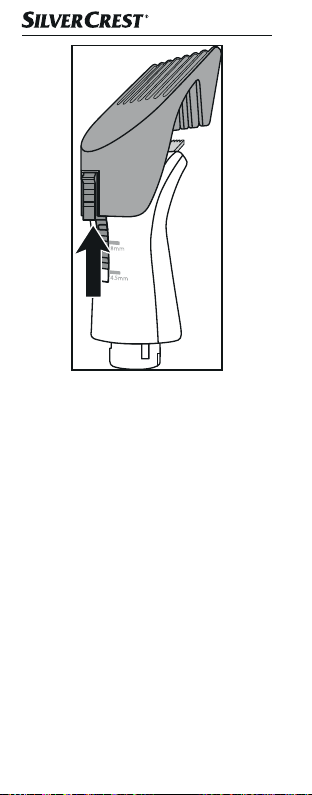
Using the bikini line trimmer
To shave or trim your bikini line or
underarm hair, proceed as follows:
1) Attach the bikini line trimmer
to the handset as described
in the section “Removing and
connecting the attachments”.
NOTE
► If you wish to trim your hair to a
specific length, you can attach
the bikini line trimmer comb
to the bikini line trimmer :
― plug the length control unit of
the bikini line trimmer comb
into the gap on the bikini line
trimmer (see Fig. 2).
― Lock the bikini line trimmer
comb at the desired
length. The further you push
the bikini line trimmer comb
into the gap on the bikini line
trimmer , the shorter your
hair will be trimmed.
■ 16 │ GB│IE│NI

(Fig. 2)
Length settings
of the bikini line
trimmer comb
Level 1
(pushed all the way in)
Level 2 4.5 mm
Level 3 6 mm
Level 4 8 mm
GB│IE│NI │ 17 ■
3.5 mm

2) To switch the appliance on, turn
the battery compartment cover
anticlockwise until the marking
on the battery compartment
cover points towards the
marking on the handset .
3) Move the bikini line trimmer
against the direction of growth
across the patch of skin to be
shaved.
4) To switch the appliance off, turn
the
marking of the battery
compartment cover to the 0
marking on the handset .
NOTE
► To remove the bikini line trimmer
comb from the bikini line
trimmer , push the length
control unit down while simultaneously pulling the bikini line
trimmer comb off upwards
(see Fig. 3).
■ 18 │ GB│IE│NI

(Fig.3)
Using the eyebrow trimmer
To trim your eyebrows or remove
facial hair, proceed as follows:
1) Attach the eyebrow trimmer
to the handset as described
in the section “Removing and
connecting the attachments”.
2) To trim the hair to a length of
3mm or 6mm, additionally attach
the eyebrow trimmer comb to
the eyebrow trimmer :
GB│IE│NI │ 19 ■

(Fig.4)
Lock the eyebrow trimmer comb
into the guide rail on the
eyebrow trimmer (see Fig.
4). Ensure that the desired
length of the
eyebrow trimmer comb
is adjacent to the side of the
eyebrow trimmer which has
the longer blade.
The short edges of the eyebrow
trimmer comb allow you to
trim your eyebrows to 3mm and
the long edges of the eyebrow
trimmer comb allow you
to trim your eyebrows to 6mm
evenly; to do this, apply the eyebrow trimmer comb vertically
to your skin (Fig. 5).
■ 20 │ GB│IE│NI

(Fig. 5)
3) In order to switch the appliance
on, turn the battery compartment
cover anticlockwise until
the
marking on the battery
compartment cover points
towards the
handset .
4) Place the eyebrow trimmer
with the desired length of the
eyebrow trimmer comb against
the beginning of the eyebrow
you are about to trim. Move the
tip of the eyebrow trimmer comb
over the eyebrow against the
direction of growth several times.
5) To switch the appliance off, turn
the
compartment cover to the 0
marking on the handset .
marking on the
marking of the battery
GB│IE│NI │ 21 ■

NOTE
► You can use the eyebrow trim-
mer without the eyebrow
trimmer comb in order to
shape the contours of your
eyebrows. Carefully use the
short blade of the eyebrow
trimmer to remove stray
hairs at the edges of your eyebrows. Move the blade against
the direction of growth.
Cleaning and care
CAUTION –
SPROPERTY DAMAGE!
► Never immerse the appliance
in water or other liquids!
► Ensure that the appliance is
switched off for cleaning.
■ Before cleaning the attachments
/, remove the combs /
from the attachments /.
■ After each use, clean the attach-
ments/using the supplied
cleaning brush to remove
loose hair.
■ 22 │ GB│IE│NI
■ Regularly clean and disinfect the
attachments /with disinfectant spray.
■ Wipe the appliance with a damp
cloth. If required, use some mild
detergent on the cloth. Ensure that
the appliance is completely dry
before the next use.
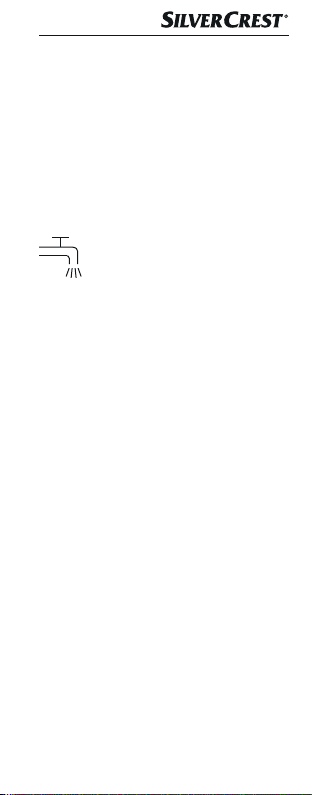
You can also clean the
attachments /under
running water:
― Remove the attachment /
from the handset as described
in the section “Removing and
connecting the attachments”.
― Clean the attachments /
under running water.
― Ensure that the attachments
/are completely dry
before using them again.
Storage
■ Always protect the eyebrow
trimmer using the supplied
protective cap .
GB│IE│NI │ 23 ■
■ Store the appliance and all
accessories in a dry and dust-free
location in the supplied storage
pouch .
Troubleshooting
The appliance is not working:
■ Replace the battery.
■ The appliance is defective. Contact
the Customer Service department.
Not all hairs are plucked:
■ You are working too fast. Move
the appliance over your skin
slowly.
Disposal
Appliance
Never dispose
of the appliance
in your normal
domestic waste.
This product is subject to the
provisions of the European
WEEE (Waste Electrical and
Electronic Equipment) Directive
2012/19/EU.
■ 24 │ GB│IE│NI

Dispose of the appliance via an
approved disposal company or
your municipal waste facility. Please
observe the currently applicable
regulations. Please contact your
waste disposal facility if you are in
any doubt.
Packaging
The packaging is made
from environmentallyfriendly material and can
be disposed of at your
local recycling plant.
Dispose of the packaging
in an environmentally
friendly manner.
Note the labelling on the
packaging and separate the packaging material components for disposal
if necessary. The packaging material is labelled with abbreviations (b)
and numbers (a) with the following
meanings:
1–7: Plastics
20–22: Paper and cardboard
80–98: Composites
GB│IE│NI │ 25 ■
Disposal of (rechargeable)
batteries
Used batteries must
not be disposed of in
household waste.
Consumers are legally
obliged to dispose of
batteries at a collection point in their
community/city district or at a retail
store.
The purpose of this requirement is to
ensure that batteries are disposed
of in an environmentally friendly
manner. Only return batteries or
rechargeable batteries when they
are fully discharged.
Kompernass Handels
GmbH warranty
Dear Customer,
This appliance has a 3-year warranty
valid from the date of purchase.
If this product has any faults, you,
the buyer, have certain statutory
rights. Your statutory rights are not
restricted in any way by the warranty
described below.
Warranty conditions
The validity period of the warranty
starts from the date of purchase.
■ 26 │ GB│IE│NI

Please keep your original receipt in
a safe place. This document will be
required as proof of purchase.
If any material or production fault
occurs within three years of the date
of purchase of the product, we will
either repair or replace the product
for you at our discretion. This warranty
service is dependent on you presenting the defective appliance and the
proof of purchase (receipt) and a
short written description of the fault
and its time of occurrence.
If the defect is covered by the warranty,
your product will either be repaired
or replaced by us. The repair or
replacement of a product does not
signify the beginning of a new warranty period.
Warranty period and
statutory claims for defects
The warranty period is not prolonged
by repairs effected under the warranty.
This also applies to replaced and
repaired components. Any damage
and defects present at the time of
purchase must be reported immediately after unpacking. Repairs carried
out after expiry of the warranty period
shall be subject to a fee.
GB│IE│NI │ 27 ■

Scope of the warranty
This appliance has been manufactured in accordance with strict quality
guidelines and inspected meticulously
prior to delivery.
The warranty covers material faults
or production faults. The warranty does
not extend to product parts subject
to normal wear and tear or fragile
parts such as switches, batteries,
baking moulds or parts made of glass.
The warranty does not apply if the
product has been damaged, improperly used or improperly maintained.
The directions in the operating
instructions for the product regarding
proper use of the product are to be
strictly followed. Uses and actions
that are discouraged in the operating
instructions or which are warned
against must be avoided.
This product is intended solely for
private use and not for commercial
purposes. The warranty shall be
deemed void in cases of misuse or
improper handling, use of force and
modifications/repairs which have
not been carried out by one of our
authorised Service centres.
■ 28 │ GB│IE│NI

Warranty claim procedure
To ensure quick processing of your
case, please observe the following
instructions:
■ Please have the till receipt and the
item number (e.g. IAN 12345)
available as proof of purchase.
■ You will find the item number on
the type plate, an engraving on
the front page of the instructions
(bottom left), or as a sticker on the
rear or bottom of the appliance.
■ If functional or other defects
occur, please contact the service
department listed either by tele-
phone or by e-mail.
■ You can return a defective product
to us free of charge to the service
address that will be provided to
you. Ensure that you enclose the
proof of purchase (till receipt)
and information about what the
defect is and when it occurred.
You can download these
instructions along with many
other manuals, product
videos and software on
www.lidl-service.com.
GB│IE│NI │ 29 ■

Service
Service Great Britain
Tel.: 0871 5000 720 (£
0.10/Min.)
E-Mail:
kompernass@lidl.co.uk
Service Ireland
Tel.: 1890 930 034
(0,08 EUR/Min., (peak))
(0,06 EUR/Min., (off peak))
E-Mail: kompernass@lidl.ie
IAN 298780
Importer
Please note that the following
address is not the service address.
Please use the service address provided in the operating instructions.
KOMPERNASS HANDELS GMBH
BURGSTRASSE 21
DE - 44867 BOCHUM
GERMANY
www.kompernass.com
■ 30 │ GB│IE│NI

Indholdsfortegnelse
Introduktion ...........32
Anvendelsesområde ....32
Pakkens indhold ........33
Betjeningselementer. . . . .34
Tekniske data ..........34
Sikkerhedsanvisninger . .35
Indsætning af batteri ....43
Tips og tricks ...........44
Anvendelse af
produktet ............ 45
Aftagning og påsætning
af tilbehørsdele .............45
Anvendelse af bikinitrimmer . . . 47
Anvendelse af
øjenbrynstrimmer ...........50
Rengøring og
vedligeholdelse ....... 53
Opbevaring ............54
Afhjælpning af fejl ......55
Bortskaffelse ...........55
Garanti for Kompernass
Handels GmbH ........ 58
Service ...................62
Importør ..................62
DK │ 31 ■

Introduktion
Tillykke med købet af dit nye produkt.
Du har valgt et produkt af høj kvalitet.
Betjeningsvejledningen er en del af
dette produkt. Den indeholder
vigtige informationer om sikkerhed,
anvendelse og bortskaffelse. Du bør
sætte dig ind i alle produktets
betjenings- og sikkerhedsanvisninger
før brug. Brug kun produktet som
beskrevet og kun til de angivne
anvendelsesområder. Lad vejledningen
følge med produktet, hvis du giver
det videre til andre.
Anvendelsesområde
Dette produkt er udelukkende beregnet
til trimning af øjenbryn, bikiniområdet
og armhuler i private hjem. Det må
ikke anvendes i kommerciel sammenhæng! Al anden anvendelse betragtes
som værende uden for anvendelsesområdet.
Krav af en hvilken som helst art på
grund af skader, som er opstået ved
anvendelse uden for anvendelsesområdet, forkert udførte reparationer,ikketilladte ændringer eller anvendelse af
ikke-tilladte reservedele, er udelukkede.
Brugeren bærer alene risikoen.
■ 32 │ DK

Pakkens indhold
■ Mini-trimmer
■ Beskyttelseskappe til
øjenbrynstrimmer
■ Øjenbrynstrimmer
■ Øjenbrynskam
■ Trimmer
■ Trimmerkam
■ Opbevaringspose
■ Rengøringsbørste
■ AA-batteri
■ Betjeningsvejledning
Tag alle produktets dele ud af kassen, og fjern alt emballeringsmaterialet. Kontrollér, at alle dele er leveret med, og at de ikke har synlige
skader.
INFO
► Hvis der mangler dele, eller
hvis nogle af delene er defekte
på grund af mangelfuld emballage eller på grund af transporten, bedes du henvende dig til
vores service-hotline (se kapitlet
Service).
DK │ 33 ■

Betjeningselementer
Billeder se klap-ud-siden:
Beskyttelseskappe til
øjenbrynstrimmer
Øjenbrynskam
Øjenbrynstrimmer
Motordel
Låg til batterirum
Rengøringsbørste
AA-batteri
Opbevaringspose
Bikinitrimmer
Bikinitrimmerkam
Tekniske data
Produkt
Spændingsforsyning
Spænding
Kapslingsklasse
1 x 1,5 V
type AA LR6
Mignon
1,5 V
(jævnstrøm)
IPX4
Beskyttelse
mod sprøj-
tende vand fra
alle retninger
■ 34 │ DK

Sikkerhedsanvisninger
► Kontrollér produktet for
udvendige, synlige skader før brug. Brug ikke
produktet, hvis det er
beskadiget eller har
været tabt på gulvet.
► FARE! Emballerings-
materialer er ikke legetøj!
Hold alle emballeringsmaterialer væk fra børn.
Der er fare for kvælning!
► Hårklippemaskiner kan
bruges af børn fra 8 år
og derover og af personer med nedsatte fysiske, psykiske, motoriske
eller mentale evner eller
manglende erfaring
og/eller viden, hvis de
er under opsyn eller
DK │ 35 ■

undervises i sikker brug
af produktet og de farer,
der kan være forbundet
med det. Børn må ikke
lege med produktet.
Rengøring og vedligeholdelse, som brugeren
skal udføre, må ikke
udføres af børn.
► Hårklippemaskiner må
bruges af børn fra 3 år
under opsyn.
► Udsæt ikke produktet
for direkte sollys eller
høje temperaturer. Ellers
kan det overophedes og
gå i stykker, så det ikke
længere kan repareres.
■ 36 │ DK

► FARE! Brug ikke
dette produkt i nærheden af levende ild
(f.eks. stearinlys), og stil
ikke tændte stearinlys
på eller ved siden af
produktet. Derved kan
brand undgås.
► For at undgå personska-
der må produktet ikke
bruges med en beskadiget eller defekt tilbehørsdel.
► Sluk straks for produktet,
hvis du opdager usædvanlige lyde, lugt af
brand eller røgudvikling.
Lad en kvalificeret
reparatør efterse produktet, før det anvendes
igen.
DK │ 37 ■

► Lad kun autoriserede
specialforretninger eller
kundeservice reparere produktet. Forkert
udførte reparationer kan
medføre fare for brugeren. Desuden bortfalder
alle garantikrav.
► Produktet må ikke
ændres eller ombygges. Produktet må ikke
åbnes af brugeren.
Egnet til rengøring
under rindende
vand.
■ 38 │ DK

FARE
Forkert håndtering
af batterier kan
føre til brand, eksplosioner, udløb af
farlige stoffer eller
andre farlige situationer!
► Smid ikke batterierne
ind i ild, og udsæt
dem ikke for høje
temperaturer.
► Batterierne må ikke
åbnes, deformeres
eller kortsluttes, da
kemikalierne indeni
kan løbe ud.
DK │ 39 ■

FARE
► Prøv ikke på at gen-
oplade batterierne.
Batterier, der er mærket
med "genopladeligt",
er de eneste, der må
genoplades. Fare for
eksplosion!
► Kontrollér batterierne
regelmæssigt. Udløbne
kemikalier kan forårsage vedvarende
skader på produktet.
Vær særligt forsigtig
med batterierne, hvis
de er defekte, eller
hvis syren løber ud.
Ætsningsfare! Bær
beskyttelseshandsker.
■ 40 │ DK

FARE
► Kemikalier, som løber
ud af batteriet, kan
føre til hudirritationer.
Skyl med rigeligt
vand ved kontakt med
huden. Hvis kemikalierne kommer i øjnene,
skal øjnene skylles
grundigt med vand -
lad være med at
gnide i øjnene, og
søg straks læge.
► Forskellige typer bat-
terier eller genopladelige batterier må ikke
anvendes sammen.
► Sæt altid batterierne
i, så polerne vender
rigtigt, da der ellers
er fare for, at de eksploderer.
DK │ 41 ■

FARE
► Hvis produktet ikke
skal anvendes i en
længere periode, skal
batterierne tages ud.
► Børn må ikke kunne
få fat i batterierne.
Børn kan putte batterierne i munden og
sluge dem. Hvis et
batteri sluges, skal
der omgående søges
lægehjælp.
■ 42 │ DK

Indsætning af batteri
1) Drej batterirummets låg i
urets retning, indtil - markeringen på batterirummets låg
peger mod - markeringen
på motordelen .
2) Tag batterirummets låg af
huset.
3) Sæt AA-batteriet ind i
motordelen med pluspolen
(+) foran.
4) Sæt batterirummets låg på
motordelen igen, så
markeringen på batterirummets låg peger mod
- markeringen på motordelen .
5) Drej batterirummets låg
mod urets retning, indtil
markeringen på batterirummets
låg peger mod 0 - markeringen på motordelen .
-
-
DK │ 43 ■

Tips og tricks
BEMÆRK
► Brug ikke produktet, hvis...
― du er solskoldet på de
pågældende kropsdele,
― du har hudirritationer, eller
hvis huden har en svag rød
farve,
― du har en hudsygdom som
for eksempel neurodermitis,
― du har acne, modermær-
ker eller vorter på de pågældende kropsdele,
― du har sår, åbne sår eller
hævede ar på de pågældende kropsdele.
► Test først produktet på et lille,
skjult sted, så du ved, om
huden kan tåle behandlingen.
■ 44 │ DK

■ Behandl huden med en peeling
eller en massagehandske, før
produktet anvendes. Derved fjernes døde hudceller, nedgroede
hår undgås, og de fine hår retter
sig op. Derved kan produktet
bedre klippe hårene af.
■ Huden skal være tør og fedtfri
ved behandlingen.
■ Plej huden efter anvendelsen med
en fugtighedslotion eller creme.
Creme med Aloe Vera eller kamilleekstrakt er særligt velegnet, da
huden beroliges og plejes.
Anvendelse af produktet
Aftagning og påsætning af
tilbehørsdele
Den vedlagte bikini-trimmer og
øjenbrynstrimmer kan sættes på
og tages af på samme måde. Sørg
for, at tilbehørsdelen sættes korrekt
på motordelen .
DK │ 45 ■

▯ Aftagning af dele:
1) Drej tilbehørsdelen mod urets retning, indtil
tilbehørsdelen peger mod markeringen på motordelen .
2) Tag tilbehørsdelen af motordelen .
▯ Påsætning af tilbehørsdele:
(Fig.1)
1) Sæt tilbehørsdelen på motordelen , så
tilbehørsdelen peger mod markeringen på motordelen
(se fig. 1).
2) Drej tilbehørsdelen i urets retning, indtil
tilbehørsdelen peger mod markeringen på motordelen
(se fig. 1).
- markeringen på
- markeringen på
- markeringen på
■ 46 │ DK

Anvendelse af bikinitrimmer
Hvis du vil barbere / trimme bikinizonen eller armhulerne, skal du
gøre følgende:
1) Sæt bikinitrimmeren på motor-
delen som beskrevet i kapitlet
»Aftagning og påsætning af tilbehørsdele«.
BEMÆRK
► Hvis du vil trimme håret i en
bestemt længde, kan du sætte
bikinitrimmerkammen på
bikinitrimmeren :
― Sæt længdeindstillingen til
bikinitrimmerkammen ind
i udskæringen på bikinitrimmeren (se fig. 2).
― Lad bikinitrimmerkammen
gå i indgreb ved den ønskede
længde. Jo længere bikinitrimmerkammen sættes
ind i udskæringen på bikinitrimmeren , jo kortere bliver
håret.
DK │ 47 ■

(Fig.2)
Længdeindstillinger
bikinitrimmerkam
Trin 1
(sat helt ind)
Trin 2 4,5 mm
Trin 3 6 mm
Trin 4 8 mm
3,5 mm
■ 48 │ DK

2) For at tænde for produktet skal
batterirummets låg drejes
mod urets retning, indtil - markeringen på batterirummets låg
peger mod - markeringen
på motordelen .
3) Hold bikinitrimmeren hen
over stedet, der skal barberes,
imod vækstretningen.
4) Når du vil afslutte anvendelsen,
drejes
terirummets låg til 0 - markeringen på motordelen for at
slukke for produktet.
BEMÆRK
► For at fjerne bikinitrimmerkam-
men fra bikinitrimmeren
skal du trykke på længdeindstillingen og samtidig tage bikinitrimmerkammen af oppefra
(se fig. 3).
- markeringen på bat-
DK │ 49 ■
(Fig 3)
Anvendelse af
øjenbrynstrimmer
Hvis du vil klippe øjenbrynene eller
fjerne behåring i ansigtet, skal du
gøre følgende:
1) Sæt øjenbrynstrimmeren på
motordelen som beskrevet i
kapitlet »Aftagning og påsætning af tilbehørsdele«.
2) Hvis du vil trimme hårene med
en længde på 3 mm eller 6
mm, skal du også sætte øjenbrynskammen på øjen-
brynstrimmeren :
■ 50 │ DK

(Fig. 4)
Lad øjenbrynskammen gå
ind i skinnen på øjenbrynstrimmeren (se fig. 4). Sørg for,
at den ønskede længde for
øjenbrynskammen sidder
på siden af øjenbrynstrimmeren
, der har det længste skær.
Med de korte takker på
øjenbrynskammen kan du
trimme en hårlængde på 3
mm og med de lange takker
på øjenbrynskammen en
hårlængde på 6 mm, hvis øjenbrynskammen holdes lodret
mod huden (Fig. 5).
DK │ 51 ■

(Fig. 5)
3) For at tænde for produktet skal
batterirummets låg drejes
mod urets retning, indtil
markeringen på batterirummets
låg peger mod - markeringen på motordelen .
4) Hold øjenbrynstrimmeren
med den ønskede kamlængde
på øjenbrynskammen ved
starten af øjenbrynet, der skal
trimmes. Kør flere gange med
spidsen af øjenbrynskammen
hen over øjenbrynet, der skal
trimmes og imod vækstretningen.
5) Når du vil afslutte trimningen af
øjenbrynet, drejes
på batterirummets låg til 0 -
markeringen på motordelen
for at slukke for produktet.
-
- markeringen
■ 52 │ DK

BEMÆRK
► For at kunne forme øjenbryne-
nes konturer kan du anvende
øjenbrynstrimmeren uden
øjenbrynskam .
Barber forsigtigt generende små
hår af øjenbrynenes kanter med
den korte klinge på øjenbrynstrimmeren . Bevæg klingen
i retningen mod hårvæksten.
Rengøring og
vedligeholdelse
OBS – MATERIELLE SKADER!
► Læg aldrig produktet ned i
vand eller andre væsker!
► Sørg for, at produktet er
slukket, når du rengør det.
■ Før rengøring af tilbehørsdelene
/ skal kammene /
tages af tilbehørsdelene /.
■ Rengør tilbehørsdelene/
efter hver brug med den medfølgende rengøringsbørste , så
løse hår fjernes.
DK │ 53 ■

■ Desinficér tilbehørsdelene /
regelmæssigt ved at spraye dem
med desinfektionsspray og rense
dem.
■ Tør produktet af med en fugtig
klud. Tilsæt et mildt rengøringsmiddel til kluden ved behov.
Sørg for, at produktet er helt tørt,
før det bruges næste gang.
Du kan også rengøre
tilbehørsdelene /
under rindende vand:
― Tag tilbehørsdelen /af
motordelen som beskrevet i
kapitlet »Aftagning og påsætning
af tilbehørsdele«.
― Rengør tilbehørsdelene /
under rindende vand.
― Kontrollér, at tilbehørsdelene
/er helt tørre før næste
brug.
Opbevaring
■ Beskyt altid øjenbrynstrimme-
ren med den medfølgende
beskyttelseskappe til øjen-
brynstrimmeren.
■ 54 │ DK

■ Opbevar produktet og alle til-
behørsdele i den medfølgende
opbevaringspose på et tørt
og støvfrit sted.
Afhjælpning af fejl
Produktet fungerer ikke:
■ Skift batteriet.
■ Produktet er defekt. Henvend dig
til kundeservice.
Alle hår fjernes ikke:
■ Du går for hurtigt frem. Bevæg
produktet langsommere hen over
huden.
Bortskaffelse
Produkt
Bortskaf ikke
produktet sammen med det
almindelige husholdningsaffald.
Dette produkt er underlagt
EU-direktivet 2012/19/EU
WEEE (om affald af elektronisk og elektrisk udstyr).
DK │ 55 ■

Bortskaf produktet via en godkendt
bortskaffelsesvirksomhed eller den
kommunale genbrugsplads. Følg de
aktuelt gældende regler. Henvend
dig i tvivlstilfælde til den lokale genbrugsplads.
Emballage
Emballagen består af mil-
jøvenlige materialer, som
kan bortskaffes på de
lokale genbrugspladser.
Bortskaf emballagen miljøvenligt.
Vær opmærksom på
mærkningen på de forskellige emballagematerialer, og
aflever dem sorteret til bortskaffelse.
Emballagematerialerne er mærket
med forkortelserne (b) og tallene (a)
med følgende betydning:
1–7: Plast
20–22: Papir og pap
80–98: Kompositmaterialer
■ 56 │ DK

Bortskaffelse af batterier/
genopladelige batterier
Batterier/genopladelige batterier må ikke
smides ud sammen
med husholdningsaf-
faldet. Alle forbrugere
er lovmæssigt forpligtede til at aflevere batterier/genopladelige batterier på det kommunale indsamlingssted eller i de respektive
forretninger.
Denne forpligtelse hjælper med til,
at batterier/genopladelige batterier kan afleveres til miljøskånsom
destruktion. Levér kun batterier/genopladelige batterier tilbage i afladet tilstand.
DK │ 57 ■

Garanti for
Kompernass Handels
GmbH
Kære kunde
På dette produkt får du 3 års garanti
fra købsdatoen. I tilfælde af mangler
ved produktet har du en række juridiske rettigheder i forhold til sælgeren af
produktet. Dine juridiske rettigheder
forringes ikke af den nedenfor
anførte garanti.
Garantibetingelser
Garantiperioden begynder på købsdatoen. Opbevar venligst din originale
kvittering et sikkert sted. Dette dokument er nødvendigt for at kunne
dokumentere købet.
Hvis der inden for tre år fra købsdatoen for dette produkt opstår en
materiale- eller fabrikationsfejl, vil
produktet – efter vores valg – blive
repareret eller ombyttet gratis for dig.
Denne garantiydelse forudsætter, at
det defekte produkt og købsbeviset
(kvittering) afleveres inden for tre-årsfristen, og der gives en kort skriftlig
beskrivelse af, hvori manglen består,
og hvornår den er opstået.
■ 58 │ DK

Hvis defekten er dækket af vores
garanti, får du et repareret eller et
nyt produkt retur. Reparation eller
ombytning af produktet udløser ikke
en ny garantiperiode.
Garantiperiode og juridiske
mangelkrav
Garantiperioden forlænges ikke,
hvis der gøres brug af garantien.
Det gælder også for udskiftede og
reparerede dele. Skader og mangler, som eventuelt allerede fandtes
ved køb, samt manglende dele, skal
anmeldes straks efter udpakningen.
Når garantiperioden er udløbet, er
reparation af skader betalingspligtig.
DK │ 59 ■

Garantiens omfang
Produktet er produceret omhyggeligt
efter strenge kvalitetsretningslinjer
og testet grundigt inden leveringen.
Garantien dækker materiale- og
fabrikationsfejl. Denne garanti
omfatter ikke produktdele, der er
udsat for normal slitage, og derfor kan betragtes som sliddele, eller
for skader på skrøbelige dele, som
f.eks. kontakter, batterier, bageforme
eller dele som er lavet af glas.
Denne garanti bortfalder, hvis produktet er blevet beskadiget, ikke er
forskriftsmæssigt anvendt eller vedligeholdt. For at sikre forskriftsmæssig anvendelse af produktet skal alle
anvisninger nævnt i betjeningsvejledningen nøje overholdes. Anvendelsesformål og handlinger, som frarådes
eller der advares imod i betjeningsvejledningen, skal ubetinget undgås.
Produktet er kun beregnet til privat
og ikke til kommercielt brug. Ved
misbrug og uhensigtsmæssig brug,
anvendelse af vold og ved indgreb,
som ikke er foretaget af vores autoriserede serviceafdeling, bortfalder
garantien.
■ 60 │ DK

Afvikling af garantisager
For at sikre en hurtig behandling af
din anmeldelse bør du følge nedenstående anvisninger:
■ Ved alle forespørgsler bedes du
have kvitteringen og artikelnummeret (f.eks. IAN 12345) klar
som dokumentation for købet.
■ Artikelnummeret kan du finde på
typeskiltet, som indgravering, på
vejledningens forside (nederst til
venstre) eller som et klæbemærke
på bag- eller undersiden.
■ Hvis der opstår funktionsfejl eller
øvrige mangler, bedes du først
kontakte nedennævnte serviceafdeling telefonisk eller via
e-mail.
■ Et produkt, der er registreret som
defekt, kan du derefter indsende
portofrit til den oplyste serviceadresse med vedlæggelse af
købsbevis (kvittering) og en
beskrivelse af, hvori manglen
består, og hvornår den er opstået.
På www.lidl-service.com
kan du downloade denne
og mange andre håndbøger, produktvideoer og
software.
DK │ 61 ■

Service
Service Danmark
Tel.: 32 710005
E-Mail: kompernass@lidl.dk
IAN 298780
Importør
Bemærk at den efterfølgende
adresse ikke er en serviceadresse.
Kontakt først det nævnte servicested.
KOMPERNASS HANDELS GMBH
BURGSTRASSE 21
DE - 44867 BOCHUM
TYSKLAND
www.kompernass.com
■ 62 │ DK

Table des matières
Introduction ............64
Utilisation conforme .....64
Matériel livré ...........65
Éléments de commande . .66
Caractéristiques
techniques ............ 66
Consignes de sécurité . . . .67
Mettre les piles en place . .76
Conseils et astuces ......77
Utilisation de l’appareil. . . 78
Retirer et positionner
les embouts ................78
Utiliser la tondeuse
pour le maillot .............80
Utiliser la tondeuse
pour sourcils ..............83
Nettoyage et entretien . . .86
Stockage ..............87
Dépannage ............88
Mise au rebut ..........88
Garantie de Kompernass
Handels GmbH ........ 90
Service après-vente .........94
Importateur ................94
FR│BE │ 63 ■

Introduction
Toutes nos félicitations pour l’achat
de votre nouvel appareil.
Vous venez ainsi d’opter pour un
produit de grande qualité. Le mode
d’emploi fait partie intégrante de ce
produit. Il contient des remarques
importantes concernant la sécurité,
l’usage et la mise au rebut.
Avant d’utiliser le produit, veuillez
vous familiariser avec toutes les
consignes d’utilisation et de sécurité.
N’utilisez le produit que conformément
aux consignes et pour les domaines
d’utilisation prévus. Si vous cédez le
produit à un tiers, remettez-lui également tous les documents.
Utilisation conforme
Cet appareil est exclusivement destiné
à tondre les sourcils, la zone maillot
et des aisselles dans un cadre
domestique. Ne l’utilisez pas à des
fins professionnelles! Tout usage
autre ou dépassant ce cadre est
réputé non conforme.
Aucune réclamation ne sera prise en
compte pour des dommages résultant d’un usage du matériel non
conforme à la destination, de réparations effectuées incorrectement,
de modifications non autorisées, ou
encore de l’utilisation de pièces de
rechange non agréées.
■ 64 │ FR│BE

L’utilisateur assume seul la responsabilité des risques encourus.
Matériel livré
■ Mini-tondeuse pour femme
■ Capuchon de protection
pour la tondeuse sourcils
■ Tondeuse sourcils
■ Peigne pour les sourcils
■ Tondeuse
■ Peigne de la tondeuse
■ Sac de rangement
■ Brosse de nettoyage
■ Pile AA
■ Mode d’emploi
Retirez toutes les pièces de l’appareil
du carton et retirez l’ensemble du
matériau d’emballage. Vérifiez si la
livraison est au complet et ne présente
aucun dégât apparent.
REMARQUES
► En cas de livraison incomplète
ou de dommages résultant
d'un emballage défectueux
ou dutransport, veuillez vous
adresser à la hotline du service
après-vente (voir le chapitre
Service après-vente).
FR│BE │ 65 ■

Éléments de commande
Figures voir le volet dépliant :
Capuchon de protection
pour la tondeuse sourcils
Peigne pour les sourcils
Peigne de la tondeuse sourcils
Appareil
Couvercle du compartiment
à piles
Brosse de nettoyage
Pile AA
Sac de rangement
Tondeuse pour le maillot
Peigne de la tondeuse pour
le maillot
Caractéristiques
techniques
Appareil
Alimentation
électrique
Tension
Indice de
protection
1 x 1,5 V type AA
LR6 mignon
1,5 V
(courant continu)
IPX4
Protection
omnidirectionnelle
contre les projec-
tions d‘eau
■ 66 │ FR│BE

Consignes de sécurité
► Avant d’utiliser l’appareil,
vérifiez que celui-ci ne
présente aucun dégât
extérieur visible. Ne
mettez pas en service un
appareil endommagé
ou qui a chuté.
► DANGER! Les maté-
riaux d’emballage ne
sont pas des jouets
pour les enfants! Tenez
tous les matériaux d’emballage éloignés des
enfants. Il y a risque
d’étouffement!
► Les tondeuses peuvent
être utilisées par des
enfants à partir de 8
ans et par des personnes
ayant des capacités
physiques, sensorielles
ou mentales réduites
ou un manque d’expé-
FR│BE │ 67 ■

rience et de connaissances, à condition
qu’ils aient reçu une
supervision ou des instructions concernant
l’utilisation de l’appareil en toute sécurité et
qu’ils comprennent les
dangers encourus. Les
enfants ne doivent pas
jouer avec l’appareil.
Le nettoyage et la maintenance utilisateur ne
doivent pas être réalisés
par des enfants s’ils ne
sont pas surveillés.
► Cette tondeuse peut
être utilisée par des
enfants à partir de 3
ans à condition qu’ils
soient sous surveillance.
■ 68 │ FR│BE

► N’exposez pas l’ap-
pareil au rayonnement
direct du soleil ou à
des températures élevées. Il peut sinon se
produire une surchauffe
et l’appareil risque
d’être définitivement
endommagé.
► DANGER! N’utilisez
pas l’appareil à proximité de flammes nues
(par ex. bougies) et ne
posez pas de bougies
en combustion sur ou
près de l’appareil. Vous
contribuerez ainsi à éviter les incendies.
► Afin d’éviter toute bles-
sure, n’utilisez pas l’appareil avec un embout
endommagé ou défectueux.
► Si vous percevez des
bruits inhabituels, une
FR│BE │ 69 ■

odeur de brûlé ou un
dégagement de fumée,
éteignez immédiatement l’appareil. Faites
contrôler l’appareil par
un spécialiste qualifié
avant de le réutiliser.
► Confiez les réparations
de l’appareil exclusivement à des entreprises
agréées ou au service
après-vente. Toute réparation non conforme
peut entraîner des
risques pour l’utilisateur.
À cela s’ajoute l’annulation de la garantie.
► Ne procédez pas à
des transformations
ou des modifications
sur l’appareil de votre
propre initiative. L’appareil ne doit pas être
ouvert par l’utilisateur.
■ 70 │ FR│BE

Peut être lavé à
l’eau courante.
DANGER
Une manipulation
incorrecte des piles
peut entraîner un
incendie, des explosions, une fuite
de substances
dangereuses ou
d'autres situations
dangereuses!
► Ne jetez pas les piles
au feu et ne les exposez pas à des températures élevées.
FR│BE │ 71 ■

DANGER
► Il est interdit d'ouvrir les
piles, de les déformer
et de les court-circuiter
étant donné que les
produits chimiques
qu'elles contiennent
risquent de s'écouler.
► N'essayez pas de
recharger les piles.
Seules les piles
marquées comme
«rechargeables»
peuvent être rechargées.
Risque d'explosion!
■ 72 │ FR│BE

DANGER
► Vérifiez régulièrement
les piles. Les produits
chimiques qui ont fui
de la pile peuvent
endommager irréversiblement l'appareil.
Lorsque vous maniez
des piles endommagées ou usagées,
usez de beaucoup
de prudence. Risque
de brûlure chimique!
Portez des gants de
protection.
FR│BE │ 73 ■

DANGER
► Les produits chimiques
qui s'échappent d'une
pile peuvent entraîner
des irritations cutanées.
En cas de contact
avec la peau, rincer
abondamment à l'eau.
En cas de contact des
produits chimiques
avec les yeux, rincezles abondamment à
l'eau, ne les frottez
pas et consultez immédiatement un médecin.
► Les types de piles
ou d'accus différents
ne doivent pas être
mélangés.
■ 74 │ FR│BE

DANGER
► Insérez toujours les
piles en respectant les
polarités pour éviter
tout risque d'éclatement.
► Retirez les piles de
l'appareil, si vous ne
l'utilisez pas pendant
une période prolongée.
► Conservez les piles
hors de portée des
enfants. Les enfants
pourraient mettre
les piles dans leur
bouche et les avaler.
Si une pile a été avalée, il faut immédiatement consulter un
médecin.
FR│BE │ 75 ■

Mettre les piles en place
1) Tournez le couvercle du compartiment à pilesdans le
sens contraire des aiguilles
d’une montre jusqu’à ce que
le repère sur le couvercle
du compartiment à piles
pointe sur le repère
l’appareil .
2) Retirez le couvercle du compartiment à piles du boîtier.
3) Introduisez la pile AA avec
le pôle plus (+) en premier
dans l’appareil .
4) Placez à nouveau le couvercle
du compartiment à piles
sur l’appareil de manière à
ce que le repère
vercle du compartiment à piles
pointe sur le repère sur
l’appareil .
5) Tournez le couvercle du compartiment à piles dans le
sens contraire aux aiguilles
d’une montre jusqu’à ce que
le repère
du compartiment à piles
pointe sur le repère 0 sur l’appareil .
sur le couvercle
sur
sur le cou-
■ 76 │ FR│BE

Conseils et astuces
REMARQUE
► N'utilisez pas l'appareil,
lorsque vous...
― présentez un coup de soleil
sur les zones corporelles
concernées.
― présentez des irritations ou
rougeurs cutanées.
― souffrez d'une maladie de la
peau, comme par exemple
la névrodermite.
― avez des boutons d'acné,
des taches de naissance
ou des verrues sur les zones
corporelles concernées.
― avez des plaies, plaies
ouvertes, ou des cicatrices
saillantes sur les zones corporelles concernées.
► Testez d'abord l'appareil sur
une petite zone cachée pour
tester si votre peau le tolère.
FR│BE │ 77 ■

■ Avant d’utiliser l’appareil, il est
recommandé de procéder à
un peeling ou de frictionner la
peau à l’aide d’un gant de massage. Cela permet de supprimer
les pellicules mortes, d’éviter les
poils incarnés et de dresser les
poils fins. L’appareil peut ainsi
couper encore mieux les poils.
■ La peau doit être sèche et
exempte de toute graisse pour
l’application.
■ Après l’utilisation, appliquez une
lotion hydratante ou une crème
sur la peau. La crème contient de
préférence de l’aloé vera ou des
extraits de camomille pour apaiser
et hydrater la peau.
Utilisation de l’appareil
Retirer et positionner les
embouts
Les embouts joints (tondeuse pour le
maillot et tondeuse sourcils )
peuvent être mis en place et retirés
de la même manière. Veillez au bon
alignement de l’embout avec l’appareil .
■ 78 │ FR│BE

▯ Retirer l’embout :
1) Tournez l’embout dans le sens
contraire aux aiguilles d’une
montre jusqu’à ce que le repère
sur l’embout pointe sur le
repère sur l’appareil .
2) Retirez l’embout de l’appareil
.
▯ Positionner l’embout :
(Fig.1)
1) Placez l’embout sur l’appareil
de manière à ce que le repère
sur l’embout pointe sur le repère
sur l’appareil (voir fig. 1).
2) Tournez l’embout dans le sens
des aiguilles d’une montre
jusqu’à ce que le repère
sur
l’embout pointe sur le repère
de l’appareil (voir fig. 1).
FR│BE │ 79 ■

Utiliser la tondeuse pour le
maillot
Si vous souhaitez raser/tondre la
zone du maillot ou les aisselles,
procédez comme suit:
1) Placez la tondeuse pour le maillot comme décrit au chapitre
«Retirer et positionner les
embouts» sur l’appareil .
REMARQUE
► Si vous souhaitez tondre les
poils à une longueur précise,
vous pouvez placer le peigne de
la tondeuse pour le maillot sur
la tondeuse pour le maillot :
― Placez pour cela le régula-
teur de longueur du peigne
de la tondeuse pour le maillot dans l'évidement de la
tondeuse pour le maillot
(voir fig. 2).
― Faites s'enclencher le peigne
de la tondeuse pour le maillot sur la longueur sou-
haitée. Plus vous poussez le
peigne de la tondeuse pour
le maillot dans l'évidement
sur la tondeuse pour le maillot , plus la longueur de
coupe sera courte.
■ 80 │ FR│BE

(Fig.2)
Réglages de la longueur
sur le peigne de la tondeuse pour le maillot
Vitesse 1
(entièrement rentré)
Niveau 2 4,5 mm
Niveau 3 6 mm
Niveau 4 8 mm
FR│BE │ 81 ■
3,5 mm

2) Pour allumer l’appareil, tournez
le couvercle du compartiment à
piles dans le sens contraire
aux aiguilles d’une montre
jusqu’à ce que le repère sur le
couvercle
du compartiment à piles pointe
sur le repère
3) Passez la tondeuse pour le maillot à rebrousse-poil sur l’endroit
à raser.
4) Lorsque vous souhaitez arrêter
l’utilisation, tournez le repère
du couvercle du compartiment à
piles sur le repère 0 de l’appareil pour l’éteindre.
REMARQUE
► Pour retirer le peigne de la ton-
deuse pour le maillot de la
tondeuse pour le maillot ,
appuyez sur le régulateur de
longueur et sortez en même
temps le peigne de la tondeuse
pour le maillot vers le haut
(voir fig. 3).
sur l’appareil .
■ 82 │ FR│BE

(Fig.3)
Utiliser la tondeuse pour
sourcils
Lorsque vous souhaitez raccourcir
les sourcils ou les poils du visage,
procédez comme suit:
1) Placez la tondeuse sourcils
comme décrit au chapitre «Retirer
et positionner les embouts» sur
l’appareil .
2) Si vous souhaitez tondre les poils
à une longueur de 3 mm ou 6
mm, vous devez placer en plus le
peigne pour les sourcils sur la
tondeuse sourcils :
FR│BE │ 83 ■

(Fig.4)
Faites également s’enclencher
le peigne pour les sourcils
dans le guide sur la tondeuse
sourcils (voir fig. 4). Veillez
à ce que la longueur souhaitée
du peigne pour les sourcils se
retrouve du côté de la tondeuse
sourcils avec le tranchant le
plus long.
Les dents courtes du peigne
pour les sourcils vous
permettent de couper à une
longueur de poils de 3 mm, les
dents longues du peigne pour
les sourcils permettent de
tondre de manière régulière
une longueur de poils de 6
mm, lorsque vous posez le
peigne pour les sourcils verticalement sur la peau (Fig. 5).
■ 84 │ FR│BE

(Fig. 5)
3) Pour allumer l’appareil, tournez
le couvercle du compartiment à
piles dans le sens contraire
aux aiguilles d’une montre
jusqu’à ce que le repère sur le
couvercle
du compartiment à piles pointe
sur le repère sur l’appareil .
4) Amenez la tondeuse sourcils
avec la longueur de souhaitée
du peigne pour les sourcils au
début des sourcils qui doivent être
tondus. Ne passez jamais la
pointe du peigne pour les sourcils à rebrousse-poil sur les
sourcils à tondre.
5) Lorsque vous souhaitez arrêter la
tonte des sourcils, tournez le
repère du couvercle du compartiment à piles vers le repère 0
de l’appareil , pour éteindre
l’appareil.
FR│BE │ 85 ■
-
REMARQUE
► Pour dessiner les contours des
sourcils, vous pouvez également
utiliser la tondeuse sourcils
sans le peigne pour les sourcils . Rasez prudemment,
avec la lame courte de la tondeuse sourcils , les petits
poils ennuyeux sur les bords
des sourcils. Déplacez la lame
à rebrousse-poil.
Nettoyage et entretien
ATTENTION-RISQUE DE
DÉGÂTS MATÉRIELS!
► N'immergez jamais l'appareil
dans de l'eau ou dans d'autres
liquides!
► Assurez-vous que l'appareil est
éteint avant de le nettoyer.
■ Avant de nettoyer les embouts
/, retirez les peignes /
des embouts /.
■ Après chaque utilisation, nettoyez
les embouts /avec la brosse
de nettoyage , livrée d’origine
afin de retirer les poils détachés.
■ 86 │ FR│BE

■ Désinfectez les embouts /
régulièrement, en les vaporisant
de spray désinfectant pour les
nettoyer.
■ Essuyez l’appareil avec un chiffon
humide. Si nécessaire, versez un
peu de liquide vaisselle doux sur
un chiffon. Avant l’utilisation suivante, assurez-vous que l’appareil
a entièrement séché.
Vous pouvez également
nettoyer les embouts /
à l’eau courante :
― Retirez l’embout respectif /
comme décrit au chapitre «Retirer et positionner les embouts»
de l’appareil .
― Nettoyez les embouts /à
l’eau courante.
― Assurez-vous que les embouts
/soient entièrement secs
avant la prochaine utilisation.
Stockage
■ Protégez toujours la tondeuse
sourcils à l’aide du capuchon
de protection fourni pour la
tondeuse sourcils.
FR│BE │ 87 ■

■ Conservez l’appareil et tous ses
accessoires dans le sac de rangement livré d’origine, dans
un endroit sec et exempt de
poussière.
Dépannage
L’appareil ne fonctionne pas :
■ Remplacez la pile.
■ L’appareil est défectueux. Adres-
sez-vous au service après-vente.
Les poils ne sont pas tous saisis :
■ Vous travaillez trop vite. Déplacez
l’appareil plus lentement sur la
peau.
Mise au rebut
Appareil
Ne jetez en aucun
cas l’appareil
avec les ordures
ménagères normales.
Ce produit est assujetti à
la directive européenne
2012/19/EU-DEEE (déchets
d’équipements électriques et
électroniques).
■ 88 │ FR│BE

Éliminez l’appareil par l’intermédiaire d’une entreprise de traitement
des déchets autorisée ou via le service de recyclage de votre commune.
Respectez la réglementation en
vigueur. En cas de doute, veuillez
contacter votre centre de recyclage.
Emballage
L’emballage est constitué
de matériaux écologiques
que vous pouvez recycler
par le biais des postes de
recyclage locaux.
Observez le marquage
sur les différents matériaux d‘emballage et
nécessaire. Les matériaux d‘emballage sont repérés par des abréviations (b) et des numéros (a) qui ont
la signification suivante:
1–7: Plastiques
20–22: Papier et carton
80–98: Matériaux composites
Mise au rebut des piles/
batteries
triez-les séparément si
Les piles/accus ne
doivent pas être jetés
dans la poubelle des
déchets domestiques.
FR│BE │ 89 ■

Chaque consommateur est légalement tenu de remettre les piles/
accus à un point de collecte de sa
commune/son quartier ou dans le
commerce.
Cette obligation a pour objectif
d’assurer le traitement écologique
des piles et accus. Ne jeter que des
piles/accus à l’état déchargé.
Garantie de Kompernass
Handels GmbH
Chère cliente, cher client,
Cet appareil est garanti 3 ans à partir
de la date d’achat. Si ce produit
venait à présenter des vices, vous
disposez de droits légaux face au
vendeur de ce produit. Vos droits
légaux ne sont pas restreints par
notre garantie présentée ci-dessous.
Conditions de garantie
La période de garantie débute à
la date de l’achat. Veuillez bien
conserver le ticket de caisse d’origine.
Ce document servira de preuve
d’achat.
■ 90 │ FR│BE

Si dans un délai de trois ans suivant la
date d’achat de ce produit, un vice
de matériel ou de fabrication venait
à apparaître, le produit sera réparé
ou remplacé gratuitement par nos
soins, selon notre choix. Cette prestation de garantie nécessite dans un
délai de trois ans la présentation de
l’appareil défectueux et du justificatif
d’achat (ticket de caisse) ainsi que
la description brève du vice et du
moment de son apparition.
Si le vice est couvert par notre
garantie, vous recevrez le produit
réparé ou un nouveau produit en
retour. Aucune nouvelle période de
garantie ne débute avec la réparation
ou l’échange du produit.
Période de garantie et
réclamation légale pour
vices cachés
L’exercice de la garantie ne prolonge
pas la période de garantie. Cette
disposition s’applique également
aux pièces remplacées ou réparées.
Les dommages et vices éventuellement
déjà présents à l’achat doivent être
signalés immédiatement après le
déballage. Toute réparation survenant
après la période sous garantie fera
l’objet d’une facturation.
FR│BE │ 91 ■

Étendue de la garantie
L’appareil a été fabriqué avec soin
conformément à des directives de
qualité strictes et consciencieusement
contrôlé avant sa livraison.
La prestation de garantie est
valable pour des vices de matériel
et de fabrication. Cette garantie ne
s’étend pas aux pièces du produit
qui sont exposées à une usure normale
et peuvent de ce fait être considérées
comme pièces d’usure, ni aux détériorations de pièces fragiles, par ex.
connecteur, accu, moules ou pièces
en verre.
Cette garantie devient caduque si
le produit est détérioré, utilisé ou
entretenu de manière non conforme.
Toutes les instructions listées dans
le manuel d’utilisation doivent être
exactement respectées pour une
utilisation conforme du produit. Des
buts d’utilisation et actions qui sont
déconseillés dans le manuel d’utilisation, ou dont vous êtes avertis
doivent également être évités.
Le produit est uniquement destiné à
un usage privé et ne convient pas à
un usage professionnel.
La garantie est annulée en cas d’entretien incorrect et inapproprié, d’usage
de la force et en cas d’intervention
non réalisée par notre centre de service
après-vente agréé.
■ 92 │ FR│BE

Procédure en cas de garantie
Afin de garantir un traitement rapide
de votre demande, veuillez suivre
les indications suivantes :
■ Veuillez avoir à portée de main
pour toutes questions le ticket de
caisse et la référence article (par
ex. IAN 12345) en tant que justificatif de votre achat.
■ Vous trouverez la référence sur la
plaque signalétique, une gravure,
sur la page de garde de votre
manuel d’utilisation (en bas à
gauche) ou sous forme d’autocollant au dos ou sur le dessous.
■ Si des erreurs de fonctionnement
ou d’autres vices venaient à
apparaître, veuillez d’abord
contacter le département service
clientèle cité ci-dessous par
téléphone ou par e-mail.
■ Vous pouvez ensuite retourner un
produit enregistré comme étant
défectueux en joignant le ticket
de caisse et en indiquant en quoi
consiste le vice et quand il est
survenu, sans devoir l’affranchir à
l’adresse de service après-vente
communiquée.
FR│BE │ 93 ■

Sur www.lidl-service.com,
vous pouvez télécharger
ce manuel ainsi que beaucoup d’autres, des vidéos
produit et logiciels.
Service après-vente
Service France
Tel.: 0800 919270
E-Mail: kompernass@lidl.fr
Service Belgique
Tel.: 070 270 171
(0,15 EUR/Min.)
E-Mail: kompernass@lidl.be
IAN 298780
Importateur
Veuillez tenir compte du fait que
l’adresse suivante n’est pas une
adresse de service après-vente.
Veuillez d’abord contacter le service
mentionné.
KOMPERNASS HANDELS GMBH
BURGSTRASSE 21
DE - 44867 BOCHUM
ALLEMAGNE
www.kompernass.com
■ 94 │ FR│BE

Inhoud
Inleiding ...............96
Gebruik in overeenstemming met bestemming . . 96
Inhoud van het pakket . . .97
Bedieningselementen ....98
Technische gegevens ....98
Veiligheidsvoorschriften . . 99
Batterij plaatsen ...... 108
Tips en trucs .......... 109
Apparaat gebruiken. . . 110
Opzetstukken afnemen en
plaatsen .................110
Bikinitrimmer gebruiken .....112
Wenkbrauwtrimmer
gebruiken ...............115
Reiniging en onderhoud 118
Opbergen ........... 119
Problemen oplossen . . . 120
Afvoeren ............ 120
Garantie van Kompernaß
Handels GmbH ....... 123
Service ..................127
Importeur ................127
NL│BE │ 95 ■

Inleiding
Hartelijk gefeliciteerd met de aankoop van uw nieuwe apparaat.
U hebt hiermee gekozen voor een
hoogwaardig product. De gebruiksaanwijzing maakt deel uit van dit
product. Deze bevat belangrijke aanwijzingen voor veiligheid,
gebruik en afvoer. Lees alle bedienings- en veiligheidsvoorschriften
voordat u het product in gebruik
neemt. Gebruik het product uitsluitend op de voorgeschreven wijze en
voor de aangegeven doeleinden.
Geef alle documenten mee als u het
product overdraagt aan een derde.
Gebruik in overeenstemming met bestemming
Dit apparaat is uitsluitend bedoeld
voor het trimmen van de wenkbrauwen, de bikinilijn en de okselzone in
privéhuishoudens. Gebruik het niet
bedrijfsmatig! Een ander of verdergaand gebruik geldt als niet in overeenstemming met de bestemming.
De fabrikant aanvaardt geen aansprakelijkheid voor schade als
gevolg van gebruik dat niet in overeenstemming is met de bestemming,
onvakkundige reparaties, veranderingen die ongeoorloofd zijn uitgevoerd of gebruik van vervangingsonderdelen die niet zijn toegestaan.
■ 96 │ NL│BE

Het risico is uitsluitend voor de
gebruiker.
Inhoud van het pakket
■ Mini-trimmer
■ Beschermkapje voor
wenkbrauwtrimmer
■ Wenkbrauwtrimmer
■ Wenkbrauwkam
■ Trimmer
■ Trimmerkam
■ Opbergetui
■ Reinigingsborsteltje
■ AA-batterij
■ Gebruiksaanwijzing
Haal alle onderdelen van het apparaat uit de doos en verwijder alle
verpakkingsmateriaal. Controleer of
het pakket compleet is en of er geen
sprake is van zichtbare schade.
OPMERKINGEN
► Neem contact op met de ser-
vicehelpdesk (zie het hoofdstuk
Service) als het pakket niet
compleet is, of indien er sprake
is van schade door gebrekkige
verpakking of transport.
NL│BE │ 97 ■
 Loading...