

Page 1

PANINI-GRILL SPM 2000 A2
PANINI-GRILL
Bedienungsanleitung
PIASTRA ELETTRICA
Istruzioni per l’uso
IAN 87712
GRIL DE TABLE
Mode d’emploi
PANINI MAKER
Operating instructions
Page 2

Klappen Sie vor dem Lesen die Seite mit den Abbildungen aus und machen Sie sich anschließend mit allen
Funktionen des Gerätes vertraut.
Avant de lire le mode d‘emploi, ouvrez la page contenant les illustrations et familiarisez-vous ensuite avec
toutes les fonctions de l‘appareil.
Prima di leggere aprire la pagina con le immagini e prendere confi denza con le diverse funzioni
dell’apparecchio.
Before reading, unfold the page containing the illustrations and familiarise yourself with all functions of
the device.
DE / AT / CH Bedienungsanleitung Seite 1
FR / CH Mode d’emploi Page 9
IT / CH Istruzioni per l’uso Pagina 17
GB Operating instructions Page 25
Page 3
A
2
1
5 4
6
3
8
9
7
B
0
Page 4

INHALTSVERZEICHNIS SEITE
Einleitung 2
Bestimmungsgemäßer Gebrauch 2
Lieferumfang 2
Gerätebeschreibung 2
Technische Daten 2
Sicherheitshinweise 2
Erste Inbetriebnahme 4
Bedienen 4
Tipps und Tricks 5
Reinigen und Pflegen 5
Aufbewahren 6
Rezepte 6
Spinat-Käse-Panini . . . . . . . . . . . . . . . . . . . . . . . . . . . . . . . . . . . . . . . . . . . . . . . . . . . . . . . . . . .6
Hähnchenbrust-Panini . . . . . . . . . . . . . . . . . . . . . . . . . . . . . . . . . . . . . . . . . . . . . . . . . . . . . . . .6
Senf-Baguette . . . . . . . . . . . . . . . . . . . . . . . . . . . . . . . . . . . . . . . . . . . . . . . . . . . . . . . . . . . . . . .7
Entsorgen 7
Garantie und Service 7
Importeur 8
- 1 -
Page 5

Panini-Grill
Einleitung
Herzlichen Glückwunsch zum Kauf Ihres neuen
Gerätes.
Sie haben sich damit für ein hochwertiges Produkt
entschieden. Die Bedienungsanleitung ist Bestandteil dieses Produkts. Sie enthält wichtige Hinweise
für Sicherheit, Gebrauch und Entsorgung. Machen
Sie sich vor der Benutzung des Produkts mit allen
Bedien- und Sicherheitshinweisen vertraut. Benutzen
Sie das Produkt nur wie beschrieben und für die angegebenen Einsatzbereiche. Händigen Sie alle
Unterlagen bei Weitergabe des Produkts an Dritte
mit aus.
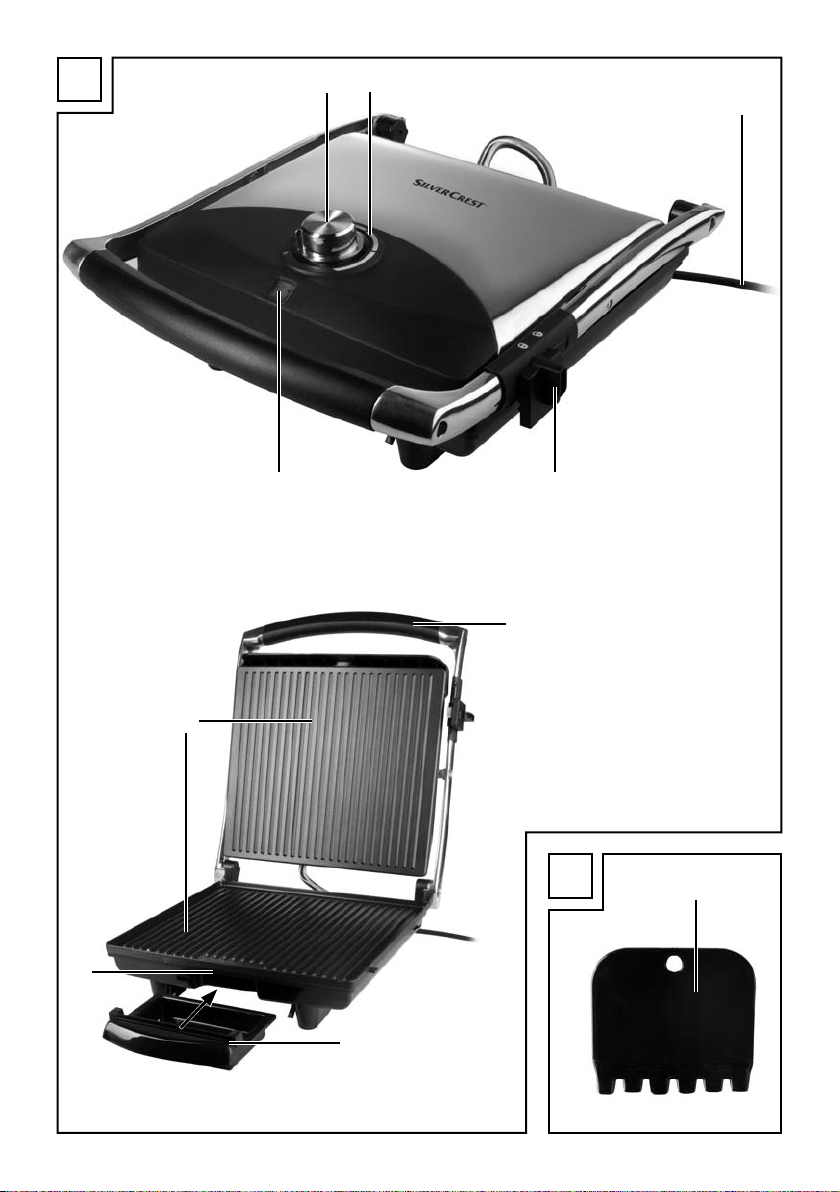
Gerätebeschreibung
Abbildung A:
1 Heizstufenregler
2 rote Kontrollleuchte “Aufheizen”
3 Netzkabel
4 Sicherheitsverschluss
5 grüne Kontrollleuchte “Ready”
6 Griff
7 Fett-Auffangschale
8 Fettauslauf
9 Heizplatten
Abbildung B:
0 Reinigungsschaber
Technische Daten
Bestimmungsgemäßer
Gebrauch
Der Panini-Grill ist dafür bestimmt, kleine Brötchen
und Sandwiches zu rösten oder andere Lebensmittel
zu grillen.
Er ist ausschließlich für den privaten Haushalt bestimmt. Benutzen Sie das Gerät nicht gewerblich!
Lieferumfang
• Panini-Grill
• Fett-Auffangschale
• Reinigungsschaber
• Bedienungsanleitung
Nennspannung: 220 - 240 V ~, 50 Hz
Leistungsaufnahme: 2000 W
Sicherheitshinweise
So vermeiden Sie Gefahren durch
elektrischen Schlag
• Das Gerät darf nur in trockenen Räumen im
Innenbereich eingesetzt werden. Halten Sie das
Gerät – auch im ausgeschalteten Zustand – von
Spritzwasser fern.
• Benutzen Sie das Gerät nur dann, wenn die örtliche Netzspannung mit der Nennspannung des
Gerätes übereinstimmt.
• Schließen Sie das Gerät nicht über eine Mehrfachsteckdose an, über die gleichzeitig andere
elektrische Geräte arbeiten, denn das kann zu
einer Überlastung des Stromkreises führen.
• Schalten Sie das Gerät nach jedem Gebrauch
aus. Ziehen Sie dazu den Netzstecker.
• Achten Sie beim Reinigen darauf, dass kein
Wasser in das Innere des Gerätes gelangt. Reinigen Sie das Gerät nie unter fließendem Wasser.
- 2 -
Page 6

Tauchen Sie das Gerät nie in Wasser oder andere Flüssigkeiten ein.
• Schützen Sie das Netzkabel vor Beschädigung.
Achten Sie darauf, es nicht einzuklemmen und
von heißen Gegenständen fernzuhalten. Lassen
Sie das Netzkabel nicht lose von Tisch oder
Arbeitsplatte hängen.
• Öffnen Sie nie das Gehäuse des Gerätes.
• Lassen Sie beschädigte Netzstecker oder Netzkabel sofort von autorisiertem Fachpersonal
oder dem Kundenservice austauschen, um
Gefährdungen zu vermeiden.
• Reparaturen dürfen nur im vom Hersteller
autorisierten Fachhandel oder durch erfahrenes
Fachpersonal ausgeführt werden.
So vermeiden Sie Brand- und
Verletzungsgefahren
• Stellen Sie das Gerät auf eine ebene, rutschfeste
und hitzebeständige Unterlage und nicht auf
oder neben andere Geräte, die viel Wärme
ausstrahlen können (z.B. Toaster, Küchenherde).
• Betreiben Sie das Gerät nicht in der Nähe leicht
brennbarer Gegenstände, z.B. unter Gardinen
oder neben Küchenkrepp-Rollen.
Auch bei vorschriftsmäßiger Benutzung werden
einzelne Geräteteile sehr heiß (z.B. die obere
und untere Gehäuseplatte). Achten Sie darauf,
diese Oberflächen nicht zu berühren, bis sie
nach dem Ausschalten vollständig abgekühlt
sind.
• Dieses Gerät ist nicht dafür bestimmt, durch
Personen (einschließlich Kinder) mit eingeschränkten physischen, sensorischen oder
geistigen Fähigkeiten oder mangels Erfahrung
und/oder mangels Wissen benutzt zu werden,
es sei denn, sie werden durch eine für ihre
Sicherheit zuständige Person beaufsichtigt oder
erhielten von ihr Anweisungen, wie das Gerät
zu benutzen ist.
• Kinder sollten beaufsichtigt werden, um sicherzustellen, dass sie nicht mit dem Gerät spielen.
• Betreiben Sie dieses Gerät nicht mit einer externen Zeitschaltuhr oder einem separaten Fernwirksystem.
• Lassen Sie das Gerät nach dem Ausschalten vollständig abkühlen, bevor Sie es reinigen und verstauen.
So vermeiden Sie Schäden am
Gerät
• Entnehmen Sie jegliche Speisen nur mit einem
Kunststoff- oder Holzspachtel oder einem anderen geeigneten, nichtmetallischen Gegenstand,
um die Antihaftbeschichtung des Gerätes nicht
zu zerstören.
• Benutzen Sie – aus dem selben Grund – zur Reinigung keine scharfen Putzmittel und spitzen
Gegenstände.
• Um eine gefährliche Überhitzung zu vermeiden,
wickeln Sie stets die gesamte Länge des Netzkabels ab.
• Während des Betriebs kann das Gerät gefahrlos
am wärmeisolierten Griff geöffnet und geschlossen werden.
- 3 -
Page 7

Erste Inbetriebnahme
Bedienen
1. Entnehmen Sie das Gerät aus der Verpackung.
Entfernen Sie alle zusätzlichen Transportsicherungen, z.B. Folien oder Kabelhalter.
2. Überprüfen Sie vor der Inbetriebnahme den Lieferumfang auf Vollständigkeit und eventuell sichtbare Beschädigungen.
3. Lesen Sie diese Gebrauchsanleitung aufmerksam
durch.
4. Stellen Sie das Gerät gemäß den Sicherheitshinweisen auf.
5. Öffnen Sie den Sicherheitsverschluss 4 .
6. Reinigen Sie das Gerät mit einem feuchten Tuch
wie unter “Reinigen und Pflegen” beschrieben.
7. Schließen Sie das Gerät.
8. Stecken Sie den Netzstecker in eine Netzsteckdose und lassen Sie das Gerät für ca.
5 Minuten auf maximaler Temperatureinstellung
aufheizen.
Hinweis:
Beim erstmaligen Aufheizen des Gerätes kann es
durch fertigungsbedingte Rückstände zu leichter
Rauch- und Geruchsentwicklung kommen. Das ist
normal und völlig ungefährlich. Sorgen Sie für ausreichende Belüftung, öffnen Sie zum Beispiel ein
Fenster.
9. Ziehen Sie den Netzstecker nach dem Aufheizen
aus der Netzsteckdose und lassen Sie das Gerät
abkühlen.
10. Reinigen Sie das Gerät noch einmal mit einem
feuchten Tuch.
1. Schließen Sie den Gerätedeckel am Griff 6.
2. Schieben Sie die Fett-Auffangschale 7 in das
Gerät.
3. Stecken Sie den Netzstecker in eine Netzsteckdose. Die grüne Kontrollleuchte “Ready” 5
leuchtet auf, wenn der Heizstufenregler 1 auf
„0“ steht.
4. Stellen Sie die gewünschte Stufe am Heizstufenregler 1 ein. Die grüne Kontrollleuchte “Ready”
5 erlischt und die rote Kontrollleuchte “Aufheizen” 2 leuchtet auf. Sobald die eingestellte
Heizstufe erreicht ist, erlischt die rote Kontrollleuchte “Aufheizen” 2 und die grüne Kontroll-
leuchte “Ready” 5 leuchtet wieder auf.
Hinweis:
Die grüne Kontrollleuchte “Ready” 5 leuchtet
auch, wenn der Heizstufenregler 1 auf „0“ steht.
Sobald Sie den Heizstufenregler 1 auf die ge-
wünschte Position stellen, erlischt die grüne Kontrollleuchte “Ready” 5 bis die Temperatur erreicht ist.
Hinweis:
Die grüne Kontrollleuchte “Ready” 5 kann sich
zwischendurch wieder abschalten und die rote Kontrollleuchte “Aufheizen” 2 leuchtet wieder auf. Das
bedeutet, dass die eingestellte Temperatur unterschritten wurde und das Gerät wieder aufheizt!
5. Öffnen Sie den Gerätedeckel und legen Sie die
zu röstenden/grillenden Lebenmittel auf die untere Heizplatte 9.
6. Schließen Sie den Gerätedeckel am Griff 6.
Durch die drehbar gelagerte obere Heizplatte
9, liegt er auch bei dickerem Grillgut immer
parallel zur unteren Heizplatte 9. So wird ein
optimales Grillergebnis erreicht.
7. Kontrollieren Sie nach einiger Zeit die Bräunung
des Grillgutes. Öffnen Sie hierzu den Gerätedeckel am Griff 6.
- 4 -
Page 8

Hinweis:
Fangen Sie mit kurzen Grillzeiten an und steigern
Sie sie, bis Sie die richtige Dauer gefunden haben.
8. Wenn Sie mit der Bräunung zufrieden sind, entnehmen Sie das Grillgut.
• Wenn Sie sich nicht sicher sind, ob das Grillgut
auch im Inneren schon gar ist, benutzen Sie ein
handelsübliches Fleischthermometer.
Reinigen und Pflegen
Achtung:
Verwenden Sie keine spitzen oder scharfen Gegenstände, um das Grillgut zu entnehmen. Diese könnten
die Oberflächen der Heizplatten 9 beschädigen!
9. Drehen Sie den Heizstufenregler 1 auf „0“
und ziehen Sie den Netzstecker aus der
Netzsteckdose.
Achtung:
Ziehen Sie immer den Netzstecker aus der Netzsteckdose, wenn Sie das Gerät nicht verwenden. Es
genügt nicht den Heizstufenregler 1 auf „0“ zu
stellen!
Tipps und Tricks
• Um Fleisch zarter zu machen und das Grillen zu
beschleunigen, können Sie es vorher marinieren.
Als Grundlage hierfür eignen sich zum Beispiel
saure Sahne, Rotwein, Essig, Buttermilch oder frischer Saft von Papaya oder Ananas. Fügen Sie,
je nach Geschmack, Kräuter und Gewürze hinzu. Geben Sie kein Salz hinzu, weil dieses dem
Fleisch das Wasser entzieht und es hart macht.
Legen Sie das Fleisch so in die Marinade, dass
es ganz bedeckt ist und schließen Sie das Gefäß. Lassen Sie es am besten über Nacht darin
ziehen.
• Die Heizplatten 9 sind antihaft-beschichtet,
daher ist extra Fett nicht nötig. Wenn Sie trotzdem Fett benutzen wollen, achten Sie darauf,
dass das Fett/Öl zum Braten geeignet ist, zum
Beispiel Rapsöl.
Achtung!
Ziehen Sie vor der Reinigung den Netzstecker und
warten Sie, bis das Gerät vollständig abgekühlt ist.
Verletzungsgefahr!
Achtung!
Reinigen Sie das Gerät nie unter fließendem Wasser und tauchen Sie es nie in Wasser ein. Das Gerät
kann irreparabel beschädigt werden!
• Ziehen Sie den Reinigungsschaber 0, nachdem
sich die Heizplatten 9 abgekühlt haben, über
die Heizplatten 9, so dass Fett und Rückstände
zusammengeschoben werden und Sie diese besser entfernen können.
• Wischen Sie die Heizplatten 9 mit einem feuchten Tuch ab. Bei hartnäckigeren Verschmutzungen geben Sie ein mildes Spülmittel auf das
Tuch. Benutzen Sie zur Reinigung keine scharfen
Putzmittel, raue Schwämme oder spitze Gegenstände, um die Antihaftbeschichtung nicht zu
zerstören.
• Bei starken Verkrustungen legen Sie ein nasses
Spültuch auf die festgebackenen Rückstände, um
diese aufzuweichen.
Für die Reinigung der Außenflächen des Gerätes
genügt ein feuchtes Tuch.
Achten Sie darauf, dass vor der erneuten Verwendung des Gerätes alle Teile vollständig trocken sind.
Wischen Sie den Reinigungsschaber 0 mit einem
feuchten Tuch ab. Bei hartnäckigeren Verschmutzungen geben Sie ein mildes Spülmittel auf das Tuch.
- 5 -
Page 9

Aufbewahren
Bewahren Sie das gereinigte Gerät an einem
trockenem Ort auf.
Schließen Sie den Sicherheitsverschluss 4 .
Wickeln Sie das Netzkabel 3 um die Kabel-
aufwicklung an der Unterseite das Gerätes.
Rezepte
Ein Panini ist ein warmes, aus frischem Weißbrot zubereitetes Sandwich. Es wird frisch geröstet und
dann serviert.
Spinat-Käse-Panini
250 g Blattspinat
1 Zwiebel
1 Knoblauchzehe
1 EL Öl
2 TL Zitronensaft
1 Prise Salz (und Pfeffer)
4 Scheiben Toast/Weißbrot
40 g Kräuterbutter
75 g Mozzarella
20 g Pinienkerne
• Blattspinat verlesen und waschen.
• Zwiebel und Knoblauchzehe schälen und fein
hacken, in heißem Öl glasig dünsten. Den Spinat
zufügen. Mit Zitronensaft, Salz und Pfeffer würzen.
• Toast mit Kräuterbutter bestreichen.
• Mozzarella in Scheiben schneiden, mit dem abgetropften Spinat auf zwei Toastscheiben verteilen. Mit Pinienkernen bestreuen.
• Die Panini mit einer zweiten Scheibe Toast bedecken.
• Die Panini vorsichtig auf den auf mittlere Heizstufe vorgeheizten Panini-Grill legen und den Dekkel schließen.
• Warten bis die Panini gold-braun geröstet sind.
Dann aus dem Panini-Grill entnehmen.
Hähnchenbrust-Panini
400 g Hähnchenbrustfilet
20 g Butter
Pfeffer, Salz, Paprikapulver
120 g Bacon, in Streifen
6 Scheiben Weißbrot/Toast
3 EL Salatdressing (Joghurt)
30 g Eisbergsalat
2 Tomaten
1 Avocado
1 TL Limonensaft
50 g Salatgurke
• Hähnchenbrustfilet unter fließendem Wasser
kurz abspülen und mit Küchenpapier trockentupfen. In einer beschichteten Pfanne Butter erhitzen
und die Hähnchenbrustfilets darin von beiden
Seiten kräftig anbraten. Den Herd auf mittlere
Temperatur zurückschalten und die Hähnchenbrustfilets ca. 10 Minuten fertig braten. Nach
dem Braten mit Salz, Pfeffer und Paprika würzen,
aus der Pfanne nehmen und beiseitelegen.
• Das Fett in der Pfanne noch einmal erhitzen und
die Bacon-Streifen darin knusprig braten.
• Auf 3 Toast-/Weißbrotscheiben Joghurt-Dressing
verteilen, Eisbergsalat darauflegen, Tomaten in
Scheiben schneiden, würzen und ebenfalls
drauflegen.
• Hähnchenbrustfilets der Länge nach aufschneiden und auf die Tomaten legen.
• Avocado der Länge nach rundum aufschneiden
und durch eine Drehbewegung vom Kern lösen.
Schale abziehen und Avocado in Scheiben
schneiden. Avocado mit dem Limonensaft beträufeln, damit sie nicht braun anläuft. Die Scheiben auf die Panini legen.
• Gurke in Scheiben schneiden und auf die Avocado legen.
• Die Panini mit einer zweiten Scheibe Toast bedecken.
• Die Panini vorsichtig auf den auf mittlere Heizstufe vorgeheizten Panini-Grill legen und den Dekkel schließen.
• Warten bis die Panini gold-braun geröstet sind
und vorsichtig aus dem Panini-Grill entnehmen.
- 6 -
Page 10

Senf-Baguette
1 Baguette
1 Zehe Knoblauch
50 g Senfgurken
40 g Pecorino
1 EL scharfer Senf
2 EL süßer Senf
50 g Butter
2 EL Schnittlauchröllchen
Salz, Pfeffer
• Das Baguette in ca. 2-3 Zentimeter großen Abständen quer ein- aber nicht durchschneiden.
• Knoblauch abziehen und zerdrücken, Senfgurken sehr fein würfeln und Pecorino raspeln.
• Scharfen und süßen Senf mit der weichen Butter,
Knoblauch, Gurkenwürfeln, Pecorino und Schnittlauch verrühren und mit Salz und Pfeffer abschmecken.
• Senfbutter in die Baguetteeinschnitte füllen und
in Alufolie einwickeln.
• Die Baguettes auf den auf mittlere Heizstufe vorgeheizten Panini-Grill legen und den Deckel
schließen. Das Baguette sollte gold-braun sein.
Entsorgen
Werfen Sie das Gerät keinesfalls in den
normalen Hausmüll. Dieses Produkt
unterliegt der europäischen Richtlinie
2002/96/EC.
Garantie und Service
Sie erhalten auf dieses Gerät 3 Jahre Garantie ab
Kaufdatum. Das Gerät wurde sorgfältig produziert
und vor Anlieferung gewissenhaft geprüft.
Bitte bewahren Sie den Kassenbon als Nachweis
für den Kauf auf. Bitte setzen Sie sich im Garantiefall mit Ihrer Servicestelle telefonisch in Verbindung.
Nur so kann eine kostenlose Einsendung Ihrer Ware
gewährleistet werden.
Die Garantieleistung gilt nur für Material- oder
Fabrikationsfehler, nicht aber für Transportschäden,
Verschleißteile oder für Beschädigungen an zerbrechlichen Teilen, z. B. Schalter oder Akkus. Das
Produkt ist lediglich für den privaten und nicht für
den gewerblichen Gebrauch bestimmt.
Bei missbräuchlicher und unsachgemäßer Behandlung, Gewaltanwendung und bei Eingriffen, die
nicht von unserer autorisierten Service-Niederlassung vorgenommen wurden, erlischt die Garantie.
Ihre gesetzlichen Rechte werden durch diese
Garantie nicht eingeschränkt.
Die Garantiezeit wird durch die Gewährleistung
nicht verlängert. Dies gilt auch für ersetzte und reparierte Teile. Eventuell schon beim Kauf vorhandene
Schäden und Mängel müssen sofort nach dem
Auspacken gemeldet werden, spätestens aber zwei
Tage nach Kaufdatum. Nach Ablauf der Garantiezeit anfallende Reparaturen sind kostenpflichtig.
Entsorgen Sie das Gerät über einen zugelassenen
Entsorgungsbetrieb oder über Ihre kommunale
Entsorgungseinrichtung.
Beachten Sie die aktuell geltenden Vorschriften.
Setzen Sie sich im Zweifelsfall mit Ihrer Entsorgungseinrichtung in Verbindung.
Führen Sie alle Verpackungsmaterialien
einer umweltgerechten Entsorgung zu.
- 7 -
Page 11

Service Deutschland
Tel.: 01805 772 033 (0,14 EUR/Min. aus dem dt.
Festnetz, Mobilfunk max. 0,42 EUR/Min.)
E-Mail: kompernass@lidl.de
IAN 87712
Service Österreich
Tel.: 0820 201 222 (0,15 EUR/Min.)
E-Mail: kompernass@lidl.at
IAN 87712
Service Schweiz
Tel.: 0842 665566 (0,08 CHF/Min.,
Mobilfunk max. 0,40 CHF/Min.)
E-Mail: kompernass@lidl.ch
IAN 87712
Importeur
KOMPERNASS GMBH
BURGSTRASSE 21
44867 BOCHUM, DEUTSCHLAND
www.kompernass.com
- 8 -
Page 12

SOMMAIRE PAGE
Introduction 10
Usage conforme 10
Accessoires fournis 10
Description de l'appareil 10
Caractéristiques techniques 10
Consignes de sécurité 10
Première mise en service 12
Opération 12
Conseils et astuces 13
Nettoyage et entretien 13
Rangement 14
Recettes 14
Panini aux épinards et au fromage . . . . . . . . . . . . . . . . . . . . . . . . . . . . . . . . . . . . . . . . . . . .14
Panini à la poitrine de poulet . . . . . . . . . . . . . . . . . . . . . . . . . . . . . . . . . . . . . . . . . . . . . . . . .14
Baguette à la moutarde . . . . . . . . . . . . . . . . . . . . . . . . . . . . . . . . . . . . . . . . . . . . . . . . . . . . .15
Mise au rebut 15
Garantie et service après-vente 15
Importateur 16
- 9 -
Page 13

Gril de table
Introduction
Toutes nos félicitations pour l'achat de votre nouvel
appareil.
Vous avez choisi un produit de grande qualité. Le
mode d'emploi fait partie de ce produit. Il contient
des remarques importantes concernant la sécurité,
l'utilisation et la mise au rebut. Veuillez vous familiariser avec l'ensemble des consignes d'opération et
de sécurité avant l'usage du produit. N'utilisez le
produit que conformément aux consignes et pour
les domaines d'utilisation prévus. Conservez soigneusement ces instructions. En cas de transfert du
produit à un tiers, remettez-lui également tous les
documents.
Usage conforme
Le Panini-Maker est destiné à toaster de petits pains
et des sandwiches ou à griller d'autres aliments.
Il est exclusivement réservé à un usage domestique.
N'utilisez pas l'appareil pour des applications commerciales !
Accessoires fournis
• Gril de table
• Récupérateur de graisse
• Grattoir de nettoyage
• Mode d'emploi
Description de l'appareil
Figure A :
1 Régulateur de degré de chauffage
2 Voyant de contrôle rouge “Chauffer”
3 Cordon d’alimentation
4 Fermeture de sécurité
5 Voyant de contrôle vert “Ready”
6 Poignée
7 Récupérateur de graisse
8 Sortie de graisse
9 Plaques chauffantes
Figure B :
0 Grattoir de nettoyage
Caractéristiques techniques
Tension nominale : 220-240 V ~, 50 Hz
Puissance consommée : 2000 W
Consignes de sécurité
Comment faire pour éviter tout
danger de choc électrique
• L'appareil doit uniquement être utilisé à l'intérieur
dans des pièces sèches. Maintenez l'appareil même lorsqu'il est éteint - à l'écart des éclaboussures.
• Utilisez uniquement l'appareil lorsque la tension
secteur locale correspond à la tension nominale
de l'appareil.
• Ne raccordez pas l'appareil par le biais d'une
prise multiple, par laquelle d'autres appareils
électriques travaillent en même temps, pour
éviter toute surcharge du circuit électrique.
• Eteignez l'appareil après chaque utilisation.
A cet effet, débranchez la prise secteur.
• Lors du nettoyage, veillez à ce qu'il n'y ait pas
d'eau qui pénètre à l'intérieur de l'appareil.
Ne nettoyez pas l'appareil sous l'eau courante.
- 10 -
Page 14

Ne plongez pas l'appareil dans de l'eau ou
dans d'autres liquides.
• Protégez le cordon d'alimentation de tout dommage. Veillez à ne pas le coincer et tenez-le à
l'écart des objets chauds. Ne pas laisser pendre
le cordon d'alimentation de la table ou du plan
de travail.
• N'ouvrez jamais le boîtier de l'appareil.
• Faites immédiatement remplacer la fiche secteur
ou le cordon d'alimentation endommagé par un
technicien spécialisé ou par le service clientèle
afin d'éviter tout danger.
• Les réparations devront exclusivement être confiées à des distributeurs agréés par le fabricant ou
à des spécialistes expérimentés.
Vous évitez ainsi les risques
d'incendie et de blessures
• Posez l'appareil sur une surface plane, anti-dérapante et thermo-résistante et pas sur ou à côté
d'autres appareils qui peuvent diffuser beaucoup
de chaleur (par ex. grille-pain, fours).
• N'utilisez pas l'appareil à proximité d'objets facilement inflammables, par exemple sous des rideaux
ou à côté de rouleaux de papier essuie-tout.
• Cet appareil n'est pas prévu pour des personnes (y compris des enfants) dont les capacités
physiques, sensorielles ou mentales ou dont le
manque d'expérience ou de connaissances les
empêchent d'assurer un usage sûr des appareils,
s'ils n'ont pas été surveillés ou initiés au préalable.
• Les enfants doivent être surveillés afin d'éviter
qu'ils ne jouent avec l'appareil
• N'opérez pas cet appareil avec un temporisateur externe ou un système de télécommande
séparé.
• Laissez entièrement refroidir l'appareil après
l'avoir éteint, avant de le nettoyer et de le ranger.
Vous évitez ainsi les dommages
sur l'appareil
• Retirez tous les aliments à l'aide d'une spatule en
plastique ou en bois ou d'un autre objet adapté,
non métallique, pour ne pas endommager le
revêtement anti-adhésif de l'appareil.
• Pour la même raison, n'utilisez pas de produits
de nettoyage agressifs ou d'objets pointus pour
nettoyer l'appareil.
Même si vous exploitez l'appareil en respectant
les consignes, des parties de l'appareil deviennent très chaudes (les plaques supérieure et
inférieure par ex). Veillez à ne pas toucher les
surfaces jusqu'à ce qu'elles soient bien refroidies après mise hors tension de l'appareil.
• Pour éviter une surchauffe dangereuse, déroulez
toujours le cordon d'alimentation dans son intégralité.
• En cours d'usage, l'appareil peut être ouvert
et fermé sans risque au niveau de la poignée
thermo-isolée.
- 11 -
Page 15

Première mise en service
Opération
1. Déballez l'appareil. Retirez toutes les autres
sécurités de transport supplémentaires, par ex. les
films et les attaches de câble.
2. Vérifiez tout d'abord la complétude de la livraison
et l'absence de dommage manifeste.
3. Lisez attentivement ce mode d'emploi.
4. Installez l'appareil selon les consignes de sécurité.
5. Ouvrez la fermeture de sécurité 4 .
6. Nettoyez l'appareil à l'aide d'un chiffon humidifié,
conformément à ce qui est décrit sous le chapitre
"Nettoyage et entretien".
7. Fermez l'appareil.
8. Enfichez la fiche secteur dans la prise secteur et
laissez chauffer l'appareil pendant env. 5 minutes
à température maximale.
Remarque :
Lors du premier chauffage de l'appareil, la présence
de résidus de fabrication peut entraîner l'apparition
d'un léger voile de fumée et d'odeur. Ce phénomène
est tout à fait normal et sans danger. Assurez une
aération suffisante, par exemple en ouvrant une
fenêtre.
1. Fermez le couvercle de l'appareil au niveau
de la poignée 6.
2. Insérez le récupérateur de graisse 7 dans
l'appareil.
3. Branchez la fiche secteur dans la prise secteur.
Le voyant de contrôle vert “Ready” 5 s'allume à
nouveau lorsque le régulateur de degré de
chauffage 1 est sur "0".
4. Réglez le degré souhaité au niveau du régulateur de degré de chauffage 1. Le voyant de
contrôle vert "Ready" 5 s'éteint et le voyant de
contrôle rouge "Chauffer" 2 s'allume. Dès que
l'appareil a atteint le degré de chauffage défini,
le voyant de contrôle rouge "Chauffer" 2
s'éteint et le voyant de contrôle vert "Ready" 5
s'allume à nouveau.
Remarque :
Le témoin de contrôle vert „Ready“ 5 est aussi allumé, lorsque le bouton de régulateur de degré de
chauffage 1 se trouve sur „0“. Lorsque vous mettez
le régulateur de degré de chauffage 1 dans la posi-
tion souhaitée, le témoin de contrôle vert “Ready” 5
se rallume dès que la température est atteinte.
9. Après avoir chauffé l'appareil, débranchez la
fiche secteur de la prise et laissez refroidir
l'appareil.
10. Nettoyez encore une fois l'appareil avec un
chiffon humide.
Remarque :
Le voyant de contrôle vert "Ready" 5 peut à nouveau s'éteindre périodiquement et le voyant de contrôle rouge "Chauffer" 2 s'allume à nouveau. Cela
signifie que l'appareil est passé en-dessous de la
température définie et qu'il chauffe à nouveau !
5. Ouvrez le couvercle de l'appareil et poser les
aliments à griller sur la plaque chauffante inférieure 9.
6. Fermez le couvercle de l'appareil à l'aide de la
poignée 6.
Grâce à la plaque chauffante 9 supérieure
à l'attache pivotante , elle se situe toujours en
parallèle à la plaque chauffante 9 inférieure
même en cas d'aliments à griller plus épais.
C'est ainsi qu'il est possible de parvenir à un
résultat optimal.
- 12 -
Page 16

7. Après quelque temps, contrôlez le degré de dorage de l'aliment à griller. Ouvrez à cet effet le
couvercle de l'appareil à l'aide de la poignée 6.
Remarque :
Démarrez par de courtes durées et allongez-les,
jusqu'à ce que vous ayez trouvé la bonne durée.
8. Lorsque vous êtes satisfait du degré de dorage,
ouvrez le couvercle et retirez l'aliment à griller.
• Les plaques chauffantes 9 sont dotées d'un re-
vêtement anti-adhésif, il n'y a donc pas besoin
de graisse supplémentaire. Si vous souhaitez
quand même en utiliser, veillez à choisir de la
graisse/huile adaptée à la cuisson comme par
ex. de l'huile de colza.
• Si vous n'êtes pas sûr si l'aliment à griller est bien
cuit à l'intérieur, utilisez un thermomètre à viande
disponible dans le commerce.
Attention :
N'utilisez pas d'objets pointus ou aiguisés pour retirer
l'aliment à griller. Ils pourraient endommager les
surfaces des plaques chauffantes 9 !
9. Mettez le régulateur de degré de chauffage 1
sur “0” et retirez la fiche secteur de la prise
secteur.
Attention :
Retirez toujours la fiche secteur de la prise lorsque
vous n'utilisez pas l'appareil. Il ne suffit pas de mettre le régulateur de degré de chauffage 1 sur “0” !
Conseils et astuces
• Pour rendre la viande plus tendre et accélérer
le processus de cuisson, nous vous recommandons de faire mariner la viande. Pour ce faire,
il est par exemple approprié d'utiliser du vin
rouge, du vinaigre, du babeurre ou du jus frais,
de la papaye ou de l'ananas. Selon vos préférences, ajouter des herbes et des épices. N'ajoutez
pas de sel, car il absorbe l'eau de la viande et
la rend dure. Faites mariner la viande de telle
manière qu'elle soit entièrement recouverte par
la marinade et refermez le récipient. De préférence, laissez mariner pendant une nuit.
Nettoyage et entretien
Attention !
Avant le nettoyage, débranchez la fiche secteur et
attendez jusqu'à ce que l'appareil soit complètement
refroidi. Danger !
Attention !
Ne nettoyez jamais l'appareil à l'eau courante et ne
le plongez jamais dans l'eau. L'appareil risque alors
d'être endommagé de manière irréparable.
• Une fois que les plaques chauffantes 9 se sont
refroidies, passez le grattoir de nettoyage 0 au-
dessus des plaques chauffantes 9, afin de col-
lecter la graisse et les résidus et de pouvoir les
retirer plus facilement.
• Essuyez les plaques chauffantes 9 à l'aide d'un
chiffon humidifié. En cas de taches tenaces, appliquez un produit de nettoyage doux. N'utilisez
pas de produits abrasifs, d'éponges rêches ou
d'objets pointus pour le nettoyage, pour ne pas
détruire le revêtement anti-adhésif.
• Si la surface est encroûtée, posez un chiffon
mouillé sur les résidus cuits pour les ramollir.
Pour le nettoyage des surfaces extérieures, un chiffon
humide est également suffisant.
Veillez à ce que toutes les pièces soient entièrement
sèches avant d'utiliser à nouveau l'appareil.
- 13 -
Page 17

Essuyez le grattoir de nettoyage 0 à l’aide d’un
chiffon humidifié. En cas de saletés tenaces, mettez
un peu de détergent sur le chiffon.
Rangement
• Poser le panini avec précaution sur le PaniniMaker préchauffé à chaleur intermédiaire et
fermer le couvercle.
• Attendre jusqu'à ce que le panini soit grillé avec
une belle couleur dorée. Puis le retirer du PaniniMaker.
Ranger l'appareil nettoyé dans un endroit sec.
Actionnez la fermeture de sécurité 4 .
Enroulez le cordon d'alimentation 3 autour de
l'élément spécial prévu à cet effet sur le dessous
de l'appareil.
Recettes
Un panini est un sandwich chaud préparé à base
de pain blanc frais. Il est fraîchement grillé, puis servi.
Panini aux épinards et au fromage
250 g d'épinards en branche
1 oignon
1 gousse d'ail
1 CS d'huile
2 CC de jus de citron
1 pincée de sel (et de poivre)
4 tranches de toast/pain blanc
40 g de beurre aux herbes
75 g de mozzarella
20 g de pignons de pin
• Trier les épinards et les laver.
• Peler les oignons et les gousses d'ail et les hacher
finement, les faire revenir dans de l'huile chaude.
Ajouter les épinards. Relever avec le jus de citron,
le sel et le poivre.
• Tartiner le toast de beurre aux herbes.
• Couper la mozzarella en tranches, la répartir sur
deux tranches de toast avec les épinards égouttés.
Parsemer de pignons de pin.
• Recouvrir la préparation d'une deuxième tranche
de toast.
Panini à la poitrine de poulet
400 g de filet de poulet
20 g de beurre
Poivre, sel et poudre de piment
120 g de bacon, en lamelles
6 tranches de toast/pain blanc
3 CS d'assaisonnement pour salade (yaourt)
30 g de salade Iceberg
2 tomates
1 avocat
1 CC de jus de citron
50 g de concombre
• Rincer brièvement le filet de poulet à l'eau courante
et le sécher en tapotant avec du papier essuietout. Chauffer du beurre dans une poêle à revêtement anti-adhésif et bien faire cuire les filets de
poitrine de poulet des deux côtés. Remettre le
four à température moyenne et finir de cuire les
filets de poitrine de poulet pendant env. 10 minutes.
Epicer après la cuisson avec du sel, du poivre et
de la poudre de piment, retirer le poulet de la
poêle et le mettre de côté.
• Chauffer encore une fois la graisse dans la poêle
et y faire cuire les lamelles de bacon jusqu'à ce
qu'elles soient bien croustillantes.
• Répartir l'assaisonnement au yaourt sur les 3 tranches de toast/de pain blanc, y poser la salade
Iceberg, couper les tomates en tranches, les
épicer et également les poser.
• Couper les filets de poulet dans la longueur et
les poser sur les tomates.
• Découper les avocats dans la longueur et sortir
le noyau à l'aide d'un mouvement de rotation.
Retirer la pelure et couper l'avocat en tranches.
Asperger l'avocat de jus de citron, afin qu'il ne
brunisse pas. Poser les tranches sur les paninis.
- 14 -
Page 18

• Couper le concombre en tranches et les poser
sur l'avocat.
• Recouvrir la préparation d'une deuxième
tranche de toast.
• Poser le panini avec précaution sur le PaniniMaker préchauffé à chaleur intermédiaire et
fermer le couvercle.
• Attendre jusqu'à ce que les paninis aient une belle
couleur dorée et les retirer du Panini-Maker.
Baguette à la moutarde
1 baguette
1 gousse d'ail
50 g de cornichons à la moutarde
40 g de pecorino
1 CS de moutarde
2 CS de moutarde douce
50 g de beurre
2 CS de ciboulette en rondelles
sel, poivre
• Entailler la baguette par écarts d'env. 2-3 centimètres, sans toutefois les couper entièrement.
• Peler les gousses d'ail et les écraser, découper
les cornichons en dés très fins et râper le pecorino.
• Mélanger la moutarde forte et douce avec le
beurre ramolli, l'ail, les dés de cornichons, le
pecorino et la ciboulette et assaisonner avec du
sel et du poivre.
• Mettre le beurre à la moutarde dans les entailles
des baguettes et les emballer dans du papier
aluminium.
• Poser les baguettes avec précaution sur le PaniniMaker préchauffé à chaleur intermédiaire et fermer
le couvercle. Les baguettes devrait se doter d'une
belle couleur dorée.
Mise au rebut
L'appareil ne doit jamais être jeté dans
la poubelle domestique normale. Ce
produit est soumis à la directive européenne 2002/96/EC.
Mettez l'appareil au rebut en le confiant à une
entreprise de traitement des déchets agréée ou au
service de recyclage de votre commune.
Respectez la réglementation en vigueur.
En cas de doutes, contactez votre organisation de
recyclage.
Eliminer l'ensemble des matériaux
d'emballage d'une manière respectueuse
de l'environnement.
Garantie et service après-vente
Cet appareil bénéficie de 3 ans de garantie à
compter de la date d'achat. L'appareil a été fabriqué
avec soin et consciencieusement contrôlé avant sa
distribution.
Veuillez conserver le ticket de caisse en guise de
preuve d'achat. Si la garantie devait s'appliquer,
contactez par téléphone votre interlocuteur du service
après-vente. Cette condition doit être respectée pour
assurer l'expédition gratuite de votre marchandise.
La prestation de garantie s'applique uniquement
pour les erreurs de matériaux et de fabrication, pas
pour les dommages de transport, les pièces d'usure
ou les dommages subis par les pièces fragiles, comme par ex. les interrupteurs ou les batteries. Le produit est exclusivement destiné à un usage privé et
non commercial.
La garantie est annulée en cas de manipulation incorrecte et inappropriée, d'utilisation brutale et en
cas d'intervention qui n'aurait pas été réalisée par
notre centre de service après-vente agréé. Cette garantie ne constitue pas une restriction de vos droits
légaux.
- 15 -
Page 19

La durée de la garantie n'est pas prolongée par la
garantie du fabricant. Ceci vaut également pour les
pièces remplacées et réparées. Tous dommages et
défauts présents dès l'achat doivent être notifiés dès
que le produit est déballé, et au plus tard deux
jours après la date d'achat. Toutes réparations survenant après la période sous garantie ne seront pas
prises en charge.
Service France
Tel.: 0800 919270
E-Mail: kompernass@lidl.fr
IAN 87712
Service Suisse
Tel.: 0842 665566 (0,08 CHF/Min.,
mobile max. 0,40 CHF/Min.)
E-Mail: kompernass@lidl.ch
IAN 87712
Importateur
KOMPERNASS GMBH
BURGSTRASSE 21
44867 BOCHUM, GERMANY
www.kompernass.com
- 16 -
Page 20

INDICE PAGINA
Introduzione 18
Uso conforme 18
Fornitura 18
Descrizione dell'apparecchio 18
Dati tecnici 18
Avvertenze di sicurezza 18
Prima messa in funzione 20
Uso 20
Consigli e suggerimenti 21
Pulizia e cura 21
Conservazione 22
Ricette 22
Panini con spinaci e formaggio . . . . . . . . . . . . . . . . . . . . . . . . . . . . . . . . . . . . . . . . . . . . . . .22
Panini al petto di pollo . . . . . . . . . . . . . . . . . . . . . . . . . . . . . . . . . . . . . . . . . . . . . . . . . . . . . .22
Baguette alla senape . . . . . . . . . . . . . . . . . . . . . . . . . . . . . . . . . . . . . . . . . . . . . . . . . . . . . . .23
Smaltimento 23
Garanzia e assistenza 23
Importatore 24
- 17 -
Page 21

Piastra elettrica
Introduzione
Congratulazioni per l'acquisto del nuovo apparecchio.
Lei ha scelto un prodotto di alta qualità. Il manuale
di istruzioni è parte integrante del presente prodotto.
Esso contiene importanti indicazioni per la sicurezza,
l'uso e lo smaltimento. Prima di utilizzare il prodotto,
si familiarizzi con tutte le indicazioni relative ai comandi e alla sicurezza. Utilizzi il prodotto solo come
descritto e per i campi di impiego indicati. Conservi
con cura il manuale. In caso di cessione del prodotto
a terzi, consegni anche tutta la documentazione relativa.
Descrizione dell'apparecchio
Figura A:
1 Regolatore temperatura
2 Spia di controllo rossa “Riscaldamento”
3 Cavo di alimentazione
4 Chiusura di sicurezza
5 Spia di controllo verde “Ready”
6 Impugnatura
7 Vassoio raccogligrasso
8 Scolo del grasso
9 Piastre calde
Figura B:
0 Raschietto
Dati tecnici
Uso conforme
Il Piastra elettrica per panini o altri alimenti.
Esso è destinato esclusivamente all'uso domestico
privato. Non utilizzare l'apparecchio a fini commerciali!
Fornitura
• Piastra elettrica
• Vassoio raccogligrasso
• Raschietto
• Istruzioni per l'uso
Tensione nominale: 220 - 240 V ~, 50 Hz
Potenza assorbita: 2000 W
Avvertenze di sicurezza
Per evitare i rischi di scossa elettrica
• Utiizzare l'apparecchio solo in ambienti asciutti
e non all'esterno. Tenere lontano l'apparecchio
dagli spruzzi d'acqua anche quando è spento.
• Utilizzare l'apparecchio solo se la tensione di
rete locale corrisponde alla tensione di rete dell'apparecchio.
• Non collegare l'apparecchio a una presa multipla
contemporaneamente ad altri elettrodomestici,
perché ciò potrebbe provocare un sovraccarico
di tensione.
• Spegnere l'apparecchio dopo ogni impiego,
scollegando la spina dalla presa di corrente.
• Durante la pulizia, impedire la penetrazione di
acqua all'interno dell'apparecchio. Non pulire
mai l'apparecchio sotto l'acqua corrente.
- 18 -
Page 22

Non immergere mai l'apparecchio in acqua
o altri liquidi.
• Proteggere il cavo di rete dai danni. Fare attenzione a non schiacciarlo e tenerlo lontano da
oggetti surriscaldati. Non lasciar pendere il cavo
di rete dal tavolo o dal piano di lavoro.
• Non aprire mai l'alloggiamento dell'apparecchio.
• Fare sostituire immediatamente la spina o il cavo
di rete danneggiato da personale specializzato
autorizzato o dal centro di assistenza ai clienti,
per evitare possibili danni.
• Le riparazioni devono essere eseguite solo da
personale specializzato autorizzato dal produttore o da personale esperto.
Per evitare i rischi di incendio e di
ferimento
• Posizionare l'apparecchio su una superficie piana,
antisdrucciolo e resistente al calore e non sopra
o accanto ad altri apparecchi che irradiano molto calore (ad es. forno elettrico, fornelli).
• Non azionare l'apparecchio in vicinanza di oggetti facilmente infiammabili, ad es. sotto tendine
o vicino a rotoli di carta da cucina.
• Questo apparecchio non è indicato per l'uso da
parte di persone (inclusi bambini) con limitate
capacità fisiche, sensoriali o mentali o prive dell'esperienza e/o della conoscenza necessaria, a
meno che tali persone non vengano sorvegliate
da un responsabile per la sicurezza o abbiano
ricevuto indicazioni sull'impiego dell'apparecchio.
• Sorvegliare i bambini per assicurarsi che non
giochino con l'apparecchio.
• Non azionare l'apparecchio con un timer esterno
o un sistema di telecomando separato.
• Fare raffreddare completamente l'apparecchio
prima di pulirlo e di riporlo.
Per evitare danni all'apparecchio
• Prelevare le vivande solo con una spatola di
plastica o legno o un altro oggetto idoneo non
metallico, per non distruggere il rivestimento antiaderente dell'apparecchio.
• Per lo stesso motivo, non utilizzare detergenti
aggressivi e oggetti acuminati per la pulizia
dell'apparecchio.
Anche in caso di uso conforme, i singoli componenti dell'apparecchio si surriscaldano (ad
es. il piano superiore e inferiore dell'alloggiamento). Fare quindi attenzione a non toccare
queste superfici finché non si saranno completamente raffreddate dopo lo spegnimento
dell'apparecchio.
• Per evitare un surriscaldamento pericoloso,
svolgere sempre il cavo di rete completamente.
• Durante il funzionamento, l'apparecchio può
essere aperto e chiuso senza rischi utilizzando
l'apposita maniglia termoisolata.
- 19 -
Page 23

Prima messa in funzione
Uso
1. Prelevare l'apparecchio dalla confezione. Rimuovere
tutti gli ulteriori fissaggi per il trasporto, ad es. pellicole o fermacavi.
2. Prima della messa in funzione, controllare la
completezza e l'integrità della fornitura.
3. Leggere attentamente le presenti istruzioni per
l'uso.
4. Installare l'apparecchio in conformità alle avvertenze di sicurezza.
5. Aprire la chiusura di sicurezza 4 .
6. Pulire l'apparecchio con un panno umido, come
descritto alla voce “Pulizia e cura”.
7. Chiudere l'apparecchio.
8. Inserire la spina di rete in una presa e fare riscaldare l'apparecchio per ca. 5 minuti, fino a quando
non raggiungerà la temperatura massima.
Suggerimento:
nel corso del primo riscaldamento dell'apparecchio,
a causa dei resti di lavorazione, si può manifestare
una leggera formazione di fumo e odore. Si tratta
di un evento normale e completamente innocuo.
Provvedere a un'aerazione sufficiente, aprendo ad
esempio una finestra.
1. Chiudere il coperchio dell'apparecchio utilizzando
l'impugnatura 6.
2. Spingere la vaschetta di raccolta dei grassi 7
nell'apparecchio.
3. Inserire la spina di rete in una presa di corrente.
La spia di controllo verde “Ready” 5 si accende quando il regolatore temperatura 1 si trova
su “0”.
4. Impostare il livello desiderato con il regolatore
temperatura 1. La spia di controllo verde “Ready” 5 si spegne e la spia di controllo rossa “Riscaldamento” 2 si accende. Non appena l'apparecchio ha raggiunto il livello di calore
impostato, la spia di controllo rossa “Riscaldamento” 2 e la spia di controllo verde “Ready”
5 si riaccendono.
Suggerimento:
la spia di controllo verde “Ready” 5 sia ccende
anche se il regolatore del livello di calore 1 si trova su „0“. Non appena si imposta il regolatore del
livello di calore 1 nella posizione desiderata, la
spia di controllo verde “Ready” 5 si spegne fino al
raggiungimento della temperatura.
9. Dopo il riscaldamento, staccare la spina dalla
presa di corrente e fare raffreddare l'apparecchio.
10. Pulire nuovamente l'apparecchio con un panno
umido.
Suggerimento:
È possibile che nel frattempo la spia di controllo verde “Ready” 5 si spenga di nuovo e la spia di controllo rossa “Riscaldamento” 2 si riaccenda. Ciò
significa che la temperatura impostata dev'essere
nuovamente raggiunta e l'apparecchio deve riscaldarsi!
5. Aprire il coperchio dell'apparecchio e collocare
gli alimenti da arrostire/grigliare sulla piastra
calde 9 inferiore .
6. Chiudere il coperchio dell'apparecchio utilizzando
l'impugnatura 6
La piastra calde 9 superiore, essendo girevole,
sarà sempre parallela a quella la piastra calde 9
inferiore anche in presenza di alimenti spessi. In
tal modo si ottiene un risultato di cottura ottimale.
- 20 -
Page 24

7. Dopo qualche tempo, controllare la doratura del
cibo. A tale scopo aprire il coperchio dell'apparecchio. A tale scopo aprire il coperchio dell'apparecchio utilizzando l'impugnatura 6.
• Se non si è sicuri che il cibo sia cotto anche all'interno, utilizzare un termometro per la carne
disponibile in commercio.
Suggerimento:
cominciare con tempi di cottura brevi e aumentarli
fino a scoprire la durata corretta.
8. Se si è soddisfatti del grado di doratura, aprire
il coperchio e prelevare gli alimenti.
Attenzione:
non utilizzare oggetti appuntiti o acuminati per prelevare gli alimenti. Essi potrebbero danneggiare le
superfici delle piastre calde 9!
9. Ruotare il regolatore temperatura 1 su “0” ed
estrarre la spina dalla presa.
Attenzione:
estrarre sempre la spina dalla presa se non si utilizza
l'apparecchio. Non è sufficiente posizionare il regolatore temperatura 1 su “0”!
Consigli e suggerimenti
• Per rendere la carne più tenera e velocizzare i
tempi di cottura, è possibile marinarla in precedenza. A tale scopo sono adatti ad esempio
panna acida, vino rosso, aceto, latticello o succo
fresco di papaia o ananas. In base ai gusti, aggiungere erbe e spezie. Non aggiungere sale,
poiché esso sottrae liquidi alla carne e la indurisce. Collocare la carne nella marinata in modo
da ricoprila completamente e chiudere il contenitore. Lasciarla preferibilmente a marinare per
tutta la notte.
• La piastra calde 9 sono ricoperte di uno strato
antiaderente, per cui non è necessario aggiungere
altro grasso. Se tuttavia si desidera utilizzare del
grasso, assicurarsi che si tratti di grasso/olio
adatto per la cottura, ad esempio olio di colza.
Pulizia e cura
Attenzione!
Prima della pulizia, estrarre la spina dalla presa e
attendere fino al completo raffreddamento dell'apparecchio. Pericolo di lesioni!
Attenzione!
Non pulire mai l'apparecchio sotto l'acqua corrente
e non immergerlo mai in acqua. L'apparecchio potrebbe danneggiarsi irreparabilmente!
• Dopo che le piastre calde 9 si sono raffreddate,
passare il raschietto 0 su di esse 9 per ammuc-
chiare il grasso e altri residui al fine di poterli
rimuovere con facilità.
• Pulire le piastre calde 9 con un panno umido.
In caso di sporco resistente, versare un po' di
detergente delicato sul panno. Per la pulizia,
non utilizzare detergenti aggressivi, spugnette
abrasive o oggetti acuminati, per non distruggere
il rivestimento antiaderente.
• In caso di incrostazioni, poggiare un panno
umido sui residui induriti, per ammorbidirli.
Per la pulizia delle superfici esterne dell'apparecchio
è sufficiente utilizzare un panno umido.
Controllare che tutte le componenti dell'apparecchio
siano asciutte prima di riutilizzarlo.
Pulire il raschietto 0 con un panno umido. In caso
di sporco persistente, inumidire il panno con detersivo per stoviglie delicato.
- 21 -
Page 25

Conservazione
Conservare l'apparecchio pulito in un luogo asciutto.
Chiudere la chiusura di sicurezza 4 .
Avvolgere il cavo di rete 3 sull'apposito dispositivo
collocato sul lato inferiore dell'apparecchio.
Ricette
Con il termine panini si intende qui un sandwich caldo preparato con pane bianco fresco. Viene
arrostito fresco e servito subito.
Panini con spinaci e formaggio
250 g di spinaci a foglia
1 cipolla
1 spicchio d'aglio
1 cucchiaio di olio
2 cucchiaini di succo di limone
1 pizzico di sale (e pepe)
4 fette di pane per toast/pane bianco
40 g di burro alle erbe
75 g di mozzarella
20 g di pinoli
• Selezionare e lavare le foglie di spinaci.
• Sbucciare le cipolle e l'aglio, tritarli e farli rosolare
in olio bollente fino a quando non diventano trasparenti. Aggiungere gli spinaci. Condire con il
succo di limone, il sale e il pepe.
• Cospargere il pane per toast con il burro alle
erbe.
• Tagliare la mozzarella a fette, distribuirla su due
fette di pane per toast insieme agli spinaci sgocciolati. Cospargere con i pinoli.
• Ricoprire il panini con la seconda fetta di pane
per toast.
• Collocare cautamente il panini sul grill preriscaldato a temperatura media e chiudere il coperchio.
• Attendere fino a quando il panini abbia assunto
una colorazione bruno-dorata, quindi prelevarlo
dal grill.
Panini al petto di pollo
400 g di filetto di pollo
20 g di burro
Pepe, sale, paprika in polvere
120 g di pancetta a strisce
6 fette di pane per toast/pane bianco
3 cucchiai di condimento per insalata (allo yogurt)
30 g di insalata verde
2 pomodori
1 avocado
1 cucchiaino di succo di limone
50 g di cetrioli per insalata
• Lavare brevemente il filetto di pollo sotto l'acqua
corrente e asciugarlo con carta da cucina. Riscaldare il burro in una padella con rivestimento
antiaderente e arrostire a fiamma viva il filetto
da entrambi i lati. Abbassare la fiamma a livello
medio e finire di cuocere il filetto di pollo per circa
10 minuti. Dopo la cottura, insaporire con sale,
pepe e paprika, prelevare il filetto dalla padella
e metterlo da parte.
• Riscaldare ancora il grasso nella padella e fare
cuocere le fette di pancetta fino a ottenere una
consistenza croccante.
• Distribuire il condimento allo yogurt su 3 fette di
pane per toast/pane bianco, collocarvi su una
foglia di insalata verde, tagliare i pomodori a
fette, aromatizzarli e collocare anch'essi sulle fette.
• Tagliare i filetti di pollo nel senso della lunghezza e
collocarli sui pomodori.
• Tagliare l'avocado nel senso della lunghezza e
liberarlo dal nocciolo con un movimento rotatorio.
Sbucciare l'avocado e tagliarlo a fette. Spruzzare
l'avocado con il succo di limone, per impedire
che annerisca. Mettere le fette di avocado sul
panini.
• Tagliare a fette il cetriolo e poggiare le fette sull'avocado.
• Ricoprire il panini con la seconda fetta di pane
per toast.
• Collocare cautamente il panini sul grill preriscaldato
a temperatura media e chiudere il coperchio.
• Attendere fino a quando il panini avrà assunto
una colorazione bruno-dorata e rimuoverlo quindi
dal grill.
- 22 -
Page 26

Baguette alla senape
1 baguette
1 spicchio d'aglio
50 g di cetrioli alla senape
40 g di pecorino
1 cucchiaio di senape
2 cucchiai di senape dolce
50 g di burro
2 cucchiai di erba cipollina
sale, pepe
• Incidere la baguette a intervalli di ca. 2-3 centimetri, senza però tagliarla completamente.
• Sbucciare l'aglio e schiacciarlo, tagliare finemente
a dadini i cetrioli alla senape e grattugiare il pecorino.
• Mescolare la senape piccante e dolce con il
burro ammorbidito, l'aglio, i dadini di cetrioli, il
pecorino e l'erba cipollina, insaporire quindi con
sale e pepe.
• Riempire gli intagli della baguette con questo
composto e avvolgerla in un foglio di alluminio.
• Collocare la baguette sul grill preriscaldato a
temperatura media e chiudere il coperchio. La
baguette deve assumere un colore bruno-dorato.
Smaltimento
Non smaltire per alcun motivo l'apparecchio insieme ai normali rifiuti domestici.
Il presente prodotto è conforme alla
direttiva europea 2002/96/EC.
Garanzia e assistenza
Questo apparecchio è garantito per tre anni a
partire dalla data di acquisto. L'apparecchio
è stato prodotto con cura e debitamente collaudato
prima della consegna.
Conservare lo scontrino come prova d'acquisto. In
caso di interventi in garanzia, contattare telefonicamente il proprio centro di assistenza. Solo in questo
modo è possibile garantire una spedizione gratuita
della merce.
La garanzia vale solo per i difetti di materiale o
fabbricazione, non per i danni da trasporto, parti
soggette a usura o danni a parti fragili come ad es.
interruttori o accumulatori. Il prodotto è destinato
esclusivamente all'uso domestico e non a quello
commerciale.
La garanzia decade in caso di impiego improprio o
manomissione, uso della forza e interventi non eseguiti dalla nostra filiale di assistenza autorizzata.
Questa garanzia non costituisce alcun limite ai diritti
legali del consumatore. Il periodo di garanzia non
viene prolungato in caso di un intervento in garanzia.
Ciò vale anche per le componenti sostituite e riparate. I danni e difetti presenti già all'acquisto devono
essere comunicati immediatamente dopo il disimballaggio, e non oltre due giorni dalla data di acquisto. Le riparazioni effettuate dopo la scadenza del
periodo di garanzia sono a pagamento.
Smaltire l'apparecchio presso un'azienda autorizzata
o presso l'ente comunale di smaltimento.
Rispettare le prescrizioni attualmente in vigore.
In caso di dubbio, mettersi in contatto con l'ente di
smaltimento competente.
Smaltire tutti i materiali dell'imballaggio
in modo ecologicamente conforme.
- 23 -
Page 27

Assistenza Italia
Tel.: 02 36003201
E-Mail: kompernass@lidl.it
IAN 87712
Assistenza Svizzera
Tel.: 0842 665566 (0,08 CHF/Min.,
telefonia mobile max. 0,40 CHF/Min.)
E-Mail: kompernass@lidl.ch
IAN 87712
Importatore
KOMPERNASS GMBH
BURGSTRASSE 21
44867 BOCHUM, GERMANY
www.kompernass.com
- 24 -
Page 28

CONTENT PAGE
Introduction 26
Intended Use 26
Items supplied 26
Description of the appliance 26
Technical data 26
Safety instructions 26
Commissioning 28
Operation 28
Tips and Tricks 29
Cleaning and Care 29
Storage 29
Recipes 30
Spinach & Cheese Panini . . . . . . . . . . . . . . . . . . . . . . . . . . . . . . . . . . . . . . . . . . . . . . . . . . . .30
Chickenbreast Panini . . . . . . . . . . . . . . . . . . . . . . . . . . . . . . . . . . . . . . . . . . . . . . . . . . . . . . . .30
Mustard Baguette . . . . . . . . . . . . . . . . . . . . . . . . . . . . . . . . . . . . . . . . . . . . . . . . . . . . . . . . . .31
Disposal 31
Warranty and Service 31
Importer 31
- 25 -
Page 29

Panini Maker
Introduction
Congratulations on the purchase of your new
appliance.
You have clearly decided in favour of a quality
product. These operating instructions are a part of
this product. They contain important information in
regard to safety, use and disposal. Before using the
product, familiarise yourself with all of these operating
and safety instructions. Use the product only as described and only for the specified areas of application.
Retain these instructions for future reference. In addition, pass these documents on, together with the
product, to any future owner.
Description of the appliance
Figure A:
1 Heat level regulator
2 Red control lamp “Heat up”
3 Power cable
4 Safety closure
5 Green control lamp “Ready”
6 Handle
7 Grease catchment tray
8 Grease drainage outlet
9 Hotplates
Figure B:
0 Cleaning scraper
Technical data
Intended Use
This Panini Grill is intended for toasting small bread
rolls and sandwiches or for grilling other foodstuffs.
The appliance is intended for domestic use only.
Not for commercial use!
Items supplied
• Panini Maker
• Grease catchment tray
• Cleaning scraper
• Operating Instructions
Power rating: 220 - 240 V ~, 50 Hz
Power consumption : 2000 W
Safety instructions
How to avoid the risks of an
electrical shock
• The Panini Maker may only be used in dry rooms
indoors. Protect the appliance from spray water –
even when it is switched off.
• Use the appliance only if the local mains voltage
complies with the rated voltage of the appliance.
• Do not connect the appliance to a multiple connection power socket on which other electrical
devices are operating at the same time; this could
lead to an overload of the power circuit.
• Switch the appliance off after every use.
Additionally, disconnect the power plug.
• When cleaning, ensure that water cannot permeate
into the appliance. NEVER clean the appliance
under running water.
- 26 -
Page 30

NEVER submerse the appliance in water or
other liquids.
• Protect the power cable from damage. Be careful
not to pinch/squeeze it, and keep it away from
hot objects. Do not allow the power cable to
hang freely from a table or workcounter.
• NEVER open the housing of the appliance.
• Arrange for defective power plugs and/or cables
to be replaced at once by qualified technicians
or our Customer Service Department.
• Repairs may only be carried out by experienced
specialists or workshops authorised to do so by
the manufacturer.
• This appliance is not intended for use by individuals (including children) with restricted physical,
physiological or intellectual abilities or deficiences
in experience and/or knowledge unless they are
supervised by a person responsible for their safety
or receive from this person instruction in how the
appliance is to be used.
• Children should be supervised to ensure that
they do not play with the appliance.
• Do not operate this appliance by means of an
external time switch or a separate remote control
system.
• After switching it off, allow the appliance to cool
completely before cleaning and storing it.
How to avoid the risk of fire
and injury
• Place your Panini Maker on a flat, non-slip and
heat-resistant surface and not on or close to other
appliances that could emit a significant level of
heat (e.g. toasters, kitchen ovens).
• Do not operate the appliance close to easily
flammable objects, such as curtains or next to
rolls of paper towels.
Even when used properly, some parts of the
appliance become very hot (such as the top
and bottom housing plates). After switching the
appliance off, take care not to touch these surfaces until they have cooled down completely.
• To avoid a dangerous overheating, ALWAYS
unwind the full length of the power cable.
• During use, the Panini Maker can be opened and
closed without risk by using the heat-insulated grip.
You can thus prevent the appliance
from being damaged
• To avoid damaging the non-stick coating of the
Sandwich Maker, remove your cooked foods
only with a plastic or wooden spatula or some
other suitable, non-metallic implement.
• For the same reason, do not use abrasive cleaners
and sharp objects to clean the appliance.
- 27 -
Page 31

Commissioning
Operation
1. Take the appliance out of the packaging. Remove
all additional transport packing, e.g. plastic wrap
or cable holders.
2. Before the first usage, check that all items have
been delivered and there are no visible damages.
3. Read these operating instructions carefully.
4. Set up the appliance according to the safety
instructions.
5. Open the safety closure 4 .
6. Clean the appliance with a damp cloth as described in "Cleaning and Care".
7. Close the appliance.
8. Insert the plug into a power socket and allow the
appliance to heat up at its maximum temperature
setting for approx. 5 minutes.
Note:
Due to manufacturing residues, this initial heating up
could result in a light production of odour and smoke.
This is completely normal and is not dangerous.
Provide for sufficient ventilation, for example, open
a window.
9. After being heated up, remove the plug from
the wall socket and allow the appliance to
cool down.
10. Clean the appliance once more with a damp
cloth.
1. Close the appliance lid at the handle 6.
2. Push the grease catchment tray 7 into the appliance.
3 Insert the plug into a mains power socket. The
green control lamp "Ready" 5 illuminates if the
heat level regulator 1 is set to "0".
4 Set the required heat level using the heat level
regulator 1. The green control lamp "Ready" 5
goes out and the red control lamp "Heat up" 2
illuminates. As soon as the set temperature level
is reached, the red control lamp "Heat up" 2
goes out and the green control lamp "Ready" 5
illuminates again.
Note:
The green control lamp “Ready“ 5 also lights up
when the heat level regulator 1 is at position „0“.
As soon as you have set the heat level regulator 1
to the required position, the green control lamp
“Ready” 5 will go off until the desired temperature
has been attained.
Note:
From time to time, the green control lamp “Ready”
5 may go out again and the red control lamp
"Heat up" 2 illuminates again. This means that the
temperature of the appliance has dropped below
the programmed setting, and it is automatically heating itself up again!
5. Open the appliance lid and place the foodstuff
to be toasted/grilled on the lower hotplate 9.
6. Close the appliance lid using the handle 6.
Due to the positioning of the upper hotplate 9
being variable, even with thick items it is always
parallel to the lower hotplate 9. This ensures an
optimal cooking result.
7. After a short period check the browning of the
foodstuff. To do this, open the appliance lid
using the handle 6.
- 28 -
Page 32

Note:
Start with short cooking times and expand on them
until you have discovered the ideal duration.
8. When you are satisfied with the browning, open
the lid and remove the foodstuff.
Cleaning and Care
Important!
Before cleaning, remove the plug from the wall socket
and wait until the appliance has cooled down completely. Risk of injury!
Warning:
Do not use sharp or pointed objects to remove the
foodstuff. They could damage the surfaces of the
hotplates 9!
9. Turn the heat level regulator 1 to “0” and
remove the plug from the power socket.
Warning:
When the appliance is not in use, always remove
the plug from the power socket. It is not sufficient
to simply place the heat level regulator 1 in the
position “0”!
Tips and Tricks
• To make meat softer and to speed up grilling, it
can be marinaded beforehand. Suitable as the
basis for this are, for example, sour cream, red
wine, vinegar, buttermilk, or the fresh juice from
papayas or pineapples. Subject to taste, add
herbs and spices. Do not add salt, salt extracts
water from the meat and makes it hard. Place
the meat in the marinade so that it is completely
covered and then close the receptacle. It is best
to let it stand overnight.
• The hotplates 9 have a non-stick coating, extra
fat is therefore not needed. If you wish to use fat
anyway, please ensure that the fat/oil is suitable
for cooking, e.g. rapeseed oil.
• If you are not sure if the foodstuff is cooked in
the middle, use a standard commercial meat
thermometer.
Important!
Never clean the appliance under running water,
and never submerge it in water. The appliance
could be irreparably damaged!
• Draw the cleaning scraper 0, after the hotplates 9 have cooled, over the hotplates 9 so that
the fat and other residues are gathered together
so that you can better remove it.
• Wipe the hotplates 9 with a moist cloth. For
stubborn soiling use a mild detergent on the
cloth. To avoid destroying the non-stick coating,
do not use aggressive detergents, rough sponges or sharp objects.
• It is best to lay a wet dish cloth on encrusted residues in order to soften them.
A damp cloth is also sufficient for cleaning the outer
surfaces of the appliance.
Be sure to allow all parts to dry completely before
using the Panini Maker again.
Wipe the cleaning scraper 0 with a moist cloth.
For stubborn soiling, apply a mild detergent to the
cloth.
Storage
Store the cleaned appliance at a dry location.
Close the safety closure 4 .
Wrap the power cable 3 around the cable retainers
on the underside of the appliance.
- 29 -
Page 33

Recipes
A Panini is a warm sandwich prepared with fresh
white bread. It is freshly toasted and then served.
Spinach & Cheese Panini
250 g Spinach leaves
1 Onion
1 Garlic clove
1 tbsp. oil
2 tbsp Lemon juice
1 Pinch of salt (and pepper)
4 Slices of white bread
40 g Herb butter
75 g Mozzarella
20 g Pine nuts
• Sort and wash the spinach leaves.
• Peel and finely hack the onion and garlic clove,
then steam them in hot oil until glassy. Add the
spinach. Flavour with lemon juice, salt and pepper.
• Spread herb butter on the bread.
• Cut the mozzarella into slices, spread them over
the two bread slices with the drained spinach.
Bestrew with pine nuts.
• Cover the Panini with a second slice of white
bread.
• Carefully place the Panini on the Panini Maker,
already pre-heated to a middle heat level, and
close the lid.
• Wait until the Panini is toasted to a golden-brown.
Then take it from the Panini Maker.
Chickenbreast Panini
400 g chicken breast fillet
20 g butter
Pepper, salt, paprika powder
120 g Bacon, in strips
6 Slices of white bread
3 Tbsp Salad dressing (Yoghurt)
30 g Lettuce
2 Tomatoes
1 Avocado
1 Tsp Lemon juice
50 g Cucumber
• Rinse the chicken breast fillets under running water
then pat them dry with kitchen paper. Heat some
butter in a non-stick pan and then roast the chicken
breast fillets well on both sides. Turn the cooker
down to a medium heat and then roast the chicken
breast fillets thoroughly for approx. 10 minutes.
After roasting, flavour with salt, pepper and paprika, take them from the pan and place them to
the side.
• Heat the fat up in the pan once again and then
fry the bacon strips until crispy.
• Spread the salad dressing onto 3 slices of white
bread, garnish with lettuce, cut the tomatoes into
slices, spice them and place them on the lettuce.
• Slice the chicken breast fillets along their length
and lay them on the tomatoes.
• Cut the avocado along its length all around and,
with a twist, detach it from its core. Peel it and slice
it into strips. Spread the lemon juice over the avocado so that it does not turn brown. Lay the
strips on the Panini.
• Cut the cucumber into slices and lay them on the
avocado.
• Cover the Panini with a second slice of white
bread.
• Carefully place the Panini on the Panini Maker,
already pre-heated to a middle heat level, and
close the lid.
• Wait until the Panini is toasted golden-brown and
then carefully remove it from the Panini-Maker.
- 30 -
Page 34

Mustard Baguette
1 Baguette
1 Garlic clove
50 g Gherkin in piccalilli
40 g Pecorino Romano
1 Tbsp Mustard
2 Tbsp Sweet mustard
50 g Butter
2 Tbsp Chive rolls
Salt, pepper
• Cut, but do not separate into pieces, the baguette
laterally at distances of approx. 2-3 centimeters.
• Peel and crush the garlic, cube the gherkin very
finely and grate the Pecorino Romano.
• Blend the sharp and sweet mustards with the soft
butter, garlic, gherkin cubes, Pecorino Romano
and chives, flavour with salt and pepper.
• Fill the mustard butter into the baguette cuts and
wrap in aluminium foil.
• Pre-heat the Panini Maker to a medium level, place
the baguettes on it and close the lid. The baguette
should be golden-brown.
Disposal
Do not dispose of the appliance in your
normal domestic waste. This product is
subject to the European directive
2002/96/EC.
Dispose of the appliance through an approved disposal centre or at your community waste facility.
Observe the currently applicable regulations.
In case of doubt, please contact your waste disposal
centre.
Dispose of all packaging materials in an
environmentally friendly manner.
Warranty and Service
The warranty for this appliance is for 3 years from
the date of purchase. The appliance has been manufactured with care and meticulously examined
before delivery.
Please retain your receipt as proof of purchase. In
the event of a warranty claim, please make contact
by telephone with our Service Department. Only in
this way can a post-free despatch for your goods be
assured.
The warranty covers only claims for material and
maufacturing defects, but not for transport damage,
for wearing parts or for damage to fragile components, e.g. buttons or batteries. This product is for private use only and is not intended for commercial use.
The warranty is void in the case of abusive and improper handling, use of force and internal tampering
not carried out by our authorized service branch. Your
statutory rights are not restricted in any way by this
warranty.
The warranty period will not be extended by repairs
made under warranty. This applies also to replaced
and repaired parts. Any damage and defects extant
on purchase must be reported immediately after unpacking the appliance, at the latest, two days after
the purchase date. Repairs made after the expiration of the warranty period are subject to payment.
Service Great Britain
Tel.: 0871 5000 720 (£ 0.10/Min.)
E-Mail: kompernass@lidl.co.uk
IAN 87712
Importer
KOMPERNASS GMBH
BURGSTRASSE 21
44867 BOCHUM, GERMANY
www.kompernass.com
- 31 -
Page 35

KOMPERNASS GMBH
BURGSTRASSE 21
44867 BOCHUM
DEUTSCHLAND / GERMANY
www.kompernass.com
Stand der Informationen · Version des informations
Versione delle informazioni · Last Information Update:
02 / 2013 · Ident.-No.: SPM2000A2022013-2
IAN 87712
 Loading...