

UNTERBAU-RADIO SKRI 2000 A1
UNTERBAU-RADIO
Bedienungs- und Sicherheitshinweise
UNDER-CABINET RADIO
Operation and Safety Notes
IAN 63920

Klappen Sie vor dem Lesen die Seite mit den Abbildungen aus und machen Sie sich anschließend mit allen
Funktionen des Gerätes vertraut.
Before reading, unfold the page containing the illustrations and familiarise yourself with all functions of
the device.
DE / AT / CH Bedienungs- und Sicherheitshinweise Seite 1
GB Operation and Safety Notes Page 37
A
4
4
4
20
22
21
2
3
4
5
7
6
23
8 9
10 11 12
21
2324
13
14
25 26
19
18
1
17
16
15
27
B
2828
48
29
30
31
32
33
34
35
36
37
38
39
40
41
42
43
44
45
46
47

Inhaltsverzeichnis
Einführung . . . . . . . . . . . . . . . .2
Informationen zu dieser
Bedienungsanleitung . . . . . . . . . . . . 2
Urheberrecht. . . . . . . . . . . . . . . . . . . 2
Bestimmungsgemäße Verwendung .2
Warnhinweise . . . . . . . . . . . . . . . . . . 3
Sicherheit . . . . . . . . . . . . . . . .4
Gefahr durch elektrischen Strom . . . 4
Umgang mit Batterien . . . . . . . . . . . . 4
Grundlegende Sicherheitshinweise . 5
Bedienelemente . . . . . . . . . . . 6
Aufstellen und Anschließen . .8
Sicherheitshinweise . . . . . . . . . . . . . . 8
Lieferumfang und Transportinspektion . 8
Auspacken . . . . . . . . . . . . . . . . . . . . 8
Entsorgung der Verpackung . . . . . . . 9
Anforderungen an den Aufstellort . . 9
Elektrischer Anschluss . . . . . . . . . . . . 9
Gerätebatterie . . . . . . . . . . . . . . . .10
Fernbedienungsbatterie . . . . . . . . . 10
Anbringung unter einem
Hängeschrank . . . . . . . . . . . . . . . .11
Demontage . . . . . . . . . . . . . . . . . . .12
Aufstellen des Gerätes . . . . . . . . . .12
Station für iPod/iPhone vorbereiten 12
Stromversorgung herstellen . . . . . . .12
UKW-Wurfantenne . . . . . . . . . . . . .12
Bedienung und Betrieb . . . .13
Ein- und Ausschalten . . . . . . . . . . . .13
Grundeinstellungen . . . . . . . . . . . .13
Einstellmenü aktivieren . . . . . . . . . . 14
Alarm programmieren . . . . . . . . . .18
Küchentimer . . . . . . . . . . . . . . . . . . 21
Küchentimer programmieren. . . . . .22
Radiobetrieb . . . . . . . . . . . . . . . . . .23
Wiedergabe von externen
Audiogeräten . . . . . . . . . . . . . . . . .26
Anschluss iPod/iPhone . . . . . . . . . .26
Weitere Funktionen . . . . . . . . . . . . .28
Reinigung . . . . . . . . . . . . . . .31
Sicherheitshinweise . . . . . . . . . . . . .31
Gehäuse reinigen . . . . . . . . . . . . . . 31
Fehlerbehebung . . . . . . . . . .31
Sicherheitshinweise . . . . . . . . . . . . .31
Fehlerursachen und -behebung . . . 32
Lagerung/Entsorgung . . . . .33
Lagerung . . . . . . . . . . . . . . . . . . . .33
Gerät entsorgen . . . . . . . . . . . . . . .33
Batterien entsorgen . . . . . . . . . . . . .33
Anhang . . . . . . . . . . . . . . . . .33
Hinweise zur
EG-Konformitätserklärung . . . . . . . .33
Technische Daten . . . . . . . . . . . . . .34
Garantie . . . . . . . . . . . . . . . . . . . . . 35
Service . . . . . . . . . . . . . . . . . . . . . . 35
Importeur . . . . . . . . . . . . . . . . . . . .35
DE
AT
CH
SKRI 2000 A1
1

Einführung
DE
AT
CH
Einführung
Informationen zu dieser Bedienungsanleitung
Diese Bedienungsanleitung ist Bestandteil des Unterbau-Radios SKRI 2000 A1
(nachfolgend als Gerät bezeichnet) und gibt Ihnen wichtige Hinweise für den
bestimmungsgemäßen Gebrauch, die Sicherheit, den Anschluss sowie die
Bedienung des Gerätes.
Die Bedienungsanleitung muss ständig in der Nähe des Gerätes verfügbar sein.
Sie ist von jeder Person zu lesen und anzuwenden, die mit der Bedienung und
Störungsbehebung des Gerätes beauftragt ist.
Bewahren Sie diese Bedienungsanleitung auf und geben Sie diese mit dem
Gerät an Nachbesitzer weiter.
Urheberrecht
Diese Dokumentation ist urheberrechtlich geschützt. Jede Vervielfältigung, bzw.
jeder Nachdruck, auch auszugsweise, sowie die Wiedergabe der Abbildungen,
auch im veränderten Zustand ist nur mit schriftlicher Zustimmung des Herstellers
gestattet.
Bestimmungsgemäße Verwendung
Dieses Gerät ist nur zum Empfang von UKW-Radioprogrammen, als Küchentimer,
zum Alarmgeben durch Alarmton, Radio oder iPod/iPhone und zum Anschluss
von externen Audiogeräten (z.B. MP3-Player) und iPod/iPhone in geschlossenen
Räumen bestimmt. Das Gerät ist zur freien Aufstellung oder zur Montage unter
einem Hängeschrank bestimmt. Hierzu müssen die integrierten Stellfüße bzw.
die mitgelieferte Montageplatte verwendet werden. Eine andere oder darüber
hinausgehende Benutzung gilt als nicht bestimmungsgemäß. Das Gerät ist nicht
zur Verwendung in gewerblichen oder industriellen Bereichen vorgesehen.
Ansprüche jeglicher Art wegen Schäden aus nicht bestimmungsgemäßer Verwendung, unsachgemäßen Reparaturen, unerlaubt vorgenommener Veränderungen
oder Verwendung nicht zugelassener Ersatzteile sind ausgeschlossen. Das Risiko
trägt allein der Benutzer.
„Made for iPod“ und „Made for iPhone“ bedeutet, dass ein elektronisches Zubehörteil speziell für den Anschluss an einen iPod oder ein iPhone konzipiert wurde
und der Entwickler sich dafür verbürgt, dass das Gerät den Leistungsstandards von
Apple entspricht. Apple ist nicht verantwortlich für den Betrieb dieses Gerätes oder
dafür, dass es Sicherheits- und Regulierungsstandards einhält. Beachten Sie, dass
die Verwendung dieses Zubehörteils mit einem iPod, iPhone die drahtlose Leistung
beeinfl ussen kann. iPad, iPhone, iPod, iPod classic, iPod nano, iPod shuffl e und
iPod touch sind Warenzeichen der Apple Inc., eingetragen in den USA und anderen
Ländern. iPad ist ein Warenzeichen der Apple Inc.
2
SKRI 2000 A1

Einführung
Warnhinweise
In der vorliegenden Bedienungsanleitung werden folgende Warnhinweise verwendet:
GEFAHR
Ein Warnhinweis dieser Gefahrenstufe kennzeichnet eine
drohende gefährliche Situation.
Falls die gefährliche Situation nicht vermieden wird, kann dies zum Tod oder
zu schweren Verletzungen führen.
►
Die Anweisungen in diesem Warnhinweis befolgen, um die Gefahr des
Todes oder schwerer Verletzungen von Personen zu vermeiden.
WARNUNG
Ein Warnhinweis dieser Gefahrenstufe kennzeichnet eine
mögliche gefährliche Situation.
Falls die gefährliche Situation nicht vermieden wird, kann dies zu Verletzungen
führen.
Die Anweisungen in diesem Warnhinweis befolgen, um Verletzungen von
►
Personen zu vermeiden.
ACHTUNG
Ein Warnhinweis dieser Gefahrenstufe kennzeichnet einen
möglichen Sachschaden.
Falls die Situation nicht vermieden wird, kann dies zu Sachschäden führen.
►
Die Anweisungen in diesem Warnhinweis befolgen, um Sachschäden zu
vermeiden.
DE
AT
CH
SKRI 2000 A1
HINWEIS
Ein Hinweis kennzeichnet zusätzliche Informationen, die den Umgang mit ►
dem Gerät erleichtern.
3

Sicherheit
DE
AT
CH
Sicherheit
In diesem Kapitel erhalten Sie wichtige Sicherheitshinweise im Umgang mit
dem Gerät.
Dieses Gerät entspricht den vorgeschriebenen Sicherheitsbestimmungen.
Ein unsachgemäßer Gebrauch kann zu Personen- und Sachschäden führen.
Gefahr durch elektrischen Strom
GEFAHR
Lebensgefahr durch elektrischen Strom!
Beim Kontakt mit unter Spannung stehenden Leitungen oder
Bauteilen besteht Lebensgefahr!
Beachten Sie die folgenden Sicherheitshinweise um eine Gefährdung durch
elektrischen Strom zu vermeiden:
►
Benutzen Sie das Gerät nicht, wenn das Steckernetzteil, das Anschlusskabel
oder der Anschlussstecker beschädigt sind.
Öff nen Sie auf keinen Fall das Steckernetzteil. Werden spannungsführende ►
Anschlüsse berührt und der elektrische und mechanische Aufbau verändert,
besteht Stromschlaggefahr.
Umgang mit Batterien
WARNUNG
Gefahr durch nicht ordnungsgemäße Verwendung! Es besteht
Explosions- und Auslaufgefahr!
Für den sicheren Umgang mit Batterien beachten Sie folgende Sicherheitshinweise:
Werfen Sie Batterien nicht ins Feuer.
►
Schließen Sie Batterien nicht kurz. ►
Versuchen Sie nicht Batterien wieder aufzuladen. ►
Überprüfen Sie regelmäßig die Batterien. Ausgetretene Batteriesäure kann ►
dauerhafte Schäden am Gerät verursachen. Im Umgang mit beschädigten
oder ausgelaufen Batterien besondere Vorsicht walten lassen. Verätzungsgefahr! Schutzhandschuhe tragen.
Batterien für Kinder unzugänglich aufbewahren. Bei Verschlucken umgehend ►
einen Arzt aufsuchen.
Entnehmen Sie die Batterien, wenn Sie das Gerät längere Zeit nicht benutzen. ►
4
SKRI 2000 A1

Sicherheit
Grundlegende Sicherheitshinweise
Beachten Sie für einen sicheren Umgang mit dem Gerät die folgenden
Sicherheitshinweise:
■
Kontrollieren Sie das Gerät vor der Verwendung auf äußere sichtbare Schäden.
Nehmen Sie ein beschädigtes oder heruntergefallenes Gerät nicht in Betrieb.
Bei Beschädigung der Kabel oder Anschlüsse lassen Sie diese von autorisiertem
■
Fachpersonal oder dem Kundenservice austauschen.
Dieses Gerät ist nicht dafür bestimmt, durch Personen (einschließlich Kinder)
■
mit eingeschränkten physischen, sensorischen oder geistigen Fähigkeiten
oder mangels Erfahrung und/oder mangels Wissen benutzt zu werden, es
sei denn, sie werden durch eine für ihre Sicherheit zuständige Person beaufsichtigt oder erhielten von ihr Anweisungen, wie das Gerät zu benutzen ist.
Kinder sollten beaufsichtigt werden, um sicherzustellen, dass sie nicht mit
■
dem Gerät spielen.
Lassen Sie Reparaturen am Gerät nur von autorisierten Fachbetrieben oder
■
dem Kundenservice durchführen. Durch unsachgemäße Reparaturen können
Gefahren für den Benutzer entstehen. Zudem erlischt der Garantieanspruch.
Eine Reparatur des Gerätes während der Garantiezeit darf nur von einem vom
■
Hersteller autorisierten Kundendienst vorgenommen werden, sonst besteht bei
nachfolgenden Schäden kein Garantieanspruch mehr.
Defekte Bauteile dürfen nur gegen Original-Ersatzteile ausgetauscht werden.
■
Nur bei diesen Teilen ist gewährleistet, dass sie die Sicherheitsanforderungen
erfüllen werden.
Schützen Sie das Gerät vor Feuchtigkeit und dem Eindringen von Flüssigkeiten.
■
Tauchen Sie das Gerät niemals unter Wasser, stellen Sie das Gerät nicht in der
Nähe von Wasser auf und stellen Sie keine mit Flüssigkeit gefüllten Gegenstände (z.B. Vasen) auf das Gerät.
Stellen Sie keine Gegenstände auf das Gerät.
■
Das Gerät nicht in der Nähe von off enen Flammen (z.B. Kerzen) betreiben. ■
Vermeiden Sie direkte Sonneneinstrahlung. ■
Die Zuleitung immer am Steckernetzteil aus der Steckdose ziehen, nicht am ■
Anschlusskabel.
Ziehen Sie bei auftretenden Störungen und bei Gewitter das Steckernetzteil
■
aus der Steckdose.
DE
AT
CH
SKRI 2000 A1
5
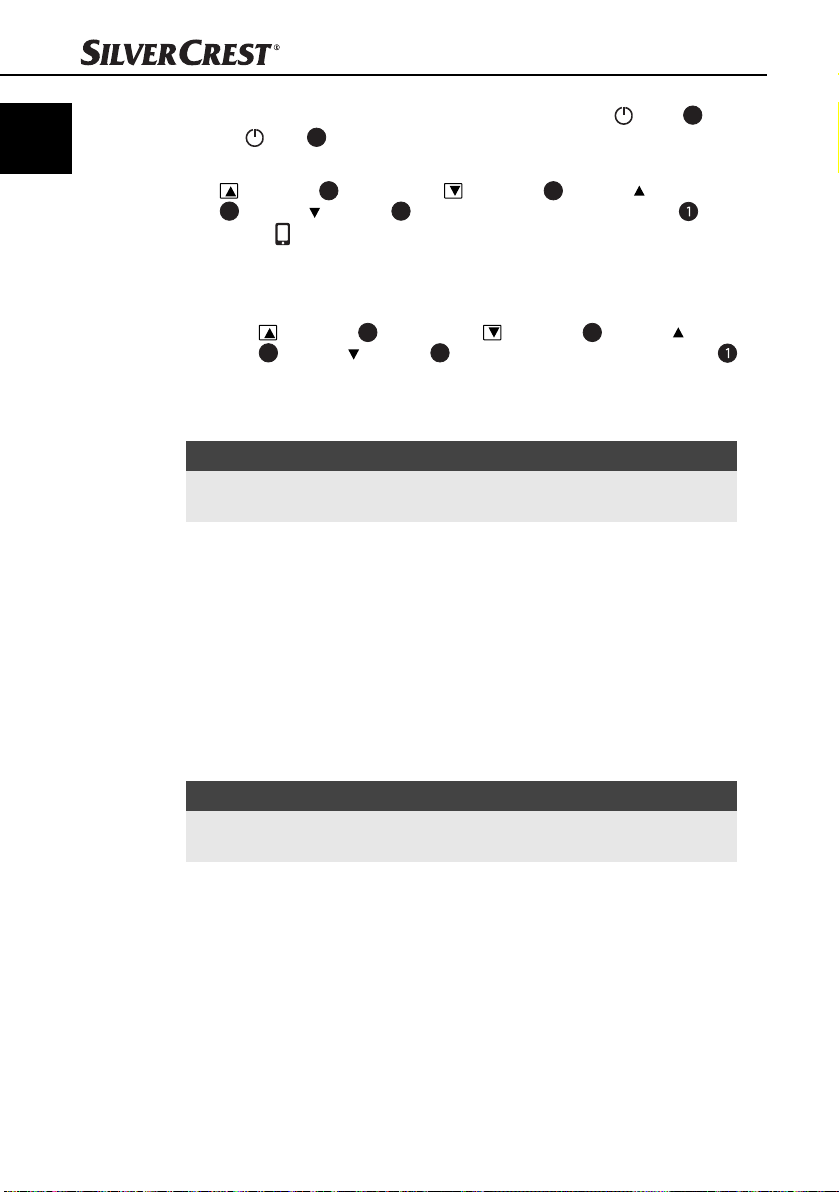
Bedienelemente
i-Time Sync
I Enter
i
i
i
i
DE
AT
CH
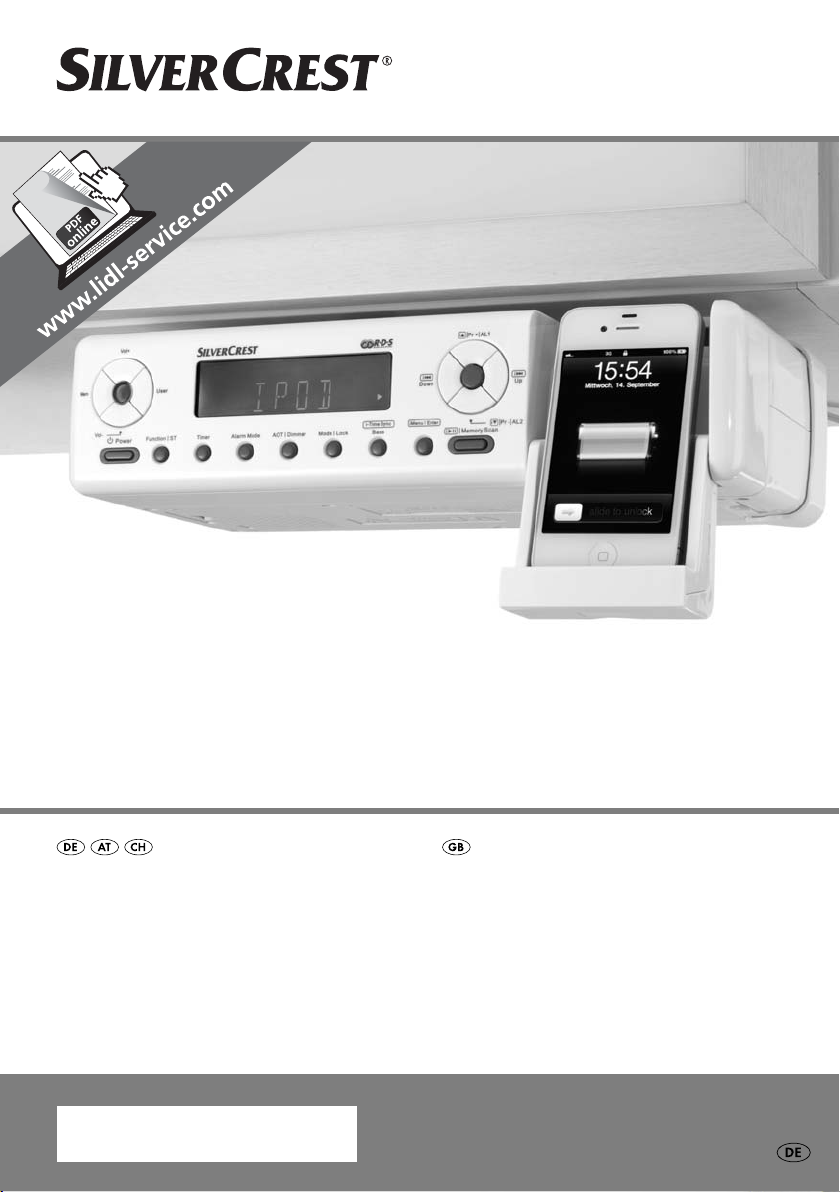
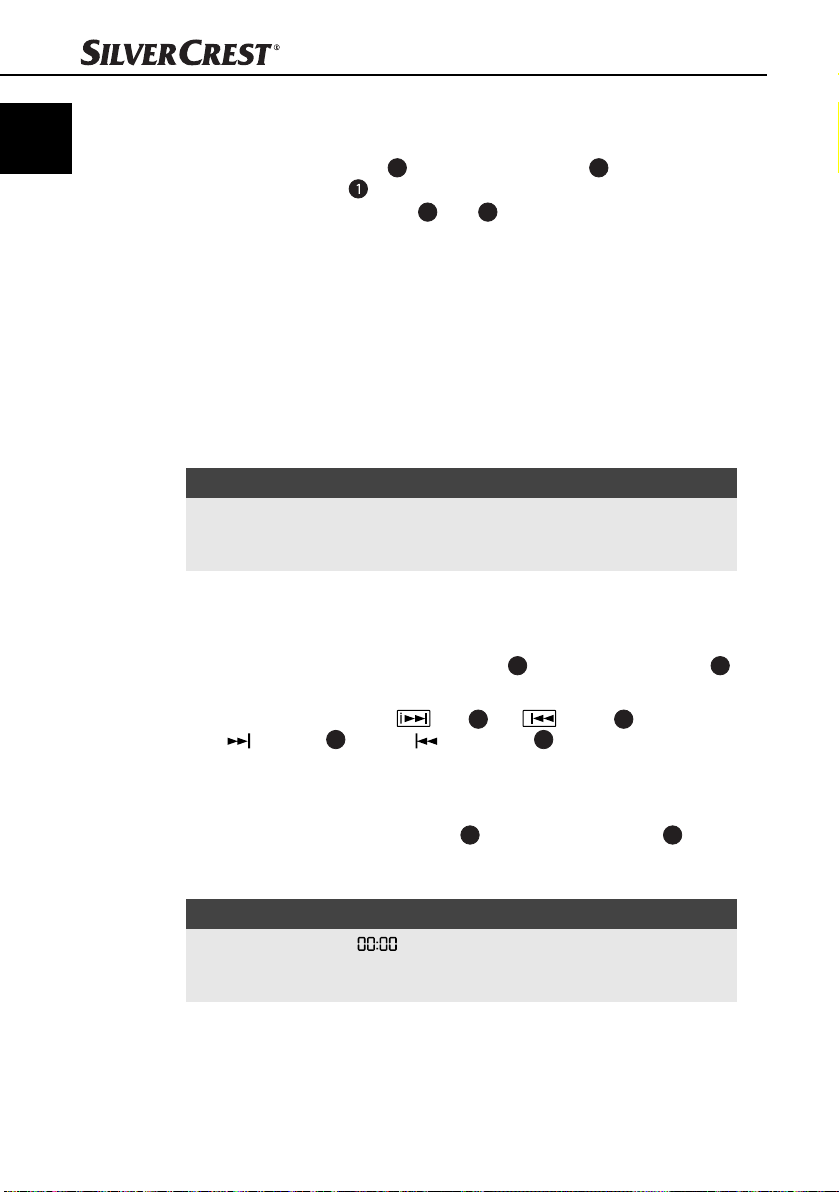
Bedienelemente
(Abbildungen siehe vordere Ausklappseite Bild A)
Display
2
User: Benutzer wählen
3
Vol+: Lautstärke erhöhen
4
Mem: Speicherplatzwahl
5
Vol–: Lautstärke senken
6
Power: Ein-/ausschalten
7
Function / ST: Funktionswahl / Stereoaktivierung
8
Timer: Timer einstellen und aktivieren
9
Alarm Mode: Alarmart auswählen
10
AOT / Dimmer: Ausschalttimer / Displaydimmer ein-/ausschalten
11
Mode / Lock: Einstellmenü aufrufen / Tastensperre
12
i-Time Sync
13
14
i
Steckernetzteil
15
/ Pr– / AL2: Vorherige Funktion beim iPod/iPhone / Vorherigen Speicherplatz
16
i
17
/ Pr+ / AL1: Nächste Funktion beim iPod/iPhone / Nächsten Speicherplatz
18
i
19
i
Montageplatte
20
21
Stellfüße (ausklappbar)
22
Sicherungsbügel für iPod/iPhone
23
Lautsprecher
24
Batteriefach
25
DC-Buchse: Stromanschlussbuchse (7V) für Steckernetzteil
AUX IN-Buchse: Eingangs-Anschlussbuchse für Audiogeräte mit 3,5mm Klinkenstecker
26
27
Wurfantenne für UKW-Empfang
Bass: Zeitanzeige und Datum mit iPod/iPhone synchronisieren / Bass-
anhebung
I Enter
: Bedienung beim iPod/iPhone / Eingabe
/ Memory Scan: Pause/Abspielen beim iPod/iPhone / automatischer Sender-
suchlauf / gespeicherte Radiosender abrufen
anwählen / Alarm 2 einstellen
/ Up: Schneller Vorlauf beim iPod/iPhone / Empfangsfrequenz erhöhen
anwählen / Alarm 1 einstellen
/ Down: Schneller Rücklauf beim iPod/iPhone / Empfangsfrequenz senken
6
SKRI 2000 A1

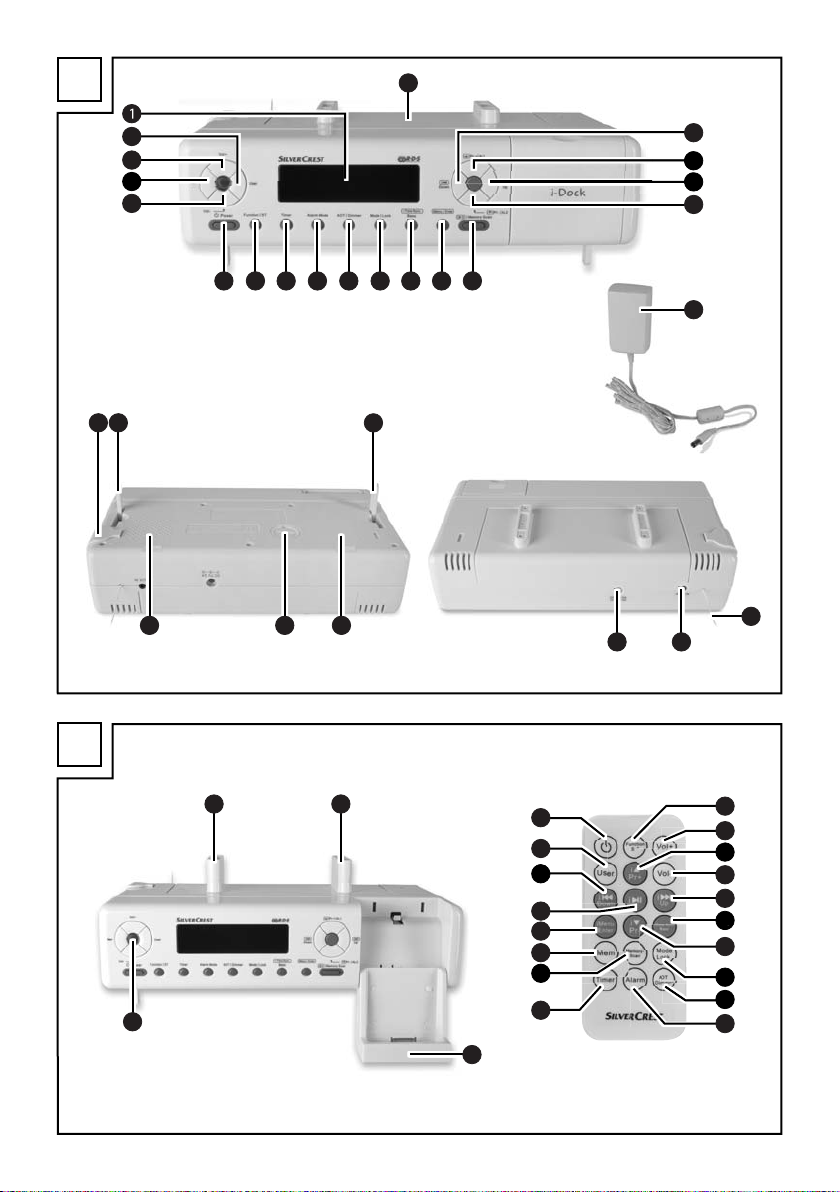
Bedienelemente
i
(Abbildungen siehe vordere Ausklappseite Bild B)
28
Abstandshalter (für Unterbaumontage)
29
Station für iPod/iPhone
30
: Ein-/ausschalten
31
User: Benutzer wählen
32
i / Down: Schneller Rücklauf beim iPod/iPhone / Empfangsfrequenz senken
33
i : Pause/Abspielen beim iPod/iPhone
34
iMenu / Enter: Bedienung beim iPod/iPhone / Eingabe
35
Mem: Speicherplatzwahl
36
Memory-Scan: automatischer Sendersuchlauf / gespeicherte Radiosender abrufen
37
Timer: Timer einstellen und aktivieren
38
Function / ST: Funktionswahl / Stereoaktivierung Mode: Einstellmenü
39
Vol +: Lautstärke erhöhen
40
i / Pr+: Nächste Funktion beim iPod/iPhone / Nächsten Speicherplatz anwählen
41
Vol -: Lautstärke senken
42
i / Up: Schneller Vorlauf beim iPod/iPhone / Empfangsfrequenz erhöhen
43
iTime Sync / Bass: Zeitanzeige und Datum mit iPod/iPhone synchronisieren / Bass-
i
44
/ Pr–: Vorherigen Speicherplatz anwählen / Vorherige Funktion beim iPod/iPhone
45
Mode / Lock: Einstellmenü aufrufen / Tastensperre
46
AOT / Dimmer: Ausschalttimer / Displaydimmer ein-/ausschalten
47
Alarm: Alarmart auswählen
48
Sensor für Fernbedienung
DE
AT
CH
anhebung
SKRI 2000 A1
7

Aufstellen und Anschließen
DE
AT
CH
Aufstellen und Anschließen
Sicherheitshinweise
WARNUNG
Bei der Inbetriebnahme des Gerätes können Personen- und
Sachschäden auftreten!
Beachten Sie die folgenden Sicherheitshinweise, um die Gefahren zu vermeiden:
Verpackungsmaterialien dürfen nicht zum Spielen verwendet werden.
►
Es besteht Erstickungsgefahr.
►
Beachten Sie die Hinweise zu den Anforderungen an den Aufstellort sowie
zum elektrischen Anschluss des Gerätes, um Personen- und Sachschäden
zu vermeiden.
Lieferumfang und Transportinspektion
Das Gerät wird standardmäßig mit folgenden Komponenten geliefert:
Unterbau-Radio SKRI 2000 A1
▯
Steckernetzteil JVSW0702000 ▯
Montageplatte ▯
4 Befestigungsschrauben (kurz) ▯
2 x Abstandshalter inkl. 4 Befestigungsschrauben (lang) ▯
Sicherungsbügel für iPod/iPhone ▯
1 x Batterie 3 V Typ CR2032 ▯
1 x Batterie 3 V Typ CR2025 ▯
Fernbedienung ▯
Klinke-Kabel 3,5 auf 3,5 mm (50 cm) ▯
Diese Bedienungsanleitung ▯
Auspacken
8
HINWEIS
Prüfen Sie die Lieferung auf Vollständigkeit und auf sichtbare Schäden. ►
Bei einer unvollständigen Lieferung oder Schäden infolge mangelhafter ►
Verpackung oder durch Transport wenden Sie sich an die Service-Hotline
(siehe Kapitel Service S. 35).
Entnehmen Sie alle Teile des Gerätes und die Bedienungsanleitung aus dem ♦
Karton.
Entfernen Sie sämtliches Verpackungsmaterial.
♦
SKRI 2000 A1

Aufstellen und Anschließen
Entsorgung der Verpackung
Die Verpackung schützt das Gerät vor Transportschäden. Die Verpackungsmaterialien sind nach umweltverträglichen und entsorgungstechnischen Gesichtspunkten
ausgewählt und deshalb recyclebar.
Die Rückführung der Verpackung in den Materialkreislauf spart Rohstoff e und
verringert das Abfallaufkommen. Entsorgen Sie nicht mehr benötigte Verpackungsmaterialien gemäß den örtlich geltenden Vorschriften.
HINWEIS
Heben Sie wenn möglich die Originalverpackung während der Garantiezeit ►
des Gerätes auf, um das Gerät im Garantiefall ordnungsgemäß verpacken
zu können.
Anforderungen an den Aufstellort
Für einen sicheren und fehlerfreien Betrieb des Gerätes muss der Aufstellort
folgende Voraussetzungen erfüllen:
■
Bei Aufstellung des Gerätes das Gerät auf eine feste, fl ache und waagerechte
Unterlage stellen. Verwenden Sie die ausklappbaren Stellfüße.
Das Gerät so aufstellen oder montieren, dass vorhandene Lüftungsöff nungen
■
und die Lautsprecher nicht verdeckt werden.
Betreiben Sie das Gerät nicht in einer heißen, nassen oder sehr feuchten
■
Umgebung oder in der Nähe von brennbarem Material.
Montieren Sie das Gerät nicht direkt über einer Kochstelle.
■
Die Steckdose muss leicht zugänglich sein, so dass das Steckernetzteil ■
notfalls leicht abgezogen werden kann.
DE
AT
CH
Elektrischer Anschluss
Das Gerät wird über das mitgelieferte Steckernetzteil mit einer Gleichspannung ■
von 7V versorgt. Schließen Sie das Gerät ausschließlich über das mitgelieferte
Steckernetzteil an die Stromversorgung an.
Vergleichen Sie vor dem Anschließen des Gerätes die Anschlussdaten des
■
Steckernetzteils (Spannung und Frequenz) auf dem Typenschild mit denen Ihres
Elektronetzes. Diese Daten müssen übereinstimmen, damit keine Schäden am
Gerät auftreten.
Schützen Sie das Anschlusskabel vor heißen Oberfl ächen und scharfen Kanten.
■
Achten Sie darauf, dass das Anschlusskabel nicht straff gespannt oder ■
geknickt wird.
Lassen Sie das Anschlusskabel nicht über Ecken hängen (Stolperdrahteff ekt).
■
Wenn Sie das Gerät für längere Zeit nicht nutzen, trennen Sie das Stecker- ■
netzteil von der Stromversorgung.
SKRI 2000 A1
9
Aufstellen und Anschließen
DE
AT
CH
Gerätebatterie
Durch Einlegen der Batterie vermeiden Sie, dass bei einem möglichen Netzausfall
die programmierte Uhrzeit, programmierte Speicherplätze und Alarmzeiten
verloren gehen. Die Batterie bewirkt, dass die interne Uhr und das Datum auch
während des Netzausfalls weiterlaufen. Bei Wiedereinschalten des Netzstroms
erscheint auf dem Display
HINWEIS
Das Gerät kann auch ohne Batterie betrieben werden. ►
Batterie einlegen/wechseln
Öff nen Sie die Abdeckung des Batteriefachs ♦
indem Sie die Abdeckung mit einer Münze bis zum Anschlag nach links
drehen und abheben.
Legen Sie die Batterie vom Typ CR2032 (im Lieferumfang enthalten) in das
♦
Batteriefach ein. Die Seite mit der Markierung + zeigt nach oben.
Schließen Sie das Batteriefach, indem Sie die Abdeckung aufsetzen und die
♦
Abdeckung mit einer Münze nach rechts drehen.
Fernbedienungsbatterie
Batterie aktivieren
Die Batterie für die Fernbedienung ist bei Auslieferung bereits eingelegt.
Aktivieren Sie die Batterie, indem Sie den Isolationsstreifen entfernen. ♦
automatisch die korrekte Zeit.
24
auf der Geräteunterseite,
10
Batterie wechseln
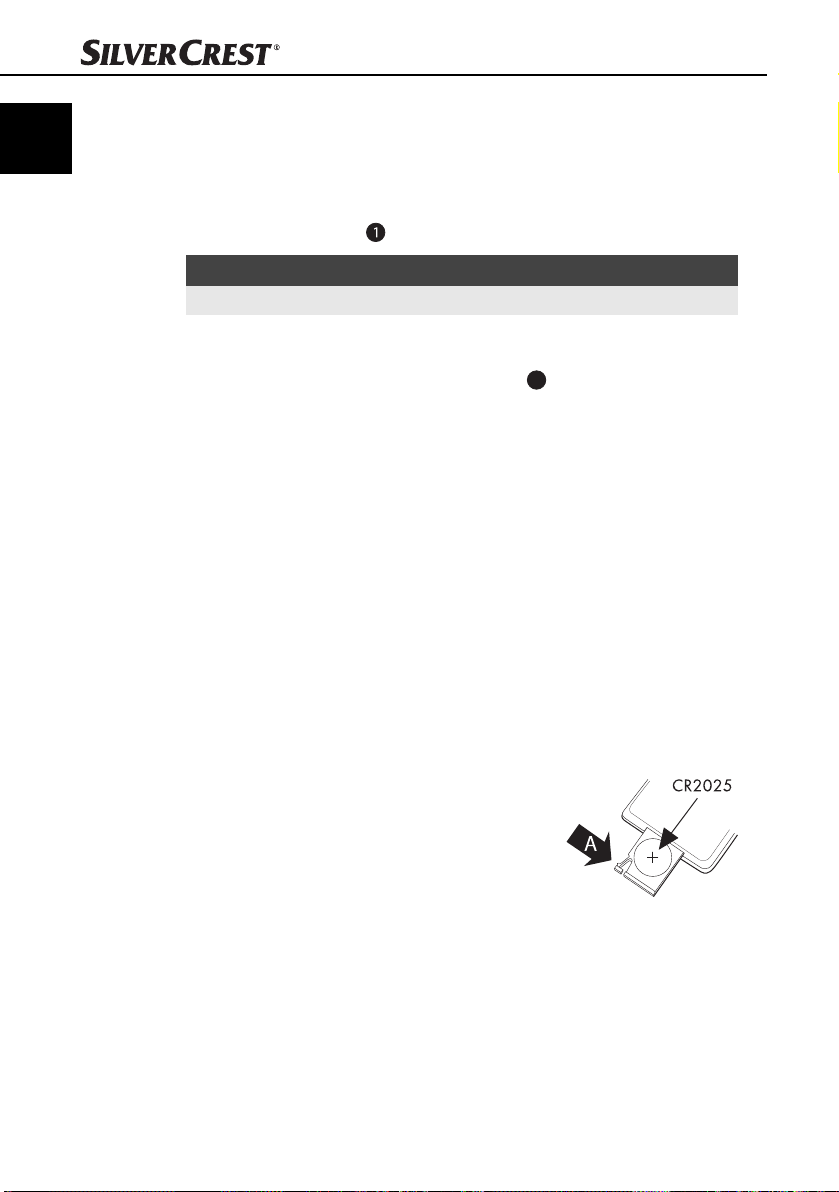
Drücken Sie mit dem Fingernagel die Kerbe (A) ♦
nach rechts und ziehen Sie gleichzeitig das
Batteriefach heraus.
Legen Sie eine 3 V Batterie vom Typ CR 2025
♦
in das Batteriefach ein. Die Seite mit der Markierung „+“ zeigt nach oben.
Schieben Sie das Batteriefach wieder ganz in
♦
die Fernbedienung ein.
SKRI 2000 A1

Aufstellen und Anschließen
Anbringung unter einem Hängeschrank
Sie können das Gerät mit der mitgelieferten Montageplatte 20 z.B. unter einem
Hängeschrank montieren. Zur Montage des Gerätes gehen Sie wie folgt vor:
Schieben Sie die Montageplatte
♦
20
Montageplatte
Suchen Sie eine geeignete Anbaustelle für das Gerät aus (siehe auch
♦
Kapitel Anforderungen an den Aufstellort S. 9).
♦
Halten Sie die Montageplatte
die Vorderkante der Montageplatte
Hängeschrankes befi nden, damit das Gerät nach der Montage bündig mit
dem Hängeschrank abschließt. Die Seitenkanten der Montageplatte
müssen einen Abstand von ca. 4,5 cm zu angrenzenden Schränken oder
Wänden haben.
ab.
20
nach hinten und nehmen Sie die
20
unter die Anbaustelle. Dabei sollte sich
20
ca. 6,8 cm hinter der Front des
20
DE
AT
CH
SKRI 2000 A1
HINWEIS
Wenn Sie das Gerät linksbündig an einem angrenzenden Schrank bzw. einer ►
Wand montieren möchten, entfernen Sie vorher den Sicherungsbügel 22
vom Gerät.
♦
Markieren Sie die 4 Befestigungspunkte mit einem Stift.
Erzeugen Sie mit einem Dorn oder Nagel jeweils eine kleine Vertiefung an ♦
den Markierungen.
♦
Setzen Sie wahlweise die mitgelieferten Abstandshalter
in die jeweilige Vertiefung auf der Montageplatte
Schrauben Sie die Montageplatte ♦
(siehe Abbildung).
20
mit den mitgelieferten Schrauben fest
28
mit der Haltenase
20
.
11

Aufstellen und Anschließen
DE
AT
CH
Setzen Sie das Gerät schräg mit den vorderen Aussparungen in der Ober- ♦
seite des Gerätes in die Montageplatte 20 ein. Drücken Sie den hinteren
Teil des Gerätes nach oben gegen die Montageplatte
hörbar einrastet.
♦
Prüfen Sie den sicheren Sitz des Gerätes.
Demontage
Ziehen Sie das Gerät nach vorne und nehmen Sie das Gerät nach unten ab. ♦
Drehen Sie die Schrauben an der Montageplatte ♦
20
Sie die Montageplatte
ab.
Aufstellen des Gerätes
Sie können das Gerät alternativ auch aufstellen. Um bei der Aufstellung die
23
Lüftungsschlitze und die Lautsprecher
cken, müssen die beiden Stellfüße
♦
Greifen Sie in die Mulde an der Seite des jeweiligen Stellfußes und klappen
Sie den Stellfuß bis zum Anschlag aus.
Suchen Sie einen geeigneten Aufstellort für das Gerät aus (siehe auch
♦
Kapitel Anforderungen an den Aufstellort S. 9).
an der Geräteunterseite nicht zu verde-
21
des Gerätes ausgeklappt werden:
Station für iPod/iPhone vorbereiten
Sie können Ihren iPod/Ihr iPhone an das Gerät anschließen. Dazu müssen Sie
29
die Station
Klappen Sie die Station
♦
Entfernen Sie den Sicherungsbügel
♦
♦
An den Seiten der Station
Sie den Sicherungsbügel
nasen in den Aussparungen einrasten.
herunterklappen und den Sicherungsbügel 22 montieren:
29
ganz nach unten.
22
von der Seite des Gerätes.
29
befi ndet sich jeweils eine Aussparung. Schieben
22
von vorn so auf die Station 29, dass die Halte-
20
, bis das Gerät
20
heraus und nehmen
Stromversorgung herstellen
Schließen Sie den Anschlussstecker des Steckernetzteils ♦
25
auf der Rückseite des Gerätes an.
♦
Stecken Sie das Steckernetzteil
UKW-Wurfantenne
Wickeln Sie die Wurfantenne ♦
12
15
an die DC-Buchse
15
in die Steckdose.
27
für den UKW-Empfang ganz ab.
SKRI 2000 A1

Bedienung und Betrieb
Bedienung und Betrieb
In diesem Kapitel erhalten Sie wichtige Hinweise zur Bedienung und Betrieb des
Gerätes.
Ein- und Ausschalten
Nach dem Anschließen des Gerätes an die Stromversorgung startet die automatische
Systemeinstellung. Auf dem Display
„PLEASE WAIT FOR SETTING THANKS“. Wird in dieser Zeit ein Signal empfangen,
wird das System automatisch aktualisiert.
HINWEIS
Um diesen Vorgang abzubrechen, drücken Sie eine beliebige Taste. ►
Das System startet dann mit folgenden Standardeinstellungen:
Datum/Zeit:
■
Radio ist ausgeschaltet ■
Betriebsart Uhr/Standby-Betrieb ist aktiv ■
Displaydimmer ist aktiv ■
Mit dem Anschluss an die Stromversorgung schaltet das Gerät in den Uhr/StandbyBetrieb. Über die Taste
wird das Gerät ein- bzw. ausgeschaltet.
Über die Taste Function / ST
nung schalten Sie zwischen den Betriebsarten Radio, iPod und AUX hin und her.
HINWEIS
Power 6 oder die -Taste 30 auf der Fernbedienung
7
DE
AT
CH
erscheint für ca. 3 bis 5 Minuten der Text
oder die Taste Function / ST 38 auf der Fernbedie-
Die Taste ► Power 6 oder die -Taste 30 auf der Fernbedienung trennen das Gerät nicht vollständig vom Stromnetz. Das Gerät verbraucht auch
im Standby-Betrieb Strom. Um das Gerät vollständig vom Stromnetz zu
trennen, muss das Steckernetzteil
Grundeinstellungen
Nach dem Anschließen des Gerätes an die Stromversorgung zeigt das Gerät auf
dem Display
der Betriebsart Uhr/Standby-Betrieb.
SKRI 2000 A1
15
aus der Steckdose gezogen werden.
die Uhrzeit und den Wochentag an. Das Gerät befi ndet sich in
13
Bedienung und Betrieb
i
DE
AT
CH
Einstellmenü aktivieren
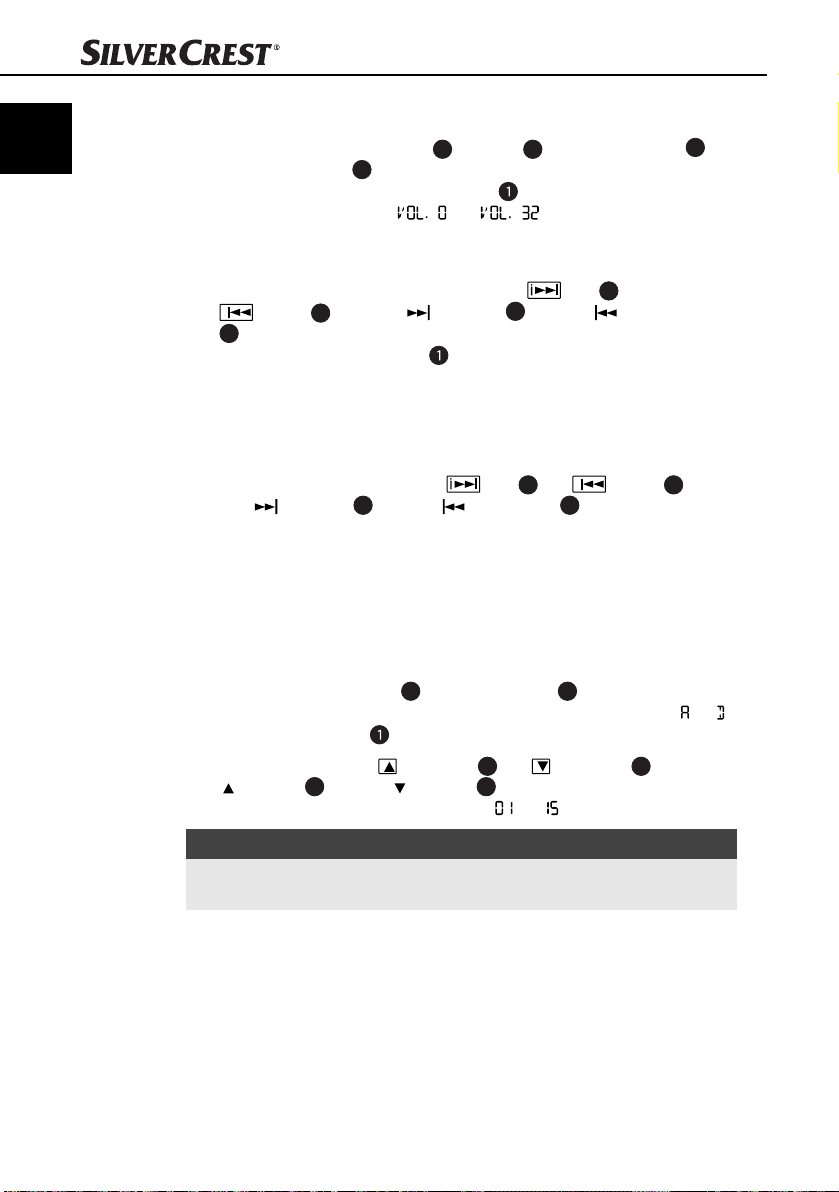
Um das Einstellmenü zu aktivieren, drücken Sie in der Betriebsart Uhr/StandbyBetrieb die Taste Mode / Lock
dienung. Die im Display
Betätigung der Taste Mode / Lock
möglichkeit um. Die Reihenfolge der Menüpunkte ist:
Uhrzeit einstellen
▯
Datum einstellen ▯
Erinnerungsfunktion einstellen ▯
Update-Modus einstellen ▯
Displaydimmer ein-/ausschalten ▯
Displaydimmer Startzeit einstellen ▯
Uhrzeitformat einstellen ▯
HINWEIS
Das Einstellmenü wird automatisch beendet, wenn Sie ca. 15 Sekunden ►
lang keine Taste betätigen. Die vorgenommenen Einstellungen werden
gespeichert.
Uhrzeit einstellen
Voraussetzung: Das Gerät befi ndet sich in der Betriebsart Uhr/Standby-Betrieb.
Drücken Sie einmal die Taste Mode / Lock
♦
auf der Fernbedienung. Die Uhrzeitanzeige beginnt zu blinken.
Stellen Sie mit den Tasten
♦
i
/ Up-Taste 42 und der i / Down Taste 32 auf der Fernbedienung
die aktuelle Uhrzeit ein. Pro Tastendruck wird die Uhrzeit um eine Minute
verändert. Ein Festhalten der jeweiligen Taste für mehr als 2 Sekunden
startet die Schnelleinstellung.
♦
Drücken Sie die Taste Mode / Lock
Fernbedienung erneut, um die aktuelle Einstellung zu speichern und zum
nächsten Menüpunkt zu wechseln.
11
oder die Mode Lock Taste 45 auf der Fernbe-
angezeigte Uhrzeit beginnt zu blinken. Jede weitere
11
oder 45 schaltet auf die nächste Einstell-
11
oder die Mode Lock Taste 45
/ Up 17 und
11
oder die Mode Lock Taste 45 auf der
/ Down 19 oder der
i
14
HINWEIS
Die Uhrzeit wird auf ► Uhr zurückgesetzt, wenn das Gerät von der
Stromversorgung getrennt wird und keine Batterie eingelegt ist oder die
Batterie zu schwach ist.
SKRI 2000 A1

Bedienung und Betrieb
i
i
i
Datum einstellen
Voraussetzung: Das Gerät befi ndet sich in der Betriebsart Uhr/Standby-Betrieb.
Drücken Sie zweimal die Taste Mode / Lock
♦
45
auf der Fernbedienung. Die Datumsanzeige beginnt zu blinken.
Stellen Sie mit den Tasten
♦
i
/ Up-Taste 42 und der i / Down Taste 32 auf der Fernbedienung
das aktuelle Datum ein. Pro Tastendruck wird das Datum um einen Tag
verändert. Die Wochentagsanzeige ändert sich automatisch. Ein Festhalten der
jeweiligen Taste für mehr als 2 Sekunden startet die Schnelleinstellung.
♦
Drücken Sie die Taste Mode / Lock
Fernbedienung erneut, um die aktuelle Einstellung zu speichern und zum
nächsten Menüpunkt zu wechseln.
HINWEIS
Das Datum wird auf ► zurückgesetzt, wenn das Gerät von der
Stromversorgung getrennt wird und keine Batterie eingelegt ist oder die
Batterie zu schwach ist.
/ Up 17 und
11
11
oder die Mode Lock Taste
/ Down 19 oder der
i
oder die Mode Lock Taste 45 auf der
Erinnerungsfunktion einstellen
Sie können bis zu 6 Datumswerte einstellen, an denen eine automatische Erinnerung ausgelöst wird. Die Funktion SDA (Special Day Alert) ist nützlich, um sich
z.B. an Geburtstage oder andere wiederkehrende Ereignisse erinnern zu lassen.
Die Erinnerung erfolgt jedes Jahr zum gleichen Datum. An diesem Datum ertönt
zu jeder vollen Stunde von 8:00 - 23:00 Uhr für 10 Minuten ein Alarmton.
Voraussetzung: Das Gerät befi ndet sich in der Betriebsart Uhr/Standby-Betrieb.
Drücken Sie dreimal die Taste Mode / Lock
♦
auf der Fernbedienung. Die aktuelle Einstellung des gewählten Erinnerungsdatums wird im Wechsel mit der Anzeige angezeigt. Neben der Anzeige
steht die Nummer des Speicherplatzes für das Datum. Mögliche Werte
sind bis .
♦
Wählen Sie mit der Taste
36
Scan
auf der Fernbedienung den Speicherplatz des einzustellenden
Datums aus.
Stellen Sie mit den Tasten
♦
i
/ Up-Taste 42 und der i / Down Taste 32 auf der Fernbedienung
das Datum für diesen Speicherplatz ein. Pro Tastendruck wird das Datum
um einen Tag verändert. Ein Festhalten der jeweiligen Taste für mehr als 2
Sekunden startet die Schnell einstellung.
/ Memory Scan 14 oder der Taste Memory-
i
/ Up 17 und
11
oder die Mode Lock Taste 45
/ Down 19 oder der
i
DE
AT
CH
SKRI 2000 A1
15

Bedienung und Betrieb
i
i
DE
AT
CH
HINWEIS
Drücken Sie die Taste Timer ►
bedienung, um das Jahr zu ignorieren. Im Display
Tag und der Monat angezeigt. Die Erinnerungsfunktion wird nun jedes
Jahr an diesem Datum aktiviert.
♦
Drücken Sie die Taste Mode / Lock
Fernbedienung erneut, um die aktuelle Einstellung zu speichern und zum
nächsten Menüpunkt zu wechseln.
8
oder die Timer Taste 37 auf der Fern-
werden nur der
11
oder die Mode Lock Taste 45 auf der
Update-Modus einstellen
Voraussetzung: Das Gerät befi ndet sich in der Betriebsart Uhr/Standby-Betrieb.
Drücken Sie viermal die Taste Mode / Lock
♦
auf der Fernbedienung. Im Display erscheint und ein blinkendes Uhrensymbol .
♦
Drücken Sie die Taste
der Fernbedienung, um die automatische RDS-Funktion auszuschalten. Das
blinkende Uhrensymbol erlischt.
♦
Drücken Sie die Taste
der Fernbedienung, um die automatische RDS-Funktion zu aktivieren. Das
blinkende Uhrensymbol erscheint.
Drücken Sie die Taste Mode / Lock ♦
Fernbedienung erneut, um die aktuelle Einstellung zu speichern und zum
nächsten Menüpunkt zu wechseln.
/ Down 19 oder die Taste i / Down 32 auf
i
/ Up 17 oder die Taste i / Up-Taste 42 auf
11
oder die Mode Lock Taste 45
11
oder die Mode Lock Taste 45 auf der
16
Zeitgesteuerte Displaydimmung ein-/ausschalten
Voraussetzung: Das Gerät befi ndet sich in der Betriebsart Uhr/Standby-Betrieb.
Das Gerät verfügt über zwei Möglichkeiten der Displaydimmung.
1. Zeitgesteuerte Displaydimmung
2. Displaydimmung manuell einstellen (siehe auch Kapitel Displaydimmer
manuell ein-/ausschalten S. 30).
Drücken Sie fünfmal die Taste Mode / Lock
♦
auf der Fernbedienung. Die aktuelle Einstellung des Displaydimmers wird
angezeigt ( oder ).
♦
Wählen Sie mit der Taste
Fernbedienung „ “, die Displaybeleuchtung erlischt nach 15 Sekunden.
Wählen Sie mit der Taste ♦
auf der Fernbedienung „ “, die Displaybeleuchtung leuchtet dauerhaft.
/ Up 17 oder der i / Up-Taste 42 auf der
/ Down 19 oder der i / Down Taste 32
i
11
oder die Mode Lock Taste 45
SKRI 2000 A1
Bedienung und Betrieb
i
Drücken Sie die Taste Mode / Lock ♦
Fernbedienung erneut, um die aktuelle Einstellung zu speichern und zum
nächsten Menüpunkt zu wechseln.
Modus Display-
Anzeige
Zeitst.
Dimmer
AUS
Zeitst.
Dimmer
EIN
DT OFF Wird durch
DT ON Standard-
Displaybeleuchtung
die AOT/
Dimmer Taste
eingestellt
mäßig von
23:00 - 5:59
ausgeschaltet
Steuerung mit der Taste AOT/Dimmer
46
oder
DIM OFF: Display leuchtet dauerhaft
DIM ON: Displaybeleuchtung aus; drücken einer
beliebigen Taste schaltet die Displaybeleuchtung für
15 s ein.
23:00 - 5:59 Uhr Drücken einer beliebigen
6:00 - 22:59 Uhr DIM OFF: Display leuchtet
Displaydimmer Startzeit einstellen
Voraussetzung: Das Gerät befi ndet sich in der Betriebsart Uhr/Standby-Betrieb.
Drücken Sie sechsmal die Taste Mode / Lock
♦
45
auf der Fernbedienung. Die aktuelle Startzeit des Displaydimmers ( )
wird im Wechsel mit der Anzeige angezeigt.
Stellen Sie mit den Tasten
♦
i
/ Up-Taste 42 und der i / Down-Taste 32 auf der Fernbedienung die
gewünschte Startzeit ein. Pro Tastendruck wird die Startzeit um eine Minute
verändert. Ein Festhalten der jeweiligen Taste für mehr als 2 Sekunden startet
die Schnelleinstellung.
♦
Drücken Sie die Taste Mode / Lock
Fernbedienung erneut, um die aktuelle Einstellung zu speichern und zum
nächsten Menüpunkt zu wechseln.
11
oder die Mode Lock Taste 45 auf der
Taste schaltet das Display für
60 s ein.
dauerhaft DIM ON: Displaybeleuchtung aus; drücken einer
beliebigen Taste schaltet die
Displaybeleuchtung für 15 s ein.
11
oder die Mode Lock Taste
/ Up 17 und
11
oder die Mode Lock Taste 45 auf der
/ Down 19 oder der
i
10
DE
AT
CH
Uhrzeitformat einstellen
SKRI 2000 A1
Voraussetzung: Das Gerät befi ndet sich in der Betriebsart Uhr/Standby-Betrieb.
Drücken Sie siebenmal die Taste Mode / Lock
♦
45
auf der Fernbedienung. Die aktuelle Einstellung des Uhrzeitformates wird
angezeigt ( = 24-Stunden-Format oder = 12-StundenFormat).
Stellen Sie mit der Taste ♦
der Fernbedienung das Uhrzeitformat auf
anzeige im 12-Stunden-Format wünschen.
/ Up 17 oder die Taste i / Up-Taste 42 auf
11
oder die Mode Lock Taste
, wenn Sie eine Uhrzeit-
17
Bedienung und Betrieb
i
i
DE
AT
CH
Stellen Sie mit der Taste ♦
der Fernbedienung das Uhrzeitformat auf
anzeige im 24-Stunden-Format wünschen.
Drücken Sie die Taste Mode / Lock
♦
der Fernbedienung erneut, um die aktuelle Einstellung zu speichern und zur
Grundeinstellung zurück zu kehren.
Alarm programmieren
Das Gerät verfügt über zwei Alarmtimer. Alle Einstellungen können für beide
Alarmtimer unabhängig voneinander vorgenommen werden. Sie können wählen,
ob zur programmierten Zeit ein Alarmton erklingen, das Radio oder der iPod/
das iPhone angehen soll.
HINWEIS
Wird während der Alarmprogrammierung ca. 15 Sekunden lang keine ►
Taste gedrückt, wird die Alarmzeit mit den aktuellen Einstellungen aktiviert.
Alarmzeit einstellen
Drücken Sie die Taste Alarm Mode ♦
Fernbedienung. Die eingestellte Alarmzeit des jeweiligen Alarms wird
blinkend im Display angezeigt und die Anzeige bzw. erscheint.
Über der Zeitanzeige werden die Wochentage angezeigt, an denen dieser
Alarm aktiviert ist.
Stellen Sie mit den Tasten
♦
i
/ Up-Taste 42 und der i / Down-Taste 32 auf der Fernbedienung die
gewünschte Alarmzeit ein. Pro Tastendruck wird die Alarmzeit um eine Minute
verändert. Ein Festhalten der jeweiligen Taste für mehr als 2 Sekunden startet
die Schnelleinstellung.
/ Down 19 oder der i / Down-Taste 32 auf
i
, wenn Sie eine Uhrzeit-
11
oder die Mode Lock Taste 45 auf
9
oder die Taste Alarm 47 auf der
/ Up 17 und
/ Down 19 oder der
i
18
Wochentage einstellen
Drücken Sie im Alarm-Modus die Taste Function / ST ♦
Function / ST
binationen Mo-Fr, Sa-So oder Mo-So umzuschalten. Die jeweils gewählte
Kombination wird über der Alarmzeit angezeigt.
♦
Drücken und halten Sie die Taste Function / ST
auf der Fernbedienung für mindestens 2 Sekunden gedrückt, um zwischen
den Wochentagskombinationen und der Einstellmöglichkeit für einen einzelnen
Wochentag umzuschalten.
HINWEIS
38
auf der Fernbedienung, um zwischen den Wochentagskom-
Bei der Einstellmöglichkeit für einen einzelnen Wochentag wechseln ►
Sie mit der Taste Function / ST 7 oder der Taste Function / ST 38 auf
der Fernbedienung zwischen den Wochentagen.
7
oder die Taste
7
oder die Function / ST 38
SKRI 2000 A1
Bedienung und Betrieb
i
i
i
i
Alarm mit Alarmton einstellen
Um für den jeweiligen Alarm „Alarmton“ auszuwählen drücken Sie im ♦
Alarm-Modus die Taste
bzw. die i
bis im Display
Pr+ Taste 40 oder die i Pr– Taste 44 auf der Fernbedienung,
das Symbol erscheint.
/ Pr+ / AL1 18 oder die Taste
i
i
Alarm mit Radio einstellen
Wenn das Radio zum Alarmzeitpunkt angehen soll, nehmen Sie vor der Aktivierung
des Alarms folgende Einstellungen vor:
Schalten Sie das Radio ein, indem Sie die Taste
♦ Power 6 oder die
Taste 30 auf der Fernbedienung drücken und mit der Taste Function / ST
7
oder der Taste Function / ST 38 auf der Fernbedienung die Betriebsart
Radio wählen.
Wählen Sie den Sender aus, mit dem Sie geweckt werden möchten
♦
(siehe Kapitel Sender manuell einstellen S. 24 oder Nächsten
Sender suchen S. 24).
♦
Stellen Sie mit den Tasten Vol+
der Vol– Taste
(siehe Kapitel Lautstärke einstellen S. 60).
Schalten Sie das Radio aus, indem Sie die Taste ♦ Power 6 oder die
Taste 30 auf der Fernbedienung drücken.
Um für den jeweiligen Alarm „Radio“ auszuwählen drücken Sie im Alarm-
♦
Modus die Taste
die i
Pr+ Taste 40 oder die i Pr– Taste 44 auf der Fernbedienung, bis im
Display das Symbol erscheint.
41
auf der Fernbedienung die gewünschte Lautstärke ein
/ Pr+ / AL1 18 oder die Taste
i
3
und Vol– 5 oder der Vol+ Taste 39 und
/ Pr– / AL2 16 bzw.
i
/ Pr– / AL2 16
DE
AT
CH
Alarm mit iPod/iPhone einstellen
SKRI 2000 A1
Wenn der iPod/das iPhone zum Alarmzeitpunkt angehen soll, nehmen Sie vor
der Aktivierung des Alarms folgende Einstellungen vor:
Schalten Sie das Gerät ein, indem Sie die Taste
♦ Power 6 oder die
30
Taste
auf der Fernbedienung drücken und mit der Taste Function / ST 7
oder der Taste Function / ST
wählen.
Setzen Sie Ihren iPod bzw. Ihr iPhone in die Station ♦
Wählen Sie auf Ihrem iPod/iPhone einen Titel (oder ein Album bzw. eine
♦
Wiedergabeliste) aus.
♦
Stellen Sie mit den Tasten Vol+
der Vol– Taste
(siehe Kapitel Lautstärke einstellen S. 60).
Schalten Sie Ihren iPod/Ihr iPhone in den Pausemodus, oder schalten Sie
♦
das Gerät aus.
41
auf der Fernbedienung die gewünschte Lautstärke ein
38
auf der Fernbedienung die Betriebsart
29
ein.
3
und Vol– 5 oder der Vol+ Taste 39 und
19
Bedienung und Betrieb
i
i
i
i
DE
AT
CH
Schalten Sie die Betriebsart iPod aus, indem Sie die Taste ♦ Power 6 oder
Taste 30 auf der Fernbedienung drücken.
die
Um für den jeweiligen Alarm „iPod“ auszuwählen drücken Sie die Taste
♦
/ Pr+ / AL1 18 oder die Taste
i
40
oder die i Pr– Taste 44 auf der Fernbedienung, bis im Display das
Symbol erscheint.
/ Pr– / AL2 16 bzw. die i Pr+ Taste
i
Alarm ausschalten
Um den jeweiligen Alarm auszuschalten, drücken Sie im Alarm-Modus die ♦
Taste
/ Pr+ / AL1 18 oder die Taste
i
40
Taste
oder die i Pr– Taste 44 auf der Fernbedienung, bis im Display
kein Symbol mehr angezeigt wird.
/ Pr– / AL2 16 bzw. die i Pr+
i
Wenn die Alarmzeit erreicht ist
HINWEIS
Ist der Alarmzeitpunkt erreicht, wird der Ausschalttimer (falls aktiviert) ►
sofort beendet.
Bei der Einstellung „Alarm mit Alarmton“ ertönt ein Signalton. Die Lautstärke des Signaltons wird bis zur Maximallautstärke kontinuierlich angehoben.
Die Dauer des Alarms ist auf 10 Minuten begrenzt. Das Radio wird dabei auf
„Mute“ geschaltet.
Bei der Einstellung „Alarm mit Radio“ wird das Radio eingeschaltet. Der zuvor
gewählte Sender wird in der eingestellten Lautstärke für maximal 60 Minuten aktiviert.
Bei der Einstellung „Alarm mit iPod/iPhone“ wird der iPod/das iPhone ein-
geschaltet. Die Wiedergabe startet mit dem zuletzt ausgewählten Titel und wird
in der eingestellten Lautstärke für maximal 60 Minuten wiedergegeben.
Drücken Sie eine beliebige Taste, um den aktuellen Alarm zu beenden.
20
HINWEIS
Der Alarm wird bei Erreichen der nächsten Alarmzeit (z.B. am nächsten Tag) ►
wieder aktiv.
SKRI 2000 A1

Bedienung und Betrieb
i
Küchentimer
Das Gerät verfügt über einen praktischen Küchentimer, mit dem z.B. Koch- und
Backzeiten überwacht werden können. Der einstellbare Zeitbereich des Küchentimers liegt zwischen 1 Minute und 23 Stunden, 59 Minuten.
Küchentimer einstellen
Drücken Sie die Taste Timer ♦
Die Anzeige zeigt . Im Display wird das Kochtopfsymbol für den
Küchentimer eingeblendet.
Stellen Sie mit den Tasten
♦
i
/ Up-Taste 42 und der i / Down-Taste 32 auf der Fernbedienung
die gewünschte Zeit für den Küchentimer ein. Pro Tastendruck wird die Zeit
um eine Minute verändert. Ein Festhalten der Taste für mehr als 2 Sekunden
startet die Schnelleinstellung.
HINWEIS
Wird während der Einstellung ca. 15 Sekunden lang keine Veränderung ►
vorgenommen, wechselt das Gerät wieder in die vorherige Betriebsart.
Küchentimer starten
Drücken Sie nach Einstellung der Zeit die Taste Timer ♦
37
Taste
auf der Fernbedienung erneut. Die angezeigte Zeit beginnt
rückwärts zu laufen. Im Display wird eine rückwärts laufende Uhr
eingeblendet.
8
oder die Timer Taste 37 auf der Fernbedienung.
/ Up 17 und
/ Down 19 oder der
i
8
oder die Timer
DE
AT
CH
SKRI 2000 A1
HINWEIS
Wird während des Ablaufens des Küchentimers eine andere Funktion gewählt, ►
wird die Anzeige der Restzeit ausgeblendet. Das Kochtopfsymbol und
die rückwärts laufende Uhr
Drücken Sie die Taste Timer
nung erneut, um die Restzeit des Küchentimers für ca. 10 Sekunden wieder
anzeigen zu lassen.
30 Sekunden vor Ablauf des Küchentimers beginnt das Gerät mit einzelnen Signaltönen auf das Erreichen der eingestellten Zeit akustisch hinzuweisen. Die Abstände
der Einzeltöne werden dabei immer kürzer. Bei Erreichen der eingestellten Zeit ertönt das Alarmsignal des Küchentimers als Dauerintervall für maximal 60 Minuten.
Drücken Sie die Taste Timer
♦
nung, um das Alarmsignal des Küchentimers abzuschalten.
werden weiter im Display angezeigt.
8
oder die Timer Taste 37 auf der Fernbedie-
8
oder die Timer Taste 37 auf der Fernbedie-
21

Bedienung und Betrieb
i
i
i
DE
AT
CH
Küchentimer unterbrechen
Drücken Sie bei laufendem Küchentimer die Taste Timer ♦
37
auf der Fernbedienung. Der Küchentimer wird angehalten. Die
Taste
angezeigte Restzeit beginnt zu blinken.
HINWEIS
Das Gerät wechselt nach ca. 15 Sekunden wieder in die vorherige Be- ►
triebsart. Drücken Sie die Taste Timer 8 oder die Timer Taste 37 auf der
Fernbedienung erneut, um die Restzeit des Küchentimers wieder anzeigen
zu lassen.
Um den Küchentimer wieder zu starten, drücken Sie die Taste Timer
♦
die Timer Taste
wieder gestartet.
Um den Küchentimer vor Ablauf der Zeit abzuschalten, drücken und halten
♦
Sie die Taste Timer 8 oder die Timer Taste 37 auf der Fernbedienung, bis
im Display
mehr angezeigt werden.
HINWEIS
Der Küchentimer wird sofort ausgeschaltet für den Fall, dass ein Alarm ►
aktiv wird.
37
auf der Fernbedienung erneut. Der Küchentimer wird
das Kochtopfsymbol und die rückwärts laufende Uhr nicht
Küchentimer programmieren
Sie können häufi g benötigte Zeiten für den Küchentimer vorprogrammieren,
um diese nicht immer wieder eingeben zu müssen. Es können bis zu 6 Zeiten
vorprogrammiert werden. Standardmäßig sind die 6 Speicherplätze mit
5/10/15/20/25/30 Minuten vorprogrammiert.
Gehen Sie zur Programmierung der Küchentimer wie folgt vor:
Drücken Sie die Taste Timer
♦
um den Küchentimer zu aktivieren.
Stellen Sie mit den Tasten
♦
i
/ Up-Taste 42 und der i / Down-Taste 32 auf der Fernbedienung
die gewünschte Zeit für den Küchentimer ein. Pro Tastendruck wird die Zeit
um eine Minute verändert. Ein Festhalten der Taste für mehr als 2 Sekunden
startet die Schnelleinstellung.
♦
Drücken Sie die Taste Function / ST
Fernbedienung, um die Timerauswahl zu aktivieren. Neben der Zeitanzeige
wird ein blinkendes angezeigt, daneben erscheint die Zahl für den ersten
Timer.
Wählen Sie mit den Tasten
♦
Pr+ Taste 40 oder der i Pr– Taste 44 auf der Fernbedienung den
der i
Speicherplatz des einzustellenden Timers zwischen und aus.
8
oder die Timer Taste 37 auf der Fernbedienung,
/ Pr+ / AL1 18 und
i
8
oder die Timer
/ Up 17 und
7
oder die Taste Function / ST 38 auf der
/ Down 19 oder der
i
/ Pr– / AL2 16 bzw.
i
8
oder
22
SKRI 2000 A1

Bedienung und Betrieb
i
i
Drücken Sie die Taste Function / ST ♦
der Fernbedienung erneut, um die eingestellte Zeit auf dem gewählten Speicherplatz zu programmieren. Das blinkende wird nun konstant angezeigt.
Wiederholen Sie den Vorgang für die anderen Speicherplätze.
♦
Küchentimer abrufen
Um eine programmierte Zeit für den Küchentimer abzurufen, gehen Sie wie folgt vor:
Drücken Sie die Taste Timer
♦
um den Küchentimer zu aktivieren.
Wählen Sie mit den Tasten
♦
Pr+ Taste 40 oder der i Pr– Taste 44 auf der Fernbedienung den
der i
gewünschten Timer zwischen und aus.
♦
Drücken Sie die Taste Timer
erneut, um den Küchentimer zu starten.
Radiobetrieb
HINWEIS
Für einen guten Radioempfang muss die Wurfantenne ►
werden. Richten Sie die Antenne im Radiobetrieb auf den besten Empfang aus.
►
Die technischen Gegebenheiten des Gerätes ermöglicht eine einstellbare
Empfangsfrequenz außerhalb des zulässigen UKW (FM)-Bereiches von
87,5–108 MHz. In verschiedenen Ländern können abweichende nationale
Regelungen zu den zugewiesenen Rundfunkfrequenzbereichen bestehen.
Beachten Sie, dass Sie die außerhalb des zugewiesenen Rundfunkfrequenzbereiches empfangenen Informationen nicht verwerten, an Dritte
weiterleiten oder zweckentfremdet missbräuchlich verwenden dürfen.
7
oder die Taste Function / ST 38 auf
8
oder die Timer Taste 37 auf der Fernbedienung,
/ Pr+ / AL1 18 und
i
8
oder die Timer Taste 37 auf der Fernbedienung
/ Pr– / AL2 16 bzw.
i
27
ganz abgewickelt
DE
AT
CH
Radio ein-/ausschalten
SKRI 2000 A1
Drücken Sie die Taste ♦ Power 6 oder die -Taste 30 auf der Fernbedienung. Das Display zeigt den aktuellen Modus an indem sich das Gerät
befi ndet.
Drücken Sie die Taste Function / ST ♦
der Fernbedienung mehrfach, um die Radiofunktion auszuwählen. Im Display
erscheint die Empfangsfrequenz des eingestellten Senders.
♦ Power 6 oder die
Schalten Sie das Radio aus, indem Sie die Taste
-Taste 30 auf der Fernbedienung erneut drücken. Das Gerät wechselt
zurück in die Betriebsart Uhr/Standby-Betrieb. Die aktuelle Uhrzeit wird
angezeigt.
7
oder die Taste Function / ST 38 auf
23
Bedienung und Betrieb
i
i
i
i
DE
AT
CH
Lautstärke einstellen
Stellen Sie mit den Tasten Vol+ ♦
41
und der Vol– Taste
ein. Der Lautstärkepegel wird im Display angezeigt. Sie können einen
Lautstärkepegel zwischen
auf der Fernbedienung die gewünschte Lautstärke
3
und Vol– 5 oder der Vol+ Taste 39
und wählen.
Sender manuell einstellen
Stellen Sie durch Einzeldrücke auf die Tasten ♦
/ Down 19 bzw. der i / Up-Taste 42 und der i / Down-Taste
i
32
auf der Fernbedienung den gewünschten Sender ein. Die Frequenz des
Senders wird auf dem Display angezeigt. Der Lautsprecher ist während
der Einstellung abgeschaltet.
/ Up 17 und
Nächsten Sender suchen
Sie können das Gerät automatisch nach dem nächstliegenden Sender suchen lassen.
Drücken und halten Sie die Taste ♦
der i
/ Up-Taste 42 und der i / Down-Taste 32 auf der Fernbedienung für mindestens zwei Sekunden gedrückt. Das Gerät sucht nach dem
nächstliegenden Sender mit ausreichender Empfangsqualität.
Wiederholen Sie den Vorgang, bis Sie den gesuchten Sender gefunden haben.
♦
/ Up 17 und
/ Down 19 bzw.
i
Benutzer auswählen
Voraussetzung: Das Gerät befi ndet sich in der Betriebsart Radio.
Drücken Sie die Taste User
♦
um den gewünschten Benutzer auszuwählen. Der aktuelle Benutzer bis
wird auf dem Display für 10 Sekunden angezeigt.
Drücken Sie die Tasten
♦
i
Pr+ Taste 40 oder die i Pr– Taste 44 auf der Fernbedienung , um einen
voreingestellten Speicherplatz zwischen und auszuwählen.
2
oder die User Taste 31 auf der Fernbedienung,
/ Pr+ / AL1 18 und
i
/ Pr– / AL2 16 bzw. die
i
24
HINWEIS
Jeder Benutzer hat 15 Speicherplätze zur Verfügung. Der erste Speicher- ►
platz für Benutzer A ist vom Hersteller voreingestellt.
SKRI 2000 A1

Bedienung und Betrieb
i
i
i
i
Sender manuell speichern
Voraussetzung: Das Gerät befi ndet sich in der Betriebsart Radio.
Das Gerät stellt 60 Speicherplätze (4 Benutzer a 15 Speicherplätze) für Sendefrequenzen zur Verfügung. Um eine Sendefrequenz zu speichern, gehen Sie wie
folgt vor:
Stellen Sie wie vorab beschrieben den gewünschten Sender ein.
♦
Drücken Sie die Taste Mem ♦
nung. Das Symbol MEM, der Benutzer und der Speicherplatz erscheinen
im Display .
Drücken Sie die Taste User ♦
bis der gewünschte Benutzer ( - ) angezeigt wird.
Wählen Sie mit den Tasten
♦
der i
Pr+ Taste 40 oder der i Pr– Taste 44 auf der Fernbedienung den ge-
wünschten Speicherplatz für den eingestellten Sender zwischen und aus.
♦
Drücken Sie die Taste Mem
dienung. Die Empfangsfrequenz des eingestellten Senders wird auf dem
gewählten Speicherplatz gespeichert.
4
oder die Mem Taste 35 auf der Fernbedie-
2
oder die User Taste 31 auf der Fernbedienung,
/ Pr+ / AL1 18 oder
i
4
oder die Mem Taste 35 auf der Fernbe-
/ Pr– / AL2 16 bzw.
i
Gespeicherten Sender abrufen
Voraussetzung: Das Gerät befi ndet sich in der Betriebsart Radio.
Drücken Sie die Taste User
♦
bis der gewünschte Benutzer ( - ) angezeigt wird.
Wählen Sie mit den Tasten
♦
Pr+ Taste 40 oder der i Pr– Taste 44 auf der Fernbedienung den
der i
Speicherplatz für den gespeicherten Sender zwischen und aus.
2
oder die User Taste 31 auf der Fernbedienung,
/ Pr+ / AL1 18 oder
i
/ Pr– / AL2 16 bzw.
i
DE
AT
CH
SKRI 2000 A1
25

Bedienung und Betrieb
i
i
DE
AT
CH
Automatischer Sendersuchlauf (AMS-Funktion)
Voraussetzung: Das Gerät befi ndet sich in der Betriebsart Radio.
Um die Speicherplätze für die Sendefrequenzen mit den stärksten empfangbaren Sendern zu belegen, kann ein automatischer Sendersuchlauf durchgeführt
werden.
HINWEIS
Bei Ausführung der nachfolgend beschriebenen Funktion gehen alle vorher ►
gespeicherten Sender verloren.
Drücken und halten Sie die Taste
♦
Memory-Scan-Taste
beginnt mit dem Sendersuchlauf und belegt die Speicherplätze bis
mit den gefundenen Sendern.
Nach Beendigung des Sendersuchlaufs können Sie durch einmaliges
♦
drücken der Taste
36
, alle gespeicherten Sender zwischen und für 10 Sekunden
wiedergeben.
HINWEIS
Werden mehr als 60 Sender gefunden, werden nur die ersten 60 Empfangs- ►
frequenzen gespeichert.
Werden weniger als 60 Sender gefunden, bleiben die letzten Speicherplätze ►
unverändert.
36
für mindestens drei Sekunden gedrückt. Das Gerät
/ Memory Scan 14 oder der Memory-Scan-Taste
i
/ Memory Scan 14 oder die
i
Wiedergabe von externen Audiogeräten
Schließen Sie ein externes Audiogerät, wie z.B. einen MP3-Player, an die ♦
3,5 mm Klinkenbuchse AUX IN 26 auf der Rückseite des Gerätes an.
♦ Power 6 oder die Taste 30 auf der Fernbedie-
Drücken Sie die Taste
nung. Das Display zeigt den aktuellen Modus an indem sich das Gerät
befi ndet.
Drücken Sie die Taste Function / ST ♦
der Fernbedienung mehrfach, um die Funktion auszuwählen.
Starten Sie die Wiedergabe am externen Audiogerät und stellen Sie die
♦
Lautstärke ein.
7
oder die Taste Function / ST 38 auf
HINWEIS
Beachten Sie die Bedienungsanleitung des externen Audiogerätes. ►
Anschluss iPod/iPhone
Mit der Station 29 können Sie das Gerät als Lautsprecher für Ihren iPod/Ihr iPhone
verwenden. Wenn Sie den iPod/das iPhone in die Station einsetzen, wird es außerdem automatisch aufgeladen.
26
SKRI 2000 A1

Bedienung und Betrieb
I Enter
i
i
i-Time Sync
i
i
I Enter
i
iMenu
Voraussetzung: Das Gerät befi ndet sich in der Betriebsart iPod.
I Enter
♦
Drücken Sie die Taste
iPod/das iPhone zu aktivieren.
Die folgenden Funktionen können damit ausgeführt werden:
Taste Funktion
/ Pr– / AL2
i
/ Pr+ / AL1
i
i-Time Sync
/ Memory Scan
i
/ Down
i
/ Up
I Enter
Bass
17
19
16
18
12
13
13, um die Menüsteuerung für den
Nächste Funktion
Vorherige Funktion
Zeitanzeige und Datum des Gerätes mit der
Zeit des iPods/iPhones synchronisieren
Wiedergabe anhalten und fortsetzen
14
Schneller Rücklauf
Schneller Vorlauf
kurz drücken: Menü zurück
lang drücken: Auswahl bestätigen
Musik wiedergeben
Bereiten Sie die Anschlussstation 29 vor, wie im Kapitel Station für iPod/
iPhone vorbereiten S. 48 beschrieben.
Setzen Sie Ihren iPod bzw. Ihr iPhone in die Station
♦
♦ Power 6 oder die -Taste 30 auf der Fernbedie-
Drücken Sie die Taste
nung. Das Display zeigt den aktuellen Modus an indem sich das Gerät
befi ndet
Drücken Sie die Taste Function / ST ♦
der Fernbedienung mehrfach, um die Funktion auszuwählen.
Wählen Sie auf Ihrem iPod/iPhone einen Titel (oder ein Album bzw. eine
♦
Wiedergabeliste) aus.
Drücken Sie die Taste ♦
der Fernbedienung, um die Wiedergabe zu starten oder anzuhalten.
/ Memory Scan 14 oder die i -Taste 33 auf
i
7
oder die Taste Function / ST 38 auf
29
DE
AT
CH
ein.
SKRI 2000 A1
27

Bedienung und Betrieb
i-Time Sync
DE
AT
CH
iPod/iPhone aufl aden
Ist Ihr iPod/iPhone in die Station 29 eingesetzt, wird es automatisch aufgeladen,
bis die Batterie voll ist.
HINWEIS
Der iPod/das iPhone wird nicht über die Backup-Batterie aufgeladen. ►
Uhrzeit i-Time Sync einstellen
Die iTime-Sync-Funktion ermöglicht es Ihnen, die Uhrzeit und das Datum auf dem
Gerät mit der Uhrzeit und dem Datum Ihres iPods oder iPhones zu synchronisieren
(iPod Touch, iPod nano und iPod Classic; ältere iPod-Modelle wie iPod mini
unterstützen diese Funktion nicht).
Setzen Sie Ihren iPod bzw. Ihr iPhone in die Station
♦
♦
Drücken Sie die Taste
auf der Fernbedienung. Die Uhrzeit und das Datum des iPods oder iPhones
werden auf das Gerät übertragen. Nach Abschluss der Synchronisation,
ertönt ein Signalton.
HINWEIS
Die Uhrzeit auf dem iPhone wird kontinuierlich über die Mobilfunkmasten ►
aktualisiert. Die Uhrzeit auf dem iPod entspricht nur der Uhrzeit auf Ihrem
Computer nach der letzten Synchronisation. Es ist möglich, einen Zeitunterschied von 59 Sekunden zwischen dem Gerät und dem synchronisiertem
iPod/iPhone zu haben.
i-Time Sync
Bass 12 oder die Taste iTime Sync Bass 43
29
ein.
Weitere Funktionen
Stereofunktion
Das Gerät unterstützt die Stereofunktion. Die Standardeinstellung ist Stereo on.
Um die Stereofunktion zu ändern, gehen Sie wie folgt vor:
Drücken und halten Sie die Taste Function / ST
♦
auf der Fernbedienung gedrückt, bis im Display
aktuelle Einstellung der Stereofunktion angezeigt wird ( oder ).
Drücken und halten Sie die Taste Function / ST ♦
auf der Fernbedienung erneut, um die Einstellung zu wechseln.
HINWEIS
Bei Stereoempfang eines Radiosenders und aktivierter Stereofunktion, ►
erscheint für 3 Sekunden im Display .
28
7
oder die Taste Function / ST 38
die
7
oder die Taste Function / ST 38
SKRI 2000 A1

Bedienung und Betrieb
i-Time Sync
i
i
Tastensperre
Sie können die Tasten des Gerätes sperren, damit keine Einstellungen versehentlich geändert werden können.
Drücken und halten Sie die Taste Mode / Lock
♦
45
auf der Fernbedienung für mindestens zwei Sekunden gedrückt, um die
Tastensperre ein- oder auszuschalten. Bei eingeschalteter Tastensperre
erscheint im Display
♦
Zum Entsperren drücken und halten Sie wieder die Taste Mode / Lock
oder die Mode Lock Taste
Sekunden gedrückt.
das Symbol .
45
auf der Fernbedienung für mindestens zwei
11
oder die Mode Lock Taste
Bassanhebung
Mit der Bassanhebung können Sie eine verstärkte Wiedergabe der tiefen Frequenzen
einschalten.
Drücken Sie für ca. 2 Sekunden die Taste
♦
Taste iTime Sync Bass
oder auszuschalten. Bei eingeschalteter Bassanhebung erscheint im Display
das Symbol .
43
auf der Fernbedienung, um die Bassanhebung ein-
i-Time Sync
Bass 12 oder die
Wechselnde Anzeige
Voraussetzung: Das Gerät befi ndet sich in der Betriebsart Uhr/Standby-Betrieb.
Drücken Sie die Taste
♦
auf der Fernbedienung, das Datum und die Uhrzeit werden abwechselnd
angezeigt.
Drücken Sie die Taste ♦
der Fernbedienung noch einmal, wird nur die Uhrzeit angezeigt.
Voraussetzung: Das Gerät befi ndet sich in der Betriebsart Radio.
Drücken Sie die Taste Mode / Lock
♦
der Fernbedienung, die Empfangsfrequenz bzw. der Stationsname (bei RDSEmpfang) und die Uhrzeit werden abwechselnd angezeigt.
♦
Drücken Sie die Taste Mode / Lock
Fernbedienung noch einmal, wird nur die Uhrzeit angezeigt.
♦
Drücken Sie die Taste Mode / Lock
der Fernbedienung noch einmal, wird nur die Empfangsfrequenz bzw. der
Stationsname (bei RDS-Empfang) angezeigt.
/ Down 19 oder die i / Down Taste 32
i
/ Down 19 oder die i / Down Taste 32 auf
i
11
oder die Mode Lock Taste 45 auf
11
oder die Mode Lock Taste 45 auf der
11
oder die Mode Lock Taste 45 auf
11
DE
AT
CH
SKRI 2000 A1
29

Bedienung und Betrieb
DE
AT
CH
Automatisches Abschalten (Einschlaff unktion)
Mit der Einschlaff unktion stellt sich das Gerät nach einer Zeit zwischen 5 und
90 Minuten selbst aus.
Drücken Sie die Taste AOT / Dimmer
♦
der Fernbedienung, um die Funktion aufzurufen. Die aktuell verbleibende
Zeit bis zum Abschalten des Radios wird angezeigt.
Drücken Sie die Taste AOT / Dimmer ♦
auf der Fernbedienung wiederholt, um die gewünschte Zeit einzustellen.
Nach ca. 15 Sekunden kehrt das Gerät wieder zur Anzeige der gewählten
Betriebsart zurück.
HINWEIS
Die einstellbare Zeitspanne reicht von 90 bis 5 Minuten. Die Einstellung ►
erfolgt in Schritten zu 5 Minuten. Danach erscheint die Anzeige .
Bei der Anzeige ist die Einschlaff unktion abgeschaltet.
Befi ndet sich das Gerät in der Betriebsart Uhr/Standby-Betrieb, schalten ►
Sie mit dem Drücken der Taste AOT / Dimmer 10 oder der AOT Dimmer
46
Taste
auf der Fernbedienung das Gerät in dem zuletzt ausgewählten
Modus (Radio/iPod/AUX) ein.
10
oder die AOT Dimmer Taste 46 auf
10
oder die AOT Dimmer Taste 46
Displaydimmer manuell ein-/ausschalten
Drücken und halten Sie die Taste AOT / Dimmer ♦
46
Taste
auf der Fernbedienung gedrückt, bis im Display die aktuelle
Einstellung des Displaydimmers angezeigt wird ( oder ).
♦
Drücken und halten Sie die Taste AOT / Dimmer
46
auf der Fernbedienung erneut, um die aktuelle Einstellung zu
Taste
wechseln (siehe auch Kapitel Zeitgesteuerte Displaydimmung ein-/
ausschalten S. 52). Nach ca. 15 Sekunden wird die zuletzt verwendete
Displaydarstellung wieder angezeigt.
10
oder die AOT Dimmer
10
oder die AOT Dimmer
30
SKRI 2000 A1

Reinigung/Fehlerbehebung
Reinigung
Sicherheitshinweise
GEFAHR
Lebensgefahr durch elektrischen Strom!
Ziehen Sie das Steckernetzteil aus der Steckdose, bevor Sie mit der Reinigung ►
beginnen.
ACHTUNG
Beschädigung des Gerätes!
Stellen Sie sicher, dass bei der Reinigung keine Feuchtigkeit in das Gerät ►
eindringt, um eine irreparable Beschädigung des Gerätes zu vermeiden.
Gehäuse reinigen
Reinigen Sie die Oberfl ächen des Gerätes mit einem weichen, trockenen Tuch. ■
Fehlerbehebung
In diesem Kapitel erhalten Sie wichtige Hinweise zur Störungslokalisierung und
Störungsbehebung. Beachten Sie die Hinweise um Gefahren und Beschädigungen
zu vermeiden.
DE
AT
CH
Sicherheitshinweise
WARNUNG
Beachten Sie die folgenden Sicherheitshinweise um Gefahren und Sachschäden
zu vermeiden:
►
Reparaturen an Elektrogeräten dürfen nur von Fachleuten durchgeführt werden,
die vom Hersteller geschult sind. Durch unsachgemäße Reparaturen können
erhebliche Gefahren für den Benutzer und Schäden am Gerät entstehen.
SKRI 2000 A1
31

Fehlerbehebung
i
DE
AT
CH
Fehlerursachen und -behebung
Die nachfolgende Tabelle hilft bei der Lokalisierung und Behebung kleinerer
Störungen:
Fehler Mögliche Ursache Behebung
15
ist
Stecken Sie das Steckernetzteil 15 in
die Steckdose.
Überprüfen Sie die Haussicherungen.
Erhöhen Sie die Lautstärke mit der
Taste Vol+
Schalten Sie das Gerät mit der Taste
Power 6 auf die Betriebsart
Radio/iPod/Aux/ ein.
Starten Sie die Wiedergabe an dem
externen Audiogerät.
Starten Sie die Wiedergabe am iPod/
iPhone.
Setzen Sie den iPod/das iPhone
29
richtig in die Station 29 ein.
Stellen Sie den Sender mit dem Tasten
/ Up 17 und
richtig ein.
Versuchen Sie durch Bewegen der
Wurfantenne
verbessern.
Setzen Sie den iPod/das iPhone
29
richtig in die Station 29 ein.
Stellen Sie sicher, dass die Wiedergabeliste Musik enthält.
Das Display zeigt
nichts an.
Kein Ton
Störgeräusche
beim
Radioempfang
iPod/iPhone wird
nicht aufgeladen
Alarm mit iPod/
iPhone hat nicht
funktioniert
Das Steckernetzteil
nicht eingesteckt.
Steckdose liefert keine
Spannung.
Die Lautstärke steht auf
Minimum.
Das Gerät befi ndet sich in
der Betriebsart Uhr/Standby-Betrieb.
Die Wiedergabe des externen Audiogerätes ist nicht
gestartet.
Die Wiedergabe des iPod/
iPhones ist nicht gestartet.
Der iPod/das iPhone ist
nicht richtig in die Station
eingesetzt
Der Sender ist nicht richtig
eingestellt.
Der Empfang ist zu
schwach.
Der iPod/das iPhone ist
nicht richtig in die Station
eingesetzt.
Die ausgewählte Wiedergabeliste auf Ihrem iPod/
iPhone ist leer.
3
.
i
27
den Empfang zu
/ Down 19
32
HINWEIS
Wenn Sie mit den vorstehend genannten Schritten das Problem nicht lösen ►
können, wenden Sie sich bitte an den Kundendienst.
SKRI 2000 A1

Lagerung/Entsorgung/Anhang
Lagerung/Entsorgung
Lagerung
Sollten Sie das Gerät längere Zeit nicht benutzen, trennen Sie es von der Stromversorgung, entnehmen Sie die Batterie und lagern Sie es an einem sauberen,
trockenen Ort ohne direkte Sonneneinstrahlung.
Gerät entsorgen
Werfen Sie das Gerät keinesfalls in den normalen Hausmüll.
Dieses Produkt unterliegt der europäischen Richtlinie 2002/96/ECWEEE (Waste Electrical and Electronic Equipment).
Entsorgen Sie das Gerät über einen zugelassenen Entsorgungsbetrieb oder über
Ihre kommunale Entsorgungseinrichtung. Beachten Sie die aktuell geltenden
Vorschriften. Setzen Sie sich im Zweifelsfall mit Ihrer Entsorgungseinrichtung in
Verbindung.
Batterien entsorgen
Batterien dürfen nicht im Hausmüll entsorgt werden. Jeder Verbraucher ist gesetzlich
verpfl ichtet, Batterien bei einer Sammelstelle seiner Gemeinde/seines Stadtteils
oder im Handel abzugeben. Diese Verpfl ichtung dient dazu, dass Batterien einer
umweltschonenden Entsorgung zugeführt werden können. Geben Sie Batterien
nur im entladenen Zustand zurück.
Anhang
DE
AT
CH
Hinweise zur EG-Konformitätserklärung
Dieses Gerät entspricht hinsichtlich Übereinstimmung mit den
grundlegenden Anforderungen und den anderen relevanten
Vorschriften der europäischen Richtlinie für elektromagnetische
Verträglichkeit 2004/108/EC, der Niederspannungsrichtlinie
2006/95/EC sowie der Ökodesign-Richtlinie 2009/125/EC
(Verordnung 1275/2008 Anhang II, Nr.1).
Die vollständige Original-Konformitätserklärung ist beim
Importeur erhältlich.
SKRI 2000 A1
33

Anhang
DE
AT
CH
Technische Daten
Steckernetzteil
Hersteller Fai Shing Industries Ltd.
Modell JVSW0702000
Eingangsspannung, -strom 100-240 V~ 50/60 Hz, 350 mA
Ausgangsspannung, -strom 7 V
Schutzklasse
Gerät
Eingangsspannung, -strom 7 V , 2 A
Batterie für Datensicherung
Batterie für Fernbedienung
Leistungsaufnahme
Betrieb ca. 5 W
Standby ca. 1,8 W
, 2 A
II /
1 x 3 V Typ CR2032
(im Lieferumfang enthalten)
1 x 3 V Typ CR2025
(im Lieferumfang enthalten)
34
Ausgangsleistung Lautsprecher ca. 2 x 1W (bei 10 % Klirrfaktor)
Frequenzbereich Radio (UKW) 87,5 - 108 MHz
Betriebstemperatur +5 - +40 °C
Feuchtigkeit (keine Kondensation) 5 - 90 %
Abmessungen (B x H x T)
(ohne Standfuß)
Gewicht ca. 1070 g
ca. 30 x 15,7 x 8,4 cm
SKRI 2000 A1

Anhang
Garantie
Sie erhalten auf dieses Gerät 3 Jahre Garantie ab Kaufdatum. Das Gerät wurde
sorgfältig produziert und vor Anlieferung gewissenhaft geprüft.
Bitte bewahren Sie den Kassenbon als Nachweis für den Kauf auf. Bitte setzen
Sie sich im Garantiefall mit Ihrer Servicestelle telefonisch in Verbindung. Nur so
kann eine kostenlose Einsendung Ihrer Ware gewährleistet werden.
HINWEIS
Das Produkt ist lediglich für den privaten und nicht für den gewerblichen Gebrauch
bestimmt. Bei missbräuchlicher und unsachgemäßer Behandlung, Gewaltanwendung und bei Eingriff en, die nicht von unserer autorisierten Service-Niederlassung
vorgenommen wurden, erlischt die Garantie.
Ihre gesetzlichen Rechte werden durch diese Garantie nicht eingeschränkt. Die
Garantiezeit wird durch die Gewährleistung nicht verlängert. Dies gilt auch für
ersetzte und reparierte Teile.
Eventuell schon beim Kauf vorhandene Schäden und Mängel müssen sofort nach
dem Auspacken gemeldet werden, spätestens aber zwei Tage nach Kaufdatum.
Nach Ablauf der Garantiezeit anfallende Reparaturen sind kostenpfl ichtig.
Service
Service Deutschland
Tel.: 01805 772 033 (0,14 EUR/Min. aus dem dt. Festnetz,
Mobilfunk max. 0,42 EUR/Min.)
E-Mail: kompernass@lidl.de
IAN 63920
DE
AT
CH
Die Garantieleistung gilt nur für Material- oder Fabrikationsfehler, nicht ►
aber für Transportschäden, Verschleißteile oder für Beschädigungen an
zerbrechlichen Teilen, z.B. Schalter oder Akkus.
Service Österreich
Service Schweiz
Importeur
SKRI 2000 A1
Tel.: 0820 201 222 (0,15 EUR/Min.)
E-Mail: kompernass@lidl.at
IAN 63920
Tel.: 0842 665566 (0,08 CHF/Min., Mobilfunk max. 0,40 CHF/Min.)
E-Mail: kompernass@lidl.ch
IAN 63920
KOMPERNASS GMBH
BURGSTRASSE 21
D-44867 BOCHUM
www.kompernass.com
35

36
SKRI 2000 A1

Index
Introduction . . . . . . . . . . . . .38
Information for these operating
instructions . . . . . . . . . . . . . . . . . . .38
Copyright . . . . . . . . . . . . . . . . . . . .38
Intended use . . . . . . . . . . . . . . . . . . 38
Warning notices . . . . . . . . . . . . . . . 39
Safety . . . . . . . . . . . . . . . . . .40
Risks from electric shock . . . . . . . . .40
Handling of batteries . . . . . . . . . . . 40
Basic Safety Instructions . . . . . . . . .41
Operating components . . . .42
Setting up and connecting . .44
Safety instructions . . . . . . . . . . . . . . 44
Items supplied and transport
inspection . . . . . . . . . . . . . . . . . . . .44
Unpacking . . . . . . . . . . . . . . . . . . .44
Disposal of the packaging . . . . . . .45
Set-up location requirements. . . . . .45
Electrical connection . . . . . . . . . . . . 45
Appliance battery . . . . . . . . . . . . . .46
Remote Control Battery . . . . . . . . .46
Installation under a wall cupboard .47
Disinstallation . . . . . . . . . . . . . . . . .48
Setting the appliance up. . . . . . . . .48
Preparing the station for iPod/iPhone 48
Providing mains power . . . . . . . . . . 48
VHF wire antenna . . . . . . . . . . . . . . 48
Handling and operation . . .49
Switching On and Off . . . . . . . . . .49
Basic settings . . . . . . . . . . . . . . . . .49
Activating the settings menu . . . . . .50
Programming the alarm . . . . . . . . .54
Kitchen timer . . . . . . . . . . . . . . . . . .57
Programming the kitchen timer . . . .58
Radio operation . . . . . . . . . . . . . . .59
Playback of external audio
appliances . . . . . . . . . . . . . . . . . . .62
Connection of iPod/iPhone . . . . . .62
Additional functions . . . . . . . . . . . . 64
Cleaning . . . . . . . . . . . . . . . .67
Safety instructions . . . . . . . . . . . . . . 67
Cleaning the housing . . . . . . . . . . .67
Troubleshooting . . . . . . . . . .67
Safety instructions . . . . . . . . . . . . . . 67
Malfunction causes and remedies . 68
Storage / Disposal . . . . . . . .69
Storage . . . . . . . . . . . . . . . . . . . . . . 69
Disposal of the appliance . . . . . . . . 69
Disposing of the batteries . . . . . . . . 69
Appendix . . . . . . . . . . . . . . .69
Information regarding the EG
Declaration of Conformity . . . . . . . 69
Technical data . . . . . . . . . . . . . . . .70
Warranty . . . . . . . . . . . . . . . . . . . .71
Service . . . . . . . . . . . . . . . . . . . . . . 71
Importer . . . . . . . . . . . . . . . . . . . . .71
GB
SKRI 2000 A1
37

GB
Introduction
Introduction
Information for these operating instructions
These operating instructions are a component of the Under-Cabinet Radio
SKRI 2000 A1 (henceforth designated as the appliance) and they provide you
with important information about the intended use, safety, installation and connection as well as operation of the appliance.
These operating instructions must be kept available in the vicinity of the appliance at all times. They are to be read and used by everyone assigned to service
and repair faults in the appliance.
Retain these operating instructions and pass them on, with the appliance, to any
future owners.
Copyright
This documentation is copyright protected. Any copying or reproduction, including
as extracts, as well as the reproduction of images, also in an altered state, is not
permitted without the express written consent of the manufacturer.
Intended use
This appliance is intended only for use in the reception of FM radio stations, as
a kitchen timer, to give alarms through signal tones, radio or iPod / iPhone and
for the connection of external audio appliances (e.g. MP3 player) and iPod /
iPhone in indoor areas. The appliance is intended as a free standing unit or
for installation under a wall cupboard. For this, the built-in foot-pads resp. the
supplied mounting plate must be used. Any other use or uses beyond those mentioned here are considered to be unintended use. This appliance is not intended
for use in commercial or industrial environments.
No warranty claims of any kind will be accepted for damage caused by
improper use, incompetent repairs, unauthorised modifi cations or for the use of
unapproved replacement parts. The operator bears the risk alone.
38
"Made for iPod" and "Made for iPhone" means that an electronic accessory has
been specifi cally designed for connection to an iPod or iPhone and the developer
guarantees that the appliance complies with the performance standards of
Apple. Apple is not responsible for the operation of this appliance or that it complies with safety and regulatory standards. Take note that using this accessory
with an iPod or iPhone can aff ect the wireless performance. iPad, iPhone, iPod,
iPod classic, iPod nano, iPod shuffl e and iPod touch are trademarks of Apple Inc.,
registered in the U.S. and other countries. iPad is a trademark of Apple Inc.
SKRI 2000 A1

Introduction
Warning notices
In these extant operating instructions the following warning notices are used:
DANGER
A warning at this risk level indicates a threateningly dangerous
situation.
In the event that the dangerous situation is not avoided it could lead to death
or serious physical injury.
►
The directives in this warning are there to avoid the risks of death or serious
physical injury.
WARNING
A warning at this risk level indicates a possible dangerous
situation.
If the dangerous situation is not avoided it could lead to physical injuries.
The directives in this warning are there to avoid personal physical injuries.
►
IMPORTANT
A warning at this risk level indicates possible property damage.
If the situation is not avoided it could lead to property damage.
►
The directives in this warning are there to avoid property damage.
NOTICE
A notice indicates additional information that assists in the handling of the ►
appliance.
GB
SKRI 2000 A1
39

GB
Safety
In this section you receive important safety information regarding the handling of
the appliance.
This appliance complies with the statutory safety regulations.
Incorrect usage can lead to injuries and property damage.
Risks from electric shock
DANGER
Potentially fatal risks from electric shock!
A potentially fatal risk can arise from contact with live wires or
components!
Observe the following safety instructions to avoid the risks of electric shock:
►
Do not use the appliance if the power adapter, the power cable or the
plug are damaged.
Do not, under any circumstances, open the power adapter. The risk of ►
receiving an electric shock is elevated if the power carrying connections
are touched or the electrical or mechanical construction is altered.
Handling of batteries
Safety
40
WARNING
Risks from improper use! The risk of explosions and injuries
exists!
For the safe handling of batteries observe the following safety instructions:
Do not throw batteries into a fi re.
►
Do not short circuit batteries. ►
Do not attempt to recharge batteries. ►
Regularly check the condition of the batteries. Leaking battery acid can ►
cause permanent damage to the appliance. Special caution should be
shown when handling damaged or leaking batteries. Risk of acid burns!
Wear protective gloves.
Store batteries in a place inaccessible to children. If swallowed seek ►
IMMEDIATE medical attention.
►
If you do not intend to use the appliance for an extended period of time,
remove the batteries.
SKRI 2000 A1

Safety
Basic Safety Instructions
For safe handling of the appliance observe the following safety instructions:
Before using it, check the appliance for signs of visible external damage. Do ■
not put into operation an appliance that is damaged or has been dropped.
Damaged cables or connections should be replaced by authorised qualifi ed
■
persons or by the Customer Service Department.
This appliance is not intended for use by individuals (including children)
■
with restricted physical, physiological or intellectual abilities or defi ciences
in experience and / or knowledge unless they are supervised by a person
responsible for their safety or receive from this person instruction on how the
appliance is to be used.
Children should be supervised to ensure that they do not play with the appliance.
■
Repairs should only be carried out by authorised specialist companies or by ■
the Customer Service Department. Incompetent repairs can result in risks for
the user. In addition, warranty claims become void.
■
Repairs to the appliance during the warranty period may only be carried
out by a customer service fi rm authorised by the manufacturer, if they are
not, additional warranty claims can no longer be considered for subsequent
defects.
Defective components may only be replaced with original replacement parts.
■
Only by using original replacement parts can it be guaranteed that the
safety requirements are being complied with.
Protect the appliance from moisture and penetration by liquids. Never sub-
■
merge the appliance under water, do not place the appliance in the vicinity
of water and do not place any object fi lled with liquids (i.e. fl ower vases) on
the appliance.
Do not place any objects on the appliance.
■
Do not operate the appliance in the vicinity of open fl ames (i.e. candles). ■
Avoid direct sunlight. ■
Always pull on the plug when disconnecting from the mains power socket, ■
never pull on the power cable itself.
In the event of a malfunction occurring or a thunderstorm approaching,
■
remove the plug from the mains power socket.
GB
SKRI 2000 A1
41

Operating components
i-Time Sync
I Enter
i
i
i
i
Operating components
(for illustrations see front fold out side fi gure A)
GB
Display
2
User: Select user
3
Vol+: Volume increase
4
Mem: Memory storage space selection
5
Vol–: Volume decrease
6
Power: Switching On and Off
7
Function / ST: Function selection / Stereo activation
8
Timer: Set and activate the timer
9
Alarm Mode: Select alarm type
10
AOT / Dimmer: Switch-off timer / Switch display dimmer on / off
11
Mode / Lock: Call-up settings menu / Button lock
12
i-Time Sync
Bass: Synchronise time and date display with iPod / iPhone /
Bass boost
I Enter
13
14
/ Memory Scan: Pause/Playback with iPod / iPhone / Automatic radio
i
: Operation of the iPod / iPhone / Input
station search / retrieve preset radio station
Connector power pack
15
/ Pr– / AL2: Previous function with iPod / iPhone / Call-up previous memory
16
i
17
18
/ Up: Fast forward with iPod/iPhone / Raise reception frequency
/ Pr+ / AL1: Next function with iPod/iPhone / Call-up next memory storage
i
storage space / Set Alarm 2
space / Set Alarm 1
19
20
21
22
23
24
25
26
27
/ Down: Fast rewind with iPod/iPhone / Lower reception frequency
i
Mounting plate
Foot-pads (hinged)
Securing bracket for iPod/iPhone
Speakers
Battery compartment
DC-Socket: Current connection socket (7V) for power adapter
AUX IN-Socket: Input connection socket for audio appliances with 3.5mm jackplug
Wire antenna for VHF reception
42
SKRI 2000 A1

Operating components
i
(for illustrations see front fold out side fi gure B)
28
Spacer (for under-cabinet installation)
29
Station for iPod/iPhone
30
: Switching On and Off
31
User: Select user
32
i / Down: Fast rewind with iPod/iPhone / Lower reception frequency
33
i : Pause/Playback with iPod/iPhone
34
iMenu / Enter: Operation with iPod/iPhone / Input
35
Mem: Memory storage space selection
36
Memory-Scan: automatic radio station search/call-up preset radio station
37
Timer: Set and activate the timer
38
Function / ST: Function selection / Stereo activation Mode: Setting menu
39
Vol+: Volume increase
40
i / Pr+: Next function with iPod/iPhone / Call-up next memory storage space
41
VOL–: Volume decrease
42
i / Up: Fast forward with iPod/iPhone / Raise reception frequency
43
iTime Sync / Bass: Synchronise time and date display with iPod / iPhone / Bass boost
i
44
/ Pr–: Select previous memory storage space / Previous function with iPod/iPhone
45
Mode / Lock: Call-up settings menu / Button lock
46
AOT / Dimmer: Switch-off timer / Switch display dimmer on/off
47
Alarm: Select alarm type
48
Sensor for remote control
GB
SKRI 2000 A1
43

GB
Setting up and connecting
Setting up and connecting
Safety instructions
WARNING
Damage may occur to property and injuries to people when
taking the appliance into service!
Pay heed to the following safety information to avoid these risks.
Packaging material should not be used as a play thing by children.
►
There is a risk of suff ocation!
►
To avoid risks to persons and property, observe the requirements for the
set-up location and the electrical connections.
Items supplied and transport inspection
The appliance is delivered with the following components as standard:
Under-Cabinet Radio SKRI 2000 A1
▯
Power adapter JVSW0702000 ▯
Mounting plate ▯
4 Securing screws (short) ▯
2 x Spacers including 4 securing screws (long) ▯
Securing bracket for iPod/iPhone ▯
1 x Battery 3 V Type CR2032 ▯
1 x Battery 3 V Type CR2025 ▯
Remote control ▯
Jackplug cable 3.5 to 3.5 mm (50 cm) ▯
This operating manual ▯
Unpacking
44
NOTICE
Check the contents to ensure everything is present and for signs of visible ►
damage.
►
If the items supplied are incomplete, or damaged due to defective packaging
or transportation, contact the Service Hotline (see chapter Service p. 71).
Remove all appliance parts and the operating instructions from the carton. ♦
Remove all packing material. ♦
SKRI 2000 A1

Setting up and connecting
Disposal of the packaging
The packaging protects the appliance from transport damage. The packaging
materials are selected from the point of view of their environmental friendliness
and disposal technology and are therefore recyclable.
The recirculation of packaging into the material circuit saves on raw material and
reduces the amount of waste generated. Dispose of packaging material that is
no longer needed as per the regionally established regulations.
NOTICE
If possible preserve the original packaging during the warranty period so ►
that, in the event of a warranty claim, you can repackage the appliance
ideally for its return.
Set-up location requirements
For the safe and fault free operation of the appliance, the installation location
must fulfi ll the following conditions:
■
When setting the appliance up, place it on a fi rm, fl at and even surface.
Use the hinged foot-pads.
Set up or mount the appliance in such a way that the extant ventilation open-
■
ings and the speaker are not covered.
Do not operate the appliance in a hot, wet or very humid location or in the
■
vicinity of fl ammable materials.
Do not install the appliance directly over a hotplate.
■
The mains power socket must at all times be easily accessible, so that the ■
plug can be easily and quickly removed if necessary.
GB
Electrical connection
The appliance is powered with a DC voltage of 7V via the supplied power ■
adapter. Connect the appliance to the mains power supply only via the
supplied power adapter.
Before connecting the appliance compare the connection data (Voltage
■
and frequency) on the rating plate with that of your mains electric source.
To avoid potential damage to the appliance this data must concur.
Protect the connection cable against hot surfaces and sharp edges.
■
Ensure that the connection cable is not tightly stretched or kinked. ■
Do not allow the connection cable to hang over edges (Tripwire eff ect). ■
If you do not intend to use the appliance for an extended period, disconnect ■
the plug from the mains power supply.
SKRI 2000 A1
45

GB
Setting up and connecting
Appliance battery
With the insertion of a battery you can avoid the loss of programmed times
and dates plus alarm times in the event of a possible power failure. The battery
ensures that the internal clock and date continue to run even during a power
failure. The display
ration of mains power.
NOTICE
The appliance can also be operated without a battery. ►
Inserting / replacing the battery
Open the cover of the battery compartment ♦
appliance by turning the cover with a coin as far as it will go to the left
and then lifting it off .
Insert the battery type CR2032 (supplied) into the battery compartment.
♦
The side with the marking + points upwards.
Close the battery compartment by attaching the cover and then, using a
♦
coin, turn it all the way to the right.
Remote Control Battery
Activating the battery
The remote control battery is already inserted when delivered.
Activate the battery by removing the isolation strip. ♦
will then automatically show the correct time on the resto-
24
on the underside of the
46
Changing the battery
Using a fingernail press the recess (A) to the right ♦
and, at the same time, pull the battery compartment out.
Insert a 3 V battery of type CR 2025 in the
♦
battery compartment. The side with the marking
"+" must point upwards.
Slide the battery compartment completely back
♦
into the remote control.
SKRI 2000 A1

Setting up and connecting
Installation under a wall cupboard
With the supplied mounting plate 20 you can install the appliance under, for example, a wall cupboard. For the installation of the appliance proceed as follows:
Slide the mounting plate
♦
Select a suitable installation location for the appliance (see also the section
♦
Set-up location requirements p. 45).
Hold the mounting plate ♦
edge of the mounting plate
of the cupboard so that, after the installation, the appliance is fl ush with the
cupboard. The side edges of the mounting plate
about 4.5 cm to adjacent cabinets or walls.
20
to the rear and remove the mounting plate 20 .
20
under the installation location. Thereby the front
20
should be approx. 6.8 cm behind the front
20
must have a spacing of
GB
SKRI 2000 A1
NOTICE
If you wish to install the unit fl ush to the left on an adjacent cabinet or a ►
wall, remove the safety clip 22 from the appliance beforehand.
♦
Mark the 4 securing points with a pencil.
Using a spike or nail, make a small depression at the respective marking points. ♦
If wished, insert the supplied spacer ♦
respective depression on the mounting plate
♦
Firmly screw the mounting plate
28
with the retaining lug into the
20
.
20
on with the supplied screws (see illustration).
47

GB
Setting up and connecting
Place the appliance aslant, with the front recesses in the top face of the ♦
appliance, in the mounting plate 20. Press the rear part of the appliance
20
upwards against the mounting plate
into place.
♦
Check to ensure that the appliance is securely seated.
Disinstallation
Pull the appliance forwards and remove the appliance downwards. ♦
Unscrew the screws on the mounting plate ♦
20
.
plate
Setting the appliance up
As an alternative you can stand the appliance on a level surface. In order to
avoid the ventilation slots and speaker
21
covered, the two foot-pads
♦
Reach into the recess on the side of the respective foot-pad and pull the
hinged foot out as far as it will go.
Select a suitable installation location for the appliance (see also the section
♦
Set-up location requirements p. 45).
on the appliance must be hinged outwards:
Preparing the station for iPod/iPhone
You can connect your iPod/iPhone to the appliance. For this you must fold the
29
station
down and install the locking clip 22:
Fold the station
♦
Remove the locking clip
♦
On each side of the station ♦
from the front onto the station
recesses.
29
all the way down.
22
from the side of the appliance.
29
29
until the appliance audibly locks
20
23
on the bottom of the appliance being
there is a recess. Slide the locking clip 22
so that the retaining lugs engage in the
and remove the mounting
Providing mains power
Connect the connector plug of the power adapter ♦
on the rear panel of the appliance.
♦
Insert the power adapter
VHF wire antenna
Unwind the wire antenna ♦
48
15
into a mains power socket.
27
completely for VHF reception.
15
into the DC socket 25
SKRI 2000 A1

Handling and operation
Handling and operation
In this section you receive important information for the handling and operation
of the appliance.
Switching On and Off
After connecting the appliance to the mains power supply, it automatically starts
the setting system. In the display
THANKS“ appears for about 3 to 5 minutes. Should a signal be received during
this period, the system is updated automatically.
NOTICE
To cancel this process, press any button. ►
The system then starts with the following default settings:
Date/Time
■
Radio is switched off ■
Clock mode/Standby operation is active ■
Display dimmer is active ■
With connection to the mains power supply, the appliance switches to clock/
standby operation. The appliance can be switched on or off via the button
6
Power
Using the button Function / ST
control, you can switch back and forth between the modes radio, iPod and AUX.
or the -button 30 on the remote control.
7
or the button Function / ST 38 on the remote
GB
the text „PLEASE WAIT FOR SETTING
Basic settings
SKRI 2000 A1
NOTICE
The button ► Power 6 or the -button 30 on the remote control do not
completely disconnect the appliance from the mains power supply. The
appliance also consumes power when in standby-mode. To completely
disconnect the appliance from the mains power supply, the power adapter
must be removed from the mains power socket.
After the appliance has been connected to the mains power supply it shows the
time of day and the day of the week in the display
operational mode clock/standby operation.
. The appliance is in the
15
49

GB
i
Handling and operation
Activating the settings menu
To activate the settings menu, in the mode clock/standby operation press the
11
button Mode / Lock
time of day, shown in the display
the button Mode / Lock
item sequence is:
Setting the time of day
▯
Setting the date ▯
Setting the memory function ▯
Set the Update Mode ▯
Switch display dimmer on/off ▯
Set display dimmer start time ▯
Setting the time of day format ▯
NOTICE
The setting menu ends automatically if you do not actuate any buttons for ►
approx. 15 seconds. The executed setting(s) is/are saved.
Setting the time
Prerequisite: The appliance is in the operational mode clock/standby operation.
Press the button Mode / Lock
♦
control once. The time of day indicator begins to blink.
♦
Using the buttons
/ Down buttons 32 on the remote control, set the current time. With each
press on the button the time of day changes by one minute. Holding the
respective button down for more than 2 seconds starts the speed setting.
♦
Press the button Mode / Lock
control, once again to save the current setting and move on to the next
menu item.
or the button Mode Lock 45 on the remote control. The
11
or 45 switches to the next setting potential. The menu
/ Up 17 and
, begins to blink. Each further actuation of
11
or the Mode Lock button 45 on the remote
/ Down 19 or the / Up 42 and
i
11
, or the Mode Lock 45 button on the remote
50
NOTICE
The time of day will revert back to ► if the appliance is disconnected
from the mains power supply and no battery is inserted or if the battery is
too weak.
SKRI 2000 A1

Handling and operation
i
i
i
Setting the date
Prerequisite: The appliance is in the operational mode clock/standby operation.
Press the button Mode / Lock
♦
control, twice. The date indicator begins to blink.
Using the buttons ♦
and
/ Down buttons 32 on the remote control, set the current date. With
each press of the button the date is changed by one day. The weekday
indicator changes automatically. Holding the respective button down for
more than 2 seconds starts the speed setting.
♦
Press the button Mode / Lock
control, once again to save the current setting and move on to the next menu item.
NOTICE
The date will revert back to ► if the appliance is disconnected
from the mains power supply and no battery is inserted or if the battery is
too weak.
Setting the memory function
You can set up to 6 dates on which an automatic reminder will be triggered.
The function SDA (Special Day Alert) is useful as a reminder, for example, of
birthdays or other recurring events. The reminder occurs every year on the same
date. On these dates an alarm tone is sounded for 10 minutes, every hour on the
hour, from 08:00 to 23:00.
Prerequisite: The appliance is in the operational mode clock/standby operation.
Press the button Mode / Lock
♦
control, three times. The current setting of the selected reminder dates is
shown alternating with the indicator . Next to the indicator is the
number of the memory slot for that date. Possible classifi cations are to
.
♦
Using the button
on the remote control, select storage slot of the date to be set.
♦
Using the buttons
and
/ Down 32 buttons on the remote control, set the current date for
this memory slot. With each press of the button the date is changed by one
day. Holding the respective button down for more than 2 seconds starts the
speed setting.
/ Up 17 and
/ Memory Scan 14, or the Memory-Scan 36 button
i
/ Up 17 and
11
, or the Mode Lock 45 button on the remote
/ Down 19 or the / Up 42
i
11
, or the Mode Lock 45 button on the remote
11
, or the Mode Lock 45 button on the remote
/ Down 19 or the / Up 42
i
GB
SKRI 2000 A1
51

GB
i
i
Handling and operation
NOTICE
Press the button Timer ►
trol, to ignore the year. In the display
are indicated. The memory function will then be activated every year
on this date.
♦
Press the button Mode / Lock
control, once again to save the current setting and move on to the next
menu item.
Set the Update Mode
Prerequisite: The appliance is in the operational mode clock/standby operation.
Press the button Mode / Lock
♦
control, four times. In the display appears and a blinking clock
symbol .
♦
Press the button
control, to switch the automatic RDS function off . The blinking clock symbol
extinguishes.
♦
Press the button
control, to activate the automatic RDS function. The blinking clock symbol
appears.
Press the button Mode / Lock ♦
control, once again to save the current setting and move on to the next
menu item.
i
8
, or the Timer 37 button on the remote con-
only the day and the month
11
, or the Mode Lock 45 button on the remote
11
, or the Mode Lock 45 button on the remote
/ Down 19, or the button / Down 32 on the remote
/ Up 17, or the button / Up 42 on the remote
11
, or the Mode Lock 45 button on the remote
52
Switching time controlled display dimming on/off
Prerequisite: The appliance is in the operational mode clock/standby operation.
This appliance has two options for display dimming.
1. Time conrtrolled display dimming
2. Setting the display dimming manually (see also chapter Switching the
display dimmer on/off manually S. 66).
Press the button Mode / Lock
♦
control, fi ve times. The current setting of the display dimmer appears (
or ).
♦
Using the button
control, select " ", the display light extinguishes after 15 seconds.
Using the button ♦
remote control, select " ", the display light now glows continuously.
i
11
, or the Mode Lock 45 button on the remote
/ Up 17, or the / Up 42 button on the remote
/ Down 19, or the / Down 32 button on the
SKRI 2000 A1

Handling and operation
i
Press the button Mode / Lock ♦
control, once again to save the current setting and move on to the next
menu item.
Mode Display
Indicator
Time
controlled
Dimmer
OFF
Time
controlled
Dimmer
ON
DT OFF Is set by the
DT ON Off by default,
Display
lighting
AOT / Dimmer button
from 23:00 to
05:59
11
, or the Mode Lock 45 button on the remote
Control with the button AOT/Dimmer
46
or
DIM OFF: Display lighting glows continuously
DIM ON: Display lighting off ; press any button and
the display lighting switches on for 15 seconds.
23:00 pm 05:59 am
06:00 am 22:59 pm
Setting the display dimmer start time
Prerequisite: The appliance is in the operational mode clock/standby operation.
Press the button Mode / Lock
♦
control, six times. The current start time of the display dimmer ( ) is
shown alternating with the indicator .
♦
Using the buttons
and
/ Down 32 buttons on the remote control, set the desired start time.
With each press on the button the start time changes by one minute. Holding
the respective button down for more than 2 seconds starts the speed setting.
Press the button Mode / Lock ♦
control, once again to save the current setting and move on to the next
menu item.
11
, or the Mode Lock 45 button on the remote
/ Up 17 and
11
, or the Mode Lock 45 button on the remote
Press any button and the display
lighting switches on for 60 seconds.
DIM OFF: Display lighting glows
continuously
DIM ON: Display lighting off ; press
any button and the display lighting
switches on for 15 seconds.
/ Down 19, or the / Up 42
i
10
GB
Setting the time of day format
SKRI 2000 A1
Prerequisite: The appliance is in the operational mode clock/standby operation.
Press the button Mode / Lock
♦
control, seven times. The current setting for the time of day format is shown
( = 24 hour format or = 12 hour format).
♦
Using the button
control, change the time format to if you want a clock display in
12-hour format.
11
, or the Mode Lock 45 button on the remote
/ Up 17, or the button / Up 42 on the remote
53

Handling and operation
i
i
GB
Using the button ♦
remote control, change the time format to
display in 24-hour format.
Press the button Mode / Lock
♦
control, once again to save the current setting and to return to the basic settings.
/ Down 19, or the / Down 32 button on the
i
Programming the alarm
This appliance has two alarms available. All settings for both alarms can be
carried out independently of each other. When programming the alarm times
you can select whether at the programmed time an alarm tone should sound,
the radio should start playing or the iPod/iPhone should switch on.
NOTICE
If, during alarm programming, a further button is not pressed within ►
approx. 15 seconds, the alarm will activate with the current settings.
Setting alarm times
Press the button Alarm Mode ♦
control. The set alarm time of the respective alarm is shown blinking in the
display and the indicator resp. appears. The weekdays on which
this alarm is activated are shown above the time indicator.
♦
Using the buttons
/ Down 32 buttons on the remote control, set the desired alarm
and
time. With each press on the button the alarm time changes by one minute.
Holding the respective button down for more than 2 seconds starts the
speed setting.
11
, or the Mode Lock 45 button on the remote
9
, or the button Alarm 47 on the remote
/ Up 17 and
, if you want a clock
/ Down 19, or the / Up 42
i
54
Setting the weekdays
In alarm-mode, press the button Function / ST ♦
38
ST
on the remote control, to toggle between the weekday combinations
Mon-Fri, Sat-Sun or Mon-Sun. The respective selected combination is indicated above the alarm time.
Press and hold the button Function / ST ♦
on the remote control, for at least 2 seconds, so as to switch between the
weekday combinations and adjustment options for an individual weekday.
NOTICE
With the adjustment options for an individual weekday, switch between ►
the weekdays with the button Function / ST 7, or the button Func-
38
tion / ST
on the remote control.
7
, or the button Function /
7
, or the Function / ST 38 button
SKRI 2000 A1

Handling and operation
i
i
i
i
Setting the alarm with an alarm tone
To select an individual "alarm tone" option for the respective alarm, in ♦
alarm-mode press the button
resp. the button Pr+ 40 or the button Pr– 44 on the remote control,
16
until in the display
Setting the alarm with radio
If it is intended that the radio switches on at the alarm time, carry out the following settings before activation of the alarm:
Switch the radio on by pressing the button
♦ Power 6, or the button
30
on the remote control, and with the button Function / ST 7, or the button
Function / ST
Select the radio station with which you wish to be woken (see chapter
♦
Manual station selection p. 60 or Search for the next station p.
60).
♦
With the buttons Vol+
on the remote control, set the desired sound volume level (see chapter
Adjusting the volume p. 60).
♦ Power 6, or the button 30
Switch the radio off by pressing the button
on the remote control.
To select the "radio" option for the respective alarm, in alarm-mode press the
♦
button
Pr+
the symbol appears.
/ Pr+ / AL1 18 or the button
i
40
or the button Pr– 44 on the remote control, until in the display
the symbol appears.
38
on the remote control, select the operating mode radio.
3
and Vol– 5, or the buttons Vol+ 39 and Vol– 41
/ Pr+ / AL1 18 or the button
i
/ Pr– / AL2 16 resp. the button
i
/ Pr– / AL2
i
GB
Setting the alarm with iPod/iPhone
SKRI 2000 A1
If it is intended that the iPod/iPhone switches on at the alarm time, carry out the
following settings before activation of the alarm:
Switch the appliance on by pressing the button
♦ Power 6, or the
30
button
the button Function / ST
♦
Insert your iPod and/or iPhone into the station
Select a title (or an album or playlist) on your iPod / iPhone.
♦
With the buttons Vol+ ♦
Vol– button
(see chapter Adjusting the volume p. 60).
Switch your iPod / iPhone in the pause mode, or switch the power off .
♦
on the remote control, and with the button Function / ST 7, or
38
on the remote control, select the operating mode
.
29
.
3
and Vol– 5, or the Vol+ button 39 and the
41
on the remote control, set the desired sound volume level
55

GB
i
i
i
i
Handling and operation
Switch the mode iPod off by pressing the button ♦ Power 6 or the but-
30
on the remote control.
ton
To select the "iPod" option for the respective alarm, press the button
♦
Pr+ / AL1
Pr– button 44 on the remote control, until in the display the symbol
appears.
, or the button
18
Switching the alarm off
To switch an individual alarm off , in alarm-mode press the button ♦
Pr+ / AL1
the i
longer appears.
, or the button
18
Pr– button 44 on the remote control, until in display a symbol no
When the alarm time has arrived
NOTICE
When the alarm time is reached, the switch off timer (if enabled) is immedi- ►
ately terminated.
With the setting "Alarm with an alarm tone", a signal tone sounds. The volume of the signal tone will continually increase until the maximum sound volume
level has been reached. The duration of the alarm signal is limited to 10 minutes.
The radio is thereby switched to "mute".
With the setting "Alarm with Radio" the radio will be switched on. The previ-
ously selected station will be activated for a maximum of 60 minutes at the set
volume.
With the setting "Alarm with iPod/iPhone" the iPod/iPhone will be
switched on. Playback starts with the last selected title and is played at the set
volume for a maximum of 60 minutes.
Press any button to end the currently sounding alarm.
/ Pr– / AL2 16 resp. the Pr+ Taste 40 or the
i
/ Pr– / AL2 16 resp. the Pr+ button 40 or
i
/
i
/
i
56
NOTICE
The alarm becomes active again when the next alarm time has arrived (i.e. ►
on the next day).
SKRI 2000 A1

Handling and operation
i
Kitchen timer
The appliance has a convenient kitchen timer with which, for example, cooking
and baking times can be monitored. The programmable time range of the kitchen
timer lies between 1 minute and 23 hours, 59 minutes.
Setting the kitchen timer
Press the button Timer ♦
indicator shows . In the display the cooking pot symbol for the
kitchen timer is faded in.
Using the buttons
♦
42
button
desired running time for the kitchen timer. With each press on the button
the start time changes by one minute. Holding the button down for more
than 2 seconds starts the speed setting.
NOTICE
If, during the setting, approx. 15 seconds passes without any changes tak- ►
ing place, the appliance reverts back to the previous operational mode.
and the / Down-button 32 on the remote control, set the
Starting the kitchen timer
After setting the time, press the button Timer ♦
the remote control, once again. The displayed time begins to run backwards.
In the display a backwards-running clock
8
, or the button Timer 37 on the remote control. The
/ Up 17 and
/ Down 19, or the / Up-
i
8
, or the button Timer 37 on
is blended in.
GB
SKRI 2000 A1
NOTICE
If, during the operation of the kitchen timer, another function is selected, the ►
indicator of the remaining time is faded out. The cooking pot symbol and
the backwards-running clock
Press the button Timer
again to display the remaining time for the kitchen timer for about 10 seconds.
30 seconds before the kitchen timer run time has expired the appliance begins to
acoustically indicate, with individual signal tones, the arrival of the set time. The
intervals between the individual tones will be ever shorter. When the set time has
elapsed, the alarm signal of the kitchen timer sounds as a continuous tone for a
maximum of 60 minutes.
Press the button Timer
♦
switch the alarm signal of the kitchen timer off .
8
continue to be indicated in the display .
or the button Timer 37 on the remote control once
8
, or the button Timer 37 on the remote control, to
57

GB
i
i
i
Handling and operation
Interrupting the kitchen timer.
When the kitchen timer is running, press the button Timer ♦
37
on the remote control. The kitchen timer is interrupted. The indicated
Timer
remaining time begins to blink.
NOTICE
After approx. 15 seconds the appliance reverts back to the previous opera- ►
tional mode. Press the button Timer 8, or the button Timer 37 on the remote
control, once again to display the remaining time to elapse on the kitchen timer.
To restart the kitchen timer, press the button Timer
♦
on the remote control, once again. The kitchen timer restarts.
To switch the kitchen timer off before the expiry of the set period, press and
♦
hold the the button Timer 8, or the button Timer 37 on the remote control,
until in the display
clock are no longer indicated.
NOTICE
The kitchen timer is switched off immediately in the event of an alarm ►
becoming active.
Programming the kitchen timer
So that it is no longer necessary to continually re-enter them, you can preprogramme the kitchen timer with the most frequently used time periods. Up to
6 time periods can be preprogrammed. By default, the six memory slots are
preprogrammed with 5/10/15/20/25/30 minutes.
For the programming of the kitchen timer proceed as follows:
Press the button Timer
♦
activate the kitchen timer.
Using the buttons
♦
42
and the / Down-button 32 on the remote control , set the desired running time for the kitchen timer. With each press on the button the start time
changes by one minute. Holding the button down for more than 2 seconds
starts the speed setting.
♦
Press the button Function / ST
remote control, to activate the kitchen timer. Next to the time display a blinking is indicated, next to it appears a number for the fi rst timer.
Using the buttons
♦
40
button
slot for the interval to be saved, between and .
or the Pr– button 44 on the remote control, select the memory
the cooking pot symbol and the backwards running
8
, or the button Timer 37 on the remote control, to
/ Up 17 and
7
, or the button Function / ST 38 on the
/ Pr+ / AL1 18 and
i
8
, or the button
8
, or the button Timer 37
/ Down 19, or the / Up- button
i
/ Pr– / AL2 16, resp. the Pr+
i
58
SKRI 2000 A1

Handling and operation
i
i
Press the button Function / ST ♦
remote control, once again to programme the set time onto the selected
memory slot. The blinking element is now indicated as a constant.
Repeat the process for the other memory slots.
♦
Accessing the kitchen timer
To access a programmed time for the kitchen timer proceed as follows:
Press the button Timer
♦
activate the kitchen timer.
Using the buttons
♦
40
button
slot between and for the required timer interval.
♦
Press the button Timer
once again to start the kitchen timer.
or the Pr– button 44 on the remote control, select the memory
/ Pr+ / AL1 18 and
i
Radio operation
NOTICE
For good radio reception the wire antenna ►
Adjust the antenna, whilst in radio operation, for the best reception.
►
The technical realities of the appliance allow for tuning reception frequencies outside of the permitted VHF (FM) range of 87.5 to 108 MHz.
Deviating national regulations may apply in various countries to the
allocated radio frequency ranges. Please note that information received
outside of the assigned radio frequency ranges may not be exploited,
passed on to third parties or otherwise misused.
7
, or the button Function / ST 38 on the
8
, or the button Timer 37 on the remote control, to
/ Pr– / AL2 16 , resp. the Pr+
i
8
, or the Timer button 37 on the remote control,
27
must be completely uncoiled.
GB
Switching the radio on/off
SKRI 2000 A1
Press the button ♦ Power 6, or the -Taste 30 on the remote control.
The display indicates the mode in which the appliance is currently in.
Press the button Function / ST ♦
remote control, several times to select the radio function. The display shows
the reception frequency of the selected radio station.
♦ Power 6, or the -button 30
Switch the radio off by pressing the button
on the remote control, once again. The appliance switches back to the operational mode clock/standby operation. The current time of day is shown.
7
, or the button Function / ST 38 on the
59

GB
i
i
i
i
Handling and operation
Adjusting the volume.
Using the buttons Vol+ ♦
41
button
sound volume level will be indicated in the display . You can select a
sound volume level between
on the remote control, set the desired sound volume level. The
Manual station selection
Using single presses on the buttons ♦
resp. the
control, select the desired radio station. The frequency of the station is
shown in the display . During the tuning the speaker is switched off .
/ Up-button 42 and the / Down-button 32 on the remote
Search for the next station
The appliance can automatically search for the nearest station.
♦
Press and hold the buttons
/ Up-button 42 and the / Down-Taste 32 on the remote control, for
at least two seconds. The appliance searches for the nearest station with
suffi cient reception quality.
Repeat this process until you have found the station you are looking for.
♦
Selecting the user
Prerequisite: The appliance is in the radio operational mode.
Press the button User
♦
select the desired user. The current user, to , is indicated in the display
for 10 seconds.
Press the buttons
♦
40
button
lected memory slot between and .
or the Pr– button 44 on the remote control, to choose a prese-
3
and Vol– 5, or the Vol+ button 39 and Vol–
and .
/ Up 17 and
/ Up 17 and
2
, or the User button 31 on the remote control, to
/ Pr+ / AL1 18 and
i
i
/ Down 19,
i
/ Down 19, resp. the
i
/ Pr– / AL2 16 resp. the Pr+
60
NOTICE
Every user has 15 memory slots available. The fi rst memory slot for user A ►
is preset by the manufacturer.
SKRI 2000 A1

Handling and operation
i
i
i
i
Saving stations manually
Prerequisite: The appliance is in the radio operational mode.
The appliance provides 60 memory slots (4 users each with 15 memory locations)
for transmitter frequencies. To save a station frequency proceed as follows:
Tune, as described previously, the desired station.
♦
Press the button Mem ♦
symbol MEM, the user and the memory slot appear in the display .
Press the button User ♦
the desired user ( - ) is indicated.
Using the buttons
♦
40
button
memory slot for the set transmitter between and .
♦
Press the button Mem
reception frequency of the tuned station is saved on the selected memory slot.
or the Pr– button 44 on the remote control, select the desired
Access saved stations
Prerequisite: The appliance is in the radio operational mode.
Press the button User
♦
the desired user ( - ) is indicated.
Using the buttons
♦
40
button
slots for the saved radio transmitters between and .
or the Pr– button 44 on the remote control, select the memory
4
, or the Mem button 35 on the remote control. The
2
, or the User button 31 on the remote control, until
/ Pr+ / AL1 18 or
i
4
, or the Mem button 35 on the remote control. The
2
, or the User button 31 on the remote control, until
/ Pr+ / AL1 18 or
i
/ Pr– / AL2 16, resp. the Pr+
i
/ Pr– / AL2 16 resp. the Pr+
i
GB
SKRI 2000 A1
61

GB
i
i
Handling and operation
Automatic station search (AMS function)
Prerequisite: The appliance is in the radio operational mode.
To allocate the memory slots to the station frequencies with the strongest receivable
signals, an automatic station search can be carried out.
NOTICE
With the carrying out of the following described function all previously ►
saved stations will be lost.
Press and hold the button
♦
36
button
begins the station search and allocates the stations found to the memory
slots to .
On completion of the station search, by a single press on the button
♦
i
you can playback all the saved radio stations between and for
10 seconds.
NOTICE
If more than 60 stations are found, only the fi rst 60 reception frequencies will ►
be saved.
►
If less than 60 radio stations are found, the last memory slots remain unchanged.
on the remote control, for at least three seconds. The appliance
/ Memory Scan 14, or Memory Scan button 36 on the remote control,
/ Memory Scan 14, or the Memory-Scan
i
Playback of external audio appliances
Connect an external audio appliance, for example, an MP3 player to the ♦
3.5 mm jackplug socket AUX IN 26 on the rear panel of the appliance.
♦ Power 6, or the button 30 on the remote control.
Press the button
The display indicates the mode in which the appliance is currently in.
♦
Press the button Function / ST
remote control, several times to select the function .
Start playback of the external audio appliance and set the volume as
♦
required.
NOTICE
Follow the operating instructions for the external audio appliance. ►
7
, or the button Function / ST 38 on the
Connection of iPod/iPhone
With the station 29 you can use the appliance as a speaker for your iPod/
iPhone. When you insert the iPod/iPhone in the station it will, in addition, be
automatically charged.
62
SKRI 2000 A1

Handling and operation
I Enter
i
i
i-Time Sync
i
i
I Enter
i
iMenu
Prerequisite: The appliance is in the operational mode iPod.
I Enter
♦
Press the button
iPod/iPhone.
With this, the following functions can be executed:
Button Function
/ Pr– / AL2
i
/ Pr+ / AL1
i
i-Time Sync
i
i
Bass
/ Memory Scan
/ Down
/ Up
17
I Enter
Playback of music
Prepare the docking station 29 as described in the chapter Preparing the
station for iPod/iPhone on p. 48.
Insert your iPod and/or iPhone into the station
♦
♦ Power 6, or the -button 30 on the remote control.
Press the button
The display indicates the mode in which the appliance is currently in.
Press the button Function / ST ♦
remote control, several times to select the function .
Select a title (or an album or playlist) on your iPod / iPhone.
♦
Press the button ♦
control to start or stop playback.
Next function
Previous function
Synchronise the date and time display of the
appliance with the time on the iPod/iPhone
Stop/continue playback
14
Fast rewind
Fast forward
brief press: back to menu
long press: confi rm selection
/ Memory Scan 14 or the -button 33 on the remote
19
16
18
12
13
i
13 to activate menu management for the
29
.
7
, or the button Function / ST 38 on the
GB
SKRI 2000 A1
63

Handling and operation
i-Time Sync
Charging the iPod/iPhone
If your iPod/iPhone is inserted into the station 29 it will charge automatically until
the battery is full.
GB
NOTICE
The iPod/iPhone will not charge via the back-up battery. ►
Setting the Time/i-Time Synchronisation
The iTime Sync function allows you to synchronize the time and date on the appliance with the time and date on your iPod or iPhone (iPod Touch, iPod Nano and
iPod Classic); older iPod models such as iPod mini do not support this function).
Insert your iPod and/or iPhone into the station
♦
♦
Press the button
remote control. The time and date on the iPod or iPhone will be transferred to
the appliance. After the synchronisation is completed, a signal tone sounds.
NOTICE
The time on the iPhone will be updated continuously over the cell phone ►
towers. The time on the iPod corresponds only to the time on your computer
after the last synchronisation. It is possible to have a time diff erence of 59
seconds between the appliance and the synchronised iPod/iPhone.
i-Time Sync
Bass 12 or the button iTime Sync Bass 43 on the
Additional functions
Stereo function
The appliance supports stereo function. The standard setting is Stereo on. To
change the stereo function, proceed as follows:
Press and hold the button Function / ST
♦
the remote control , until the current setting of the stereo function is indicated
in the display
Press and once again hold the button Function / ST
♦
tion / ST
( or ).
38
on the remote control, to change the setting.
7
29
.
, or the button Function / ST 38 on
7
, or the button Func-
64
NOTICE
With the stereo reception of a radio transmitter and an activated stereo ►
feature, there appears in the display for 3 seconds the indicator icon.
SKRI 2000 A1

Handling and operation
i-Time Sync
i
i
Button lock
You can lock the buttons of the appliance so that settings cannot be altered by
unauthorised people.
Press and hold the button Mode / Lock
♦
the remote control, for at least two seconds to switch the button lock either
on or off . When the button lock is switched on, in the display
appears.
♦
To release the lock, press and hold the button Mode / Lock
Lock button
Bass accentuation
With the bass accentuation you can switch on an enhanced playback of the low
frequencies.
For about 2 seconds press the button
♦
iTime Sync Bass
on or off . With bass accentuation switched on, the symbol appears
in the display.
Alternating display
Prerequisite: The appliance is in the operational mode clock/standby operation.
Press the button
♦
control, the date and time are indicated alternately.
♦
Press the button
control, once more and only the time is indicated.
Prerequisite: The appliance is in the radio operational mode.
By pressing the button Mode / Lock
♦
the remote control, the reception frequency resp. the station name (for RDS
reception) and the time are displayed alternately.
Press the button Mode / Lock ♦
control, once more to only indicate the time.
♦
Press the button Mode / Lock
control, once more to indicate only the reception frequency resp. the station
name (for RDS reception).
45
on the remote control, for at least two seconds.
43
on the remote control, to switch the bass accentuation
/ Down 19, or the / Down button 32 on the remote
i
/ Down 19, or the / Down button 32 on the remote
i
11
, or the Mode Lock button 45 on
the symbol
11
, or the Mode
i-Time Sync
11
, or the Mode Lock button 45 on
11
, or the Mode Lock button 45 on the remote
11
or the Mode Lock button 45 on the remote
Bass 12, or the button
GB
SKRI 2000 A1
65

GB
Handling and operation
Automatic switch off (Sleep function)
With the sleep function the appliance switches itself off after a time lapse of
between 5 and 90 minutes.
Press the button AOT / Dimmer
♦
remote control, to call the function up. The currently remaining time until the
radio switches itself off is shown.
Press the button AOT / Dimmer ♦
remote control, repeatedly to set the desired time period. After about
15 seconds the appliance returns to an indication of the selected mode.
NOTICE
The setable time period ranges from 90 to 5 minutes. The setting takes ►
place in stages of 5 minutes. Afterwards, the indicator appears.
With the indicator the sleep function is switched off .
Should the appliance be in the mode clock/standby operation, by pressing ►
the button AOT / Dimmer 10 or the AOT Dimmer button 46 on the remote
control, you switch the appliance into the last selected mode (radio / iPod
/ AUX).
Switching the display dimmer on/off manually
Press and hold the button AOT / Dimmer ♦
on the remote control, until in the display
play dimmer is indicated ( or ).
♦
Press and hold the button AOT / Dimmer
the remote control, once again to change the current setting (see also the
chapter Switching time controlled display dimming on/off p. 52).
After about 15 seconds, the last indicated screen display reappears.
10
, or the AOT Dimmer button 46 on the
10
, or the AOT Dimmer button 46 on the
10
, or the AOT Dimmer button 46
the current setting of the dis-
10
, or the AOT Dimmer button 46 on
66
SKRI 2000 A1

Cleaning/Troubleshooting
Cleaning
Safety instructions
DANGER
Potentially fatal risk from electric shock!
Remove the plug from the mains power socket before you start cleaning the ►
appliance.
IMPORTANT
Damage to the appliance!
To avoid irreparable damage, ensure that no moisture can get inside the ►
appliance when you are cleaning it.
Cleaning the housing
Clean the surfaces of the appliance with a soft, dry cloth. ■
Troubleshooting
In this section you receive important information for the localisation and remedying of malfunctions. Observe these instructions to avoid risks and damage.
GB
Safety instructions
WARNING
Pay heed to the following safety information to avoid risks and property damage:
►
Repairs to electronic appliances may only be carried out by specialists who
have been trained by the manufacturer. Considerable risk for the consumer and
damage to the appliance can occur as a result of incompetent repairs.
SKRI 2000 A1
67

Malfunction causes and remedies
i
The following table will help with the localising and remedying of minor malfunctions:
Troubleshooting
GB
Defect Possible cause Solution
15
has
Insert the power adapter 15 into a
mains power socket.
Check the circuit fuse.
Increase the sound volume with the
button Vol+
With the button
the appliance into the operating mode
Radio/iPod/Aux.
Start playback of the external audio
appliance.
Start playback of the iPod/iPhone.
Insert the iPod/iPhone correctly into
the station
Using the buttons
/ Down 19, tune the radio station
i
in to the ideal reception.
Try to improve reception by moving
the wire antenna
Insert the iPod/iPhone correctly into
the station 29.
Ensure that the playlist contains music.
The display is
showing nothing.
No sound
Noisy radio
reception
iPod/iPhone is not
being charged
The alarm with
iPod/iPhone has
not functioned
The power adapter
not been connected.
The mains power socket is
not supplying any power.
The volume is set to minimum.
The appliance is in the
operational mode clock/
standby operation.
Playback of the external
audio appliance has not
started.
Playback of the iPod/iPhone
has not started.
The iPod/iPhone is not
properly inserted into the
29
station
The radio station is not
properly tuned in.
Reception is too weak.
The iPod/iPhone is not
properly inserted into the
29
station
The selected playlist on your
iPod/iPhone is empty.
.
3
.
Power 6 switch
29
.
27
/ Up 17 and
.
68
NOTICE
If you cannot solve the problem with the aforementioned methods, please ►
contact the Customer Service Department.
SKRI 2000 A1

Storage/Disposal/Appendix
Storage / Disposal
Storage
If you do not intend to use the appliance for an extended period of time, disconnect it from the mains power supply, remove the battery and store it at a clean,
dry location that is not subjected to direct sunlight.
Disposal of the appliance
Do not dispose of the appliance in your normal domestic waste.
This product is subject to the provisions of European Directive
2002/96/EC-WEEE (Waste Electrical and Electronic Equipment).
Dispose of the appliance through an approved disposal centre or at your com-
munity waste facility. Observe the currently applicable regulations. In case of
doubt, please contact your waste disposal centre.
Disposing of the batteries
Batteries must not be disposed of in your household waste. Every consumer is
statutorily obliged to dispose of batteries at a collection centre in his/her community/district or a at a dealer. This obligation is intended to ensure that batteries
are disposed of in an environmentally friendly manner. Dispose of batteries only
when they are fully discharged.
GB
Appendix
Information regarding the EG Declaration of Conformity
This appliance complies with, in regard to conformance
to the basic requirements and other relevent regulations,
the European Directive for Electromagnetic Compatibility
2004/108/EC, the Low Voltage Directive 2006/95/EC as
well as the Eco-Design Directive 2009/125/EC (Supplement
1275/2008 Appendix II, Nr.1).
The complete original Declaration of Conformity can be
obtained from the importer.
SKRI 2000 A1
69

Technical data
Mains plug
Appendix
GB
Manufacturer Fai Shing Industries Ltd.
Model JVSW0702000
Input voltage, current 100-240 V~ 50/60 Hz, 350 mA
Output voltage, current 7 V
Protection class
II /
Appliance
Input voltage, current 7 V , 2 A
Battery for data retention
Battery for remote control
Power consumption
Operation approx. 5 W
Standby approx. 1.8 W
Speaker power output:
Radio frequency range (VHF) 87.5 - 108 MHz
1 x 3 V Type CR2032
(supplied)
1 x 3 V Type CR2025
(supplied)
approx. 2 x 1 W
(with 10 % harmonic distortion)
, 2 A
70
Operating temperature +5 - +40 °C
Humidity (no condensation) 5 - 90 %
Measurements (W x H x D)
(without stand)
Weight approx. 1070 g
approx.
30 x 15.7 x 8.4
cm
SKRI 2000 A1

Appendix
Warranty
With this appliance you receive a 3 year warranty from the date of purchase.
The appliance has been manufactured with care and meticulously examined
before delivery.
Please retain your receipt as proof of purchase. In the case of a warranty claim,
please make contact with our service department by telephone. Only in this way
can a post-free dispatch for your goods be assured.
NOTICE
This appliance is intended solely for private, non-commercial use. If this product
has been subjected to improper or inappropriate handling, abuse, or modifi cations not carried out by one of our authorised sales and service outlets, the
warranty becomes void.
Your statutory rights are not restricted in any way by this warranty. The warranty
period will not be extended as a result of warranty adjustments. This applies also
to replacement and repaired parts.
Possible damage and/or faults present at the time of purchase must be reported
immediately after unpacking or, at the very latest, within two days after the
purchase date.
After expiry of the warranty period incidental repairs are subject to payment.
GB
The warranty is valid only for material or manufacturing defects not, ►
however, for transport damage, wear and tear or for damage to breakable
parts, i.e. switches or batteries.
Service
Importer
SKRI 2000 A1
Service Great Britain
Tel.: 0871 5000 720 (£ 0.10/Min.)
E-Mail: kompernass@lidl.co.uk
IAN 63920
KOMPERNASS GMBH
BURGSTRASSE 21
44867 BOCHUM, GERMANY
www.kompernass.com
71

KOMPERNASS GMBH
Burgstraße 21
D-44867 Bochum
www.kompernass.com
Stand der Informationen · Last Information Update:
01 / 2012 · Ident.-No.: SKRI2000A1092011-3
IAN 63920
1
 Loading...