

Page 1
FOOD PROCESSOR SKM 500 B1
FOOD PROCESSOR
Operating instructions
KONYHAI ROBOTGÉP
Használati utasítás
KUHINJSKI APARAT
Navodila za uporabo
KUCHYNSKÝ ROBOT
Návod na obsluhu
IAN 103418
KUCHYŇSKÝ ROBOT
Návod k obsluze
KÜCHENMASCHINE
Bedienungsanleitung
Page 2
Before reading, unfold the page containing the illustrations and familiarise yourself with all functions of
the device.
Olvasás előtt kattintson az ábrát tartalmazó oldalra és végezetül ismerje meg a készülék mindegyik
funkcióját.
Pred branjem odprite stran s slikami in se nato seznanite z vsemi funkcijami naprave.
Před čtením si otevřete stranu s obrázky a potom se seznamte se všemi funkcemi přístroje.
Pred čítaním si odklopte stranu s obrázkami a potom sa oboznámte so všetkými funkciami prístroja.
Klappen Sie vor dem Lesen die Seite mit den Abbildungen aus und machen Sie sich anschließend mit allen
Funktionen des Gerätes vertraut.
GB Operating instructions Page 1
HU Használati utasítás Oldal 33
SI Navodila za uporabo Stran 65
CZ Návod k obsluze Strana 97
SK Návod na obsluhu Strana 129
DE / AT / CH Bedienungsanleitung Seite 159
Page 3
Page 4

Table of contents
Introduction . . . . . . . . . . . . . . . . . . . . . . . . . . . . . . . . . . . . . . . . . . . . . . . . . . . 2
Intended use . . . . . . . . . . . . . . . . . . . . . . . . . . . . . . . . . . . . . . . . . . . . . . . . . . 2
Scope of delivery . . . . . . . . . . . . . . . . . . . . . . . . . . . . . . . . . . . . . . . . . . . . . . 3
Disposal of packaging . . . . . . . . . . . . . . . . . . . . . . . . . . . . . . . . . . . . . . . . . . . . . . . . . . . . . 3
Appliance description . . . . . . . . . . . . . . . . . . . . . . . . . . . . . . . . . . . . . . . . . . . 4
Technical details . . . . . . . . . . . . . . . . . . . . . . . . . . . . . . . . . . . . . . . . . . . . . . . 4
Safety instructions . . . . . . . . . . . . . . . . . . . . . . . . . . . . . . . . . . . . . . . . . . . . . 5
Initial start-up . . . . . . . . . . . . . . . . . . . . . . . . . . . . . . . . . . . . . . . . . . . . . . . . . 7
Assembly . . . . . . . . . . . . . . . . . . . . . . . . . . . . . . . . . . . . . . . . . . . . . . . . . . . . . 8
Mixing bowl with kneading knife, cutting knife or emulsifying disc . . . . . . . . . . . . . . . . . . . 8
Mixing bowl with food processor . . . . . . . . . . . . . . . . . . . . . . . . . . . . . . . . . . . . . . . . . . . . 9
Blender . . . . . . . . . . . . . . . . . . . . . . . . . . . . . . . . . . . . . . . . . . . . . . . . . . . . . . . . . . . . . . . 10
Operation . . . . . . . . . . . . . . . . . . . . . . . . . . . . . . . . . . . . . . . . . . . . . . . . . . . 11
Using the kneading knife . . . . . . . . . . . . . . . . . . . . . . . . . . . . . . . . . . . . . . . . . . . . . . . . . . 11
Using the cutting knife . . . . . . . . . . . . . . . . . . . . . . . . . . . . . . . . . . . . . . . . . . . . . . . . . . . . 12
Working with the emulsifying disc . . . . . . . . . . . . . . . . . . . . . . . . . . . . . . . . . . . . . . . . . . . 14
Working with the food processor. . . . . . . . . . . . . . . . . . . . . . . . . . . . . . . . . . . . . . . . . . . . 15
Working with the blender . . . . . . . . . . . . . . . . . . . . . . . . . . . . . . . . . . . . . . . . . . . . . . . . . 16
GB
Cleaning and care . . . . . . . . . . . . . . . . . . . . . . . . . . . . . . . . . . . . . . . . . . . . . 18
Storage . . . . . . . . . . . . . . . . . . . . . . . . . . . . . . . . . . . . . . . . . . . . . . . . . . . . . 20
Fault rectifi cation . . . . . . . . . . . . . . . . . . . . . . . . . . . . . . . . . . . . . . . . . . . . . . 21
Disposal of the appliance . . . . . . . . . . . . . . . . . . . . . . . . . . . . . . . . . . . . . . . 22
EC Declaration of Conformity information . . . . . . . . . . . . . . . . . . . . . . . . . 22
Importer . . . . . . . . . . . . . . . . . . . . . . . . . . . . . . . . . . . . . . . . . . . . . . . . . . . . . 22
Warranty . . . . . . . . . . . . . . . . . . . . . . . . . . . . . . . . . . . . . . . . . . . . . . . . . . . . 23
Service . . . . . . . . . . . . . . . . . . . . . . . . . . . . . . . . . . . . . . . . . . . . . . . . . . . . . . 23
Recipes . . . . . . . . . . . . . . . . . . . . . . . . . . . . . . . . . . . . . . . . . . . . . . . . . . . . . . 24
SKM 500 B1
1
Page 5

GB
Introduction
Congratulations on the purchase of your new appliance!
You have clearly decided in favour of a modern, high quality product. These
operating instructions are a constituent of this product. They contain important
information with regard to safety, use and disposal. Before using the product,
familiarise yourself with all operating and safety instructions. This appliance
must be used as described and only for the purposes indicated. Please also,
pass these operating instructions on to any future owner(s).
Intended use
This appliance is intended exclusively for processing foodstuff s in household
quantities. This appliance is intended exclusively for use in domestic households.
It is not to be used for commercial applications!
This appliance is intended only for private use in enclosed, dry spaces. It must
not be used outdoors.
The appliance may only be used with original accessories.
WARNING
Danger if used for incorrect purpose!
Failure to use the appliance for its intended purpose can be dangerous.
► Only use the appliance for its intended purpose.
► Observe the procedures described in these operating instructions.
NOTE
Failure to use the appliance for its intended purpose can be dangerous.
►
Use the appliance only for its intended purposes. Follow the procedures
described in these operating instructions. Claims of any kind for damage
resulting from unintended use, improper repairs, unauthorised modifi cation
or the use of unauthorised spare parts will not be accepted. The user is the
sole bearer of the risk.
2
SKM 500 B1
Page 6

Scope of delivery
This appliance is supplied with the following components as standard:
▯ Food processor
▯ Mixing bowl with lid and pusher
▯ Cutting knife incl. cover
▯ Kneading knife
▯ Disk adapter
▯ Cutting disk
▯ Shredding disk
▯ Grating disk
▯ Emulsifying disc
▯ Blender with lid and closure
▯ Dough scraper
▯ Drive shaft adapter
▯ Drive shaft
▯ Operating instructions
1) Remove all parts of the appliance and the operating instructions from the
carton.
2) Remove all packaging materials and stickers.
NOTE
Check the contents for completeness and for signs of visible damage.
►
► If the contents are incomplete or damaged due to defective packaging or
through transportation, contact the Service Hotline (see chapter Service).
GB
Disposal of packaging
The packaging protects the appliance from transport damage. The packaging
materials have been selected in accordance with their environmental friendliness
and disposal attributes, and are therefore recyclable.
Recirculation of packaging into the material fl ow conserves raw materials and
reduces the amount of waste that is generated. Dispose of packaging material
that is no longer needed in accordance with applicable local regulations.
NOTE
If possible, keep the original packaging of the appliance during the
►
warranty period so that it can be properly packed for returning in the
event of a warranty claim.
SKM 500 B1
3
Page 7

GB
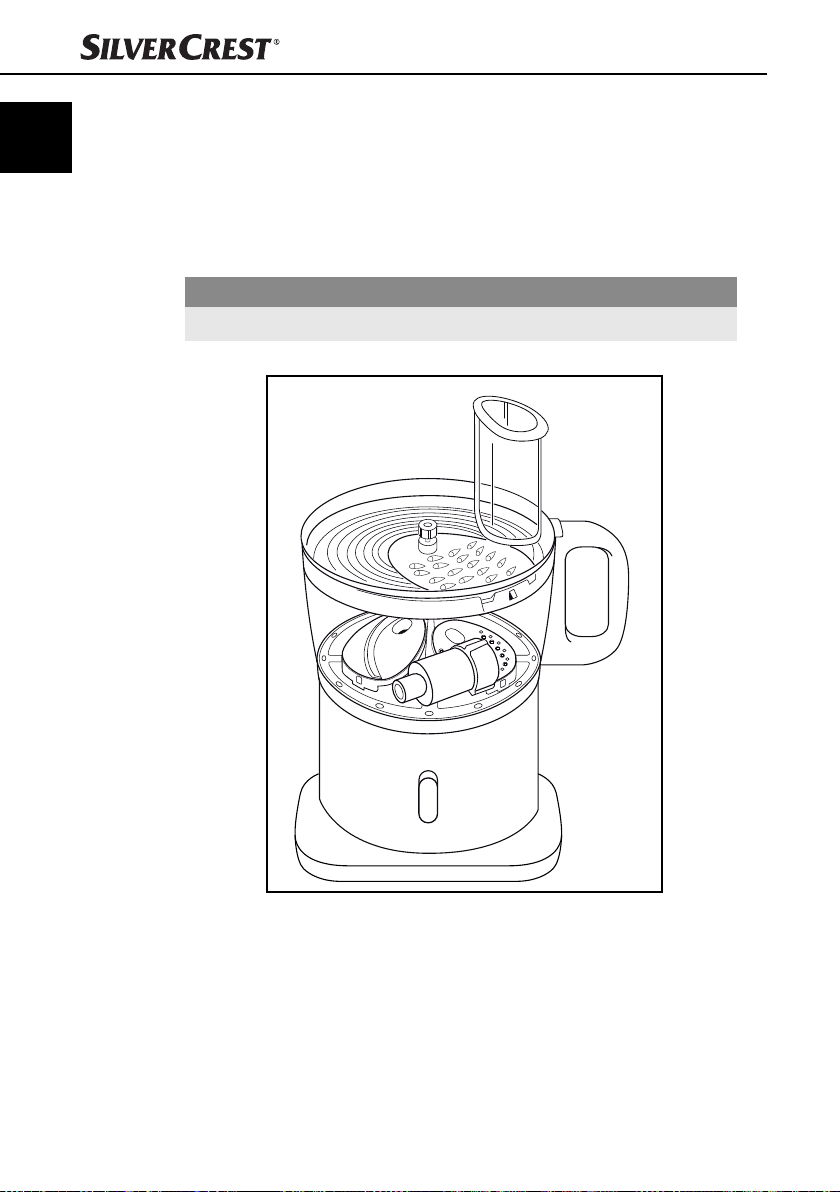
Appliance description
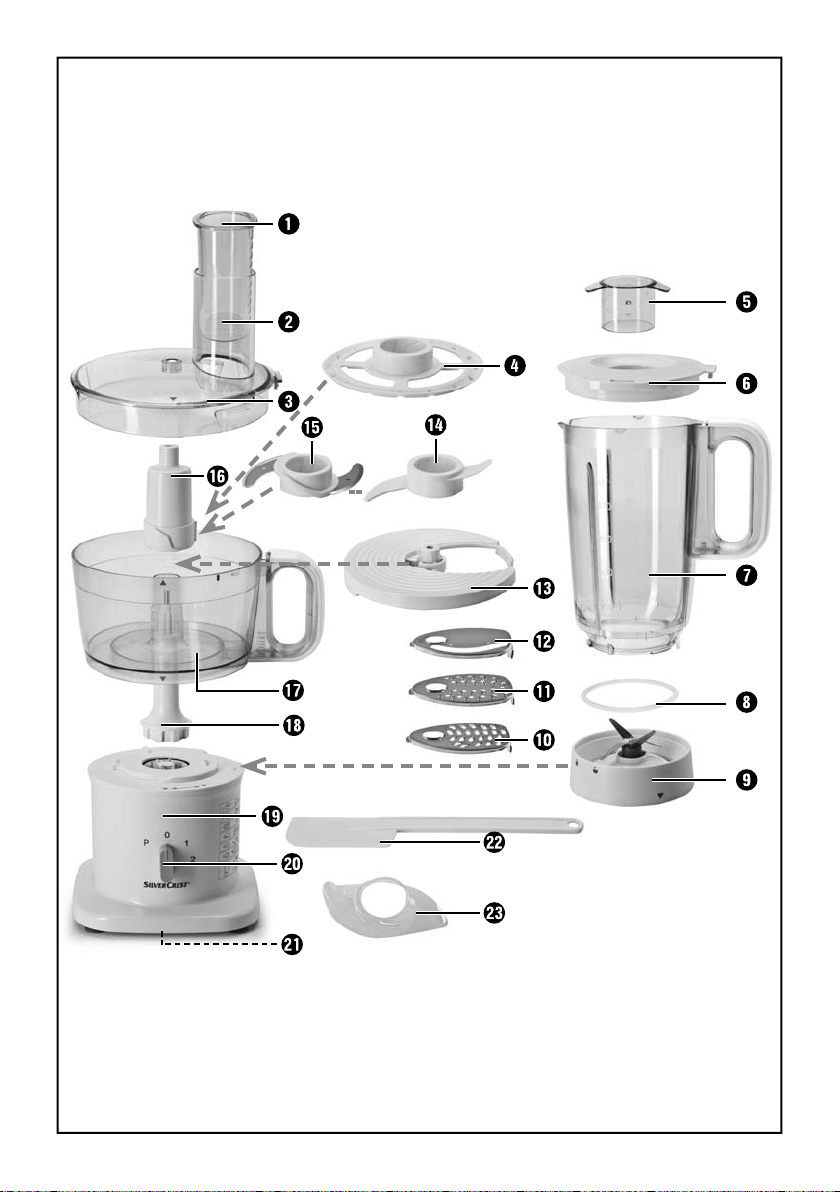
1 Pusher
2 Filling shaft
3 Lid
4 Emulsifying disc
5 Blender closure
6 Blender lid
7 Blender
8 Sealing ring
9 Holder with mixing knife
0 Shredding disk
q Grating disk
w Cutting disk
e Disk adapter
r Kneading knife
t Cutting knife
z Drive shaft adapter
u Mixing bowl
i Drive shaft
o Motor block
p Speed regulator
a Cord storage
s Dough scraper
d Cutting knife guard
Technical details
Mains voltage 220 - 240 V ~, 50 Hz
Rated power 500 W
Protection class
4
II
SKM 500 B1
Page 8

Safety instructions
RISK OF ELECTRIC SHOCK
► The appliance must only be connected to correctly installed and
earthed mains power sockets. Ensure that the rating of the local
power supply corresponds with the details on the rating plate of
the appliance.
► Ensure that the power cord does not become wet or moist during
use. Route the cord in such a way that it cannot be crushed or
damaged.
► Keep the power cord away from hot surfaces.
► Do not perform any repairs on the appliance. All repairs must be
performed by our Customer Services or by qualifi ed personnel.
► NEVER separate or connect the appliance from/to a power sup-
ply if your feet are in water.
► Remove the plug from the mains power socket when the appliance
is being cleaned or in the event of a fault. Switching the appliance off
is insuffi cient, since the appliance receives power for as long as
the plug is connected to the mains power socket.
GB
► To avoid risks, arrange for defective plugs and/or power cords to
be replaced immediately by qualifi ed technicians or our Customer Service Department.
Never submerge the appliance in water or other liquids.
SKM 500 B1
5
Page 9

GB
WARNING! RISK OF INJURY!
► Never use the appliance for purposes other than those described in
these instructions.
► The appliance should always be disconnected from the mains when
not supervised and before assembly, disassembly or cleaning.
► This appliance may not be used by children.
► The appliance and its connecting cable must be kept away from
children.
► Children should be supervised to ensure that they do not play with
the appliance.
► This appliance can be used by persons with reduced physical, sen-
sory or mental capabilities or lack of experience and knowledge if
they have been given supervision or instruction concerning safe use
of the appliance, and if they are aware of the potential risks.
► Children must not play with the appliance.
► Always disconnect the appliance from the mains power supply
when fi tting or removing accessory parts. This will prevent unintentional activation of the appliance.
► Only use the original accessory parts for this appliance. Acces-
sory parts from other manufacturers may not be suitable, and this
may lead to risks!
► Caution: the cutting knife, the cutting, shredding and grating discs
and the mixing knife are extremely sharp! Handle it with great care.
6
SKM 500 B1
Page 10

WARNING! RISK OF INJURY!
► Caution: the cutting knife, the cutting, shredding and grating discs
and the mixing knife are extremely sharp! For this reason, take
care when cleaning.
► Caution: the cutting knife, the cutting, shredding and grating discs
and the mixing knife are extremely sharp! For this reason, take
care when emptying the mixing bowl and the blender.
► When the appliance is operating, do not put anything other
than the ingredients to be processed into the mixing bowl or the
blender.
► Do not put hands and foreign objects in the to fi lling shaft or the
mixer to avoid the risk of injury or damage to the appliance.
► Do not change accessories unless the drive is stationary and the
mixer is unplugged from the power supply! The appliance will run
on for a short time after being switched off !
► Never leave the appliance unattended!
► Before changing accessories or additional parts that are in mo-
tion during operation, the appliance must be switched off and
disconnected from mains power.
GB
CAUTION - PROPERTY DAMAGE!
► Never fi ll the blender with boiling fl uids, such as soup! Allow
these to cool until lukewarm.
Initial start-up
■ Clean the appliance as described in the chapter “Cleaning and Care”.
■ Place the appliance on a fl at and clean surface.
■ Attach the appliance to the subsurface with the suction cups so that it is fi xed.
■ Unwind the power cord from the cord storage a and then attach it to the
cable leadthrough.
■ Assemble the appliance as described in the chapter entitled “Assembly”
depending on the type of use.
SKM 500 B1
7
Page 11
GB
Assembly
Mixing bowl with kneading knife, cutting knife or
emulsifying disc
NOTE
Use the diagrams on the fold-out page for assembly assistance!
►
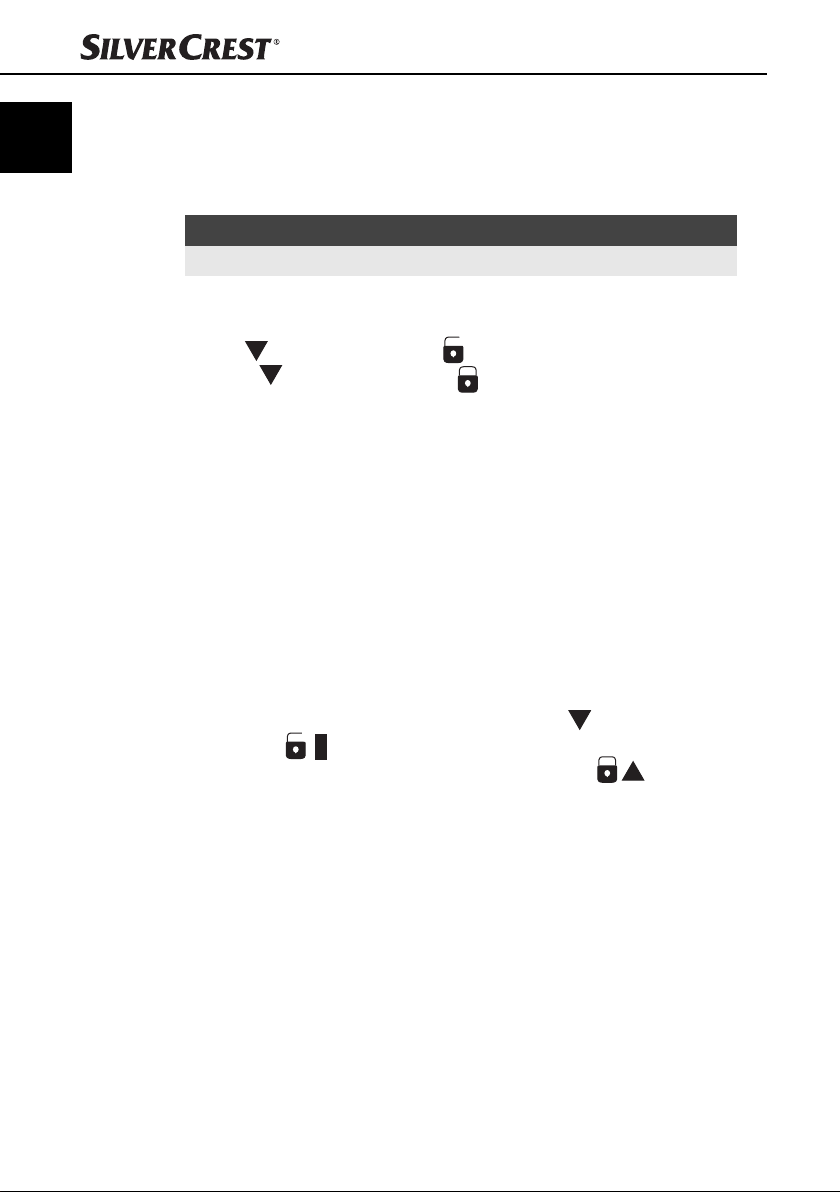
1) Attach the drive shaft i to the shaft holder.
2) Place the mixing bowl u onto the motor block o in such a way that the ar is pointing at the symbol and rotate the mixing bowl u until the
row
arrow
3) Put the drive shaft adapter z onto the drive shaft i.
4) Now choose your insert:
■ Kneading r or cutting knife t: Slide the kneading knife r or the cutting
knife t onto the drive shaft adapter z so that the locking mechanisms
engage.
■ Emulsifying disc 4: Fit the emulsifying disc 4 to the drive shaft adapter z
in such a way that the locking mechanisms engage.
5) Put the lid 3 onto the mixing bowl u so that the arrow
the symbol
dible “click” is heard and the arrow is pointing to the symbol
6) Slide the pusher 1 into the fi lling shaft 2.
7) Insert the plug into the mains power socket.
is pointing at the symbol . The mixing bowl u is now fi xed.
– the kneading knife r for stirring cake dough,
– The cutting knife t for chopping onions, Parmesan cheese and the
like, or
– the emulsifying disc 4 for whipping cream, beating egg white or
making light desserts.
on the lid 3 points to
(white square) on the mixing bowl u. Then rotate it until an au-
(white arrow).
8
SKM 500 B1
Page 12
Mixing bowl with food processor
NOTE
Use the diagrams on the fold-out page for assembly assistance!
►
1) Fit the drive shaft i to the shaft holder.
2) Place the mixing bowl u onto the motor block o so that the arrow
pointing at the symbol
is pointing at the symbol
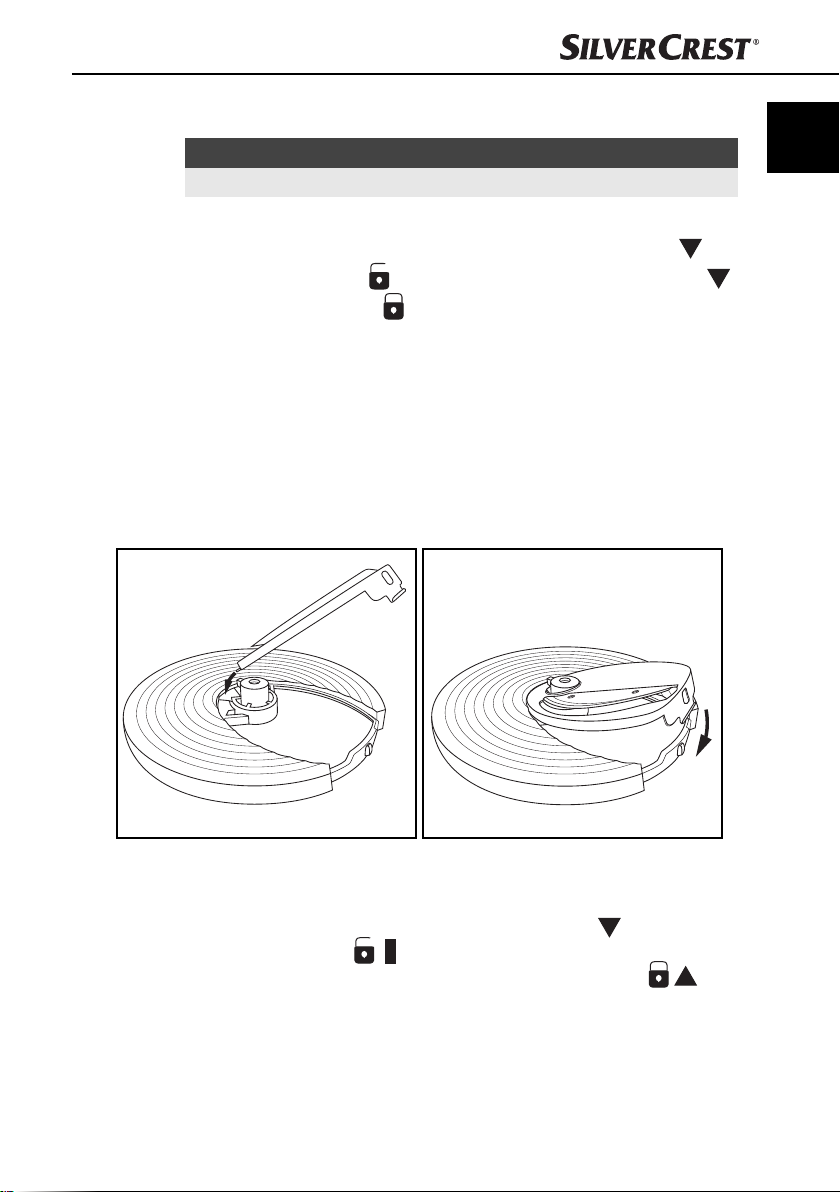
3) Select a suitable disk 0 q w (see chapter “Working with the food processor”)
and insert it into the disk adapter e:
– if a diff erent disk is still installed: Press the metal tab of the disk outwards
so that it slides over the locking mechanism on the disk adapter e. You
can now remove the disk.
– insert the new disk with the narrower side fi rst into the recess in the
disk adapter e (Fig. 1) and push the disk fi rmly downwards so that it
engages and is fi rmly seated (Fig. 2).
and rotate the mixing bowl u until the arrow
. The mixing bowl u is now fi xed.
GB
is
Fig. 1 Fig. 2
4) Place the disk adapter e with the disk fi tted onto the drive shaft i.
5) Put the lid 3 onto the mixing bowl u so that the arrow
points to the symbol
audible “click” is heard and the arrow is pointing to the symbol
SKM 500 B1
on the lid 3
on the mixing bowl u. Then rotate it until an
.
9
Page 13
GB
Blender
6) Slide the pusher 1 into the fi lling shaft 2.
7) Insert the plug into the mains power socket.
NOTE
Use the diagrams on the fold-out page for assembly assistance!
►
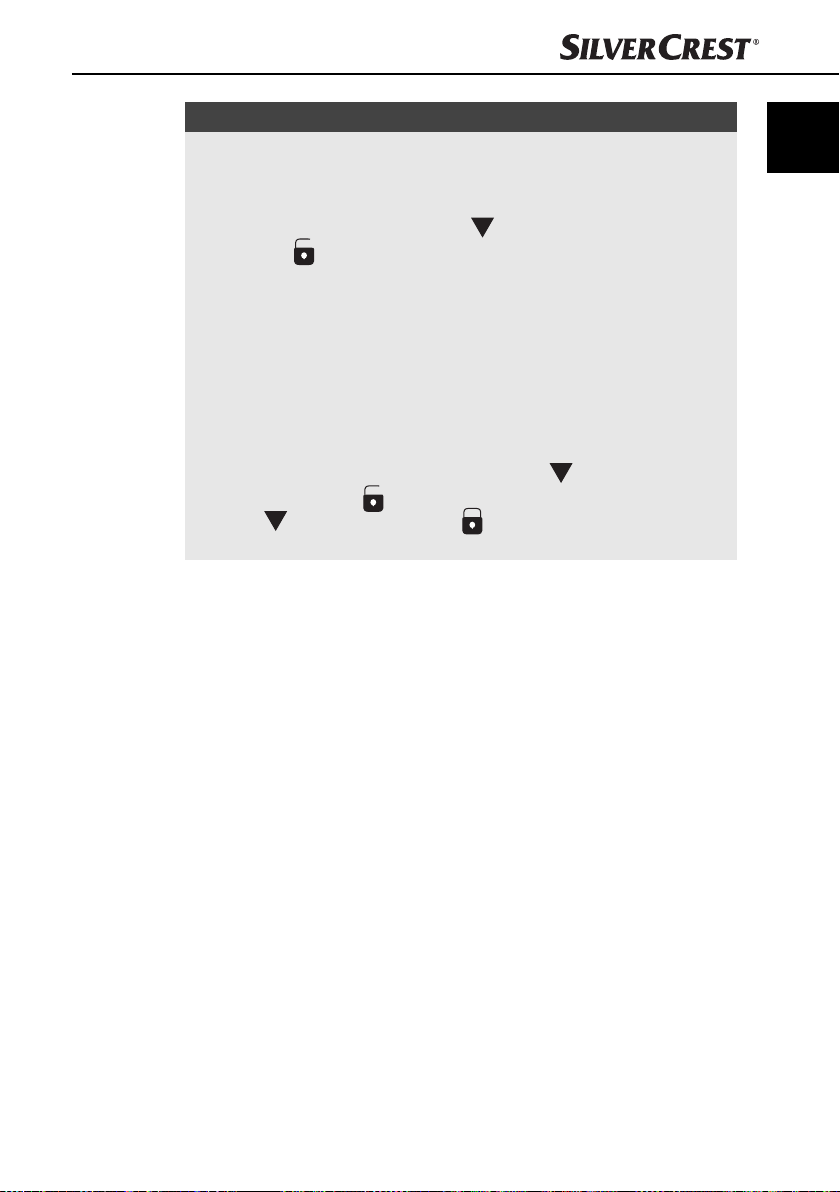
1) Place the blender onto the motor block o in a central position so that the
arrow
2) Turn the blender until the arrow is pointing at the symbol .
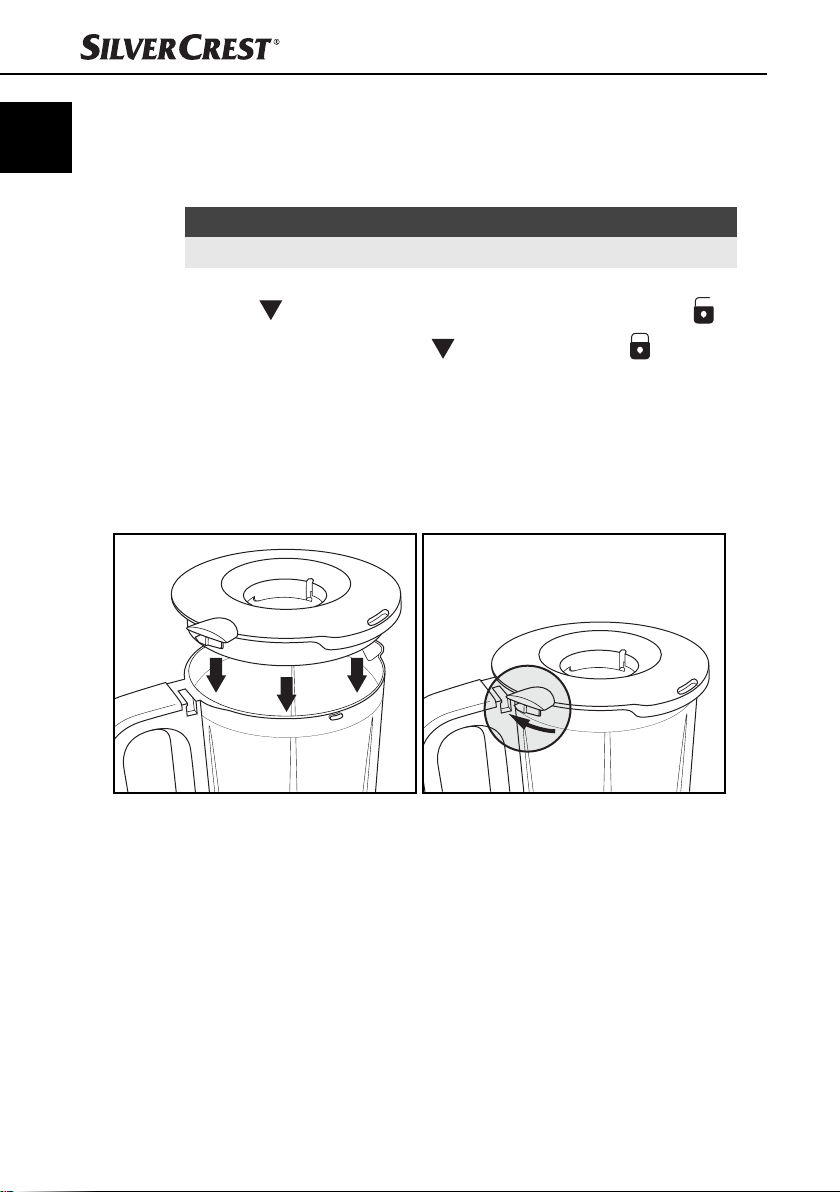
3) Fit the lid 6 to the blender 7 so that the lip of the lid 6 is exactly in line with
the handle of the blender 7 (Fig. 3). Ensure that the lip is positioned exactly at
the side next to the handle towards which the guide at the handle opens.
Rotate the lid 6 clockwise so that the locking mechanism on the lid 6 en-
gages in the guide at the handle of the blender 7 (Fig. 4). Press the lip down
a little way to ensure that the locking mechanism has engaged in the slot.
on the holder with mixing knife 9 is pointing at the symbol .
Fig. 3 Fig. 4
4) Fit the blender closure 5 to the lid 6 of the blender so that the plastic tabs
slide into the guides in the lid 6. Then rotate the closure 5 by 90°, so that
it is fi rmly attached.
5) Insert the plug into the mains power socket.
10
SKM 500 B1
Page 14
Operation
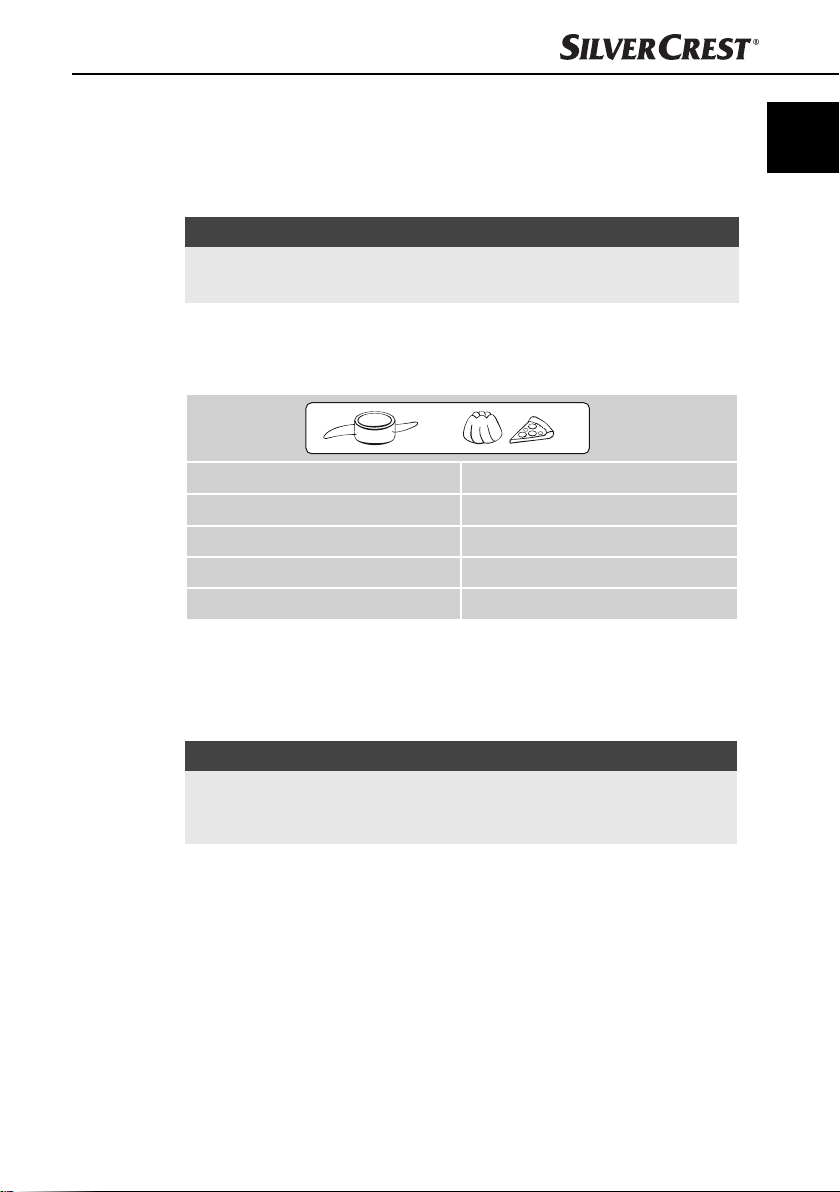
Using the kneading knife
The kneading knife r can be used to knead dough for cakes, bread rolls or pizzas.
NOTE
Do not attempt to mix liquids with the kneading knife r. They will over fl ow
►
or spray out. Always use the blender for liquids!
1) Insert the kneading knife r as described in the chapter “Assembly”.
2) Pour in the necessary ingredients. Do not exceed the quantities specifi ed in
the following table.
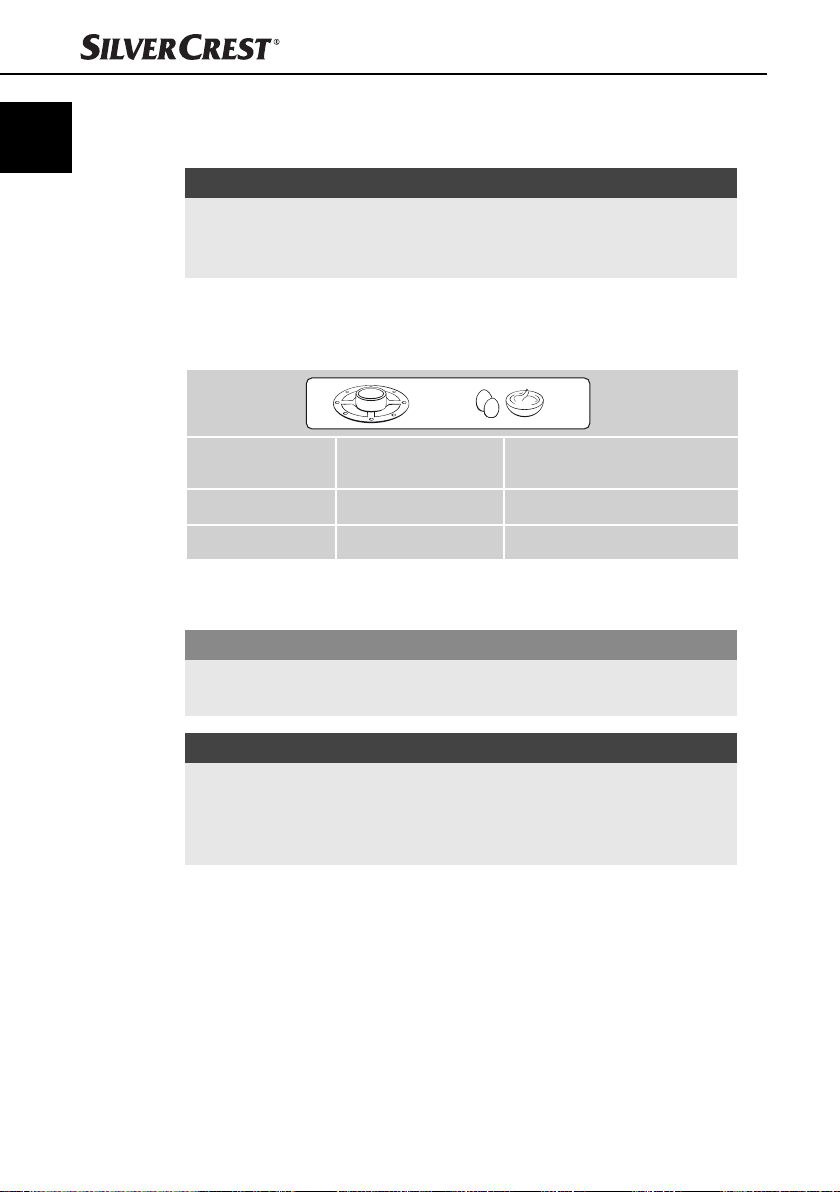
INGREDIENT MAX. AMOUNT
Flour (for yeast dough) max. 300 g
Flour (for pizza dough) max. 300 g
Flour (for cake dough) max. 300 g
Eggs (for cakes) max. 4 pieces
3) Now close the lid 3.
4) Start kneading for 20 seconds by turning the speed regulator p to setting 1,
then increasing the speed to setting 2 for about 1 minute.
5) The normal processing time for kneading is 30 - 180 seconds.
GB
SKM 500 B1
NOTE
If you wish to add ingredients during the kneading process, add them via
►
the fi lling shaft 2!
The appliance stops if the lid 3 is opened!
11
Page 15
GB
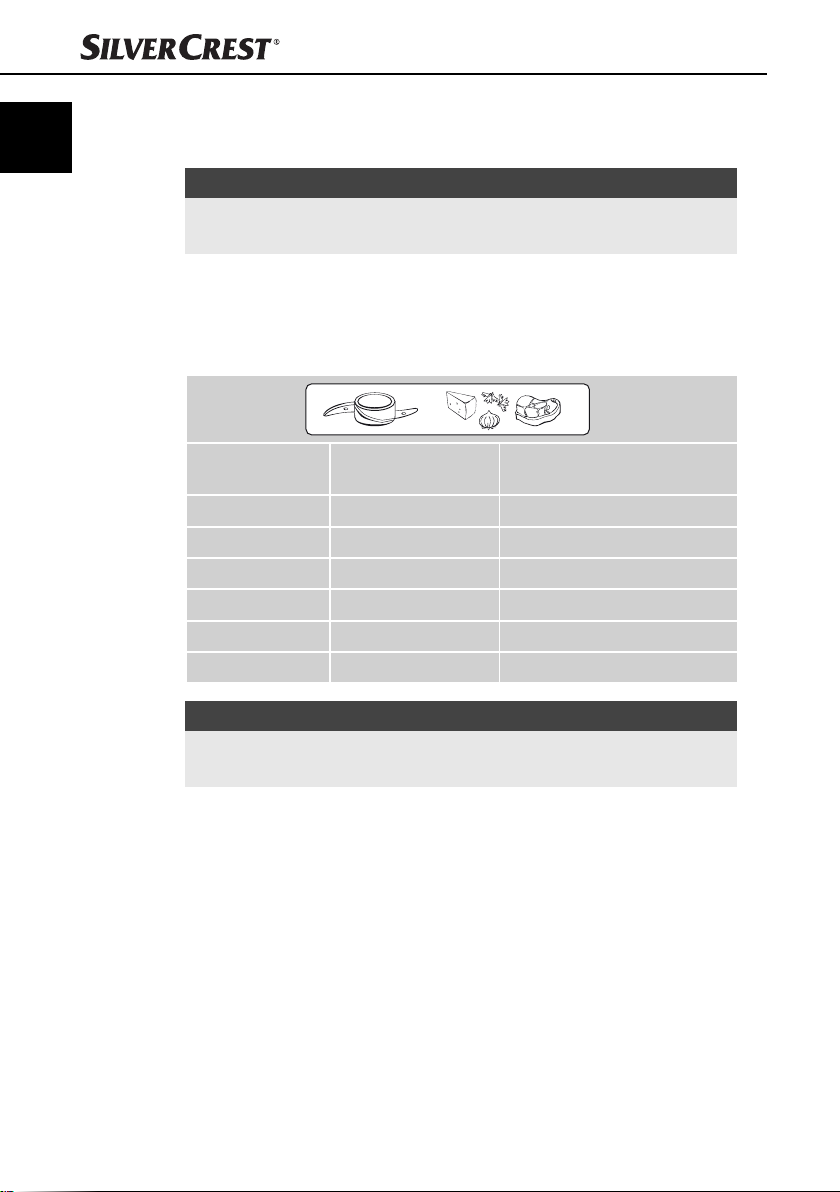
Using the cutting knife
Food, such as onions or meat, can be chopped up with the cutting knife t.
NOTE
Do not attempt to mix liquids with the cutting knife t. They will overfl ow or
►
spray out. Always use the blender for liquids!
1) Insert the cutting knife t as described in the chapter “Assembly”.
2) Cut the ingredients into pieces of approximately 2 - 3 cm.
3) Pour the ingredients in. Do not exceed the quantities specifi ed in the following table.
INGREDIENT
Bread max. 100 g Level 1 - 2
Cheese max. 200 g Level 1 - 2
Meat max. 500 g Level 1 - 2
Herbs max. 50 g Level 1
Garlic 150 - 300 g Pulse setting
Onions max. 500 g Pulse setting
NOTE
The speeds given in the table are intended as reference values. These can
►
vary depending on the quality and quantity of the ingredients!
MAX.
AMOUNT
SPEED
12
SKM 500 B1
Page 16

4) Now close the lid 3.
5) Start chopping by turning the speed regulator p. The normal processing
time for chopping is 10 - 60 seconds.
If ingredients stick to the sides of the mixing bowl or the knife:
– Switch the appliance off .
– Remove the lid 3.
– Remove the ingredients from the cutting knife t and the inside using the
dough scraper s.
– Close the lid 3.
– Restart the appliance.
NOTE
Only process meat that is boneless!
►
► Do not allow the appliance to operate for long periods when chopping
(hard) cheese. Otherwise the cheese will heat up, start to melt and agglutinate.
► If you wish to add ingredients during the cutting process, add them via the
fi lling shaft 2! The appliance will stop if the lid is opened!
Do not exceed the maximum quantities specifi ed in the table when adding
ingredients!
GB
SKM 500 B1
13
Page 17
GB
Working with the emulsifying disc
The emulsifying disc 4 can be used to whip cream or egg whites or mix desserts.
NOTE
Do not attempt to mix watery liquids with the emulsifying disc 4. These will
►
overfl ow or spray out. Always use the blender for watery liquids!
► Process no more than 400 ml of liquid! This would spray out or fl ow over.
1) Insert the emulsifying disc 4 as described in the chapter “Assembly”.
2) Pour in the necessary ingredients. Do not exceed the quantities specifi ed in
the following table.
INGREDIENT
Runny cream 125 - 350 ml approx. 20 - 30 seconds
Egg white from 2 - 4 eggs approx. 30 - 70 seconds
3) Close the lid 3.
4) Start by turning the speed regulator p of the appliance to setting 2.
CAUTION - PROPERTY DAMAGE!
Never use the emulsifying disc 4 for kneading dough or preparing cake
►
dough with butter/margarine! This may damage the emulsifying disc.
NOTE
The mixing bowl u and the emulsifying disc 4 must be completely dry
►
and grease-free when you are whisking egg white. Otherwise the egg
white will not get fi rm!
► The egg white that is being processed should be at room temperature.
MAX.
AMOUNT
PROCESSING TIME
14
SKM 500 B1
Page 18
Working with the food processor
You can shred, grate or cut using the three disks 0 q w of the food processor.
1) Select the required disk and assemble everything as described in the chapter
“Assembly”.
2) Remove the pusher 1 from the fi lling shaft 2.
3) Cut the food into pieces that will easily fi t into the fi lling shaft 2.
4) Start the food processor at setting 1 by turning the speed regulator p.
5) Then gradually add the food. Push the food in using the pusher 1 without
applying pressure.
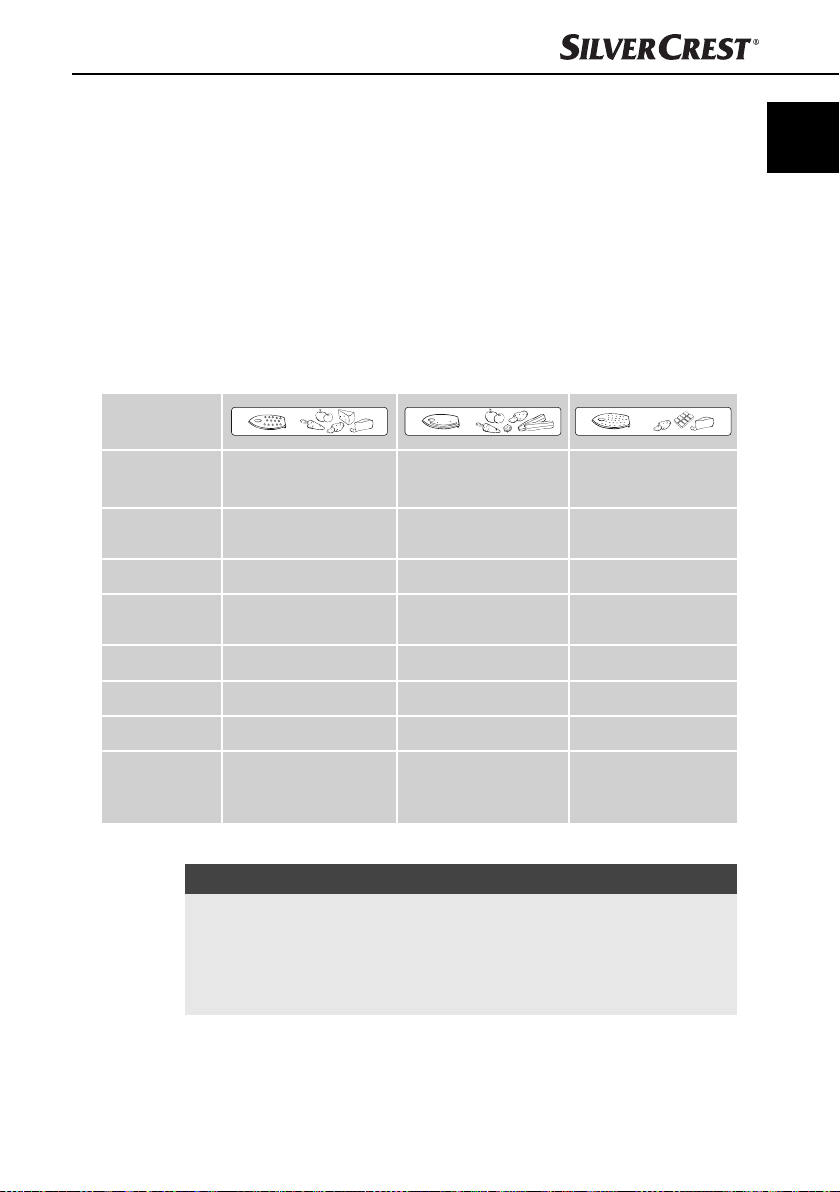
Do not exceed the quantities specifi ed in the following table.
INGREDIENT SHREDDING DISK CUTTING DISK GRATING DISK
Apples/carrots max. 500 g max. 500 g -
Parmesan max. 200 g - max. 200 g
Cucumber - max. 2 -
Potatoes max. 500 g max. 500 g max. 500 g
GB
Onions - max. 300 g -
Chocolate - - max. 200 g
Hard cheese
(e.g. mature
Gouda)
NOTE
►
► Do not allow the appliance to operate for long periods when chopping
max. 300 g - -
Do not prepare large quantities all at once, but in several portions. Empty
the mixing bowl u each time.
(hard) cheese or chocolate. Otherwise the ingredients will become too hot,
start to melt and agglutinate.
SKM 500 B1
15
Page 19
GB
Working with the blender
You can prepare milk shakes, for example or chop up ice cubes using the blender
(blender 7 with installed holder with mixing knife 9 and sealing ring 8).
CAUTION - PROPERTY DAMAGE!
Never fi ll the blender with boiling fl uids, such as soup! Allow these to cool
►
until lukewarm.
1) Place the blender onto the motor block o as described in the chapter “Assembly”.
2) Cut the solid ingredients into small pieces.
3) Pour in the necessary ingredients. Do not exceed the quantities specifi ed in
the following table.
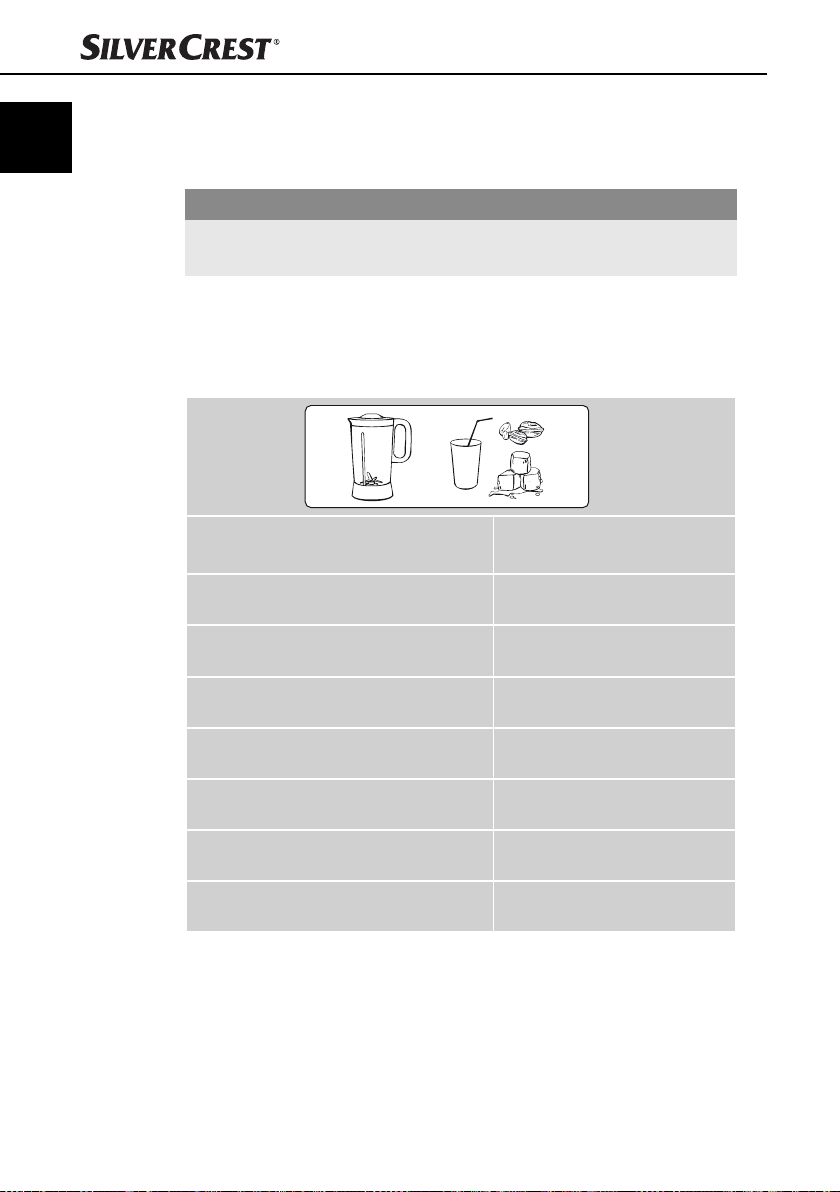
INGREDIENT MAX. AMOUNT
Bananas/strawberries + milk for a shake max. 500 ml
Broccoli/tomatoes (vegetables) max. 500 ml
16
Bananas/melons for cocktails max. 500 ml
Boiled pulses (e.g. lentils) max. 250 g
Ice cubes
Almonds max. 200 g
Nuts max. 200 g
4) Close the lid 6 and ensure that the closure 5 has been fi tted.
5) Start by turning the speed regulator p of the appliance to setting 2.
max. 6 cubes or 140 g
(Switch setting "P")
SKM 500 B1
Page 20

If ingredients stick to the sides of the blender during processing:
– Switch the appliance off .
– Remove the plug from the mains power socket.
– Open the lid 6 and remove the ingredients from the inside using the
dough scraper s.
– Close the lid 6 and re-connect the appliance to the power supply.
CAUTION - PROPERTY DAMAGE!
Never open the lid 6 of the blender whilst the knife is still rotating! Food
►
could spray out!
► If you are mixing an easily foaming liquid such as milk, put no more than 1
litre into the blender so that it does not overfl ow.
NOTE
If you wish to add liquid whilst the mixer is operating remove the closure 5
►
and pour the fl uid into the opening in the lid 6.
► When mixing hard ingredients such as ice cubes, use setting "P" (Pulse)
several times.
► Do not prepare large quantities all at once, but in several portions.
► If you are dissatisfi ed with the results, switch the appliance off and remove
the plug from the mains power socket. Stir the ingredients using the dough
scraper s or remove some of them. Add some liquid if necessary and mix
again.
GB
SKM 500 B1
17
Page 21

GB
Cleaning and care
WARNING - RISK OF ELECTRIC SHOCK!
► Always remove the plug from the mains power socket before cleaning the
appliance.
► Under no circumstances must the motor block o be submersed in
liquid. This could result in a potentially fatal electric shock and the appliance
could be damaged.
► Never open the appliance housing! You could receive a potentially fatal
electric shock.
WARNING - RISK OF INJURY!
► Be careful when cleaning the cutting knife t, the cutting disk w, the
shredding disk 0, the grating disk q and the mixing knife. These parts
are extremely sharp!
CAUTION - PROPERTY DAMAGE!
Do not use solvents or abrasive cleaners. These will damage the surface of
►
the appliance!
► Do not use abrasive, aggressive or chemical cleaning agents! They could
irreparably damage the surface!
NOTE
Always clean all parts immediately after use. This makes food residue
►
easier to remove.
18
SKM 500 B1
Page 22
NOTE
Disconnect the holder with mixing knife 9 from the blender 7 for cleaning!
►
► Remove the small Philips screw from the underside of the holder with mixing
knife 9.
► Rotate the blender 7 until the arrow on the blender 7 is pointing at
the symbol
the holder 9.
► Remove the sealing ring 8 from the holder: Slightly lift the sealing ring 8
with a fl at, blunt object (e.g. made from wood) and then carefully guide
the sealing ring 8 over the knife.
Never use sharp or pointed objects for removing the sealing ring 8!
These can damage the sealing ring 8 and therefore cause leaks!
To assemble, place the sealing ring 8 back into the holder 9 and place
the blender 7 onto the holder 9 so that the arrow
is pointing at the symbol
the arrow
screw back in again.
■ Only clean the motor block o, the power cord and the knife guard for the
cutting knife d with a damp cloth. Dry everything properly before re-using it.
■ Clean the holder with mixing knife 9 and the sealing ring 8 in warm
dishwater. Afterwards, rinse all parts with clean water so that no detergent
residue remain on the parts.
■ Clean the cutting knife t, the kneading knife r, the disk adapter e, the
shredding disk 0, the grating disk q and the cutting disk w, the emulsifying
disc 4, the lid 3 with pusher 1, the mixing bowl u, the drive shaft i, the
drive shaft adapter z, the blender 7, the blender closure 5, the blender
lid 6 and the dough scraper s in warm dishwater. Afterwards, rinse all
parts with clean water so that no detergent residue remains on the parts.
– You can also clean these parts in the dishwasher! If possible, place the
parts in the top basket of the dishwasher. Ensure that the parts are not
trapped in any way.
■ Dry all parts thoroughly before re-using the appliance.
on the holder 9. The blender 7 can then be released from
on the blender 7
on the holder 9. Rotate the blender 7 until
is pointing at the symbol . Then screw the small Philips
GB
SKM 500 B1
19
Page 23
GB
Storage
Store the cleaned and dried appliance in a dust-free and dry location.
Wind the cable around the cord storage a and attach the end to the cable
leadthrough.
Proceed as follows in order to store accessory parts in the mixing bowl u in a
space-saving way:
CAUTION - PROPERTY DAMAGE!
Never start the appliance with the accessory parts stored inside it!
►
20
0
P1
2
1) Fit the drive shaft i to the motor block o.
2) Fit the mixing bowl u to the motor block o.
3) Slide the emulsifying disc 4 over the drive shaft i in the mixing bowl u.
SKM 500 B1
Page 24
4) Slide the cutting knife t with the knife guard d fi tted and the kneading
knife r over the drive shaft i onto the emulsifying disc 4.
5) Place the drive shaft adapter z and 2 disks (e.g. cutting w and shredding
disk 0) at the side next to the drive shaft i in the mixing bowl u.
6) Place the disk adapter e with the disk fi tted onto the drive shaft i.
7) Close the lid 3 and slide the pusher 1 into the fi lling shaft 2.
Fault rectifi cation
DEFECT CAUSE SOLUTION
GB
The appliance
does not work.
The appliance
stops suddenly.
The motor runs, but
the accessory parts
do not rotate.
The plug is not
connected.
The appliance is not
correctly assembled
and engaged.
The appliance is
defective.
3 of the
The lid
appliance may have
become loose when
processing hard
ingredients.
The appliance is
defective.
The drive shaft
not inserted properly.
i is
Insert the plug into a mains
power socket.
Check the assembly of the
appliance and ensure that all
marks are correctly aligned.
In this case, contact the
Customer Services.
Replace the lid 3.
In this case, contact the
Customer Services.
Check the assembly of the
drive shaft i.
SKM 500 B1
21
Page 25
GB
Disposal of the appliance
Never dispose of the appliance in your normal domestic waste.
This product is subject to the provisions of European Directive
2012/19/EU.
Dispose of the appliance through an approved disposal centre or at your community waste facility. Please observe the currently applicable regulations. Please
contact your waste disposal centre should you be in any doubt.
EC Declaration of Conformity information
With regard to compliance with essential requirements and other
relevant provisions, this appliance complies with the European
Electromagnetic Compatibility Directive 2004/108/EC, the
Low Voltage Directive 2006/95/EC as well as the ErP Directive
2009/125/EC, Regulation 1275/2008 Annex 1, No. 1.
The full original Declaration of Conformity is available from the
importer.
Importer
KOMPERNASS HANDELS GMBH
BURGSTRASSE 21
44867 BOCHUM
GERMANY
www.kompernass.com
22
SKM 500 B1
Page 26

Warranty
The warranty for this appliance is for 3 years from the date of purchase. The
appliance has been manufactured with care and meticulously examined before
delivery.
Please retain your receipt as proof of purchase. In the case of a warranty claim,
please make contact by telephone with our Customer Service Department. Only
in this way can a post-free despatch for your goods be assured.
NOTICE
►
This product is for domestic use only and is not intended for commercial use. The
warranty is void in the case of abusive and improper handling, use of force and
internal tampering not carried out by our authorised service branch.
Your statutory rights are not restricted in any way by this warranty. The warranty
period is not extended by repairs made under the warranty. This applies also to
replaced and repaired parts.
Damages and defects extant at the time of purchase must be reported immediately after unpacking, resp. no later than two days after the date of purchase.
Repairs made after the lapse of the warranty period are subject to charge.
Service
Service Great Britain
Tel.: 0871 5000 720 (£ 0.10/Min.)
E-Mail: kompernass@lidl.co.uk
IAN 103418
GB
The warranty covers only claims for material and manufacturing defects,
but not for transport damage, wearing parts or for damage to fragile
components, e.g. buttons or batteries.
SKM 500 B1
Hotline availability: Monday to Friday 08:00 - 20:00 (CET)
23
Page 27

GB
Recipes
Salad plate
Ingredients:
■ 1 fresh cucumber
■ 1/4 head of white cabbage
■ 2 peppers
■ 1 onion
For the marinade:
■ 3 - 4 tbsp wine vinegar
■ 2 tbsp cooking oil
■ Salt
■ Sugar
■ Freshly ground pepper
■ 1 tbsp chopped herbs
Preparation:
1) Peel the cucumber and divide the cabbage into pieces that will fi t into the
fi lling shaft 2 of the food processor.
2) Now slice the cucumber, cabbage, prepared peppers and onions with the
food processor at level 1 using the cutting disk w.
3) Stir the ingredients for the marinade using the mixer.
4) Combine the vegetables with the marinade and season to taste.
24
SKM 500 B1
Page 28

Stuff ed chicken breast with curry sauce
Ingredients:
■ 4 chicken breasts, each approx. 150 g
■ Salt
■ Freshly ground pepper
For the suffi ng:
■ 150 g minced pork (raw)
■ 1 onion, diced
■ Chinese seasoning
■ 1 pinch of ginger powder
For the sauce:
■ 250 ml white wine
■ 2 - 4 tbsp cream
■ Salt, 1 tbsp curry powder
■ Cornfl our (if required)
Preparation:
1) Season the chicken breasts with salt and pepper and then cut them up using
a sharp kitchen knife.
2) Process all of the ingredients for the stuffi ng into a dough in the mixing bowl
using the kneading knife r, and season to taste.
3) Now fi ll the chicken breasts with the stuffi ng and sew them up. (Alternatively,
you can also use toothpicks.)
4) Heat the fat and fry all the chicken breasts in it.
5) Pour in the wine and then let the chicken breasts braise for 10-15 minutes.
6) Remove the chicken breasts from the pan and place them where they will
keep warm.
7) Season the sauce with cream, salt and curry powder and thicken the sauce
as desired with cornfl our.
Now serve the chicken breasts with the sauce on a bed of rice, for example.
GB
SKM 500 B1
25
Page 29

GB
Potato röstis
Ingredients:
■ 4 large, starchy potatoes
■ Salt
■ Pepper
■ Nutmeg, ground
■ 80 g Butter or margarine
Preparation:
1) Wash and peel the potatoes and cut them into strips with the shredding disc 0.
2) Wrap the potato mass in a cloth and squeeze the liquid out.
3) Sprinkle the spices on the potato mass and mix everything together.
4) Using a small ladle, put some of the potato mass into the hot fat and press it
fl at with a spatula.
5) Now fry the röstis on both sides until they are crispy.
Suitable as an accompaniment to meat and game dishes.
Tuna spread
Ingredients:
■ 1 can of tuna in sauce with vegetables
■ 3 tbsp yoghurt
■ 1 tsp lemon juice, freshly pressed
■ 1 pinch salt
■ Freshly ground pepper
■ 2 hard-boiled eggs, diced
26
To serve:
■ Whole wheat bread in slices
■ Butter for buttering the bread
■ 1 hard boiled egg, diced
■ Chives, sliced
SKM 500 B1
Page 30

Preparation:
1) Blend all ingredients in the mixing attachment at the highest level until the
desired consistency is reached (approx. 15 seconds) and then season to
taste.
2) Spread butter and the tuna mixture onto the bread and sprinkle with
chopped egg and chives.
Tomato sauce
Ingredients:
■ 5 tbsp cooking oil
■ 1 large onion
■ 1 large tin (800 g) peeled tomatoes
■ Salt, pepper, 1 pinch sugar, 1 pinch thyme
■ 1 pinch chilli powder
■ 1/2 bunch parsley, chopped
■ 1/2 bunch basil, fi nely chopped
■ 40 g cold butter or 100 ml sweet cream
Preparation:
1) Peel the onions and roughly dice them with a knife.
2) Heat the oil and fry the onions in it or use the microwave for 2-3 minutes at
600 watts.
3) Add the tomatoes with the juice and stir in all of the spices.
4) Let the sauce simmer covered for 20 minutes or gently cook it all in the
microwave.
5) Allow the tomato sauce to cool (to lukewarm) and then purée it in the blender.
6) Then pour the sauce back into a pot and boil it until it has reduced a little.
7) Now stir in the butter or cream.
8) Sprinkle on the herbs and fl avour it to taste.
Serve with any kind of pasta and sprinkle with grated cheese.
GB
SKM 500 B1
27
Page 31

GB
Pancakes
Ingredients:
■ 2 - 3 eggs
■ 375 ml milk
■ 1 pinch salt
■ 250 g fl our
■ Fat for frying
Preparation:
1) Mix the eggs, milk and salt with the kneading knife r.
2) Sift the fl our through and then add it to the mixture. Mix everything together
with the kneading knife r until you have a smooth batter.
3) Allow the batter to rise for 20 minutes.
4) Heat the fat and, with a small ladle, place some batter in the pan. (Only as
much as is needed to thinly cover the pan bottom.)
5) Fry the pancakes until golden brown on both sides and serve hot.
Marble cake
Ingredients:
■ 125 g soft butter or margarine
■ 125 g sugar
■ 3 eggs
■ 1/2 packet of vanilla sugar
■ 1 pinch salt
■ 250 g wheat fl our
■ 1/2 packet baking powder
■ 75 ml milk
■ 20 g baking cocoa
■ 50 g semisweet chocolate
■ Butter for greasing the tin
28
SKM 500 B1
Page 32

Preparation:
1) Break the chocolate into large pieces and chop them using the cutting knife t.
2) Place all ingredients except the chocolate and the baking cocoa into the
mixing bowl u and mix using the kneading knife r.
3) Grease a round cake tin (diameter: 20 - 22 cm) or a loaf tin (30 cm long).
4) Pour half of the dough into the tin and then stir the cocoa and grated
chocolate into the remaining pastry.
5) Now place the dark dough onto the light dough and fold in with a fork in
a spiral shape.
Tip: If you wish, you can also cover the cake with 100 g of semisweet chocolate
and then decorate it with blobs of cream and chocolate biscuits.
Yeast dough
Ingredients:
■ 300 g wheat fl our
■ 15 g fresh yeast or 5 g dried yeast
■ Approx. 150 ml lukewarm milk
■ 50 g butter or margarine (room temperature)
■ 50 g sugar
■ 1 egg
GB
SKM 500 B1
Preparation:
1) Place the fl our, dry yeast or crumbled yeast and all other ingredients (not
directly on the yeast) into the mixing bowl u.
2) Mix everything using the kneading knife r.
3) Remove the dough from the mixing bowl u and place it in a large bowl.
4) Cover the dough with a dish cloth, place it in a warm place and let the
dough rise until it has visibly increased in size.
5) Then knead the dough again by hand.
6) After that, the dough is fi nished and can be further processed.
29
Page 33

GB
Orange drink
Ingredients:
■ 250 ml orange juice
■ 1 - 2 tbsp lemon juice
■ 150 g tinned apricots
■ 6 ice cubes, crushed
■ 2 tsp sugar or honey
Preparation:
1) Place the ice cubes into the blender and chop using switch setting “P”.
2) Put the orange juice, the lemon juice and the apricots and the ice cubes in
the blender and mix everything for about 10 seconds at level 2.
3) Now add the sugar or honey to taste and serve the juice ice cold.
30
SKM 500 B1
Page 34

Hazelnut biscuits
Ingredients:
■ 200 g hazelnuts
■ 60 g cane sugar
■ 2 egg whites
■ 2 tsp honey
■ Approx. 50 g of plum or rose hip jam
■ 35 g each of semisweet and milk chocolate
Preparation:
1) Chop the nuts in the mixer and put four tablespoons thereof aside.
2) Process the remaining nuts, sugar, egg whites and honey with the kneading
knife r to a fi rm dough.
3) Sprinkle the remaining nuts onto a work surface and roll the dough out to
about a quarter inch thick.
4) Now cut out the biscuits and place them on a baking tray lined with baking
paper.
5) Join the cooled biscuits together in pairs with the rose hip or plum jam and
then coat them with some milk chocolate and semisweet chocolate.
6) Melt the two types of chocolate separately. Dip the biscuits up to half way in
and allow to dry on cake racks.
GB
SKM 500 B1
Bon appetit!
These recipes are provided subject to change. All ingredients and preparation
information are guidelines. Enhance these recipe suggestions in accordance with
your personal experience.
We hope you enjoy the recipes and wish you “bon appetit”.
31
Page 35

32
SKM 500 B1
Page 36

Tartalomjegyzék
Bevezető . . . . . . . . . . . . . . . . . . . . . . . . . . . . . . . . . . . . . . . . . . . . . . . . . . . . 34
Rendeltetésszerű használat . . . . . . . . . . . . . . . . . . . . . . . . . . . . . . . . . . . . . 34
A csomag tartalma . . . . . . . . . . . . . . . . . . . . . . . . . . . . . . . . . . . . . . . . . . . . 35
A csomagolás ártalmatlanítása . . . . . . . . . . . . . . . . . . . . . . . . . . . . . . . . . . . . . . . . . . . . . 35
A készülék leírása . . . . . . . . . . . . . . . . . . . . . . . . . . . . . . . . . . . . . . . . . . . . . 36
Műszaki adatok . . . . . . . . . . . . . . . . . . . . . . . . . . . . . . . . . . . . . . . . . . . . . . 36
Biztonsági utasítások . . . . . . . . . . . . . . . . . . . . . . . . . . . . . . . . . . . . . . . . . . 37
Első használat . . . . . . . . . . . . . . . . . . . . . . . . . . . . . . . . . . . . . . . . . . . . . . . . 39
Összeszerelés . . . . . . . . . . . . . . . . . . . . . . . . . . . . . . . . . . . . . . . . . . . . . . . . 40
Keverőtál dagasztókéssel, szeletelőkéssel vagy elegyítő tárcsával . . . . . . . . . . . . . . . . . . 40
Keverőtál aprítóval . . . . . . . . . . . . . . . . . . . . . . . . . . . . . . . . . . . . . . . . . . . . . . . . . . . . . . . 41
Mixer . . . . . . . . . . . . . . . . . . . . . . . . . . . . . . . . . . . . . . . . . . . . . . . . . . . . . . . . . . . . . . . . . 42
Működés . . . . . . . . . . . . . . . . . . . . . . . . . . . . . . . . . . . . . . . . . . . . . . . . . . . . 43
A dagasztókés használata . . . . . . . . . . . . . . . . . . . . . . . . . . . . . . . . . . . . . . . . . . . . . . . . 43
A szeletelőkéssel történő munka . . . . . . . . . . . . . . . . . . . . . . . . . . . . . . . . . . . . . . . . . . . . 44
Munkavégzés az elegyítő tárcsával . . . . . . . . . . . . . . . . . . . . . . . . . . . . . . . . . . . . . . . . . 46
Az aprítóval történő munka . . . . . . . . . . . . . . . . . . . . . . . . . . . . . . . . . . . . . . . . . . . . . . . . 47
A mixer használata . . . . . . . . . . . . . . . . . . . . . . . . . . . . . . . . . . . . . . . . . . . . . . . . . . . . . . 48
Tisztítás és ápolás . . . . . . . . . . . . . . . . . . . . . . . . . . . . . . . . . . . . . . . . . . . . .50
Tárolás . . . . . . . . . . . . . . . . . . . . . . . . . . . . . . . . . . . . . . . . . . . . . . . . . . . . . .52
HU
Hibaelhárítás . . . . . . . . . . . . . . . . . . . . . . . . . . . . . . . . . . . . . . . . . . . . . . . . . 53
A készülék ártalmatlanítása . . . . . . . . . . . . . . . . . . . . . . . . . . . . . . . . . . . . 54
EK megfelelőségi nyilatkozatra vonatkozó tudnivaló . . . . . . . . . . . . . . . 54
Gyártja . . . . . . . . . . . . . . . . . . . . . . . . . . . . . . . . . . . . . . . . . . . . . . . . . . . . . . 54
Garancia . . . . . . . . . . . . . . . . . . . . . . . . . . . . . . . . . . . . . . . . . . . . . . . . . . . . 55
Szerviz . . . . . . . . . . . . . . . . . . . . . . . . . . . . . . . . . . . . . . . . . . . . . . . . . . . . . . 55
Receptek . . . . . . . . . . . . . . . . . . . . . . . . . . . . . . . . . . . . . . . . . . . . . . . . . . . . 56
SKM 500 B1
33
Page 37

HU
Bevezető
Gratulálunk új készüléke megvásárlásához!
Vásárlásával modern és kiváló minőségű termék mellett döntött. A használati
útmutató a termék része. Fontos tudnivalókat tartalmaz a biztonságra, használatra
és ártalmatlanításra vonatkozóan. A termék használata előtt ismerkedjen meg
valamennyi használati útmutatóval és biztonsági fi gyelmeztetéssel.
Csak a leírtak szerint és a megadott célokra használja a terméket. A készülék
harmadik személynek történő továbbadása esetén adja át a készülékhez tartozó
valamennyi leírást is.
Rendeltetésszerű használat
Ez a készülék kizárólag háztartásban szokásos mennyiségű élelmiszer feldolgozására szolgál. A készülék kizárólag magánháztartásokban használható.
Ne használja kereskedelmi célokra.
A készülék kizárólag magáncélra, zárt, esőtől védett helyiségben való használatra
készült. Ne használja a szabadban!
A készüléket csak az eredeti tartozékokkal szabad használni.
FIGYELMEZTETÉS
Nem a rendeltetésnek megfelelő használatból eredő veszély!
A készülék a nem rendeltetésnek megfelelő használatából és/vagy másfajta
használatából veszélyek adódhatnak.
► A készüléket csak rendeltetésének megfelelően használja.
► Tartsa be a jelen használati útmutatóban leírt kezelési módot.
34
TUDNIVALÓ
A készülék rendeltetésellenes és/vagy rendeltetésétől eltérő használata
►
veszélyes lehet. A készüléket csak rendeltetésének megfelelően használja.
Tartsa be a jelen használati útmutatóban leírt kezelési módot. A nem rendeltetésszerű használatból, szakszerűtlen javítási munkából, jogosulatlanul
végzett módosításból vagy nem engedélyezett alkatrész használatából
eredő károk esetén semmilyen igény nem érvényesíthető. A kockázatot
egyedül a felhasználó viseli.
SKM 500 B1
Page 38

A csomag tartalma
A készüléket alapvetően az alábbi összetevőkkel szállítjuk:
▯ konyhai robotgép
▯ keverőtál fedéllel és tömködővel
▯ szeletelőkés, burkolattal
▯ dagasztókés
▯ tárcsaadapter
▯ szeletelőtárcsa
▯ durva-reszelőtárcsa
▯ fi nom-reszelőtárcsa
▯ elegyítő tárcsa
▯ mixer fedéllel és záróelemmel
▯ tésztakaparó
▯ hajtótengely-adapter
▯ hajtótengely
▯ használati útmutató
1) Vegye ki a dobozból a készülék valamennyi részét és a használati útmutatót!
2) Vegye le az összes csomagolóanyagot és címkét.
TUDNIVALÓ
Ellenőrizze a csomag tartalmát, hogy hiánytalan-e és nincs-e rajta látható
►
sérülés.
► Hiányos szállítás vagy a nem megfelelő csomagolásból eredő, illetve a
szállítás során keletkezett károk esetén forduljon az ügyfélszolgálathoz
(lásd a Szerviz fejezetet).
HU
A csomagolás ártalmatlanítása
A csomagolás védi a készüléket a sérülésektől a szállítás során. A csomagolóanyagokat környezetbarát és hulladék ártalmatlanítási szempontok szerint
választottuk ki és ezért újrahasznosíthatók.
Nyersanyagot takarít meg és csökkenti a hulladékmennyiséget, ha a csomagolást
visszajuttatja az anyagkörforgásba. A feleslegessé vált csomagolóanyagokat a
hatályos helyi előírásoknak megfelelően helyezze el a hulladékban.
TUDNIVALÓ
Lehetőség szerint a garancia teljes ideje alatt őrizze meg a csomagolást, így
►
garanciális javítás esetén a készüléket megfelelően vissza lehet csomagolni.
SKM 500 B1
35
Page 39

HU
A készülék leírása
1 Tömködő
2 Betöltőnyílás
3 Fedél
4 Elegyítő tárcsa
5 Mixer záróeleme
6 Mixer fedele
7 Mixerkehely
8 Tömítőgyűrű
9 Tartóelem mixerkéssel
0 Durva-reszelőtárcsa
q Finom-reszelőtárcsa
w Szeletelőtárcsa
e Tárcsaadapter
r Dagasztókés
t Szeletelőkés
z Hajtótengely-adapter
u Keverőtál
i Hajtótengely
o Motorblokk
p Sebességszabályozó
a Kábeltekercselő
s Tésztakaparó
d Pengevédő a szeletelőkéshez
Műszaki adatok
Hálózati feszültség 220 - 240 V ~, 50 Hz
Névleges teljesítmény 500 W
Védelmi osztály
36
II
SKM 500 B1
Page 40

Biztonsági utasítások
ÁRAMÜTÉS VESZÉLYE
► A készüléket csak előírásszerűen beszerelt és földelt aljzatba
csatlakoztassa. A hálózati feszültségnek meg kell egyeznie a
készülék típustábláján megadott feszültséggel.
► Figyeljen arra, hogy használat közben a hálózati kábel ne legyen
vizes vagy nedves. Úgy helyezze el a kábelt, hogy az ne szoruljon
be, vagy más módon se sérülhessen meg.
► Tartsa távol a hálózati vezetéket a forró felületektől.
► Ne végezzen javítást a készüléken. Javításokat csak az ügyfél-
szolgálat vagy hozzáértő szakember végezhet.
► Soha ne válassza le vagy csatlakoztassa a készüléket az áramel-
látásról, ha vízben áll a lába.
► Mindig húzza ki a hálózati csatlakozót a csatlakozó aljzatból,
amikor tisztítja a készüléket, vagy ha az meghibásodott. A kikapcsolás magában nem elegendő, mert a készülékben mindaddig
hálózati feszültség van, amíg a hálózati csatlakozó az aljzatba
van csatlakoztatva.
► A veszélyek elkerülése érdekében a sérült hálózati csatlakozót
vagy vezetéket azonnal cseréltesse ki engedélyezett szakemberrel
vagy az ügyfélszolgálattal.
HU
A készüléket semmiféleképpen nem szabad vízbe vagy más
folyadékba meríteni!
SKM 500 B1
37
Page 41

HU
FIGYELMEZTETÉS! SÉRÜLÉSVESZÉLY!
► Ne használja a készüléket az ebben az útmutatóban leírtaktól
eltérő célra.
► A készüléket mindig válassza le a hálózatról, ha felügyelet nélkül
hagyja, valamint összeszerelés, szétszedés vagy tisztítás előtt.
► A készüléket nem használhatják gyermekek.
► A készüléket és csatlakozóvezetékét gyermekektől távol kell tartani.
► Ügyeljen a gyermekekre, hogy ne játsszanak a készülékkel.
► A készüléket csökkent fi zikai, érzékszervi vagy mentális képességű
vagy tapasztalattal és/vagy tudással nem rendelkező személyek
csak felügyelet mellett használhatják, vagy ha felvilágosították
őket a készülék biztonságos használatáról és megértették az
ebből eredő veszélyeket.
► Gyermekek nem játszhatnak a készülékkel.
► Mindig válassza le a készüléket a hálózatról, ha tartozékokat
tesz fel rá vagy vesz le róla. Így elkerülhető a készülék véletlen
bekapcsolása.
► A készülékhez csak az eredeti alkatrészeket használja. Más
gyártó tartozékai valószínűleg nem alkalmasak a készülékhez
és veszélyt okozhatnak!
► Vigyázat: a szeletelőkés, a szeletelő-, a durva- és fi nom-reszelőtár-
csa, valamint a mixerkés nagyon éles! Mindig óvatosan használja
azokat.
38
SKM 500 B1
Page 42

FIGYELMEZTETÉS! SÉRÜLÉSVESZÉLY!
► Vigyázat: a vágókés, a szeletelő-, a durva- és fi nom-reszelőtárcsa,
valamint a mixerkés nagyon éles! Tisztítás közben legyen óvatos.
► Vigyázat: a vágókés, a szeletelő-, a durva- és fi nom-reszelőtárcsa,
valamint a mixerkés nagyon éles! Óvatosan ürítse ki a keverőtálat
és a mixerkelyhet!
► A gép működése közben kizárólag a feldolgozandó élelmiszereket
tegye a keverőtálba vagy a mixerbe.
► A sérülések és a készülék károsodásának elkerülése érdekében
soha ne tegye a kezét vagy idegen tárgyakat a betöltőnyílásba
vagy a mixerbe.
► A tartozékok cseréjét csak a meghajtó leállása után és kihúzott
hálózati csatlakozó mellett végezze! A készülék kikapcsolás után
még rövid ideig működik!
► A készüléket soha ne hagyja felügyelet nélkül.
► A használat közben, mozgó tartozékok vagy kiegészítők cseréje
előtt a készüléket ki kell kapcsolni és le kell választani a hálózatról.
HU
FIGYELEM - ANYAGI KÁROK!
► Soha ne töltsön a mixerbe forró folyadékot, például levest!
Először várja meg, amíg az langyosra lehűl.
Első használat
■ Tisztítsa meg a készüléket a „Tisztítás és ápolás” fejezetben leírtak szerint.
■ Helyezze a készüléket tiszta és sima felületre.
■ A megfelelő rögzítés érdekében rögzítse a készüléket a készülék alján található
négy tapadókorong segítségével.
■ A hálózati kábelt tekerje le a kábeltekercselőről a és rögzítse a kábelátvezetőn.
■ Felhasználástól függően, állítsa össze a készüléket az „Összeszerelés“
fejezetben leírtak szerint.
SKM 500 B1
39
Page 43

HU
Összeszerelés
Keverőtál dagasztókéssel, szeletelőkéssel
vagy elegyítő tárcsával
TUDNIVALÓ
Végezze az összeszerelést a kihajtható oldalon látható ábrák segítségével!
►
1) Helyezze a hajtótengelyt i a tengelytartóra.
2) Helyezze a keverőtálat u a motorblokkra o oly módon, hogy a
a
szimbólumra mutasson, és forgassa el annyira a keverőtálat u, hogy
a
nyíl a szimbólumra mutasson. A keverőtál u ezzel megfelelően
rögzítve van.
3) Helyezze a hajtótengely-adaptert z a hajtótengelyre i.
4) Válasszon eszközt:
– a dagasztókést r süteménytészta dagasztásához,
– a szeletelőkést t hagyma, parmezánsajt stb. aprításához, vagy
– az elegyítő tárcsát 4 tejszín és tojáshab felveréséhez vagy könnyű
desszertek készítéséhez.
■ Dagasztó- r vagy szeletelőkés t: Tolja a dagasztókést r, illetve a sze-
letelőkést t a hajtótengely-adapterre z oly módon, hogy a reteszelések
egymásba érjenek.
■ Elegyítő tárcsa 4 felhelyezése: Helyezze az elegyítő tárcsát 4 a hajtóten-
gely-adapterre z oly módon, hogy a reteszek egymásba érjenek.
5) Helyezze fel a fedelet 3 a keverőtálra u oly módon, hogy a
fedélen 3 a keverőtál u
addig, amíg hallható „kattanást“ nem hall és a
nem mutat.
6) Tolja be a tömködőt 1 a betöltőnyílásba 2.
7) Csatlakoztassa a hálózati csatlakozót az aljzatba.
szimbólumára mutasson. Forgassa el
nyíl a szimbólumra
nyíl
nyíl a
40
SKM 500 B1
Page 44

Keverőtál aprítóval
TUDNIVALÓ
Végezze az összeszerelést a kihajtható oldalon látható ábrák segítségével!
►
1) Helyezze a hajtótengelyt i a tengelytartóba.
2) Helyezze a keverőtálat u a motorblokkra o oly módon, hogy a
a
szimbólumra mutasson, és forgassa el annyira a keverőtálat u, hogy
a
nyíl a szimbólumra mutasson. A keverőtál u ezzel megfelelően
rögzítve van.
3) Válassza ki a megfelelő tárcsát 0 q w (lásd: „Az aprítóval történő munka“
című fejezetet) és helyezze be a tárcsaadapterbe e:
– ha még egy másik tárcsa benne van: nyomja kifelé a tárcsa fémfülét
úgy, hogy az átcsússzon a tárcsaadapter e reteszelésén. Most már
leemelheti a tárcsát.
– helyezze az új tárcsát először keskeny oldalával a tárcsaadapter mélye-
désébe e (1. ábra) és nyomja lefelé a tárcsát, amíg az bekattan
és megfelelően rögzül (2. ábra).
HU
nyíl
1. ábra 2. ábra
4) Helyezze a megfelelő tárcsával ellátott tárcsaadaptert e a hajtótengelyre i.
5) Helyezze fel a fedelet 3 a keverőtálra u oly módon, hogy a
fedélen 3 a
addig, amíg hallható „kattanást“ nem hall és a nyíl a
nem mutat.
szimbólumra mutasson a keverőtálon u. Forgassa el
SKM 500 B1
nyíl a
szimbólumra
41
Page 45

HU
Mixer
6) Tolja be a tömködőt 1 a betöltőnyílásba 2.
7) Csatlakoztassa a hálózati csatlakozót az aljzatba.
TUDNIVALÓ
Végezze az összeszerelést a kihajtható oldalon látható ábrák segítségével!
►
1) Helyezze fel a mixert a motorblokk o közepére oly módon, hogy a
a tartóelemen a mixerkéssel 9 a
2) Forgassa el a mixert annyira, hogy a nyíl a szimbólumra mutasson.
3) Helyezze fel a mixer fedelét 6 a mixerkehelyre 7 oly módon, hogy a fedél 6
kiálló része pontosan a mixerkehely 7 fogantyúja mellett legyen (3. ábra).
Ügyeljen arra, hogy a kiálló rész a fogantyúnak pontosan arra az oldalára
kerüljön, ami felé a fogantyún lévő sín nyitott.
Forgassa el a fedelet 6 az óramutató járásával megegyező irányba oly
módon, hogy a fedél 6 reteszzárja a mixerkehely 7 fogantyúján lévő
sínbe érjen (4. ábra). Közben nyomja kissé lefelé a kiálló részt, hogy a
rögzítés biztosan a hasadékba nyúljon.
3. ábra 4. ábra
4) Helyezze a mixer záróelemét 5 a mixer fedelére 6 oly módon, hogy a
műanyag nyúlványok a fedél 6 vezetősínjeibe csússzanak. Forgassa el
a záróelemet 5 90°-kal, hogy megfelelően rögzüljön.
5) Csatlakoztassa a hálózati csatlakozót az aljzatba.
nyíl
szimbólumra mutasson.
42
SKM 500 B1
Page 46

Működés
A dagasztókés használata
A dagasztókés r segítségével sütemény-, zsemle- vagy pizzatészta és ezekhez
hasonló tészta dagasztható.
TUDNIVALÓ
Ne próbáljon folyadékot keverni a dagasztókéssel r. A folyadék túlfoly-
►
hat vagy kifröccsenhet. A folyadékokhoz használja mindig a mixert!
1) Helyezze be a dagasztókést r az "Összeszerelés" fejezetben leírtak szerint.
2) Töltse be a szükséges hozzávalókat. Ne lépje túl a következő táblázatban
megadott mennyiségeket:
HOZZÁVALÓ MAX. MENNYISÉG
Liszt (kelt tésztához) max. 300 g
Liszt (pizzatésztához) max. 300 g
Liszt (piskótatésztához) max. 300 g
Tojás (margarinos tésztához) max. 4 db
3) Zárja le a fedelet 3.
4) Forgassa el a sebességszabályozót p és dagasszon 20 másodpercen
keresztül az 1. fokozaton, majd kb. 1 percre állítsa a sebességet a
2. fokozatra.
5) A normál dagasztási idő 30 - 180 másodperc.
HU
SKM 500 B1
TUDNIVALÓ
Ha a dagasztás közben további hozzávalót szeretne betölteni, akkor ezt
►
a betöltőnyíláson 2 keresztül teheti meg!
Ha kinyitja a fedelet 3, a készülék leáll!
43
Page 47

HU
A szeletelőkéssel történő munka
A szeletelőkéssel t élelmiszert, így például hagymát vagy húst apríthat.
TUDNIVALÓ
Ne próbáljon folyadékot keverni a szeletelőkéssel t. A folyadék túlfolyhat
►
vagy kifröccsenhet. A folyadékokhoz használja mindig a mixert!
1) Helyezze be a szeletelőkést t az "Összeszerelés" fejezetben leírtak szerint.
2) Vágja a hozzávalókat kb. 2 - 3 cm nagyságú darabokra.
3) Töltse bele a hozzávalókat. Ne lépje túl a következő táblázatban megadott
mennyiségeket:
HOZZÁVALÓ
Kenyér max. 100 g 1 - 2. fokozat
Sajt max. 200 g 1 - 2. fokozat
Hús max. 500 g 1 - 2. fokozat
Fűszernövények max. 50 g 1. fokozat
Fokhagyma 150 - 300 g Impulzus-állás
Hagyma max. 500 g Impulzus-állás
TUDNIVALÓ
A táblázatban megadott sebességek irányértékek. Ezek a hozzávalók
►
jellegétől és mennyiségétől függően változhatnak!
MAX.
MENNYISÉG
SEBESSÉG
44
SKM 500 B1
Page 48

4) Zárja le a fedelet 3.
5) Indítsa el az aprítást a sebességszabályozó p elforgatásával.
A normál aprítási idő 10 - 60 másodperc.
Ha a hozzávalók a keverőtál falára vagy a késre tapadnak:
– Kapcsolja ki a készüléket.
– Vegye le a fedőt 3.
– Távolítsa el a hozzávalókat a szeletelőkésről t, valamint a belső falról
a tésztakaparó s segítségével.
– Csukja le a fedelet 3.
– Indítsa el újra a készüléket.
TUDNIVALÓ
Csak csont nélküli húst dolgozzon fel!
►
► Ne használja túl sokáig a készüléket, ha (kemény-)sajtot aprít. Ellenkező
esetben a sajt felforrósodik, megolvad és csomóssá válik.
► Ha a szeletelés közben további hozzávalókat szeretne betölteni, akkor ezt
a betöltőnyíláson 2 keresztül teheti meg! Ha kinyitja a fedelet, akkor a
készülék leáll!
Ügyeljen azonban arra, hogy a hozzávalók utántöltésénél ne lépje túl a
táblázatban megadott maximális mennyiségeket!
HU
SKM 500 B1
45
Page 49

Munkavégzés az elegyítő tárcsával
Az elegyítő tárcsával 4 tejszínt és tojáshabot verhet fel vagy desszertet keverhet
össze.
HU
TUDNIVALÓ
Ne próbáljon híg folyadékot keverni az elegyítő tárcsával 4. A folyadék
►
túlfolyhat vagy kifröccsenhet. A híg folyadékokhoz használja mindig a
mixert!
► Soha ne dolgozzon fel 400 ml folyadéknál többet! Ellenkező esetben
a folyadék túlfolyhat vagy kifröccsenhet.
1) Helyezze be az elegyítő tárcsát 4 az "Összeszerelés" fejezetben leírtak
szerint.
2) Töltse be a szükséges hozzávalókat. Ne lépje túl a következő táblázatban
megadott mennyiségeket:
HOZZÁVALÓ
Folyékony tejszín 125 - 350 ml kb. 20 - 30 másodperc
Tojásfehérje 2 - 4 darab kb. 30 - 70 másodperc
3) Zárja le a fedelet 3.
4) Indítsa el a készüléket oly módon, hogy a sebességszabályozót p a
2. fokozatra állítja.
FIGYELEM - ANYAGI KÁROK!
Soha ne használja az elegyítő tárcsát 4 tészta gyúrásához vagy vajas/
►
margarinos süteménytészta készítéséhez! Ez tönkre teheti a készüléket.
MAX.
MENNYISÉG
FELDOLGOZÁSI IDŐ
46
TUDNIVALÓ
Ha tojáshabot ver, akkor a keverőtálnak u és az elegyítő tárcsának 4
►
teljesen száraznak és zsírmentesnek kell lennie. Ellenkező esetben nem
lesz kemény a tojáshab!
► A tojáshabbá feldolgozandó tojásfehérjének szobahőmérsékletűnek kell
lennie.
SKM 500 B1
Page 50

Az aprítóval történő munka
Az aprítókészlet három tárcsájával 0 q w durvára vagy fi nomra reszelhet
vagy éppen szeletelhet.
1) Válassza ki a kívánt tárcsát és állítsa össze a készüléket az „Összeszerelés“
fejezetben leírtak szerint.
2) Vegye ki a tömködőt 1 a betöltőnyílásból 2.
3) Vágja az élelmiszereket akkora darabokra, hogy azok gond nélkül beleférjenek
a betöltőnyílásba 2 .
4) Indítsa el a készüléket oly módon, hogy a sebességszabályozót p az
1. fokozatra állítja.
5) Ezt követően egymás után töltse bele az élelmiszereket. Adagolja az élelmiszereket a tömködő 1 segítségével, anélkül hogy nyomást gyakorolna rájuk.
Ne lépje túl a következő táblázatban megadott mennyiségeket:
HU
HOZZÁVALÓ
Alma/
sárgarépa
Parmezán max. 200 g - max. 200 g
Salátauborka - max. 2 db -
Burgonya max. 500 g max. 500 g max. 500 g
Hagyma - max. 300 g -
Csokoládé - - max. 200 g
Kemény sajt
(pl. régi gouda)
TUDNIVALÓ
Nagyobb mennyiséget ne egyszerre, hanem több adagban, egymás után
►
dolgozzon fel. Közben rendszeresen ürítse ki a keverőtálat u.
► Ne használja túl sokáig a készüléket, ha (kemény-)sajtot vagy csokoládét
aprít. Ellenkező esetben a hozzávalók felforrósodnak, megolvadnak és
csomóssá válnak.
DURVA-
RESZELŐTÁRCSA
max. 500 g max. 500 g -
max. 300 g - -
SZELETELŐTÁRCSA
FINOM-
RESZELŐTÁRCSA
SKM 500 B1
47
Page 51

A mixer használata
A mixer segítségével (mixerkehely 7 beszerelt tartóelemmel, mixerkéssel 9 és
tömítőgyűrűvel 8) például tejes turmixok készíthetők vagy jégkocka aprítható.
HU
FIGYELEM - ANYAGI KÁROK!
Soha ne töltsön a mixerkehelybe forró folyadékot, például levest!
►
Először várja meg, amíg langyosra hűl.
1) Helyezze a mixert a motorblokkra o az "Összeszerelés" című fejezetben
leírtak szerint.
2) Vágja a szilárd hozzávalókat kis darabokra.
3) Töltse be a kívánt hozzávalókat. Ne lépje túl a következő táblázatban
megadott mennyiségeket:
HOZZÁVALÓ MAX. MENNYISÉG
Banán/földieper + tej turmixhoz max. 500 ml
Brokkoli/paradicsom (zöldség) max. 500 ml
Banán/dinnye koktélhoz max. 500 ml
Főtt hüvelyesek (pl. lencse) max. 250 g
48
Jégkocka
Mandula max. 200 g
Csonthéjasok max. 200 g
4) Zárja le a fedelet 6 és ellenőrizze, hogy a mixer záróeleme 5 is fel lett
helyezve.
5) Indítsa el a készüléket oly módon, hogy a sebességszabályozót p a
2. fokozatra állítja.
Max. 6 darab vagy 140 g
(„P“ kapcsolóállás)
SKM 500 B1
Page 52

Amennyiben a munka során hozzávalók tapadnak a mixerkehely falára:
– Kapcsolja ki a készüléket.
– Húzza ki a hálózati csatlakozót a hálózati aljzatból.
– Nyissa ki a fedelet 6 és távolítsa el a hozzávalókat a mixer belső
faláról a tésztakaparó segítségével s.
– Zárja vissza a fedelet 6 és csatlakoztassa a készüléket az elektromos
hálózatra.
FIGYELEM - ANYAGI KÁROK!
Soha ne nyissa ki a mixer fedelét 6, amíg a kések forognak! Az élelmiszer
►
kifröccsenhet!
► Ha könnyen habzó folyadékot, pl. tejet turmixol, akkor maximum 1 liter
folyadékot töltsön a mixerbe, hogy a tartalma ne folyjon ki.
TUDNIVALÓ
Ha folyadékot szeretne utánatölteni miközben a mixer működik, akkor
►
távolítsa el a záróelemet 5 és öntse be a folyadékot a fedél 6 nyílásán
keresztül.
► Kemény hozzávalók, pl. jégkocka turmixolásánál, működtesse többször
egymás után a „P“ (impulzus) kapcsolóállást.
► Nagyobb adagokat ne egyszerre, hanem több adagban, egymás után
dolgozzon fel.
► Ha nem elégedett az eredménnyel, akkor kapcsolja ki a készüléket és
húzza ki a hálózati csatlakozót. Keverje össze a hozzávalókat a tésztakaparó s segítségével vagy vegye ki a hozzávalók egy részét. Adjon hozzá
kevés folyadékot és még egyszer turmixolja össze az egészet.
HU
SKM 500 B1
49
Page 53

HU
Tisztítás és ápolás
FIGYELMEZTETÉS - ÁRAMÜTÉS VESZÉLYE!
► A készülék tisztítása előtt mindig húzza ki a hálózati csatlakozót az aljzatból.
► Semmiképpen ne merítse folyadékba a motorblokkot o!
Az áramütés által életveszély állhat fenn és a készülék megsérülhet.
► Soha ne nyissa fel a készülék burkolatát. Ellenkező esetben áramütés
veszélye áll fent.
FIGYELMEZTETÉS - SÉRÜLÉSVESZÉLY!
► Legyen nagyon óvatos a durva-reszelőtárcsa 0, a fi nom-reszelőtárcsa q,
a szeletelőtárcsa w, a szeletelőkés t és a mixerkés tisztításánál.
Ezek a részek nagyon élesek!
FIGYELEM - ANYAGI KÁR!
Ne használjon oldó- vagy súroló hatású szereket. Ezek megtámadják a
►
készülék felületét!
► Ne használjon erős hatású, súroló vagy vegyi tisztítószereket.
Ezek helyrehozhatatlan kárt tehetnek a készülék felületében!
TUDNIVALÓ
Tisztítson meg minden alkatrészt közvetlenül a használat után.
►
Ebben az esetben az élelmiszer-maradékok könnyebben eltávolíthatók.
50
SKM 500 B1
Page 54

TUDNIVALÓ
A tisztításhoz válassza le a tartóelemet a mixerkéssel 9 a mixerkehelyről 7!
►
► Távolítsa el a kis kereszthornyos csavart a mixerkéses tartóelem 9 aljáról.
► Forgassa el a mixerkelyhet 7 annyira, hogy a nyíl a mixerkelyhen 7
szimbólumra mutasson a tartóelemen 9. A mixerkehely 7 ekkor
a
leválasztható a tartóelemről 9.
► Vegye ki a tömítőgyűrűt 8 a tartóelemből: Emelje meg kissé a tömítő-
gyűrűt 8 egy lapos, tompa pálcikával (pl. fából) és vigye óvatosan a
tömítőgyűrűt 8 a kés fölé.
Soha ne használjon hegyes vagy éles tárgyat a tömítőgyűrű 8 eltávolításához! Ezek megsérthetik a tömítőgyűrűt 8 és szivárgást okozhatnak!
Az összeszereléshez helyezze vissza a tömítőgyűrűt 8 a tartóelembe 9
és helyezze fel a mixerkelyhet 7 a tartóelembe 9 oly módon, hogy a
nyíl a mixerkelyhen 7 a
Forgassa el a mixerkelyhet 7 oly módon, hogy a
mutasson. Ezt követően csavarozza vissza a kis kereszthornyos csavart.
■ A motorblokkot o, a hálózati kábelt és a szeletelőkés pengevédőjét d
csak enyhén benedvesített törlőkendővel tisztítsa. Mindent töröljön alaposan
szárazra, mielőtt a készüléket újra használja.
■ A tartóelemet a mixerkéssel 9 és a tömítőgyűrűt 8 meleg mosogatószeres
vízben tisztítsa. Ezután öblítse le tiszta vízzel az összes elemet, hogy ne
maradjon rajtuk mosogatószer.
■ A szeletelőkést t, a dagasztókést r, a tárcsaadaptert e, a durva-resze-
lőtárcsát 0, a fi nom-reszelőtárcsát q, és a szeletelőtárcsát w, az elegyítő
tárcsát 4, a fedelet 3 a tömködővel 1, a keverőtálat u, a hajtótengelyt i,
a hajtótengely-adaptert z, a mixerkelyhet 7, a mixer záróelemét 5, a
mixer fedelét 6, valamint a tésztakaparót s meleg mosogatószeres vízben
tisztítsa. Ezután öblítse le tiszta vízzel az összes elemet, hogy ne maradjon
rajtuk mosogatószer.
– Ezeket az alkatrészeket akár mosogatógépben is tisztíthatja! Az elemeket
lehetőség szerint a mosogatógép felső kosarába helyezze.
Ügyeljen arra, hogy az elemek ne szoruljanak be.
■ Mindent töröljön alaposan szárazra, mielőtt a készüléket újra használja.
szimbólumra mutasson a tartóelemen 9.
nyíl a szimbólumra
HU
SKM 500 B1
51
Page 55

HU
Tárolás
Tárolja a megtisztított és száraz készüléket pormentes és száraz helyen.
Tekerje fel a hálózati kábelt a kábeltekercselőre a és rögzítse a kábel végét
a kábelátvezetőn.
A következőképpen helyezheti a tartozékokat helytakarékos módon a keverőtál-
ba u:
FIGYELEM - ANYAGI KÁROK!
Soha ne indítsa el a készüléket, ha tartozékok vannak benne!
►
52
0
P1
2
1) Helyezze a hajtótengelyt i a motorblokkra o.
2) Helyezze a keverőtálat u a motorblokkra o.
3) Tolja az elegyítő tárcsát 4 a hajtótengelyre i a keverőtálban u.
SKM 500 B1
Page 56

4) Tolja a szeletelőkést t felhelyezett pengevédővel d és a dagasztókést r
a hajtótengelyen i keresztül az elegyítő tárcsára 4.
5) Helyezze a hajtótengely-adaptert z és a 2 tárcsát (pl. szeletelő- w és
reszelőtárcsa 0) a hajtótengely i mellé, a keverőtálba u.
6) Helyezze a tárcsával ellátott tárcsaadaptert e a hajtótengelyre i.
7) Zárja le a fedelet 3 és tolja be a tömködőt 1 a betöltőnyílásba 2.
Hibaelhárítás
HIBA OKA MEGOLDÁS
HU
A készülék nem
működik.
A készülék hirtelen
megáll.
A motor működik,
a tartozék azonban
nem forog.
A hálózati csatlakozó
nincsen csatlakoztatva.
A készülék nem megfelelően van összeszerelve és rögzítve.
A készülék elromlott. Forduljon az ügyfélszolgálathoz.
Előfordulhat, hogy a
készülék fedele
szilárd hozzávalók
feldolgozása során
meglazult.
A készülék elromlott. Forduljon az ügyfélszolgálathoz.
A hajtótengely
nem megfelelően van
behelyezve.
i
Csatlakoztassa a hálózati
csatlakozót egy aljzatba.
Ellenőrizze a készülék összeállítását, és győződjön meg arról,
hogy a jelölések megfelelően
egymás fölé kerültek.
3
Helyezze vissza a fedelet 3
a megfelelő módon.
Ellenőrizze a hajtótengely
összeszerelését i.
SKM 500 B1
53
Page 57

HU
A készülék ártalmatlanítása
Semmi esetre se dobja a készüléket a háztartási hulladékba.
A termékre a 2012/19/EU uniós irányelv vonatkozik.
A készüléket engedélyezett hulladékgyűjtő helyen, vagy a helyi hulladékeltávolító
üzemnél tudja leadni. Vegye fi gyelembe a hatályos előírásokat. Ha bizonytalan,
vegye fel a kapcsolatot a hulladékkezelővel.
EK megfelelőségi nyilatkozatra vonatkozó
tudnivaló
A készülék megfelel az elektromágneses összeférhetőségről
szóló 2004/108/EC, a 2006/95/EC kisfeszültségi
irányelv, valamint az energiát felhasználó termékekre
vonatkozó 2009/125/EC környezetbarát tervezési irányelv,
1275/2008 rendelet, 1. függelékének, 1. sz. alapvető követelményeinek és más vonatkozó előírásoknak.
A teljes eredeti megfelelőségi nyilatkozat a gyártónál
szerezhető be.
Gyártja
KOMPERNASS HANDELS GMBH
BURGSTRASSE 21
44867 BOCHUM
GERMANY
www.kompernass.com
54
SKM 500 B1
Page 58

Garancia
A készülékre a vásárlás napjától számított 3 év garanciát vállalunk. A készüléket
gondosan gyártottuk, és szállítás előtt lelkiismeretesen ellenőriztük.
Kérjük, hogy a vásárlás igazolására őrizze meg a pénztári blokkot. Kérjük, hogy
garanciaigény esetén telefonon forduljon ügyfélszolgálatához. Csak ebben az
esetben garantálhatjuk, hogy díjmentesen tudja beküldeni az árut.
TUDNIVALÓ
►
A termék kizárólag magánhasználatra, nem ipari felhasználásra készült.
A garancia érvényét veszti visszaélésszerű vagy szakszerűtlen kezelés, erőszak
alkalmazása vagy olyan beavatkozások esetén, amelyeket általunk nem engedélyezett szervizben végeztek el.
Az Ön törvényben előírt jogait ez a garancia nem korlátozza.
A garancia ideje nem hosszabbodik meg a jótállással. Ez a cserélt és javított
alkatrészekre is vonatkozik.
Az esetlegesen már a vételkor meglévő károkat és hiányokat a kicsomagolás
után azonnal, de legkésőbb 2 nappal a vásárlás napja után jelezni kell.
A garanciaidő lejárta után esedékes javítások díjkötelesek.
Szerviz
Szerviz Magyarország
Tel.: 0640 102785
E-Mail: kompernass@lidl.hu
IAN 103418
HU
A garancia csak anyag- és gyártási hibára vonatkozik, nem pedig szállítási
kárra, kopásra vagy törékeny részek (pl. kapcsoló) sérülésére.
SKM 500 B1
Az ügyfélszolgálati forródrót elérhetősége:
hétfőtől péntekig 8.00 és 20.00 óra között (közép-európai idő szerint)
55
Page 59

HU
Receptek
Salátatál
Hozzávalók:
■ 1 friss uborka
■ 1/4 fej fehér káposzta
■ 2 paprika
■ 1 fej hagyma
A páchoz:
■ 3 - 4 evőkanál borecet
■ 2 ek. étolaj
■ só
■ cukor
■ bors borsdarálóból
■ 1 ek. aprított zöldfűszer
Elkészítés:
1) Hámozza meg az uborkát és úgy darabolja fel a káposztát, hogy a darabok
beférjenek az aprító betöltőnyílásába 2.
2) Gyalulja le az uborkát, a káposztát, az előkészített paprikát és a hagymát
az 1. fokozaton a szeletelőtárcsa w segítségével.
3) Keverje össze a páchoz való hozzávalókat a mixerben.
4) Keverje össze a pácot a zöldséggel és fűszerezze.
56
SKM 500 B1
Page 60

Töltött csirkemell curry szósszal
Hozzávalók:
■ 4 db csirkemell, egyenként 15 dkg
■ só
■ bors borsdarálóból
A töltelékhez:
■ 15 dkg darált sertéshús
■ 1 fej hagyma kockára vágva
■ kínai fűszerkeverék
■ 1 csipet gyömbérpor
A szószhoz:
■ 2,5 dl fehér bor
■ 2 - 4 evőkanál tejszín
■ só, 1 tk. curry
■ szükség esetén étkezési keményítő
Elkészítés:
1) Sózza meg és borsozza meg a csirkemelleket és vágja be egy éles konyhakéssel.
2) Dolgozza össze a töltelékhez való valamennyi hozzávalót a keverőtálban
a dagasztókéssel r masszának és ízesítse.
3) Töltse meg a csirkemelleket a töltelékkel és varrja össze. (Tetszés szerint,
fapálcikát is használhat hozzá.)
4) Forrósítsa fel a zsírt és pirítsa meg benne a csirkemelleket.
5) Öntse hozzá a bort, majd párolja puhára a csirkemelleket 10 - 15 percig.
6) Vegye ki a csirkemelleket a serpenyőből és tartsa őket melegen.
7) Ízesítse a szószt tejszínnel, sóval és curryvel, és ízlés szerint sűrítse be étkezési
keményítővel.
A szószos csirkemellhez köretként például rizst tálalhat.
HU
SKM 500 B1
57
Page 61

HU
Burgonya röszti
Hozzávalók:
■ 4 nagy, lisztes burgonya
■ só
■ bors
■ őrölt szerecsendió
■ 8 dkg vaj vagy margarin
Elkészítés:
1) Mossa meg és hámozza meg a burgonyát, majd vágja csíkokra a durva-reszelőtárcsával 0 .
2) Tegye a burgonyamasszát egy kendőbe és nyomkodja ki belőle a nedvességet.
3) Szórjon fűszereket a burgonyamasszára és keverjen össze mindent.
4) Egy kis merőkanállal tegyen kevés burgonyamasszát a forró zsírba és egy
sütőlapáttal nyomkodja laposra.
5) Süsse a rösztik mindkét oldalát ropogósra.
Köretként húshoz és vadételekhez tálalható.
Tonhal krém
Hozzávalók:
58
■ 1 doboz konzerv tonhal pácban zöldség körettel
■ 3 ek. joghurt
■ 1 tk. frissen csavart citromlé
■ 1 csipet só
■ bors borsdarálóból
■ 2 keményre főtt tojás kockára vágva
Tálaláshoz:
■ teljes kiőrlésű kenyér szeletelve
■ vaj a kenyérhez
■ 1 keményre főtt tojás kockára vágva
■ apróra vágott metélőhagyma
SKM 500 B1
Page 62

Elkészítés:
1) Valamennyi hozzávalót keverje össze a mixer legmagasabb fokozatán, amíg
el nem éri a kívánt állagot (kb. 15 másodperc) és ízesítse.
2) Vajazza meg a kenyeret, kenje meg a tonhal krémmel, majd szórjon rá
tojáskockát és metélőhagymát.
Paradicsomszósz
Hozzávalók:
■ 5 ek. étolaj
■ 1 nagy fej hagyma
■ 1 nagy doboz (80 dkg) hámozott paradicsom
■ só, bors, 1 csipet cukor, 1 csipet kakukkfű,
■ 1 csipet csilipor
■ 1/2 csokor petrezselyem, aprítva
■ 1/2 csokor bazsalikom apróra vágva
■ 4 dkg hideg vaj vagy 1 dl tejszín
Elkészítés:
1) Hámozza meg a hagymát és aprítsa késsel durva darabokra.
2) Forrósítsa fel az olajat, pirítsa meg benne a hagymát vagy használja a
mikrohullámú sütőt 2-3 percig 600 W teljesítményen.
3) Tegye bele a paradicsomot levével együtt és keverje bele a fűszereket.
4) Hagyja a szószt fedő alatt 20 percig lassan főni vagy főzze az egészet a
mikrohullámú sütőben.
5) Hagyja lehűlni a paradicsomszószt (langyosra) és pürésítse a mixerben.
6) Ezután öntse vissza a szószt az edénybe és hagyja még egy kicsit besűrűsödni.
7) Keverje bele a vajat vagy a tejszínt.
8) Szórjon bele fűszernövényeket és ízesítse.
Köretként bármilyen reszelt sajtos főtt tésztához ajánlott.
HU
SKM 500 B1
59
Page 63

HU
Palacsinta
Hozzávalók:
■ 2 - 3 tojás
■ 3,75 dl tej
■ 1 csipet só
■ 25 dkg liszt
■ zsiradék a kisütéshez
Elkészítés:
1) Keverje össze a dagasztókéssel r a tojást, tejet és a sót.
2) Szitálja hozzá a lisztet. Az egészet keverje el a dagasztókéssel r, míg sima
tésztát nem kap.
3) Hagyja állni a tésztát kb. 20 percig.
4) Forrósítsa fel a zsiradékot és tegyen bele egy kis merőkanál tésztát.
(Mindig csak annyit, hogy a palacsintasütő serpenyő alja vékonyan legyen
befedve.)
5) Süsse a palacsinta mindkét oldalát aranybarnára és tálalja forrón.
Márványsütemény
Hozzávalók:
■ 12,5 dkg puha vaj vagy margarin
■ 12,5 dkg cukor
■ 3 tojás
■ 1/2 csomag vaníliacukor
■ 1 csipet só
■ 25 dkg búzaliszt
■ fél csomag sütőpor
■ 75 ml tej
■ 2 dkg sütéshez való kakaópor
■ 5 dkg étcsokoládés tortabevonó
■ zsiradék a sütőformához
60
SKM 500 B1
Page 64

Elkészítés:
1) Törje nagy darabokra a tortabevonót és aprítsa fel a vágókéssel t.
2) A tortabevonón és a sütéshez való kakaón kívül az összes hozzávalót tegye
a keverőtálba u és keverje össze a hozzávalókat a dagasztókéssel r.
3) Kenjen ki egy kuglóff ormát (átmérője: 20 - 22 cm) vagy egy szögletes
formát (30 cm hosszú).
4) Töltse a tészta felét a sütőformába, majd a maradék tésztába keverje bele
a kakaóport és a fi nomra reszelt tortabevonót.
5) Adja hozzá a sötét tésztát a világos tésztához és spirál alakban villával
húzza át egymáson a két tésztát.
Tipp: Ízlés szerint a süteményt 10 dkg étcsokoládés tortabevonóval is bevonhatja, illetve tejszínhabbal és csokoládédísszel díszítheti.
Kelesztett tészta
Hozzávalók:
■ 300 g búzaliszt
■ 15 g friss élesztő vagy 5 g száraz élesztő
■ kb. 150 ml langyos tej
■ 5 dkg vaj vagy margarin (szobahőmérséklet)
■ 5 dkg cukor
■ 1 tojás
HU
SKM 500 B1
Elkészítés:
1) Tegye a lisztet, a száraz élesztőt vagy a szétmorzsolt élesztőt és valamennyi
egyéb hozzávalót (ne közvetlenül az élesztőre) a keverőtálba u.
2) Keverjen össze mindent a dagasztókéssel r.
3) Vegye ki a tésztát a keverőtálból u és rakja bele egy nagy tálba.
4) Takarja le a tésztát egy konyharuhával, tegye meleg helyre és hagyja megkelni
a tésztát, amíg szemmel láthatóan nagyobb nem lesz.
5) Ezután kézzel, erősen még egyszer dagassza át a tésztát.
6) Ekkor a tészta elkészült és tovább dolgozhat vele.
61
Page 65

HU
Narancsital
Hozzávalók:
■ 250 ml narancslé
■ 1 - 2 evőkanál citromlé
■ 15 dkg konzerv sárgabarack
■ 6 jégkocka szétzúzva
■ 2 tk. cukor vagy méz
Elkészítés:
1) Helyezze a jégkockákat a mixerbe és aprítsa fel a „P“ kapcsolóállással.
2) Töltse a mixerbe a jégkockához a narancslevet, a citromlevet és a sárgabarackot, és turmixolja a 2. fokozaton 10 percen keresztül.
3) Ízesítse cukorral és mézzel és tálalja az italt jéghidegen.
62
62
SKM 500 B1
SKM 500 B1
Page 66

Mogyorós keksz
Hozzávalók:
■ 200 g mogyoróbél
■ 60 g nádcukor
■ 2 tojásfehérje
■ 2 ek. méz
■ kb. 50 g szilva- vagy csipkebogyólekvár
■ 5 dkg étcsokoládés és 5 dkg tejcsokoládés tortabevonó
Elkészítés:
1) Darálja össze a mogyorót a mixerben és tegyen félre belőle négy evőkanálnyit.
2) Dolgozza össze a maradék mogyorót, cukrot, tojásfehérjét és mézet a
dagasztókéssel r kemény tésztává.
3) Szórja meg a gyúródeszkát a maradék mogyoróval és nyújtsa ki a tésztát fél
centiméter vastagra.
4) Szaggassa ki a kekszeket és tegye sütőpapírral kibélelt tepsire.
5) Ragassza össze a kihűlt kekszeket kettesével csipkebogyó- vagy szilvalekvárral
és vonja be tejcsokoládés, illetve étcsokoládés tortabevonóval.
6) Ehhez mindkét tortabevonót külön olvassza fel. Félig merítse bele a kekszeket
és sütőrácson hagyja megszáradni.
HU
SKM 500 B1
Jó étvágyat!
A receptek sikerét nem garantáljuk. Valamennyi hozzávaló és elkészítési mód
adata csak hozzávetőleges érték. Egészítse ki a receptajánlatokat személyes
tapasztalataival.
Sok szerencsét kívánunk a receptekhez és jó étvágyat.
63
Page 67

64
SKM 500 B1
Page 68

Kazalo
Uvod . . . . . . . . . . . . . . . . . . . . . . . . . . . . . . . . . . . . . . . . . . . . . . . . . . . . . . . . 66
Predvidena uporaba . . . . . . . . . . . . . . . . . . . . . . . . . . . . . . . . . . . . . . . . . . 66
Vsebina kompleta . . . . . . . . . . . . . . . . . . . . . . . . . . . . . . . . . . . . . . . . . . . . . 67
Odstranitev embalaže med odpadke . . . . . . . . . . . . . . . . . . . . . . . . . . . . . . . . . . . . . . . . 67
Opis naprave. . . . . . . . . . . . . . . . . . . . . . . . . . . . . . . . . . . . . . . . . . . . . . . . . 68
Tehnični podatki . . . . . . . . . . . . . . . . . . . . . . . . . . . . . . . . . . . . . . . . . . . . . . 68
Varnostni napotki . . . . . . . . . . . . . . . . . . . . . . . . . . . . . . . . . . . . . . . . . . . . . 69
Pred prvo uporabo . . . . . . . . . . . . . . . . . . . . . . . . . . . . . . . . . . . . . . . . . . . . 71
Sestava . . . . . . . . . . . . . . . . . . . . . . . . . . . . . . . . . . . . . . . . . . . . . . . . . . . . . 72
Posoda za mešanje z gnetilko, rezilom ali ploščo za stepanje . . . . . . . . . . . . . . . . . . . . . 72
Posoda za mešanje s pretočnim sekljalnikom . . . . . . . . . . . . . . . . . . . . . . . . . . . . . . . . . . 73
Mešalni nastavek . . . . . . . . . . . . . . . . . . . . . . . . . . . . . . . . . . . . . . . . . . . . . . . . . . . . . . . . 74
Uporaba . . . . . . . . . . . . . . . . . . . . . . . . . . . . . . . . . . . . . . . . . . . . . . . . . . . . 75
Uporaba gnetilke . . . . . . . . . . . . . . . . . . . . . . . . . . . . . . . . . . . . . . . . . . . . . . . . . . . . . . . . 75
Uporaba rezila . . . . . . . . . . . . . . . . . . . . . . . . . . . . . . . . . . . . . . . . . . . . . . . . . . . . . . . . . 76
Uporaba plošče za stepanje . . . . . . . . . . . . . . . . . . . . . . . . . . . . . . . . . . . . . . . . . . . . . . . 78
Uporaba pretočnega sekljalnika . . . . . . . . . . . . . . . . . . . . . . . . . . . . . . . . . . . . . . . . . . . . 79
Uporaba mešalnega nastavka. . . . . . . . . . . . . . . . . . . . . . . . . . . . . . . . . . . . . . . . . . . . . . 80
SI
Čiščenje in vzdrževanje . . . . . . . . . . . . . . . . . . . . . . . . . . . . . . . . . . . . . . . .82
Shranjevanje . . . . . . . . . . . . . . . . . . . . . . . . . . . . . . . . . . . . . . . . . . . . . . . . . 84
Odprava napak . . . . . . . . . . . . . . . . . . . . . . . . . . . . . . . . . . . . . . . . . . . . . . 85
Odstranitev naprave med odpadke . . . . . . . . . . . . . . . . . . . . . . . . . . . . . . 86
Opombe o ES-izjavi o skladnosti . . . . . . . . . . . . . . . . . . . . . . . . . . . . . . . . . 86
Proizvajalec . . . . . . . . . . . . . . . . . . . . . . . . . . . . . . . . . . . . . . . . . . . . . . . . . . 86
Servis . . . . . . . . . . . . . . . . . . . . . . . . . . . . . . . . . . . . . . . . . . . . . . . . . . . . . . . 86
Garancijski list . . . . . . . . . . . . . . . . . . . . . . . . . . . . . . . . . . . . . . . . . . . . . . . . 87
Recepti . . . . . . . . . . . . . . . . . . . . . . . . . . . . . . . . . . . . . . . . . . . . . . . . . . . . . . 88
SKM 500 B1
65
Page 69

SI
Uvod
Iskrene čestitke ob nakupu vaše nove naprave!
Odločili ste se za sodoben in kakovosten izdelek. Navodila za uporabo so
sestavni del izdelka. Vsebujejo pomembne napotke za varnost, uporabo in odstranjevanje odpadne naprave. Preden začnete izdelek uporabljati, se seznanite
z vsemi napotki o njegovi uporabi in varnosti. Izdelek uporabljajte samo na
opisani način in le za navedena področja uporabe. Ob predaji izdelka tretji
osebi zraven priložite vso dokumentacijo.
Predvidena uporaba
Naprava je namenjena izključno za pripravo živil v količinah, običajnih v gospodinjstvih. Naprava je namenjena izključno za uporabo v zasebnih gospodinjstvih.
Ne uporabljajte je v poslovne namene!
Naprava je predvidena le za zasebno uporabo v zaprtih prostorih, zaščitenih
pred dežjem. Ne uporabljajte je na prostem!
Napravo je dovoljeno uporabljati le z originalnim priborom.
OPOZORILO
Nevarnost zaradi nepredvidene uporabe!
V primeru nepredvidene uporabe in/ali drugačne vrste uporabe naprava
lahko predstavlja vir nevarnosti.
► Napravo uporabljajte izključno v predvidene namene.
► Z napravo ravnajte tako, kot je opisano v navodilih za uporabo.
66
NAPOTEK
V primeru nepredvidene uporabe in/ali drugačne vrste uporabe naprava
►
lahko predstavlja vir nevarnosti. Napravo uporabljajte izključno v predvidene namene. Z napravo ravnajte tako, kot je opisano v navodilih za uporabo. Izključeno je uveljavljanje kakršnih koli zahtevkov na podlagi škode,
nastale zaradi nepredvidene uporabe, nestrokovnih popravil, nedovoljenih
sprememb ali uporabe nedovoljenih nadomestnih delov. Tveganje nosi
izključno uporabnik.
SKM 500 B1
Page 70

Vsebina kompleta
Naprava ob nakupu standardno vsebuje naslednje sestavne dele:
▯ kuhinjski aparat
▯ posoda za mešanje s pokrovom in potiskalom
▯ rezilo s pokrovom
▯ gnetilka
▯ prilagojevalnik za plošče
▯ rezalna plošča
▯ strgalna plošča
▯ plošča za ribanje
▯ plošča za stepanje
▯ mešalni nastavek s pokrovom in z zapiralom
▯ strgalo za testo
▯ prilagojevalnik pogonske gredi
▯ pogonska gred
▯ navodila za uporabo
1) Iz škatle vzemite vse dele naprave in navodila za uporabo.
2) Odstranite ves embalažni material in nalepke.
NAPOTEK
Preverite, ali kupljen izdelek vsebuje vse sestavne dele in ali nima vidnih
►
poškodb.
► V primeru nepopolnega kompleta ali poškodb zaradi pomanjkljive emba-
laže ali transporta se obrnite na telefonsko servisno službo (glejte poglavje
Servis).
SI
Odstranitev embalaže med odpadke
Embalaža napravo varuje pred poškodbami med prevozom. Embalažni materiali
so izbrani v skladu z njihovo ekološko primernostjo in tehničnimi vidiki odstranjevanja, zato jih je mogoče reciklirati.
Povratek embalaže v krogotok materialov pomeni prihranek surovin in zmanjšano
nastajanje odpadkov. Nepotrebne embalažne materiale odstranite med odpadke
v skladu z veljavnimi lokalnimi predpisi.
NAPOTEK
Embalažo med garancijsko dobo naprave po možnosti shranite, da boste
►
napravo lahko pravilno zapakirali v primeru uveljavljanja garancije.
SKM 500 B1
67
Page 71

SI
Opis naprave
1 Potiskalo
Odprtina za dodajanje živil
2
3 Pokrov
Plošča za stepanje
4
5 Zapiralo mešalnega nastavka
6 Pokrov mešalnega nastavka
7 Posoda mešalnika
8 Tesnilni obroč
9 Držalo z rezilom mešalnika
0 Strgalna plošča
q Plošča za ribanje
w Rezalna plošča
e Prilagojevalnik za plošče
r Gnetilka
t Rezilo
z Prilagojevalnik pogonske gredi
u Posoda za mešanje
i Pogonska gred
o Motorni blok
p Regulator hitrosti
a Navitje kabla
s Strgalo za testo
d Zaščita za rezila
Tehnični podatki
Električna napetost 220 - 240 V ~, 50 Hz
Nazivna moč 500 W
Razred zaščite
68
II
SKM 500 B1
Page 72

Varnostni napotki
NEVARNOST ELEKTRIČNEGA UDARA
► Napravo priključite samo v električno vtičnico, instalirano in
ozemljeno po predpisih. Električna napetost se mora ujemati z
navedbami na tipski tablici naprave.
► Pazite, da se med delovanjem naprave ne namoči ali navlaži
električni kabel. Kabel speljite tako, da se nikjer ne zatika in da
se ga ne da poškodovati.
► Električni kabel odstranite iz bližine vročih površin.
► Na napravi ne izvajajte nobenih popravil. Vsakršna popravila
morajo izvesti servisna služba ali usposobljeni strokovnjaki.
► Naprave ne priklapljajte na električno omrežje in ne odklapljajte
z njega, ko imate noge v vodi.
► Električni vtič zmeraj izvlecite iz električne vtičnice, preden napra-
vo začnete čistiti ali je okvarjena. Sam izklop ne zadostuje, ker je
naprava pod električno napetostjo, dokler je električni vtič priklopljen v vtičnico.
► Poškodovane električne vtiče ali električne kable naj vam takoj
zamenjajo pooblaščeni strokovnjaki ali servisna služba, da se
izognete nevarnosti.
SI
Naprave nikoli ne smete polagati v vodo ali druge tekočine.
SKM 500 B1
69
Page 73

SI
OPOZORILO! NEVARNOST TELESNIH POŠKODB!
► Naprave nikoli ne uporabljajte za druge namene, kot so opisani
v teh navodilih.
► Kadar naprava ni pod nadzorom in preden jo začnete sestavljati,
razstavljati ali čistiti, jo vedno ločite od omrežja.
► Otroci naprave ne smejo uporabljati.
► Napravo in njen električni kabel je treba hraniti izven dosega otrok.
► Otroke je treba nadzorovati, da preprečite igro z napravo.
► Osebe z omejenimi fi zičnimi, zaznavnimi ali duševnimi sposob-
nostmi ali s pomanjkljivimi izkušnjami in/ali znanjem to napravo
lahko uporabljajo le, če jih pri tem nekdo nadzoruje ali jih je poučil o varni uporabi naprave in so razumele nevarnosti, ki izhajajo
iz uporabe naprave.
► Otroci se ne smejo igrati z napravo.
► Napravo praviloma zmeraj odklopite od električnega omrežja, ko
nameščate ali odstranjujete dele pribora. Tako boste preprečili
nenamerni vklop naprave.
► Skupaj z napravo uporabljajte samo originalne dele pribora. Deli
pribora drugih proizvajalcev morebiti niso primerni zanjo in lahko
povzročijo nevarnost!
► Previdno: rezilo, rezalna, strgalna plošča in plošča za ribanje ter
rezilo mešalnika so zelo ostri! Z njimi vedno ravnajte previdno.
70
SKM 500 B1
Page 74

OPOZORILO! NEVARNOST TELESNIH POŠKODB!
► Previdno: rezilo, rezalna, strgalna plošča in plošča za ribanje ter
rezilo mešalnika so zelo ostri! Zato bodite previdni pri čiščenju.
► Previdno: rezilo, rezalna, strgalna plošča in plošča za ribanje ter
rezilo mešalnika so zelo ostri! Zato bodite previdni pri praznjenju
posode za mešanje in posode mešalnika.
► Med delovanjem naprave v posodo za mešanje ali v mešalni
nastavek dajajte le sestavine, predvidene za pripravo.
► V odprtino za dodajanje živil ali v mešalnik nikoli ne segajte z
rokami in vanju ne polagajte neprimernih predmetov, da ne bi
poškodovali naprave.
► Pribor menjavajte samo, ko pogon miruje in električni vtič ni
priklopljen v električno vtičnico! Naprava po izklopu potrebuje
še nekaj časa za zaustavitev!
► Naprave nikoli ne puščajte nenadzorovane.
► Pred menjavanjem pribora ali dodatnih delov, ki se med
delovanjem premikajo, je napravo treba izklopiti in jo odklopiti
iz električnega omrežja.
SI
POZOR ‒ MATERIALNA ŠKODA!
► V mešalni nastavek nikoli ne nalivajte vrelih tekočin, npr. juhe!
Počakajte, da se omenjene tekočine najprej ohladijo na sobno
temperaturo.
Pred prvo uporabo
■ Napravo očistite, kot je opisano v poglavju Čiščenje in vzdrževanje.
■ Napravo postavite na gladko in čisto površino.
■ Napravo na podlago pritrdite s štirimi sesalnimi nastavki, da se ne bo premikala.
■ Električni kabel odvijte z navitja kabla a in ga potem zataknite na izpustu
za kabel.
■ Napravo sestavite glede na vrsto uporabe in kot je opisano v poglavju
Sestava.
SKM 500 B1
71
Page 75

SI
Sestava
Posoda za mešanje z gnetilko, rezilom ali
ploščo za stepanje
NAPOTEK
Pri sestavljanju si pomagajte s slikami na razklopni strani!
►
1) Pogonsko gred
2) Posodo za mešanje
na simbol
na simbol
3) Prilagojevalnik pogonske gredi
4) Sedaj izberite želen nastavek:
– gnetilko r za gnetenje testa za kolače,
– rezilo t za sekljanje čebule, parmezana ipd., ali
– ploščo za stepanje 4 za stepanje smetane, snega iz beljakov ali lahkih
sladic.
■ Gnetilka r ali rezilo t: Gnetilko r oz. rezilo t potisnite na prilagojevalnik
pogonske gredi z, tako da se bodo zaskočni nastavki med seboj prilegali.
■ Plošča za stepanje 4: Ploščo za stepanje 4 namestite na prilagojevalnik
pogonske gredi z, tako da se bodo zaskočni nastavki med seboj prilegali.
5) Pokrov
kaže
ga obrnite toliko, da zaslišite jasen »klik« in puščica kaže
(bela puščica).
6) Potiskalo
7) Električni vtič priklopite v električno vtičnico.
i nataknite na sprejemni nastavek za gred.
u namestite na motorni blok o tako, da puščica kaže
, in obrnite posodo za mešanje u toliko, da puščica kaže
. Posoda za mešanje u je sedaj trdno pritrjena.
z namestite na pogonsko gred i.
3 namestite na posodo za mešanje u, tako da puščica na pokrovu 3
na simbol (bel kvadrat) na posodi za mešanje u. Potem
1 vstavite v odprtino za dodajanje živil 2.
na simbol
72
SKM 500 B1
Page 76

Posoda za mešanje s pretočnim sekljalnikom
NAPOTEK
Pri sestavljanju si pomagajte s slikami na razklopni strani!
►
1) Pogonsko gred
2) Posodo za mešanje
na simbol
na simbol . Posoda za mešanje u je sedaj trdno pritrjena.
3) Izberite primerno ploščo
sekljalnika) in jo vstavite v prilagojevalnik za plošče e:
– Če je nameščena še kakšna druga plošča: Kovinski nastavek plošče poti-
snite navzven, tako da zdrsne čez zaskočni nastavek na prilagojevalniku
za plošče e. Ploščo sedaj lahko dvignete.
– Novo ploščo z ožjo stranjo naprej namestite v odprtino na prilagojevalniku
za plošče e (Slika 1) in potem ploščo trdno potisnite navzdol, da se
zaskoči in je trdno pritrjena (Slika 2).
i nataknite na sprejemni nastavek za gred.
u na motorni blok o namestite tako, da puščica kaže
. Nato posodo za mešanje u obrnite toliko, da puščica kaže
0 q w (glejte poglavje Uporaba pretočnega
SI
Silka 1 Silka 2
4) Prilagojevalnik za plošče
gred i.
5) Pokrov
3 namestite na posodo za mešanje u, tako da puščica na po-
krovu
3 kaže na simbol na posodi za mešanje u. Potem ga obrnite
toliko, da zaslišite jasen »klik« in puščica kaže na simbol
SKM 500 B1
e z vstavljeno ploščo namestite na pogonsko
.
73
Page 77

SI
6) Potiskalo 1 vstavite v odprtino za dodajanje živil 2.
7) Električni vtič priklopite v električno vtičnico.
Mešalni nastavek
NAPOTEK
Pri sestavljanju si pomagajte s slikami na razklopni strani!
►
1) Mešalni nastavek namestite na sredino motornega bloka o, tako da puščica
na držalu z rezilom mešalnika 9 kaže na simbol .
2) Mešalni nastavek obrnite, tako da puščica
3) Pokrov 6 mešalnega nastavka na posodo mešalnika 7 namestite tako, da se
rob na pokrovu 6 nahaja točno poleg ročaja posode mešalnika 7
Pazite, da rob poleg ročaja namestite točno na tisti strani, na katero je odprto vodilo na ročaju.
Pokrov 6 obračajte v smeri urnega kazalca, tako da zaskočni nastavek na pokrovu 6 sega v vodilo na ročaju posode mešalnika 7 (Slika 4). Pri tem rob
pritiskajte malce navzdol, da zagotovite, da se zaskočni nastavek namesti v režo.
Slika 3 Slika 4
4) Zapiralo 5 mešalnega nastavka namestite na pokrov 6 mešalnega nastavka,
tako da plastični nastavki zdrsnejo v vodila v pokrovu 6. Potem obrnite
zapiralo 5 za 90°, da bo trdno nameščeno.
5) Električni vtič priklopite v električno vtičnico.
kaže na simbol .
(Slika 3).
74
SKM 500 B1
Page 78

Uporaba
Uporaba gnetilke
Z gnetilko r lahko zgnetete testo, na primer za kolače, žemlje ali pizzo.
NAPOTEK
Ne poskušajte mešati tekočin z gnetilko r. Tekočine bi stekle čez rob ali
►
brizgale iz posode. Za tekočine vedno uporabljajte mešalni nastavek!
SI
1) Gnetilko
2) Vse potrebne sestavine dodajte v napravo. Pri tem ne smete preseči količin,
navedenih v naslednji preglednici:
Moka (za kvašeno testo) največ 300 g
Moka (za testo za pizzo) največ 300 g
Moka (za testo za kolač) največ 300 g
Jajca (za kolač iz umešanega testa) največ 4 kosi
3) Zaprite pokrov
4) Z obratom regulatorja hitrosti
in potem hitrost za približno 1 minuto povečajte na stopnjo 2.
Normalen čas gnetenja je 30 - 180 sekund.
NAPOTEK
►
r vstavite po opisu v poglavju Sestava.
SESTAVINA NAJVEČJA KOLIČINA
3.
p za 20 sekund vklopite gnetenje na stopnji 1
Če med gnetenjem želite dodati več sestavin, jih dodajte skozi odprtino za
dodajanje živil 2!
Če odprete pokrov 3, se naprava zaustavi!
SKM 500 B1
75
Page 79

Uporaba rezila
Z rezilom t lahko sesekljate živila, na primer čebulo ali meso.
NAPOTEK
Z rezilom t ne poskušajte mešati tekočin. Tekočine bi stekle čez rob ali
►
brizgale iz posode. Za tekočine vedno uporabljajte mešalni nastavek!
SI
1) Vstavite rezilo
2) Sestavine narežite na kose velikosti približno 2 - 3cm.
3) Sestavine zložite v napravo. Pri tem ne smete preseči količin, navedenih
v naslednji preglednici:
SESTAVINA
Kruh največ 100 g stopnja 1 - 2
Sir največ 200 g stopnja 1 - 2
Meso največ 500 g stopnja 1 - 2
Zelišča največ 50 g stopnja 1
Česen 150 - 300 g Impulzna nastavitev
Čebula največ 500 g Impulzna nastavitev
NAPOTEK
Hitrosti, navedene v preglednici, so orientacijske vrednosti, ki se lahko
►
razlikujejo glede na lastnosti in količine sestavin!
t, kot je opisano v poglavju »Sestava«.
NAJVEČJA
KOLIČINA
HITROST
76
SKM 500 B1
Page 80

4) Zaprite pokrov 3.
5) Z obratom regulatorja hitrosti
Normalen čas sekljanja je 10 - 60 sekund.
Če se sestavine nakopičijo na steni posode za mešanje ali prilepijo na rezilo:
– Napravo izklopite.
– Odstranite pokrov 3.
– S strgalom za testo s odstranite sestavine z rezila t in z notranjih sten.
– Zaprite pokrov 3.
– Napravo ponovno vklopite.
NAPOTEK
Z napravo pripravljajte samo meso brez kosti!
►
► Naprave ne pustite delovati predolgo, kadar sekljate (trdi) sir. V nasprotnem
primeru se sir preveč segreje, se začne topiti in se zlepi v grude.
► Če med rezanjem želite dodati več sestavin, jih dodajte skozi odprtino za
dodajanje živil 2! Če odprete pokrov, se naprava zaustavi!
Pazite na to, da pri dodajanju sestavin celotna količina ne preseže največjih dovoljenih količin, navedenih v preglednici!
p vklopite sekljanje.
SI
SKM 500 B1
77
Page 81

SI
Uporaba plošče za stepanje
S ploščo za stepanje 4 lahko stepate smetano in beljak ter zmešate sladice.
NAPOTEK
Ne poskušajte mešati vodenih tekočin s ploščo za stepanje 4. Tekočine bi
►
stekle čez rob ali brizgale iz posode. Za vodne tekočine vedno uporabljajte
mešalni nastavek!
► Procesa ne več kot 400 ml tekočine! To bi pršite čez ali teči.
1) Vstavite ploščo za stepanje
2) Vse potrebne sestavine zložite v napravo. Pri tem ne smete preseči količin,
navedenih v naslednji preglednici:
4, kot je opisano v poglavju »Sestava«.
3.
NAJVEČJA
KOLIČINA
p napravo vklopite na stopnji 2.
ČAS PRIPRAVE
SESTAVINA
Tekoča smetana 125 - 350 ml približno 20 - 30 sekund
Beljak 2 - 4 kosi približno 30 - 70 sekund
3) Zaprite pokrov
4) Z obratom regulatorja hitrosti
POZOR ‒ MATERIALNA ŠKODA!
Plošče za stepanje 4 nikoli ne uporabljajte za gnetenje testa ali za pripravo
►
testa za kolače z maslom/margarino! Plošča bi se pri tem poškodovala.
NAPOTEK
Posoda za mešanje u in plošča za stepanje 4 morata biti popolnoma
►
suhi in brez maščob, kadar pripravljate sneg iz beljakov. V nasprotnem
primeru se sneg ne strdi!
► Beljak, ki ga želite stepsti v sneg, mora imeti sobno temperaturo.
78
SKM 500 B1
Page 82

Uporaba pretočnega sekljalnika
S tremi ploščami 0 q w pretočnega sekljalnika lahko strgate, ribate ali režete.
1) Izberite želeno ploščo in vse skupaj sestavite, kot je opisano v poglavju
Sestava.
2) Potiskalo
3) Živila narežite na tako velike kose, da jih boste brez težav dali v odprtino za
dodajanje živil
4) Z obratom regulatorja hitrosti
5) Potem postopno dodajajte živila. Živila v sekljalnik potiskajte s potiskalom
vendar ne premočno.
Pri tem ne smete preseči količin, navedenih v naslednji preglednici:
1 vzemite iz odprtine za dodajanje živil 2.
2.
p pretočni sekljalnik vklopite na stopnji 1.
SI
1,
SESTAVINA
Jabolka/korenje največ 500 g največ 500 g -
Parmezan največ 200 g - največ 200 g
Dolga kumara - največ 2 kosa -
Krompir največ 500 g največ 500 g največ 500 g
Čebula - največ 300 g -
Čokolada - - največ 200 g
Trdi sir (npr. stara
gavda)
NAPOTEK
Večjih količin ne pripravljajte naenkrat, temveč v več zaporednih delih.
►
Vmes vedno izpraznite posodo za mešanje u.
► Naprave ne pustite delovati predolgo, kadar sekljate (trdi) sir ali čokolado.
V nasprotnem primeru se sestavine preveč segrejejo, se začnejo topiti in se
zlepijo v grude.
STRGALNA
PLOŠČA
največ 300 g - -
REZALNA
PLOŠČA
PLOŠČA ZA
RIBANJE
SKM 500 B1
79
Page 83

SI
Uporaba mešalnega nastavka
Z mešalnim nastavkom (posoda mešalnika 7 z nameščenim držalom z rezilom
mešalnika 9 in s tesnilnim obročem 8) lahko na primer pripravite mlečne napitke
ali sesekljate ledene kocke.
POZOR ‒ MATERIALNA ŠKODA!
V mešalni nastavek nikoli ne nalivajte vrelih tekočin, na primer juh! Tekočine
►
naj se najprej ohladijo na mlačno temperaturo.
1) Mešalni nastavek namestite na motorni blok
»Sestava«.
2) Trde sestavine narežite na majhne koščke.
3) Želene sestavine zložite v napravo. Pri tem ne smete preseči količin, navedenih
v naslednji preglednici:
SESTAVINA NAJVEČJA KOLIČINA
Banane/jagode + mleko za napitek
(shake)
Brokoli/paradižnik (zelenjava) največ 500 ml
Banane/melone za koktajle največ 500 ml
Kuhane stročnice (npr. leča) največ 250 g
Ledene kocke
o, kot je opisano v poglavju
največ 500 ml
največ 6 kosov ali 140 g
(položaj stikala P)
80
Mandlji največ 200 g
Orehi največ 200 g
4) Zaprite pokrov
5) Z obratom regulatorja hitrosti
6 in zagotovite, da je vstavljeno tudi zapiralo 5.
p napravo vklopite na stopnji 2.
SKM 500 B1
Page 84

Če se sestavine med pripravo prilepijo na stene mešalnega nastavka:
– Napravo izklopite.
– Električni vtič potegnite iz električne vtičnice.
– Pokrov 6 odprite in sestavine odstranite s sten s strgalom za testo s.
– Zaprite pokrov 6 in napravo ponovno priključite na električno omrežje.
POZOR ‒ MATERIALNA ŠKODA!
Nikoli ne odpirajte pokrova 6 mešalnega nastavka, dokler se še vrti
►
rezilo! Živila bi lahko začela brizgati iz posode!
► Če mešate tekočine, ki se hitro spenijo, na primer mleko, jih v mešalni
nastavek nalijte največ 1 liter, da vsebina ne začne teči čez rob.
NAPOTEK
Če želite doliti tekočine, ko mešalnik deluje, odstranite zapiralo 5 in
►
tekočino dolijte skozi odprtino v pokrovu 6.
► Pri mešanju trdih sestavin, na primer ledenih kock, večkrat zaporedoma
pritisnite stikalo v položaju »P« (Pulse, impulzno delovanje).
► Večjih količin ne mešajte naenkrat, temveč v več zaporednih delih.
► Če z rezultatom niste zadovoljni, napravo izklopite in električni vtič
potegnite iz vtičnice. Sestavine premešajte s pomočjo strgala za testo s
ali iz posode odvzemite del živil. Po potrebi dodajte malce tekočine in vse
skupaj še enkrat premešajte.
SI
SKM 500 B1
81
Page 85

SI
Čiščenje in vzdrževanje
OPOZORILO ‒ NEVARNOST ELEKTRIČNEGA UDARA!
► Pred čiščenjem naprave vedno izvlecite električni vtič iz vtičnice.
► Motornega bloka o nikakor ne smete polagati v tekočine! Tako
ravnanje lahko povzroči smrtno nevarnost zaradi električnega udara ter
poškoduje napravo.
► Ohišja naprave nikoli ne odpirajte. V nasprotnem primeru lahko pride do
smrtno nevarnega električnega udara.
OPOZORILO – NEVARNOST TELESNIH POŠKODB!
► Bodite previdni pri čiščenju rezila t, rezalne plošče w, strgalne plošče 0,
plošče za ribanje q in rezila mešalnika. Ti deli so zelo ostri!
POZOR ‒ MATERIALNA ŠKODA!
Pri čiščenju ne uporabljajte razredčil, topil ali ostrih predmetov. Takšna
►
sredstva poškodujejo površino naprave!
► Za čiščenje ne uporabljajte nobenih ostrih, agresivnih ali kemičnih sredstev.
Ta lahko nepopravljivo poškodujejo površine naprave!
NAPOTEK
Vse dele očistite neposredno po uporabi. Tako lahko lažje odstranite
►
ostanke živil.
82
SKM 500 B1
Page 86

NAPOTEK
Pred čiščenjem držalo z rezilom mešalnika 9 odstranite s posode mešal-
►
nika
7!
► Odstranite majhen križni vijak na spodnji strani držala z rezilom mešalnika 9.
► Posodo mešalnika 7 obrnite toliko, da puščica na posodi mešalnika 7
kaže na simbol na držalu 9. Posodo mešalnika 7 potem lahko
snamete z držala
► Odstranite tesnilni obroč 8 iz držala: Tesnilni obroč 8 s plosko, topo
palčko (npr. iz lesa) rahlo dvignite in potem tesnilni obroč 8 previdno
pomaknite čez rezila.
Za odstranjevanje tesnilnega obroča 8 nikoli ne uporabljajte ostrih ali
koničastih predmetov! Ti bi lahko poškodovali tesnilni obroč
povzročili netesnost!
9.
8 in tako
SI
Pri sestavljanju tesnilni obroč
posodo mešalnika
kaže na simbol
ca
kaže na simbol . Potem majhen križni vijak ponovno zategnite.
■ Motorni blok o, električni kabel in zaščito za rezila d čistite le z rahlo
navlaženo krpo za pomivanje. Vse skupaj dobro osušite, preden napravo
ponovno uporabite.
■ V topli vodi za pomivanje operite
obroč 8. Potem vse dele izperite s čisto vodo, tako da na njih ni ostankov
sredstva za pomivanje.
■ V topli vodi za pomivanje operite rezilo t, gnetilko r, prilagojevalnik za
plošče e, strgalno 0, rezalno ploščo w in ploščo za ribanje q, ploščo za
stepanje 4, pokrov 3 s potiskalom 1, posodo za mešanje u, pogonsko
gred i, prilagojevalnik pogonske gredi z, posodo mešalnika 7, zapiralo
mešalnega nastavka 5, pokrov mešalnega nastavka 6 in strgalo za testo s.
Potem vse dele izperite s čisto vodo, tako da na njih ni ostankov sredstva za
pomivanje.
–
Vse te dele lahko operete tudi v pomivalnem stroju! Pri tem po možnosti
dele položite v zgornjo košaro pomivalnega stroja. Pazite, da se deli ne
zataknejo.
■ Vse skupaj dobro osušite, preden napravo ponovno uporabite.
7 na držalo 9 tako, da puščica na posodi mešalnika 7
na držalu
8 ponovno vstavite v držalo 9 in namestite
9. Posodo mešalnika 7 obrnite toliko, da pušči-
držalo z rezilom mešalnika 9 in tesnilni
SKM 500 B1
83
Page 87

Shranjevanje
Očiščeno in suho napravo shranite na čistem mestu brez prisotnosti prahu.
Kabel ovijte okoli navitja kabla a in konec kabla zataknite na izpustu za kabel.
Za prostorsko varčno shranjevanje delov pribora v posodi za mešanje u naredite
naslednje:
SI
POZOR ‒ MATERIALNA ŠKODA!
Naprave nikoli ne zaženite, ko so v njej shranjeni deli pribora!
►
0
P1
2
84
1) Pogonsko gred i namestite na motorni blok o.
2) Posodo za mešanje u namestite na motorni blok o.
3) Ploščo za stepanje 4 potisnite na pogonsko gred i v posodi za mešanje u.
SKM 500 B1
Page 88

4) Rezilo t z nameščeno zaščito za rezila d in gnetilko r potisnite čez
pogonsko gred i na ploščo za stepanje 4.
5) Prilagojevalnik pogonske gredi z in 2 plošči (npr. rezalno w in strgalno
ploščo 0) položite ob strani poleg pogonske gredi i v posodo za meša-
nje u.
6) Prilagojevalnik za plošče e z vstavljeno ploščo namestite na pogonsko
gred i.
7) Zaprite pokrov 3 in potiskalo 1 vstavite v odprtino za dodajanje živil 2.
Odprava napak
NAPAKA VZROK REŠITEV
SI
Naprava ne deluje.
Naprava se nenadoma zaustavi.
Motor deluje,
vendar se pribor
ne vrti.
Električni vtič ni priklopljen v električno
vtičnico.
Deli naprave niso
pravilno sestavljeni in
pritrjeni.
Naprava je
okvarjena.
Pokrov
3 naprave
se je pri pripravi trdih
sestavin morebiti
razrahljal.
Naprava je okvarjena. Obrnite se na servisno službo.
Pogonska gred i ni
pravilno vstavljena.
Električni vtič priklopite
v električno vtičnico.
Preverite sestavo naprave in se
prepričajte, da se vse oznake
nahajajo pravilno ena nad
drugo.
Obrnite se na servisno službo.
Ponovno pravilno namestite
pokrov 3.
Preverite namestitev pogonske
gredi i.
SKM 500 B1
85
Page 89

SI
Odstranitev naprave med odpadke
Naprave nikakor ne odvrzite med običajne gospodinjske
odpadke. Za ta izdelek velja evropska direktiva
Napravo oddajte pri podjetju, registriranem za predelavo odpadkov, ali pri
krajevnem komunalnem podjetju za odvoz odpadkov. Upoštevajte trenutno
veljavne predpise. V primeru dvoma se obrnite na krajevno podjetje za odvoz
odpadkov.
Opombe o ES-izjavi o skladnosti
Naprava glede skladnosti z osnovnimi zahtevami in drugimi
ustreznimi predpisi ustreza evropski direktivi o elektromagnetni združljivosti 2004/108/EC, direktivi o nizkonapetostnih
napravah 2006/95/EC, direktivi ErP 2009/125/EC in št. 1
dodatka 1 nemške Uredbe 1275/2008.
Celotna izvirna izjava o skladnosti je na voljo pri uvozniku.
Proizvajalec
KOMPERNASS HANDELS GMBH
BURGSTRASSE 21
44867 BOCHUM
GERMANY
www.kompernass.com
2012/19/EU.
Servis
86
Servis Slovenija
Tel.: 080080917
E-Mail: kompernass@lidl.si
IAN 103418
Dosegljivost telefonske službe za stranke:
Od ponedeljka do petka od 8:00 do 20:00 (po srednjeevropskem času)
SKM 500 B1
Page 90

Garancijski list
1. S tem garancijskim listom jamčimo Kompernass Handels GmbH, da bo izdelek v garancijskem roku ob normalni in pravilni uporabi brezhibno deloval in
se zavezujemo, da bomo ob izpolnjenih spodaj navedenih pogojih odpravili
morebitne pomanjkljivosti in okvare zaradi napak v materialu ali izdelavi oz.
po svoji presoji izdelek zamenjali ali vrnili kupnino.
2. Garancija je veljavna na ozemlju Republike Slovenije.
3. Garancijski rok za proizvod je 3 leta od dneva nabave.
4. Kupec je dolžan okvaro javiti pooblaščenemu servisu oz. se informirati o
nadaljnjih postopkih na zgoraj navedeni telefonski številki. Svetujemo vam,
da pred tem natančno preberete navodila o sestavi in uporabi izdelka.
5. Kupec je dolžan pooblaščenemu servisu predložiti garancijski list in račun,
kot potrdilo in dokazilo o nakupu.
6. V primeru, da proizvod popravlja nepooblaščeni servis ali oseba, kupec ne
more uveljavljati zahtevkov iz te garancije.
7. Vzroki za okvaro oz. nedelovanje izdelka morajo biti lastnosti stvari same, in ne
vzroki, ki so zunaj proizvajalčeve oz. prodajalčeve sfere. Kupec ne more uveljavljati zahtevkov iz te garancije, če se ni držal priloženih navodil za sestavo in
uporabo izdelka ali, če je izdelek kakorkoli spremenjen ali nepravilno vzdrževan.
8. Jamčimo servisiranje in rezervne dele za minimalno dobo, ki je zahtevana s
strani zakonodaje.
9. Obrabni deli oz. potrošni material so izvzeti iz garancije.
10. Vsi potrebni podatki za uveljavljanje garancije se nahajajo na dveh ločenih
dokumentih (garancijski list, račun).
11. Ta garancija proizvajalca ne izključuje pravic potrošnika, ki izhajajo iz odgovornosti prodajalca za napake na blagu.
Prodajalec:
Lidl d.o.o.k.d., Pod lipami 1, SI-1218 Komenda
SI
SKM 500 B1
87
Page 91

SI
Recepti
Solatna plošča
Sestavine:
■ 1 sveža kumara
■ 1/4 glave belega zelja
■ 2 papriki
■ 1 čebula
Za marinado
■ 3 - 4 žlice vinskega kisa
■ 2 žlici jedilnega olja
■ Sol
■ Sladkor
■ Poper iz mlinčka
■ 1 žlica sesekljanih zelišč
Priprava:
1) Olupite kumaro in zelje narežite tako, da lahko koščke zelja vstavite v odprtino za dodajanje živil
2) Sedaj kumaro, zelje, pripravljeno papriko in čebulo sesekljajte na stopnji 1 z
rezalno ploščo
3) V mešalniku zmešajte sestavine za marinado.
4) Marinado pomešajte z zelenjavo in jo začinite po okusu.
2 pretočnega sekljalnika.
w.
88
SKM 500 B1
Page 92

Nadevane piščančje prsi s curryjevo omako
Sestavine:
■ 4 piščančje prsi po 150 g
■ Sol
■ Poper iz mlinčka
Za nadev:
■ 150 g mlete svinjine
■ 1 čebula, narezana na kocke
■ Kitajska začimba
■ 1 noževa konica mletega ingverja
Za omako:
■ 250 ml belega vina
■ 2 - 4 žlice smetane
■ Sol, 1 čajna žlička curryja
■ Po potrebi malce mešanice za zgoščevanje omake
Priprava:
1) Posolite in popoprajte piščančje prsi in potem vanje zarežite z ostrim kuhinjskim nožem.
2) Z gnetilko
ki jo začinite po okusu.
3) Nato piščančje prsi napolnite s tem nadevom in jih zašijte.
(V ta namen lahko uporabite tudi lesene palčke.)
4) Potem segrejte maščobo in v njej popražite vse piščančje prsi.
5) Dolijte vino in piščančje prsi dušite 10 - 15 minut, dokler niso pripravljene.
6) Piščančje prsi vzemite iz ponve in jih dajte na toplo.
7) Omako po okusu začinite s smetano, soljo in curryjem in jo po želji zgostite s
sredstvom za zgoščevanje omake.
Sedaj piščančje prsi z omako razporedite na primer po rižu.
r v posodi za mešanje zgnetite vse sestavine za nadev v maso,
SI
SKM 500 B1
89
Page 93

SI
Krompirjeve polpete Rösti
Sestavine:
■ 4 krompirji, veliki, mokasti
■ Sol
■ Poper
■ Mleti muškatni orešček
■ 80 g masla ali margarine
Priprava:
1) Operite in olupite krompir in ga s strgalno ploščo
2) Krompirjevo maso dajte v krpo in iz nje iztisnite tekočino.
3) Krompirjevo maso potresite z začimbami in vse skupaj premešajte.
4) Sedaj z manjšo zajemalko malce krompirjeve mase dajte v vročo maščobo
in jo pritisnite navzdol in izravnajte z lopatko za obračanje.
5) Potem polpete hrustljavo zapecite na obeh straneh.
Primerno kot priloga k mesu in jedem z divjačino.
Premaz s tunino
Sestavine:
■ 1 konzerva tunine v omaki z zelenjavo
■ 3 žlice jogurta
■ 1 čajna žlička sveže iztisnjenega limoninega soka
■ 1 ščepec soli
■ Poper iz mlinčka
■ 2 trdo kuhani jajci, narezani na kocke
Kot dodatek:
■ Rezine polnozrnatega kruha
■ Maslo za mazanje
■ 1 trdo kuhano jajce, narezano na kocke
■ Sesekljan drobnjak
0 narežite na trakove.
90
SKM 500 B1
Page 94

Priprava:
1) Zmešajte vse sestavine na najvišji stopnji v mešalnem nastavku, dokler ne dosežete želene konsistence (okrog 15 sekund) in jih potem začinite po okusu.
2) Premažite kruh z maslom in tunino kremo in vse skupaj potresite s sesekljanim
jajcem in drobnjakom.
Paradižnikova omaka
Sestavine:
■ 5 žlic jedilnega olja
■ 1 velika čebula
■ 1 velika konzerva (800 g) olupljenega paradižnika
■ Sol, poper, 1 ščepec sladkorja, 1 ščepec timijana,
■ 1 ščepec čilija v prahu
■ 1/2 šopka sesekljanega peteršilja
■ 1 šopek na drobno sesekljane bazilike
■ 40 g hladnega masla ali 100 ml sladke smetane
Priprava:
1) Čebulo olupite in jo z nožem sesekljajte na večje koščke.
2) Segrejte olje in v njem popražite čebulo ali pa za to za 2 - 3 minute pri 600 W
uporabite mikrovalovno pečico.
3) Dodajte paradižnik skupaj s sokom in umešajte vse začimbe.
4) Omaka naj se v pokritem loncu na majhnem ognju počasi kuha 20 minut ali
pa jo pripravite v mikrovalovni pečici.
5) Paradižnikova omaka naj se ohladi (da postane mlačna), potem pa jo zmešajte v mešalnem nastavku.
6) Nato omako ponovno prelijte v lonec in jo po potrebi malce pokuhajte.
7) Sedaj primešajte maslo ali smetano.
8) Omako potresite z zelišči in jo po okusu začinite.
Z nastrganim sirom kot priloga k testeninam vseh vrst.
SI
SKM 500 B1
91
Page 95

SI
Palačinke
Sestavine:
■ 2–3 jajca
■ 375 ml mleka
■ 1 ščepec soli
■ 250 g moke
■ Maščoba za peko
Priprava:
1) Z gnetilko
2) Presejte moko in jo dodajte masi. Vse skupaj zmešajte z gnetilko
nastane gladko testo.
3) Testo pustite počivati približno 20 minut.
4) Segrejte maščobo in z manjšo zajemalko nanjo nalijte testo.
(Zmeraj le toliko, da je dno ponve na tanko prekrito.)
5) Palačinke popecite zlato rumeno na obeh straneh in jih postrezite vroče.
Marmorni kolač
Sestavine:
■ 125 g mehkega masla ali margarine
■ 125 g sladkorja
■ 3 jajca
■ 1/2 zavitka vaniljevega sladkorja
■ 1 ščepec soli
■ 250 g pšenične moke
■ 1/2 zavitka pecilnega praška
■ 75 ml mleka
■ 20 g kakava za peko
■ 50 g kuverture iz polgrenke čokolade
■ Maščoba za model
r zmešajte jajca, mleko in sol.
r, da
92
SKM 500 B1
Page 96

Priprava:
1) Kuverturo razlomite na večje kose in jih sesekljajte z rezilom t.
2) Vse sestavine razen kuverture in kakava za peko dajte v posodo za mešanje
in jih zmešajte z gnetilko
3) Model za marmorni kolač premažite z maščobo (premer: 20 - 22 cm), lahko
pa uporabite tudi štirioglati model (dolžine 30 cm).
4) Polovico testa dajte v model, v drugo polovico testa pa umešajte kakav in
preostalo kuverturo.
5) Nato temno testo položite na svetlo testo in temno testo z vilicami v obliki
spiral umešajte v svetlega.
Nasvet: Če želite, lahko kolač dodatno prelijete tudi s 100 g kuverture iz polgrenke čokolade, nato pa ga okrasite še s smetano in čokoladnimi okraski.
Kvašeno testo
Sestavine:
■ 300 g pšenične moke
■ 15 g svežega kvasa ali 5 g suhega kvasa
■ Približno 150 ml mlačnega mleka
■ 50 g masla ali margarine (sobne temperature)
■ 50 g sladkorja
■ 1 jajce
u
r.
SI
SKM 500 B1
Priprava:
1) Moko, suhi ali razdrobljeni kvas in vse druge sestavine (vendar teh ne neposredno na kvas) dajte v posodo za mešanje
2) Vse skupaj premešajte z gnetilko
3) Testo vzemite iz posode za mešanje
4) Testo prekrijte s kuhinjsko krpo, ga postavite na toplo mesto in ga pustite
vzhajati, dokler vidno ne narase.
5) Potem testo še enkrat temeljito premesite z rokami.
6) Zdaj je testo pripravljeno in ga lahko uporabite.
r.
u.
u in ga dajte v veliko posodo.
93
Page 97

SI
Pomarančni napitek
Sestavine:
■ 250 ml pomarančnega soka
■ 1 - 2 žlici limoninega soka
■ 150 g marelic iz konzerve
■ 6 razdrobljenih ledenih kock
■ 2 čajni žlički sladkorja ali medu
Priprava:
1) Ledene kocke dajte v mešalni nastavek in jih razdrobite s stikalom v položaju »P«.
2) Pomarančni sok, limonin sok in marelice dodajte ledenim kockam v mešalnem nastavku in vse skupaj mešajte okrog 10 sekund na stopnji 2.
3) Sedaj po okusu dodajte še sladkor ali med, potem pa postrezite z ledeno
hladnim sokom.
94
94
SKM 500 B1
Page 98

Lešnikovi keksi
Sestavine:
■ 200 g lešnikovih jedrc
■ 60 g trsnega sladkorja
■ 2 beljaka
■ 2 čajni žlički medu
■ Okrog 50 g slivove ali šipkove marmelade
■ Po 35 g kuverture iz polgrenke in mlečne čokolade
Priprava:
1) Sesekljajte lešnike v mešalniku, od tega dajte štiri žlice na stran.
2) Iz preostalih lešnikov, sladkorja, beljaka in medu z gnetilko
testo.
3) Delovno površino potresite s preostalimi lešniki in po njih razvaljajte testo do
debeline pol centimetra.
4) Sedaj izrežite kekse in jih zložite v pekač, obložen s papirjem za peko.
5) Ohlajene kekse sestavite dva po dva, tako da vmes namažete šipkovo ali
slivovo marmelado, potem pa jih izmenično oblijte s kuverturo iz mlečne in iz
polgrenke čokolade.
6) V ta namen ločeno raztopite obe vrsti kuverture. Kekse v kuverturo pomočite
do polovice in jih odložite na kuhinjsko rešetko, da se posušijo.
SI
r zgnetite trdno
SKM 500 B1
Dober tek!
Vsi recepti so brez zagotovila za uspeh. Vse sestavine in podatki o pripravi so
približni. Predloge za recepte lahko dopolnite s svojimi izkušnjami.
Vsekakor vam želimo veliko uspeha in dober tek.
95
Page 99

96
SKM 500 B1
Page 100

Obsah
Úvod . . . . . . . . . . . . . . . . . . . . . . . . . . . . . . . . . . . . . . . . . . . . . . . . . . . . . . . . 98
Použití vsouladu surčením . . . . . . . . . . . . . . . . . . . . . . . . . . . . . . . . . . . . . 98
Rozsah dodávky . . . . . . . . . . . . . . . . . . . . . . . . . . . . . . . . . . . . . . . . . . . . . . 99
Likvidace obalového materiálu . . . . . . . . . . . . . . . . . . . . . . . . . . . . . . . . . . . . . . . . . . . . . 99
Popis přístroje . . . . . . . . . . . . . . . . . . . . . . . . . . . . . . . . . . . . . . . . . . . . . . .100
Technické údaje . . . . . . . . . . . . . . . . . . . . . . . . . . . . . . . . . . . . . . . . . . . . . . 100
Bezpečnostní pokyny . . . . . . . . . . . . . . . . . . . . . . . . . . . . . . . . . . . . . . . . .101
První uvedení do provozu . . . . . . . . . . . . . . . . . . . . . . . . . . . . . . . . . . . . . 103
Sestavení . . . . . . . . . . . . . . . . . . . . . . . . . . . . . . . . . . . . . . . . . . . . . . . . . . .104
Míchací mísa shnětacím nožem, řezacím nožem nebo emulgačním kotoučem . . . . . . . 104
Míchací mísa skrájecím, krouhacím nebo strouhacím kotoučem . . . . . . . . . . . . . . . . . . . 105
Mixér . . . . . . . . . . . . . . . . . . . . . . . . . . . . . . . . . . . . . . . . . . . . . . . . . . . . . . . . . . . . . . . . 106
Provoz . . . . . . . . . . . . . . . . . . . . . . . . . . . . . . . . . . . . . . . . . . . . . . . . . . . . . 107
Práce shnětacím nožem . . . . . . . . . . . . . . . . . . . . . . . . . . . . . . . . . . . . . . . . . . . . . . . . . 107
Práce s řezacím nožem . . . . . . . . . . . . . . . . . . . . . . . . . . . . . . . . . . . . . . . . . . . . . . . . . . 108
Práce semulgačním kotoučem . . . . . . . . . . . . . . . . . . . . . . . . . . . . . . . . . . . . . . . . . . . . . 110
Práce skrájecím, krouhacím a strouhacím kotoučem . . . . . . . . . . . . . . . . . . . . . . . . . . . . 111
Práce smixérem . . . . . . . . . . . . . . . . . . . . . . . . . . . . . . . . . . . . . . . . . . . . . . . . . . . . . . . . 112
Čištění a údržba . . . . . . . . . . . . . . . . . . . . . . . . . . . . . . . . . . . . . . . . . . . . .114
Uložení . . . . . . . . . . . . . . . . . . . . . . . . . . . . . . . . . . . . . . . . . . . . . . . . . . . . . 116
Odstranění závad . . . . . . . . . . . . . . . . . . . . . . . . . . . . . . . . . . . . . . . . . . . .117
Likvidace přístroje . . . . . . . . . . . . . . . . . . . . . . . . . . . . . . . . . . . . . . . . . . . 118
Upozornění kprohlášení oshodě ES . . . . . . . . . . . . . . . . . . . . . . . . . . . . 118
CZ
Dovozce . . . . . . . . . . . . . . . . . . . . . . . . . . . . . . . . . . . . . . . . . . . . . . . . . . . .118
Záruka . . . . . . . . . . . . . . . . . . . . . . . . . . . . . . . . . . . . . . . . . . . . . . . . . . . . .119
Servis . . . . . . . . . . . . . . . . . . . . . . . . . . . . . . . . . . . . . . . . . . . . . . . . . . . . . .119
Recepty . . . . . . . . . . . . . . . . . . . . . . . . . . . . . . . . . . . . . . . . . . . . . . . . . . . .120
SKM 500 B1
97
 Loading...