

Page 1
SACACORCHOS ELÉCTRICO SKE 6 A1
SACACORCHOS ELÉCTRICO
Instrucciones de uso
ELECTRIC CORKSCREW
Operating instructions
IAN 100655
SACA-ROLHAS ELÉCTRICO
Manual de instruções
ELEKTRISCHER KORKENZIEHER
Bedienungsanleitung
Page 2
Antes de empezar a leer abra la página que contiene las imágenes y, en seguida, familiarícese con todas
las funciones del dispositivo.
Antes de começar a ler abra na página com as imagens e, de seguida, familiarize-se com todas as
funções do aparelho.
Before reading, unfold the page containing the illustrations and familiarise yourself with all functions of
the device.
Klappen Sie vor dem Lesen die Seite mit den Abbildungen aus und machen Sie sich anschließend mit allen
Funktionen des Gerätes vertraut.
ES Instrucciones de uso Página 1
PT Manual de instruções Página 7
GB / MT Operating instructions Page 13
DE / AT / CH Bedienungsanleitung Seite 19
Page 3
Page 4

Índice
Introducción . . . . . . . . . . . . . . . . . . . . . . . . . . . . . . . . . . . . . . . . . . . . . . . . . . . . . . . . . . .2
Uso previsto . . . . . . . . . . . . . . . . . . . . . . . . . . . . . . . . . . . . . . . . . . . . . . . . . . . . . . . . . . .2
Volumen de suministro . . . . . . . . . . . . . . . . . . . . . . . . . . . . . . . . . . . . . . . . . . . . . . . . . .2
Descripción del aparato . . . . . . . . . . . . . . . . . . . . . . . . . . . . . . . . . . . . . . . . . . . . . . . . .2
Características técnicas . . . . . . . . . . . . . . . . . . . . . . . . . . . . . . . . . . . . . . . . . . . . . . . . . .2
Indicaciones de seguridad . . . . . . . . . . . . . . . . . . . . . . . . . . . . . . . . . . . . . . . . . . . . . . .3
Inserción/cambio de las pilas . . . . . . . . . . . . . . . . . . . . . . . . . . . . . . . . . . . . . . . . . . . . .4
Manejo . . . . . . . . . . . . . . . . . . . . . . . . . . . . . . . . . . . . . . . . . . . . . . . . . . . . . . . . . . . . . . .4
Limpieza y mantenimiento . . . . . . . . . . . . . . . . . . . . . . . . . . . . . . . . . . . . . . . . . . . . . . .5
Almacenamiento . . . . . . . . . . . . . . . . . . . . . . . . . . . . . . . . . . . . . . . . . . . . . . . . . . . . . . .5
Solución de fallos . . . . . . . . . . . . . . . . . . . . . . . . . . . . . . . . . . . . . . . . . . . . . . . . . . . . . .5
Garantía y asistencia técnica . . . . . . . . . . . . . . . . . . . . . . . . . . . . . . . . . . . . . . . . . . . . .6
Desecho . . . . . . . . . . . . . . . . . . . . . . . . . . . . . . . . . . . . . . . . . . . . . . . . . . . . . . . . . . . . . .6
Importador . . . . . . . . . . . . . . . . . . . . . . . . . . . . . . . . . . . . . . . . . . . . . . . . . . . . . . . . . . .6
ES
SKE 6 A1
1
Page 5

ES
Introducción
ES
Felicidades por la compra de su aparato nuevo.
Ha adquirido un producto de alta calidad. Las
instrucciones de uso forman parte del producto y
contienen indicaciones importantes acerca de la
seguridad, el uso y el desecho de este aparato.
Antes de usar el producto, familiarícese con todas
las indicaciones de manejo y de seguridad. Utilice
el producto únicamente como se describe y para
los ámbitos de aplicación indicados. Entregue todos
los documentos cuando transfi era el producto a
terceros.
Volumen de suministro
▯ Sacacorchos eléctrico
▯ 4 pilas AA, 1,5 V LR6
▯ Cortacápsulas (y base del aparato)
▯ Instrucciones de uso
INDICACIÓN
► Compruebe la integridad del volumen de
o inmediatamente después de
suministr
desembalar el producto.
► Retire todos los materiales de embalaje.
Uso previsto
El sacacorchos eléctrico está previsto exclusivamente
para descorchar las botellas de vino de uso comercial (con corcho natural o sintético).
Este producto no es apto para descorchar botellas
de cava.
El sacacorchos eléctrico no es apto para retirar o
abrir otro tipo de cierres de botellas como, p. ej.,
chapas o tapones roscados.
Este producto está diseñado exclusivamente para
su uso doméstico privado. No se permite un uso
industrial.
Cualquier uso diferente o que vaya más allá de lo
indicado se considera contrario al uso previsto.
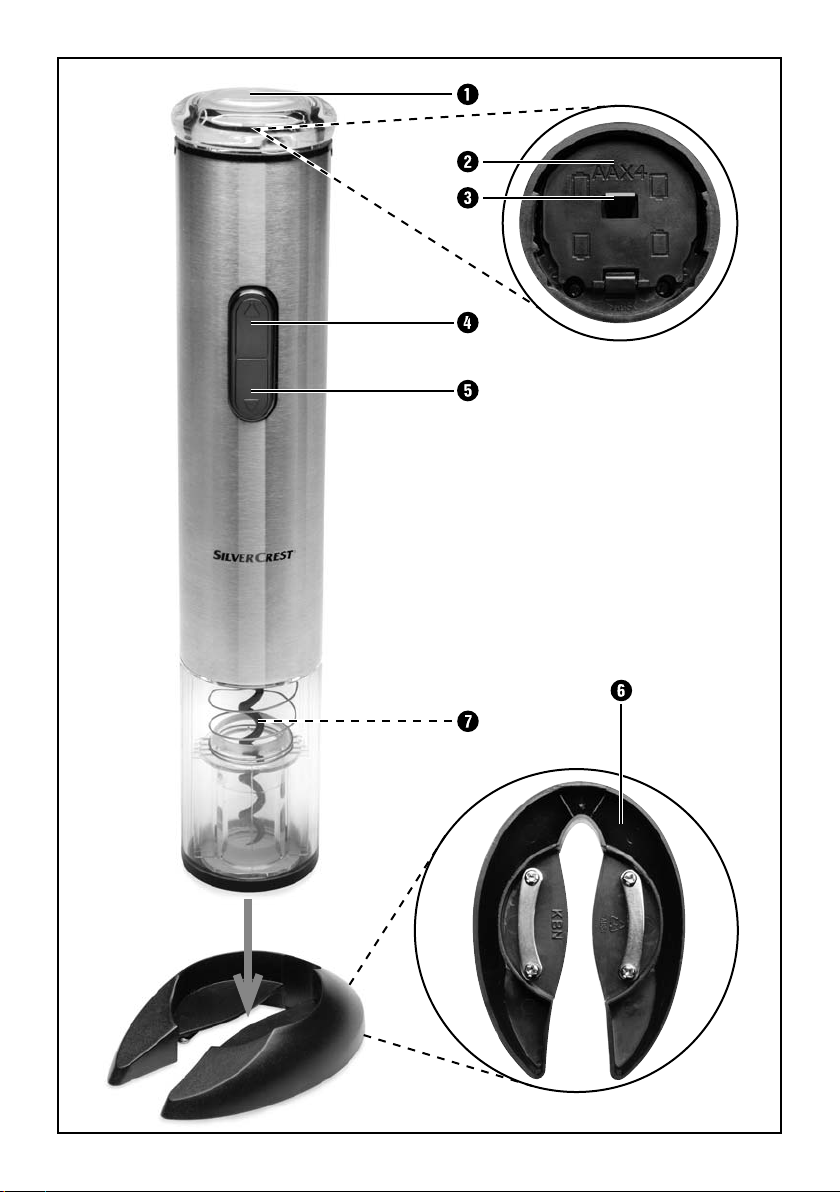
Descripción del aparato
1 Tapa roscada
2 Compartimento para pilas
3 Bloqueo
4 Botón
5 Botón
6 Cortacápsulas
7 Espiral
Características técnicas
Alimentación de
corriente: 4 x 1,5 V
Consumo de corriente: 2,5 A
Tipo de pila: 1,5 V, Mignon, AA, LR6
2
SKE 6 A1
Page 6
Indicaciones de seguridad
¡ADVERTENCIA! ¡PELIGRO DE LESIONES!
► Este aparato puede ser utilizado por niños a partir de 8 años y por personas
cuyas facultades físicas, sensoriales o mentales sean reducidas o carezcan
de los conocimientos y de la experiencia necesaria siempre que sean
vigilados o hayan sido instruidos correctamente sobre el uso seguro del
aparato y hayan comprendido los peligros que entraña.
► Los niños no deben jugar con el aparato.
► Los niños no deben realizar las tareas de limpieza y mantenimiento del
aparato sin supervisión.
► Maneje con cuidado la punta del sacacorchos y el cortacápsulas.
¡ADVERTENCIA!
Indicaciones de seguridad para la manipulación de las pilas:
► No arroje las pilas al fuego. No vuelva a cargar las pilas. ¡Existe riesgo de
explosión y de lesiones!
► No abra, estañe ni suelde las pilas. ¡Existe riesgo de explosión y de lesiones!
► Compruebe las pilas de forma regular. Las pilas con fugas pueden ocasionar
daños al aparato.
ES
► Si no pretende utilizar el aparato durante un periodo de tiempo prolongado,
extraiga las pilas.
► Si las pilas tienen fugas, utilice guantes de protección. Limpie el comparti-
mento para pilas y los contactos de las pilas con un paño seco.
► Los niños no deben tener acceso a las pilas, ya que podrían metérselas en
la boca y atragantarse. En caso de ingestión de una pila, busque inmediatamente asistencia médica.
¡ATENCIÓN! ¡PELIGRO DE DAÑOS MATERIALES!
No sumerja nunca el aparato en agua ni en otros líquidos.
SKE 6 A1
3
Page 7

ES
Inserción/cambio de las pilas
ES
¡ATENCIÓN!
¡PELIGRO DE DAÑOS MATERIALES!
► Para insertar las pilas, observe siempre la
polaridad especifi
partimento para pilas.
► Utilice siempre las pilas del tipo
Mignon AA
► Utilice siempre pilas del mismo tipo.
1)
Para retirar la tapa roscada 1, gírela hasta
que la fl echa de la la tapa roscada 1 apunte
hacia la indicación "Open" (abierto) del sacacorchos. Levante la tapa roscada 1.
2) Para abrir el compartimento para pilas 2, tire
del bloqueo 3 hacia sí mismo para desblo-
quear el compartimento para pilas 2.
3) Extraiga las pilas gastadas.
4) Coloque las nuevas pilas según la polaridad
indicada en la tapa del compartimento para
pilas.
5) A continuación, cierre el compartimiento para
pilas 2 de forma que el bloqueo 3 encastre.
6) Coloque la tapa roscada 1 sobre el aparato
de forma que la fl echa de la la tapa roscada 1
apunte hacia la indicación "Open" (abierto)
del sacacorchos. Tras esto, gire la tapa roscada 1 hasta que la fl echa apunte hacia la
indicación "Close" (cerrado). La tapa roscada 1 volverá a quedar fi ja en el aparato.
cada en la tapa del com-
, LR6.
Manejo
INDICACIÓN
► ¡No descorche botellas de cava con este
chos! El corcho podría quedarse
sacacor
enganchado en el aparato.
✓
✕
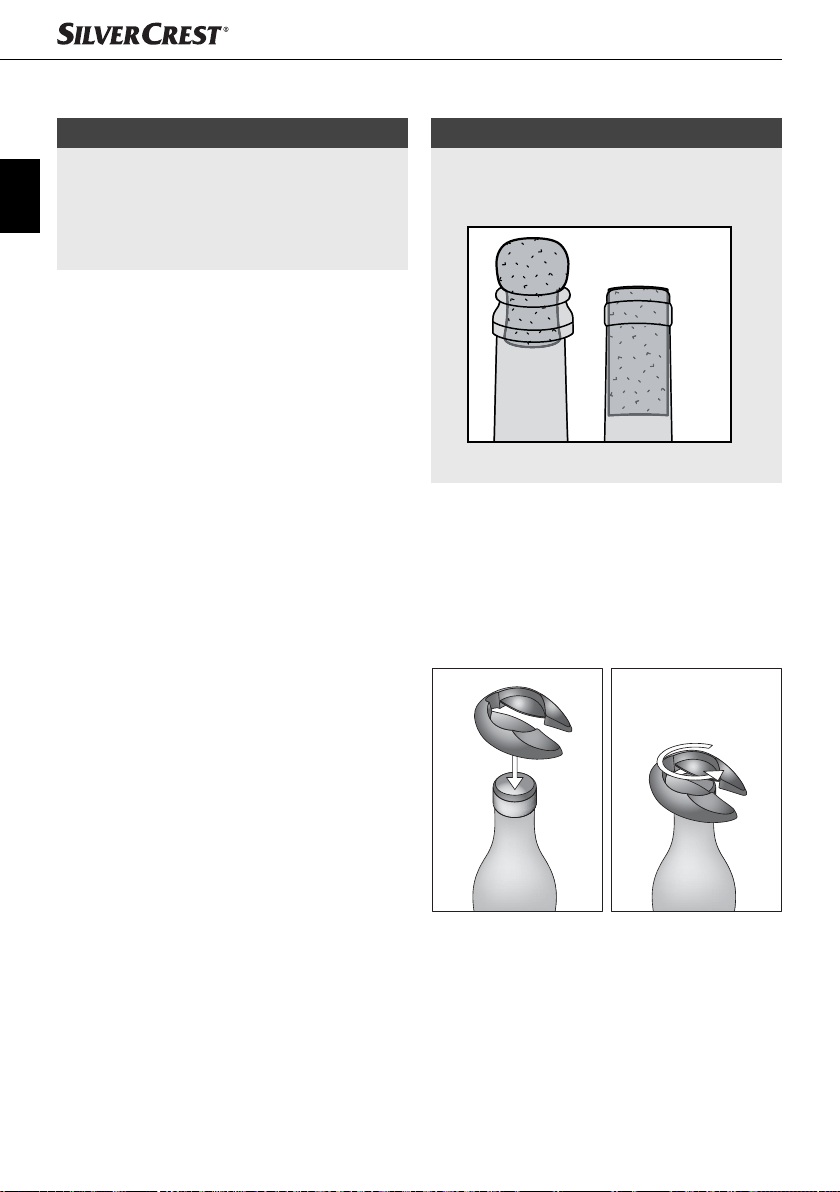
Figura 1
1) Para cortar la cápsula que cubre el corcho de
la botella
Coloque el cortacápsulas 6 sobre la botella de
vino cerrada como se muestra en la fi gura 2
2) Apriete con el dedo índice y pulgar. Agarre la
botella de vino con una mano para que no se
vuelque.
, utilice el cortacápsulas 6:
.
Figura 2
3) Gire 360 grados la botella de vino. Es posible
que necesite repetir este proceso varias veces
hasta que pueda retirar la cápsula.
4
SKE 6 A1
Page 8
4) Retire la cápsula cortada.
5) Agarre la botella de vino con una mano para
que no se vuelque. Coloque el sacacorchos
eléctrico sobre la botella de vino. Apriete bien
hasta que note cómo la espiral 7 penetra en
el corcho.
6) Mantenga pulsado el botón
Tras esto, la espiral 7 penetrará en el corcho
y lo extraerá del cuello de la botella. Mantenga
bien sujetos la botella de vino y el sacacorchos.
7) Suelte el botón
haya salido completamente del cuello de la
botella.
8) Retire el sacacorchos de la botella y manténgalo
con la abertura hacia abajo. Pulse el botón
4. Tras esto, el corcho se desenroscará del
interior del sacacorchos.
9) Suelte el botón
salga del sacacorchos.
INDICACIÓN
► Puede utilizarse el cortacápsulas 6 como
base par
basta con insertar el sacacorchos en la abertura de la parte superior del cortacápsulas 6.
De esta manera, el sacacorchos puede descansar sobre una base estable.
5 inferior una vez el corcho
4 en cuanto el corcho
a el sacacorchos:
5 inferior.
Limpieza y mantenimiento
¡ATENCIÓN!
¡PELIGRO DE DAÑOS MATERIALES!
No sumerja nunca el aparato en agua ni
en otros líquidos.
► No utilice productos de limpieza abrasivos
esivos, ya que pueden dañar las
ni agr
superfi cies.
■ Limpie la carcasa del sacacorchos y del corta-
cápsulas 6 e
mente húmedo. Para eliminar la suciedad más
persistente, vierta unas gotas de un producto de
limpieza suave en el paño húmedo. Procure que
no penetre humedad en el sacacorchos durante
la limpieza.
xclusivamente con un paño ligera-
Almacenamiento
■ Limpie bien el aparato antes de almacenarlo.
■ Si no pretende utilizar el aparato durante un pe-
olongado de tiempo, extraiga las pilas.
riodo pr
■ Guarde el aparato limpio en un lugar limpio,
seco y sin polv
o.
Solución de fallos
El aparato no funciona.
■ Las pilas están agotadas/tienen muy poca
car
ga.
– Cambie las pilas de la manera descrita en
el capítulo "Inser
■ El aparato está defectuoso.
– Póngase en contacto con el servicio de
asistencia técnica.
ción/cambio de las pilas".
ES
SKE 6 A1
5
Page 9
ES
Garantía y asistencia técnica
ES
Este aparato tiene 3 años de garantía desde la
fecha de compra. El aparato ha sido fabricado
cuidadosamente y examinado en profundidad
antes de su entrega. Guarde el comprobante de
caja como justifi cante de compra. Si necesitara
hacer uso de la garantía, póngase en contacto
por teléfono con su punto de servicio habitual.
Este es el único modo de garantizar un envío
gratuito.
La garantía cubre los defectos de fabricación o
del material, pero no los daños de transporte, las
piezas sujetas a desgaste ni los daños sufridos por
las piezas frágiles (p. ej., interruptores o pilas). Este
producto ha sido diseñado exclusivamente para el
uso particular y no para el uso industrial.
En caso de manipulación indebida e incorrecta, uso
de la fuerza y apertura del aparato por personas
ajenas a nuestros centros de asistencia técnica
autorizados, la garantía pierde su validez.
Sus derechos legales no se ven limitados por esta
garantía.
La duración de la garantía no se prolonga por
hacer uso de ella. Este principio rige también para
las piezas sustituidas y reparadas. Si después de
la compra del aparato, se detecta la existencia
de daños o de defectos al desembalarlo, deben
notifi carse de inmediato o, como muy tarde, dos
días después de la fecha de compra. Cualquier
reparación que se realice una vez fi nalizado el
plazo de garantía está sujeta a costes.
Servicio España
Tel.: 902 59 99 22
(0,08 EUR/Min. + 0,11 EUR/
llamada (tarifa normal))
(0,05 EUR/Min. + 0,11 EUR/
llamada (tarifa reducida))
E-Mail: kompernass@lidl.es
IAN 100655
Desecho
No deseche nunca el aparato
con la basura doméstica.
Este aparato está sujeto
a la Directiva europea
2012/19/EU.
Deseche el aparato en un centro de residuos autorizado a través de las instalaciones de desecho de
residuos comunitarias. Observe las normas vigentes.
En caso de duda, póngase en contacto con las
instalaciones municipales de desecho de residuos.
Las pilas/baterías no pueden
desecharse con la basura
doméstica.
Los consumidores están obligados legalmente a
entregar las pilas en un punto de recogida de
residuos de su municipio/barrio o en un establecimiento.
Con esta obligación se consigue que las pilas o
baterías se desechen de forma respetuosa con el
medio ambiente. Devuelva las pilas exclusivamente
en estado descargado.
El embalaje consta de materiales ecoló-
gicos que pueden desecharse a través
de los centros de reciclaje locales.
Importador
KOMPERNASS HANDELS GMBH
BURGSTRASSE 21
44867 BOCHUM
GERMANY
www.kompernass.com
Disponibilidad de la línea de atención al
cliente:
de lunes a viernes de 8.00 a 20.00 h (CET)
6
SKE 6 A1
Page 10

Índice
Introdução . . . . . . . . . . . . . . . . . . . . . . . . . . . . . . . . . . . . . . . . . . . . . . . . . . . . . . . . . . . .8
Utilização correta . . . . . . . . . . . . . . . . . . . . . . . . . . . . . . . . . . . . . . . . . . . . . . . . . . . . . .8
Conteúdo da embalagem . . . . . . . . . . . . . . . . . . . . . . . . . . . . . . . . . . . . . . . . . . . . . . . .8
Descrição do aparelho . . . . . . . . . . . . . . . . . . . . . . . . . . . . . . . . . . . . . . . . . . . . . . . . . .8
Dados técnicos . . . . . . . . . . . . . . . . . . . . . . . . . . . . . . . . . . . . . . . . . . . . . . . . . . . . . . . . .8
Instruções de segurança . . . . . . . . . . . . . . . . . . . . . . . . . . . . . . . . . . . . . . . . . . . . . . . . .9
Colocar/substituir pilhas . . . . . . . . . . . . . . . . . . . . . . . . . . . . . . . . . . . . . . . . . . . . . . . .10
Operação . . . . . . . . . . . . . . . . . . . . . . . . . . . . . . . . . . . . . . . . . . . . . . . . . . . . . . . . . . . .10
Limpeza e conservação . . . . . . . . . . . . . . . . . . . . . . . . . . . . . . . . . . . . . . . . . . . . . . . . .11
Armazenamento . . . . . . . . . . . . . . . . . . . . . . . . . . . . . . . . . . . . . . . . . . . . . . . . . . . . . .11
Resolução de erros . . . . . . . . . . . . . . . . . . . . . . . . . . . . . . . . . . . . . . . . . . . . . . . . . . . .11
Garantia e assistência técnica . . . . . . . . . . . . . . . . . . . . . . . . . . . . . . . . . . . . . . . . . . .12
Eliminação . . . . . . . . . . . . . . . . . . . . . . . . . . . . . . . . . . . . . . . . . . . . . . . . . . . . . . . . . . .12
Importador . . . . . . . . . . . . . . . . . . . . . . . . . . . . . . . . . . . . . . . . . . . . . . . . . . . . . . . . . .12
PT
SKE 6 A1
7
Page 11

Introdução
Parabéns pela compra do seu novo aparelho.
Optou por um produto de elevada qualidade.
O manual de instruções é parte integrante deste
produto. Este contém instruções importantes para
PT
a segurança, utilização e eliminação. Antes de utilizar o produto, familiarize-se com todas as instruções de operação e segurança. Utilize o produto
apenas como descrito e nas áreas de aplicação
indicadas. Ao transferir o produto para terceiros,
entregue todos os respetivos documentos.
Utilização correta
O saca-rolhas destina-se exclusivamente a abrir
garrafas de vinho convencionais (rolhas naturais
ou de plástico).
Este aparelho não foi concebido para extrair
rolhas de espumante.
O saca-rolhas não é adequado para retirar/abrir
outros tipos de tampas para garrafas, como p.ex.
cápsulas ou tampas roscadas.
Este aparelho destina-se exclusivamente ao uso
privado. Não o utilize para fi ns comerciais.
Qualquer utilização diferente ou fora do âmbito
descrito é considerada incorreta.
Conteúdo da embalagem
▯ Saca-rolhas eléctrico
▯ 4 Pilhas AA, 1,5 V LR6
▯ Cortador de lacres
(simultaneamente supor
▯ Manual de instruções
NOTA
► Ao retirar o material da embalagem, verifi que
am fornecidas todas as peças.
se for
► Retire todos os materiais da embalagem.
te de mesa)
Descrição do aparelho
1 Tampa
2 Compartimento das pilhas
3 Bloqueio
4 Botão
5 Botão
6 Cortador de lacres
7 Espiral
Dados técnicos
Alimentação de tensão: 4 x 1,5 V
Consumo de corrente: 2,5 A
Tipo de pilhas: 1,5 V, Micro, AA, LR6
8
SKE 6 A1
Page 12

Instruções de segurança
AVISO! PERIGO DE FERIMENTOS!
► Este aparelho pode ser utilizado por crianças com idades superiores a
8 anos, bem como por pessoas com capacidades físicas, sensoriais ou
mentais reduzidas, ou com falta de experiência e/ou conhecimento,
caso sejam vigiadas ou instruídas sobre a utilização segura do aparelho
e compreendam os perigos daí resultantes.
► As crianças não podem brincar com o aparelho.
► A limpeza e a manutenção pelo utilizador não podem ser realizadas por
crianças não vigiadas.
► Tenha cuidado ao manusear a ponta do saca-rolhas e o cortador de lacres.
AVISO!
Instruções de segurança para o manuseamento das pilhas:
► Não coloque as pilhas no fogo. Não recarregue as pilhas. Perigo de
explosão e de ferimentos!
► Nunca abra nem tente soldar as pilhas. Perigo de explosão e de ferimentos!
► Verifi que regularmente as pilhas. Pilhas com fuga de líquido podem danifi car
o aparelho.
PT
► Caso não pretenda utilizar o aparelho durante um longo período de tempo,
retire as pilhas.
► Em caso de fuga de líquido das pilhas, calce luvas de proteção. Limpe o
compartimento das pilhas e os contactos das mesmas com um pano seco.
► Mantenha as pilhas fora do alcance de crianças. Estas podem colocar as
pilhas na boca e engoli-las. Se uma pilha for ingerida, procure imediatamente assistência médica.
ATENÇÃO! DANOS MATERIAIS!
Nunca mergulhe o aparelho em água ou noutro tipo de líquidos.
SKE 6 A1
9
Page 13
Colocar/substituir pilhas
Operação
ATENÇÃO! DANOS MATERIAIS!
► Ao colocar as pilhas, verifi que sempre a
PT
polaridade indicada no r
mento!
► Utilize sempre pilhas do tipo Micro AA, LR6.
► Utilize sempre pilhas do mesmo tipo.
1)
Retire a tampa 1, rodando-a de forma a que
a seta na tampa 1 fi que orientada para a inscrição "Open" no saca-rolhas. Levante depois
a tampa 1.
2) Abra o compartimento das pilhas 2, puxando
o bloqueio 3 na sua direção e desbloqueando
o compartimento das pilhas 2.
3) Remova as pilhas antigas, caso estejam
inseridas.
4) Insira as pilhas novas, respeitando a polaridade
indicada no respetivo compartimento.
5) Feche o compartimento das pilhas 2, de forma
que o bloqueio 3 encaixe.
6) Coloque a tampa 1 no aparelho, de forma
que a seta na tampa 1 fi que orientada para
a inscrição "Open". Rode depois a tampa 1,
de forma a que a seta fi que orientada para
a inscrição "Close". A tampa 1 está agora
novamente fi xa no aparelho.
espetivo comparti-
NOTA
► Não extraia rolhas de espumante com a
ajuda do saca-r
encravadas no aparelho.
olhas! Estas podem fi car
✓
✕
Figura 1
1) Para cortar o lacre que se encontra por cima da
rolha da garraf
coloque o cortador de lacres 6, conforme
ilustrado na fi gura 2
fechada.
2) Pressione-o bem com o polegar e o indicador.
Segure bem a garrafa de vinho com uma mão
para que não caia.
a, utilize o cortador de lacres 6:
, sobre a garrafa de vinho
10
Figura 2
3) Rode a garrafa de vinho 360 graus. Poderá
ter de repetir este processo várias vezes, até
poder retirar o lacre da película de vedação.
SKE 6 A1
Page 14

4) Retire o lacre cortado.
5) Segure bem a garrafa de vinho com uma mão
para que esta não caia. Coloque o saca-rolhas
sobre a garrafa de vinho. Pressione-o bem até
que a espiral 7 entre percetivelmente na
rolha.
6) Mantenha depois o botão inferior
mido. A espiral 7 é enroscada para dentro
da rolha e retira-a em seguida do gargalo da
garrafa. Continue a segurar bem a garrafa de
vinho e o saca-rolhas.
7) Solte o botão inferior
rolha estiver completamente fora do gargalo
da garrafa.
8) Retire o saca-rolhas da garrafa e segure-o com
o orifício para baixo. Prima depois o botão
4. A rolha é agora desenroscada do
interior do saca-rolhas.
9) Solte o botão
do saca-rolhas.
NOTA
► O cortador de lacres 6 pode ser utilizado
como supor
coloque o saca-rolhas simplesmente na
cavidade da parte superior do cortador
de lacres 6. O saca-rolhas tem assim um
suporte seguro.
te de mesa para o saca-rolhas:
5 apenas quando a
4 assim que a rolha caia
5 pre-
Limpeza e conservação
ATENÇÃO! DANOS MATERIAIS!
Nunca mergulhe o aparelho em água ou
noutros líquidos!
► Não utilize detergentes abrasivos ou agressi-
v
os. Estes podem danifi car as superfícies!
■ Limpe o corpo do saca-rolhas, bem como o
cor
tador de lacres 6, exclusivamente com um
pano ligeiramente húmido. Em caso de sujidade
persistente, coloque algumas gotas de um
detergente suave no pano húmido. Certifi que-
-se de que, durante a limpeza, não se infi ltra
humidade no saca-rolhas!
Armazenamento
■ Limpe bem o aparelho antes de o guardar.
■ Se o aparelho não for utilizado durante um
longo período de tempo, r
■ Guarde o aparelho limpo num local seco,
limpo e sem pó.
etire as pilhas.
Resolução de erros
O aparelho não funciona.
■ As pilhas estão descarregadas/fracas.
– Substitua as pilhas como descrito no capítulo
"Colocar/substituir pilhas".
■ O aparelho está avariado.
– Contacte a Assistência Técnica.
PT
SKE 6 A1
11
Page 15

Garantia e assistência técnica
Este aparelho tem uma garantia de 3 anos a
contar da data de compra. Este aparelho foi
fabricado com o maior cuidado e testado escrupulosamente antes da sua distribuição.
PT
Guarde o talão de compra como comprovativo
da compra. Caso deseje acionar a garantia, telefone para o seu serviço de Assistência Técnica.
Apenas deste modo pode ser garantido um
envio gratuito do seu produto.
A garantia abrange apenas defeitos de material
ou de fabrico e não inclui danos durante o transporte, peças de desgaste ou danos em peças frágeis,
p.ex. interruptores ou baterias. O produto foi
concebido apenas para uso privado e não para
uso comercial.
A garantia extingue-se em caso de utilização incorreta, uso de força e intervenções que não tenham
sido efetuadas pela nossa Filial de Assistência
Técnica autorizada.
Os seus direitos legais não são limitados por esta
garantia.
O período de garantia não é prolongado pelo
acionamento da mesma. Isto também se aplica a
peças substituídas e reparadas. Danos e defeitos
que possam eventualmente existir no momento da
compra devem ser imediatamente comunicados,
após retirar o aparelho da embalagem, o mais
tardar dois dias após a data de compra. Expirado
o período da garantia, quaisquer reparações
necessárias estão sujeitas a pagamento.
Assistência Portugal
Tel.: 70778 0005 (0,12 EUR/Min.)
E-Mail: kompernass@lidl.pt
IAN 100655
Horário de atendimento da linha de apoio:
Segunda a sexta das 8:00 horas – 20:00 horas
(HEC)
Eliminação
Nunca deposite o aparelho
no lixo doméstico comum.
Este produto está sujeito ao
disposto na Diretiva Europeia
2012/19/EU.
Entregue o aparelho num Ponto Eletrão autorizado
ou num Centro de Receção de REEE do seu município. Respeite os regulamentos atualmente em
vigor. Em caso de dúvida, entre em contacto com
o Centro de Receção de REEE.
As pilhas/baterias não podem
ser depositadas no lixo doméstico.
Todos os consumidores têm a obrigação legal de
entregar as pilhas/baterias num pilhão da sua área
de residência/da sua freguesia ou numa loja que
venda pilhas/baterias.
Esta obrigação serve para garantir que as pilhas/
baterias são eliminadas em conformidade com as
normas ambientais. Entregue as pilhas/baterias
apenas quando estiverem completamente descarregadas.
A embalagem é composta por materiais
recicláveis que podem ser depositados
nos ecopontos locais.
Importador
KOMPERNASS HANDELS GMBH
BURGSTRASSE 21
44867 BOCHUM
GERMANY
www.kompernass.com
12
SKE 6 A1
Page 16

Contents
Introduction . . . . . . . . . . . . . . . . . . . . . . . . . . . . . . . . . . . . . . . . . . . . . . . . . . . . . . . . . .14
Intended use . . . . . . . . . . . . . . . . . . . . . . . . . . . . . . . . . . . . . . . . . . . . . . . . . . . . . . . . .14
Package contents. . . . . . . . . . . . . . . . . . . . . . . . . . . . . . . . . . . . . . . . . . . . . . . . . . . . . .14
Appliance description . . . . . . . . . . . . . . . . . . . . . . . . . . . . . . . . . . . . . . . . . . . . . . . . . .14
Technical data . . . . . . . . . . . . . . . . . . . . . . . . . . . . . . . . . . . . . . . . . . . . . . . . . . . . . . . .14
Safety guidelines . . . . . . . . . . . . . . . . . . . . . . . . . . . . . . . . . . . . . . . . . . . . . . . . . . . . . .15
Inserting/replacing batteries . . . . . . . . . . . . . . . . . . . . . . . . . . . . . . . . . . . . . . . . . . . .16
Handling . . . . . . . . . . . . . . . . . . . . . . . . . . . . . . . . . . . . . . . . . . . . . . . . . . . . . . . . . . . . .16
Cleaning and care . . . . . . . . . . . . . . . . . . . . . . . . . . . . . . . . . . . . . . . . . . . . . . . . . . . . .17
Storage . . . . . . . . . . . . . . . . . . . . . . . . . . . . . . . . . . . . . . . . . . . . . . . . . . . . . . . . . . . . . .17
Troubleshooting . . . . . . . . . . . . . . . . . . . . . . . . . . . . . . . . . . . . . . . . . . . . . . . . . . . . . . .17
Warranty and service . . . . . . . . . . . . . . . . . . . . . . . . . . . . . . . . . . . . . . . . . . . . . . . . . .18
Disposal . . . . . . . . . . . . . . . . . . . . . . . . . . . . . . . . . . . . . . . . . . . . . . . . . . . . . . . . . . . . .18
Importer . . . . . . . . . . . . . . . . . . . . . . . . . . . . . . . . . . . . . . . . . . . . . . . . . . . . . . . . . . . . .18
GB
MT
SKE 6 A1
13
Page 17

Introduction
Congratulations on the purchase of your new
appliance.
You have selected a high-quality product.
The operating instructions are part of this product.
They contain important information on safety, usage
and disposal. Before using the product, familiarise
GB
yourself with all handling and safety guidelines.
Use the product only as described and for the range
MT
of applications specifi ed. Please also pass these
operating instructions on to any future owner(s).
Package contents
▯ Electric Corkscrew
▯ 4 x AA batteries, 1.5 V LR6
▯ Foil cutter (also functions as a stand)
▯ Operating instructions
NOTE
► Check for completeness directly after
unpacking.
► Remove all packaging material.
Intended use
This corkscrew is intended exclusively for the
uncorking of standard commercial wine bottles
(natural or plastic corks).
It is not designed for the uncorking of champagne
bottles.
This corkscrew is not suitable for removing/opening
other types of bottle closures, such as crown corks
or screw caps.
It is exclusively intended for use in private households. Do not use this corkscrew in a commercial
setting.
It is not intended for any other use or use beyond
that specifi ed.
Appliance description
1 Decorative cap
2 Battery compartment
3 Catch
button
4
button
5
6 Foil cutter
7 Corkscrew thread
Technical data
Power supply: 4 x 1,5 V
Power consumption: 2.5 A
Battery type: 1.5 V, Mignon, AA, LR6
14
SKE 6 A1
Page 18

Safety guidelines
WARNING! RISK OF INJURY!
► This appliance may be used by children aged 8 years and above and
by persons with limited physical, sensory or mental capabilities or lack
of experience and knowledge, provided that they are under supervision
or have been told how to use the appliance safely and are aware of the
potential risks.
► Children must not use the appliance as a plaything.
► Cleaning and user maintenance tasks may not be carried out by children
unless they are supervised.
► Take care when handling the tip of the corkscrew and the foil cutter.
WARNING!
Safety information for handling batteries:
► Never throw batteries into the fi re. Do not recharge batteries. There is a risk
of explosion and injury!
► Never open batteries and never solder or weld batteries. There is a risk of
explosion and injury!
GB
MT
► Check the condition of the batteries at regular intervals. Leaking batteries
can cause damage to the appliance.
► If you do not intend to use the appliance for an extended period, remove
the batteries.
► If the batteries have leaked, use protective gloves. Clean the battery com-
partment and the battery contacts with a dry cloth.
► Keep batteries out of the reach of children. Children might put batteries into
their mouth and swallow them. If a battery is swallowed, medical assistance
must be sought immediately.
ATTENTION! MATERIAL DAMAGE!
Never immerse the appliance in water or other fl uids.
SKE 6 A1
15
Page 19

Inserting/replacing batteries
Handling
ATTENTION! MATERIAL DAMAGE!
► When inserting the batteries, observe the
y indicated on the battery compart-
polarit
ment cover!
► Always use Mignon AA, LR6 batteries.
GB
MT
► Always use batteries of the same type.
1)
Remove the decorative cap 1 by turning it so
that the arrow on the decorative cap 1 points
towards the marking "Open". Remove the
decorative cap 1.
2) Open the battery compartment 2 by pulling
the catch 3 towards you and unlatching the
battery compartment 2.
3) Remove the old batteries, if present.
4) Insert the new batteries as per the polarity
diagram provided on the cover of the battery
compartment.
5) Close the battery compartment 2 so that the
catch 3 clicks into place.
6) Replace the decorative cap 1 so that the arrow
on the decorative cap 1 points towards the
marking "Open". Turn the decorative cap 1
so that the arrow points to the marking "Close".
The decorative cap 1 is now fi rmly back in
place on the appliance.
NOTE
► Do not attempt to remove champagne corks
with the cork
the appliance.
screw! These can get caught in
✓
✕
Figure 1
the foil cutter 6 to cut open the foil sleeve
1) Use
encasing the bottle cork:
Place the foil cutter 6 onto the closed bottle of
wine as shown in Figure 2.
2) Press it together fi rmly with your thumb and
forefi nger. Grip the bottle fi rmly with one hand
so that it cannot fall over.
16
Figure 2
3) Turn the bottle of wine through 360 degrees.
You may have to repeat this several times
before you can remove the foil sleeve capsule.
SKE 6 A1
Page 20

4) You can now remove the cut foil sleeve.
5) Grip the bottle fi rmly with one hand so that
it cannot fall over. Place the corkscrew onto
the wine bottle. Press it down fi rmly until the
corkscrew thread 7 perceptibly penetrates
the cork.
6) Then keep the lower
The corkscrew thread 7 is screwed into the
cork and then pulls it out of the bottle neck.
Keep a fi rm grip on the wine bottle and the
corkscrew while doing this.
7) Do not release the lower
cork has been completely removed from the
bottle neck.
8) Remove the corkscrew from the bottle and hold
it with the opening pointing downwards.
Then press the
unscrewed from inside the corkscrew.
9) Release the
falls out of the corkscrew.
NOTE
► You can use the foil cutter 6 as a stand for
the cork
Simply insert the corkscrew into the notch
on the top surface of the foil cutter 6. This
provides the corkscrew with a secure stand.
button 4 as soon as the cork
screw:
button 5 depressed.
button 5 until the
button 4. The cork is now
Cleaning and care
ATTENTION! MATERIAL DAMAGE!
Never immerse the appliance in water or
other fl uids!
► Do not use abrasive or aggressive cleaning
materials. These may damage the sur
of your appliance.
■ Clean the housing of the corkscrew and the foil
cutter 6 only with a slightly damp cloth. In case
of stubborn soiling, pour a fe
detergent onto the damp cloth. Ensure that no
moisture enters the corkscrew during cleaning!
w drops of a mild
faces
Storage
■ Always clean the appliance thoroughly before
storing.
■ If you do not intend to use the appliance for an
xtended period of time, remove the batteries.
e
■ Store the cleaned appliance in a clean, dust-free
y place.
and dr
Troubleshooting
The appliance is not working.
■ The batteries are discharged/weak.
– Insert new batteries as described in the
section "Inser
■ The appliance is defective.
– Contact Customer Service.
ting/replacing batteries".
GB
MT
SKE 6 A1
17
Page 21

Warranty and service
You are provided a 3-year warranty on this
appliance, valid from the date of purchase.
This appliance has been manufactured with care
and inspected meticulously prior to delivery.
Please retain your receipt as proof of purchase.
In the event of a warranty claim, please contact
your Customer Service unit by telephone. This is the
GB
only way to guarantee free return of your goods.
MT
The warranty only covers claims for material and
manufacturing defects, not for damage sustained
during carriage, components subject to wear and
tear or damage to fragile components such as
switches or batteries. This appliance is intended
solely for private use and not for commercial
purposes.
The warranty shall be deemed void in the instance
of misuse or improper handling, use of force and
interventions which were not carried out by one
of our authorised Service centres.
Your statutory rights are not restricted by this warranty.
The warranty period is not prolonged by repairs
eff ected under the warranty. This also applies to
replaced and repaired components. Any damage
and defects present at the time of purchase must be
reported immediately after unpacking, but no later
than two days after the date of purchase. Repairs
eff ected after expiry of the warranty period shall
be subject to charge.
Service Great Britain
Tel.: 0871 5000 720 (£ 0.10/Min.)
E-Mail: kompernass@lidl.co.uk
IAN 100655
Service Malta
Tel.: 80062230
E-Mail: kompernass@lidl.com.mt
IAN 100655
Hotline availability:
Monday to Friday 08:00 - 20:00 (CET)
Disposal
Under no circumstances should
the appliance be disposed of
in standard household waste.
This product is subject to
the provisions of European
Directive 2012/19/EU.
Dispose of the appliance via an approved waste
disposal company or your municipal waste disposal
facility. Please observe applicable regulations.
Please contact your waste disposal facility if you
are in any doubt.
Used batteries must not be
disposed of in household
waste.
Consumers are legally obligated to dispose of batteries at a collection point in their community / city
district or at a retail store.
The purpose of this obligation is to ensure that
batteries are disposed of in an environmentally
congruent manner. Only dispose of batteries when
they are fully discharged.
The packaging is made of environmen-
tally friendly materials which you can
dispose of at local recycling centres.
Importer
KOMPERNASS HANDELS GMBH
BURGSTRASSE 21
44867 BOCHUM
GERMANY
www.kompernass.com
18
SKE 6 A1
Page 22

Inhaltsverzeichnis
Einleitung . . . . . . . . . . . . . . . . . . . . . . . . . . . . . . . . . . . . . . . . . . . . . . . . . . . . . . . . . . . .20
Bestimmungsgemäßer Gebrauch . . . . . . . . . . . . . . . . . . . . . . . . . . . . . . . . . . . . . . . . .20
Lieferumfang . . . . . . . . . . . . . . . . . . . . . . . . . . . . . . . . . . . . . . . . . . . . . . . . . . . . . . . . .20
Gerätebeschreibung . . . . . . . . . . . . . . . . . . . . . . . . . . . . . . . . . . . . . . . . . . . . . . . . . . .20
Technische Daten . . . . . . . . . . . . . . . . . . . . . . . . . . . . . . . . . . . . . . . . . . . . . . . . . . . . . .20
Sicherheitshinweise . . . . . . . . . . . . . . . . . . . . . . . . . . . . . . . . . . . . . . . . . . . . . . . . . . . .21
Batterien einlegen / wechseln . . . . . . . . . . . . . . . . . . . . . . . . . . . . . . . . . . . . . . . . . . . .22
Bedienung . . . . . . . . . . . . . . . . . . . . . . . . . . . . . . . . . . . . . . . . . . . . . . . . . . . . . . . . . . .22
Reinigung und Pfl ege . . . . . . . . . . . . . . . . . . . . . . . . . . . . . . . . . . . . . . . . . . . . . . . . . .23
Aufbewahrung . . . . . . . . . . . . . . . . . . . . . . . . . . . . . . . . . . . . . . . . . . . . . . . . . . . . . . .23
Fehler beheben . . . . . . . . . . . . . . . . . . . . . . . . . . . . . . . . . . . . . . . . . . . . . . . . . . . . . . .23
Garantie und Service . . . . . . . . . . . . . . . . . . . . . . . . . . . . . . . . . . . . . . . . . . . . . . . . . .24
Entsorgung . . . . . . . . . . . . . . . . . . . . . . . . . . . . . . . . . . . . . . . . . . . . . . . . . . . . . . . . . . .24
Importeur . . . . . . . . . . . . . . . . . . . . . . . . . . . . . . . . . . . . . . . . . . . . . . . . . . . . . . . . . . . .24
DE
AT
CH
SKE 6 A1
19
Page 23

Einleitung
Herzlichen Glückwunsch zum Kauf Ihres neuen
Gerätes.
Sie haben sich damit für ein hochwertiges Produkt
entschieden. Die Bedienungsanleitung ist Bestandteil dieses Produkts. Sie enthält wichtige Hinweise
für Sicherheit, Gebrauch und Entsorgung. Machen
Sie sich vor der Benutzung des Produkts mit allen
Bedien- und Sicherheitshinweisen vertraut. Benutzen Sie das Produkt nur wie beschrieben und für
DE
die angegebenen Einsatzbereiche. Händigen Sie
AT
alle Unterlagen bei Weitergabe des Produkts an
CH
Dritte mit aus.
Bestimmungsgemäßer
Gebrauch
Der Korkenzieher ist ausschließlich zum Entkorken
handelsüblicher Weinfl aschen (Natur- oder Plastikkorken) bestimmt.
Er ist nicht zum Entkorken von Sektkorken bestimmt.
Der Korkenzieher ist nicht zum Entfernen/Öff nen
anderer Flaschenverschlussarten wie z.B. Kronkorken
oder Schraubverschlüssen geeignet.
Er ist ausschließlich für die Nutzung in privaten
Haushalten bestimmt. Nutzen Sie ihn nicht gewerblich.
Eine andere oder darüber hinausgehende Benutzung gilt als nicht bestimmungsgemäß.
Lieferumfang
▯ Elektrischer Korkenzieher
▯ 4 x AA-Batterie, 1,5 V LR6
▯ Kapselschneider (gleichzeitig Standfuß)
▯ Bedienungsanleitung
HINWEIS
► Überprüfen Sie direkt nach dem Auspacken
alles auf V
► Entfernen Sie alles Verpackungsmaterial.
ollständigkeit.
Gerätebeschreibung
1 Zierkappe
2 Batteriefach
3 Verriegelung
4 Taste
5 Taste
6 Kapselschneider
7 Spirale
Technische Daten
Spannungsversorgung: 4 x 1,5 V
Stromaufnahme: 2,5 A
Batterietyp: 1,5 V, Mignon, AA, LR6
20
SKE 6 A1
Page 24

Sicherheitshinweise
WARNUNG! VERLETZUNGSGEFAHR!
► Dieses Gerät kann von Kindern ab 8 Jahren und darüber sowie von Perso-
nen mit verringerten physischen, sensorischen oder mentalen Fähigkeiten
oder Mangel an Erfahrung und Wissen benutzt werden, wenn sie beaufsichtigt oder bezüglich des sicheren Gebrauchs des Gerätes unterwiesen
wurden und die daraus resultierenden Gefahren verstehen.
► Kinder dürfen nicht mit dem Gerät spielen.
► Reinigung und Benutzer-Wartung dürfen nicht von Kindern ohne Beaufsich-
tigung durchgeführt werden.
► Seien Sie vorsichtig im Umgang mit der Spitze des Korkenziehers und dem
Kapselschneider.
WARNUNG!
Sicherheitshinweise für den Umgang mit Batterien:
► Werfen Sie keine Batterien ins Feuer. Laden Sie Batterien nicht wieder auf.
Es besteht Explosions- und Verletzungsgefahr!
► Öff nen Sie die Batterien niemals, löten oder schweißen Sie nie an Batterien.
Es besteht Explosions- und Verletzungsgefahr!
DE
AT
CH
► Überprüfen Sie regelmäßig die Batterien. Auslaufende Batterien können
Beschädigungen am Gerät verursachen.
► Wenn Sie ein Gerät längere Zeit nicht benutzen, entnehmen Sie die Batterien.
► Bei ausgelaufenen Batterien ziehen Sie Schutzhandschuhe an. Reinigen Sie
das Batteriefach und die Batteriekontakte mit einem trockenen Tuch.
► Batterien dürfen nicht in die Hände von Kindern gelangen. Kinder könnten Bat-
terien in den Mund nehmen und verschlucken. Sollte eine Batterie verschluckt
worden sein, muss sofort medizinische Hilfe in Anspruch genommen werden.
ACHTUNG! SACHSCHADEN!
Sie dürfen das Gerät keinesfalls in Wasser oder andere Flüssigkeiten
tauchen.
SKE 6 A1
21
Page 25

Batterien einlegen / wechseln
Bedienung
ACHTUNG! SACHSCHADEN!
► Beachten Sie beim Einlegen der Batterien
immer die auf dem Batter
angegebene Polarität!
► Benutzen Sie immer Batterien des Typs
Mignon AA
► Benutzen Sie immer Batterien des gleichen Typs.
1)
DE
AT
CH
Entfernen Sie die Zierkappe 1, indem Sie diese
so drehen, dass der Pfeil auf der Zierkappe 1
auf die Beschriftung „Open“ am Korkenzieher
weist. Heben Sie dann die Zierkappe 1 ab.
2) Öff nen Sie das Batteriefach 2, indem Sie
die Verriegelung 3 zu sich ziehen und das
Batteriefach 2 entriegeln.
3) Entnehmen Sie, falls bereits eingelegt, die alten
Batterien.
4) Legen Sie die neuen Batterien gemäß der auf
dem Batteriefachdeckel angegebenen Polarität
ein.
5) Schließen Sie das Batteriefach 2, so dass die
Verriegelung 3 einrastet.
6) Setzen Sie die Zierkappe 1 so auf das Gerät,
dass der Pfeil auf der Zierkappe 1 auf die
Beschriftung „Open“ weist. Drehen Sie dann
die Zierkappe 1, so dass der Pfeil auf die
Beschriftung „Close“ weist. Die Zierkappe 1
sitzt nun wieder fest am Gerät.
, LR6.
iefachdeckel
HINWEIS
► Entfernen Sie keine Sektkorken mit Hilfe
orkenziehers! Diese können im Gerät
des K
verhaken.
✓
✕
Abbildung 1
1) Um die Folienmanschette über dem Flaschenkorken aufzu
Kapselschneider
Setzen Sie den Kapselschneider 6 wie in
Abbildung 2
Weinfl asche auf.
2) Drücken Sie ihn fest mit Daumen und Zeigefi nger
zusammen. Umgreifen Sie die Weinfl asche fest
mit einer Hand, damit sie nicht umfallen kann.
schneiden, benutzen Sie den
6
:
gezeigt auf die verschlossene
22
Abbildung 2
3) Drehen Sie die Weinfl asche um 360 Grad.
Eventuell müssen Sie dies mehrmals wiederholen, bis Sie die Kapsel der Folienmanschette
abnehmen können.
SKE 6 A1
Page 26

4) Nehmen Sie die abgeschnittene Folienmanschette ab.
5) Umgreifen Sie die Weinfl asche fest mit einer
Hand, damit diese nicht umfallen kann. Setzen
Sie den Korkenzieher auf die Weinfl asche auf.
Drücken Sie ihn fest auf, bis die Spirale 7
spürbar in den Korken eindringt.
6) Halten Sie dann die untere Taste
gedrückt. Die Spirale 7 wird in den Korken
hineingedreht und zieht ihn anschließend aus
dem Flaschenhals. Halten Sie Weinfl asche und
Korkenzieher dabei weiter fest umgriff en.
7) Lassen Sie die untere Taste
der Korken vollständig aus dem Flaschenhals
herausgezogen ist.
8) Nehmen Sie den Korkenzieher von der Flasche
herunter und halten Sie ihn mit der Öff nung nach
unten. Drücken Sie dann auf die Taste
Der Korken wird nun aus dem Inneren des
Korkenziehers herausgedreht.
9) Lassen Sie die Taste
Korken aus dem Korkenzieher herausfällt.
HINWEIS
► Den Kapselschneider 6 k
Standfuß für den Korkenzieher verwenden:
Stecken Sie den Korkenzieher einfach in die
Aussparung auf der Oberseite des Kapselschneiders 6. So hat der Korkenzieher einen
sichereren Stand.
4 los, sobald der
önnen Sie als
5
5 erst los, wenn
4.
Reinigung und Pfl ege
ACHTUNG! SACHSCHADEN!
Tauchen Sie das Gerät niemals in Wasser
oder andere Flüssigkeiten!
► Verwenden Sie keine scheuernden oder
aggr
essiven Reinigungsmittel. Diese können
die Oberfl ächen beschädigen!
■ Reinigen Sie die Gehäuse des Korkenziehers
so
wie den Kapselschneider 6 ausschließlich
mit einem leicht feuchten Tuch. Geben Sie bei
hartnäckigen Verschmutzungen einige Tropfen
eines milden Spülmittels auf das feuchte Tuch.
Achten Sie darauf, dass bei der Reinigung keine
Feuchtigkeit in den Korkenzieher gelangt!
Aufbewahrung
■ Reinigen Sie das Gerät vor dem Verstauen
gründlich.
■ Wenn Sie das Gerät längere Zeit nicht benutzen,
entfernen Sie die Batter
■ Bewahren Sie das gereinigte Gerät an einem
en, staubfreien und trockenen Ort auf.
sauber
ien.
Fehler beheben
Das Gerät funktioniert nicht.
■ Die Batterien sind leer/schwach.
– Wechseln Sie die Batterien wie im Kapitel
„Batterien einlegen/w
■ Das Gerät ist defekt.
– Wenden Sie sich an den Service.
echseln“ beschrieben.
DE
AT
CH
SKE 6 A1
23
Page 27

Garantie und Service
Sie erhalten auf dieses Gerät 3 Jahre Garantie
ab Kaufdatum. Das Gerät wurde sorgfältig
produziert und vor Anlieferung gewissenhaft
geprüft. Bitte bewahren Sie den Kassenbon als
Nachweis für den Kauf auf. Bitte setzen Sie sich
im Garantiefall mit Ihrer Servicestelle telefonisch
in Verbindung. Nur so kann eine kostenlose
Einsendung Ihrer Ware gewährleistet werden.
Die Garantieleistung gilt nur für Material- oder
Fabrikationsfehler, nicht aber für Transportschäden,
DE
Verschleißteile oder für Beschädigungen an zerbrech-
AT
lichen Teilen, z. B. Schalter oder Akkus. Das Produkt
CH
ist lediglich für den privaten und nicht für den
gewerblichen Gebrauch bestimmt.
Bei missbräuchlicher und unsachgemäßer Behandlung, Gewaltanwendung und bei Eingriff en, die
nicht von unserer autorisierten Service-Niederlassung vorgenommen wurden, erlischt die Garantie.
Ihre gesetzlichen Rechte werden durch diese Garantie nicht eingeschränkt.
Die Garantiezeit wird durch die Gewährleistung
nicht verlängert. Dies gilt auch für ersetzte und reparierte Teile. Eventuell schon beim Kauf vorhandene
Schäden und Mängel müssen sofort nach dem
Auspacken gemeldet werden, spätestens aber zwei
Tage nach Kaufdatum. Nach Ablauf der Garantiezeit anfallende Reparaturen sind kostenpfl ichtig.
Service Deutschland
Tel.: 0800 5435 111 (Kostenfrei aus dem
dt. Festnetz/Mobilfunknetz)
E-Mail: kompernass@lidl.de
IAN 100655
Service Österreich
Tel.: 0820 201 222 (0,15 EUR/Min.)
E-Mail: kompernass@lidl.at
IAN 100655
Entsorgung
Werfen Sie das Gerät kei-
nesfalls in den normalen
Hausmüll. Dieses Produkt
unterliegt der europäischen
Richtlinie 2012/19/EU.
Entsorgen Sie das Gerät über einen zugelassenen
Entsorgungsbetrieb oder über Ihre kommunale
Entsorgungseinrichtung. Beachten Sie die aktuell
geltenden Vorschriften. Setzen Sie sich im Zweifelsfall mit Ihrer Entsorgungseinrichtung in Verbindung.
Batterien/Akkus dürfen nicht
im Hausmüll entsorgt werden.
Jeder Verbraucher ist gesetzlich verpfl ichtet, Batterien/Akkus bei einer Sammelstelle seiner Gemeinde /
seines Stadtteils oder im Handel abzugeben.
Diese Verpfl ichtung dient dazu, dass Batterien/Akkus
einer umweltschonenden Entsorgung zugeführt
werden können. Geben Sie Batterien/Akkus nur im
entladenen Zustand zurück.
Die Verpackung besteht aus umweltfreundli-
chen Materialien, die Sie über die örtlichen
Recyclingstellen entsorgen können.
Importeur
KOMPERNASS HANDELS GMBH
BURGSTRASSE 21
44867 BOCHUM
GERMANY
www.kompernass.com
Service Schweiz
Tel.: 0842 665566 (0,08 CHF/Min.,
Mobilfunk max. 0,40 CHF/Min.)
E-Mail: kompernass@lidl.ch
IAN 100655
Erreichbarkeit Hotline: Montag bis Freitag von
8:00 Uhr – 20:00 Uhr (MEZ)
24
SKE 6 A1
Page 28

KOMPERNASS HANDELS GMBH
BURGSTRASSE 21
44867 BOCHUM
DEUTSCHLAND / GERMANY
www.kompernass.com
Estado de las informaciones · Estado das informações
Last Information Update · Stand der Informationen:
06/ 2014 · Ident.-No.: SKE6A1-042014-2
IAN 100655
5
 Loading...