

Page 1
HAIR & BEARD TRIMMER SHBS 5 A1
HAIR & BEARD TRIMMER
Operating instructions
HAJ- ÉS SZAKÁLLVÁGÓ
Használati utasítás
ZASTŘIHOVAČ VLASŮ A VOUSŮ
Návod k obsluze
HAAR- UND BARTSCHNEIDER
Bedienungsanleitung
IAN 96126
MASZYNKA DO STRZYŻENIA
WŁOSÓW I BRODY
Instrukcja obsługi
APARAT ZA STRIŽENJE LAS IN
BRADE
Navodila za uporabo
STROJČEK NA STRIHANIE VLASOV
A BRADY
Návod na obsluhu
4
Page 2
Before reading, unfold the page containing the illustrations and familiarise yourself with all functions of the device.
Przed przeczytaniem proszę rozłożyć stronę z ilustracjami, a następnie proszę zapoznać się z wszystkimi
funkcjami urządzenia.
Olvasás előtt kattintson az ábrát tartalmazó oldalra és végezetül ismerje meg a készülék mindegyik
funkcióját.
Pred branjem odprite stran s slikami in se nato seznanite z vsemi funkcijami naprave.
Před čtením si otevřete stranu s obrázky a potom se seznamte se všemi funkcemi přístroje.
Pred čítaním si odklopte stranu s obrázkami a potom sa oboznámte so všetkými funkciami prístroja.
Klappen Sie vor dem Lesen die Seite mit den Abbildungen aus und machen Sie sich anschließend mit allen Funktionen des Gerätes vertraut.
GB Operating instructions Page 1
PL Instrukcja obsługi Strona 19
HU Használati utasítás Oldal 37
SI Navodila za uporabo Stran 55
CZ Návod k obsluze Strana 73
SK Návod na obsluhu Strana 91
DE / AT / CH Bedienungsanleitung Seite 109
Page 3
A
C
B
D E F
Page 4
Contents
Introduction . . . . . . . . . . . . . . . . . . . . . 2
Information concerning these operating
instructions . . . . . . . . . . . . . . . . . . . . . . . . . . . . 2
Copyright . . . . . . . . . . . . . . . . . . . . . . . . . . . . . 2
Limitation of liability . . . . . . . . . . . . . . . . . . . . . 2
Intended use . . . . . . . . . . . . . . . . . . . . . . . . . . 2
Warnings used . . . . . . . . . . . . . . . . . . . . . . . . . 3
Safety. . . . . . . . . . . . . . . . . . . . . . . . . . 4
Basic safety instructions . . . . . . . . . . . . . . . . . . 4
Package contents . . . . . . . . . . . . . . . . 7
Spare Parts . . . . . . . . . . . . . . . . . . . . . . . . . . . 8
Disposal of packaging . . . . . . . . . . . . . . . . . . . 8
Appliance description . . . . . . . . . . . . . 8
Before fi rst use . . . . . . . . . . . . . . . . . . 9
Charging the batteries . . . . . . . . . . . . . . . . . . . 9
Operation with the mains power adapter . . . . 9
Oiling the cutting attachments . . . . . . . . . . . . 10
Handling and use . . . . . . . . . . . . . . . 10
Attaching/changing the cutter attachments . . 10
Attaching/changing the comb attachments . . 10
Hair trimmer attachment . . . . . . . . . . . . . . . . 11
Beard trimmer attachment . . . . . . . . . . . . . . . 12
Precision trimmer attachment . . . . . . . . . . . . . 12
Ear/nose hair trimmer attachment . . . . . . . . . 12
Shaver attachment . . . . . . . . . . . . . . . . . . . . . 12
Cleaning and care . . . . . . . . . . . . . . . 13
GB
Cleaning the shaver attachment . . . . . . . . . . 14
Cleaning the ear/nose hair trimmer
attachment . . . . . . . . . . . . . . . . . . . . . . . . . . . 14
Disposal . . . . . . . . . . . . . . . . . . . . . . . 15
Disposal of the appliance . . . . . . . . . . . . . . . 15
Disposal of batteries . . . . . . . . . . . . . . . . . . . 16
Appendix . . . . . . . . . . . . . . . . . . . . . . 17
Technical details. . . . . . . . . . . . . . . . . . . . . . . 17
Notes on the Declaration of Conformity . . . . 17
Warranty . . . . . . . . . . . . . . . . . . . . . . . . . . . . 17
Service . . . . . . . . . . . . . . . . . . . . . . . . . . . . . . 18
Importer . . . . . . . . . . . . . . . . . . . . . . . . . . . . . 18
SHBS 5 A1
1
Page 5
GB
Introduction
Information concerning these operating instructions
Congratulations on the purchase of your new appliance.
You have selected a high-quality product. The operating instructions are a constituent of this product.
They contain important information about safety, use and disposal. Before using the product,
familiarise yourself with all operating and safety instructions. Use this product only as described
and only for the specifi ed areas of application. Retain these instructions for future reference.
Please also pass these operating instructions on to any future owner(s).
Copyright
This documentation is subject to copyright protection.
Any copying or reproduction, including extracts thereof, and the reproduction of images (even in
a modifi ed state), is only permitted with the written authorisation of the manufacturer.
Limitation of liability
All technical information, data and information for installation, connection and operation contained in these operating instructions corresponds to the latest state at the time of printing and
takes into account our previous experience and our best available knowledge.
No claims can be derived from the details, illustrations and descriptions in these instructions.
The manufacturer assumes no responsibility for damage caused by failure to observe these
instructions, improper use, incompetent repairs, making unauthorised modifi cations or for using
unapproved replacement parts.
Intended use
This appliance is intended for use only in private environments, not for commercial purposes.
This appliance is only intended for cutting natural hair. It may only be used with human hair,
not with artifi cial or animal hair.
It is not intended for any other use or for uses extending beyond those stated. Claims of any
kind for damage arising as a result of non-intended use will not be accepted. The user is the
sole bearer of the risk.
2
SHBS 5 A1
Page 6
Warnings used
The following warnings are used in these operating instructions:
DANGER
A warning at this risk level indicates an imminently hazardous situation.
If the hazardous situation is not avoided, it could lead to death or serious physical injury.
► Follow the instructions in this warning to avoid a fatality or serious personal injury.
WARNING
A warning of this risk level indicates a potentially hazardous situation.
Failure to avoid this hazardous situation could result in physical injury.
► Follow the instructions in this warning to prevent physical injury.
CAUTION
A warning of this risk level indicates potential damage to property.
Failure to avoid this situation could result in damage to property.
► Follow the instructions in this warning to prevent damage to property.
NOTE
A note indicates additional information that will assist you in handling the appliance.
►
GB
SHBS 5 A1
3
Page 7

GB
Safety
This section provides you with important safety information regarding
handling of the appliance. The appliance complies with the statutory
safety regulations. Incorrect usage can lead to personal injury and
property damage.
Basic safety instructions
For safe handling of the appliance, follow the safety information below:
■ This appliance may be used by children aged 8 over and by persons
with reduced physical, sensory or mental capabilities or lack of experience and knowledge, provided that they are under supervision or
have been told how to use the appliance safely and are aware of the
potential risks. Children must not play with the appliance. Cleaning and
user maintenance tasks must not be carried out by children unless they
are supervised.
■ Before use, check the appliance for externally visible damage. Never
operate an appliance that is damaged. There is a risk of electrocution.
■ The appliance may no longer be used if there is any damage to the cable,
to the mains power adapter, the housing or any other components.
■ All repairs must be carried out by authorised specialist companies or
the Customer Service department. Improper repairs can pose signifi cant
risks to the user. Warranty claims also become void.
■ Do not use the appliance with a defective cutter attachment or defective
comb attachment, since these may have sharp edges. There is a risk of
personal injury!
4
SHBS 5 A1
Page 8
■ Defective components must always be replaced with original replacement
parts. Compliance with safety requirements can only be guaranteed if
original replacement parts are used.
■ Never operate the appliance unsupervised, and only in accordance
with the information on the nameplate.
■ Use only the mains power adapter provided when using mains power.
■ Remove the mains power adapter from the wall socket
- if a defect occurs,
- before cleaning the appliance,
- if you do not intend using the appliance for long periods,
- after every use.
When doing so, pull the mains power adapter itself and not the cable.
■ ATTENTION! Keep the appliance dry.
■ Do not use the appliance while taking a bath. Risk of fatal electrical
shocks!
■ Never submerge the appliance or the cable with mains power adapter
in water or other liquids.
■ If the appliance falls into the water, it is imperative that you pull the
mains power adapter out of the power socket before you reach into
the water.
GB
SHBS 5 A1
■ Never touch the mains power adapter with wet hands, especially when
plugging it in or unplugging it. Risk of fatal electrical shocks!
5
Page 9

GB
■ The installation of a residual current circuit breaker with a rated tripping
current of no more than 30 mA off ers further protection from electric
shocks. Have the installation carried out only by a qualifi ed electrician.
■ Check the mains power adapter and the hair and beard trimmer regu-
larly for any possible mechanical defects.
■ Ensure that the cable does not get jammed in cupboard doors or pulled
over hot surfaces. If this occurs, the cable insulation may be damaged.
■ Only plug the mains power adapter into an easily reachable power
socket so that you can pull the mains power adapter out of the power
socket quickly in an emergency.
■ Do not cover the mains power adapter to avoid impermissible warming.
6
SHBS 5 A1
Page 10
Package contents
This appliance is supplied with the following components as standard:
▯ Hair and beard trimmer
▯ Charging station
▯ Mains power adapter
▯ Hair trimmer attachment
▯ Beard trimmer attachment
▯ Precision trimmer attachment
▯ Ear/nose hair trimmer attachment
▯ Shaver attachment
▯ Comb attachment for the hair trimmer attachment
▯ Comb attachment for the beard trimmer attachment
▯ Cleaning brush
▯ Scissors
▯ Comb
▯ Blade oil
▯ Storage pouch
▯ This operating manual
NOTE
Check the delivery for completeness and for signs of visible damage.
►
► If the delivery is incomplete, or is damaged due to defective packaging or through transpor-
tation, contact the Service Hotline (see chapter Service).
♦ Remove all appliance parts from the carton.
♦ Remove all packaging materials from the appliance.
GB
SHBS 5 A1
DANGER
► Packaging material must not be used as a plaything. There is a risk of suff ocation.
7
Page 11
GB
Spare Parts
You can also contact the Service Hotline if you need replacement parts (see chapter
Service).
Disposal of packaging
The packaging protects the appliance from transport damage.
Returning the packaging to the material cycle conserves raw materials and reduces the amount of
waste that is generated. Dispose of packaging material which is no longer needed in accordance
with applicable local regulations.
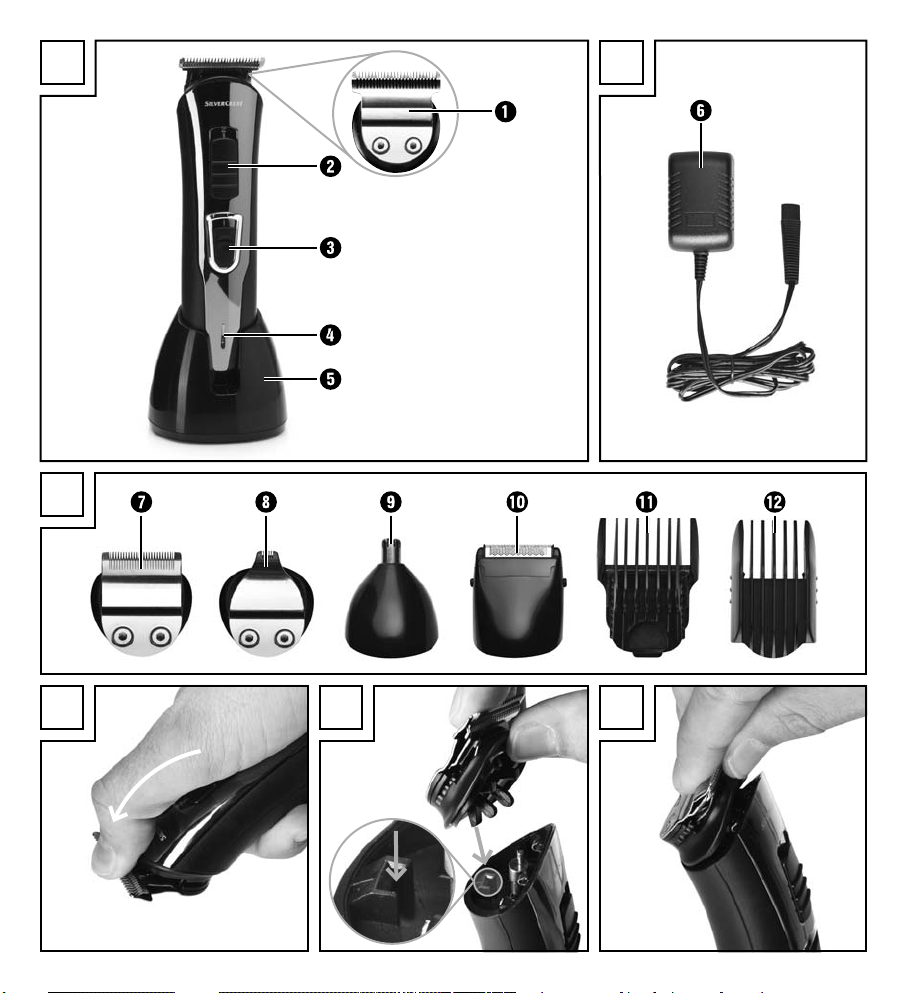
Appliance description
Figure A:
Hair trimmer attachment
2
Slide switch for cut length fi ne adjustment
3
On/off switch
4
Charging indicator lamp
5
Charging station/holder with connecting socket for mains power adapter
Figure B:
6
Mains power adapter
Figure C:
7
Beard trimmer attachment
8
Precision trimmer attachment
9
Ear/nose hair trimmer attachment
10
Shaver attachment
11
Comb attachment for the hair trimmer attachment
12
Comb attachment for the beard trimmer attachment
8
SHBS 5 A1
Page 12
Before fi rst use
The hair and beard trimmer can be used as a battery-powered or mains-powered appliance.
Charging the batteries
The battery for the hair and beard trimmer should be charged for at least 90 minutes before fi rst use.
♦ Connect the mains power adapter cable 6 to the hair and beard trimmer charging station 5.
♦ Avoid damaging the appliance! Ensure that the appliance is switched off before charging the
battery.
♦ Plug the mains power adapter 6 (wide-range voltage 100–240 V) in a power socket complying
with the appliance specifi cations.
♦ The charging progress is indicated by the charging indicator lamp 4.
– charging indicator lamp fl ashes red: the battery is discharged
– charging indicator lamp illuminates red: battery is being charged
– charging indicator lamp illuminates green: battery is fully charged
♦ Once the battery is fully charged, you can use the appliance for around 60 minutes without
connecting it to the power supply.
Operation with the mains power adapter
If your hair and beard trimmer stops working during shaving due to a discharged or weak battery,
you can continue shaving by plugging in the mains power adapter
♦ Plug the mains power adapter plug 6 into the socket on the underside of the hair and beard
trimmer.
♦ To avoid injuries and damage to the appliance, always switch the appliance off before con-
necting it to the power supply.
♦ Plug the mains power adapter 6 (wide-range voltage 100–240 V) in a power socket complying
with the appliance specifi cations.
♦ After 1–2 seconds, you can switch the appliance on by pressing the ON/OFF switch 3.
If the appliance does not start immediately, switch it off again and wait around 1 minute
before switching it on again.
♦ If you want to charge the battery without using the charging station 5 in this manner you can
only do this when the appliance is switched off .
GB
6
.
SHBS 5 A1
9
Page 13
GB
Oiling the cutting attachments
We recommend that you oil the hair trimmer , beard trimmer 7 and precision trimmer attachments 8 before fi rst use and after cleaning to ensure full mobility.
♦ To do this, simply apply a couple of drops of blade oil (accessory) between the blades, and
then distribute it evenly.
♦ Wipe off any access oil with a soft cloth. Use only non-corrosive oils such as sewing machine oil.
Handling and use
Attaching/changing the cutter attachments
WARNING
► Switch off the appliance before attaching or changing the cutter attachments.
There is a risk of personal injury!
♦ Press your thumbs forwards against the cutter attachment to release it from its holder
(see Fig. D). Then remove the cutter attachment from the appliance.
♦ To attach the cutter attachment, insert the lower plug-in tab into the opening on the appliance
(see Fig. E).
♦ Then press the upper part of the cutter attachment onto the appliance until it audibly clicks into
place and is fi rmly seated (see Fig. F).
Attaching/changing the comb attachments
Comb attachment for the hair trimmer attachment
The comb attachment 11 has settings for 6 diff erent cut lengths (13 mm/15 mm/17 mm/
19 mm/21 mm/23 mm).
♦ Attach the comb attachment 11 from the front onto the hair trimmer attachment and press
the rear end fi rmly until it clicks into place.
♦ To remove the comb attachment 11, release the lower end and pull it forwards off the appliance.
10
SHBS 5 A1
Page 14
Comb attachment for the beard trimmer attachment
The comb attachment 12 has settings for 6 diff erent cut lengths (4 mm/6 mm/9 mm/12 mm/
15 mm/18 mm).
♦ Attach the comb attachment 12 from the front onto the beard trimmer attachment 7 and press
it down.
♦ To remove the comb attachment 12 press it forwards off the appliance.
Hair trimmer attachment
NOTE
Any hair to be cut should be clean and dry.
►
► Brush the hair carefully through to remove any knots.
► Place a hairdressing cape or cloth around your neck and throat to avoid cut hair ends
falling inside your collar.
► Start by setting the comb attachment 11 to a longer length and reduce this in stages while
cutting the hair.
► Please note that the corresponding cut length will only be achieved if the slide switch 2
is set to position 3 and the appliance is being held at right angles to the skin surface.
♦ Switch the hair and beard trimmer on by pressing the ON/OFF switch 3.
♦ Run the hair and beard trimmer slowly through your hair.
♦ Hold the appliance so that the comb attachment 11 is as fl at as possible.
♦ Always cut from your neck towards the top of your head, or from your forehead and temples
upwards towards the middle of your head.
♦ Use the hair trimmer attachment without the comb attachment 11 to cut the hair very short.
♦ You can use the slide switch 2 to fi nely adjust the cut length in three steps.
GB
SHBS 5 A1
11
Page 15
GB
Beard trimmer attachment
NOTE
Comb the beard in the direction of growth to remove any knots.
►
► Start by setting the comb attachment 12 to a longer length and reduce this in stages while
cutting the hair.
► Please note that the corresponding cut length will only be achieved if the slide switch 2 is
set to position 3 and the appliance is being held at right angles to the skin surface.
♦ Cut the beard against the beard growth direction (upwards from chin to ear). Trim fi rst one
side and then other.
♦ Use the beard trimmer attachment 7 without the comb attachment 12 to cut the beard very
short or to add shape or trim a moustache.
♦ You can use the slide switch 2 to fi nely adjust the cut length in three steps.
Precision trimmer attachment
♦ Use the precision trimmer attachment 8 to add shape to a moustache, mutton chops, sideburns
or eyebrows.
♦ Lay the edge of the precision trimmer attachment 8 at the required level of the hair growth
and move the appliance downwards.
Ear/nose hair trimmer attachment
♦ Use the ear/nose hair trimmer 9 if you want to remove ear or nose hair.
♦ Guide the metal end of the ear/nose hair trimmer attachment 9 slowly into the nostril or ear.
♦ Move the appliance slowly in a circular motion to cut the hair.
Shaver attachment
♦ Use the shaver attachment 10 for a dry shave.
♦ Hold the appliance at right angles to the skin surface and move it gently over your face.
♦ Shave in the opposite direction to the beard growth. In complicated areas, such as the chin,
pull the skin tight to achieve a better result.
12
SHBS 5 A1
Page 16
Cleaning and care
DANGER
Danger to life due to electric shock!
► Pull the mains power adapter 6 out of the power socket before cleaning the appliance.
► Never touch the mains power adapter 6 with wet hands, especially when plugging it in or
unplugging it.
► Always keep the mains power adapter 6 and the cable dry.
CAUTION
Possible damage to the appliance.
► The hair and beard trimmer may never be immersed in water or other liquids for cleaning,
since the appliance is not watertight. If this is done, live parts (batteries) can be damaged.
► Do not use aggressive or abrasive cleaning agents, as these can damage the upper surfaces.
► Clean the housing only with a soft damp cloth and a mild detergent.
♦ Switch the hair and beard trimmer off by pressing the ON/OFF switch 3.
♦ Disconnect the cable from the appliance and pull the mains power adapter 6 out of the
power socket.
♦ If any comb attachment (11 or 12) is attached, remove this fi rst.
♦ Wash the comb attachment (11 or 12) if required under running water.
♦ Dry the comb attachment (11 or 12) thoroughly afterwards.
♦ Press your thumbs against the cutter attachment to release it from its holder (see Fig. D).
♦ Use the cleaning brush supplied to remove any hair residue from the cutter attachment.
♦ Once you have completed cleaning, plug the cutter attachment plug-in tab back into the
mounting opening on the appliance (see Fig. E).
♦ Push the cutter attachment back onto the appliance by pressing lightly from above (see Fig. F).
GB
SHBS 5 A1
NOTE
In order to reduce friction, occasionally apply a couple of drops of blade oil (accessory)
►
between the blades, and then distribute it evenly. You can also use any non-corrosive oil
(e.g. sewing machine oil). Wipe off any access oil with a soft cloth.
13
Page 17
GB
Cleaning the shaver attachment
CAUTION
Possible damage to the appliance.
► Do not remove the shaving foil from the foil holder and do not clean this with the cleaning brush.
♦ Remove the shaver attachment 10 from the appliance.
♦ Press the buttons at the side of the shaver attachment 10 and pull off the shaving foil holder.
Hold the shaving foil holder only by the sides and do not press on the foil itself.
♦ Clean the cutting blades with the supplied cleaning brush.
♦ Clean the shaving foil in the shaving foil holder by holding it under running water and allow
it to dry off completely before reattaching it to the shaver attachment 10.
♦ Replace the shaving foil holder onto the shaver attachment 10. During replacement ensure that
the fi xing tabs on the shaving foil holder are inserted into the corresponding openings on the
shaver attachment 10, and then press the shaving foil holder gently down until it audibly clicks
into place.
NOTE
Every now and again, apply a couple of drops of blade oil (accessory) between the blades,
►
and then distribute it evenly. Attach the shaver attachment 10 to the appliance and allow the
appliance to run for a few seconds without using it. Wipe off any access oil with a soft cloth.
Cleaning the ear/nose hair trimmer attachment
♦ Remove the ear/nose hair trimmer attachment 9 from the appliance.
♦ Clean the ear/nose hair trimmer attachment 9 under running water and allow it to dry
completely before using it again.
14
SHBS 5 A1
Page 18
Disposal
Disposal of the appliance
Never dispose of the appliance in the normal domestic waste. This product is
subject to the provisions of European Directive 2012/19/EU (Waste Electrical
and Electronic Equipment).
Dispose of the appliance via an approved disposal company or your municipal waste facility.
Please observe the currently applicable regulations. Please contact your waste disposal centre
if you are in any doubt.
NOTE
Before disposing of the appliance it is essential to fi rst remove the battery.
►
CAUTION
Removal of the battery requires a certain amount of manual dexterity; otherwise there is a
►
risk of injury! If you have no experience in using tools, you should entrust the task to some-
one who is competent to do the job properly.
► Ensure that the battery does not get damaged during removal. There is a risk of fi re!
► The removed battery may not be reused.
► Never short-circuit the battery. The contacts on the removed battery should not be connected
by an metallic objects. The battery can overheat and explode.
► WARNING! Only remove the battery for disposal of the appliance. Removal will destroy the
appliance. Never operate an appliance that has been dismantled.
♦ Disconnect the appliance from the power supply.
♦ Switch on the appliance and let it run until the battery is fully discharged.
♦ Remove the cutter attachment from the appliance (see chapter Attaching/changing the cutter
attachments)
♦ There are three screws on the rear of the appliance. Two of the screws are in the mounting
opening of the appliance.
♦ Loosen both the screws with a Philips screwdriver.
GB
SHBS 5 A1
15
Page 19
GB
♦ Remove the rear side of the appliance.
♦ Use a diagonal cutter/fl at-head screwdriver to disconnect the battery from the circuit board.
Remove the battery. Take the battery and the appliance separately to appropriate disposal
facilities.
Disposal of batteries
Used batteries may not be disposed of in household waste. All consumers are statutorily required
to dispose of batteries at a collection point provided by their local community or at a retail store.
The purpose of this obligation is to ensure that batteries are disposed of in a non-polluting manner.
Only dispose of batteries when they are fully discharged.
16
SHBS 5 A1
Page 20
Appendix
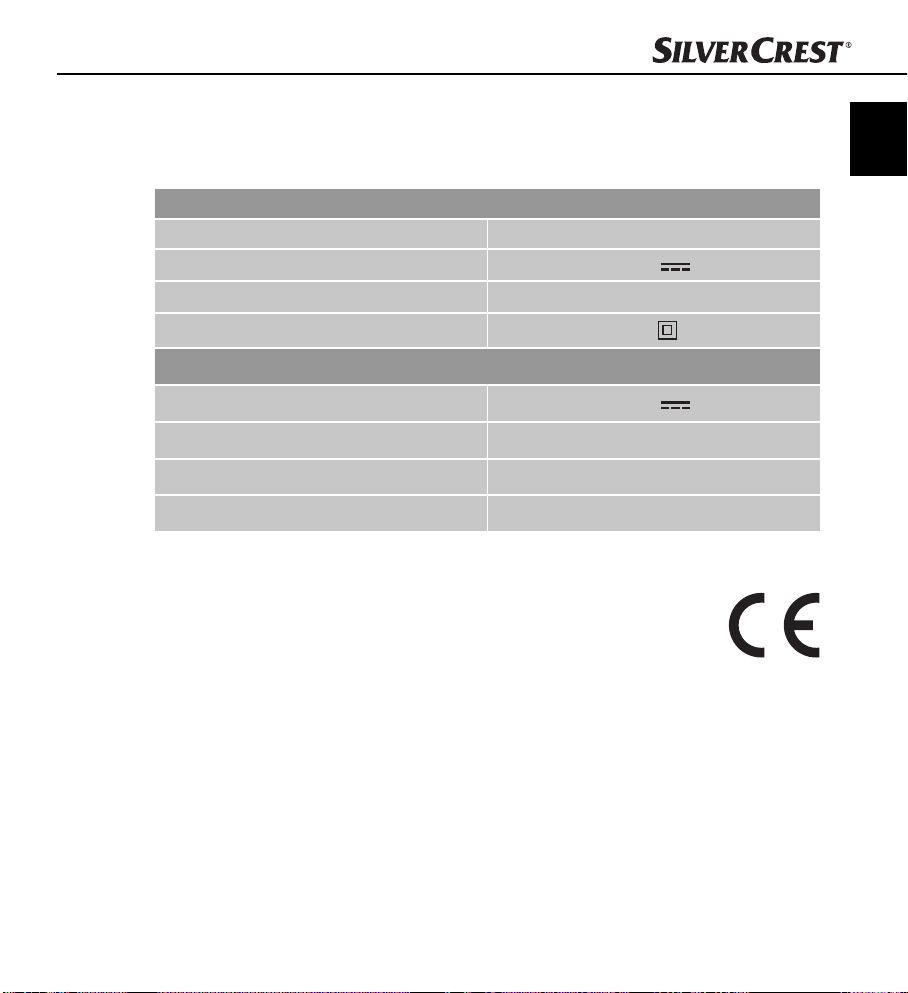
Technical details
Mains power adapter PTB-045100EU
Input voltage 100–240 V ∼, 50/60 Hz
Output voltage 4.5 V
Output current 1000 mA
Protection class
Hair and beard trimmer
Input voltage 4.5 V
Input current 1000 mA
Rechargeable battery 3.7 V/700 mAh Li-ion battery
Environmental temperature 5°C up to 35°C
Notes on the Declaration of Conformity
With regard to conformity with essential requirements and other relevant provisions, this appliance complies with the guidelines of the Electromagnetic Compatibility Directive 2004/108/EC and the Low Voltage Directive 2006/95/EC.
The full original Declaration of Conformity is available from the importer.
GB
II /
Warranty
SHBS 5 A1
The warranty for this appliance is for 3 years from the date of purchase. The appliance has been
manufactured with care and meticulously examined before delivery.
Please retain your receipt as proof of purchase. In the case of a warranty claim, please make
contact by telephone with our Customer Service Department. Only in this way can a post-free
despatch for your goods be assured.
17
Page 21
GB
NOTICE
The warranty covers only claims for material and manufacturing defects, but not for
►
transport damage, wearing parts or for damage to fragile components, e.g. buttons or
batteries.
This product is for domestic use only and is not intended for commercial use. The warranty is void
in the case of abusive and improper handling, use of force and internal tampering not carried out
by our authorised service branch.
Your statutory rights are not restricted in any way by this warranty. The warranty period is not
extended by repairs made under the warranty. This applies also to replaced and repaired parts.
Damages and defects extant at the time of purchase must be reported immediately after unpacking, resp. no later than two days after the date of purchase.
Repairs made after the lapse of the warranty period are subject to charge.
Service
Service Great Britain
Tel.: 0871 5000 720 (£ 0.10/Min.)
E-Mail: kompernass@lidl.co.uk
IAN 96126
Hotline availability: Monday to Friday 08:00 - 20:00 (CET)
Importer
KOMPERNASS HANDELS GMBH
BURGSTRASSE 21
44867 BOCHUM
GERMANY
www.kompernass.com
18
SHBS 5 A1
Page 22
Spis treści
Wprowadzenie . . . . . . . . . . . . . . . . . 20
Informacje o niniejszej instrukcji obsługi . . . . 20
Prawa autorskie . . . . . . . . . . . . . . . . . . . . . . . 20
Ograniczenie odpowiedzialności . . . . . . . . . 20
Użytkowanie zgodne z przeznaczeniem . . . 20
Zastosowane wskazówki ostrzegawcze . . . . 21
Bezpieczeństwo . . . . . . . . . . . . . . . . 22
Podstawowe zasady bezpieczeństwa . . . . . . 22
Zakres dostawy . . . . . . . . . . . . . . . . 25
Części zamienne . . . . . . . . . . . . . . . . . . . . . . 26
Utylizacja opakowania . . . . . . . . . . . . . . . . . 26
Opis urządzania . . . . . . . . . . . . . . . . 26
Przed uruchomieniem . . . . . . . . . . . . 27
Ładowanie akumulatora . . . . . . . . . . . . . . . . 27
Praca z wykorzystaniem zasilacza
wtyczkowego . . . . . . . . . . . . . . . . . . . . . . . . . 27
Oliwienie nasadek . . . . . . . . . . . . . . . . . . . . . 28
Obsługa i praca . . . . . . . . . . . . . . . . 28
Zakładanie / wymiana nasadek . . . . . . . . . . 28
Zakładanie / wymiana nasadek
grzebieniowych . . . . . . . . . . . . . . . . . . . . . . . 28
Nasadka do strzyżenia włosów . . . . . . . . . . 29
Nasadka do strzyżenia brody . . . . . . . . . . . . 30
Nasadka - precyzyjny trymer . . . . . . . . . . . . . 30
Nasadka - trymer do nosa i uszu . . . . . . . . . . 30
Nasadka do golenia . . . . . . . . . . . . . . . . . . . 30
Czyszczenie i pielęgnacja . . . . . . . . . 31
Czyszczenie nasadki do golenia . . . . . . . . . . 32
Czyszczenie nasadki - trymer do nosa i uszu . 33
Utylizacja . . . . . . . . . . . . . . . . . . . . . . 33
Utylizacja urządzenia . . . . . . . . . . . . . . . . . . 33
Utylizacja baterii/akumulatorów . . . . . . . . . . 34
Załącznik . . . . . . . . . . . . . . . . . . . . . . 35
Dane techniczne . . . . . . . . . . . . . . . . . . . . . . 35
Wskazówki dotyczące deklaracji zgodności . 35
Gwarancja . . . . . . . . . . . . . . . . . . . . . . . . . . . 35
Serwis . . . . . . . . . . . . . . . . . . . . . . . . . . . . . . 36
Importer . . . . . . . . . . . . . . . . . . . . . . . . . . . . . 36
PL
SHBS 5 A1
19
Page 23

PL
Wprowadzenie
Informacje o niniejszej instrukcji obsługi
Serdecznie gratulujemy zakupu nowego urządzenia.
Wybrany produkt charakteryzuje się wysoką jakością. Instrukcja obsługi stanowi element składowy
produktu. Zawiera ona ważne wskazówki na temat bezpieczeństwa, użytkowania i utylizacji.
Przed przystąpieniem do eksploatacji produktu należy zapoznać się ze wszystkimi wskazówkami
dotyczącymi obsługi i bezpieczeństwa. Produkt należy użytkować wyłącznie zgodnie z zamieszczonym tu opisem oraz w podanym zakresie zastosowań. Instrukcję obsługi przechowuj zawsze
w bezpiecznym miejscu. W przypadku przekazania urządzenia następnej osobie, nie zapomnij
dołączyć również instrukcji obsługi.
Prawa autorskie
Niniejsza dokumentacja jest chroniona prawem autorskim.
Wszelkie rozpowszechnianie, wzgl. każdy przedruk, także we fragmentach, jak również odtwa-
rzanie ilustracji, także w zmienionym stanie, jest dozwolone wyłącznie po uzyskaniu pisemnej
zgody producenta.
Ograniczenie odpowiedzialności
Wszystkie zawarte w niniejszej instrukcji obsługi informacje techniczne, dane, wskazówki montażu
i podłączania oraz obsługi, są aktualne na dzień przekazania do druku i uwzględniają nasze
dotychczasowe doświadczenie oraz spostrzeżenia zgodnie z najlepszą wiedzą.
Na podstawie zawartych tu informacji, ilustracji i opisów nie można wysuwać żadnych roszczeń.
Producent nie ponosi żadnej odpowiedzialności za szkody, spowodowane nieprzestrzeganiem
instrukcji, użytkowaniem urządzenia niezgodnie z przeznaczeniem, niefachowymi naprawami,
niedozwolonymi przeróbkami oraz używaniem niedozwolonych części zamiennych.
Użytkowanie zgodne z przeznaczeniem
Urządzenie przeznaczone jest wyłącznie do użytku domowego, a nie do zastosowań komercyjnych. Urządzenie przewidziane jest wyłącznie do strzyżenia naturalnych włosów. Może być ono
wykorzystywane wyłącznie do włosów ludzkich, a nie do włosów sztucznych ani zwierzęcych.
Inne lub wykraczające poza powyższe użytkowanie uznaje się za niezgodne z przeznaczeniem.
Wszelkie roszczenia z tytułu szkód wynikających z użytkowania niezgodnego z przeznaczeniem
są wykluczone. Ryzyko ponosi wyłącznie użytkownik.
20
SHBS 5 A1
Page 24
Zastosowane wskazówki ostrzegawcze
W niniejszej instrukcji obsługi zastosowano następujące wskazówki ostrzegawcze:
NIEBEZPIECZEŃSTWO
Wskazówka ostrzegawcza tego stopnia zagrożenia oznacza grożącą
sytuację niebezpieczną.
Nieuniknięcie niebezpiecznej sytuacji może doprowadzić do śmierci lub powstania ciężkich
obrażeń.
► Należy przestrzegać instrukcji w niniejszej wskazówce ostrzegawczej, aby uniknąć
zagrożenia śmiercią lub ciężkich obrażeń ciała.
OSTRZEŻENIE
Wskazówka ostrzegawcza tego stopnia zagrożenia oznacza możliwą
sytuację niebezpieczną.
Nieuniknięcie niebezpiecznej sytuacji może doprowadzić do powstania obrażeń.
► Należy przestrzegać instrukcji zawartych w niniejszej wskazówce ostrzegawczej,
by uniknąć obrażeń u osób.
UWAGA
Wskazówka ostrzegawcza tego stopnia zagrożenia oznacza możliwą
szkodę materialną.
Nieuniknięcie takiej sytuacji może doprowadzić do powstania szkód materialnych.
► Aby uniknąć szkód materialnych, należy przestrzegać instrukcji zawartych w niniejszej
wskazówce ostrzegawczej.
PL
SHBS 5 A1
WSKAZÓWKA
Wskazówka oznacza dodatkowe informacje, ułatwiające korzystanie z urządzenia.
►
21
Page 25
PL
Bezpieczeństwo
W tym rozdziale znajdują się ważne wskazówki bezpieczeństwa, dotyczące obsługi urządzenia. Niniejsze urządzenie jest zgodne z odpowiednimi przepisami bezpieczeństwa. Mimo to, nieprawidłowe użycie
może spowodować obrażenia u ludzi i szkody materialne.
Podstawowe zasady bezpieczeństwa
Mając na uwadze bezpieczne użytkowanie urządzenia, przestrzegaj
następujących wskazówek bezpieczeństwa:
■ To urządzenie może być używane przez dzieci od 8 roku życia oraz
przez osoby o zmniejszonych zdolnościach fi zycznych, sensorycznych
lub umysłowych lub też osoby nieposiadające odpowiedniego doświadczenia i/lub wiedzy, wyłącznie pod nadzorem lub po przeszkoleniu
w zakresie bezpiecznego używania urządzenia oraz wynikających z
niego zagrożeń. Dzieci nie mogą bawić się urządzeniem. Czyszczenie
i konserwacja przez użytkownika nie mogą być wykonywane przez
dzieci bez nadzoru.
■ Przed przystąpieniem do użytkowania sprawdź, czy urządzenie nie
ma widocznych uszkodzeń. Nie uruchamiaj uszkodzonego urządzenia.
Istnieje niebezpieczeństwo porażenia prądem elektrycznym.
■ W przypadku stwierdzenia uszkodzeń kabla, zasilacza wtyczkowego,
obudowy lub innych elementów, dalsze korzystanie z urządzenia jest
zabronione.
■ Naprawy urządzenia zlecaj wyłącznie autoryzowanym serwisom lub
serwisowi producenta. Nieprawidłowo wykonane naprawy mogą
powodować poważne zagrożenie dla użytkownika. Ponadto, w takim
przypadku wygasa gwarancja.
22
SHBS 5 A1
Page 26
■ Nie używaj urządzenia z uszkodzoną nasadką tnącą ani uszkodzoną
nasadką grzebieniową, ponieważ mogą one mieć ostre krawędzie.
Niebezpieczeństwo odniesienia obrażeń!
■ Uszkodzone elementy wymieniać zawsze na oryginalne części zamienne.
Tylko te części gwarantują odpowiednie bezpieczeństwo użytkowania
urządzenia.
■ Nigdy nie pozostawiaj urządzenia działającego bez nadzoru oraz
korzystaj z niego wyłącznie zgodnie z informacjami na tabliczce
znamionowej.
■ Do zasilania sieciowego korzystaj wyłącznie z dostarczonego zasilacza
wtyczkowego.
■ Zasilacz wtyczkowy należy wyciągnąć z gniazda
- kiedy wystąpi usterka,
- przed przystąpieniem do czyszczenia urządzenia,
- gdy urządzenie przez dłuższy czas nie jest używane,
- po każdym użyciu.
Należy przy tym chwytać bezpośrednio za zasilacz wtyczkowy, a nie
za kabel.
■ UWAGA! Urządzenie przechowywać w suchym miejscu i utrzymywać
w suchym stanie.
PL
SHBS 5 A1
■ Nie korzystać z urządzenia podczas kąpieli. Niebezpieczeństwo pora-
żenia prądem elektrycznym!
■ Nie zanurzać urządzenia ani kabla wraz zasilaczem wtyczkowym
w wodzie ani w żadnej innej cieczy.
■ Gdyby urządzenie wpadło do wody, najpierw bezwzględnie wyciągnij
zasilacz wtyczkowy z gniazda, zanim sięgniesz po urządzenie do wody.
23
Page 27

■ Nigdy nie dotykaj zasilacza wtyczkowego mokrymi rękoma, w szcze-
gólności podczas wkładania go do gniazda lub wyjmowania z gniazda.
Zagrożenie porażenia prądem elektrycznym!
PL
■ Zamontowanie wyłącznika różnicowo-prądowego o pomiarowym napię-
ciu wyłączającym o wartości nie większej niż 30 mA zapewnia dalszą
ochronę przed porażeniem prądem elektrycznym. Montaż należy
zlecić wyłącznie elektrykowi.
■ Sprawdzaj zasilacz wtyczkowy oraz maszynkę do strzyżenia włosów i
brody regularnie pod kątem ewentualnych uszkodzeń mechanicznych.
■ Dopilnuj, aby kabel nie został przycięty między drzwiczkami szafek
ani nie był przeciągany po gorących powierzchniach. Mogłoby w ten
sposób dojść do uszkodzenia izolacji kabla.
■ Zasilacz wtyczkowy podłączać wyłącznie do łatwo dostępnego gniazda,
aby w razie usterki można było szybko wyjąć zasilacz z gniazda.
■ Nie zakrywać zasilacza wtyczkowego, by nie spowodować jego
przegrzania.
24
SHBS 5 A1
Page 28
Zakres dostawy
Urządzenie dostarczane jest standardowo z następującymi elementami:
▯ Maszynka do strzyżenia włosów i brody
▯ Stacja do ładowania
▯ Wtyczkowy zasilacz sieciowy
▯ Nasadka do strzyżenia włosów
▯ Nasadka do strzyżenia brody
▯ Nasadka - precyzyjny trymer
▯ Nasadka - trymer do nosa i uszu
▯ Nasadka do golenia
▯ Nasadka grzebieniowa do nasadki do strzyżenia włosów
▯ Nasadka grzebieniowa do nasadki do strzyżenia brody
▯ Szczotka do czyszczenia
▯ Nożyczki
▯ Grzebień
▯ Oliwa do ostrzy
▯ Woreczek do przechowywania
▯ Niniejsza instrukcja obsługi
WSKAZÓWKA
Po rozpakowaniu nowego urządzenia sprawdź, czy w środku znajdują się wszystkie części
►
oraz czy nie ma żadnych widocznych uszkodzeń.
► W przypadku niekompletnej dostawy, bądź wystąpienia uszkodzeń wskutek wadliwego
opakowania lub transportu skontaktuj się z infolinią serwisową (patrz rozdział Serwis).
♦ Wyjmij wszystkie elementy urządzenia z kartonu.
♦ Usuń z urządzenia wszelkie materiały opakowaniowe.
PL
SHBS 5 A1
NIEBEZPIECZEŃSTWO
► Elementów opakowania nie dawać dzieciom do zabawy.
Istnieje niebezpieczeństwo uduszenia.
25
Page 29
Części zamienne
Gdy potrzebne są części zamienne, należy skontaktować się z infolinią serwisową (patrz rozdział Serwis).
PL
Utylizacja opakowania
Opakowanie chroni urządzenie przed uszkodzeniami podczas transportu.
Zwracanie opakowania do obiegu materiałów oszczędza surowce naturalne i zmniejsza
zanieczyszczenie odpadami. Zbędne materiały opakowania utylizować zgodnie z miejscowo
obowiązującymi przepisami.
Opis urządzania
Rysunek A:
Nasadka do strzyżenia włosów
2
Przełącznik suwakowy do precyzyjnego ustawiania długości strzyżenia
3
Włącznik/wyłącznik
4
Wskaźnik stanu naładowania
5
Stacja ładowania / uchwyt z gniazdem przyłączeniowym zasilacza wtyczkowego
Rysunek B:
6
Wtyczkowy zasilacz sieciowy
Rysunek C:
7
Nasadka do strzyżenia brody
8
Nasadka - precyzyjny trymer
9
Nasadka - trymer do nosa i uszu
10
Nasadka do golenia
11
Nasadka grzebieniowa do nasadki do strzyżenia włosów
12
Nasadka grzebieniowa do nasadki do strzyżenia brody
26
SHBS 5 A1
Page 30

Przed uruchomieniem
Maszynka do strzyżenia włosów i brody może być zasilana akumulatorowo i sieciowo.
Ładowanie akumulatora
Przed pierwszym zastosowaniem akumulator maszynki do strzyżenia włosów i brody powinien
być ładowany przez co najmniej 90 minut.
♦ Podłącz kabel zasilacza wtyczkowego 6 do stacji ładowania 5 maszynki do strzyżenia
włosów i brody.
♦ Unikaj uszkodzeń urządzenia! Przed rozpoczęciem ładowania akumulatorów upewnij się,
że urządzenie jest wyłączone.
♦ Włóż zasilacz wtyczkowy 6 (zakres napięcia 100 - 240 V) do gniazda spełniającego
wymagania urządzenia.
♦ Przebieg procesu ładowania jest sygnalizowany przez kontrolkę 4:
- kontrolka ładowania miga na czerwono: akumulator jest rozładowany
- kontrolka ładowania świeci się na czerwono: akumulator jest ładowany
- kontrolka ładowania świeci się na zielono: akumulator jest naładowany.
♦ Przy całkowicie naładowanym akumulatorze można korzystać z urządzenia w czasie do
60 minut bez konieczności podłączania go do sieci.
Praca z wykorzystaniem zasilacza wtyczkowego
Jeżeli z powodu rozładowanego lub słabego akumulatora maszynka do strzyżenia włosów i
brody zatrzyma się w trakcie jej użytkowania, można kontynuować strzyżenie po podłączeniu
6
zasilacza wtyczkowego
♦ Włóż wtyk zasilacza wtyczkowego 6 do gniazda znajdującego się na dolnej części maszynki
do strzyżenia włosów i brody.
♦ Aby uniknąć obrażeń oraz uszkodzeń urządzenia, wyłączaj je zawsze przed podłączeniem
do zasilania sieciowego.
♦ Włóż zasilacz wtyczkowy 6 (zakres napięcia 100 - 240 V) do gniazda spełniającego
wymagania urządzenia.
♦ Po 1 - 2 sekundach możesz włączyć urządzenie przełącznikiem WŁ. / WYŁ. 3. Gdyby
urządzenie nie włączyło się od razu, wyłącz je ponownie i odczekaj ok. 1 minutę, zanim je
ponownie włączysz.
.
PL
SHBS 5 A1
27
Page 31

PL
♦ Jeśli chcesz w ten sposób naładować akumulatory bez korzystania ze stacji ładowania 5,
wówczas możesz to zrobić tylko przy wyłączonym urządzeniu.
Oliwienie nasadek
Przed pierwszym użyciem i po każdorazowym czyszczeniu zalecamy oliwienie nasadek do
strzyżenia włosów , brody 7 i precyzyjnego trymera 8. użyciem i po czyszczeniu.
♦ W celu ograniczenia tarcia, od czasu do czasu dodawaj jedną do dwóch kropel oliwa
(akcesoria) na ostrza i rozprowadź oliwę równomiernie.
♦ W razie potrzeby wytrzyj nadmiar oliwy za pomocą miękkiej ściereczki. Stosuj tylko oliwę
wolną od kwasów, np. oliwę do maszyn do szycia.
Obsługa i praca
Zakładanie / wymiana nasadek
OSTRZEŻENIE
► Przed zakładaniem lub wymianą nasadek wyłącz urządzenie.
Niebezpieczeństwo odniesienia obrażeń!
♦ Przyciśnij od przodu kciukiem ząbki głowicy tnącej, aby wyjąć zespół tnący z uchwytu (patrz
rys. D). Zdejmij nasadkę tnącą z urządzenia.
♦ W celu założenia nasadki tnącej wprowadź dolny zaczep w otwór mocujący urządzenia
(patrz rys. E).
♦ Następnie wciśnij górną część nasadki tnącej na urządzenie, aż do słyszalnego zatrzaśnięcia
się i pewnego zamocowania (patrz rys. F).
Zakładanie / wymiana nasadek grzebieniowych
Nasadka grzebieniowa do nasadki do strzyżenia włosów
Nasadka grzebieniowa 11 ma ustawienia do 6 różnych długości cięcia (13 mm / 15 mm /
17 mm / 19 mm / 21 mm / 23 mm).
♦ Załóż nasadkę grzebieniową 11 od przodu na nasadkę do strzyżenia włosów i naciśnij jej
tylną część, aż się zatrzaśnie.
28
SHBS 5 A1
Page 32

♦ W celu zdjęcia nasadki grzebieniowej 11 zwolnij ją w dolnym końcu i zdejmij z urządzenia
pociągając do przodu.
Nasadka grzebieniowa do nasadki do strzyżenia brody
Nasadka grzebieniowa 12 ma ustawienia do 6 różnych długości cięcia (4 mm / 6 mm /
9 mm / 12 mm / 15 mm / 18 mm).
♦ Załóż nasadkę grzebieniową 12 od przodu na nasadkę do strzyżenia brody 7 i przesuń
ją w dół.
♦ W celu zdjęcia nasadki grzebieniowej 12 zsuń ją do przodu z urządzenia.
Nasadka do strzyżenia włosów
WSKAZÓWKA
Strzyżone włosy powinny być czyste i suche.
►
► Przeczesz starannie włosy, aby je rozczesać.
► Wokół szyi i karku załóż pelerynę fryzjerską lub chustę, by za kołnierz nie wpadły resztki
włosów.
► Zacznij najpierw z nasadką grzebieniową 11 z jedną z większych długości strzyżenia
i w trakcie strzyżenia zmieniaj ją stopniowo na mniejsze długości strzyżenia.
► Pamiętaj, że właściwą długość włosów uzyskasz tylko wtedy, gdy przełącznik suwakowy 2
jest w położeniu 3, a urządzenie trzymasz pod kątem prostym do powierzchni skóry.
♦ Włącz maszynkę do strzyżenia włosów i brody za pomocą przełącznika WŁ. / WYŁ. 3.
♦ Przesuń maszynkę do strzyżenia włosów i brody powoli przez włosy.
♦ Trzymaj urządzenie przy tym w taki sposób, aby wybrana nasadka grzebieniowa 11 w miarę
możliwości przylegała płasko do powierzchni głowy.
♦ Strzyżenie wykonywać należy zawsze w kierunku od karku do górnej części głowy lub od
czoła i skroni do czubka głowy.
♦ Aby przystrzyc włosy bardzo krótko, używaj nasadki do strzyżenia włosów bez nasadki
grzebieniowej 11.
♦ Za pomocą przełącznika suwakowego 2 można ustawiać żądaną długość strzyżenia w 3
stopniach.
PL
SHBS 5 A1
29
Page 33

PL
Nasadka do strzyżenia brody
WSKAZÓWKA
Przeczesz starannie brodę, by rozczesać ew. splątania.
►
► Zacznij najpierw z nasadką grzebieniową 12 z jedną z większych długości strzyżenia i w
trakcie strzyżenia zmieniaj ją stopniowo na mniejsze długości strzyżenia.
► Pamiętaj, że właściwą długość włosów uzyskasz tylko wtedy, gdy przełącznik suwakowy 2
jest w położeniu 3, a urządzenie trzymasz pod kątem prostym do powierzchni skóry.
♦ Strzyż brodę w kierunku przeciwnym do kierunku porastania włosów (od podbródka do ucha
i do góry). Najpierw przystrzyż jedną, potem drugą stronę.
♦ Aby przystrzyc brodę bardzo krótko lub przystrzyc wąsy i kontury, używaj nasadki do strzyżenia
włosów 7 bez nasadki grzebieniowej 12.
♦ Za pomocą przełącznika suwakowego 2 można ustawiać żądaną długość strzyżenia w 3
stopniach.
Nasadka - precyzyjny trymer
♦ Używaj precyzyjnego trymera 8 do formowania wąsów, baków, bokobrodów lub brwi.
♦ Przyłóż krawędź nasadki precyzyjnego trymera 8 na żądanej wysokości do nasady włosów
i poruszaj urządzeniem w dół.
Nasadka - trymer do nosa i uszu
♦ Użyj trymera do nosa i uszu 9, gdy chcesz usunąć włosy z nosa lub uszu.
♦ Wprowadź tylko metalowe zakończenie nasadki trymera do nosa i uszu 9 powoli do dziurki
w nosie lub do ucha.
♦ Poruszaj urządzeniem powoli okrężnie, by wyciąć włosy.
Nasadka do golenia
♦ Używaj tej nasadki 10 do golenia na sucho.
♦ Trzymaj urządzenie pod kątem prostym do powierzchni skóry i prowadź je delikatnie po twarzy.
♦ Gól w kierunku przeciwnym doi kierunku porostu włosów. W skomplikowanych miejscach, jak
np. na podbródku, napnij skórę, by uzyskać lepszy wynik.
30
SHBS 5 A1
Page 34

Czyszczenie i pielęgnacja
NIEBEZPIECZEŃSTWO
Niebezpieczeństwo utraty życia wskutek porażenia prądem elektrycznym!
► Przed przystąpieniem do czyszczenia urządzenia należy najpierw wyjąć zasilacz wtyczko-
wy 6 z gniazda.
► Nigdy nie dotykaj zasilacza wtyczkowego 6 mokrymi rękoma podczas wtykania go do
gniazda lub wyjmowania go z gniazda.
► Zasilacz wtyczkowy 6 oraz kabel muszą pozostawać zawsze suche.
UWAGA
Możliwość uszkodzenia urządzenia.
► Maszynka do strzyżenia włosów i brody nie może być w celu czyszczenia zanurzana
w wodzie ani w innych cieczach, ponieważ urządzenie nie jest wodoszczelne. Na skutek
tego mogłoby dojść do uszkodzenia elementów przewodzących prąd (akumulatorów).
► Nie stosuj żadnych agresywnie działających ani szorujących środków czyszczących, ponie-
waż mogą one uszkodzić powierzchnię obudowy.
► Obudowę urządzenia czyść wyłącznie lekko wilgotną szmatką z delikatnym płynem do
zmywania.
♦ Wyłącz maszynkę do strzyżenia włosów i brody za pomocą przełącznika WŁ. / WYŁ. 3.
♦ Odłącz kabel od urządzenia i wyjmij zasilacz wtyczkowy 6 z gniazda.
♦ Ewentualnie zdejmij z urządzenia odpowiednią nasadkę (11 lub 12).
♦ Umyj nasadkę grzebieniową (11 lub 12) pod bieżącą wodą, jeśli to konieczne.
♦ Następnie dokładnie wysusz nasadkę grzebieniową (11 lub 12).
♦ Przyciśnij od przodu kciukiem ząbki głowicy tnącej, aby wyjąć zespół tnący z uchwytu
(patrz rys. D).
♦ Za pomocą załączonej szczotki do czyszczenia usuń pozostałe resztki włosów z zespołu
tnącego.
♦ Po zakończeniu czyszczenia włóż zaczep zespołu tnącego ponownie w otwór mocujący
urządzenia (patrz rys. E).
♦ Zatrzaśnij nasadkę tnącą, wciskając ją lekko od góry (patrz rys. F).
PL
SHBS 5 A1
31
Page 35

PL
WSKAZÓWKA
W celu ograniczenia tarcia, od czasu do czasu dodawaj jedną do dwóch kropel oliwy
►
(akcesoria) na ostrza i rozprowadź oliwę równomiernie. Można również stosować każdą
inną oliwę, niezawierającą kwasów (jak, np. oliwa do maszyn szwalniczych). W razie
potrzeby wytrzyj nadmiar oliwy za pomocą miękkiej ściereczki.
Czyszczenie nasadki do golenia
UWAGA
Możliwość uszkodzenia urządzenia.
► Nie demontuj folii tnącej z ramki i nie czyść jej za pomocą szczoteczki do czyszczenia.
♦ Zdejmij nasadkę do golenia 10 z urządzenia.
♦ Naciśnij umieszczone z boku przyciski nasadki do golenia 10 i ściągnij ramkę z folią.
Trzymaj przy tym ramkę tylko z boku i nie naciskaj na folię.
♦ Oczyść głowicę nożową za pomocą dołączonej szczoteczki.
♦ Umyj folię tnącą w ramce pod bieżącą wodą i zostaw ją do całkowitego wyschnięcia, zanim
zamontujesz ją ponownie w nasadce do golenia 10.
♦ Zamontuj ramkę z folią z powrotem w nasadce do golenia 10. Podczas montowania zwróć
uwagę na to, by zaczepy ramki z folią weszły w odpowiednie wycięcia w nasadce do gole-
nia 10 i lekko dociśnij ramkę w dół, aż do słyszalnego zatrzaśnięcia się.
WSKAZÓWKA
W celu ograniczenia tarcia, od czasu do czasu dodawaj jedną do dwóch kropel oliwy
►
(akcesoria) na głowicę nożową i rozprowadź oliwę równomiernie. Załóż nasadkę do
golenia 10 na urządzenie i uruchom na chwilę urządzenie, nie używając go do golenia.
W razie potrzeby wytrzyj nadmiar oliwy za pomocą miękkiej ściereczki.
32
SHBS 5 A1
Page 36

Czyszczenie nasadki - trymer do nosa i uszu
♦ Zdejmij nasadkę - trymer do nosa i uszu 9 z urządzenia.
♦ Umyj nasadkę - trymer do nosa i uszu 9 pod bieżącą wodą i zostaw ją do całkowitego
wyschnięcia, zanim jej ponownie użyjesz.
Utylizacja
Utylizacja urządzenia
Nie należy wyrzucać urządzenia wraz z normalnymi odpadami domowymi.
Ten produkt podlega przepisom dyrektywy europejskiej 2012/19/EU (zużyty
sprzęt elektryczny i elektroniczny).
Urządzenie należy zutylizować za pośrednictwem dopuszczonego zakładu utylizacji odpadów
lub komunalnego zakładu oczyszczania. Przestrzegać aktualnie obowiązujących przepisów.
W razie pytań i wątpliwości należy skontaktować się z najbliższym zakładem utylizacji.
WSKAZÓWKA
Przed utylizacją urządzenia należy z niego koniecznie usunąć akumulator.
►
UWAGA
Do wymontowania akumulatora wymagana jest pewna zręczność manualna, w przeciwnym
►
razie istnieje niebezpieczeństwo zranienia! Jeżeli nie masz doświadczenia w obchodzeniu
się z narzędziami, zleć demontaż akumulatora osobie, która potrafi to fachowo wykonać.
► Należy przy tym uważać, by nie uszkodzić akumulatora. Niebezpieczeństwo pożaru!
► Wymontowanego akumulatora nie wolno ponownie używać.
► Nie wolno zwierać biegunów akumulatora. Bieguny wymontowanego akumulatora nie
mogą być łączone metalowymi przedmiotami. Akumulator może się przegrzać i wybuchnąć.
► UWAGA! Akumulator należy wymontować tylko w celu utylizacji urządzenia. Wymontowanie
akumulatora powoduje zniszczenie urządzenia. Nigdy nie uruchamiaj rozmontowanego
urządzenia.
PL
SHBS 5 A1
33
Page 37

PL
♦ Odłącz urządzenie od sieci.
♦ Włącz urządzenie i zostaw je włączone tak długo, aż akumulator całkowicie się rozładuje.
♦ Zdejmij nasadkę do strzyżenia z urządzenia (patrz rozdz. Zakładanie / wymiana nasadek).
♦ Z tyłu urządzenia znajdują się trzy wkręty. Dwa z tych wkrętów znajdują się w otworze mocu-
jącym urządzenia.
♦ Odkręć wkręty wkrętakiem krzyżakowym.
♦ Zdejmij tylną część urządzenia.
♦ Za pomocą szczypiec do cięcia / wkrętaka płaskiego przetnij połączenie od akumulatora do
płytki. Wyjmij akumulator. Akumulator przekaż oddzielnie do odpowiedniego punktu zbiórki.
Utylizacja baterii/akumulatorów
Baterii i akumulatorów nie wolno wyrzucać razem z odpadami domowymi. Każdy użytkownik jest
ustawowo zobowiązany do oddania zużytych baterii/akumulatorów w punkcie zbiorczym swojej
gminy/dzielnicy, lub sprzedawcy. Obowiązek ten został wprowadzony, aby baterie/akumulatory
były usuwane w sposób nieszkodliwy dla środowiska naturalnego. Baterie/akumulatory należy
oddawać tylko w rozładowanym stanie.
34
SHBS 5 A1
Page 38

Załącznik
Dane techniczne
Zasilacz wtyczkowy PTB-045100EU
Napięcie wejściowe 100 - 240 V ∼, 50 / 60 Hz
Napięcie wyjściowe 4,5 V
Prąd wyjściowy 1000 mA
Stopień ochrony
II /
Maszynka do strzyżenia włosów i brody
Napięcie wejściowe 4,5 V
Prąd wejściowy 1000 mA
Akumulator Akumulator litowo-jonowy 3,7 V, 700 mAh
Temperatura otoczenia 5°C do 35°C
Wskazówki dotyczące deklaracji zgodności
Niniejsze urządzenie spełnia pod względem zgodności z podstawowymi
wymogami i pozostałymi ważnymi przepisami wymagania dyrektywy w
zakresie kompatybilności elektromagnetycznej 2004/108/EC oraz dyrektywy
niskonapięciowej 2006/95/EC.
Pełny oryginalny tekst deklaracji zgodności jest dostępny u importera.
Gwarancja
Urządzenie objęte jest 3-letnią gwarancją, licząc od daty zakupu. Urządzenie zostało starannie
wyprodukowane i poddane skrupulatnej kontroli przed wysyłką.
Paragon należy zachować jako dowód dokonania zakupu. W przypadku roszczeń gwarancyjnych
należy skontaktować się telefonicznie z serwisem. Tylko w ten sposób można zagwarantować
bezpłatną wysyłkę zakupionego produktu.
PL
SHBS 5 A1
35
Page 39

PL
WSKAZÓWKA
Gwarancja obejmuje wyłącznie wady materiałowe i fabryczne, natomiast nie obejmuje
►
uszkodzeń transportowych, części ulegających zużyciu ani uszkodzeń części łatwo łamliwych, np. wyłącznika lub akumulatorów.
Urządzenie jest przeznaczone wyłącznie do użytkowania w gospodarstwie domowym, a nie do
celów przemysłowych. Gwarancja traci ważność w przypadku niewłaściwego używania urządzenia,
używania niezgodnego z przeznaczeniem, użycia siły lub ingerencji w urządzenie dokonywanej
poza autoryzowanymi punktami serwisowymi.
Niniejsza gwarancja nie ogranicza ustawowych praw nabywcy urządzenia. Okres gwarancji
nie ulega przedłużeniu o czas trwania usługi gwarancyjnej. Dotyczy to również wymienionych i
naprawionych części.
Ewentualne szkody i wady stwierdzone w chwili zakupu należy zgłosić niezwłocznie po rozpakowaniu
urządzenia, nie później niż po upływie dwóch dni od daty zakupu.
Wszystkie naprawy wykonywane po upływie okresu gwarancji będą płatne.
Serwis
Serwis Polska
Tel.: 22 397 4996
E-Mail: kompernass@lidl.pl
IAN 96126
Czas pracy infolinii:
od poniedziałku do piątku, w godzinach 08:00 - 20:00 czasu środkowoeuropejskiego
Importer
KOMPERNASS HANDELS GMBH
BURGSTRASSE 21
44867 BOCHUM
GERMANY
www.kompernass.com
36
SHBS 5 A1
Page 40

Tartalomjegyzék
Bevezető . . . . . . . . . . . . . . . . . . . . . . 38
Információk a jelen használati útmutatóhoz . 38
Szerzői jogvédelem . . . . . . . . . . . . . . . . . . . . 38
A felelősség korlátozása . . . . . . . . . . . . . . . . 38
Rendeltetésszerű használat . . . . . . . . . . . . . . 38
Felhasznált fi gyelmeztető utasítások . . . . . . . 39
Biztonság . . . . . . . . . . . . . . . . . . . . . . 40
Alapvető biztonsági fi gyelmeztetések . . . . . . 40
A csomag tartalma . . . . . . . . . . . . . . 43
Pótalkatrészek . . . . . . . . . . . . . . . . . . . . . . . . 44
A csomagolás ártalmatlanítása . . . . . . . . . . . 44
A készülék leírása . . . . . . . . . . . . . . . 44
Üzembe helyezés előtt . . . . . . . . . . . 45
Az akkumulátor feltöltése . . . . . . . . . . . . . . . . 45
Üzemeltetés hálózati adapterrel . . . . . . . . . . 45
Vágófejek olajozása . . . . . . . . . . . . . . . . . . . 46
Kezelés és üzemeltetés . . . . . . . . . . . 46
A vágófejek behelyezése/cseréje . . . . . . . . . 46
A fésűfejek behelyezése/cseréje . . . . . . . . . . 46
Hajvágó fej . . . . . . . . . . . . . . . . . . . . . . . . . . 47
Szakállvágó fej . . . . . . . . . . . . . . . . . . . . . . . 48
Precíziós trimmelő fej . . . . . . . . . . . . . . . . . . . 48
Orr-/fülszőr trimmelő fej . . . . . . . . . . . . . . . . 48
Borotvafej . . . . . . . . . . . . . . . . . . . . . . . . . . . . 48
Tisztítás és ápolás . . . . . . . . . . . . . . . 49
A borotvafej tisztítása . . . . . . . . . . . . . . . . . . 50
Orr-/fülszőr trimmelő fej tisztítása . . . . . . . . . 51
Ártalmatlanítás . . . . . . . . . . . . . . . . . 51
A készülék ártalmatlanítása . . . . . . . . . . . . . . 51
Az elemek/akkumulátorok ártalmatlanítása . 52
Függelék . . . . . . . . . . . . . . . . . . . . . . 53
Műszaki adatok . . . . . . . . . . . . . . . . . . . . . . . 53
A megfelelőségi nyilatkozatra vonatkozó
tudnivalók . . . . . . . . . . . . . . . . . . . . . . . . . . . 53
Garancia . . . . . . . . . . . . . . . . . . . . . . . . . . . . 53
Szerviz . . . . . . . . . . . . . . . . . . . . . . . . . . . . . . 54
Gyártja . . . . . . . . . . . . . . . . . . . . . . . . . . . . . 54
HU
SHBS 5 A1
37
Page 41

HU
Bevezető
Információk a jelen használati útmutatóhoz
Gratulálunk új készüléke megvásárlásához!
Vásárlásával kiváló minőségű termék mellett döntött. A használati utasítás a termék része. Fontos
tudnivalókat tartalmaz a biztonságra, használatra és ártalmatlanításra vonatkozóan. A termék
használata előtt ismerkedjen meg valamennyi használati útmutatóval és biztonsági fi gyelmeztetéssel. Csak a leírtak szerint és a megadott célokra használja a készüléket. Őrizze meg jól ezt
a használati útmutatót. A készülék harmadik személynek történő továbbadása esetén adja át a
készülékhez tartozó valamennyi leírást is.
Szerzői jogvédelem
Ez a dokumentáció szerzői jogvédelem alatt áll.
Bármilyen sokszorosítás, ill. utánnyomás még kivonatos formában is, valamint az ábrák megjelen-
tetése még módosított formában is csak a gyártó írásos engedélyével lehetséges.
A felelősség korlátozása
A jelen használati útmutatóban lévő valamennyi műszaki információ, a beszerelésre, csatlakoztatásra és kezelésre vonatkozó tudnivalók megfelelnek a nyomtatás időpontjában aktuális változatnak, melybe legjobb tudomásunk szerint vontuk be eddigi tapasztalatainkat és felismeréseinket.
A jelen használati útmutató adataiból, ábráiból és leírásaiból semmiféle igény nem támasztható.
A gyártó nem vállal felelősséget a használati útmutató be nem tartásából, a nem rendeltetésszerű
használatból, szakszerűtlen javítási munkákból, jogosulatlanul végrehajtott módosításokból vagy
a nem engedélyezett alkatrészek használatából eredő károkért.
Rendeltetésszerű használat
Ez a készülék csak magánhasználatra, nem pedig ipari és kereskedelmi célokra van engedélyezve.
A készülék csak természetes haj vágására készült. A készülék csak emberi hajhoz – műhajhoz
vagy állatszőrhöz nem – használható.
Más vagy ezen túlmenő használat rendeltetésellenesnek minősül. Semmilyen, a nem rendeltetésszerű használatból eredő kárigény nem érvényesíthető. A kockázatot egyedül a felhasználó viseli.
38
SHBS 5 A1
Page 42

Felhasznált fi gyelmeztető utasítások
Ebben a használati útmutatóban a következő fi gyelmeztető jelzéseket használjuk:
VESZÉLY
Ennek a veszélyességi fokozatnak a fi gyelmeztető jele fenyegető veszélyes
helyzetet jelöl.
Halálhoz vagy súlyos sérüléshez vezethet, ha nem kerüli el a veszélyes helyzetet.
► A súlyos személyi sérülések elkerülése érdekében kövesse a fi gyelmeztető jelzés szerinti
utasításokat.
FIGYELMEZTETÉS
Ennek a veszélyességi fokozatnak a fi gyelmeztető jelzése lehetséges
veszélyhelyzetet jelöl.
Sérülést okozhat, ha nem tudja elkerülni ezeket a veszélyes helyzeteket.
► A személyi sérülések elkerülése érdekében kövesse a fi gyelmeztető jelzések szerinti
utasításokat.
FIGYELEM
Ennek a veszélyességi fokozatnak a fi gyelmeztető jelzése lehetséges anyagi
kárt jelöl.
Anyagi kárt okozhat, ha nem tudja elkerülni ezeket a helyzeteket.
► Az anyagi kár elkerülése érdekében kövesse a fi gyelmeztető jelzések szerinti utasításokat.
HU
SHBS 5 A1
TUDNIVALÓ
Tudnivaló jelöli a kiegészítő információkat, amelyek megkönnyítik a készülék kezelését.
►
39
Page 43

Biztonság
Ebben a fejezetben a készülék kezelésével kapcsolatos fontos biztonsági
utasításokat ismerheti meg. A készülék megfelel a biztonsági előírásoknak.
A szakszerűtlen használat személyi és anyagi kárt okozhat.
Alapvető biztonsági fi gyelmeztetések
HU
A készülék biztonságos használata érdekében tartsa be az alábbi biztonsági utasításokat:
■ A készüléket 8 éves kor feletti gyermekek és csökkent fi zikai, érzékszervi
vagy mentális képességű vagy tapasztalattal illetve tudással nem rendelkező személyek csak felügyelet mellett használhatják, vagy ha felvilágosították őket a készülék biztonságos használatáról és megértették
az ebből eredő veszélyeket. Gyermekek nem játszhatnak a készülékkel.
Tisztítást és a felhasználó által végzendő karbantartást felügyelet nélküli
gyermekek nem végezhetnek.
■ Használat előtt ellenőrizze a készüléket, hogy nincs-e rajta látható sérülés.
Ne működtessen hibás készüléket. Áramütés veszélye áll fenn!
■ Amennyiben a kábel, a hálózati adapter, a burkolat vagy egyéb alkat-
rész hibája állapítható meg, a készüléket nem szabad tovább használni.
■ Csak megfelelő jogosultsággal rendelkező szakemberrel vagy az
ügyfélszolgálattal javíttassa a készüléket. A szakszerűtlen javítás jelentős veszélyt jelenthet a felhasználó számára. Ezenkívül a garancia is
érvényét veszti.
■ Ne használja a készüléket hibás vágófejjel vagy hibás fésűfejjel, mert
azok éles pereműek lehetnek. Balesetveszély!
40
SHBS 5 A1
Page 44

■ A hibás alkatrészeket csak eredeti alkatrészekre szabad cserélni. Csak
ilyen alkatrészekkel garantálható, hogy azok megfelelnek a biztonsági
követelményeknek.
■ A készüléket soha ne használja felügyelet nélkül, és mindig ügyeljen
a típustábla adataira.
■ Hálózati üzemeltetéshez csak a mellékelt hálózati adaptert használja.
■ Húzza ki a hálózati adaptert a csatlakozó aljzatból,
- ha hibát észlel,
- mielőtt tisztítja a készüléket,
- ha hosszabb ideig nem használja a készüléket,
- minden használat után.
Az adaptert ne a kábelnél fogva, hanem közvetlenül a csatlakozónál
fogva húzza ki.
■ FIGYELEM! Tartsa szárazon a készüléket.
■ Ne használja a készüléket fürdés közben. Áramütés veszélye áll fenn!
■ Soha ne merítse a készüléket vagy a kábelt a hálózati adapterrel vízbe
vagy más folyadékba.
■ Amennyiben a készülék vízbe esett, először feltétlenül a hálózati adap-
tert húzza ki a csatlakozó aljzatból, mielőtt a vízbe nyúl.
HU
SHBS 5 A1
■ Soha ne fogja meg a hálózati adaptert nedves kézzel, különösen akkor,
amikor azt a csatlakozó aljzathoz csatlakoztatja, ill. abból kihúzza.
Áramütés veszélye áll fenn!
41
Page 45

■ Egy legfeljebb 30 mA-es kioldási áramú áram-védőkapcsoló beszere-
lése további védelmet biztosít az áramütéssel szemben. A beszerelést
kizárólag villanyszerelő szakemberrel végeztesse.
■ Rendszeresen ellenőrizze a hálózati adaptert, valamint a haj- és sza-
kállvágó készüléket esetleges mechanikai hibák szempontjából.
HU
■ Ügyeljen arra, hogy a kábel ne szoruljon be szekrényajtókba vagy ne
legyen forró felületen. Ellenkező esetben a kábelszigetelés megsérülhet.
■ A hálózati adaptert csak egy jól hozzáférhető hálózati aljzatba csatlakoz-
tassa, hogy hiba esetén gyorsan ki lehessen húzni a hálózati aljzatból.
■ A túlzott felmelegedés elkerülése érdekében ne takarja le a hálózati
adaptert.
42
SHBS 5 A1
Page 46

A csomag tartalma
A készüléket alapvetően az alábbi elemekkel szállítjuk:
▯ haj- és szakállvágó
▯ töltő
▯ hálózati adapter
▯ hajvágó fej
▯ szakállvágó fej
▯ precíziós trimmelő fej
▯ orr-/fülszőr trimmelő fej
▯ borotvafej
▯ fésűfej a hajvágó fejhez
▯ fésűfej a szakállvágó fejhez
▯ tisztítókefe
▯ olló
▯ fésű
▯ pengeolaj
▯ tárolótok
▯ a jelen használati útmutató
TUDNIVALÓ
Ellenőrizze a csomag tartalmát, hogy hiánytalan-e és nincs-e rajta látható sérülés.
►
► Hiányos szállítás vagy a nem megfelelő csomagolásból eredő, illetve a szállítás során
keletkezett károk esetén forduljon az ügyfélszolgálathoz (lásd a Szerviz fejezetet).
♦ Vegye ki a kartoncsomagolásból a készülék valamennyi részét.
♦ Távolítson el minden csomagolóanyagot a készülékről.
HU
SHBS 5 A1
VESZÉLY
A csomagolóanyag nem játékszer. Fulladásveszély áll fenn.
►
43
Page 47

HU
Pótalkatrészek
Alkatrészigény esetén hívja ügyfélszolgálati közvetlen vonalunkat (lásd a Szerviz részben).
A csomagolás ártalmatlanítása
A csomagolás védi a készüléket a sérülésektől a szállítás során.
Nyersanyagot takarít meg és csökkenti a hulladékmennyiséget, ha a csomagolást visszajuttatja
az anyagkörforgásba. A feleslegessé vált csomagolóanyagokat a hatályos helyi előírásoknak
megfelelően helyezze el a hulladékban.
A készülék leírása
„A“ ábra:
hajvágó fej
2
tolókapcsoló vágáshossz-fi nombeállításhoz
3
be-/ki-kapcsoló
4
töltésellenőrző kijelző
5
töltőállomás / tartó csatlakozóaljzattal a hálózati adapter részére
„B“ ábra:
6
hálózati adapter
„C“ ábra:
7
szakállvágó fej
8
precíziós trimmelő fej
9
orr-/fülszőr trimmelő fej
10
borotváló fej
11
fésűfej a hajvágó fejhez
12
fésűfej a szakállvágó fejhez
44
SHBS 5 A1
Page 48

Üzembe helyezés előtt
A haj- és szakállvágó akkumulátorról vagy hálózatról üzemeltethető.
Az akkumulátor feltöltése
Az első használat előtt a haj- és szakállvágó készülék akkumulátorát legalább 90 percig ajánlott
tölteni.
♦ Csatlakoztassa a hálózati adapter 6 kábelét a haj- és szakállvágó töltőállomásához 5.
♦ Kerülje el a készülék sérülését! Mielőtt tölteni kezdi az akkumulátort, bizonyosodjon meg róla,
hogy a készülék ki van kapcsolva.
♦ Csatlakoztassa a hálózati adaptert 6 (széles feszültségtartomány: 100 - 240 V) az eszköz-
jellemzőknek megfelelő csatlakozó aljzatba.
♦ A töltési folyamatot a töltésellenőrző kijelző 4 mutatja:
- töltésellenőrző kijelző pirosan villog: az akkumulátor lemerült
- töltésellenőrző kijelző pirosan világít: az akkumulátor töltése folyamatban van
- töltésellenőrző kijelző zölden világít: az akkumulátor fel van töltve.
♦ Teljesen feltöltött akkumulátorral a készüléket mintegy 60 percig üzemeltetheti elektromos
hálózatra csatlakoztatás nélkül.
Üzemeltetés hálózati adapterrel
Ha haj- és szakállvágó készüléke lemerült vagy gyenge akkumulátor miatt borotválkozás közben
leáll, akkor a borotválkozást csatlakoztatott hálózati adapterrel 6 folytathatja.
♦ Csatlakoztassa a hálózati adapter 6 kábelcsatlakozóját a haj- és szakállvágó alján lévő
aljzatba.
♦ A sérülések és a készülék károsodásának elkerülése érdekében mindig kapcsolja ki a készüléket,
mielőtt csatlakoztatja az elektromos hálózathoz.
♦ Csatlakoztassa a hálózati adaptert 6 (széles feszültségtartomány: 100 - 240 V) az eszköz-
jellemzőknek megfelelő csatlakozó aljzatba.
♦ 1 - 2 másodperc múlva bekapcsolhatja a készüléket a be-/ki-kapcsolóval 3. Amennyiben
a készülék nem indul azonnal, kapcsolja ki még egyszer és várjon kb. 1 percet, mielőtt újra
bekapcsolja.
♦ Ha az akkumulátort a töltőállomás 5 használata nélkül akarja ilyen módon feltölteni, akkor
azt csak kikapcsolt készülékkel tegye.
HU
SHBS 5 A1
45
Page 49

HU
Vágófejek olajozása
Ajánlatos a hajvágó fejet , a szakállvágó fejet 7 és a precíziós trimmelő fejet 8 az első
használat előtt és tisztítás után beolajozni annak érdekében, hogy azok megtartsák mozgékonyságukat.
♦ Tegyen egy-két csepp pengeolajat (tartozék) a pengék közé, és oszlassa el egyenletesen.
♦ Szükség esetén a felesleges olajat puha törlőkendővel törölje le. Csak savmentes olajat,
pl. varrógépolajat használjon.
Kezelés és üzemeltetés
A vágófejek behelyezése/cseréje
FIGYELMEZTETÉS
► Kapcsolja ki a készüléket, mielőtt a vágófejeket behelyezi/kicseréli.
Balesetveszély!
♦ Nyomja meg elölről hüvelykujjával a vágófejet, hogy ki tudja venni a tartóból (lásd D ábrát).
Vegye le a vágófejet a készülékről.
♦ A vágófej ráhelyezéséhez vezesse az alsó beilleszthető fület a készülék nyílásába (lásd E ábrát).
♦ Ezt követően nyomja a vágófej felső részét a készülékre, amíg az hallhatóan be nem kattan
és megfelelően rögzítve van (lásd F ábrát).
A fésűfejek behelyezése/cseréje
Fésűfej a hajvágó fejhez
A fésűfej 11 6 különböző vágáshosszhoz (13 mm / 15 mm / 17 mm / 19 mm / 21 mm / 23 mm)
kínál beállításokat.
♦ Helyezze a fésűfejet 11 elölről a hajvágó fejre és nyomja meg erősen a hátsó végét, amíg
be nem kattan.
♦ A fésűfej 11 levételéhez lazítsa meg az alsó végét, majd húzza le előrefelé a készülékről.
46
SHBS 5 A1
Page 50

Fésűfej a szakállvágó fejhez
A fésűfej 12 6 különböző vágáshosszhoz (4 mm / 6 mm / 9 mm / 12 mm / 15 mm / 18 mm) kínál
beállításokat.
♦ Helyezze a fésűfejet 12 elölről a szakállvágó fejre 7 és tolja lefelé.
♦ Ha le akarja venni a fésűfejet 12, tolja le előrefelé a készülékről.
Hajvágó fej
TUDNIVALÓ
A vágandó haj legyen tiszta és száraz.
►
► Alaposan fésülje meg a haját, hogy kibogozza az esetleges csomókat.
► Annak érdekében, hogy megakadályozza a hajmaradékok beesését a gallér mögé, tegyen
beterítő kendőt vagy kendőt a nyaka és tarkója köré.
► Kezdje először egy hosszabb vágás-hosszúságú fésűfejjel 11, és a vágás során fokozatosan
állítson be rövidebb vágáshosszakat.
► Kérjük ügyeljen arra, hogy a megfelelő vágáshossz csak akkor valósul meg, ha a tolókap-
csoló 2 a 3 pozícióban van és a készüléket merőlegesen tartja a bőrfelületre.
♦ Kapcsolja be a haj- és szakállvágót a be-/ki-kapcsolóval 3.
♦ Vezesse végig lassan a haj- és szakállvágót a hajon.
♦ Közben úgy tartsa a készüléket, hogy a fésűfej 11 lehetőleg laposan feküdjön fel.
♦ Mindig a tarkó felől vágjon a fejtető irányába, ill. a homloktól és halántéktól felfelé a fejközép
felé.
♦ Használja a hajvágó fejet fésűfej 11 nélkül, ha nagyon rövidre kívánja vágni a hajat.
♦ A tolókapcsoló 2 segítségével a kívánt vágáshosszt 3 fokozatban változtathatja.
HU
SHBS 5 A1
47
Page 51

HU
Szakállvágó fej
TUDNIVALÓ
Fésülje át a szakállat növekedési irányban, hogy kibogozza az esetleges csomókat.
►
► Kezdje először egy hosszabb vágás-hosszúságú fésűfejjel 12, és a vágás során fokozatosan
állítson be rövidebb vágáshosszakat.
► Kérjük ügyeljen arra, hogy a megfelelő vágáshossz csak akkor valósul meg, ha a tolókap-
2
csoló
a 3 pozícióban van és a készüléket merőlegesen tartja a bőrfelületre.
♦ Vágja a szakállat a növekedési iránnyal szemben (az álltól a fül felé). Trimmelje először az
egyik, majd a másik oldalt.
♦ Használja a szakállvágó fejet 7 fésűfej 12 nélkül, ha nagyon rövidre kívánja vágni a szakállt,
vagy bajuszt és kontúrt kíván vágni.
♦ A tolókapcsoló 2 segítségével a kívánt vágáshosszt 3 fokozatban változtathatja.
Precíziós trimmelő fej
♦ Használja a precíziós trimmelő fejet 8 bajusz, pofaszakáll, barkó vagy szemöldök formázására.
♦ Tartsa a precíziós trimmelő fej 8 élét a szőrtő kívánt magasságára és mozgassa a készüléket
lefelé.
Orr-/fülszőr trimmelő fej
♦ Használja az orr-/fülszőr trimmelő fejet 9, ha orr- vagy fülszőrt szeretne eltávolítani.
♦ Az orr-/fülszőr trimmelő fejnek 9 csak a fémhegyét vezesse be lassan egy orrlyukba vagy fülbe.
♦ Mozgassa a készüléket lassan körözve, a szőrök levágásához.
Borotvafej
48
♦ Használja a borotvafejet 10 száraz borotválkozáshoz.
♦ Tartsa a készüléket merőlegesen a bőrfelületre és futtassa végig óvatosan az arcán.
♦ Borotváljon a szakáll növekedési irányával szemben. A nehezen elérhető helyeken, pl. állánál
feszítse ki a bőrt, hogy jobb eredményt érjen el.
SHBS 5 A1
Page 52

Tisztítás és ápolás
VESZÉLY
Életveszély áramütés következtében!
► Húzza ki a hálózati adaptert 6 a hálózati aljzatból, mielőtt a készüléket tisztítja.
► Soha ne fogja meg a hálózati adaptert 6 nedves kézzel, amikor azt a hálózati aljzathoz
csatlakoztatja, ill. kihúzza onnan.
► A hálózati adaptert 6 és a kábelt mindig tartsa szárazon.
FIGYELEM
A készülék megsérülhet.
► A haj- és szakállvágó készüléket tisztításkor nem szabad vízbe vagy más folyadékba meríteni,
mivel a készülék nem vízálló. A víztől megsérülhetnek az áramot vezető alkatrészek (akku-
mulátor).
► Ne használjon erős vagy súroló hatású tisztítószert, mert ez kárt tehet a készülék felületében.
► A burkolatot kizárólag enyhén nedves törlőruhával és gyenge hatású mosogatószerrel
tisztítsa.
♦ Kapcsolja ki a haj- és szakállvágót a be-/ki-kapcsolóval 3.
♦ Válassza le a kábelt a készülékről és húzza ki a hálózati adaptert 6 az aljzatból.
♦ Vegye le az esetlegesen felhelyezett fésűfejet (11 vagy 12) a készülékről.
♦ Ha szükséges, mossa le a fésűfejet (11 vagy 12) folyó vízzel.
♦ Ezt követően alaposan szárítsa meg a fésűfejet (11 vagy 12).
♦ Nyomja meg elölről hüvelykujjával a vágófejet, hogy kitudja venni a tartóból (lásd D ábrát).
♦ Távolítsa el a mellékelt tisztítókefével a megmaradt hajszálakat a vágófejről.
♦ A tisztítás elvégzése után illessze vissza a vágófej beilleszthető fülét a készülék nyílásába (lásd
E ábrát).
♦ A vágófejet felülről történő enyhe nyomással pattintsa vissza (lásd F ábrát).
HU
SHBS 5 A1
49
Page 53

TUDNIVALÓ
A súrlódás csökkentése érdekében, tegyen egy-két csepp pengeolajat (tartozék) a pengék
►
közé, és oszlassa el egyenletesen. Bármilyen egyéb savmentes olajat (pl. varrógépolajat)
is használhat. Szükség esetén a felesleges olajat puha törlőkendővel törölje le.
A borotvafej tisztítása
HU
FIGYELEM
A készülék megsérülhet.
► Ne szerelje ki a borotvaszitát a borotvaszita-keretből és ne tisztítsa a borotvaszitát a tisztító-
kefével.
♦ Vegye le a borotvafejet 10 a készülékről.
♦ Nyomja felfelé a borotvafej 10 oldalt elhelyezett gombjait és húzza le a borotvaszita-keretet.
Közben csak oldalról tartsa a borotvaszita-keretet és ne nyomja meg a borotvaszitát.
♦ Tisztítsa meg a kést a készülékhez mellékelt tisztítókefével.
♦ Tisztítsa meg a borotvaszitát a borotvaszita-keretben folyó víz alatt és hagyja teljesen megszá-
radni, mielőtt visszateszi a borotvafejre 10.
♦ Tegye vissza a borotvaszita-keretet a borotvafejre 10. A visszahelyezésnél ügyeljen arra, hogy
a borotvaszita-keret rögzítőfülei a borotvafej 10 megfelelő mélyedéseibe illeszkedjenek és
nyomja kissé lefelé a borotvaszita-keretet, amíg az hallhatóan be nem kattan.
TUDNIVALÓ
Időnként tegyen egy-két csepp pengeolajat (tartozék) a késre, és oszlassa el egyenletesen.
►
Tegye rá a borotvafejet 10 a készülékre és hagyja néhány percig működni a készüléket,
anélkül hogy használná. Szükség esetén a felesleges olajat puha törlőkendővel törölje le.
50
SHBS 5 A1
Page 54

Orr-/fülszőr trimmelő fej tisztítása
♦ Vegye le az orr-/fülszőr trimmelő fejet 9 a készülékről.
♦ Tisztítsa meg az orr-/fülszőr trimmelő fejet 9 folyó víz alatt és hagyja teljesen megszáradni,
mielőtt újra használja.
Ártalmatlanítás
A készülék ártalmatlanítása
Semmi esetre se dobja a készüléket a háztartási hulladékba. Ez a termék az
európai 2012/19/EU (Waste Electrical and Electronic Equipment) irányelv alá
tartozik.
A készüléket engedélyeztetett hulladékgyűjtő helyen vagy a helyi hulladékeltávolító üzemnél tudja
leadni. Vegye fi gyelembe az érvényben lévő előírásokat. Ha bizonytalan, vegye fel a kapcsolatot
a hulladékkezelővel.
TUDNIVALÓ
A készülék ártalmatlanítása előtt feltétlenül ki kell venni belőle az akkumulátort.
►
FIGYELEM
Az akkumulátor kiszereléséhez kevés kézügyesség szükséges, ellenkező esetben balesetve-
►
szély áll fenn! Amennyiben nincs tapasztalata szerszámok használatában, az akkumulátor
kiszerelését bízza olyan személyre, aki azt szakszerűen el tudja végezni.
► A kiszerelésnél ügyeljen arra, hogy az akkumulátor ne sérüljön meg. Tűzveszély!
► A kiszerelt akkumulátort nem szabad ismét használni.
► Soha ne zárja rövidre az akkumulátort. A kiszerelt akkumulátor pólusai nem érintkezhetnek
fémes tárgyakkal. Az akkumulátor túlhevülhet és felrobbanhat.
► FIGYELEM! Az akkumulátort csak az ártalmatlanításhoz szerelje ki a készülékből.
Az akkumulátor kiszerelése révén a készülék tönkremegy. Ne működtessen újra szétszedett
készüléket.
HU
SHBS 5 A1
51
Page 55

HU
♦ Válassza le a készüléket a hálózatról.
♦ Kapcsolja be a készüléket és hagyja addig üzemelni, amíg az akkumulátor le nem merül.
♦ Vegye le a vágófejet a készülékről (lásd A vágófejek behelyezése/cseréje fejezetet).
♦ A készülék hátoldalán három csavar található. A csavarok közül kettő a készülék nyílásában
van.
♦ Lazítsa meg a csavarokat egy csillagcsavarhúzóval.
♦ Vegye le a készülék hátoldalát.
♦ Szüntesse meg egy csípőfogóval / lapos csavarhúzóval az akkumulátor és az alaplap közötti
kapcsolatot. Vegye ki az akkumulátort. Az akkumulátort és a készüléket egymástól elkülönítve
adja le megfelelő ártalmatlanításra.
Az elemek/akkumulátorok ártalmatlanítása
Az elemeket/akkumulátorokat nem szabad a háztartási hulladékba dobni. Minden felhasználó
törvényes kötelessége, hogy az elemeket/akkumulátorokat lakóhelye gyűjtőhelyén vagy a
kereskedőnél adja le. Ez a kötelezettség azt a célt szolgálja, hogy az elemek/akkumulátorok
környezetkímélő ártalmatlanításra kerülhessenek. Az elemeket és akkumulátorokat csak lemerült
állapotban adja le.
52
SHBS 5 A1
Page 56

Függelék
Műszaki adatok
Hálózati adapter PTB-045100EU
Bemeneti feszültség 100 - 240 V ∼, 50 / 60 Hz
Kimeneti feszültség 4,5 V
Kimeneti áram 1000 mA
Védelmi osztály
Haj- és szakállvágó
Bemeneti feszültség 4,5 V
Bemeneti áram 1000 mA
Akkumulátor Li-Ion akkumulátor 3,7 V, 700 mAh
Környezeti hőmérséklet 5°C ... 35°C
A megfelelőségi nyilatkozatra vonatkozó tudnivalók
A készülék megfelel az elektromágneses összeférhetőségre vonatkozó
2004/108/EC irányelv, valamint az alacsony feszültségű készülékekre
vonatkozó 2006/95/EC irányelv alapvető elvárásainak és egyéb vonatkozó
előírásoknak.
A teljes eredeti megfelelőségi nyilatkozat a gyártónál szerezhető be.
II /
HU
Garancia
SHBS 5 A1
A készülékre 3 év garanciát adunk a vásárlás dátumától számítva. A készüléket gondosan gyártottuk, és szállítás előtt lelkiismeretesen ellenőriztük.
Kérjük, a vásárlás igazolására őrizze meg a pénztári blokkot. Kérjük, garanciaigény esetén vegye
fel a kapcsolatot telefonon az Ön közelében lévő szervizzel. Csak ebben az esetben garantálhatjuk,
hogy ingyen tudja beküldeni az árut.
53
Page 57

HU
TUDNIVALÓ
A garancia csak anyag- és gyártási hibára vonatkozik, nem pedig szállítási kárra, kopásra
►
vagy törékeny részek (pl. kapcsoló vagy elem) sérülésére.
A termék kizárólag magánhasználatra, nem kereskedelmi használatra készült. A garancia
érvényét veszti visszaélésszerű vagy szakavatatlan kezelés, erőszak alkalmazása vagy olyan
beavatkozások esetén, amelyeket nem engedélyeztetett szervizelő üzleteink hajtottak végre.
Az ön törvényes jogait ez a garancia nem korlátozza. A garancia ideje nem hosszabbodik a
jótállással. Ez érvényes a cserélt és javított alkatrészekre is.
Az esetlegesen már vételkor meglévő károkat és hiányosságokat kicsomagolás után azonnal, de
legkésőbb 2 nappal a vásárlás után jelezni kell.
A garancia idejének lejárta után esedékes javítások költségtérítésesek.
Szerviz
Szerviz Magyarország
Tel.: 0640 102785
E-Mail: kompernass@lidl.hu
IAN 96126
Az ügyfélszolgálati forródrót elérhetősége:
hétfőtől péntekig 8.00 és 20.00 óra között (közép-európai idő szerint)
Gyártja
KOMPERNASS HANDELS GMBH
BURGSTRASSE 21
44867 BOCHUM
GERMANY
www.kompernass.com
54
SHBS 5 A1
Page 58

Kazalo
Uvod . . . . . . . . . . . . . . . . . . . . . . . . . . 56
Informacije o teh navodilih za uporabo. . . . . 56
Avtorske pravice . . . . . . . . . . . . . . . . . . . . . . 56
Omejitev odgovornosti . . . . . . . . . . . . . . . . . . 56
Predvidena uporaba . . . . . . . . . . . . . . . . . . . 56
Opozorila v teh navodilih . . . . . . . . . . . . . . . 57
Varna uporaba . . . . . . . . . . . . . . . . . 58
Osnovni varnostni napotki . . . . . . . . . . . . . . . 58
Vsebina kompleta . . . . . . . . . . . . . . . 61
Rezervni deli . . . . . . . . . . . . . . . . . . . . . . . . . 62
Odstranitev embalaže med odpadke . . . . . . 62
Opis naprave. . . . . . . . . . . . . . . . . . . 62
Pred prvo uporabo . . . . . . . . . . . . . . 63
Polnjenje akumulatorskih baterij . . . . . . . . . . . 63
Uporaba z omrežnim napajalnikom . . . . . . . 63
Oljenje rezalnih nastavkov. . . . . . . . . . . . . . . 64
Uporaba in delovanje. . . . . . . . . . . . 64
Natikanje/menjava rezalnih nastavkov . . . . . 64
Natikanje/menjava nastavkov z glavnikom . . 64
Nastavek za striženje las . . . . . . . . . . . . . . . . 65
Nastavek za britje brade . . . . . . . . . . . . . . . . 66
Nastavek za natančno oblikovanje . . . . . . . . 66
Nastavek za britje dlačic v nosu/ušesih . . . . 66
Nastavek za britje . . . . . . . . . . . . . . . . . . . . . 66
Čiščenje in vzdrževanje . . . . . . . . . . 67
Čiščenje nastavka za britje . . . . . . . . . . . . . . 68
Nastavek za britje dlačic v nosu/ušesih . . . . 69
Odstranjevanje med odpadke . . . . . 69
Odstranitev naprave med odpadke . . . . . . . . 69
Odstranitev baterij/akumulatorjev . . . . . . . . . 70
Priloga . . . . . . . . . . . . . . . . . . . . . . . . 71
Tehnični podatki . . . . . . . . . . . . . . . . . . . . . . . 71
Opombe v zvezi z izjavo o skladnosti . . . . . . 71
Proizvajalec . . . . . . . . . . . . . . . . . . . . . . . . . . 71
Servis . . . . . . . . . . . . . . . . . . . . . . . . . . . . . . . 72
Garancijski list . . . . . . . . . . . . . . . . . . . . . . . . 72
SI
SHBS 5 A1
55
Page 59

Uvod
Informacije o teh navodilih za uporabo
Iskrene čestitke ob nakupu vaše nove naprave.
Odločili ste se za kakovosten izdelek. Navodila za uporabo so sestavni del izdelka. Vsebujejo
pomembne napotke za varnost, uporabo in odstranjevanje naprave med odpadke. Preden začnete
izdelek uporabljati, se seznanite z vsemi napotki o njegovi uporabi in varnosti. Izdelek uporabljajte
le tako, kot je opisano v navodilih, in samo za navedena področja uporabe. Ta navodila za
uporabo dobro shranite. Ob predaji izdelka tretji osebi zraven priložite vso dokumentacijo.
SI
Avtorske pravice
Ta dokumentacija je zaščitena z avtorskimi pravicami.
Vsakršno razmnoževanje oz. ponatis, tudi deloma, ter predvajanje slik, tudi v spremenjenem
stanju, so dovoljeni le s pisnim dovoljenjem proizvajalca.
Omejitev odgovornosti
Vse tehnične informacije, podatki in napotki za priključitev in uporabo naprave, ki so navedeni
v teh navodilih, ustrezajo zadnjemu stanju informacij neposredno pred tiskanjem in so rezultat
naših dosedanjih izkušenj in ugotovitev ter v skladu z našim najboljšim znanjem.
Iz podatkov, slik in opisov v teh navodilih ni mogoče izpeljevati nikakršnih zahtevkov.
Proizvajalec ne prevzame nikakršne odgovornosti za škodo, nastalo zaradi neupoštevanja teh
navodil za uporabo, nepredvidene uporabe, nestrokovnih popravil, nedovoljenih sprememb ali
uporabe nedovoljenih nadomestnih delov.
Predvidena uporaba
Ta naprava je namenjena le za zasebno uporabo in je ni dovoljeno uporabljati za poslovne
namene. Aparat je predviden samo za striženje naravnih dlak. Uporabljati se sme samo za
človeške lase in dlake, ne pa tudi za umetne lase ali živalske dlake.
Kakršna koli druga ali drugačna uporaba od navedene velja za nepredvideno. Uveljavljanje
kakršnih koli zahtevkov zaradi škode, nastale zaradi nepredvidene uporabe, je izključeno.
Tveganje nosi izključno uporabnik.
56
SHBS 5 A1
Page 60

Opozorila v teh navodilih
V teh navodilih za uporabo se uporabljajo naslednje vrste opozoril:
NEVARNOST
Opozorilo na tej stopnji nevarnosti označuje grozečo nevarno situacijo.
Če nevarne situacije ne preprečite, lahko pride do smrti ali do težkih poškodb.
► Upoštevajte navodila v tem opozorilu, da preprečite nevarnost smrti ali težkih poškodb oseb.
OPOZORILO
Opozorilo te stopnje nevarnosti označuje morebitno nevarno situacijo.
Če nevarne situacije ne preprečite, lahko pride do telesnih poškodb.
► Upoštevajte navodila v tem opozorilu, da preprečite telesne poškodbe oseb.
POZOR
Opozorilo te stopnje nevarnosti označuje morebitno materialno škodo.
Če situacije ne preprečite, lahko pride do materialne škode.
► Upoštevajte navodila v tem opozorilu, da preprečite materialno škodo.
NAPOTEK
Napotek označuje dodatne informacije, ki vam olajšajo delo z napravo.
►
SI
SHBS 5 A1
57
Page 61

SI
Varna uporaba
V tem poglavju najdete pomembne varnostne napotke za ravnanje z
napravo. Ta naprava ustreza predpisanim varnostnim določilom. Nepravilna uporaba lahko privede do poškodb oseb in materialne škode.
Osnovni varnostni napotki
Za varno ravnanje z napravo upoštevajte naslednje varnostne napotke:
■ Otroci od 8 let starosti naprej in osebe z zmanjšanimi fi zičnimi, zaznavnimi
ali duševnimi sposobnostmi ali s pomanjkljivimi izkušnjami in znanjem
to napravo lahko uporabljajo le, če jih pri tem nekdo nadzoruje ali jih
je poučil o varni uporabi naprave in so razumeli nevarnosti, ki izhajajo
iz uporabe naprave. Otroci se ne smejo igrati z napravo. Otroci tudi ne
smejo naprave čistiti ali vzdrževati kot uporabniki, če pri tem niso pod
nadzorom.
■ Pred uporabo preverite, ali so na napravi vidne morebitne zunanje
poškodbe. Poškodovane naprave ne uporabljajte več. Obstaja nevarnost električnega udara.
■ Če bi ugotovili poškodbe na kablu, na omrežnem napajalniku, na ohišju
ali na drugih delih, ne smete nadaljevati z uporabo naprave.
■ Popravilo naprave prepustite samo pooblaščenim strokovnim delav-
nicam ali servisni službi. Zaradi nestrokovnih popravil lahko pride do
velikih nevarnosti za uporabnika. Poleg tega preneha veljati garancija.
■ Aparata ne uporabljajte z okvarjenim rezalnim nastavkom ali z okvarje-
nim nastavkom z glavnikom, ker bi ta lahko imela ostre robove. Obstaja
nevarnost poškodb!
58
SHBS 5 A1
Page 62

■ Okvarjene dele naprave lahko zamenjate le za originalne nadomestne
dele. Samo pri teh delih je zagotovljeno, da bodo izpolnjene zahteve
glede varnosti naprave.
■ Naprave nikoli ne uporabljajte brez nadzora in samo v skladu s
podatki na tipski tablici.
■ Za napajanje iz električnega omrežja uporabljajte samo priloženi
omrežni napajalnik.
■ Vtič omrežnega napajalnika potegnite iz vtičnice:
- če se pojavi motnja,
- preden napravo začnete čistiti,
- kadar naprave dlje časa ne uporabljate,
- po vsaki uporabi.
Pri tem vlecite neposredno za omrežni napajalnik in ne za kabel.
■ POZOR! Napravo hranite na suhem.
■ Naprave ne uporabljajte med kopanjem. Obstaja nevarnost električnega
udara!
■ Naprave in kabla z omrežnim napajalnikom nikoli ne potopite v vodo
ali kakšno drugo tekočino.
■ Če bi vam naprava padla v vodo, obvezno najprej izvlecite omrežni
napajalnik iz vtičnice, preden sežete v vodo.
SI
SHBS 5 A1
■ Omrežnega napajalnika nikoli ne prijemajte z mokrimi rokami, še pose-
bej, kadar ga vtikate v vtičnico oz. vlečete iz nje.
Obstaja nevarnost električnega udara!
59
Page 63

SI
■ Vgradnja zaščitne naprave za okvarne tokove z nazivnim diferenčnim
tokom do ne več kot 30mA nudi še dodatno zaščito pred električnim
udarom. Napravo naj vam vgradi izključno električar.
■ Omrežni napajalnik in aparat za striženje las in brade redno preverjajte
glede morebitnih mehanskih okvar.
■ Pazite na to, da se kabel ne zatakne za vrata omare ali spelje čez
vroče površine. Drugače bi se izolacija kabla lahko poškodovala.
■ Omrežni napajalnik priključite samo na dobro dosegljivo vtičnico, da
lahko v primeru motnje omrežni napajalnik hitro potegnete iz vtičnice.
■ Omrežnega napajalnika ne prekrivajte, da preprečite njegovo nedovo-
ljeno segrevanje.
60
SHBS 5 A1
Page 64

Vsebina kompleta
Naprava ob nakupu standardno vsebuje naslednje sestavne dele:
▯ Aparat za striženje las in brade
▯ Polnilna postaja
▯ Omrežni napajalnik
▯ Nastavek za striženje las
▯ Nastavek za britje brade
▯ Nastavek za natančno oblikovanje
▯ Nastavek za britje dlačic v nosu/ušesih
▯ Nastavek za britje
▯ Nastavek z glavnikom za nastavek za striženje las
▯ Nastavek z glavnikom za nastavek za britje brade
▯ Ščetka za čiščenje
▯ Škarje
▯ Glavnik
▯ Olje za rezilo
▯ Torbica za shranjevanje
▯ Ta navodila za uporabo
NAPOTEK
Preverite, ali komplet vsebuje vse sestavne dele in ali ti nimajo vidnih poškodb.
►
► V primeru nepopolne dobave ali poškodb zaradi pomanjkljive embalaže ali transporta
se obrnite na telefonsko servisno službo (glejte poglavje Servis).
♦ Vse dele naprave vzemite iz škatle.
♦ Z naprave odstranite ves embalažni material.
SI
SHBS 5 A1
NEVARNOST
► Embalažnih materialov ni dovoljeno uporabljati za igro.
Obstaja nevarnost zadušitve.
61
Page 65

Rezervni deli
Če potrebujete nadomestne dele, se ravno tako obrnite na servisno telefonsko službo
(glejte poglavje Servis).
Odstranitev embalaže med odpadke
Embalaža napravo varuje pred poškodbami med prevozom.
Povratek embalaže v krogotok materialov pomeni prihranek surovin in manj odpadkov. Nepotreb-
ne embalažne materiale odstranite med odpadke v skladu z veljavnimi lokalnimi predpisi.
SI
Opis naprave
Slika A:
nastavek za striženje las
2
drsno stikalo za fi no prilagajanje dolžine reza
3
stikalo za vklop/izklop
4
nadzorni prikaz polnjenja
5
polnilna postaja/držalo s priključno vtičnico za omrežni napajalnik
Slika B:
6
omrežni napajalnik
Slika C:
7
nastavek za britje brade
8
nastavek za natančno oblikovanje
9
nastavek za britje dlačic v nosu/ušesih
10
nastavek za britje
11
nastavek z glavnikom za nastavek za striženje las
12
nastavek z glavnikom za nastavek za britje brade
62
SHBS 5 A1
Page 66

Pred prvo uporabo
Aparat za striženje las in brade se lahko uporablja kot akumulatorska ali omrežna naprava.
Polnjenje akumulatorskih baterij
Pred prvo uporabo je treba akumulatorsko baterijo aparata za striženje las in brade polniti
najmanj 90 minut.
♦ Povežite kabel omrežnega napajalnika 6 s polnilno postajo 5 aparata za striženje las in
brade.
♦ Izogibajte se poškodbam naprave! Zagotovite, da je naprava izklopljena, preden akumulatorsko
baterijo začnete polniti.
♦ Vtaknite omrežni napajalnik 6 (obsega področje napetosti 100–240 V) v vtičnico, ki je
v skladu z navedbami za napravo.
♦ Postopek polnjenja prikazuje nadzorni prikaz polnjenja 4:
- nadzorni prikaz polnjenja utripa rdeče: akumulatorska baterija je spraznjena
- nadzorni prikaz polnjenja sveti rdeče: akumulatorska baterija se polni
- nadzorni prikaz polnjenja sveti zeleno: akumulatorska baterija je napolnjena
♦ Z napolnjeno akumulatorsko baterijo lahko napravo uporabljate do pribl. 60 minut brez
priključitve na električno omrežje.
Uporaba z omrežnim napajalnikom
Če se vaš aparat za striženje las in brade zaradi izpraznjene ali šibke akumulatorske baterije
med britjem zaustavi, lahko z britjem nadaljujete pri priključenem omrežnem napajalniku 6.
♦ Vtaknite vtič kabla omrežnega napajalnika 6 v vtičnico na spodnji strani aparata za striženje
las in brade.
♦ Da preprečite poškodbe in škodo naprave, to vedno izklopite, preden jo povežete z električnim
omrežjem.
♦ Vtaknite omrežni napajalnik 6 (obsega področje napetosti 100–240 V) v vtičnico, ki je
v skladu z navedbami za napravo.
♦ Po 1–2 sekundah lahko napravo vklopite s stikalom za vklop/izklop 3. Če naprave ne bi bilo
mogoče takoj zagnati, jo ponovno izklopite in počakajte pribl. 1 minuto, preden jo ponovno
vklopite.
♦ Če želite na ta način napolniti akumulatorsko baterijo brez uporabe polnilne postaje 5,
potem to lahko storite le, če je naprava izklopljena.
SI
SHBS 5 A1
63
Page 67

Oljenje rezalnih nastavkov
Priporočamo vam, da nastavek za striženje las , za britje brade 7 in nastavek za natančno
oblikovanje 8 pred prvo uporabo in po čiščenju naoljite, da ohranite njihovo premičnost.
♦ V ta namen med rezila dajte eno do dve kapljici olja za rezila (iz pribora) in ga enakomerno
porazdelite.
♦ Odvečno olje po potrebi obrišite z mehko krpo. Uporabljajte samo olje brez kislin, kot npr.
olje za šivalne stroje.
Uporaba in delovanje
SI
Natikanje/menjava rezalnih nastavkov
OPOZORILO
► Preden začnete natikati ali menjavati rezalne nastavke, napravo izklopite.
Obstaja nevarnost poškodb!
♦ Od spredaj s palcem pritisnite na rezalni nastavek, da ga sprostite iz držala (glejte sliko D).
Rezalni nastavek snemite z naprave.
♦ Za namestitev rezalnega nastavka spodnji zatični jeziček vtaknite v sprejemno odprtino naprave
(glejte sliko E).
♦ Potem zgornji del rezalnega nastavka potisnite na napravo, tako da se slišno zaskoči in je
trdno pritrjen (glejte sliko F).
Natikanje/menjava nastavkov z glavnikom
Nastavek z glavnikom za nastavek za striženje las
Nastavek z glavnikom 11 omogoča nastavitve za 6 različnih dolžin reza (13 mm/15 mm/
17 mm/19 mm/21 mm/23 mm).
♦ Nataknite nastavek z glavnikom 11 od spredaj na nastavek za striženje las in pritisnite
na zadnjo stran, tako da se zaskoči.
♦ Za odstranitev nastavka z glavnikom 11 tega na njegovem spodnjem koncu ločite in ga
pomaknite naprej ter z naprave.
64
SHBS 5 A1
Page 68

Nastavek z glavnikom za nastavek za britje brade
Nastavek z glavnikom 12 omogoča nastavitve za 6 različnih dolžin reza (4 mm/6 mm/9 mm/
12 mm/15 mm/18 mm).
♦ Nataknite nastavek z glavnikom 12 od spredaj na nastavek za britje brade 7 in ga potisnite
navzdol.
♦ Za odstranjevanje nastavka z glavnikom 12 tega potisnite naprej in ga snemite z naprave.
Nastavek za striženje las
NAPOTEK
Lasje za striženje morajo biti čisti in suhi.
►
► Lase skrbno prečešite, da odstranite morebitne vozličke.
► Okrog vratu položite frizersko ogrinjalo ali brisačo, da preprečite, da bi ostanki las padali
za ovratnik.
► Najprej začnite z nastavkom z glavnikom 11 za daljšo dolžino reza in med potekom striženja
postopoma nastavljajte krajše dolžine reza.
► Prosimo, upoštevajte, da boste ustrezno dolžino reza dosegli le, če se drsno stikalo 2
nahaja v položaju 3 in napravo držite pod pravim kotom na površino kože.
♦ Vklopite aparat za striženje las in brade s stikalom za vklop/izklop 3.
♦ Aparat za striženje las in brade počasi pomikajte skozi lase.
♦ Pri tem aparat držite tako, da se nastavek z glavnikom 11 čim bolj plosko prilega.
♦ Vedno začnite striči na vratu in nadaljujte v smeri zgornjega dela glave oz. s čela in senc
navzgor k sredini glave.
♦ Uporabljajte nastavek za striženje las brez nastavka z glavnikom 11, da lase postrižete
zelo na kratko.
♦ Z drsnim stikalom 2 lahko želeno dolžino reza malce prilagodite v 3 stopnjah.
SI
SHBS 5 A1
65
Page 69

SI
Nastavek za britje brade
NAPOTEK
Brado prečešite v smeri rasti dlak, da odstranite morebitne vozličke.
►
► Najprej začnite z nastavkom z glavnikom 12 za daljšo dolžino reza in med potekom striženja
postopoma nastavljajte krajše dolžine reza.
► Prosimo, upoštevajte, da boste ustrezno dolžino reza dosegli le, če se drsno stikalo 2
nahaja v položaju 3 in napravo držite pod pravim kotom na površino kože.
♦ Brado brijte v nasprotni smeri rasti dlak (od brade navzgor proti ušesom). Najprej oblikujte
eno, potem pa še drugo stran.
♦ Uporabljajte nastavek za britje brade las 7 brez nastavka z glavnikom 12, da brado ali brke
ter robove postrižete zelo na kratko.
♦ Z drsnim stikalom 2 lahko želeno dolžino reza malce prilagodite v 3 stopnjah.
Nastavek za natančno oblikovanje
♦ Nastavek za natančno oblikovanje 8 uporabljajte za prirezovanje brkov, zalizcev ali obrvi.
♦ Položite rob nastavka za natančno oblikovanje 8 na želeni višini roba las in napravo pomikajte
navzdol.
Nastavek za britje dlačic v nosu/ušesih
♦ Nastavek za britje dlačic v nosu/ušesih 9 uporabljajte, kadar želite odstraniti dlake v nosu
ali ušesih.
♦ V nosnico ali v uho počasi pomikajte le kovinsko konico nastavka za britje dlačic v nosu/
ušesu 9.
♦ Napravo počasi premikajte v krogih, da pobrijete dlačice v votlinah.
Nastavek za britje
♦ Nastavek za britje 10 uporabljajte za suho britje.
♦ Napravo pod pravim kotom položite na površino kože in jo narahlo pomikajte po obrazu.
♦ Brijte se v nasprotni smeri rasti dlak. Na težavnih mestih kot npr. na bradi kožo napnite,
da dosežete boljši rezultat.
66
SHBS 5 A1
Page 70

Čiščenje in vzdrževanje
NEVARNOST
Smrtna nevarnost zaradi električnega udara!
► Povlecite omrežni napajalnik 6 iz vtičnice, preden napravo začnete čistiti.
► Omrežnega napajalnika 6 nikoli ne prijemajte z mokrimi rokami, še posebej, kadar ga
vtikate v vtičnico oz. vlečete iz nje.
► Omrežni napajalnik 6 in kabel vedno ohranjajte suha.
POZOR
Možne poškodbe naprave
► Aparata za striženje las in brade pri čiščenju ni dovoljeno potopiti v vodo ali druge tekočine,
ker naprava ni neprepustna za vodo. Zaradi tega bi se lahko poškodovali sestavni deli pod
tokom (akum. baterije).
► Ne uporabljajte agresivnih čistil ali grobih čistilnih sredstev, saj lahko poškodujejo površino
ohišja.
► Ohišje naprave očistite izključno z rahlo vlažno krpo in blagim čistilom.
♦ Aparat za striženje las in brade izklopite s stikalom za vklop/izklop 3.
♦ Ločite kabel od naprave in povlecite omrežni napajalnik 6 iz vtičnice.
♦ Po potrebi odstranite nastavek z glavnikom (11 ali 12) z naprave.
♦ Po potrebi nastavek z glavnikom (11 ali 12) sperite pod tekočo vodo.
♦ Potem nastavek z glavnikom (11 ali 12) dobro osušite.
♦ Od spredaj s palcem pritisnite na rezalni nastavek, da ga sprostite iz držala (glejte sliko D).
♦ S priloženo ščetko za čiščenje odstranite ostanke las z rezalnega nastavka.
♦ Po izvedenem čiščenju zatični jeziček rezalnega nastavka vtaknite nazaj v sprejemno odprtino
naprave (glejte sliko E).
♦ Rezalni nastavek naj se ob rahlem pritiskanju od zgoraj ponovno zaskoči (glejte sliko F).
SI
SHBS 5 A1
67
Page 71

SI
NAPOTEK
Za zmanjšanje trenja med rezila dajte eno do dve kapljici olja za rezila (iz pribora) in ga
►
enakomerno porazdelite. Uporabite pa lahko tudi olje brez kisline (kot npr. olje za šivalni
stroj). Odvečno olje po potrebi obrišite z mehko krpo.
Čiščenje nastavka za britje
POZOR
Možne poškodbe naprave
► Strižne folije ne odstranite iz okvirja s strižno folijo in tega ne čistite s ščetko za čiščenje.
♦ Nastavek za britje 10 snemite z naprave.
♦ Pritisnite ob strani nameščene gumbe nastavka za britje 10 in okvir s strižno folijo snemite.
Pri tem okvir s strižno folijo držite le ob strani in ne pritiskajte na strižno folijo.
♦ Očistite strižno rezilo s priloženo ščetko za čiščenje.
♦ Očistite strižno folijo v okvirju s strižno folijo pod tekočo vodo in jo pustite, da se popolnoma
posuši, preden jo ponovno namestite na nastavek za britje 10.
♦ Okvir s strižno folijo ponovno namestite na nastavek za britje 10. Pri nameščanju pazite na to,
da se pritrdilni jezički na okvirju s strižno folijo ujemajo z ustreznimi odprtinami na nastavku za
britje 10 in okvir s folijo za striženje rahlo potisnite navzdol, tako da se slišno zaskoči.
NAPOTEK
Občasno na strižna rezila dajte eno do dve kapljici olja za rezila (iz pribora) in ga enako-
►
merno porazdelite. Namestite nastavek za britje 10 na napravo in napravo pustite delovati
nekaj sekund, ne da bi jo uporabljali. Odvečno olje po potrebi obrišite z mehko krpo.
68
SHBS 5 A1
Page 72

Nastavek za britje dlačic v nosu/ušesih
♦ Nastavek za britje dlačic v nosu/ušesih 9 snemite z naprave.
♦ Očistite nastavek za britje dlačic v nosu/ušesih 9 pod tekočo vodo in ga pustite, da se pov-
sem posuši, preden ga ponovno začnete uporabljati.
Odstranjevanje med odpadke
Odstranitev naprave med odpadke
Naprave nikakor ne odvrzite med običajne gospodinjske odpadke.
Za ta izdelek velja evropska direktiva 2012/19/EU o odpadni električni in
elektronski opremi (angl. Waste Electrical and Electronic Equipment).
Napravo oddajte pri podjetju, registriranem za odstranjevanje odpadkov, ali pri svojem komunalnem podjetju za odstranjevanje odpadkov. Upoštevajte trenutno veljavne predpise. V primeru
dvoma se obrnite na najbližje podjetje za odstranjevanje odpadkov.
NAPOTEK
Pred odstranjevanjem naprave morate obvezno odstraniti akumulatorsko baterijo.
►
POZOR
Za odstranjevanje akumulatorske baterije potrebujete malce ročne spretnosti, drugače obstaja
►
nevarnost poškodb! Če nimate izkušenj pri rokovanju z orodjem, bo bolje, da odstranitev
akumulatorske baterije prepustite osebi, ki jo lahko izvede na strokoven način.
► Pri odstranjevanju pazite na to, da se akumulatorska baterija ne poškoduje. Obstaja nevar-
nost požara!
► Odstranjene akumulatorske baterije ni dovoljeno ponovno uporabiti.
► Akumulatorske baterije nikoli ne zvežite na kratko. Kontaktov iz odstranjene akumulatorske
baterije ni dovoljeno povezati s kovinskimi predmeti. Akumulatorska baterija se lahko pregreje
in eksplodira.
► POZOR! Akumulatorsko baterijo odstranite le pred odstranitvijo naprave. Z odstranitvijo
akumulatorske baterije se naprava uniči. Razstavljene naprave ne uporabljajte več.
SI
SHBS 5 A1
69
Page 73

SI
♦ Napravo ločite od električnega omrežja.
♦ Napravo vklopite in jo pustite delovati tako dolgo, dokler se akumulatorska baterija ne sprazni.
♦ Rezalni nastavek snemite z naprave (glejte poglavje Natikanje/menjava rezalnih nastavkov).
♦ Na hrbtni strani naprave se nahajajo trije vijaki. Dva vijaka se nahajata v sprejemni odprtini
naprave.
♦ Odvijte vijake s križnim izvijačem.
♦ Snemite hrbtno stran naprave.
♦ S kleščami ščipalkami/križnim izvijačem ločite povezavo akumulatorske baterije in plošče z
vezjem. Odstranite akumulatorsko baterijo. Akumulatorsko baterijo in napravo ločeno oddajte
za primerno odstranjevanje.
Odstranitev baterij/akumulatorjev
Baterij/akumulatorjev ni dovoljeno odvreči v gospodinjske odpadke. Vsak potrošnik je po zakonu
dolžan oddati baterije/akumulatorje na zbirališču svoje občine/svoje četrti ali jih oddati v trgovini.
Ta obveza služi temu, da se baterije/akumulatorji lahko oddajo za okolju prijazno odstranjevanje.
Baterije/akumulatorje oddajajte samo prazne.
70
SHBS 5 A1
Page 74

Priloga
Tehnični podatki
Omrežni napajalnik PTB-045100EU
Vhodna napetost 100–240V∼, 50/60Hz
Izhodna napetost 4,5 V
Izhodni tok 1000 mA
Razred zaščite
Aparat za striženje las in brade
Vhodna napetost 4,5 V
Vhodni tok 1000 mA
Akumulatorska baterija akumulatorska baterija Li-Ion 3,7 V, 700 mAh
Temperatura v okolici 5°C do 35°C
Opombe v zvezi z izjavo o skladnosti
Ta naprava je skladna z osnovnimi zahtevami in drugimi relevantnimi predpisi
evropske Direktive o elektromagnetni združljivosti 2004/108/EC ter Direktive
2006/95/EC o nizkonapetostnih napravah.
Celotna izvirna izjava o skladnosti je na voljo pri uvozniku.
II /
SI
Proizvajalec
SHBS 5 A1
KOMPERNASS HANDELS GMBH
BURGSTRASSE 21
44867 BOCHUM
GERMANY
www.kompernass.com
71
Page 75

SI
Servis
Servis Slovenija
Tel.: 080080917
E-Mail: kompernass@lidl.si
IAN 96126
Dosegljivost telefonske službe za stranke:
Od ponedeljka do petka od 8:00 do 20:00 (po srednjeevropskem času)
Garancijski list
1. S tem garancijskim listom jamčimo Kompernass Handels GmbH, da bo izdelek v garancijskem roku ob normalni in pravilni uporabi brezhibno deloval in se zavezujemo, da bomo ob
izpolnjenih spodaj navedenih pogojih odpravili morebitne pomanjkljivosti in okvare zaradi
napak v materialu ali izdelavi oz. po svoji presoji izdelek zamenjali ali vrnili kupnino.
2. Garancija je veljavna na ozemlju Republike Slovenije.
3. Garancijski rok za proizvod je 3 leta od dneva nabave.
4. Kupec je dolžan okvaro javiti pooblaščenemu servisu oz. se informirati o nadaljnjih postopkih na zgoraj navedeni telefonski številki. Svetujemo vam, da pred tem natančno preberete
navodila o sestavi in uporabi izdelka.
5. Kupec je dolžan pooblaščenemu servisu predložiti garancijski list in račun, kot potrdilo in
dokazilo o nakupu.
6. V primeru, da proizvod popravlja nepooblaščeni servis ali oseba, kupec ne more uveljavljati
zahtevkov iz te garancije.
7. Vzroki za okvaro oz. nedelovanje izdelka morajo biti lastnosti stvari same, in ne vzroki, ki so
zunaj proizvajalčeve oz. prodajalčeve sfere. Kupec ne more uveljavljati zahtevkov iz te garancije, če se ni držal priloženih navodil za sestavo in uporabo izdelka ali, če je izdelek kakorkoli
spremenjen ali nepravilno vzdrževan.
8. Jamčimo servisiranje in rezervne dele za minimalno dobo, ki je zahtevana s strani zakonodaje.
9. Obrabni deli oz. potrošni material so izvzeti iz garancije.
10. Vsi potrebni podatki za uveljavljanje garancije se nahajajo na dveh ločenih dokumentih
(garancijski list, račun).
11. Ta garancija proizvajalca ne izključuje pravic potrošnika, ki izhajajo iz odgovornosti prodajalca za napake na blagu.
Prodajalec:
Lidl d.o.o.k.d., Pod lipami 1, SI-1218 Komenda
72
SHBS 5 A1
Page 76

Obsah
Úvod . . . . . . . . . . . . . . . . . . . . . . . . . . 74
Informace ktomuto návodu kobsluze . . . . . . 74
Autorské právo . . . . . . . . . . . . . . . . . . . . . . . . 74
Omezení ručení . . . . . . . . . . . . . . . . . . . . . . . 74
Použití vsouladu surčením . . . . . . . . . . . . . . 74
Použitá výstražná upozornění . . . . . . . . . . . . 75
Bezpečnost . . . . . . . . . . . . . . . . . . . . 76
Základní bezpečnostní pokyny . . . . . . . . . . . 76
Rozsah dodávky . . . . . . . . . . . . . . . . 79
Náhradní díly . . . . . . . . . . . . . . . . . . . . . . . . 80
Likvidace obalového materiálu . . . . . . . . . . . 80
Popis přístroje . . . . . . . . . . . . . . . . . . 80
Před spuštěním . . . . . . . . . . . . . . . . . 81
Nabití baterií . . . . . . . . . . . . . . . . . . . . . . . . . 81
Provoz se síťovým zdrojem . . . . . . . . . . . . . . . 81
Namazání nástavců pro stříhání olejem . . . . 82
Obsluha a provoz . . . . . . . . . . . . . . . 82
Nasazení/výměna nástavců pro stříhání . . . . 82
Nasazení/výměna hřebenových nástavců . . 82
Nástavec pro stříhání vlasů . . . . . . . . . . . . . . 83
Nástavec pro stříhání vousů . . . . . . . . . . . . . 84
Přesný tvarovací nástavec . . . . . . . . . . . . . . . 84
Nástavec pro zastřihování chloupků vnose
a uších . . . . . . . . . . . . . . . . . . . . . . . . . . . . . . 84
Holicí nástavec . . . . . . . . . . . . . . . . . . . . . . . 84
Čištění a ošetřování . . . . . . . . . . . . . 85
Čištění holicího nástavce . . . . . . . . . . . . . . . . 86
Čištění nástavce pro zastřihování chloupků
vnose a uších . . . . . . . . . . . . . . . . . . . . . . . . 87
Likvidace . . . . . . . . . . . . . . . . . . . . . . 87
Likvidace přístroje . . . . . . . . . . . . . . . . . . . . . 87
Likvidace baterií/akumulátorů . . . . . . . . . . . . 88
Dodatek . . . . . . . . . . . . . . . . . . . . . . . 89
Technické údaje . . . . . . . . . . . . . . . . . . . . . . . 89
Informace kProhlášení oshodě . . . . . . . . . . . 89
Záruka . . . . . . . . . . . . . . . . . . . . . . . . . . . . . . 89
Servis . . . . . . . . . . . . . . . . . . . . . . . . . . . . . . . 90
Dovozce . . . . . . . . . . . . . . . . . . . . . . . . . . . . . 90
CZ
SHBS 5 A1
73
Page 77

CZ
Úvod
Informace ktomuto návodu kobsluze
Gratulujeme vám kzakoupení nového přístroje.
Rozhodli jste se pro vysoce kvalitní výrobek. Návod kobsluze je součástí tohoto výrobku. Obsahuje
důležité informace obezpečnosti, použití a likvidaci. Před použitím výrobku se prosím dobře
seznamte se všemi provozními a bezpečnostními pokyny. Výrobek používejte pouze předepsaným
způsobem a prouvedené oblasti použití. Tento návod kobsluze dobře uschovejte. Při předávání
výrobku třetím osobám předejte spolu sním i tyto podklady.
Autorské právo
Tato dokumentace je chráněná autorským právem.
Jakékoli rozmnožování, resp. dotisk, i pouze částečným způsobem, stejně jako reprodukce ilustrací,
i ve změněném stavu, jsou povoleny pouze svýslovným písemným souhlasem výrobce.
Omezení ručení
Všechny technické informace obsažené vtomto návodu kobsluze, jakož i údaje a pokyny pro
připojení a obsluhu odpovídají poslednímu stavu techniky vdobě tisku a byly sestaveny spřihlédnutím knašim dosavadním zkušenostem a poznatkům a podle našeho nejlepšího vědomí.
Zúdajů, obrázků a popisů vtomto návodu nelze vyvozovat žádné nároky.
Výrobce nepřebírá ručení za škody vzniklé na základě nedodržení návodu kobsluze, použití
vrozporu surčením, neodborných oprav či nedovoleně provedených změn nebo na základě
použití nedovolených náhradních dílů.
Použití vsouladu surčením
Tento přístroj je určen pouze pro soukromé použití a nikoli pro komerční účely. Přístroj je určen
pouze kstříhání přírodních vlasů. Smí se používat pouze na lidské vlasy – ne na umělé vlasy
nebo zvířecí chlupy.
Jiné použití než kurčenému účelu nebo nad jeho rámec je považováno za použití vrozporu surčením.
Jsou vyloučeny nároky jakéhokoliv druhu kvůli poškození, které vzniklo na základě použití vrozporu surčením. Riziko nese sám uživatel.
74
SHBS 5 A1
Page 78

Použitá výstražná upozornění
Vtomto návodu kobsluze jsou použita následující výstražná upozornění:
NEBEZPEČÍ
Výstražným upozorněním tohoto stupně nebezpečí se označuje nebezpečná,
ohrožující situace.
Pokud se nebezpečné situaci nezabrání, může mít za následek usmrcení nebo vážné zranění.
► Pro zabránění nebezpečí usmrcení nebo těžké újmy na zdraví se musí dodržovat pokyny
uvedené vtomto výstražném upozornění.
VAROVÁNÍ
Výstražné upozornění tohoto stupně nebezpečí označuje možnou nebezpeč-
nou situaci.
Pokud se takové nebezpečné situaci nezabrání, může vést ke zraněním.
► Za účelem zabránění zranění osob je proto třeba dodržovat pokyny vtomto výstražném
upozornění.
POZOR
Výstražné upozornění tohoto stupně nebezpečí označuje možnou hmotnou
škodu.
Pokud se této nebezpečné situaci nezabrání, může dojít khmotným škodám.
► Pro zabránění hmotným škodám je proto třeba dodržovat pokyny vtomto výstražném
upozornění.
CZ
SHBS 5 A1
UPOZORNĚNÍ
Upozornění označuje doplňující informace usnadňující manipulaci spřístrojem.
►
75
Page 79

CZ
Bezpečnost
Vtéto kapitole jsou uvedena důležitá bezpečnostní upozornění ohledně
manipulace spřístrojem. Tento přístroj odpovídá předepsaným bezpečnostním předpisům. Neodborné použití může vést kezranění osob a
hmotným škodám.
Základní bezpečnostní pokyny
Pro bezpečnou manipulaci spřístrojem dodržujte následující bezpečnostní
pokyny:
■ Děti od 8 let a osoby somezenými fyzickými, smyslovými nebo mentál-
ními schopnostmi či nedostatkem zkušeností a znalostí mohou používat
tento přístroj pouze tehdy, pokud jsou pod dohledem nebo pokud byly
poučeny obezpečném používání přístroje a pokud porozuměly ztoho
vyplývajícímu nebezpečí. Děti si nesmí hrát spřístrojem. Čištění a uživatelskou údržbu nesmí provádět děti bez dozoru.
■ Zkontrolujte před použitím přístroj, zda na něm nejsou vnější viditelná
poškození. Poškozený přístroj neuvádějte do provozu. Hrozí nebezpečí
úrazu elektrickým proudem.
■ Zjistíte-li poškození kabelu, síťového zdroje, krytu nebo jiných dílů,
nesmíte přístroj dál používat.
■ Opravy na přístroji nechte provádět pouze autorizovanými odbornými
fi rmami nebo zákaznickým servisem. Neodborné opravy mohou vést
kvzniku závažných nebezpečí pro uživatele. Navíc zanikají i záruční
nároky.
■ Nepoužívejte přístroj svadným nástavcem pro stříhání nebo vadným
hřebenovým nástavcem, protože mohou mít ostré hrany. Hrozí nebezpečí poranění!
76
SHBS 5 A1
Page 80

■ Vadné konstrukční díly se smějí nahradit pouze originálními náhradními
díly. Pouze utěchto součástí je zaručeno, že budou splněny bezpečnostní požadavky.
■ Neprovozujte přístroj nikdy bez dohledu a používejte ho pouze podle
údajů na typovém štítku.
■ Používejte pro zapojení do sítě pouze síťový zdroj, který je součástí
dodaného výrobku.
■ Vytáhněte síťový zdroj ze zásuvky
- když dojde kporuše,
- před čištěním přístroje,
- když přístroj delší dobu nepoužíváte,
- po každém použití.
Tahejte při tom přímo za síťový zdroj a ne za kabel.
■ POZOR! Přístroj uchovávejte vsuchu.
■ Přístroj nepoužívejte během koupání! Hrozí nebezpečí úrazu elektrickým
proudem!
■ Přístroj ani kabel se síťovým zdrojem nikdy neponořujte do vody nebo
jiných tekutin.
■ Pokud přístroj spadne do vody, bezpodmínečně vytáhněte nejprve
síťový zdroj ze zásuvky a až potom sáhněte do vody.
CZ
SHBS 5 A1
■ Nesahejte na síťový zdroj nikdy mokrýma rukama, obzvláště když
ho zasouváte do zásuvky, resp. když ho zní vytahujete.
Hrozí nebezpečí úrazu elektrickým proudem!
77
Page 81

■ Instalace ochranného zařízení proti chybnému proudu sdimenzovaným
vypínacím proudem nejvýše 30mA nabízí další ochranu před úrazem
elektrickým proudem. Nechte tuto instalaci provést pouze odborným
elektrikářem.
■ Pravidelně kontrolujte, zda na síťovém zdroji a na zastřihovači vlasů
a vousů nejsou případné mechanické vady.
■ Dbejte na to, aby kabel nebyl sevřen ve dveřích skříně nebo tažen
přes horké plochy. Jinak by se mohla poškodit izolace kabelu.
■ Zapojte síťový zdroj pouze do dobře přístupné zásuvky, abyste ho
vpřípadě poruchy mohli ze zásuvky rychle vytáhnout.
CZ
78
■ Síťový zdroj nezakrývejte, předejdete tak nežádoucímu zahřátí.
SHBS 5 A1
Page 82

Rozsah dodávky
Přístroj se standardně dodává snásledujícími komponenty:
▯ Zastřihovač vlasů a vousů
▯ Nabíjecí stanice
▯ Síťový zdroj
▯ Nástavec pro stříhání vlasů
▯ Nástavec pro stříhání vousů
▯ Přesný tvarovací nástavec
▯ Nástavec pro zastřihování chloupků vnose a uších
▯ Holicí nástavec
▯ Hřebenový nástavec knástavci pro stříhání vlasů
▯ Hřebenový nástavec knástavci pro stříhání vousů
▯ Čisticí kartáček
▯ Nůžky
▯ Hřeben
▯ Olej na mazání čepelek
▯ Sáček pro uložení
▯ Tento návod kobsluze
UPOZORNĚNÍ
Zkontrolujte dodávku, zda je kompletní a zda není viditelně poškozená.
►
► Vpřípadě neúplné dodávky nebo poškození vzniklého vdůsledku vadného obalu nebo
během přepravy kontaktujte servisní horkou linku (viz kapitola Servis).
♦ Vyjměte všechny části přístroje zkrabice.
♦ Odstraňte zpřístroje všechen obalový materiál.
CZ
SHBS 5 A1
NEBEZPEČÍ
► Obalový materiál není na hraní. Hrozí nebezpečí udušení.
79
Page 83

CZ
Náhradní díly
Potřebujete-li náhradní díly, obraťte se rovněž na servisní horkou linku (viz kapitola Servis).
Likvidace obalového materiálu
Obal chrání přístroj před poškozením při přepravě.
Navrácení obalu do oběhu zpracování materiálu šetří suroviny a snižuje produkci odpadů.
Již nepotřebný obalový materiál zlikvidujte podle místně platných předpisů.
Popis přístroje
ObrázekA:
Nástavec pro stříhání vlasů
2
Posuvný přepínač pro jemné nastavení délky stříhání
3
Vypínač
4
Indikátor nabití
5
Nabíjecí stanice / držák spřipojovací zdířkou pro síťový zdroj
ObrázekB:
6
Síťový zdroj
ObrázekC:
7
Nástavec pro stříhání vousů
8
Přesný tvarovací nástavec
9
Nástavec pro zastřihování chloupků vnose a uších
10
Holicí nástavec
11
Hřebenový nástavec knástavci pro stříhání vlasů
12
Hřebenový nástavec knástavci pro stříhání vousů
80
SHBS 5 A1
Page 84

Před spuštěním
Zastřihovač vlasů a vousů lze používat jako akumulátorový nebo síťový přístroj.
Nabití baterií
Před prvním použitím by se měla baterie zastřihovače vlasů a vousů nabíjet minimálně 90minut.
♦ Zapojte kabel síťového zdroje 6 do nabíjecí stanice 5 zastřihovače vlasů a vousů.
♦ Zamezte poškození přístroje! Před nabíjením baterie se ujistěte, že je přístroj vypnutý.
♦ Zapojte síťový zdroj 6 (napěťový rozsah 100-240V) do zásuvky odpovídající specifi kaci
přístroje.
♦ Oprocesu nabíjení informuje indikátor nabití 4:
- Indikátor bliká červeně: Baterie je vybitá
- Indikátor svítí červeně: Baterie se nabíjí
- Indikátor svítí zeleně: Baterie je nabitá.
♦ Splně nabitou baterií můžete přístroj provozovat až cca 60minut bez připojení ksíti.
Provoz se síťovým zdrojem
Pokud se váš zastřihovač vlasů a vousů kvůli vybité nebo málo nabité baterii během holení vypne,
můžete vholení pokračovat spřipojeným síťovým zdrojem 6.
♦ Zasuňte kabelovou zástrčku síťového zdroje 6 do zdířky na spodní straně zastřihovače vlasů
a vousů.
♦ Před zapojením přístroje do sítě ho vždy vypněte, předejdete tak zraněním a škodám.
♦ Zapojte síťový zdroj 6 (napěťový rozsah 100-240V) do zásuvky odpovídající specifi kaci
přístroje.
♦ Po 1-2sekundách můžete přístroj zapnout vypínačem 3. Pokud se přístroj hned nerozběhne,
vypněte ho ještě jednou a vyčkejte cca 1minutu, než ho znovu zapnete.
♦ Chcete-li tímto způsobem nabít baterii bez použití nabíjecí stanice 5, pak pouze při vypnutém
přístroji.
CZ
SHBS 5 A1
81
Page 85

Namazání nástavců pro stříhání olejem
Doporučujeme vám nástavec pro stříhání vlasů , nástavec pro stříhání vousů 7 a přesný tvarovací nástavec 8 před prvním použitím a po čištění namazat olejem, abyste zachovali jejich
pohyblivost.
♦ Za tím účelem kápněte jednu až dvě kapky oleje na mazání čepelek (příslušenství) mezi čepelky
a rovnoměrně ho rozdělte.
♦ Setřete příp. přebytečný olej měkkým hadříkem. Používejte pouze olej neobsahující kyseliny,
jako např. olej do šicího stroje.
Obsluha a provoz
Nasazení/výměna nástavců pro stříhání
CZ
VAROVÁNÍ
► Před nasazením nebo výměnou nástavců přístroj vypněte.
Hrozí nebezpečí poranění!
♦ Zatlačte zepředu palcem na nástavec pro stříhání, abyste ho uvolnili zdržáku (viz Obr.D).
Sejměte nástavec pro stříhání zpřístroje.
♦ Knasazení nástavce pro stříhání zasuňte spodní zásuvný jazýček do upínacího otvoru přístroje
(viz Obr.E).
♦ Poté zatlačte do přístroje horní díl nástavce pro stříhání, až nástavec slyšitelně zaskočí a pevně
drží (viz Obr.F).
Nasazení/výměna hřebenových nástavců
Hřebenový nástavec knástavci pro stříhání vlasů
Hřebenový nástavec 11 umožňuje nastavení pro 6různých délek stříhání (13mm / 15mm /
17mm / 19mm / 21mm / 23mm).
♦ Nasuňte hřebenový nástavec 11 zepředu na nástavec pro stříhání vlasů a zatlačte na
zadní konec, až zaskočí.
♦ Chcete-li hřebenový nástavec sejmout 11 , uvolněte ho na jeho dolním konci a stáhněte ho
směrem dopředu zpřístroje.
82
SHBS 5 A1
Page 86

Hřebenový nástavec knástavci pro stříhání vousů
Hřebenový nástavec 12 umožňuje nastavení pro 6různých délek stříhání (4mm / 6mm / 9mm /
12mm / 15mm / 18mm).
♦ Nasaďte hřebenový nástavec 12 zepředu na nástavec pro stříhání vousů 7 a zasuňte ho dolů.
♦ Chcete-li hřebenový nástavec sejmout 12, vysuňte ho směrem dopředu zpřístroje.
Nástavec pro stříhání vlasů
UPOZORNĚNÍ
Stříhané vlasy by měly být čisté a suché.
►
► Vlasy pečlivě pročešte, abyste odstranili případná spletená místa.
► Kolem krku a šíje položte kadeřnický přehoz nebo ručník, abyste zabránili padání zbytků
vlasů za límec.
► Začněte nejprve hřebenovým nástavcem 11 světší délkou stříhání a během stříhání nastavujte
postupně kratší délky.
► Uvědomte si prosím, že příslušné délky stříhání dosáhnete pouze tehdy, když se posuvný
přepínač 2 nachází vpoloze3 a přístroj držíte vpravém úhlu kpokožce.
♦ Zapněte zastřihovač vlasů a vousů vypínačem 3.
♦ Veďte zastřihovač vlasů a vousů pomalu po vlasech.
♦ Držte při tom přístroj tak, aby hřebenový nástavec 11 dosedal co nejvíce naplocho.
♦ Stříhejte vždy od týla směrem ktemeni hlavy, resp. od čela a spánků nahoru ke středu hlavy.
♦ Chcete-li vlasy zastřihnout velmi nakrátko, použijte nástavec pro stříhání vlasů bez hřebeno-
vého nástavce 11.
♦ Posuvným přepínačem 2 můžete mírně měnit požadovanou délku stříhání ve 3stupních.
CZ
SHBS 5 A1
83
Page 87

CZ
Nástavec pro stříhání vousů
UPOZORNĚNÍ
Vousy pročešte ve směru růstu, abyste odstranili případná spletená místa.
►
► Začněte nejprve hřebenovým nástavcem 12 světší délkou stříhání a během stříhání nastavujte
postupně kratší délky.
► Uvědomte si prosím, že příslušné délky stříhání dosáhnete pouze tehdy, když se posuvný
přepínač
♦ Stříhejte vousy proti směru jejich růstu (od brady nahoru kuchu). Zastřihněte nejprve jednu,
potom druhou stranu.
♦ Chcete-li vousy zastřihnout velmi nakrátko nebo vytvořit knírek a stříhat kontury, použijte nástavec
pro stříhání vousů 7 bez hřebenového nástavce 12.
♦ Posuvným přepínačem 2 můžete mírně měnit požadovanou délku stříhání ve 3stupních.
2
nachází vpoloze3 a přístroj držíte vpravém úhlu kpokožce.
Přesný tvarovací nástavec
♦ Přesný tvarovací nástavec 8 používejte pro tvarování knírku, kratších či delších kotlet nebo obočí.
♦ Přiložte hranu přesného tvarovacího nástavce 8 vpožadované výšce okraje vousů a pohybujte
přístrojem směrem dolů.
Nástavec pro zastřihování chloupků vnose a uších
♦ Nástavec pro zastřihování chloupků vnose a uších 9 používejte pro odstraňování chloupků
vnose nebo uších.
♦ Zasuňte pomalu do nosní dírky nebo ucha pouze kovový hrot nástavce pro zastřihování
chloupků vnose a uších 9.
♦ Pro zastřihnutí chloupků pohybujte přístrojem pomalu vkruzích.
Holicí nástavec
♦ Holicí nástavec 10 používejte pro suché holení.
♦ Držte přístroj vpravém úhlu kpokožce a veďte ho jemně po obličeji.
♦ Holení provádějte proti směru růstu vousů. Na komplikovaných místech jako např. na bradě
84
vypněte pokožku, abyste dosáhli lepšího výsledku.
SHBS 5 A1
Page 88

Čištění a ošetřování
NEBEZPEČÍ
Nebezpečí ohrožení života elektrickým proudem!
► Vytáhněte síťový zdroj 6 ze zásuvky, než se pustíte do čištění přístroje.
► Nesahejte na síťový zdroj 6 nikdy mokrýma rukama, když ho zasouváte do zásuvky,
resp. když ho zní vytahujete.
► Udržujte síťový zdroj 6 a kabel vždy vsuchém stavu.
POZOR
Možné poškození přístroje.
► Zastřihovač vlasů a vousů se kčištění nesmí ponořit do vody ani jiných tekutin, protože není
vodotěsný. Mohou se tak poškodit díly vedoucí proud (baterie).
► Nepoužívejte agresivní nebo abrazivní čisticí prostředky, protože mohou poškodit povrch krytu.
► Kryt přístroje čistěte výhradně mírně navlhčeným hadříkem a jemným čisticím prostředkem.
♦ Vypněte zastřihovač vlasů a vousů vypínačem 3.
♦ Odpojte kabel od přístroje a vytáhněte síťový zdroj 6 ze zásuvky.
♦ Sejměte zpřístroje příp. nasazený hřebenový nástavec (11 nebo 12).
♦ Umyjte hřebenový nástavec (11 nebo 12), je-li třeba, pod tekoucí vodou.
♦ Potom hřebenový nástavec (11 nebo 12) dobře osušte.
♦ Zatlačte zepředu palcem na nástavec pro stříhání, abyste ho uvolnili zdržáku (viz Obr.D).
♦ Přiloženým čisticím kartáčkem odstraňte znástavce po stříhání zbylé vlasy.
♦ Po provedeném čištění zasuňte zásuvný jazýček nástavce pro stříhání zpět do upínacího
otvoru přístroje (viz Obr.E).
♦ Nechte nástavec pro stříhání lehkým tlakem seshora opět zaskočit (viz Obr.F).
CZ
SHBS 5 A1
85
Page 89

CZ
UPOZORNĚNÍ
Pro snížení tření kápněte jednu až dvě kapky oleje na mazání čepelek (příslušenství) mezi
►
čepelky a rovnoměrně ho rozdělte. Můžete použít také každý olej, který neobsahuje kyseliny
(jako např. olej do šicího stroje). Setřete příp. přebytečný olej měkkým hadříkem.
Čištění holicího nástavce
POZOR
Možné poškození přístroje.
► Nevyjímejte planžetu zjejího rámečku a nečistěte ji čisticím kartáčkem.
♦ Sejměte zpřístroje holicí nástavec 10.
♦ Zatlačte na knofl íky holicího nástavce 10 umístěné po stranách a sejměte rámeček s planžetou.
Držte při tom rámeček s planžetou pouze ze stran a netlačte na planžetu.
♦ Vyčistěte stříhací nůž přiloženým čisticím kartáčkem.
♦ Omyjte planžetu vrámečku pod tekoucí vodou a nechte ji úplně vyschnout, než ji nasadíte
zpět na holicí nástavec 10.
♦ Nasaďte rámeček s planžetou opět na holicí nástavec 10. Při nasazování dbejte na to, aby
upevňovací jazýčky na rámečku planžety zapadly do příslušných vybrání na holicím nástavci 10,
a zatlačte rámeček planžety lehce dolů, až slyšitelně zaskočí.
UPOZORNĚNÍ
Čas od času kápněte jednu až dvě kapky oleje na mazání čepelek (příslušenství) na stříhací
►
nůž a rovnoměrně olej rozdělte. Nasaďte holicí nástavec 10 na přístroj a nechte přístroj několik sekund běžet, aniž byste ho používali. Setřete příp. přebytečný olej měkkým hadříkem.
86
SHBS 5 A1
Page 90

Čištění nástavce pro zastřihování chloupků vnose a uších
♦ Sejměte zpřístroje nástavec pro zastřihování chloupků vnose a uších 9.
♦ Omyjte nástavec pro zastřihování chloupků vnose a uších 9 pod tekoucí vodou a nechte
ho úplně vyschnout, než ho začnete znovu používat.
Likvidace
Likvidace přístroje
Vžádném případě nevyhazujte přístroj do normálního domovního odpadu.
Tento výrobek podléhá evropské směrnici č. 2012/19/EU (odpad elektrické
a elektronické zařízení).
Přístroj předejte klikvidaci odborné fi rmě oprávněné knakládání sodpady nebo využijte možnost
likvidace zajišťovanou obcí. Dodržujte aktuálně platné předpisy. Vpřípadě pochybností se informujte ve sběrném dvoře.
UPOZORNĚNÍ
Před likvidací přístroje je nutné vyjmout baterii.
►
POZOR
Pro vyjmutí baterie potřebujete trochu řemeslné zručnosti, jinak hrozí nebezpečí zranění!
►
Nemáte-li zkušenosti vzacházení snářadím, měli byste vyjmutí baterie přenechat osobě,
která to může provést odborným způsobem.
► Při vyjímání dávejte pozor, aby se baterie nepoškodila. Hrozí nebezpečí požáru!
► Vyjmutá baterie se nesmí použít znovu.
► Baterii nikdy nezkratujte. Kontakty na vyjmuté baterii nesmějí být propojeny kovovými
předměty. Může dojít kpřehřátí a explozi baterie.
► POZOR! Baterii vyjměte pouze za účelem likvidace přístroje. Vyjmutím baterie se přístroj
zničí. Rozebraný přístroj neuvádějte znovu do provozu.
CZ
SHBS 5 A1
87
Page 91

CZ
♦ Odpojte přístroj od sítě.
♦ Zapněte přístroj a nechte ho běžet tak dlouho, až se baterie vybije.
♦ Sejměte zpřístroje nástavec pro stříhání (viz kapitola Nasazení/výměna nástavců pro stříhání).
♦ Na zadní straně přístroje se nacházejí tři šrouby. Dva ztěchto šroubů jsou vupínacím otvoru
přístroje.
♦ Povolte šrouby křížovým šroubovákem.
♦ Sejměte zadní stěnu přístroje.
♦ Přerušte štípacími kleštěmi / plochým šroubovákem spoj mezi baterií a deskou plošných spojů.
Vyjměte baterii. Předejte baterii a přístroj odděleně kvhodné likvidaci.
Likvidace baterií/akumulátorů
Baterie/akumulátory nesmějí přijít do domovního odpadu. Každý spotřebitel je ze zákona
povinen baterie a akumulátory odevzdat na sběrném místě ve své obci/městské čtvrti nebo
vobchodě. Tato povinnost slouží ktomu, aby byly baterie/akumulátory odevzdány
kekologické likvidaci. Baterie/akumulátory odevzdávejte pouze zcela vybité.
88
SHBS 5 A1
Page 92

Dodatek
Technické údaje
Síťový zdroj PTB-045100EU
Vstupní napětí 100 - 240V ∼, 50 / 60Hz
Výstupní napětí 4,5V
Výstupní proud 1000mA
Třída ochrany
Zastřihovač vlasů a vousů
Vstupní napětí 4,5V
Vstupní proud 1000mA
Baterie Baterie Li-Ion 3,7V, 700mAh
Okolní teplota 5°C do 35°C
Informace kProhlášení oshodě
Tento přístroj je ohledně shody vsouladu se základními požadavky a ostatními
relevantními ustanoveními evropské směrnice č. 2004/108/EC pro elektromagnetickou kompatibilitu, jakož i směrnice č. 2006/95/EC onízkém napětí.
Kompletní originální Prohlášení oshodě lze obdržet udovozce.
II /
CZ
Záruka
SHBS 5 A1
Na tento přístroj platí 3 letá záruka od data zakoupení. Přístroj byl vyroben s nejvyšší pečlivostí a
před odesláním prošel výstupní kontrolou.
Uschovejte si, prosím, pokladní lístek jako doklad o nákupu. Budete-li uplatňovat záruku, spojte
se prosím telefonicky se servisní provozovnou. Pouze tak vám můžeme zajistit bezplatné zaslání
vašeho zboží.
89
Page 93

CZ
UPOZORNĚNÍ
Záruční plnění se vztahuje pouze na vady materiálu nebo výrobní závady, nikoliv však na
►
opotřebované díly nebo poškození, vzniklé při dopravě
a na poškození rozbitných součástí, např. spínačů nebo akumulátorů.
Výrobek je určen výhradně pro soukromé použití, nikoliv pro podnikatelské účely. Při nesprávném a
neodborném využívání, při použití násilí a při zásazích, které nebyly provedeny našimi autorizovanými
servisními provozovnami, záruční nároky zanikají.
Vaše práva vyplývající ze zákona touto zárukou nejsou omezena. Záručním plněním se záruční doba
neprodlouží. To platí jak pro nahrazené, tak i pro opravené díly.
Případné škody a nedostatky, zjištěné už při koupě, se musí hlásit hned po vybalení výrobku, nejpozdějí však do dvou dnů od data nákupu.
Po uplynutí záruční doby podléhají veškerá opravy poplatkům.
Servis
Servis Česko
Tel.: 800143873
E-Mail: kompernass@lidl.cz
IAN 96126
Dostupnost horké linky: pondělí až pátek 8:00 hod. – 20:00 hod. (SEČ)
Dovozce
KOMPERNASS HANDELS GMBH
BURGSTRASSE 21
44867 BOCHUM
GERMANY
www.kompernass.com
90
SHBS 5 A1
Page 94

Obsah
Úvod . . . . . . . . . . . . . . . . . . . . . . . . . . 92
Informácie k tomuto návodu na obsluhu . . . . 92
Autorské právo . . . . . . . . . . . . . . . . . . . . . . . . 92
Obmedzenie ručenia . . . . . . . . . . . . . . . . . . . 92
Používanie v súlade surčením . . . . . . . . . . . . 92
Použité výstražné upozornenia . . . . . . . . . . . 93
Bezpečnosť . . . . . . . . . . . . . . . . . . . . 94
Základné bezpečnostné upozornenia . . . . . . 94
Rozsah dodávky . . . . . . . . . . . . . . . . 97
Náhradné diely . . . . . . . . . . . . . . . . . . . . . . . 98
Zneškodnenie obalových materiálov . . . . . . . 98
Popis prístroja . . . . . . . . . . . . . . . . . . 98
Pred uvedením do prevádzky . . . . . 99
Nabíjanie batérií . . . . . . . . . . . . . . . . . . . . . . 99
Prevádzka so sieťovým adaptérom . . . . . . . . 99
Naolejovanie nadstavcov na strihanie. . . . .100
Obsluha aprevádzka . . . . . . . . . . . 100
Nasadenie/výmena nadstavcov na strihanie 100
Nasadenie/výmena hrebeňových nadstavcov 100
Nadstavec na strihanie vlasov . . . . . . . . . . . 101
Nadstavec na strihanie brady . . . . . . . . . . .102
Nadstavec na precízne strihanie . . . . . . . . . 102
Nadstavec na strihanie chĺpkov v nose a
ušiach . . . . . . . . . . . . . . . . . . . . . . . . . . . . . . 102
Nadstavec na holenie . . . . . . . . . . . . . . . . .102
Čistenie a ošetrovanie . . . . . . . . . . 103
Čistenie nadstavca na holenie . . . . . . . . . . . 104
Čistenie nadstavca na strihanie chĺpkov v
nose a ušiach . . . . . . . . . . . . . . . . . . . . . . . . 105
Zneškodnenie . . . . . . . . . . . . . . . . . 105
Zneškodnenie zariadenia . . . . . . . . . . . . . . 105
Likvidácia batérií/akumulátorov . . . . . . . . . 106
Dodatok . . . . . . . . . . . . . . . . . . . . . . 107
Technické údaje . . . . . . . . . . . . . . . . . . . . . . 107
Upozornenia k vyhláseniu ozhode . . . . . . . 107
Záruka . . . . . . . . . . . . . . . . . . . . . . . . . . . . . 107
Servis . . . . . . . . . . . . . . . . . . . . . . . . . . . . . .108
Dovozca . . . . . . . . . . . . . . . . . . . . . . . . . . . 108
SK
SHBS 5 A1
91
Page 95

Úvod
Informácie k tomuto návodu na obsluhu
Srdečne vám gratulujeme ku kúpe tohto nového prístroja.
Touto kúpou ste sa rozhodli pre vysoko kvalitný výrobok. Návod na obsluhu je súčasťou tohto
výrobku. Obsahuje dôležité upozornenia týkajúce sa bezpečnosti, používania azneškodnenia.
Pred používaním výrobku sa oboznámte so všetkými pokynmi na obsluhu abezpečnostnými
upozorneniami. Výrobok používajte iba tak, ako je to popísané aiba vtých oblastiach použitia,
ktoré sú tu uvedené. Tento návod na obsluhu dobre uschovajte. Pri postúpení výrobku tretej osobe
odovzdajte sním aj všetky podklady.
Autorské právo
Táto dokumentácia je chránenáautorským právom.
Akékoľvek rozmnožovanie alebo dotlač, aj čiastková, ako aj reprodukcia obrázkov, aj vzmenenej
podobe, je povolená len spísomným súhlasom výrobcu.
SK
Obmedzenie ručenia
Všetky technické informácie, uvedené vtomto návode na obsluhu, údaje apokyny pre pripojenie
aobsluhu zodpovedajú, pri odovzdávaní do tlače, najnovšiemu stavu azohľadňujú snajlepším
vedomím naše doterajšie skúsenosti aznalosti.
Zúdajov, zobrazení apopisov vtomto návode nemožno odvodzovať žiadne nároky.
Výrobca nepreberá žiadnu záruku za škody, ktoré vzniknú nedodržaním tohto návodu, nespráv-
nym používaním, neodbornými opravami, nepovolenými zmenami alebo použitím nepovolených
náhradných dielov.
Používanie v súlade surčením
Tento prístroj je určený len na súkromné používanie v domácnostiach a nie na komerčné účely.
Prístroj je určený len na strihanie prirodzených vlasov. Prístroj sa smie používať len na ľudské vlasy
– nie na umelé vlasy alebo zvieraciu srsť.
Iné alebo nad rámec siahajúce používanie sapovažuje zapoužívanie v rozpore surčením.
Nároky akéhokoľvek druhu za škody spôsobené používaním v rozpore s určením sú vylúčené.
Riziko nesie výlučne používateľ.
92
SHBS 5 A1
Page 96

Použité výstražné upozornenia
Vpredloženom návode na obsluhu sú použité nasledujúce výstražné upozornenia:
NEBEZPEČENSTVO
Výstražné upozornenie s týmto stupňom nebezpečenstva označuje hroziacu
nebezpečnú situáciu.
Ak tejto nebezpečnej situácii nezabránite, môže to viesť až ksmrti alebo ťažkému poraneniu.
► Aby ste sa vyhli nebezpečenstvu smrti alebo ťažkému poraneniu osôb, riaďte sa inštrukciami,
uvedenými vtomto výstražnom upozornení.
VAROVANIE
Výstražné upozornenie tohto stupňa nebezpečenstva označuje možnú
nebezpečnú situáciu.
Ak sa nebezpečnej situácii nezabráni, môže to mať za následok zranenie.
► Aby ste zabránili zraneniu osôb, riaďte sa inštrukciami, uvedenými vtomto výstražnom
upozornení.
POZOR
Výstražné upozornenie tohto stupňa nebezpečenstva označuje možné
vecné škody.
Ak sa nebezpečnej situácii nezabráni, môže to mať za následokvecné škody.
► Aby ste zabránili vecným škodám, riaďte sa inštrukciami, uvedenými vtomto výstražnom
upozornení.
SK
SHBS 5 A1
UPOZORNENIE
Upozornenie obsahuje dodatočné informácie, ktoré uľahčujú zaobchádzanie so zariadením.
►
93
Page 97

SK
Bezpečnosť
Vtejto kapitole sú uvedené dôležité bezpečnostné upozornenia ozaobchádzaní s prístrojom. Tento prístroj zodpovedá príslušným bezpečnostným
ustanoveniam. Jeho neodborné používanie však môže viesť kporaneniu
osôb akvecným škodám.
Základné bezpečnostné upozornenia
Pre bezpečné zaobchádzanie s prístrojom dodržiavajte nasledujúce
bezpečnostné upozornenia:
■ Tento prístroj môžu používať deti staršie ako 8 rokov, ako aj osoby
so zníženými fyzickými, zmyslovými alebo mentálnymi schopnosťami
alebo nedostatkom skúseností a vedomostí, ak sú pod dohľadom alebo
boli o bezpečnom používaní prístroja poučené a pochopili z toho vyplývajúce nebezpečenstvá. Deti sa nesmú hrať s prístrojom. Deti nesmú
vykonávať čistenie a užívateľskú údržbu bez dohľadu.
■ Pred použitím prístroj skontrolujte vzhľadom na viditeľné vonkajšie
poškodenia. Poškodený prístroj neuvádzajte do prevádzky. Hrozí
nebezpečenstvo zásahu elektrickým prúdom.
■ Ak zistíte poškodenia na kábli, sieťovom adaptéri, na kryte alebo na
iných častiach, prístroj sa už nesmie používať.
■ Prístroj smie opravovať iba autorizovaný odborný podnik alebo zákaz-
nícky servis. Neodbornými opravami môžu pre používateľa vzniknúť
značné nebezpečenstvá. Okrem toho zaniknú nároky na záruku.
■ Prístroj neužívajte s poškodeným nadstavcom na strihanie alebo poško-
deným hrebeňovým nadstavcom, pretože tieto môžu mať ostré hrany.
Hrozí nebezpečenstvo poranenia!
94
SHBS 5 A1
Page 98

■ Chybné diely smú byť nahradené len originálnymi náhradnými dielmi.
Len pri takýchto dieloch je zabezpečené, že budú splnené bezpečnostné
požiadavky.
■ Prístroj nikdy nepoužívajte bez dohľadu. Používajte ho len v súlade
s údajmi uvedenými na typovom štítku.
■ Na napájanie zo siete používajte iba dodaný sieťový adaptér.
■ Vytiahnite sieťový adaptér zo zásuvky
- ak sa vyskytne porucha,
- pred čistením prístroja,
- ak prístroj dlhší čas nepoužívate,
- po každom použití.
Ťahajte pritom priamo za sieťový adaptér a nie za kábel.
■ POZOR! Udržiavajte prístroj vsuchu.
■ Prístroj nepoužívajte počas kúpania. Hrozí nebezpečenstvo zásahu
elektrickým prúdom!
■ Prístroj ani kábel so sieťovým adaptérom nikdy neponárajte do vody
alebo inej tekutiny.
■ Ak prístroj spadol do vody, najprv bezpodmienečne vytiahnite sieťový
adaptér zo zásuvky, predtým ako siahnete do vody.
SK
SHBS 5 A1
■ Sieťový adaptér nikdy nechytajte vlhkými rukami, hlavne keď ho pripá-
jate do zásuvky resp. z nej vyťahujete.
Hrozí nebezpečenstvo zásahu elektrickým prúdom!
■ Ďalšiu ochranu pred zasiahnutím elektrickým prúdom môže zabezpečiť
montáž prúdového chrániča s prúdom nie vyšším než 30 mA.
Túto montáž zverte do rúk výlučne odbornému elektrikárovi.
95
Page 99

SK
■ Sieťový adaptér a strihač na vlasy a bradu pravidelne skontrolujte,
či nemajú mechanické chyby.
■ Dbajte o to, aby kábel nebol stlačený v dverách skrine alebo aby ste
ho neťahali ponad horúce povrchy. V opačnom prípade by sa mohla
poškodiť izolácia kábla.
■ Sieťový adaptér pripájajte len do dobre dostupnej zásuvky, aby v prípade
porúch bolo možné sieťový adaptér rýchlo vytiahnuť zo zásuvky.
■ Sieťový adaptér nezakrývajte, aby ste zabránili neprípustnému prehrievaniu.
96
SHBS 5 A1
Page 100

Rozsah dodávky
Zariadenie sa štandardne dodáva snasledujúcimi komponentmi:
▯ Strihač na vlasy a bradu
▯ Nabíjačka
▯ Sieťový adaptér
▯ Nadstavec na strihanie vlasov
▯ Nadstavec na strihanie brady
▯ Nadstavec na precízne strihanie
▯ Nadstavec na strihanie chĺpkov v nose a ušiach
▯ Nadstavec na holenie
▯ Hrebeňový nadstavec pre nadstavec na strihanie vlasov
▯ Hrebeňový nadstavec pre nadstavec na strihanie brady
▯ Kefka na čistenie
▯ Nožnice
▯ Hrebeň
▯ Olej na čepieľky
▯ Odkladacie vrecko
▯ Návod na obsluhu
UPOZORNENIE
Prekontrolujte kompletnosť dodávky a prípadné viditeľné poškodenia.
►
► Vprípade nekompletnej dodávky alebo poškodení, spôsobených zlým balením alebo
prepravou, sa obráťte na zákaznícku linku servisu (pozri kapitolu Servis).
♦ Vyberte z obalu všetky diely prístroja.
♦ Odstráňte zo zariadenia všetky obalové materiály.
SK
SHBS 5 A1
NEBEZPEČENSTVO
► Obalové materiály sa nesmú používať na hranie.
Hrozí nebezpečenstvo udusenia.
97
 Loading...