


10-20mm f-3.5 EX DC HSM
g
ଐ
ஜ
ᛖ
ᵈᗧ
⼊๔
r
g
Wij stellen het op prijs dat u een Sigma objectief heeft aangeschaft. Teneinde
maximaal profijt en plezier van uw Sigma objectief te hebben, adviseren wij u
deze gebruiksaanwijzing geheel door te lezen alvorens u het objectief gaat
gebruiken.
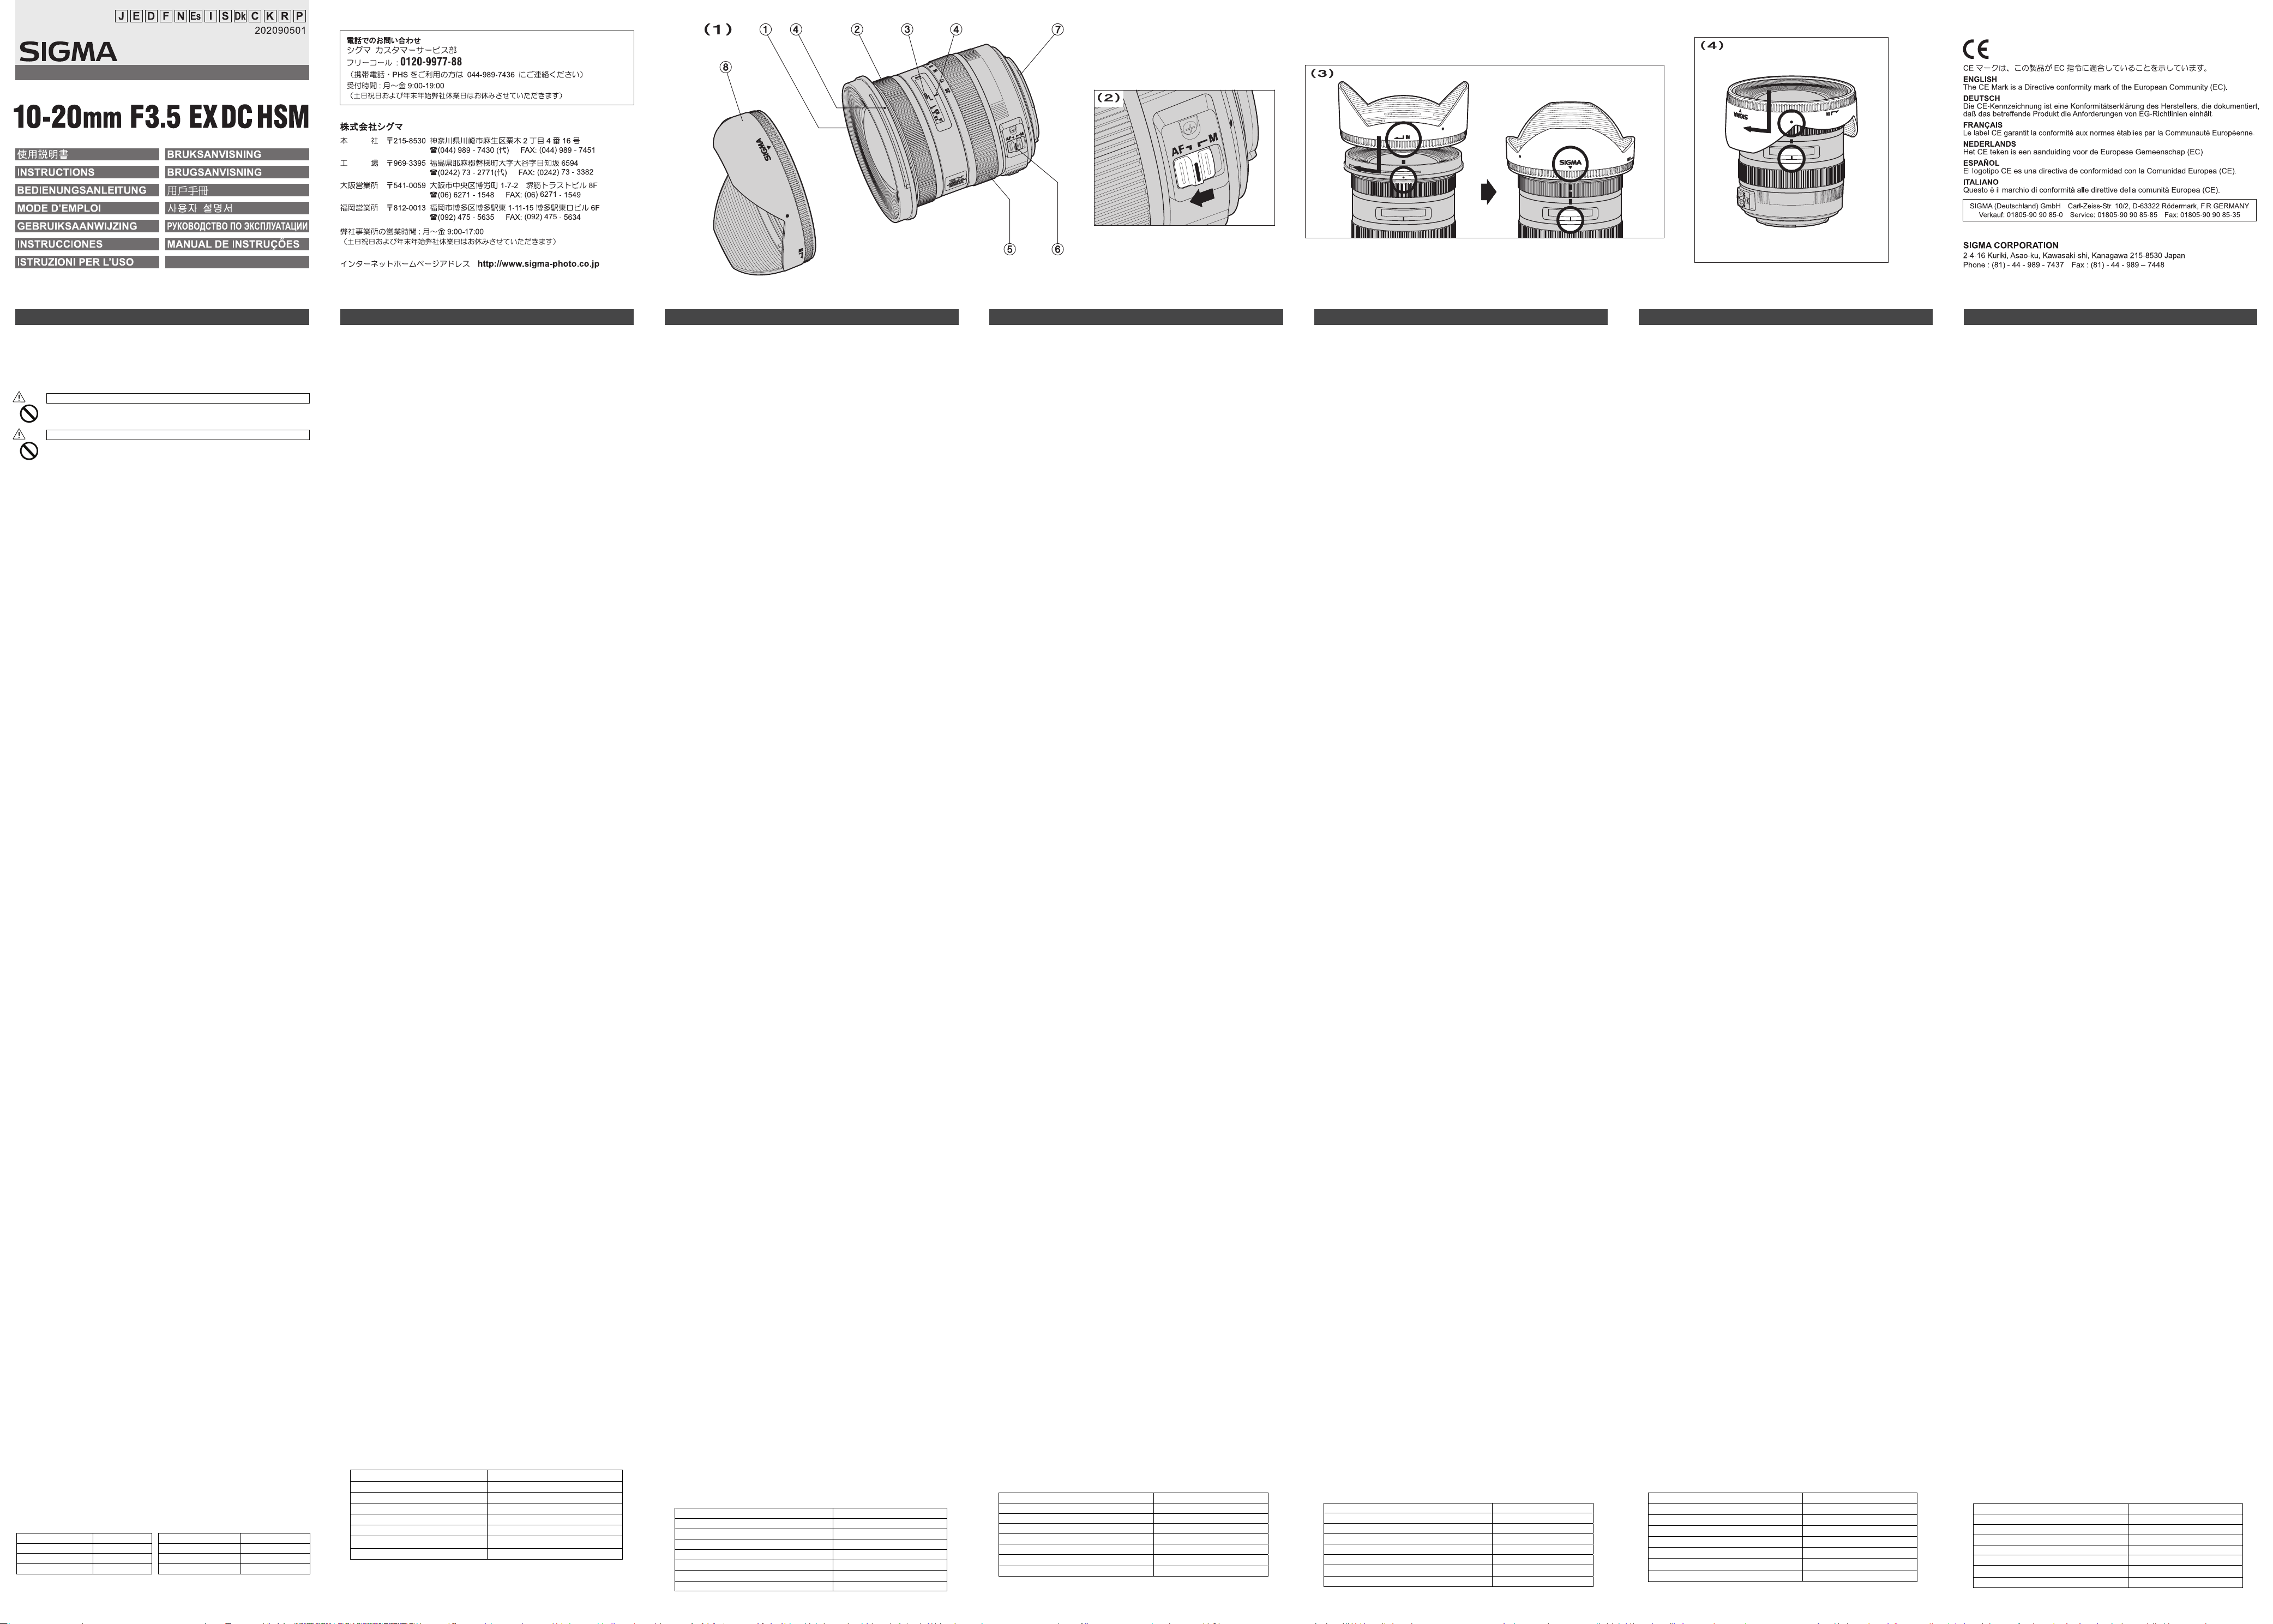
BESCHRIJVING VAN DE ONDERDELEN (fig.1)
DC OBJECTIEVEN
DC objectieven zijn speciaal ontwikkeld voor het gebruik op digitale camera’s.
De beeldcircel van de DC objectieven correspondeert met de afmetingen van
de digitale sensor van de meeste digitale camera’s.
ŦDe DC objectieven zijn niet geschikt voor camera’s met een beeldsensor
groter dan het APS-C formaat en 35mm SLR camera’s. In dit geval zal er
vignettering optreden.
ŦBij gebruik van de DC objectieven met de Sigma SD9, SD10 of SD14 zal de
corresponderen beeldhoek 17-34mm zijn.
BEVESTIGING OP DE CAMERABODY
Wanneer uw Sigma objectief op de camerabody is bevestigd, zal het
automatisch net zo functioneren als de originele objectieven. Lees hiervoor
de gebruiksaanwijzing van uw camera.
ŦOp de vatting bevindt zich een aantal electrische contacten en
koppelstukken. Deze moeten goed schoon worden gehouden teneinde
van een goed contact verzekerd te zijn. Plaats, bij het verwisselen van
objectieven deze altijd met de voorzijde en niet met de vatting op tafel. Dit
ter voorkoming van beschadiging.
BELICHTINGSINSTELLING
Wanneer een Sigma objectief op uw camerabody is bevestigd, functioneert
dit geheel automatisch. Lees hiervoor de gebruiksaanwijzing van uw camera.
SCHERPSTELLEN EN ZOOMEN
Deze lens heeft de ingebouwde Hyper Sonic Motor (HSM) van Sigma. De
HSM maakt snel en geluidloos automatisch scherpstellen mogelijk.
䇶Sigma AF en Canon AF䇷
Om de autofocus functie te activeren dient u het schuifje op het objectief op
de AF postitie te zetten. Wilt u handmatig scherpstellen zet dan het schuifje
op het objectief op de M positie. Vervolgens kunt u scherpstellen door aan de
focusring te draaien.
䇶Nikon AF, Pentax AF en Sony䇷
Om de autofocus functie te activeren dient u het schuifje op het objectief en
de camera op AF positie te zetten (fig.2). Wilt u handmatig scherpstellen zet
dan het schuifje op het objectief op de M positie. Vervolgens kunt u
scherpstellen door aan de focusring te draaien.
Raadpleeg a.u.b. de gebruiksaanwijzing van uw camera om bovengenoemde
instellingen op uw camera te wijzigen.
Voor Nikon, Pentax en Sony vatting is het alleen mogelijk de AF te gebruiken
met de camera welke de Ultrasonic Motor kan ondersteunen zoals HSM. De
AF zal niet functioneren indien de camera/body dit niet ondersteunt.
Handmatig scherpstellen kan bij bit objectief ook in de autofocus stand. Als
de camera op “One-Shot” AF (AF-S) is ingesteld, kunt u de scherpstelling
eventueel handmatig corrigeren nadat de autofocus scherpstelling z’n werk
heeft gedaan, en u de ontspanknop half ingedrukt houdt.
Wanneer .u dit objectief op handmatige instelling gebruikt, raden wij u aan de
correcte scherpstelling visueel in de zoeker vast te stellen. Dit vanwege een
mogelijke scherpte verschuiving als gevolg van extreme temperatuurswijzigingen,
waardoor meerdere lenscomponenten kunnen uitzetten. In het bijzonder bij
instelling op oneindig dient hierop te worden gelet.
䇶ZOOMEN䇷
Verdraai de zoomring naar de gewenste positie
FLITSOPNAMEN
Flitsopnamen met de ingebouwde flitser van uw camera kunnen donkere
randen/hoeken vertonen. Dit komt omdat de beeldhoek van het objectief
groter is dan beeldhoek van de flitser. Indien u een externe flitser gebruikt
dient u de flitser te voorzien van een groothoek diffuser (bij de Sigma flitsers
kunt u deze eenvoudig, door de diffuser uit te trekken, voor de flitser klappen).
Niet alle externe flitsers hebben een groothoek diffuser, het is dan aan te
bevelen om vooraf enkele proefopnamen te maken.
ZONNEKAP
Bij dit objectief wordt een losse zonnekap met bajonetaansluiting
meegeleverd. De zonnekap draagt bij tot het voorkomen van lichtvlekken en
nevenbeelden, die worden veroorzaakt door sterk tegenlicht dat vanachter
het onderwerp direct in het objectief valt. Let erop dat bij het monteren van
de zonnekap deze volledig in de geblokkeerde positie wordt gedraaid. (fig.3)
ŦOm objectief en zonnekap op te kunnen bergen in de koffer, moet u eerst de
zonnekap afnemen en deze omgekeerd op het objectief plaatsen. (fig.4)
FILTERS
ŦGebruik slechts 1 filter tegelijk. Twee of meer filters en/of extra dikke
filters-zoals een polarisatiefilter-kan vignettering veroorzaken.
ŦGebruik uitsluitend een “circulair” polarisatiefilter in combinatie met een
autofocus camera. Wanneer een “lineair” polarisatiefilter op AF camera’s
wordt gebruikt, zal de autofocus scherpstelling en de automatische
belichtingsregeling niet correct functioneren.
ONDERHOUD EN OPSLAG
ŦVermijd vallen of stoten en stel het objectief niet bloot aan extreem hoge of
lage temperaturen of hoge vochtigheid.
ŦIndien het objectief voor langere tijd wordt opgeborgen, kies dan voor een
koele, droge en bij voorkeur goed geventileerde plaats. Houd het objectief,
om beschadiging van de lenscoating te voorkomen, weg van mottenballen
of naftalinegas.
Ŧ
Gebruik geen thinner, benzine of andere organische schoonmaakmiddelen
om vuil of vingerafdrukken van de lenselementen te verwijderen. Gebruik
daarvoor een speciaal lensdoekje of lenstissues.
ŦDit objectief is niet waterbestendig. Zorg er bij regen of in de buurt van
water voor dat het niet nat wordt. Lenselementen, interne mechanische
delen en electrische componenten die door water zijn aangetast, zijn in de
meeste gevallen niet tegen redelijke kosten te herstellen.
ŦPlotselinge temperatuur verandering kan condensatie veroorzaken op het
oppervlak van de lens. Bij het betreden van een warme kamer vanuit de
koude buitenlucht, is het raadzaam het objectief in de tas te houden totdat
de temperatuur van het objectief ongeveer gelijk is aan die van de
kamertemperatuur.
TECHNISCHE GEGEVENS
Lensconstructie (groepen – elementen) 10 – 13
Beeldhoek 102.4 – 63.8°
Kleinste diafragma 22
Kortste instelafstand 0.24m
Maximale vergrotings maatstaf 1:6.6
Filtermaat 82mm
Afmetingen (diam.glengte) 87.3g88.2mm
Gewicht 520g
Opgegeven afmetingen en gewicht zijn met SIGMA vatting.
NEDERLANDS
1. Filterschroefdraad
2. Scherpstelring
3. Afstandschaal
4. Index teken
5. Zoomring
6.
Scherpstelkeuze schakelaar
7. Vatting
8. Zonnekap
ƜƷƨƼƸŴǷǰȞȬȳǺǛƓᝰƍ൭NJƍƨƩƖƋǓƕƱƏƝƟƍLJƢŵஜᛟଢ
ǛƝችᛠƷɥŴȬȳǺƷೞᏡŴદ˺ŴӕǓৢƍɥƷදໜǛദƠƘྸᚐƠƯŴ
ϙჇજࢨǛƓಏƠLjƘƩƞƍŵƳƓஜᛟଢƸŴӲǫȡȩဇσဇƱƳƬƯƓǓLJ
ƢƷưŴႸƴǑǓƝဇǫȡȩƷᛆ࢘ሖǛƓᛠLjƴƳǓŴƝဇǫȡȩƷᛟ
ଢNjƋǘƤƯƝᚁƘƩƞƍŵƓᛠLjƴƳƬƨƋƱƸŴٻЏƴሥƠƯƘƩƞƍŵ
ӲᢿỉӸᆅί1ὸ
Ĭ ȕǣȫǿȸƶơ
ĭ ȕǩȸǫǹȪȳǰ
Į ᙀяႎុᩉႸႮ
į ዴ
ӕǓৢƍǛᛚǔƱŴဇᎍƕͻǛƏӧᏡࣱƕƋǓLJƢŵ
ŠȬȳǺǛ˄ƚƨǫȡȩưŴٽᨗǍࢍƍήเǛᙸǔƱŴᙻщᨦܹǛឪƜƢǕƕƋǓ
LJƢŵཎƴȬȳǺҥ˳ưٽᨗǛႺᙸǔƱŴڂଢƷҾ׆ƱƳǓLJƢŵ
ӕǓৢƍǛᛚǔƱŴဇᎍƕᨦܹǛƏƔŴཋႎܹƕႆဃƢǔӧᏡࣱƕƋǓLJƢŵ
ŠЭࢸƷǭȣȃȗǛƸƣƠƨLJLJȬȳǺǛ્ፗƢǔƱŴଐήƕƋƨƬƨئӳƴᨼήྵ
ᝋǛƓƜƠŴ້໎ƷҾ׆ƴƳǔئӳƕƋǓLJƢŵ
Š
ȞǦȳȈᢿƸᙐᩃƳ࢟ཞǛƠƯƓǓLJƢƷưŴᒰƴৢƏƱࣴƷҾ׆ƱƳǓLJƢŵ
ŠɤᏩƸҗЎƴࢍࡇƷƋǔNjƷǛƝဇƘƩƞƍŵࢊƍNjƷǛƝဇƴƳǓLJƢƱŴ
᠃ƢǔǕƕƋǓLJƢŵ
İ ǺȸȠȪȳǰ
ı ȕǩȸǫǹȢȸȉЏƑǹǤȃȁ
IJ ȞǦȳȈ
ij ȬȳǺȕȸȉ
DC ἾὅἌỆếẟề㩷
ǤȡȸǸǵȸǯȫǛȇǸǿȫɟაȬȕǫȡȩƷજእ܇ƷٻƖƞ (APS-C Ⴛ࢘)
ƴӳǘƤƯᚨᚘƞǕƨŴȇǸǿȫɟაȬȕݦဇȬȳǺưƢŵƞǒƴŴȇǸǿȫƷ
ཎࣱƴӳǘƤƨήܖᚨᚘǛᘍƏƜƱưŴ᭗ဒឋ҄ǛܱྵƠƯƍLJƢŵ
Ŧ
APS-C
Ⴛ࢘ƷٻƖƞǑǓNjٻƖƳજእ܇ǛƬƨȇǸǿȫɟაȬȕǫȡȩŴƓ
ǑƼ
35mm
ဃơLJƢŵ
ŦǷǰȞ SD ǷȪȸǺƴƝဇƷئӳƸŴ17
ἾὅἌỉბᏮ૾ඥ
ǫȡȩǁƷბᏮ૾ඥƸŴƓƪƷǫȡȩȡȸǫȸᙌȬȳǺƱӷಮưƢƷưŴǫ
ȡȩƷᛟଢƴࢼƬƯბᏮƠƯƘƩƞƍŵ
ŦȞǦȳȈ᩿ƴƸǓᡲѣဇŴAF ᡲѣဇƷᘺፗǍŴᩓൢໜሁƕƋǓLJƢŵǭ
ǺǍ൲ǕƕƭƘƱᛚ˺ѣǍᨦƷҾ׆ƱƳǓLJƢƷưƝදƘƩƞƍŵ
ɟაȬȕǫȡȩƴƸဇưƖLJƤǜŵƝဇƴƳǔƱဒ᩿ƴDZȩȬƕ
Ყ
34 mm Ⴛ࢘ƷဒᚌƴƳǓLJƢŵ
ᩧЈỆếẟề
ᩧЈƷൿܭ૾ඥƸŴƓƪƷǫȡȩȡȸǫȸᙌȬȳǺƱӷಮưƢŵǫȡȩƷᛟ
ଢƴࢼƬƯǓǍǷȣȃǿȸᡮࡇሁǛǻȃȈƠƯƘƩƞƍŵ
ἦὅἚӳỪẶểἌὊἱὅἂ
ƜƷȬȳǺƸŴȏǤȑȸǽȋȃǯȢȸǿȸ(HSMᲩឬ᪦ඬȢȸǿȸ㪀ǛဇƠŴᡆ
ᡮƳǪȸȈȕǩȸǫǹƱ˺ѣ᪦ƷᨊӊǛܱྵƠƯƍLJƢŵ㩷
ẎἉἂἰ AF ဇẆỿἶἠὅ AF ဇẏ
ǪȸȈȕǩȸǫǹưજࢨƢǔئӳƸŴȕǩȸǫǹȢȸȉЏǓƑǹǤȃȁǛ AF
ƴǻȃȈƠLJƢᲢ 2ᲣŵȞȋȥǢȫưજࢨƢǔئӳƸŴȕǩȸǫǹȢȸȉЏǓ
ƑǹǤȃȁǛ M ƴǻȃȈƠŴȕǩȸǫǹȪȳǰǛׅƠƯȔȳȈǛӳǘƤLJƢŵ
ẎἝἅὅ AF ဇẆἬὅἑἕἁἋ AF ဇẆἏἝὊဇẏ
ǪȸȈȕǩȸǫǹưજࢨƢǔئӳƸŴǫȡȩǛ AF ȢȸȉƴǻȃȈƠƯŴȬȳǺ
ƷȕǩȸǫǹȢȸȉЏǓƑǹǤȃȁǛ AF ƴǻȃȈƠLJƢᲢ 2ᲣŵȞȋȥǢȫ
ưજࢨƢǔئӳƸŴȕǩȸǫǹȢȸȉЏǓƑǹǤȃȁǛ M ƴǻȃȈƠŴȕǩȸ
ǫǹȪȳǰǛׅƠƯȔȳȈǛӳǘƤLJƢŵ
ŦǫȡȩƷȕǩȸǫǹȢȸȉƷЏǓƑƸŴƝဇƷǫȡȩƷᛟଢƴࢼƬƯƘ
Ʃƞƍŵ
ŦȋdzȳŴȚȳǿȃǯǹŴǽȋȸဇƸŴឬ᪦ඬȢȸǿȸƴݣࣖƠƨǫȡȩƱƷኵ
ӳƤưǪȸȈȕǩȸǫǹજࢨƕӧᏡưƢŵឬ᪦ඬȢȸǿȸƴݣࣖƠƯƍƳƍǫ
ȡȩƱƷኵӳƤưƸŴȞȋȥǢȫȕǩȸǫǹưƷƝဇƱƳǓLJƢŵ
Ŧ
ƜƷȬȳǺƸŴAFƴǻȃȈƠƨLJLJưȞȋȥǢȫưƷȔȳȈᙀദǛƢǔƜƱNj
ӧᏡưƢŵǫȡȩǛǷȳǰȫAFȢȸȉƴǻȃȈƠƯŴӳࢸŴǷȣȃǿȸȜǿ
ȳǛҞƠƷLJLJưȕǩȸǫǹȪȳǰǛׅƠƯȔȳȈǛᛦૢƠƯƘƩƞƍŵ
ŦȞȋȥǢȫưȔȳȈǛӳǘƤǔᨥƴƸŴႸႮƕĐᲢᨂᢒᲣƷˮፗưNjᢒƴ
ȔȳȈƕӳǘƳƍƜƱƕƋǓLJƢƷưŴȕǡǤȳȀȸưᄩᛐƠƳƕǒȔȳȈǛ
ӳǘƤƯƘƩƞƍŵ
ẎἌἌὊἱὅἂẏ
ǺȸȠȪȳǰǛׅƠƯŴஇᢘƳನƴƳǔǑƏƴໜុᩉǛ٭҄ƞƤLJƢŵ
ἧἻἕἉἷજࢨ
ǫȡȩƷϋᔺȕȩȃǷȥƸŴƜƷȬȳǺƷဒᚌǛǫȐȸƠƯƍƳƍƨNJŴဒ᩿ԗ
ᡀƷήƕɧឱƠƯƠLJƍLJƢŵٳ˄ƚȕȩȃǷȥǛӕǓ˄ƚŴȯǤȉȑȍȫǛ
ဇƠƯજࢨƠƯƘƩƞƍŵᲢƝဇƷȕȩȃǷȥƴǑƬƯƸݣࣖưƖƳƍNjƷ
NjƋǓLJƢƷưŴʙЭƴȆǹȈજࢨǛᘍƬƯƘƩƞƍŵᲣ
ἾὅἌἧὊἛ
ȬȳǺȕȸȉƸŴဒឋƴࢨ᪪ǛɨƑǔஊܹήዴƷǫȃȈƴஊјưƢŵӕǓ˄ƚ
૾ඥƸŴȬȳǺέᇢƴȬȳǺȕȸȉǛƸNJᡂLjŴᚘ૾ӼƴഥLJǔLJưׅƠƯᄩ
ܱƴӕǓ˄ƚƯƘƩƞƍŵᲢ 3Უ
Ŧઃ࠘ƴƸȬȳǺȕȸȉǛᡞƞƴƸNJᡂLjŴᚘ૾ӼƴׅƠƯܭưƖLJƢ
Ტ 4Უŵ
ἧỵἽἑὊ
Ŧဒ᩿ԗᡀƕƚǒǕǔǕƕƋǔƷưŴȕǣȫǿȸƸҾЩƱƠƯᲫưဇƠƯ
ƘƩƞƍŵ
ŦήȕǣȫǿȸǛဇƢǔئӳƸŴόήǿǤȗᲢǵȸǭȥȩȸPLᲣǛƝဇ
ƘƩƞƍŵ
ሥẆӕৢɥỉද
ŦൢƸǫȓǍᥢƷҾ׆ƱƳǓLJƢŵᧈ᧓ဇƠƳƍئӳƸŴʑ༞дƱɟደƴ
ࣱ݅Ʒᑣƍܾ֥ƴλǕƯሥƠƯƘƩƞƍŵȊȕǿȪȳሁŴ᧸ᖓдƷƋǔئ
ƴƸሥƠƳƍưƘƩƞƍŵ
ŦȬȳǺ᩿ƴƸႺưᚑǕƳƍưƘƩƞƍŵǴȟǍ൲Ǖƕ˄ƍƨƱƖƴƸŴȖ
ȭǢȸƔȬȳǺȖȩǷưӕǓᨊƍƯƘƩƞƍŵƷួƳƲƸŴࠊᝤƷȬȳǺǯ
ȪȸȊȸ෩ƱȬȳǺǯȪȸȋȳǰȚȸȑȸư᠉ƘƍƯƘƩƞƍŵșȳǸȳŴ
ǷȳȊȸሁƷஊೞ๋дƸዌݣƴǘƳƍưƘƩƞƍŵ
ŦƜƷȬȳǺƸ᧸൦ನᡯưƸƋǓLJƤǜŵᩋټǍ൦ᡀưƷဇưƸŴǒƞƳƍ
ǑƏƴදƠƯƘƩƞƍŵ൦ƕȬȳǺϋᢿƴλǓᡂljƱŴٻƖƳᨦƷҾ׆Ʊ
ƳǓŴྸɧᏡƴƳǔئӳƕƋǓLJƢŵ
Ŧ࣯ນƳภࡇ٭҄ƴǑǓŴȬȳǺϋᢿƴ൦ƕဃơǔƜƱƕƋǓLJƢŵ݊ƍދٳ
Ɣǒଡ଼ƔƍܴϋƴλǔƱƖƳƲƸŴDZȸǹǍȓȋȸȫᘥƴλǕŴԗƷภࡇƴ
ƳơLJƤƯƔǒƝဇƘƩƞƍŵ
ԼឋᚰểỴἧἑὊἇὊἥἋỆếẟề
ԼឋᚰƱǢȕǿȸǵȸȓǹƴ᧙ƠƯƸŴКኡƷżᚰᙹܭŽǛƝӋༀƘƩƞƍŵ
ɼễˁಮ
ȬȳǺನᲢ፭ᲧᲣ 10Ყ13 இٻજࢨྙ 1:6.6
ဒ ᚌ
இݱǓ 22 இٻࢲ X μᧈ 87.3 x 88.2mm
இჺજࢨុᩉ 0.24m 520
102.4Ყ63.8°
ȕǣȫǿȸǵǤǺ 82mm
ٻƖƞƞƸŴǷǰȞȞǦȳȈƷNjƷưƢŵ
Thank you very much for purchasing a Sigma Lens. In order to get the
maximum performance and enjoyment out of your Sigma lens, please read
this instruction booklet thoroughly before you start to use the lens.
DESCRIPTION OF THE PARTS (fig.1)
1. Filter Attachment Thread
2. Focus Ring
3. Distance Scale
4. Focus Index Line
DC LENS
These are special lenses that are designated for digital cameras because
the lens image circle is designated to correspond to the size of the image
sensors of most digital SLR cameras. The specialized design gives these
lenses the ideal properties for digital cameras.
ŦAn image sensor element larger than those corresponding to APS-C
cannot be used in digital cameras or 35mm SLR cameras. If such an
element is used vignetting will occur on the picture surface.
ŦIf you use SD9, SD10 or SD14 digital cameras, corresponding angle of
view will be 17-34mm.
ATTACHING TO CAMERA BODY
When this lens is attached to the camera body it will automatically function
in the same way as your normal lens. Please refer to the instruction booklet
for your camera body.
ŦOn the lens mount surface, there are a number of couplers and electrical
contacts. Please keep them clean to ensure proper connection. To avoid
damaging the lens, be especially sure to place the lens with its front end
down while changing the lens.
SETTING THE EXPOSURE MODE
The sigma lens functions automatically after mounting to your camera.
Please, refer to the camera instruction book.
FOCUSING AND ZOOMING
This lens features Sigma’s built-in Hyper Sonic Motor (HSM). The HSM
enables quick and quiet autofocusing.
䇶SIGMA AF and CANON AF䇷
For autofocus operation, set the focus mode switch on the lens to the “AF”
position (fig.2). If you wish to focus manually, set the focus mode switch on
the lens to the “M” position. You can adjust the focus by turning the focus
ring.
䇶NIKON AF, PENTAX AF and SONY䇷
For autofocus operation, set the camera to AF mode and set the focus
mode switch on the lens to the “AF” position (fig.2). If you wish to focus
manually, set the focus mode switch on the lens to the “M” position. You can
adjust the focus by turning the focus ring.
ŦPlease refer to camera’s instruction manual for details on changing the
camera’s focusing mode.
ŦFor Nikon, Pentax and Sony mounts, it is only possible to use AF with
camera bodies which support motors driven by ultrasonic waves such as
HSM. AF will not function if the camera body does not support this type of
motor.
ŦThis lens also permits manual focusing even in the autofocus mode. With
the camera set to the One-Shot AF (AF-S) mode, it is possible to
manually override the autofocus while the shutter release button is
pressed halfway.
ŦWhen operating this lens in manual focus mode, it is recommended that
correct focus be confirmed visually in the viewfinder rather than relying on
the distance scale. This is due to possible focus shift resulting from
extreme changes in temperature which cause various components in the
lens to expand and contract. Special allowance is made for this at the
infinity setting.
żZoomingŽ
Rotate the Rubber grip on the zoom ring to the desired position.
FLASH PHOTOGRAPHY
Built-in flash of your camera may not cover angle of view of this lens, and
this may cause light fall-off at the corners. When external flash is used, flip
wide panel of your flashgun down to cover flash’s head, before taking
picture. (This may not work with some flashguns, please test your
equipment shootings beforehand)
LENS HOOD
A bayonet type detachable hood is provided with the lens. This lens hood
helps to prevent flare and ghosted images caused by bright illumination
from outside the picture area. Attach the hood and turn clockwise until it
stops rotation. (fig.3)
ŦIn order to place the lens and hood into the storage case, you must first
remove the hood, then replace it on the lens in the reverse position.
(fig.4)
FILTER
ŦOnly one filter should be used at the time. Two or more filters and/or
special thicker filters, like a polarizing filter, may cause vignetting.
ŦWhen using a polarizing filter with AF camera, use the “circular” type.
BASIC CARE AND STORAGE
ŦAvoid any shocks or exposure to extreme high or low temperatures or to
humidity.
ŦFor extended storage, choose a cool and dry place, preferably with good
ventilation. To avoid damage to the lens coating, keep away from
mothballs or naphthalene gas.
ŦDo not use thinner, benzine or other organic cleaning agents to remove
dirt or finger prints from the lens elements. Clean by using a soft,
moistened lens cloth or lens tissue.
ŦThis lens is not waterproof. When you use the lens in the rain or near
water, keep it from getting wet. It is often impractical to repair the internal
mechanism, lens elements and electric components damaged by water.
ŦSudden temperature changes may cause condensation or fog to appear
on the surface of the lens. When entering a warm room from the cold
outdoors, it is advisable to keep the lens in the case until the temperature
of the lens approaches room temperature.
TECHNICAL SPECIFICATIONS
Lens construction 10 – 13
Angle of View 102.4 – 63.8°
Minimum Aperture 22
Minimum Focusing Distance 0.24m (0.79 ft)
Magnification 1:6.6
Filter Size 82mm
Dimensions Dia.gLength 87.3g88.2mm (3.44g3.47in)
Weight 520g (18.3oz)
ENGLISH
5. Zoom Ring
6. Focus Mode Switch
7. Mount
8. Lens Hood
Dimensions and weight include the SIGMA mount.
DEUTSCH
Wir danken Ihnen für das Vertrauen, das Sie uns mit dem Kauf dieses
SIGMA Produktes erwiesen haben. Bitte lesen Sie sich diese Anleitung vor
der ersten Benutzung des Gerätes aufmerksam durch.
BESCHREIBURUNG DER TEILE (Abb.1)
1. Filtergewinde
2. Entfernungsring
3. Entfernungsskala
4. Einstellindex
DC OBJEKTIVE
Der Bildkreis dieser Objektive ist speziell für Digitalkameras mit
Aufnahmesensoren bis zum APS-C Format berechnet. Dieses Design
verleiht den Objektiven die optimalen Eigenschaften für den Einsatz an
digitalen Kameras, zudem ermöglicht es die kompakte und leichte Bauweise.
Ŧ
Werden Objektive der DC-Serie an Digital-Kameras, deren Aufnahmesensoren
größer als das APS-C Format sind oder an 35mm SLR Kameras
eingesetzt, treten Vignettierungen im Bild auf.
ŦDer sogenannte „Verlängerungsfaktor“ der Brennweite, der den optischen
Eindruck äquivalent zum KB-Format ausdrückt, ergibt sich aus der Größe
des Aufnahmesensors Ihrer Kamera.
ANSETZEN AN DAS KAMERAGEHÄUSE
An die Kamera angesetzt, funktioniert dieses Objektiv genauso automatisch wie
lhr Normalobjektiv. Einzelheiten hierüber finden Sie in der Bedienungsanleitung
zur Kamera.
ŦHalten Sie die Kontakte und Kupplungselemente am Objektivanschluß
stets sauber. Stellen Sie das Gerät z. Bsp. beim Objektivwechsel
grundsätzlich nicht auf der Kontaktleiste ab, um eine Beschädigung der
Kupplungselemente zu vermeiden.
EINSTELLEN DER BETRIEBSART
Das SIGMA Objektiv stellt nach dem Ansetzen an die Kamera alle
Funktionen automatisch zur Verfügung. Einzelheiten entnehmen Sie bitte
der Gebrauchsanleitung der Kamera.
EINSTELLUNG VON SCHÄRFE UND BRENNWEITE
Dieses Objektiv verfügt über einen eingebauten SIGMA Hyper Sonic Motor
(HSM). Der HSM ermöglicht die schnelle und leise automatische
Scharfeinstellung.
䇶SIGMA AF und CANON AF䇷
Für die automatische Scharfeinstellung schalten Sie den Fokussierschalter am
Objektiv auf die “AF”-Position (Abb.2). Sollten Sie die Schärfe manuell
einstellen wollen, schalten Sie den Fokussierschalter am Objektiv auf die “M”Position. Sie können die Schärfe nun durch Drehen des Entfernungsrings einstellen.
䇶NIKON AF, PENTAX AF und SONY䇷
Für die automatische Scharfeinstellung schalten Sie die Kamera in den
AF-Betrieb und schalten Sie den Fokussierschalter am Objektiv auf die
“AF”-Position (Abb.2). Sollten Sie die Schärfe manuell einstellen wollen,
schalten Sie den Fokussierschalter am Objektiv auf die “M”-Position. Sie
können die Schärfe nun durch Drehen des Entfernungsrings einstellen.
Hinweise zum Wechsel der Fokussierbetriebsart der Kamera entnehmen
Sie bitte der Bedienungsanleitung der Kamera.
Bei Nikon, Pentax, und Sony Anschlüssen, kann der Autofokus nur mit
Kameras benutzt werden, die Ultraschallmotoren, wie die HSM,
unterstützen. Der Autofokus wird nicht funktionieren, wenn die Kamera
diese Art von Motoren nicht unterstützt.
Dieses Objektiv kann auch manuell scharfgestellt werden, während die
AF-Betriebsart eingestellt ist. Wenn die Kamera auf Einzelbild-AF (AF-S)
eingestellt ist, können Sie, nachdem das Objektiv von der Automatik
scharfgestellt wurde und zum Stillstand gekommen ist, die Schärfe durch
Drehen am Fokussierring manuell einstellen. Der Auslöser muß hierbei
halb durchgedrückt bleiben.
Bei manueller Fokussierung sollte die Schärfe auf der Mattscheibe
eingestellt werden, da durch Temperaturschwankungen Abweichungen
von der Entfernungsskala auftreten können. Dies gilt insbesondere für die
Unendlich-Einstellung.
żBRENNWEITENEINSTELLUNGŽ
Durch Drehen des Zoomringes wird die Brennweite eingestellt.
BLITZLICHTFOTOGRAFIE
Der eingebaute Blitz Ihrer Kamera kann nicht den vollständigen Bildwinkel
dieses Objektives ausleuchten, was zu Abdunklungen in den Bildecken
führen kann. Wenn Sie ein externes Blitzgerät verwenden, setzen Sie bitte
eine Weitwinkelstreuscheibe vor den Blitzkopf. Bei einigen Geräten kann
dies nicht möglich sein, daher prüfen Sie Ihre Ausrüstung bitte im voraus.
GEGENLICHTBLENDE
Das Objektiv wird mit einer abnehmbaren Bajonett-Gegenlichtblende
geliefert. Diese hilft, Streulicht und Reflexe zu vermeiden, wie sie durch
starkes, seitlich einfallendes Licht entstehen können. Orientieren Sie sich
beim Anbringen der Gegenlichtblende an den aufgedruckten Markierungen
und achten Sie darauf, daß die Blende korrekt einrastet. (Abb.3)
Ŧ
Zum Transport oder zur Aufbewahrung des Objektives kann die Gegenlichtblende
abgenommen und umgestülpt aufgesetzt werden. (Abb.4)
FILTER
Ŧ
Bei Einsatz von Polfiltern verwenden Sie an einer Autofokuskamera bitte
ausschließlich Zirkular-Polfilter. Beim Einsatz eines Linear-Polfilters können
sich bei Autofokus und Belichtungsautomatik Einstellfehler ergeben.
ŦVerwenden Sie grundsätzlich nur ein Filter. Zwei oder mehr Filter
gleichzeitig bzw. stärkere Spezialfilter — z.B. Polarisationsfilter oder solche,
mit besonders hoher Filterfassung
PFLEGE UND AUFBEWAHRUNG
ŦSetzen Sie das Objektiv nicht harten Stößen, extrem hohen bzw.
niedrigen Temperaturen oder hoher Luftfeuchtigkeit aus.
ŦWählen Sie für längere Lagerung einen kühlen, trockenen und möglichst
gut belüfteten Ort. Vermeiden Sie die Lagerung in der Nähe von
Chemikalien, deren Dämpfe die Vergütung angreifen könnten.
ŦVerwenden Sie zur Entfernung von Schmutz oder Fingerabdrücken auf
Glasflächen keinesfalls Verdünner, Benzin oder andere organische
Reinigungsmittel, sondern ein sauberes, feuchtes Optik-Reinigungstuch
oder Optik-Reinigungspapier.
Ŧ
Das Objektiv ist nicht wassergeschützt. Sorgen Sie deshalb bei Aufnahmen
im Regen oder in der Nähe von Wasser für ausreichenden Schutz. Die
Reparatur eines Objektives mit Wasserschaden ist häufig nicht möglich!
ŦTemperaturschocks können zum Beschlagen des Objektives und seiner
Glasflächen führen. Beim Wechsel aus der Kälte in ein geheiztes Zimmer
empfiehlt es sich, das Objektiv solange im Köcher oder der Fototasche zu
belassen, bis es die Zimmertemperatur angenommen hat.
TECHNISCHE DATEN
Glieder– Linsen
Diagonaler Bildwinkel
Kleinste Blende
Naheinstellgrenze
Größter Abbildungsmaßstab
Filterdurchmesse
Abmessungen Ø ×Baulänge
Gewicht 520
Abmessungen und Gewicht beziehen sich auf den SIGMA-Anschluß.
5. Brennweitenring
6. Fokussierschalter
7. Anschluß
8. Gegenlichtblende
—
können zu Vignettierungen verursachen.
10 – 13
102.4 – 63.8°
22
0.24m
1:6.6
82mm
87.3g88.2mm
FRANÇAIS
Nous vous remercions d’avoir choisi un objectif SIGMA. Pour en tirer le
meilleur profit et le plus grand plaisir, nous vous conseillons de lire
attentivement le mode d’emploi avant toute utilisation.
DESCRIPTION DES ELEMENTS (fig.1)
1. Filetage pour filtre
2. Bague des distances
3. Echelle des distances
4. Repère de distance
OBJECTIF DC
Ces objectifs sont spécialement étudiés pour une utilisation sur les boîtiers
reflex numériques, leur cercle image correspondant à la taille des capteurs
des appareils les plus courants. Leur conception spécifique les fait
bénéficier de caractéristiques idéales pour les appareils numériques.
Ŧ
Cet objectif ne doit pas être utilisé avec un appareil numérique dont le
capteur est d'une taille supérieure au format APS-C ou sur un boîtier reflex
135mm. Sinon un vignettage important apparaîtrait en périphérie de l'image.
ŦEn cas d'utilisation avec les boîtiers numériques Sigma SD9, SD10 ou
SD14, l'angle de champ est équivalent à celui d'un zoom 17-34mm.
FIXATION SUR L’APPAREIL
Lorsque l’objectif est fixé sur le boîtier, les automatismes fonctionnent
comme avec vos objectifs habituels. Consultez éventuellement le mode
d’emploi de l’appareil.
ŦSur la monture se trouvent plusieurs contacts électriques et électroniques.
Gardez-les bien propres pour garantir un bon fonctionnement. Ne posez
jamais l’objectif sur sa base arrière pour éviter d’endommager ces
éléments.
REGLAGE DU SYSTEME D’EXPOSITION
Cet objectif Sigma fonctionne automatiquement dès qu’il est monté sur le
boîtier. Veuillez vous reporter au mode d'emploi de I’appareil.
MISE AU POINT ET ZOOMING
Cet objectif est équipé de la motorisation à haute fréquence Sigma “Hyper
Sonic Motor”(HSM). Elle rend la mise au point automatique rapide et silencieuse.
䇶SIGMA AF et CANON AF䇷
Pour une mise au point automatique, placez le sélecteur de mise au point
en position “AF” (fig.2). Pour une mise au point manuelle, placez le
sélecteur en position “M” position, et ajustez le point en tournant la bague
de mise au point.
䇶NIKON AF, PENTAX AF et SONY䇷
Pour une mise au point automatique, mettez le boîtier en mode AF et
placez le sélecteur de mise au point en position “AF” (fig.2). Pour une mise
au point manuelle, placez le sélecteur en position “M” position, et ajustez le
point en tournant la bague de mise au point.
Veuillez vous référer au mode d'emploi du boîtier pour changer le mode
de mise au point de l'appareil.
Dans les versions pour Nikon, Pentax et Sony, la mise au point AF n'est
possible qu'avec les boîtiers permettant d'activer un moteur à ondes
ultrasonique du type de celui de la motorisation HSM. L'AF est
indisponible avec les autres boîtiers.
Cet objectif permet la mise au point manuelle, même en mode autofocus.
Avec l’appareil en mode de mise au point "spot" (ONE SHOT)(AF-S),
vous pouvez retoucher la mise au point manuellement après que l’objectif
ait fait la mise au point automatiquement en maintenant le déclencheur
enclenché à mi-course.
En cas d’utilisation de cet objectif en mise au point manuelle, il est
recommandé de vérifier la qualité de la mise au point à partir du viseur.
En effet, des écarts importants de température peuvent provoquer de
légères modifications des composants intemes, qui font varier la position
de la mise au point. Une tolérance particulière est prévue à cet effet en
position infini.
䇶Zooming䇷
Tournez la bague de zoom sur la position voulue.
PHOTOGRAPHIE AU FLASH
Le flash intégré de votre boîtier peut ne pas couvrir l'angle de champ de cet
objectif, ce qui peut engendrer un assombrissement des coins de l'image.
En cas d'utilisation avec le flash intégré, il est recommandé d'utiliser
l'élargisseur d'angle prévu à cet effet. (certains flashes pouvant ne pas
couvrir l'angle de vue maximal, il est conseillé d'effectuer un test préalable)
PARE-SOLEIL
Un pare-soleil démontable avec fixation à baïonnette est livré avec objectif. Ce
pare-soleil protège l’objectif des rayons parasites et de lumière incidente.
Assurez-vous qu’il se fixe convenablement jusqu’à la position de blocage (fig.3).
ŦPour replacer l'objectif et le pare-soleil dans la valise de transport, veillez à
détacher d'abord le pare-soleil et à le replacer ensuite en position inversée. (fig.4)
FILTRES
ŦN’employez jamais deux filtres à la fois. L’utilisation de deux filtres, ou
d’un filtre très épais, comme un filtre polarisant ordinaire, peut provoquer
un vignettage.
ŦSi vous souhaitez utiliser un filtre polarisant sur un zoom AF,
choisissez-le de type “circulaire”. Avec un filtre de type linéaire,
l’autofocus et le calcul d’exposition pourraient être incorrects.
PRECAUTIONS ELEMENTAIRES ET RANGEMENT
ŦNe pas exposer l’objectif aux chocs, ni à des températures extrèmes, ou
à l’humidité.
Ŧ
Si l’objectif n’est pas utilisé pendant longtemps, choisir un endroit frais, sec
et bien ventilé. Ne pas placer l’objectif près de la naphtaline ou des produits
anti-mites afin de ne pas détériorer le revêtement multicouche des lentilles.
Ŧ
Ne pas utiliser de dissolvant, d’essence ou autre matière organique pour le
nettoyage de saletés ou d’empreintes de doigts sur les éléments optiques.
ŦCet objectif n’est pas étanche. Si vous l’utilisez par temps de pluie ou
près de l’eau, veuillez à ne pas le mouiller. Les réparations du
mécanisme interne, des éléments optiques et/ou des éléments
électriques ne sont pas toujours possibles en cas de dommages.
ŦDes écarts soudains de température peuvent causer de la condensation
ou de la buée peut apparaître sur la lentille frontale. Lorsque vous
pénétrez dans un local chauffé en venant d’un extérieur froid, il est
recommandé de placer l’objectif dans un étui jusqu’à ce que sa
température avoisine celle du local.
CARACTERISTIQUES
Construction de l’ objectif 10 – 13
Angle de champ 102.4 – 63.8°
Ouverture minimale 22
Distance minimale de mise au point 0.24m
Rapport de reproduction 1:6.6
Diamétre de filtre 82mm
Dimension: diamentreglongueur 87.3g88.2mm
Poids 520g
5. Bague de zoom
6. Sélecteur de mise au point
7. Baïonnette
8. Pare-Soleil
Dimensions et poids donnés pour la monture SIGMA.
ESPAÑOL
Le agradecemos la compra de este objetivo Sigma. Para conseguir los
mejores resultados de su objetivo lea atentamente este manual de
instrucciones antes de utilizarlo.
DESCRIPCION DE LOS COMPONENTES (fig.1)
1. Rosca para filtros
2. Aro de enfoque
3. Escala de distancias
4. Línea de índice
5. Aro del Zoom
6. Selector de enfoque
7. Montura
8. Parasol
OBJETIVO DC
Estos objetivos han sido específicamente diseñados para cámaras digitales
ya que su círculo de imagen coincide con el de los sensores de la mayoría
de cámaras digitales réflex. Su diseño especializado los convierte en
objetivos ideales para cámaras digitales.
ŦLos sensores de imagen mayores que los que correspondan a APS-C no
son aptos para las cámaras digitales de 35mm. Si se emplean
provocarán un efecto de viñeteo sobre la superficie de la imagen.
ŦSi emplea las cámaras digitales SD9, SD10 o SD14 de Sigma, el ángulo
de visión del objetivo será de 17-34mm.
CONEXION AL CUERPO DE CAMERA
Cuando el objetivo se conecta a la cámara funciona del mismo modo que
los objetivos originales. Consulte el manual de instrucciones de su cámara.
ŦEn la superficie de la montura existen una serie de contactos eléctricos y
acopladores. Manténgalos limpios para asegurar una correcta conexión.
Para prevenir daños en el objetivo tenga especial cuidado al apoyarlo
cuando cambie de óptica.
MODO AJUSTE DE EXPOSICION
Los objetivos Sigma funcionan automáticamente al conectarlos a su
cámara. Por favor, consulte el manual de su cámara.
INTERRUPTOR DE BLOQUEO DEL ZOOM
Este objetivo, diseñado por Sigma, incorpora un motor Hipersónico (HSM).
Éste proporciona un enfoque rápido y silencioso.
䇶SIGMA AF y CANON AF䇷
Para utilizar el autofoco, ponga el selector en la posición “AF” (fig.2).Si
quiere enfocar manualmente ponga el selector en la posición “M”. Ajuste el
foco moviendo el aro de enfoque.
䇶NIKON AF, PENTAX AF y SONY䇷
Para utilizar el autofoco, ponga la cámara en el modo AF y ponga el
selector de la óptica en la posición “AF” (fig.2). Si quiere enfocar
manualmente ponga el selector en la posición “M”. Ajuste el foco moviendo
el aro de enfoque.
Para cambiar el modo de enfoque de la cámara, mírelo en el manual de
instrucciones de la cámara.
En las monturas Nikon, Pentax y Sony solo funcionará el AF con cuerpos
que soporten los motores ultrasónicos, como los HSM o similares. En
caso contrario el AF estará desactivado.
Este objetivo también permite el enfoque manual aunque esté en modo
automático. Con la cámara preparada para Modo Disparo AF (ONE
SHOT) (AF-S) puede ajustar el enfoque manualmente después que el
objetivo haya enfocado automáticamente (y se pare) mientras mantenga
el botón disparador suavemente presionado.
Cuando utilice estos objetivos en modo de enfoque manual es
recomendable comprobar visualmente por el visor cualquier cambio de
enfoque. Esto es debido a que los cambios de temperatura causan que
distintos elementos internos se expandan o contraigan (de modo que no
coincida con la escala de distancias con la medición efectiva). Este efecto
puede ser más ostensible en ajuste infinito.
䇶OPERACION ZOOM䇷
Gire el aro del Zoom hasta la posición deseada.
FOTOGRAFIA CON FLASH
Podría ser que el flash incorporado de la cámara no cubriera el ángulo de
visión de este objetivo, esto podría causar entradas de luz en los bordes.
Cuando utilice un flash externo, bascule el panel angular de su unidad de
flash para cubrir el cabezal antes de tomar una fotografía. (Puede que no
funcione con algunas unidades de flash, por favor compruebe su equipo
antes de tomar fotografías).
PARASOL
Se incorpora con el objetivo un parasol extraíble de tipo bayoneta. Este
parasol ayuda a prevenir los destellos y reflejos producidos por la
iluminación ambiental. Al conectarlo compruebe que quede completamente
sujeto. (fig.3).
ŦPara guardar el objetivo y el parasol en su caja primero tiene que sacar
el parasol y después invertirlo en el objetivo (fig.4).
FILTROS
ŦSolamente debe utilizarse un filtro cada vez. Utilizar dos o más filtros a la
vez, especialmente los de efectos como el polarizador, pueden causar
viñeteos.
ŦCuando utilice un filtro polarizador en una cámara AF, observe que sea
de tipo circular. Si utiliza un filtro polarizador de tipo lineal, el enfoque
automático y la exposición automática pueden funcionar incorrectamente.
CUIDADOS BASICOS Y ALMACENAJE
ŦEvite los golpes o la exposición a temperaturas extremas, altas o bajas,
y/o humedad.
ŦEn caso de almacenaje por un tiempo prolongado, elija un lugar fresco y
seco, preferiblemente con buena ventilación. Para evitar daños en el
tratamiento de los objetivos, aléjelos de las bolas o gas de naftalina.
ŦNo utilice diluyente, gasolina u otros limpiadores orgánicos para limpiar la
suciedad de los objetivos. Para limpiarlos utilice un paño de tela suave o
limpia objetivos.
ŦEstos objetivos no son impermeables. Cuando los utilice en la lluvia o
cerca del agua, asegúrese de mantenerlo seco. Es prácticamente
imposible reparar los mecanismos internos, elementos de cristal y
componentes eléctricos dañados por el agua.
ŦSi hay cambios súbitos de temperatura puede haber condensación o velo
en la superficie del objetivo. Cuando entre en una habitación cálida,
viniendo de un lugar frío, es recomendable mantener el objetivo en su
caja hasta que su temperatura se asemeje a la de la habitación.
CARACTERISTCAS
Construcción del objetivo 10 – 13
Ángulo de visión 102.4 – 63.8°
Apertura mínima 22
Distancia mínima enfoque 0.24m
Ampliación 1:6.6
Diámetro filtro 82mm
Dimensiones (diámglong) 87.3g88.2mm
Peso 520g
Dimensiones y peso incluyen montura SIGMA.
Vi ringraziamo della preferenza accordataci con l’acquisto del vostro nuovo
obiettivo Sigma. Vi raccomandiamo di leggere attentamente le presenti
istruzioni prima di cominciare a usarlo. Conoscendolo meglio, vi sarà facile
ottenerne le migliori prestazioni e soddisfazioni.
ELEMENTI PRINCIPALI (fig.1)
1. Portafiltri frontale a vite
2. Ghiera di messa a fuoco
3. Scala delle distanze
4. Indice di collimazione
OBIETTIVI DC
Sono obiettivi costruiti apposta per le fotocamere digitali. Il loro cerchio di
copertura corrisponde alle dimensioni dei sensori digitali usati nella maggior
parte delle reflex digitali. Il loro schema ottico li rende particolarmente adatti
alle macchine fotografiche digitali.
ŦSensori d’immagine più grandi di quelli corrispondenti allo APS-C non
possono essere usati nelle reflex digitali o nelle reflex 35mm. Se ciò
avviene l’immagine risulta “vignettata” ai bordi.
ŦNelle fotocamere digitali SD9, SD10 e SD14, il corrispondente campo
visuale sarà di 17-34mm.
APPLICAZIONE SUL CORPO MACCHINA
Una volta che avrete inserito lo zoom nell’innesto della fotocamera,
funzionerà automaticamente allo stesso modo di un qualsiasi altro obiettivo
(v. istruzioni per l’uso della fotocamera).
Ŧ
La superficie dell’innesto presenta un certo numero di contatti elettrici e altri
elementi per il trasferimento di dati e informazioni. Vi raccomandiamo di
curarne la pulizia. I contatti sono molto delicati. Durante le operazioni di cambio
di ottica, appoggiate l’obiettivo su una superficie piana badando a rivolgerne in
giù la parte della lente frontale per evitare di danneggiare i contatti in questione.
IMPOSTAZIONE DEL MODO DI ESPOSIZIONE
Una volta montato sulla fotocamera, l'obiettivo Sigma funziona
automaticamente. Si consultino le istruzioni per l'uso del corpo macchina.
MESSA A FUOCO E MANOVRA DELLO ZOOM
Questo obiettivo incorpora un motore ipersonico (HSM), il quale permette
una più veloce e silenziosa messa a fuoco automatica.
䇶SIGMA AF e CANON AF䇷
Per attivare l’Autofocus, impostare la messa a fuoco scegliendo,
sull’obiettivo, la posizione “AF” (fig.2). Quando si desidera mettere a fuoco
manualmente, scegliere, sull’obiettivo, la posizione “M”. In questo caso si
mette a fuoco ruotando la ghiera di messa a fuoco.
䇶NIKON AF, PENTAX AF e SONY䇷
Per attivare l’autofocus impostare, sulla fotocamera, la modalità AF e
scegliere, sull’obiettivo, la posizione “AF” (fig.2). Quando si desidera
mettere a fuoco manualmente, scegliere, sull’obiettivo, la posizione “M”. In
questo caso si mette a fuoco ruotando la ghiera di messa a fuoco.
ŦConsultare il libretto d’istruzioni della fotocamera per variare la modalità di
messa a fuoco.
ŦPer attacchi Nikon, Pentax e Sony è possible usare solamente la modalità
AF quando il corpo macchina riconosce il motore a ultrasuoni, come lo
HSM. La modalità AF non è possible se il corpo macchina non riconosce
questo tipo di motore.
Ŧ
Questo obiettivo lascia la facoltà di mettere a fuoco manualmente persino
ad autofocus inserito. Se infatti la fotocamera è predisposta per il modo di
funzionamento One Shot AF (AF-S), non c’è che da premere a meta corsa
il pulsante di scatto e da far intervenire il meccanismo di messa a fuoco
automatica (con successivo arresto) per ottenere, meediante la ghiera di
messa a fuoco manuale, la nitidezza “personalizzata” che si preferisce.
Ŧ
Se usate l’obiettivo con messa a fuoco manuale, accertatevi della nitidezza
del quadro mediante osservazione diretta dell’immagine che si forma nel
mirino. L’operazione è vivamente raccomandabile in considerazione degli
scostamenti ai quall il piano di messa a fuoco può andar soggetto in caso di
tori sbalzi di temperatura, par effetto dei quali diversi elementi ottici
dell’obiettivo possono dilatarsi fino a entrare in contatto reciproco. Per la
regolazione sull’infinito è prevista una compensazione speciale.
䇶MANOVRA DELLO ZOOM䇷
Fate ruotare la presina di gomma sulla ghiera dello zoom sino a
raggiungere la posizione desiderata.
FOTOGRAFIA CON IL FLASH
Il flash incorporato nella fotocamera potrebbe non illuminare tutto il campo
ripreso da questo obiettivo. Ciò causa una caduta di luce ai bordi. Quando,
con questo obiettivo, usate un flash esterno, inserite il suo pannello diffusore,
prima di scattare la foto. (Il pannello diffusore di alcuni flash non sempre
copre il campo di ripresa. Scattate alcune foto di prova per verificarlo)
PARALUCE
Il vostro obiettivo è corredato da un paraluce staccabile con attacco a
baionetta. Il paraluce previene efficacemente i riflessi interni e le immagini
fantasma che possono prodursi con un’illuminazione controluce. Dopo aver
applicato il paraluce, sinceratevi che sia perfettamente bloccato.(fig.3)
Ŧ
Per riporre l’obiettivo, il paraluce può essere applicato anche all’incontrario. (fig.4)
FILTRI
ŦSi può usare un solo filtro per volta. Con l’impiego di due o più filtri e/o di
filtri molto spessi (come i polarizzatori) è facile incorrere in vignettature.
Ŧ
Se volete adoperare un polarizzatore con una fotocamera AF, sceglietelo del
tipo “circolare”. Un polarizzatore “lineare”, infatti, può compromettere il regolare
funzionamento sia dell’autofocus che del sistema di esposizione automatica.
CURA E CONSERVAZIONE
ŦProteggete l’obiettivo da cadute e colpi, ed evitate di esporlo ad alte
temperature o umidità eccessiva.
ŦIn previsione di un prolungato periodo di inutilizzo, conservate l’obiettivo
in un posto fresco, asciutto e, possibilmente, ben aerato. Evitate di
esporlo a vapori di canfora o naftalina, che potrebbero deteriorame i
delicati rivestimenti antiriflessi.
ŦNon usate solventi, benzina o altri detergenti organici quando si tratta di
eliminare dagli elementi ottici tracce di sporco o impronte digitali, Ripuliteli
invece con un panno morbido inumidito o con una cartina per lenti.
ŦL’obiettivo non è impermeabile. Fate che non si bagni quando lo usate
sotto la pioggia o vicino all’acqua. Spesso i meccanismi interni, gli elementi
ottici e i componenti elettrici vengono danneggiati irrimediabilmente
dall’acqua, tanto da renderne impossibile qualsiasi riparazione.
ŦImprovvisi sbalzi di temperatura possono favorire la formazione di
condensa o provocare la velatura della lente frontale. Quando entrate in
un vano riscaldato mentre fuori fa molto freddo, vi consigliamo di tenere
l’obiettivo nella relativa custodia finché la sua temperatura non si sarà
adattata alla temperatura ambiente.
CARATTERISTICHE TECNICHE
Costituzione ottica (Gruppi-El.) 10 – 13
Angoli di campo 102.4 – 63.8°
Apertura minima 22
Distanza min. messa fuoco 0.24m
Rapporto d’ingrandim. 1:6.6
Diamentro filtri 82mm
Dimensioni (diametro lunghezza) 87.388.2mm
Peso 520g
ITALIANO
5. Ghiera di variazione della focale (zoom)
6. Selettore di messa a fuoco
7. Innesto
8. Paraluce
Dimensioni e pesi s’intendono comprensivi di attacco SIGMA.
 Loading...