


R-35ST English 24/02/2005 16:30 Page A
Important
R-35ST
MICROWAVE OVEN
OPERATION MANUAL
OPERATION MANUAL
This operation manual contains important information which you should read carefully before using your microwave oven.
IMPORTANT: There may be a serious risk to health if this operation manual is not followed or if the oven is modified so that it operates with the door open.
900 W (IEC 60705)
ENGLISH

R-35ST English 24/02/2005 16:30 Page B
GB Dear Customer,
Congratulations on acquiring your new microwave oven, which from now on will make your kitchen chores considerably easier.
You will be pleasantly surprised by the kinds of things you can do with a microwave.
Not only can you use it for rapid defrosting or heating up of food, you can also prepare whole meals. In our test kitchen our microwave team has gathered together a selection of the most delicious international recipes which are quick and simple to prepare.
Be inspired by the recipes we have included and prepare your own favourite dishes in your microwave oven.
There are so many advantages to having a microwave oven which we are sure you will find exciting:
●Food can be prepared directly in the serving dishes, leaving less to wash up.
●Shorter cooking times and the use of little water and fat ensure that many vitamins, minerals and
characteristic flavours are preserved.
We advise you to read the cookery book guide and operating instructions carefully. You will then easily understand how to use your oven.
Enjoy using your microwave oven and trying out the delicious recipes.

R-35ST English 24/02/2005 16:30 Page 1
GB
Attention:
Your product is marked with this symbol.
It means that used electrical and electronic products should not be mixed with general household waste. There is a separate collection system for these products.
A. Information on Disposal for Users (private households)
1. In the European Union
Attention: If you want to dispose of this equipment, please do not use the ordinary dust bin!
Used electrical and electronic equipment must be treated separately and in accordance with legislation that requires proper treatment, recovery and recycling of used electrical and electronic equipment.
Following the implementation by members states private households within the EU states may return their used electrical and electronic equipment to designated collection facilities free of charge*.
In some countries* your local retailer may also take back your old product free of charge if you purchase a similar new one.
*) Please contact your local authority for further details.
If your used electrical or electronic equipment has batteries or accumulators, please dispose of these separately beforehand according to local requirements.
By disposing of this product correctly you will help ensure that the waste undergoes the necessary treatment, recovery and recycling and thus prevent potential negative effects on the environment and human health which could otherwise arise due to inappropriate waste handling.
2. In other Countries outside the EU
If you wish to discard this product, please contact your local authorities and ask for the correct method of disposal.
For Switzerland: Used electrical or electronic equipment can be returned free of charge to the dealer, even if you don’t purchase a new product. Further collection facilities are listed on the homepage of www.swico.ch or www.sens.ch.
B. Information on Disposal for Business Users
1.In the European Union
If the product is used for business purposes and you want to discard it:
Please contact your SHARP dealer who will inform you about the take-back of the product. You might be charged for the costs arising from take-back and recycling. Small products (and small amounts) might be taken back by your local collection facilities.
For Spain: Please contact the established collection system or your local authority for take-back of your used products.
2. In other Countries outside the EU
If you wish to discard of this product, please contact your local authorities and ask for the correct method of disposal.
1

R-35ST English 24/02/2005 16:30 Page 2
CONTENTS
INFORMATION ON PROPER DISPOSAL . . . . . . . . . . . . . . . . . . . . . . . . . . . . . . . . . . . . .1 OVEN AND ACCESSORIES . . . . . . . . . . . . . . . . . . . . . . . . . . . . . . . . . . . . . . . . . . . . .3 CONTROL PANEL . . . . . . . . . . . . . . . . . . . . . . . . . . . . . . . . . . . . . . . . . . . . . . . . . . . .4 IMPORTANT SAFETY INSTRUCTIONS . . . . . . . . . . . . . . . . . . . . . . . . . . . . . . . . . . . .5 - 7 INSTALLATION . . . . . . . . . . . . . . . . . . . . . . . . . . . . . . . . . . . . . . . . . . . . . . . . . . . . . .7 BEFORE OPERATION . . . . . . . . . . . . . . . . . . . . . . . . . . . . . . . . . . . . . . . . . . . . . . . . . .7 STOP KEY . . . . . . . . . . . . . . . . . . . . . . . . . . . . . . . . . . . . . . . . . . . . . . . . . . . . . . . . . .8 SETTING THE CLOCK . . . . . . . . . . . . . . . . . . . . . . . . . . . . . . . . . . . . . . . . . . . . . . . . .8 MICROWAVE POWER LEVELS . . . . . . . . . . . . . . . . . . . . . . . . . . . . . . . . . . . . . . . . . . . .9 MICROWAVE COOKING . . . . . . . . . . . . . . . . . . . . . . . . . . . . . . . . . . . . . . . . . . . . . .10 OTHER CONVENIENT FUNCTIONS . . . . . . . . . . . . . . . . . . . . . . . . . . . . . . . . . .11 - 13 EXPRESS COOK & EXPRESS DEFROST . . . . . . . . . . . . . . . . . . . . . . . . . . . . . . . . . . . . .14 EXPRESS COOK & EXPRESS DEFROST CHART . . . . . . . . . . . . . . . . . . . . . . . . . . . .15 - 16 AUTO COOK OPERATION . . . . . . . . . . . . . . . . . . . . . . . . . . . . . . . . . . . . . . . . . . . . .17 AUTO COOK CHART . . . . . . . . . . . . . . . . . . . . . . . . . . . . . . . . . . . . . . . . . . . . .17 - 18 RECIPES FOR AUTO COOK AC-7 . . . . . . . . . . . . . . . . . . . . . . . . . . . . . . . . . . . . . . . .19 RECIPES FOR AUTO COOK AC-8 . . . . . . . . . . . . . . . . . . . . . . . . . . . . . . . . . . . . . . . .20 CARE AND CLEANING . . . . . . . . . . . . . . . . . . . . . . . . . . . . . . . . . . . . . . . . . . . . . . .21 SERVICE CALL CHECK . . . . . . . . . . . . . . . . . . . . . . . . . . . . . . . . . . . . . . . . . . . . . . . .21 SERVICE ADDRESSES . . . . . . . . . . . . . . . . . . . . . . . . . . . . . . . . . . . . . . . . . . . . .22 - 27 SPECIFICATIONS . . . . . . . . . . . . . . . . . . . . . . . . . . . . . . . . . . . . . . . . . . . . . . . . . . . .28
2

R-35ST English 24/02/2005 16:30 Page 3
OVEN AND ACCESSORIES
OVEN
1 |
2 |
|
3 |
|
|
|
|
|
|
|
1 |
Door |
|
|
|
|
|
|
||
|
|
|
|
|
2 |
Door hinges |
|
|
|
|
5 |
3 |
Oven lamp |
|
|
|
|
|
4 |
Waveguide cover |
|
|
|
|
|
5 |
Control panel |
|
|
|
|
|
6 |
Coupling |
|
|
|
|
|
7 |
Door lock openings |
|
|
|
|
|
8 |
Oven cavity |
|
|
|
|
|
9 |
Door seals and |
|
|
|
|
|
|
sealing surfaces |
9 |
|
|
|
|
10 Door safety latches |
|
8 |
6 |
4 |
7 |
11 Ventilation openings |
||
10 |
|
|
|
|
12 Outer cabinet |
|
|
|
|
|
|
13 Power supply cord |
|
|
|
|
|
11 |
|
|
12
13
|
ACCESSORIES: |
14 |
Check to make sure the following accessories are |
provided: |
|
15 |
(14) Turntable (15) Roller stay (16) Coupling |
Place the turntable support in the centre of the oven |
|
|
floor so that it can freely rotate around the coupling. |
16 |
Place the turntable onto the turntable support so that it |
locates firmly into the coupling. |
|
|
To avoid turntable damage, ensure dishes or |
|
containers are lifted clear of the turntable rim when |
|
removing them from the oven. |
NOTE: When you order accessories, please mention two items: part name and model name to your dealer or SHARP authorised service agent.
ENGLISH
3
R-35ST English 24/02/2005 16:30 Page 4
|
CONTROL PANEL |
|
|
|
|
|
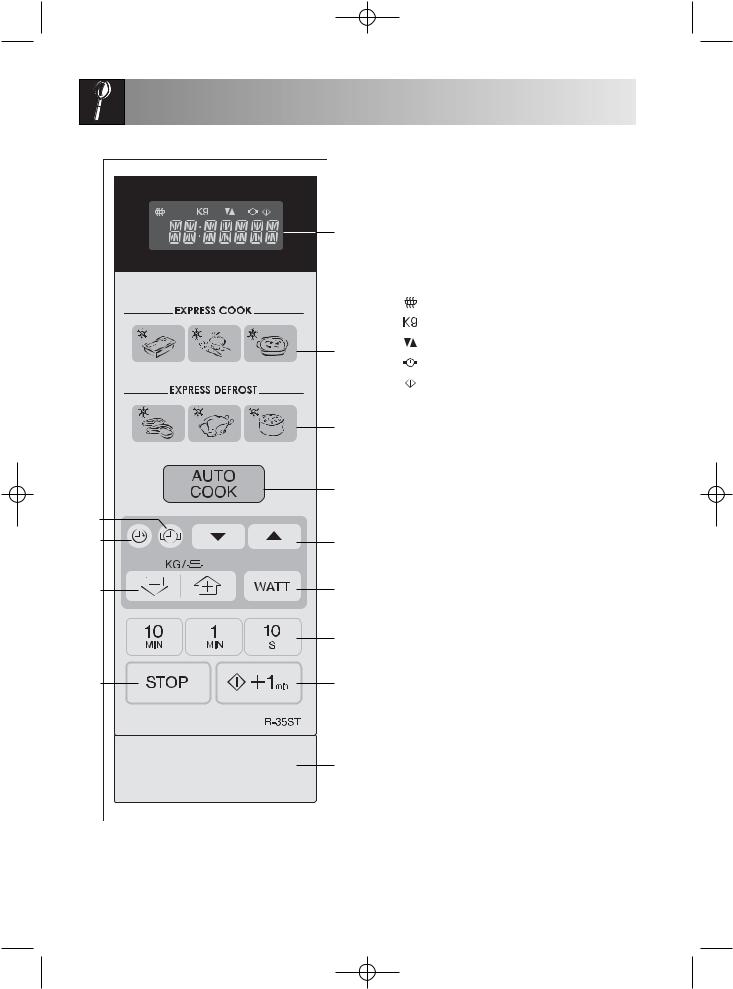
CONTROL PANEL |
||
|
|
1 |
Digital Display and Indicators |
|
|
|
|
The appropriate indicator will flash or light |
|
|
1 |
|
up, just above each symbol according to the |
|
|
|
|
instruction. When an indicator is flashing, |
|
|
|
|
press the suitable button (having the same |
|
|
|
|
symbol) or do the necessary operation. |
|
|
|
|
Microwave indicator |
|
|
|
|
Weight indicator |
|
|
2 |
|
More/Less indicator |
|
|
|
Clock set indicator |
||
|
|
|
||
|
|
|
Cooking in progress |
|
|
|
2 |
EXPRESS COOK keys |
|
|
3 |
3 |
EXPRESS DEFROST keys |
|
|
4 |
AUTO COOK key |
||
|
|
|||
|
|
5 |
LESS and MORE keys |
|
|
|
6 |
CLOCK key |
|
|
4 |
7 |
TIMER key |
|
6 |
|
8 |
WEIGHT DECREASE/INCREASE keys |
|
|
9 |
POWER LEVEL key |
||
7 |
|
|||
5 |
10 |
TIME keys |
||
|
|
11 |
START/+1min key |
|
8 |
9 |
12 |
STOP key |
|
13 |
DOOR OPEN button |
|||
|
|
|||
|
10 |
|
|
|
12 |
11 |
|
|
|
|
13 |
|
|
|
|
4 |
|
|
|
R-35ST English 24/02/2005 16:30 Page 5
IMPORTANT SAFETY INSTRUCTIONS
IMPORTANT SAFETY INSTRUCTIONS: READ CAREFULLY AND KEEP FOR FUTURE REFERENCE
To avoid the danger of fire.
The microwave oven should not be left unattended during operation. Power levels that are too high, or cooking times that are too long, may overheat foods resulting in a fire.
In cases where the oven is to be installed into a kitchen cabinet, the installation frame EBR-45ST licensed by SHARP must be used. This is available from your dealer. Refer to the frame installation instructions for A type models or ask your dealer for the proper instruction procedure. Only the use of this frame will guarantee the safety and quality of the product.
The electrical outlet must be readily accessible so that the unit can be unplugged easily in an emergency.
The AC power supply must be 230 V, 50 Hz, with a minimum 10 A distribution line fuse, or a minimum 10 A distribution circuit breaker.
It is recommended that a separate circuit serving only this appliance be provided.
Do not place the oven in areas where heat is generated. For example, close to a conventional oven. Do not install the oven in an area of high humidity or where moisture may collect.
Do not store or use the oven outdoors.
If food being heated begins to smoke, DO NOT OPEN THE DOOR. Turn off and unplug the oven and wait until the food has stopped smoking. Opening the door while food is smoking may cause a fire.
Use only microwave-safe containers and utensils. See Page 2 in the separate cookbook.
Do not leave the oven unattended when using disposable plastic, paper or other combustible food containers.
Clean the waveguide cover, the oven cavity, the turntable and roller stay after use. These must be dry and free from grease. Built-up grease may overheat and begin to smoke or catch fire.
Do not place flammable materials near the oven or ventilation openings. Do not block the ventilation openings.
Remove all metallic seals, wire twists, etc., from food and food packages. Arcing on metallic surfaces may cause a fire.
Do not use the microwave oven to heat oil for deep frying. The temperature cannot be controlled and the oil may catch fire.
To make popcorn, use only special microwave popcorn makers.
Do not store food or any other items inside the oven. Check the settings after you start the oven to ensure the oven is operating as desired.
See the corresponding hints in this operation manual and the cookery book section.
To avoid the possibility of injury
WARNING:
Do not operate the oven if it is damaged or malfunctioning. Check the following before use: a)The door; make sure the door closes properly
and ensure it is not misaligned or warped. b)The hinges and door safety latches; check to
make sure they are not broken or loose.
c)The door seals and sealing surfaces; ensure that they have not been damaged.
d)Inside the oven cavity or on the door; make sure there are no dents.
e)The power supply cord and plug; ensure that they are not damaged.
Never adjust , repair or modify the oven yourself. It is hazardous for anyone other than a competent person to carry out any service or repair operation which involves the removal of a cover which gives protection against exposure to microwave energy.
Do not operate the oven with the door open or alter the door safety latches in any way.
Do not operate the oven if there is an object between the door seals and sealing surfaces.
Do not allow grease or dirt to build up on the door seals and adjacent parts. Clean the oven at regular intervals and remove any food deposits. Follow the instructions for “Care and Cleaning” on page 21. Failure to maintain the oven in a clean condition could lead to a deterioration of the surface that could adversely affect the life of the appliance and possibly result in a hazardous situation.
Individuals with PACEMAKERS should check with their doctor or the manufacturer of the pacemaker for precautions regarding microwave ovens.
ENGLISH
5
R-35ST English 24/02/2005 16:30 Page 6
IMPORTANT SAFETY INSTRUCTIONS
To avoid the possibility of electric shock
Under no circumstances should you remove the outer cabinet.
Never spill or insert any objects into the door lock openings or ventilation openings. In the event of a spill, turn off and unplug the oven immediately, and call an authorised SHARP service agent.
Do not immerse the power supply cord or plug in water or any other liquid.
Do not let the power supply cord hang over the edge of a table or work surface.
Keep the power supply cord away from heated surfaces, including the rear of the oven.
Do not attempt to replace the oven lamp yourself or allow anyone who is not an electrician authorised by SHARP to do so. If the oven lamp fails, please consult your dealer or an authorised SHARP service agent.
If the power supply cord of this appliance is damaged, it must be replaced with a special cord. The exchange must be made by an authorised SHARP service agent.
To avoid the possibility of explosion and sudden boiling:
WARNING: Liquids and other foods must not be heated in sealed containers since they are liable to explode.
Never use sealed containers. Remove seals and lids before use. Sealed containers can explode due to a build up of pressure even after the oven has been turned off.
Take care when microwaving liquids. Use a widemouthed container to allow bubbles to escape.
Microwave heating of beverages can result in delayed eruptive boiling, therefore care has to be taken when handling the container.
To prevent sudden eruption of boiling liquid and possible scalding:
1.Stir liquid prior to heating/reheating.
2.It is advisable to insert a glass rod or similar utensil into the liquid whilst reheating.
3.Let liquid stand for at least 20 seconds in the oven at the end of cooking time to prevent delayed eruptive boiling.
Do not cook eggs in their shells, and whole hard boiled eggs should not be heated in microwave ovens since they may explode even after microwave cooking has ended. To cook or reheat eggs which have not been scrambled or mixed, pierce the yolks and the whites, or the eggs may explode. Shell and slice hard boiled eggs before reheating them in the microwave oven.
Pierce the skin of such foods as potatoes, sausages and fruit before cooking, or they may explode.
To avoid the possibility of burns
Use pot holders or oven gloves when removing food from the oven to prevent burns.
Always open containers, popcorn makers, oven cooking bags, etc., away from the face and hands to avoid steam burns.
To avoid burns, always test food temperature and stir before serving and pay special attention to the temperature of food and drink given to babies, children or the elderly.
Temperature of the container is not a true indication of the temperature of the food or drink; always check the food temperature.
Always stand back from the oven door when opening to avoid burns from escaping steam and heat.
Slice stuffed baked foods after heating to release steam and avoid burns.
Keep children away from the door to prevent them burning themselves.
To avoid misuse by children
WARNING: Only allow children to use the oven without supervision when adequate instructions have been given so that the child is able to use the oven in a safe way and understands the hazards of improper use.
Do not lean or swing on the oven door. Do not play with the oven or use it as a toy.
Children should be taught all important safety instructions: use of pot holders, careful removal of food coverings; paying special attention to packaging (e.g. self-heating materials) designed to make food crisp, as they may be extra hot.
Other warnings
Never modify the oven in any way.
Do not move the oven while it is in operation.
This oven is for home food preparation only and may only be used for cooking food. It is not suitable for commercial or laboratory use.
To promote trouble-free use of your oven and avoid damage.
Never operate the oven when it is empty.
When using a browning dish or self-heating material, always place a heat-resistant insulator such as a porcelain plate under it to prevent damage to the turntable and roller stay due to heat stress. The preheating time specified in the dishes instructions must not be exceeded.
6

R-35ST English 24/02/2005 16:30 Page 7
IMPORTANT SAFETY INSTRUCTIONS
Do not use metal utensils, which reflect microwaves and may cause electrical arcing. Do not put cans in the oven.
Use only the turntable and the roller stay designed for this oven.
To prevent the turntable from breaking:
(a)Before cleaning the turntable with water, leave the turntable to cool.
(b)Do not put hot foods or hot utensils on a cold turntable.
(c)Do not put cold foods or cold utensils on a hot turntable.
Do not place anything on the outer cabinet during operation.
NOTE:
If you are unsure how to connect your oven, please consult an authorised, qualified electrician. Neither the manufacturer nor the dealer can accept any liability for damage to the oven or personal injury resulting from failure to observe the correct electrical connection procedure.
Water vapour or drops may occasionally form on the oven walls or around the door seals and sealing surfaces. This is a normal occurrence and is not an indication of microwave leakage or a malfunction.
1.Remove all packing materials from the inside of the oven cavity. Discard the loose polythene sheet from between the door and cavity. Remove the feature sticker, if attached, from the outside of the oven door.
Do not remove the protective film attached to the inside of the door
INSTALLATION
3.Place the oven on a flat, level surface strong enough to support the oven’s weight plus the heaviest item likely to be cooked.
4.Ensure there is a minimum free space above the oven of 19,5 cm.
 19,5cm
|
|
|
|
|
|
|
|
|
|
|
|
|
|
|
|
|
|
|
|
|
|
|
|
|
|
|
|
|
|
|
|
|
|
|
|
|
|
|
|
|
|
|
|
|
|
|
|
|
|
|
|
|
|
5. Securely connect the plug of the oven to a |
|||||
|
|
|
|
|
|
|
|
|
|
|
standard earthed (grounded) household electrical |
|
|
|
|
|
|
|
|
|
|
|
|
2. Check the oven carefully for any signs of damage. |
|
||||||||||
|
outlet. |
||||||||||
BEFORE OPERATION
Plug in the oven. |
1. |
|
1. The oven display will flash: |
||
|
||
2. Press the STOP key, the display will show: |
|
|
To set the clock, see page 8. |
2. |
|
x1 |
||
|
ENGLISH
7
R-35ST English 24/02/2005 16:30 Page 8
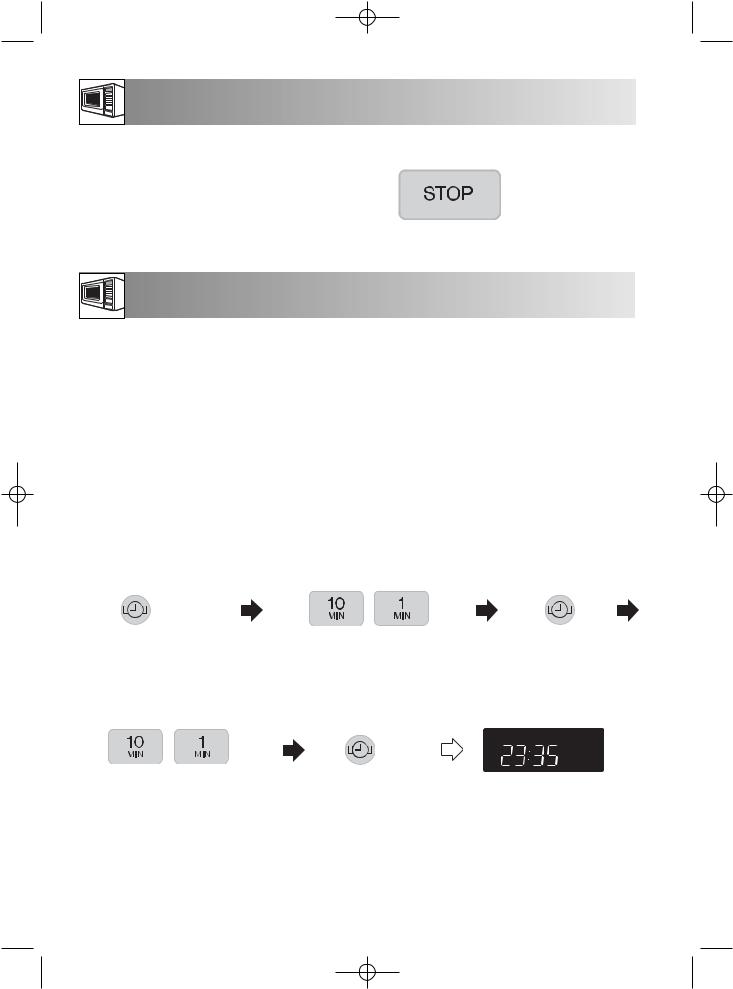
STOP KEY
Use of the STOP key:
1.Erasing a mistake during programming.
2.Stopping the oven temporaily during cooking.
3.Cancelling a programme during cooking by pressing the STOP key twice.
SETTING THE CLOCK
There are two setting modes: 12 hour clock and 24 hour clock.
1.To set the 12 hour clock, press the clock key once  will appear in the display.
2.To set the 24 hour clock, press the clock key twice  will appear in the display.
To set the clock, follow the example below.
Example:
To set the 24 hour clock to 23:35
1. Choose the 24-hour clock |
2. Set the hours: |
by pressing the CLOCK |
Press the 10 MIN key twice. |
key twice. |
Press the 1 MIN key three times. |
x2 |
x2 |
x3 |
|
||
4. Set the minutes: |
5. Start the clock by |
|
Press the 10 MIN key three times. |
pressing the CLOCK |
|
Press the 1 MIN key five times. |
key once. |
|
x1
x3 x5
NOTE:
 x1
x1
 x2
x2
3.Change from hours to minutes by pressing the CLOCK key once.
x1
Check the display
1.Press the STOP key if you make a mistake during programming.
2.If the electrical power supply to your microwave
oven is interrupted, the display will intermittently show  after the power is reinstated. If this
occurs during cooking, the programme will be erased. The time of day will also be erased.
3.When you want to reset the time of day, follow the above example again.
8
 Loading...