


INSTRUCTION MANUAL
High-pressure Steam Sterilizer
Labo Autoclave
Model MLS-3751
Nos. MLS-3781
Thank you for purchasing a Sanyo Autoclave.
•Please read this instruction manual carefully before using the product.
After reading this manual, store it in a readily accessible place along with the warranty card.
•Please pay particular attention to the
S Safety Precautions T section on page 1 to 6.
Model No. indication
Contents Page
Safety Precautions . . . . . . . . . . . . . . . 1 ~ 6
Precautions in Use . . . . . . . . . . . . . . . . . . . 7
Before Using the Product . . . . . . . . . . . . . . 8
Names and Functions of Part . . . . . . . 9 ~ 10
Explanation of Label . . . . . . . . . . . . . . . . . 11
Sterilization Objects . . . . . . . . . . . . . 12 ~ 13
How to Use
• Basic operating procedure . . . . . . 14 ~ 22
• For continuous use . . . . . . . . . . . . . . . 22
• To stop the operation . . . . . . . . . . . . . . 23
• For timer operation . . . . . . . . . . . . . . . . 23
On Power Failure . . . . . . . . . . . . . . . . . . . . 24
On Voice Guide . . . . . . . . . . . . . . . . . . . . . 25
Maintenance . . . . . . . . . . . . . . . . . . . . . . . . 26
Troubleshooting . . . . . . . . . . . . . . . . 27 ~ 28
Specifications . . . . . . . . . . . . . . . . . . . . . . 29
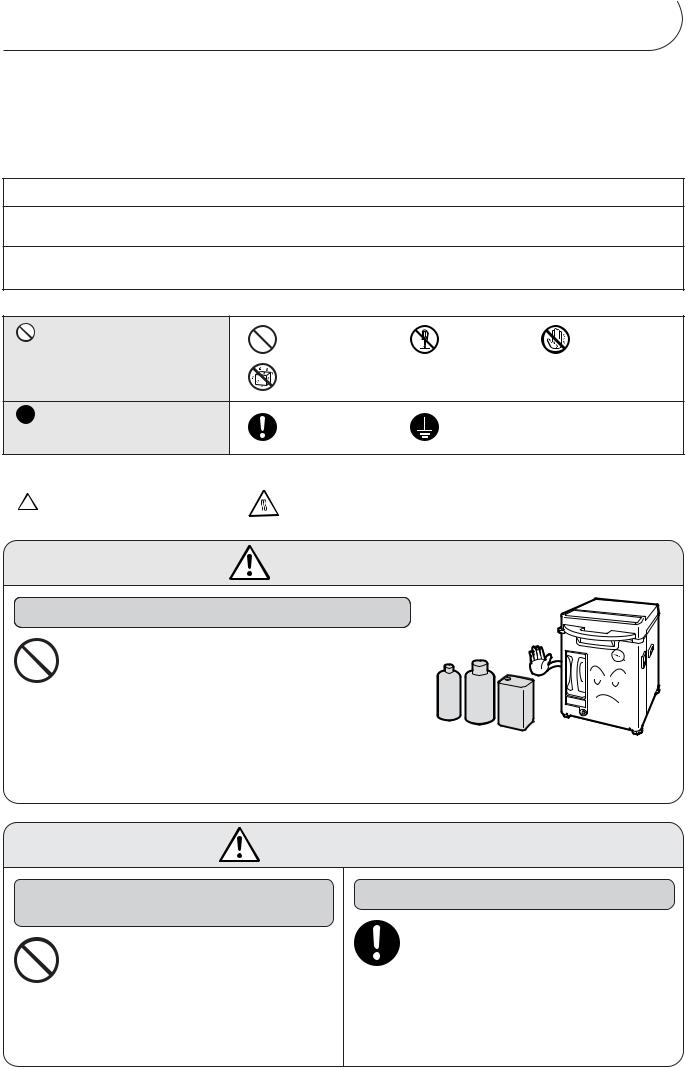
These precautions must be Safety Precautions observed without fail.
•Read these Safety Precautions carefully before use so as to use the product properly.
•Be sure to observe the precautions without fail as they are intended to ensure the safe use of the product, protect you and other people against hazards, and prevent loss of and damage to property.
The indications and meanings of each category of precaution are as shown below.
•The possible consequences due to inobservance of these precautionary indications or inappropriate operation of the product are classified into the 3 categories as follows.
 DANGER : This warns of actions that will cause death or serious injury to the operator or other persons.
 WARNING : This warns of actions that could possibly cause death or serious injury to the operator or other persons.
 CAUTION : This warns of actions that are likely to cause injury to the operator or other persons or loss of or: damage to the property.
• The symbols appearing in the text mean the following.
This symbol denotes a |
General prohibition |
Disassembly |
Touching with wet |
|
prohibited action that |
prohibited |
hands prohibited |
||
|
||||
must not be performed. |
|
|
|
|
|
Contact with water prohibited |
|
|
This symbol denotes a
compulsory action that must You must do this. Grounding wire must be connected. be performed without fail.
• The labels appearing in the text mean the following.
denotes a caution to be observe. |
|
|
This part is hot and may burn. |
|
|
|
|
DANGER
Never introduce inflammables in the product.
1 of the Occupational Safety and Health Act Enforcement |
Alcohol |
Gas |
Gasoline |
||
Do not put the following substances specified in Annex |
|
|
|
|
|
Ordinance into or near the product. |
|
|
|
|
|
• Explosive substances |
• Ignitable substances |
• Oxidizing substances |
|||
• Flammable substances |
• Combustible substances |
|
|
|
|
Failure to observe this warning may result in injury, fire or trouble with the product |
by possible explosion. |
||||
WARNING
Do not put anything that corrodes stainless steel inside the product.
Do not put culture mediums that corrodes stainless steel inside the product.
Failure to observe this warning may result in injury, fire or trouble with the product by possible explosion.
Check the cover packings.
Sterilization of animal oil and fat (e.g., waste generated after BSE inspection) causes premature wear, cracking or breakage of the cover packings. If the product is used with defective packings, steam may escape and cause burns or other accidents.
1
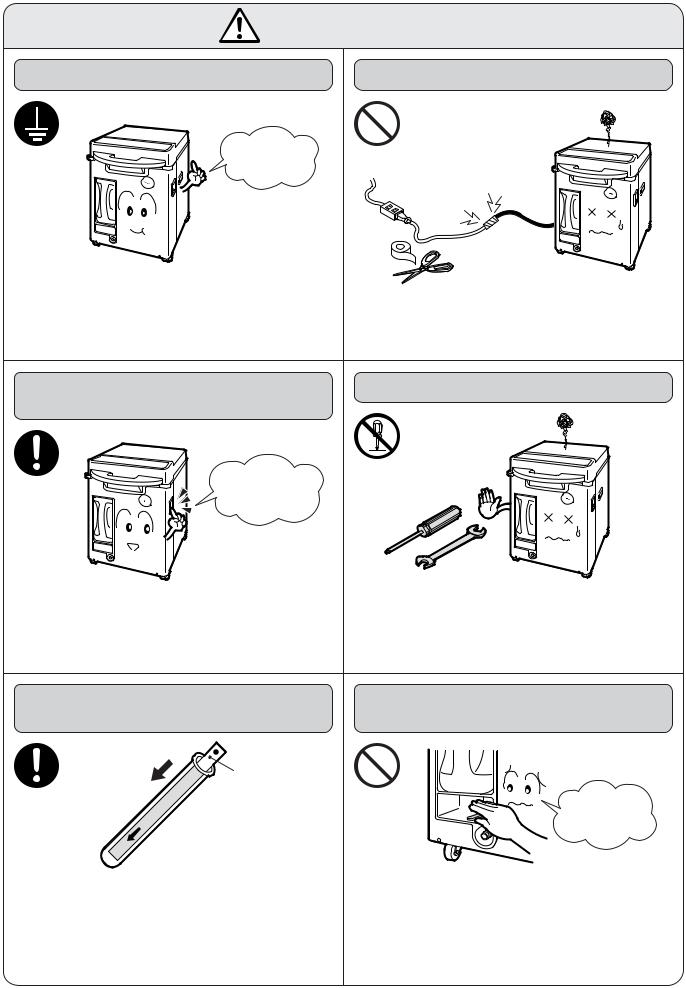
WARNING
Ground the product without fail. |
Do not extend the power cord. |
Ground without fail!
Make sure that the product has been properly grounded. Be sure to connect one end of grounding line to the ground and the other end to the grounding terminal.
Failure to observe this warning may result in electric shock.
Do not connect the power cord or plug to an extension cord.
Failure to observe this warning may result in electric shock or fire.
In the event of trouble, stop operation and turn OFF the power.
Do not modify the product.
Set my power switch to OFF.
Should trouble (burning smell, etc.) occur, set the power switch to the OFF position, shut down the main power, and contact the dealer from whom you purchased the product.
Continuing to operate the product in anything but proper working order may result in electric shock or fire.
The product should never be disassembled or repaired by any other person than a qualified service engineer.
Failure to observe this warning may result in fire, malfunction or injury.
Check the product for sterilization performance.
 OK card
OK
The sterilization performance will vary depending on such factors as the type and volume of objects to be sterilized, the arrangement of objects and the type of container. Therefore, use a sterilization indicator such as an OK card for checking the performance.
Failure to observe this warning may result in accident or incomplete sterilization.
Do not open the drain valve during operation.
Do not open valve.
Before draining off heating water, open the cover for at least 2 hours after the end of operation.
Failure to observe this warning may cause hot water to gush out, resulting in scald or accident.
(Heating water is water that is poured into the ) chamber to help the heater in the chamber generate steam for sterilization.
2
Safety Precautions
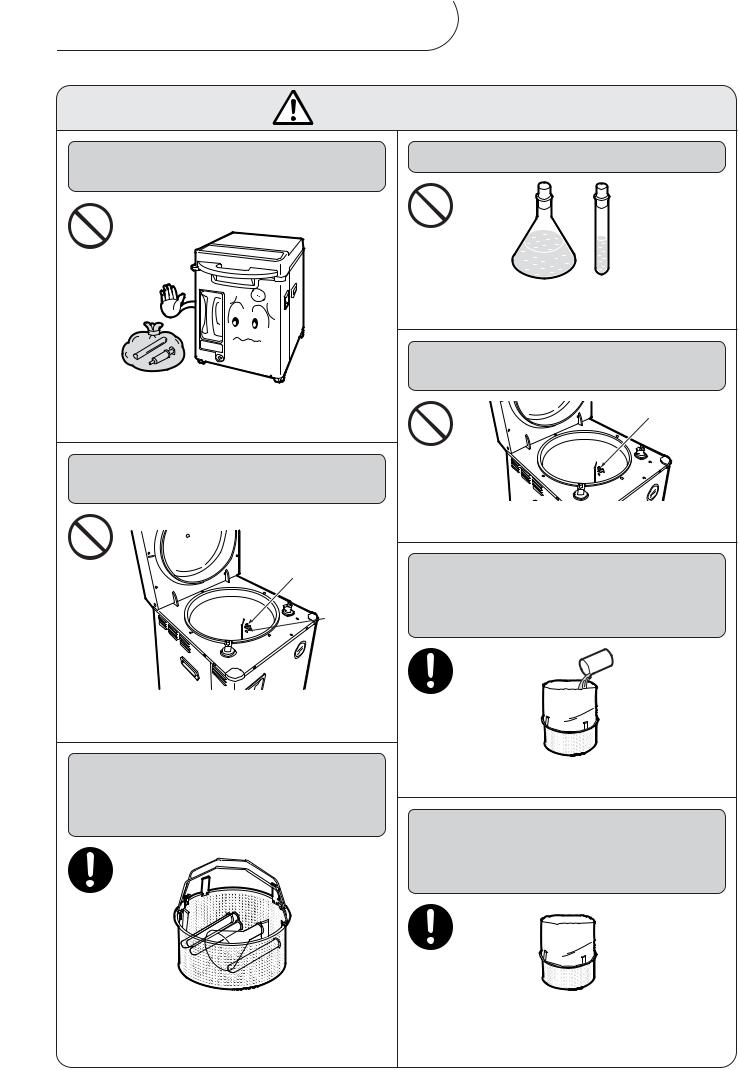
WARNING
Do not sterilize objects in a steam impermeable container or bag.
Do not seal the object container tightly.
Failure to observe this warning may result in accident or incomplete sterilization.
Do not block the holes or temperature sensor in the chamber with objects.
Temperature sensor
 Hole
Hole
Use a porous cap or loosen the cover sufficiently.
Failure to observe this warning may result in accident or incomplete sterilization.
Do not place objects on the temperature sensor in the chamber.
Temperature sensor
Failure to observe this warning may destabilize control of the product or result in incomplete sterilization.
When sterilizing waste, pour about 300ml of water into the sterilization bag and sterilize the waste with the bag open.
300mL
Failure to observe this warning may destabilize control of the product or result in incomplete sterilization.
When sterilizing only containers such as beakers, flasks and test tubes, place them with their openings facing downward or lay them on their sides.
Sterilizing without water in the bag or with the bag closed may result in incomplete sterilization.
When using the sterilization bag, be sure to put it in the stainless steel basket included with the product and set it in the chamber for sterilization.
If the containers are placed with their openings facing upward, it is hard for air to sufficiently escape from the container and for steam to sufficiently penetrate inside, thus resulting in incomplete sterilization.
If the sterilization bag is put directly in the chamber, it may block the temperature sensor or it may be pinched between the chamber opening and the cover packing, resulting in trouble with the product.
3
CAUTION
Connect power cord of the product |
Use care not to scald yourself when |
|||||||
to its own dedicated outlet. |
taking out the sterilized objects at the |
|||||||
|
|
|
|
|
|
end of operation. |
||
|
|
|
|
|
|
|
|
|
|
|
|
|
|
|
|
|
|
|
|
|
|
|
|
|
|
|
Black : AC |
|
Black : AC |
|
Yellow/Green : Grounding wire |
|
Connect the power cord to a dedicated outlet as |
|
shown below. |
|
<MLS-3751>: Single phase, 100V AC, 20A or higher |
Be sure to wear thermally insulated leather gloves. |
<MLS-3781>: Single phase, 200V AC, 20A or higher |
|
|
Note that it takes time until liquid is cooled down. |
Failure to observe this caution may result in ignition or |
Handling a sterilized object with bare bands immediately |
malfunctioning. |
after the end of operation may result in burns. |
Before performing maintenance, set |
Do not touch the power switch with |
the power switch to the OFF position. |
wet hands. |
Set power
switch to OFF .
Set the power switch to OFF and sufficiently |
|
cool the product before performing maintenance. |
Failure to observe this caution may result in electric |
Failure to observe this warning may result in electric |
|
shock or burns. |
shock. |
|
|
Nothing should be placed on the |
Do not use staples or nails to anchor |
power cord. |
the power cord. |
Failure to observe this caution may overheat the power cord, resulting in fire.
Failure to observe this caution may overheat the power cord, resulting in fire.
4
Safety Precautions
CAUTION
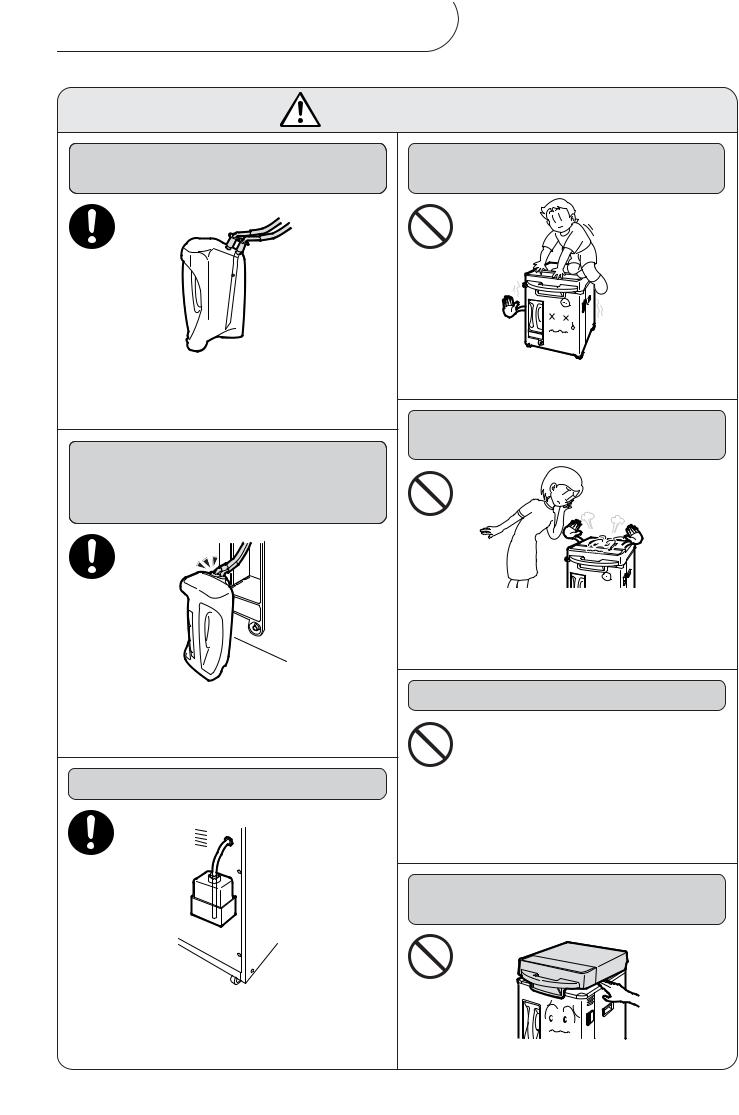
Be careful about the position of the exhaust hose insertion holes.
 Hose in tank
Be sure to insert the hose in the tank into the holes at the back inside the exhaust tank.
Failure to observe this caution may cause large steam leaks from the tank on the rear side.
When using the exhaust tank attached to the product, insert the exhaust hose packings securely in the holes of the exhaust tank.
Be sure to use the exhaust tank attached to the product.
If the packings of the exhaust hose have not been inserted sufficiently, steam may escape and result in burns.
Insert the hose securely.
Do not allow children to use or play with the product.
Failure to observe this caution may result in burns, electric shock or injury.
Keep your head away when opening the cover at the end of operation.
Since high-temperature steam will escape when the cover is opened, wait until the steam dissipates. During this time, keep your head away from the product.
Failure to observe this caution may result in burns.
Keep away from the safety valve vent.
Keep your head away from the safety valve vent when steam escapes.Set the power switch toOFF position, shut down the main power and contact the dealer from whom you purchased the product.
Failure to observe this caution may result in burns.
Do not stick your fingers in the hinged part of the cover.
Be sure to insert the hose down to the bottom of |
|
the exhaust tank on the rear side. |
|
Incomplete hose insertion may cause steam or hot |
Your fingers may be pinched and injured. |
water to spill over the tank. |
5

CAUTION
Do not wet the product. |
Drain off heating water everyday after |
|
use of the product. |
|
Insert the attached drain hose in the drain water |
|
port and drain water at least 2 hours after operation. |
|
If water is drained out in haste, hot water may splatter, |
Failure to observe this caution may cause short-circuits |
resulting in burns or damage to the floor.Repeated use |
of the same heating water may corrode the chamber or |
|
in live parts, resulting in electric shock or fire. |
clog the piping. |
Install the product on a level surface. |
Do not move the product with the |
|
exhaust tank full of water. |
Tip-resistant |
|
metal |
|
Anchor the product firmly with the tip-resistant |
|
metal attached to the product. |
|
If the product is installed on an inclined surface, hot |
When moving the product, be sure to discard water |
water in the chamber will spill, resulting in scald or |
in the exhaust tank. |
electric shock.Moreover, the product may fall, resulting |
Failure to observe this caution may cause hot water to |
in injury or damage to the floor. |
spill from the exhaust tank, resulting in burns or accident. |
Hold the grips when moving the product. |
If trouble is indicated on the process |
|
display, set the power switch in the |
|
OFF position. |
|
Set power |
|
switch to OFF. |
OFF |
If the same condition persists even after retrying |
|
the operation, set the power switch in the OFF |
|
position, shut down the main power, and contact |
Unlock the casters when moving the product. |
the dealer from whom you purchased the product. |
Continuing to operate the product anything but proper |
|
Accidentally dropping the product may result in injury |
working order may result in electric shock or fire. |
6
Precautions in Use
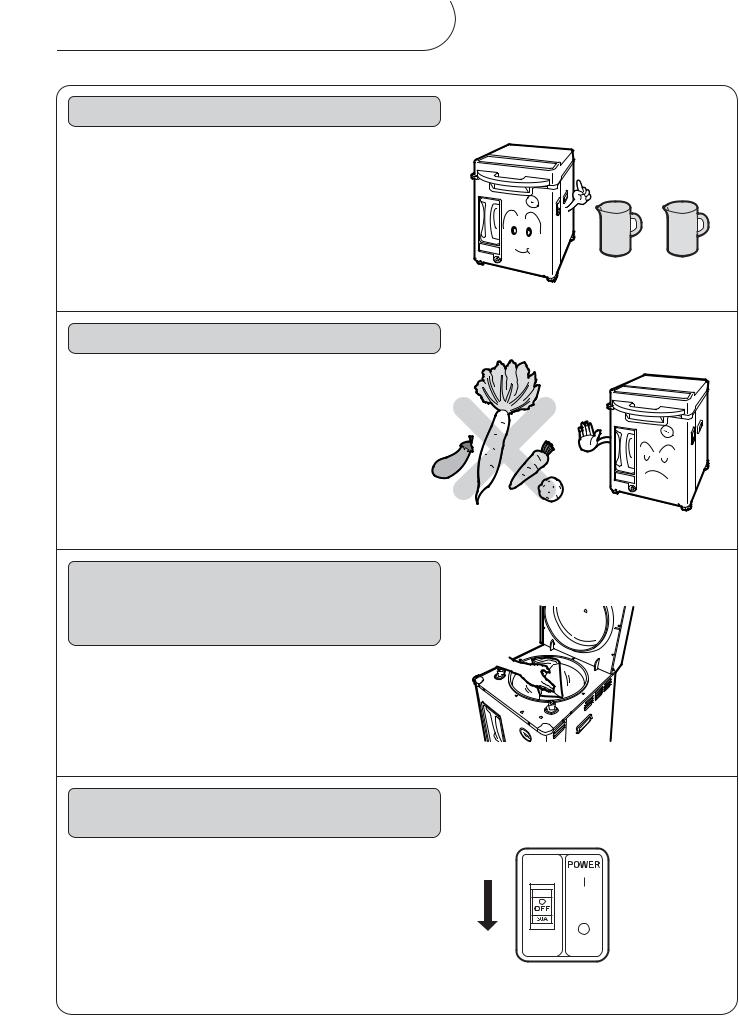
Use purified or city water as heating water.
Use of well water, saline water, etc. may cause trouble.
Purified City water water
Do not use the product for anything other than the intended purposes of sterilization, heat-retention and melting.
Failure to observe this caution may corrode the chamber or clog the piping.
(Do not use the product as a cooking heater.)
After sterilizing culture mediums that generated sulfide gas or chlorine gas, clean the chamber on the inside without fail.
Corrosion of the chamber may cause premature malfunction of the product.
Set the power switch in the OFF position everyday after use.
Before leaving the product unused for a long time, be sure to set the power switch in the OFF position and shut down the main power.
7
Before Using the Product
Installation
• Product environment and conditions of use |
|
|
Location : Indoor |
|
|
Ambient temperature : 5 ~ 40°C Altitude |
: 0 ~ 3000m |
|
Relative humidity : 50 ~ 80% |
Voltage fluctuation : ±10% of nominal voltage |
|
|
|
|
• The boiling point must be set for the product according to the altitude
of the location where the product is installed. The boiling point has been set at 100°C at the time of shipment from the factory. Before installing the product in a place 500m higher than sea level, consult your dealer.
•Do not install the product in the following places. Otherwise, trouble may occur with your product.
Places exposed to direct sunlight
Places where water splashes
Inclined surfaces (It becomes difficult to detect heating without water.)
Places exposed to air containing salt, sulfur, etc.
Humid places
Dusty places
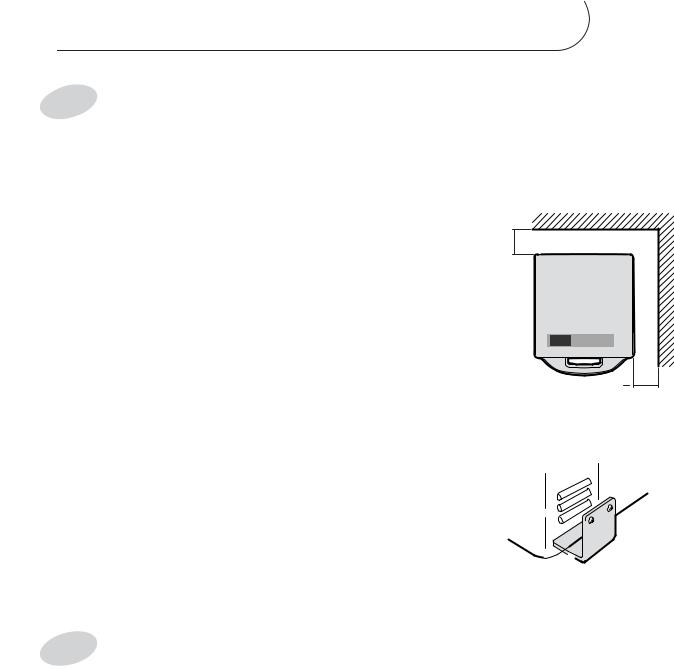
•Since steam is emitted from the exhaust tank on the rear side of the product, do not install the product in places where an electric outlet or equipment exists.
More than 15cm
More than 15cm
•Leave a clearance of more than 15cm behind the product and more than 15cm on the sides of the product. If the product is installed in close proximity to walls, the product may overheat, resulting in trouble.
•Wall surfaces may be marred by venting steam or crack under high humidity.
•Anchor the product firmly by means of tip-resistant metals (2 pcs. included with the product).
Three tip-resistant metals are included with the product. Use two of |
|
them for anchoring the product. If the product is not anchored directly |
|
to the floor, anchor it to a floor plate using all three tip-resistant |
|
metals. |
|
• Be sure to install the product on a level rigid surface and lock all four casters. |
|
• Be sure to mount the exhaust tank on the rear side of the product |
ON |
and the tank mounting brackets to the rear side of the product. |
|
(See page 9.) |
|
Screws
(Remove the screws on the right and left sides the product, and retighten them with the tip-resistant metals.)
Commercially available anchor bolts (M4 L=20mm or longer.
Nut-tightening type)
Power supply and ground connections |
Tip-resistant metal |
•The unit's power cord must be connected to its own dedicated and properly wired connection outlet where no other plugs are connected.
For 120V units : MLS-3750 ;
The unit should be connected to an appropriate receptacle that is rated 16.7 or greater.
For 220V units :
The 220V versions of the MLS-3751 / 3781 Autoclave are shipped without a plug on the power cord. Use the power-plug when the products is set. The protective grounding conductor of power supply cord must be connected to the contacting member of an attachment plug.
rating ;
|
|
M L S - 3 7 5 1 |
M L S - 3 7 8 1 |
|
Power cord |
Wire size |
AW G 1 4 |
||
Type |
S J T |
|||
|
||||
Plug |
250VAC, 10A or greater |
250VAC, 20A or greater |
||
For 230V units :
The 230V versions of the MLS-3751 / 3781 Autoclave are shipped without a plug on the power cord. Use the power-plug which is applied IEC60309 when the products is set. The protective grounding conductor of power supply cord must be connected to the contacting member of an attachment plug.
rating ;
|
M L S - 3 7 5 1 |
M L S - 3 7 8 1 |
Power cord Wire size |
AW G 1 4 |
|
Plug |
250VAC, 10A or greater |
250VAC, 20A or greater |
• The unit must be connected straight to ground.
The green / yellow conductor of the power cord is the grounding wire. You must ask your dealer or a qualified electrician to do the grounding work involved.
8
Names and Functions of Parts
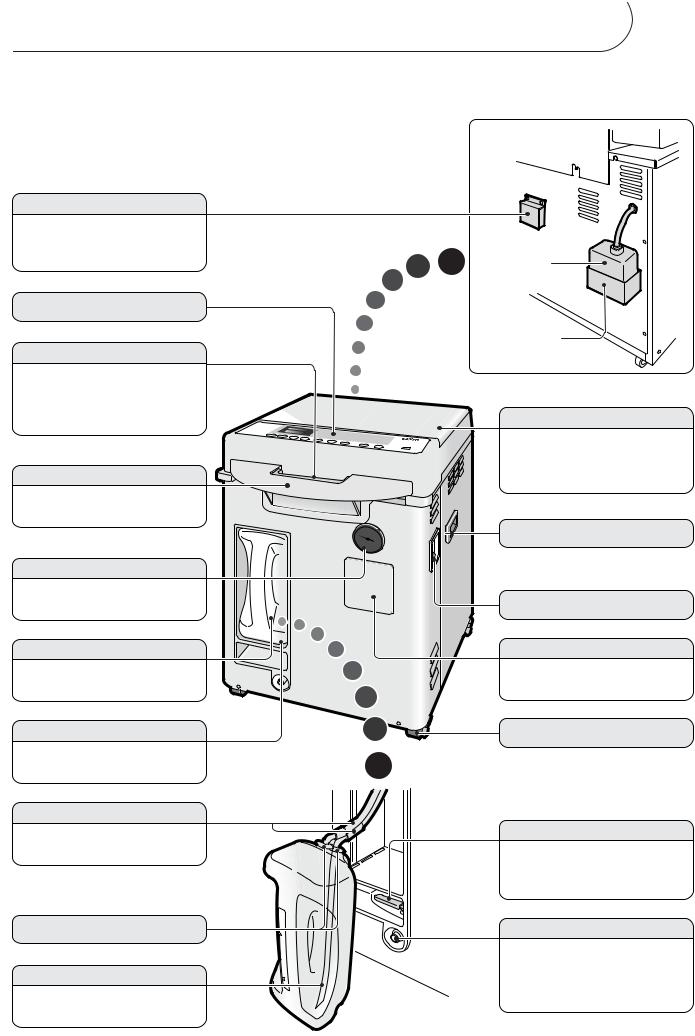
Safety valve pressure relief port
Steam is discharged through this port if pressure in the chamber rises abnormally.
Control panel
Movable handle
Used for unlocking the cover. The cover can be unlocked by pressing this handle down and pulling toward you.
Handle
Use for opening/closing the cover.
Pressure gauge
Indicates the pressure inside the chamber.
Exhaust tank
Condenses steam emitted from the chamber.
Tank case
Encases the exhaust tank.
Exhaust hose
Sends steam and air in the chamber to the exhaust tank.
Packings
Hose in tank
Converts steam discharged from the chamber into water.
Rear side
Exhaust tank |
on the rear side |
Tank mounting bracket
Cover
Cover to shut the chamber tight.
It is lined with silicon rubber packing.
Grip
Power switch
Cover
Remove this cover to connect the optional printer to the product.
Caster
Exhaust valve
Manually opening/closing valve used for draining heating water from the chamber.
Drain outlet
Heating water is drained from the chamber through this outlet. Connect the included drain hose to drain heating water.
9
 Loading...