


Advanced Travel Chess
Instructions
Bedienungsanleitung
Mode d’emploi
Handleiding

|
|
QUICK START |
||
To play a game right away, without reading the entire manual first, simply follow these Quick Start steps! |
||||
Open the battery cover in |
|
|
Enter moves by making |
|
1 the base of the unit, and |
|
|
5 them on the board, |
|
insert three “AAA” (Type |
|
|
pressing the pegged |
|
AM4/R03) batteries. Make |
|
|
chess pieces down gently |
|
sure to observe the |
|
|
into the holes of the from |
|
correct polarity! Reinstall |
|
3 x AAA/AM4/RO3 |
and to squares for each |
|
the battery cover. |
|
move. |
||
|
|
|||
Press GO/STOP to turn |
|
|
As soon as the computer |
|
the computer on. If the |
|
|
||
|
|
6 makes a move, its move |
||
2 unit doesn’t respond, reset |
GO/STOP |
|||
it as noted in Section 7.1. |
|
|
is shown in the display |
|
|
|
window. You’ll see the |
||
|
|
|
||
|
|
|
piece, along with the |
|
|
|
piece color and the from |
||
Set up the chess pieces in |
and to squares of the |
|||
|
computer’s move. In this example, the computer wants to |
|||
3 the initial starting position |
|
|||
move its Black pawn from E7 to E5. Press the computer’s |
||||
|
||||
with the White pieces |
|
pawn down on Square E7, and then press it down on |
||
closest to you, as shown |
|
Square E5. This completes the computer’s move, and |
||
in this diagram. |
|
now it’s your turn again. Make your next move as de- |
||
|
|
|||
|
scribed above. Enjoy your game! |
|||
|
!"#$%&'( |
|||
|
|
|||
|
) * |
|
||
To reset the computer for |
|
|
You can press GO/STOP at any time to turn the computer |
|
|
|
off. Your current position and game (up to 30 individual |
||
4 a NEW GAME of chess, |
CLEAR |
ENTER |
||
moves) will be stored in the computer’s memory. When |
||||
simultaneously press the |
|
|
you switch back on again, you can continue playing right |
|
CLEAR and ENTER keys. |
|
|
||
NEW GAME |
where you left off! |
|||
|
||||

KEYS AND FEATURES
1.DETACHABLE COVER: Protects unit from dust and keeps chess pieces in place during travel.
2.PIECE STORAGE AREA: For piece storage and captured pieces.
3.SENSORY CHESSBOARD: Each square contains a sensor that registers piece movement. Certain squares can also be used within Level Mode and Option Mode to select levels and options.
4.BATTERY COMPARTMENT: In base of unit. Uses three “AAA” (AM4/R03) alkaline batteries.
5.ACL (Reset): In base of unit. Used to eliminate static discharge after inserting new batteries.
6.GAME KEYS
•PIECE SYMBOL KEYS: Used in Verify and Position Modes. Also used for pawn promotions.
•GO/STOP: Press to turn the unit on and off.
•INFO: Press to enter Info Mode; within Info Mode, press to cycle through the main info groups. Press during your move to request a hint.
•LEVEL: Press to enter Level Mode; within Level Mode, press to skip over eight levels at a time.
•POSITION: Press to enter Position Mode.
•TAKE BACK: Press to take back an individual move (a move for either side). You can take back up to a maximum of 30 individual moves.
•OPTION: Press to enter Option Mode; within Option Mode, press to cycle through the main option groups.
•CLEAR: Press simultaneously with ENTER to reset for a new game. Press to exit Option, Verify, and Position Modes. Press to clear Info Displays and cancel Clear Board requests in Position Mode. Press to cancel Level Mode if you decide not to make changes (unless you have used board squares to change levels; then CLEAR will enter the new level, just like ENTER).
•ENTER: Press together with CLEAR to reset for a new game. Press to change sides with the computer; press while the computer is thinking to force it to move. Press to turn option settings on and off, and to exit Level Mode with your new level selected. Press to clear the board in Position Mode, and then press again to confirm.
ENGLISH |
A8 |
B8 |
C8 |
D8 |
E8 |
F8 |
G8 |
H8 |
A7 |
B7 |
C7 |
D7 |
E7 |
F7 |
G7 |
H7 |
A6 |
B6 |
C6 |
D6 |
E6 |
F6 |
G6 |
H6 |
A5 |
B5 |
C5 |
D5 |
E5 |
F5 |
G5 |
H5 |
A4 |
B4 |
C4 |
D4 |
E4 |
F4 |
G4 |
H4 |
A3 |
B3 |
C3 |
D3 |
E3 |
F3 |
G3 |
H3 |
A2 |
B2 |
C2 |
D2 |
E2 |
F2 |
G2 |
H2 |
A1 |
B1 |
C1 |
D1 |
E1 |
F1 |
G1 |
H1 |
•BLACK/> and WHITE/< KEYS: Press to change levels one at a time in Level Mode, and press to cycle through options in Option Mode and Info Mode. Also used to select the color in Position Mode.
7.DISPLAY WINDOW: Used to show moves and move information during a game. Also used for level and option selection, piece verification, position setup, and more.
3

TABLE OF CONTENTS
QUICK START |
3.6 |
Mate Search Levels |
|
KEYS AND FEATURES |
|
(Squares A6-H6) |
|
INTRODUCTION |
3.7 |
Training Levels |
|
1. LET’S GET STARTED! |
|
(Squares A7-H8) |
|
1.1 |
First, Install the Batteries |
4. INFO MODE: WATCH AND |
|
1.2 |
Ready to Play? Here’s How to |
LEARN! |
|
|
Move! |
Using Info Mode |
|
1.3 |
Now It’s the Computer’s Turn |
4.1 |
Principal Variation |
1.4 |
Change Your Mind? Take Back! |
4.2 |
Search Information |
1.5 |
Game Over? Why Not Play Again! |
4.3 |
Chess Clock Information |
1.6 |
Too Easy/Hard? Change the |
4.4 |
Move Count/Game Moves |
|
Level |
4.5 |
Want a Hint? Just Ask! |
2. MORE FEATURES TO EXPLORE |
5. OPTIONS FOR FUN AND |
||
2.1 |
Whose Move? Check the Display! |
VARIETY |
|
2.2 |
Special Chess Moves |
Selecting Game Options |
|
2.3 |
Illegal Moves |
5.1 |
Operation Mode Options |
2.4 |
Check, Mate, and Draw |
5.2 |
Playing Mode Options |
2.5 |
Interrupting the Computer’s |
5.3 |
Rotating Display Options |
|
Search |
6. VERIFYING/SETTING UP |
|
2.6 |
Changing Sides with the |
POSITIONS |
|
|
Computer |
6.1 |
Verifying Positions |
2.7 |
Built-In Openings |
6.2 |
Changing and Setting Up |
2.8 |
Thinking on the Opponent’s Time |
|
Positions |
2.9 |
Game Memory |
7. TECHNICAL DETAILS |
|
3. THE PLAYING LEVELS |
7.1 |
The ACL Function |
|
Setting a Playing Level |
7.2 |
Care and Maintenance |
|
3.1 |
Normal Playing Levels |
7.3 |
Technical Specifications |
|
(Squares A1-G2) |
TROUBLESHOOTING GUIDE |
|
3.2Infinite Level (Square H2)
3.3Tournament Levels (Squares A3-H3)
3.4Blitz Levels (Squares A4-H4)
3.5Beginner Levels (Squares A5-H5)
4

INTRODUCTION
Ready to enter the exciting world of computer chess? You’ve come to the right place! Your new computer offers so many game options, playing levels, and special features—you’ll never look at chess the same way again! The Quick Start at the front of the manual will get you playing right away, and you’ll find more details on basic game operation in Section 1. Once you learn the basics, be sure to go on and explore
the rest of this manual, even if you normally don’t like to read instruction booklets! You’ll discover that this chess computer has all kinds of other interesting and fun-filled features that will delight you—we guarantee it!
Your new computer knows and follows all the rules of chess—you
can be sure that it will never cheat! For those of you who haven’t played before, we have included a short overview of the rules to get you started. For more detailed information, why not visit your local library, where you’re sure to find lots of interesting chess books!
1. LET’S GET STARTED!
1.1 First, Install the Batteries
Your computer runs on three “AAA” (Type AM4/RO3) batteries. Insert the batteries into the compartment in the base of the unit, making sure to observe the correct polarity. Use fresh alkaline batteries for longer battery life!
Turn the computer on by pressing GO/STOP, and a beep will signal that the game is ready to play. If the computer fails to respond (static discharge may cause it to lock up), use a paper clip or another sharp object to press down into the hole marked ACL in the base of the unit for at least one second. This will reset the computer.
Tip: To conserve energy and extend battery life, turn on the Auto Power Down option (see Section 5.1).
1.2 Ready to Play? Here’s How to Move!
Okay, now it’s time to start a game! It’s easy—just follow these steps:
a.Press GO/STOP to turn the computer on, if you haven’t already done so.
b.Press the CLEAR and ENTER keys together to reset the computer for a new game of chess. Set up the pieces in their starting
positions, with the White pieces nearest to you, as shown in the
Quick Start.
c. To make a move, lightly press down on the piece you want to |
ENGLISH |
|
move until you hear a beep—the sensory board will recognize |
||
your piece automatically. Don’t believe it? Just look at the display |
||
window, which is suddenly full of information—it shows your |
||
piece, along with the piece color and the square you just pressed! |
||
|
||
d. Take that piece and gently press it down into the hole of the |
|
|
square you are moving to. You’ll hear a second beep as the |
|
|
computer confirms your move. You’ve just made your first full |
|
|
move of the game! Next, it’s the computer’s turn. |
|
You’ll notice that the computer often moves instantly at the beginning of a game, instead of taking time to think. This is because it is playing from memory, using a built-in “book” of opening moves (for more information, see Section 2.7).
1.3 Now It’s the Computer’s Turn
When the computer moves, it beeps and displays its move. Check out the display window—you’ll see the from and to squares of the computer’s move, along with the color and type of piece it is moving! Press the indicated piece down on the from square until you hear a beep. Move that same piece to the indicated to square and press it down to complete the computer’s move. And it’s your turn again…
1.4 Change Your Mind? Take Back!
When you’re playing chess against this computer, nothing is “set in stone”—you can change your mind or decide to play a different move whenever you want! When it’s your turn to move, simply press TAKE BACK, and the display will show the move to be taken back. Press the indicated piece down on the original to square, then press it down on the original from square to complete the take-back. Repeat this as often as you’d like, taking back up to 30 individual moves (or 15 moves for each side). To continue playing at any point, just make another move on the board!
After taking back a capture and/or pawn promotion, the computer will make sure that your board is still set up correctly by reminding you to put the captured piece and/or pawn back on the board! It does this by displaying the piece symbol and its square location. Put the indicated piece back on the board and press down on that square to complete the take-back.
5

MAKING THE COMPUTER’S MOVE:
AN EXAMPLE!
After the computer displays its move, it’s up to you to make its move on the board! Here, the display indicates the computer wants to move its Black pawn (]!) from D7 to D5. Pick up the D7 pawn and press it down lightly into the hole on Square D7. Then press the pawn down on Square D5. That’s it!
!"#$%&'( !"#$%&'( ) * ) *
When castling, first follow the take-back steps as described above for the King, and then do the same for the Rook to complete the take-back.
1.5 Game Over? Why Not Play Again!
Whenever you finish a game (or if you give up on your current game), it’s easy to start over again! Reset the computer by pressing the
CLEAR and ENTER keys together, and a New Game tone tells you that the computer is ready for a new game. The same playing level will be in effect, but you can change it if you’d like, as explained in Section 3.
IMPORTANT: Resetting the computer for a new game clears your current game from the computer’s memory—be careful not to press these keys by mistake!
1.6 Too Easy/Hard? Change the Level
When you first turn your computer on, it’s automatically set to Normal Playing Level D1 (five seconds a move). However, you have 64 different levels to choose from—you’ll want to try them all out! For descriptions
of the playing levels and how to change levels, see Section 3.
2. MORE FEATURES TO EXPLORE
2.1 Whose Move? Check the Display!
When the computer plays Black, it flashes a black square in the display while it is thinking. After it has moved, a white square shows that it is now White’s turn to move. You can tell at a glance if the computer is currently thinking, and which side is to move!
2.2 Special Chess Moves
Captures: To capture, press down on the piece you want to move, remove the captured piece from the board, and press your piece down on the square of the captured piece. Captures are displayed as in
E5•F6.
En Passant Captures: In this type of capture, the computer continues to display your move until you press down on the captured pawn and remove it from the board.
Castling: The computer automatically recognizes castling after the King is moved. After you have pressed the King down on its from and to squares, the computer continues to display your move until you press on the Rook’s from and to squares to complete the move. Note that Kingside castling is displayed as 0-0, and Queenside castling as
0-0-0.
Pawn Promotions: When you promote a pawn, first make your move as usual, pressing your pawn down on its from and to squares. Next, press the PIECE SYMBOL KEY for your desired promotion piece (%, $, #, or @). The computer recognizes your new piece immediately, displays it briefly, and then begins thinking about its next move. Remember to change your piece on the board! When the computer promotes a pawn, the display shows both the pawn and the promoted piece. Don’t forget to replace the computer’s pawn with its new piece.
2.3 Illegal Moves
Your computer will never accept an illegal move! If you try to make one, you’ll hear a low double beep, and the display will show the square the piece came from. Either move that same piece to another square, or press the piece back down on its original from square and move a different piece.
If you don’t make the computer’s move correctly, you’ll also get an error message. This means you are either moving the wrong piece, or moving the computer’s piece to the wrong square. If the computer
6

wants to move its pawn from D7 to D5, for example, and you press down on D7 and then D6, the display shows Er:D5 briefly, pointing out your error. The display then returns to showing the move again (D7D5), and the computer expects you to press down on D5 to complete its move.
If you press down on a piece and the from square is displayed, but you decide not to make that move, simply press down on that same square again to cancel. Then make another move. If you change your mind after entering your whole move, take the move back as described in Section 1.4.
2.4 Check, Mate, and Draw
When a King is in check, the computer first displays its move as usual. After the move is made, CHECK flashes in the display for a few seconds, along with the checking move. The display then goes back to showing the clock.
If the computer discovers a forced mate against its opponent, it first displays its move as usual. After the move has been made on the board, the computer flashes a mate announcement along with the move for several seconds (e.g., =in 2 for a mate in two moves). The display then goes back to showing the clock.
When a game ends in checkmate, the display flashes MATE (along with the mating move or with the clock display) for a short time after the move has been made. The display then goes back to showing the clock. The computer recognizes draws by stalemate, three-fold repetition,
and the 50-move rule. After a draw has occurred, the display flashes EnD (along with the drawing move or with the clock display) for a brief time after the move has been made. The display then goes back to showing the clock.
2.5 Interrupting the Computer’s Search
Think the computer is taking too long to move? You can interrupt it any time! Simply press ENTER while the computer is thinking, and it will stop and play the best move it has found so far. This feature can be handy on the higher levels, where the computer can take a long time to move, and on the Infinite Level, where the computer thinks indefinitely unless you stop it.
On the Mate Search Levels, pressing ENTER won’t force the computer to make a move. Instead, the computer will display – – – – – to indicate that it was interrupted before it found a mate. To continue play,
switch to another level. |
|
|
2.6 Changing Sides with the Computer |
ENGLISH |
|
To change sides with the computer, simply press ENTER when it’s |
||
|
||
your turn—and the computer will make the next move for your side. |
|
|
Change sides as often as you wish! |
|
|
Want the computer to play the first move for White at the start of a |
|
|
new game? Press CLEAR and ENTER together to reset for a new |
|
|
game, and then press ENTER! |
|
|
Want to watch the computer play chess against itself? Press ENTER |
|
|
after each move—watch as it plays for both sides of the board, one |
|
|
move after another. Study its strategies, and you might improve your |
|
|
own game! |
|
2.7 Built-In Openings
At the beginning of a game, the computer will often move instantly on many levels. This is because it is playing from memory, using its own built-in “book” of opening chess moves. This book contains most major openings and many positions from grandmaster play. If the current board position is in its book, the computer plays a response to that position automatically, instead of having to think about the move!
A special feature of this computer’s opening book is its ability to handle transpositions. A transposition occurs when a position reached by a certain set of moves can also be reached when those same moves occur in a different order. The computer’s integrated Automatic Transposition Manager handles these cases with ease!
Also included is a unique user-selectable book feature, which lets you choose from different types of opening books, or even turn the book off, if desired. For complete details, see Section 5.2.
2.8 Thinking on the Opponent’s Time
As you play, you may notice that the computer sometimes replies to your moves immediately, even in the middle of games played on the higher levels. This is because the computer thinks on your time, using the time you are taking for your move to think ahead and plan its own strategies. It tries to guess the move you are likely to make, and then calculates its responses for that particular move while you are still thinking. If the computer has guessed right, there’s no reason for it to keep on calculating—it immediately plays the move it has already found!
7

To disable this feature, turn on the Easy Mode option, as described in Section 5.2.
2.9 Game Memory
You may interrupt a game at any time by pressing GO/STOP. Play is then suspended, and the computer stores your current game (up to 30 individual moves). When you switch back on again, you can continue right where you left off!
3. THE PLAYING LEVELS
Your chess computer offers 64 different levels of play! When you set the level, keep in mind that when the computer has more time to think about its moves, it becomes stronger and plays better—just like a human chess player! For an overview of all the levels, refer to the Level Chart. The levels are also described individually in this section.
Setting a Playing Level
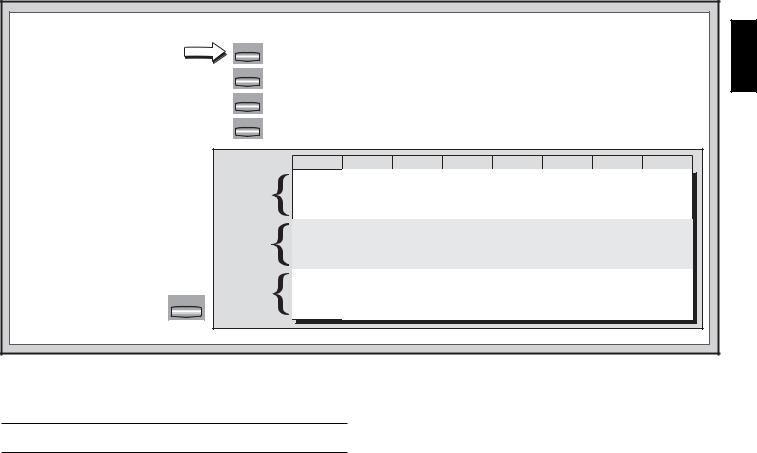
See “USE THIS CHART TO SELECT A PLAYING LEVEL!” for a look at how to set a level and a chart showing all the levels.
There are two methods of setting levels—by using the game keys or the board squares. Whichever method you use, always press LEVEL first to enter Level Mode, and the computer will display the current playing level. When you enter Level Mode the first time, the computer is set on Normal Playing Level D1 (with an average response time of five seconds a move), and the display shows L0:05.
•To select a level by using game keys: After entering Level Mode by pressing LEVEL, change levels one at a time by using the BLACK/> and WHITE/< keys. As a shortcut, press LEVEL repeatedly to skip over eight levels at a time. When the display shows your desired level, press ENTER to enter your new level into the computer and exit Level Mode.
•To select a level by pressing board squares: As indicated in the Level Chart, each of the 64 squares corresponds to one level. After entering Level Mode by pressing LEVEL, take a chess piece and press the desired square to activate a level, using the chart as a guide. When you press down on the desired square and that level shows in the display, press ENTER to enter your new level into the
computer and exit Level Mode. When making your selection via the board squares, pressing CLEAR has the same effect as pressing ENTER—it enters your level into the computer.
•To verify the level without changing it: If you press LEVEL to verify the level but you don’t want to actually change levels, press CLEAR. This returns you to normal play without changing the level or clock settings, even while the computer is thinking.
Other important points to remember regarding levels:
•Changing the level always resets the chess clocks.
•We do not recommend changing levels while the computer is thinking. If you must do this, first press ENTER to abort the computer’s search, and make its move on the board. Then, take back the computer’s move and change the level. Finally, press ENTER to make the computer start thinking on the new level.
•If you change the level while the computer is thinking, the clock is reset and the current search is aborted.
•If you press LEVEL while the computer is thinking but the level is not changed (if you press CLEAR instead of ENTER), the computer will also abort its search.
3.1Normal Playing Levels (Squares A1-G2)
LEVEL |
TIME PER MOVE |
DISPLAY |
A1 .................... |
1 second .................... |
L 0:01 |
B1 .................... |
2 seconds .................. |
L 0:02 |
C1 .................... |
3 seconds .................. |
L 0:03 |
D1 .................... |
5 seconds .................. |
L 0:05 |
E1 .................. |
10 seconds .................. |
L 0:10 |
F1 .................. |
15 seconds .................. |
L 0:15 |
G1 .................. |
20 seconds .................. |
L 0:20 |
H1 .................. |
30 seconds .................. |
L 0:30 |
A2 .................. |
45 seconds .................. |
L 0:45 |
B2 .................... |
1 minute .................... |
L 1:00 |
C2 .................... |
1.5 minutes ............... |
L 1:30 |
D2 .................... |
2 minutes ................... |
L 2:00 |
E2 .................... |
3 minutes ................... |
L 3:00 |
F2 .................... |
5 minutes ................... |
L 5:00 |
G2 .................. |
10 minutes ................... |
L10:00 |
When you choose one of the Normal Playing Levels, you are selecting an average response time for the computer. Note that the times are averaged over a large number of moves. In the opening and endgame,
8

|
USE THIS CHART TO SELECT A PLAYING LEVEL! |
|
|
|
ENGLISH |
||||||
1. Press LEVEL to enter |
LEVEL |
|
9 ply |
10 ply |
11 ply |
12 ply |
13 ply |
14 ply |
15 ply |
16 ply |
|
|
|
|
|
||||||||
Level Mode. |
|
|
search |
search |
search |
search |
search |
search |
search |
search |
|
|
|
PLY:9 |
PLY:10 |
PLY:11 |
PLY:12 |
PLY:13 |
PLY:14 |
PLY:15 |
PLY:16 |
|
|
|
|
TRAINING |
A8 |
B8 |
C8 |
D8 |
E8 |
F8 |
G8 |
H8 |
|
|
|
LEVELS |
1 ply |
2 ply |
3 ply |
4 ply |
5 ply |
6 ply |
7 ply |
8 ply |
|
|
|
|
|
||||||||
2. Next, select your level, using the |
|
search |
search |
search |
search |
search |
search |
search |
search |
|
|
|
PLY:1 |
PLY:2 |
PLY:3 |
PLY:4 |
PLY:5 |
PLY:6 |
PLY:7 |
PLY:8 |
|
||
Level Chart. There are two ways |
|
A7 |
B7 |
C7 |
D7 |
E7 |
F7 |
G7 |
H7 |
|
|
to do this. |
|
MATE |
Mate in |
Mate in |
Mate in |
Mate in |
Mate in |
Mate in |
Mate in |
Mate in |
|
|
|
|
|||||||||
• Cycle through the levels until |
1 move |
2 moves |
3 moves |
4 moves |
5 moves |
6 moves |
7 moves |
8 moves |
|
||
SEARCH |
|
||||||||||
=in:1 |
=in:2 |
=in:3 |
=in:4 |
=in:5 |
=in:6 |
=in:7 |
=in:8 |
|
|||
your level is displayed: |
|
LEVELS |
|
||||||||
|
A6 |
B6 |
C6 |
D6 |
E6 |
F6 |
G6 |
H6 |
|
||
• Press BLACK/> to |
|
|
|||||||||
|
|
|
|
|
|
|
|
|
|
||
increase > levels by one. |
BEGINNER |
1 sec. |
2 sec. |
3 sec. |
4 sec. |
5 sec. |
6 sec. |
7 sec. |
8 sec. |
|
|
• Press WHITE/< to |
per move |
per move |
per move |
per move |
per move |
per move |
per move |
per move |
|
||
LEVELS |
bEG:1 |
bEG:2 |
bEG:3 |
bEG:4 |
bEG:5 |
bEG:6 |
bEG:7 |
bEG:8 |
|
||
decrease < levels by one. |
|
||||||||||
|
A5 |
B5 |
C5 |
D5 |
E5 |
F5 |
G5 |
H5 |
|
||
• Press LEVEL to increase |
|
|
|||||||||
|
|
|
|
|
|
|
|
|
|
||
> levels by eight. |
|
BLITZ |
5 min. |
10 min. |
15 min. |
20 min. |
30 min. |
45 min. |
60 min. |
90 min. |
|
• OR, simply locate your level |
per game |
per game |
per game |
per game |
per game |
per game |
per game |
per game |
|
||
LEVELS |
bL: 5 |
bL:10 |
bL:15 |
bL:20 |
bL:30 |
bL:45 |
bL:60 |
bL:90 |
|
||
square and press one of the |
|
||||||||||
|
A4 |
B4 |
C4 |
D4 |
E4 |
F4 |
G4 |
H4 |
|
||
pegged chess pieces down into |
|
|
|||||||||
|
40 moves |
35 moves |
40 moves |
35 moves |
40 moves |
45 moves |
50 moves |
40 moves |
|
||
the hole to display that level! |
TOURNA- |
|
|||||||||
in 1:30 |
in 1:45 |
in 1:45 |
in 1:30 |
in 2:00 |
in 2:30 |
in 2:00 |
in 3:00 |
|
|||
|
|
MENT |
tr40 |
tr35 |
tr40 |
tr35 |
tr40 |
tr45 |
tr50 |
tr40 |
|
|
|
LEVELS |
1:30:00 |
1:45:00 |
1:45:00 |
1:30:00 |
2:00:00 |
2:30:00 |
2:00:00 |
3:00:00 |
|
|
|
|
A3 |
B3 |
C3 |
D3 |
E3 |
F3 |
G3 |
H3 |
|
3. Finally, press ENTER to |
ENTER |
|
45 sec. |
1 min. |
1.5 min. |
2 min. |
3 min. |
5 min. |
10 min. |
Infinite |
|
|
per move |
per move |
per move |
per move |
per move |
per move |
per move |
Level |
|
||
exit Level Mode, using |
|
|
|
||||||||
|
NORMAL |
L0:45 |
L1:00 |
L1:30 |
L2:00 |
L3:00 |
L5:00 |
L10:00 |
9:99:99 |
|
|
your new level! |
|
PLAYING |
A2 |
B2 |
C2 |
D2 |
E2 |
F2 |
G2 |
H2 |
|
|
|
LEVELS + |
|
||||||||
|
|
|
|
|
|
|
|
|
|
|
|
|
|
INFINITE |
1 sec. |
2 sec. |
3 sec. |
5 sec. |
10 sec. |
15 sec. |
20 sec. |
30 sec. |
|
|
|
LEVEL |
per move |
per move |
per move |
per move |
per move |
per move |
per move |
per move |
|
|
|
|
L0:01 |
L0:02 |
L0:03 |
L0:05 |
L0:10 |
L0:15 |
L0:20 |
L0:30 |
|
|
|
|
A1 |
B1 |
C1 |
D1 |
E1 |
F1 |
G1 |
H1 |
|
For more details, see Section 3. |
|
|
|
|
|
|
|
|
|
|
|
|
|
|
|
9 |
|
|
|
|
|
|
|

the computer tends to play faster, but in complicated middlegame positions, it may take longer to move.
3.2 Infinite Level (Square H2)
LEVEL |
TIME |
DISPLAY |
H2 ................. |
No time limit ................. |
9:99:99 |
On the Infinite Level, the computer will search indefinitely, until it finds a forced mate or forced move; until it has fully searched the position to its maximum depth; or until you stop the search by pressing ENTER. If you halt the search, the computer makes the move it currently thinks is best. Try experimenting with this level—set up interesting board positions and let the computer analyze them for you! It will think for hours or even days on end, trying to come up with the best possible move. And don’t forget to watch the computer as it thinks—take advantage of the Rotating Display feature (see Section 5.3)!
3.3 Tournament Levels (Squares A3-H3)
LEVEL |
MOVES/TOTAL TIME |
ALTERNATING DISPLAY |
|
A3 ..... |
40 moves in 1 hr. 30 min. ................. |
tr40 |
1:30:00 |
B3 ..... |
35 moves in 1 hr. 45 min. ................. |
tr35 |
1:45:00 |
C3 ..... |
40 moves in 1 hr. 45 min. ................. |
tr40 |
1:45:00 |
D3 ..... |
35 moves in 1 hr. 30 min. ................. |
tr35 |
1:30:00 |
E3 ..... |
40 moves in 2 hrs. ............................. |
tr40 |
2:00:00 |
F3 ..... |
45 moves in 2 hrs 30 min. ................. |
tr45 |
2:30:00 |
G3 .... |
50 moves in 2 hrs. ............................. |
tr50 |
2:00:00 |
H3 ..... |
40 moves in 3 hrs. ............................. |
tr40 |
3:00:00 |
The Tournament Levels require you to make a certain number of moves within a given amount of time. If a player exceeds the allotted time for a given number of moves, the computer flashes TImE along with the elapsed time to show that the game is over. If you wish, you can continue to play even after the time has run out.
If you choose a Tournament Level, you may want to set the chess clocks to display countdown time instead of the elapsed time (see Section 5.1). When the game time runs out, the countdown clock automatically reverts back to the normal clock display.
NEED HELP CHOOSING A LEVEL?
SOME TIPS FOR YOU!
•Are you a beginning player? Start out with the Beginner Levels or lower Training Levels. These levels restrict the computer’s search depth, resulting in weaker play and giving you the chance to learn about the game and perhaps even win! For even more of a shot at winning, combine one of these levels with the Easy Mode option (Section 5.2), so the computer can’t think on your time!
•Are you an intermediate or more advanced player? Try the Normal, Training, or Tournament Levels. The Normal Levels range from easy all the way up to a difficult 10-minute response time, and the Tournament Levels are extremely challenging. The Training Levels allow you to set your desired search depth—as you conquer each level, go on to the next! And don’t forget to try the Blitz Levels for some fast and exciting games of Speed Chess!
•Want to experiment? Use the Mate Search Levels to solve problems up to mate in eight—try searching from a position in one of your own games, or set up an actual mate problem. Choose the Infinite Level to have the computer analyze complicated positions for hours or even days!
3.4Blitz Levels (Squares A4-H4)
LEVEL |
TIME PER GAME |
DISPLAY |
A4 .................... |
5 minutes ................... |
bL: 5 |
B4 .................. |
10 minutes ................... |
bL:10 |
C4 .................. |
15 minutes ................... |
bL:15 |
D4 .................. |
20 minutes ................... |
bL:20 |
E4 .................. |
30 minutes ................... |
bL:30 |
F4 .................. |
45 minutes ................... |
bL:45 |
G4 .................. |
60 minutes ................... |
bL:60 |
H4 .................. |
90 minutes ................... |
bL:90 |
On the Blitz Levels (also called Speed Chess or “Sudden Death” Levels), you set the total time for the whole game. If the game time is exceeded, the computer flashes tImE along with the elapsed time to
10
show that the game is over.
If you select a Blitz Level, you may want to set the chess clocks to display countdown time instead of elapsed time (see Section 5.1). When game time runs out, the countdown clock automatically reverts back to the normal clock display.
3.5 Beginner Levels (Squares A5-H5)
LEVEL |
TIME PER MOVE |
DISPLAY |
A5 .................... |
1 second .................... |
BEG:1 |
B5 .................... |
2 seconds .................. |
BEG:2 |
C5 .................... |
3 seconds .................. |
BEG:3 |
D5 .................... |
4 seconds .................. |
BEG:4 |
E5 .................... |
5 seconds .................. |
BEG:5 |
F5 .................... |
6 seconds .................. |
BEG:6 |
G5 .................... |
7 seconds .................. |
BEG:7 |
H5 .................... |
8 seconds .................. |
BEG:8 |
Are you a novice or beginning chess player? If so, these levels are especially for you! Here, the computer restricts its search so that it deliberately plays weaker and gives you a better chance to win! The levels start out easy and gradually get a little harder—as you beat each one, go on to the next!
3.6 Mate Search Levels (Squares A6-H6)
LEVEL |
PROBLEM |
DISPLAY |
A6 ................... |
Mate in 1 .................... |
=in:1 |
B6 ................... |
Mate in 2 .................... |
=in:2 |
C6 ................... |
Mate in 3 .................... |
=in:3 |
D6 ................... |
Mate in 4 .................... |
=in:4 |
E6 ................... |
Mate in 5 .................... |
=in:5 |
F6 ................... |
Mate in 6 .................... |
=in:6 |
G6 ................... |
Mate in 7 .................... |
=in:7 |
H6 ................... |
Mate in 8 .................... |
=in:8 |
Selecting one of these levels activates a special Mate Finder Program. If you have a position where there may be a mate and you would like the computer to find it, set the computer on one of the Mate Search Levels. This computer can solve mates in up to eight moves. Mates in one to five are usually found quite quickly, whereas solutions taking six to eight moves may take quite some time. If there is no mate present or the computer can’t find a mate, it will display dashes (– – – – –). To continue play, simply switch to another level.
3.7 Training Levels (Squares A7-H8) |
|
|
|
||
LEVEL |
DISPLAY |
LEVEL |
DISPLAY |
|
|
A7 .......... |
PLY: 1 |
A8 .......... |
PLY: 9 |
ENGLISH |
|
B7 |
PLY: 2 |
B8 |
PLY:10 |
||
|
|||||
C7 .......... |
PLY: 3 |
C8 .......... |
PLY:11 |
|
|
D7 .......... |
PLY: 4 |
D8 .......... |
PLY:12 |
|
|
E7 .......... |
PLY: 5 |
E8 .......... |
PLY:13 |
|
|
F7 .......... |
PLY: 6 |
F8 .......... |
PLY:14 |
|
|
G7 ......... |
PLY: 7 |
G8 ......... |
PLY:15 |
|
|
H7 .......... |
PLY: 8 |
H8 .......... |
PLY:16 |
|
|
On the Training Levels, the computer’s search depth is limited to a |
|
||||
certain number of moves, as shown above. As you cycle through the |
|
||||
levels, the computer displays PLY:# for each level. A “ply” is an indi- |
|
||||
vidual move (a move for either side), and “#” is the number representing |
|
||||
the search depth. For example, on Level A7, the computer searches to |
|
||||
a depth of one ply (PLY:1), and thus looks ahead only one individual |
|
||||
move. On this level, therefore, it will often overlook a mate in one. This |
|
||||
produces weaker play, giving beginners a better chance of beating the |
|
||||
computer! |
|
|
|
|
|
4. INFO MODE: WATCH AND LEARN!
Imagine this: You’re playing chess against a friend, and it’s his move. You’d love to know what move he’s thinking about, and you’d really like to get his opinion of the board position. But, of course, you won’t ask— because that’s just not done! Well, guess what—when you play against this chess computer, you can ask anything you want, and you’ll get all the answers! In fact, you can get an incredible amount of information about the computer’s thought process. On request, it will show you the move it’s thinking of, the line of play it expects after that move, its evaluation of the current board position, how deeply it is searching, and more. As you can imagine, studying this information can help you learn so much more about chess!
Using Info Mode
How do you access all this game information? By using Info Mode at any time! If you do this while the computer is thinking, you’ll see the information displays change as the computer considers different moves and searches deeper!
11

See “INFO MODE AT A GLANCE!” for a chart summarizing all the Info Mode displays.
Game information is divided into four groups, and pressing INFO cycles from one group to another. The BLACK/> and WHITE/< keys can be used to cycle through the displays within each of the groups. Press CLEAR to exit Info Mode and go back to showing the normal chess clock.
After learning about Info Mode, take a look at Section 5.3 for a description of the Rotating Display feature. Selecting this feature makes the computer automatically cycle through the requested information in one-second intervals every time it thinks about its move—you can actually watch the computer “think out loud”!Whenever requested information is not available, the display will show dashes (– – – – –).
4.1 Principal Variation
Press INFO the first time to get information on the principal variation (the predicted line of play, or the sequence of moves the computer thinks will be made). The first display you will see is the move the computer is currently thinking of making. The principal variation is shown to a maximum depth of four individual moves. Press BLACK/> repeatedly to scroll forward through all the moves:
•Move 1 (predicted line of play)
•Move 2 (predicted line of play)
•Move 3 (predicted line of play)
•Move 4 (predicted line of play)
Press WHITE/< to scroll backward and see previous displays again. Press CLEAR to return to the normal clock display.
Since the first move of the predicted line of play is the move the computer assumes you will make, you can also consider this move as a hint! So—whenever you need help, press INFO on your turn!
4.2 Search Information
Press INFO a second time to get information on the computer’s search! Press BLACK/> repeatedly to scroll forward through these four displays:
•Evaluation of the current position (based on a pawn being worth 1.0 points; a positive number indicates White is ahead)
•Two numbers: The first is the current search depth, or the number of individual moves the computer is looking ahead; the second is
INFO MODE AT A GLANCE!
PRINCIPAL VARIATION INFO:
INFO |
x1 • Move 1 (predicted line of play) |
|
|
||
|
WHITE /– |
• Move 2 (predicted line of play) |
|
|
|
|
BLACK /+ |
• Move 3 (predicted line of play) |
|
• Move 4 (predicted line of play) |
|
|
|
|
SEARCH INFO: |
|
|
INFO |
x2 • Evaluation of current position |
|
|
||
|
WHITE /– |
• 2 numbers: Search depth + number |
|
|
of moves examined so far |
|
BLACK /+ |
• Current move under consideration |
|
|
|
|
|
• Positions searched per second |
CHESS CLOCK INFO: |
|
|
INFO |
x3 • Elapsed time since last move |
|
|
||
|
WHITE /– |
• Elapsed time for the computer |
|
|
• Elapsed time for the player |
|
BLACK /+ |
• Remaining time for the computer* |
|
|
|
|
|
• Remaining time for the player* |
|
|
*Blitz/Tournament Levels only |
MOVE COUNT INFO: |
|
|
INFO |
x4 • Number of White moves played so far |
|
|
||
|
WHITE /– |
|
|
BLACK /+ |
• Moves of the current game |
|
|
|
Press CLEAR at any time to exit Info Mode. |
||
|
|
For more details, see Section 4. |
12

the number of moves the computer has examined so far
•The move currently being considered
•The search speed, or number of positions (nodes) being searched every second
Press WHITE/< to scroll backward and see previous displays again. Press CLEAR to return to the normal clock display.
4.3 Chess Clock Information
Press INFO a third time for chess clock information. The chess clocks keep track of the time for both sides. Press BLACK/> repeatedly to scroll forward through the clock displays:
•Elapsed time since the last move was made
•Total elapsed time for the computer
•Total elapsed time for the player
•Remaining time for the computer (Blitz/Tournament Levels only)
•Remaining time for the player (Blitz/Tournament Levels only)
Press WHITE/< to scroll backward and see previous displays again.
Press CLEAR to return to the normal clock display.
The clocks stop whenever you take back a move, check level settings, select options, verify or set up a position, or turn the unit off. In all these cases, however, the times are retained in memory, and the clocks resume as soon as play is continued. Whenever you change levels or press CLEAR and ENTER together to reset for a new game, the chess clocks are always reset to 0:00:00.
4.4 Move Count/Game Moves
Press INFO a fourth time to show the move number in the game so far. You can then press WHITE/< repeatedly to scroll backward back through the moves of your game (up to 30 individual moves).
•Number of White moves played so far
•Moves of the current game
Press BLACK/> to go forward through the moves again at any point. Press CLEAR to return to the normal clock display.
4.5 Want a Hint? Just Ask!
In case you missed this feature when it was mentioned in Section
4.1, we wanted to point it out again—if you ever need advice on a move, you can always ask the computer for a hint. Simply press INFO when it’s your turn to move, and the computer will show a suggested move for your side!
5. OPTIONS FOR FUN AND VARIETY |
|
In addition to all the features you’ve learned about so far, your chess |
ENGLISH |
scribed individually in this section, and summarized in the Option Mode |
|
computer also offers many other exciting game options! All of these |
|
options are user-selectable at any time during a game. They are de- |
|
Chart. |
|
Selecting Game Options
There are two methods of setting options, as described below—by using the game keys or pressing board squares.
See “THE BASICS OF OPTION MODE: HERE’S HOW!” for a chart summarizing how to use Option Mode, and an overview of all the options.
The Game Options are divided into three groups: Operation Mode, Playing Mode, and Rotating Display Mode. Pressing OPTION cycles from one group to another. Each group contains eight different options, and the BLACK/> and WHITE/< keys are used to cycle through the options within each of the groups. For each option, a plus (+) in the display indicates the displayed option is ON, and a minus (–) means the option is OFF. Press ENTER to turn each option on or off as it is displayed. Remember that pressing OPTION cycles through the three main groups, so you can switch to any of the groups at any time. After you have made all your option selections from any or all of the option groups, press CLEAR to return to normal game play.
Another method of selecting game options is by pressing the option squares. As shown in the Options Chart, Squares A1-H1, A2-H2, and
A3-H3 can be used to turn options on and off. First, press OPTION to enter Option Mode; then take a chess piece and press the desired square to access any option, using the chart as a guide. You’ll see that pressing a square repeatedly turns that option on and off again, with plus (+) for ON and minus (–) for OFF. Once you have made all your selections, press CLEAR to return to your game.
When the computer is first powered on, certain default options are set. Options which are automatically in effect at the first startup are shown in the chart with a plus, and options which are off are shown with a minus. Whenever you reset the computer for a new game, most of your selected options are carried over to your next game. Some
13
exceptions are Auto Answer, which is automatically set back to ON when you start a new game, and Play White from the Top, which is automatically set back to OFF.
5.1 Operation Mode Options (Squares A1-H1)
These options affect how you operate your computer.
Press OPTION once to select the Operation Mode Options. Then use the BLACK/> and WHITE/< keys to select options within this group, and press ENTER to turn options on (+) or off (–). Or, simply press the option squares to turn options on or off.
a. Auto Answer Mode (Square A1)
On:+AUt Off:-AUt
Normally, the computer automatically answers with a countermove whenever you enter a move. If you turn Auto Answer off, however, you can enter any number of moves one by one, without allowing the computer to answer. You’ll see that there are many great ways to use this feature!
•Play through master games. Press ENTER to see what the computer would do in any position!
•Keep records of your own chess games. When a game is over, play to any position to see how other moves or different strategies might have affected the outcome.
•Study opening lines by entering them manually!
•Play against a friend, with the computer acting as referee. It will monitor your game, checking all moves for legality and keeping track of time for both sides!
When playing against another person, if either side should need help, press INFO to see a suggested move. To see what the computer would do in a certain position, press ENTER and the computer will make the next move. After it has made its move, Auto Answer remains off, and you may continue your game. Also, note that this option will automatically go back to its default setting of ON whenever you use CLEAR and ENTER simultaneously to start a new game.
b. Sound with Keypress (Square B1)
On:+SNd Off:-SNd
This option lets you turn off the sound that accompanies each keypress. You will still hear beeps when the computer moves or when an illegal move or keypress is made.
c.Silent Mode (Square C1)
On:+SIL Off:-SIL
Normally, the computer always beeps when it has found its move. For completely silent operation, turn on Silent Mode.
d.Ticking Clock (Square D1)
On:+tICk Off:-tICk
When you turn this option on, you activate a ticking sound that makes the computer’s clock sound like a real chess clock! Just imagine—you can create the atmosphere of a championship chess tournament in your own living room!
e.Countdown Clock (Square E1)
On:+cdn Off:-cdn
Turning this option on causes the computer to display the countdown time instead of the elapsed time. Note that this option is only available in combination with the Tournament and Blitz Levels.
f.System Test (Square F1)
On:+tESt Off:-tESt
The System Test is included primarily as a troubleshooting tool. After activating this option by selecting +tESt, pressing BLACK/> repeatedly will cycle through all the segments in the LCD display. To exit the test, press CLEAR and ENTER together to reset the computer.
CAUTION: Be careful not to activate this option during a game, since resetting the computer is the only way to exit the test, and your current game will be lost.
g.Auto Power Down (Square G1)
On:+aPd Off:-aPd
The Auto Power Down option is a battery-saving feature! With this option activated, the computer will automatically turn itself off if no keypresses or moves are made for about 15 minutes. To continue the game where you left off, press GO/STOP to turn the computer back on.
Note that the computer will not turn itself off while it is thinking.
h.Play White from the Top (Square H1)
On:+tOP Off:-tOP
Want to depart from the usual standard and let the computer play the White pieces from the top of the board? Then try out this interesting
14
|
THE BASICS OF OPTION MODE: HERE’S HOW! |
|
|
ENGLISH |
|||||||
1. Press OPTION repeatedly to |
OPTION |
x2 = PLAYING MODE (SEL...) |
|
|
|
|
|||||
OPTION |
x1 = OPERATION MODE (AUt...) |
|
|
|
|
||||||
select a Mode. |
|
|
|
|
|
|
|
|
|
|
|
2. Next, select your option(s), using |
|
|
|
|
|
|
|
|
|
|
|
the Option Chart below. There are |
OPTION |
x3 = ROTATING DISPLAY MODE (rd:1...) |
|
|
|
||||||
two ways to do this. |
|
|
|
|
|
|
|
|
|
|
|
• Cycle through the options within |
OPTION |
x4 = back to OPERATION MODE... |
|
|
|
|
|||||
|
|
|
|
|
|
||||||
that mode: |
|
|
|
|
|
|
|||||
|
|
|
|
|
|
|
|
|
|
|
|
• Press BLACK/> to cycle > |
|
|
|
|
|
|
|
|
|
|
|
forward. |
|
|
|
A4 |
B4 |
C4 |
D4 |
E4 |
F4 |
G4 |
H4 |
• Press WHITE/< to cycle < |
|
|
Variation Variation Variation Variation Position |
Depth & |
Nodes |
Time per |
|||||
backward. |
|
ROTATING |
|||||||||
|
to ply 1 |
to ply 2 |
to ply 3 |
to ply 4 |
Evaluation |
Moves |
Searched |
Move |
|||
• When your option is displayed, |
DISPLAY |
|
|
|
|
|
|
|
|
|
|
press ENTER to toggle it on |
OPTIONS |
|
-rd:1 |
-rd:2 |
-rd:3 |
-rd:4 |
-rd:E |
-rd:d |
-rd:n |
-rd:t |
|
|
|
A3 |
B3 |
C3 |
D3 |
E3 |
F3 |
G3 |
H3 |
||
(+) or off (–). |
|
|
|
||||||||
|
|
|
Selective/ |
Easy |
Random |
Passive |
Active |
Complete |
Tournament |
Book |
|
• OR, simply locate your option |
PLAYING |
|
|||||||||
square and press one of the pegged |
|
Brute Force |
Mode |
Play |
Book |
Book |
Book |
Book |
On/Off |
||
MODE |
|
Search |
|
|
|
|
|
|
|
||
pieces down into the hole to toggle |
OPTIONS |
|
+SEL |
-EASY |
-RANd |
-bk:P |
-bk:A |
-bk:? |
-bk:t |
+bOOk |
|
that option on (+) or off (–). |
|
|
|
A2 |
B2 |
C2 |
D2 |
E2 |
F2 |
G2 |
H2 |
|
|
|
Auto |
Sound with |
Silent |
Ticking |
Countdown |
System |
Auto Power |
Play White |
|
|
|
OPERATION |
|||||||||
3. Finally, press CLEAR to |
|
Answer |
Keypress |
Mode |
Clock |
Clock |
Test |
Down |
from Top |
||
CLEAR |
MODE |
|
|
|
|
|
|
|
|
|
|
OPTIONS |
|
+AUT |
+SNd |
-SIL |
-tICK |
-cdn |
-tESt |
-aPd |
-tOP |
||
exit Option Mode, using |
|
|
|
A1 |
B1 |
C1 |
D1 |
E1 |
F1 |
G1 |
H1 |
your new option(s). |
|
|
|
|
|
|
|
|
|
|
|
For more details, see Section 5.
option! Choose +tOP at the beginning of a new game, and set up the board with the Black pieces closest to you, as shown in the diagram in this section. Then, press ENTER to start the game. Watch as the computer makes the first move for White from the top of the board!
See “TRY BLACK FROM THE BOTTOM: HERE’S THE POSITION!” for the correct board set-up when using this option.
When the computer plays White from the top, board notation is automatically reversed. Additionally, this option will go back to its default
setting of OFF when you start a new game.
5.2 Playing Mode Options (Squares A2-H2)
These options affect how the computer selects its moves.
Press OPTION twice to select the Playing Mode Options. Then use the BLACK/> and WHITE/< keys to select options within this group, and press ENTER to turn options on (+) or off (–). Or, simply press the option squares to turn options on or off.
15
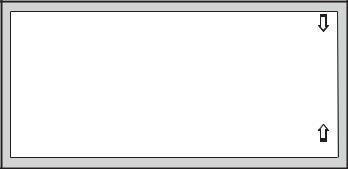
TRY BLACK FROM THE
BOTTOM:
HERE’S THE POSITION!
When the computer plays White from the top (Section 5.1, Option H1), be sure to set up the pieces correctly! Notice that the Kings and Queens are positioned differently, and the board notation is reversed.
|
('&%$#"! |
|
|
|
|
|
|
|
) * |
For more details, see Section 5.1.
a.Selective Search (Square A2)
On:+SEL Off:-SEL
The program in this chess computer normally uses a Selective Search algorithm. This allows the computer to see combinations that would otherwise take much longer to compute. Turning this option off by choosing -SEL makes the program switch to a powerful Brute Force algorithm. This search method minimizes the risk of an occasional oversight.
Note that the Mate Search Levels always use the Brute Force method.
b.Easy Mode (Square B2)
On:+EASy Off:-EASy
Want to win more games against the computer? Try turning on Easy
Mode, which prevents the computer from thinking on your time! This weakens all the playing levels without affecting the computer’s time controls. Normally, as described in Section 2.8, the computer thinks on your time, using the time you are contemplating your next move to think ahead and plan its strategies. This is part of what makes your computer such a tough opponent! By using Easy Mode to make all the levels weaker, you effectively have many more levels to choose from!
c. Random Play (Square C2)
On:+RaNd Off:-RaNd
Turn this option on for greater variety of play. Instead of selecting one
single best move, the computer will then choose one of the best moves to play by consulting its built-in Randomizer!
d.Passive Book (Square D2)
On:+bk:P Off:-bk:P
Selecting the Passive Book option forces the computer to give preference to passive and closed positions when deciding which lines to play. If this option is selected, the Active Book and Tournament Book options are disabled.
e.Active Book (Square E2)
On:+bk:A Off:-bk:A
When this option is activated, the computer will give preference to active lines and open positions when deciding which lines to play. If this option is selected, the Passive Book and Tournament Book options are disabled.
f.Complete Book (Square F2)
On:+bk:? Off:-bk:?
Turning on the Complete Book option gives the computer the freedom to choose any move from its built-in book of openings, so you’ll see a greater variety of opening lines being played. If this option is selected, the Passive, Active, and Tournament Book options are disabled.
With this option on, you may see the computer make some questionable moves. This is because its built-in book of openings must contain responses to certain lines of play (even questionable lines), in case they are played. While the computer would not make these moves on its own, it needs to know how to respond to them in the best way. Therefore, when you turn on the Complete Book, the computer could potentially play one of these moves.
g.Tournament Book (Square G2)
On:+bk:t Off:-bk:t
When you turn the Tournament Book option on, the computer is forced to always select the best possible line of play in every opening. While this results in the best chess play, it also narrows down the computer’s choice of moves by limiting its available book lines. If this option is selected, the Active Book and Passive Book options are disabled.
16

h. Book On/Off (Square H2)
On:+bOOk Off:-bOOk
Set this option to -BOOK to completely lock out the computer’s builtin book of openings. When you turn the book off like this, the computer is forced to take time to think of its moves from the very beginning of the game, rather than using moves contained in its memory. For more details on openings, see Section 2.7. If you turn the book completely off, all other book options are also automatically disabled.
5.3 Rotating Display Options (Squares A3-H3)
IMPORTANT: The Rotating Display feature is only activated WHILE THE COMPUTER IS THINKING.
Normally, the computer’s display shows the time for the player to move. However, the computer can also display other information, as described in Section 4 (Info Mode). The Rotating Display feature works hand-in-hand with Info Mode, since it allows you to choose which of the Info Displays you want to see, and then cycles your choices in onesecond increments. You may turn on any or all of the Rotating Display options, as desired.
Press OPTION three times to select the Rotating Display Options. Then use the BLACK/> and WHITE/< keys to select the options you want to see rotated in the display. The options are described below and summarized in the Option Mode Chart in this section. Press ENTER to turn these options on (+) or off (–). Or, simply press the option squares to turn the options on or off.
If you think the display information is changing too quickly when it rotates, press INFO to freeze the display. Successive presses of INFO and the BLACK/> and WHITE/< keys will allow you to cycle through all the displays manually, as described in Section 4. To start the display rotation again, press OPTION followed by CLEAR. In any event, when the computer starts thinking about its next move, the display automatically starts rotating again.
The game information you can see while the computer is thinking includes the following:
•rd:1 to rd:4 = the predicted line of play (up to four individual moves)
•rd:E = an evaluation of the current position
•rd:d = the computer’s search depth, and the number of moves examined so far in the game
•rd:n = the number of nodes searched per second
•rd:t = the amount of time the move has taken so far
When requested information is not available, the display will show a |
ENGLISH |
|
series of dashes (– – – – –). |
||
|
||
For complete descriptions of these options and details on exactly |
|
|
how to interpret the displays, see Section 4. |
|
6. VERIFYING/SETTING UP POSITIONS
6.1 Verifying Positions
See “IT’S EASY TO VERIFY PIECES!” for a step-by-step example of using Verify Mode.
If you should knock over the chess pieces or if you think your board position may be incorrect, the computer can verify all the piece locations for you!
When it is your turn, press one of the PIECE SYMBOL KEYS (&, %, $, #, @, or !). The computer shows you where the first piece of that type is located on the board—the display shows the piece symbol, color indicator, and square designation. Press the same PIECE SYMBOL KEY again to see the location of the next piece of that same type. All the White pieces are shown first, then the Black pieces. When there are no more pieces of that type, only the piece symbol remains in the display.
Want to verify more pieces? Simply repeat the above procedure using the other PIECE SYMBOL KEYS, verifying the entire board if desired! Press CLEAR to return to normal game play.
6.2 Changing and Setting Up Positions
See “TRY OUT POSITION MODE!” to get an idea of how this feature works.
Position Mode is an exciting feature which lets you set up special board positions to play from, or problems you want the computer to solve! Caution: All previous moves in your current game will be erased from the computer’s memory if you make changes to the position during a game.
Press POSITION to enter Position Mode, and the display will show -POS-. You can change or set up a position whenever it is your turn to
17

|
IT’S EASY TO VERIFY PIECES! |
||
CLEAR |
ENTER |
1. Press CLEAR and ENTER together to reset the |
|
NEW GAME |
|
computer for a new game. |
|
|
Display: [ 0:00:00. |
||
|
|
|
|
|
|
2. |
Press the KNIGHT Key. |
|
|
|
Display: [,@,b1 (the first White Knight). |
|
|
3. |
Press KNIGHT again. |
|
|
|
Display: [,@,G1 (the second White Knight). |
|
|
4. |
Press KNIGHT again. |
|
|
|
Display: ],@,b8 (the first Black Knight). |
|
|
5. |
Press KNIGHT again. |
|
|
|
Display: ],@,g8 (the second Black Knight). |
|
|
6. |
Press KNIGHT again. |
|
|
|
Display: @ (no more Knights on the board). |
CLEAR 7. Repeat to verify any other piece! Press CLEAR to exit Verify Mode.
For more details, see Section 6.1.
move. After you have set up your new position, press CLEAR to exit Position Mode.
•To remove a piece from the board, press the piece down on its square and then remove it. Notice that the display indicates the piece type and color, along with a minus sign (–) and the square location.
•To move a piece from one square to another, press the piece down on its original square, pick it up, and then press it down on the new square. As you do this, the display will show a minus sign
(–)for the first square, and a plus sign (+) for the second square.
•To add a piece to the board, first press the PIECE SYMBOL KEY for that piece (&, %, $, #, @, or !). Make sure the display shows the correct color symbol for the piece you want to add. If it does not, press BLACK/> or WHITE/< to change the color. When the
|
TRY OUT POSITION MODE! |
|
CLEAR ENTER |
1. |
Press CLEAR and ENTER together to reset |
NEW GAME |
|
the computer for a new game. |
|
Display: [ 0:00:00. |
|
|
|
|
POSITION |
2. |
Press POSITION to enter Position Mode. |
|
|
Display: -POS-. |
3.Press the White pawn down on Square E2, and remove it from the board.
E2 |
Display: [,!,-E2. |
4.Press that same pawn down on Square E3 to add it to the board.
E3 |
Display: [,!,+E3. |
5.Press the Black Queen down on Square D8, and remove it from the board.
D8 |
Display: ],%,-D8. |
6.Press that same Queen down on Square H5 to add it to the board.
H5 |
|
Display: ],%,+H5. |
|
7. |
Press WHITE/< to change the color to move |
WHITE /< |
||
|
|
next. |
|
8. |
Press CLEAR to exit. |
|
||
CLEAR |
||
|
|
For more details, see Section 6.2. |
|
|
|
|
|
display shows the correct piece type and color, place that piece onto the desired square and press down gently. The display shows a plus sign (+), along with the location for that square. To add another piece of the same type, simply press down onto another square. To add a different piece, press a different PIECE SYMBOL KEY and follow the same steps outlined above.
•To clear the board, press ENTER while you are in Position Mode. The display will show _ to symbolize an empty chessboard.
18

Press ENTER once more to confirm that you do want to clear the board. Then add pieces as described previously. If you decide not to clear the board, press CLEAR to cancel. This feature can be handy when you want to set up a position with only a few pieces, where it would be much easier to start out with an empty board!
•Once you have changed the board position as described above, make sure the color indicator in the display is showing the correct color of the side to move. Change the color, if necessary, by pressing BLACK/> or WHITE/<.
•To exit Position Mode, press CLEAR. You will return to normal game play, with your new board position!
Note that any legal position can be set up using the above procedures. The computer will not permit you to set up an illegal position, such as one where there are more than the prescribed number of pieces for a normal game, or one where a King is in check and is not to move. In such cases, the computer will simply beep when you press CLEAR, and you will not be allowed to exit Position Mode. Check the position using the PIECE SYMBOL KEYS, if necessary, and correct the position (by adding a piece, removing a piece, or moving an incorrectly placed piece). Then press CLEAR to exit Position Mode.
7. TECHNICAL DETAILS
7.1 The ACL Function
Computers sometimes “lock up” due to static discharge or various other electrical disturbances. If this should happen, take out the batteries and use a pin or another sharp object to press into the hole marked ACL in the base of the unit for at least one second. This resets the computer.
7.2 Care and Maintenance
Your chess computer is a precision electronic device, and should not be subjected to rough handling or exposed to extreme temperatures or moisture. Be sure to remove the batteries before cleaning the unit. Do not use chemical agents or liquids to clean the unit, as they may damage the plastic.
Weak batteries should be replaced promptly, since they can leak and damage the computer. Please also note the following regarding the use of batteries. Warning: Use only alkaline or zinc carbon batteries. Do
not mix different types of batteries or new and used batteries. Do |
|
||
not recharge non-rechargeable batteries. Use only the recom- |
|
||
mended batteries or equivalent. Be sure to observe the correct |
ENGLISH |
||
polarity when inserting batteries. Worn out batteries should be |
|||
|
|||
removed from the unit promptly. Do not short circuit the supply |
|
||
terminals. |
|
|
|
7.3 Technical Specifications |
|
||
Keys: |
16 |
|
|
LCD Display: |
48-segment |
|
|
Batteries: |
3 x AAA/AM4/RO3 (1.5V) cells |
|
|
Power Consumption: |
150 mW maximum |
|
|
Dimensions: |
202 x 135 x 32 mm |
|
|
Weight: |
300 g (excluding batteries) |
|
|
Please retain this information for future reference.
Saitek reserves the right to make technical changes without notice in the interest of progress.
19

CONDITIONS OF WARRANTY
1.Warranty period is 2 years from date of purchase with proof of purchase submitted.
2.Operating instructions must be followed.
3.Product must not have been damaged as a result of defacement, misuse, abuse, neglect, accident, destruction or alteration of the serial number, improper electrical voltages or currents,
repair, alteration or maintenance by any person or party other than our own service facility or an authorized service center, use or installation of non-Saitek replacement parts in the product or the modification of
this product in any way, or the incorporation of this product into any other products, or damage to the product caused by accident, fire, floods, lightning, or acts of God, or any use violative of instructions furnished by Saitek plc.
4.Obligations of Saitek shall be limited to repair or replacement with the same or similar unit, at our option. To obtain repairs under this warranty, present the product and proof of purchase (e.g., bill or invoice) to the authorized Saitek Technical Support Center (listed on the separate sheet packaged with this product) transportation charges prepaid. Any requirements that conflict with any state or Federal laws, rules and/or obligations shall not be enforceable in that particular territory and Saitek will adhere to those laws, rules, and/or obligations.
5.When returning the product for repair, please pack it very carefully, preferably using the original packaging materials. Please also include an explanatory note.
6.IMPORTANT: To save yourself unnecessary cost and inconvenience, please check carefully that you have read and followed the instructions in this manual.
7.This warranty is in Lieu of all other expressed warranties, obligations or liabilities. ANY IMPLIED WARRANTIES, OBLIGATIONS, OR LIABILITIES, INCLUDING BUT NOT LIMITED TO THE IMPLIED WARRANTIES OF MERCHANTABILITY AND FITNESS FOR A PARTICULAR PURPOSE, SHALL BE LIMITED IN DURATION TO THE DURATION OF THIS WRITTEN LIMITED WARRANTY. Some states do not allow limitations on how long an implied warranty lasts, so the above limitations may not apply to you. IN NO EVENT SHALL WE BE LIABLE FOR
ANY SPECIAL OR CONSEQUENTIAL DAMAGES FOR BREACH OF THIS OR ANY OTHER WARRANTY, EXPRESS OR IMPLIED, WHATSOEVER Some states do not allow the exclusion or limitation of special, incidental or consequential damages, so the above limitation may not apply to you. This warranty gives you specific legal rights, and you may also have other rights which vary from state to state.
Information for Customers in the United States:
FCC Compliance and Advisory Statement
Warning: Changes or modifications to this unit not expressly approved by the party responsible for compliance could void the user’s authority to operate the equipment.
This device complies with Part 15 of the FCC Rules. Operation is subject to the following two conditions:
1.This device may not cause harmful interference, and
2.This device must accept any interference received, including interference that may cause undesired operation
NOTE: This equipment has been tested and found to comply with the limits for a Class B digital device, pursuant to Part 15 of the FCC Rules. These limits are designed to provide reasonable protection against harmful interference in a residential installation. This equipment generates, uses and can radiate radio frequency energy and, if not installed and used in accordance with the instructions, may cause harmful interference to radio communications. However, there is no guarantee that interference will not occur in a particular installation. If this equipment does cause harmful interference to radio or television reception, which can be determined by turning the equipment off and on, the user is encouraged to try to correct the interference by one or more of the following measures:
•Reorient or relocate the receiving antenna.
•Increase the separation between the equipment and receiver.
•Connect the equipment into an outlet on a circuit different from that to which the receiver is connected.
•Consult the dealer or an experienced radio/TV technician for help. Saitek Industries, 2295 Jefferson Street, Torrance, CA 90501, USA
20
|
|
TROUBLESHOOTING GUIDE |
|
|
ENGLISH |
SYMPTOMS |
|
POSSIBLE CAUSES |
|
ACTION TO TAKE |
|
|
|
|
|||
The computer doesn’t react, |
• |
Batteries are not installed correctly. |
• |
Reinstall the batteries, observing the correct polarity. |
|
behaves erratically, or “freezes” |
• |
Batteries are weak or bad. |
• |
Replace the batteries. |
|
during a game. |
|
||||
|
• |
Static discharge or an electrical disturbance has caused a |
• |
Press into the hole marked ACL to reset the computer (see |
|
|
|
lock-up. |
|
Section 7.1). |
|
Display is difficult to read. |
• |
Batteries are weak or bad. |
• |
Replace the batteries with fresh alkalines. |
|
The computer will not make a |
• The Auto Answer option may be turned off. |
• The computer only responds automatically if Auto Answer is |
|
||
move. |
|
|
|
on (see Section 5.1). |
|
|
• |
The computer is thinking for a long time on a high level. |
• To interrupt the computer, press ENTER. |
|
|
The computer will not accept your |
• |
Is it your turn? Is your King in check? Will your move put |
• Review the rules. Verify the position to make sure it is |
|
|
move. |
|
your King into check? Are you trying to castle incorrectly? |
|
correct (see Section 6.1). |
|
|
|
Are you moving to an illegal square? |
• To interrupt the computer, press ENTER. |
|
|
|
• |
The computer is thinking (its color symbol is flashing). |
|
||
An error message shows when a |
• You have not entered the computer’s last move correctly |
• Check the display, and press the correct square to complete |
|
||
square is pressed. |
|
(wrong from or to square). |
|
the computer’s move. |
|
You can’t exit Position Mode with |
• You have set up an illegal position. A King may be in check, |
• |
Check the position, and make changes (see Section 6.2). |
|
|
CLEAR—you only get beeps. |
|
too many pawns may be on the board, etc. |
|
Press CLEAR again to exit Position Mode. |
|
The display is showing _. |
• You are in Position Mode, and have pressed ENTER to clear |
• To clear the board, press ENTER once more; to cancel, |
|
||
|
|
the board. |
|
press CLEAR (see Section 6.2). |
|
The computer seems to be making |
• The computer has made a special move, such as en |
• Review the rules. Verify the position (see Section 6.1). |
|
||
illegal moves. |
|
passant, castling, or a pawn promotion. |
|
|
|
|
• Your board position is incorrect. |
• Verify the position (see Section 6.1). |
|
||
|
• |
Batteries are running out. |
• |
Replace the batteries with fresh alkalines. |
|
The computer is making instant or |
• The computer may be on a low level where it moves quickly |
• Press LEVEL to check the level (see Section 3). Change to |
|
||
irrational moves. |
|
and plays weaker than normal, due to limited search depth. |
|
another level, if desired. |
|
|
• |
Batteries are running out. |
• |
Replace the batteries with fresh alkalines. |
|
The computer is silent. |
• |
The Silent Mode option may be activated. |
• |
Check the option settings (see Section 5.1). |
|
21
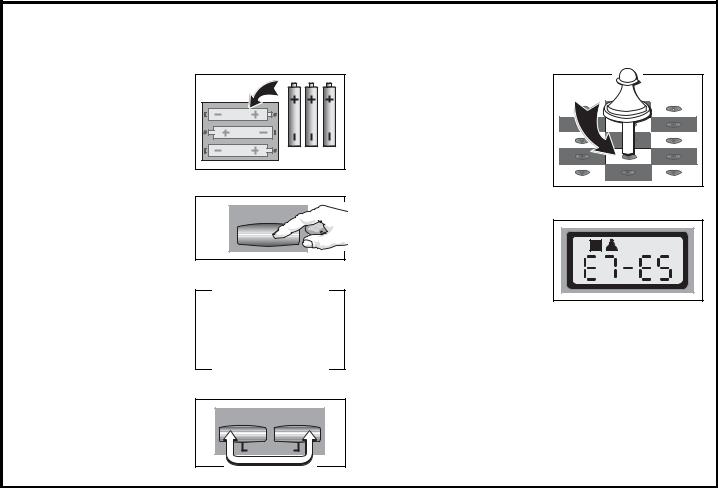
|
SCHNELLSTART |
||
Öffnen Sie das |
|
Zur Eingabe von Zügen, |
|
1 Batteriefach und legen Sie |
|
5 drücken Sie die |
|
3 AAA (AM4/R03) |
|
gewünschte Figur |
|
Batterien gemäß der |
|
zunächst auf ihr |
|
eingezeichneten Polarität |
|
Ausgangs- dann auf ihr |
|
ein. Schließen Sie das |
3 x AAA/AM4/RO3 |
Zielfeld. Der Computer |
|
Batteriefach wieder. |
registriert so automatisch, |
||
|
|||
|
|
welche Figur gezogen |
|
|
|
wurde. |
|
Drücken Sie GO/STOP |
|
|
|
2 um den Computer |
GO/STOP |
|
|
anzuschalten. Reagiert |
6 |
Sobald der Computer einen |
|
das Gerät nicht, lesen Sie |
Zug macht, wird dieser im |
||
bitte Abschnitt 7.1. |
|
Display angezeigt. Drücken |
|
|
|
Sie dann die gewünschte |
|
|
|
Figur auf ihr Ausgangs- |
|
Stellen Sie die |
|
dann auf ihr Zielfeld. Hier |
|
3 Schachfiguren wie in der |
|
im Beispiel würden Sie den |
|
|
schwarzen Bauern zunächst auf e7 dann auf e5 drücken. |
||
Abbildung gezeigt auf. Die |
|
||
weißen Figuren sollten |
So einfach geht das! |
||
|
|||
Ihnen am nächsten |
|
Geben Sie Ihren nächsten Zug auf die gleiche Weise ein. |
|
stehen. |
|
|
|
|
!"#$%&'( |
Drücken Sie GO/STOP, um den Computer |
|
|
) * |
||
|
|
Um den Computer für |
|
|
|
4 einen neue Partie |
CLEAR |
ENTER |
|
einzustellen, drücken Sie |
|
|
|
CLEAR und ENTER |
NEW GAME |
||
gleichzeitig. |
|||
|
|
||
auszuschalten. Die aktuelle Stellung wird
gespeichert und kann später fortgeführt werden!
22
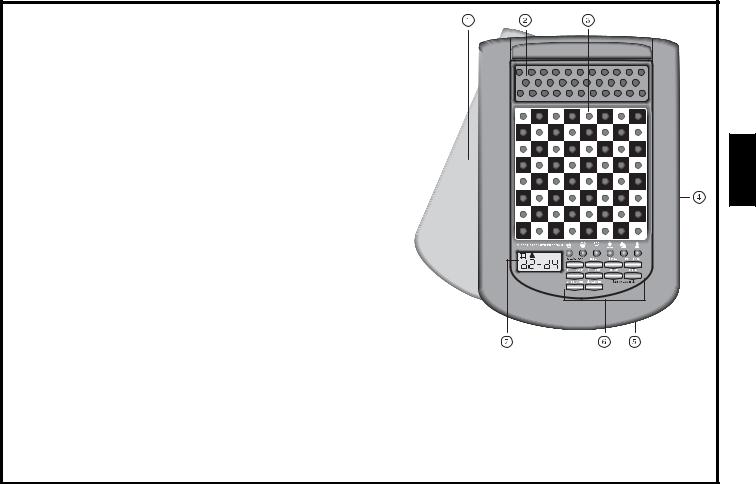
TASTEN UND FUNKTIONEN
1.ABNEHMBARE ABDECKUNG: Schützt die Einheit vor Staub und verhindert, daß Figuren verloren gehen.
2.FIGURENAUFBEWAHRUNGSFELD: Hier können Sie Figuren aufbewahren oder geschlagene Figuren abstellen.
3.SENSORSCHACHBRETT: Jedes Feld enthält einen Sensor, der auf Druck reagiert. Dies ermöglicht die Zugeingabe und hilft auch bei der Auswahl von Spielstufen und Optionen.
4.BATTERIEFACH: Auf der Unterseite des Geräts. Für 3 “AAA” (AM4/R03) alkaline Batterien.
5.ACL (Reset): Auf der Unterseite des Geräts. Wichtig, um statische Aufladungen vom Computer zu nehmen.
6.SPIELTASTEN
•FIGURENSYMBOLE: Wichtig bei Positionsaufbau und -kontrolle, sowie bei Bauern-umwandlung.
•GO/STOP: Hiermit schalten Sie den Computer an oder aus.
•INFO: Hiermit aktivieren Sie den Informationsmodus. Innerhalb dieses Modus, können Sie mit dieser Taste zwischen einzelnen Gruppen blättern. Während eines Zuges hilft Ihnen diese Taste, Hinweise abzufragen.
•LEVEL: Hiermit aktivieren Sie den Informationsmodus. Innerhalb dieses Modus, können Sie mit dieser Taste zwischen einzelnen Gruppen blättern. Während eines Zuges hilft Ihnen diese Taste, Hinweise abzufragen.
•POSITION: Hiermit aktivieren Sie den Positionsmodus.
•TAKE BACK: Wird zur Rücknahme von Zügen eingesetzt. Insgesamt können Sie bis zu 30 Züge zurücknehmen.
•OPTION: Hiermit aktivieren Sie den Optionsmodus. Innerhalb dieses Modus, können Sie mit dieser Taste zwischen einzelnen Gruppen blättern.
•CLEAR: Gleichzeitig mit ENTER gedrückt, wird die Funktion NEW GAME aktiviert. Drücken Sie sie alleine, wird die Funktion “Abbruch” ausgelöst. So können Sie verschiedene Auswahlmodi verlassen, ohne die Einstellungen zu ändern (Options-, Positions-, Infooder Kontrollmodus).
•ENTER: Gleichzeitig mit CLEAR gedrückt, wird die Funktion NEW GAME aktiviert. Als Einzelfunktion gebräuchlich, um mit dem Computer die Seiten zu tauschen, Suchfunktionen abzubrechen, Optionseinstellungen zu aktivieren/
A8 |
B8 |
C8 |
D8 |
E8 |
F8 |
G8 |
H8 |
|
A7 |
B7 |
C7 |
D7 |
E7 |
F7 |
G7 |
H7 |
|
A6 |
B6 |
C6 |
D6 |
E6 |
F6 |
G6 |
H6 |
DEUTSCH |
A5 |
B5 |
C5 |
D5 |
E5 |
F5 |
G5 |
H5 |
|
A4 |
B4 |
C4 |
D4 |
E4 |
F4 |
G4 |
H4 |
|
|
|
|
|
|
|
|
|
|
A3 |
B3 |
C3 |
D3 |
E3 |
F3 |
G3 |
H3 |
|
A2 |
B2 |
C2 |
D2 |
E2 |
F2 |
G2 |
H2 |
|
A1 |
B1 |
C1 |
D1 |
E1 |
F1 |
G1 |
H1 |
|
deaktivieren, eine neue Spielstufe auszuwählen etc.
•WHITE/< UND BLACK/> TASTEN: Mit diesen Tasten können Sie Spielstufen, Optionen oder Informationen in Einzelschritten durchblättern.
7.DISPLAY-ANZEIGE: Zeigt Züge und Informationen während einer Partie. Zusätzlich hilft es bei Auswahl von Spielstufen und Optionen, zur Stellungskontrolle/ aufbau.
23
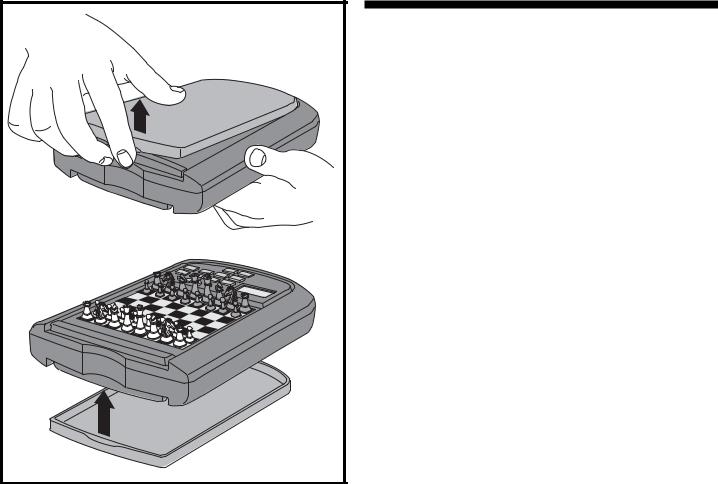
INHALT
SCHNELLSTART |
4. INFO-MODUS: BEOBACHTEN |
||
TASTEN UND FUNKTIONEN |
UND LERNEN! |
||
EINLEITUNG |
Info-Modus anwenden |
||
1. LOS GEHT’S! |
4.1 |
Hauptvarianten |
|
1.1 |
Zuerst Batterien einlegen |
4.2 |
Suchinformationen |
1.2 |
Spielbereit? So ziehen Sie..! |
4.3 |
Schachuhr-Informationen |
1.3 |
Nun ist der Computer am Zug |
4.4 |
Zugzähler/Zuganzahl |
1.4 |
Sie haben Ihre Meinung |
4.5 |
Wie wäre es mit einem |
|
geändert? Nehmen Sie Züge |
|
Hinweis? Einfach fragen! |
|
zurück! |
5. OPTIONENFÜRSPIELSPASS |
|
1.5 |
Spiel zu Ende? Auf ein Neues |
UND ABWECHSLUNG |
|
1.6 |
Zu einfach/schwer? Ändern Sie |
Optionen auswählen |
|
|
die Spielstufe |
5.1 |
Computereinstellungen |
2. MEHR FUNKTIONEN ENTDECKEN! |
|
(Felder A1-H1) |
|
2.1 |
Wer ist am Zug? Prüfen Sie das |
5.2 |
Spieleinstellungen |
|
Display! |
|
(Felder A2-H2) |
2.2 |
Spezielle Schachzüge |
5.3 |
Rotierende Anzeige |
2.3 |
Ungültige Züge |
|
(Felder A3-H3) |
2.4 |
Schach, Matt und Remis |
6. POSITIONEN PRÜFEN/ |
|
2.5 |
Die Computersuche |
AUFBAUEN |
|
|
unterbrechen |
6.1 |
Positionen prüfen |
2.6 |
Seitenwechsel mit dem |
6.2 |
Positionen verändern und |
|
Computer |
|
aufbauen |
2.7 |
Gespeicherte Eröffnungen |
7. TECHNISCHE ANGABEN |
|
2.8 |
Rechnen wenn der Gegner am |
7.1 |
Die ACL-Funktion |
|
Zug ist |
7.2 |
Pflege und Wartung |
2.9 |
Spielstandspeicher |
7.3 |
Technische Spezifikation |
3. DIE SPIELSTUFEN |
PROBLEMLÖSUNGSHINWEISE |
||
Eine Spielstufe einstellen
3.1Normale Stufen (Felder A1-G2)
3.2Analysestufe (Feld H2)
3.3Turnierstufen (Felder A3-H3)
3.4Blitzschach (Felder A4-H4)
3.5Spaßstufen (Felder A5-H5)
3.6Mattsuchstufen (Felder A6-H6)
3.7Trainingsstufen (Felder A7-H8)
24

EINLEITUNG
Sind Sie bereit in die aufregende Welt des Computerschachs einzutreten? Dann liegen Sie richtig! Ihr neuer Computer bietet so viele Optionen, Spielstufen und spezielle Funktionen - so haben Sie Schach noch nie erlebt! Mit Hilfe des Schnellstarts am Anfang können Sie sofort loslegen. Die Details finden Sie im Anschluß an diese Einleitung. Haben Sie einmal die Grundbegriffe gelernt, lohnt es sich, diese Anleitung zu lesen. So entdecken Sie alle Möglichkeiten dieses Schachcomputers - Spielspaß garantiert!
Ihr neuer Schachcomputer kennt selbstverständlich alle Schachregeln und hält diese genauestens ein. Für alle Einsteiger, haben wir eine kurze Regelübersicht integriert. So können Sie sofort spielen und mit viel Spaß trainieren!
1. LOS GEHT’S!
1.1 Zuerst Batterien einlegen
Ihr Computer benötigt 3 AAA (AM4/R03) Batterien. Legen Sie diese Batterien in das entsprechende Fach auf der Unterseite des Geräts ein. Achten Sie dabei auf die Polarität. Nutzen Sie frische Batterien!
Schalten Sie den Computer durch Drücken von GO/STOP an. Ein “Beep” signalisiert die Spielbereitschaft. Reagiert das Gerät nicht (aufgrund statischer Aufladung), drücken Sie mit einem spitzen Gegenstand ca. 1-2 sek. in die ACL-Vertiefung auf der Unterseite des Computers. So wird Ihr Computer zurückgesetzt.
Tip: Um Energie zu sparen und das Leben Ihrer Batterien zu verlängern, nutzen Sie die Abschaltautomatik (s. Abschnitt 5.1).
1.2 Spielbereit? So ziehen Sie..!
Okay, jetzt ist es Zeit, ein Spiel zu wagen! Dies ist ziemlich einfach - folgen Sie nur diesen Schritten:
a.Drücken Sie GO/STOP, um den Computer anzuschalten
b.Drücken Sie CLEAR und ENTER gleichzeitig. So stellen Sie eine neue Partie ein. Bauen Sie die Grundstellung auf! Die weißen Steine sollten Ihnen am nächsten stehen (siehe auch
Schnellstart).
c.Um einen Zug auszuführen, drücken Sie die gewünschte Figur auf ihr Ausgangsfeld bis Sie einen Ton hören - das Sensorbrett erkennt Ihre Figur automatisch. Sie glauben es nicht? Schauen Sie doch mal auf das Display, das plötzlich voll von Informationen ist - es zeigt Ihre Figur, die Farbe und das Feld, das Sie gerade gedrückt haben.
d.Nehmen Sie diese Figur und stellen Sie sie auf das Zielfeld. Sie hören einen zweiten Ton - der Computer bestätigt so die Eingabe. Das war’s - Sie haben gerade Ihren ersten Zug ausgeführt. Nun ist der Computer am Zug!
Sie werden bemerken, daß der Computer am Anfang einer Partie |
|
sofort antwortet, anstatt sich Zeit für Berechnungen zu nehmen. Das |
|
kommt, weil er aus seiner Bibliothek heraus spielt, in der Eröffnungs- |
DEUTSCH |
1.3 Nun ist der Computer am Zug |
|
züge abgelegt sind (siehe auch Abschnitt 2.7). |
|
Zieht der Computer, wird sein Zug signalisiert und angezeigt. Prüfen |
|
Sie das Display - Sie sehen das Ausgangs- und Zielfeld, sowie die |
|
Farbe und das Symbol der gewünschten Figur. Drücken Sie diese auf |
|
das Ausgangs- und dann auf ihr Zielfeld. Der Computerzug ist |
|
ausgeführt und Sie sind wieder gefragt... |
|
1.4 Sie haben Ihre Meinung geändert? Nehmen Sie Züge zurück!
Spielen Sie gegen einen Computer, ist nichts “endgültig” - Sie können Ihre Strategie wechseln oder entscheiden, einen anderen Zug zu spielen, wann Sie wollen! Sind Sie am Zug, drücken Sie dazu einfach TAKE BACK. Das Display zeigt dann den letzten Zug an. Drücken Sie die gezeigte Figur auf das Feld auf dem Sie steht und stellen Sie sie - wiederum durch andrücken - zurück auf ihr ursprüngliches Ausgangsfeld. Sie können dies bis zu 30 mal wiederholen. Wollen Sie normal weiterspielen, geben Sie einfach ganz normal wieder einen Zug ein.
Nach Rücknahme eines Schlagzuges oder einer Bauernumwandlung, erinnert Sie der Computer daran, die geschlagene/umgewandelte Figur wieder zurückzustellen. Er zeigt die Figur und ihr aktuelles Feld an.
Stellen Sie sie durch andrücken wieder auf das richtige Feld.
So schließen Sie die Rücknahme korrekt ab. Nehmen Sie eine Rochade zurück, nehmen Sie zunächst den Königsdann den Turmzug zurück.
25
 Loading...