


SaitekTM
P2600 Rumble Force Gamepad Manual

1 |
4 quick-fire shoulder |
|
|
|
|
||
|
triggers |
|
|
|
5 |
FPS gaming button |
|
|
|
||
2 |
Analog/Digital button |
6 |
6 Buttons |
3Rumble Force button 
48-way D-Pad 
7 2 Analog Joysticks
|
1 |
|
2 |
3 |
4 |
5 |
6 |
|
7 |
|
FR |
4 |
Gâchettes |
Touche analogique/ |
Bouton Rumble |
Pavé Directionnel |
la Touche FPS |
6 |
Boutons de Tir |
2 |
Sticks Analogique |
|
|
|
Digital |
Force |
|
|
|
|
|
|
DE |
4 |
Triggers |
Analog-/Digital- |
Rumble Force- |
8-Wege D-Pad |
Der FPS-Schalter |
6 |
Tasten |
2 Analoge Joysticks |
|
|
|
|
Schalter |
Funktion |
|
|
|
|
|
|
IT |
4 |
Trigger |
Pulsante analogico/ |
Tasto-Rumble |
Pulsantiera D-Pad |
il Pulsante FPS |
6 |
Pulsanti |
2 |
Joystick Analogici |
|
|
|
Digitale |
Force |
|
|
|
|
|
|
ES |
4 |
Gatillos |
Botón Analógico/ |
Tecla de Rumble |
Teclado en D 8 vias |
Tecla de disparador |
6 |
Botones |
2 |
Palancas de mando |
|
|
|
Digital |
Force |
|
primera persona |
|
|
analógicas |
|
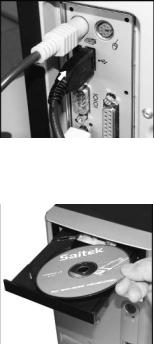
1.The USB cable
Insert the P2600’s USB plug into one of your PC’s free USB sockets.
Le câble USB
Branchez la prise USB du P2600 à l'un des ports USB de votre ordinateur.
USB-Kabel
Stecken Sie den USB-Stecker des P2600 in einen der verfügbaren USB-Anschlüsse Ihres PCs.
Cavo USB
Inserire la spina USB del P2600 in una delle prese USB libere del PC.
El cable USB
Inserte el conector USB del P2600 en uno de los enchufes USB libres del ordenador.
2.Installation of drivers, programming software and online manual
Insert the CD supplied with your Saitek P2600 into the CD drawer of your PC and close the drawer. Once the PC has recognised the CD, follow the on-screen instructions to install driver software and access the manuals.
Installation des pilotes, logiciel de programmation et manuel en ligne
Insérez le CD fourni avec votre Saitek P2600 dans le lecteur de CD de votre PC et refermez le tiroir. Une fois que le PC aura reconnu le CD, suivez les instructions à l'écran pour installer le logiciel et son pilote et pouvoir accéder aux manuels.
Treiberinstallation, Programmiersoftware und Online-Anleitung
Legen Sie die mit Ihrem Saitek-P2600 mitgelieferte CD in das CD-Fach Ihres PC und schließen Sie dieses. Wenn Ihr PC die CD automatisch erkannt hat, folgen Sie bitte den Anweisungen auf dem Bildschirm, um die Treibersoftware zu installieren und auf die Anleitungen zuzugreifen.
Installazione di driver, software di programmazione e manuale online.
Inserire il CD fornito con la Saitek P2600 nel cassetto portaCD del PC e chiudere il cassetto. Quando il PC ha riconosciuto il CD, seguire le istruzioni a schermo per installare il software del driver e accedere ai manuali.
Instalación de controladores, software de programación y manual en-línea
Inserte el CD suministrado con el P2600 de Saitek en el lector de CD del PC. Una vez que el PC haya reconocido el CD, siga las instrucciones de pantalla para instalar el software del controlador y acceder a los manuales.

The FPS Gaming Button
Most First Person Shooter (FPS) games on the PC don't support gamepads without complex programming of controls. However, the Saitek gamepad FPS feature allows you to use your gamepad in an FPS game at the touch of a button.
Pressing the FPS gaming button automatically sets up the pad's controls for the following commands found in most current FPS genre games. You must insert the installation disc and install both product drivers and Saitek Smart Technology (SST) Programming software for the FPS button to work.
7 |
Bottom trigger |
|
|
FPS button |
|
8 |
Bottom trigger |
|||
5 |
Top trigger |
|
|
|
|
|
|
|||
|
|
|
|
|
|
|
6 |
Top trigger |
||
|
|
|
|
|
|
|
|
10 |
|
|
|
|
|
D-Pad |
4 |
9 |
|
|
|||
|
|
|
1 |
|
|
|||||
|
|
|
|
|
3 |
|
|
|||
|
|
|
|
|
2 |
|
|
|
||
|
|
|
|
|
|
|
|
|
||
|
|
11 |
12 |
|
|
|
|
|
||
|
|
|
|
|
|
|
|
|
|
|
Button 1 |
Use (E) |
Button 2 |
Jump (Space) |
Button 3 |
Flashlight (F) |
Button 4 |
Reload (R) |
Button 10 |
Buy (B) |
Button 9 |
Drop Weapon (G) |
Top left trigger 5 |
Right Mouse Button |
Top right trigger 6 |
Left Mouse Button |
Bottom left trigger 7 |
Crouch (C) |
Bottom right trigger 8 |
Scores/Objectives (Tab) |
D-Pad |
|
|
(=) |
|
Next Item (]) |
|
(-) |
Left mini joystick 11 left-right |
Previous Item ([) |
|
|
(X Axis) |
Strafe Right (D) |
Left mini joystick 11 up-down |
Strafe Left (A) |
|
|
(Y Axis) |
Forwards (W) |
|
Backwards (S) |
Right mini joystick 12 up-down |
Mouse |
(Z Axis) |
|
Right mini joystick 12 left-right |
Mouse |
(Rz Axis) |
|
P2600 RUMBLE FORCE PAD
GETTING STARTED
Installation for Users of Windows® XP
A) Drivers Only For Typical Users
1.With your computer switched on, close down any programs that are currently running and insert the Saitek Smart Technology CD into your CD-ROM drive.
2.When the Introduction Screen appears, click Install Software to continue. If the CD does not run automatically, select Start from the Windows® Taskbar, then Run and type D:\Setup.exe and click OK - where D:\ is letter of your CD-ROM drive.
3.When the Welcome screen appears, click Next to continue.
4.After reading the Disclaimer, select the I accept the terms of the Disclaimer option and click Next to continue.
5.At the Driver Setup screen, if you haven't already done so, plug the USB cable into one of your computer's USB ports and click on Next.
6.At the Driver Setup screen, click Next to test your controller.
7.When the Saitek Controller screen appears, try out all your controller's buttons and controls to show that it is working properly. When you have finished, click OK.
8.At the Software Setup screen, select Do not install the SST Programming Software and click Next. The Programming Software can be installed at a later date by following instruction (B). below
9.At the Registration screen, select Check this box to register now and follow the on-screen instructions, or you can choose to select this option later.
10.Click on Finish to complete the installation.
B) Drivers and Programming Software For Advanced Users
Follow points 1 - 7 of the install procedure in A), then at the Software Setup screen, select Install the SST Programming Software and click Next.
In the following Software Setup screen, click Next and follow the on-screen instructions. At this point you will be asked to install such features as the Saitek
Magic Mouse, HID-compliant mouse, Saitek Magic Keyboard and HID Keyboard Device (these are what XP calls the various elements of your Saitek controller). Continue to click on Next and Finish to accept the installation until the Registration screen appears.
At the Registration screen, select Check this box to register now and follow the on-screen instructions, or do not select this option and register later.
Upon completion of the installation, you have the option to Run Profile Editor, which will give you a view of the 3D programming environment. If you do not wish to see the Profile Editor at this point, just uncheck the box and click on Finish to complete the installation.
Installation for Users of Windows® 2000
A) Drivers Only For Typical Users
1.With your computer switched on, close down any programs that are currently running and insert the Saitek Smart Technology CD into your CD-ROM drive.
2.When the Introduction Screen appears, click Install Software to continue. If the CD does not run automatically, select Start from the Windows® Taskbar, then Run and type D:\Setup.exe and click OK - where D:\ is letter of your CD-ROM drive.
3.When the Welcome screen appears, click Next to continue.
4.After reading the Disclaimer, select the I accept the terms of the Disclaimer option and click Next to continue.
5.At the Device Driver Installation screen, click on Next and follow the on-screen instructions.
6.When prompted, plug the USB cable into one of your computer's USB ports and click on Configure.
7.When the Controller Properties screen appears, click Next to view the Test screen.
8.Now try out all your controller's buttons and controls to show that it is working properly. When you have finished, click OK.
9.At the Programming Software screen, select Typical User and click Next.
10.At the Registration screen, select Register and follow the on-screen instructions or select Register Later and click Next. 11.Click on Finish to complete the installation.
B) Drivers and Programming Software For Advanced Users
1.Follow points 1 - 8 of the install procedure in A), then at the Programming Software screen, select Advanced User and click Next.
2.At the Programmable Controller Drivers screen, click Update and follow the on-screen instructions.
3.Then at the Installation of programming software successful screen, click Next.
4.At the Registration screen, select Register and follow the on-screen instructions or select Register Later and click Next.
5.Upon completion of the installation, you have the option to Run Profile Editor, which will give you a view of the 3D programming environment. If you do not wish to see the Profile Editor at this point, just uncheck the box and click on Finish to complete the installation.
IMPORTANT INFORMATION
A Word on Driver Updates
From time to time there may be updates to the driver and programming software for this product.
You can check for the latest software updates by visiting the Saitek website and clicking on Downloads. A drop down menu will appear. Select Drivers and
Software.
For Windows® XP users; Dynamic updates
If you are using the SST Programming software then you will need to obtain an updated version to work with the new drivers that you have downloaded from Windows update. To obtain the new version of the software, open the Game Controllers icon in Control Panel, select the controller in the window and click
Properties. At the top of the Properties window click the About tab and you will see a link that says Click here to download the SST Programming Software.
Click on the link and Windows will give a download prompt asking if you want to open the file or save it. Choose to save it to your preferred location on your computer's hard disk and the file will start downloading. Once the file has downloaded, find it on your hard disk and double click on it to install the programming software.
Enabling Your Controller in Game
Most games support game controllers, which you can enable by using a [control] options menu within the Main Menu of the game itself.
If you are having trouble working out how to do this or if you're unsure whether the game being used supports game controllers, please refer to the user manual for that game for more help.
How to Test your Controller
•You can do this at any time by Clicking on Start, then Settings and selecting Control Panel in Windows (XP users may only need to click on Start and then Control Panel)
•Look for an icon called either Game Controllers or Gaming Options (XP users may have to click Printers and Other Hardware first).
•Open the Game Controllers/Gaming Options window then the name of your controller should show up.
•Click on Properties and this will bring up the test screen.
•Moving your controller and pressing the buttons should result in a response in this screen; if there is a response you know that the controller is functioning correctly.
PROGRAMMING YOUR SAITEK CONTROLLER WITH SAITEK SMART TECHNOLOGY PROGRAMMING SOFTWARE
Introducing Saitek Smart Technology Programming Software
Saitek Smart Technology Programming Software (SST) is the software Saitek supplies to configure your Saitek controller for enhanced functionality. SST delivers a powerful set of features, allowing you to program your device with the ultimate configuration for total interaction. Despite a level of sophistication previously unseen in the market, and because of the Saitek Smart Technology inside, the software remains simple and intuitive to use.
For a complete guide on how to program your Saitek controller, visit the Saitek website at www.saitek.com.
Features of Smart Technology Programming Software:
•Quick and easy setup in any game
•Personalize the controller settings for your favorite games
•Configure your controller with an on-screen 3D model and interface
•Multiple setup option for each controller - ideal if a controller is used by several people
•Program special moves with sophisticated timing features
•Special game setups available as 'Profiles' from the Saitek website and on the Smart Technology CD
•Download the latest version of Saitek Smart Technology software from the Saitek website
What is a Profile
A Profile is a custom setup for improved gameplay - consisting of a set of commands that are pre-assigned to the buttons or axes of your controller. There are over two hundred pre-written Profiles available on the Product Companion Disk that accompanies this device or on the Saitek Website - www.saitek.com. (Please check the website for new or improved Profiles, which are being added regularly).
How Do I Program My Controller?
After getting to know your controller, you can start creating your own personal Profiles with the Saitek Smart Technology programming software (SST). This software has virtually unlimited programming capabilities and allows you to customize the controller to your exact gaming needs.
The Profile Editor allows you to program the buttons on your controller to perform different actions within your games - this is especially useful if the game you are using does not have its own screen that allows reconfiguring of your buttons.
GETTING STARTED
1.Double-click on the Saitek Smart Technology icon the install left on your desktop.
2.In the Profile Editor, choose the control to which you wish to assign a keyboard command. You do this by left-clicking on the control's cell in the control list on the right of the screen.
3.With the cursor flashing, type in the key commands and then click on the green tick mark when complete.
4.Repeat this procedure for all the buttons you would like to program and then click File, Save at the top of the Profile Editor window.
5.Give the profile a name (it is recommended you name it after the game for which the profile is intended) and then click Save.
6.To enable the profile either click the Profile Now icon at the top of the Profile Editor (it looks like a black and yellow crosshair) or right-click on the controller icon in your taskbar and select the name of the profile from the pop-up list of options.
7.You will notice that when a profile is loaded that the controller icon in your taskbar has a green square behind it, indicating that a profile is currently loaded.
If you wish to unload a profile simply right-click on the controller icon and click Clear Profile from the pop-up list of options.
If you require more detailed assistance with using the SST Programming Software, click on Help at the top of the Profile Editor and then Manual.
Technical Support
Can't get your pad to work - don't worry, we're here to help you!
Nearly all the products that are returned to us as faulty are not faulty at all - they have just not been installed properly.
If you experience any difficulty with this product, please first visit our website www.saitek.com. The technical support area will provide you with all the information you need to get the most out of your product and should solve any problems you might have.
If you do not have access to the internet, or if the website cannot answer your question, please contact your local Saitek Technical Support Team. We aim to offer quick, comprehensive and thorough technical support to all our users so, before you call, please make sure you have all the relevant information at hand.
To find your local Saitek Technical Support Center , please see the separate Technical Support Center sheet that came packaged with this product.
Conditions of Warranty
1.Warranty period is 2 years from date of purchase with proof of purchase submitted.
2.Operating instructions must be followed.
3.Specifically excludes any damages associated with leakage of batteries.
Note: Batteries can leak when left unused in a product for a period of time, so it is advisable to inspect batteries regularly.
4.Product must not have been damaged as a result of defacement, misuse, abuse, neglect, accident, destruction or alteration of the serial number, improper electrical voltages or currents, repair, alteration or maintenance by any person or party other than our own service facility or an authorized service center, use or installation of non-Saitek replacement parts in the product or the modification of this product in any way, or the incorporation of this product into any other products, or damage to the product caused by accident, fire, floods, lightning, or acts of God, or any use violative of instructions furnished by Saitek plc.
5.Obligations of Saitek shall be limited to repair or replacement with the same or similar unit, at our option. To obtain repairs under this warranty, present the product and proof of purchase (eg, bill or invoice) to the authorized Saitek Technical Support Center (listed on the separate sheet packaged with this

product) transportation charges prepaid. Any requirements that conflict with any state or Federal laws, rules and/or obligations shall not be enforceable in that particular territory and Saitek will adhere to those laws, rules, and/or obligations.
6.When returning the product for repair, please pack it very carefully, preferably using the original packaging materials. Please also include an explanatory note.
IMPORTANT: To save yourself unnecessary cost and inconvenience, please check carefully that you have read and followed the instructions in this manual.
This warranty is in Lieu of all other expressed warranties, obligations or liabilities. ANY IMPLIED WARRANTIES, OBLIGATIONS, OR LIABILITIES, INCLUDING BUT NOT LIMITED TO THE IMPLIED WARRANTIES OF MERCHANTABILITY AND FITNESS FOR A PARTICULAR PURPOSE, SHALL BE
LIMITED IN DURATION TO THE DURATION OF THIS WRITTEN LIMITED WARRANTY. Some states do not allow limitations on how long an implied warranty lasts, so the above limitations may not apply to you. IN NO EVENT SHALL WE BE LIABLE FOR ANY SPECIAL OR CONSEQUENTIAL DAMAGES FOR BREACH OF THIS OR ANY OTHER WARRANTY, EXPRESS OR IMPLIED, WHATSOEVER Some states do not allow the exclusion or limitation of special, incidental or consequential damages, so the above limitation may not apply to you. This warranty gives you specific legal rights, and you may also have other rights which vary from state to state.
This symbol on the product or in the instructions means that your electrical and electronic equipment should be disposed at the end of its life separately from your household waste. There are separate collection systems for recycling in the EU.
For more information, please contact the local authority or your retailer where you purchased the product.
FCC Compliance and Advisory Statement
Warning: Changes or modifications to this unit not expressly approved by the party responsible for compliance could void the user's authority to operate the equipment.
This device complies with Part 15 of the FCC Rules. Operation is subject to the following two conditions:
1This device may not cause harmful interference, and;
2This device must accept any interference received, including interference that may cause undesired operation.
NOTE: This equipment has been tested and found to comply with the limits for a Class B digital device, pursuant to Part 15 of the FCC Rules. These limits are designed to provide reasonable protection against harmful interference in a residential installation. This equipment generates, uses and can radiate radio frequency energy and, if not installed and used in accordance with the instructions, may cause harmful interference to radio communications. However, there is no guarantee that interference will not occur in a particular installation. If this equipment does cause harmful interference to radio or television reception, which can be determined by turning the equipment off and on, the user is encouraged to try to correct the interference by one or more of the following measures:
-Reorient or relocate the receiving antenna;
-Increase the separation between the equipment and receiver;
-Connect the equipment into an outlet on a circuit different from that to which the receiver is connected;
-Consult the dealer or an experienced radio/TV technician for help.
Saitek Industries, 2295 Jefferson Street, Torrance, CA 90501, USA
Canada ICES-003.
Operation is subject to the following two conditions:
1This device may not cause interference, and;
2This device must accept any interference, including interference that may cause undesired operation of the device.
This Class B digital apparatus complies with Canadian ICES-003.
Cet appareil numérique de la classe B est conforme à la norme NMB-003 du Canada.
This symbol on the product or in the instructions means that your electrical and electronic equipment should be disposed at the end of its life separately from your household waste. There are separate collection systems for recycling in the EU.
For more information, please contact the local authority or your retailer where you purchased the product.
La touche de jeu FPS
La plupart des jeux de tir à la première personne 'First Person Shooter' (FPS) sur PC ne supportent pas les manettes sans une programmation complexe des commandes. Cependant, la caractéristique FPS de la manette Saitek vous permet d'utiliser votre manette avec un jeu FPS en appuyant simplement sur un bouton.
Appuyez sur le bouton de jeu FPS pour installer automatiquement les commandes de manette suivantes pour la plupart des jeux FPS les plus courants. Vous devez insérer le disque d'installation et installer les pilotes produit et le logiciel de programmation Saitek Smart Technology pour que la touche FPS puisse fonctionner.
7 Gâchette inférieure
5 Gâchette supérieure 
Pavé directionnel
11
la touche FPS |
8 |
Gâchette inférieure |
|
|
|
|
|
|
6 |
Gâchette supérieure |
|
10
4
9
1 3
2
12
Touche 1 |
Utiliser (E) |
Touche 2 |
Sauter (Espace) |
Touche 3 |
Lampe torche (F) |
Touche 4 |
Recharger (R) |
Touche 10 |
Acheter (B) |
Touche 9 |
Lâcher l'arme (G) |
Gâchette gauche (haut) 5 |
Bouton de souris droite |
Gâchette droite (haut) 6 |
Bouton de souris gauche |
Gâchette gauche (bas) 7 |
S'accroupir (C) |
Gâchette droite (bas) 8 |
Scores/Objectifs (Tab) |
Pavé directionnel |
|
|
(=) |
|
Objet suivant (]) |
|
(-) |
Mini-joystick gauche 11 gauche-droite |
Objet précédent ([) |
|
|
(Axe X) |
Mitrailler à droite (D) |
Mini-joystick gauche 11 haut-bas |
Mitrailler à gauche (A) |
|
|
(Axe Y) |
Avancer (W) |
|
Reculer (S) |
Mini-joystick droit 12 haut-bas |
Souris |
(Axe Z) |
|
Mini-joystick droit 12 gauche-droite |
Souris |
(Axe Rz) |
|
MANETTE P990
Installation pour les utilisateurs de Windows® XP
A) Pilotes pour des utilisateurs type uniquement
1.L'ordinateur allumé, fermez tous les programmes en cours d'exécution et insérez le CD Saitek Smart Technology dans votre lecteur de CD-ROM.
2.Lorsque l'écran d'introduction apparaît, cliquez sur Installer le logiciel pour continuer. Si le CD ne se met pas en route automatiquement, sélectionner
Démarrer dans la barre de tâches Windows, puis Exécuter, puis tapez D:\Setup.exe (D : étant votre lecteur de CD) et cliquez sur OK.
3.Lorsque l'écran de bienvenue apparaît, cliquez sur Suivant pour continuer.
4.Après avoir lu l'avertissement, sélectionnez I accept the terms of the Disclaimer (J'accepte les termes de cet avertissement) et cliquez sur Suivant pour continuer.
5.Une fois que l’écran de Réglage des pilotes s’affiche (et si vous ne l’avez pas déjà fait), connectez le câble USB à l’un des ports USB de votre ordinateur et cliquez sur Suivant.
6.Cliquez sur Suivant dans les deux fenêtres suivantes et à l'écran de mise à jour des drivers, cliquez sur Suivant pour tester votre contrôleur
7.Lorsque l'écran de contrôle Saitek apparaît, essayez tous les boutons de votre contrôleur, ainsi que les contrôles, afin de vous assurer qu'ils fonctionnent correctement. Lorsque vous avez terminé, veuillez cliquer sur OK.
8.A l'écran de configuration du logiciel, sélectionnez Ne pas installer le logiciel de programmation SST et cliquez sur Suivant. Le logiciel de programmation peut être installé à une date ultérieure en suivant l'instruction (B) figurant ci-dessous.
9.Sur l'écran d'enregistrement, sélectionner Cocher cette case pour enregistrer maintenant, et suivez les instructions données à l'écran. Vous pouvez
également choisir de sélectionner cette option plus tard.
10.Cliquez sur Terminer pour terminer l'installation.
B) Pilotes et Logiciel de Programmation pour les Utilisateurs Avancés
1.Suivez les points 1 à 7 de A). A l'écran Configuration du logiciel, sélectionnez Installez le logiciel de programmation SST et cliquez sur Suivant.
2.A l'écran Configuration du logiciel, cliquez sur Suivant et suivez les instructions données à l'écran. Vous êtes alors invité(e) à installer des fonctions telles que la souris Saitek Magic Mouse ou le clavier Saitek Magic Keyboard (c'est le nom que XP donne aux différents éléments de votre contrôleur Saitek).
Cliquez toujours sur Suivant, Continuer de toute façon et Terminer pour accepter l'installation jusqu'à ce que vous obteniez le message Installation of programming software successful (Installation réussie du logiciel de programmation).
3.A l'écran d'enregistrement, sélectionnez Cliquez pour vous enregistrer maintenant et suivez les instructions à l'écran, ou ne sélectionnez pas cette option pour vous enregistrer plus tard.
4.A la fin du processus d'installation, vous aurez la possibilité d'exécuter l'éditeur de profil (Run Profile Editor), ce qui vous permettra de visualiser en 3D votre environnement de programmation. Si vous ne voulez pas exécuter l'éditeur de profil, cliquez simplement sur Terminer pour compléter le processus d'installation.
 Loading...