


R80 USB SPORTS WHEEL
USER MANUAL MANUEL D’UTILISATION BEDIENUNGSANLEITUNG MANUALE D’USO MANUAL DEL USUARIO

R80 USB SPORTS WHEEL
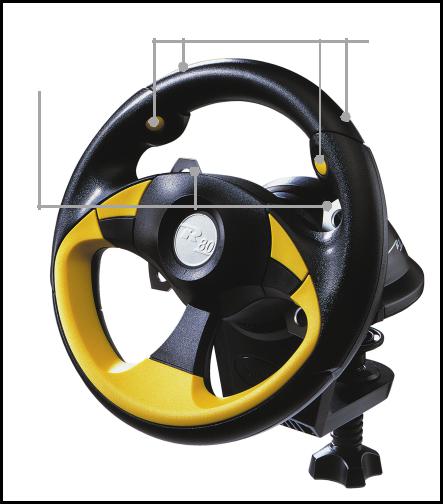
Buttons
Gearshift paddles (for gas and brake)
Clamping system
R80 USB SPORTS WHEEL
The R80 Sports wheel is guaranteed to improve your driving experience forever. It has no pedals because the gas and brake functions are transferred to the paddles behind the wheel – but what does this mean for you? There are no more tangles with cable wires, no more slippery pedals and all the controls are conveniently placed at your fingertips for complete control, precision driving and the fastest race times
Main Features
•4 Wheel Mounted Buttons
•2 Gas and Brake Paddles
•Pedal-free Wheel
•Ultra Compact Design saves on desk space
•Easy to secure clamping mechanism
Installing the R80 USB Sports Wheel on Windows® XP
1With your computer switched on and all applications shut down, plug the R80 Sports Wheel into one of your computer’s USB ports.
2The Found New Hardware callout will appear to inform you that the wheel has been successfully installed.
3To test that R80 Sports Wheel is functioning correctly, click on Start on the Windows® Taskbar and then select Control Panel.
4In the Control Panel list, select Printers and other Hardware, then double-click the Game Controllers icon. In the Game Controllers window select Saitek R80.
Note for users who have changed their XP® Desktop settings to Classic view: To test that the R80 Sports Wheel is functioning correctly, click on Start on the Windows® Taskbar and then select Settings and Control Panel. In Control Panel, double-click the Game Controllers icon, then in the Game Controllers window select Saitek R80.
5Next, click on Properties to open the Saitek R80 Properties window. Click on the Test tab and try out the buttons and controls of your new wheel. Turn the wheel through its full range of movement and the cursor should reach the left and right corners of the square. Press all the buttons and the indicators should light up as you press the corresponding control. Press on the gas and brake paddles and the throttle indicator should move up and down.
6After testing your wheel, click OK twice to finish. Now it’s time to load your favorite game and enjoy the fun!
Installing the R80 USB Sports Wheel on Windows® 2000
1With your computer switched on and all applications shut down, plug the R80 Sports Wheel into one of your computer’s USB ports.
2Your computer will automatically detect and load the drivers for your new wheel.
3To test that your R80 Sports Wheel is functioning correctly, click on Start on the Windows® Taskbar and then select Settings and Control Panel.
4In the Control Panel, double-click the Gaming Options icon, then in the Gaming Options window select
Saitek R80.
5Next, click on Properties to open the Saitek R80 Properties window. Click on the Test tab and try out the buttons and controls of your new wheel. Turn the wheel through its full range of movement and the cursor should reach the left and right corners of the square. Press all the buttons and the indicators should light up as you press the corresponding control. Press on the gas and brake paddles and the throttle indicator should move up and down.
6After testing your wheel, click OK twice to finish. Now it’s time to load your favorite game and enjoy the fun!
Installing the R80 USB Sports Wheel on Windows® Me
1With your computer switched on and all applications shut down, plug the R80 Sports Wheel into one of your computer’s USB ports.
2Your computer will automatically detect and load the drivers for your new wheel.
3To test that your R80 Sports Wheel is functioning correctly, click on Start on the Windows® Taskbar and then select Settings and Control Panel.
4In the Control Panel, double-click the Game Controllers icon, then in the Game Controllers window select Saitek R80
5Next, click on Properties to open the Gaming Options Properties window. Click on the Test tab and try out the buttons and controls of your new wheel. Turn the wheel through its full range of movement and the cursor should reach the left and right corners of the square. Press all the buttons and the indicators should light up as you press the corresponding control. Press on the gas and brake paddles and the throttle indicator should move up and down.
6After testing your wheel, click OK twice to finish. Now it’s time to load your favorite game and enjoy the fun!
Installing the R80 USB Sports Wheel on Windows® 98 (Second Edition)
1With your computer switched on and all applications shut down, plug the R80 Sports Wheel into one of your computer’s USB ports.
2When the Add New Hardware Wizard appears, click Next and follow the on-screen instructions.
3When prompted, select Search for the best driver for your device (Recommended) and click on Next.
4At the following screen, select the CD-ROM drive option, insert your Windows® 98 (SE) CD and click on
Next.
5Continue to follow the on-screen instructions until the installation is complete, then click on Finish and remove your CD.
6To test that your R80 Sports Wheel is functioning correctly, click on Start on the Windows® Taskbar and then select Settings and Control Panel.
7In Control Panel, double-click the Game Controllers icon, then in the Game Controllers window, select
R80 Sports Wheel.
8Next, click on Properties to open the Game Controller Properties window. Click on the Test tab and try out the buttons and controls of your new wheel. Turn the wheel through its full range of movement and the cursor should reach the left and right corners of the square. Press all the buttons and the indicators should light up as you press the corresponding control. Press on the gas and brake paddles and the throttle indicator should move up and down.
9After testing your wheel, click OK twice to finish. Now it’s time to load your favorite game and enjoy the fun!
TROUBLESHOOTING
Q My computer is not recognizing the R80 Sports Wheel – what’s wrong?
ACheck the cable connections. Unplug your controller and plug it back in, making certain that is securely attached.
TECHNICAL SUPPORT
Can’t get started – don’t worry, we’re here to help you!
Did you know that nearly all the products that are returned to us as faulty are not faulty at all? They have just not been installed properly.
So, if you experience any difficulty with this product, please visit our website or contact one of our friendly technical support staff who will be pleased to help you.
Our website www.saitek.com is designed to help you get the best performance from your Saitek product. And if you still have problems, we also have teams of product specialists around the world you can call for advice and support. Contact details are provided on the Technical Support Center list provided with this product. Saitek is dedicated to helping you enjoy your purchase – please call us if you have any difficulties or worries.
The Saitek Website
If you have access to an Internet connection, many of your technical queries may be answered with a simple visit to the Saitek Website at:
www.saitek.com
The Technical Support area will provide you with all the information you need to get the most out of your controller and solve any problems you might have.
The site also contains regularly updated material, including information about:
•Current and forthcoming products
•Driver upgrades
•Links to useful sites
Contacting Saitek
If you do not have access to the Internet, or if the website cannot answer your question, you will need to contact your local Saitek Technical Support Team.
However, before contacting Technical Support, here are a few tips to help us to help you:
•Make sure you have followed all the steps shown in this manual
•Check that the controller is correctly connected to your computer
•Confirm that your PC is functioning normally
At Saitek, we aim to offer comprehensive and thorough technical support to all of our users. So, before you call, follow the guidelines below to ensure that you have all of the information necessary for us to help you.
1Know the problem - make sure that you are clear about the problem you are having and that you can describe the events that led up to it.
2Check the Troubleshooting Guide – in the Troubleshooting section of this manual.
3Know your hardware - if it is possible, have the following information to hand:
•The make and model of the computer you are using
•The name and version of the game you were using when you started having problems
•The make and model of your computer’s motherboard
•The make and model of your computer’s sound card
4Be ready - if possible, please try and ring whilst sitting at the computer with all the relevant information and hardware to hand. If you are having a problem with a particular game or application, make sure that you have it loaded.
5Be patient - we try our best to deal with customer queries as quickly as possible. At times it may be necessary to refer queries on to our specialist staff. Please be patient!
To contact your local Saitek Technical Support Center, please look up the relevant contact details on the separate Technical Support Center sheet that came packaged with this product.
Conditions of Warranty
1Warranty period is 2 years from date of purchase with proof of purchase submitted.
2Operating instructions must be followed.
3Product must not have been damaged as a result of defacement, misuse, abuse, neglect, accident, destruction or alteration of the serial number, improper electrical voltages or currents, repair, alteration or maintenance by any person or party other than our own service facility or an authorized service center, use or installation of non-Saitek replacement parts in the product or the modification of this product in any way, or the incorporation of this product into any other products, or damage to the product caused by accident, fire, floods, lightning, or acts of God, or any use violative of instructions furnished by Saitek plc.
4Obligations of Saitek shall be limited to repair or replacement with the same or similar unit, at our option. To obtain repairs under this warranty, present the product and proof of purchase (e.g. bill or invoice) to the authorized Saitek Technical Support Center (listed on the separate sheet packaged with this product) transportation charges prepaid. Any requirements that conflict with any state or Federal laws, rules and/or obligations shall not be enforceable in that particular territory and Saitek will adhere to those laws, rules, and/or obligations.
5When returning the product for repair, please pack it very carefully, preferably using the original packaging materials. Please also include an explanatory note.
6IMPORTANT: To save yourself unnecessary cost and inconvenience, please check carefully that you have read and followed the instructions in this manual.
7This warranty is in Lieu of all other expressed warranties, obligations or liabilities. ANY IMPLIED WARRANTIES, OBLIGATIONS, OR LIABILITIES, INCLUDING BUT NOT LIMITED TO THE IMPLIED WARRANTIES OF MERCHANTABILITY AND FITNESS FOR A PARTICULAR PURPOSE, SHALL BE LIMITED IN DURATION TO THE DURATION OF THIS WRITTEN LIMITED WARRANTY. Some states do not allow limitations on how long an implied warranty lasts, so the above limitations may not apply to you. IN NO EVENT SHALL WE BE LIABLE FOR ANY SPECIAL OR CONSEQUENTIAL DAMAGES FOR BREACH
OF THIS OR ANY OTHER WARRANTY, EXPRESS OR IMPLIED, WHATSOEVER Some states do not allow the exclusion or limitation of special, incidental or consequential damages, so the above limitation may not apply to you. This warranty gives you specific legal rights, and you may also have other rights which vary from state to state.
FCC Compliance and Advisory Statement
Warning: Changes or modifications to this unit not expressly approved by the party responsible for compliance could void the user’s authority to operate the equipment.
This device complies with Part 15 of the FCC Rules. Operation is subject to the following two conditions:
1This device may not cause harmful interference, and
2This device must accept any interference received, including interference that may cause undesired operation
NOTE: This equipment has been tested and found to comply with the limits for a Class B digital device, pursuant to Part 15 of the FCC Rules. These limits are designed to provide reasonable protection against harmful interference in a residential installation. This equipment generates, uses and can radiate radio frequency energy and, if not installed and used in accordance with the instructions, may cause harmful interference to radio communications. However, there is no guarantee that interference will not occur in a particular installation. If this equipment does cause harmful interference to radio or television reception, which can be determined by turning the equipment off and on, the user is encouraged to try to correct the interference by one or more of the following measures:
•Reorient or relocate the receiving antenna
•Increase the separation between the equipment and receiver
•Connect the equipment into an outlet on a circuit different from that to which the receiver is connected
•Consult the dealer or an experienced radio/TV technician for help
Saitek Industries, 2295 Jefferson Street, Torrance, CA 90501, USA
VOLANT DE COURSE R80 POUR PC
Boutons
Manettes d’accélération et de freinage
Système de blocage
VOLANT DE COURSE R80 POUR PC
Si vous n’aimez pas utiliser des pédales pour jouer avec vos jeux favoris, alors le volant de course R80 est ce qu’il vous faut! Procurez-vous le et dites adieu aux pédales qui glissent et aux câbles qui s’emmêlent. Le volant de course R80 vous permet d’être au volant d’une voiture, comme si vous y étiez, avec des boutons de contrôle accessibles du bout des doigts, et ce, pour les courses automobiles les plus folles!
Caractéristiques:
•4 boutons facilement accessibles
•2 palettes de commandes, l’une pour l’accélération, l’autre pour le freinage
•Un design ultra compac,ce qui vous fait économiser de la place sur votre bureau
•Facile d’’utilisation, mécanisme d’attache de sécurité
 Loading...