


|
|
|
|
|
|
|
|
|
|
|
|
|
|
|
|
|
|
|
|
|
|
|
|
|
|
|
|
|
|
|
|
|
|
|
|
|
|
|
|
|
|
|
|
|
|
|
|
|
|
|
|
|
|
|
|
|
|
|
|
|
|
|
|
|
|
|
|
|
|
|
|
|
|
|
|
|
|
|
|
|
TPM_manual.indd 1 |
|
|
|
|
|
|
|
|
10-11-19 4:36 |
|
||||||||
|
|
|
|
|
|
|
|
|
|
||||||||||
|
|
|
|
|
|||||||||||||||
|
|
|
|
||||||||||||||||
|
|
|
|
|
|
|
|
|
|
|
|
|
|
|
|
|
|
|
|
|
|
|
|
|
|
|
|
|
|
|
|
|
|
|
|
|
|
|
|

CLOSER TO REALITY
WITH SAITEK’S PRO FLIGHT RANGE
YOUR COMPLETE COCKPIT SOLUTION //
BIP |
FIP |
BACKLIT INFORMATION PANEL |
DIGITAL LCD DISPLAY |
MULTI PANEL |
RADIO PANEL |
IN-COCKPIT CONTROLS |
IN-COCKPIT CONTROLS |
|
|
PERFECT PARTNERS |
|
TPM_manual.indd 2 |
|
|
10-11-19 4:36 |
|
|
||
|
|
|
|

ENGLISH
INTRODUCTION |
4 |
INSTALLATION |
6 |
HOW TO TEST AND ADJUST YOUR CONTROLLER |
8 |
PROGRAMMING YOUR PRO FLIGHT CONTROLLER WITH SMART TECHNOLOGY PROGRAMMING SOFTWARE |
9 |
FRANÇAIS
DÉMARRAGE |
12 |
INSTALLATION |
14 |
ACTIVATION DE VOTRE CONTRÔLEUR DANS LES JEUX |
16 |
PROGRAMMATION DE VOTRE CONTRÔLEUR PRO FLIGHT |
17 |
DEUTSCH
ERSTE SCHRITTE |
20 |
INSTALLATION |
22 |
TESTEN UND EINSTELLEN IHRES CONTROLLERS |
24 |
PROGRAMMIEREN DES PRO FLIGHT-CONTROLLERS |
26 |
ITALIANO
AVVIO |
29 |
INSTALLAZIONE |
31 |
COME VERIFICARE E REGOLARE IL CONTROLLER |
33 |
PROGRAMMAZIONE DEL CONTROLLER PRO FLIGHT |
34 |
ESPAÑOL
PRIMEROS PASOS |
38 |
INSTALACIÓN |
40 |
CÓMO PROBAR Y AJUSTAR SU MANDO |
42 |
PROGRAMAR SU MANDO PRO FLIGHT |
43 |
TPM_manual.indd 3 |
|
|
10-11-19 4:36 |
|
|
||
|
|
|
|

INTRODUCTION
Fully compatible with all major flight simulation titles and pre-existing flight simulation set ups, the Pro Flight Throttle, Prop and Mixture System replicates the control surface found in light aircraft, such as the Cessna®, Piper® and Mooney Bravo®.
Three durable aluminum rods allow users to accurately alter throttle, pitch and fuel
9 TOGGLE SWITCHES FOR EXTRA CONTROL
9 interrupteurs à bascule pour un contrôle supplémentaire
9 Wippschalter für zusätzliche Kontrolle 9 interruttori a levetta per un controllo di livello superiore 9 interruptores de palanca para un control extra
3 AXIS – THROTTLE, PROP PITCH AND MIXTURE
3 axes – manette des gaz, pas d’hélice et richesse du mélange. 3 Achsen – Schubregler, Propellersteigung und Benzingemisch. 3 assi – acceleratore, passo dell’elica e miscela.
3 Ejes: Aceleración, distancia de propulsión y mezcla.
TPM_manual.indd 4 |
|
|
10-11-19 4:36 |
|
|
||
|
|
|
|

FEATURES:
•3 Axis – Throttle, Prop Pitch and Mixture
•Authentic control surfaces for many light aircraft, including Cessna®, Piper® and Mooney Bravo®
•9 Toggle switches for extra control
•Multitude of mounting options – clamps included with unit
•Powerful Smart Technology (ST) programming software allows gamers to configure their controls to suit their preferred flying style, and to save the configurations as personal profiles
•Works with all major flight titles
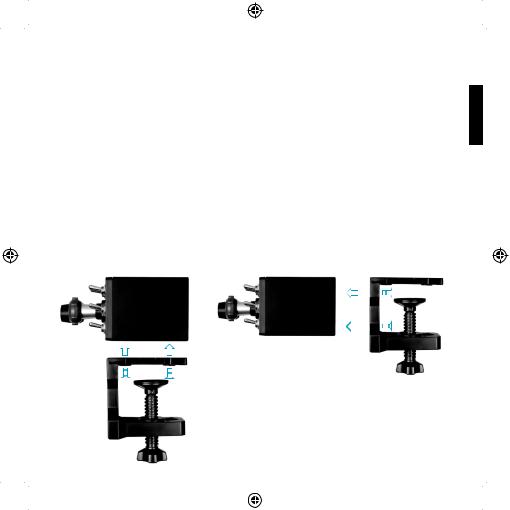
HOW TO ATTACH THE CLAMPS
5
ENGLISH
TPM_manual.indd 5 |
|
|
10-11-19 4:36 |
|
|
||
|
|
|
|

DRIVERS AND SOFTWARE INSTALLATION FOR USERS OF WINDOWS® XP, 32AND 64-BIT
1.With your computer powered on, close down any programs that are currently running, and then insert the Installation CD into your CD-ROM drive.
2.When the Welcome screen appears, click Next to continue. If the CD
does not run automatically, select Start from the Windows Taskbar, then Run, then type D:\Setup.exe into the Run window’s text entry field, and then click OK (assuming D:\ is the letter of your CD-ROM drive).
3.After reading the Disclaimer, select the I accept the terms of the Disclaimer option and click Next to continue.
4.At the Driver Setup screen, if you haven’t already done so, plug the USB cable into one of your computer’s USB ports, and then click Next.
5.At the Driver Setup screen, click Next to test your controller.
6.When the Saitek Controller screen appears, try out all of your controller’s controls to determine if it is working properly. When you have finished, click OK.
7.In the following Software Setup screen, click Next and follow the on-screen instructions. At this point you will be asked to install such features as the
Programmable Support for Mouse, Programmable Support for Keyboard
and Programmable Hotkeys (these are important components of the programming software and are required).
8.If you are asked if Windows can connect to Windows Update to search for software, choose No, not at this time. Continue to click Next and Finish to accept the installation.
9.Upon completion of the installation, you have the option to Run Profile Editor, which will give you a view of the programming environment. If you do not wish to see the
Profile Editor at this point, uncheck the box and click Finish to complete the installation.
6
TPM_manual.indd 6 |
|
|
10-11-19 4:37 |
|
|
||
|
|
|
|

DRIVERS AND SOFTWARE INSTALLATION FOR USERS OF WINDOWS® VISTA AND 7, 32AND 64-BIT USING THE SAITEK PRO FLIGHT RADIO PANEL
1.With your computer powered on, close down any programs that are currently running, and then insert the Installation CD into your CD-ROM drive.
2.When the Welcome screen appears, click Next to continue. If the CD
does not run automatically, select Start from the Windows Taskbar, then Run, then type D:\Setup.exe into the Run window’s text entry field, and then click OK (assuming D:\ is the letter of your CD-ROM drive).
3.After reading the Disclaimer, select the I accept the terms of the Disclaimer option and click Next to continue.
4.At the Driver Setup screen, if you haven’t already done so, plug the USB cable into one of your computer’s USB ports and then click Next.
5.At the Driver Setup screen, click Next to test your controller.
6.When the Saitek Controller screen appears, try out all of your controller’s controls to determine if it is working properly. When you have finished, click OK.
7.In the following Software Setup screen, click Next and a pop-up box will appear asking if you “want to trust software from Saitek.” Click yes, and then click Next.
8.Upon completion of the installation, you have the option to Run Profile Editor, which will give you a view of the programming environment. If you do not wish to see the Profile Editor at this point, uncheck the box and click on Finish to complete the installation.
ENABLING YOUR CONTROLLER IN GAMES
You can test your controller at any time by going to Game Controllers, highlighting the controller and clicking properties where you will see a test page.
ENGLISH
7
TPM_manual.indd 7 |
|
|
10-11-19 4:37 |
|
|
||
|
|
|
|
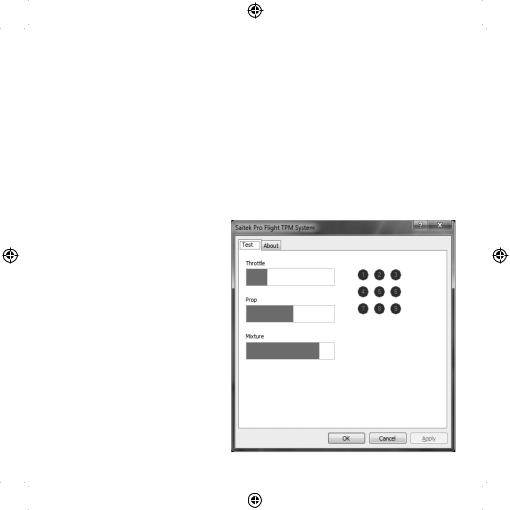
HOW TO TEST AND ADJUST YOUR CONTROLLER
For XP users: Click Start and go to Control Panel. If it is in Classic view then you will see Game Controllers. If it is in Category View then click Printers and other Hardware, then you will see Game Controllers.
For Vista users: Click Start and go to Control Panel. If it is in Classic view then you will see Game Controllers. If it is the Control Panel Home view then click Hardware and Sound, then you will see Game Controllers.
For Windows 7 users: Click Start then Games (if you don’t have a Games link then type games explorer in the run bar and enter/select the Games Explorer link in the programs search list). In the Games Explorer click Tools then Input Devices and this will open Game Controllers.
Once in the Game Controllers window, the Saitek Pro Flight TPM should appear. Click on Properties to bring up the test screen and then click on the Test tab. Moving your
Throttle, Prop, Mixture or any of the
9 toggle switches will result in a response in this screen; if there is a response you know that the TPM is functioning correctly.
8
TPM_manual.indd 8 |
|
|
10-11-19 4:37 |
|
|
||
|
|
|
|
PROGRAMMING YOUR PRO FLIGHT CONTROLLER WITH SMART TECHNOLOGY PROGRAMMING SOFTWARE
INTRODUCING SMART TECHNOLOGY PROGRAMMING SOFTWARE
Smart Technology (ST) Programming Software is the software supplied to configure your controller for enhanced functionality. ST delivers a powerful set of features, allowing you to program your device with the ultimate configuration for total interaction. Despite a level of sophistication previously unseen in the market, the software remains simple and intuitive to use.
FEATURES OF SMART TECHNOLOGY PROGRAMMING SOFTWARE:
•Quick and easy setup in any game
•Personalize the controller settings for your favorite games
•Configure your controller with an on-screen, high resolution model and interface
•Multiple setup options for each controller - ideal if a controller is used by several people
•Program special moves with sophisticated timing features
•Special game setups available as “Profiles” from the Saitek website and on the Smart Technology CD
•Download the latest version of Smart Technology Programming Software from the Saitek website
RUNNING THE SMART TECHNOLOGY PROGRAMMING SOFTWARE
A.Click on Start, then All Programs, and then look for Smart Technology in your list of programs. Click on this and under this heading you will see another heading with an icon saying Profile Editor. Click on this and the Smart Technology software will open up.
B.Look on your desktop for the Smart Technology icon. Once found, double-click and the Smart Technology software will load.
9
ENGLISH
TPM_manual.indd 9 |
|
|
10-11-19 4:37 |
|
|
||
|
|
|
|
C. Right-click the controller icon next to your clock, and click Profile Editor from the list.
Once the ST software has opened, you will be presented with a “tip” screen (if it’s the
first time you have run the software). This screen gives useful information pertaining to the profile software. If you do not wish to see this screen when you start the ST software, uncheck the small check box in the corner of the tip screen. The tip box can be closed by clicking on the OK icon in the bottom right corner. You can get the tip box back by going to the support tab and clicking on SHOW STARTUP TIPS PAGE.
PRODUCT
The product page is the main screen that appears when the Smart Technology software is first opened (as shown above). Any Pro Flight hardware connected to your computer will be automatically detected and displayed on this screen. Since they are always first in the list of connected hardware, the Pro Flight Rudder Pedals will always appear in the software’s product page, although no Pro Flight hardware is physically connected to your computer.
PROGRAMMING
From the programming tab, you can mimic your controller to directly copy any of the keyboard commands that are used in your favorite games. The commands are then saved in what we call a Profile. When you click on the programming tab, you will be presented with a high resolution image of the controller you are going to program on the left, and going down the right side of the screen you will see a list of command boxes called “Cells.” For a detailed guide on the programming, go to the support tab and click
READ PROGRAMMING MANUAL.
SUPPORT
From the support tab, you can access the following features by clicking on them.
10
TPM_manual.indd 10 |
|
|
10-11-19 4:37 |
|
|
||
|
|
|
|
SHOW TIPS
Once clicked, the tip screen will appear; this is the same screen that appears the very first time you run the ST software and you can run through all tips from this screen if desired.
DOWNLOAD DRIVERS AND SOFTWARE
Clicking on this link will open your default browser and direct it to the download drivers and software page.
DOWNLOAD GAME PROFILES
Clicking on this link will open your default browser and direct it to the download profiles page. From this page, choose your controller and a list of pre-made profiles that match all the latest games will appear.
READ ST PROGRAMMING MANUAL
The full ST programming manual will open in your default browser window.
CONTACT US
Clicking on Contact Us will open your default browser and direct it to the contact information page; from here you can choose from a list of contacts.
EU DECLARATION OF CONFORMITY:
As required, certain of these products have been tested and conform to the requirements of the European Union Directives 2002/95/EC, 2002/96/EC, and
2004/108/EC. Authorized signatory of the manufacturer is Mad Catz, Inc., 7480 Mission Valley Road, Suite 101, San Diego, CA 92108.
11
ENGLISH
TPM_manual.indd 11 |
|
|
10-11-19 4:37 |
|
|
||
|
|
|
|

DÉMARRAGE
Entièrement compatible avec la plupart des jeux de simulation de vol et des installations de simulation de vol existantes, le système manette des gaz, pas d’hélice et richesse du mélange Pro Flight reproduit les actionneurs que l’on trouve sur les avions légers tels que Cessna®, Piper® et Mooney Bravo®.
9 TOGGLE SWITCHES FOR EXTRA CONTROL
9 interrupteurs à bascule pour un contrôle supplémentaire
9 Wippschalter für zusätzliche Kontrolle 9 interruttori a levetta per un controllo di livello superiore 9 interruptores de palanca para un control extra
3 AXIS – THROTTLE, PROP PITCH AND MIXTURE
3 axes – manette des gaz, pas d’hélice et richesse du mélange. 3 Achsen – Schubregler, Propellersteigung und Benzingemisch. 3 assi – acceleratore, passo dell’elica e miscela.
3 Ejes: Aceleración, distancia de propulsión y mezcla.
12
TPM_manual.indd 12 |
|
|
10-11-19 4:37 |
|
|
||
|
|
|
|
Trois manettes en aluminium durable permettent aux utilisateurs de modifier précisément le niveau des gaz, du pas et de la richesse du mélange, et 9 interrupteurs à bascule supplémentaires entièrement programmables fournissent de nombreuses commandes définies par l’utilisateur pendant le vol.
CARACTÉRISTIQUES:
•3 axes – manette des gaz, pas d’hélice et richesse du mélange
•Contrôle parfait des gouvernes pour de nombreux avions légers, notamment
Cessna®, Piper® et Mooney Bravo®
•9 interrupteurs à bascule pour un contrôle supplémentaire
•Nombreuses options de montage – pinces de serrage fournies avec le système
•Le puissant logiciel de programmation Smart Technology (ST) permet aux joueurs de configurer leurs commandes afin qu’elles s’adaptent à leur style de jeu préféré, ainsi que d’enregistrer les configurations dans des profils personnels
•Fonctionne avec la plupart des jeux de simulation
COMMENT FIXER LES PINCES DE SERRAGE
13
FRANÇAIS
TPM_manual.indd 13 |
|
|
10-11-19 4:37 |
|
|
||
|
|
|
|

INSTALLATION DES PILOTES ET DU LOGICIEL POUR LES UTILISATEURS DE WINDOWS® XP, 32 ET 64 BITS
1.Lorsque votre ordinateur est allumé, fermez tous les programmes en cours de fonctionnement, puis insérez le CD d’installation dans le lecteur de CD-ROM.
2.Lorsque l’écran de bienvenue apparaît, cliquez sur Next pour poursuivre. Si le CD ne s’exécute pas automatiquement, sélectionnez Start dans la barre des tâches Windows, puis Run, puis saisissez D:\Setup.exe dans le champ de saisie de la fenêtre Run, puis cliquez sur OK (en supposant que D:\ correspond à la lettre de votre lecteur de CD-ROM).
3.Après avoir lu l’avis d’exclusion de responsabilité, sélectionnez l’option I accept the terms of the Disclaimer et cliquez sur Next pour poursuivre.
4.Dans l’écran de configuration du pilote, si vous ne l’avez pas encore fait, branchez le câble USB dans l’un des ports USB de l’ordinateur, puis cliquez sur Next.
5.Dans l’écran de démarrage du pilote, cliquez sur Next pour tester le contrôleur.
6.Lorsque l’écran du contrôleur Saitek apparaît, essayez toutes les commandes de votre contrôleur afin de déterminer s’il fonctionne correctement. Lorsque vous avez terminé, cliquez sur OK.
7.Dans l’écran Software Setup suivant, cliquez sur Next et suivez les instructions
à l’écran. À ce stade, il vous sera demandé d’installer des fonctions telles que Programmable Support for Mouse, Programmable Support for Keyboard et Programmable Hotkeys (il s’agit de composants importants du logiciel de programmation et ils sont nécessaires).
8.S’il vous est demandé si Windows peut se connecter à Windows Update pour rechercher le logiciel, choisissez No, not at this time. Poursuivez pour cliquer sur Next et Finish pour accepter l’installation.
9.À la fin de l’installation, il vous est proposé l’option Run Profile Editor, qui vous donnera un aperçu de l’environnement de programmation. Si vous ne souhaitez pas voir l’éditeur de profil à ce stade, décochez la case et cliquez sur Finish pour achever l’installation.
14
TPM_manual.indd 14 |
|
|
10-11-19 4:37 |
|
|
||
|
|
|
|

INSTALLATION DES PILOTES ET DU LOGICIEL POUR LES UTILISATEURS DE WINDOWS® VISTA ET 7, 32 ET 64 BITS
1. |
Lorsque votre ordinateur est allumé, fermez tous les programmes en cours de |
FRANÇAIS |
|
fonctionnement, puis insérez le CD d’installation dans le lecteur de CD-ROM. |
|
|
|
|
2. |
Lorsque l’écran de bienvenue apparaît, cliquez sur Next pour poursuivre. Si le CD |
|
|
ne s’exécute pas automatiquement, sélectionnez Start dans la barre des tâches |
|
|
Windows, puis Run, puis saisissez D:\Setup.exe dans le champ de saisie de la |
|
|
|
|
|
fenêtre Run, puis cliquez sur OK (en supposant que D:\ correspond à la lettre de |
|
|
votre lecteur de CD-ROM). |
|
3. |
Après avoir lu l’avis d’exclusion de responsabilité, sélectionnez l’option I accept the |
|
|
terms of the Disclaimer et cliquez sur Next pour poursuivre. |
|
4. |
Dans l’écran de configuration du pilote, si vous ne l’avez pas encore fait, branchez |
|
|
le câble USB dans l’un des ports USB de l’ordinateur, puis cliquez sur Next. |
|
5. |
Dans l’écran de démarrage du pilote, cliquez sur Next pour tester le contrôleur. |
|
6. |
Lorsque l’écran du contrôleur Saitek apparaît, essayez toutes les commandes de |
|
|
votre contrôleur afin de déterminer s’il fonctionne correctement. Lorsque vous avez |
|
|
terminé, cliquez sur OK. |
|
7. |
Dans l’écran de configuration du logiciel suivant, cliquez sur Next et une zone |
|
|
contextuelle va apparaître en vous demandant si vous « voulez faire confiance au |
|
|
logiciel de Saitek ». Cliquez sur yes, puis sur Next. |
|
8. |
À la fin de l’installation, il vous est proposé l’option Run Profile Editor, qui vous |
|
|
donnera un aperçu de l’environnement de programmation. Si vous ne souhaitez |
|
|
pas voir l’éditeur de profil à ce stade, décochez la case et cliquez sur Finish pour |
|
|
achever l’installation. |
|
ACTIVATION DE VOTRE CONTRÔLEUR DANS LES JEUX
La plupart des jeux prennent en charge les contrôleurs de jeux, que vous pouvez activer en utilisant le menu des options [control] dans le menu principal ou le jeu lui-
15
TPM_manual.indd 15 |
|
|
10-11-19 4:37 |
|
|
||
|
|
|
|
 Loading...