


GB
D
F
I
SP
P
RF
mod. DZ5020
GR
UA
www.rowenta.com

5 |
6* |
4
3b*
3a 3c
3d*
3
11b
2
1
11a
AUTO-OFF
11d
7
8
9
10
11c
12
13
14

fig. 1
fig. 4
fig. 7
NO
AUTO-OFF
fig. 10
fig. 2 |
fig. 3 |
fig. 5 |
fig. 6 |
NO OK
OK
fig. 8 |
fig. 9 |
OK
AUTO-OFF
fig. 11 |
fig. 12 |
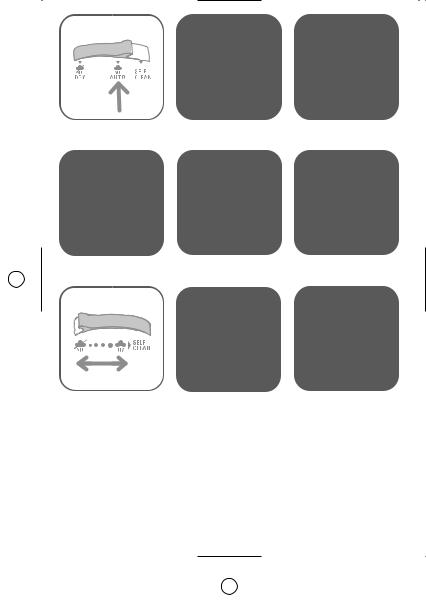
fig. 13 |
fig. 14 |
fig. 15 |
fig. 16 |
fig. 17 |
fig. 18 |
NO
fig. 19 |
fig. 20 |
fig. 21 |
DESCRIPTION
1 |
Spray nozzle |
|
8 |
Handle |
|
2 |
Filling inlet |
|
9 |
Thermostat control light* |
|
|
(with slide-button opening) |
10 |
Temperature control dial |
|
|
3 |
Variable steam control |
11 |
LED display* |
|
|
|
a Dry ironing |
|
|
a Yellow LED |
|
|
b Steam max. position * |
|
b Green LED |
|
|
|
c Self Clean |
|
|
c Red LED |
GB |
|
d Autosteam |
* |
12 |
d Auto-off LED |
|
4 |
Spray button |
|
Water tank |
|
|
|
13 |
Maximum water level |
|
||
5 |
Shot of steam button |
|
|||
|
indicator |
|
|||
6 |
Auto-off indicator light* |
|
|
||
14 |
Soleplate |
|
|||
7 |
Cord |
|
|
||
|
|
|
|
||
SAFETY INSTRUCTIONS
This appliance complies with the technical rules and standards for safety currently in force (Electromagnetic Compatibility, Low Voltage, Environment).
The appliance may only be connected to alternating current as specified on the rating plate. Only safe extension leads should be used.
An electrical appliance is not a toy. Use and store the appliance out of reach of children. Do not let the supply cord hang down.
Do not leave the appliance unattended while it is connected to the mains supply.
Electrical appliances generate high temperatures. Always use the handle and warn other users of the potential dangers (e.g. escaping steam or hot water, especially when ironing vertically).
Never direct steam at persons or animals, never treat clothing which is being worn.
Always unplug the appliance before filling or emptying the water tank; before leaving the room (even for a short time); before cleaning the appliance and after use.
Never unplug the appliance by tugging on the cord.Do not immerse the appliance in water.
An electrical appliance should not be used if:
–the appliance is not functioning correctly;
–the appliance, the supply cord or the cord protector is damaged;
–the appliance has been dropped;
* depending on model |
3 |

– the appliance is obviously leaking. In these cases the appliance should be returned to an approved Rowenta Customer Service Centre for repair. (See enclosed Service Centre addresses.) Repairs to electrical appliances may only be carried out by specialists. Improperly carried out repairs can cause serious danger to users. To avoid danger to users, a defective or damaged supply cord may only be replaced by an authorised Rowenta Customers Service Centre .
This product has been designed for domestic use only. Any commercial use, inappropriate use or failure to comply
with the instructions, the manufacturer accepts no responsibility and the guarantee will not apply.
Environment protection first !
Your appliance contains valuable materials which can be recovered or recycled. Leave it at a local civic waste collection point.
Keep these instructions
BEFORE USE
1 • Unpacking
Take the iron out of the box and remove all the stickers.
IMPORTANT Before doing anything else, remove the soleplate protector (fig.1)!
2 • What water may be used ?
Your iron has been designed to operate using untreated tap water up to 17° dH (German water hardness). If in doubt, check with your local water authority. However, if your water is very hard, you can mix 50% untreated tap water with 50% distilled or demineralised water.
IMPORTANT Heat concentrates the elements contained in water during evaporation. The types of water listed below contain organic waste or mineral elements that can cause spitting, brown staining or premature wear of the appliance:- water from clothes dryers, scented or softened water, water from refrigerators, batteries or air conditioners, pure distilled

or demineralised water or rain water should not be used in your iron. Also do not use boiled, filtered or bottled water.
3 • Using for the first time
Plug in the iron (fig.2) and set the temperature control dial (fig.3) to ••• to heat the appliance.
A little smoke and a slight smell may be emitted, but this is only temporary.
Unplug the iron (fig.4) and fill the water tank (§ 4 Filling the water tank).
To remove any impurities in the iron's steam chamber, unplug the iron and hold it over a sink horizontally. Push the steam control into the Self Clean position : steam will now begin to build up.
After a few seconds water will emerge from the soleplate, rinsing any impurities out of the steam chamber (fig.5). Move the steam control to steam  position after approx.
1 minute. Plug in the iron and allow the iron to heat up again. Wait until the remaining water has evaporated. Unplug from the mains and allow the iron to fully cool down.
USE
4 • Filling the water tank
IMPORTANT Before filling the water tank, unplug the iron and set the steam control to dry position  .
.
Tilt the iron. Open the filling inlet (fig.6). Pour in water up to the max mark (fig.7). Close the filler inlet (fig.8) and return the iron to the horizontal.
5 • Setting the temperature
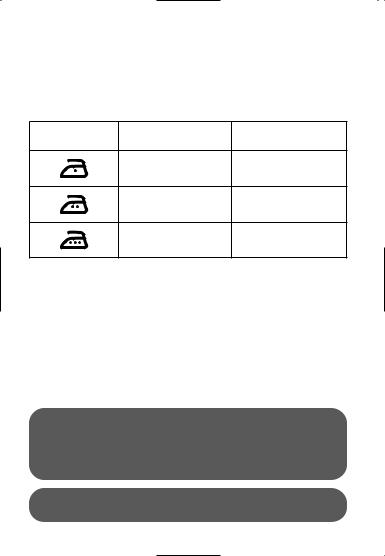
Set the iron temperature to suit the type of material using the temperature control dial (fig.3).
Temperature control*: The temperature control light indicates that the soleplate is heating up. When the temperature control light goes off (fig.9), the set temperature is reached and you can begin ironing.
* depending on model |
5 |

Ironing label |
Fabric |
Temperature |
|
control |
|||
|
|
||
|
Synthetic fibres, e.g. |
• |
|
|
viscose, polyester… |
||
|
|
||
|
Silk, wool |
•• |
|
|
Cotton, linen |
••• |
Electronic temperature control*: The traffic lights tell you whether the soleplate is at the selected temperature (fig.10).
YELLOW |
The soleplate is still too cold for the selected |
|
material. |
||
|
||
|
|
|
GREEN |
The soleplate is at the right temperature for the selected |
|
material. |
||
|
||
|
|
|
RED |
The soleplate is still too hot for the selected material. |
|
|
|
|
AUTOOFF |
The automatic electronic cut-out* is active. |
|
|
|
IMPORTANT The iron takes longer to cool down than to heat up. We recommend that you start with fabrics to be ironed at a low temperature. For mixed fabrics set the temperature for the most delicate fabric.
TIP Always spray starch onto the reverse side of the fabric to be ironed.
6 • Dry ironing
Set the variable steam control to  (fig.11) and set the temperature to suit the type of material (care points •, ••, •••).
7 • Steam ironing
You can steam iron from temperature setting •• upwards.
Steam function* The steam quantity can be set to between no steam (minimum steam quantity) and  (maximum steam quantity) (fig.12). We recommend setting to maximum steam
* depending on model |
6 |

quantity  only when the iron is at temperature setting •••.
Auto Steam function* Set the steam button to  (fig.13) and the steam quantity will adjust automatically to the soleplate temperature.
8 • Shot of steam
(from temperature setting •• upwards)
IMPORTANT Leave an interval of 4 seconds between each shot and wait until the flow of steam is finished before standing the iron on its heel.
Press the shot of steam button  to generate a powerful jet of steam and remove stubborn creases (fig.14).
9 • Vertical shot of steam
(from temperature setting •• upwards)
TIP Hold the iron 10 to 20 centimetres away from the garment to avoid burning delicate fabrics.
Hold the iron to the vertical and press the shot of steam button (  fig.15) to remove creases from suits, jackets, skirts, hanging curtains etc.
IMPORTANT Never direct the steam at persons or animals!
10 • Spray
Press the spray button 
 to dampen stubborn creases (fig.16).
11 • Anti-Drip system*
It prevents water escaping from the soleplate when the temperature is too low.
12 • Automatic electronic 3-position cut-out*
If, although switched on, the appliance is not moved, it will automatically switch off and the auto off light will blink after the following intervals (fig. 17):
-After 30 sec., if the iron is left standing on the soleplate or lying on its side .
-After 8 mins., if the iron is left standing on its heel.
To switch the iron back on, move the iron gently.
* depending on model |
7 |

AFTER USE
13 • Emptying
Unplug the iron (fig.4), pour away remaining water (fig.18) and set steam control to  .
.
Open and close the steam control several times (fig.19) to prevent the valve hole into the steam chamber from scaling or blocking up.
14 • Storing
Allow the appliance to cool down before storing the iron standing on its heel (fig.20).
IMPORTANT Do not wind the cord around the hot soleplate. Never store your iron placed down on the soleplate (fig.21).
MAINTENANCE AND CLEANING
IMPORTANT Unplug and allow the iron to fully cool down before maintenance and cleaning.
15 • Anti-scale system
Your iron contains an anti-scale cartridge to reduce scale deposits. This considerably prolongs the operational life of your iron.
The anti-scale cartridge is an integral part of the water tank and does not need to be replaced.
16 • Self Clean function
(prolongs the life of the iron)
The Self Clean function flushes dirt and scale particles out of the steam chamber.
IMPORTANT Do not use descaling agents, as these damage the lining of the steam chamber and so may impair the steam function.
Fill the water tank with tap untreated water up to the max mark and heat the iron to the ••• temperature. Unplug the iron and hold it over a sink horizontally. Hold the steam control into the Self Clean position (fig.5) : steam will now begin to build up. After a few seconds water will emerge from the soleplate, rinsing dirt and scale particles out of the steam chamber.
Move the steam control to  position after approx. 1 minute. Plug in the iron and allow the iron to heat up again. Wait until the
remaining water has evaporated. Unplug from the mains and allow the iron to fully cool down.
When cool, the soleplate can be wiped with a damp cloth.
TIP Use the Self Clean function approx. every 2 weeks. If the water is very hard, clean the iron weekly.
17 • Cleaning the iron
When the appliance has cooled down, wipe it down with a damp cloth or sponge, as required.
Remove the dirt from the soleplate with a damp cloth or sponge.
IMPORTANT Do not use sharp or abrasive cleaning agents or objects to clean soleplate and other parts of the iron.
If the appliance has been standing unused for long periods, use the Self Clean function (see § 16).
PROBLEMS?
Problems |
Cause |
Solution |
|
|
|
|
|
The iron is |
No mains supply. |
Check that the mains plug is properly |
|
plugged in, but |
|
inserted or try plugging the iron into |
|
the soleplate of |
|
a different socket. |
|
the iron |
|
|
|
remains cold. |
|
|
|
Temperature control |
Set the temperature control to a |
||
|
|||
|
set too low. |
higher temperature. |
|
|
|
|
|
|
The automatic |
Move your iron. |
|
|
electronic cut-out* is |
|
|
|
active. |
|
|
|
|
|
|
Thermostat |
This is normal. |
When the thermostat control light* or |
|
control light* or |
|
the yellow led* goes on and off the |
|
the yellow led* |
|
iron is heating up. As soon as the |
|
goes on and |
|
thermostat control light* goes off or |
|
off. |
|
the green led* lights up the set |
|
|
|
temperature has been reached. |
|
|
|
|
* depending on model |
9 |
None or too |
Steam control set on |
Turn the steam control to the |
|
little steam is |
dry position . |
required setting area. |
|
being emitted. |
|
|
|
Not enough water in |
Fill the water tank. |
||
|
|||
|
the water tank. |
|
|
|
|
|
|
|
Anti-Drip* is active |
Wait for the soleplate to reach |
|
|
(§ 11). |
the correct temperature. |
|
|
|
|
|
Brown streaks |
Residues in the steam |
Use the Self Clean function then |
|
come through |
chamber or on the |
clean your iron. |
|
the holes inthe |
soleplate. |
|
|
soleplate and |
|
|
|
Use of chemical |
Do not add any descaling agents |
||
stain the linen. |
|||
descaling agents. |
to the water in the water tank. |
||
|
|||
|
|
Use the Self Clean function and |
|
|
|
clean your iron. |
|
|
|
|
|
|
Fabric fibres have |
Clean the soleplate with a |
|
|
accumulated in the |
non-metallic sponge. |
|
|
holes of the soleplate |
Vacuum the holes of the |
|
|
and are burning. |
soleplate from time to time. |
|
|
|
|
|
|
Your linen is not rinsed |
Ensure linen is rinsed thoroughly |
|
|
sufficiently or you have |
to remove any soap deposits or |
|
|
ironed a new garment |
chemicals on new garments |
|
|
before washing it. |
which may be sucked by the |
|
|
|
iron. |
|
|
|
|
|
|
Use of starch. |
Always spray starch onto the |
|
|
|
reverse side of the fabric to be |
|
|
|
ironed and clean your iron |
|
|
|
soleplate. |
|
|
|
|
|
|
Pure distilled / |
Only use untreated tap water or |
|
|
demine-ralised or |
mix half tap water with half |
|
|
softened water is |
distilled/demineralised water. |
|
|
being used. |
Use the Self Clean function and |
|
|
|
clean your iron. |
|
|
|
|
|
Iron is leaking. |
Overuse of shot of |
Allow more time between each |
|
|
steam button. |
shot. |
|
|
|
|
|
|
Soleplate temperature |
Set the temperature control to a |
|
|
too low . |
higher temperature. |
|
|
|
|
If you are unable to trace the cause of the fault, contact an official Rowenta Customer Service Centre. The addresses are shown in the enclosed service centre address list. Helplines listed at the front of this leaflet.
Further hints and tips are obtainable from our homepage: www.rowenta.com. Subject to modifications !
* depending on model |
10 |
BESCHREIBUNG
1 |
Spray |
8 |
Komfortgriff |
|
|
2 |
Verschließbare |
9 |
Temperaturkontrollleuchte* |
|
|
|
Einfüllöffnung |
10 |
Temperaturregler |
|
|
3 |
Dampfregler |
11 |
LED-Anzeige* |
|
|
|
a Bügeln ohne Dampf |
|
a Gelbes Lämpchen |
|
|
|
b Maximale Dampfmenge |
* |
b Grünes Lämpchen |
|
|
|
c Self Clean |
|
c Rotes Lämpchen |
|
|
|
d Automatischer Dampf |
* |
d Automatikstoppanzeige |
|
|
4 |
Spraytaste |
12 |
Anzeige automatische |
|
|
5 |
Dampfstoßtaste |
|
Abschaltung |
|
|
13 |
Maximale Füllhöhe |
D |
|||
6 |
Auto-Off Leuchtanzeige* |
||||
14 |
Bügelsohle |
||||
7 |
Anschlußleitung |
|
|||
|
|
|
SICHERHEITSHINWEISE
Die Sicherheit dieses Geräts entspricht den gültigen technischen Bestimmungen und Normen (elektromagnetische Verträglichkeit, Niederspannung, Umweltverträglichkeit).
Vergewissern Sie sich, dass die Netzspannung der auf dem Typenschild Ihres Gerätes angegebenen Spannung entspricht.
Benutzen Sie nur Verlängerungskabel in einwandfreiem Zustand. Elektrische Geräte können eine Gefahrenquelle darstellen.
Benutzen Sie das Gerät nicht in Reichweite von Kindern, und bewahren Sie es nicht in Reichweite von Kindern auf. Lassen Sie die Stromzuleitung nicht herunterhängen. Lassen Sie das angeschlossene Bügeleisen nie unbeaufsichtigt.
Elektrische Geräte können sehr heiß werden. Fassen Sie das Bügeleisen stets am Griff an, und weisen Sie andere Benutzer auf eventuelle Gefahren hin. Das Bügeleisen, das austretende Wasser und der austretende Dampf sind heiß. Besondere Vorsicht ist geboten, wenn sich das Bügeleisen in vertikaler Lage befindet.
Richten Sie den Dampfstrahl nicht auf Personen oder Tiere, und bügeln Sie keine am Körper befindlichen Kleidungsstücke.
Das Gerät darf nur an eine geerdete Steckdose angeschlossen werden. Jeder Eingriff, außer der im Haushalt üblichen Reinigung und Pflege, muss durch den Kundendienst erfolgen.
Lassen Sie die Zuleitung niemals in die Nähe oder in Berührung mit den heißen Teilen des Gerätes, einer Wärmequelle oder einer scharfen Kante kommen.
Bei Verwendung einer Verlängerungsschnur muss diese einen Stecker mit Erdung aufweisen und muss so verlegt werden, dass niemand darüber stolpern kann.
* je nach Modell |
11 |
Vor dem Befüllen und Leeren das Gerät stets vom Stromkreislauf trennen. Das gleiche gilt, wenn Sie den Raum verlassen (selbst wenn es nur für einen Augenblick ist) sowie nach der Benutzung und vor der Reinigung. Niemals durch Ziehen an der Stromzuleitung den Netzstecker vom Stromkreislauf trennen. Tauchen Sie das Gerät nicht ins Wasser. Elektrogeräte dürfen nicht verwendet werden, wenn:
-das Gerät, die Stromzuleitung oder der Netzstecker Schäden oder Anomalien aufweisen,
-das Gerät heruntergefallen ist oder ausläuft.
Schicken Sie das Gerät in diesem Fall an ein zugelassenes Rowenta Servicecenter (die Adressen sind in der Kundendienst-Liste aufgeführt). Reparaturen an elektrischen Geräten müssen von Fachleuten ausgeführt werden. Von Nicht-Fachleuten ausgeführte Reparaturen können eine Gefahrenquelle darstellen. Um eventuelle Risiken zu vermeiden, dürfen Reparaturen an der Stromzuleitung und das Auswechseln dieser nur von einem zugelassenen Rowenta Servicecenter ausgeführt werden.
Für eventuelle Schäden, die auf unsachgemäße oder der Gebrauchsanweisung nicht entsprechenden Benutzung zurückzuführen sind, übernimmt Rowenta keine Haftung.
Dieses Gerät wurde ausschließlich für den Haushaltsgebrauch konzipiert.
Denken Sie an den Schutz der Umwelt !
Ihr Gerät enthält wertvolle Rohstoffe, die wieder verwertet werden können. Geben Sie Ihr Gerät deshalb bitte bei einer Sammelstelle Ihrer Stadt oder Gemeinde ab.
Bewahren Sie diese Anweisungen gut auf.
VOR DEM GEBRAUCH
1 • Auspacken
Nehmen Sie das Bügeleisen aus der Verpackung, und entfernen Sie alle Aufkleber.
WICHTIG! Entfernen Sie zuerst den Sohlenschutz (Abb.1)!
2 • Welches Wasser dürfen Sie verwenden?
Bis zu einem Härtegrad von 17° dH kann reines Leitungswasser verwendet werden.
Bei härterem Wasser empfehlen wir ein Mischverhältnis von 1:1 mit destilliertem Wasser.

WICHTIG! Geben Sie keine Zusätze in den Wassertank. Benutzen Sie weder Wasser aus dem Wäschetrockner, parfümiertes Wasser, entkalktes Wasser, Kühlschrankwasser, Batteriewasser, Klimaanlagenwasser, reines destilliertes Wasser noch Regenwasser. Sie enthalten organische Substanzen oder Mineralstoffe, die zum stoßartigen Herausspritzen des Wassers, braunem Ausfluss und vorzeitiger Alterung Ihres Geräts führen können.
3 • Inbetriebnahme
Schließen Sie das Bügeleisen an das Stromnetz an (Abb.2), und stellen Sie den Temperaturregler (Abb.3) auf •••, um das Bügeleisen ohne Wasser aufzuheizen.
Es kann zu leichter Rauchund Geruchsentwicklung kommen, die jedoch schnell wieder verschwindet.
Ziehen Sie den Netzstecker des Bügeleisens (Abb.4) und befüllen Sie den Wassertank (§ 4 Befüllen des Wassertanks).
Zum Entfernen eventueller Verunreinigungen muss das Gerät vom Stromkreislauf entfernt werden. Halten Sie es waagrecht über das Spülbecken. Stellen Sie den Dampfregler auf die Position SELF CLEAN: Es wird eine große Menge Dampf abgegeben. Nach einigen Sekunden werden die Verunreinigungen der Dampfkammer zusammen mit Wasser und Dampf aus der Sohle ausgespült (Abb.5). Stellen Sie den Dampfregler nach etwa 1 Minute auf die Position  . Schließen Sie das Gerät erneut an, und heizen Sie es erneut auf. Warten Sie, bis das restliche Wasser verdampft ist. Trennen das Gerät vom Stromkreislauf, und lassen Sie es ganz abkühlen.
BENUTZUNG
4 • Befüllen des Wassertanks
WICHTIG! Vor dem Befüllen des Wassertanks Netzstecker ziehen, und den Dampfregler auf die Position  stellen.
Halten Sie das Bügeleisen schräg. Öffnen Sie die Einfüllöffnung (Abb.6). Befüllen Sie es bis zur Anzeige „maximale Füllhöhe“ (Abb.7). Schließen Sie die Einfüllöffnung (Abb.8). Sie können nun das Bügeleisen wieder waagerecht hinstellen.
5 • Temperatur einstellen
Stellen Sie die Bügeltemperatur je nach zu bügelnder Stoffart am Temperaturregler ein (Abb.3).
Temperaturkontrolle*: Die Leuchtanzeigen zeigen an, wenn die Bügelsohle die gewünschte Temperatur erreicht hat. Wenn das Anzeigelämpchen ausgeht (Abb.9), ist die gewünschte Temperatur erreicht, und Sie können mit dem Bügeln beginnen.
Stoffetikett |
Stoffart |
Temperaturregler |
|
Synthetikfasern |
• |
|
(Viskose, Polyester…) |
|
|
Seide, Wolle |
•• |
|
Baumwolle, |
••• |
|
Leinen |
Elektronische Temperaturkontrolle*: Die Leuchtanzeigen zeigen an, wenn die Sohle die eingestellte Temperatur erreicht hat (Abb.10).
GELB |
Die Sohle ist noch nicht heiß genug für diese Stoffart. |
|
|
|
|
GRÜN |
Die Sohle hat die richtige Temperatur für diese Stoffart |
|
erreicht. |
||
|
||
|
|
|
ROT |
Die Sohle ist noch zu heiß für diese Stoffart. |
|
|
|
|
AUTO-OFF |
Der elektronische Automatikstopp ist aktiviert. |
|
|
|
WICHTIG! Das Bügeleisen braucht mehr Zeit zum Abkühlen als zum Aufheizen. Es wird empfohlen, mit den empfindlicheren Stoffen bei niedriger Temperatur zu beginnen. Wenn Sie Mischgewebe bügeln, stellen Sie die Bügeltemperatur auf die empfindlichste Faser ein.
TIPP Wäschestärke sollte stets auf die Rückseite der zu bügelnden Stoffe gesprüht werden.
* je nach Modell |
14 |
 Loading...