

Page 1
Installation Instructions
SLC 5/03™ and SLC 5/04™ Processors
Firmware/Operating System Upgrade
Introduction
Enclosed in this package is a firmware/operating system upgrade for
your SLC 5/03 or SLC 5/04 processor. Take anti-static precautions
when upgrading the firmware.
ATTENTION
The Flash EPROMs are electrostatic sensitive devices.
Do not handle without proper grounding
precautions. Do not install PROM with power
applied to the SLC 5/03 or SLC 5/04 processor.
!
If you upgrade an SLC 5/03 or SLC 5/04 processor, you receive
anomaly fixes as well as added functionality. During the upgrade, the
ladder logic program inside the processor is erased. Therefore, the
first step in upgrading the firmware/operating system is to save the
processor’s ladder logic program.
This product is CE compliant for all applicable directives when
product or packaging is marked.
Installation Procedure
1 Publication 1747-IN007C-EN-P - October 2002
Follow these instructions carefully. Refer to page 3 for component
placement information.
1. Save the current user program to your hard drive using your
programming software, to a memory module, or to a 1747-PSD
Program Storage Device.
IMPORTANT
2. Remove the communication cable between the processor and
your programming terminal.
The user program is cleared as part of the
firmware/operating system upgrade process.
You must restore your program after loading
the upgrade. Also, all communication ports are
returned to the default parameters.
Page 2
2 SLC 5/03™ and SLC 5/04™ Processors Firmware/Operating System Upgrade
3. Remove power from the chassis containing the processor.
ATTENTION
Do not remove the processor from the SLC 500
chassis until all power is removed from the SLC
500 power supply.
!
4. Remove the processor from the chassis.
5. Plug the firmware/operating system upgrade pack into the
memory module socket.
6. Move the operating system write-protect jumper (J4) to the
unprotected, or program, position.
IMPORTANT
Jumper J4, located in the bottom right corner of
the motherboard, provides write protection from
any download of a new operating system. The
“out of the box” position of this jumper is
“PROTECT,” or write protect. Without the
jumper, the processors are write protected.
Publication 1747-IN007C-EN-P - October 2002
Page 3
Catalog and Serial
Number Label
SLC 5/03™ and SLC 5/04™ Processors Firmware/Operating System Upgrade 3
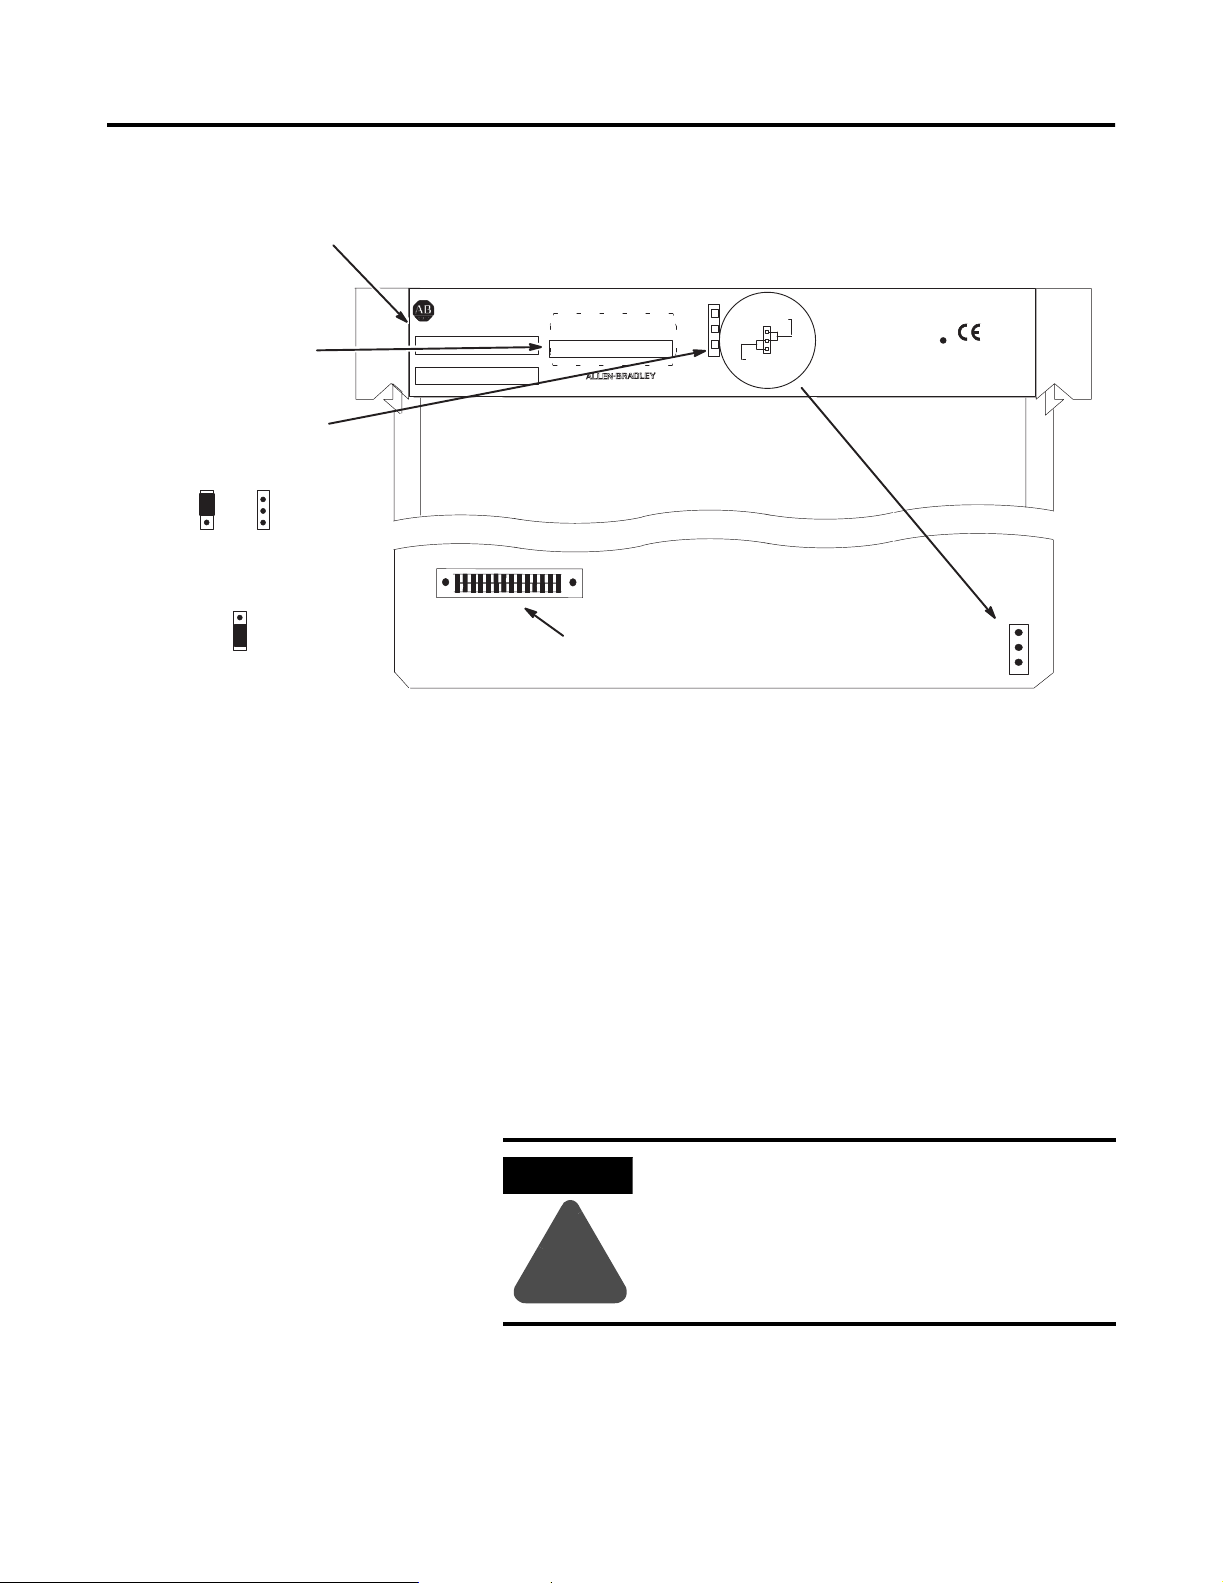
Figure 1 Component Placement Information
Place the firmware
upgrade label here.
The SLC 5/03 and SLC 5/04
processors are
protected
from the
firmware download when jumper J4
is in this position:
OR
The SLC 5/03 and SLC 5/04
processors accept the firmware
download when jumper J4 is in this
position:
SLC 500
PROCESSOR UNIT
CAT
SERIAL NO.
SER
FAC
PROC. REV.
PLACE FRN UPGRADE LABEL HERE
OPERATING SYSTEM INFO
OS #
SER
FRN
WHITE
RED
BATTERY
+
-
PROTECT
1
PROGRAM
J4
3
CURRENT REQUIREMENTS: 1A @ 5 VDC
LISTED IND. CONT. EQ.
U
L
FOR HAZ. LOC. A196
CLASS 1, GROUPS A, B, C AND D, DIV
OPERATING TEMPERATURE CODE T3C
SA
c
Daughter Board
Mother Board
Firmware
Upgrade/Memory
Jumper J4
Module Socket
7. Firmly seat the processor back into the chassis.
8. Apply power to the chassis containing the processor while
watching the LED display. All the LEDs should turn on and then
turn off. The download process of the firmware takes up to 2.5
minutes. While the download is in progress, the RUN and FLT
LEDs remain off. The other four LEDs – RS232, DH485 (DH+ on
the SLC 5/04), FORCE, and BATT – turn on and off in a walking
bit sequence. If the download is successful, these four LEDs
remain on together. If the FLT LED turns on and a combination
of LEDs flash on and off indicating an error condition, refer to
the troubleshooting information on page 4.
R
200mA @ 24 VDC
. 2
MADE IN USA
9. After completing the download, remove power from the chassis
containing the processor.
ATTENTION
Do not remove the processor from the SLC 500
chassis until all power is removed from the SLC
500 power supply.
!
10. Remove the processor from the chassis.
11. Carefully remove the firmware upgrade pack and place it in the
anti-static packaging it was shipped in.
Publication 1747-IN007C-EN-P - October 2002
Page 4

4 SLC 5/03™ and SLC 5/04™ Processors Firmware/Operating System Upgrade
12. Move the operating system write-protect jumper (J4) back to the
protected position (see diagram on page 3).
IMPORTANT
13. Apply the enclosed firmware upgrade label to the processor
nameplate.
14. Firmly seat the processor back into the chassis.
15. Attach the communication cable between the processor and
your programming terminal.
16. Apply power to the chassis containing the processor while
watching the LED display. All the LEDs should flash on and then
turn off except for the FLT LED which should remaining
flashing. If the FLT LED turns on and a combination of LEDs
flash on and off indicating an error condition, refer to the
troubleshooting information in this document.
Failure to return the J4 jumper to the protected
position results in an error (0x3D Hex) on the
power cycle following the download of a valid
program to the processor. This error condition
prevents the module from going to run and
causes Channel 0 communication settings to
return to their defaults. To properly clear the
error, place the J4 jumper in the protected
position, and then re-download a valid user
program to the processor.
Identifying Processor Errors While Downloading Firmware
Publication 1747-IN007C-EN-P - October 2002
17. Restore your program.
The download process of the firmware/operating system takes up to
2.5 minutes. While the download is in progress, the RUN and FLT
LEDs remain off. The other four LEDs – RS232, DH485 (DH+ on the
SLC 5/04), FORCE, and BATT – turn on and off in a walking bit
sequence. If the download is successful, these four LEDs remain on
together.
If the download is not successful, the FLT LED turns on and a
combination of LEDs flash on and off indicating an error condition.
The following LED diagrams and tables provide information regarding
error messages, possible cause(s) for the error, and recommended
action(s) to take to resolve the error.
Page 5

SLC 5/03™ and SLC 5/04™ Processors Firmware/Operating System Upgrade 5
If the LED’s indicate:
POWER
If the LED’s indicate:
POWER
If the LED’s indicate:
POWER
(1)
RUN
FLT
BATT
FORCE
DH485
RS232
The Following
Error Exists
Fatal Hardware
Error
Probable Cause Recommended Action
Major hardware failure due to
noise, improper grounding, or
poor power source.
Cycle power and see if the error
repeats itself. If the error clears,
you should be able to download
the firmware. If the error persists,
contact your Rockwell
Automation representative.
(1)
RUN
FLT
BATT
FORCE
DH485
RS232
The Following
Error Exists
Corrupted
Operating
System Memory
Module
Probable Cause Recommended Action
The operating system on the
Flash EPROM is corrupt.
Cycle power and see if the error
repeats itself. If the error persists,
either contact your Rockwell
Automation representative for a
new operating system upgrade
cartridge, or download the old
operating system, if available.
(1)
RUN
FLT
BATT
FORCE
DH485
RS232
The Following
Error Exists
Flash EPROM
Failure
Probable Cause Recommended Action
The processor flash EPROM is
corrupt.
Cycle power and see if the error
repeats itself. If the error clears,
you should be able to download
the firmware. If the error persists,
contact your Rockwell
Automation representative.
POWER
(1)
RUN
FLT
BATT
FORCE
DH485
RS232
The Following
Error Exists
Corrupt or
Missing
Probable Cause Recommended Action
The operating system is missing
or has been corrupted.
If the LED’s indicate:
Operating
System
Refer to the following key to determine the status of the LED indicators:
Indicates the LED is OFF.
Indicates the LED is ON.
(1) The DH485 LED on the SLC 5/03 processor is labeled DH+ on the SLC 5/04 processor.
Cycle power. If error clears, you
should be able to download the
firmware. If the error persists,
contact your Rockwell
Automation representative for a
new operating system.
Publication 1747-IN007C-EN-P - October 2002
Page 6

6 SLC 5/03™ and SLC 5/04™ Processors Firmware/Operating System Upgrade
If the LED’s indicate:
POWER
If the LED’s indicate:
POWER
If the LED’s indicate:
POWER
(1)
RUN
FLT
BATT
FORCE
DH485
RS232
The Following
Error Exists
Downloadable
Operating
Probable Cause Recommended Action
Failure during transmission of
Download the operating system.
downloadable operating system.
System Failure
(1)
The Following
RUN
FLT
BATT
(1)
FORCE
DH485
RS232
Error Exists
Incompatible
Platform
The Following
RUN
FLT
BATT
FORCE
DH485
RS232
Error Exists
Memory Write
Protected
Probable Cause Recommended Action
The upgrade of the operating
system is incompatible with the
processor hardware.
Use an operating system that is
compatible with your processor
hardware.
Probable Cause Recommended Action
An attempt was made to
download the operating system
onto write-protected memory.
Change the J4 jumper of the
SLC 5/03 and SLC 5/04
processors to the program
position.
Refer to the following key to determine the status of the LED indicators:
Indicates the LED is OFF.
Indicates the LED is ON.
(1) The DH485 LED on the SLC 5/03 processor is labeled DH+ on the SLC 5/04 processor.
Publication 1747-IN007C-EN-P - October 2002
Page 7

SLC 5/03™ and SLC 5/04™ Processors Firmware/Operating System Upgrade 7
If the LED’s indicate:
POWER
If the LED’s indicate:
POWER
(1)
The Following
Probable Cause Recommended Action
Error Exists
RUN
FLT
BATT
FORCE
DH485
RS232
NVRAM error Major hardware failure due to
noise, improper grounding, or
poor power source.
Cycle power and see if the error
repeats itself. If the error clears,
you should be able to download
the firmware. If the error persists,
contact your Rockwell
Automation representative.
(1)
RUN
FLT
BATT
FORCE
DH485
RS232
The Following
Error Exists
Hardware
Watchdog
Time-out
Probable Cause Recommended Action
Major hardware failure due to
noise, improper grounding, or
poor power source.
Cycle power and see if the error
repeats itself. If the error clears,
you should be able to download
the firmware. If the error persists,
contact your Rockwell
Automation representative.
Refer to the following key to determine the status of the LED indicators:
Indicates the LED is OFF.
Indicates the LED is ON.
(1) The DH485 LED on the SLC 5/03 processor is labeled DH+ on the SLC 5/04 processor.
Publication 1747-IN007C-EN-P - October 2002
Page 8

Rockwell Automation
Support
Rockwell Automation provides technical information on the Web to assist
you in using its products. At http://support.rockwellautomation.com
find technical manuals, a knowledge base of FAQs, technical and application
notes, sample code and links to software service packs, and a MySupport
feature that you can customize to make the best use of these tools.
For an additional level of technical phone support for installation,
configuration, and troubleshooting, we offer TechConnect Support programs.
For more information, contact your local distributor or Rockwell Automation
representative, or visit http://support.rockwellautomation.com
, you can
.
Installation Assistance
If you experience a problem with a hardware module within the first 24
hours of installation, please review the information that's contained in this
manual. You can also contact a special Customer Support number for initial
help in getting your module up and running.
United States 1.440.646.3223
Monday – Friday, 8am – 5pm EST
Outside United
States
Please contact your local Rockwell Automation representative for any
technical support issues.
New Product Satisfaction Return
Rockwell tests all of its products to ensure that they are fully operational
when shipped from the manufacturing facility. However, if your product is
not functioning, it may need to be returned.
United States Contact your distributor. You must provide a Customer Support case
number (see phone number above to obtain one) to your distributor in
order to complete the return process.
Outside United
States
Please contact your local Rockwell Automation representative for
return procedure.
Publication 1747-IN007C-EN-P - October 2002 21 PN 40071-093-01(3)
Supersedes Publication 1747-IN007B- EN-P - October 2001 Copyright © 2007 Rockwell Automation, Inc . All rights reserved. Printed in Singapore.
 Loading...