

Page 1

SLC
™
500
4-Channel Analog
I/O Modules
(Catalog Numbers 1746-NI4,
1746-NIO4I, 1746-NIO4V,
1746-NO4I, and 1746-NO4V)
User Manual
Page 2
Important User Information
Solid state equipment has operational characteristics differing from those of
electromechanical equipment. Safety Guidelines for the Application,
Installation and Maintenance of Solid State Controls (Publication SGI-1.1
available from your local Rockwell Automation sales office or online at
http://www.ab.com/manuals/gi) describes some important differences
between solid state equipment and hard-wired electromechanical devices.
Because of this difference, and also because of the wide variety of uses for
solid state equipment, all persons responsible for applying this equipment
must satisfy themselves that each intended application of this equipment is
acceptable.
In no event will Rockwell Automation, Inc. be responsible or liable for
indirect or consequential damages resulting from the use or application of
this equipment.
The examples and diagrams in this manual are included solely for illustrative
purposes. Because of the many variables and requirements associated with
any particular installation, Rockwell Automation, Inc. cannot assume
responsibility or liability for actual use based on the examples and diagrams.
No patent liability is assumed by Rockwell Automation, Inc. with respect to
use of information, circuits, equipment, or software described in this manual.
Reproduction of the contents of this manual, in whole or in part, without
written permission of Rockwell Automation, Inc. is prohibited.
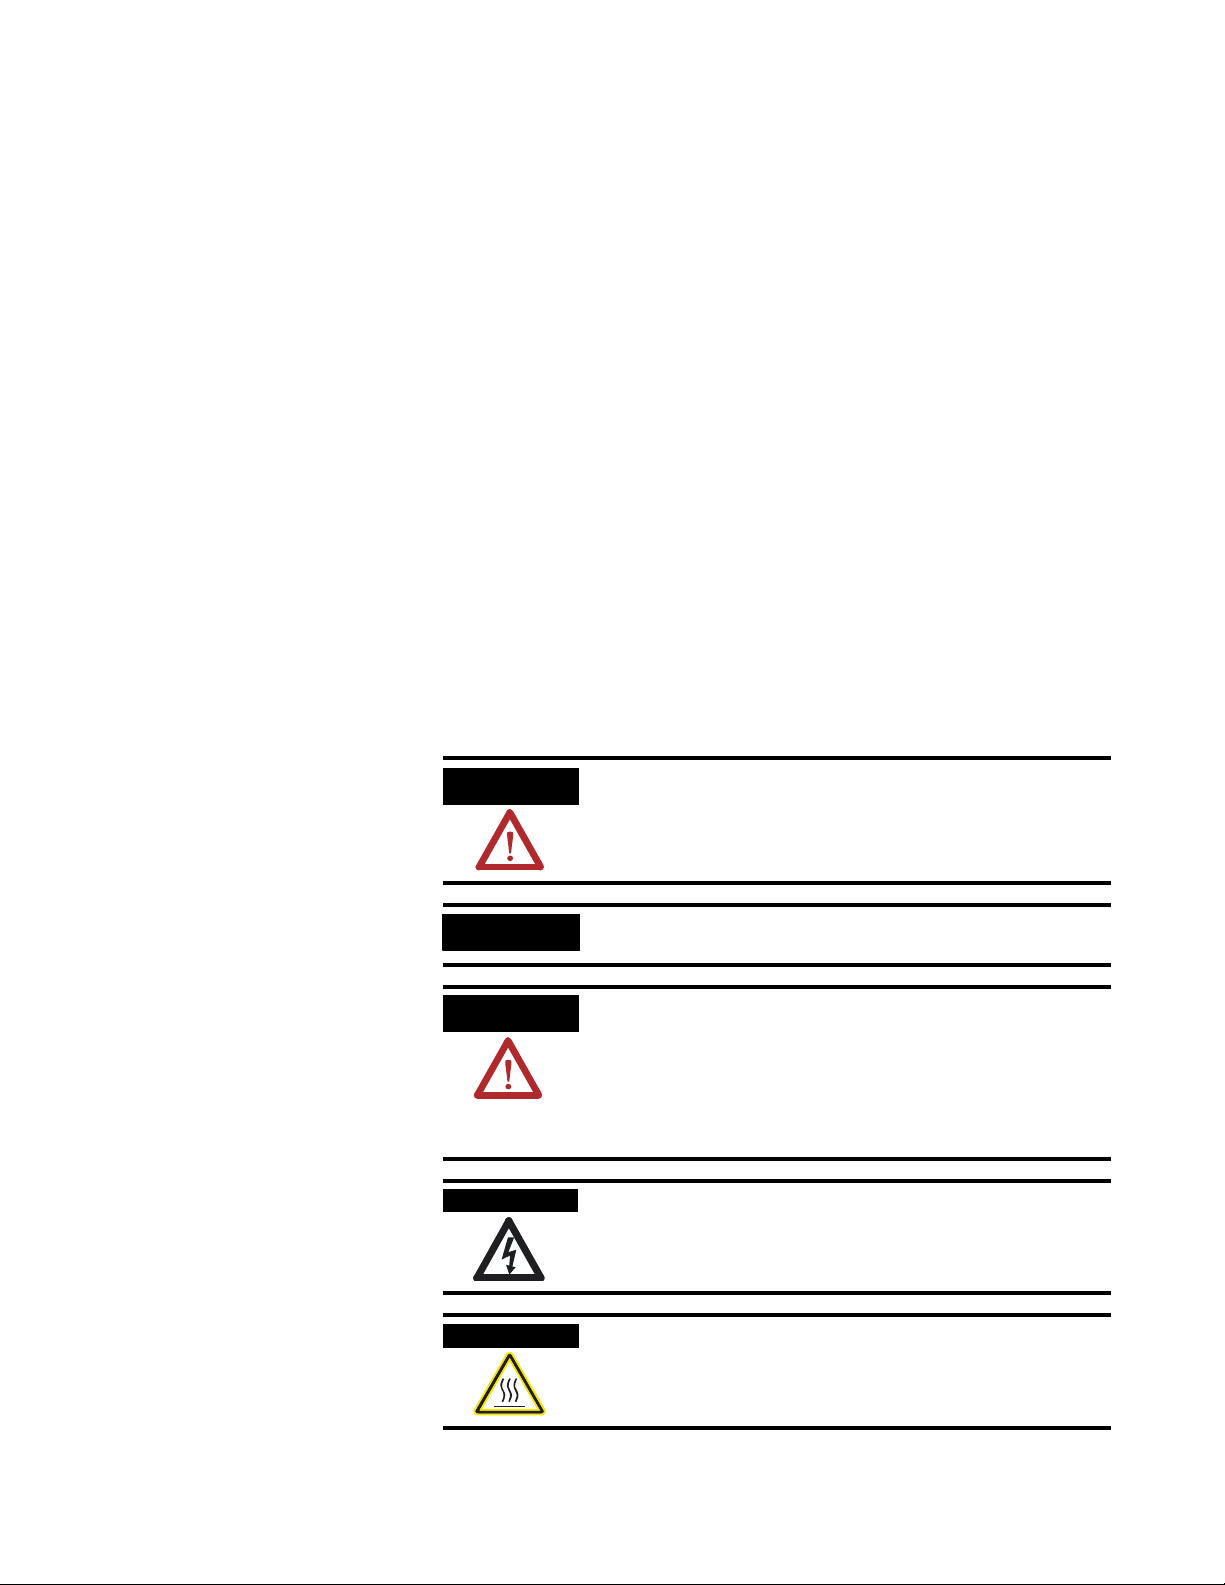
Throughout this manual we use notes to make you aware of safety
considerations.
WARNING
IMPORTANT
ATTENTION
SHOCK HAZARD
BURN HAZARD
Identifies information about practices or circumstances
that can cause an explosion in a hazardous environment,
which may lead to personal injury or death, property
damage, or economic loss.
Identifies information that is critical for successful
application and understanding of the product.
Identifies information about practices or circumstances
that can lead to personal injury or death, property
damage, or economic loss. Attentions help you:
• identify a hazard
• avoid a hazard
• recognize the consequence
Labels may be located on or inside the drive to alert
people that dangerous voltage may be present.
Labels may be located on or inside the drive to alert
people that surfaces may be dangerous temperatures.
Page 3

Summary of Changes
The information below summarizes the changes to this manual since
the last printing.
To help you find new and updated information in this release of the
manual, we have included change bars as shown to the right of this
paragraph.
For information on: See:
SCP (scale with parameters) instruction available with SLC™
5/05
Change in Impedance to ANL Com specification for NI4
Series B module
Change in Impedance Channel to Channel specification for
NI4 Series B module
Change in Input Impedance specification for NI4 Series B
module
Change in resistance value for NI4 Series B module Appendix D
6-3, 6-9, 6-15, 6-21
A-1
A-1
A-4
Publication 1746-UM005B-EN-P - June 2004
Page 4

2 Summary of Changes
Publication 1746-UM005B-EN-P - June 2004
Page 5

Overview
Quick Start for Experienced Users
Table of Contents
Preface
Who Should Use this Manual. . . . . . . . . . . . . . . . . . . . . . . P-1
Purpose of this Manual . . . . . . . . . . . . . . . . . . . . . . . . . . . P-1
Related Documentation . . . . . . . . . . . . . . . . . . . . . . . . P-2
Common Techniques Used in this Manual . . . . . . . . . . . . . P-3
Your Questions or Comments on this Manual . . . . . . . . P-3
Chapter 1
How to Use Analog. . . . . . . . . . . . . . . . . . . . . . . . . . . . . . 1-1
Types of Analog Modules . . . . . . . . . . . . . . . . . . . . . . . . . 1-1
1746-NI4 Analog Input Module. . . . . . . . . . . . . . . . . . . 1-2
1746-NIO4I and NIO4V Analog Combination Modules. . 1-2
1746-NO4I and NO4V Analog Output Modules . . . . . . . 1-2
Chapter 2
Required Tools and Equipment . . . . . . . . . . . . . . . . . . . . . 2-1
Procedures . . . . . . . . . . . . . . . . . . . . . . . . . . . . . . . . . . . . 2-2
Installing and Wiring Your Analog
Module
Chapter 3
European Union Directive Compliance . . . . . . . . . . . . . . . 3-1
EMC Directives . . . . . . . . . . . . . . . . . . . . . . . . . . . . . . 3-1
Determining Your Power Requirements for a Modular
Controller . . . . . . . . . . . . . . . . . . . . . . . . . . . . . . . . . . . . . 3-2
Determining Your Power Requirements for a Fixed
Controller . . . . . . . . . . . . . . . . . . . . . . . . . . . . . . . . . . . . . 3-2
Configuring Your Module . . . . . . . . . . . . . . . . . . . . . . . . . 3-5
Switch Settings for the 1746–NI4. . . . . . . . . . . . . . . . . . 3-5
Switch Settings for the 1746-NIO4I and -NIO4V. . . . . . . 3-5
External Power Switch for the 1746-NO4I and -NO4V . . 3-6
Choosing a Slot in the Chassis . . . . . . . . . . . . . . . . . . . . . . 3-6
Installing Your Module . . . . . . . . . . . . . . . . . . . . . . . . . . . 3-6
Removing the Analog Module Terminal Block. . . . . . . . 3-7
Wiring Considerations . . . . . . . . . . . . . . . . . . . . . . . . . . . . 3-8
System Wiring Guidelines. . . . . . . . . . . . . . . . . . . . . . . 3-9
Grounding Your Cable. . . . . . . . . . . . . . . . . . . . . . . . . 3-9
Determining the Cable Length . . . . . . . . . . . . . . . . . . . 3-10
Wiring the Analog Module. . . . . . . . . . . . . . . . . . . . . . . . . 3-10
Labeling and Installing the Terminal Block. . . . . . . . . . . . . 3-12
Grounding the Foil Shields and Drain Wires. . . . . . . . . . . . 3-12
Wiring Schematics for 2, 3, and 4-Wire Analog Input
Devices . . . . . . . . . . . . . . . . . . . . . . . . . . . . . . . . . . . . 3-14
Wiring Schematic for Single-ended Analog Input
Connections . . . . . . . . . . . . . . . . . . . . . . . . . . . . . . . . 3-15
Minimizing Electrical Noise on Analog Modules . . . . . . . . . 3-15
i Publication 1746-UM005B-EN-P - June 2004
Page 6

Table of Contents ii
Module Operation and System
Considerations
Chapter 4
Interface between the Module and the Processor . . . . . . . . 4-1
Entering Module ID Codes . . . . . . . . . . . . . . . . . . . . . . 4-1
Addressing Analog Modules . . . . . . . . . . . . . . . . . . . . . 4-2
Bit Level Addressing . . . . . . . . . . . . . . . . . . . . . . . . . . 4-4
Processor Update of Analog Data . . . . . . . . . . . . . . . . . 4-5
Monitoring the Input and Output Data . . . . . . . . . . . . . 4-5
Converting Analog Input Data . . . . . . . . . . . . . . . . . . . 4-6
Converting Analog Output Data . . . . . . . . . . . . . . . . . . 4-7
System Considerations. . . . . . . . . . . . . . . . . . . . . . . . . . . . 4-9
Safe State for Outputs . . . . . . . . . . . . . . . . . . . . . . . . . 4-9
Retentive Programming Option. . . . . . . . . . . . . . . . . . . 4-9
Retentive Analog Output Example . . . . . . . . . . . . . . . . 4-10
Non-Retentive Analog Output Example. . . . . . . . . . . . . 4-11
During a Mode Change or Power Cycle . . . . . . . . . . . . 4-11
Input Out-of-Range Detection. . . . . . . . . . . . . . . . . . . . 4-11
Response to Slot Disable . . . . . . . . . . . . . . . . . . . . . . . 4-13
Input Response to Slot Disable. . . . . . . . . . . . . . . . . . . 4-13
Output Response to Slot Disable . . . . . . . . . . . . . . . . . 4-13
Input Channel Filtering . . . . . . . . . . . . . . . . . . . . . . . . 4-14
Testing Your Module
Programming Examples
Chapter 5
Testing the SLC 500 System . . . . . . . . . . . . . . . . . . . . . . . . 5-1
Start-up Procedures . . . . . . . . . . . . . . . . . . . . . . . . . . . 5-1
Inspect the Analog Module. . . . . . . . . . . . . . . . . . . . . . 5-2
Disconnect Prime Movers (Motion Devices) . . . . . . . . . 5-2
Power Up the SLC 500 System . . . . . . . . . . . . . . . . . . . 5-3
Testing Analog Inputs . . . . . . . . . . . . . . . . . . . . . . . . . 5-4
Testing Analog Outputs . . . . . . . . . . . . . . . . . . . . . . . . 5-6
Chapter 6
Addressing, Out-of-Range Detection, and Scaling of Analog
Inputs. . . . . . . . . . . . . . . . . . . . . . . . . . . . . . . . . . . . . . . . 6-1
Calculating the Linear Relationship . . . . . . . . . . . . . . . . 6-2
Calculating the Out-of-Range Flag Using the Scale
Instruction . . . . . . . . . . . . . . . . . . . . . . . . . . . . . . . . . . 6-3
Using Standard Math . . . . . . . . . . . . . . . . . . . . . . . . . . 6-4
Using the Scale (SCL) Instruction . . . . . . . . . . . . . . . . . 6-6
Using Scale with Parameters (SCP) Instruction. . . . . . . . 6-7
Addressing and Scaling Outputs. . . . . . . . . . . . . . . . . . . . . 6-8
Calculating the Linear Relationship . . . . . . . . . . . . . . . . 6-8
Using Standard Math . . . . . . . . . . . . . . . . . . . . . . . . . . 6-10
Using the Scale with Parameters (SCP) Instruction. . . . . 6-12
Scaling Offset when > 32,767 or < -32,768 . . . . . . . . . . . . . 6-14
Calculating the Linear Relationship . . . . . . . . . . . . . . . . 6-14
Publication 1746-UM005B-EN-P - June 2004
Page 7

Maintenance and Safety
Specifications
Table of Contents iii
Calculating the Shifted Linear Relationship . . . . . . . . . . 6-15
Using Standard Math . . . . . . . . . . . . . . . . . . . . . . . . . . 6-16
Using the Scale with Parameters (SCP) Instruction. . . . . 6-18
Scaling and Range Checking and Analog Inputs and
Outputs . . . . . . . . . . . . . . . . . . . . . . . . . . . . . . . . . . . . . . 6-20
Calculating the Linear Relationship . . . . . . . . . . . . . . . . 6-21
Using Standard Math Instructions . . . . . . . . . . . . . . . . . 6-22
Scaling and Range Checking of Analog Inputs and
Outputs . . . . . . . . . . . . . . . . . . . . . . . . . . . . . . . . . . . . . . 6-24
Using SCL Instruction. . . . . . . . . . . . . . . . . . . . . . . . . . 6-25
Using the Scale with Parameters (SCP) Instruction. . . . . 6-26
Chapter 7
Preventative Maintenance . . . . . . . . . . . . . . . . . . . . . . . . . 7-1
Safety Considerations When Troubleshooting. . . . . . . . . . . 7-2
Appendix A
Analog Modules Specification . . . . . . . . . . . . . . . . . . . . . . A-1
General Specifications for NI4, NIO4I, NIO4V, NO4I, and
NO4V. . . . . . . . . . . . . . . . . . . . . . . . . . . . . . . . . . . . . . . . A-1
General Analog Input Specifications for NI4, NIO4I, and
NIO4V . . . . . . . . . . . . . . . . . . . . . . . . . . . . . . . . . . . . . . . A-2
Current-Loop Input Specifications for NI4, NIO4I, and
NIO4V . . . . . . . . . . . . . . . . . . . . . . . . . . . . . . . . . . . . . . . A-3
Voltage Input Specifications for NI4, NIO4I, and NIO4V . . . A-4
Current Output Specifications for NIO4I and NO4I . . . . . . . A-5
Voltage Output Specifications for NIO4V and NO4V. . . . . . A-6
Two’s Complement Binary
Numbers
Optional Analog Input Software
Calibration
Module Input and Output Circuits
Appendix B
Positive Decimal Values . . . . . . . . . . . . . . . . . . . . . . . . A-1
Negative Decimal Values . . . . . . . . . . . . . . . . . . . . . . . A-2
Appendix C
Calibrating an Analog Input Channel . . . . . . . . . . . . . . . . . A-1
Calculating the Software Calibration . . . . . . . . . . . . . . . A-2
Appendix D
Index
Publication 1746-UM005B-EN-P - June 2004
Page 8

Table of Contents iv
Publication 1746-UM005B-EN-P - June 2004
Page 9

Preface
Read this preface to familiarize yourself with the rest of the manual. It
provides information concerning:
• who should use this manual
• the purpose of this manual
• related documentation
• conventions used in this manual
• Rockwell Automation support
Who Should Use this Manual
Purpose of this Manual
Use this manual if you are responsible for designing, installing,
programming, or troubleshooting control systems that use SLC 500
4-Channel Analog I/O Modules.
You should have a basic understanding of electrical circuitry and
familiarity with relay logic. If you do not, obtain the proper training
before using this product.
This manual describes the procedures you use to install, wire, and
troubleshoot your 4-channel analog I/O module. This manual:
• explains how to install and wire your module
• gives you an overview of the SLC 500 programmable controller
system
Refer to your programming software user documentation for more
information on programming your SLC 500 programmable controller.
1 Publication 1746-UM005B-EN-P - June 2004
Page 10

2 Preface
Related Documentation
The following documents contain additional information concerning
Rockwell Automation products. To obtain a copy, contact your local
Rockwell Automation office or distributor.
For Read this Document Document Number
In-depth information on the SLC Instruction Set. SLC 500 Instruction Set Reference Manual 1747-RM001
A description on how to install and use your Modular SLC 500
programmable controller.
A description on how to install and use your Fixed SLC 500
programmable controller.
A description on how to install 4-channel analog I/O modules SLC 500 4-Channel Analog I/O Modules
Information on reducing electrical noise. System Design for Control of Electrical
In-depth information on grounding and wiring Allen-Bradley®
programmable controllers.
A description of important differences between solid-state
programmable controller products and hard-wired electromechanical
devices.
An article on wire sizes and types for grounding electrical
equipment.
A glossary of industrial automation terms and abbreviations. Allen-Bradley Industrial Automation
SLC 500 Modular Hardware Style User
Manual
SLC 500 Fixed Hardware Style Installation &
Operation Manual
Installation Instructions
Noise
Allen-Bradley Programmable Controller
Grounding and Wiring Guidelines
Application Considerations for Solid-State
Controls
National Electrical Code - Published by the National Fire Protection
Association of Boston, MA.
Glossary
1747-UM011
1747-6.21
1746-IN008
GMC-RM001
1770-4.1
SGI-1.1
AG-7.1
Publication 1746-UM005B-EN-P - June 2004
Page 11

If you would like a manual, you can:
• download an electronic version from the internet at:
– www.theautomationbookstore.com
– http://ab.com/manuals
• order a printed manual by:
– contacting your local distributor or Rockwell Automation
representative
– visiting www.theautomationbookstore.com
– calling 1.800.963.9548 (USA/Canada) or 001.330.725.1574
(Outside USA/Canada)
Preface 3
Common Techniques Used in this Manual
The following conventions are used throughout this manual:
• Bulleted lists such as this one provide information, not
procedural steps.
• Numbered lists provide sequential steps or hierarchical
information.
• Italic type is used for emphasis.
Your Questions or Comments on this Manual
If you find a problem with this manual, or you have any suggestions
for how this manual could be made more useful to you, please
contact us at the address below:
Rockwell Automation
Automation Control and Information Group
Technical Communication, Dept. A602V
P.O. Box 2086
Milwaukee, WI 53201-2086
Publication 1746-UM005B-EN-P - June 2004
Page 12

4 Preface
Publication 1746-UM005B-EN-P - June 2004
Page 13

Chapter
Overview
This chapter describes how analog is used and provides two
application examples of analog. The types of available analog
modules and their related specifications are also described.
1
How to Use Analog
Analog refers to the representation of numerical quantities by the
measurement of continuous physical variables. Analog applications
are present in many forms. The following application shows a typical
use of analog.
In this application the processor controls the amount of fluid placed in
a holding tank by adjusting the percentage of the valve opening. The
valve is initially open 100%. As the fluid level in the tank approaches
the preset point, the processor modifies the output to degrade closing
the valve 90%, 80%, adjusting the valve to maintain a set point.
Analog Output
Valve
Level Sensor
Analog Input
CPU
Analog I/O
Module
Types of Analog Modules
1 Publication 1746-UM005B-EN-P - June 2004
The following sections provide an overview of the various analog
modules.
Page 14

1-2 Overview
1746-NI4 Analog Input Module
The 1746-NI4 Analog Input module contains 4 analog input channels
that are user selectable per channel for voltage or current to support a
variety of monitoring and controlling applications
1746-NIO4I and NIO4V Analog Combination Modules
The NIO4I and NIO4V Analog Combination I/O modules provide two
input and two output channels in a single slot module. The
1746-NIO4I module contains two current or voltage inputs (user
selectable per channel), and two current outputs. The 176-NIO4V
module contains two current or voltage inputs (user selectable per
channel) and two voltage outputs.
1746-NO4I and NO4V Analog Output Modules
The NO4I and NO4V Analog Output Modules provide 4 analog output
channels. The NO4I module contains four current outputs. The NO4V
module contains four voltage outputs. Both of these modules support
a variety of monitoring and controlling applications.
Catalog 1746- Input Channels per
Module
NI4 4 differential, voltage or
current selectable per
channel, not individually
isolated
NIO4I 2 differential, voltage or
current selectable per
channel, not individually
isolated
NIO4V 2 differential, voltage or
current selectable per
channel, not individually
isolated
NO4I NA 4 current outputs, not
Output Channels per
Module
NA 35 mA 85 mA NA
2 current outputs, not
individually isolated
2 voltage outputs, not
individually isolated
individually isolated
Backplane Current Draw External 24V dc Power
5V (max.) 24V (max.)
55 mA 145 mA NA
55 mA 115 mA NA
55 mA 195 mA 24 ±10% at 195 mA max.
Supply Tolerances
(21.6 to 26.4V dc)
(1)
NO4V NA 4 voltage outputs, not
individually isolated
(1) Required for some applications if SLC 24V power is not readily available.
For more specification information, refer to Appendix A.
Publication 1746-UM005B-EN-P - June 2004
55 mA 145 mA 24 ±10% at 145 mA max.
(21.6 to 26.4V dc)
(1)
Page 15

Chapter
2
Quick Start for Experienced Users
This chapter can help you to get started using analog. The procedures
are based on the assumption that you have an understanding of SLC
500 products. You should understand electronic process control and
be able to interpret the ladder logic instructions required to generate
the electronic signals that control your application.
Because it is a start–up guide for experienced users, this chapter does
not contain detailed explanations about the procedures listed. It does,
however, reference other chapters in this book where you can get
more information.
If you have any questions or are unfamiliar with the terms used or
concepts presented in the procedural steps, always read the
referenced chapters and other recommended documentation before
trying to apply the information.
Required Tools and Equipment
This chapter:
• tells you what tools and equipment you need
• lists preliminary considerations
• describes when to configure the module
• explains how to install and wire the module
• discusses system power–up procedures
Have the following tools and equipment ready:
• small blade screwdriver
• an adequate length of communication cable (Belden™ 8761) for
your specific application. (See chapter 3, Installing and Wiring
Your Analog Module for maximum cable distances.)
• programming equipment
1 Publication 1746-UM005B-EN-P - June 2004
Page 16

2-2 Quick Start for Experienced Users
Procedures
1. Check the contents of shipping box. Reference
Unpack the shipping box making sure that the contents include:
• Analog I/O module (Catalog Number 1746-Series)
• installation instructions (publication 1746-IN008)
If the contents are incomplete, call your local Allen–Bradley representative for assistance.
2. Determine your power requirements for the modular controller. Reference
Review the power requirements of your system to see that your chassis supports placement of the
analog module.
• For modular style systems, calculate the total load on the system power supply using the
procedure described in the SLC 500 Modular Hardware Style User Manual (publication
1747-UM011) or the SLC 500 Family System Overview (publication 1747-SO001).
• For fixed SLC 500 controllers, refer to the SLC 500 Fixed Hardware Style Installation &
Operation Manual (publication 1747-6.21).
Catalog Number Backplane Current Draw External 24V dc Power
5V (max.) 24V (max.)
Supply Tolerance
1746-NI4 35 mA 85 mA NA
1746-NIO4I 55 mA 145 mA NA
1746-NIO4V 55 mA 115 mA NA
1746-NO4I 55 mA 195 mA 24 ±10% at 195 mA max.
(21.6 to 26.4V dc)
(1)
1746-NO4V 55 mA 145 mA 24 ±10% at 145 mA max.
(1)
(1)
Required for some applications if SLC 24V power is not readily available.
(21.6 to 26.4V dc)
Chapter 3
(Installing and
Wiring Your
Analog Module)
Appendix A
(Specifications)
Publication 1746-UM005B-EN-P - June 2004
Page 17
Quick Start for Experienced Users 2-3
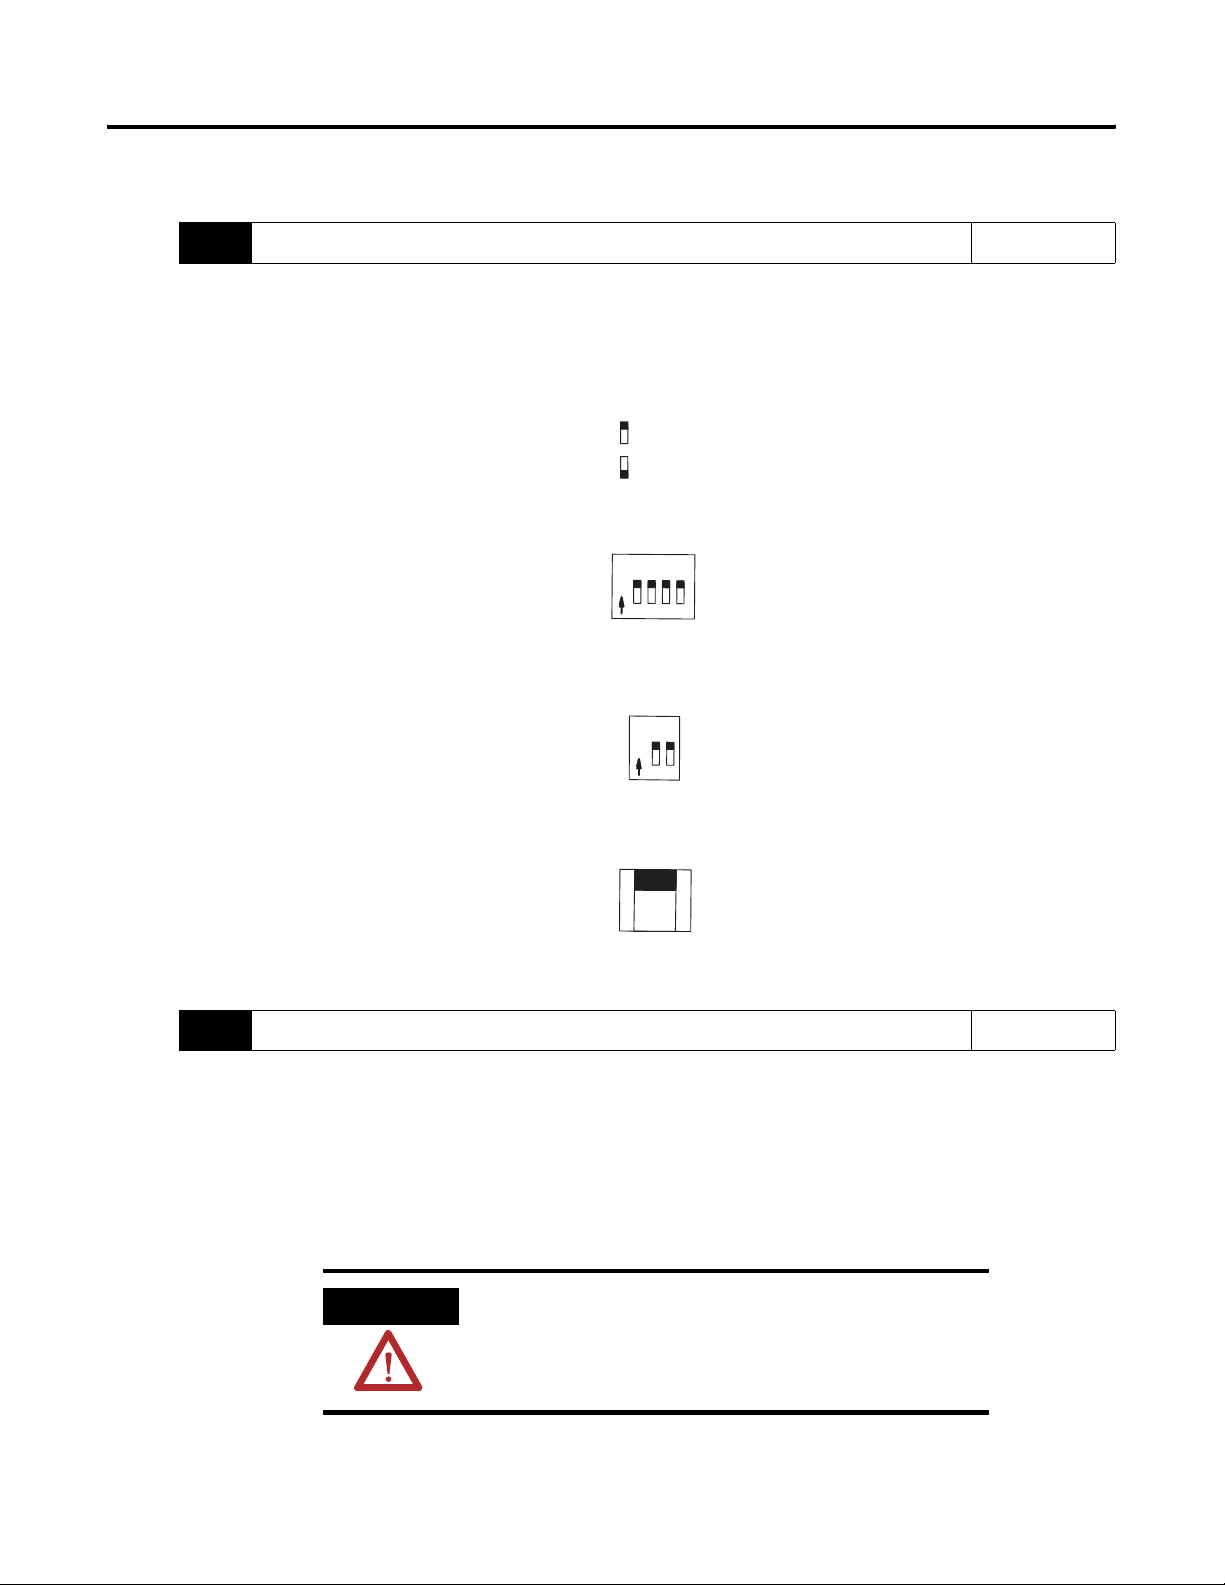
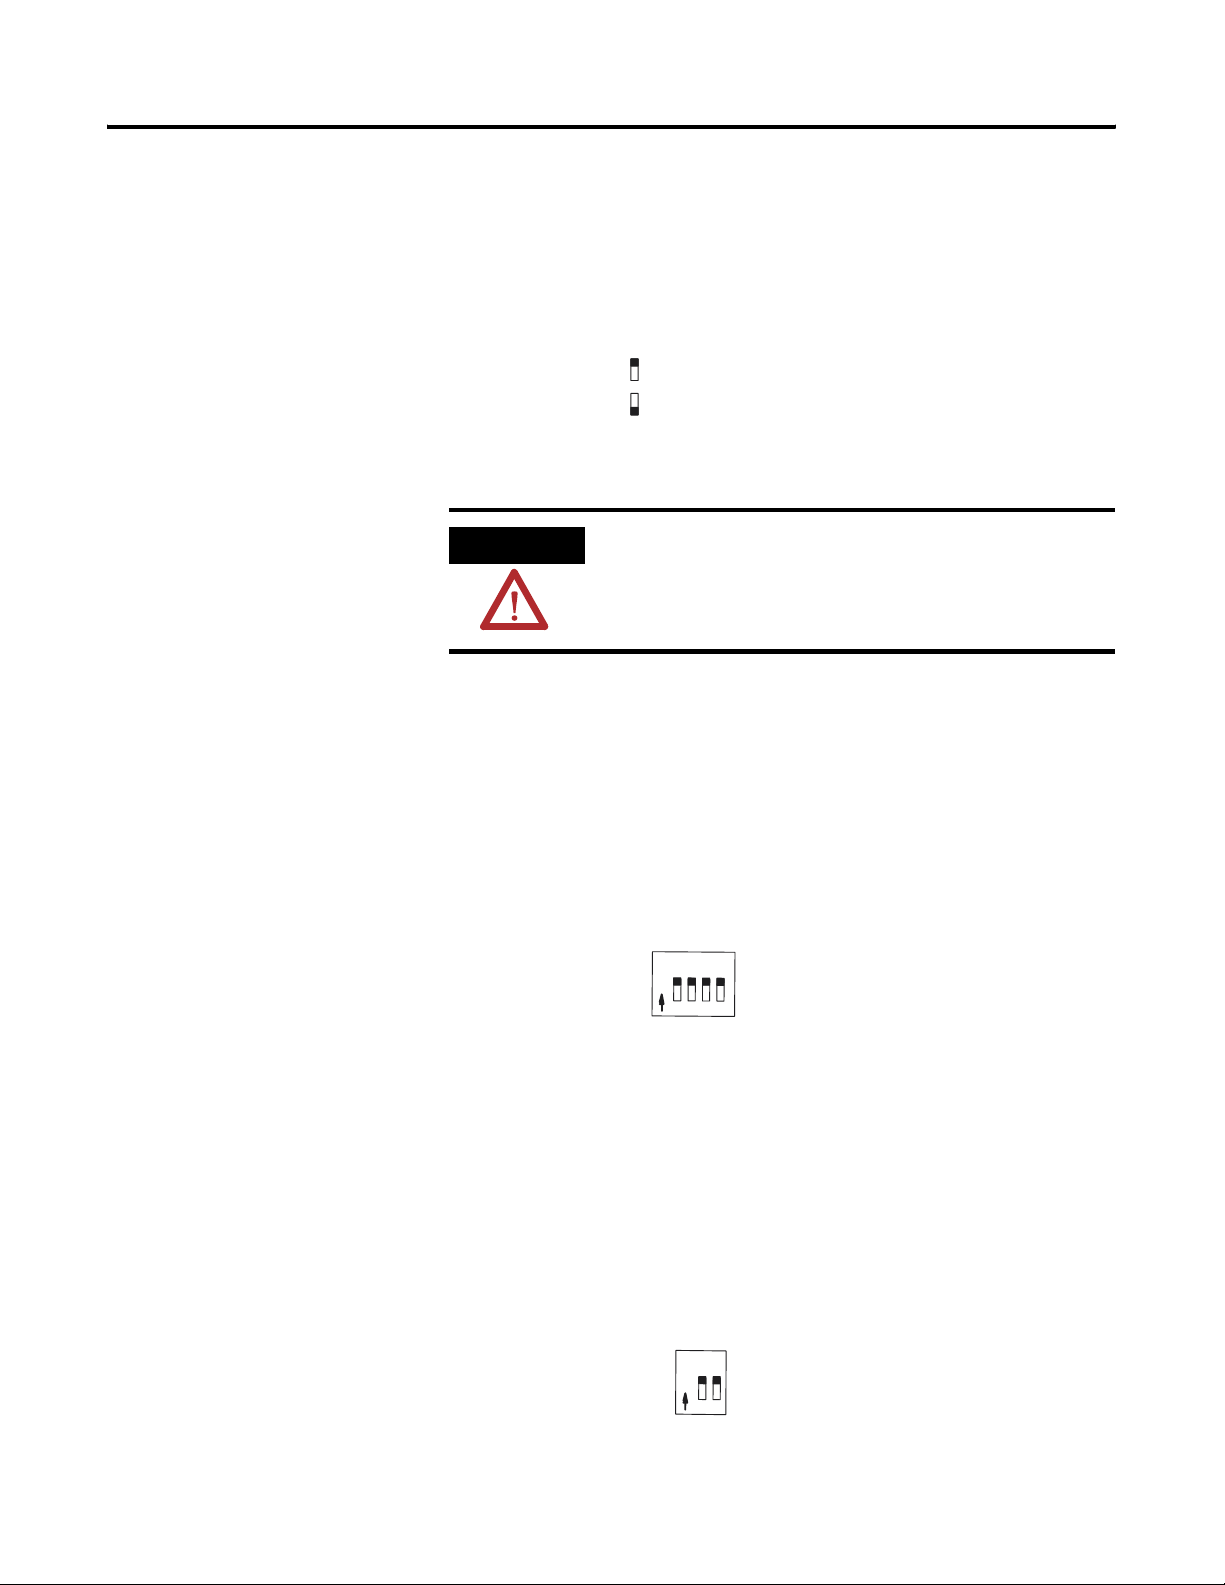
3. Configure the module using the DIP switches (analog inputs only). Reference
Each analog input channel can be configured for either voltage or current. Locate the DIP
switches on your module and set them for your application.
_
ON Configures channel for current input
_
Off Configures channel for voltage input
Current
1746-NI4
1746-NIO4I, NIO4V
1
O
N
Voltage
Current
O
N
Voltage
External
23
1
2
Switch 1 = Channel 0
4
Switch 2 = Channel 1
Switch 3 = Channel 2
Switch 4 = Channel 3
Switch 1 = Channel 0
Switch 2 = Channel 1
Chapter 3
(Installing and
Wiring Your
Analog Module)
1746-NO4I, NO4V
24V dc
Power
Selector
Backplane
Sw 1
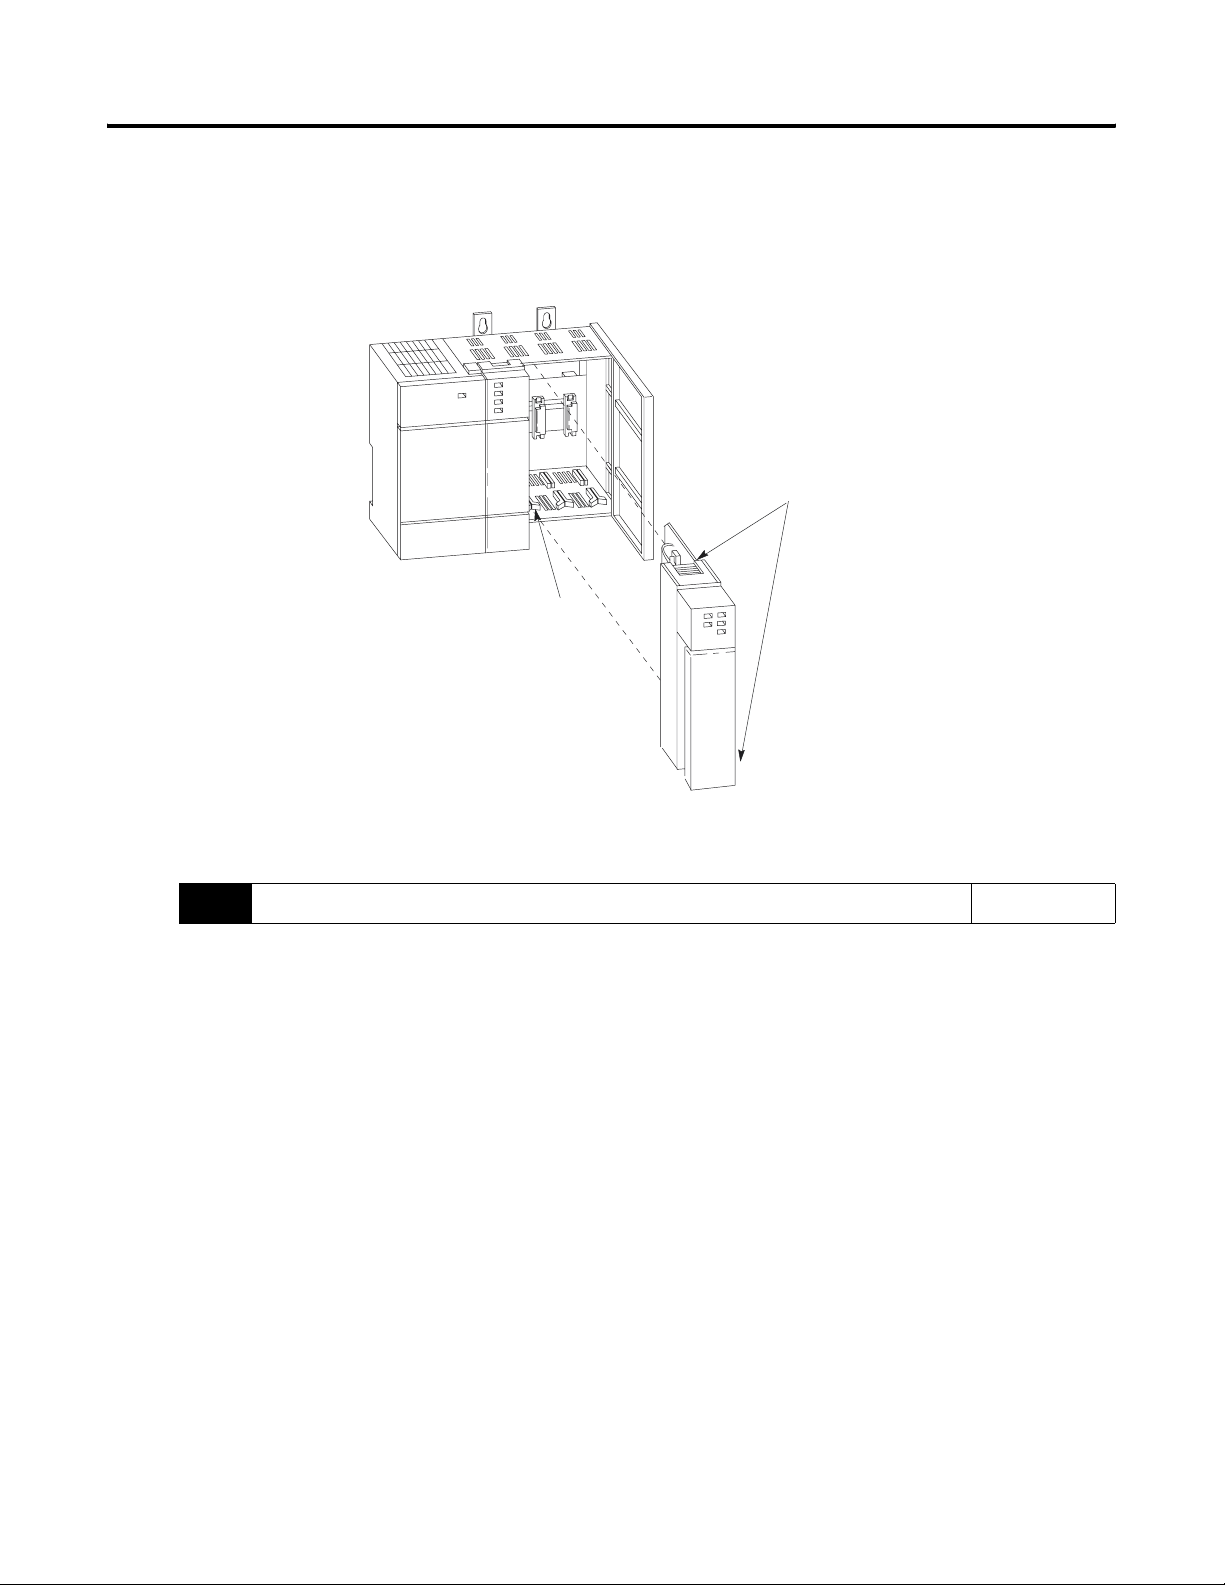
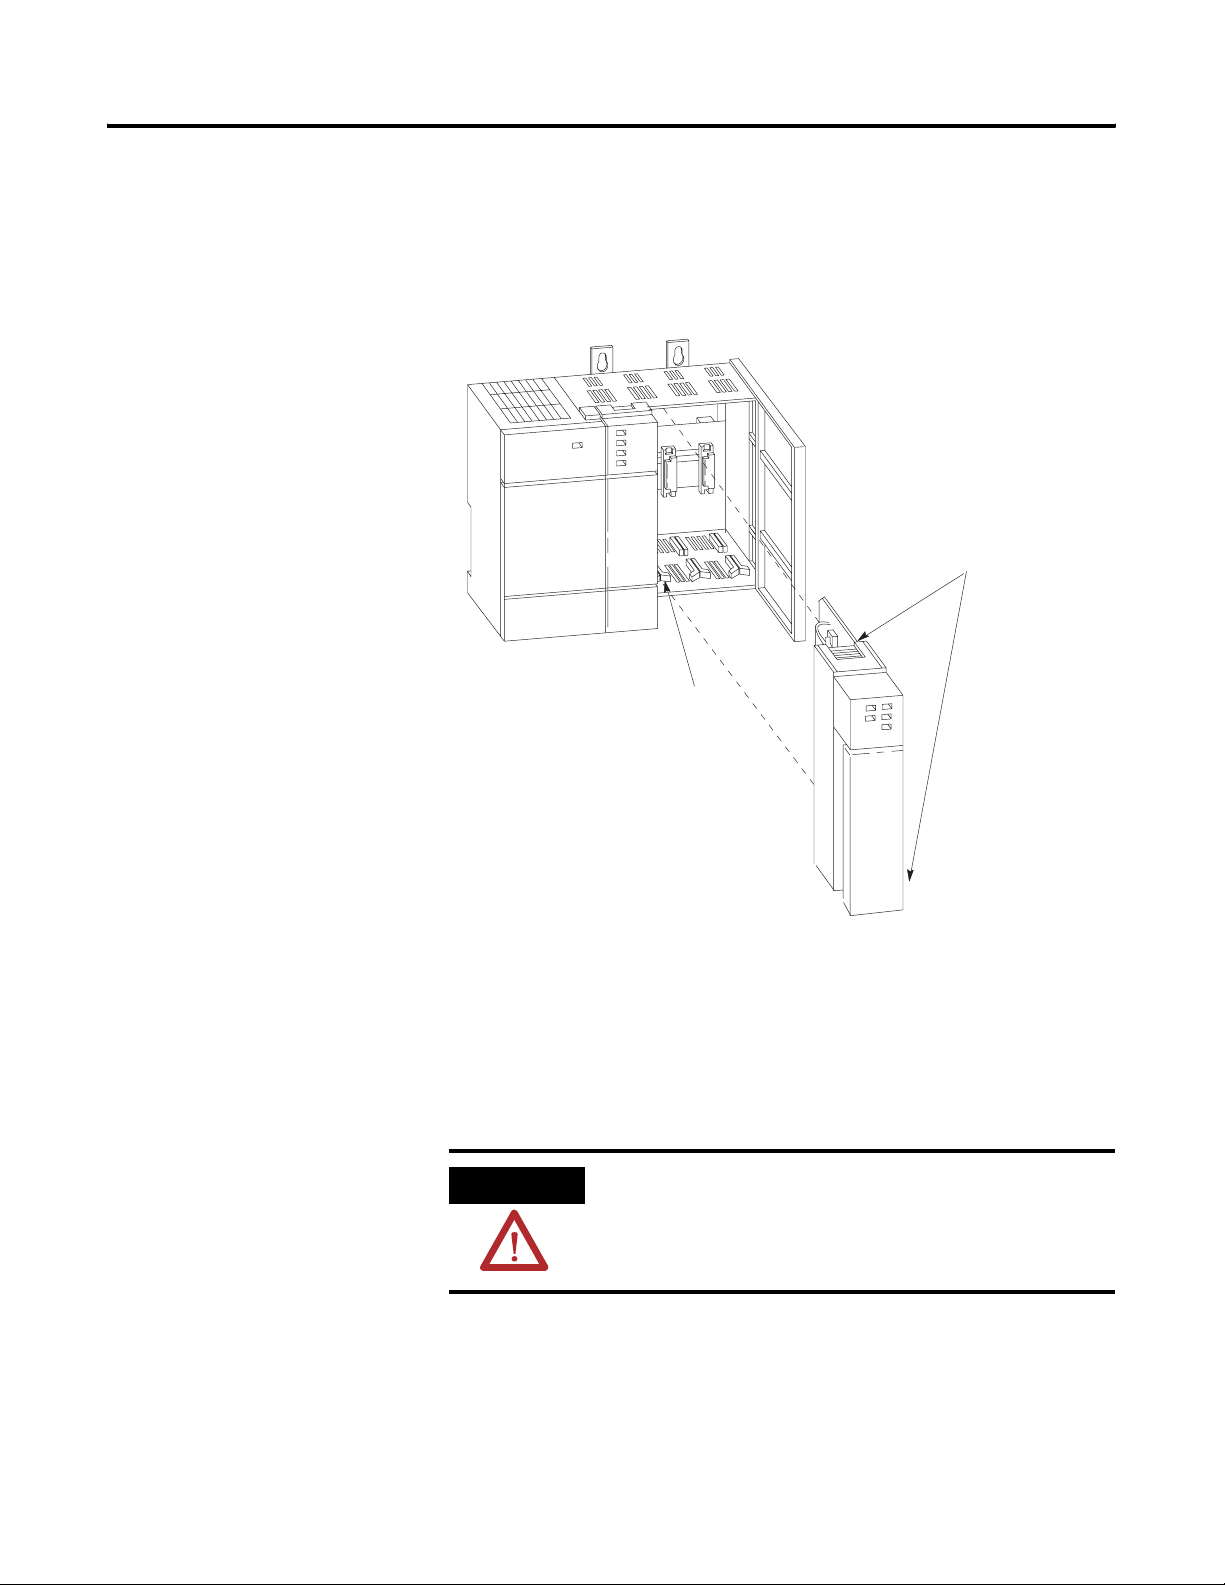
4. Install your module. Reference
When selecting a slot for an analog module, position the module:
Chapter 3
(Installing and
• in a slot away from ac or high voltage dc modules
• in the chassis closest to the bottom of the enclosure where the SLC 500 system is
Wiring Your
Analog Module)
installed
• away from the chassis power supply if installed in a modular system
ATTENTION
Never install, remove, or wire modules with power
applied to the chassis or devices wired to the
modules.
Publication 1746-UM005B-EN-P - June 2004
Page 18
2-4 Quick Start for Experienced Users
Make sure system power is off; then insert the analog module into your 1746 chassis. In this
example procedure, local slot 1 is selected.
Top and Bottom Module
Release(s)
Card Guide
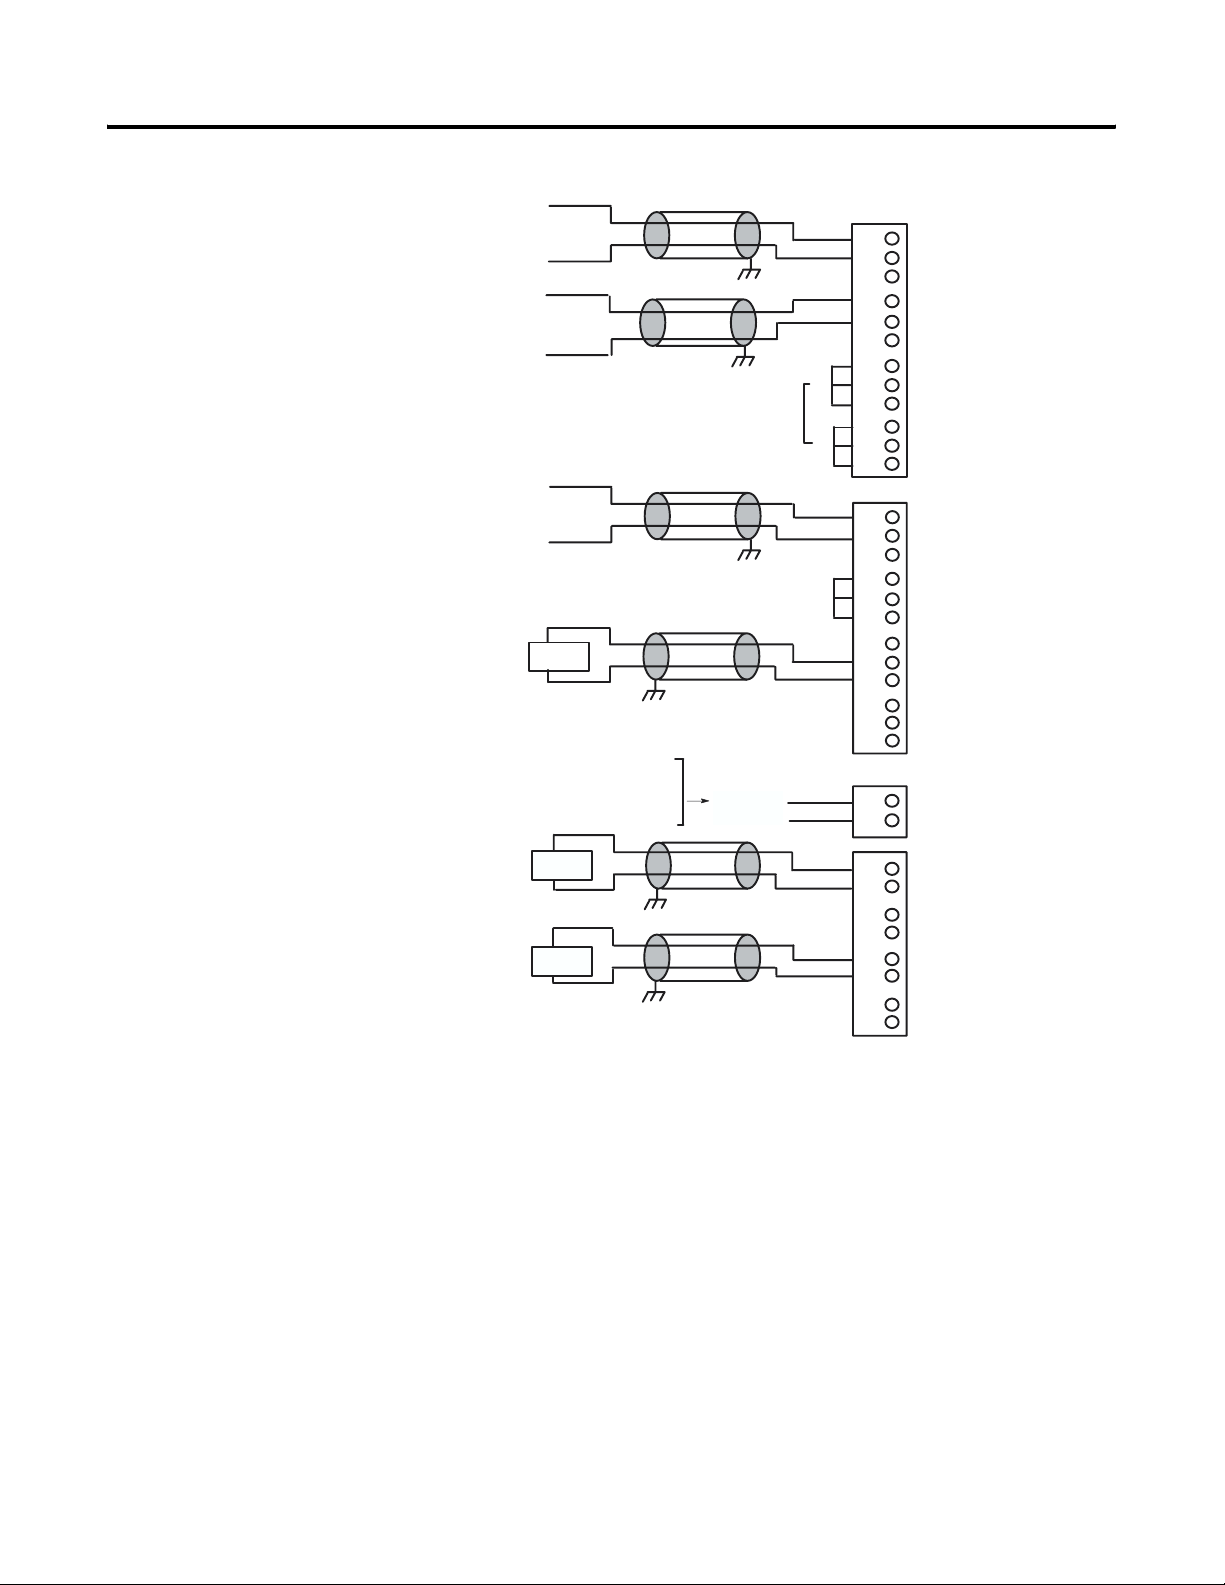
5. Wire the module. Reference
Important: Follow these guidelines when wiring the module.
Chapter 3
(Installing and
• Use shielded communication cable (Belden 8761) and keep length as short as possible.
• Connect only one end of the cable shield to earth ground.
Wiring Your
Analog Module)
• Channels are not isolated from each other. All analog commons are connected together
internally.
• The module does not provide power for analog inputs.
• Use a power supply that matches the transmitter (sensor) specifications.
Publication 1746-UM005B-EN-P - June 2004
Page 19
Quick Start for Experienced Users 2-5
NI4
NIO4I & NIO4V
NO4I & NO4V
+
analog
source
_
+
analog
source
_
+
analog
source
_
Load
24V dc power supply if
external power is selected.
Cable length from external
24V dc power supply to analog
module must be less than 10m.
earth
ground
earth
ground
Jumper unused
earth
ground
Jumper unused
earth
ground
Ext. pwr.
sup.
inputs.
inputs.
Do not jumper
unused outputs.
10
11
10
11
0
1
2
3
4
5
6
7
8
9
0
1
2
3
4
5
6
7
8
9
0
1
IN 0 +
_
IN 0
ANL COM
IN 1 +
_
IN 1
ANL COM
IN 2 +
_
IN 2
ANL COM
IN 3 +
_
IN 3
ANL COM
IN 0 +
_
IN 0
ANL COM
IN 1 +
_
IN 1
ANL COM
not used
OUT 0
ANL COM
not used
OUT 1
ANL COM
+24V dc
dc COM
Load
Load
Analog commons are internally connected
in the module. Channels are not isolated
from each other.
earth
ground
earth
ground
Do not jumper
unused outputs.
0
1
2
3
4
5
6
7
OUT 0
ANL COM
OUT 1
ANL COM
OUT 2
ANL COM
OUT 3
ANL COM
Publication 1746-UM005B-EN-P - June 2004
Page 20
2-6 Quick Start for Experienced Users
6. Configure system I/O configuration. Reference
Configure your system I/O configuration for the particular slot the analog module is in. When
assigning an I/O module to a slot location, select the module from the displayed list. If not listed,
select OTHER at the bottom of the list and enter the module’s ID code at the prompt.
Catalog No. Module ID Code
1746-NI4 4401
1746-NIO4I 3201
1746-NIO4V 3202
1746-NO4I 5401
1746-NO4V 5402
7.
Check that the module is operating correctly.
Chapter 4
(Module
Operation
and System
Considerations)
Chapter 5
(Testing Your
Module)
Reference
ATTENTION
Machine motion during system checkout can be
hazardous to personnel. During all checkout
procedures, you must disconnect all devices which,
when energized, might cause machine motion.
Apply power to the fixed or modular system. The analog module LED (red) should be
illuminated, indicating that the module is receiving 24V dc power.
Publication 1746-UM005B-EN-P - June 2004
Page 21

Quick Start for Experienced Users 2-7
8. Understanding analog inputs. Reference
Analog inputs convert current and voltage signals into 16–bit (max.) integer values and place
them in the input image for the slot that the analog module resides in.
Address 1746-NI4 1746-NI04I, -NI04V
I:e.0 Input Channel 0 Input Channel 0
I:e.1 Input Channel 1 Input Channel 1
I:e.2 Input Channel 2
I:e.3 Input Channel 3
Note: The e is the slot number.
Voltage/Current Range Integer Representation
-10V dc to +10V dc -32,768 to +32,767
0 to 10V dc 0 to 32,767±10V dc
0 to 5V dc 0 to 16, 384
Chapter 4
(Module
Operation and
System
Considerations)
1 to 5V dc 3,277 to 16,384
-20 mA to +20 mA -16,384 to +16,384
0 to 20 mA 0 to 16,384±20 mA
4 to 20 mA 3,277 to 16,384
Publication 1746-UM005B-EN-P - June 2004
Page 22

2-8 Quick Start for Experienced Users
9. Understanding analog outputs. Reference
Analog outputs convert 16-bit integer values placed in the output image to voltage or current
signals for the slot that the analog card is in.
Address 1746-NO4 1746-NI04I, -NI04V
O:e.0 Output Channel 0 Output Channel 0
O:e.1 Output Channel 1 Output Channel 1
O:e.2 Output Channel 2
O:e.3 Output Channel 3
1746-NO4I, -NIO4I 1746-NO4V, -NIO4V
Current Range Decimal Representation
for Output Word
Voltage Range Decimal Representation
for Output Word
0 to 21 mA 0 to 32,764 -10 to +10V dc -32,768 to +32,764
0 to 20 mA 0 to 31, 208 0 to 10V dc 0 to 32,764
Chapter 4
(Module
Operation and
System
Considerations)
4 to 20 mA 6,242 to 31,208 0 to 5V dc 0 to 16,384
1 to 5V dc 3,277 to 16,384
10. Write ladder logic to process the module’s analog data. Reference
Several programming examples are provided in chapter 6 that demonstrate how to scale the raw
data from the analog card into engineering units such as psi, percent, etc. Study these examples
and apply them to your application as appropriate.
Chapter 5
(Testing Your
Module)
Chapter 6
(Programming
Examples)
Publication 1746-UM005B-EN-P - June 2004
Page 23

Chapter
3
Installing and Wiring Your Analog Module
To obtain the maximum performance from an analog module, proper
module installation is imperative. This chapter describes the
procedures that you must follow to install the analog module in an
SLC 500 system. The following items are described:
• European Union Directive Compliance
• determining your power requirements
• configuring your module
• selecting a slot in the chassis
• installing your module
• wiring considerations
– system wiring guidelines
– grounding your cable
– determining the cable length
• wiring the analog module
• minimizing electrical noise on the analog module
European Union Directive Compliance
If this product is installed within the European Union or EEA regions
and has the CE mark, the following regulations apply.
EMC Directives
This product is tested to meet Council Directive 89/336/EEC
Electromagnetic Compatibility (EMC) and the following standards, in
whole or in part, documented in a technical construction file:
• EN 50081–2
EMC - Generic Emission Standard, Part 2 - Industrial
Environment
• EN 50082–2
EMC - Generic Immunity Standard, Part 2 - Industrial
Environment
This product is intended for use in an industrial environment.
1 Publication 1746-UM005B-EN-P - June 2004
Page 24

3-2 Installing and Wiring Your Analog Module
Determining Your Power Requirements for a Modular Controller
Analog modules require both 5V dc and 24V dc power from the
backplane of the SLC 500 system. However, the NO4I and NO4V
analog modules can use an external 24V dc power supply. This
eliminates the 24V dc backplane power requirement, providing
configuration flexibility if SLC power supply loading is critical. These
two modules provide user-supplied external 24V dc power supply
connections.
The 24V dc user power connection on a fixed SLC 500 can power an
NO4I or NO4V analog module. However, the regulation of the 24V dc
user connection on a modular SLC 500 power supply, Catalog Number
1746-P1, -P2, -P4 is outside of the requirements of the NO4I and
NO4V analog modules and cannot be used.
The following table shows the power requirements for each analog
module using backplane power. Use this table to calculate the total
load on the modular system power supply. For more information refer
to the SLC 500 user manual for modular controllers.
IMPORTANT
The analog modules do not supply loop power for
the input device. You must supply the appropriate
loop power for loop-powered input devices.
Determining Your Power Requirements for a Fixed Controller
Catalog Number 5 Volt Current 24 Volt Current
1746-NI4 35 mA 85 mA
1746-NIO4I 55 mA 145 mA
1746-NIO4V 55 mA 115 mA
1746-NO4I 55 mA
1746-NO4V 55 mA
(1)
Omit these values from your SLC power supply loading calculations if you decide to use an external
power supply.
195 mA
145 mA
(1)
(1)
The chart starting on the next page provides available analog module
combinations in the expansion chassis of a fixed controller.
valid combination
•
invalid combination
valid combination when used with
∇
external power supply
BASIC net = Basic Module is supplying power to an
AIC. No other device requiring power is connected
to the AIC.
Publication 1746-UM005B-EN-P - June 2004
Page 25

Installing and Wiring Your Analog Module 3-3
NI4 NIO4I NIO4V NO4I NO4V
• • • _ • IA4
• • •
• • •
• • •
• • •
• • •
• • •
• • •
• • •
• • •
• • •
• • •
• • •
• •
• • •
• • •
∇
∇
∇
∇
∇
∇
∇ ∇
∇ ∇
∇
∇
∇
∇
∇
∇
∇ ∇
∇
∇
• IA8
• IA16
• IM4
• IM8
• IM16
• OA8
OA16
OAP12
• IB8
• IB16
• IV8
• IV16
• IG16
• OV8
OV16
• OB8
• OG16
• •
•
• • •
• •
•
•
•
•
• • •
• •
∇ ∇
∇ ∇
∇ ∇
∇
∇ ∇
∇ ∇
∇ ∇
∇ ∇
∇ ∇
∇ ∇
∇ ∇
∇ ∇
∇
∇ ∇
∇ ∇
OW4
OW8
OW16
• IO4
IO8
IO12
NI4
NIO4I
NIO4V
DCM
HS
OB16
• IN16
BASIC net
BASIC
OB32
OV32
Publication 1746-UM005B-EN-P - June 2004
Page 26

3-4 Installing and Wiring Your Analog Module
NI4 NIO4I NIO4V NO4I NO4V
• • •
∇
• IV32
• • •
•
∇
∇ ∇
∇ ∇ ∇ ∇ ∇
∇ ∇ ∇ ∇ ∇
• • •
• • •
• • •
• •
• •
• • •
• • •
IMPORTANT
The NO4I and NO4V modules provide user supplied
∇
∇
∇
∇ ∇
∇ ∇
∇
∇
external 24V dc power supply connections. When
the NO4I module is used in a fixed controller, you
must provide an external power supply.
• IB32
OX8
NO4I
NO4V
• ITB16
• ITV16
• IC16
OBP16
OVP16
• NT4
• NR4
When the NO4I or NO4V is used with an external 24V dc power
supply and is placed in a fixed controller expansion chassis, it is
compatible with those modules noted in the compatibility chart
starting on the previous page. When set for external power, the
module will only draw the 5V current off the backplane. Refer to the
next section for details on how to configure your module for external
power.
The 24V dc user power connection on a fixed SLC 500 can power an
NO4I or NO4V analog module. However, the regulation of the 24V dc
user connection on a modular SLC 500 power supply, Catalog Number
1746-P1, -P2, and -P4 is outside of the requirements of the NO4I and
NO4V analog modules and cannot be used.
Publication 1746-UM005B-EN-P - June 2004
Page 27
Installing and Wiring Your Analog Module 3-5
Configuring Your Module
The NI4, NIO4I and NIO4V analog modules have user selectable DIP
switch settings which allow you to configure the input channels as
either current or voltage inputs. The switches are located on the
analog module board. The following illustration shows the ON and
OFF switch settings. Switch orientation is also provided on the
nameplate of the module.
ON – Configures channel for current input
OFF – Configures channel for voltage input
ATTENTION
Care should be taken to avoid connecting a voltage
source to a channel configured for current input.
Improper module operation or damage to the
module can occur.
Switch Settings for the 1746–NI4
The NI4 has 4 individual DIP switches that control the input mode of
input channels 0 through 3. A switch in the ON position configures
the channel for current input. A switch in the OFF position configures
the channel for voltage input.
Current
1
O
N
Voltage
2
3
Switch 1 = Channel 0
4
Switch 2 = Channel 1
Switch 3 = Channel 2
Switch 4 = Channel 3
Switch Settings for the 1746-NIO4I and -NIO4V
The NIO4I and NIO4V have 2 individual switches labeled 1 and 2.
These switches control the input mode of input channel 0 and 1. A
switch in the ON position configures the channel for current input. A
switch in the OFF position configures the channel for voltage input.
Current
12
O
N
Switch 1 = Channel 0
Switch 2 = Channel 1
Voltage
Publication 1746-UM005B-EN-P - June 2004
Page 28

3-6 Installing and Wiring Your Analog Module
External Power Switch for the 1746-NO4I and -NO4V
The NO4I and NO4V analog output modules have an external
24V dc power switch, SW1, which gives you the option of using an
external power supply. In the UP position, power is drawn from an
external power source. In the DOWN position, power is drawn from
the backplane of the module. The switch is located on the analog
module board. Switch orientation is also provided on the nameplate
of the module.
The 24V dc user power connection on a fixed SLC 500 can power an
NO4I or NO4V analog module. However, the regulation of the 24V dc
user connection on a modular SLC 500 power supply, Catalog Number
1746-P1, -P2, is outside of the requirements of the NO4I and NO4V
analog modules and cannot be used.
External
Choosing a Slot in the Chassis
Installing Your Module
24V dc
Power
Selector
Backplane
Two factors determine where the analog module should be located in
the chassis: ambient temperature and electrical noise. Consider the
following conditions when selecting a slot for an analog module.
Position the module:
• in a slot away from ac or high voltage dc module
• in the chassis closest to the bottom of the enclosure where the
SLC 500 system is installed
• away from the chassis power supply if installed in a modular
system
All modules are mounted in a single slot. Remember that in a modular
system the processor always occupies the first slot of the first chassis.
Sw 1
Publication 1746-UM005B-EN-P - June 2004
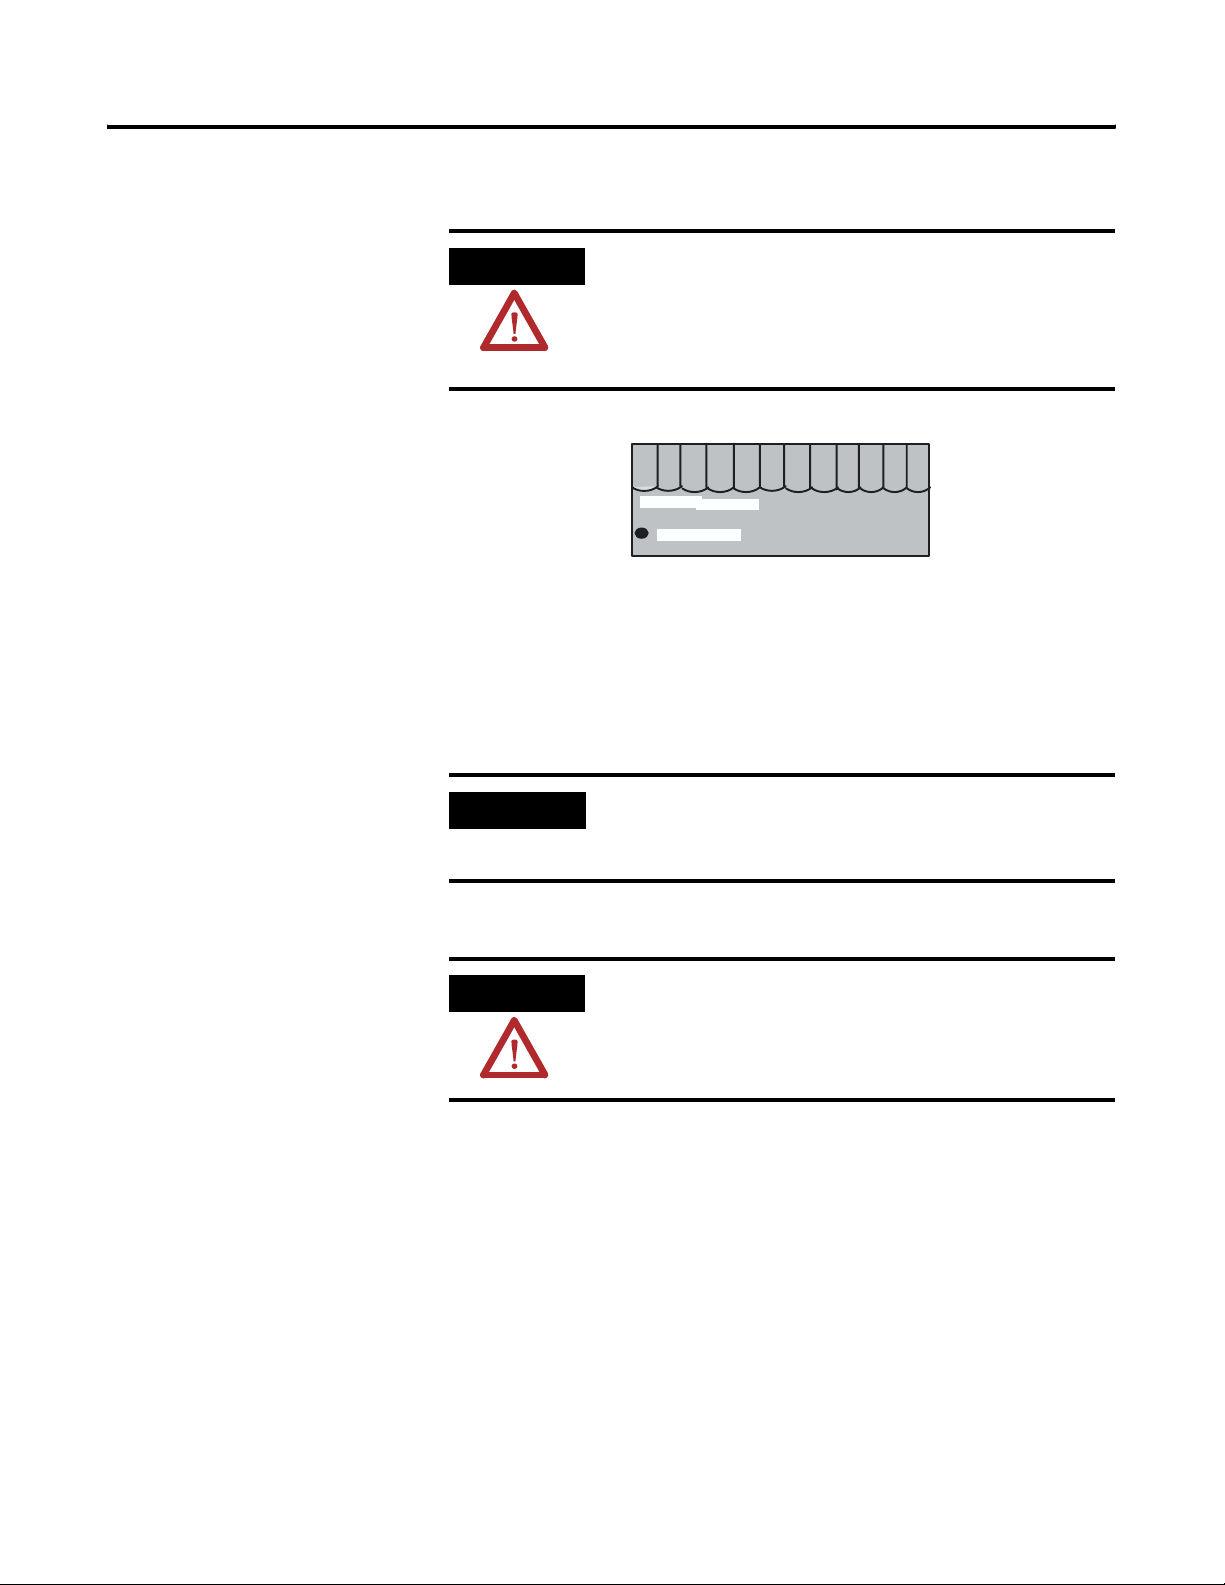
When installing the analog module in a chassis, it is not necessary to
remove the terminal block from the module. However, if the terminal
block is removed, use the write-on label located on the side of the
terminal block to identify the module location and type.
Page 29
Installing and Wiring Your Analog Module 3-7
ATTENTION
Never install, remove, or wire modules with power
applied to the chassis. Also, do not expose analog
modules to surfaces or other areas that may typically
hold an electrostatic charge. Electrostatic charges can
destroy the analog circuitry.
SLOT ____
RACK ____
MODULE _____
Removing the Analog Module Terminal Block
To remove the terminal block, grasp it on the top and bottom and pull
outward and down.
IMPORTANT
The potentiometer sets the voltage during factory
calibration to 2.5 volts. It is set and sealed at the
factory and does not require any adjustments.
1. Verify that all switches are set correctly for the application.
ATTENTION
Care should be taken to avoid connecting a voltage
source to a channel configured for a current input.
Publication 1746-UM005B-EN-P - June 2004
Page 30
3-8 Installing and Wiring Your Analog Module
2. Align the circuit board of the analog module with the card guide
of the chassis.
3. Slide the module in until both top and bottom retaining clips are
secured.
Top and Bottom Module Release(s)
Wiring Considerations
Card Guide
4. To remove the module, depress the retaining clips at the top and
bottom of the module and slide the module out.
The following section provides system wiring guidelines, how to
ground your Belden cable, and how to determine the cable length.
ATTENTION
Before wiring any analog module, disconnect power
from the SLC 500 system and from any other source
to the analog module.
Publication 1746-UM005B-EN-P - June 2004
Page 31

Installing and Wiring Your Analog Module 3-9
System Wiring Guidelines
Use the following guidelines in planning the system wiring for the
analog modules:
• all analog common terminals (ANL COM) are electrically
connected inside the module. ANL COM is not connected to
earth ground inside the module.
• voltages on IN+ and IN- terminals must remain within ± 20 Volts
with respect to ANL COM to ensure proper input channel
operation. This is true for current and voltage input channel
operation.
• voltage outputs (OUT 0 and OUT 1) of the NIO4V and NO4V
are referenced to ANL COM. Load resistance (R1) for a voltage
output channel must be equal to or greater than 1K ohms.
• current output channels (OUT 0 and OUT 1) of the NIO4I and
NO4I source current that returns to ANL COM. Load resistance
(R1) for a current output channel must remain between 0 and
500 ohms.
Grounding Your Cable
Belden cable #8761 has two signal wires (black and clear), one drain
wire and a foil shield. Refer to the illustration on p.
wire and foil shield must be grounded at one end of the cable. Do not
earth ground the drain wire and foil shield at both ends of the cable.
Input Channel - Use a chassis mounting tab as a ground for the drain
wire and foil shield.
Output Channel - Ground the drain wire and foil shield at the analog
load.
IMPORTANT
If you cannot ground the output channel at the load,
ground the drain wire and foil shield at the chassis
mounting tab. Do not connect the foil shield or drain
wire to the analog terminal block. They must be
connected to an earth ground, which is not provided
at the analog module.
3-10. The drain
Publication 1746-UM005B-EN-P - June 2004
Page 32

3-10 Installing and Wiring Your Analog Module
Foil Shield
Wiring the Analog Module
Insulation
Clear Wire
Black Wire
Drain Wire
Determining the Cable Length
Determine the length of cable you will need to connect a channel to
its input or output device. Remember to leave additional length to
route the drain wire and foil shield for earth grounding.
After the analog module is properly installed in the chassis, use the
following wiring procedure. Belden cable #8761 is recommended
when wiring analog modules. This section assumes that you have
properly installed the analog module.
ATTENTION
Before wiring any analog module, disconnect power
from the SLC 500 system and from any other source
to the analog module.
To wire your analog module follow these steps and refer to the
illustrations on the next page.
1. Designate the end of the cable where the drain wire and foil
shield is earth grounded as END 1. Designate the other end as
END 2.
2. At each end of the cable strip some casing to expose the
individual wires.
3. Trim the signal wires to 2 inch lengths. Strip about 3/16 inch
(4.76mm) of insulation away to expose the end of the wire.
4. At End 1, twist the drain wire and foil shield together, bend them
away from the cable, and apply shrink wrap.
Publication 1746-UM005B-EN-P - June 2004
Page 33

Installing and Wiring Your Analog Module 3-11
5. At End 2, cut the drain wire and foil shield back to the cable and
apply shrink wrap.
6. Connect the signal wires (black and clear) to the terminal block
and the input and output devices. The recommended maximum
torque is 5 lb.-in (0.565 NM) for all terminals.
• If the foil shield and drain wire of the channel are grounded
at the sourcing device, make sure End 2 of the cable is
connected to the terminal block.
• If the foil shield and drain wire are grounded at the chassis
mounting tab, make sure End 1 is connected to the terminal
block.
7. Repeat steps 1 through 6 for each channel on the analog
module. Jumper the unused plus (+), minus (-) and common
terminals of each input channel individually. Unused output and
common terminals should be left unconnected.
The following illustrations depict the proper cable preparation for
END 1 and END 2. Shrink wrap is applied to each cable end. Make
sure the foil shield and drain wires on END 1 are long enough to
reach their designated earth ground points.
Insulation
Insulation
Foil Shield and Drain Wire
Black Wire
Clear Wire
Black Wire
Clear Wire
Publication 1746-UM005B-EN-P - June 2004
Page 34

3-12 Installing and Wiring Your Analog Module
Labeling and Installing the Terminal Block
The terminal block has a write-on label. Labeling the terminal block
will help ensure that it is installed on the correct module.
SLOT ____
RACK ____
MODULE _____
Note: The black dot on the terminal block
label indicates the position of terminal 0.
Once you have wired your analog module and properly labeled the
terminal block, install the terminal block on the analog module. To
install the terminal block:
1. Align the terminal block with the receptacle.
2. Insert the terminal block and press firmly at the top and bottom
until it is properly secured.
Grounding the Foil Shields and Drain Wires
You are now ready to earth ground your foil shield and drain wire
from each cable. Do not connect the foil shield or drain wire to the
analog module terminal block. The foil shield and drain wire must be
connected to earth ground, which is not available on the terminal
block. Refer to the illustration on the next page for wiring diagrams of
the analog modules.
Publication 1746-UM005B-EN-P - June 2004
Page 35

Installing and Wiring Your Analog Module 3-13
NI4
NIO4I & NIO4V
NO4I & NO4V
+
analog
source
–
+
analog
source
–
+
analog
source
–
Load
24V dc power supply if
external power is selected.
Cable length from external
24V dc power supply to analog
module must be less than 10m.
earth
ground
earth
ground
Jumper unused
earth
ground
earth
ground
inputs.
Jumper unused
Do not jumper
unused outputs.
Ext. pwr.
sup.
inputs.
10
11
10
11
0
1
2
3
4
5
6
7
8
9
0
1
2
3
4
5
6
7
8
9
0
1
IN 0 +
IN 0 –
ANL COM
IN 1 +
IN 1 –
ANL COM
IN 2 +
IN 2 –
ANL COM
IN 3 +
IN 3 –
ANL COM
IN 0 +
IN 0 –
ANL COM
IN 1 +
IN 1 –
ANL COM
not used
OUT 0
ANL COM
not used
OUT 1
ANL COM
+24V dc
dc COM
Load
Load
Analog commons are internally connected
in the module. Channels are not isolated
from each other.
earth
ground
earth
ground
0
1
2
3
4
5
Do not jumper
unused outputs.
Publication 1746-UM005B-EN-P - June 2004
6
7
OUT 0
ANL COM
OUT 1
ANL COM
OUT 2
ANL COM
OUT 3
ANL COM
Page 36

3-14 Installing and Wiring Your Analog Module
Wiring Schematics for 2, 3, and 4-Wire Analog Input Devices
Important: The module does
2-Wire Transmitter
3-Wire Transmitter
4-Wire Transmitter
Use a power supply that matches the transmitter specifications.
+
Power
Supply
–
+
Power
Supply
–
+
Power
Supply
–
not
provide loop power for analog inputs.
Transmitter
+
–
Transmitter
Supply Signal
GND
Transmitter
Supply Signal
+–+
–
Module
IN +
IN –
ANL COM
Module
IN +
IN –
ANL COM
Module
IN +
IN –
ANL COM
Publication 1746-UM005B-EN-P - June 2004
Page 37

Installing and Wiring Your Analog Module 3-15
Wiring Schematic for Single-ended Analog Input Connections
When wiring single-ended analog input devices to the analog input card, the number of total wires
necessary can be limited by using the ANALOG COMMON terminal. Note that differential inputs are
more immune to noise than single-ended inputs.
Minimizing Electrical Noise on Analog Modules
Transmitter
+
Signal
Transmitter
+
Signal
Transmitter
+
Signal
Transmitter
Supply Signal
Ground
+
IN 0 +
IN 0 –
ANL COM
IN 1 +
IN 1 –
ANL COM
IN 2 +
IN 2 –
ANL COM
IN 3 +
IN 3 –
ANL COM
Supply
+Power
–
Inputs on analog modules employ digital high frequency filters that
significantly reduce the effects of electrical noise on input signals.
However, because of the variety of applications and environments
where analog modules are installed and operating, it is impossible to
ensure that all environmental noise will be removed by the input
filters.
NI4
Although it is not the purpose of this manual to address SLC 500
system procedures, several specific steps can be taken to help reduce
the effects of environmental noise on analog signals:
• install the SLC 500 system in a properly rated (i.e., NEMA)
enclosure. Make sure that the SLC 500 system is properly
grounded.
• use Belden cable #8761 for wiring the analog modules making
sure that the drain wire and foil shield are properly earth
grounded.
• route the Belden cable separate from any other wiring.
Additional noise immunity can be obtained by routing the cables
in grounded conduit.
Publication 1746-UM005B-EN-P - June 2004
Page 38

3-16 Installing and Wiring Your Analog Module
• group analog and low voltage dc modules away from ac I/O or
high voltage dc modules.
A system may malfunction due to a change in the operating
environment after a period of time. We recommend periodically
checking system operation, particularly when new machinery or other
noise sources are installed near the SLC 500 system. For further details
on system installation and startup refer to:
• SLC 500 Modular Hardware Style User Manual (publication
1747-UM011)
• SLC 500 Fixed Hardware Style Installation & Operation Manual
(publication 1747-6.21)
• Safety Guidelines for the Application, Installation Maintenance
of Solid State Control (A–B Publication SGI–1.1).
Publication 1746-UM005B-EN-P - June 2004
Page 39

Chapter
4
Module Operation and System Considerations
This chapter describes:
• Interface between the Module and Processor
• System Considerations
Interface between the Module and the Processor
This section describes how to set up an analog module in a SLC 500
system.
Entering Module ID Codes
When configuring an analog module for an SLC 500 system using your
programming software, a list of the different I/O modules, including
the analog modules, is most likely provided for you. If a list is not
provided, you need to enter the module identification code when
configuring the slot. Refer to the table below for the appropriate
analog module ID code.
Using the Hand-Held Terminal (HHT) firmware v1.1, enter the proper
MODULE ID CODE under the “other” selection. Version 2.0 or later of
the HHT firmware provides a list of I/O modules. Refer to the
following publications for complete information:
• your programming software’s user manual
• the Hand-Held Terminal User Manual
Catalog No. Module ID Code
1746-NI4 4401
1746-NIO4I 3201
1746-NIO4V 3202
1746-NO4I 5401
1746-NO4V 5402
1 Publication 1746-UM005B-EN-P - June 2004
Page 40

4-2 Module Operation and System Considerations
Addressing Analog Modules
NI4 - Each input channel of the NI4 is addressed as a single word in
the input image table. The NI4 uses a total of 4 words in the input
image table. The converted values from channels 0 through 3 are
addressed as input words 0 through 3 respectively for the slot where
the module resides.
EXAMPLE
If you want to address input channel 2 of the NI4 in
slot 4, you would address it as input word 2 in slot 4
(I:4.2).
NIO4I and NIO4V - Each input channel of the NIO4I and NIO4V is
addressed as a single word in the input image table and each output
channel of the module is addressed as a single word in the output
image table. Both the NIO4I and NIO4V use a total of 2 input words
and 2 output words.
The converted input values from input channels 0 and 1 are addressed
as words 0 and 1 of the slot where the module resides. The output
values for the output channels 0 and 1 are addressed as output words
0 and 1 of the slot where the module resides.
EXAMPLE
If you want to address output channel 0 of the NIO4I
in slot 3, you would address it as output word 0 in
slot 3 (O:3.0).
NO4I and NO4V - Each output channel of the NO4I and NO4V is
addressed as a single word in the output image table. Both modules
use a total of 4 output words. The converted output values from
output channels 0 through 3 are addressed as words 0 through 3
respectively for the slot where the module resides.
Publication 1746-UM005B-EN-P - June 2004
EXAMPLE
If you want to address output channel 3 of the NO4I
in slot 3, you would address it as output word 3 in
slot 3 (O:3.3).
Page 41

SLC 500
SLC 5/01 or 5/02
Data Files
Output
Image
Input
Image
Slot e
Module Operation and System Considerations 4-3
The following illustration shows I/O addressing for the analog
modules.
1746-NI4
Analog Input Module
Input
Scan
Input
Image
4 words
Input Channel 0
Input Channel 1
Input Channel 2
Word 0
Word 1
Word 2
Address
I:e.0
I:e.1
I:e.2
SLC 500
SLC 5/01 or 5/02
Data Files
Slot e
Output
Image
Slot e
Input
Image
SLC 500
SLC 5/01 or 5/02
Data Files
Slot e
Output
Image
Input
Image
Output
Scan
Input
Scan
Output
Scan
1746-NIO4I & NIO4V
Analog Combination Modules
Output
Image 2
words
Input
Image 2
words
1746-NO4I & NO4V
Analog Output Modules
Output
Image
4 words
Input Channel 3
Bit 15 Bit 0
Output Channel 0
Output Channel 1
Bit 15 Bit 0
Input Channel 0
Input Channel 1
Bit 15 Bit 0
Output Channel 0
Output Channel 1
Output Channel 2
Output Channel 3
Bit 15 Bit 0
Word 3
Word 0
Word 1
Word 0
Word 1
Word 0
Word 1
Word 2
Word 3
I:e.3
Address
O:e.0
O:e.1
I:e.0
I:e.1
Address
O:e.0
O:e.1
O:e.2
O:e.3
e = slot # of module
Publication 1746-UM005B-EN-P - June 2004
Page 42

4-4 Module Operation and System Considerations
746-NI4
1
I:e.0
I:e.1
I:e.2
I:e.3
msb lsb
Bit Level Addressing
The following bit maps show bit level addressing for the analog inputs
and outputs. The input channel converter resolution is 16 bits, or 1
word. The output channel converter resolution is 14 bits and is loaded
from the most significant 14 bits of the associated output word.
The two least significant bits (O:e.0/0 and O:e.0/1) of the output word
have no effect on the actual output value.
CH 0 INPUT
0123456789101112131415
CH 1 INPUT
0123456789101112131415
CH 2 INPUT
0123456789101112131415
CH 3 INPUT
0123456789101112131415
1746-NIO4I & NIO4V
1746-NO4I & NO4V
O:e.0
O:e.1
I:e.0
I:e.1
O:e.0
O:e.1
O:e.2
O:e.3
msb lsb
CH 0 OUTPUT
CH 1 OUTPUT
CH 0 INPUT
CH 1 INPUT
msb lsb
CH 0 OUTPUT
CH 1 OUTPUT
CH 2 OUTPUT
CH 3 OUTPUT
e = slot # of module
x = bit not used
XX
0123456789101112131415
XX
0123456789101112131415
lsbmsb
0123456789101112131415
0123456789101112131415
XX
0123456789101112131415
XX
0123456789101112131415
XX
0123456789101112131415
XX
0123456789101112131415
Publication 1746-UM005B-EN-P - June 2004
Page 43

Module Operation and System Considerations 4-5
Processor Update of Analog Data
The analog input and output data is updated by the processor once
during each scan of the user program. The table below shows typical
analog update scan times and the number of input and output bits for
the specified modules.
If an application requires processor updates of the analog data more
frequently than once per scan, use an Immediate Input or an
Immediate Output instruction. An Immediate Input or Output
instruction typically updates 16 bits (or 1 analog channel) in 1
millisecond.
Refer to your programming software’s user manual for more
information.
Typical Time for Analog Data Updates to the Processor’s Input and Output Image
Once per processor scan
(Automatic)
10 milliseconds for typical
1K program
Using immediate Input or Output
Instruction
Number of Input and Output Bits Representing Analog Data
Description Input Bits Output Bits
NI4 64 NI4OI and NIO4V
(2 input and 2 Output
channels)
NO4I and NO4V - 64
32
1 millisecond per analog
channel
32
Monitoring the Input and Output Data
The analog input and output data can be monitored in several
different radices using your programming software. Viewing the radix
as decimal allows the analog input and output data to be viewed as
decimal representations of integer words.
When monitoring in binary radix, data is viewed in two’s complement
representation for negative values. A description of two’s complement
data is available in Appendix B.
Publication 1746-UM005B-EN-P - June 2004
Page 44

4-6 Module Operation and System Considerations
If you are using the Hand-Held Terminal (HHT) or the Data Table
Access Module
™ (DTAM) to monitor input and output data, the binary
radix is the only available option. To view the analog input and
output data in decimal radix, the data must be moved to an integer
data file.
Converting Analog Input Data
Analog inputs convert current and voltage signals into 16 bit two’s
complement binary values.
The table below identifies the current and voltage input ranges for the
input channels, the number of significant bits for the applications
using input ranges less than full scale, and their resolution
Voltage/Current Range Decimal Representation Number of Significant Bits Resolution per LSB
-10V dc to +10V dc - 1LSB -32,768 to +32,767 16 bits 305.176 µV
0 to 10V dc - 1LSB 0 to 32,767 15 bits
0 to 5V dc 0 to 16,384 14 bits
1 to 5V dc 3,277 to 16,384 13.67 bits
-20 mA to +20 mA -16,384 to +16,384 15 bits 1.22070 µA
0 to +20 mA 0 to 16,384 14 bits
4 to +20 mA 3,277 to 16,384 13.67 bits
To determine an approximate voltage that an input value represents,
use one of the following equations:
10V
32,768
input image for the corresponding analog input.
For example, if an input value of ±16,021 is in the input
image, the calculated input voltage is:
32,768
It should be noted that this is the calculated value. The
actual value may vary within the accuracy limitations of the
module.
× input value = input voltage(V)
The Input Value is the decimal value of the word in the
10V
× ±16,201 = ±4.889221(V)
Publication 1746-UM005B-EN-P - June 2004
Page 45

Module Operation and System Considerations 4-7
To determine an approximate current that an input value represents,
you can use the following equation:
20 mA
16,384
input image for the corresponding analog input.
For example, if an input value of 4096 is in the input image,
the calculated input current is:
16,384
It should be noted that this is the calculated value. The
actual value may vary within the accuracy limitations of
the module.
× input value = input current (mA)
The Input Value is the decimal value of the word in the
20 mA
× 4096 = 5(mA)
Converting Analog Output Data
Analog outputs convert a 16-bit two’s complement binary value into
an analog output signal. Because the analog output channels have a
14-bit converter, the 14 most significant bits of this 16-bit number are
the bits that the output channel converts.
The NIO4I and NO4I support two and four current outputs
respectively, ranging from 0 mA to a maximum of 21 mA. The NIO4V
and NO4V support two and four voltage outputs respectively, ranging
from -10 to +10 Volts dc.
The following tables identify the current and voltage output ranges for
the output channels, the number of significant bits for the applications
using output ranges less than full scale, and their resolution.
Current Range Decimal Representation
for Output Word
0 to 21 mA - 1LSB 0 to +32,764 13 bits 2.56348 µA
0 to +20 mA 0 to +31,208 12.92 bits
4 to +20 mA 6,242 to +31,208 12.6 bits
Number of
Significant Bits
Publication 1746-UM005B-EN-P - June 2004
Resolution
per LSB
Page 46

4-8 Module Operation and System Considerations
Voltage Range Decimal
Representation for
Output Word
-10 to +10V dc
-32,768 to +32,764 14 bits
- 1LSB
0 to +10V dc
0 to +32,764 13 bits
Number of
Significant
Bits
Resolution per
LSB
1.22070 mV
- 1LSB
0 to 5V dc 0 to +16,384 12 bits
1 to 5V dc +3,277 to +16,384 11.67 bits
Use the following equation to determine the decimal value for the
current output:
32,768
21 mA
For example, if an output value of 4 mA is desired, the value to be put in the
corresponding word in the output image can be calculated as follows:
32,768
21 mA
Note: The actual resolution for analog current outputs is 2.56348 µA per LSB,
where the LSB position in the output word is indicated as:
× Desired Current Output (mA) = Output Decimal V alue
× 4 mA = 6242
LSB
XX
0123456789101112131415
X = Bit Not Used
Use the following equation to determine the decimal value for the
voltage output:
32,768
10V dc
For example, if an output value of 1V dc is desired, the value to be put in the
corresponding word in the output image can be calculated as follows:
32,768
10V dc
Note: The actual resolution for analog voltage outputs is 1.22070 mV per LSB,
where the LSB position in the output word is indicated as:
× Desired Voltage Output (V dc) = Output Decimal V alue
× 1V dc = 3277
X
= Bit Not Used
LSB
XX
0123456789101112131415
Publication 1746-UM005B-EN-P - June 2004
Page 47

Module Operation and System Considerations 4-9
System Considerations
This section describes the system considerations for an analog
module. These include:
• safe state for outputs
• retentive programming
• input out-of-range detection
• response to slot disable
• input channel filtering
Safe State for Outputs
Whenever an SLC 500 system is NOT in the RUN mode, the outputs
on the analog module are automatically forced to 0 Volts or 0 mA by
the SLC 500 system. This occurs when the processor is in the:
• FAULT mode
• PROGRAM mode
• TEST mode
ATTENTION
When designing and installing the SLC 500 system,
devices connected to the analog module output
channels must be placed into a safe state whenever
the analog output is 0 volts or 0 mA (± the offset
error).
Retentive Programming Option
This section describes the affects of a processor mode change on
analog outputs. The following information applies to the 1746-NIO4I,
NIO4V, NO4I and NO4V analog modules.
This programming option allows you to retain analog data in the
Input and Output Image tables when the SLC 500 processor:
• transitions from RUN-PROGRAM-RUN mode OR
• when power is turned OFF and reapplied
In both cases, when power is reapplied, the data is transferred to the
module whether the programming rung is true or false.
If an SLC 500 system detects a fault condition, the analog outputs reset
to zero. The data in the Output Image table is retained during the
Publication 1746-UM005B-EN-P - June 2004
Page 48

4-10 Module Operation and System Considerations
fault. Once the fault condition is corrected and the major fault bit in
the processor is cleared, the retained data is sent to the analog output
channels.
If you choose not to use the retentive programming option, retained
data is not sent to the output channels.
The following section provides example program options for retentive
data and non–retentive data.
Retentive Analog Output Example
If a modular system is configured with the CPU in slot 0, a discrete
I/O module in slot 1, and an analog output module in slot 2 the
following ladder logic rung can be programmed.
I1:1.0/0
] [
MOV
MOVE
Source 32767
Dest O0:2.0
When bit 0 of the discrete I/O module turns ON, the rung is true and
the value 32767 is moved into the Output Image table location that
corresponds with analog output channel 0 in slot 2. At the end of the
scan, this value is transferred to the module where it is converted to
the appropriate voltage or current (depending on the type of module
used).
If on the next program scan the rung becomes false, the MOVE of the
value of 32767 to the Output Image table does not occur. Unless
another rung is added to transfer data to the Output Image based on
this rung being false, the previous data is retained. That is, the value
32767 remains in the Output Image table and is transferred to the
analog module at the end of subsequent program scans until changed
by the user program.
Publication 1746-UM005B-EN-P - June 2004
Page 49

Module Operation and System Considerations 4-11
Non-Retentive Analog Output Example
The following example shows a non-retentive program during a
program execution and for a mode change or power cycle.
I1:1.0/0
] [
I1:1.0/0
] [
/
MOV
MOVE
Source 32767
Dest O0:2.0
MOV
MOVE
Source 0
Dest O0:2.0
In the above example, as long as discrete input 0 is ON, the value
32767 is transferred to analog output channel 0. If discrete input 0
turns OFF, the value 0 is transferred to analog output channel 0.
During a Mode Change or Power Cycle
The first pass bit in the Status File is used to initialize the analog
output following a power up in the RUN mode or entry into the RUN
or TEST mode. The address of the First Pass bit is S2:1/15. When this
bit is ON, the first pass of the program scan is taking place. Therefore,
the following ladder rung can be programmed to always clear the
analog output channel during the first program scan.
S2:1/15
] [
MOV
MOVE
Source 0
Dest O0:2.0
Input Out-of-Range Detection
Analog modules do not provide an input out-of-range signal to the
processor. However, if this feature is critical to a specific application,
you can program the processor to provide this function.
The following program applies to all SLC 500 processors. The program
shows two compare instructions that check for analog input values
Publication 1746-UM005B-EN-P - June 2004
Page 50

4-12 Module Operation and System Considerations
which exceed low and high limits respectively. For this example, the
analog input value is in word 1 of slot 1 (I1:1.1). Whenever the input
value exceeds a limit, this program latches a binary variable in
memory that could serve as an alarm indication at some other point in
the program.
LES
LESS THAN
Source A I1:1.1
Source B 0
GRT
GREATER THAN
Source A I1:1.1
Source B 16,384
Remainder of Program
END
B3/0
(U)
B3/0
(L)
B3/0
(L)
Turn OFF
Alarm
Turn ON Alarm, Low Limit
Exceeded
Turn ON Alarm, High Limit
Exceeded
The second program is for SLC 5/02 processors. This program uses the
Limit Test instruction that checks both low and high limits in a single
instruction. This instruction assumes that the analog input value is in
word 1 of slot 1 (I1:1.1).
As in the above program, whenever the input value exceeds a limit,
this program latches a binary variable in memory which could serve as
an alarm indication at some other point in the program.
Publication 1746-UM005B-EN-P - June 2004
LIM
LIMIT TEST (CIRC)
Low Lim 16,385
Test I1:1.1
High Lim ±1
Remainder of Program
END
B3/0
(U)
B3/0
(L)
Turn OFF
Alarm
Turn ON Alarm,
Limit Exceeded
Page 51

Module Operation and System Considerations 4-13
Response to Slot Disable
You have the ability to disable any slot in the chassis using the
processor. Before disabling any slot containing an analog module, it is
important to consider how the analog module will respond when the
slot is disabled.
ATTENTION
The response to slot disable for inputs and outputs is the same for all
the analog modules.
Make sure that the implications of disabling an
analog module slot are clearly understood before
utilizing this feature.
Input Response to Slot Disable
The module continues to update the input values to the processor.
However, the processor does not read inputs from a module that is
disabled. Therefore, when the processor disables the analog module
slot, the module inputs appearing in the processor image table remain
in their last state. When the processor re-enables the analog module
slot, the current state of the module inputs are received by the
processor during the subsequent scan.
Output Response to Slot Disable
The processor may change the analog module output data as it
appears in the processor image table. However, this data is not
transferred to the analog module.
Instead, the analog module holds its outputs in their last state. When
the slot is re-enabled, the data that appears in the processor image
table is transferred to the analog module on the subsequent scan.
Publication 1746-UM005B-EN-P - June 2004
Page 52

4-14 Module Operation and System Considerations
Input Channel Filtering
The input channels for all of the analog modules incorporate
extensive on board signal conditioning. The purpose of this
conditioning is to reject the high frequency noise that can couple into
an analog input signal while passing the normal variations of the input
signal. The conditioning is performed by passing the input signal
through a 6 pole Gaussian digital filter.
The sharp cut-off of this filter is demonstrated in the frequency
response plot shown below. Frequency components of the input
signal at or below the filter corner frequency of 10 Hz are passed with
under 3 dB of attenuation. This pass band allows the normal variation
of sensor inputs such as temperature, pressure and flow transducers to
be input data to the processor.
20
0
-20
-40
-60
-80
Output Amplitude in dB
-100
-120
-140
1
Frequency in Hz
100010010
Publication 1746-UM005B-EN-P - June 2004
Noise signals coupled in at frequencies above the 10 Hz pass band is
sharply rejected. An area of particular concern is the 50/60 Hz region,
where pick up from power lines can occur. From the frequency
response diagram, you see that a 60 Hz signal on the plus (+) input
with respect to the minus (-) input is attenuated by over 55 dB (60 Hz
normal mode rejection).
Page 53

Module Operation and System Considerations 4-15
If power line noise is coupling into the input signal through the input
cable, the proper use of differential inputs reduces the effect of noise.
With differential inputs, noise couples into both the plus (+) and
minus (-) inputs where it is attenuated by over 105 dB (60 Hz
common mode rejection).
The affect of the filter with respect to time can be seen by examining
the step response of the input channel. The following illustration
shows the response of the input value versus time when a step
change is made in the voltage or current at the input terminal. The
response of the filter demonstrates no overshoot and rapid settling
time. The input value settles to within 95% of the final value in 60
milliseconds, independent of the input magnitude.
EXAMPLE
100
Percentage (%) of Final V alue
If the input instantaneously changes from 0 to 10
volts, the value converted by the analog module after
60 milliseconds is 9.5 volts. Within this time the
analog module updates the input data value in
memory with an intermediate response every 512
microseconds.
95
80
60
40
20
0
0
60
Time (ms)
1208040
Publication 1746-UM005B-EN-P - June 2004
Page 54

4-16 Module Operation and System Considerations
Publication 1746-UM005B-EN-P - June 2004
Page 55

Chapter
5
Testing Your Module
The purpose of this chapter is to help you isolate problems in a
systematic and controlled manner before beginning normal system
operation.
If your analog module is installed in the expansion chassis of a fixed
system, test your system using the procedures described in the SLC
500 Fixed Hardware Style Installation & Operation Manual
(publication 1747-6.21) before executing the analog module start up
procedures.
Testing the SLC 500 System
If your analog module is installed in a modular system, test the
modular system using the procedures described in the SLC 500
Modular Hardware Style User Manual (publication 1747-UM011)
before executing the analog module start up procedures.
Start-up Procedures
Once you have tested your SLC 500 system, follow the steps below in
sequence to test your analog module:
1. Inspect the analog module.
2. Disconnect prime movers.
3. Power up the SLC 500 system.
4. Test the analog inputs.
5. Test the analog outputs.
6. Start up the system.
1 Publication 1746-UM005B-EN-P - June 2004
Page 56

5-2 Testing Your Module
Inspect the Analog Module
Problems can be prevented by inspecting the analog module before
installing it in the SLC 500 system. Inspection should include the
following steps:
1. Make sure that all voltage/current mode selection DIP switches
are set properly (inputs only).
2. Make sure that all analog module wiring connections are correct
and that there are no missing
of all terminals to make certain wires are secure.
or broken wires. Check the tightness
ATTENTION
Care should be taken to avoid connecting a voltage
source to a channel configured for a current input.
Improper module operation or damage to the
module can occur.
3. Make sure that the shield for the cable used to wire the analog
module is properly grounded. Refer to chapter 3 for additional
information.
ATTENTION
Do not connect the Belden #8761 foil shield and
drain wire to the analog module terminal block. The
foil shield and drain wire must be connected to earth
ground, which is not available on the analog module
terminal block.
4. Make certain that the removable terminal block on the analog
module is secured on the module.
Disconnect Prime Movers (Motion Devices)
Publication 1746-UM005B-EN-P - June 2004
During the following test procedures the processor is energized. As a
safety precaution, make sure that machine motion does not occur. To
achieve this:
• Disconnect the motor wires at the motor starter or the motor
itself. This allows you to test the operation of the starter coil,
verifying that your output circuit is wired correctly and
functioning.
• To disconnect a solenoid, disengage the valve, leaving the coil
connected.
Page 57

Testing Your Module 5-3
In some instances, you may not be able to disconnect a device the
preferred way. In these cases, open the output circuit at a point as
close as possible to the motion-causing device. For example, your
output might be a relay coil which in turn energizes a motor starter. If
you cannot disconnect the motor wires, open the circuit at a point
between the motor starter and the relay contact.
ATTENTION
Machine motion during system checkout can be
hazardous to personnel. During all checkout
procedures, you must disconnect all devices which,
when energized, might cause machine motion.
Power Up the SLC 500 System
Apply power to the fixed or modular system. The analog module LED
(red) should be illuminated, indicating that the module is receiving
24V dc power.
While an illuminated analog module LED does not ensure that the
module is operating properly, a non-illuminated LED indicates that the
analog module is not functional. Do not continue with the test
procedures until the LED is illuminated.
The four most probable causes of a non-illuminated LED are:
• The SLC 500 system is not receiving power from its power
supply. Check the POWER LED on the fixed system unit or the
power supply on the modular system. If the LED is not
illuminated, refer to the Fixed Hardware Style Installation &
Operation Manual (publication 1747-6.21) or the Modular
Hardware Style User Manual (publication 1747-UM011). If the
module is a 1746-NO4I or NO4V, check the state of the optional
24V dc power switch. If external power is selected, but not
connected to the front of the module, the power LED will not
illuminate.
• The power from the supply is not being received by the
remainder of the SLC 500 system. You can test this by attempting
to go online with the programming device.
• The slot in the chassis where the analog module is located is not
operational. Remove the power from the SLC 500 system, move
the analog module to another slot and restore power. If it
appears that the slot is defective, replace the chassis.
• The analog module is defective.
Publication 1746-UM005B-EN-P - June 2004
Page 58

5-4 Testing Your Module
Testing Analog Inputs
Before testing the analog module input channels, the SLC 500 system
must be installed and tested according to the SLC 500 Fixed Hardware
Style Installation & Operation Manual (publication 1747-6.21) or the
SLC 500 Modular Hardware Style User Manual (publication
1747-UM011). The processor must be connected to a programming
device, properly configured, and must have no rungs in its ladder
program. The analog module LED must also be illuminated.
ATTENTION
The procedure described in this section for testing
analog module input channels assumes that all I/O
module outputs that normally activate prime movers
or other potentially dangerous devices have been
disconnected from these devices.
Do not attempt to test the analog module input
channels unless prime movers and/or other
potentially dangerous devices are disconnected from
the I/O modules.
The devices connected to the analog module input channels are
referred to as “sensors.” If the sensors can be manually varied over
their normal operating range, use these devices to test the analog
module input channels.
If the sensors cannot be manually varied, a voltage source or current
source is necessary to test the input channels. In this case, disconnect
the analog module input channels at the sensor to test the terminal
block wiring. The following information applies to either test
procedure.
Publication 1746-UM005B-EN-P - June 2004
IMPORTANT
ATTENTION
The following procedure does not ensure that the
input mode DIP switch is properly configured.
Visually inspect the input mode DIP switch before
installing the analog module in the chassis.
Care should be taken to avoid connecting a voltage
source to a channel configured for a current input.
Improper module operation or damage to the
module can occur.
Page 59

Testing Your Module 5-5
To test the analog inputs follow these steps:
1. Determine the boundary conditions for the analog module input
channel. For example, if the input channel is connected to a
sensor that has an output range of 1 mA to 5 mA, the boundary
conditions would be 1 mA (lower) and 5 mA (upper).
2. Using the formulas from page, calculate the input decimal values
that should appear in the processor image table when the
boundary conditions are present on the analog module input
channel.
For example, if 1 mA and 5 mA are boundary conditions, the
decimal values would be 819 and 4096.
3. Assuming that the programming device is on–line with the
processor, select the test mode and continuous scan mode
function.
4. Display the data in File 1 (Input Image Table).
5. Change the radix of the display to decimal.
6. If the input channel of the module has been disconnected from
its sensor, attach a voltage source (voltage input) or current
source (current input) to the input and set the source to the
lower boundary condition.
If the input channel is connected to its sensor, set the sensor to
its lower boundary condition.
7. Locate the input channel image data in the image table. The
input image word for the input channel being tested should read
approximately the lower boundary calculated in step 2.
The exact value of the image word is affected by the accuracy of
the analog module and the input sensor. Ensure that the
deviation from the boundary value is within tolerances for the
analog application.
8. If the input channel has been disconnected from its sensor,
attach the voltage source (voltage input) or current source
(current input) to the input and set the source to the upper
boundary condition.
If the input channel is connected to its sensor, set the sensor to
its upper boundary condition.
9. Repeat step 7 for the upper boundary condition.
Publication 1746-UM005B-EN-P - June 2004
Page 60

5-6 Testing Your Module
10. Repeat steps 1 through 8 for the remaining analog inputs.
11. If any of the analog input channels do not pass the start–up
procedure, check for the following potential causes:
• The processor is not in the TEST/CONTINUOUS scan mode.
• The terminal block is not secured on the analog module.
• The analog module terminal block is not wired properly or
wires are broken. See chapter 3 for details on wiring the
analog module.
• The analog module input channel sensor (or test voltage or
current source) is not operating properly.
If a current source is not available to test a current input channel, a
test voltage can be applied to the current input channel to achieve the
input boundary conditions. In normal operation, a voltage source
should not be connected to an analog input channel in the current
mode. To determine the boundary conditions use the following
equation:
Voltage Input (V) = Current Input (mA) x 0.25
EXAMPLE
If the current input boundary conditions are 1 mA
and 5 mA, the boundary conditions in volts would
be 0.25 volts and 1.25 volts. If this calculation is done
correctly, the test voltage should never exceed 5
volts.
Testing Analog Outputs
Before testing the analog module output channels, the SLC 500 system
must be installed and tested according to the SLC 500 Modular
Hardware Style User Manual (publication 1747-UM011) or the SLC 500
Fixed Hardware Style Installation & Operation Manual (publication
1747-6.21). The processor must be connected to a programming
Publication 1746-UM005B-EN-P - June 2004
Page 61

Testing Your Module 5-7
device, properly configured, and must have no rungs in its ladder
program. The analog module LED must be illuminated.
ATTENTION
The procedure described in this section for testing
analog module output channels assumes that all I/O
module outputs that normally activate prime movers
or other potentially dangerous devices have been
disconnected from these devices.
Do not attempt to test the analog module output
channels unless prime movers and/or other
potentially dangerous devices are disconnected from
the I/O modules.
The devices connected directly to the analog module outputs are
referred to as “actuators.” If the actuators do not affect prime movers
or initiate any other potentially dangerous operation, use these
devices to test the outputs.
If the actuators affect prime movers or initiate a potentially dangerous
operation, use a voltmeter to test the voltage outputs and an ammeter
to test the current outputs. Note that these meters have some inherent
error of their own.
In the latter case, disconnect actuators at the analog module outputs
to test the terminal blocks.
The following procedure applies to either of the previous situations.
1. Determine the boundary conditions for the analog module
output channel. For example, if the output channel is connected
to an actuator that has an input range of 1 volt to 5 volts, the
boundary conditions are 1 volt (lower) and 5 volts (upper).
2. Using the formulas from page, calculate the output decimal
values that must be entered into the processor image table to
produce the analog module output channel boundary conditions
determined in step 1.
For example, if 1 volt and 5 volts are boundary conditions, the
decimal values would be 3277 and 16384.
Publication 1746-UM005B-EN-P - June 2004
Page 62

5-8 Testing Your Module
3. Create and save the test rung shown below.
MOV
MOVE
Source N7:0
Dest O:e.x
"e" is the slot number of the analog module
"x" is the number of the analog module output channel
being tested
4. Download the program to the processor and enter the RUN
mode.
5. Display the data in address N7:0.
6. Enter lower boundary condition value in N7:0. For example, if
the lower boundary condition is 1 volt, enter 3277 into N7:0.
7. If the output channel has not been disconnected from its
actuator, the actuator should assume its lower boundary
condition.
If the output channel has been disconnected from its actuator,
connect either the ammeter (current output) or voltmeter
(voltage output) to the analog module output channel. The
exact value of the meter reading is affected by the accuracy of
the analog module and the meter. Ensure that the deviation from
the lower boundary condition is within tolerances for the
application in which the analog module is used.
Publication 1746-UM005B-EN-P - June 2004
For example, if 1 volt was the lower boundary condition, the
voltmeter should read approximately 1 volt.
8. Enter upper boundary condition value in N7:0. For example, if
the upper boundary condition is 5 volts, enter 16384 into N7:0.
9. Repeat step 7 for the upper boundary condition.
10. Repeat steps 1 through 9 for each output channel.
11. If any of the output channels do not pass the start–up
procedure, check for the following potential causes:
• The processor is not in the RUN mode.
• The terminal block is not secured in the analog module.
• The analog module terminal block is not wired properly or
wires are broken. See chapter 3 for details on wiring the
analog module.
• The actuator or test ammeter/voltmeter is not operating
properly.
Page 63

Chapter
Programming Examples
This chapter shows several programming examples that provide
additional capabilities such as:
• Addressing, Out-of-Range Detection, and Scaling of Analog
Inputs
• Addressing and Scaling of Analog Outputs
• Scaling Offsets when > 32,767 or < -32,768
• Scaling and Range Checking of Analog Inputs and Outputs
6
Addressing, Out-of-Range Detection, and Scaling of Analog Inputs
IMPORTANT
The following example uses an NI4 analog input module to show
input addressing, range checking and scaling of analog inputs into
engineering units.
The following assumptions are being made:
• The NI4 is located in slot 3 of a modular system.
• A temperature transducer with a 0 to 10V dc output is wired to
the second input channel on the analog module.
• The transducer voltage signal is proportional to a range of 100°
C to 500° C (212° F to 932° F).
• The process temperature must stay between 275° and 300° C
(527° F to 572° F). If the temperature deviates from this range, a
flag is set and this out-of-range value is not processed. The data
is presented in degrees C for monitoring and display purposes.
The programming examples in this chapter are for
informational purposes only. Because of the many
variables and requirements associated with any
application, the Allen–Bradley Company cannot
assume responsibility or liability for actual use based
on these examples.
1 Publication 1746-UM005B-EN-P - June 2004
Page 64

6-2 Programming Examples
The scaling operation is displayed in the following graph. It displays
the linear relationship between the input and the resulting scaled
values.
500°C
(Scaled max.)
Scaled
Value
300°C
275°C
100°C
(Scaled min.)
0=0V dc
(input min.)
Low
Limit
Process operating range
High
Limit
32767 = 10V dc – 1 LSB
(input max.)
Input Value
Calculating the Linear Relationship
Use the following equations to express the linear relationship between
the input value and the resulting scaled value.
Scaled value = (input value x slope) + offset
Slope = (scaled max. - scaled min.) / (input max. - input min.)
(500 - 100) / (32,767 - 0) = 400/32,767
Offset = scaled min. - (input min. x slope)
100 - (0 x (400/32,767)) = 100
Scaled value = (input value x (400 / 32767)) + 100
Publication 1746-UM005B-EN-P - June 2004
Page 65

Programming Examples 6-3
Calculating the Out-of-Range Flag Using the Scale Instruction
Use the following equation to calculate the low and high limit input
values which determine the out-of-range flag.
Input value = (scaled value - offset) / slope
low limit (275 - 100) / (400/32,767) = 14,344
high limit (300 - 100) / (400/32,767) = 16,393
Once you have calculated the linear relationship and the out-of-range
flag value, this example allows you to:
• Turn on a heater or fan to maintain the process temperature
between 275° and 300° C by using the out-of-range flags.
• Monitor the process temperature using a Data Table Access
Module (DTAM) or Hand-Held Terminal (HHT).
• Output the process temperature for operation interface purposes
by:
– MOVing the scaled value to an output module as variable
data to a Dataliner
– Converting the scaled value to BCD (using TOD instruction)
and MOVing it to an LED display
The following ladder diagrams show how to program the processor.
The first example uses standard math instructions available in any SLC
500 processor. The ladder diagram prevents a processor fault by
unlatching the mathematical overflow bit S2:5/0 before the end of the
scan.
The second example uses the scaling instruction (SCL)➀ available in
the 5/02 and higher processors. The rate parameter is calculated by
multiplying the slope by 10,000.
rate = (400/32767) x 10,000 = 122
If the result of the Source times the Rate, divided by 10000 is greater
than 32767, the SCL instruction overflows, causing error 0020 (Minor
Error Bit), and places 32767 in the Destination. This occurs regardless
of the current offset.
The third example uses the SCP (scale with parameters) instruction
available in the SLC 5/03 (OS302 or later), SLC 5/04 (OS401 or later),
and SLC 5/05 only.
Publication 1746-UM005B-EN-P - June 2004
Page 66

6-4 Programming Examples
Using Standard Math
Rung 2:0
Check for below allowable range
| Below |
| range flag |
| +LES–––––––––––––––+ B3 |
|–+LESS THAN +–––––––––––––––––––––––––––––––––––––––––––––––––( )–––––|
| |Source A I:1.1| 0 |
| | | |
| |Source B 14344| |
| | | |
| +––––––––––––––––––+ |
Rung 2:1
Check for above allowable range
| Above |
| range flag |
| +GRT–––––––––––––––+ B3 |
|–+GREATER THAN +–––––––––––––––––––––––––––––––––––––––––––––––––( )–––––|
| |Source A I:1.1| 1 |
| | | |
| |Source B 16383| |
| | | |
| +––––––––––––––––––+ |
Rung 2:2
Turn on the below range alarm output when analog
input is below acceptible range
| Below | Below |
| range flag| range alarm |
| B3 O:2 |
|––––] [–––––––––––––––––––––––––––––––––––––––––––––––––––––––––––––––( )–––––|
| 0 0 |
Rung 2:3
Turn on the above range alarm output when analog
input is above acceptible range
| Above | Above |
| range flag| range alarm |
| | |
| B3 O:2 |
|––––] [–––––––––––––––––––––––––––––––––––––––––––––––––––––––––––––––( )–––––|
| 1 1 |
Ladder logic continued on the next page .
Publication 1746-UM005B-EN-P - June 2004
Page 67

Programming Examples 6-5
Rung 2:4
Scale the analog input value and process the result
only when it is within the acceptible range
| Below |Above Multiply |
| range flag|range flag by the |
| scaled range |
| |
| B3 B3 +MUL–––––––––––––––+ |
|––––]/[––––––––]/[–––––––––––––––––––––––––––––––––––+–+MULTIPLY +–+–|
| 0 1 | |Source A I:1.1| | |
| | | | | |
| | |Source B 400| | |
| | | | | |
| | |Dest N7:0| | |
| | | 0| | |
| | +––––––––––––––––––+ | |
| | | |
| | Divide | |
| | result by | |
| | input | |
| | range | |
| | +DDV–––––––––––––––+ | |
| +–+DOUBLE DIVIDE +–+ |
| | |Source 32767| | |
| | | | | |
| | |Dest N7:0| | |
| | | 0| | |
| | +––––––––––––––––––+ | |
| | Add offset | |
| | (N7:0 cont | |
| | ains proce | |
| | ss tempera | |
| | ture) | |
| | +ADD–––––––––––––––+ | |
| +–+ADD +–+ |
| | |Source A N7:0| | |
| | | 0| | |
| | |Source B 100| | |
| | | | | |
| | |Dest N7:0| | |
| | | 0| | |
| | +––––––––––––––––––+ | |
| |
| | Clear flt | |
| | bit from | |
| | overflow | |
| | S:5 | |
| +––––(U)–––––––––––––––+ |
| 0 |
Rung 2:5
| |
|–––––––––––––––––––––––––––––––––––––+END+––––––––––––––––––––––––––––––––––––|
| |
Publication 1746-UM005B-EN-P - June 2004
Page 68

6-6 Programming Examples
Using the Scale (SCL) Instruction
Rung 2:0
Check for below allowable range.
| Below |
| range flag |
| +LES–––––––––––––––+ B3 |
|–+LESS THAN +–––––––––––––––––––––––––––––––––––––––––––––––––( )–––––|
| |Source A I:1.1| 0 |
| | 0| |
| |Source B 14344| |
| | | |
| +––––––––––––––––––+ |
Rung 2:1
Check for above allowable range.
| Above |
| range flag |
| +GRT–––––––––––––––+ B3 |
|–+GREATER THAN +–––––––––––––––––––––––––––––––––––––––––––––––––( )–––––|
| |Source A I:1.1| 1 |
| | 0| |
| |Source B 16383| |
| | | |
| +––––––––––––––––––+ |
Rung 2:2
Turn on the below range alarm output when the analog
input is below the acceptible range.
| Below Below |
| range flag range alarm |
| B3 O:2 |
|––––] [––––––––––––––––––––––––––––––––––––––––––––––––––––––––––––––––––( )––|
| 0 0 |
Rung 2:3
Turn on the above range alarm output when the analog
input is above the acceptible range.
| Above Above |
| range flag range alarm |
| B3 O:2 |
|––––] [––––––––––––––––––––––––––––––––––––––––––––––––––––––––––––––––––( )––|
| 1 1 |
Rung 2:4
Scale analog input value and process the result only
when it is within acceptible range.
| Below |Above Scale |
| range flag |range flag analog input |
| B3 B3 +SCL–––––––––––––––+ |
|––––]/[––––––––]/[–––––––––––––––––––––––––––––––––––––––+SCALE +–|
| 0 1 |Source I:1.1| |
| (2:0) (2:1) | 0| |
| |Rate [/10000] 122| |
| | | |
| |Offset 100| |
| | | |
| |Dest N7:0| |
| | 0| |
| +––––––––––––––––––+ |
| |
Rung 2:5
| |
|–––––––––––––––––––––––––––––––––––––+END+––––––––––––––––––––––––––––––––––––|
Publication 1746-UM005B-EN-P - June 2004
Page 69

Programming Examples 6-7
Using Scale with Parameters (SCP) Instruction
Rung 2:0
Check for below allowable range.
| Below |
| range flag |
| +LES–––––––––––––––+ B3 |
|–+LESS THAN +–––––––––––––––––––––––––––––––––––––––––––––––––( )–––––|
| |Source A I:1.1| 0 |
| | 0| |
| |Source B 14344| |
| | | |
| +––––––––––––––––––+ |
Rung 2:1
Check for above allowable range.
| Above |
| range flag |
| +GRT–––––––––––––––+ B3 |
|–+GREATER THAN +–––––––––––––––––––––––––––––––––––––––––––––––––( )–––––|
| |Source A I:1.1| 1 |
| | 0| |
| |Source B 16383| |
| | | |
| +––––––––––––––––––+ |
Rung 2:2
Turn on the below range alarm output when the analog
input is below the acceptible range.
| Below Below |
| range flag range alarm |
| B3 O:2 |
|––––] [––––––––––––––––––––––––––––––––––––––––––––––––––––––––––––––––––( )––|
| 0 0 |
Rung 2:3
Turn on the above range alarm output when the analog
input is above the acceptible range.
| Above Above |
| range flag range alarm |
| B3 O:2 |
|––––] [––––––––––––––––––––––––––––––––––––––––––––––––––––––––––––––––––( )––|
| 1 1 |
Rung 2:4
| Below |Above Scale |
| range flag |range flag analog input |
| B3 B3 +SCP–––––––––––––––+ |
|––––]/[––––––––]/[–––––––––––––––––––––––––––––––––––––––+SCALE W/PARAMETERS+–|
| 0 1 |Input I:1.1| |
| 0|
|Input Min. 0|
| |
|Input Max. 32767|
| |
|Scaled Min. 100|
| |
|Scaled Max. 500|
| |
|Scaled Output N7:0|
| 0|
+––––––––––––––––––+
Rung 2:5
| |
|–––––––––––––––––––––––––––––––––––––+END+––––––––––––––––––––––––––––––––––––|
Publication 1746-UM005B-EN-P - June 2004
Page 70

6-8 Programming Examples
Addressing and Scaling Outputs
We are making the following assumptions:
• The NIO4I is located in slot 2 of a SLC 500 system.
• An actuator from a flow control valve is wired to output channel
0.
• The actuator accepts a 4 mA to 20 mA signal proportional to 0 to
100% of the valve’s opening. For this example the signal actuator
can not receive a signal out of the 4 mA to 20 mA range.
• The percentage of valve opening is manually input to the SLC.
The following graph displays the linear relationship.
20 mA = 31208
(scaled max.)
Scaled
Value
4 mA = 6242
(scaled min.)
0%
(input min.)
Input Value
100%
(input max.)
Calculating the Linear Relationship
Use the following equations to calculate the scaled output value:
Scaled value = (input value x slope) + offset
Slope = (scaled max. - scaled min.) / (input max. - input min.)
(31,208 - 6,242) / (100-0) = 24,966/100
Offset = scaled min. - (input min. x slope)
6,242 - (0 x (24,966/100)) = 6,242
Scaled value = (input value x (24,966/100)) + 6,242
Publication 1746-UM005B-EN-P - June 2004
Page 71

Programming Examples 6-9
The out-of-range limits are predetermined because any value less than
0% is 6,242 and any value greater than 100% is 31,208. The ladder
logic checks for the out-of-range flag to verify that not less than 4 mA
and not more than 20 mA is provided out of the analog output
channel.
The percentage of valve opening may be input to the processor by:
• entering the data through a DTAM or HHT
• MOVing the data from thumb wheels or a keypad (possibly
converting the data from BCD using FRD instruction)
The percentage of valve opening may be output for operator interface
by:
• monitoring the data using a DTAM or HHT
• MOVing the data to an output module as variable data to a
Dataliner
• converting the data to BCD (using TOD instruction) and
MOVing it to an LED display
Since the slope is greater than 3.2767 only standard math can be used
for the ladder diagram with SLC 500 fixed, SLC 5/01, 5/02, 5/03
(OS300 or OS301), and 5/04 (OS400) processors. The ladder diagram
prevents a processor fault by unlatching the mathematical overflow bit
S2:5/0 before the end of the scan. Refer to the example ladder
diagram on the next page. Following the standard math example is a
ladder diagram using the SCP instruction, available only in the SLC
5/03 (OS302 or later), SLC 5/04 (OS401 or later), and SLC 5/05.
Publication 1746-UM005B-EN-P - June 2004
Page 72

6-10 Programming Examples
Using Standard Math
Rung 2:0
N7:0 contains percentage of valve open. If this value is
less than 0, move the minimum value to the analog output
(6242 decimal = 4 mA at the analog output).
| Check for Below |
| below range flag |
| range |
| +LES–––––––––––––––+ B3 |
|–+LESS THAN +––––––––––––––––––––––––––––––––+––––( )–––––––––––––––+–|
| |Source A N7:0| | 0 | |
| | 0| | | |
| |Source B 0| | | |
| | | | | |
| +––––––––––––––––––+ | | |
| | Minimum | |
| | analog | |
| | output | |
| | value | |
| | +MOV–––––––––––––––+ | |
| +–+MOVE +–+ |
| |Source 6242| |
| | | |
| |Dest O:2.0| |
| | | |
| +––––––––––––––––––+ |
Rung 2:1
N7:0 contains percentage of valve open. If this value is
greater than 100, move the maximum value to the analog output
(31208 decimal = 20 mA at the analog output).
| Check for Above |
| above range flag |
| range |
| +GRT–––––––––––––––+ B3 |
|–+GREATER THAN +––––––––––––––––––––––––––––––––+––––( )–––––––––––––––+–|
| |Source A N7:0| | 1 | |
| | 0| | | |
| |Source B 100| | | |
| | | | | |
| +––––––––––––––––––+ | | |
| | Minimum | |
| | analog | |
| | output | |
| | value | |
| | +MOV–––––––––––––––+ | |
| +–+MOVE +–+ |
| |Source 31208| |
| | | |
| |Dest O:2.0| |
| | | |
| +––––––––––––––––––+ |
Ladder logic continued on the next page .
Publication 1746-UM005B-EN-P - June 2004
Page 73

Programming Examples 6-11
Rung 2:2
Scale values in the 0 to 100% range to the decimal
range for the 4–20 mA analog output.
| Below |Above Mulitply |
| range flag|range flag by scaled |
| range |
| B3 B3 +MUL–––––––––––––––+ |
|––––]/[––––––––]/[–––––––––––––––––––––––––––––––––––+–+MULTIPLY +–+–|
| 0 1 | |Source A N7:0| | |
| | | 0| | |
| | |Source B 24966| | |
| | | | | |
| | |Dest N7:1| | |
| | | 0| | |
| | +––––––––––––––––––+ | |
| | | |
| | Divide by | |
| | input | |
| | range | |
| | +DDV–––––––––––––––+ | |
| +–+DOUBLE DIVIDE +–+ |
| | |Source 100| | |
| | | | | |
| | |Dest N7:1| | |
| | | 0| | |
| | +––––––––––––––––––+ | |
| | Add offset | |
| | +ADD–––––––––––––––+ | |
| +–+ADD +–+ |
| | |Source A N7:1| | |
| | | 0| | |
| | |Source B 6242| | |
| | | | | |
| | |Dest O:2.0| | |
| | | | | |
| | +––––––––––––––––––+ | |
| | Clear math | |
| | overflow | |
| | bit | |
| | S:5 | |
| +––––(U)–––––––––––––––+ |
| 0 |
Rung 2:3
| |
|–––––––––––––––––––––––––––––––––––––+END+––––––––––––––––––––––––––––––––––––|
Publication 1746-UM005B-EN-P - June 2004
Page 74

6-12 Programming Examples
Using the Scale with Parameters (SCP) Instruction
Rung 2:0
N7:0 contains percentage of valve open. If this value is
less than 0, move the minimum value to the analog output
(6242 decimal = 4 mA at the analog output).
| Check for Below |
| below range flag |
| range |
| +LES–––––––––––––––+ B3 |
|–+LESS THAN +––––––––––––––––––––––––––––––––+––––( )–––––––––––––––+–|
| |Source A N7:0| | 0 | |
| | 0| | | |
| |Source B 0| | | |
| | | | | |
| +––––––––––––––––––+ | | |
| | Minimum | |
| | analog | |
| | output | |
| | value | |
| | +MOV–––––––––––––––+ | |
| +–+MOVE +–+ |
| |Source 6242| |
| | | |
| |Dest O:2.0| |
| | | |
| +––––––––––––––––––+ |
Rung 2:1
N7:0 contains percentage of valve open. If this value is
greater than 100, move the maximum value to the analog output
(31208 decimal = 20 mA at the analog output).
| Check for Above |
| above range flag |
| range |
| +GRT–––––––––––––––+ B3 |
|–+GREATER THAN +––––––––––––––––––––––––––––––––+––––( )–––––––––––––––+–|
| |Source A N7:0| | 1 | |
| | 0| | | |
| |Source B 100| | | |
| | | | | |
| +––––––––––––––––––+ | | |
| | Minimum | |
| | analog | |
| | output | |
| | value | |
| | +MOV–––––––––––––––+ | |
| +–+MOVE +–+ |
| |Source 31208| |
| | | |
| |Dest O:2.0| |
| | | |
| +––––––––––––––––––+ |
Ladder logic continued on the next page .
Publication 1746-UM005B-EN-P - June 2004
Page 75

Programming Examples 6-13
Rung 2:2
Scale values in the 0 to 100% range to the
decimal range for the 4–20 mA analog output.
| Below |Above |
| range flag|range flag |
| B3 B3 +SCP––––––––––––––––––––+ |
|––––]/[––––––––]/[––––––––––––––––––––––––––––––––––+SCALE W/PARAMETERS +–|
| 0 1 |Input N7:0| |
| | 0| |
| |Input Min. 0| |
| | | |
| |Input Max. 100| |
| | | |
| |Scaled Min. 6242| |
| | | |
| |Scaled Max. 31208| |
| | | |
| |Scaled Output O:2.0| |
| | | |
| +–––––––––––––––––––––––+ |
| |
Rung 2:3
| |
|–––––––––––––––––––––––––––––––––––––+END+––––––––––––––––––––––––––––––––––––|
Publication 1746-UM005B-EN-P - June 2004
Page 76

6-14 Programming Examples
Scaling Offset when
>
32,767 or < -32,768
There may be applications when the offset value put into standard
math instructions is greater than 32,767 or less than -32,768. In these
cases, it is easier to shift the linear relationship along the input value
axis and reduce the values.
This example is similar to the situation described in Example 2, except
the 4 mA to 20 mA signal is scaled to a value between 90-100%. The
NIO4I is located in slot 2 and the output device is wired to channel 0.
The following graph displays the linear relationship.
20 mA = 31208
(scaled max.)
Scaled
Value
4 mA = 6242
(scaled min.)
90%
(input min.)
Input Value
100%
(input max.)
Calculating the Linear Relationship
Use the following equations to calculate the scaled units:
Scaled value = (input value x slope)+ offset
Slope = (scaled max. - scaled min.) / (input max. - input min.)
(31,208 - 6,242) / (100 - 90) = 24,966/10
Offset = scaled min. - (input min. x slope)
6242 - (90 x (24,966/10)) = -218,452
Scaled value = (input value) x (24,966/10) - 218,452
Publication 1746-UM005B-EN-P - June 2004
Notice the offset value is less than -32,768.
Page 77

Programming Examples 6-15
The following graph shows the shifted linear relationship. Notice that
the resulting offset value is reduced.
20 mA = 31208
(scaled max.)
Scaled
Value
4 mA = 6242
(scaled min.)
90%
(input min.)
100%
(input max.)
Input Value
Calculating the Shifted Linear Relationship
Use the following equations to recalculate the linear relationship:
Scaled value = ((input value - input min.) x slope)) + offset
Slope = (scaled max. - scaled min.) / (input max. - input min.)
(31,208 - 6,242) / (100-90) = 24,966/10
Offset = scaled min.
6,242
Scaled value = ((input value - 90) x (24,966/10)) + 6242
Since the slope is greater than 3.2767, only standard math can be used
for the ladder diagram with SLC 500 fixed, SLC 5/01, 5/02, 5/03
(OS300 and 301) and 5/04 (OS400). The following ladder diagram
prevents a processor fault by unlatching the mathematical overflow bit
S2:5/0 before the end of the scan. Refer to the example ladder
diagram on the next page. Following this example is another ladder
diagram performing the same function, but using the SCP (scale with
parameters) instruction available only in the SLC 5/03 (OS302), SLC
5/04 (OS401), and SLC 5/05.
Publication 1746-UM005B-EN-P - June 2004
Page 78

6-16 Programming Examples
Rung 2:0
N7:0 contains the percentage of the valve open.
| Check for |
| below range |
| +LES–––––––––––––––+ B3 |
|–+LESS THAN +––––––––––––––––––––––––––––––––+––( )–––––––––––––––––+–|
| |Source A N7:0| | 0 | |
| | 0| | | |
| |Source B 90| | | |
| | | | | |
| +––––––––––––––––––+ | | |
| | +MOV–––––––––––––––+ | |
| +–+MOVE +–+ |
| |Source 6242| |
| | | |
| |Dest O:2.0| |
| | | |
| +––––––––––––––––––+ |
Rung 2:1
| Check for |
| above range |
| +GRT–––––––––––––––+ B3 |
|–+GREATER THAN +––––––––––––––––––––––––––––––––+––( )–––––––––––––––––+–|
| |Source A N7:0| | 1 | |
| | 0| | | |
| |Source B 100| | | |
| | | | | |
| +––––––––––––––––––+ | | |
| | +MOV–––––––––––––––+ | |
| +–+MOVE +–+ |
| |Source 31208| |
| | | |
| |Dest O:2.0| |
| | | |
| +––––––––––––––––––+ |
Using Standard Math
Ladder logic continued on the next page .
Publication 1746-UM005B-EN-P - June 2004
Page 79

Programming Examples 6-17
Rung 2:2
Scale values in the 90–100% range to the decimal range for the 4–20 mA analog
output.
| Subtract |
| the input |
| min. |
| B3 B3 +SUB–––––––––––––––+ |
|––––]/[––––––––]/[–––––––––––––––––––––––––––––––––––+–+SUBTRACT +–+–|
| 0 0 | |Source A N7:0| | |
| | | 0| | |
| | |Source B 90| | |
| | | | | |
| | |Dest N7:1| | |
| | | 0| | |
| | +––––––––––––––––––+ | |
| | | |
| | Multiply | |
| | by the | |
| | scaled | |
| | range | |
| | +MUL–––––––––––––––+ | |
| +–+MULTIPLY +–+ |
| | |Source A N7:1| | |
| | | 0| | |
| | |Source B 24966| | |
| | | | | |
| | |Dest N7:1| | |
| | | 0| | |
| | +––––––––––––––––––+ | |
| | Divide | |
| | result by | |
| | input | |
| | range | |
| | +DDV–––––––––––––––+ | |
| +–+DOUBLE DIVIDE +–+ |
| | |Source 10| | |
| | | | | |
| | |Dest N7:1| | |
| | | 0| | |
| | +––––––––––––––––––+ | |
| | Add offset | |
| | +ADD–––––––––––––––+ | |
| +–+ADD +–+ |
| | |Source A N7:1| | |
| | | 0| | |
| | |Source B 6242| | |
| | | | | |
| | |Dest O:2.0| | |
| | | | | |
| | +––––––––––––––––––+ | |
| | Clear flt | |
| | bit from | |
| | overflow | |
| | S:5 | |
| +––––(U)–––––––––––––––+ |
| 0 |
Rung 2:3
| |
|–––––––––––––––––––––––––––––––––––––+END+––––––––––––––––––––––––––––––––––––|
Publication 1746-UM005B-EN-P - June 2004
Page 80

6-18 Programming Examples
Using the Scale with Parameters (SCP) Instruction
Rung 2:0
N7:0 contains percentage of valve open. If this value is
less than 90, move the minimum value to the analog output
(6242 decimal = 4 mA at the analog output).
| Check for Below |
| below range flag |
| range |
| +LES–––––––––––––––+ B3 |
|–+LESS THAN +––––––––––––––––––––––––––––––––+––––( )–––––––––––––––+–|
| |Source A N7:0| | 0 | |
| | 0| | | |
| |Source B 90| | | |
| | | | | |
| +––––––––––––––––––+ | | |
| | Minimum | |
| | analog | |
| | output | |
| | value | |
| | +MOV–––––––––––––––+ | |
| +–+MOVE +–+ |
| |Source 6242| |
| | | |
| |Dest O:2.0| |
| | | |
| +––––––––––––––––––+ |
Rung 2:1
N7:0 contains percentage of valve open. If this value is
greater than 100, move the maximum value to the analog output
(31208 decimal = 20 mA at the analog output).
| Check for Above |
| above range flag |
| range |
| +GRT–––––––––––––––+ B3 |
|–+GREATER THAN +––––––––––––––––––––––––––––––––+––––( )–––––––––––––––+–|
| |Source A N7:0| | 1 | |
| | 0| | | |
| |Source B 100| | | |
| | | | | |
| +––––––––––––––––––+ | | |
| | Minimum | |
| | analog | |
| | output | |
| | value | |
| | +MOV–––––––––––––––+ | |
| +–+MOVE +–+ |
| |Source 31208| |
| | | |
| |Dest O:2.0| |
| | | |
| +––––––––––––––––––+ |
Ladder logic continued on the next page .
Publication 1746-UM005B-EN-P - June 2004
Page 81

Programming Examples 6-19
Rung 2:2
Scale values in the 90 to 100% range to the
decimal range for the 4–20 mA analog output.
| Below |Above Scale for the |
| analog output |
| range flag|range flag |
| B3 B3 +SCP––––––––––––––––––––+ |
|––––]/[––––––––]/[––––––––––––––––––––––––––––––––––+SCALE W/PARAMETERS +–|
| 0 1 |Input N7:0| |
| | 0| |
| |Input Min. 90| |
| | | |
| |Input Max. 100| |
| | | |
| |Scaled Min. 6242| |
| | | |
| |Scaled Max. 31208| |
| | | |
| |Scaled Output O:2.0| |
| | | |
| +–––––––––––––––––––––––+ |
Rung 2:3
| |
|–––––––––––––––––––––––––––––––––––––+END+––––––––––––––––––––––––––––––––––––|
| |
Publication 1746-UM005B-EN-P - June 2004
Page 82

6-20 Programming Examples
Scaling and Range Checking and Analog Inputs and Outputs
This example demonstrates the addressing of analog I/O and the
scaling and range checking of analog input and output values. An
NIO4V is placed in slot 1 of an SLC 500 system. A 0 to 200 psi
pressure sensor is input as a 4 mA to 20 mA signal to input channel 0.
The input value is checked to ensure it remains within the 4 mA to 20
mA range.
It is then scaled and output as a 0 to 2.5 volt signal to a panel meter
pressure display connected to output channel 0. If an out–of–range
condition is detected a flag bit will be set. The scaling operation is
shown below.
The graph displays the linear relationship between the input value
and the resulting scaled value.
8192
(scaled max.)
Scaled
Value
0
(scaled min.)
3277
(input min.)
Input Value
16384
(input max.)
Publication 1746-UM005B-EN-P - June 2004
Page 83

Programming Examples 6-21
Calculating the Linear Relationship
Use the following equations to express the linear relationship between
the input value and the resulting scaled value:
Scaled value = (input value x slope) + offset
Slope = (scaled max. - scaled min.) / (input max. - input min.)
(8192 - 0) / (16384 - 3277) = 8192/13107
Offset = scaled min. - (input min. x slope)
0-3277 (8192/13,107) = -2048
Scaled value = (input value x (8192/13017)) - 2048
This equation can be implemented using integer math capabilities of
the SLC 500 system. Three example programs are shown. The first
runs on any SLC 500 processor and the second uses the scaling
instruction available on the SLC 5/02 and later processors. The third
program uses the SCP (scale with parameters) instruction available
only with SLC 5/03 (OS302 or later), SLC 5/04 (OS401 or later), and
SLC 5/05.
In the first example program the analog input value is checked against
the minimum and maximum allowable input values.
If the input is out-of-range, the output value is set to its minimum or
maximum value. If the input value is in range the output value is
determined by scaling the input. To scale an analog input, follow
these steps:
1. Multiply the input by the scaled range
Scale range=(scaled max. - scaled min.).
2. Divide the 32 bit result by the input range
Input range=(input max. - input min.).
3. Add in the offset value (in this case negative). The final value is
then moved to the analog output channel 0.
The multiply operation will generate an overflow bit and minor error
flag whenever the results exceed 16 bits. Since the divide is carried
out on the 32 bit result in the math register, the overflow does not
present a problem. The minor error flag has to be cleared before the
end of the program scan to avoid a system error.
Publication 1746-UM005B-EN-P - June 2004
Page 84

6-22 Programming Examples
Rung 2:0
Check for below range.
| +LES–––––––––––––––+ B3 |
|–+LESS THAN +––––––––––––––––––––––––––––––––+––( )–––––––––––––––––+–|
| |Source A I:1.0| | 0 | |
| | | | | |
| |Source B 3277| | | |
| | | | | |
| +––––––––––––––––––+ | | |
| | +MOV–––––––––––––––+ | |
| +–+MOVE +–+ |
| |Source 0| |
| | | |
| |Dest O:1.0| |
| | | |
| +––––––––––––––––––+ |
Using Standard Math Instructions
Ladder logic continued on the next page .
Publication 1746-UM005B-EN-P - June 2004
Page 85

Programming Examples 6-23
Rung 2:1
Check for above range.
| +GRT–––––––––––––––+ B3 |
|–+GREATER THAN +––––––––––––––––––––––––––––––––+––( )–––––––––––––––––+–|
| |Source A I:1.0| | 1 | |
| | | | | |
| |Source B 16384| | | |
| | | | | |
| +––––––––––––––––––+ | | |
| | +MOV–––––––––––––––+ | |
| +–+MOVE +–+ |
| |Source 8192| |
| | | |
| |Dest O:1.0| |
| | | |
| +––––––––––––––––––+ |
Rung 2:2
Scale the analog input for the analog output.
| Multiply |
| by the scaled |
| range |
| |
| B3 B3 +MUL–––––––––––––––+ |
|––––]/[––––––––]/[–––––––––––––––––––––––––––––––––––+–+MULTIPLY +–+–|
| 0 1 | |Source A I:1.0| | |
| | | | | |
| | |Source B 8192| | |
| | | | | |
| | |Dest N7:0| | |
| | | 0| | |
| | +––––––––––––––––––+ | |
| | | |
| | Divide | |
| | result by | |
| | the input | |
| | range | |
| | +DDV–––––––––––––––+ | |
| +–+DOUBLE DIVIDE +–+ |
| | |Source 13107| | |
| | | | | |
| | |Dest N7:0| | |
| | | 0| | |
| | +––––––––––––––––––+ | |
| | Add offset | |
| | +ADD–––––––––––––––+ | |
| +–+ADD +–+ |
| | |Source A N7:0| | |
| | | 0| | |
| | |Source B –2048| | |
| | | | | |
| | |Dest O:1.0| | |
| | | | | |
| | +––––––––––––––––––+ | |
| | Clear flt | |
| | bit from | |
| | overflow | |
| | S:5 | |
| +––––(U)–––––––––––––––+ |
| 0 |
Rung 2:3
| |
|–––––––––––––––––––––––––––––––––––––+END+––––––––––––––––––––––––––––––––––––|
| |
Publication 1746-UM005B-EN-P - June 2004
Page 86

6-24 Programming Examples
Scaling and Range Checking of Analog Inputs and Outputs
The scaling instruction available in the SLC 5/02 processor is used to
realize a more efficient program. The scaling instruction uses the same
multiply, divide and add algorithm but it does so with a single rate
instead of the scaled range and input range values. The rate is
determined by:
Rate = (scaled range / input range) x 10,000
For the programming example the rate = 6250
Publication 1746-UM005B-EN-P - June 2004
Page 87

Programming Examples 6-25
Using SCL Instruction
Rung 2:0
Check for below range.
| +LES–––––––––––––––+ B3 |
|–+LESS THAN +––––––––––––––––––––––––––––––––+––( )–––––––––––––––––+–|
| |Source A I:1.0| | 0 | |
| | | | | |
| |Source B 3277| | | |
| | | | | |
| +––––––––––––––––––+ | | |
| | +MOV–––––––––––––––+ | |
| +–+MOVE +–+ |
| |Source 0| |
| | | |
| |Dest O:1.0| |
| | | |
| +––––––––––––––––––+ |
Rung 2:1
Check for above range.
| +GRT–––––––––––––––+ B3 |
|–+GREATER THAN +––––––––––––––––––––––––––––––––+––( )–––––––––––––––––+–|
| |Source A I:1.0| | 1 | |
| | | | | |
| |Source B 16384| | | |
| | | | | |
| +––––––––––––––––––+ | | |
| | +MOV–––––––––––––––+ | |
| +–+MOVE +–+ |
| |Source 8192| |
| | | |
| |Dest O:1.0| |
| | | |
| +––––––––––––––––––+ |
Rung 2:2
Scale the analog input for the analog output.
| B3 B3 +SCL–––––––––––––––+ |
|––––]/[––––––––] [–––––––––––––––––––––––––––––––––––––––+SCALE +–|
| 0 1 |Source I:1.0| |
| | | |
| |Rate [/10000] 6250| |
| | | |
| |Offset –2048| |
| | | |
| |Dest O:1.0| |
| | | |
| +––––––––––––––––––+ |
| |
Rung 2:3
| |
|–––––––––––––––––––––––––––––––––––––+END+––––––––––––––––––––––––––––––––––––|
Publication 1746-UM005B-EN-P - June 2004
Page 88

6-26 Programming Examples
Using the Scale with Parameters (SCP) Instruction
Rung 2:0
Check for below range.
| +LES–––––––––––––––+ B3 |
|–+LESS THAN +––––––––––––––––––––––––––––––––+––( )–––––––––––––––––+–|
| |Source A I:1.0| | 0 | |
| | | | | |
| |Source B 3277| | | |
| | | | | |
| +––––––––––––––––––+ | | |
| | +MOV–––––––––––––––+ | |
| +–+MOVE +–+ |
| |Source 0| |
| | | |
| |Dest O:1.0| |
| | | |
| +––––––––––––––––––+ |
Rung 2:1
Check for above range.
| +GRT–––––––––––––––+ B3 |
|–+GREATER THAN +––––––––––––––––––––––––––––––––+––( )–––––––––––––––––+–|
| |Source A I:1.0| | 1 | |
| | | | | |
| |Source B 16384| | | |
| | | | | |
| +––––––––––––––––––+ | | |
| | +MOV–––––––––––––––+ | |
| +–+MOVE +–+ |
| |Source 8192| |
| | | |
| |Dest O:1.0| |
| | | |
| +––––––––––––––––––+ |
Rung 2:2
Scale the analog input for the analog output.
| B3 B3 +SCP––––––––––––––––––––+ |
|––––]/[––––––––] [––––––––––––––––––––––––––––––––––+SCALE W/PARAMETERS +–|
| 0 1 |Input I:1.0| |
| | | |
| |Input Min. 3277| |
| | | |
| |Input Max. 16384| |
| | | |
| |Scaled Min. 0| |
| | | |
| |Scaled Max. 8192| |
| | | |
| |Scaled Output O:1.0| |
| | | |
| +–––––––––––––––––––––––+ |
| |
Rung 2:3
| |
|–––––––––––––––––––––––––––––––––––––+END+––––––––––––––––––––––––––––––––––––|
| |
Publication 1746-UM005B-EN-P - June 2004
Page 89

Maintenance and Safety
Chapter
7
Preventative Maintenance
This chapter provides preventive maintenance information and safety
considerations when troubleshooting your SLC 500 system.
The printed circuit boards of the analog modules must be protected
from dirt, oil, moisture and other airborne contaminants. To protect
these boards, the SLC 500 system must be installed in an enclosure
suitable for the environment. The interior of the enclosure should be
kept clean and the enclosure door should be kept closed whenever
possible.
Regularly inspect your terminal connections for tightness. Loose
connections may cause improper functioning of the SLC 500 system or
damage the components of the system.
ATTENTION
To ensure personal safety and to guard against
equipment damage, inspect connections with
incoming power OFF.
For general maintenance procedures for electrical equipment, refer to
the requirements specific to your region.
• Europe: Refer to the standards found in EN 60204 and your
national regulations.
• United States: Refer to article 70B of the National Fire Protection
Association (NFPA). It describes general requirements regarding
safety related work practices.
Safety considerations are an important element of proper
troubleshooting procedures. Actively thinking about the safety of
yourself and others, as well as the condition of your equipment, is of
primary importance. Refer to the SLC 500 Fixed Hardware Style
Installation & Operation Manual (publication 1747-6.21) or the SLC
500 Modular Hardware Style User Manual (publication 1747-UM011)
for additional information on troubleshooting.
1 Publication 1746-UM005B-EN-P - June 2004
Page 90

7-2 Maintenance and Safety
Safety Considerations When Troubleshooting
The following section describes several safety areas you should be
aware of when troubleshooting your SLC 500 system.
Indicator Lights - When the red LED on the analog module is
illuminated it indicates that 24V dc power is applied to the module.
Activating Devices When Troubleshooting - When
troubleshooting, never reach into the machine to actuate a device.
Unexpected machine motion could occur. Use a wooden stick.
Stand Clear of Machine - When troubleshooting any SLC 500 system
problem, have all personnel remain clear of the machine. The
problem could be intermittent, and sudden unexpected machine
motion could occur. Have someone ready to operate an emergency
stop switch in case it becomes necessary to shut off power to the
machine.
ATTENTION
Never reach into a machine to actuate a switch since
unexpected machine motion can occur.
Remove all electrical power at the main power
disconnect switches before checking electrical
connections or inputs/outputs causing machine
motion.
Program Alteration - There are several causes of alteration to the
user program, including extreme environmental conditions,
Electromagnetic Interference (EMI), improper grounding, improper
wiring connections, and unauthorized tampering. If you suspect the
program has been altered, check it against a previously saved
program on an EEPROM or UVPROM memory module.
Safety Circuits installed on the machine for safety reasons, like over
travel limit switches, stop push buttons, and interlocks, should always
be hard–wired to the master control relay. These devices must be
wired in series so that when any one device opens, the master control
relay is de–energized thereby removing power to the machine. Never
alter these circuits to defeat their function. Serious injury or machine
damage could result.
Publication 1746-UM005B-EN-P - June 2004
Page 91

Specifications
Appendix
A
Analog Modules Specification
General Specifications for NI4, NIO4I, NIO4V, NO4I, and NO4V
This section lists the specifications for the 1746-NI4, NIO4I, NIO4V,
NO4I and NO4V analog modules. They include:
• General specifications
• Current and Voltage input specifications
• Current and Voltage output specifications
Specification Value
SLC Communication Format 16 Bit Two’s Complement Binary
Field Wiring to Backplane Isolation 500V dc
Update Time 512 µs for all channels in parallel
Recommended Cable Shielded Belden #8761
Maximum Wire Size #14 AWG (maximum)
Terminal Block Removable
Location 1746 chassis
Calibration Factory Calibrated (Refer to calibration
procedure, pg. D-2)
Noise Immunity NEMA Standard ICS 2-230
Environmental Conditions
Operating Temperature
Storage Temperature
Relative Humidity
Agency Certification
(when product or packaging is marked)
1 Publication 1746-UM005B-EN-P - June 2004
0° to +60° C (+32° to +140° F)
-40° to +85° C (-40° to +185° F)
5 to 95% (non–condensing)
C-UL Listed Industrial Control Equipment
for use in Class 1, Div 2 Hazardous
Locations
Marked for all applicable directives
Marked for all applicable acts
N223
Page 92

A-2 Specifications
General Analog Input
Catalog 1746- Input Channels per
Module
NI4 4 differential, voltage or
current selectable per
channel, not individually
isolated
NIO4I 2 differential, voltage or
current selectable per
channel, not individually
isolated
NIO4V 2 differential, voltage or
current selectable per
channel, not individually
isolated
NO4I NA 4 current outputs, not
NO4V NA 4 voltage outputs, not
Output Channels per
Module
NA 35 mA 85 mA NA
2 current outputs, not
individually isolated
2 voltage outputs, not
individually isolated
individually isolated
individually isolated
(1) Required for some applications if SLC 24V power is not readily available.
Specifications for NI4,
Backplane Current Draw External 24V dc Power
5V (max.) 24V (max.)
55 mA 145 mA NA
55 mA 115 mA NA
55 mA 195 mA 24 ±10% at 195 mA max.
55 mA 145 mA 24 ±10% at 145 mA max.
Supply Tolerance
(21.6 to 26.4V dc)
(21.6 to 26.4V dc)
(1)
(1)
NIO4I, and NIO4V
Specification 1746-NI4 1746-NI04I, -NIO4V
Converter Resolution 16 bit
Repeatability ±1 LSB
Location of LSB in I/O image word 0000 0000 0000 0001
Non–linearity 0.01%
Common Mode Voltage Range -20 to +20 volts
Common Mode Rejection at 0 to 10 Hz (min.) 50 dB
Common Mode Rejection at 60 Hz (min.) 105 dB
Normal Mode Rejection at 60 Hz (min.) 55 dB
Channel Bandwidth 10 Hz
Step Response 60 ms at 95%
Conversion Method Delta–Sigma Modulation
Impedance to ANL COM
Impedance channel to channel
(1) The value listed is for Series B and greater. For Series A, the impedance to ANL COM is 500K Ohms.
(2) The value listed is for Series B and greater. For Series A, the impedance channel to channel is 500K Ohms.
380K ohms
760K ohms
(1)
(2)
500K ohms
1M ohms
Publication 1746-UM005B-EN-P - June 2004
Page 93

Current-Loop Input
Specifications A-3
Specifications for NI4,
NIO4I, and NIO4V
Specification 1746-NI4, -NI04I, -NIO4V
Input Range (Normal Operation) -20 to +20 mA
Absolute Maximum Input Current -30 to +30 mA
Absolute Maximum Input Voltage ±7.5V dc or 7.5V ac RMS
Current Input Coding -20 to +20 mA -16,384 to +16,384
Input Impedance 250 Ohms
Resolution 1.22070 µA per LSB
Full Scale 20 mA
Overall Accuracy at +25° C (77° F) (max.) ±0.365% of full scale
Overall Accuracy at 0° to +60° C
(32° to 140° F) (max.)
Overall Accuracy Drift (max.) +79 ppm/5 C of full scale
Gain Error at +25° C (77° F) (max.) +0.323%
Gain Error at 0° to +60° C
(32° to 140° F) (max.)
Gain Error Drift (max.) ±67ppm/° C
Offset Error at +25° C (77° F) (max.)
(lin = 0, Vcm = 0)
Offset Error at 0° to +60° C
(32° to 140° F) (max.) (lin = 0, Vcm = 0)
±0.642% of full scale
±0.556%
±7 LSB
±14 LSB
(1)
Offset Error Drift (max.) (lin = 0, Vcm = 0) ±0.20 LSB/° C
(1) Refer to Appendix C for a method to improve accuracy over temperature.
Publication 1746-UM005B-EN-P - June 2004
Page 94

A-4 Specifications
Voltage Input Specifications for NI4, NIO4I, and NIO4V
Specification 1746-NI4 1746-NI04I, -NI04V
Input Range -10 to +10V dc - 1 LSB
Voltage Input Coding (-10 to +10V dc - 1 LSB) -32,768 to +32,767
Input Impedance
Resolution 305.176 µV per LSB
Full Scale 10V dc
Overall Accuracy at +25° C (77° F) (max.) ±0.284% of full scale
Overall Accuracy at 0° to +60° C
(32° to 140° F) (max.)
Overall Accuracy Drift (max.) ±63 ppm/° C of full scale
Gain Error at +25° C (77° F) (max.) ±0.263%
760K ohms
±0.504% of full scale
(1)
1M ohms
(2)
Gain Error at 0° to +60° C
(32° to 140° F) (max.)
Gain Error Drift (max.) ±57 ppm/° C
Offset Error at +25° C (77° F) (max.) ±7 LSB
Offset Error at 0° to +60° C
(32° to 140° F) (max.)
Offset Error Drift (max.) ±0.20 LSB/° C
Overvoltage Protection (max. across IN+ to IN-
terminals)
(1) The value listed is for Series B and greater. For Series A, the input impedance is 1M ohm.
(2) Refer to Appendix C for a method to improve accuracy over temperature.
±0.461%
±14 LSB
either 220V ac RMS continuously
or 220V dc continuously
Publication 1746-UM005B-EN-P - June 2004
Page 95

Current Output
Specifications A-5
Specifications for NIO4I
and NO4I
Specification 1746-NI04I, -N04I
Converter Resolution 14 bit
Location of LSB in I/O image word 0000 0000 0000 01XX
Non–linearity 0.05%
Conversion Method R-2R Ladder
Step Response 2.5 ms (at 95%)
Load Range 0 to 500 Ohms
Maximum Load Reactance 100 µH
Current Output Coding (0 to +21 mA - 1 LSB) 0 to +32764
Output Range (Normal) 0 to +20 mA
Overrange Capability 5% (0 to +21 mA - 1 LSB)
Resolution 2.56348 µA per LSB
Full Scale 21 mA
Overall Accuracy at +25° C (77° F) (max.) ±0.298% of full scale
Overall Accuracy at 0° to +60° C
(32° to 140° F) (max.)
Overall Accuracy Drift (max.) ±70 ppm/° C of full scale
±0.541% of full scale
Gain Error at +25° C (77° F) (max.) ±0.298%
Gain Error at 0° to +60° C
(32° to 140° F) (max.)
Gain Error Drift (max.) ±62 ppm/° C
Offset Error at +25° C (77° F) (max.) ±10 LSB
Offset Error at 0° to +60° C
(32° to 140° F) (max.)
Offset Error Drift (max.) ±0.06 LSB/° C
±0.516%
±12 LSB
Publication 1746-UM005B-EN-P - June 2004
Page 96

A-6 Specifications
Voltage Output Specifications for NIO4V and NO4V
Specification 1746--NIO4V, -N04V
Converter Resolution 14 bit
Location of LSB in I/O image word 0000 0000 0000 01XX
Non–linearity 0.05%
Conversion Method R-2R Ladder
Step Response 2.5 ms (at 95%)
Load Range 1K to ∞ Ohms
Maximum Load Current 10 mA
Maximum Load Reactance 1 µF
Voltage Output Coding (-10 to +10V dc - 1
LSB)
Output Range (Normal) -10 to +10 volts - 1 LSB
Resolution 1.22070 mV per LSB
Full Scale 10V dc
Overall Accuracy at +25° C (77° F) (max.) ±0.208% of full scale
Overall Accuracy at 0° to +60° C
(32° to 140° F) (max.)
Overall Accuracy Drift (max.) ±54 ppm/° C of full scale
Gain Error at +25° C (77° F) (max.) ±0.208%
-32,768 to +32,764
±0.384% of full scale
Gain Error at 0° to +60° C
(32° to 140° F) (max.)
Gain Error Drift (max.) ±47 ppm/° C
Offset Error at +25° C (77° F) (max.) ±9 LSB
Offset Error at 0° to +60° C
(32° to 140° F) (max.)
Offset Error Drift (max.) ±0.05 LSB/° C
±0.374%
±11 LSB
Publication 1746-UM005B-EN-P - June 2004
Page 97

Appendix
B
Two’s Complement Binary Numbers
The SLC 500 processor memory stores 16-bit binary numbers. Two’s
complement binary is used when performing mathematical
calculations internal to the processor. Analog input values from the
analog modules are returned to the processor in 16-bit two’s
complement binary format. For positive numbers, the binary notation
and two’s complement binary notation are identical.
As indicated in the figure on the next page, each position in the
number has a decimal value, beginning at the right with 2
ending at the left with 2
processor memory. A 0 indicates a value of 0; a 1 indicates the
decimal value of the position. The equivalent decimal value of the
binary number is the sum of the position values.
15
. Each position can be 0 or 1 in the
0
and
Positive Decimal Values
The far left position is always 0 for positive values. As indicated in the
figure on the next page, this limits the maximum positive decimal
value to 32767 (all positions are 1 except the far left position). For
example:
0000 1001 0000 1110 = 211+28+23+22+2
0010 0011 0010 1000 = 213+29+28+25+2
= 8192+512+256+32+8 = 9000
= 2048+256+8+4+2 = 2318
1
3
1 Publication 1746-UM005B-EN-P - June 2004
Page 98

B-2 Two’s Complement Binary Numbers
14 =
1x2
16384
13 =
1x2
8192
12 =
1x2
4096
11 =
2048
1x2
10 =
1024
1x2
9 =
512
1x2
8 =
256
1x2
7 =
1x2
128
6 =
64
1x2
5 =
32
1x2
4 =
1x2
16
3 =
1x2
1x2
10 11111111 111 111
16384
8192
4096
2048
1024
512
256
128
64
32
16
8
2 =
4
1 =
2
1x2
0 =
1
1x2
8
4
2
1
32767
0x2
15 =
This position is always zero for positive numbers
0
Negative Decimal Values
In two’s complement notation, the far left position is always 1 for
negative values. The equivalent decimal value of the binary number is
obtained by subtracting the value of the far left position, 32768, from
the sum of the values of the other positions. In the figure on the next
page (all positions are 1), the value is 32767 - 32768 = -1. For
example:
1111 1000 0010 0011 =
(214+213+212+211+25+21+20) - 215 =
(16384+8192+4096+2048+32+2+1) - 32768 =
30755 - 32768 = -2013.
Publication 1746-UM005B-EN-P - June 2004
Page 99

Two’s Complement Binary Numbers B-3
14 =
1x2
16384
13 =
1x2
8192
12 =
1x2
4096
11 =
2048
1x2
10 =
1024
1x2
9 =
512
1x2
8 =
256
1x2
7 =
1x2
128
6 =
64
1x2
5 =
1x2
32
4 =
1x2
16
3 =
1x2
1x2
10 11111111111111
16384
8192
4096
2048
1024
512
256
128
64
32
16
8
2 =
4
1 =
2
1x2
0 =
1
1x2
8
4
2
1
32767
1x2
15 =
This position is always 1 for negative numbers
1
Publication 1746-UM005B-EN-P - June 2004
Page 100

B-4 Two’s Complement Binary Numbers
Publication 1746-UM005B-EN-P - June 2004
 Loading...