

Page 1

USB Adaptor - Quick Installation Guide
General
The USB 232 adaptor converts data between the USB protocol and RISCO Group panels, ProSYS or Orbit 14 / 6
using the suitable local bus adaptor (supplied).
Hardware and Software Installation
STEP 1. - Insert the USB232B Set Up CD (supplied) into your computer CD-ROM drive.
STEP 2. - Connect the USB232B converter to your PC’s USB port.
The setup program will begin to run automatically.
Note: When using Windows XP select the No, not this time option from the Found New Hardware Wizard and click
the Next button. On other Microsoft Windows operating systems (Win 98, 2000, NT) proceed to STEP 3.
STEP 3. - Select Install from a list of specific location and click the Next button.
STEP 4. - Select Search removable media and click the Next button.
STEP 5. - Windows has finished installing the hardware. Click the Finish button.
STEP 6. - Once done with the installation of the hardware, you will be prompted to complete the installation of the
software according to the following steps (see the above Note if you are using Windows XP operating system):
1. Select Install from a list of specific location and click the Next button.
2. Select Search removable media and click the Next button.
3. Windows has finished installing the software. Click the Finish button.
STEP 7. - Make sure the Driver Software installation is accomplished according to the following:
1. Connect the USB232B unit into the USB port of the computer and then click:
Start ->Settings -> Control Panel -> System ->Hardware->Device Manager
2. Verify that the USB Serial Port is listed at Ports (COM & LPT).
STEP 8. - Changing the COM Port Settings
1. From Device Manager, select the USB serial port COM option.
2. Choose the Port Settings tab, and then click Advanced.
3. Under the BM options, choose Latency Timer. Set the timer to [1] and click the OK button.
STEP 9. - Reboot your system.
Fore more information about your USB Converter, please refer to the User Manual (supplied with the installation CD)
1
Page 2
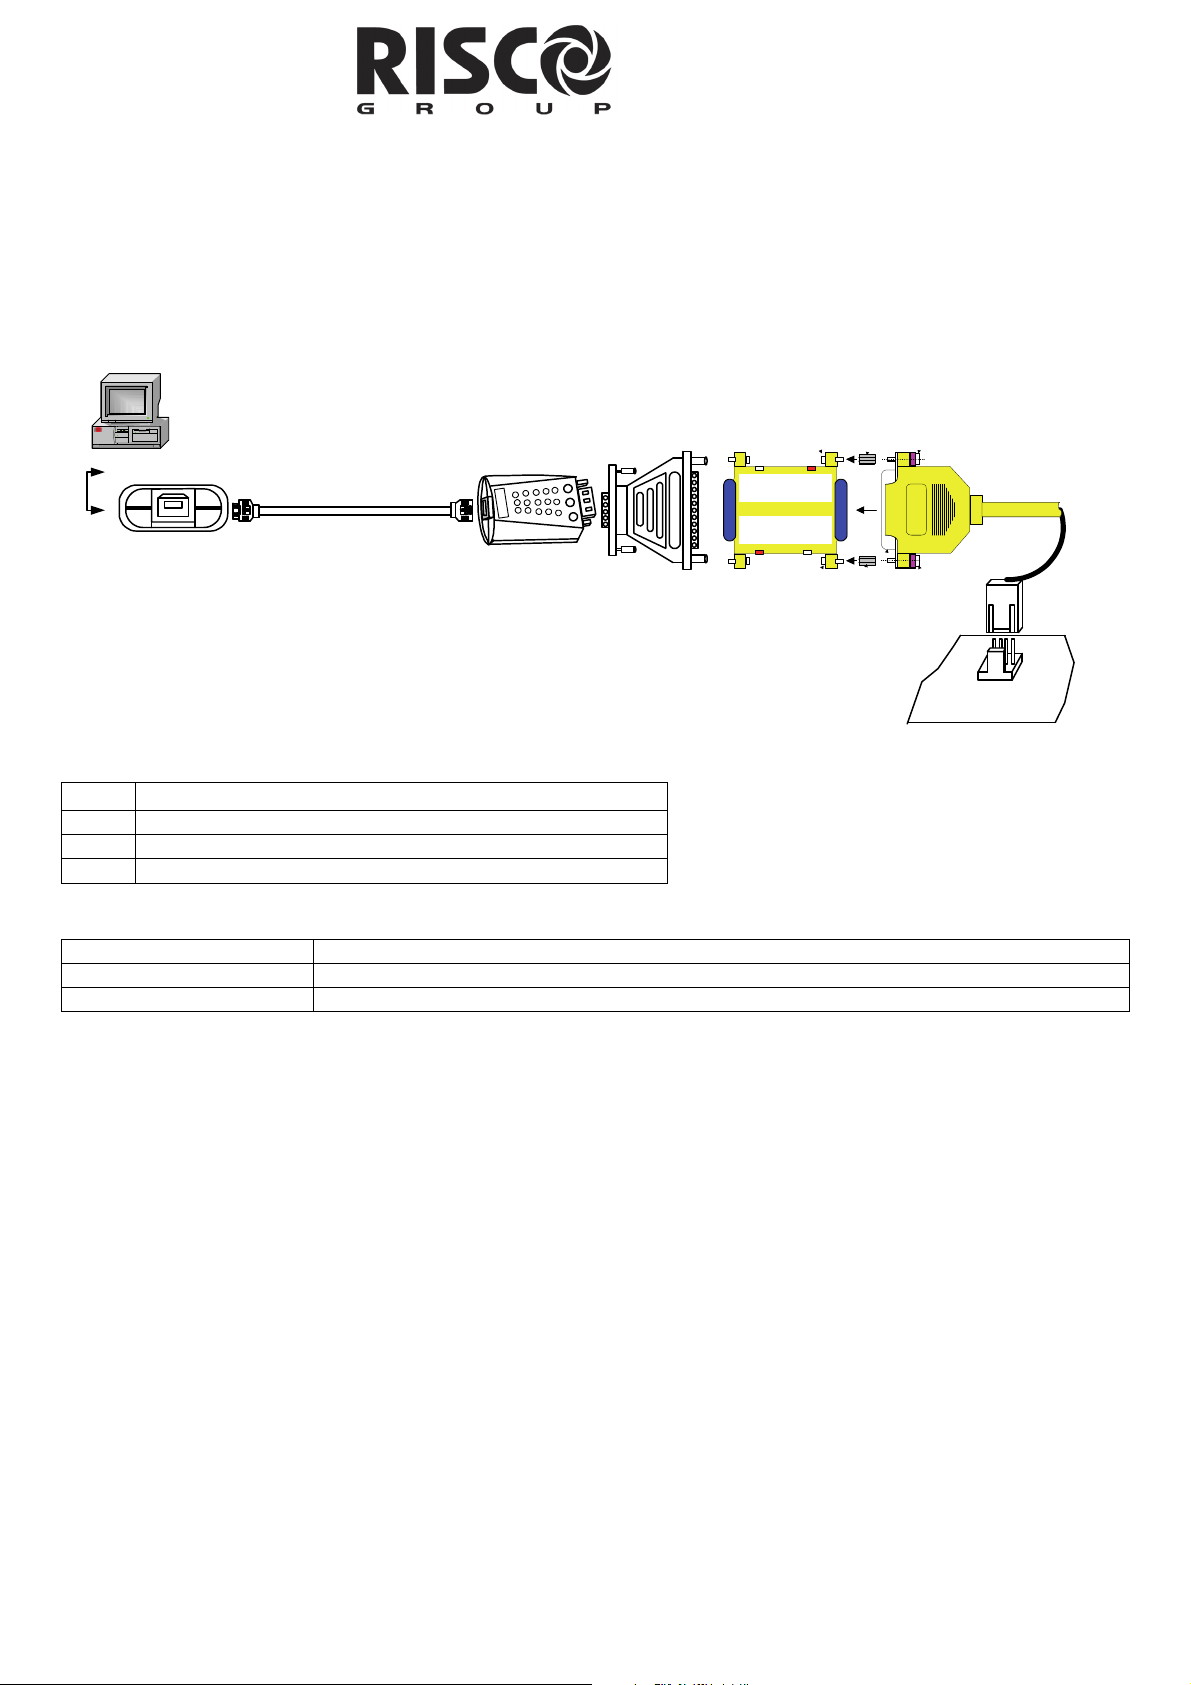
USB Wiring:
1. Connect the 9 pin of RS232 9/25 pin converter to the USB converter.
2. Connect the 25 pin side of the RS 232 9/25 converter to the supplied local bus adaptor, according to the type of
panel as follows:
ProSYS/Orbit Pro: RP296EBA000A BUS adaptor
Orbit 14/Orbit 6: RP214LU0000A Adaptor.
ProSYS / Orbit 14
Local Adapter
ProSYS:
Orbit 6 / 14:
ProSYS / Orbit 14
Main Panel
Computer
USB PORT
USB CABLE
USB
Convertor
RS232 9/25
Converter
RP296EB A000A
RP214LU0000A
LEDs Indication:
LED Turns ON when:
Link
TX
RX
The USB RS232 is ready for use
Data is being sent from the USB port to the panel
Data is being sent from the panel to the USB port
Ordering P/N:
RP128EUSB00A USB converter + ProSYS Local BUS Adaptor (RP296EBA000A) + 9/25 pin converter
RP214USB000A USB converter + Orbit 14 Local Bus Adaptor (RP214LU0000A) + 9/25 pin converter
RP128ECON00A USB converter + 9/25 pin converter
2
Page 3

Guida Rapida per l’Installazione del Convertitore
USB - 232B
Descrizione generale
L’adattatore USB 232 converte i dati tra il protocollo USB e le centrali d’allarme RISCO, Orbit-PRO, ProSYS o Orbit6/14 sfruttando il dispositivo seriale di connessione diretta fornito nel kit.
Installazione Hardware e Software
FASE 1. – Inserire nel drive del proprio computer il CD fornito nella confezione del USB232B.
FASE 2. – Collegare il convertitore USB232B nella porta USB del proprio computer.
Il programma di installazione si avvierà automaticamente.
Nota: Se si utilizza Windows XP selezionare da Installazione guidata nuovo hardware, l’opzione No, non ora e
cliccare sul pulsante Avanti. Con gli altri sistemi operativi di Windows (Windows 98, 2000, NT) procedere alla FASE 3.
FASE 3. - Selezionare Installa da un elenco o percorso specifico e cliccare sul pulsante Avanti.
FASE 4. - Selezionare Cerca nei supporti rimovibili e cliccare sul pulsante Avanti.
FASE 5. - Terminata l’installazione del hardware, cliccare sul pulsante Fine.
FASE 6. - Una volta effettuata l’installazione del hardware, si dovrà completare l’installazione del driver software
seguendo le fasi successive (consultare la nota sopra se si utilizza il sistema operativo Windows XP):
1. Selezionare Installa da un elenco o percorso specifico e cliccare sul pulsante Avanti.
2. Selezionare Cerca nei supporti rimovibili e cliccare sul pulsante Avanti.
3. Terminata l’installazione del hardware, cliccare sul pulsante Fine.
FASE 7. - Assicurarsi che l’installazione del driver software sia stata completata seguendo la procedura seguente:
1. Collegare l’unità USB232B nella porta USB del computer e poi cliccare su:
Start -> Pannello di controllo -> Sistema -> Hardware -> Gestione periferiche
2. Verificare che il dispositivo “USB Serial Port (COMxx)” sia stato aggiunto alle Porte (COM & LPT).
FASE 8. - Modifica delle impostazioni della Porta COM:
1. Da Gestione periferiche, all’interno delle Porte (COM & LPT), cliccare su “USB serial port (COMxx)”.
2. Scegliere la scheda Port Settings, e poi cliccare sul pulsante Advanced.
3. All’interno di BM options, scegliere Latency Timer. Impostare il timer a [1] e cliccare sul pulsante OK.
FASE 9. - Riavviare il proprio computer.
Nota: “xx” rappresenta il numero della porta COM associato dal Sistema al dispositivo USB. Il numero della COM può
variare in funzione del computer usato.
Per maggiori informazioni sul convertitore USB, fare riferimento al Manuale Utente in formato pdf che si trova
all’interno del CD di installazione.
3
Page 4

Cablaggio adattatore USB:
1. Collegare il convertitore USB al riduttore RS232 9/25 pin.
2. Collegare il lato 25 pin del riduttore RS 232 9/25 al dispositivo di collegamento diretto fornito. Questo
dispositivo varia in funzione del modello di centrale:
ProSYS/Orbit-Pro: Adattatore BUS RP296EBA000A
Orbit-14/Orbit-6: Adattatore RP214LU0000A
Dispositivo di
Computer
CAVO USB
Convertitore
USB
Riduttore
RS232 9/25 pin
PORTA USB
Indicatori LED:
LED Si illumina quando:
Link
TX
RX
Il convertitore USB RS232 è pronto all’uso
Trasferimento dati dalla USB alla Centrale
Trasferimento dati dalla Centrale alla porta USB
Codici Prodotto:
RP128EUSB00A Convertitore USB + dispositivo di connessione diretta ProSYS/Orbit-Pro (RP296EBA000A) + riduttore 9/25 pin
RP214USB000A Convertitore USB + dispositivo di connessione diretta Orbit-14/Orbit-6 (RP214LU0000A) + riduttore 9/25 pin
RP128ECON00A Convertitore USB + riduttore 9/25 pin
collegamento diretto
ProSYS/Orbit Pro,
Orbit-14/Orbit-6
ProSYS:
RP296EBA000A
Orbit 6 / 14:
RP214LU0000A
Centrale Orbit-Pro/
Prosys, Orbit-6 / 14
4
Page 5

ADAPTADOR USB – GUÍA RÁPIDA DE INSTALACIÓN
General
El adaptador USB 232 convierte datos entre el protocolo USB y los paneles de
RISCO Group: ProSYS, Wisdom y Orbit, usando el adaptador de bus local suministrado.
Instalación del Driver
1. Conecte el adaptador USB al puerto USB de su ordenador.
2. Bajo Windows XP / 2000 automáticamente se detectará un nuevo hardware. Durante la instalación
del hardware se le pedirá que introduzca el CD suministrado para instalar el software del driver del
USB en su ordenador.
3. Para una información más detallada, consulte el manual de usuario incluido en el CD.
4. Asegúrese que la instalación del driver ha sido correcta, así como el número de puerto COM que ha
sido asignado. Para ello:
4.1. Conecte el adaptador USB al PC, y haga clic en la siguiente ruta:
Inicio Configuración Panel de Control Sistema Hardware
Administrador de Dispositivos.
4.2. Verifique que en el apartado “Puertos (COM & PLT)”, aparece el “USB
Serial Port”. Anote el número de puerto COM que se le ha asignado (este número puede variar en
función del ordenador que se use).
Cableado del USB:
1. Enchufe el conector de 9 pins del conversor RS232 9/25 al adaptador
del USB.
2. Enchufe el conector de 25 pins del conversor RS232 9/25 al adaptador
del bus local provisto, según el tipo de panel como se indica a continuación:
ProSYS/Orbit Pro/Wisdom: Adaptador BUS RP296EBA000A
Orbit 14/Orbit 6: Adaptador RP214LU0000A.
Ordenador
CABLE USB
PUERTO USB
Indicación de los LEDs:
LED Se ilumina cuando:
Link El USB RS232 está listo para ser usado
TX Datos están siendo enviados del puerto USB al panel
RX Datos están siendo enviados del panel al puerto USB
Convertidor
USB
Convertidor
RS232 9/25
ProSYS:
RP296EBA000A
Orbit 6 / 14:
RP214LU0000A
Adaptador Local
ProSYS / Orbit 14
Panel Principal del
ProSYS / Orbit 14
P/N para Pedidos:
RP128EUSB00A Convertidor USB + Adaptador BUS local del ProSYS o Wisdom (RP296EBA000A) +
RP214USB000A Convertidor USB + Adaptador BUS local del Orbit 14 (RP214LU0000A) + convertidor de
RP128ECON00A Convertidor USB + convertidor de pins 9/25
convertidor de pins 9/25
pins 9/25
5
Page 6

Adaptateur USB – Guide d'installation rapide
Généralités
L'adaptateur USB 232 convertit les données du protocole USB aux centrales Groupe de RISCO, ProSYS ou WisDOM
à l'aide d'un adaptateur de BUS local adéquat (fourni).
Installation du Matériel et Logiciel
ETAPE 1. – Introduisez le CD d'installation (fourni) de l'USB232B dans le lecteur de CD-ROM de votre ordinateur.
ETAPE 2. – Reliez le convertisseur USB232B au port USB de votre PC.
Le programme d'installation se lancera automatiquement.
Remarque : Sous Windows XP, sélectionnez l'option Non, pas cette fois du Nouvel Assistant Matériel inclus et cliquez
sur le bouton Suivant. Si vous disposez d'autres systèmes d'exploitation Microsoft Windows (Win 98, 2000, NT), passez
à l'ETAPE 3.
ETAPE 3. – Sélectionnez l'option Installer d'une liste d'emplacements spécifiques et cliquez sur la bouton Suivant.
ETAPE 4. – Sélectionnez l'option Rechercher supports amovibles et cliquez sur le bouton Suivant.
ETAPE 5. - Windows a terminé l'installation de l'unité. Cliquez sur le bouton Terminer.
ETAPE 6. – Une fois accomplie l'installation de l'unité, vous serez invité(e) à effectuer celle du logiciel en appliquant la
procédure suivante (cf. remarque ci-dessus relative à l'utilisation du système d'exploitation Windows XP) :
1. Sélectionnez l'option Installer d'une liste d'emplacements spécifiques et cliquez sur le bouton Suivant.
2. Sélectionnez l'option Rechercher supports amovibles et cliquez sur le bouton Suivant.
3. Windows a terminé l'installation du logiciel. Cliquez sur le bouton Terminer.
ETAPE 7. – Assurez-vous que l'installation du logiciel du gestionnaire s'effectue selon les principes suivants :
1. Reliez l'adaptateur USB232B au port USB de votre ordinateur, ensuite cliquez sur :
Démarrer ->Paramètres -> Centrale -> Système -> Matériel-> Gestionnaire de périphériques.
2. Vérifiez que le Port USB en série est bien répertorié dans la liste des Ports (COM & LPT).
ETAPE 8. – Changement des Paramètres du Port COM
Du Gestionnaire de périphériques, sélectionnez l'option COM port en série USB.
Choisissez l'onglet Paramètres du Port, et cliquez ensuite sur [Caractéristiques] Avancées.
Dans les options BM, choisissez le Minuteur de Temps d'attente. Réglez le minuteur sur [1] et cliquez sur le bouton OK.
ETAPE 9. – Faites redémarrer le système.
Pour en savoir plus sur votre convertisseur USB, veuillez consulter le Manuel de l'utilisateur (fourni avec le CD
d'installation).
6
Page 7

A
Câblage USB :
1. Reliez les 9 broches du convertisseur RS232 9/25 broches au convertisseur USB.
2. Reliez le côté présentant 25 broches du convertisseur RS 232 9/25 à l'adaptateur BUS local fourni, en
procédant selon le type de centrale utilisé, comme suit :
daptateur local
ProSYS / Orbit 14
ProSYS:
ProSYS
PR296EBA000A
Orbit 6 / 14:
ProSYS/ WisDom
Local Adapter
ProSYS / Orbit 14
principale
Centrale
Main Panel
Ordinateur
Computer
USB PORT
Port USB
Câble USB
USB CABLE
Convertisseur
USB
USB
Convertor
Convertisseur
RS232 9/25
RS 232 9/25
Converter
RP296EB A000A
RP214LU0000A
Indicateurs LED :
L'indicateur LED s'allume lorsque :
Liaison L'USB RS232 est prêt à l'utilisation.
TX Les données sont envoyées du port USB vers la centrale.
RX Les données sont envoyées de la centrale vers le port USB.
Information Catalogue :
Référence Description
RP128EUSB00A Convertisseur USB + adaptateur BUS local ProSYS (RP296EBA000A) + convertisseur 9/25 broches
7
Page 8

UK
National Sales: 0870 60 510000
Tel: +44-161-655-5500
sales@riscogroup.co.uk
technical@riscogroup.co.uk
France
Tel: +33-164-73-28-50
sales-fr@riscogroup.com
support-fr@riscogroup.com
USA
Toll Free: 1-800-344-2025
Tel: +305-592-3820
sales-usa@riscogroup.com
support-usa@riscogroup.com
Israel
Tel: +972(0)3-963-7777
info@riscogroup.com
support@riscogroup.com
Italy
Tel:+39-02-66590054
info@riscogroup.it
support@riscogroup.it
Belgium
Tel: +32-2522-7622
sales-be@riscogroup.com
support-be@riscogroup.com
Brazil
Tel: +55-11-3661-8767
sales-br@riscogroup.com
support-br@riscogroup.com
Spain
Tel: +34-91-490-2133
sales-es@riscogroup.com
support-es@riscogroup.com
Switzerland
Tel: +41-27-452-24-44
sales-ch@riscogroup.com
support-ch@riscogroup.com
China
sales-cn@riscogroup.com
support-cn@riscogroup.com
www.riscogroup.com
© RISCO Group 12/2014 5IN128EUSB G.
8
 Loading...