

Ricoh SP 8400DN User Manual

User Guide
Getting Started
Loading Paper
Troubleshooting
Information for This Printer
For safe and correct use, be sure to read the Safety Information in
Read This First before using the machine.


TABLE OF CONTENTS
Manuals for This Machine................................................................................................................................. 4
1. Getting Started
Before You Start..................................................................................................................................................7
How to Read the Manuals.............................................................................................................................7
Model-Specific Information...........................................................................................................................8
List of Options................................................................................................................................................. 9
Guide to Names and Functions of Components............................................................................................11
Guide to Functions of the Attention Light....................................................................................................13
Guide to Functions of the Machine's Options................................................................................................16
Guide to Functions of the Machine's External Options.............................................................................16
Guide to Functions of the Machine's Internal Options..............................................................................17
Guide to the Names and Functions of the Machine's Control Panel........................................................... 19
Changing the Display Language.................................................................................................................... 20
How to Use the [Home] Screen...................................................................................................................... 21
Main Icons on the [Home] Screen..............................................................................................................23
[Printer (Classic)] Screen............................................................................................................................. 24
[Information] Screen....................................................................................................................................25
Possible Operations on the Screen............................................................................................................ 26
Adding Icons to the [Home] Screen........................................................................................................... 28
Turning On/Off the Power..............................................................................................................................30
Turning On/Off the Power..........................................................................................................................30
Saving Energy..............................................................................................................................................31
Accessing User Tools....................................................................................................................................... 33
Changing Default Settings...........................................................................................................................33
Quitting User Tools...................................................................................................................................... 34
Using Web Image Monitor............................................................................................................................. 35
Displaying Top Page................................................................................................................................... 36
Replenishing and Replacing Consumables....................................................................................................38
Adding Toner............................................................................................................................................... 38
Adding Staples.............................................................................................................................................40
Replacing Other Consumables...................................................................................................................40
2. Loading Paper
Loading Paper.................................................................................................................................................. 43
1

Precautions for Loading Paper....................................................................................................................43
Loading Paper into Paper Trays..................................................................................................................43
Loading Paper into the Bypass Tray...........................................................................................................45
Loading Paper into Tray 3 (LCT).................................................................................................................46
Loading Paper into the Large Capacity Tray (LCT)...................................................................................48
Loading Orientation-fixed Paper or Two-sided Paper..............................................................................49
Recommended Paper.......................................................................................................................................51
Recommended Paper Sizes and Types......................................................................................................51
Printing from the Bypass Tray.......................................................................................................................... 61
Specifying Regular Sizes Using the Control Panel....................................................................................61
Specifying a Custom Size Paper Using the Control Panel........................................................................61
Specifying Thick Paper, Thin Paper, or OHP Transparencies for Paper Type Using the Control Panel....
.......................................................................................................................................................................62
3. Troubleshooting
When the Machine Makes a Beeping Sound............................................................................................... 65
When a Status Icon Is Displayed....................................................................................................................66
When the Indicator Lamp for [Check Status] Is Lit or Flashing..................................................................... 67
When You Have Problems Operating the Machine..................................................................................... 69
If USB Connection Fails................................................................................................................................... 73
Messages Displayed When You Use the Printer Function............................................................................74
Messages Displayed on the Control Panel When You Use the Printer Function....................................74
Messages Printed on the Error Logs or Reports When You Use the Printer Function............................. 77
When Other Messages Appear..................................................................................................................... 79
When Problems Occur While Logging In..................................................................................................80
When the User Lacks Privileges to Perform an Operation........................................................................80
When You Cannot Print................................................................................................................................... 81
Other Printing Problems................................................................................................................................... 83
Removing Jammed Paper................................................................................................................................ 92
Locating Jammed Paper.............................................................................................................................. 92
4. Information for This Printer
Information on Environmental Regulations.....................................................................................................95
ENERGY STAR Program..............................................................................................................................95
Energy Saving Functions............................................................................................................................. 95
2

User Information on Electrical and Electronic Equipment (mainly Europe).........................97
Note for the Battery and/or Accumulator Symbol (For EU countries only) (mainly Europe)
.......................................................................................................................................................................98
Environmental Advice for Users (mainly Europe)..................................................................98
Notes to users in the state of California (Notes to Users in USA) (mainly North America)....
.......................................................................................................................................................................99
Trademarks.....................................................................................................................................................100
INDEX...........................................................................................................................................................103
3
Manuals for This Machine
The operating instructions of this machine are provided in the following formats:
Format Manuals
Printed manuals • Read This First
• Start Guide
• Quick Installation Guide
CD-ROM • Driver Installation Guide
Web page • Read This First
• User Guide
• Operating Instructions (HTML manuals)
• Start Guide
• Quick Installation Guide
• Driver Installation Guide
Read This First
Before using the machine, be sure to read the section of this manual entitled Safety Information. It
also describes each regulation and environmental conformance.
Start Guide
Describes how to read manuals on the control panel. It also describes how to log in to the machine.
User Guide
Regarding the basic usage of this machine, frequently used functions, troubleshooting when an
error message appears, etc., summaries are provided for each user manual.
Operating Instructions (HTML manuals)
Describes the setup for using the machine, how to use functions to print or for maintenance and
specifications, troubleshooting, system settings, and security functions.
Manuals are available in English, German, French, Italian, Spanish, Dutch, and Russian.
User Guide and Security Guide are available in the seven languages above and other languages.
For details about how to use the HTML manuals, see "How to Use the Operating Instructions",
Operating Instructions.
Quick Installation Guide
Describes procedures for unpacking and setting up the machine, which include loading paper and
installing print cartridge, etc.
4

Driver Installation Guide
Describes how to install and configure each driver. This manual is included in the drivers CD.
• Before you configure the extended security and authentication settings, refer to "Before Using This
Machine" in the Security Guide.
• You can see the following manuals on the Web page.
• Appendix
• DHCP Option 204
5

6

1. Getting Started
This section describes the symbols used in the manuals supplied with the printer, available options, and
names and functions of components.
Before You Start
How to Read the Manuals
Symbols used in the manuals
This manual uses the following symbols:
Indicates points to pay attention to when using the machine, and explanations of likely causes of paper
misfeeds, damage to originals, or loss of data. Be sure to read these explanations.
Indicates supplementary explanations of the machine's functions, and instructions on resolving user
errors.
[ ]
Indicates the names of keys on the machine's display or control panels.
(mainly Europe and Asia), (mainly Europe), or (mainly Asia)
(mainly North America)
Differences in the functions of Region A and Region B models are indicated by the two symbols. Read
the information indicated by the symbol that corresponds to the region of the model you are using. For
details about which symbol corresponds to the model you are using, see page 8 "Model-Specific
Information".
Disclaimer
Contents of this manual are subject to change without prior notice.
In no event will the company be liable for direct, indirect, special, incidental, or consequential damages
as a result of handling or operating the machine.
7
DUL004
1. Getting Started
Notes
The manufacturer shall not be responsible for any damage or expense that might result from the use of
parts other than genuine parts from the manufacturer with your office products.
For good output quality, the manufacturer recommends that you use genuine toner from the
manufacturer.
Some illustrations in this manual might be slightly different from the machine.
About IP addresses
In this manual, "IP address" covers both IPv4 and IPv6 environments. Read the instructions that are
relevant to the environment you are using.
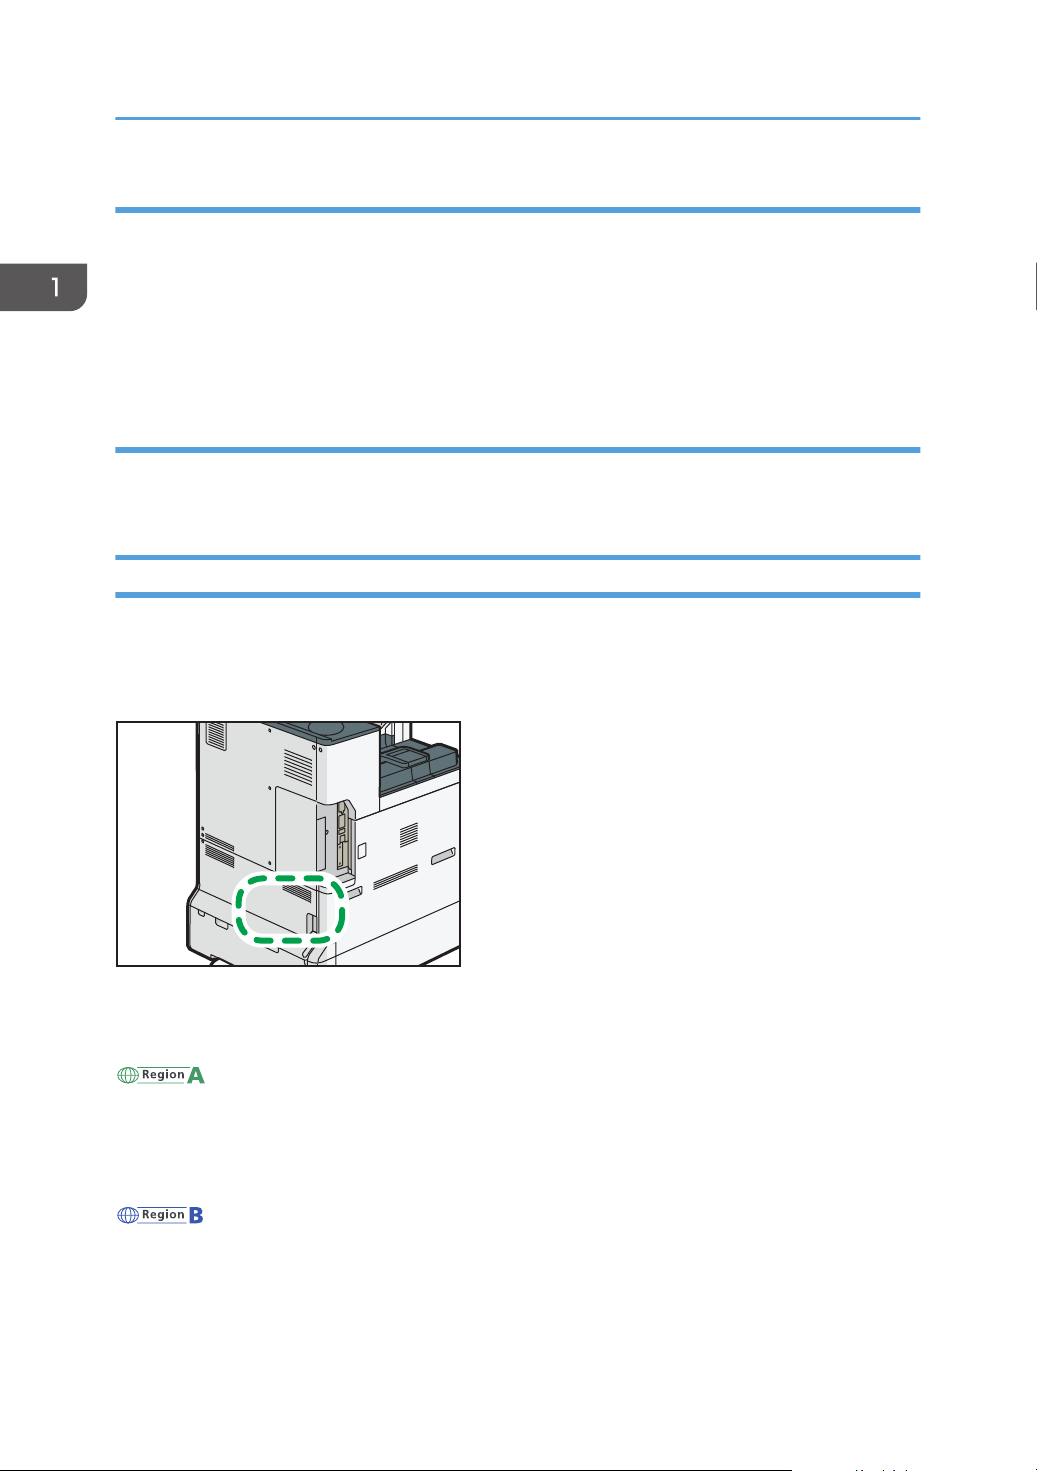
Model-Specific Information
This section explains how to identify the region to which your printer belongs.
There is a label on the rear of the printer, located in the position shown below. The label contains details
that identify the region to which your printer belongs. Read the label.
The following information is region-specific. Read the information under the symbol that corresponds to
the region of your printer.
(mainly Europe and Asia)
If the label contains the following, your printer is a Region A model:
• CODE XXXX -27
• 220–240 V
(mainly North America)
If the label contains the following, your printer is a Region B model:
• CODE XXXX -17
• 120–127 V
8

Before You Start
• Dimensions in this manual are given in two measurement units: metric and imperial. If your printer is
a Region A model, refer to the metric units. If your printer is a Region B model, refer to the imperial
units.
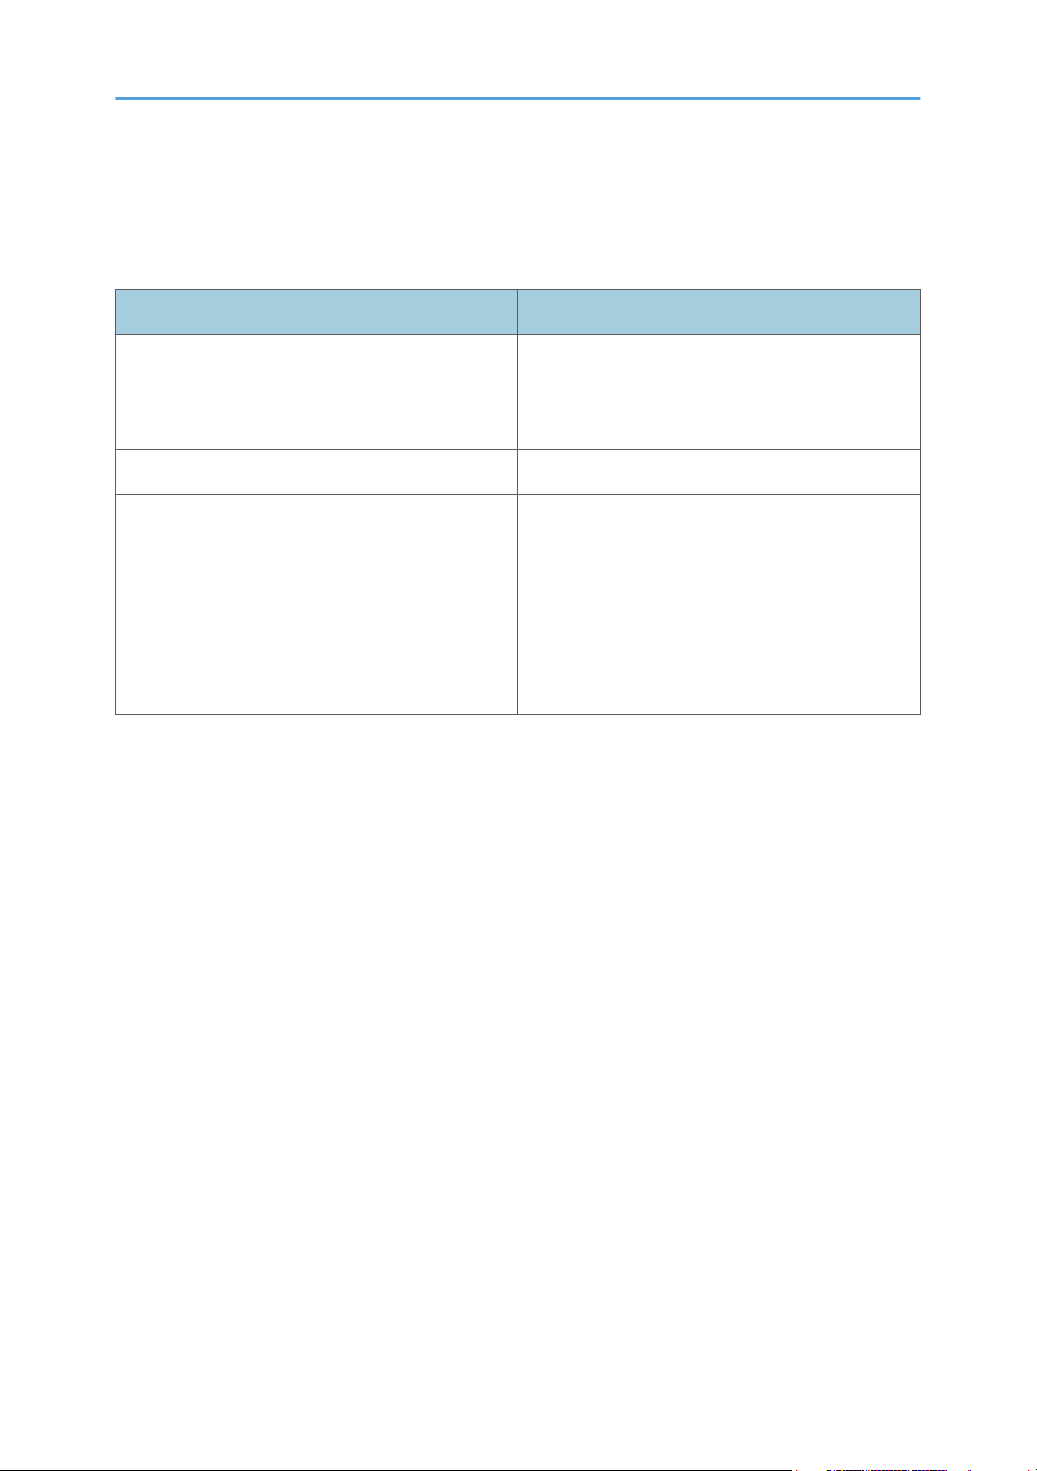
List of Options
This section provides a list of options for this printer and the names commonly used in this manual.
Option name Description
Paper Feed Unit PB3240 Lower Paper Trays
LCIT PB3260 Tray 3 (LCT)
LCIT RT3030 Large Capacity Tray (LCT)
Mail Box CS3010 Mailbox
Internal Multi-fold Unit FD3000 Internal Multi-Folding unit
Bridge Unit BU3070 Bridge unit
Punch Unit PU3050 EU
Punch Unit PU3050 NA
Punch Unit PU3050 SC
Punch Unit PU3060 EU
Punch Unit PU3060 NA
Punch Unit PU3060 SC
Output Jogger Unit Type M25 Output jogger unit
Attention Light AL3000 Attention Light
HDD Option Type P13 HDD
IPDS Unit Type P13 IPDS unit
XPS Direct Print Option Type P13 XPS card
IEEE 802.11a/g/n Interface Unit Type M19 Wireless LAN board
Punch unit
IEEE 1284 Interface Board Type M19 IEEE 1284 Interface Board
USB Device Server Option Type M19 USB Device Server
9

1. Getting Started
Option name Description
Extended USB Board Type M19 Extended USB Board
VM CARD Type P13 VM card
PostScript3 Unit Type P13 Adobe PostScript 3 unit
10
314
5
6
7
DUL005
8
9
2
Guide to Names and Functions of Components
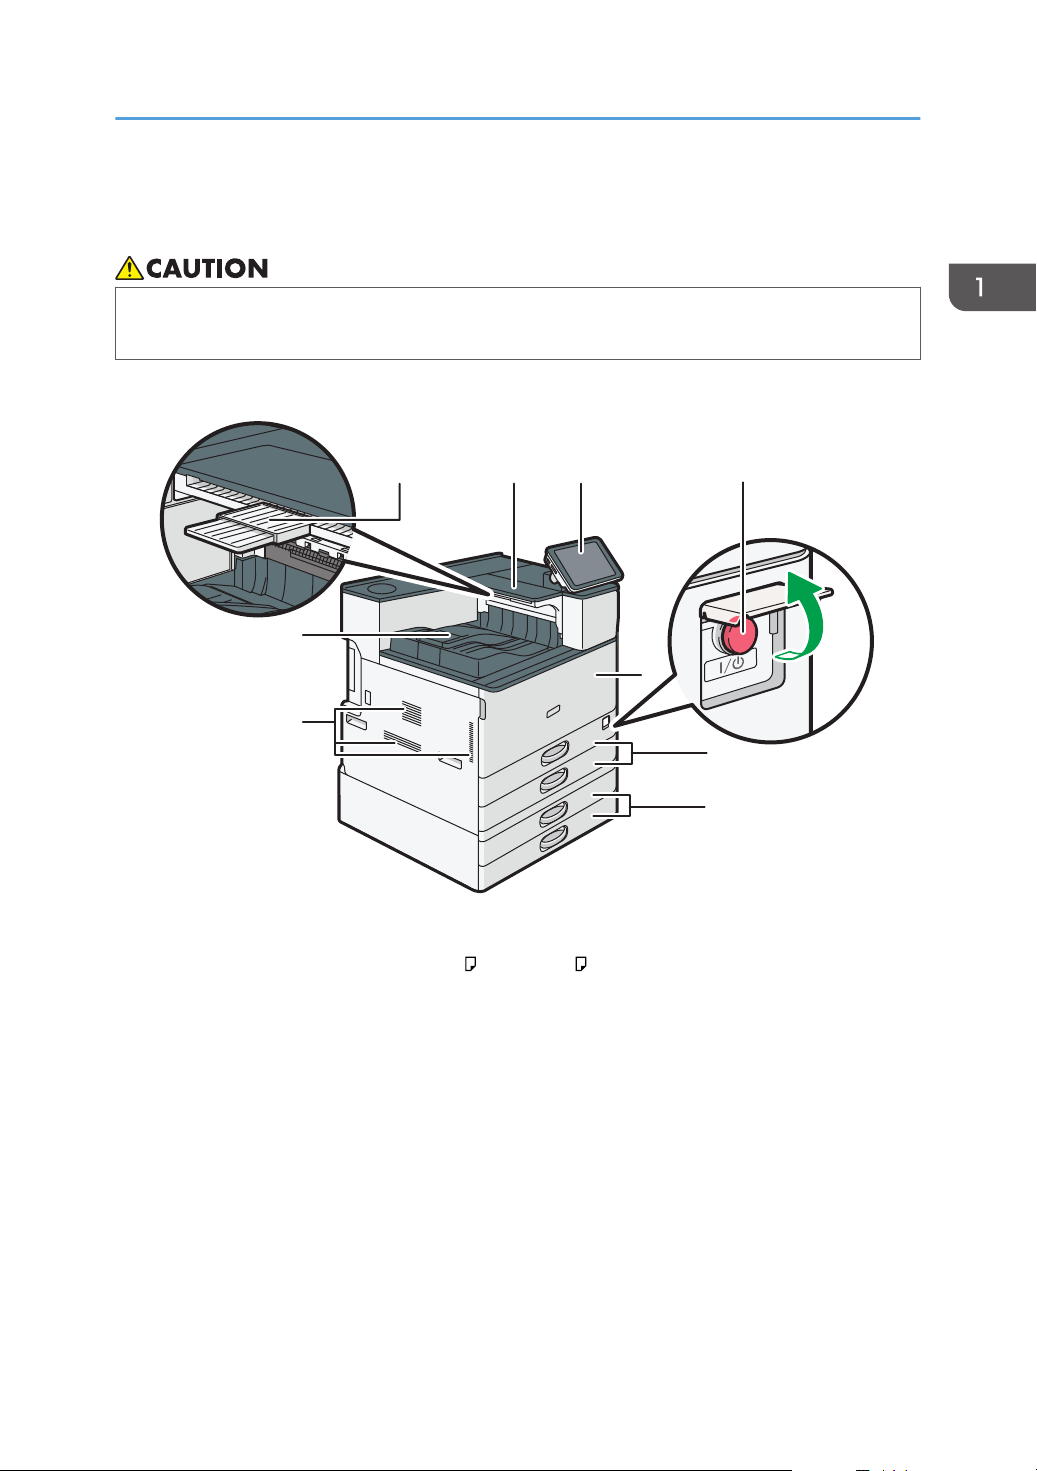
Guide to Names and Functions of Components
• Do not obstruct the machine's vents. Doing so risks fire caused by overheated internal
components.
Front and left view
1. Auxiliary Tray on the Paper Reversal Location
Pull this tray to print on paper larger than A4 or 81/2 × 11 .
2. Paper Reversal Location
This area is used to reverse pages that are printed on both sides.
3. Control panel
See page 19 "Guide to the Names and Functions of the Machine's Control Panel".
4. Main power switch
To operate the machine, the main power switch must be on. If it is off, open the main power switch's cover and
turn the switch on.
5. Front cover
Open to access the inside of the machine.
6. Paper trays (Trays 1–2)
Load paper here. For details, see page 43 "Loading Paper".
11
DUL006
1
6
5
2
3
4
1. Getting Started
7. Lower paper trays
Load paper here. For details, see page 43 "Loading Paper".
8. Vents
Prevent overheating.
9. Internal tray 1
Printed paper are delivered here.
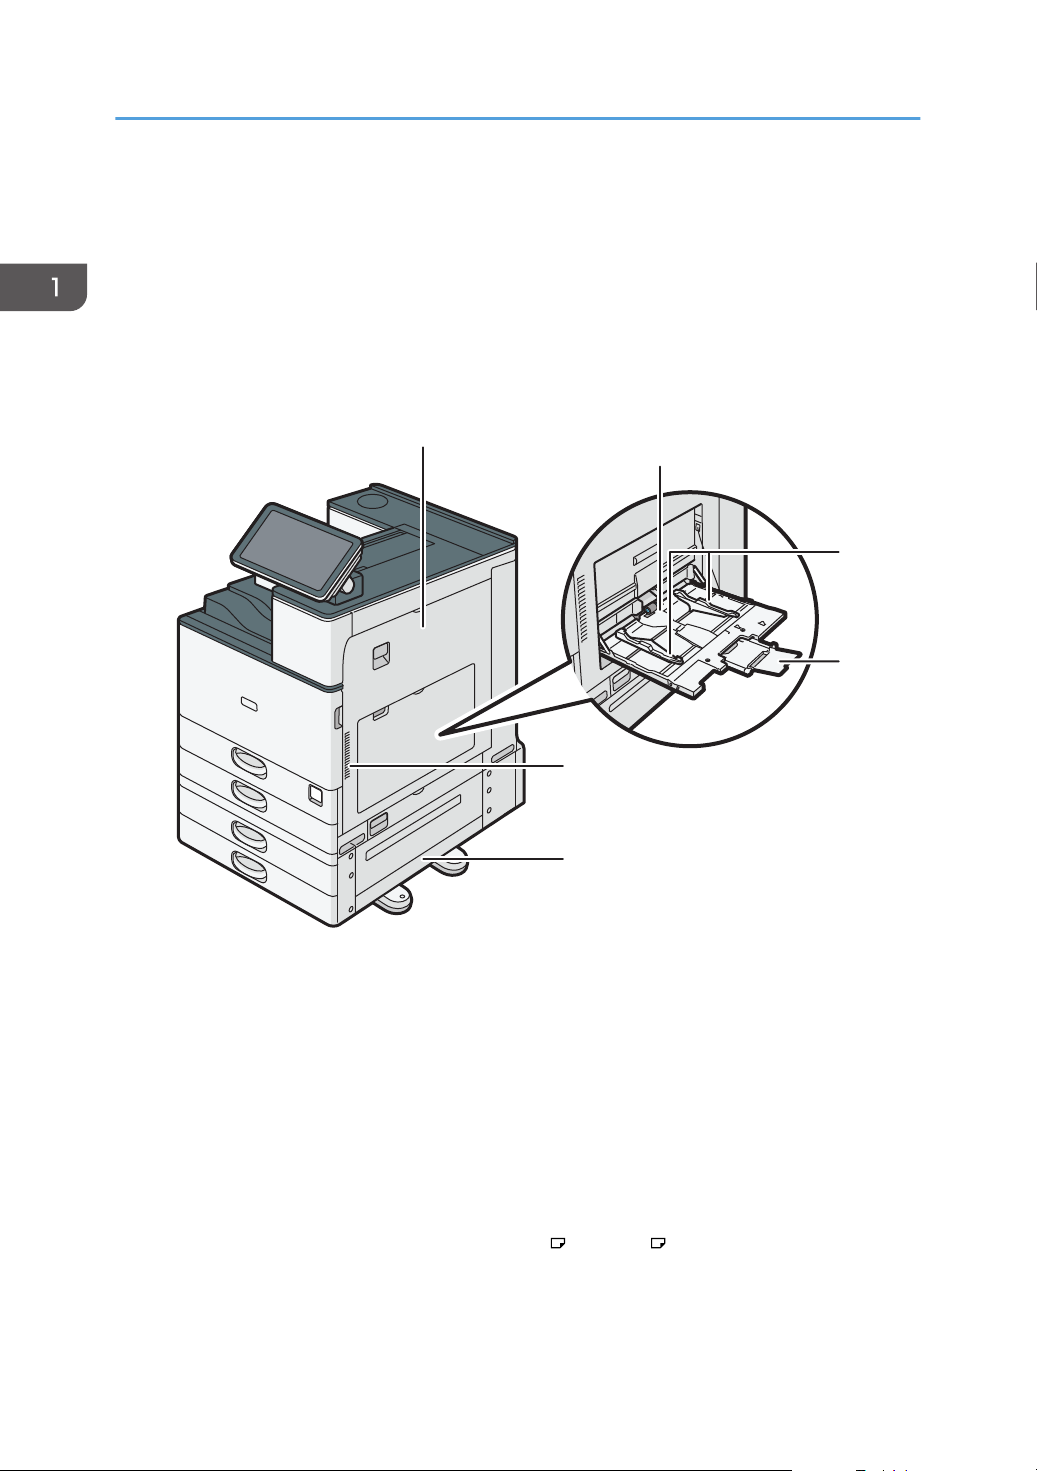
Front and right view
12
1. Right cover
Open this cover when a paper jam occurs.
2. Bypass tray
Use to print on OHP transparencies, adhesive labels, and paper that cannot be loaded in the paper trays. For
details, see page 45 "Loading Paper into the Bypass Tray".
3. Paper guides
When loading paper in the bypass tray, align the paper guides flush against the paper.
4. Extender
Pull this extender out when loading sheets larger than A4 , 81/2 × 11 in the bypass tray.
5. Vents
Prevent overheating.
6. Lower right cover
DUL007
1
1
Open this cover when a paper jam occurs.
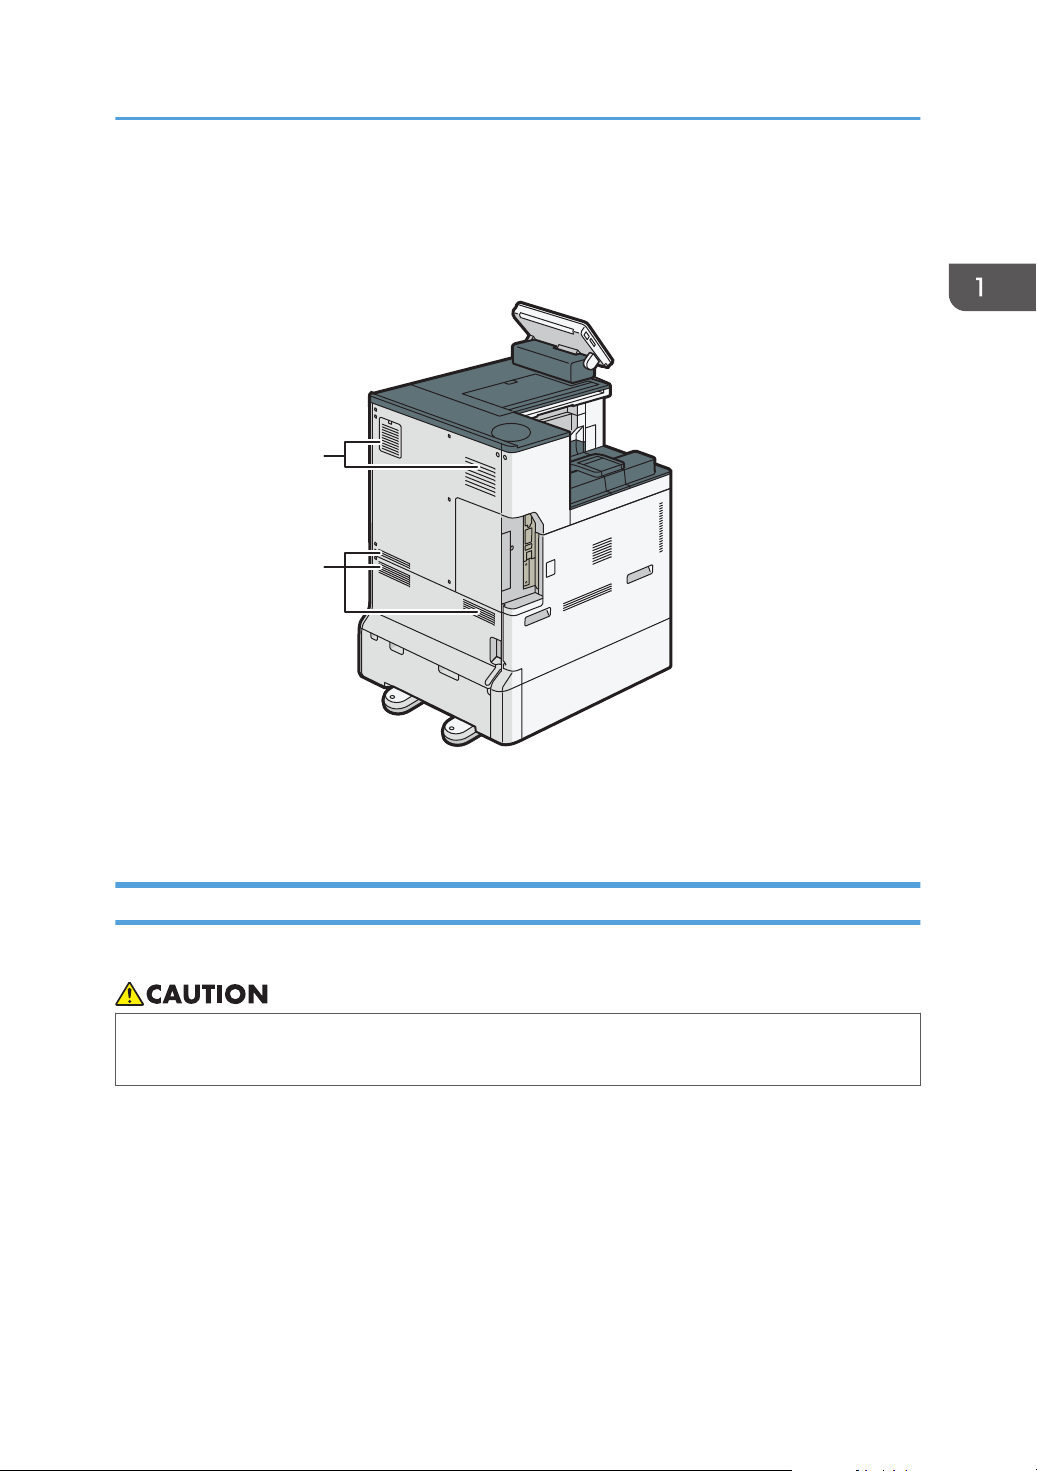
Rear and left view
Guide to Names and Functions of Components
1. Vents
Prevent overheating.
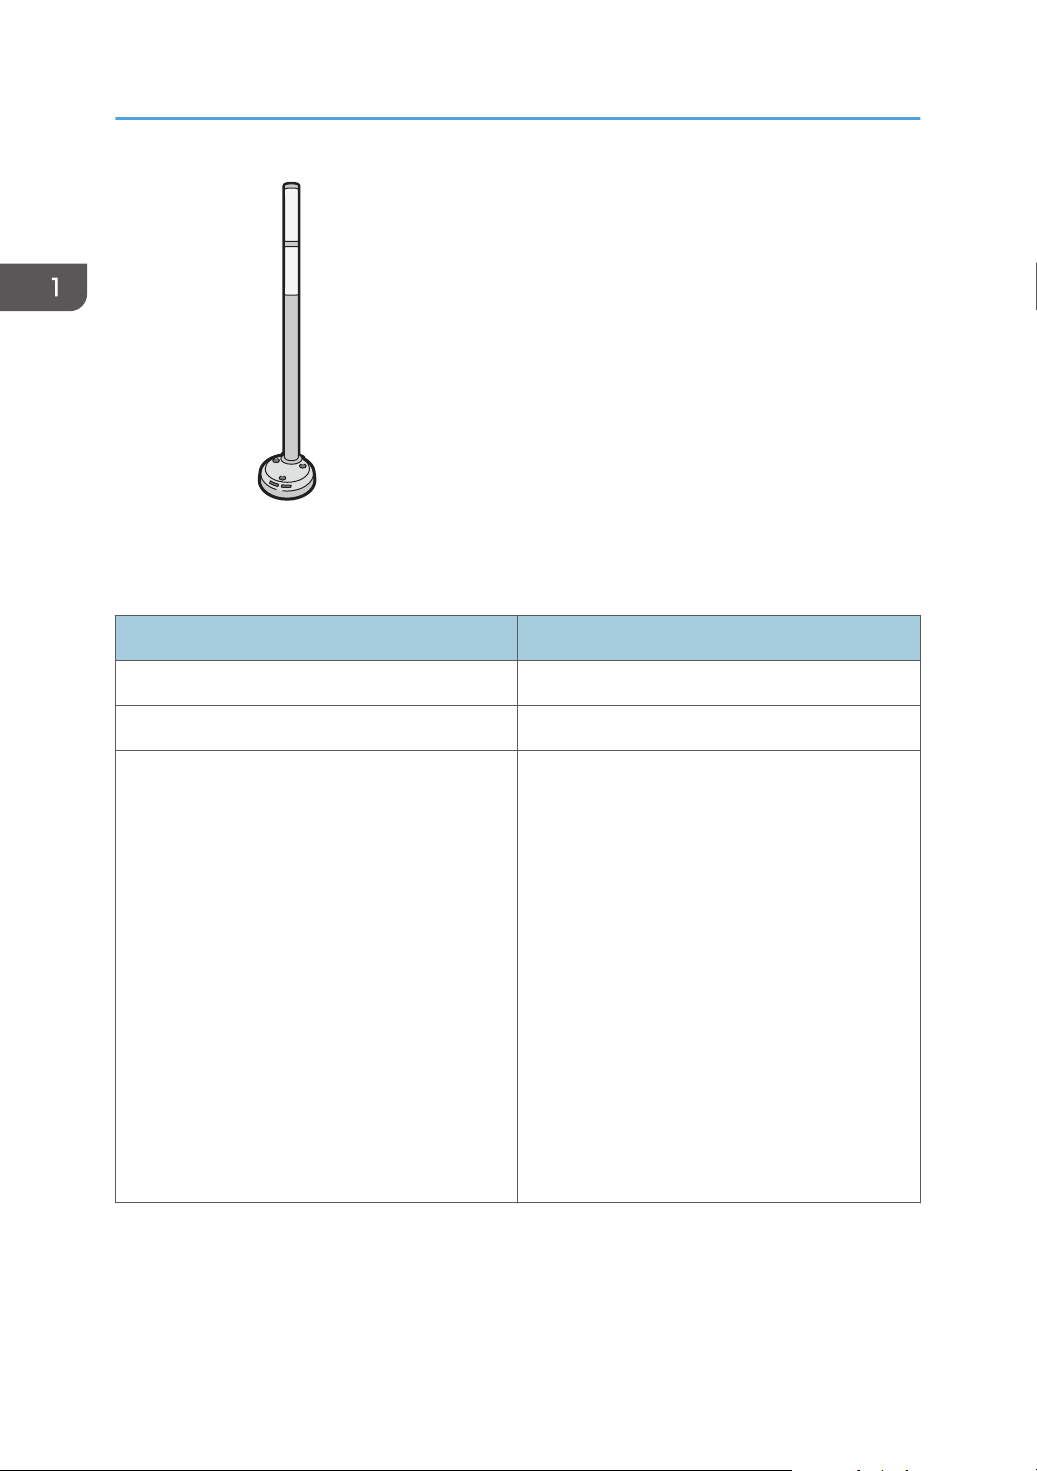
Guide to Functions of the Attention Light
This section introduces functions of the attention light.
• Do not push or pull the attention light when installed to the machine. Doing so may result in
damage or malfunction of the attention light or the machine.
13
CUV121
1. Getting Started
The attention light notifies the user by light when there is a paper jam or no paper is left.
The colors of the lamp and their meanings are as follows:
Lamp Status
The bottom lamp lights blue. Printing
The bottom lamp flashes blue. Data in
The top lamp lights red. Error occurred
(Example)
• When the service call message appears
• Paper jam
• Out of paper
• Out of toner
• Memory overflow
Read the message on the display panel, and then
take appropriate action. For details, see "When
Messages Appear and the Machine Cannot Be
Operated", Operating Instructions, page 74
"Messages Displayed When You Use the Printer
Function", or page 79 "When Other Messages
Appear".
14

Lamp Status
The top lamp flashes yellow. Warning
(Example)
• Toner has nearly run out.
• Waste toner bottle is nearly full.
• Paper has nearly run out.
Read the message on the display panel, and then
take appropriate action. For details, see "When
Messages Appear and the Machine Cannot Be
Operated", Operating Instructions, page 74
"Messages Displayed When You Use the Printer
Function", or page 79 "When Other Messages
Appear".
Guide to Names and Functions of Components
15
DUL001
6
123
7
5
8
4
9
10
1. Getting Started
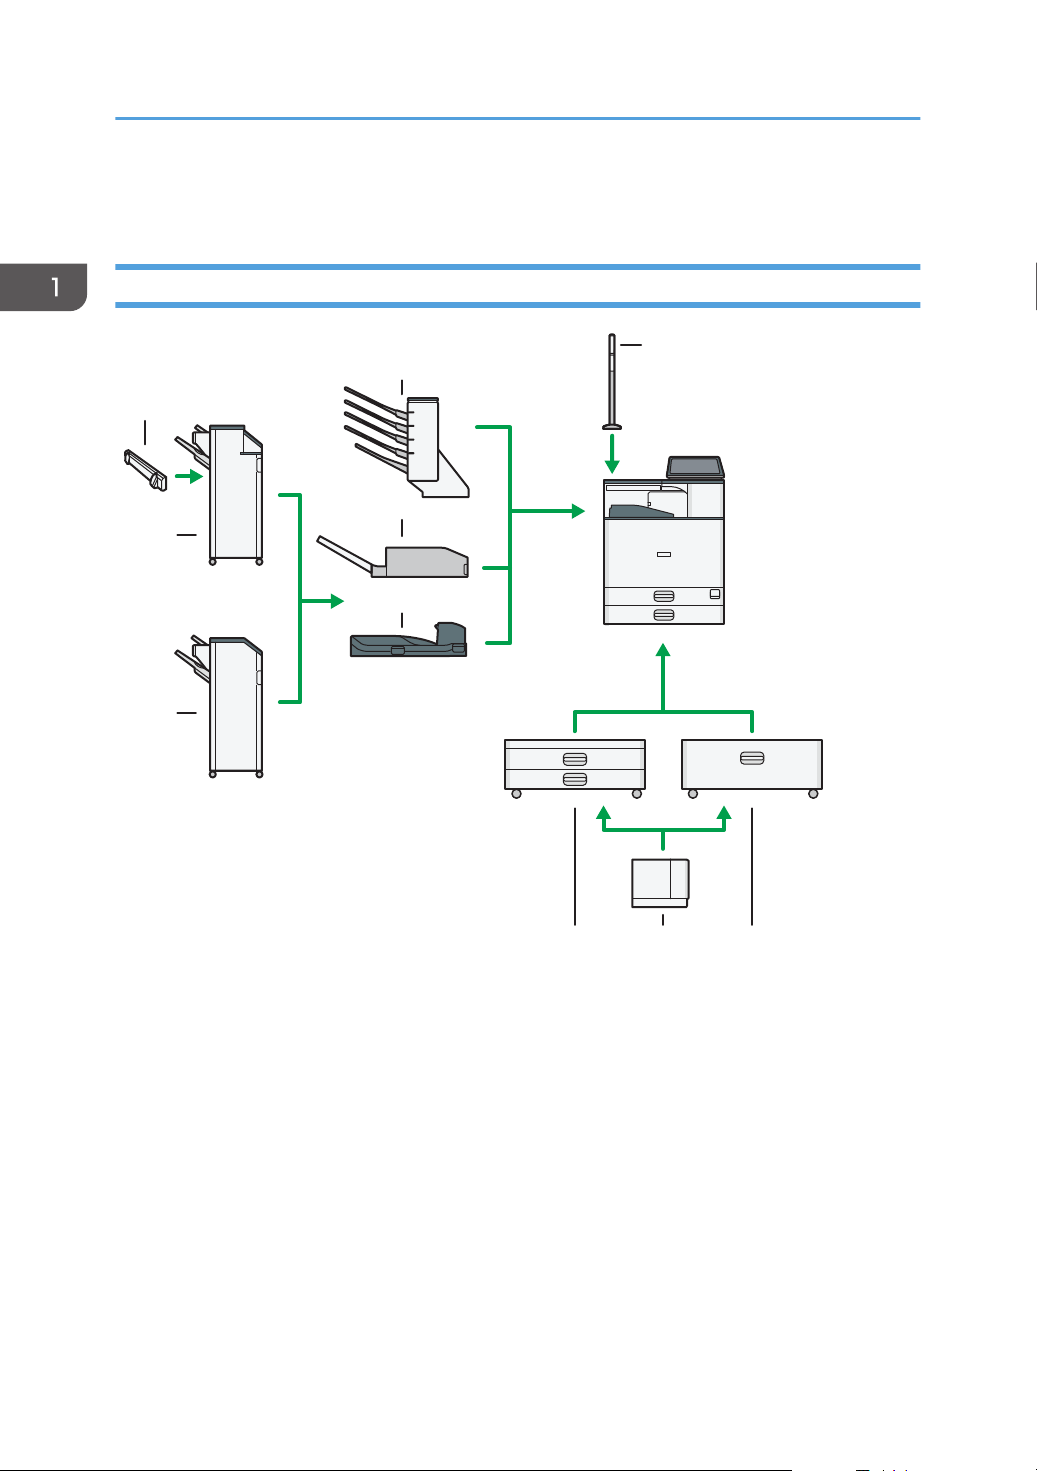
Guide to Functions of the Machine's Options
Guide to Functions of the Machine's External Options
1. Tray 3 (LCT)
Consists of two paper trays.
You can load paper even if Tray 3 (LCT) is in use. It is okay to pull out the left half of the tray while Tray 3
(LCT) is in use.
2. Large capacity tray (LCT)
Paper is loaded here.
3. Lower paper trays
Consists of two paper trays.
4. Bridge unit
Relays paper to the finisher.
16

Guide to Functions of the Machine's Options
5. Internal Multi-Folding unit
The Internal Multi-Folding unit can apply the following folds: Half Fold, Letter Fold-out, Letter Fold-in, and Zfold.
6. Mailbox
Sorts printed paper. Consists of mailbox output trays 1–4.
7. Finisher SR3210
Sorts, stacks, and staples multiple sheets of paper. Consists of the following paper trays:
• Finisher upper tray
• Finisher shift tray
Copies can be punched if the optional punch unit is installed on the finisher.
8. Finisher SR3230
Sorts, stacks, and staples multiple sheets of paper. Consists of the following paper trays:
• Finisher upper tray
• Finisher shift tray
Copies can be punched if the optional punch unit is installed on the finisher.
9. Output jogger
Jogs the sheets delivered to the finisher shift tray.
10. Attention Light
The attention flashes or lights up to notify the user of printing errors such as a paper jam, or when no paper is
left.
Guide to Functions of the Machine's Internal Options
• HDD
Allows you to store documents to be printed.
• Adobe PostScript 3 unit
Allows you to print by Adobe PostScript 3 printer driver.
If you remove the Adobe PostScript 3 Option from your machine, the PS/PDF function, which is a
standard function, will no longer work.
• VM card
With this card, you can install embedded software applications.
• IPDS unit
Allows you to print using Intelligent Printer Data Stream (IPDS).
• XPS card
Allows you to print XPS files.
• USB device server
17

1. Getting Started
Allows you to add an Ethernet port to the printer and use two IP addresses at the same time.
To attach this option, see "Installing the Interface Units", Operating Instructions.
• Extended USB Board
Allows you to add a USB port.
To attach this option, see "Installing the Interface Units", Operating Instructions.
• IEEE 1284 interface board
Allows you to connect to an IEEE 1284 cable.
To attach this option, see "Installing the Interface Units", Operating Instructions.
• Wireless LAN board
Allows you to communicate over wireless LAN.
To attach this option, see "Installing the Interface Units", Operating Instructions.
18
DNE093
21
4
5
5
6
3
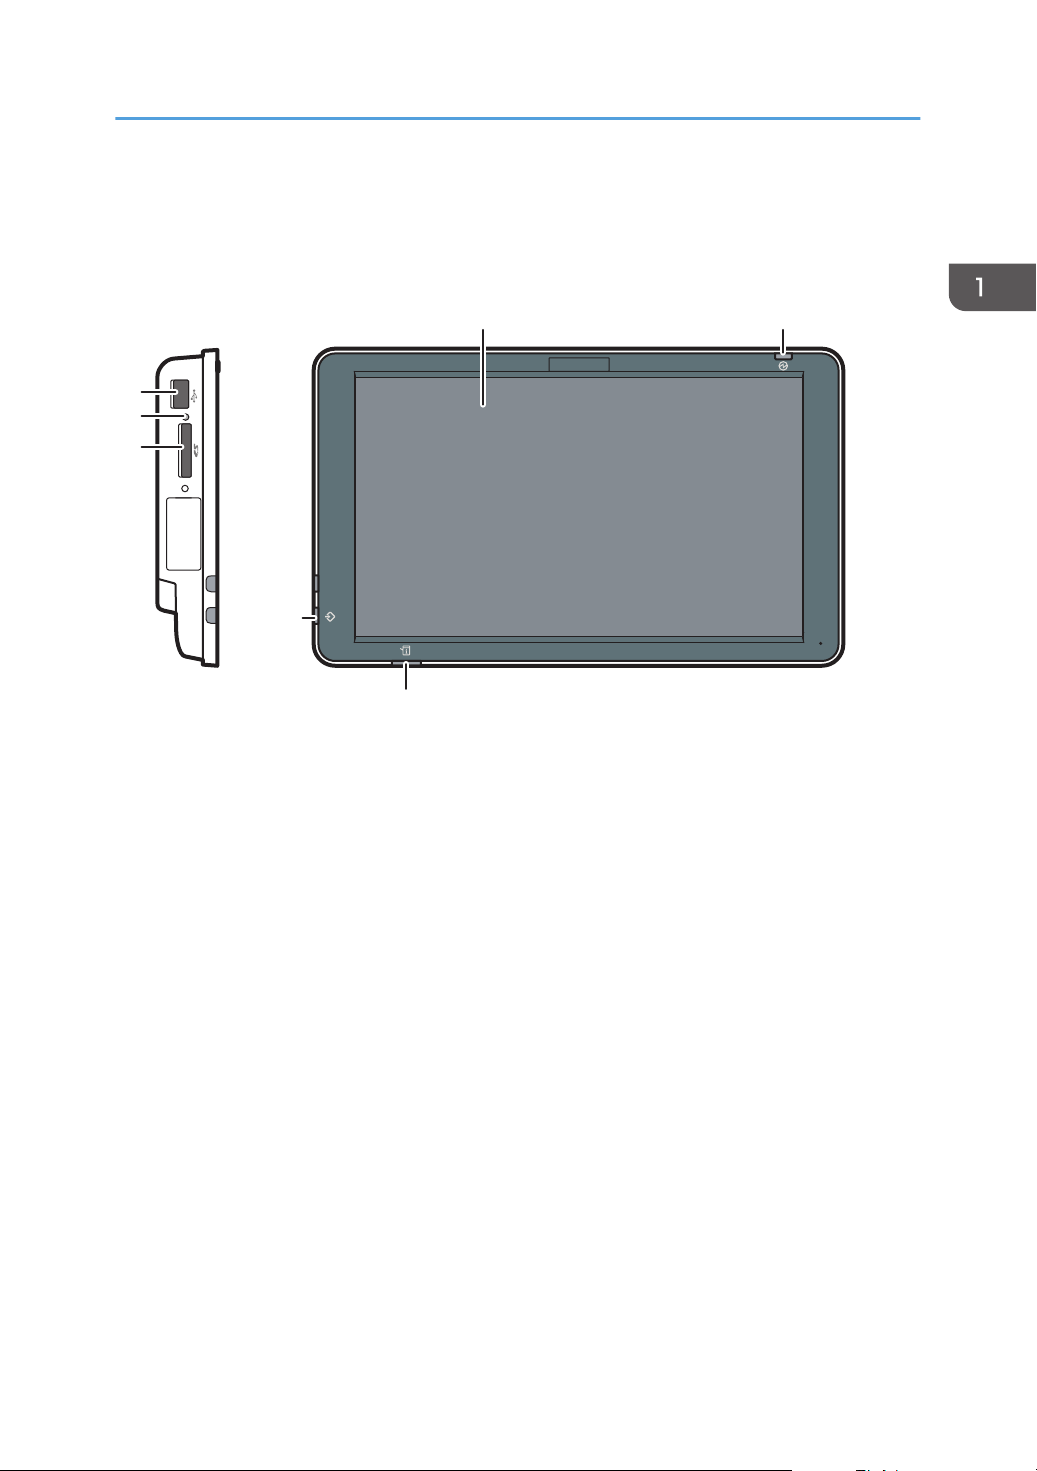
Guide to the Names and Functions of the Machine's Control Panel
Guide to the Names and Functions of the
Machine's Control Panel
1. Display panel
This is a touch panel display that features icons, keys, shortcuts, and widgets that allow you to navigate the
screens of the various functions and applications and provide you with information about operation status and
other messages. See page 21 "How to Use the [Home] Screen".
2. Main power indicator
The main power indicator goes on when you turn on the main power switch. When the machine is in Sleep
mode, the main power indicator flashes slowly. In Fusing Unit Off mode, the main power indicator is lit.
3. Status indicator
Indicates the status of the system. Stays lit when an error occurs or the toner runs out.
4. Data In indicator (printer mode)
Flashes when the machine is receiving print jobs from a computer.
5. Media slots
Use to insert an SD card or a USB flash memory device. For details, see "Inserting/Removing a Memory
Storage Device", Operating Instructions.
6. Media access lamp
Lights up when an SD card is inserted in the media slot.
19

1. Getting Started
Changing the Display Language
You can change the language used on the display. English is set as default.
1. Press [Home] ( ) at the bottom of the screen in the center.
2. Flick the screen to the left, and then press the [Change Langs. Widget] icon.
3. Select the language you want to display.
4. Press [OK].
20
DUL009
5
6
13
1 3 4
7891012 11
2
How to Use the [Home] Screen
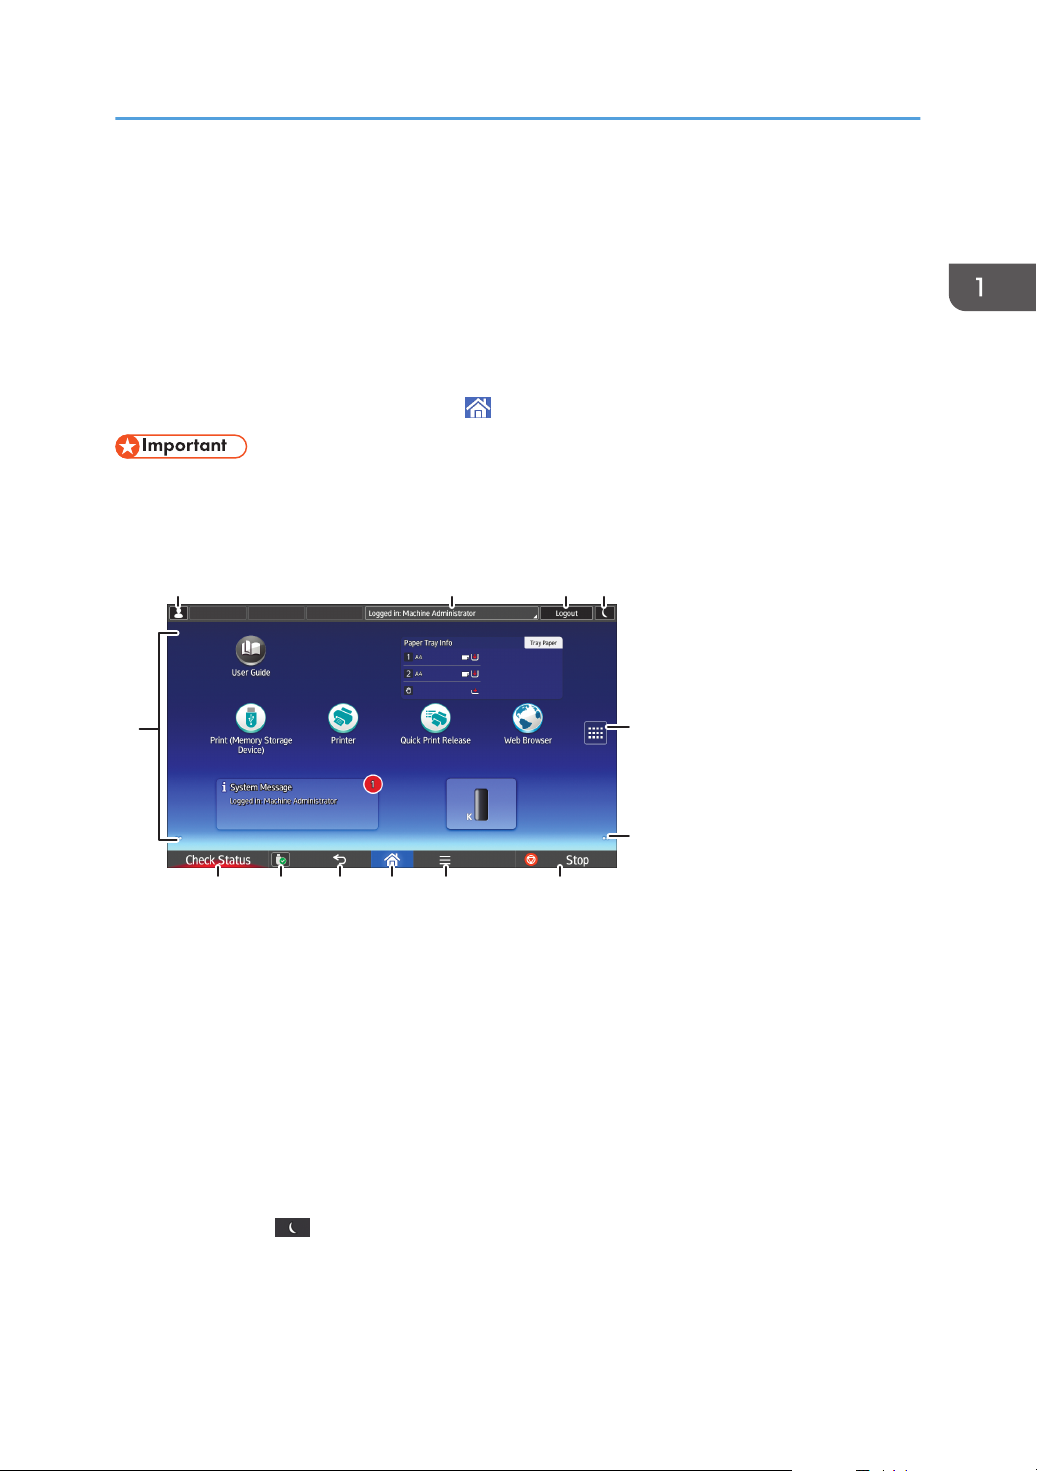
How to Use the [Home] Screen
The [Home] screen is set as the default screen when the machine is turned on.
One icon is assigned to each function, and these icons are displayed on the [Home] screen. You can
add shortcuts to frequently used Web pages to the [Home] screen. Also, you can register widgets such
as the Change Langs. Widget to it. The [Home] screen and the screen of each function may differ
depending on the optional units that are installed.
To display the [Home] screen, press [Home] ( ) at the bottom of the screen in the center.
• Do not apply strong impact or force to the screen, or it may be damaged. Maximum force
allowable is approx. 30N (approx. 3 kgf). (N = Newton, kgf = Kilogram force. 1 kgf = 9.8N.)
To switch between screens, flick your finger to the right or left on the screen.
1. Logged-in user icon
When user authentication is enabled, an icon is displayed that indicates that users are logged in.
Press the icon to show the names of the users that are currently logged in.
2. System message
Displays messages from the machine system and applications.
3. [Login]/[Logout]
These keys are displayed when user authentication is enabled. When you press [Login], the authentication
screen appears. If you have been already logged in to the machine, [Logout] appears. To log out of the
machine, press [Logout].
For details about how to log in and out, see "Logging in to the Printer", Operating Instructions.
4. [Energy Saver]
Press to switch to Sleep mode.
For details about the modes, see page 31 "Saving Energy".
21
1. Getting Started
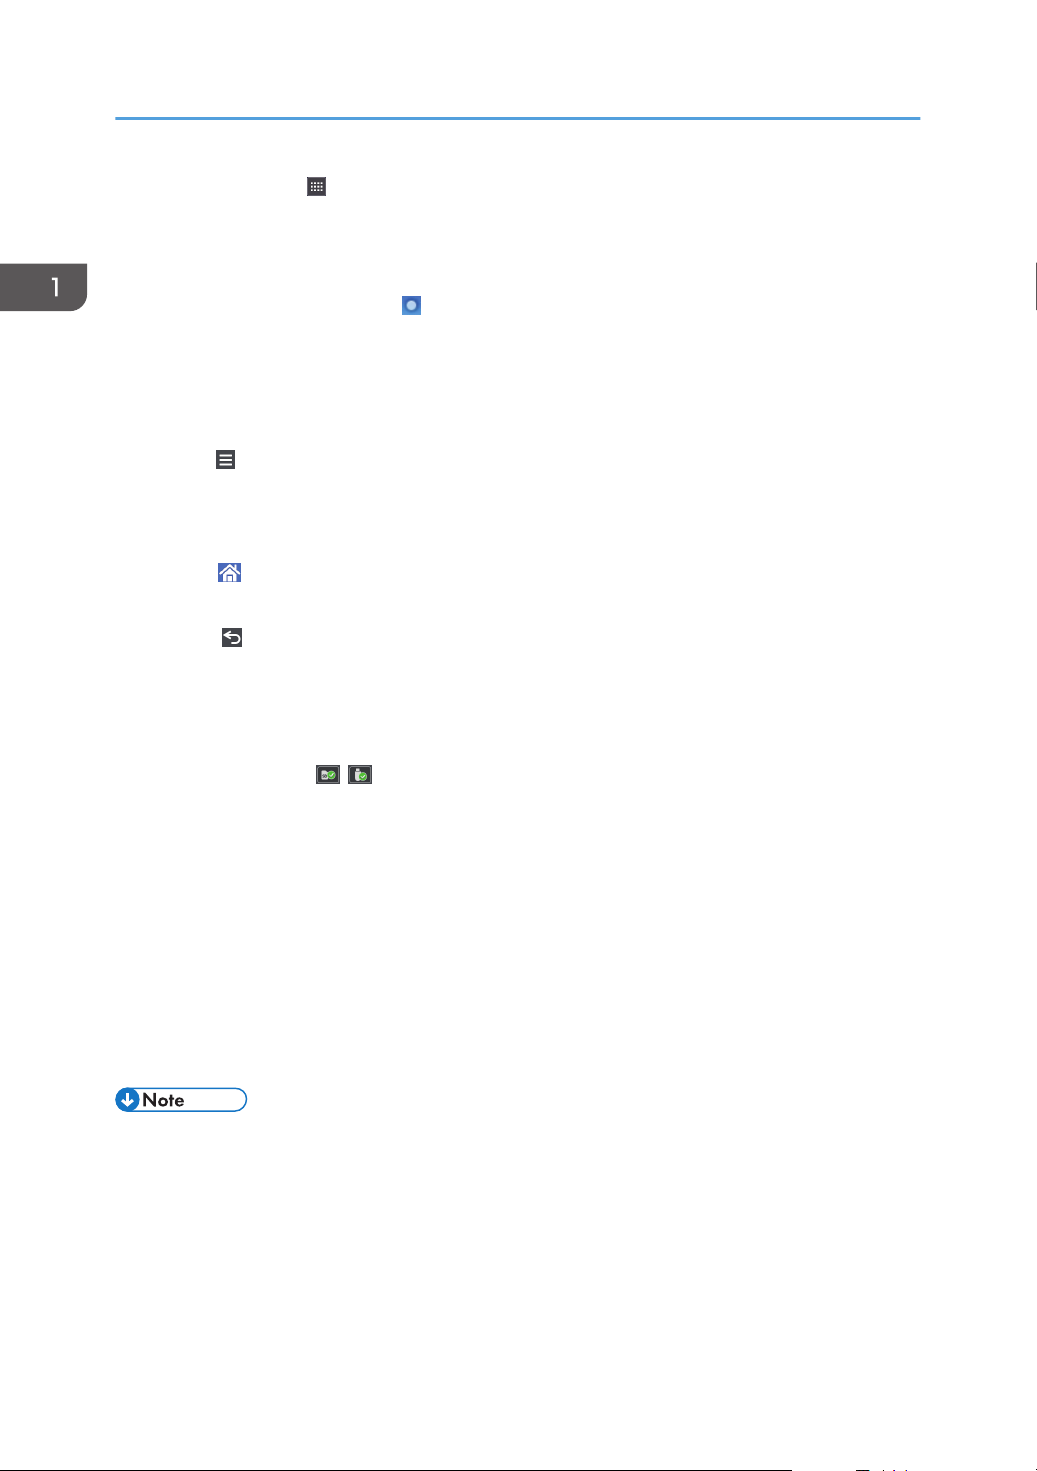
5. Application list icon
Press to display the application list. You can create shortcuts to the applications on the [Home] screen.
To use an application displayed in the [Widgets] tab and [Program] tab, create a shortcut for the application
on the [Home] screen. For details, see "Customizing the [Home] Screen", Operating Instructions.
6. Icons to switch between screens
Press to switch between the five home screens. The icons appear at the bottom right and left of the screen, the
number of icons indicates the number of screens on each side of the current screen.
7. [Stop]
Press to stop a job in progress.
8. [Menu]
Displays the menu screen of the application you are using. Depending on the application you are using, this
key may be disabled. You can also press this key in the [Home] screen to restore the [Home] screen's settings
to their defaults.
9. [Home]
Press to display the [Home] screen.
10. [Return]
Press this key to return to the previous screen while Screen Features are enabled or applications are used.
Depending on the application you are using, this key may be disabled. You can specify whether this key is
enabled or not in some applications. For details about the settings, see "Screen Features", Operating
Instructions.
11. [Media Information] /
Press to remove the inserted SD card or USB flash memory device from the media slot. For details, see
"Removing an SD Card" or "Removing a USB Flash Memory Device", Operating Instructions.
12. [Check Status]
Press to check the machine's system status, operational status of each function, and current jobs. You can also
display the job history and the machine's maintenance information.
13. Icon display area
Displays the function or application icons and widgets. Displayed icons differ between the five home screens.
For details about icons on each screen, see page 23 "Main Icons on the [Home] Screen".
You can also add shortcuts and arrange icons using folders. For details, see "Customizing the [Home]
Screen", Operating Instructions.
22
• You can change the [Home] screen's wallpaper. For details, see "Changing the [Home] Screen's
Wallpaper", Operating Instructions.
• You can switch modes by pressing icons on the [Home] screen. You can also switch modes by
pressing the function keys. For details about the function keys, see "Changing Modes by Pressing
the Function Keys", Operating Instructions.
• You cannot switch modes in any of the following situations:
• When accessing the following screens:

How to Use the [Home] Screen
• Machine Features
• Maintenance: Print
• Maintenance: Image
• Counter
• Inquiry
• Address Book Management
• Tray Paper Settings
• Current Job / Job History
• The [Home] screen is set as the default screen when the machine is turned on. You can change this
default setting under Function Priority. See "Screen Features", Operating Instructions.
Main Icons on the [Home] Screen
The following icons are displayed on the [Home] screen as a factory default:
Icon Description
Printer Allows you to make settings for using the machine as a printer easily.
For details, see "Checking the Printer Status from the Printer Icon",
Operating Instructions.
Print (Memory Storage
Device)
Quick Print Release Allows you to print files easily. For details, see "Using the Quick Print
Printer (Classic) Press to make settings for using the machine as a printer.
Web Browser Press to display Web pages. For details, see "Using the Browser
User Guide Press to display the manuals for the machine.
Address Book Management Press to display the Address Book.
Allows you to print files from a memory storage device. For details, see
"Using the Print (Memory Storage Device) Function", Operating
Instructions.
Release Function", Operating Instructions.
Function", Operating Instructions.
For details about how to use the Address Book, see "Address Book",
Operating Instructions.
23
2
31
9
10
8
5
6
7
11
DUL011
4
1. Getting Started
Icon Description
Application Site Press to display Application site.
Allows you to download applications for your machine. For details,
see "How to Use the Application Site", Operating Instructions.
User Tools Press to display the screen for the machine's initial settings.
System Mes. Widget Displays messages from the machine system and applications.
Change Langs. Widget Allows you to change the on-screen language.
Supply Info Widget Displays the remaining amount of toner.
Paper Tray Info Widget Displays the tray's settings and the amount of paper remaining. In
Energy Saver mode, this widget is dimmed and no longer reflects the
tray's settings or the amount of paper remaining.
Embedded software
applications
When an embedded software application is installed, a function icon
for the application is displayed on the [Home] screen.
You can add icons to the [Home] screen to customize the machine. For details about adding icons to the
[Home] screen, see page 28 "Adding Icons to the [Home] Screen".
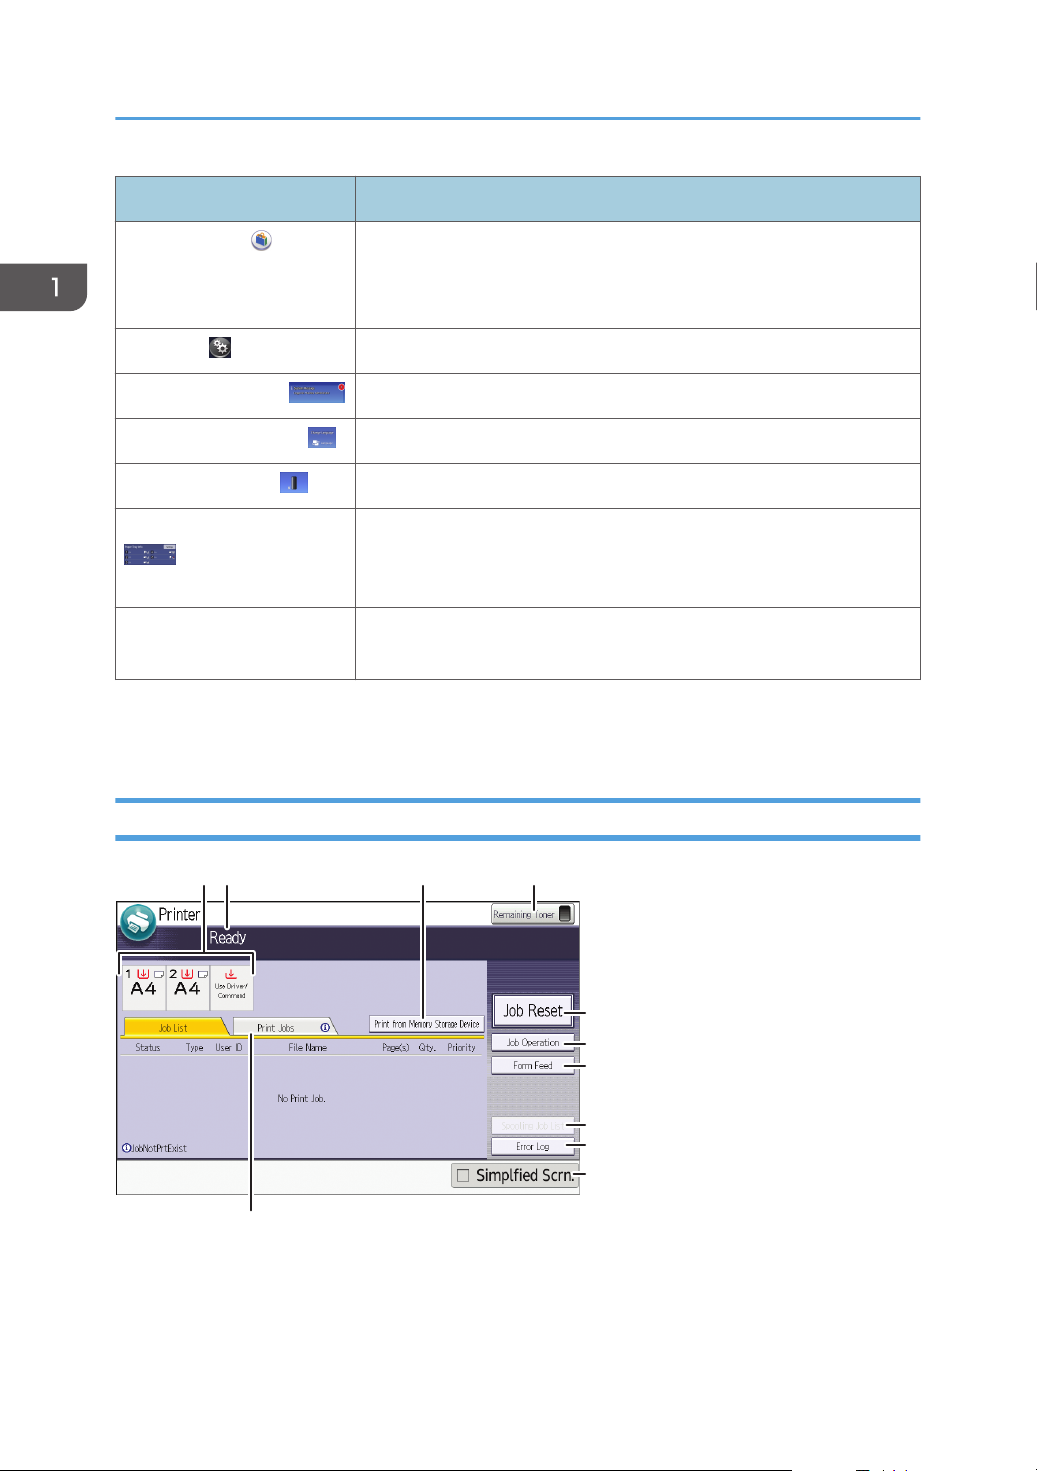
[Printer (Classic)] Screen
24
1. Paper tray status indicators
Displays paper tray settings.

How to Use the [Home] Screen
2. Operational status or messages
Displays current machine status, such as "Ready", "Offline", and "Printing...". Information about the print job
(user ID and document name) appears in this section.
3. [Print from Memory Storage Device]
Press to display the screen for printing files stored on memory storage devices directly.
4. Supply Information
Displays the remaining amount of toner.
5. [Job Reset]
Press to cancel the current print job.
If you press it when the Hex Dump is selected, Hex Dump is canceled.
6. [Job Operation]
Press to suspend a job being processed.
7. [Form Feed]
Press to print all the data left in the machine's input buffer.
8. [Spooling Job List]
Press to display spooled jobs.
9. [Error Log]
Press to display the error logs of print jobs sent from a computer.
10. [Simplfied Scrn.]
Press to switch to a simplified screen. For details, see "Switching Screen Patterns", Operating Instructions.
11. [Print Jobs]
Press to display print jobs sent from a computer.
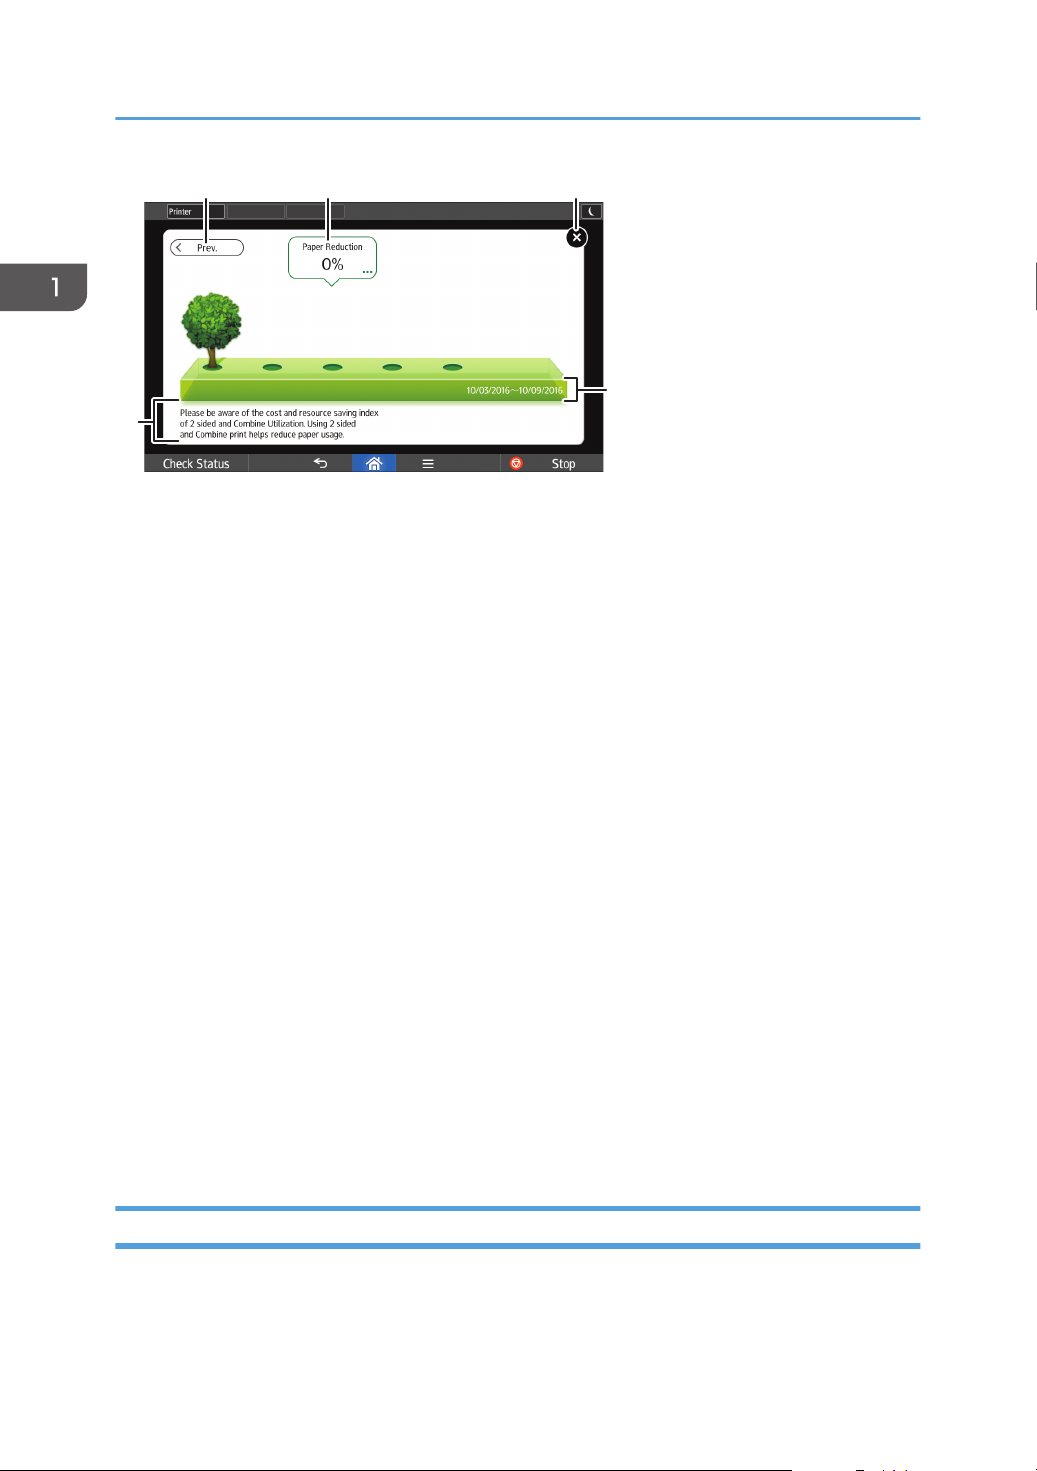
[Information] Screen
To raise awareness of resource conservation, you can configure the machine to display the reduction in
paper usage.
When user authentication is enabled, the screen is displayed when you log in to the machine. When
user authentication is not enabled, the screen is displayed after returning from Sleep mode or after a
system reset. The [Information] screen appears when the power is turned on, regardless of the
authentication settings.
25
1 2 3
DUL012
4
5
1. Getting Started
1. [Prev.] / [Crnt.]
Press to switch between the [Information] screen of the previous count period and that of the current count
period.
2. Paper Reduction
Shows the amount of paper saved by using the duplex and combine printing functions. The figure indicates the
percentage of paper saved from the total of all the paper used. As the figures become greater, the number of
the trees increases. If the paper reduction ratio exceeds a certain level, the trees will bear fruit.
Press [...] on the bottom right of the balloon to display the following items:
• Total Print Pages:
Total number of pages printed in the current count period is displayed.
• 2 sided Utilization:
The ratio of 2-sided prints to the total number of prints is displayed.
The higher the ratio is, the more leaves are displayed.
• Combine Utilization:
The ratio of combined prints to the total number of prints is displayed.
The higher the ratio is, the more leaves are displayed.
3. [Close]
Press this to close the [Information] screen and return to operation.
4. Count periods
The current and previous count periods are displayed.
5. Message
A message from the administrator is displayed.
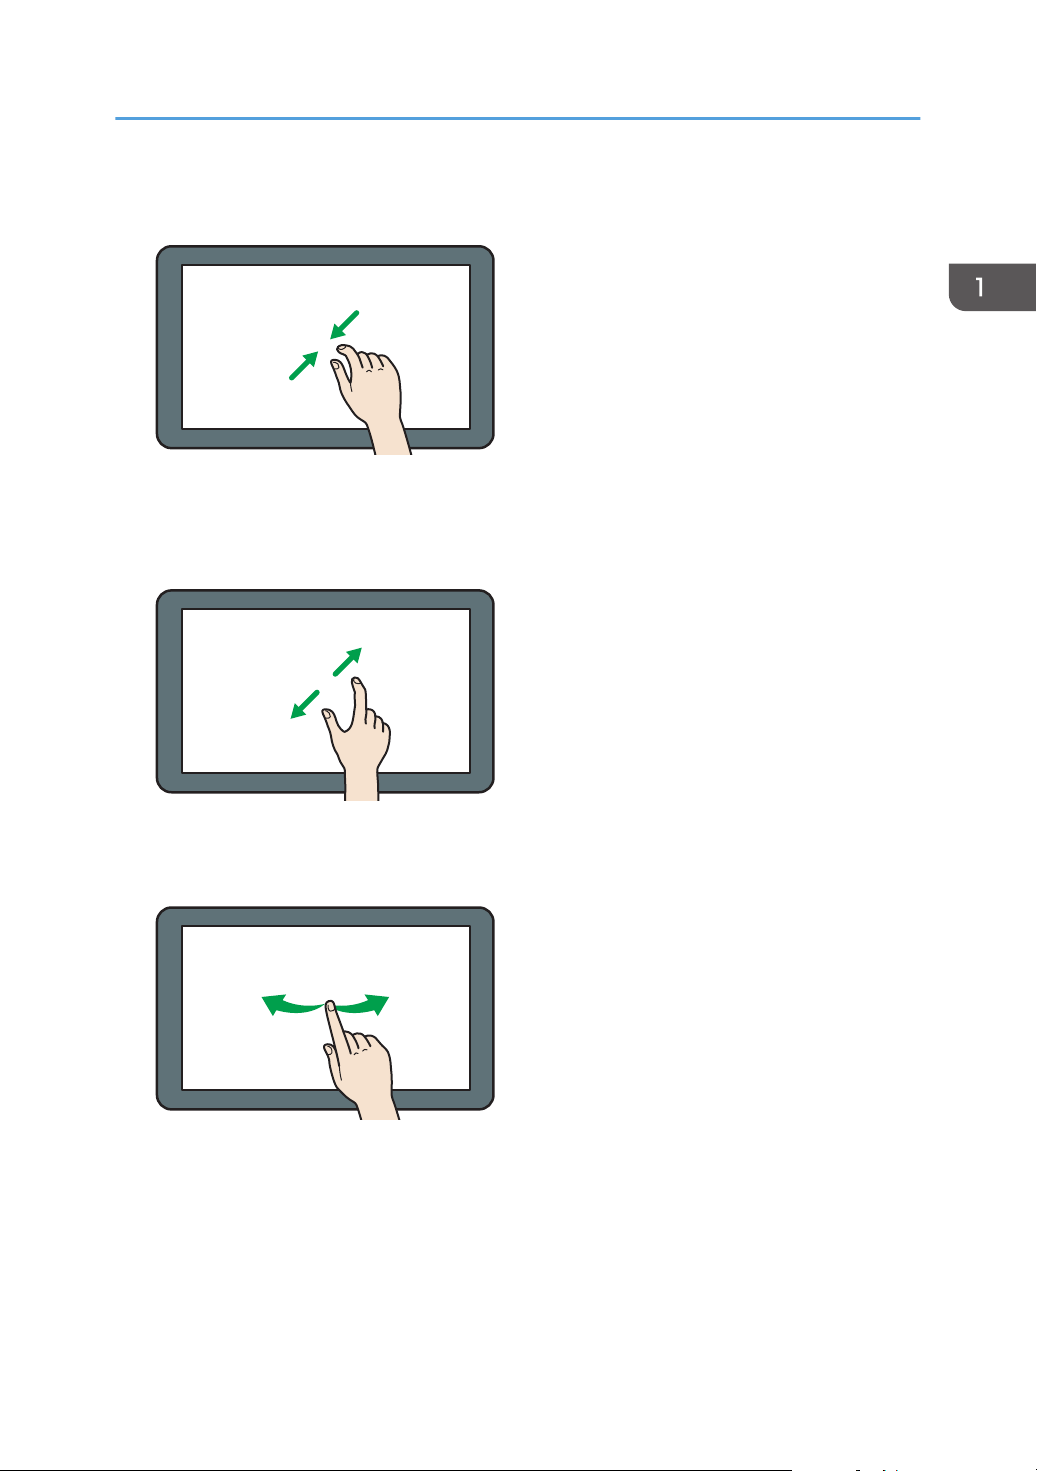
Possible Operations on the Screen
• Pinch-in
26
DNE103
DNE104
DNE102
How to Use the [Home] Screen
Place your thumb and forefinger on the screen, and then pinch the fingers together to zoom out the
screen. Double-tapping can also be effective for this operation.
• Pinch-out
Place your thumb and forefinger on the screen, and then spread the fingers apart to zoom in the
screen. Double-tapping can also be effective for this operation.
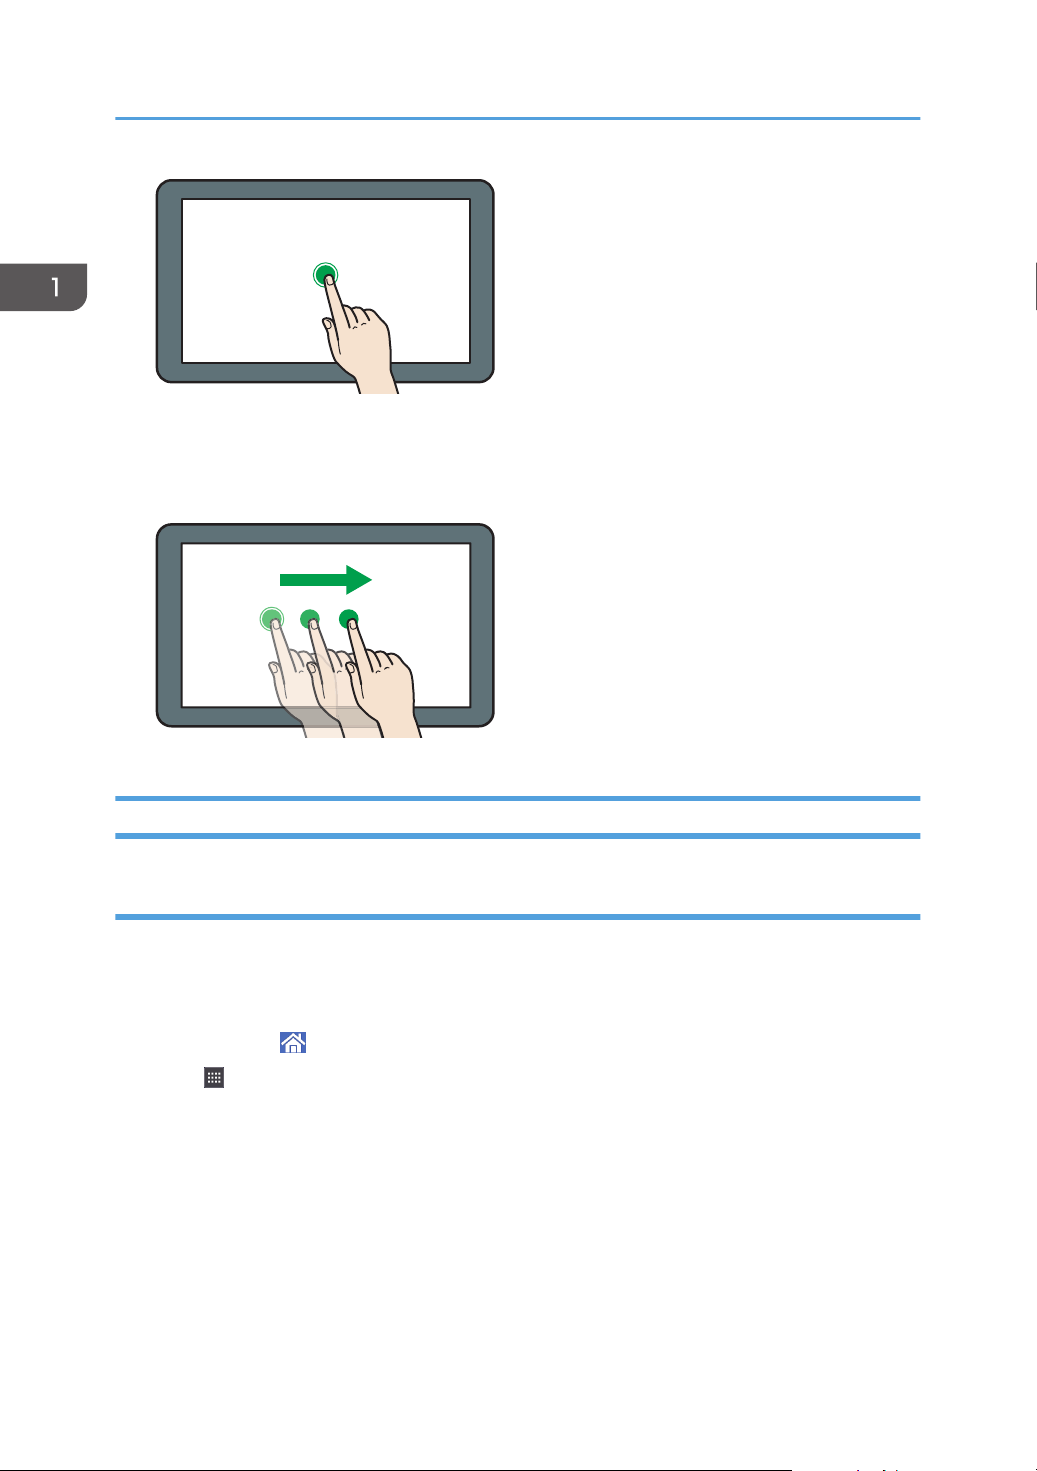
• Flick
Flick your finger to the right or left on the screen to switch between screens.
• Long tap
Place your finger on the screen and hold it there until the next screen appears. You can display the
menu screen of the application you are using.
27
DNE101
DNE111
1. Getting Started
• Drag
Slide your finger while pressing the screen. You can move icons, folders, etc., to where you want to
place them.
Adding Icons to the [Home] Screen
Adding shortcuts to the [Home] screen
You can add shortcuts to the machine's functions.
You can display the icons for the machine's functions and the embedded software applications after you
delete them from the [Home] screen.
1. Press [Home] ( ) at the bottom of the screen in the center.
2. Press .
3. Press the [Apps] tab to add a shortcut to an application other than [Printer (Classic)]. Press
the [Program] tab to add a shortcut to [Printer (Classic)].
4. Press and hold down the application icon to add a shortcut to an application other than
[Printer (Classic)]. Press and hold down the [Classic Applications] icon to add a shortcut to
[Printer (Classic)].
The image of where the shortcut is to be placed on the [Home] screen is displayed.
28
 Loading...