


WOOD |
Fireplace Insert & |
Hearth Heater |
Owners & Installation Manual |
www.regency-fire.com
Tested by:
MODELS: H2100 I3100L
Installer: Please complete the details on the back cover and leave this manual with the homeowner.
Homeowner: Please keep these instructions for future reference.
908-332b |
fpi fireplace products international ltd. 6988 Venture St., Delta, BC Canada, V4G 1H4 |
10/12/11 |
Thank-you for purchasing a
REGENCY FIREPLACE PRODUCT.
The pride of workmanship that goes into each of our products will give you years of trouble-free enjoyment. Should you have any questions about your product that are not covered in this manual, please contact the REGENCY DEALER in your area.
Keep those REGENCY FIRES burning.
SAFETY NOTE: If this Insert is not properly installed, a house fire may result. For your safety, follow the installation instructions, contact local building or fire officials about restrictions and installation inspection requirements in your area.
2 |
Regency Wood Insert & Hearth Heater |
|

table of contents 
REGENCY FIREPLACE INSERTs
& HEARTH HEATER
SAFETY LABEL |
OPERATING INSTRUCTIONS |
Safety Label For I3100L................................................. |
4 |
Safety Label For H2100M.............................................. |
5 |
INSTALLATION |
|
Before Installing Your Insert........................................... |
6 |
Chimney Specifications.................................................. |
6 |
Fireplace Specifications................................................. |
6 |
Installing Your Insert....................................................... |
6 |
Optional Flue Connector Kit........................................... |
7 |
Masonry and Factory Built Fireplace Clearances ......... |
7 |
Leg Option on H2100 Hearth Heater............................. |
8 |
Flue Connector Bracket................................................. |
8 |
Installation Into a Factory Built Fireplace....................... |
8 |
Installation Into a Masonry Fireplace............................. |
8 |
Faceplate and Trim ....................................................... |
9 |
Fan / Blower................................................................. |
10 |
Floor Protection............................................................ |
11 |
Firebrick Assembly....................................................... |
11 |
Door Handle................................................................. |
11 |
Brick Flue Baffle & Secondary Air Tube Installation..... |
11 |
Draft Control................................................................. |
12 |
Screen Door................................................................. |
12 |
First Fire....................................................................... |
13 |
Fan Operation (All Units).............................................. |
13 |
Ash Disposal................................................................ |
13 |
Some Safety Guidelines............................................... |
13 |
Creosote....................................................................... |
14 |
Maintenance |
|
Maintenance of Gold-Plated Doors.............................. |
14 |
Door Gasket................................................................. |
14 |
Door Latch Adjustment................................................. |
14 |
Glass Cleaning............................................................. |
14 |
Glass Replacement...................................................... |
14 |
Glass Removal............................................................. |
14 |
Annual Maintenance.................................................... |
15 |
parts list |
|
I3100 Main Assembly................................................... |
16 |
I3100 Faceplates.......................................................... |
17 |
H2100 Main Assembly................................................. |
18 |
I3100 & H2100 Firebrick.............................................. |
19 |
WARRANTY
Warranty....................................................................... |
23 |
http://oee.nrcan.gc.ca/residential/personal/retrofit-homes/retrofit-qualify-grant.cfm
3
Regency Wood Insert & Hearth Heater

4
(Duplicate Serial #) 106
Heater Hearth & Insert Wood Regency
LISTED FACTORY BUILT FIREPLACE INSERT |
DO NOT REMOVE THIS LABEL |
|
CERTIFIED FOR USE IN CANADA AND U.S.A. |
106 |
|
MODEL: I3100L |
|
|
TESTED TO: |
|
|
ULC S628-M93 / UL 1482-1998 / ULC S627-00 / UL 737-2000 |
REPORT NO. 632-323500 |
(MAR.1994) |
Install and use only in accordance with the manufactuerer's installation and operating instructions. Install and use only in masonry fireplace or factory built fireplace. Contact local building or fire officials about restrictions and installation inspection in your area.
Minimum Clearances to Combustibles |
|
|
|
|
|
|
|
|
|
|
|
|||||||
(Measured from insert body) |
|
|
|
|
|
|
|
|
|
|
|
INSTALL ONLY ON A NON-COMBUSTIBLE HEARTH RAISED (F) 1.5" (38mm) |
||||||
|
|
|
|
|
|
|
|
|
|
|
|
|
|
|
|
|
|
ABOVE AN ADJACENT COMBUSTIBLE FLOOR. COMBUSTIBLE FLOOR |
ADJACENT SIDEWALL A) 13"(330mm) |
|
|
|
|
|
|
|
|
|
|
|
|
|
|
MUST BE PROTECTED BY NON-COMBUSTIBLE MATERIAL EXTENDING |
|||
MANTLE |
B) 19"(480 mm) |
|
|
|
|
|
|
|
|
|
|
|
|
|
|
(E) 16" (405mm) TO FRONT AND (G) 8" (205mm) TO SIDES FROM FUEL |
||
TOP FACING |
C) 18"(455 mm) |
|
|
|
|
|
|
|
|
|
|
|
||||||
|
|
|
|
|
|
|
|
|
|
|
DOOR. |
|||||||
SIDE FACING |
D) 6.5"(165mm) |
|
|
|
|
|
|
|
|
|
|
|
|
|||||
COMPONENTS REQUIRED FOR INSTALLATION: 5.5" (140mm) or 6" (152mm) STAINLESS STEEL LINER. OPTIONAL COMPONENT: FAN, ELECTRICAL RATING: VOLTS 115, 60 HZ, 0.6 AMPS, SCREEN DOOR
DO NOT REMOVE BRICKS OR MORTAR IN MASONRY FIREPLACE. FOR USE WITH SOLID WOOD FUEL ONLY. DO NOT USE GRATE OR ELEVATE FIRE. BUILD WOOD FIRE DIRECTLY ON HEARTH. OPERATE WITH FEED DOOR CLOSED, OPEN TO FEED FIRE ONLY. REPLACE GLASS ONLY WITH CERAMIC GLASS (5mm). INSPECT AND CLEAN CHIMNEY FREQUENTLY. UNDER CERTAIN CONDITIONS OF USE CREOSOTE BUILDUP MAY OCCUR RAPIDLY. DO NOT OVERFIRE, IF INSERT GLOWS YOU ARE OVER-FIRING.
DATE OF MANUFACTURE 2011 2012 2013 JAN FEB MAR APR MAY JUN JUL AUG
908-343b
|
|
|
Manufactured by: |
||||||
|
|
FPI FIREPLACE PRODUCTS |
|||||||
|
|
|
INTERNATIONAL LTD. |
||||||
|
|
|
6988 Venture Street |
||||||
|
|
|
Delta, BC |
|
V4G 1H4 |
||||
|
|
|
MADE IN CANADA |
||||||
|
|
SEPT OCT |
NOV DEC |
||||||
|
|||||||||
|
|
|
|
|
|
|
|
|
|
|
|
|
|
|
|
|
|
|
|
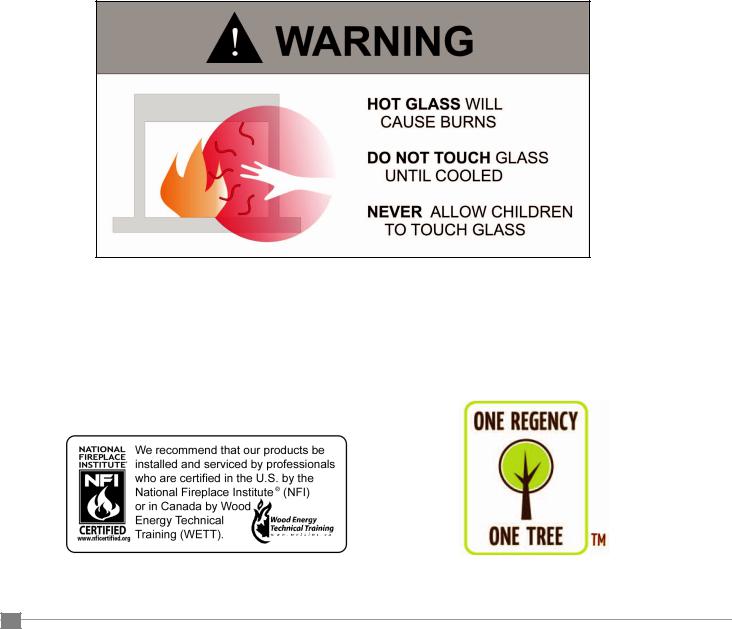
CAUTION
HOT WHILE IN OPERATION DO NOT TOUCH. KEEP CHILDREN, CLOTHING AND FURNITURE AWAY. CONTACT MAY CAUSE SKIN BURNS. READ ABOVE INSTRUCTIONS.
UNITED STATES
ENVIRONMENTAL PROTECTION AGENCY CERTIFIED TO COMPLY WITH JULY 1990, PARTICULATE EMISSION STANDARDS.
|
being constantly are units Regency NOTE: eachaccompaniesthatlabeltheofcopyaisThis if and unit the on label the Check .improved printed have We .Insert Flush Large Regency is unit the on label the difference, a is there .review your for here contents the of copy a .one correct the |
LABEL SAFETY |
|
I3100l For Label Safety |
|
|
|
|
|
||
|
|
|
|
Heater Hearth & Insert Wood Regency
(Duplicate Serial #) |
103 |
LISTED FACTORY BUILT FIREPLACE ACCESSORY HEARTH STOVE |
DO NOT REMOVE THIS LABEL |
CERTIFIED FOR USE IN CANADA AND U.S.A. |
103 |
MODEL: H2100M |
|
TESTED TO: ULC S628-M93 / UL 1482-1998 REPORT NO. 6255 (JULY 1991) |
|
INSTALL AND USE ONLY IN ACCORDANCE WITH THE MANUFACTURER'S INSTALLATION AND OPERATING INSTRUCTIONS. INSTALL AND USE ONLY IN MASONRY FIREPLACE OR FACTORY BUILT FIREPLACE.
CONTACT LOCAL BUILDING OR FIRE OFFICIALS ABOUT RESTRICTIONS AND INSTALLATION INSPECTION IN YOUR AREA.
MINIMUM CLEARANCES TO COMBUSTIBLE MATERIALS (MEASURED FROM INSERT BODY) |
INSTALL ONLY ON A NON-COMBUSTIBLE HEARTH RAISED (F) 1.5 IN / 38 MM |
|||||||||||||||||||||
ADJACENT SIDEWALL |
A) 10 in / 255 mm |
|
|
|
|
|
|
|
|
|
|
|
|
|
|
|
|
|||||
|
|
|
|
|
|
|
|
|
|
|
|
|
|
|
|
ABOVE AN ADJACENT COMBUSTIBLE FLOOR. COMBUSTIBLE FLOOR MUST |
||||||
MANTEL |
B) 25 in / 635 mm |
|
|
|
|
|
|
|
|
|
|
|
|
|
|
|
|
|||||
|
|
|
|
|
|
|
|
|
|
|
|
|
|
|
|
BE PROTECTED BY NON-COMBUSTIBLE MATERIAL EXTENDING (E) 18 IN / 455 |
||||||
TOP FACING |
C) 14 in / 355 mm |
|
|
|
|
|
|
|
|
|
|
|
|
|
|
|
|
MM TO FRONT AND (G) 6 IN / 150 MM TO SIDES. |
|
|||
SIDE FACING |
D) 8.5 in/ 216mm |
|
|
|
|
|
|
|
|
|
|
|
|
|
|
|
|
COMPONENTS REQUIRED FOR INSTALLATION MUST HAVE EITHER A 5.5" |
||||
HEARTH EXTENSION (DEPTH) |
E) 18 in / 455 mm |
|
|
|
|
|
|
|
|
|
|
|
|
|
|
|
|
(140mm) or 6" (150MM) STAINLESS STEEL LINER. |
|
|||
HEARTH EXTENSION (ELEVATION) |
F) 1.5 in/ 38 mm |
|
|
|
|
|
|
|
|
|
|
|
|
|
|
|
|
|
||||
HEARTH EXTENSION (WIDTH) |
G) 6 in |
/ 150 mm |
|
|
|
|
|
|
|
|
|
|
|
|
|
|
|
|
|
|
|
|
|
|
|
|
|||||||||||||||||||
DO NOT REMOVE BRICKS OR MORTAR IN MASONRY FIREPLACE. FOR USE WITH SOLID WOOD FUEL ONLY. DO NOT USE GRATE |
|
MANUFACTURED BY: |
|
|||||||||||||||||||
OR ELEVATE FIRE. BUILD WOOD FIRE DIRECTLY ON HEARTH. OPERATE WITH FEED DOOR CLOSED, OPEN TO FEED FIRE ONLY. |
FIREPLACE PRODUCTS INTERNATIONAL LTD. |
|||||||||||||||||||||
REPLACE GLASS ONLY WITH CERAMIC GLASS (5 MM). |
|
|
|
|
|
|
|
|
|
|
|
|
|
|
|
|
|
6988 VENTURE ST. DELTA, BC |
V4G 1H4 |
|||
INSPECT AND CLEAN CHIMNEY FREQUENTLY. UNDER CERTAIN CONDITIONS OF USE CREOSOTE BUILDUP MAY OCCUR RAPIDLY. |
|
|
908-389b |
|||||||||||||||||||
DO NOT OVERFIRE, IF INSERT GLOWS YOU ARE OVER-FIRING. |
|
|
|
|
|
|
|
|
|
|
|
|
|
|
|
|
|
|
|
|||
DATE OF MANUFACTURE 2011 |
2012 |
2013 |
JAN FEB MAR |
APR MAY JUN JUL |
AUG |
SEPT OCT NOV |
DEC |
|||||||||||||||
MADE IN CANADA
5
CAUTION
HOT WHILE IN OPERATION DO NOT TOUCH. KEEP CHILDREN,
CLOTHING AND FURNITURE AWAY. CONTACT MAY CAUSE SKIN BURNS. READ ABOVE INSTRUCTIONS.
UNITED STATES ENVIRONMENTAL PROTECTION AGENCY CERTIFIED TO COMPLY WITH JULY 1990, PARTICULATE EMISSION STANDARDS.
H2100m For Label Safety |
being constantly are units Regency NOTE: eachaccompaniesthatlabeltheofcopyaisThis if and unit the on label the Check .improved a printed have We .Heater Hearth Regency the is unit the on label the difference, a is there .review your for here contents the of copy .one correct |
LABEL SAFETY
 installation
Regency Inserts are constructed with the highestqualitymaterialsandassembledunderstrict quality control procedures that insure years of trouble free and reliable performance.
It is important that you read this manual thoroughly and fully understand the safe installation and operating procedures. The more you understand the way your Regency Insert operates, the more enjoyment you will experience from knowing that your unit is operating at peak performance.
Before Installing
Your Insert
1)Read all instructions before installing and using your fireplace insert. Install and use only in accordance with manufacturer’s installation and operating instructions.
2)Check your local building codes - Building
Inspection Department. You may require a permit before installing your insert. Be aware that local codes and regulations may override some items in the manual.
WARNING: Careless installation is the major cause of safety hazard. Check all local building and safety codes before installation of unit.
3)Notify your home insurance company that youplantoinstallafireplaceinsertorhearth heater.
4)Your fireplace insert is heavy and requires two or more people to move it safely. The insert can be badly damaged by mishandling.
5)If your existing fireplace damper control will become inaccessible once you have installed your Regency Insert, you should either remove or secure it in the open position.
6)Inspect your fireplace and chimney prior to installing your insert to determine that it is free from cracks, loose mortar or other signs of damage. If repairs are required, they should be completed before installing your insert. Do not remove bricks or mortar from your masonry fireplace.
7)Do not connect the insert to a chimney system servicing another appliance or an air distribution duct.
Emissions from burning wood or gas could contain chemicals known to the State of California to cause cancer, birth defects or other reproductive harm.
Chimney
Specifications
Beforeinstalling,checkandcleanyourchimney system thoroughly. If in doubt about its condition, seek professional advice. Your Regency
Insertisdesignedforinstallationintoamasonry fireplace that is constructed in accordance with therequirementsof"TheStandardforChimneys,
Fireplaces, Vents, and Solid Fuel Burning Appliance", N.F.P.A. 211, the National Building
Code of Canada, or the applicable local code requirements.
The appliance, when installed, must be electricallygroundedinaccordancewithlocalcodesor, in the absence of local codes, with the National
ElectricalCode,ANSI/NFPA70,ortheCanadian
Electrical code, CSA C22.1.
Regency Inserts are designed to use either a 5.5" (140mm) or 6" (152mm) flue.
Requirements for Installing Solid-fuel Inserts in Factory-built Fireplaces.
1)The insert must be tested and meet the requirements of UL1482 (U.S.) and or ULC S628 (Canada) when tested in a masonry fireplace built per ULC S628.
2)Thefactory-builtfireplacemustbelistedper
UL 127 or ULC S610.
3)Clearancesobtainedfromthemasonryfireplace tests are also relevant for installation in factory-built fireplaces.
4)Installation must include a full height listed chimney liner type HT requirements (2100 degree F.) per UL 1777 (U.S.) or ULC S635 (Canada). The liner must be securely attached to the insert flue collar and the chimney top.
5)Means must be provided to prevent room air passage to the chimney cavity of the fireplace. This may be accomplished by sealingthedamperareaaroundthechimney liner, or sealing the fireplace front.
6)Alterationofthefireplaceinanymannerisnot permitted with the following exceptions;
a.external trim pieces which do not affect the operation of the fireplace may be removed providing they can be stored onorwithinthefireplaceforre-assembly if the insert is removed.
b.the chimney damper may be removed to install the chimney liner.
7)Circulating air chambers (i.e. in a steel fireplace liner or metal heat circulator) shall not be blocked.
8)Means must be provided for removal of the insert to clean the chimney flue.
9)Inserts that project in front of the fireplace mustbesuppliedwithappropriatesupporting means.
10)Installer must mechanically attach the supplied label to the inside of the firebox of the fireplace into which the insert is installed.
"WARNING:Thisfireplacehasbeenconverted for use with a wood insert only and cannot be used for burning wood or solid fuels unless all original parts have been replaced, and the fireplace re-approved by the authority having jurisdiction."
In order for a solid-fuel insert to be certified for use in factory-built fireplaces, the above information must be clearly stated in the installation manual and appropriate markings. Final approval is contingent on the authority having jurisdiction.
Fireplace
Specifications
Your fireplace opening requires the following minimum sizes:
|
Height |
Width Depth |
|
Large (I3100L) |
25" |
28" |
17" |
Hearth Heater (H2100M) |
20.0" |
-- -- |
|
Two faceplates are available to seal the fireplace opening:
Standard |
Oversize |
Large (I3100L) |
|
44"W x 32"H |
50"W x 34.5"H |
Hearth Heater (H2100M) |
|
40 1/4"W x 30"H |
48"W x 33"H |
Installing Your
Insert
Your insert is very heavy and will require two or three people to move it into position. The insert can be made a little lighter by removing the cast iron door by opening it and lifting it off its hinges. Be sure to protect your hearth extension with a heavy blanket or carpet scrap during the installation.
Convection Grills for
I3100L
The convection grills are installed before the unit is positioned inside the fireplace.
6 |
Regency Wood Insert & Hearth Heater |
|
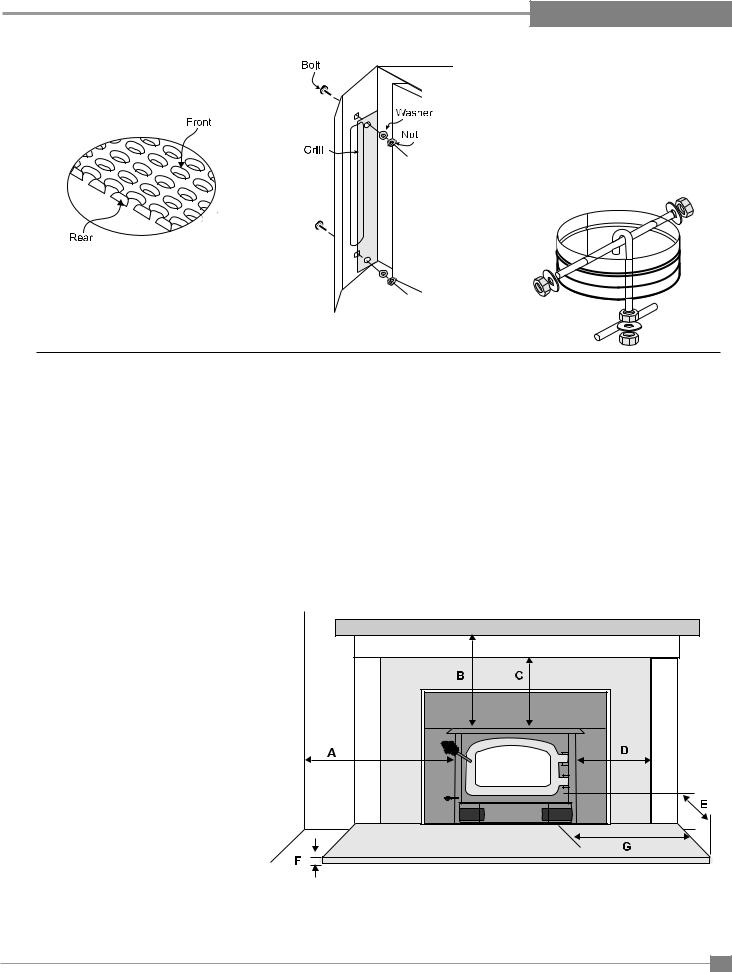
Positionthegrillontheinsidebodyfacesideand fastenusingthebolts,washersandnutsprovided
(2 per side) as shown in the diagrams.
Note: Thegrillhasafrontandrear,theholes onthefrontsidehaveroundededges and the rear holes have flat edges.
View from Rear of Insert
installation 
Optional Flue
Connector Kit
TheoptionalFlueConnectorKit(Part#846-527) and the Straight Flue Adaptor (Part #846-504) shown here, may be used to produce a secure connectionbetweenyourflueconnectorandthe insertcollar.Detailedinstallationinstructionsare included with the kit.
Masonry And Factory Built Fireplace Clearances
The minimum required clearances to combustible materials when installed into a masonry or factory built fireplace are listed below.
|
adjacent |
Mantle** |
Top |
side |
Minimum |
Minimum |
Minimum |
Unit |
Side Wall |
(to Top) |
Facing |
Facing |
Hearth |
Hearth |
Hearth Side |
|
(to Side) |
|
(to Top) |
(to Side) |
Extension* |
Thickness* |
Extension |
|
a |
B |
c |
d |
e |
f |
G |
Large Flush |
|
|
|
|
|
|
|
Insert (I3100L) |
13"/330mm |
19"/480mm |
18"/455mm |
6.5"/165mm |
16"/406mm |
1.5"/38mm |
8"/205mm |
|
|
|
|
|
|
|
|
Hearth Heater |
|
|
|
|
|
|
|
(H2100M) |
10"/255mm |
25"/635 mm |
14"/355mm |
8.5"/216mm |
18"/455mm |
1.5"/38mm |
6"/152mm |
|
|
|
|
|
|
|
|
|
|
|
|
|
|
|
|
Side and Top facing is a maximum of 1.5" thick.
Floor protection must non-combustible, insulative material with an R value of 1.1 or greater.
*If the hearth extension is flush with the floor
(F)it must extend 19.5" in front of the body face (E).
Note: Hearth Extension Width (G) is measured from edge of fuel door to side of hearth.
**A non-combustible mantel may be installed at a lower height if the framing is made of metal studs covered with a non-combustible board.
Thermal floor protection is not required if the unit is raised 3.5" minimum (measured from the bottom of the stove). However, standard ember floor protection is required. It will need to be a non-combustible material that covers 16" (406 mm) in the US and 18" (450 mm) in Canada to the front of the unit and 8" (200 mm) to the sides.
If the unit is not raised, thermal floor protection required is 18" (450 mm) in the US and Canada.
Clearance diagram for installations
7
Regency Wood Insert & Hearth Heater
 installation
Leg Option On H2100 |
Installation Into a |
Hearth Heater |
Masonry Fireplace |
The addition of legs to the Hearth Heater does not alter its certification, it does not become a freestanding woodstove. The H2100 can only be installed as a Hearth Heater i.e. vented into a masonry or factory built fireplace.
The instructions below apply to the cast legs. It will be easier to attach the legs to the stove if it is tipped on its back (preferably on a soft surface to prevent scratching).
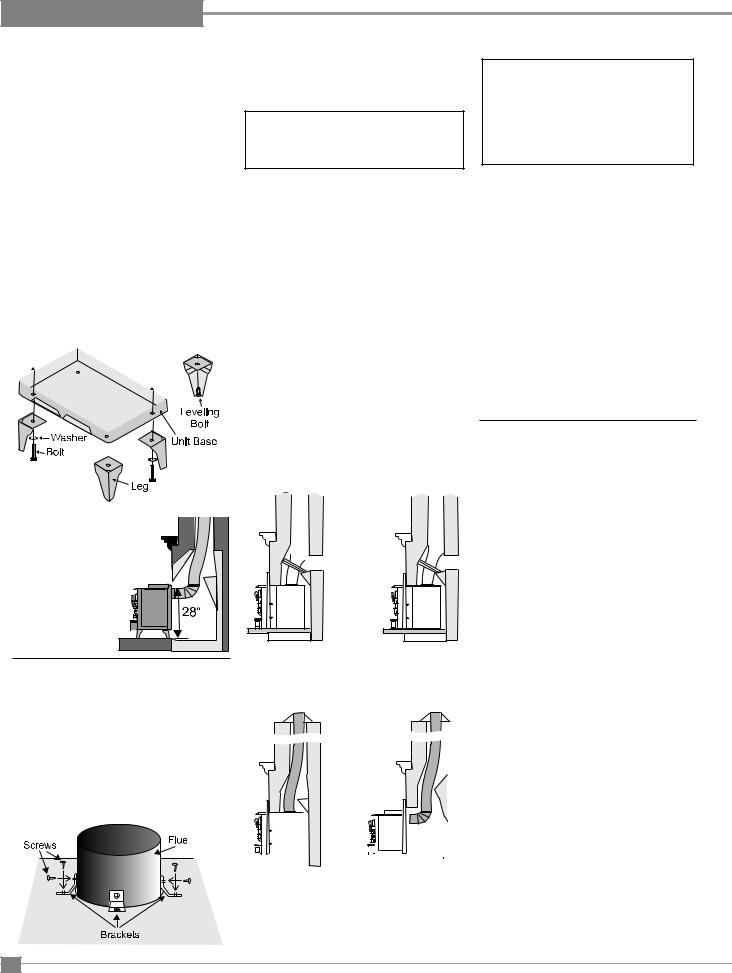
1)Thread the bolt and washer through the leg, and then into the nutsert in the base of the stove and tighten.
2)Level the stove by adjusting the levelling bolts in the bottom of each leg.
NOTE: Adding the legs changes the height of the unit, make sure you have sufficient clearance (min. 28") for your flue connection.
When referencing installation or connection to masonry fireplaces or chimneys, the masonry construction must or shall be code complying.
The insert must be installed as per the requirements of your local inspection authority. Three methods of flue connection are acceptable in most areas, these include:
1)Positive flue connection, where a large blocking plate and a short connector pipe is used.
2)Direct flue connection, where a smaller blocking plate and a connector pipe to the first flue liner tile is used.
3)Full flue liner, where a stainless steel rigid or flexible liner pipe is routed from the insert outlet collar to the top of the chimney.
Regency highly recommends the use of a full liner as the safest installation and provides the mostoptimumperformance. Yourretailershould be able to help you decide which system would be the best for your application.
Flue Connector
Bracket
Package contains: 3 brackets and 6 screws.
These brackets are to be used to hold the flue liner (not supplied) to the Insert and keep the connection. The brackets are screwed into the top of the Insert in the pre-punched holes and then screwed into the flue liner.
|
|
|
|
|
|
|
|
|
|
|
|
|
|
|
|
|
|
|
|
|
|
|
1) Positive Flue |
|
2) Direct Flue |
||||||||||||||||||||
|
|
|
|
Connection |
|
Connection |
||||||||||||||||
|
|
|
|
with Cleanout |
|
with Cleanout |
||||||||||||||||
|
|
|
|
|
|
|
|
|
|
|
|
|
|
|
|
|
|
|
|
|
|
|
|
|
|
|
|
|
|
|
|
|
|
|
|
|
|
|
|
|
|
|
|
|
|
|
|
|
|
|
|
|
|
|
|
|
|
|
|
|
|
|
|
|
|
|
|
|
|
|
|
|
|
|
|
|
|
|
|
|
|
|
|
|
|
|
|
|
|
|
|
|
|
|
|
|
|
|
|
|
|
|
|
|
|
|
|
|
|
|
|
|
|
|
|
|
|
|
|
|
|
|
|
|
|
|
|
|
|
|
|
|
|
|
|
|
|
|
|
|
|
|
|
|
|
|
|
|
|
|
|
|
|
|
|
|
|
|
|
|
|
|
|
|
|
|
|
|
|
|
|
|
|
|
|
|
|
|
|
|
|
|
|
|
|
|
|
|
|
|
|
|
|
|
|
|
|
|
|
|
|
|
|
|
|
|
|
|
|
|
|
|
|
|
|
|
|
|
|
|
|
|
|
|
|
|
|
|
|
|
|
|
|
|
|
|
|
|
|
|
|
|
|
|
|
|
|
|
|
|
|
|
|
|
|
|
|
|
|
|
|
|
|
|
|
|
|
|
|
|
|
|
|
|
|
In Canada this fireplace insert must be installed with a continuous chimney liner of either 5.5" or 6" diameter extending from the fireplace insert to the top of the chimney.Thechimneylinermustconform to the Class 3 requirements of CAN/ULCS640, Standard for Lining Systems for New Masonry Chimneys.
Note: A clean-out door is sometimes required, by your inspector, to be installedwheneitherthePositiveflue connectionorDirectflueconnection method is used.
Theuseofoneoftheconnectionmethodslisted onthispagenotonlyincreasesthesafetyofyour insert by directing the hot gases up the flue, but will also help increase the unit's efficiency and decrease creosote deposits in the chimney.
When a connected flue or liner is in use, the insert is able to “breathe” better by allowing a greaterdrafttobecreated. Thegreaterdraftcan decrease problems such as, difficult start-ups, smoking out the door, and dirty glass.
Installation Into a
Factory Built
Fireplace
1)When installed in a factory built fireplace, a full stainless steel rigid or flexible flue liner is mandatory, for both safety and performance purposes. When a flue or liner is in use, the insert is able to breathe better by allowing a greater draft to be created. The greater draft can decrease problems such as, difficult start-ups, smoking out the door, and dirty glass.
2)In order to position the flue liner, the existing rain cap must be removed from your chimney system. In most cases the flue damper should also be removed to allow passage of the liner.
3)In most cases opening the existing spark screens fully should give enough room for the insert installation. If it does not, remove and store.
3a) Full Flue Liner |
3b) Hearth Heater with |
(No Cleanout |
Full Flue Liner |
Required) |
(No Cleanout |
|
Required) |
8 |
Regency Wood Insert & Hearth Heater |
|
 Loading...