


GF55 & GFI55
TECHNICAL MANUAL
Freestanding and Fireplace
Insert Pellet Stove
WARNING: |
|
FOR YOUR SAFETY: |
Improper installation, adjustment, |
alteration, |
Do not store or use gasoline or other flammable |
service or maintenance can cause |
vapoursandliquidsinthevicinityofthisoranyother |
|
injury, property damage, or loss of life. |
appliance. |
|
Refer to this manual. For assistance or |
Installation and service must be performed by an |
|
additional information consult an |
authorized |
|
installer or service agency. |
|
authorized installer or service agency. |
|
|
|
Tested by:
IMPORTANT: SAVE THESE INSTRUCTIONS
GF55-080 |
FPI FIREPLACE PRODUCTS INTERNATIONAL, LTD. 6988 Venture St., Delta, BC, Canada V4G 1H4 |
10/26/09 |

 WARNING
HOT GLASS WILL
CAUSE BURNS
DO NOT TOUCH GLASS
UNTIL COOLED
NEVER ALLOW CHILDREN
TO TOUCH GLASS
CHILDREN AND ADULTS SHOULD BE ALERTED TO
THE HAZARDS OF HIGH SURFACE TEMPERATURES,
ESPECIALLY THE FIREPLACE GLASS, AND SHOULD
STAYAWAYTOAVOIDBURNSORCLOTHINGIGNITION.

Safety Note: If this stove is not properly installed, a house fire may result. For your safety, follow the installation instructions, contact local building, fire officials, or authority having jurisdiction about restrictions and installation inspection requirements in your area.
The authority having jurisdiction should be consulted before installation to determine the need to obtain a permit.
2 |
Greenfire Pellet Stove and Insert Technical Manual |

TABLE OF CONTENTS
* This manual is designed for the technician in conjunction with the owner’s manual. *
SAFETY LABEL |
|
Copy of Serial No. Decal ............................................... |
4 |
UNIT DIMENSIONS |
|
GF55 Freestanding Pellet Stove ................................... |
5 |
GFI55 Fireplace Pellet Insert......................................... |
6 |
INSTALLATION |
|
Important Safety Information ......................................... |
7 |
Safety Warnings & Recommendations.......................... |
7 |
Removing Pellet Stove From Pallet............................... |
8 |
Opening the Door .......................................................... |
8 |
Locating the Pellet Appliance ........................................ |
8 |
GF55 Freestanding Pellet Stove ................................... |
9 |
Clearances to Combustibles..................................... |
9 |
Alcove Clearances.................................................... |
9 |
Mobile Home Installation .......................................... |
9 |
Vent Termination Requirements ............................. |
10 |
Exhaust & Fresh Air Intake Location ...................... |
11 |
Outside Fresh Air Connection................................. |
11 |
Corner Through Wall Install.................................... |
11 |
Horizontal Exhaust Through Wall Install................. |
12 |
Vertical Rise with Horizontal Termination ............... |
13 |
Through Concrete Wall with Vertical Rise .............. |
13 |
Inside Vertical Installations ..................................... |
13 |
Outside Vertical Installations .................................. |
14 |
Hearth Mount Installations...................................... |
14 |
GFI55 Pellet Insert....................................................... |
15 |
Clearances to Combustibles................................... |
15 |
Fireplace Specifications.......................................... |
15 |
Pedestal & Leveling Legs....................................... |
15 |
Hopper Cover & Adjusting Hopper Height.............. |
15 |
Exhaust & Fresh Air Intake Location ...................... |
16 |
Outside Fresh Air Connection................................. |
16 |
Masonry Fireplace Insert Install.............................. |
16 |
Positive Flue Connection without |
|
a Full Reline (USA only) ......................................... |
17 |
Control Panel in Surround Panel............................ |
18 |
Surround Panel Installation .................................... |
18 |
Plated Door Installation ............................................... |
19 |
Thermostat Installation ................................................ |
19 |
Slider / Damper Set-Up .............................................. |
20 |
TROUBLESHOOTING |
|
Troubleshooting FAQ's ................................................ |
21 |
Wiring Diagram............................................................ |
23 |
PARTS LIST |
|
Parts List & Components............................................. |
24 |
Pellet Stove Components............................................ |
25 |
GF55 Freestanding Pellet Stove ................................. |
26 |
GFI55 Pellet Insert....................................................... |
27 |
WARRANTY |
|
Warranty ...................................................................... |
28 |
Exclusions and Limitations .......................................... |
29 |
Greenfire Pellet Stove and Insert Technical Manual |
3 |

INSTALLATION
SAFETY LABEL
This is a copy of the label that accompanies each GF55 & GFI55. We have printed a copy of the contents here for your reference.
On the GF55 the safety label is located on the underside of the hopper lid.
On the GFI55 the safety label is located on the hopper cover behind the top faceplate.
|
NSTALLEIA / |
auxsmum mini |
ÉTIQUETTECETTE PASRETIREZ |
(GFI55) dégagements LODE MVE . Les/ STO ELE .als PO ier T mat NSER E I DD eibl E PIE tbus REPLAC SUR com DÈLE ot FI ances AAS MO ear STALLED UN l ME cum IN COM inim M |
|
/NELABELTHISREMOVEDONOT |
MMEUNINSTALLECO(GF55)/AVEMODELINGSTOASAFREESTANDINSTALLED LE.MAISONMOBIDANSUNESURPIEDOUCASTRÈ,QU’ILSOITENMODÈLEFS, matérielsminimumsauxdégagements./LescombustiblematerialsclearancestoMinimum |
|
|
(Insert)GFI55 |
|
e:Modèl /odel M |
(Stove)GF55 |
|
|
Greenfire |
|
|
|
Serié:De .No |
|
|
/.No |
|
|
aliSer |
334 |
|
|
bustom es:ibl
atm cériels
combusti es:lb
àchauffage sgranule ié)certif
Typeuel del(Apparei
Heam Pelleter, Ftized
RooListed
203(8” )mm
'appareil)là
demur écôt
Unio Du(t
SidewA tall
(1526” m)m
écôt 'appareil)là
mDu deur
(tUni
Sidew otall
A
test)mobile,
unes nmaiso
stl'in danallation
cceptéA ourp
InstallatHome (ion
uitableS MobilerFo
)m
(8” m203
blindé)non
m)m chemde lemantnéei
(8” 203anteau
anl'de unshiàunité eldedmun
ofTop(Le tounitsommet
B
3” (2” m(7651 )mmm)
appl' )areil
derde'appareill àrière)
ornerC tolBackwalot UtUni nit( uD (Ducoi urm àn
BC
ULC/ Sparticulate -628 M93emission
ASTM1,July 95-1509990,1
00-S627o /comply
dTesteEnvirUS (to Testée Ponmental selor :n) ULotection -1482Age 1998ncy, / icertif ULC ted
)mm (2038” |
)mm 203(8” |
mm)152 (6” |
)mm 152(”6 |
|
19mm])ruding¾”[facing(protUnittotopparement)ausommetdu(Del'unité |
)ng¾”[19mm]ng(protruditosidefaciU(nitduparement)l'unitéaucôtéDe |
ion)ancher protectplde loortion fecprot ofedgede odevant tunitau ofopeningouvrant doortepor Fromla(De |
l'ouverture(De)plancher onectideon otprotectipr oorde flofparti edgeendre tounitpr ofderupo siomportede Fr |
|
D E F C |
||||
)mm (76 |
|
)mm 152( |
|
|
3” |
|
6” |
|
|
)tven donnerpour urm Le(vent tolWal |
ncher)-34"unpar non a ionaadepthprotegelpar protectpldeby m) dbyetrem protectione (686 floor protect) (686mmt of doi27" be e edgede 27"ibllargeur todevantmustWidthtcombus t loor La) uni . auf plancher.)(864mm of e- bustible ngantstiblal openiouvrbuimater ncom34" com (Un doorporte combustible.iprofondeur AOTE: )(864mmel omal imater Fr(DeN |
|||
D |
E |
|||
. .lmanua alanu M le |
|
sOwner ezsult See Con - -.ble .material incombusti iblestbu ielérmat omc un -on par naby protégé edtec re tpro êt be doit |
|
mustors blecombusti oflible r tCombus plancheLe |
|
)mm 14(9 |
mm)1219( |
”36 |
”48 |
'alcove)lde uminim mlargeur (LaWidth |
'alcove)lde ummmini hauteurLa (ght Hei |
vecoAl |
coveAl |
muminiM |
mumMini |
|
|
(”30 mm)762
'alcove)lde
umaxim
(LaDepth mprofondeur
Alum ecov
M maxi
deEspace |
|
)mm mm)280 (00” (11” |
|
B |
|
|
|
E |
|
/s |
|
sàspaceretmurd'arrière) ofondeureàuneprdosdepoêlLe)( |
BC |
|
BIHFPorI |
odelsM |
BIHModel E |
|
|
Materiale |
|
D |
|
||||||
|
|
|
|
H |
G |
|
|
|
|
bustiblomCto learanceCmum MiniyOnl IHBodel M |
BIH:spourlemodèleentrequidégagem fslstostandofandrearwalSidesGFrom |
|
|
|
|
|
.pot nbur theinto etspell oflful handllastartup smputtingayorbtsi |
||
|
95615 |
USACanadausin&eCerifidoerft ionatuapourstallfiéntiiCer UnisEtatauxs-.Canadaet |
|
nCanadafor/Manufacturedi r:dansleCanadapouFabriqué Ltd.tsInternationaleplaceProducFPIFir daDelta,BC,Cana |
|||||
|
|
Lesmurscôté( depthRecess |
allw |
Adjacent |
|
F |
|
||
|
|
|
|
|
|
A |
|
|
|
|
|
H |
|
|
|
|
|
|
|
|
|
|
|
|
|
|
|
|
intonutes im |
|
|
|
|
|
|
noctiProrotFleo |
hard,onainstalledcanbeTheunit |
.surfacebustiblcomnonstable dur,unsurléenstalpeutêtretéL'uni stable.blecombustinonacesurla e- i -f |
5)( |
kwallBac |
D |
C |
|
|
E |
fivenittheutRestaruger:APrimeTo |
|||
|
B |
|
Model |
|
|
|
|
|
|
|
|
|
FS |
|
|
|
|
|
|
|
|
|
A |
|
|
|
|
|
|
|
|
alldewSi |
|
|
|
|
|
|
|
ilw (Requilose, esropdr eth adownwiunit thermtoll )ostatthelight WLOW nhe
aings .nagai hasfireareAUT/ been .adjustableO/OFF shedestabli thWhen :MODE ( eR stovethe mostatther aequires arsettingsther econtactsmostat ustabladjen,opWhen) .ethe eth /HE ATther HIGHLE MOD/LOWandVELmostat E:Fansclcontacts
Tothesetti rthe ung Operatelnti mostatt Stove:lscalhe MANUforthermostat ALtheheat WhenMODE: settstoveclosecontacts
,1let Juilau reconform ourpé ificert aence, Agotection ) r . Ptal 'émission enmnvironne d EUnis particulesde -tats normes É(.s darand les,1990 st |
n cal Inspect ion i ives et : re ses ut tr ons E eplace la ver inspecti ec at lation endre IQU vent, et ec pe El inistr inspecti . s du av é s . ÉLECTR sed avant ér e’ ling instal pr r PL ent énum ur on and Adm Only u m egon t cei à seulem 00m ac ati codes d' es autions isted be portes Manuf install or "Règles ions l . ay 1 seul r et EMENT closed l 4in/ O l m with wal t tions m) les isez de ng nstruc préc m r the and e door ne or mur e buildi ibl es c CLASS (100 li sque util 3in/75mm h i y cordanc t estr les wit estrictions bus l i ne placées, ance local com avec les r r removal 4inch chim or de selon s pou l cheminée e . ent ac accord See a cord lnant fabricant ble or wall seulem em e in r through ac seulement combusti ash m) dié es about . concer m single r if hom in ncea enles du and (75 liser eêtr tcer ed only icials appli y ier ond door isted ent PL paquebot anufactured ne mobi . inch Uti off chim appareil t ions chaleur vai évent use . quar plaf l . e another erheat aisons uct ng 3 a uniquement de and r a r n viewi a ions; es un fi votre t u a n or passing t ns l ion: r u l he ce i ou de allat vit sont ; m Instal lding ving t m ez de les mur loin ith lat des foyer in ser from les s locales et w instal inst boulets ation use . bui for dans li ique only ou de for 909 local flue ed away uti aux un mount une nstall mont et s or - oc traver électr Operate 23 chimney r ion ez autorités f d i l equired de e - act requ cord Install iment . Si l'i ist 814 lisat Hearth ly forme . pour de l Cont ons au câble quent es t and h oute uti . é e throug a . bât lée fuels r m ion . ecauti pour 909" les Components and fre ous fer s ed ns to R de instal le se t st o t . ez cez ood ystem s sont equi inser instructi uni ps - codes ert e 900 pr é 23 Contact ibles t Am fi - e a W ns r been - his or erti 814 r Pl re osantes ations 23 f c êt . etized I s combust cend t 3 es Amps . ing - nect ctions . et à doit components s 14 ing 4 l . all ha 900 . tez glass nt 8 t hz, esté tcan née Pell e de t appliance Rules opera con tru Consul 1 V p ns 60 - . acle com i t 23 i 4 abr chemi y ceramic t es Les not ns s, été - Hz, Onl Exhaus l and i volt 14 f avec ept Les tion Do ers a 8 du h . . 60 With wit composantes ra ation tur 120 reil egon on ation une réc . . let . s, h clean ion céramique sé t ea ac appa d'opérati Volt wit ete du pel s ar all e Use ili dmini manuf ating: r lorsqu compl lisat ut all l'O t s porte This t your Cet ns 120 r as and être A ns de d'i o gl Uti i r F |
kWh)2. 13to 5.(3 HrBTU/ 00045, to12,000 évaluant):données Les(Rating Input |
ATTENTION: CAUTION: |
pas, sde hez . vêtements, touc lterrésu Ne ent des .llumé peuv nts, a sévères a dquan nfe aud brûlures esdloin chès les zTene rT not may , Do burns ingh . tocl operating , while severetouch, childrenep Hot Ke. ltresu |
tinset forgs
theo WLO
en,op stovethe dropwill tdown
there contactsmostat
thWhen
.adjustable
tiset arengs
stovethe
teto emperatur
upOnce
autom .lyatical
flus esid
ed’autr
l’essemeubles,de ounce
to erh
gasofurniture, orline
mostrthe conat remtacts nai
theif
UALMAN orsetting
rp ousevi
toturn
VELLE erwill
withinIf 30the hetmin contactsthermostat theclose, THEA
30 .minutes
fin .lammables
vapeurses
orp dduisant
.away
lemab srvapo
mfla
/ON buttonOFF
/ ouLmostat etin .OWdown mode:ofor rPf theess
itinAMTur: sNUAthn Le rshutdownHIandther
To open rTuAUTO theOfn/ stovef mOFF begStove:ode
/.appliance |
iond’opérat. |
ngaccompanyi instructionsoperating andinstallation See |
etd’installation instructionssle avecnuel am lensultez Co |
combustide .on
nsda potle
dse sentéver
leque granuless
jAuger ceusqu'à
am d'alnuel duimentation
outonb
écessiten êtred' appuyeramorcé, lesur
Augerle
"ONbouton Si./OFF"
Appuyere: lesur
arrerdém poêlle
rPou
ducontacts
eslLorsque
êtreeuvent .ajustés
rles péglages
chala ,eur
lde
hermtle requièreostat
thermostun Lorsqueat)
écessiteN
MODE/ H/LOW""HIG (:
ustaj .sé
réglagesles êtrepeuvent
efeu bients abli,ét
elue
qLors
MANUMODE :EL
:poêle
fairePour lefonctionner
alls' eraum
poêlele
thdu moster fat ent,erm
contactsles
rthe Lorsquemostat)
N(: unécessite
ODEM O/OFF""AUT
referse /.ment
ostattherm
lesque ducontacts
"bas cejusqu'à
"réglage
justers'a auont
leset lateursventi
rchaleu
nidu deveau
agerégl
therm ouvrentostat el,
pendantmés 30ces
ostattherm fersont
actcont dus
Si.minutes sle
LOW""glages 30pendant
ajusteras' éraux
epoêl
elnt,
duts mostatther eouvr
cconta
rLo lessque
ajêtre .ustés
réglages peuventes
einatt lte,
tempéra adéquature estate
.ent lLorsque
omaut matique
N:FABRICATIO
DEATE
D/
EANUFACTUR
MOF
DATE
ocessuspr .d'arrêt
poêlele leentamera
ts,re
restentthermostat vou
scontact/OFF" . du
lessi "ONbouton
"T enetourneraHI égrGH/LOW " "lages: MANsurAppuyer ouUEL"le
rur EEL
chaleMANU
niM deveauODE
imP nutétour les,e e lindre réglagepoêe de :le
0920 1020 1120
O N D
A S
J
F M A M J
J
081a-GF55
éteignezou .le
mostatther alà ssebai
Régl: eler
"OFF
"AUMODE /TO
4 |
Greenfire Pellet Stove and Insert Technical Manual |
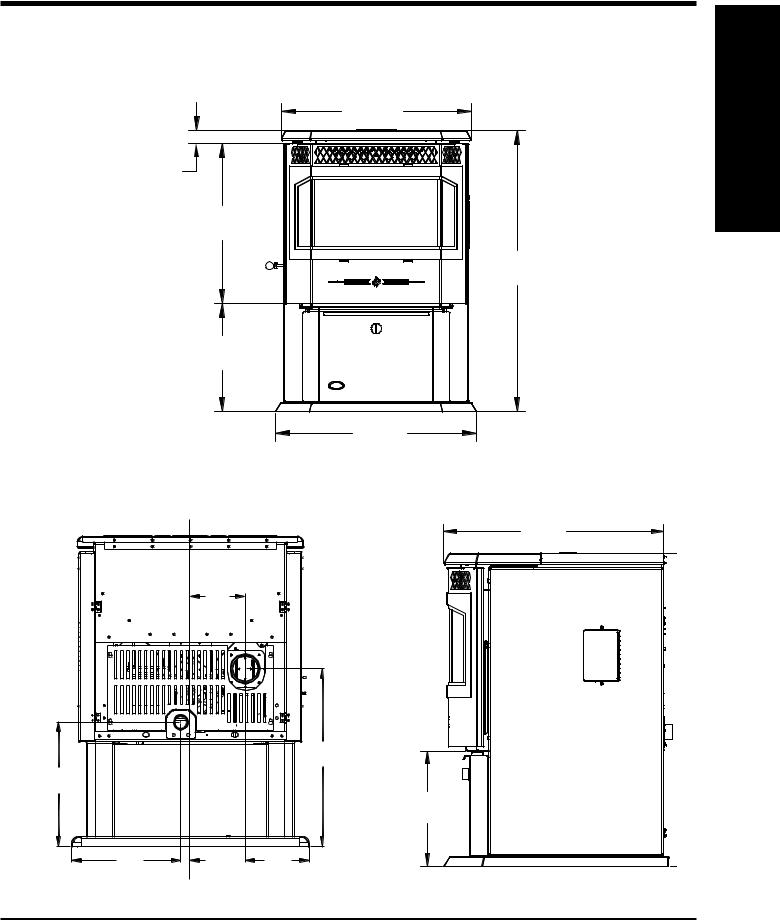
UNIT DIMENSIONS
GF55 FREESTANDING PELLET STOVE
231/16" (586mm)
19/16"  (40mm)
197/16" (494mm)
131/16" (332mm)
INSTALLATION
341/8" (866mm)
|
5 3/4" |
|
|
|
(146mm) |
|
|
|
|
20 5/16" |
|
|
|
(508mm) |
|
14 5/8" |
|
|
|
(356mm) |
|
|
|
11 7/16" |
1" |
6 11/16" |
|
(291mm) |
(170mm) |
||
(25mm) |
|||
|
|
247/16" |
(620mm) |
24" |
(610mm) |
129/16" |
(319mm) |
Greenfire Pellet Stove and Insert Technical Manual |
5 |
INSTALLATION
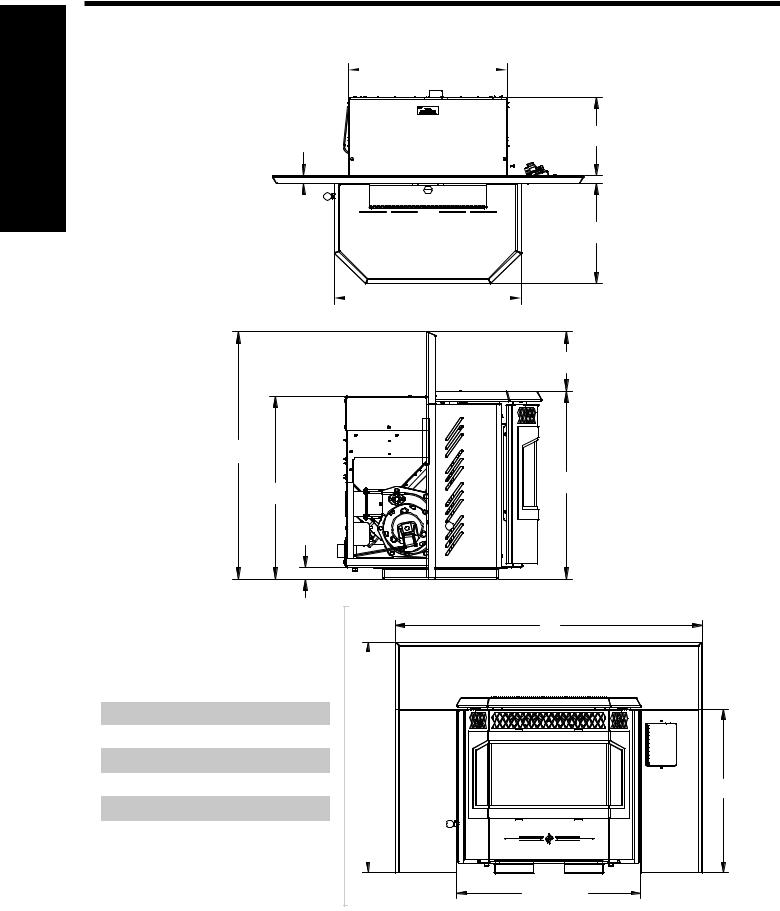
UNIT DIMENSIONS
GFI55 FIREPLACE PELLET INSERT
 203/8" (517mm)
10"
(253mm)
11/16"  (26mm)
13"
(329mm)
 241/16" (610mm)
|
71/4" |
|
(183mm) |
303/16" |
|
(766mm) |
|
|
2215/16" |
225/16" |
(582mm) |
(567mm) |
|
13/8" (35mm) |
|
|
B |
|
|
|
|
FACEPLATE DIMENSIONS |
|
|
|
|
|
|
|
Regular Faceplate |
|
|
|
|
|
|
|
(A) Height |
30" (761mm) |
|
|
|
|
|
|
(B) Width |
39-15/16" (1014mm) |
A |
|
|
|
|
|
Oversize Faceplate |
|
|
|
|
|
|
|
(A) Height |
33" (838mm) |
|
|
|
|
|
|
(B) Width |
45-15/16" (1167mm) |
|
|
|
|
|
|
|
|
|
|
213/16" (538mm)
2315/16" (609mm)
|
|
|
|
|
|
6 |
Greenfire Pellet Stove and Insert Technical Manual |
|

INSTALLATION
IMPORTANT SAFETY INFORMATION
Failure to follow these instructions may result in property damage, bodily injury or even death.
Contact your local building or fire official to obtain a permit and any information on installation restrictions and inspection requirements for your area.
To prevent the possibility of a fire, ensure that the appliance is properly installed by adhering to the installation instructions. A Greenfire dealer will be happy to assist you in obtaining information with regards to your local building codes and installation restrictions.
Be sure to maintain the structural integrity of the home when passing a vent through walls, ceilings, or roofs.
The stove's exhaust system works with negative combustion chamber pressure and a slightly positive chimney pressure. It is very important to ensure that the exhaust system be sealed and airtight. The ash pan and viewing door must be locked securely for proper and safe operation of the pellet stove.
Do not burn with insufficient combustion air. A periodic check is recommended to ensure proper combustion air is admitted to the combustion chamber. Setting the proper combustion air is achieved by adjusting the slider damper located on the left side of the stove. Refer to "Slider/Damper
Set-up" section.
When installing the stove in a mobile home, it must be electrically grounded to the steel chassis of the home and bolted to the floor. Make sure that the structural integrity of the home is maintained and all construction meets local building codes.
Minor soot or creosote may accumulate when the stove is operated under incorrect conditions such as an extremely rich burn (black tipped, lazy orange flames).
If you have any questions with regard to your stove or the above-men- tioned information, please feel free to contact your local dealer for further clarification and comments.
SAFETY WARNINGS &
RECOMMENDATIONS
CAUTION:
Do not connect to any air distribution duct or system. Do not burn garbage or flammable fluids such as gasoline, naptha or engine oil.
Unit hot while in operation. Keep children, clothing and furniture away. Contact may cause skin burns.
SOOT: Operation of the stove with insufficient combustion air will result in the formation of soot which will collect on the glass, the heat exchanger, the exhaust vent system, and may stain the outside of the house. This is a dangerous situation and is inefficient. Frequently check your stove and adjust the slider/damper as needed to ensure proper combustion. See "Slider/Damper Setting".
CLEANING: There will be some build up of fly ash and small amounts of creosote in the exhaust. This will vary due to the ash content of the fuel used and the operation of the stove. It is advisable to inspect and clean the exhaust vent semi-annually or every two tons of pellets.
ELECTRICAL: The use of a surge protected power bar is recommended. The unit must be grounded. The grounded electrical cord should be connected to a standard 115 volts (4.6 Amps), 60 hertz electrical outlet. Be careful that the electrical cord is not trapped under the appliance and that it is clear of any hot surfaces or sharp edges and also must be accessible. If this power cord should become damaged, a replacement power cord must be purchased from a Greenfire dealer.
This unit's maximum power requirement is 520 watts.
GLASS: Do not abuse the glass by striking or slamming the door. Do not attempt to operate the stove with broken glass. The stove uses ceramic glass. Replacement glass must be purchased from a Greenfire dealer.
Do not attempt to open the door and clean the glass while the unit is in operation or if glass is hot. To clean the glass, use a soft cotton cloth and mild window cleaner, gas or wood stove glass cleaner, or take a damp paper towel and dip into the fly ash. This is a very mild abrasive and will not damage the glass.
FLAMMABLE LIQUIDS: Never use gasoline, gasoline-type lantern fuel, kerosene, charcoal lighter fluid, or similar liquids to start or “freshen up” a fire in the heater. Keep all such liquids well away from the heater
while it is in use.
SMOKE DETECTOR: Smoke detectors should be installed and maintained in the structure when installing and operating a pellet burning
appliance.
OPERATION: The ash pan and door must be closed securely for proper and safe operation of the pellet stove. Also ensure all gaskets on the door are checked and replaced when necessary.
INSTALLATION: Be sure to maintain the structural integrity of your home when passing a vent through walls, ceilings, or roofs. It is recommended that the unit be secured into its position in order to avoid any displacement.
DO NOT INSTALL A FLUE DAMPER IN THE EXHAUST VENTING SYSTEM OF THIS UNIT.
DO NOT CONNECT THIS UNIT TO A CHIMNEY FLUE SERVING ANOTHER APPLIANCE.
FRESH AIR: Outside Fresh Air connection is optional. Must be connected to all units installed in Mobile and “Air Tight Homes” (R2000) or where required by local codes. Consider all large air moving devices when installing your unit and provide room air accordingly. Limited air for combustion may result in poor performance, smoking and other side effects of poor combustion.
If you have any questions with regards to your stove or the abovementioned information, please feel free to contact your Greenfire dealer for further clarification and comments.
SINCE FPI HAS NO CONTROL OVER THE INSTALLATION OF YOUR STOVE, FPI GRANTS NO WARRANTY IMPLIED OR STATED FOR THE INSTALLATION OR MAINTENANCE OF YOUR STOVE. THEREFORE, FPI ASSUMES NO RESPONSIBILITY FOR ANY CONSEQUENTIAL DAMAGE(S).
INSTALLATION
Greenfire Pellet Stove and Insert Technical Manual |
7 |

INSTALLATION
INSTALLATION
REMOVING PELLET STOVE
FROM PALLET
To remove your new stove from its pallet, remove the two (2) screws securing the bottom to the pallet.
Freestanding: |
Fireplace Insert: |
|||||||||||||||||||||||||||||||||||||||||||||||||||||||||||||||||||||||||||||
One screw can be easily seen from behind but to access the second screw |
There is one screw on either side of the bottom. See figure 2. |
|||||||||||||||||||||||||||||||||||||||||||||||||||||||||||||||||||||||||||||
the ashpan must be removed. See figure 1. |
|
|
|
|
|
|
|
|
|
|
|
|
|
|
|
|
|
|
|
|
|
|
|
|
|
|
|
|
|
|
|
|
|
|
|
|
||||||||||||||||||||||||||||||||||||||||||
|
|
|
|
|
|
|
|
|
|
|
|
|
|
|
|
|
|
|
|
|
|
|
|
|
|
|
|
|
|
|
|
|
|
|
|
|
|
|
|
|
|
|
|
|
|
|
|
|
|
|
|
|
|
|
|
|
|
|
|
|
|
|
|
|
|
|
|
|
|
|
|
|
|
|
|
|
|
|
|
|
|
|
|
|
|
|
|
|
|
|
|
|
|
|
|
|
|
|
|
|
|
|
|
|
|
|
|
|
|
|
|
|
|
|
|
|
|
|
|
|
|
|
|
|
|
|
|
|
|
|
|
|
|
|
|
|
|
|
|
|
|
|
|
|
|
|
|
|
|
|
|
|
|
|
|
|
|
|
|
|
|
|
|
|
|
|
|
|
|
|
|
|
|
|
|
|
|
|
|
|
|
|
|
|
|
|
|
|
|
|
|
|
|
|
|
|
|
|
|
|
|
|
|
|
|
|
|
|
|
|
|
|
|
|
|
|
|
|
|
|
|
|
|
|
|
|
|
|
|
|
|
|
|
|
|
|
|
|
|
|
|
|
|
|
|
|
|
|
|
|
|
|
|
|
|
|
|
|
|
|
|
|
|
|
|
|
|
|
|
|
|
|
|
|
|
|
|
|
|
|
|
|
|
|
|
|
|
|
|
|
|
|
|
|
|
|
|
|
|
|
|
|
|
|
|
|
|
|
|
|
|
|
|
|
|
|
|
|
|
|
|
|
|
|
|
|
|
|
|
|
|
|
|
|
|
|
|
|
|
|
|
|
|
|
|
|
|
|
|
|
|
|
|
|
|
|
|
|
|
|
|
|
|
|
|
|
|
|
|
|
|
|
|
|
|
|
|
|
|
|
|
|
|
|
|
|
|
|
|
|
|
|
|
|
|
|
|
|
|
|
|
|
|
|
|
|
|
|
|
|
|
|
|
|
|
|
|
|
|
|
|
|
|
|
|
|
|
|
|
|
|
|
|
|
|
|
|
|
|
|
|
|
|
|
|
|
|
|
|
|
|
|
|
|
|
|
|
|
|
|
|
|
|
|
|
|
|
|
|
|
|
|
|
|
|
|
|
|
|
|
|
|
|
|
|
|
|
|
|
|
|
|
|
|
|
|
|
|
|
|
|
|
|
|
|
|
|
|
|
|
|
|
|
|
|
|
|
|
|
|
|
|
|
|
|
|
|
|
|
|
|
|
|
|
|
|
|
|
|
|
|
|
|
|
|
|
|
|
|
|
|
|
|
|
|
|
|
|
|
|
|
|
|
|
|
|
|
|
|
|
|
|
|
|
|
|
|
|
|
|
|
|
|
|
|
|
|
|
|
|
|
|
|
|
|
|
|
|
|
|
|
|
|
|
|
|
|
|
|
|
|
|
|
|
|
|
|
|
|
|
|
|
|
|
|
|
|
|
|
|
|
|
|
|
|
|
|
|
|
|
|
|
|
|
|
|
|
|
|
|
|
|
|
|
|
|
|
|
|
|
|
|
|
|
|
|
|
|
|
|
|
|
|
|
|
|
|
|
|
|
|
|
|
|
|
|
|
|
|
|
|
|
|
|
|
|
|
|
|
|
|
|
|
|
|
|
|
|
|
|
|
|
|
|
|
|
|
|
|
|
|
|
|
|
|
|
|
|
|
|
|
|
|
|
|
|
|
|
|
|
|
|
|
|
|
|
|
|
|
|
|
|
|
|
|
|
|
|
|
|
|
|
|
|
|
|
|
|
|
|
|
|
|
|
|
|
|
|
|
|
|
|
|
|
|
|
|
|
|
|
|
|
|
|
|
|
|
|
|
|
|
|
|
|
|
|
|
|
|
|
|
|
|
|
|
|
|
|
|
|
|
|
|
|
|
|
|
|
|
|
|
|
|
|
|
|
|
|
|
|
|
|
|
|
|
|
|
|
|
|
|
|
|
|
|
|
|
|
|
|
|
|
|
|
|
|
|
|
|
|
|
|
|
|
|
|
|
|
|
|
|
|
|
|
|
|
|
|
|
|
|
|
|
|
|
|
|
|
|
|
|
|
|
|
|
|
|
|
|
|
|
|
|
|
|
|
|
|
|
|
|
|
|
|
|
|
|
|
|
|
|
|
|
|
|
|
|
|
|
|
|
|
|
|
|
|
|
|
|
|
|
|
|
|
|
|
|
|
|
|
|
|
|
|
|
|
|
|
|
|
|
|
|
|
|
|
|
|
|
|
|
|
|
|
|
|
|
|
|
|
|
|
|
|
|
|
|
|
|
|
|
|
|
|
|
|
|
|
|
|
|
|
|
|
|
|
|
|
|
|
|
|
|
|
|
|
|
|
|
|
|
|
|
|
|
|
|
|
|
|
|
|
|
|
|
|
|
|
|
|
|
|
|
|
|
|
|
|
|
|
|
|
|
|
|
|
|
|
|
|
|
|
|
|
|
|
|
|
|
|
|
|
|
|
|
|
|
|
|
|
|
|
|
|
|
|
|
|
|
|
|
|
|
|
|
|
|
|
|
|
|
|
|
|
|
|
|
|
|
|
|
|
|
|
|
|
|
|
|
|
|
|
|
|
|
|
|
|
|
|
|
|
|
|
|
|
|
|
|
|
|
|
|
|
|
|
|
|
|
|
|
|
|
|
|
|
|
|
|
|
|
|
|
|
|
|
|
|
|
|
|
|
|
|
|
|
|
|
|
|
|
|
|
|
|
|
|
|
|
|
|
|
|
|
|
|
|
|
|
|
|
|
|
|
|
|
|
|
|
|
|
|
|
|
|
|
|
|
|
|
|
|
|
|
|
|
|
|
|
|
|
|
|
|
|
|
|
|
|
|
|
|
|
|
|
|
|
|
|
|
|
|
|
|
|
|
|
|
|
|
|
|
|
|
|
|
|
|
|
|
|
|
|
|
|
|
|
|
|
|
|
|
|
|
|
|
|
|
|
|
|
|
|
|
|
|
|
|
|
|
|
|
|
|
|
|
|
|
|
|
|
|
|
|
|
|
|
|
|
|
|
|
|
|
|
|
|
|
|
|
|
|
|
|
|
|
|
|
|
|
|
|
|
|
|
|
|
|
|
|
|
|
|
|
|
|
|
|
|
|
|
|
|
|
|
|
|
|
|
|
|
|
|
|
|
|
|
|
|
|
|
|
|
|
|
|
|
|
|
|
|
|
|
|
|
|
|
|
|
|
|
|
|
|
|
|
|
|
|
|
|
|
|
|
|
|
|
|
|
|
|
|
|
|
|
|
|
|
|
|
|
|
|
|
|
|
|
|
|
|
|
|
|
|
|
|
|
|
|
|
|
|
|
|
|
|
|
|
|
|
|
|
|
|
|
|
|
|
|
|
|
|
|
|
|
|
|
|
|
|
|
|
|
|
|
|
|
|
|
|
|
|
|
|
|
|
|
|
|
|
|
|
|
|
|
|
|
|
|
|
|
|
|
|
|
|
|
|
|
|
|
|
|
|
|
|
|
|
|
|
|
|
|
|
|
|
|
|
|
|
|
|
|
|
|
|
|
|
|
|
|
|
|
|
|
|
|
|
|
|
|
|
|
|
|
|
|
|
|
|
|
|
|
|
|
|
|
|
|
|
|
|
|
|
|
|
|
|
|
|
|
|
|
|
|
|
|
|
|
|
|
|
|
|
|
|
|
|
|
|
|
|
|
|
|
|
|
|
|
|
|
|
|
|
|
|
|
|
|
|
|
|
|
|
|
|
|
|
|
|
|
|
|
|
|
|
|
|
Figure 2: Removing GFI55 From Pallet.
Figure 1: Removing GF55 From Pallet.
OPENING THE DOOR
The door lever can be found inbehind the right side of the door frame. To open the door, pivet the lever outwards and upwards until it unlocks.
LOCATING THE PELLET APPLIANCE
1.Check clearances to combustibles. See "Clearance to Combustibles" section.
2.Do not obtain combustion air from an attic, garage or any unventilated space if enough air is available. Combustion air may be obtained from a ventilated crawlspace.
3.Do not install the stove in a bedroom.
4.You can vent the stove through an exterior wall behind the unit or connect it to an existing masonry or metal chimney (must be lined if the chimney is over 6” (15 cm) diameter, or over 28 inches² (180 cm²) cross sectional area). An interior vent can be used with approved pipe passing through the ceiling and roof.
5.Locate the stove in a large and open room that is centrally located in the house. This will optimize heat circulation.
6.The power cord is 8 feet (2.43 m) long and may require a grounded extension cord to reach the nearest electrical outlet.
8 |
Greenfire Pellet Stove and Insert Technical Manual |
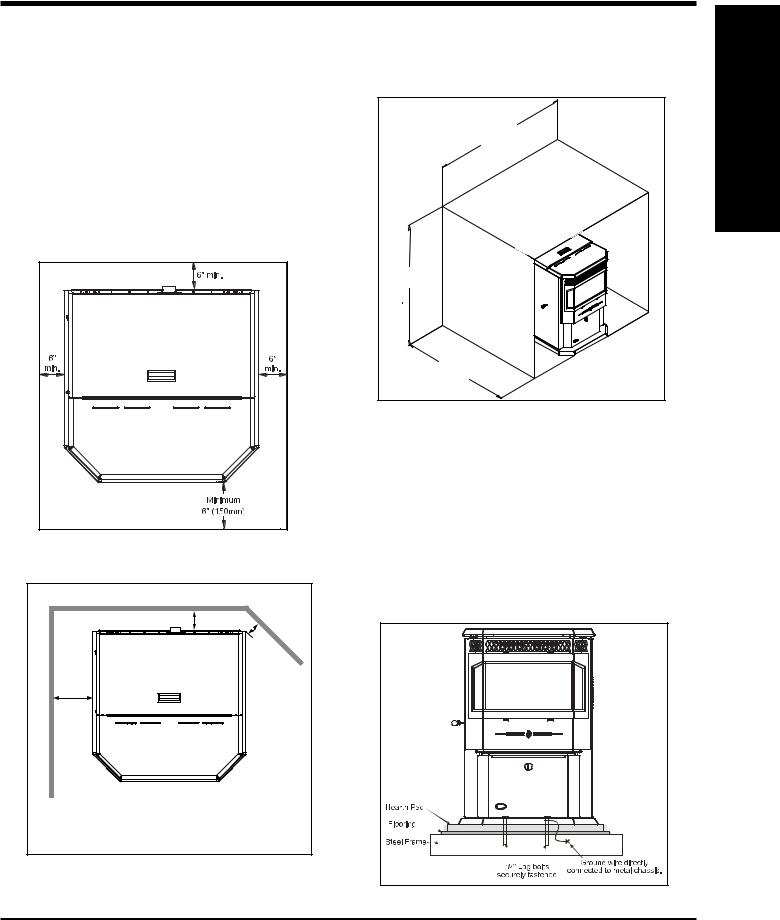
INSTALLATION
GF55 FREESTANDING PELLET STOVE
CLEARANCES TO COMBUSTIBLES
These dimensions are minimum clearances to combustibles, however it is highly recommended that you leave sufficient room on each side (20" where possible) for servicing, routine cleaning and maintenance.
This pellet stove requires floor protection. The floor protection must be non-combustible, extending 6" (150mm) beyond the full width and depth of the unit including 6" (150 mm) in front for ember protection.
Floor Protection: |
|
Width |
36-7/16” (934mm) |
Depth |
36” (914mm) |
Figure 3: Floor Protection.
|
Back wall |
|
|
3" (76mm) |
Adjacent |
|
wall |
|
|
|
|
|
|
2" |
wall |
|
(51mm)* |
|
|
|
Side |
6" |
|
|
|
|
|
(152mm) |
|
*NOTE: If the unit is installed as a corner installation, clearances change from 2" to 3", see "Corner thru Wall Installation" section.
ALCOVE CLEARANCES
Minimum Width |
36" (914mm) |
Minimum Height |
48" (1219mm) |
Maximum Depth |
30" (762mm) |
Figure 5: Alcove Clearances.
MOBILE HOME INSTALLATION
●Secure the heater to the floor using the holes in the pedestal of the appliance.
●Ensure the unit is electrically grounded to the chassis of your home (permanently).
WARNING: Do not install in a room people sleep in.
CAUTION: The structural integrity of the manufactured home floor, wall and ceiling/roof must be maintained
• Outside fresh air is mandatory. Secure outside air connections directly to fresh air intake pipe and secure with three (3) screws evenly spaced.
Figure 4: Minimum Clearances to Combustibles.
Figure 6: Mobile Home Install Mounting.
INSTALLATION
Greenfire Pellet Stove and Insert Technical Manual |
9 |
 Loading...