


Internet Telephony PBX System
(30/100 SIP Users registrations)
IPX-330 / IPX-2100
Quick Installation Guide

Table of Contents
1. |
IPX-330...................................................................................................... |
|
3 |
|
1.1. Package Contents................................................................................. |
3 |
|
|
1.2. Hardware Installation........................................................................... |
3 |
|
|
1.2.1 |
Safety Instructions...................................................................... |
3 |
|
1.2.2 |
Physical Introduction................................................................... |
4 |
|
1.2.3 |
LED & Button definitions.............................................................. |
4 |
|
1.2.4 |
Placement.................................................................................. |
5 |
|
1.2.5 |
Physical Connection..................................................................... |
5 |
|
1.3. Basic System Configuration................................................................... |
6 |
|
|
1.3.1 |
Web Login.................................................................................. |
6 |
|
1.3.2 |
Configuring the Network Setting................................................... |
7 |
|
1.3.3 |
Changing IP Address or forgotten admin password ....................... |
8 |
2. |
IPX-2100.................................................................................................... |
|
9 |
|
2.1. Package Contents................................................................................. |
9 |
|
|
2.2 Hardware Installation........................................................................... |
9 |
|
|
2.2.1 |
Safety Instructions...................................................................... |
9 |
|
2.2.2 |
Physical Introduction.................................................................. |
10 |
|
2.2.3 |
LED & Button definitions............................................................. |
10 |
|
2.2.4 |
Placement................................................................................. |
11 |
|
2.2.5 |
Physical Connection.................................................................... |
11 |
|
2.3. Basic System Configuration.................................................................. |
12 |
|
|
2.3.1 Web Login................................................................................. |
12 |
|
|
2.3.2 |
Configuring the Network Setting.................................................. |
13 |
|
2.3.3 |
Changing IP Address or forgetting admin password...................... |
14 |
3. |
Further Configuration.................................................................................. |
15 |
|

1. IPX-330
1.1. Package Contents
Thank you for purchasing PLANET Internet Telephony PBX system, IPX-330. This Quick Installation Guide will introduce how to finish the basic setting of connecting the web management interface and the Internet. Open the box of the Internet Telephony PBX system and carefully unpack it. The box should contain the following items:
•l IPX-330 x 1
•l Quick Installation Guide x 1
•l User’s Manual CD x 1
•l Power Adapter x 1 (12V DC)
•l RJ-45 x 1
If any of the above items are damaged or missing, please contact your dealer immediately.
1.2. Hardware Installation
The following are instructions for setting up PLANET IPX-330. Refer to the illustration and follow the simple steps below to quickly install your Internet Telephony PBX system.
1.2.1 Safety Instructions
The following are the safety instructions for Internet Telephony PBX system before installing.
The maximum operating temperature of the IPX-330 is -10~45°C, which allows sufficient air circulation.
The connections and equipment that supply power to the IPX-330 should be capable of operating safely with the maximum power requirements of the
IPX-330. In the event of a power overload, the supply circuits and supply wiring should become hazardous.
The power adapter must plug into the right supply voltage. Make sure that the supplied power voltage is correct and stable. If the input power voltage is over
10% lower than the standard, it may cause the IPX-330 to malfunction.
Generally, when installed after the final configuration, the product must comply with the applicable safety standards and regulatory requirements of the country in which it is installed. If necessary, consult for technical support.
3 

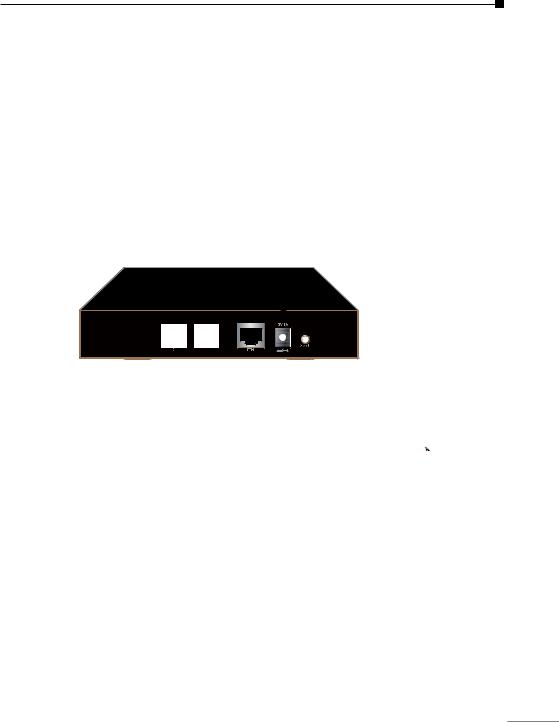
1.2.2 Physical Introduction
Internet Telephony PBX
|
|
|
|
|
FXO |
PWR |
SYS |
ETH |
1 |
2 |
Ringing |
|
IPX-330
Front Panel of the IPX-330
12V DC
Reset
2 |
1 |
ETH |
|
|
||||
|
||||||||
|
|
|
|
|
|
|
|
|
|
|
|
|
|
|
|
|
|
|
|
|
|
|
|
|
|
|
Rear Panel of the IPX-330
1.2.3 LED & Button definitions LED definitions
Front Panel LED |
Status |
Description |
|
PWR |
Steady Green |
PBX Power ON |
|
Off |
PBX Power OFF |
||
|
|||
|
|
|
|
SYS |
Blinking Green |
System is working |
|
Off |
System is off |
||
|
|||
|
|
|
|
ETH |
Blinking Green |
PBX network connection is established |
|
Off |
Waiting for network connection |
||
|
|||
|
|
|
|
|
Steady Red |
Ready / Standby |
|
FXO |
Flashing |
Ringing |
|
|
Off |
System is off |
|
|
|
|
Button |
Action |
Description |
|
|
|
|
|
Reset |
Press less than 5 secs. |
System reboot |
|
|
|
||
Press over 6 secs. |
Reset to Factory Default |
||
|
|||
|
|
|
 4
4
1.2.4 Placement
Make sure the device is placed in a safe environment to avoid equipment failure.
DO NOT place anything on top of the device. Excessive weight could damage it.
DO NOT obstruct ventilation slots on each side of the IPX-330 or expose it to direct sunlight or other heat source. Be sure that there is adequate air flow around the IPX-330.
Place the IPX-330 on a flat surface to avoid any damage.
1.2.5 Physical Connection
Telephone wire 100Base-TX UTP
2 x FXO |
Switch |
Router |
|
Internet |
|
|
|
PSTN
Video Phone |
ATA |
IP Phone IP Phone |
Mobile |
|
SIP Phone |
||||
|
|
|
Physical Connection Topology of the IPX-330
5 
 Loading...