


4-Bay SATA NAS RAID Server
NAS-7400
User’s manual
Version 1.0.0

PLANET NAS-7400 User Manual
Copyright
Copyright 2009 by PLANET Technology Corp. All rights reserved. No part of this publication may be reproduced, transmitted, transcribed, stored in a retrieval system, or translated into any language or computer language, in any form or by any means, electronic, mechanical, magnetic, optical, chemical, manual or otherwise, without the prior written permission of PLANET.
PLANET makes no representations or warranties, either expressed or implied, with respect to the contents hereof and specifically disclaims any warranties, merchantability or fitness for any particular purpose. Any software described in this manual is sold or licensed "as is". Should the programs prove defective following their purchase, the buyer (and not PLANET, its distributor, or its dealer) assumes the entire cost of all necessary servicing, repair, and any incidental or consequential damages resulting from any defect in the software. Further, PLANET reserves the right to revise this publication and to make changes from time to time in the contents hereof without obligation to notify any person of such revision or changes.
All brand and product names mentioned in this manual are trademarks and/or registered trademarks of their respective holders.
Federal Communication Commission Interference Statement
This equipment has been tested and found to comply with the limits for a Class B digital device, pursuant to Part 15 of FCC Rules. These limits are designed to provide reasonable protection against harmful interference in a residential installation. This equipment generates, uses, and can radiate radio frequency energy and, if not installed and used in accordance with the instructions, may cause harmful interference to radio communications. However, there is no guarantee that interference will not occur in a particular installation. If this equipment does cause harmful interference to radio or television reception, which can be determined by turning the equipment off and on, the user is encouraged to try to correct the interference by one or more of the following measures:
1.Reorient or relocate the receiving antenna.
2.Increase the separation between the equipment and receiver.
3.Connect the equipment into an outlet on a circuit different from that to which the receiver is connected.
4.Consult the dealer or an experienced radio technician for help.
FCC Caution
To assure continued compliance. (example-use only shielded
interface cables when connecting to computer or peripheral devices). Any changes or modifications not expressly approved by the party responsible for compliance could void the user’s authority to operate the equipment.
This device complies with Part 15 of the FCC Rules. Operation is subject to the Following two conditions: ( 1 ) This device may not cause harmful interference, and ( 2 ) this Device must accept any interference received, including interference that may cause undesired operation.
I
PLANET NAS-7400 User Manual
Federal Communication Commission (FCC) Radiation Exposure
Statement
This equipment complies with FCC radiation exposure set forth for an uncontrolled environment. In order to avoid the possibility of exceeding the FCC radio frequency exposure limits, human proximity to the antenna shall not be less than 20 cm (8 inches) during normal operation.
R&TTE Compliance Statement
This equipment complies with all the requirements of DIRECTIVE 1999/5/CE OF THE EUROPEAN PARLIAMENT AND THE COUNCIL OF 9 March 1999 on radio equipment and telecommunication terminal Equipment and the mutual recognition of their conformity (R&TTE)
The R&TTE Directive repeals and replaces in the directive 98/13/EEC (Telecommunications Terminal Equipment and Satellite Earth Station Equipment) As of April 8, 2000.
Safety
This equipment is designed with the utmost care for the safety of those who install and use it. However, special attention must be paid to the dangers of electric shock and static electricity when working with electrical equipment. All guidelines of this and of the computer manufacture must therefore be allowed at all times to ensure the safe use of the equipment.
WEEE regulation
To avoid the potential effects on the environment and human health as a result of the presence of hazardous substances in electrical and electronic equipment, end users of electrical and electronic equipment should understand the meaning of the crossed-out wheeled bin symbol. Do not dispose of WEEE as unsorted municipal waste and have to collect such WEEE separately.
Revision
User’s Manual for PLANET 4-Bay SATA NAS RAID Server
Model: NAS-7400
Rev: 1.0 (April. 2009)
Part No. EM-NAS-7400
II
PLANET NAS-7400 User Manual
TABBLE OF CONTENTS
Chapter 1: Introduction ................................................................................................... |
7 |
|
1.1 |
Features...................................................................................................................... |
7 |
1.2 |
Protocol Support...................................................................................................... |
8 |
1.3 |
Package Content ..................................................................................................... |
8 |
1.4 |
Specifications............................................................................................................ |
9 |
1.5 |
Physical Detail........................................................................................................ |
11 |
Chapter 2: Installation.................................................................................................... |
14 |
|
2.1 |
System OS Support ............................................................................................. |
14 |
2.2 |
System Browser Support................................................................................... |
14 |
2.3 |
Getting Start........................................................................................................... |
14 |
2.4 |
Installing the Software - NAS Finder ............................................................ |
17 |
2.5 |
Configure the PLANET NAS-7400 via NAS Finder .................................... |
22 |
2.6 |
Connecting to PASM............................................................................................. |
27 |
2.7 |
PASM in your Browser......................................................................................... |
28 |
Chapter 3: Connecting to NAS-7400 ........................................................................ |
30 |
|
3.1 |
Configure Network Drive on a Windows PC................................................ |
30 |
3.2 |
Setting up a Network Driver on a UNIX or Linux PC............................... |
32 |
3.3 |
Configure Network Drive on a Macintosh PC ............................................. |
35 |
3.4 |
Connecting a USB Printer to NAS-7400....................................................... |
38 |
3.5 |
Setting up the Print Server on NAS-7400................................................... |
39 |
3.6 |
Setting up Windows Printing ............................................................................ |
39 |
3.7 |
Setting up Linux Printing ................................................................................... |
41 |
3.8 |
Setting up Macintosh Printing.......................................................................... |
43 |
3.9 |
Connecting a USB Driver ................................................................................... |
45 |
3.10 Disconnecting a USB Drive............................................................................. |
46 |
|
|
1 |
|
|
|
PLANET NAS-7400 User Manual |
Chapter 4: One Touch Backup..................................................................................... |
47 |
|
4.1 |
Enable One Touch Backup................................................................................. |
47 |
4.2 |
Creating a Backup Schedule............................................................................. |
48 |
4.3 |
Performing a One Touch Backup .................................................................... |
51 |
4.4 |
Viewing Your Backup Files................................................................................. |
51 |
4.5 |
Restoring Your Backup Files ............................................................................. |
52 |
Chapter 5: SmartSYNC................................................................................................... |
54 |
|
5.1 |
Opening the SmartSYNC Windows................................................................. |
54 |
5.2 |
Displaying the NAS-7400 on your Network................................................ |
55 |
5.3 |
Changing the NAS-7400’s Network Settings ............................................. |
56 |
5.4 |
Performing a Backup ........................................................................................... |
57 |
5.5 |
Viewing Your Backup Folders ........................................................................... |
58 |
5.6 |
Performing a Restore........................................................................................... |
59 |
5.7 |
Scheduling a Backup ........................................................................................... |
60 |
5.8 |
Modifying a Backup Schedule .......................................................................... |
62 |
5.9 |
Viewing the Event Log ........................................................................................ |
64 |
Chapter 6: The features of PASM............................................................................... |
65 |
|
6.1 |
Setup Wizard .......................................................................................................... |
65 |
6.2 |
Managing Users and Groups............................................................................. |
71 |
6.2.1 Viewing a List of Users................................................................................ |
71 |
|
6.2.2 Creating a User.............................................................................................. |
71 |
|
6.2.3 Changing the Administrator’s Password .............................................. |
72 |
|
6.2.4 Changing a User’s Password..................................................................... |
73 |
|
6.2.5 Deleting a User .............................................................................................. |
73 |
|
6.2.6 Viewing a List of Groups ............................................................................ |
73 |
|
6.2.7 Creating a Group........................................................................................... |
74 |
|
6.2.8 Adding Members to a Group..................................................................... |
74 |
|
|
2 |
|
PLANET NAS-7400 User Manual |
|
6.2.9 Removing Members from a Group ......................................................... |
75 |
6.2.10 Deleting a Group......................................................................................... |
76 |
6.2.11 Viewing Quotas ........................................................................................... |
76 |
6.2.12 Setting Quotas............................................................................................. |
77 |
6.3 Managing File & Print Services ........................................................................ |
77 |
6.3.1 Configure for Windows Access................................................................. |
77 |
6.3.2 Configure for UNIX/Linux Access............................................................ |
79 |
6.3.3 Configure for Macintosh Access............................................................... |
81 |
6.3.4 Configure for FTP Access ........................................................................... |
82 |
6.3.5 Configure for your Print Server............................................................... |
83 |
6.3.6 Viewing a List Folders.................................................................................. |
84 |
6.3.7 Modifying Folder Services.......................................................................... |
84 |
6.3.8 Adding a Folder.............................................................................................. |
85 |
6.3.9 Deleting a Folder........................................................................................... |
86 |
6.3.10 Configure Windows Sharing for a Folder........................................... |
86 |
6.3.11 Configure the UNIX and Linux Sharing for a Folder ..................... |
87 |
6.3.12 Configure the FTP Sharing for a Folder ............................................. |
88 |
6.4 Managing RAID Volumes.................................................................................... |
89 |
6.4.1 Viewing RAID Volume Status ................................................................... |
89 |
6.4.2 Viewing Disk Drive Information .............................................................. |
90 |
6.4.3 Creating a RAID Volume ............................................................................ |
90 |
6.4.4 Designating a Spare Drive ........................................................................ |
91 |
6.4.5 Migrating a RAID Volume........................................................................... |
91 |
6.4.6 Deleting a RAID Volume............................................................................. |
92 |
6.4.7 Viewing an External USB Driver or Memory Stick............................ |
93 |
6.4.8 Formatting an External USB Driver or Memory Stick ..................... |
93 |
6.5 Managing Backups.................................................................................................... |
94 |
3 |
|
PLANET NAS-7400 User Manual |
|
6.5.1 Viewing a List if Snapshot Backups ....................................................... |
94 |
6.5.2 Setting up a Snapshot Backup ................................................................ |
95 |
6.5.3 Viewing the NAS Replication Schedule................................................. |
95 |
6.5.4 Setting up NAS Replication ....................................................................... |
96 |
6.5.5 Enabling One Touch Backup..................................................................... |
97 |
6.6 Managing the Network Connection................................................................ |
98 |
6.6.1 Viewing Network Setup Information ..................................................... |
98 |
6.6.2 Making Network Settings........................................................................... |
99 |
6.6.3 Working with Jumbo Frames.................................................................... |
99 |
6.7 Making Management Settings........................................................................ |
100 |
6.7.1 Viewing the Event Log .............................................................................. |
100 |
6.7.2 Setting up SMTP Authentication............................................................ |
101 |
6.7.3 Viewing the Email Alert List.................................................................... |
102 |
6.7.4 Adding an Email Alert Recipient............................................................ |
102 |
6.7.5 Deleting an Email Alert Recipient ......................................................... |
103 |
6.7.6 Enabling and Disabling the Buzzer....................................................... |
104 |
6.7.7 Viewing UPS Status.................................................................................... |
104 |
6.7.8 Setting up a UPS......................................................................................... |
105 |
6.8 Managing Services.............................................................................................. |
106 |
6.8.1 Setting System Date and Time.............................................................. |
106 |
6.8.2 Running the Network Time Protocol.................................................... |
106 |
6.8.3 Viewing the Results of NTP Synchronization.................................... |
107 |
6.8.4 Rebooting the NAS-7400 ......................................................................... |
107 |
6.8.5 Shutting Down the NAS-7400................................................................ |
108 |
6.8.6 Restarting the NAS-7400......................................................................... |
109 |
6.8.7 Viewing System Information .................................................................. |
110 |
6.8.8 Viewing Enclosure Information.............................................................. |
111 |
4 |
|
|
PLANET NAS-7400 User Manual |
|
Chapter 7: Technology Background........................................................................ |
112 |
|
7.1 |
Introduction to RAID ......................................................................................... |
112 |
7.1.1 RAID 0 – Stripe............................................................................................ |
112 |
|
7.1.2 RAID 1 – Mirror............................................................................................ |
113 |
|
7.1.3 RAID 5 – Block Striping with Distributed Parity Mirror ................ |
114 |
|
7.1.4 RAID 10 – Mirror / Stripe ........................................................................ |
114 |
|
7.2 |
Choosing a RAID Level ..................................................................................... |
116 |
7.2.1 TB Limitation................................................................................................. |
117 |
|
7.3 |
Spare Drive ........................................................................................................... |
118 |
7.4 |
Automatic Rebuilding ........................................................................................ |
118 |
7.5 |
Partition and Format.......................................................................................... |
118 |
7.6 |
RADI Volume Migration .................................................................................... |
119 |
Chapter 8: Troubleshooting........................................................................................ |
121 |
|
8.1 |
Responding to an Audible Alarm................................................................... |
121 |
8.2 |
Checking the System Status LED................................................................. |
121 |
8.3 |
Checking Disk Status LEDs ............................................................................. |
122 |
8.4 |
Replacing a Failed Disk Drive......................................................................... |
122 |
8.5 |
Checking RAID Volume Status in PASM..................................................... |
123 |
8.6 |
Checking File System Status in PASM ........................................................ |
125 |
8.7 |
Checking the Event Log in PASM.................................................................. |
125 |
8.8 |
Checking Enclosure Status in PASM ............................................................ |
130 |
8.9 |
Resolving Connections with SmartSYNC.................................................... |
130 |
8.10 Solving Network Connection Problems .................................................... |
131 |
|
8.11 Checking Your Email Inbox........................................................................... |
132 |
|
8.12 Restoring the Default Password.................................................................. |
132 |
|
8.13 Resolving a Windows Firewall Issue ......................................................... |
133 |
|
8.14 Frequently Asked Questions......................................................................... |
134 |
|
|
5 |
|
|
PLANET NAS-7400 User Manual |
Appendix A: Maintenance............................................................................................ |
138 |
Upgrading the Firmware .......................................................................................... |
138 |
Installing Application Plug-in.................................................................................. |
139 |
Replacing the Fan ....................................................................................................... |
140 |
Replacing the Power Supply ................................................................................... |
142 |
Connection Problems after Restart...................................................................... |
144 |
Appendix B Specification.............................................................................................. |
145 |
6
PLANET NAS-7400 User Manual
Chapter 1: Introduction
PLANET Technology’s NAS-7400 is network attached storage (NAS) solution for external storage targeted for small and medium business (SMB) users and small office/home office (SOHO) users.
With a NAS product, users can save their work and have access to files over the network without having to carry around a disk drive or memory stick. The Administrator can manage access privileges for greater security.
Multiple backup and synchronization functions protect your data.
1.1 Features
Up to four hot-swappable SATA II 3.5-inch disk drivers
Provides Scalability up to 4TB
10/100/1000M - Gigabit Ethernet port
RAID level support: RAID 0, 1, 5 and 10
Multi-protocol system support for Windows, UNIX, Linux and Macintosh
The Administrator can Limit the Amount of Available Disk Space Available to Individual Users
NAS-to-NAS data synchronization and backup
User, group and folder quota control
Advanced RAID bad sector recovery mechanism
Support UPnP Auto-IP and DHCP client
Aluminum Enclosure with an Internal Cooling Fan for Continuous Operation
2 Standard USB 2.0 Port for External USB HDD and Print Server Sharing
Multi-language support and user friendly web management interface
UPnP and DLNA certified Digital Media Server
Support E-Mail Notification for critical events
Support iTunes Media Server
Easy-to-use browser-based management interface
Data sharing over the network
One-touch backup of designated file folders on client PC
Snapshot backup for real-time image of the file system
Network print server with USB printer
7
PLANET NAS-7400 User Manual
UPS support with automated shutdown
Heterogeneous environment: Windows, UNIX, Linux, and Macintosh
SmartSYNC Backup & Setup Wizard
1.2 Protocol Support
Windows 2000, XP Professional, 2003 Server, and Vista Business, Enterprise, and Ultimate clients through SMB and CIFS protocols
UNIX and Linux clients through the NFS protocol
Macintosh clients through the AFP protocol
FTP clients through the FTP protocol
DLNA clients through UPnP protocol with an optional plug-in
Up to 16 concurrent connections
1.3 Package Content
NAS-7400 x 1 User’s Manual CD x 1 Power Adapter x 1 RJ-45 Cable x 1 Screw Package x 1
Quick Installation Guide x 1
8
PLANET NAS-7400 User Manual
1.4 Specifications
•Disk drive support:
•Four 1.5 Gb/s or 3 Gb/s SATA 3.5-inch disk drives
•Conforms to Serial ATA 1.0 specification and Serial ATA II: Extensions to Serial ATA 1.0 specification (SATA II, phase I specification)
•SATA specification of 3 Gb/s transfers with CRC error-checking
•Hot-swapping of disk drives
•Tagged command queuing
•Native command queuing
•Drive roaming among channels
•S.M.A.R.T status polled every 15 minutes
•Online capacity expansion
•RAID Level Migration
•Hot spare drives
•RAID Volume rebuilding
•Gigabyte rounding
•Background rebuilding
•RAID level support: RAID 0, 1, 5, and 10
•Large file support up to 2 TB
•Unicode file name support
•Networking: 10/100/1000 Mb/s Ethernet Port on motherboard
•File protocols: SMB, CIFS, FTP, AFP, NFS
•Network Time Protocol (NTP) client
•Error logging
•Phone home capability (email notification) to contact IT staff
•Hardware monitoring of:
•Fan
•Temperature
•Power
•Disk status
•One-Touch button
9
PLANET NAS-7400 User Manual
• Enclosure status
Disk drive support:
•Four 1.5 Gb/s or 3 Gb/s SATA 3.5-inch disk drives
•Conforms to Serial ATA 1.0 specification and Serial ATA II: Extensions to Serial ATA 1.0 specification (SATA II, phase I specification)
•SATA specification of 3 Gb/s transfers with CRC error-checking
•Hot-swapping of disk drives
•Tagged command queuing
•Native command queuing
•Drive roaming among channels
•S.M.A.R.T. status polled every 15 minutes
•Online capacity expansion
•RAID Level Migration
•Hot spare drives
•RAID Volume rebuilding
•Gigabyte rounding
•Background rebuilding
•RAID level support: RAID 0, 1, 5, and 10
•Large file system support up to 6 TB
•Unicode files name support
•Networking: 10/100/1000 Mb/s Ethernet Port on motherboard
•USB ports: USB 2.0, up to 480 Mb/s, two Types-A connectors
•File protocols: SMB, CIFS, FTP, AFP, and NFS
•Flash Memory: 16 MB, 16-bit
•Memory: 128 MB DDR SDRAM
•Power Supply: 200-watt ATX with PFC
•Network Time Protocol (NTP) client
•Error logging
•Phone home capability (email notification) to contact IT staff
10
PLANET NAS-7400 User Manual
1.5 Physical Detail
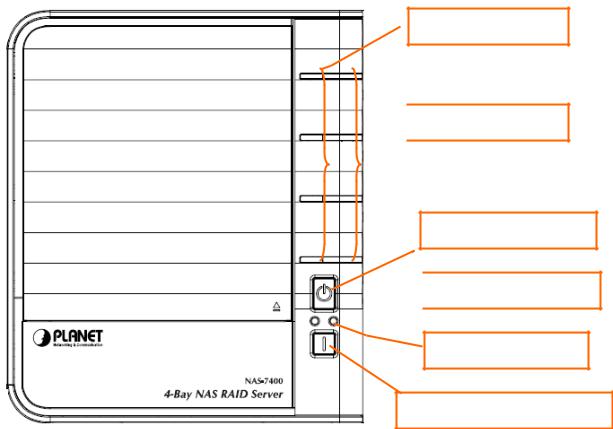
NAS-7400 Front View
Disk Status LED

 Disk Activity LED
Power Button
 System Status LED
LAN Activate LED
One Touch Backup Button
11
PLANET NAS-7400 User Manual
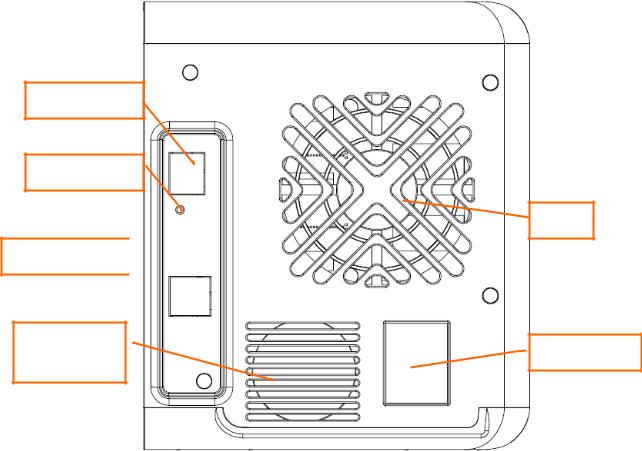
NAS-7400 Rear View
1 x LAN Port
Reset Button
Fan
2 x USB Ports 
Power
Power Port
Supply FAN
Button Description
|
Button |
|
Description |
|
Power Button |
|
Push to turn on/ turn off the NAS-7400 |
||
|
|
|
One Touch Backup is a feature that enables you to |
|
One Touch Backup |
|
backup specified folders from your PC to the |
||
Button |
|
NAS-7400 by pressing a button on the front of the |
||
|
NAS-7400. |
|||
|
|
|
||
|
|
|
|
|
|
|
|
If forgot the new password, you can use the reset |
|
Reset Button |
|
button to the default password: admin. Please press |
||
|
and hold the reset button more than 5 seconds, until |
|||
|
|
|
||
|
|
|
the System Status LED flashes three times. |
|
|
|
|
|
|
Physical Interfaces |
|
|
||
|
|
|
|
|
|
Interface |
Description |
||
|
USB Socket |
Connects to USB printers and USB Storage Devices |
|
|
|
LAN Port |
Connects to the Ethernet cable with RJ-45 |
|
|
|
connector |
|
||
|
|
|
|
|
|
Power Connection |
Connects to the power core |
|
|
|
|
|
12 |
|
|
|
PLANET NAS-7400 User Manual |
|
LED Indicators |
|
|
|
|
|
|
|
LED |
Color |
Function |
|
|
|
|
|
Power |
Blue |
Unit action indication lamp. |
|
|
|
|
|
System |
Green |
Normal Enclosure function |
|
Status |
|
|
|
Amber |
There is a problem with the fan or power |
|
|
|
|
||
|
|
supply |
|
|
|
|
|
|
Red |
The fan, power supply, or file system |
|
|
|
has failed. |
|
|
|
|
|
Disk Status |
Green |
Normal disk drive function |
|
LED |
|
|
|
Amber |
Rebuilding to this disk drive |
|
|
|
|
||
|
|
|
|
|
Red |
Failed disk drive |
|
|
|
|
|
|
Dark |
No disk drive is installed |
|
|
|
|
|
13
PLANET NAS-7400 User Manual
Chapter 2: Installation
2.1 System OS Support
Microsoft Windows:
•Vista, Server 2003, XP, 2000
•Supports Intel IA32, AMD64 and Intel EM64T platforms UNIX/Linux:
•Red Hat Enterprise Linux 3.0 (AS/WS/ES)
•Red Hat Enterprise Linux 4.0 (AS/WS/ES)
•SuSe Linux Enterprise 10 (Server/Desktop)
Apple Macintosh:
•Mac OS X
2.2 System Browser Support
Use the latest version of the following browsers to manage the NAS-7400:
•Internet Explorer
•Netscape Navigator
•Mozilla
•Firefox
•Safari (Mac OS X)
2.3 Getting Start
This chapter shows you how to configure these steps to connect NAS-7400.
14

PLANET NAS-7400 User Manual
Step1 Install Hard Drive into HDD Tray.
Step2 Installing Hard Drive into NAS-7400.
Step3 Connecting the Network.
15
PLANET NAS-7400 User Manual
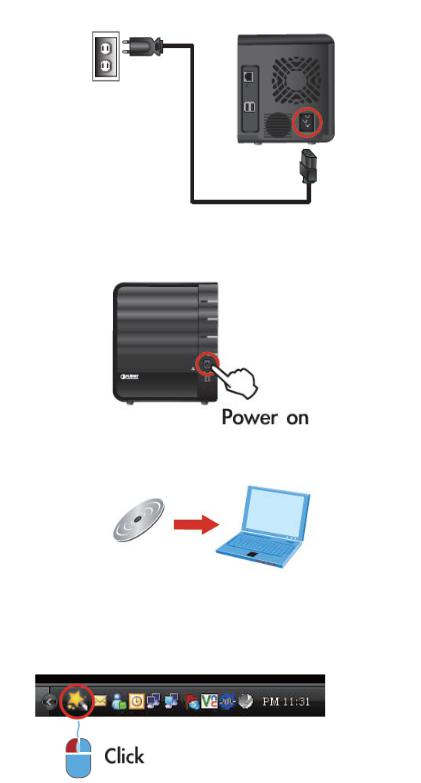
Step4 Connecting the Power.
Step5 Press the Power Button.
Step6 Install the Utility.
Step7 Use the Software (NASFinder) to search NAS-7400.
16

PLANET NAS-7400 User Manual
Step8 Login NAS-7400. (Default Login user name/password: admin / admin)
Step9 Starting to configure Network Drives.
2.4 Installing the Software - NAS Finder
After connect the NAS-7400 with your computer or the Local Area Network at first time, please install the NAS Finder into your computer. The NAS finder will search NAS-7400 automatically.
Note
By default setting, the NAS-7400 set to “Dynamic IP” mode, so it is necessary to setup a DHCP server on network
17
PLANET NAS-7400 User Manual
To install the software:
Step1 Insert the CD into your CDROM, and double-click on Utility Installer icon. The first installer screen appears.
Step2 Click the “Next” button to begin installation.
18

PLANET NAS-7400 User Manual
Step3 The License Agreement screen appears. Please click the “I accept the terms of the license agreement” option and click the “Next” button.
Step4 Please click on “Next” button to continue the next step. If install to different folder, click “Browse” and select another folder.
19
PLANET NAS-7400 User Manual
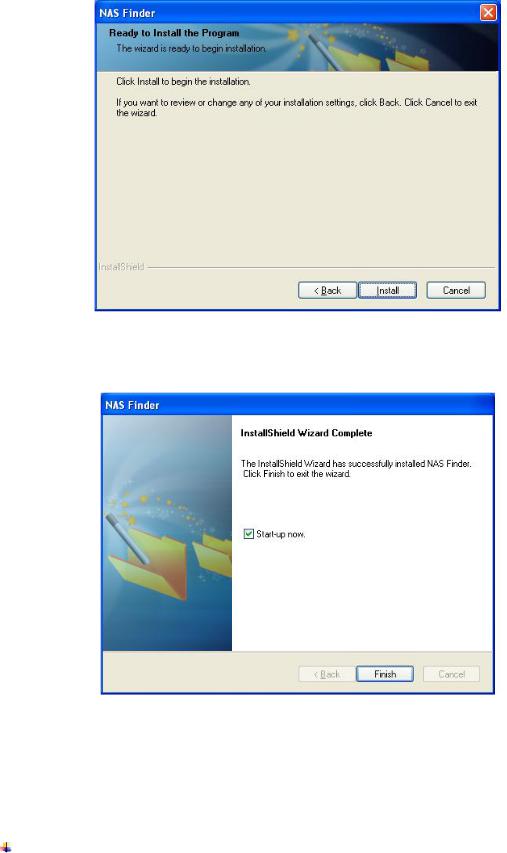
Step5 Please click on “Install” to begin the installation.
Step6 When the installation is finished, the final installation screen appears. Click to “Finish” button to close the installer.
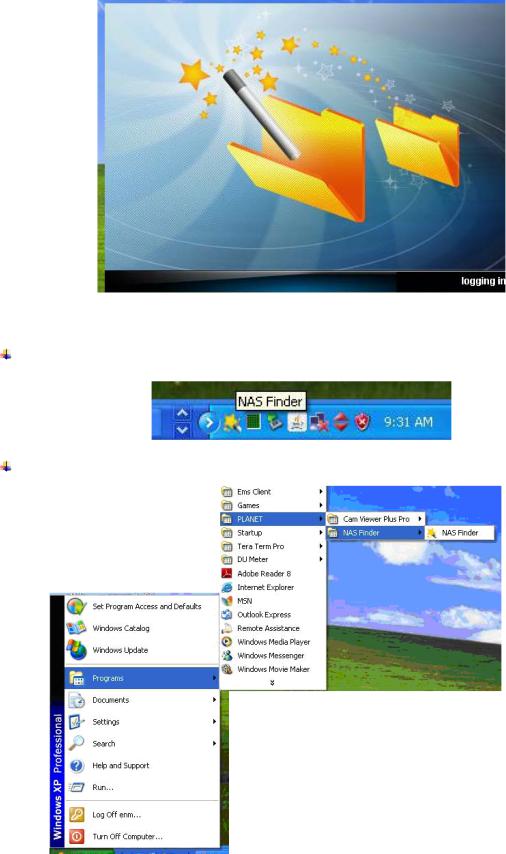
Step7 After finished installation, it will appear the boot-up window, and the NAS Finder icon will also show up on the “Toolbar” and “Start Menu ->
Program - > PLANET -> NAS Finder”.
Starting-up Window
20
PLANET NAS-7400 User Manual
From Toolbar
From Start Menu - > Program - > PLANET -> NAS Finder
21
PLANET NAS-7400 User Manual
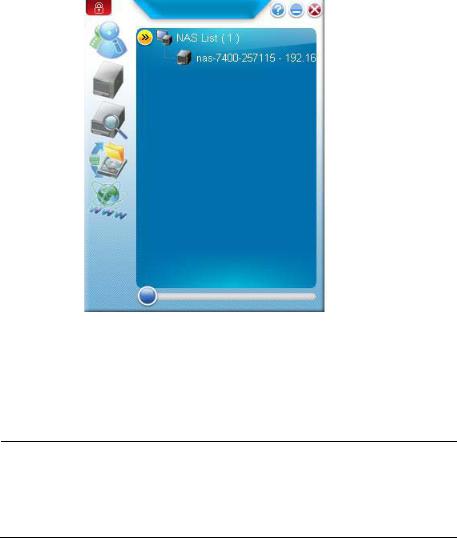
Step8 Double click on the “NAS Finder”, it will appear the NAS Finder Main screen.
2.5Configure the PLANET NAS-7400 via NAS Finder
The NAS Setup Wizard will overwrite all existing settings on
Note
the NAS-7400. In most cases, you should only run the NAS Setup Wizard one time—when you first set up your PLANET NAS Finder
22
PLANET NAS-7400 User Manual
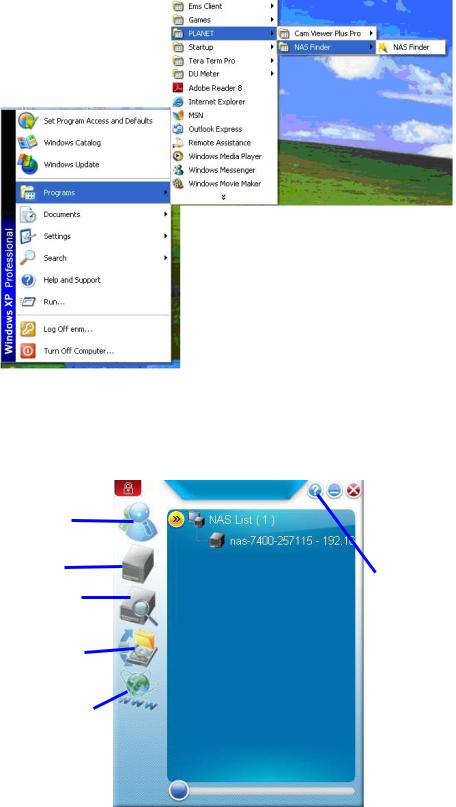
The NAS Setup Wizard performs the setup procedures on your NAS-7400. To set up your NAS-7400:
Step1: Please from “Start -> Programs -> PLANET -> NAS Finder”.
The Setup Wizard welcome screen appears.
Set default account
Set default NAS machine |
Help |
|
Locate NAS
Do backup now
Open advanced management
Tool with Web browser
23

PLANET NAS-7400 User Manual
Step2: Click on the “Set default account” button, and type the default login user name/password: admin / admin.
Note
By default setting, NAS-7400 set to “Dynamic IP” mode, so it is necessary to setup a DHCP server on network environment.
Step3: The NAS Finder will start to search the NAS device.
24
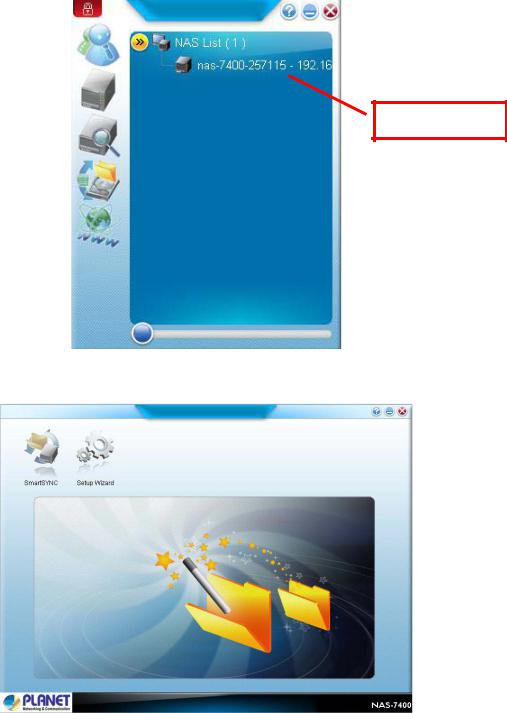
PLANET NAS-7400 User Manual
Step4: After search success, double click“nas-7400-25115- 192.168.0.101”, it will automatically enter to the NAS Finder Main Screen as following.
Double Click
The NAS Finder Main screen appears.
25
PLANET NAS-7400 User Manual
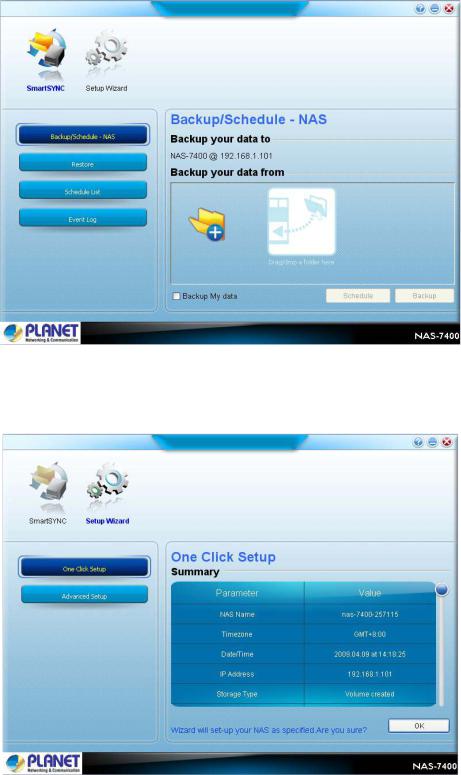
There are two options on the NAS Finder,
SmartSYNC - include “Backup/Schedule –NAS, Restore, Schedule List, and Event Log”
Setup Wizard – include “One Click Setup, and Advanced Setup” items.
26

PLANET NAS-7400 User Manual
2.6 Connecting to PASM
The PLANET Advanced Storage Manager (PASM) software is installed on the NAS-7400. The PASM runs in the web browser, so you can access PASM via web browser.
Browser Support
Choose one of the following browsers to use with PASM:
Internet Explorer
Mozilla
Firefox
Netscape Navigator
Safari (Mac OS X)
Finding the NAS-7400’s IP Address
To access the NAS-7400 in your browser, you must know the NAS-7400’s IP address. Use NAS Finder for this purpose.
Step1 From “Start -> Programs -> PLANET -> NAS Finder”.
Step2 To open the NAS Finder window, click on the “ ”icon.
Click
27
 Loading...