


USER’S GUIDE
3200

If you need to call Customer Service
Please complete the following information for future reference:
Model Number: 3200
Serial Number: 1
Date of Purchase:
Place of Purchase:
1The serial number is on the back of the unit. Retain this User’s Guide with your sales receipt as a permanent record of your purchase, in the event of theft, fire or warranty service.
© 2006 Pitney Bowes Inc.

Table of Contents |
|
|
Section I General |
|
|
1 |
General information |
|
|
Using the documentation....................................................................................... |
2 |
|
Symbols and conventions used in the documentation .................................... |
2 |
|
Accessing the complete User’s Guide................................................................... |
3 |
|
Viewing documentation ................................................................................... |
3 |
|
Control panel overview .......................................................................................... |
6 |
|
Status LED indications .................................................................................... |
9 |
2 |
Loading documents and paper |
|
|
Loading documents ............................................................................................. |
11 |
|
Using the ADF ............................................................................................... |
11 |
|
Using the scanner glass ................................................................................ |
12 |
|
Acceptable paper and other media...................................................................... |
12 |
|
Recommended media ................................................................................... |
12 |
|
Handling and using media ............................................................................. |
13 |
|
Loading paper and other media........................................................................... |
15 |
|
Loading paper................................................................................................ |
15 |
|
Loading envelopes and other media ............................................................. |
16 |
|
Printable Area................................................................................................ |
17 |
3 |
General setup |
|
|
Mode timer........................................................................................................... |
18 |
|
Paper settings...................................................................................................... |
18 |
|
Paper Type .................................................................................................... |
18 |
|
Paper Size ..................................................................................................... |
19 |
|
Tray use in Copy mode ................................................................................. |
19 |
|
Tray use in Fax mode.................................................................................... |
20 |
|
Tray use in Print mode .................................................................................. |
20 |
|
Volume Settings................................................................................................... |
21 |
|
Ring volume................................................................................................... |
21 |
|
Beeper volume .............................................................................................. |
21 |
|
Speaker volume............................................................................................. |
21 |
|
Automatic daylight savings time .......................................................................... |
22 |
|
Ecology features.................................................................................................. |
22 |
|
Toner save..................................................................................................... |
22 |
|
Sleep time...................................................................................................... |
23 |
|
Turning off the scanner lamp......................................................................... |
23 |
|
LCD Contrast....................................................................................................... |
23 |
4 |
Security features |
|
|
Security................................................................................................................ |
24 |
|
Setting Lock................................................................................................... |
24 |
|
Secure Function Lock.................................................................................... |
25 |
i

Section II Fax |
|
|
5 |
Sending a fax |
|
|
Entering fax mode................................................................................................ |
30 |
|
Sending a single-sided fax from the ADF ...................................................... |
30 |
|
Sending a 2-sided fax from the ADF ............................................................ |
30 |
|
Sending a fax from the scanner glass ........................................................... |
31 |
|
Faxing legal size documents from the scanner glass .................................... |
31 |
|
Canceling a fax in progress ........................................................................... |
31 |
|
Broadcasting........................................................................................................ |
32 |
|
Canceling a Broadcast in progress................................................................ |
32 |
|
Additional sending operations.............................................................................. |
33 |
|
Sending faxes using multiple settings ........................................................... |
33 |
|
Electronic cover page .................................................................................... |
33 |
|
Contrast ......................................................................................................... |
35 |
|
Changing fax resolution ................................................................................. |
35 |
|
Dual access ................................................................................................... |
36 |
|
Real time transmission .................................................................................. |
36 |
|
Overseas mode ............................................................................................. |
37 |
|
Delayed faxing ............................................................................................... |
37 |
|
Delayed batch transmission .......................................................................... |
38 |
|
Checking and canceling waiting jobs............................................................. |
38 |
|
Sending a fax manually ................................................................................. |
39 |
|
Out of Memory message ............................................................................... |
39 |
6 |
Receiving a fax |
|
|
Receive modes .................................................................................................... |
40 |
|
Choosing the receive mode........................................................................... |
40 |
|
Using Receive Modes.......................................................................................... |
41 |
|
Fax Only ........................................................................................................ |
41 |
|
Fax/Tel........................................................................................................... |
41 |
|
Manual........................................................................................................... |
41 |
|
External TAD ................................................................................................. |
41 |
|
Receive Mode settings ........................................................................................ |
42 |
|
Ring Delay ..................................................................................................... |
42 |
|
F/T Ring Time ................................................................................................ |
42 |
|
Easy Receive................................................................................................. |
43 |
|
Setting the Print Density ................................................................................ |
43 |
|
Additional receiving operations............................................................................ |
44 |
|
Printing a reduced incoming fax .................................................................... |
44 |
|
Duplex (2-sided) printing for Fax mode ........................................................ |
44 |
|
Setting the Fax Receive Stamp ..................................................................... |
45 |
|
Receiving a fax at the end of a conversation................................................. |
45 |
|
Printing a fax from the memory ..................................................................... |
45 |
ii

7 |
Phone services and external devices |
|
|
Phone line services.............................................................................................. |
46 |
|
Distinctive Ring.............................................................................................. |
46 |
|
Caller ID......................................................................................................... |
48 |
|
Connecting an external TAD (telephone answering device)................................ |
49 |
|
Connections................................................................................................... |
49 |
|
Recording an outgoing message................................................................... |
50 |
|
Special line considerations ............................................................................ |
50 |
|
Multi-line connections (PBX) ......................................................................... |
51 |
|
External and extension phones ........................................................................... |
52 |
|
Operation from extension telephones............................................................ |
52 |
|
For Fax/Tel mode only................................................................................... |
52 |
|
Connecting an external phone....................................................................... |
52 |
|
Using a cordless external handset ................................................................ |
53 |
|
Using remote codes....................................................................................... |
53 |
8 |
Dialing and storing numbers |
|
|
How to Dial .......................................................................................................... |
54 |
|
Manual dialing ............................................................................................... |
54 |
|
One-Touch dialing ......................................................................................... |
54 |
|
Speed-Dialing ................................................................................................ |
54 |
|
Search ........................................................................................................... |
55 |
|
LDAP Search................................................................................................. |
55 |
|
Fax redial....................................................................................................... |
55 |
|
Storing numbers .................................................................................................. |
56 |
|
Storing a pause ............................................................................................. |
56 |
|
Storing One-Touch dial numbers................................................................... |
56 |
|
Storing Speed-Dial numbers ......................................................................... |
57 |
|
Changing One-Touch and Speed-Dial numbers ........................................... |
58 |
|
Setting up Groups for broadcasting............................................................... |
59 |
|
Dialing access codes and credit card numbers ............................................. |
60 |
|
Pause ............................................................................................................ |
60 |
|
Tone or Pulse ................................................................................................ |
60 |
9 |
Remote fax options |
|
|
Fax Forwarding.................................................................................................... |
61 |
|
Paging ................................................................................................................. |
62 |
|
Fax Storage ......................................................................................................... |
62 |
|
PC Fax Receive................................................................................................... |
63 |
|
Changing Remote Fax Options ........................................................................... |
64 |
|
Turning off Remote Fax Options ................................................................... |
64 |
|
Remote Retrieval................................................................................................. |
65 |
|
Setting a remote access code ....................................................................... |
65 |
|
Using your Remote Access Code.................................................................. |
65 |
|
Retrieving fax messages ............................................................................... |
66 |
|
Changing the Fax Forwarding number .......................................................... |
66 |
|
Remote fax commands........................................................................................ |
67 |
iii

10 |
Printing reports |
|
|
Fax reports........................................................................................................... |
68 |
|
Transmission verification report..................................................................... |
68 |
|
Fax journal..................................................................................................... |
68 |
|
Reports ................................................................................................................ |
69 |
|
How to print a report ...................................................................................... |
69 |
11 |
Polling |
|
|
Polling receive ..................................................................................................... |
70 |
|
Sequential polling .......................................................................................... |
70 |
|
Polled transmit ..................................................................................................... |
71 |
|
Setup for polled transmit................................................................................ |
71 |
Section III Copy
12 |
Making copies |
|
|
How to copy ......................................................................................................... |
74 |
|
Entering copy mode....................................................................................... |
74 |
|
Making a single copy ..................................................................................... |
74 |
|
Making multiple copies .................................................................................. |
74 |
|
Stop copying .................................................................................................. |
74 |
|
Copy options........................................................................................................ |
75 |
|
Changing copy quality ................................................................................... |
75 |
|
Changing text copy resolution ....................................................................... |
76 |
|
Enlarging or reducing the image copied ........................................................ |
76 |
|
Making N in 1 copies or a poster (page layout) ............................................. |
77 |
|
Duplex (2-sided) copying .............................................................................. |
79 |
|
Sorting copies using the ADF ........................................................................ |
81 |
|
Adjusting contrast .......................................................................................... |
81 |
|
Tray Select .................................................................................................... |
82 |
|
Out of Memory message ..................................................................................... |
82 |
Section IV Software
13 Software and Network features
iv

Section V Appendixes |
|
|
A |
Safety and Legal |
|
|
Choosing a location ............................................................................................. |
86 |
|
To use the machine safely................................................................................... |
87 |
|
Important Information........................................................................................... |
90 |
|
Standard telephone and FCC Notices........................................................... |
90 |
|
Industry Canada Compliance Statement (Canada only) .............................. |
93 |
|
Disconnect device ......................................................................................... |
93 |
|
LAN connection ............................................................................................ |
93 |
|
Laser safety ................................................................................................... |
93 |
|
FDA regulations............................................................................................. |
94 |
|
Important safety instructions.......................................................................... |
95 |
|
Trademarks ................................................................................................... |
96 |
B |
Options |
|
|
Options ................................................................................................................ |
97 |
|
Optional Paper Tray (6423115) ........................................................................... |
98 |
|
Memory Board ..................................................................................................... |
98 |
|
DIMM types ................................................................................................... |
98 |
|
Installing extra memory ................................................................................. |
99 |
C |
Troubleshooting and routine maintenance |
|
|
Troubleshooting................................................................................................. |
100 |
|
If you are having difficulty with your machine .............................................. |
100 |
|
Improving the print quality ........................................................................... |
106 |
|
Setting Dial Tone Detection......................................................................... |
111 |
|
Phone line interference................................................................................ |
111 |
|
Error messages ................................................................................................. |
112 |
|
Checking if the machine has faxes in its memory ....................................... |
116 |
|
Sending faxes to another fax machine ........................................................ |
116 |
|
Sending faxes to your PC............................................................................ |
116 |
|
Document jams............................................................................................ |
117 |
|
Paper jams .................................................................................................. |
118 |
|
Routine maintenance......................................................................................... |
122 |
|
Cleaning the outside of the machine ........................................................... |
122 |
|
Cleaning the scanner glass ......................................................................... |
124 |
|
Cleaning the laser scanner window............................................................. |
124 |
|
Cleaning the corona wire............................................................................. |
126 |
|
Cleaning the drum unit ................................................................................ |
127 |
|
Replacing the toner cartridge (494-7).......................................................... |
127 |
|
Replacing the toner cartridge ...................................................................... |
128 |
|
Replacing the drum unit (494-6) .................................................................. |
130 |
|
Replacing periodic maintenance parts............................................................... |
132 |
|
Packing and shipping the machine .................................................................... |
132 |
|
Machine Information .......................................................................................... |
134 |
|
Checking the serial number......................................................................... |
134 |
|
Checking the page counters........................................................................ |
134 |
|
Checking the remaining life of parts ............................................................ |
134 |
v

D |
Menu and Features |
|
|
On-screen programming.................................................................................... |
135 |
|
Menu table................................................................................................... |
135 |
|
Memory storage........................................................................................... |
135 |
|
Menu keys ......................................................................................................... |
135 |
|
Menu Table........................................................................................................ |
137 |
|
Entering Text ..................................................................................................... |
148 |
E |
Specifications |
|
|
General .............................................................................................................. |
150 |
|
Print media......................................................................................................... |
151 |
|
Fax..................................................................................................................... |
152 |
|
Copy .................................................................................................................. |
153 |
|
Scan................................................................................................................... |
154 |
|
Print ................................................................................................................... |
155 |
|
Interfaces ........................................................................................................... |
155 |
|
Computer requirements ..................................................................................... |
156 |
|
Consumable items ............................................................................................. |
157 |
|
Ethernet wired network ...................................................................................... |
157 |
F |
Glossary |
|
G |
Index |
|
vi

Section I
General
General information |
2 |
Loading documents and paper |
11 |
General setup |
18 |
Security features |
24 |

1 General information
Using the documentation
Thank you for buying a Pitney Bowes machine! Reading the documentation will help you make the most of your machine.
Symbols and conventions used in the documentation
The following symbols and conventions are used throughout the documentation.
Bold Bold style indentifies keys on the machine control panel or computer screen.
Italics Italicized style emphasizes an important point or refers you to a related topic.
Courier Courier New font identifies the New messages shown on the LCD
of the machine.
Warning icons tell you what to do to avoid the risk of injury.
Electrical Hazard icons alert you to a possible electrical shock.
Hot Surface icons warn you not to touch machine parts that are hot.
Caution icons tell you about procedures you must follow to prevent damaging the machine.
Incorrect setup icons alert you to devices and operations that are not compatible with the machine.
Note icons give useful tips.
2
Accessing the complete User’s Guide
The printed User’s Guide does not contain all the information about your machine. The advanced features of the Printer, Network, Scanner, and PC Fax are explained in the complete User’s Guide that you can find on the CD-ROM.
Viewing documentation
Viewing documentation (Windows®)
To view the documentation, from the Start menu, point to Pitney Bowes,
Multi-Function Suite from the program group, and then click User’s Guide.
If you have not installed the software, you can find the documentation by following the instructions below:
a Turn on your PC.
Insert the Pitney Bowes CD-ROM
labeled Windows® into your CD-ROM drive.
b If the language selection screen appears, click your language.
General information |
|
c If the model name screen appears, click |
|
your model name.The CD-ROM main |
1 |
menu will appear. |
If this window does not appear, use
Windows® Explorer to find and run the setup.exe program from the root directory of the Pitney Bowes CD-ROM.
d Click Documentation.
e Click the documentation you want to read:
Setup Guide: Setup and software installation instructions.
User's Guide (3 manuals): User’s Guide for stand-alone operations, Network User’s Guide, and Software User’s Guide.
PaperPort User's Guide: Document management software.
How to find Scanning instructions
There are several ways you can scan documents. You can find the instructions as follows:
3
Chapter 1
Software User's Guide:
Scanning a document using the TWAIN driver in Chapter 2
Scanning a document using the WIA driver
(For Windows® XP only) in Chapter 2
Using ControlCenter2 in Chapter 3
Network Scanning (For models with builtin network support) in Chapter 4
PaperPort® User's Guide:
Instructions for scanning directly from ScanSoft® PaperPort®
How to find Internet FAX instructions
You can find the instructions in the Network User’s Guide on the CD-ROM.
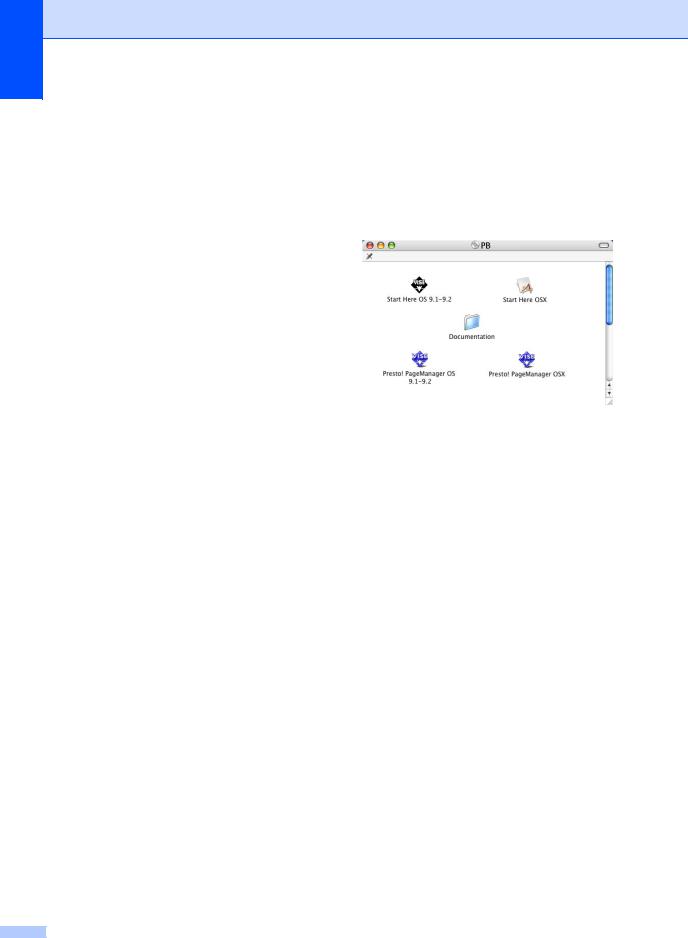
Viewing Documentation (Macintosh®)
a Turn on your Macintosh®.
Insert the Pitney Bowes CD-ROM
labeled Macintosh® into your CD-ROM drive.
b The following window will appear.
c Double-click the Documentation icon.
d If the language selection screen appears, double-click your language.
e Double-click the documentation you want to read:
Setup Guide: Setup and Software installation instructions.
User's Guides (3 manuals): User’s Guide for stand-alone operations, Network User’s Guide, and Software User’s Guide.
How to find Scanning instructions
There are several ways you can scan documents. You can find the instructions as follows:
4

Software User's Guide:
Scanning from a Macintosh® in Chapter 8 (For Mac OS® 9.1-9.2/Mac OS® X 10.2.4 or greater)
Using ControlCenter2 in Chapter 9 (For Mac OS® X 10.2.4 or greater) on page 148
Network Scanning in Chapter 10 (For Mac OS® X 10.2.4 or greater)
Presto!® PageManager® User's Guide:
Instructions for scanning directly from Presto!® PageManager®
How to find Internet FAX instructions
You can find the instructions in the Network User’s Guide on the CD-ROM.
General information
1
5
Chapter 1
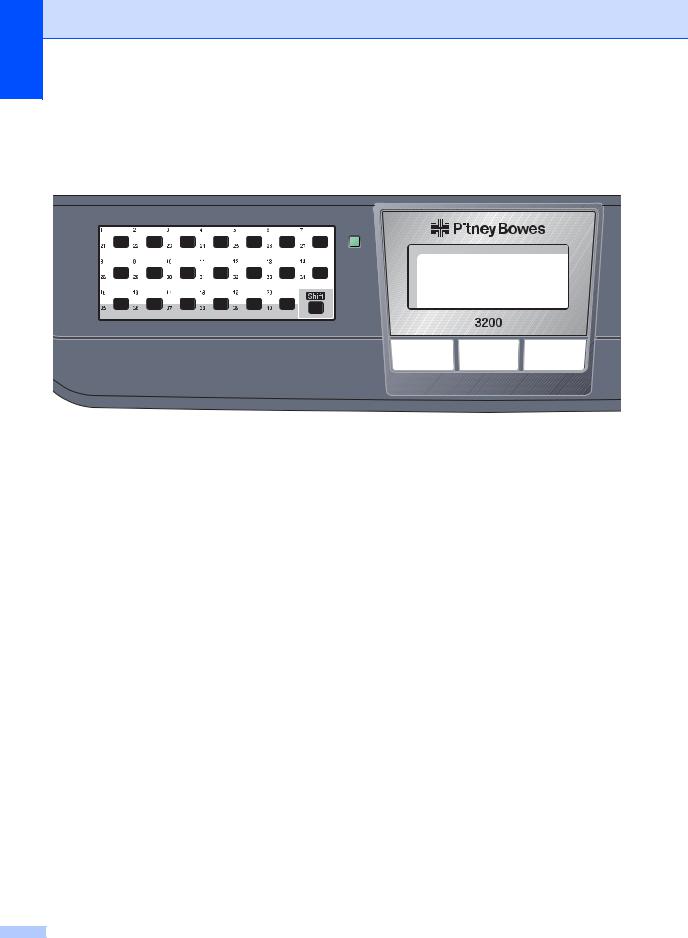
Control panel overview
|
1 |
|
|
|
|
|
|
2 |
3 |
||||||
|
|
|
|
|
|
|
|
|
|
|
|
|
|
|
|
|
|
|
|
|
|
|
|
|
|
|
|
|
|
|
|
|
|
|
|
|
|
|
|
|
|
|
|
|
|
|
|
|
|
|
|
|
|
|
|
|
|
|
|
|
|
|
|
|
|
|
|
|
|
|
|
|
|
|
|
|
|
|
|
|
|
|
|
|
|
|
|
|
|
|
|
|
|
|
|
|
|
|
|
|
|
|
|
|
|
|
|
|
|
|
|
|
|
|
|
|
|
|
|
|
|
|
|
|
|
|
|
|
|
|
|
|
|
|
|
|
|
|
|
|
|
|
|
|
|
|
|
|
|
|
|
|
|
|
|
|
|
|
|
|
|
|
|
|
|
|
|
|
|
|
|
|
|
|
|
|
|
|
|
|
|
|
|
|
|
|
|
|
|
|
|
|
|
|
|
|
|
|
|
|
|
|
|
|
|
|
|
|
|
|
|
|
|
|
|
|
|
|
|
|
|
|
|
|
11 |
10 |
|
9 |
1 |
One-Touch keys |
|
5 |
Dial pad |
|
These 20 keys give you instant access to 40 |
|
Used to enter telephone and fax numbers or to |
|
|
previously stored numbers. |
|
|
|
|
|
|
enter text. |
|
|
Shift |
|
|
|
|
|
|
The # key temporarily switches the dialing |
|
|
Lets you access One-Touch numbers 21 to 40 |
|
||
|
|
mode from Pulse to Tone during a telephone |
||
|
when held down. |
|
|
|
|
|
|
call. |
|
2 |
Status LED |
|
|
|
|
6 |
Stop/Exit |
||
|
The LED will flash and change color depending |
|||
|
on the machine status. |
|
|
Stops an operation or exits from a menu. |
3LCD
Displays messages to help you use your machine.
7Start
Starts sending a fax, copying or scanning.
4 Menu keys:
Menu
Accesses the main menu.
Clear/Back
Deletes entered data or lets you exit the menu.
OK
Selects a setting. d or c
Scrolls backwards or forwards through menu selections. Changes the volume when in fax or standby mode.
a or b
Scrolls through the menus and options.
6

3 |
4 |
|
|
|
|
|
|
|
|
|
|
|
|
|
9
8 Copy keys Duplex
You can choose Duplex to copy on both sides of the paper.
Contrast/Quality
Lets you change the quality or contrast for the next copy.
Enlarge/Reduce
Reduces or enlarges copies.
Tray Select
Lets you change which tray will be used for the next copy.
Sort
Sorts multiple copies using the ADF.
N in 1
You can choose N in 1 to copy 2 or 4 pages onto one page.
General information
1
5 |
6 |
||
|
|
|
|
|
|
|
|
8 |
7 |
9 Mode keys
 Fax
Fax
Puts the machine in Fax mode.
 Scan
Scan
Puts the machine in Scan mode.
(For details about scanning, see the Software User’s Guide on the CD-ROM.)
 Copy
Copy
Puts the machine in Copy mode.
7

Chapter 1
10 Fax and telephone keys
Hook
Press before dialing if you want to make sure a fax machine answers, and then press Start. Also, press this key after you pick up the handset of an external telephone during the F/T ring (fast double-rings).
Resolution
Sets the resolution when sending a fax.
Search/Speed Dial
Lets you look up numbers stored in the dialing memory and LDAP server.
You can search the stored number by alphabetically.
It also lets you look up the stored number in Speed-Dial numbers by pressing Shift and Search/Speed Dial simultaneously and then the three-digit number.
Redial/Pause
Redials the last number called. It also inserts a pause when programming quick dial numbers.
11 Print keys Secure
When using Secure Function Lock, you can switch restricted users by holding down Shift
as you press Secure. (see Secure Function Lock on page 25.)
You can print data saved in memory when you enter your four-digit password.
(For details about using the Secure key, see the Software User’s Guide on the CD-ROM.)
Job Cancel
Cancels a programmed fax job or print job and clears the machine’s memory.
8
General information
Status LED indications
The Status LED (light emitting diode) will flash and change color depending on the machine’s |
1 |
|||||||
status. |
|
|||||||
|
|
|
|
|
|
|
|
|
|
|
|
|
|
|
|
|
|
|
|
|
|
|
|
|
|
|
|
|
|
|
|
|
|
|
|
|
|
|
|
|
|
|
|
|
|
|
|
|
|
|
|
|
|
|
|
|
|
|
|
|
|
|
|
|
|
|
|
|
|
|
|
The LED indications shown in the table below are used in the illustrations in this chapter.
LED |
|
|
LED Status |
|
|
|
LED is off. |
|
|
|
LED is on. |
|
Green |
Yellow |
Red |
|
|
|
LED is blinking. |
|
Green |
Yellow |
Red |
LED |
Machine Status |
|
Description |
|
Sleep Mode |
|
The power switch is off or the machine is in Sleep mode. |
|
Warming Up |
|
The machine is warming up for printing. |
Green |
|
|
|
|
Ready |
|
The machine is ready to print. |
Green |
|
|
|
|
Receiving Data |
|
The machine is either receiving data from the computer, |
|
|
|
processing data in memory, or printing data. |
Yellow |
|
|
|
|
Data Remaining in |
Print data remains in the machine memory. |
|
|
Memory |
|
|
Yellow |
|
|
|
9

Chapter 1
|
Service error |
Follow the steps below. |
|
|
1. Turn off the power switch. |
Red |
|
2. Wait a few seconds, and then turn it back on and try to print |
|
again. |
|
|
|
|
|
|
If you cannot clear the error and you see the same service call |
|
|
indication after turning the machine back on, please call |
|
|
Service/Support phone number: |
|
|
In USA: 1-800-243-5556 |
|
|
In Canada: 1-800-672-6937 |
|
Cover open |
The front cover or fuser cover is open. Close the cover. |
|
|
|
|
Toner Life End |
Replace the toner cartridge with a new one. |
Red |
|
|
Paper error |
Put paper in the tray or clear the paper jam. Check the LCD |
|
|
|
message. |
|
|
|
|
Scan lock |
Check that the scanner lock lever is released. |
|
|
|
|
Others |
Check the LCD message. |
|
|
|
|
Out of memory |
Memory is full. |
|
|
|
 Note
Note
When the power switch is off or the machine is in Sleep mode, the LED is off.
10

2 Loading documents and paper
Loading documents
All fax, scan and copy operations can be performed from the ADF or the scanner glass.
Using the ADF
You can use the ADF (automatic document feeder) to fax, scan or copy sheets of paper. The ADF feeds each sheet one at a time.
When loading the ADF, make sure that documents written with ink are completely dry.
Single-sided Document
Documents must be from 5.8 to 8.5 inches (148.0 to 215.9 mm) wide and from 5.8 to 14 inches (148.0 to 355.6 mm) long, and of a
standard weight [20 lb (80 g/m2)].
2-sided Document
When you load a 2-sided document, the document must be from 5.8 to 8.5 inches (148.0 to 215.9 mm) wide and from 5.8 to 11.7 inches (148.0 to 297.0 mm) long.
For information on the capacity of the ADF see Specifications on page 150.
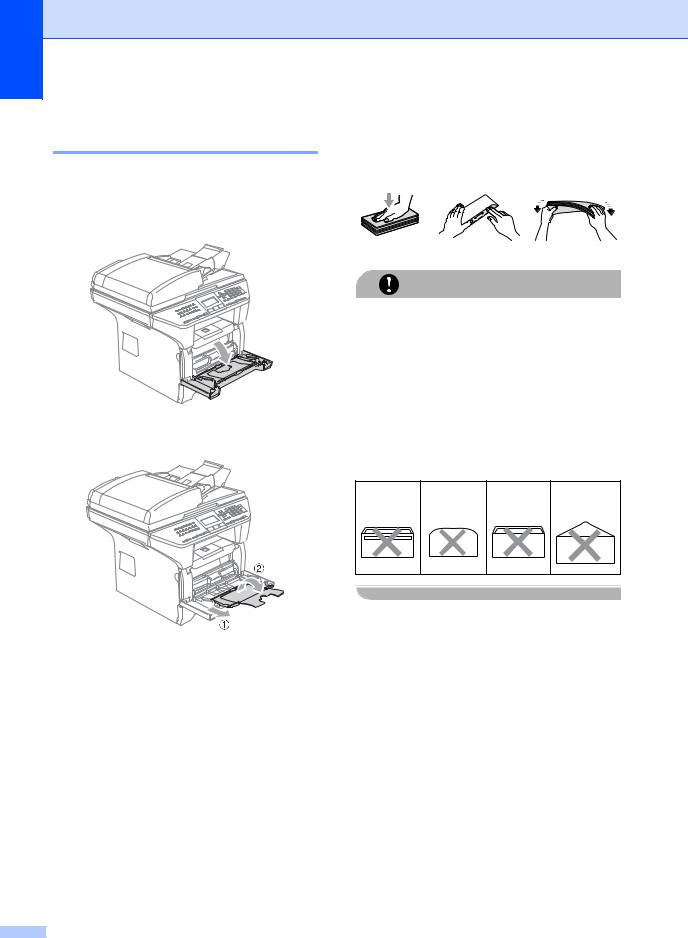
a Unfold the ADF document output
support flap (1). |
2 |
|
|
|
1 |
b Fan the pages well.
c Place your documents face up, top edge first in the ADF until you feel them touch the feed roller.
d Adjust the paper guides to fit the width of your documents.
CAUTION
To avoid damaging your machine while using the ADF, do not pull on the document while it is feeding.
To scan non-standard documents see
Using the scanner glass on page 12.
11
Chapter 2
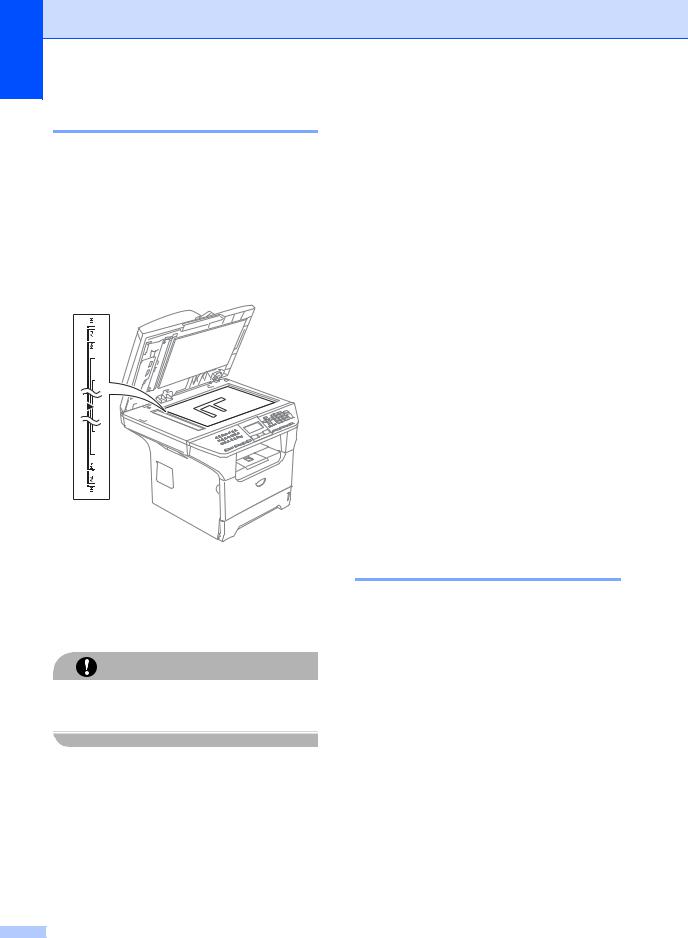
Using the scanner glass
You can use the scanner glass to fax, scan, or copy the pages of a book or single sheets of paper. Documents can be up to 8.5 inches wide and up to 14 inches long (215.9 mm wide to 355.6 mm long).
To use the scanner glass, the ADF must be empty.
a Lift the document cover.
b Using the document guidelines on the left, center the document face down on the scanner glass.
c Close the document cover.
CAUTION
If the document is a book or is thick, do not slam the cover or press on it.
12
Acceptable paper and other media
Print quality may vary according to the type of paper you are using.
You can use the following types of media: plain paper, transparencies, labels or envelopes.
For best results, follow the steps below:
Use paper made for plain paper copying.
Use paper that is 20 to 24 lb (75 to 90 g/m2).
Use labels or transparencies which are designed for use in laser printers.
When using transparencies remove each sheet immediately to prevent smudging or paper jams.
Avoid touching the printed surface of the paper immediately after printing.
Use long grain paper with a neutral Ph value, and a moisture content of approx 5%.
Recommended media
To get the best print quality, we suggest using the following paper.
Paper Type |
Item |
Plain paper |
Xerox 4200DP 20 lb |
|
|
|
Hammermill Laser Paper |
|
24 lb |
|
|
|
(Xerox Premier 80 g/m2) |
|
(Xerox Business 80 g/m2) |
|
(M-real DATACOPY 80 g/m2) |
Recycled paper |
(Xerox Recycled Supreme) |
|
|
Transparency |
3M CG 3300 |
|
|
Labels |
Avery laser label #5160 |
|
(Avery laser label L7163) |
|
|
Handling and using media
Store paper in its original packaging and keep it sealed. Keep the paper flat and away from moisture, direct sunlight and heat.
Avoid touching either side of transparencies, as this can decrease the print quality.
Only use transparencies recommended for laser printing.
Only use sharply creased envelopes.
 Improper Setup
Do not use any of the following paper, as they will cause paper feed problems: damaged, coated, curled, wrinkled, highly textured, irregularly shaped, or paper that has previously been printed on by a printer.
1 0.08 in. (4 mm) or longer
Loading documents and paper
2
13

Chapter 2
Paper capacity of the paper tray
|
Paper size |
Paper types |
No. of sheets |
Paper Tray |
A4, Letter, Legal, |
Plain paper, Recycled |
up to 250 |
(Tray #1) |
Executive, A5, A6, B5, |
paper and Bond paper |
[20 lb (80 g/m2)] |
|
B6 and Folio 1 |
|
|
|
Transparency |
up to 10 |
|
|
|
||
|
|
|
|
Multi-purpose tray |
Width: 2.75 to 8.5 in. |
Plain paper, Recycled |
up to 50 |
(MP tray) |
(69.9 to 215.9 mm) |
paper, Bond paper, |
[20 lb (80 g/m2)] |
|
Length: 4.57 to 16.0 in. |
Envelope and Labels |
|
|
(116.0 to 406.4 mm) |
Transparency |
up to 10 |
|
|
|
|
Paper Tray |
A4, Letter, Legal, |
Plain paper, Recycled |
up to 250 |
(Tray #2) |
Executive, A5, B5, B6 |
paper and Bond paper |
[20 lb (80 g/m2)] |
|
and Folio 1 |
|
|
1 Folio size is 8 in. × 13 in.
14

Loading paper and other media
When printing on plain paper 16 to 28 lb (60
to 105 g/m2) or laser transparencies use the paper tray.
For printing on other types of media use the MP tray (Multi-purpose tray).
Loading paper
a Unfold the output paper tray support flap.
b Pull the paper tray completely out of the machine.
c While pressing the blue paper-guide release lever (1), slide the paper guides to fit the paper size. Make sure that the guides are firmly in the slots.
For legal size paper, press the lever (2) located at the back of the tray and pull out the back of the paper tray. Move the tray lock button (3) to the lock position.
(1) |
(2) |
(3) |
|
(1)
Loading documents and paper
d Fan the stack of paper well to avoid paper feeding problems.
2
e Insert the paper into the paper tray with the top edge of the paper first and the print side down.
Make sure that the paper is flat in the tray and below the maximum paper mark (1).
(1)
f Push the paper tray firmly back into the machine.
15
Chapter 2
Loading envelopes and other media
Use the MP tray when printing envelopes, labels, and thick paper.
a Open the MP tray and lower it gently.
b Pull out the MP tray support.
c Insert the media into the MP tray with the top edge first and the printing side face up.
Loading Envelopes
Before loading, press the corners and sides of the envelopes to make them as flat as possible.
CAUTION
Do not use the following types of envelopes, as they will cause paper feed problems:
•That are of a baggy construction.
•That are embossed (have raised writing on them).
•That have clasps or staples.
•That are pre-printed on the inside.
|
Rounded |
Double |
Triangular |
Glue |
flap |
flap |
flap |
16

Printable Area
Printable Area for copies
The printable area of your machine begins at approximately 0.12 in. (3 mm) from the top and bottom and 0.09 in. (2.3 mm) from both sides of the paper.
2 |
2 |
1 
 1
1
10.12 in. (3 mm)
20.09 in. (2.3 mm)
 Note
Note
This printable area shown above is for a single copy or a 1 in 1 copy using Letter size paper. The printable area changes with the paper size.
Loading documents and paper
Printable Area when printing from a computer
When using the default driver the printable |
|||||||||
area is smaller than the paper size, as shown |
|||||||||
below. |
2 |
||||||||
Portrait |
|||||||||
|
|
|
|
||||||
2 |
2 |
|
|||||||
1 |
|
|
|
|
|
|
|
|
|
|
|
|
|
|
|
|
|
||
|
|
|
|
|
|
|
|
||
 1
1
10.16 in. (4.23 mm)
20.25 in. (6.35 mm)
Landscape
2 |
2 |
1 
1 
10.16 in. (4.23 mm)
20.2 in. (5.08 mm)
 Note
Note
The printable area shown above is for Letter size paper. The printable area changes with the paper size.
17

3 General setup
Mode timer
The machine has three mode keys on the control panel: Fax, Scan, and Copy.
You can set how much time the machine takes after the last Copy or Scan operation to return to Fax mode. If you select Off, the machine will stay in the mode you used last.
Also, this setting sets the time the machine will change from individual user to public user when using Secure Function Lock. See
Switching Users on page 28.
a Press Menu, 2, 1
21.Mode Timer
a2 Min
5 Min
bOff
Select ab & OK
b Press a or b to select 0 Sec,
30 Secs, 1 Min, 2 Mins, 5 Mins or
Off. Press OK. c Press Stop/Exit.
Paper settings
Paper Type
Set up the machine for the type of paper you are using. This will give you the best print quality.
a Choose one of the options below:
To set the paper type for the MP Tray press Menu, 2, 2, 1.
To set the paper type for Tray#1 press Menu, 2, 2, 2.
To set the paper type for Tray#2 press Menu, 2, 2, 3 if you installed the optional tray.
22.Paper Type 1.MP Tray
aPlain
bThick Select ab & OK
b Press a or b to select Thin, Plain,
Thick, Thicker, Transparency or Recycled Paper. Press OK.
c Press Stop/Exit.
 Note
Note
•Transparency is not available for the optional Tray #2.
•You can choose Transparency only if
A4, Letter, Legal or Folio size was chosen as the paper size.
18

Paper Size
You can use nine sizes of paper for printing copies: A4, Letter, Legal, Executive, A5, A6, B5, B6 and Folio, and four sizes for printing faxes: A4, Letter, Legal or Folio (8"×13").
When you change the size of paper in the tray, you will also need to change the setting for paper size at the same time so your machine can fit the document or an incoming fax on the page.
a Choose one of the options below:
To set the paper size for the MP Tray press Menu, 2, 3, 1.
To set the paper size for Tray#1 press Menu, 2, 3, 2.
To set the paper size for Tray#2 press Menu, 2, 3, 3 if you installed the optional tray.
23.Paper Size 1.MP Tray
aLetter
bLegal Select ab & OK
b Press a or b to select A4, Letter,
Legal, Executive, A5, A6, B5, B6,
Folio or Any. Press OK.
c Press Stop/Exit.
 Note
Note
•Any (size) appears only when you select the MP tray (Menu, 2, 3, 1).
•If you select Any for the MP Tray Paper Size: You must choose MP Only for the Tray Use setting. You cannot use the Any Paper Size selection for the MP tray when making N in 1 copies. You must choose one of the other available Paper Size selections for the MP tray.
•A6 size is not available for the optional Tray #2.
General setup
Tray use in Copy mode
You can change the priority tray that the machine will use for printing copies.
When you select Tray#1 Only, MP Only or
Tray#2 Only 1, the machine loads the paper only from that tray. If the selected tray
is out of paper, No Paper will appear on the 3 LCD. Insert the paper in the empty tray.
To change the tray setting follow the instructions below:
a Press Menu, 2, 7, 1.
27.Tray Use 1.Copy
aMP>T1
bT1>MP Select ab & OK
b Press a or b to select Tray#1 Only,
Tray#2 Only 1, MP Only, MP>T1>T2 1 or T1>T2 1>MP. Press OK.
1Tray#2 Only or T2 appears only if the optional tray is installed.
c Press Stop/Exit.
 Note
Note
•When loading the documents from the ADF and MP>T1>T2 or T1>T2>MP is selected, the machine looks for the tray with the most suitable paper and pulls paper from that tray. If no tray has suitable paper, the machine pulls paper from the higher priority tray.
•When using the scanner glass, your document is copied from the higher priority tray even if more suitable paper is in another paper tray.
19

Chapter 3
Tray use in Fax mode
You can change the default tray that the machine will use for printing received faxes.
Selecting T1>T2 1>MP will let your machine take paper from Tray #1 first before the MP
tray. MP>T1>T2 1 will take paper from the MP tray first.
 Note
Note
•You can use four sizes of paper for printing faxes: A4, Letter, Legal or Folio. When a suitable size is not in any of the trays received faxes will be stored in the machine’s memory and
Check Paper Size will appear on the LCD. For details, see Check Paper Size on page 112.
•If the tray is out of paper and received faxes are in the machine’s memory,
No Paper will appear on the LCD. Insert paper in the empty tray.
a Press Menu, 2, 7, 2.
27.Tray Use 2.Fax
aMP>T1
bT1>MP Select ab & OK
b Press a or b to select Tray#1 Only,
Tray#2 Only, MP Only, MP>T1>T2 1 or T1>T2 1>MP. Press OK.
1Tray#2 Only or T2 appears only if the optional tray is installed.
20
Tray use in Print mode
You can change the default tray the machine will use for printing from your computer.
a Press Menu, 2, 7, 3.
27.Tray Use 3.Print
aMP>T1
bT1>MP Select ab & OK
b Press a or b to select Tray#1 Only,
Tray#2 Only 1, MP Only, MP>T1>T21 or T1>T2 1>MP. Press OK.
1Tray#2 Only or T2 appears only if the optional tray is installed.
 Note
Note
•The setting in the printer driver will take priority over the setting made on the control panel.
•If the control panel is set to
Tray#1 Only, Tray#2 Only, MP Only or MP>T1>T2 and you choose ‘Auto Select’ in the printer driver, the tray use will be MP>T1>T2.
If the control panel is set to T1>T2>MP and you choose ‘Auto Select’ in the printer driver, the tray use will remain T1>T2>MP.
Volume Settings
Ring volume
You can select a ring volume level from a range of settings, from High to Off.
While in Fax mode press |
▲ or |
▲ |
to |
adjust the volume level. The LCD shows the current setting, and each key press will change the volume to the next. The machine will keep the new setting until you change it.
You can also change the volume through the menu, by following the instructions below:
a Press Menu, 2, 4, 1.
24.Volume
1.Ring
aMed
bHigh Select ab & OK
b Press a or b to select Off, Low, Med or High. Press OK.
c Press Stop/Exit.
Beeper volume
When the beeper is on, the machine will beep when you press a key, make a mistake, or after you send or receive a fax. You can select a range of volume levels, from High to
Off.
a Press Menu, 2, 4, 2.
24.Volume
2.Beeper
aMed
bHigh Select ab & OK
b Press a or b to select Off, Low, Med or High. Press OK.
c Press Stop/Exit.
General setup
Speaker volume
You can select a range of speaker volume levels, from High to Off.
To adjust the speaker volume, follow the instructions below:
a Press |
(Fax) |
3 |
|
b Press Hook. |
|||
|
|||
c Press |
▲ or ▲ . |
|
|
This setting will stay until you change it again.
You can also change the volume through the menu, by following the instructions below:
a Press Menu, 2, 4, 3.
24.Volume
3.Speaker
aMed
bHigh Select ab & OK
b Press a or b to select Off, Low, Med or High. Press OK.
c Press Stop/Exit.
21

Chapter 3
Automatic daylight savings time
You can set the machine to change automatically for Daylight Savings Time. It will set itself forward one hour in the Spring, and back one hour in the Fall.
a Press Menu 2, 5.
25.Auto Daylight
aOn
bOff
Select ab & OK
b Press a or b to select On, or Off. Press OK.
c Press Stop/Exit.
22
Ecology features
Toner save
You can save toner using this feature. When you set toner save to On, print appears lighter. The default setting is Off.
a Press Menu, 2, 6, 1.
26.Ecology 1.Toner Save
aOn
bOff
Select ab & OK
b Press a or b to choose On (or Off). Press OK.
c Press Stop/Exit.
 Note
Note
We do not recommend Toner Save for printing Photo or Gray Scale images.
 Loading...