


 Loading...
Digital Mailing System
DM400,TM DM500TM and DM550TM
Operator Guide
Canadian English Version
This product meets the applicable Industry Canada technical specifications. The Ringer Equivalence Number (REN) is an indication of the maximum number of devices allowed to be connected to a telephone interface. The termination on an interface may consist of any combination of devices subject only to the requirement that the sum of the RENs of all the devices does not exceed five.
CAUTION: Changes or modifications to this equipment not expressly approved by the party responsible for compliance (Pitney Bowes) could void the user’s authority to operate the equipment.
Use only a shielded interface cable to operate this equipment with a scale or other peripheral device.
If you experience trouble with this modem, please refer to the warranty information provided with this equipment. If the trouble is causing harm to the network, the telephone company may request that you remove the equipment from the network until the problem is resolved.
This equipment may not be used with party lines or coin lines.
This equipment is not intended to be serviceable. Please refer to the warranty information if problems occur. Failed units will be withdrawn by approved Pitney Bowes service representatives. For reference purposes, the contact address is Pitney Bowes, C/O Progistix, 85K Signet Drive, North York, ON M9L 1T6.
DM400/DM500/DM550 Operating Guide
SV61964 Rev. A
February 2007
©2007 Pitney Bowes Inc. All rights reserved. This book may not be reproduced in whole or in part in any fashion or stored in a retrieval system of any type or transmitted by any means, electronically or mechanically, without the express, written permission of Pitney Bowes.
We have made every reasonable effort to ensure the accuracy and usefulness of this manual; however, we cannot assume responsibility for errors or omissions or liability for the misuse or misapplication of our products.
Due to our continuing program of product improvement, equipment and material specifications as well as performance features are subject to change without notice. Your mailing system may not have some of the features described in this book.
E-Z Seal, Postage By Phone, and IntelliLink Control Center are trademarks or registered trademarks of Pitney Bowes Inc.
DM400/DM500/DM550 Mailing System
Operating Guide
Table of Contents
Pitney Bowes Contact Information List
Chapter 1 – Read this First
Chapter 2 – Meet the DM400/DM500/DM550
Chapter 3 – Mail in a Minute
Chapter 4 – Running Mail
Chapter 5 – Mailing System Setup
Chapter 6 – Adding Postage
Chapter 7 – Accounting Setup
Chapter 8 – Reports
Chapter 9 – Maintaining and Updating
Chapter 10 – Troubleshooting
Chapter 11 – Supplies and Options
Appendix A – Glossary
Index
SV61964 Rev. A

Pitney Bowes Contact
Information List
Pitney Bowes Web Sites
•For frequently asked questions, go to: http://www.pitneybowes.ca
•To place requests for service, go to: http://www.pitneybowes.ca/webtools
•To order Pitney Bowes supplies and accessories, go to:
http://www.pitneybowes.ca and click on Online Store.
Our Help Desk
For direct questions, call: 1.800.672.6937. Customer Service Representatives are available Monday through Friday, 8AM - 8:00PM EST.
Postage By Phone® System
To contact, call 1.800.387.4660.
Pitney Bowes Supplies
To order Pitney Bowes approved supplies, call our Pitney Bowes Supply Line™ at 1.800.672.6937 or visit our online store at:
http://www.pitneybowes.ca
vii

SV61964 Rev. A |
1 Read This First
Chapter Contents |
|
What’s in This Guide...................................... |
1-3 |
Other Information Available ........................... |
1-4 |
What You Need to Know .............................. |
1-5 |
Safety Requirements ..................................... |
1-6 |
SV60957 Rev1.-D1

1 • Read This First
1-2 |
SV61964 Rev. A |

DM400, DM500, DM550 Operating Guide
What’s in
This Guide
Chapter 1 - Read this First contains important information about CPC requirements and equipment and telephone safety precautions.
Chapter 2 - Meet the DM400/DM500/DM550 gives an overview of the mailing system and the location of each control and machine feature. Please read this section carefully. It provides a foundation for the instructions in later sections of this book.
Chapter 3 - Mail in a Minute explains the basics of running mail using the DM400/DM500/DM550. By following these instructions, you will be able to run mail within minutes.
Chapter 4 - Running Mail explains how to run mail in the different mail modes as well as when to use the various options.
Chapter 5 - Mailing System Setup provides step-by-step instructions for customizing your mailing system to suit your needs.
Chapter 6 - Adding Postage explains how to add postage funds to your IntelliLink Control Centre using Pitney Bowes’ Postage By Phone® service.
Chapter 7 - Accounting Setup explains how to set up accounts to track postage.
Chapter 8 - Reports explains the different types of reports available and how to print them.
Chapter 9 - Maintaining and Updating explains how to check the quality of the digital indicia and how to take care of the moistener and tape feeder. It also tells you how to add features and update postal rates and carriers.
Chapter 10 - Troubleshooting contains a list of problems you may encounter while using your mailing system.
Chapter 11 - Supplies and Options lists the supplies available for the DM400/DM500/DM550 and how to order them.
Appendix A - Glossary defines mailing terms used throughout this operator guide.
SV61964 Rev. A |
1-3 |

1 • Read This First
Other
Information
Publications
This section describes other sources of information available for the DM400/DM500/DM550.
Postage By Phone® Guide
This booklet details all the features of the Pitney Bowes Postage By Phone system.
Scale User Guide
If you purchase an attached scale, read this guide if you have questions about its operation.
On the Machine |
Quick Reference Cards (SV60884) |
|
Much of the information contained in the Operator guide, such as how to |
|
set postage, process mail, or clear stalls is summarized in the Quick Ref- |
|
erence Card Set. The cards are located in a slot in the Stacker module of |
|
the DM400/DM500/DM550. |
Help Key
This key is located on the IntelliLink Control Centre™. Press this to access the DM400/DM500/DM550 Help system. When you press the Help key, the help information that appears on the main screen of the control centre refers to the current operation being performed by your mailing system.
1-4 |
SV61964 Rev. A |
DM400, DM500, DM550 Operating Guide
What You Need to Know
Since your IntelliLink Control Centre is licensed by the Postal authority in your country, you must follow a few basic requirements.
Postal Requirements
•Mail must have the correct date and postage amount in the digital indicia.
•The digital indicia must bear the origin postal code.
•If you move to another location, call Postage By Phone®. Refer to the
Pitney Bowes Contact Information List for the number.
•Each time you refill your IntelliLink Control Centre through the modem, the Postage By Phone® computer automatically performs a postal inspection. If the IntelliLink Control Centre in your mailing machine has not detected a modem refill transaction at certain intervals, the message “Inspection Required” appears on the main screen of the IntelliLink Control Centre. (The system will then prompt you to connect to Pitney Bowes and perform an inspection.)
•The postage tape you use must meet post office specifications. To order approved supplies refer to Chapter 11, Supplies and Options
SV61964 Rev. A |
1-5 |

1 • Read This First
Safety
Requirements
WARNING! Follow normal safety precautions for all office equipment whenever using the DM400/DM500/DM550.
•Read all instructions before you attempt to operate the machine.
•Use the equipment only for its intended purpose.
•Place the machine near an easily accessible power outlet. Avoid using outlets controlled by wall switches or shared by other equipment.
•Plug the machine into a properly grounded power outlet. DO NOT remove the power cord’s ground pin and DO NOT use a ground adapter.
•Make sure the area in front of the power outlet is free of obstruction.
•Use the power cord wall plug as the primary means of disconnecting the machine from the AC supply.
•Turn the machine off with the switch on the left side and NOT from a power strip.
•Do not place lighted candles, cigarettes, cigars, etc. on the machine.
•DO NOT route the power cord over sharp edges or trap it between pieces of furniture. Make sure there is no strain on it.
•To reduce the risk of fire or electrical shock, DO NOT attempt to remove covers or disassemble the equipment. The housing encloses hazardous parts. If any components are dropped or otherwise damaged, report such damage to your Pitney Bowes customer service representative.
•Keep fingers, long hair, jewelry, neck ties, and loose clothing away from moving parts at all times.
•When removing jammed material, avoid using too much force to prevent personal injury and damaging equipment.
•To prevent overheating do not cover system vent openings.
•When lifting covers, wait for all parts to stop moving before placing hands near feeder path or printer.
•Do not remove covers as they enclose hazardous parts that should only be accessed by a Pitney Bowes Service Representative.
•Use only Pitney Bowes approved supplies, e.g., inks, tapes, and cleaners. Call our Supply Line in Canada. Refer to the Pitney Bowes Contact Information List for the number
•Always follow the specific occupational safety and health standards prescribed for your workplace.
1-6 |
SV61964 Rev. A |
DM400, DM500, DM550 Operating Guide
Safety Requirements continued
NOTE: The DM400/DM500/DM550 requires annual cleaning by a Pitney Bowes service representative. For continued safe operation, contact your local Pitney Bowes office for a scheduled cleaning.
If you use an AC adapter to power the IntelliLink Control Centre when it is off the mailing machine base:
•Use only the AC adapter designed specifically for the IntelliLink Control Centre on the back of the DM400/DM500/DM550. Third-party AC adapters may damage the IntelliLink Control Centre.
•To protect against electrical shock, plug the AC adapter into a properly grounded power outlet.
•Do not route the AC adapter cable over sharp edges or trap between furniture.
CAUTION! In case of an ink spill, leaking ink or excessive ink accumulation, immediately power down and disconnect the power cord from the wall plug and call your local Pitney Bowes office for a cleaning.
The IntelliLink Control Centre and its built-in Postal Security Device (PSD) connect directly to analog telephone lines. For your protection we urge you to follow basic safety precautions to reduce the risk of fire, electric shock and injury to persons, as well as the following:
•Never connect telephone wiring during a lightning storm.
•Disconnect the IntelliLink Control Centre telephone line during a lightning storm.
•Avoid using a telephone or equipment that connects to a telephone line during an electrical storm; there may be a remote risk of electrical shock from lightning.
•Never install telephone jacks in wet locations.
•Do not use this product near water, for example, near a bath tub, wash bowl, kitchen sink or laundry tub, in a wet basement or near a swimming pool.
•Never touch non-insulated telephone wires or terminals unless the telephone line has been disconnected at the network interface.
•Use caution when installing or modifying telephone lines.
•Do not use the telephone or equipment connected to the telephone line in the vicinity of a gas leak.
SV61964 Rev. A |
1-7 |

1 • Read This First
•Do not connect your IntelliLink Control Centre to a digital phone line. The device’s built-in modem is designed to work with an analog phone line only. (Your fax machine is usually connected to an analog phone line.) If you do not know if your line is digital, call your phone provider for verification.
•Disconnect the telephone cord from the wall before removing the IntelliLink Control Centre.
CAUTION! To reduce the risk of fire, use only 26 AWG telecommunication line cord either supplied with the machine or separately.
1-8 |
SV61964 Rev. A |

SV61964 Rev. A |
2Meet the DM400, DM500, DM550
Chapter Contents |
|
Introducing the DM400/DM500/DM550 |
|
Mailing System............................................... |
2-3 |
Features and Benefits ................................... |
2-3 |
Parts of the Mailing System .......................... |
2-6 |
Mailing System Exterior ................................ |
2-6 |
External Modem Connections ..................... |
2-10 |
Mailing System Interior ................................ |
2-12 |
The IntelliLink Control Centre ...................... |
2-14 |
The Main Screen ......................................... |
2-16 |
Specifications .............................................. |
2-17 |
SV60957 Rev2.-D1

2 • Meet the DM400, DM500, DM550
2-2 |
SV61964 Rev. A |

DM400, DM500, DM550 Operating Guide
Introducing
the Mailing
System
The DM400/DM500/DM550 mailing system is an easy-to-use digital mailing system you can tailor to satisfy the unique requirements of your organization. This system:
•Automatically feeds a stack of mail (DM500/DM550 only).
•Moistens and seals the envelope flaps.
•Imprints the correct postage amount.
•Stacks the finished mail.
Features and
Benefits
Postal Security
Device
The following section provides a summary of the main features and benefits of your DM400/DM500/DM550 mailing system.
The IntelliLink Control Cenre on your mailing system contains a Postal Security Device (PSD) that incorporates the latest technology. This technology eliminates the need to perform physical inspections thereby making the system easier and more convenient to use. The PSD contains the funds and performs all of the calculations necessary to print digital indicia that comply with the latest CPC standards.
SV61964 Rev. A |
2-3 |

2 • Meet the DM400, DM500, DM550
Easy-To-Use
IntelliLink
Control Centre™
Variety of
Communications
Options
The IntelliLink Control Centre is mounted on the top of your mailing machine and features a large easy-to-read graphic display, function keys and alpha and numeric keypads. A series of messages and options appear in the display to prompt you through all of the setup and mailing operations. You use the function keys and keypads to respond to the system prompts and select your options.
Your DM400/DM500/DM550 mailing system comes with communications ports for data communications with Pitney Bowes support services and for interfacing to external devices such as a personal computer, an optional scale, or other peripherals.
An internal modem with an external interface to analog telephone lines allows data communications with Pitney Bowes support services as well as external mail/parcel carriers.
Communications with Pitney Bowes provides the following benefits:
•Postage By Phone® refills
•Remote postage inspections
•Ability to download graphic images
•Ability to download rate change and software updates
Ability to Communicate With Other Applications
Your mailing machine has a peripheral communications USB port that allows you to connect to a personal computer (PC). Your system can communicate with the following software applications or application types running on a PC connected through the USB port:
•Data Exchange software
•AccuTrac™ / Budget Manager
•Ascent™
•Business Manager
•Package Manager
Ability To
Use Other
Pitney Bowes
Equipment
You can use the following Pitney Bowes equipment with your mailing system:
•U7P0 Power Stacker. This provides a larger area for stacking imprinted envelopes. Future option for DM550 only.
•J624 USB Printer – in US
•DMPR USB Printer – in Canada
2-4 |
SV61964 Rev. A |

DM400, DM500, DM550 Operating Guide
Accounting and
Reports
Advertisements
The optional accounting and reporting feature allows you to store postage costs for 25, 100 or 300 accounts. You can run reports on single or multiple accounts and limit access to the accounts by password protecting them. For more information on Accounting and Reports, refer to Chapter 7, Accounting and Chapter 8, Reports, in this guide.
Ads are messages you can include to the left of the digital indicia. You can order standard advertisements or customized ads by calling the Pitney Bowes Supply LineSM in Canada. Refer to the Pitney Bowes Contact Information List for the phone number. For information on ordering ads, refer to
Chapter 11,Supplies and Options in this guide.
When you order additional advertisements, you receive an art card which you insert into a slot on the side of the IntelliLink Control Centre. Once installed, you can select an advertisement when you run mail.
Optional Permits
Not Currently
Available
In Canada
You can print a permit on a piece of mail instead of a digital indicia. A permit is a postal mark containing a permit number that provides you with special processing or discount rates. You get the permit(s) from the post office and the permit artwork from Pitney Bowes. For information on ordering permits, refer to Chapter 11, Supplies and Options in this guide.
SV61964 Rev. A |
2-5 |

2 • Meet the DM400, DM500, DM550
Parts of the
Mailing System
Mailing System
Exterior
This section describes the parts of your DM400/DM500/DM550 Mailing System and includes:
•The Mailing System Exterior
•The Mailing System Interior
•The IntelliLink Control Centre
•The Main Screen
IntelliLink Control Centre - This contains the screen and keypad for communicating with the mailing machine and the built-in Postal Security Device (PSD).
Feed and Main Covers - Protect moving parts and prevent foreign objects from entering the machine. The feed cover protects the feeder and the main cover protects the transport area.
Thickness Adjustment Knob - You use this knob to adjust for the thicknesses of the envelopes you are feeding into your mailing system (DM500/ DM550 only).
Platform Scale - The 2kg integrated platform scale is an option.
On/Off switch - Turns the mailing system on and off. This is located on the lower left side of the feed Deck.
Feed Deck - This is where you load the mail.
Side Guide - Set this to reduce the skewing of pieces of mail as you feed them into the feeder (DM500 and DM550 only).
Transport Release Knob - You pull this knob out to drop the lower half of the transport deck if you need to clear a stall.
Art Card Slot - The art card plugs into the art card slot on the right side of the IntelliLink Control Centre (as shown in the photo on the right). The art card contains advertisements and inscriptions.
Quick Reference Card Set - These are easy reference cards containing instructions for performing operations like how to set postage, process mail, or clear stalls. The cards are located in a slot in the stacker module of your mailing system.
Stacker - This is where mail is deposited after the postage is applied to the piece of mail. It is located on the right side of the machine.
2-6 |
SV61964 Rev. A |
DM400, DM500, DM550 Operating Guide
The DM500/DM550 Mailing System
Thickness Adjustment Knob |
IntelliLink Control |
|
|
||
Side guide |
Centre |
|
Integrated Platform |
Main Cover |
|
Scale (Optional) |
||
|
||
|
Feed Cover |
Transport
Release Knob
On/Off Switch
Feed Deck
Right Side View of DM500/DM550 Mailing System
Art Card
Slot for Quick
Reference
Card Set
Stacker
SV61964 Rev. A |
2-7 |

2 • Meet the DM400, DM500, DM550
Mailing System |
The DM400 Mailing System |
Exterior |
|
continued
IntelliLink Control
Centre
Integrated Platform
Scale (Optional)
Main Cover
Feed Cover
Feed Deck
Transport
Release Knob
Connectors on the Back of the Mailing System Base
Dual External Device Ports - Two USB ports are located on the back, lower right side of the machine. These provide communications with external devices like a printer, an external scale, a PC or modem. If you have an external modem and you need to connect to one of these ports, refer to
External Modem Connections in this chapter.
Power Stacker Connector - Use this connector to attach an optional power stacker (DM550 only).
Serial Port Connector - One Pitney Bowes serial port connector. This is for Pitney Bowes use only.
Dual External |
|
|
|
|
|
|
|
|
|
Device USB |
|
|
|
Serial Port |
|
|
|
||
Ports |
|
|
|
For use by |
|
|
|
|
Pitney Bowes |
|
|
|
|
Only |
2-8 |
SV61964 Rev. A |

DM400, DM500, DM550 Operating Guide
Mailing System |
Connectors on the Back of the IntelliLink Control Centre |
Exterior |
|
continued |
Internal Analog Phone Line Connector - Future use. |
|
IntelliLink Control Centre AC Adapter Receptacle - The receptacle for |
|
the AC adapter is located on the back of the IntelliLink Control Centre. If |
|
you need to remove the control centre from the mailing system base and |
|
move it to an analog telephone line, you plug the AC adapter into this |
|
receptacle. When the control centre is connected to the mailing system |
|
base, access to the AC adapter is blocked as indicated by the dotted line |
|
in the picture below. |
|
External Modem USB Connector - The IntelliLink Control Centre has a |
|
connector for an external modem located on the right side of the IntelliLink |
|
Control Centre when viewed from the back. If your mailing system is not |
|
located near an analog phone line and you need to remove the IntelliLink |
|
Control Centre when you perform feature updates or add postage, you can |
|
connect the external modem to this connector. Refer to External Modem |
|
Connections in this chapter. |
FUTURE USE - Internal
Analog Phone Line
Connector
IntelliLink Control Centre |
External USB |
AC Adapter Receptacle |
Modem Con- |
|
nector |
SV61964 Rev. A |
2-9 |

2 • Meet the DM400, DM500, DM550
External
Modem
Connections
External Modem Connections - Back of the IntelliLink
Control Centre
This figure shows the connection between an external modem and the USB modem connector on the back of the IntelliLink Control Centre. This also shows the AC adapter plugged into the IntelliLink Control Centre after it has been removed from the mailing machine and moved to an analog phone line.
AC Adapter plugged into
IntelliLink Control Centre
|
External USB |
Telephone Cord for Analog |
Modem Cable |
|
|
Line |
|
(26 AWG or smaller) |
External Modem |
2-10 |
SV61964 Rev. A |
DM400, DM500, DM550 Operating Guide
External
Modem Connections continued
External Modem Connections - Back of the Mailing System Base
If you are using an external modem and there is an analog phone line near your mailing system, you should connect the modem to the upper-most USB connector on the back of the mailing system base as shown in the figure below.
External USB |
External |
|
Modem Cable |
||
Modem |
||
|
Telephone Cord for Analog Line (26 AWG or smaller)
Correct |
Incorrect |
SV61964 Rev. A |
2-11 |

2 • Meet the DM400, DM500, DM550
The Mailing
System Interior
Thickness Adjustment Knob (DM500/DM550 only) - Use this to adjust for the thicknesses of the envelopes. You do not have to lift the cover to adjust the knob.
For thicker pieces of mail (3/8” to 5/8”), or mail containing several inserts, use the thick mail setting. For mail containing only single inserts, or for postcards, use the normal mail setting. Refer to the figure on the right.
Thick mail setting
Normal mail setting
Top Release Stall Lever/Lower Release Lever - Lift these to clear stalls on the Feed deck.
Pressure-Sensitive Postage Tape - The DM400/DM500/DM550 uses this pressure sensitive tape to print reports and digital indicia for packages or pieces of mail that are outside the limits specified for mailing materials. See Specifications: Section ll, in this chapter for details.
Feed Deck - This feeds the envelopes to the printer.
E-Z Seal Bottle - This contains the E-Z Seal® solution used for moistening and sealing envelopes.
Interior of DM500/DM550 Mailing System
(Under the Feed Cover)
E-Z Seal® Bottle |
Postage Tape |
Top Release
Stall Lever
Thickness
Adjustment Knob
Lower
Release
Lever
Feed Deck
2-12 |
SV61964 Rev. A |

DM400, DM500, DM550 Operating Guide
The Mailing System Interior continued
Ink Cartridge - This contains the ink used to create the digital indicia. Printhead - This produces the digital indicia.
Printhead
Ink Cartridge
Interior of DM400/DM500/DM550 Mailing System
(Under the Main Cover)
SV61964 Rev. A |
2-13 |

2 • Meet the DM400, DM500, DM550
The IntelliLink
Control
Centre
1.Five Screen Keys - The five keys directly to the left of the display screen allow you to select options displayed on the screen.
2.Lock Button - If no account is selected, this locks the IntelliLink Control Centre.
3.Normal Preset Key - Returns you to the factory default settings.
4.Mode Key - Press to choose from a variety of mail processing modes.
5.Class Key - Enables you to select the correct class for your mailing (e.g., Domestic Standard Lettermail, Priority Courier, Xpresspost International.).
6.Seal Key - Allows you to moisten and seal envelopes, with or without applying postage. You can also choose not to seal the envelopes at all.
7.Accounts Key - Press to set up and edit accounts.
8.Custom Preset Key - Use this to choose frequently-used system key settings for running different jobs.
9.Menu Key - Press to view the following settings and options:
•Meter Stamp Options
•Set Up
•Zero Scale
•Rate Details
•Adjust Display Contrast
•Maintenance
•Turn Features On
•Volume Control
•Currency Add
•Display Imperial Weight
10. Funds Key - Allows you to obtain the following information:
•Funds Available (in the IntelliLink Control Centre)
•Funds Used
•Total Pieces (of mail processed by your mail system)
11.Reports Key - Offers a selection of different types of reports to run.
12.Help Key - Gives detailed information about a screen you are viewing.
13.Numeric Keys - Press numbered keys to manually enter weight, postage (Corrections, Statement of Mailing / Manifests), or creating names for accounting departments.
2-14 |
SV61964 Rev. A |

DM400, DM500, DM550 Operating Guide
The IntelliLink Control Centre continued
14.Enter Key - Press to enter the information you have selected for the mailing system.
15.Arrow Keys - Moves you to new menus, or scrolls menus and selects options.
16.Start Key - Begins processing mail with the options you have selected.
17.Tape Key - Allows you to print postage tapes for packages or pieces of mail that are outside the limits specified for mailing materials. See Specifications: Section ll, in this chapter for details.
18.Stop Key - Ends a mail or tape processing job in progress.
19.Clear Key - Allows you to clear an entry, or takes you back to a previous screen, or allows you to enter a value between 1 - 100 to print multiple tapes for the value of postage displayed on the main menu.
20.Alpha Keyboard - Use to enter accounts and other setup information. This keyboard is under a cover that opens for access.
Attached Scale
1

 Account: Engineering
Class: |
Dom Standard Ltr |
8
9
Loc k |
|
|
|
|
|
|
|
|
|
|
|
|
|
|
2 |
|
0.000kg |
|
|
|
|
|
|
|
|
|
|
10 |
|
|
|
|
|
|
|
|
|
|
|
|
|
|||
Tâche nor male |
Tâches sur mesure |
|
|
|
|
|
|
|
|
|
|
15 |
||
Normal Preset |
|
Custom Presets |
|
|
|
|
|
|
|
|
|
|
||
3 |
|
|
|
1 |
|
2 |
|
|
3 |
|
|
|
|
11 |
Mode |
|
Menu |
|
|
|
|
|
|
|
|
|
|
|
|
|
|
|
|
|
|
|
|
|
|
|
|
|
||
4 |
|
|
|
4 |
|
5 |
|
|
6 |
|
|
|
Star t / En marche |
|
|
|
|
|
|
|
|
|
|
|
16 |
||||
|
|
|
|
|
|
|
|
|
|
|
|
|
||
Class / Classe |
|
Funds / F onds |
|
|
|
|
|
|
|
|
|
|
||
5 |
|
|
|
7 |
|
8 |
|
|
9 |
|
|
|
|
|
Seal / Cacheter |
Repor ts / Rappor ts |
|
|
|
|
|
|
Tape / Bande |
|
|||||
|
|
|
|
|
|
|
|
|
|
17 |
||||
6 |
|
|
Clear / Ann uler |
|
|
|
|
|
Enter / Entr ée |
|
|
|||
|
|
|
|
|
|
|
|
|
|
|
|
|||
Accounts / Comptes |
|
Help / Aide |
|
C |
|
0 |
|
|
• |
|
|
|
Stop / Arr êt |
18 |
7 |
|
? |
|
|
|
|
|
|
|
|
|
|
|
|
|
|
|
|
|
|
|
|
|
|
|
|
|
|
|
12 |
|
|
|
|
|
|
|
|
|
|
|
|
|
14 |
Q |
|
W |
E |
R |
T |
|
Y |
|
U |
I |
O |
: |
P |
|
19 |
# |
$ |
% |
- |
|
_ |
|
/ |
! |
|
@ |
|
13 |
|
|
|
|
|
|
|
|
H |
J |
|
K |
L |
|
||
A |
S |
D |
F |
|
G |
, |
|
|
|
|||||
|
|
* |
( |
) |
+ |
|
|
' |
? |
|
|
|
|
|
|
|
|
|
|
|
|
|
|
||||||
|
|
Z |
X |
C |
V |
|
B |
|
N |
M |
|
|
|
|
20 |
|
Shift |
|
|
|
Space |
|
|
|
|
Symbol |
|
|
|
SV61964 Rev. A |
|
|
|
|
|
|
|
|
|
|
|
|
|
2-15 |
2 • Meet the DM400, DM500, DM550
The Main
Screen
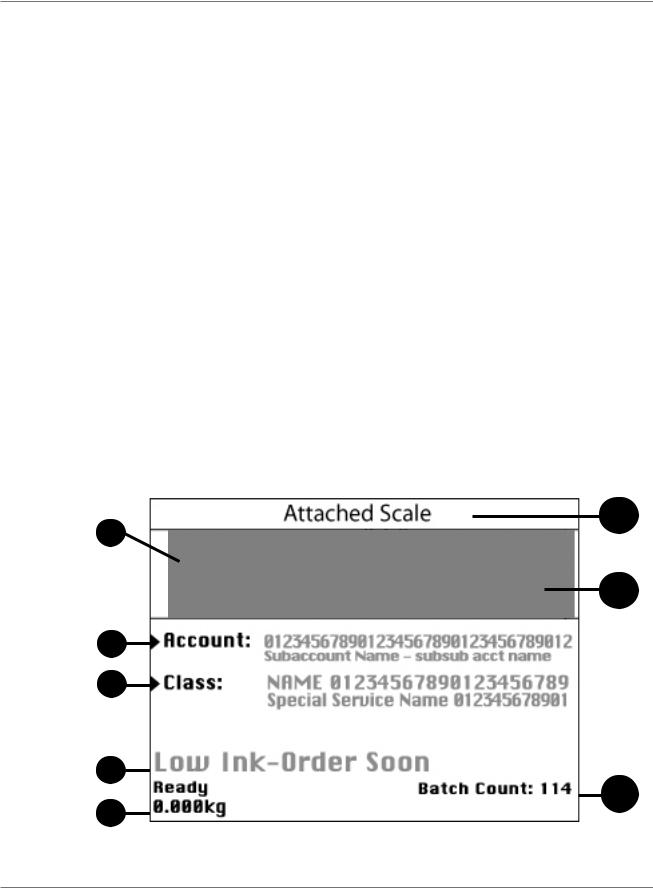
The content of the main screen depends upon the current mode of the machine. Main screens are the only screens that contain a digital indicia replica area and a main status area.
The main screen enters a sleep mode after a certain period of inactivity. Pressing any key wakes up the system and shows the last screen on the display, or the one corresponding to the Normal Preset settings (see Define Custom Presets in Chapter 5 in this guide for more information).
1.Advertisement Display - The optional message to be printed on the envelopes or tape (if selected).
2.Account - The account number or name charged with postage.
3.Class - The class you selected for the piece of mail.
4.Main Status Area - Important information such as warnings or help or navigation tips. For example, if you select a class, a message appears in this area.
5.Weight Display Area - The weight of the piece of mail.
6.Mode - The mode in which the piece of mail will be processed, or what the next required action will be.
7.Digital Indicia - The official postal indicia printed on the envelope or tape.
8.Batch Count - The number of pieces of mail run in a job.
6
1
7
2
3
4
8
5
2-16 |
SV61964 Rev. A |
Loading...