


 Loading...
DM100i / DM200L Digital Mailing Systems
Operator Guide
SV62214 Rev. A 09/08
©2008 Pitney Bowes Inc. All rights reserved. This book may not be reproduced in whole or in part in any fashion or stored in a retrieval system of any type or transmitted by any means, electronically or mechanically, without the express, written permission of Pitney Bowes.
We have made every reasonable effort to ensure the accuracy and usefulness of this manual; however, we cannot assume responsibility for errors or omissions or liability for the misuse or misapplication of our products.
Due to our continuing program of product improvement, equipment and material specifications as well as performance features are subject to change without notice. Your digital mailing system may not have some of the features described in this book. Available features vary, depending on the model of your mailing system, installed options, system software level, and how your system is set up.
E-Z Seal, Postage By Phone, Purchase Power, and PC Meter Con- |
|
nect are trademarks or registered trademarks of Pitney Bowes Inc. |
|
ENERGY STAR is a registered trademark of the United States Envi- |
|
ronmental Protection Agency. USPS is a registered trademark of the |
|
United States Postal Service. Windows is a trademark of Microsoft |
|
Corporation. |
i |
FCC Part 15 Compliance
NOTE: This equipment has been tested and found to comply with the limits for a Class B digital device, pursuant to part 15 of the FCC rules. These limits are designed to provide reasonable protection against interference in a residential installation. This equipment generates, uses, and can radiate radio frequency energy and, if not installed and used in accordance with the instruction manual, may cause interference to radio communications. However, there is no guarantee that interference will not occur in a particular installation.
If this equipment does cause interference to radio or television reception, which can be determined by turning the equipment off and on, the user is encouraged to try to correct the interference by one
or more of the following measures:
•Reorient or relocate the receiving antenna.
•Increase the separation between the equipment and receiver.
•Connect the equipment into an outlet on a circuit different from that to which the receiver is connected.
•Consult the dealer or an experienced radio/TV technician for help.
CAUTION: Changes or modifications to this equipment not expressly approved by the party responsible for compliance could void the user’s authority to operate the equipment.
A shielded USB cable be must used with this equipment to ensure compliance with the limits. Use of a unshielded cable is prohibited.
FCC Part 68 Compliance of the P700/P7L1 Modem
This equipment complies with Part 68 of the FCC rules and the requirements adopted by the ACTA. On the back of this equipment is a label that contains, among other information, a product identifier in the format US:AAAEQ##TXXXX. If requested, this number must be provided to the telephone company.
This equipment is designed to be connected to a Facility Interface Code 02LS2 network with RJ11C network interface.
A plug and jack used to connect this equipment to the premises wiring and telephone network must comply with the applicable FCC Part 68 rules and requirements adopted by the ACTA.
ii
The ringer equivalence number (REN) is used to determine the number of devices that may be connected to a telephone line. Excessive RENs on a telephone line may result in the devices not ringing in response to an incoming call. In most but not all areas, the sum of RENs should not exceed five (5.0). To be certain of the
number of devices that may be connected to a line, as determined by the total RENs, contact the local telephone company. The REN for this product is part of the product identifier that has the format US: AAAEQ##TXXXX. The digits represented by ## are the REN without a decimal point (for example 03 is a REN of 0.3).
If this mailing machine causes harm to the telephone network, the telephone company will notify you in advance that temporary discontinuance of service may be required. But if advance notice isn’t practical, the telephone company will notify you as soon as possible. Also, you will be advised of your right to file a complaint with the FCC if you believe it is necessary.
The telephone company may make changes in its facilities, equipment, operations, or procedures that could affect the operation of the equipment. If this happens the telephone company will provide advance notice in order for you to make necessary modifications to maintain uninterrupted service.
If trouble is experienced with this equipment, please contact Pitney Bowes (see page v) for phone contact for repair or warranty information. If the equipment is causing harm to the telephone network, the telephone company may request that you disconnect the equipment until the problem is resolved. This equipment is not intended to be repaired by the customer (user).
Connection to party-line service is subject to state tariffs. Contact the state public utility commission, public service commission, or corporation commission for information.
If the installation site has specially wired alarm equipment connected to the telephone line, ensure the installation of this mailing machine does not disable the alarm equipment. If you have questions about what will disable alarm equipment, consult your telephone company or a qualified installer.
iii
For California Customers Only
The battery in this product contains perchlorate material. California requires perchlorate containing products to be accompanied by the following notice: Perchlorate Material - special handling may apply, Go to: www.dtsc.ca.gov/hazardouswaste/perchlorate
Servicing
This equipment is not intended to be serviceable. Please refer to the warranty information if problems occur. Failed units will be withdrawn by Pitney Bowes service engineers and returned to the U.S. Service Center. For reference purposes, the U.S. Service Center contact address is: Pitney Bowes Inc., 1 Elmcroft Road, Stamford, CT, 069260700.
iv

Pitney Bowes Contact List
Machine Identification
Product Name: DM100i Digital Mailing System
Model Number: P700
OR
Product Name: DM200L Digital Mailing System
Model Number: P7L1
Resources
For support information:
DM100i: www.pitneyworks.com/DM100/
DM200L: www.pitneyworks.com/DM200/
To order PB supplies and accessories, go to: www.pb.com and click on Supplies
OR
order by phone at 1-800-243-7824 (M-F 8:00 AM to 8:00 PM E.T.)
To view a list of your equipment, pay invoices online, or you have questions about your Postage-by-Phone account go to: www.pb.com and click on My Account
For questions about your account or the product, call the Pitney Bowes Customer Care Center at 1-800-522-0020.
To contact the United Stated Postal Service® (USPS), visit: www.USPS.com
v

Table of Contents
1 • Introduction
What's in this Guide ................................................................. |
1-1 |
About Your Digital Mailing System ........................................... |
1-2 |
Postal Requirements................................................................ |
1-3 |
Sections of the Meter Stamp.................................................... |
1-4 |
What is IntelliLink™? ............................................................... |
1-4 |
About PC Meter Connect™ ...................................................... |
1-5 |
Other Sources of Information................................................... |
1-5 |
Specifications........................................................................... |
1-6 |
Equipment ......................................................................... |
1-6 |
Material ............................................................................. |
1-7 |
Important Safety Notes ............................................................ |
1-8 |
Important Telephone Safety Instructions.................................. |
1-9 |
2 • Getting to Know Your System
Parts of the Machine ............................................................... |
2-2 |
Control Panel .......................................................................... |
2-4 |
Connections on Back of Machine ............................................ |
2-6 |
PC Meter Connect™................................................................. |
2-7 |
3 • Running Mail
Home Screen ........................................................................... |
3-1 |
Checking Funds (Postage) Availability in Machine .................. |
3-1 |
Applying Postage ..................................................................... |
3-2 |
Keying In the Postage Directly .......................................... |
3-3 |
Entering Weight Manually ................................................. |
3-4 |
Using the Weighing Platform (Scale)................................. |
3-5 |
Using Differential Weighing ............................................... |
3-6 |
Selecting an Account to Track Postage .................................. |
3-8 |
Using the Batch Count Feature ............................................... |
3-9 |
Viewing (Checking) the Batch Count................................. |
3-9 |
Printing the Batch Count.................................................. |
3-10 |
Clearing the Batch Count ................................................ |
3-10 |
vii |
SV62214 Rev. A |

Table of Contents
4 • Printing Options
Printing Options ....................................................................... |
4-1 |
Sections of the Meter Stamp.................................................... |
4-1 |
Printing a $0.00 Meter Stamp .................................................. |
4-2 |
Auto-Advance of Printed Date for the Meter Stamp................. |
4-2 |
Manually Changing Printed Date for the Meter Stamp ............ |
4-2 |
Bypass All Printing and Seal the Envelope Only...................... |
4-3 |
Omitting/Restoring Day or Date on the Meter Stamp .............. |
4-4 |
Adding/Removing a Postal Inscription to Meter Stamp .............. |
4-5 |
Adding/Removing an Envelope Ad to the Meter Stamp........... |
4-6 |
Printing the Date and Time Only (no meter stamp).................. |
4-7 |
Printing Ad, Date, and Time Only (no meter stamp) ................ |
4-8 |
Adjusting Horizontal Print Position of Meter Stamp ................. |
4-9 |
5 • Normal and Custom Presets
What is a Preset?..................................................................... |
5-1 |
Why Should I Use Presets? ..................................................... |
5-1 |
Why Should I Always Include a USPS® “Class” in my Preset? 5-1 |
|
Normal Preset .......................................................................... |
5-2 |
Viewing (and Selecting) the Normal Preset ...................... |
5-3 |
Defining New Values for the Normal Preset ...................... |
5-4 |
Custom Presets ....................................................................... |
5-5 |
Selecting a Custom Preset................................................ |
5-5 |
Defining a New Custom Preset ......................................... |
5-6 |
Viewing (and Selecting) a Custom Preset ........................ |
5-7 |
Editing a Custom Preset Name ......................................... |
5-8 |
Deleting a Custom Preset.................................................. |
5-8 |
6 • Adding Postage/Connecting to Data Center
Postage and Your Machine ...................................................... |
6-1 |
Establishing Communications Between Your Machine and the |
|
Pitney Bowes Data Center....................................................... |
6-1 |
Downloads from the Data Center to Your Machine ..................... |
6-2 |
Using PC Meter Connect™ to Establish Communications with the
Data Center (Preferred Method) .............................................. |
6-5 |
Using Analog Phone Line to Establish Communications with the
Data Center (Alternate Method)............................................... |
6-6 |
viii |
SV62214 Rev. A |

Table of Contents
Checking Funds (Postage) Availability in Machine .................. |
6-7 |
Checking Your Postage by Phone® Account Balance............. |
6-8 |
Adding Postage........................................................................ |
6-9 |
Printing a Funds (Postage) Report ......................................... |
6-11 |
Downloading Files or Updating System ................................. |
6-12 |
7 • System Options
System Options........................................................................ |
7-1 |
Basic Options........................................................................... |
7-3 |
Advancing the Date on the Machine.................................. |
7-3 |
Setting the Machine to Today's Date ................................. |
7-3 |
Adjusting the Contrast of the Display ................................ |
7-3 |
Turning Features On and Off............................................. |
7-4 |
Setting the Date, Time, and Timeouts ............................... |
7-5 |
Setting Postage Values (Funds Warnings)........................ |
7-8 |
Changing the Lock Codes and Passwords........................ |
7-9 |
Setting Scale Options ...................................................... |
7-11 |
Connecting to Data Center.............................................. |
7-15 |
Advanced Options.................................................................. |
7-20 |
Intra BMC ZIPs ................................................................ |
7-21 |
Change Language........................................................... |
7-22 |
Meter Withdrawal (Withdrawing Postage Funds) ............ |
7-22 |
Run Install Mode.............................................................. |
7-24 |
8 • Departmental Accounting
Overview of the Accounting Feature ........................................ |
8-1 |
Activating Accounting and Setting Up Your Accounts .............. |
8-2 |
Turning On Accounting............................................................. |
8-4 |
Turning Off Accounting............................................................. |
8-5 |
Turning On Account Passwords............................................... |
8-6 |
Turning Off Account Passwords............................................... |
8-7 |
Creating an Account................................................................. |
8-8 |
Editing Account Names and Passwords .................................. |
8-9 |
SV62214 Rev. A |
ix |

Table of Contents
Selecting an Account .............................................................. |
8-11 |
Displaying Account Totals ...................................................... |
8-12 |
Printing a Single Account Report ........................................... |
8-13 |
Printing a Multi-Account Summary Report............................. |
8-13 |
Clearing an Account............................................................... |
8-14 |
Clearing all Accounts ............................................................. |
8-15 |
Deleting an Account ............................................................... |
8-16 |
9 • Reports
Overview of Reports ................................................................ |
9-1 |
Register Report (Funds Report)............................................... |
9-2 |
Add Postage Report................................................................. |
9-3 |
Single Accounts Report (Departmental Accounting) ................ |
9-4 |
Multi-Account Summary Report (Departmental Accounting) ... |
9-4 |
Special Services Report........................................................... |
9-5 |
Rates Summary Report ........................................................... |
9-6 |
Configuration Report................................................................ |
9-7 |
Error Report ............................................................................. |
9-8 |
10 • Maintenance
Messages Indicating Ink Cartridge Replacement .................. |
10-1 |
Printing a $0.00 Meter Stamp ................................................ |
10-1 |
Replacing the Ink Cartridge ................................................... |
10-2 |
Filling the Moistener............................................................... |
10-4 |
Maintaining the Moistener...................................................... |
10-5 |
Removing and Cleaning the Moistener Brush................. |
10-5 |
Removing/Cleaning the Moistener Wick and Holder....... |
10-7 |
Replacing the Print Head ....................................................... |
10-8 |
Running Print Tests.............................................................. |
10-12 |
Test Print........................................................................ |
10-13 |
Purge ............................................................................. |
10-14 |
Replacement of Print Head or Cartridge ....................... |
10-15 |
x |
SV62214 Rev. A |
Table of Contents
11 • Troubleshooting
Getting Help ............................................................................ |
11-1 |
Messages on LCD Display...................................................... |
11-1 |
Blank Display .......................................................................... |
11-1 |
Display Problems (display hard to read) ................................. |
11-2 |
Feeding Problems (stalled envelopes) ................................... |
11-2 |
Printing Problems.................................................................... |
11-3 |
Moistening Problems (envelopes don't seal) .......................... |
11-4 |
Problems Connecting to the Data Center via Analog Line...... |
11-5 |
Problems Connecting to the Data Center via the PC.............. |
11-6 |
Problems Refilling Postage via the PC ................................... |
11-8 |
Accidentally Printing the Wrong Postage................................ |
11-9 |
Viewing System Configuration Levels................................... |
11-10 |
12 • Supplies and Options
Supplies ................................................................................. |
12-1 |
Options................................................................................... |
12-1 |
Appendix A • How to Enter Text
Appendix B • Glossary
Index
SV62214 Rev. A |
xi |

Table of Contents
This page was put in as a placeholder only. This allows you to print this entire guide in a duplex (double-sided) mode while keeping the proper page positions.
xii |
SV62214 Rev. A |

1 • Introduction
What's in this Guide
Section |
Description |
Chapter 1 |
Describes the key features of your mailing system and |
Introduction |
provides material and equipment specifications. It also |
|
includes important safety notes. |
Chapter 2 |
Explains the purpose and shows the location of each |
Getting to Know |
control and machine feature. Please read this section |
Your System |
carefully. It provides a foundation for the instructions in |
|
later sections of this book. |
Chapter 3 |
Explains how to process mail. The operations covered |
Running Mail |
here are the ones you'll use most often. |
Chapter 4 |
Explains your printing options for incoming and outgoing |
Printing Options |
mail. |
Chapter 5 |
Explains the Normal and Custom Presets feature for |
Normal and |
saving commonly-used settings on your machine |
Custom Presets |
|
Chapter 6 |
Explains how to connect your system to the Pitney |
Adding Postage |
Bowes Data Center so you can add postage and down- |
/Connecting to |
load the latest postal rates and software to your meter |
Data Center |
|
Chapter 7 |
Provides step-by-step instructions for customizing sys- |
System Options |
tem operation to suit your own needs |
Chapter 8 |
Provides instructions for setting up the optional account- |
Departmental |
ing feature. |
Accounting |
|
Chapter 9 |
Provides you with a description of reports you can print |
Reports |
on your system |
Chapter 10 |
Explains how to check print quality and take care of the |
Maintenance |
ink cartridge and moistener. |
Chapter 11 |
Explains how to fix common problems and tells you |
Troubleshooting |
what error messages mean. |
Chapter 12 |
Lists the supplies available for your mailing system and |
Supplies and |
explains how to order them. It also describes options that |
Options |
add to the versatility of your mailing system and enhances |
|
the productivity of your mailroom. |
Appendix A |
Explains how you enter text for postal codes, presets |
How to Enter |
and special characters. |
Text |
|
Appendix B |
Explains terms unique to the world of mailing |
Glossary |
|
Index |
Helps you quickly locate topics within the book |
|
|
1-1 |
SV62214 Rev. A |

1 • Introduction
About Your Digital Mailing System
Your digital mailing system's advanced features include:
•Space-saving, compact footprint
•ENERGY STAR® compliant design lowers operating costs and helps preserve the environment
•Large, easy-to-read display shows system status and prompts you through setup operations
•Semi-automatic envelope feeding, transport, and auto-eject
•Automatic date advance
•Keyboard-selectable envelope ads and inscriptions
•Convenient, one-button postage-adding via Postage By Phone®
•Stacker neatly stacks finished envelopes
•Ink jet printer provides clear, crisp imprints
•Integrated weighing platform weighs mail pieces (optional)
•Integrated rating feature calculates correct postage
•Date and time stamp for use on incoming mail or on sensitive documents
•Optional accounting feature tracks postage costs by department
•Password protection limits access to authorized personnel
•Full report printing capability provides hard-copy records of your postage transactions
•In-line moistener wets and seals envelopes (optional)
•Ability to electronically download postage and software updates quickly to your machine.
1-2 |
SV62214 Rev. A |

1 • Introduction
Postal Requirements
The meter on your mailing machine is licensed by the United States Postal Service (USPS®) and you must follow some basic requirements.
•Mail must have the correct date and postage amount in the meter stamp (indicia).
•Metered mail must bear the ZIP Code location of the post office where the postage meter (mailing machine) is registered.
•If you move to another ZIP Code location, you must update the ZIP Code by calling our Customer Care Center (see page v).
•The USPS® requires a postal inspection of your machine every 120 days. This postal inspection requirement can be automatically met by connecting to the Pitney Bowes Data Center to check your Postage By Phone® meter payment account balance or to add postage to your meter.
iNOTE: If the interval between inspections is more than 90 days, your machine's display prompts "Inspection Due." If the interval between inspections is more than 120 days, the display prompts "Inspection Required." At this point, you won't be able to use your mailing system until your system is inspected. In either case, to satisfy the postal inspection requirement, simply:
•Follow the prompts on the "Inspection Due" screen or
•Press Add Postage and select "Check PBP Account Balance" (which will not decrease or change the funds in your account).
•Tape sheets are used to apply postage on mail pieces that are too thick or too large to run through your machine. These sheets must conform to postal specifications. For best performance, we recommend Pitney Bowes tape sheets (see Chapter 12, Supplies and page v for ordering information).
SV62214 Rev. A |
1-3 |

1 • Introduction
Sections of the Meter Stamp
These are the sections that make up the meter stamp printed on your mail piece.
Inscription* |
Meter Serial |
Postage Value |
|||||
|
|
Number |
Applied |
||||
|
|
||||||
|
|
|
|
|
|
|
|
|
|
|
|
|
|
|
|
|
|
|
|
|
|
|
|
|
|
|
|
|
|
|
|
|
|
|
|
|
|
|
|
|
|
|
|
|
|
|
|
|
|
|
|
|
|
|
|
|
|
|
|
Envelope Ad |
Datamatrix |
ZIP Code |
|
|
|
|
|
||||
|
Barcode |
Origination Date |
|||
Optional Printing |
Required Printing |
|
*required only for certain classes of mail |
What is IntelliLink™?
Your mailing system takes full advantage of IntelliLink™, your digital gateway to an entire suite of services and information that can move your mail more efficiently and enhance your business performance. IntelliLink™ technology gives you the ability to:
Add postage funds conveniently
You can add funds to your machine electronically via Pitney Bowes Postage By Phone® (requires analog phone line or a Windows PC with Internet connection).
Download Postal Rate Updates
The latest postal rates can be downloaded precisely when you need them.
Use USPS® Confirmation Services
You can take advantage of special services offered by the USPS® such as Delivery Confirmation, Signature Confirmation, and Certified Mail if you have this optional feature.
Add Features On Demand
You can easily download envelope ads, postal inscriptions, and optional features such as departmental accounting.
Keep Your System Current
Electronic software download capability means you'll always have the latest version of your machine's operating system.
1-4 |
SV62214 Rev. A |

1 • Introduction
About PC Meter Connect™
PC Meter Connect™ is software that allows you to connect your machine to the Pitney Bowes Data Center via a Windows PC with an Internet connection. You can then perform postage refills and meter updates quickly and conveniently, normally much quicker than using the analog phone line option of the system.
The PC Meter Connect™ software installation CD and a USB cable are included in your starter kit. You simply load the software into a PC with an Internet connection (broadband, DSL, network, etc.) and connect the USB cable between your meter and a Windows PC. See
Section 2 - Getting to Know Your System for more information on using PC Meter Connect™.
iNOTE: If you cannot use the CD provided, go to the support web site for your model (as listed on page v). Navigate to the link to download the PC Meter Connect™ software to your PC to install.
Before installing the PC Meter Connect™ software, make sure your PC meets these minimum requirements:
•Windows Vista, Windows XP, or Windows 2000 operating systems with the latest service packs
•1.2 GHz processor
•512 MB of RAM
•administrative rights to install software
•an Internet connection
Other Sources of Information
Other sources of information for your machine include:
•The DM100i/DM200L Quick Reference Guide has condensed versions of many of the topics covered in this book. You can normally store this handy guide in the front pull-out tray of the DM200L or in the slot in the stacker tray of either the DM100i or DM200L.
•The Pitney Bowes Contact List on page v, which provides helpful websites and phone numbers.
SV62214 Rev. A |
1-5 |

1 • Introduction
Specifications
Equipment
Size |
DM100i |
|
Base Model 8.5" (215 mm) H x 13.6" (345 mm) W |
|
x 15.4" (390 mm) D |
|
With Scale 8.8" (224 mm) H x 13.6" (345 mm) W |
|
x 15.4" (390 mm) D |
|
With Scale and Moistener 8.8" (224 mm) H x 28.5" |
|
(724 mm) W x 15.4" (390 mm) D |
|
DM200L |
|
10.75" (273 mm) H x 14.75" (375 mm) W x 16.25" |
|
(215 mm) D |
Weight |
DM100i 15 lbs. (6.8 kg) |
|
DM200L 17.5 lbs. (8 kg) |
Power Requirements |
100-240 VAC, 50/60Hz. .65-3A |
Ports |
1 USB; 1 RJ-11. |
Operating |
40°F (4°C) to 108°F (42°C) |
Temperature |
|
LCD Display |
4 lines, 20 characters long |
Throughput |
DM100i Up to 30 letters per minute |
|
DM200L Up to 40 letters per minute |
|
Actual throughput will vary, depending on the mate- |
|
rial used, machine condition, use of moistener, etc. |
Print Resolution |
600 x 400 dpi |
Print Image Area |
At least 1" (25.4 mm) x 6-5/8" (170 mm) |
Ink Cartridge Life |
Up to 3,000 impressions without an envelope ad. |
|
Actual ink yields vary with usage, graphics printed |
|
and environmental conditions. |
Tape Sheets |
Self-adhesive type, dual tape sheets (Pitney Bowes |
|
Part Numbers 612-9 and 620-9) for use on mail |
|
pieces that are too thick or too large to run through |
|
your machine. |
Internal Envelope Ad |
Up to 20 |
Storage |
|
Internal Postal |
Up to 20 |
Inscription Storage |
|
Maximum Imprint |
$99.999 |
1-6 |
SV62214 Rev. A |
|
|
1 • Introduction |
|
Specifications |
|
|
|
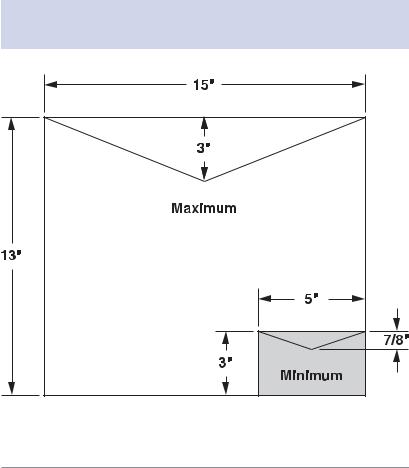
Material (see figure below) |
|
|
|
|
|
|
|
Minimum Size |
|
5" x 3" (127 mm x 76 mm) |
|
Maximum Size |
|
15" x 13" (381 x 330 mm) |
|
Minimum Flap Depth |
|
7/8" (22 mm) |
|
Maximum Flap Depth |
|
3" (76 mm) |
|
Minimum Thickness |
|
0.007" (0.18 mm) |
|
Maximum Thickness |
|
3/8" (9.5 mm) |
|
Maximum Stack Height for Mail |
|
2.5" (60 mm) |
|
IMPORTANT: For best results, always make sure your material conforms to these specifications.
SV62214 Rev. A |
1-7 |

1 • Introduction
Important Safety Notes
Follow the normal safety precautions for all office equipment.
•Please read all instructions before you attempt to operate the system. Save these instructions for future use.
•Use the power cord supplied with the machine and plug it into a properly grounded wall outlet that's located near the machine and easily accessible. Failure to properly ground the machine can result in severe personal injury and/or fire.
•The power cord wall plug is the primary means of disconnecting the machine from the AC supply. The unit is on whenever it is plugged into a live receptacle, even though the operator display may be blank.
•Place the mailing machine base close to an easily accessible wall outlet. DO NOT use a wall outlet controlled by a wall switch or one that is shared with other equipment.
•Do not use an adapter plug on the line cord or wall outlet.
•Do not remove the ground pin from the line cord.
•Make sure the area in front of the wall outlet into which the machine is plugged is free from obstruction.
•DO NOT route the power cord over sharp edges or trap it between pieces of furniture. Make sure there is no strain on the power cord.
•To reduce the risk of fire or electrical shock, DO NOT attempt to remove covers or disassemble the control panel or its base. The cabinet encloses hazardous parts. If you should drop or otherwise damage the unit, call Pitney Bowes.
•Keep fingers, long hair, jewelry and loose clothing away from moving parts at all times.
•Keep your hands out of the ink cartridge refill holder.
•Avoid touching moving parts or materials while the machine is in use. Before clearing a stall (jam), be sure machine mechanisms come to a complete stop.
•When removing stalled material, avoid using too much force to protect against minor personal injury and damage to the equipment.
•Use the equipment only for its intended purpose.
•Always follow the specific occupational safety and health standards prescribed for your workplace.
1-8 |
SV62214 Rev. A |
1 • Introduction
Important Safety Notes
•Do not place lighted candles, cigarettes, cigars, etc., on the mailing machine.
•To prevent overheating, do not cover the vent openings.
•Use only Pitney Bowes approved ink, tape strips, and cleaners. If you need Material Safety Data Sheets on the supplies for OSHA requirements, please contact your local Pitney Bowes representative.
CAUTION: In case of an ink spill, leaking ink or excessive ink accumulation, immediately disconnect the power cord from the wall plug and contact Pitney Bowes. See the page v for contact information.
Important Telephone Safety Instructions
The machine connects directly to analog telephone lines. For your protection, basic safety precautions should always be followed to reduce the risk of fire, electric shock, and injury to persons. These safety precautions include:
WARNING: To reduce the risk of fire, use only the 26 AWG telecommunication line cord supplied with your mailing machine.
•Never install telephone wiring during a lightning storm.
•Disconnect the system's telephone line during a lightning storm.
•Avoid using a telephone or equipment that connects to a telephone line during an electrical storm; there may be a remote risk of electrical shock from lightning.
•Do not use the telephone or equipment connected to the telephone to report a gas leak if the telephone is in the vicinity of the leak.
•Never install telephone jacks in wet locations.
•Do not use this product near water, for example, near a bath tub, wash bowl, kitchen sink or laundry tub, in a wet basement or near a swimming pool.
•Never touch uninsulated telephone wires or terminals unless the telephone line has been disconnected at the network interface.
SV62214 Rev. A |
1-9 |

1 • Introduction
This page was put in as a placeholder only. This allows you to print this entire guide in a duplex (double-sided) mode while keeping the proper page positions.
1-10 |
SV62214 Rev. A |

2 • Getting to Know Your System
Parts of the Machine
|
3 |
1 |
2 |
9 |
4 |
|
5 |
8 |
6 |
|
|
7 |
|
|
DM100i |
|
3 |
1 |
2 |
|
|
9 |
4 |
8 |
5 |
|
|
7 |
6 |
|
10
DM200L
2-1 |
SV62214 Rev. A |
2 • Getting to Know Your System
Parts of the Machine
Item |
Part |
Description |
1 |
Control Panel |
Allows you to enter and set up information on |
|
|
your machine (see next page for details) |
2 |
Top Cover |
Opens up to allow replacement of the ink car- |
|
|
tridge (see Chapter 10, Maintenance) |
3 |
Weighing |
Allows you to weigh a mail piece (your system |
|
Platform |
can then calculate postage based on the service |
|
(optional) |
selected) |
4 |
LED |
Lights green when your system is on; lights or- |
|
|
ange when your system is in "sleep" mode |
5Stacker Tray Allows the neat stacking of finished mail pieces
6Utility Slot Allows you store the Quick Reference Guide,
tape strips, etc. for easy access.
7 |
Transport Re- |
Home - transport rollers engaged for processing |
|
lease Lever |
mail (normal) |
|
(two position |
Released - transport rollers disengaged so you |
|
|
|
|
|
can clear a stalled mail piece |
|
|
i NOTE: The machine won't process mail |
|
|
when the lever is left in the released posi- |
|
|
tion. |
8 |
Feed Deck |
Supports your envelope, post card or tape sheet |
|
|
as it passes under the printer mechanism |
9 |
Moistener |
Applies sealing fluid to the envelope flap (you |
|
(optional) |
can seal envelopes or leave them unsealed, |
|
|
depending on how you feed them) |
10Storage Drawer Holds your USPS® Confirmation Services and (DM200L only) USPS® Return Receipt labels when used
2-2 |
SV62214 Rev. A |
2 • Getting to Know Your System
1 |
2 |
3 |
4 |
OCT 24 08 |
42 |
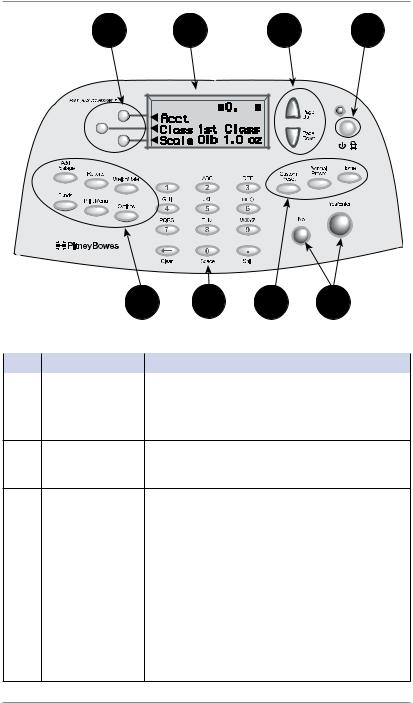
Control Panel |
7 |
6 |
7 |
5 |
|
|
|
||||
Control Panel |
|
|
|
|
|
|
|
|
|
|
|
Item |
Part/Key |
|
Description |
|
|
1 |
Screen Selection |
|
Allows you to select an option (◄) on the |
||
|
Keys |
|
screen with the corresponding key |
||
2 |
LCD Display |
|
Shows the current status of your system and |
||
|
|
|
prompts you through all operations |
||
3Page Up/Page Allows you to scroll up and down through menu Down (Scroll choices (when lit, it indicates more choices)
Keys)
4Lock/Power Key Allows you to power up or power down machine.
|
|
If the lock code feature has been enabled, you |
|
|
can either power down the machine or put the |
|
|
machine into lock-down mode. In lock-down |
|
|
mode, access to the machine requires entering |
|
|
a four-digit lock code. |
5 |
Yes/Enter and |
Allows you to confirm an operation or answer |
|
No Keys |
“Yes” or "No" to a prompt (the Yes key also |
|
|
functions as the Enter key for data entry) |
6 |
Alpha/Numeric |
Allows you to type in numbers and letters for |
|
Keypad |
account names, postage values, and other in- |
|
|
formation (see Appendix A, How to Enter Text) |
SV62214 Rev. A |
2-3 |

2 • Getting to Know Your System
Control Panel
Item |
Part/Key |
Description |
7 |
Feature Keys |
Allows you quick access to the key features on the |
|
|
system: |
|
Home |
Takes you back to the Home (date/postage) screen |
|
Normal Preset |
Allows you to recall settings that contain the most |
|
|
commonly printed postage value you use in your |
|
|
home or office (see Chapter 5, Normal and Custom |
|
|
Presets) |
|
Custom Preset |
Allows you access to up to five or ten custom set- |
|
|
tings that you can assign values such as postage |
|
|
amount, ad, account number, etc. (see Chapter 5, |
|
|
Normal and Custom Presets) |
|
Funds |
Allows you to check your postage funds and num- |
|
|
ber of mail pieces processed (see Chapter 6, Add- |
|
|
ing Postage) |
|
Add Postage |
Allows you to add (refill) postage funds to your ma- |
|
|
chine conveniently (see Chapter 6, Adding Postage) |
|
Reports |
Allows you to generate reports for postage, ac- |
|
|
counting, and other types of data (see Chapter 9, |
|
|
Reports) |
|
Weigh/Rate |
Allows you to weigh and calculate postage based |
|
|
on service selected (see Chapter 3, Running Mail) |
|
Options |
Allows you to access system setup information |
|
|
such as date, time, postage, accounts, passwords, |
|
|
etc. (see Chapter 7, System Options) |
|
Print Menu |
Allows you access to all the information printed on |
|
|
a mail piece such as date, time, postage, ad, in- |
|
|
scriptions, etc. (see Chapter 3, Running Mail) |
IMPORTANT: When you press one of the Feature keys, any entry in the preceding screen is lost unless you have first pressed the Yes/Enter key to confirm the entry. For example, if you entered an account name on one screen and then immediately pressed another Feature key, the account name will not be recorded by the system.
2-4 |
SV62214 Rev. A |
|
|
2 • Getting to Know Your System |
|
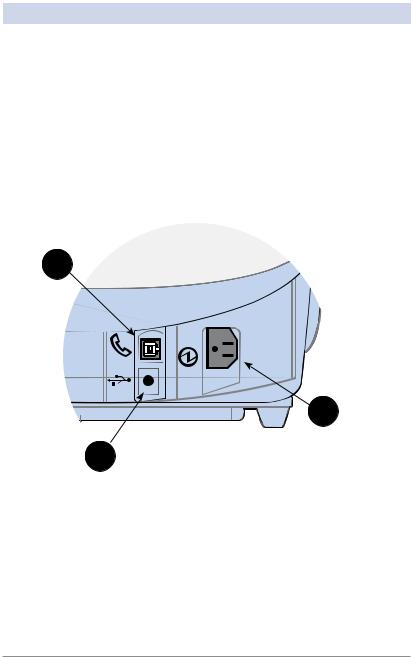
Connections on Back of Machine |
|||
|
|
|
|
Item |
Part |
|
Description |
1 |
Phone Jack |
|
Allows you to connect to an analog phone line |
|
|
|
via a standard RJ-11 phone plug (supplied) so you |
|
|
|
can download postage and software updates to |
|
|
|
your machine (see Chapter 6, Adding Postage) |
2 |
USB Port |
|
Allows you to connect your machine to a Win- |
|
|
|
dows PC that is connected to the Internet so you |
|
|
|
can download postage and software updates |
|
|
|
quickly to your machine (see PC Meter Connect™ |
|
|
|
section on next page). |
3 |
Power |
|
Connects to AC power cord (supplied) |
|
Receptacle |
|
|
1
3
2
Back of Machine
SV62214 Rev. A |
2-5 |

2 • Getting to Know Your System
PC Meter Connect™
PC Meter Connect™ is a feature that allows you to do postage refills and meter updates quickly and conveniently using your PC's Internet connection. Internet connection is normally much quicker than using the analog phone line option (see also Chapter 6, Adding Postage).
You simply load the PC Meter Connect™ software from the CD included in your starter kit into a Windows PC with an Internet connection (broadband, DSL, network, etc.) and connect a USB cable between your meter and a PC. After installation, a shortcut icon for PC Meter Connect™ displays on your PC desktop and an icon appears on the system tray, usually in the lower right corner of your desktop screen (see figures below).
Desktop |
|
Shortcut |
|
Icon |
PC Meter Connect™ Icon in System Tray |
|
Thereafter, the program is loaded in the background automatically when you boot up your computer. You will know this by seeing the PC Meter Connect™ icon in the system tray.
iNOTE: No screens or windows display when you click the desktop shortcut icon. However, if the PC Meter Connect™ software was not running for some reason (you'll know this when you don't see the PC Meter Connect™ icon in the system tray), clicking on the desktop icon will restart the software. Alternately, you may click on the Start button > All Programs > Pitney Bowes > PC Meter Connect. A PC Meter Connect™ icon will then appear in system tray.
Several messages display from PC Meter Connect™ icon in the system tray:
•"Meter detected" displays when you connect your meter to the PC (after it had been disconnected).
•"Meter is not detected" displays when you disconnect your meter from the PC. The red "x" stays on the icon thereafter.
2-6 |
SV62214 Rev. A |
2 • Getting to Know Your System
PC Meter Connect™
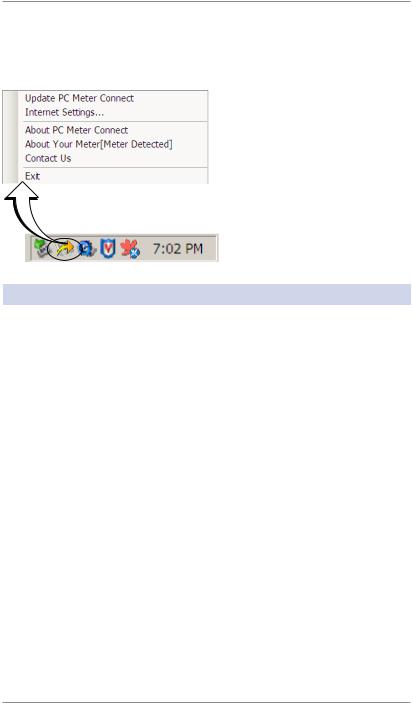
If you right-click on PC Meter Connect™ icon in the system tray, you can access several options for the PC Meter Connect™ software.
Options Screen for
PC Meter Connect™
|
Right Click on PC Meter Connect™ |
|
|
Icon in System Tray |
|
|
|
|
Option |
Description |
|
Update PC Meter |
Connects you to a Pitney Bowes website for the latest |
|
Connect™ |
version of the PC Meter Connect™ software |
|
Internet Settings... |
Allows you to change your Internet settings for best |
|
|
operation with PC Meter Connect™ (see Chapter 11 |
|
|
Troubleshooting for more details) |
|
|
|
|
About PC Meter |
Lists the PC Meter Connect™ software version |
|
Connect™ |
|
|
|
|
|
About Your Meter |
Displays whether or not the meter is connected to |
|
|
your PC; also allows access to a PDF version of this |
|
|
Operator Guide |
|
Contact Us |
Provides email and phone number information to |
|
|
contact Pitney Bowes |
|
|
|
|
Exit |
Exits the program (to restart, simply click on the PC |
|
|
Meter Connect™ desktop icon) |
|
SV62214 Rev. A |
2-7 |

2 • Getting to Know Your System
This page was put in as a placeholder only. This allows you to print this entire guide in a duplex (double-sided) mode while keeping the proper page positions.
2-8 |
SV62214 Rev. A |
Loading...