


S-LF3-F

www.pioneerelectronics.com
OPERATING GUIDE
S-LF3-F
IMPORTANT NOTICE:
The serial number for this equipment is located on the rear. Please write this serial number on your
warranty and keep it in a secure area for future reference.
BEFORE USE
SPEAKER SYSTEM
• Thank you for buying this Pioneer product.
• Please read through this operating guide before
using your speaker system so you will know how
to optimize performance. After you have finished
reading the operating guide, store it in a safe place
for future reference.
• The rated impedance of this speaker system is 8
Ω. It must be connected to an amplifier which
accepts this type of load (minimum and maximum
impedances accepted by the amplifier are generally indicated near the loudspeaker outlets: for
example "4-16 Ω" or "6-16 Ω").
• To guard against damage to this speaker system
due to an electric power overload, take the following precautions:
• Do not supply power to the speaker system in
excess of the maximum permissible input.
• When connecting or disconnecting cables, be
sure the amplifier power is OFF.
• When using a graphic equalizer, do not use
excessive amplifier volume.
• Do not try to force a low-powered amplifier to
produce loud sound (the amplifier’s distortion
will be increased, and you may damage the
tweeter).
• Avoid touching the diaphragms and suspen-
sions of the speaker units as they are fragile.
NOTE:
The speaker units in this speaker system
are magnetically shielded. However, colours
may blur if the speakers are positioned too
close to a television screen. If this happens,
switch off the television and switch it back
on again after 15 to 30 minutes. If the
problem persists, move the speakers away
from the television set.
INSTALLATION PRECAUTIONS
• The S-LF3-F system is composed of 2 identical
front speakers.
• For optimum sound reproduction of high frequencies, the treble speaker units must be at the same
height as the listener's ears.
• For low frequencies, it is possible to increase the
level of bass sounds by positioning the speakers
close to a wall (the maximum increase being
obtained for a position in a corner of the listening
room).
• Do not install these speakers close to an oven or
heating appliance. Avoid exposing them to direct
sunlight. High temperature can distort the structure of the enclosure and adversely affect the
sound.
• These speakers are heavy and fragile, therefore it
is dangerous to install them in an unstable position.
1
www.pioneerelectronics.com
CONNECTIONS
• Switch off the amplifier power supply (OFF).
• Connect the speaker wires to the input terminals at
the rear of the speaker; connect the common-side
wire to the · terminal and the hot-side wire to the
ª terminal. Bear in mind that the red input terminal has a “ª“ polarity, and the black terminal has
a “·” polarity.
• Connect the wire to the loudspeaker outlet termi-
nals of the amplifier. Connect the hot-side wire to
the ª terminal and the common-side wire to the
· terminal.
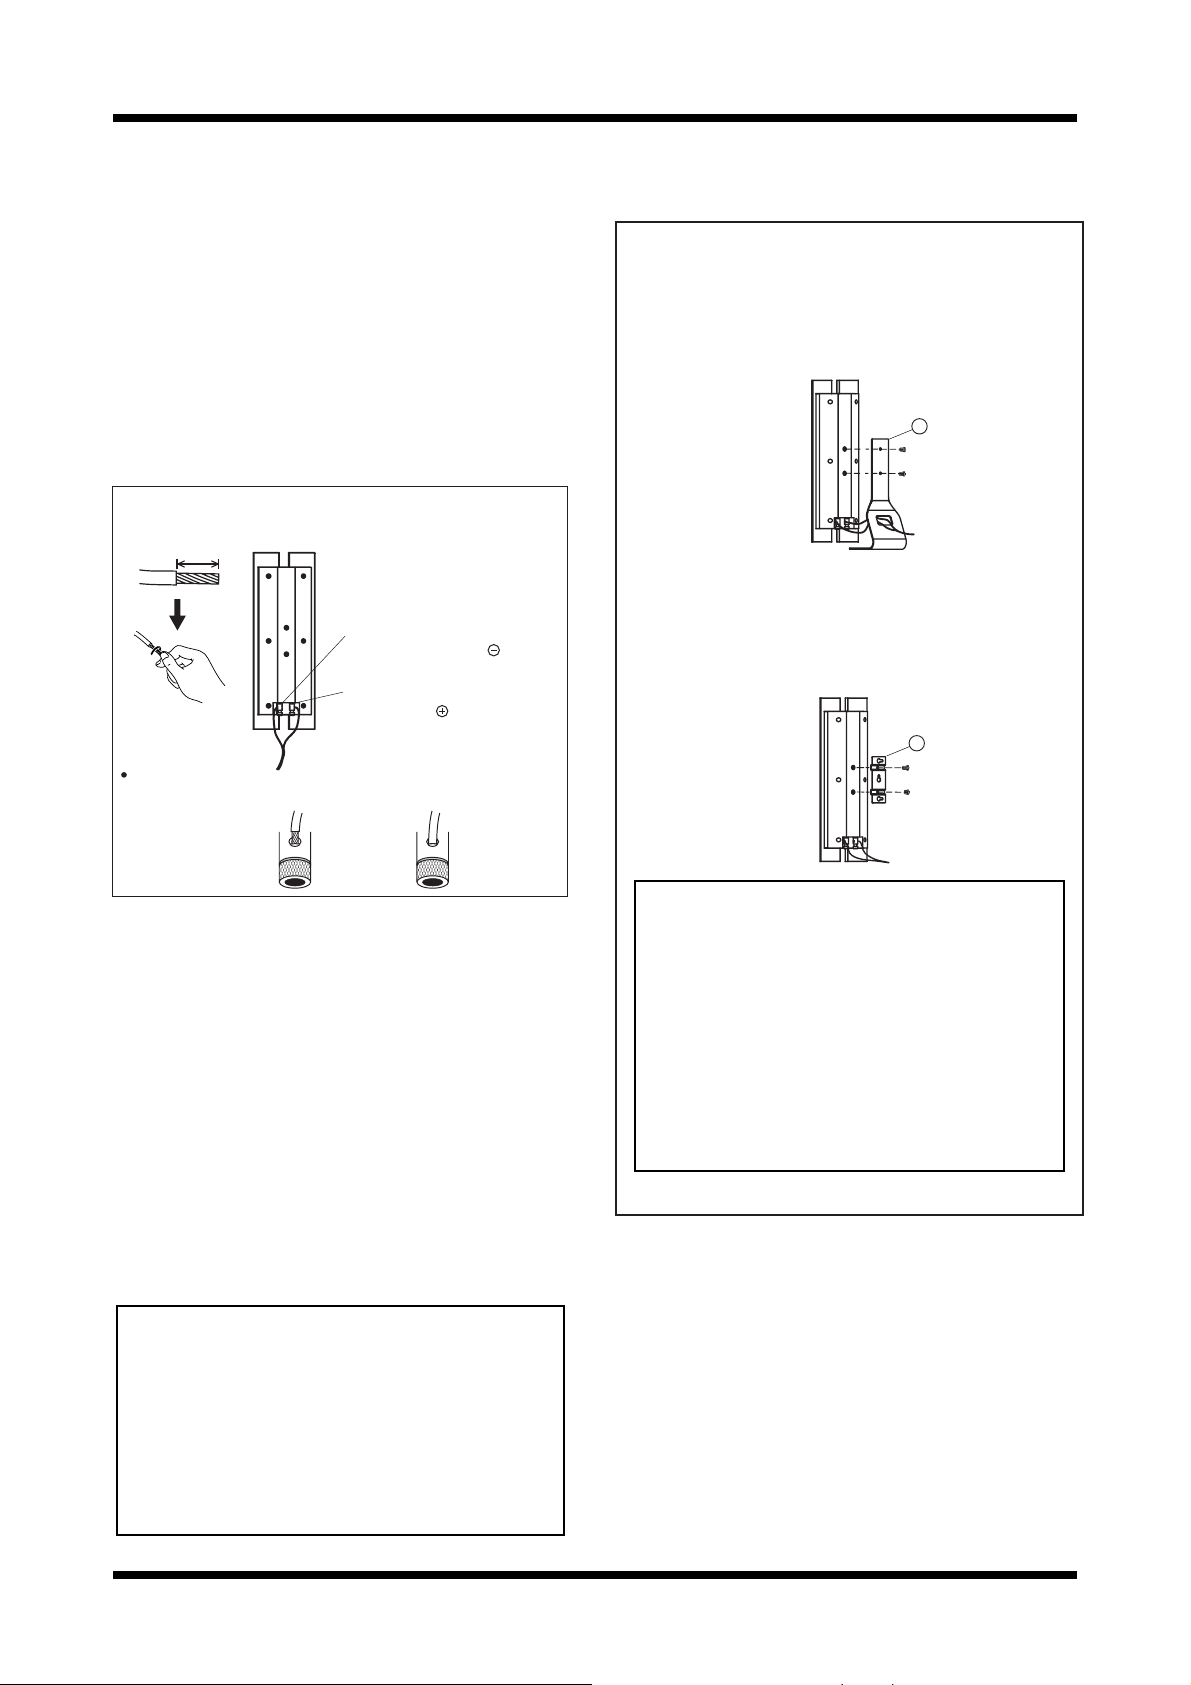
2
1
Strip the insulation at the tip of the
wire and twist the strands.
10—12 mm
If you insert the speaker wire too far so that the insulation is touching the
speaker terminal, you may not get any sound.
Turn the thumbscrew anticlockwise, make sure that the
speaker wires are inserted well
into the hole and turn the
thumbscrew clockwise to fasten
into position.
3 Connect the common-side
speaker wire to the terminal.
4 Connect the hot-side speaker
wire to the terminal.
USING THE ACCESSORIES
Confirm that the following accesories are in the
box when you open it:
● 2 Speaker stands + 1 polybag including 4 screws.
Before screwing the speaker stand 1 to the back of the
cabinet, thread the speaker wires through the opening in the
speaker stand and then connect them to the input terminal.
The 2 screws that hold the speaker stand must be screwed
into the dedicated inserts in the speaker.
1
● 2 Mounting panels
This Mounting panel 2 will enable you to mount the
speaker system on your interior walls. Before screwing the
mounting panel, make sure that wires are properly connected
to the input terminal. The 2 screws that hold the mounting
panel must be fixed into the dedicated inserts in the speaker
system.
2
< right > < wrong >
REMARKS:
• Check that the wires are securely connected to
the terminals. A loose connection may cause not
just intermittent or distorted sound but short-circuiting and breakdown of the amplifier.
• If there is too much exposed wire outside the
terminal, speaker wires may touch causing the
amplifier to short, damaging the amplifier and
making it unusable.
• If the wires of one of the speakers have been
connected with the wrong polarities, you will find
when listening to a stereo recording that bass
sounds are weakened and the stereo effect normally obtained between the two speakers does
not exist.
CAUTION:
The speakers are equipped with a protection
device to protect the transducers from extreme
conditions. Under these conditions the protection device will activate and stop the speaker
from producing sound. If this happens shut off
the system for 5-10 minutes and allow the protection device to reset.
Caution
In order to prevent the speaker from falling
make sure the wall is sturdy enough to support the weight of the speaker. Do not mount
it on plywood boards or soft-surface walls.
Mount the speaker system on a flat wall, this
will reduce the pressure on the screws, avoiding the risk of become loose, and preventing
the speaker system from falling. If you are
unsure of the quality and strength of the wall,
consults a professional for advice.
● 1 Operating instruction/Warranty
NOTES:
•
Pioneer will not be responsible for any accidents or damages resulting from improper installation.
CABINET MAINTENANCE
• Use a cloth to wipe away dust and dirt.
• If the enclosure is very dirty, wipe with a soft cloth
dipped in a neutral detergent diluted five to six
times with water, then wipe again with the dry
cloth.
• Do not use thinner, benzene, cleaning sprays or
other chemical products on or near the enclosures
as the surfaces could be adversely affected.
2
 Loading...