


Thank you for buying this Pioneer product.
Please read through these operating instructions so that you will know how to operate your model properly. After you have finished reading the instructions, put them in a safe place for future reference.
Contents
01 Before you start |
|
03 Connecting up |
|
Checking what’s in the box . . . . . . . . . . |
3 |
Connecting to your Pioneer |
|
Attaching the iPod type adapter . . . . . . |
3 |
AV receiver. . . . . . . . . . . . . . . . . . . . . . . |
5 |
02 Controls and displays |
|
04 Additional information |
|
Top panel. . . . . . . . . . . . . . . . . . . . . . . . |
4 |
Specifications . . . . . . . . . . . . . . . . . . . . |
6 |
Rear panel. . . . . . . . . . . . . . . . . . . . . . . |
4 |
Cleaning the unit . . . . . . . . . . . . . . . . . . |
6 |
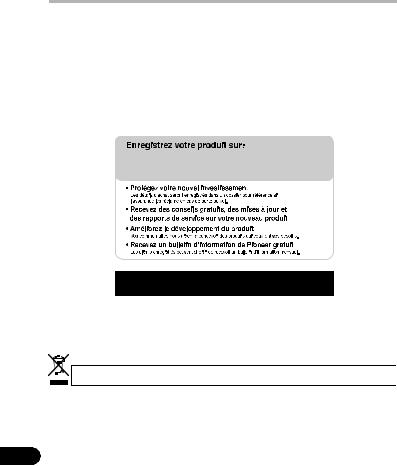
Register your product at
http://www.pioneerelectronics.com (US)
http://www.pioneerelectronics.ca (Canada)
• Protect your new investment
The details of your purchase will be on file for reference in the event of an insurance claim such as loss or theft.
•Receive free tips, updates and service bulletins on your new product
•Improve product development
Your input helps us continue to design products that meet your needs.
• Receive a free Pioneer newsletter
Registered customers can opt in to receive a monthly newsletter.
Discover the benefits of registering your product online at
http://www.pioneer.co.uk (or http://www.pioneer.eu).
http://www.pioneer.co.uk
http://www.pioneer.eu
If you want to dispose this product, do not mix it with general household waste. There is a separate collection system for used electronic products in accordance with legislation that requires proper treatment, recovery and recycling.
Private households in the member states of the EU, in Switzerland and Norway may return their used electronic products free of charge to designated collection facilities or to a retailer (if you purchase a similar new one).
For countries not mentioned above, please contact your local authorities for the correct method of disposal.
By doing so you will ensure that your disposed product undergoes the necessary treatment, recovery and recycling and thus prevent potential negative effects on the environment and human health.
2
En
Before you start
Chapter 1
Before you start
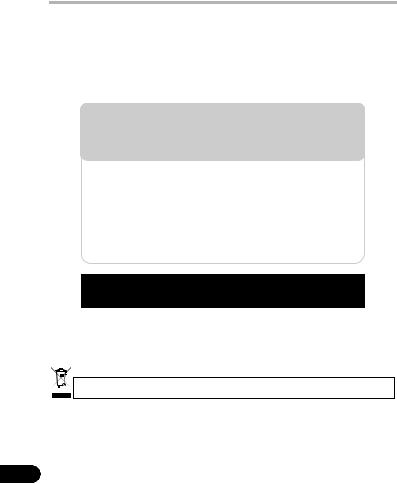
Checking what’s in the box
Please check that you’ve received the following supplied accessories:
•iPod type adapter x6
•iPod control cable x1
•These operating instructions
•Warranty card
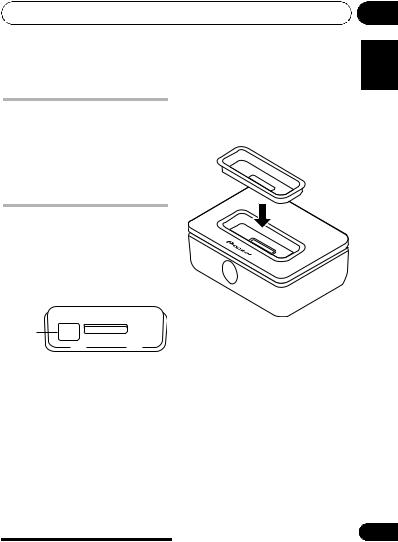
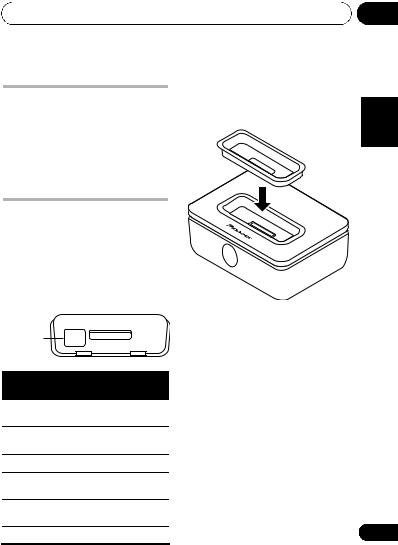
Attaching the iPod type adapter
For your iPod to sit properly in the dock connector port, you will have to match the iPod type adapter with your model of iPod. Each iPod type adapter has a model marking as shown below.
After selecting the iPod type adapter that corresponds with your iPod unit, insert it into the iPod type adapter pocket as shown.
01
English
iPod model marking
|
|
|
|
|
|
|
|
|
|
|
|
|
|
Model mark |
Corresponding iPod |
|||||
type |
||||||
|
||||||
|
|
|
|
|
|
|
iPod 20GB |
Fourth generation |
|||||
|
20 GB iPod |
|||||
|
|
|
|
|
|
|
iPod 40GB |
Fourth generation |
|||||
|
40 GB iPod |
|||||
|
|
|
|
|
|
|
mini |
iPod mini |
|||||
|
|
|
|
|
|
|
Color 20GB |
20 GB / 30 GB iPod |
|||||
30GB |
<color display> |
|||||
|
|
|
|
|
|
|
Color 40GB |
40 GB / 60 GB iPod |
|||||
60GB |
<color display> |
|||||
|
|
|
|
|
|
|
nano |
iPod nano |
|||||
•It is also possible to connect an iPod type adapter from an original iPod dock.
•When using fifth generation iPod models with this system, please use the iPod type adapter supplied with your iPod unit.
•When using a third generation iPod model with this system, please use an ‘Apple iPod Universal Dock adapter 3-pack for iPod with Dock Connector’ available for purchase from Apple Inc.
3
En
02 Controls and displays
Chapter 2
Controls and displays
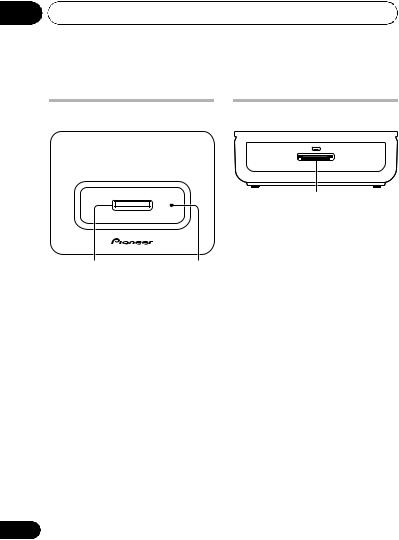
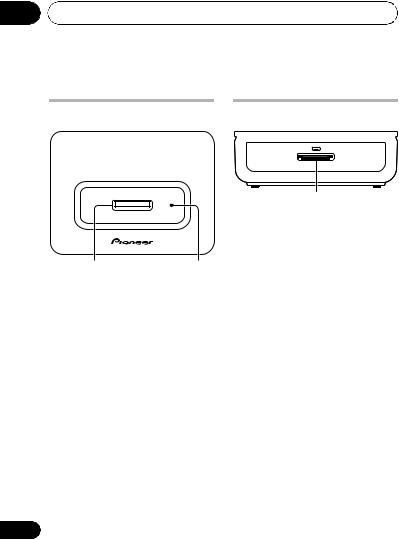
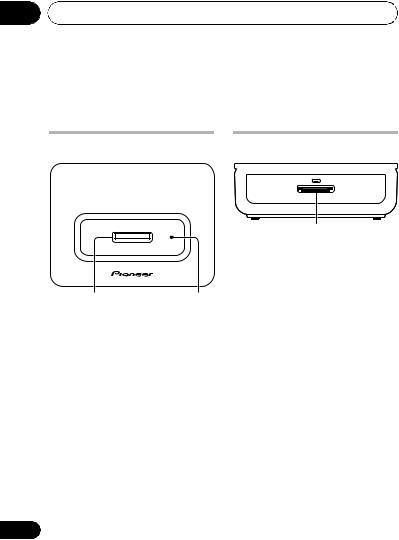
Top panel |
Rear panel |
|
|
|
|
|
|
|
|
|
|
3
3 iPod control cable terminal
Connect the iPod control cable.
1 |
2 |
1 iPod connector port
Insert your iPod dock connector port to connect and recharge your iPod unit.
2 iPod type adapter pocket
Holds the iPod type adapter that matches your iPod unit.
4
En
Connecting up |
03 |
Chapter 3
Connecting up
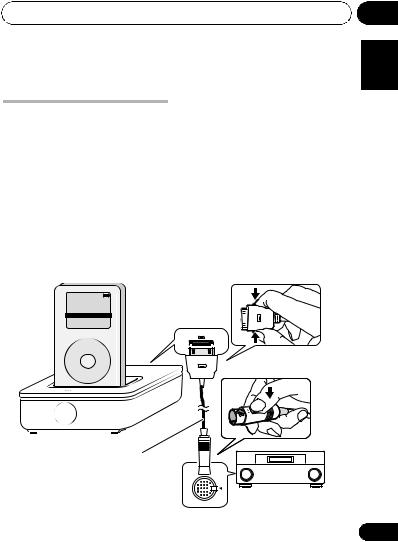
Connecting to your Pioneer AV receiver
Connect this unit to a Pioneer AV receiver with a dedicated iPod control cable terminal. You will be able to use the remote control supplied with the receiver to control this unit.
 Caution
•Before connecting or disconnecting this unit from your AV receiver, make sure the power to the AV receiver is switched off.
1Connect the terminal on this unit to the dedicated iPod terminal on the receiver.
Use the iPod control cable. Connect both ends as shown below (make sure
the  mark on the connector is facing upwards).
2Place the iPod in the connector port.
3Plug in and switch on your AV receiver.
Please refer to the manual supplied with the receiver for detailed instructions on operating the iPod using the iPod control cable.
English
|
iPod |
|
|
|
|
Music |
> |
|
Extras |
> |
|
Settings >
Shuffle Songs
Backlight
MENU
This unit
iPod control cable
IN
Pioneer AV receiver with a dedicated terminal for an iPod control cable
5
En

04 Additional information
Chapter 4
Additional information
Specifications
• Main unit
Dimensions
. . . .99 mm (W) x 33 mm (H) x 74 mm (D) 3.9 in. (W) x 1.3 in. (H) x 2.9 in. (D)
Weight . . . . . . . . . . . . . . . . . 150 g (5.3 oz.)
•Accessories
iPod type adapter . . . . . . . . . . . . . . . . . . . 6 iPod control cable . . . . . . . . . . . . . . . . . . . 1 These operating instructions . . . . . . . . . . 1 Warranty card (North America /Europe / Japan) . . . . . . . . . . . . . . . . . . . . . . . . . . . . 3
 Note
Note
•Specifications and design subject to possible modification without notice, due to improvements.
Cleaning the unit
•Use a polishing cloth or dry cloth to wipe off dust and dirt.
•When the surface is dirty, wipe with a soft cloth dipped in some neutral cleanser diluted five or six times with water, and wrung out well, and then wipe again with a dry cloth. Do not use furniture wax or cleansers.
•Never use thinners, benzine, insecticide sprays or other chemicals on or near this unit, since these will corrode the surface.
Published by Pioneer Corporation. Coppyright © 2007 Pioneer Corporation. All rights reserved.
6
En

Additional information |
04 |
Should this product require service in the U.S.A. and you wish to locate the nearest Pioneer Authorized Independent Service Company, or if you wish to purchase replacement parts, operating instructions, service manuals, or accessories, please call the number shown below.
8 0 0 – 4 2 1 – 1 4 0 4
Please do not ship your product to Pioneer without first calling the Customer Support Division at the above listed number for assistance.
Pioneer Electronics (USA) Inc.
Customer Support Division
P.O. BOX 1760, Long Beach,
CA 90801-1760, U.S.A.
For warranty information please see the Limited Warranty sheet included with your product.
Should this product require service in Canada, please contact a Pioneer Canadian Authorized Dealer to locate the nearest Pioneer Authorized Service Company in Canada. Alternatively, please contact the Customer Satisfaction Department at the following address:
Pioneer Electronics of Canada, Inc.
Customer Satisfaction Department
300 Allstate Parkway, Markham, Ontario L3R 0P2
1-877-283-5901
905-479-4411
For warranty information please see the Limited Warranty sheet included with your product.
Si ce produit doit être réparé au Canada, veuillez vous adresser à un distributeur autorisé Pioneer du Canada pour obtenir le nom du Centre de Service Autorisé Pioneer le plus près de chez-vous. Vous pouvez aussi contacter le Service à la clientèle de Pioneer:
Pioneer Électroniques du Canada, Inc. Service Clientèle
300, Allstate Parkway, Markham, Ontario L3R 0P2 1-877-283-5901 905-479-4411
Pour obtenir des renseignements sur la garantie, veuillez vous reporter au feuillet sur la garantie restreinte qui accompagne le produit.
S018_B_EF
English
7
En
Nous vous remercions de votre achat d’un produit Pioneer.
Veuillez lire ce mode d’emploi pour savoir comment utiliser correctement votre modèle. Après sa lecture, placez ce mode d’emploi dans un endroit accessible pour pouvoir le consulter.
Table des matières
01 Avant de commencer
Vérifier le contenu de la boîte . . . . . . . . 3 Fixation de l’adaptateur de
type d’iPod . . . . . . . . . . . . . . . . . . . . . . 3
02 Contrôles et affichages
Vue supérieure . . . . . . . . . . . . . . . . . . . 4 Vue arrière. . . . . . . . . . . . . . . . . . . . . . . 4
03 Connexion
Connexion à votre récepteur
AV Pioneer . . . . . . . . . . . . . . . . . . . . . . .5
04 Informations supplémentaires
Caractéristiques techniques . . . . . . . . .6 Nettoyage de l’appareil. . . . . . . . . . . . . .6
http://www.pioneerelectronics.com (États-Unis)
http://www.pioneerelectronics.ca (Canada)
Découvrez les nombreux avantages offerts en enregistrant votre produit en ligne maintenant sur http://www.pioneer.fr (ou http://www.pioneer.eu).
http://www.pioneer.fr
http://www.pioneer.eu
Si vous souhaitez vous débarrasser de cet appareil, ne le mettez pas à la poubelle avec vos ordures ménagères. Il existe un système de collecte séparé pour les appareils électroniques usagés, qui doivent être récupérés, traités et recyclés conformément à la législation.
Les habitants des états membres de l’UE, de Suisse et de Norvège peuvent retourner gratuitement leurs appareils électroniques usagés aux centres de collecte agréés ou à un détaillant (si vous rachetez un appareil similaire neuf).
Dans les pays qui ne sont pas mentionnés ci-dessus, veuillez contacter les autorités locales pour savoir comment vous pouvez vous débarrasser de vos appareils.
Vous garantirez ainsi que les appareils dont vous vous débarrassez sont correctement récupérés, traités et recyclés et préviendrez de cette façon les impacts néfastes possibles sur l’environnement et la santé humaine.
2
Fr
Avant de commencer |
01 |
Chapitre 1
Avant de commencer
Vérifier le contenu de la boîte
Veuillez vérifier que vous avez reçu les accessoires suivants :
•Adaptateur de type d’iPod x6
•câble de contrôle iPod x1
•Ce mode d’emploi
•Carte de garantie
Fixation de l’adaptateur de type d’iPod
Pour que votre iPod soit placé correctement dans le port connecteur du dock, vous devez sélectionner l’adaptateur correspondant à votre iPod. Chaque adaptateur de type d’iPod a une indication de modèle comme ci-après.
Indication de modèle d’iPod
Indication de Type d’iPod modèle correspondant
iPod 20Go iPod 20Go quatrième génération
iPod 40Go iPod 40Go quatrième génération
mini |
iPod mini |
Couleur iPod 20Go / 30Go 20Go 30Go <affichage couleur>
Couleur iPod 40Go / 60Go 40Go 60Go <affichage couleur>
nano |
iPod nano |
Après la sélection de l’adaptateur de type d’iPod correspondant à votre iPod, introduisez-le dans l’emplacement prévu à cet effet comme illustré.
•Il est aussi possible de connecter un adaptateur de type d’iPod d’un dock pour iPod original.
•Lors de l’utilisation de modèles d’iPod de la cinquième génération avec ce système, veuillez utiliser l’adaptateur fourni avec votre iPod.
•Lors de l’utilisation d’un iPod de la troisième génération avec ce système, veuillez utiliser un ‘Apple iPod Universal Dock Adapter - Jeu de 3 adaptateurs pour iPod avec Dock connector’, disponible chez Apple Inc.
Français
3
Fr
02 Contrôles et affichages
Chapitre 2
Contrôles et affichages
Vue supérieure |
Vue arrière |
|
|
|
|
|
|
|
|
|
|
3
3 Borne pour câble de contrôle iPod
Raccordez le câble de contrôle iPod.
1 |
2 |
1Port connecteur d’iPod
Introduisez le port connecteur de votre iPod pour brancher et recharger votre iPod.
2Emplacement pour adaptateur de type d’iPod
Pour placer l’adaptateur de type d’iPod correspondant à votre iPod.
4
Fr
Connexion |
03 |
Chapitre 3
Connexion
Connexion à votre récepteur AV Pioneer
Connectez cet appareil à un récepteur AV Pioneer avec une borne spécialisée pour câble de contrôle iPod. Vous pourrez utiliser la télécommande fournie avec le récepteur pour contrôler cet appareil.
 Attention
•Avant de connecter ou déconnecter cet appareil de votre récepteur AV, assurez-vous que le récepteur AV est hors tension.
1 Connectez la borne de cet appareil à la borne spécialisée de l'iPod sur le récepteur.
Utilisez le câble de contrôle iPod. Connectez les deux extrémités comme indiqué ci-après (veillez à ce que le repère  sur le connecteur soit dirigé vers le haut).
2Placez l'iPod dans le port connecteur.
3Branchez et mettez votre récepteur AV sous tension.
Veuillez consulter le mode d'emploi fourni avec le récepteur pour des instructions détaillées sur le fonctionnement de l'iPod à l'aide du câble de contrôle iPod.
Français
|
iPod |
Music |
> |
Extras |
> |
Settings >
Shuffle Songs
Backlight
MENU
Cet appareil
Câble de contrôle iPod
IN
Récepteur AV Pioneer avec une borne spécialisée pour
câble de contrôle iPod
5
Fr

04 Informations supplémentaires
Chapitre 4
Informations supplémentaires
Caractéristiques techniques
• Appareil principal
Dimensions
. . . . .99 mm (L) x 33 mm (H) x 74 mm (P) Poids . . . . . . . . . . . . . . . . . . . . . . . . . 150 g
•Accessoires
Adaptateur de type d'iPod . . . . . . . . . . . . 6 Câble de contrôle iPod . . . . . . . . . . . . . . . 1 Ce mode d'emploi . . . . . . . . . . . . . . . . . . . 1 Carte de garantie
(Amérique du Nord/Europe/Japon ) . . . . 3
 Remarque
•Les caractéristiques techniques sont sujettes à modification sans préavis, à des fins d’amélioration.
Nettoyage de l’appareil
•Utilisez un chiffon de nettoyage ou un chiffon sec pour enlever la poussière et la saleté.
•Si la surface est sale, essuyez-la avec un chiffon doux imbibé d’une solution d’eau et de produit de nettoyage neutre (cinq à six parts d’eau pour une de produit) et bien essoré, puis essuyez-la à nouveau avec un chiffon sec. Évitez d’utiliser des cires ou produits de nettoyage pour mobilier.
•N’utilisez jamais de dissolvants, de benzine, d’insecticides ou autres produits chimiques près de ou sur cet appareil, car ces produits pourraient en corroder la surface.
Publication de Pioneer Corporation. © 2007 Pioneer Corporation.
Tous droits de reproduction et de traduction réservés.
6
Fr

Informations supplémentaires |
04 |
Should this product require service in the U.S.A. and you wish to locate the nearest Pioneer Authorized Independent Service Company, or if you wish to purchase replacement parts, operating instructions, service manuals, or accessories, please call the number shown below.
8 0 0 – 4 2 1 – 1 4 0 4
Please do not ship your product to Pioneer without first calling the Customer Support Division at the above listed number for assistance.
Pioneer Electronics (USA) Inc.
Customer Support Division
P.O. BOX 1760, Long Beach,
CA 90801-1760, U.S.A.
For warranty information please see the Limited Warranty sheet included with your product.
Should this product require service in Canada, please contact a Pioneer Canadian Authorized Dealer to locate the nearest Pioneer Authorized Service Company in Canada. Alternatively, please contact the Customer Satisfaction Department at the following address:
Pioneer Electronics of Canada, Inc.
Customer Satisfaction Department
300 Allstate Parkway, Markham, Ontario L3R 0P2
1-877-283-5901
905-479-4411
For warranty information please see the Limited Warranty sheet included with your product.
Si ce produit doit être réparé au Canada, veuillez vous adresser à un distributeur autorisé Pioneer du Canada pour obtenir le nom du Centre de Service Autorisé Pioneer le plus près de chez-vous. Vous pouvez aussi contacter le Service à la clientèle de Pioneer:
Pioneer Électroniques du Canada, Inc. Service Clientèle
300, Allstate Parkway, Markham, Ontario L3R 0P2 1-877-283-5901 905-479-4411
Pour obtenir des renseignements sur la garantie, veuillez vous reporter au feuillet sur la garantie restreinte qui accompagne le produit.
S018_B_EF
Français
7
Fr

Vielen Dank für den Kauf dieses Pioneer-Produkts.
Lesen Sie bitte diese Bedienungsanleitung sorgfältig durch, damit Sie in der Lage sind, dieses Modell ordnungsgemäß zu bedienen. Bewahren Sie diese Bedienungsanleitung zur künftigen Einsichtnahme an einem sicheren Ort auf, nachdem Sie sie gelesen haben.
Inhalt
01 Vor dem Start |
|
03 Vornahme der Anschlüsse |
|
Prüfung des Packungsinhalts . . . . . . . . |
3 |
Anschluss an Ihren Audio-/ |
|
Montage des iPod-Adapters . . . . . . . . . |
3 |
Video-Receiver von Pioneer . . . . . . . . . . |
5 |
02 Bedienelemente und Anzeigen |
|
04 Ergänzende Informationen |
|
Oberseite. . . . . . . . . . . . . . . . . . . . . . . . |
4 |
Technische Daten . . . . . . . . . . . . . . . . . |
6 |
Rückseite . . . . . . . . . . . . . . . . . . . . . . . |
4 |
Reinigung des Geräts. . . . . . . . . . . . . . . |
6 |
Bitte nutzen Sie die Möglichkeit zur Registrierung Ihres Produktes unter
http://www.pioneer.de (oder http://www.pioneer.eu)
http://www.pioneer.de
http://www.pioneer.eu
Mischen Sie dieses Produkt, wenn Sie es entsorgen wollen, nicht mit gewöhnlichen Haushaltsabfällen. Es gibt ein getrenntes Sammelsystem für gebrauchte elektronische Produkte, über das die richtige Behandlung, Rückgewinnung und Wiederverwertung gemäß der bestehenden Gesetzgebung gewährleistet wird.
Privathaushalte in den Mitgliedsstaaten der EU, in der Schweiz und in Norwegen können ihre gebrauchten elektronischen Produkte an vorgesehenen Sammeleinrichtungen kostenfrei zurückgeben oder aber an einen Händler zurückgeben (wenn sie ein ähnliches neues Produkt kaufen).
Bitte wenden Sie sich in den Ländern, die oben nicht aufgeführt sind, hinsichtlich der korrekten Verfahrensweise der Entsorgung an die örtliche Kommunalverwaltung.
Auf diese Weise stellen Sie sicher, dass das zu entsorgende Produkt der notwendigen Behandlung, Rückgewinnung und Wiederverwertung
unterzogen wird, und so mögliche negative Einflüsse auf die Umwelt und die menschliche Gesundheit vermieden werden.
K058_A_Ge
2
Ge

Vor dem Start |
01 |
Kapitel 1
Vor dem Start
Prüfung des Packungsinhalts
Überprüfen Sie, ob sich folgendes mitgeliefertes Zubehör in der Packung befindet:
•iPod-Adapter x6
•iPod-Steuerkabel x1
•Diese Bedienungsanleitung
•Garantiekarte
Montage des iPod-Adapters
Damit Ihr iPod genau in den Dock-Anschluss passt, muss der zu Ihrem iPod-Modell passende iPod-Adapter gewählt werden. Jeder iPod-Adapter weist eine im Folgenden dargestellte Modellbezeichnung auf.
Nachdem Sie den zu Ihrem iPod-Gerät passenden iPod-Adapter ausgewählt haben, stecken Sie ihn wie dargestellt in den iPod-Adapter-Halter.
Deutsch
iPodModellbezeichnung
Modellbezeichnung Zugehöriger iPod
iPod 20GB |
20 GB iPod der |
|
vierten Generation |
|
|
iPod 40GB |
40 GB iPod der |
|
vierten Generation |
|
|
mini |
iPod mini |
|
|
Color 20GB |
20 GB / 30 GB iPod |
30GB |
<Farbdisplay> |
|
|
Color 40GB |
40 GB / 60 GB iPod |
60GB |
<Farbdisplay> |
|
|
nano |
iPod nano |
|
|
•Ebenso ist der Anschluss eines iPod-Adapters von einem Original- iPod-Dock möglich.
•Benutzen Sie bei Verwendung von iPod-Modellen der fünften Generation mit diesem System bitte den Ihrem iPod-Gerät beiliegenden iPod-Adapter.
•Benutzen Sie bei Verwendung von iPod-Modellen der dritten Generation bitte einen bei Apple Inc. erhältlichen ‘Apple iPod Universal Dock Adapter 3er-Packung für iPod mit Dock Connector’.
3
Ge
02 Bedienelemente und Anzeigen
Kapitel 2
Bedienelemente und
Anzeigen
Oberseite |
Rückseite |
|
|
|
|
|
|
|
|
|
|
3
3 iPod-Steuerkabelanschluss
Schließen Sie das iPod-Steuerkabel an.
1 |
2 |
1iPod-Anschluss
Verbinden Sie Ihren iPod Dock-Anschluss, um Ihren iPod anzuschließen und aufzuladen.
2iPod-Adapter-Halter
Zum Einsetzen des zu Ihrem iPod passenden iPod-Adapters.
4
Ge
 Loading...