


 Loading...
DIAG1300 User manual
1
General Information |
3 |
|
|
|
|
|
|
|
|
|
|
|
|||||||
Connecting to a Laptop or Desktop PC |
4 |
|
|
|
|
|
|
|
|
|
|
|
|
||||||
1.0 Installation Instructions |
5 |
|
|
|
|
|
|
|
|
|
|
|
|
||||||
|
|
1.1 |
Parallel Port Data Module |
7 |
|
|
|
|
|
|
|
|
|
|
|
|
|||
|
|
1.2 |
Software Patch for the DIAG1300 EDi Service tool |
8 |
|
|
|
|
|
|
|
|
|
|
|
|
|||
2.0 Starting |
and using the diagnostic software |
9 |
|
|
|
|
|
|
|
|
|
|
|
||||||
|
|
2.1 |
Connecting the hardware |
9 |
|
|
|
|
|
|
|
|
|
|
|
|
|||
|
|
2.2 |
Starting the software program |
9 |
|
|
|
|
|
|
|
|
|
|
|
||||
|
|
2.3 |
Menu bar |
10 |
|
|
|
|
|||||||||||
|
|
2.4 |
Save as |
11 |
|
|
|
|
|||||||||||
3.0 Data List |
|
|
|
12 |
|
|
|||||||||||||
|
|
3.1 |
View Engine data |
12 |
|
|
|
|
|
|
|
||||||||
|
|
3.2 |
View Engine Information |
13 |
|
|
|
|
|
|
|
||||||||
|
|
3.3 |
Custom data lists |
14 |
|
|
|
|
|
||||||||||
|
|
3.4 |
Change font style and size |
15 |
|
|
|||||||||||||
|
|
3.5 |
Print or preview data lists |
15 |
|
|
|
|
|
||||||||||
|
|
3.6 |
Save data list |
16 |
|
|
|
|
|||||||||||
4.0 Diagnostic |
codes |
17 |
|
|
|
|
|
|
|
||||||||||
|
|
4.1 |
Active codes |
17 |
|
|
|
|
|
||||||||||
|
|
4.2 |
Inactive codes |
17 |
|
|
|
||||||||||||
|
|
4.3 |
Save diagnostic codes |
18 |
|
|
|
|
|
|
|
|
|||||||
|
|
4.4 |
Clear codes |
19 |
|
|
|
|
|
|
|||||||||
5.0 Programmable parameters |
20 |
|
|
|
|
|
|||||||||||||
|
|
5.1 |
Save As programmable parameters |
21 |
|
|
|
|
|
|
|
|
|||||||
|
|
5.2 |
Reprogram parameters |
21 |
|
|
|
|
|
||||||||||
6.0 Diagnostic |
tests |
23 |
|
|
|
||||||||||||||
|
|
6.1 |
Key on engine turn off tests |
24 |
|
|
|
|
|
|
|
|
|
||||||
|
|
6.2 |
Key on engine operating test |
24 |
|
|
|
|
|
|
|
|
|
||||||
7.0 Data Recording |
25 |
|
|
|
|
||||||||||||||
|
|
7.1 |
Setup recording |
25 |
|
|
|
||||||||||||
|
|
7.2 |
Recording mode |
27 |
|
|
|
||||||||||||
|
|
7.3 |
Playback mode |
28 |
|
|
|||||||||||||
|
|
7.4 |
Changing file directories (Browse) |
28 |
|
||||||||||||||
|
|
7.5 |
Deleting a record file |
28 |
|
|
|
|
|||||||||||
|
|
7.6 |
Printing or previewing a recording file frame |
28 |
|
|
|
|
|
|
|
|
|
||||||
|
|
7.7 |
Exporting a recording file |
28 |
|
||||||||||||||
8.0 Loss of |
ECM communication |
30 |
|
|
|
|
|
|
|
||||||||||
9.0 |
Exit diagnostic software |
31 |
|
|
|
|
|
||||||||||||
10.0 |
|
|
Emergency shut down |
32 |
|
|
|
|
|
||||||||||
11.0 |
|
Working offline |
33 |
|
|
|
|
||||||||||||
|
|
|
11.1 Playback of data recordings offline |
34 |
|
|
|
|
|||||||||||
|
|
11.2 |
|
Exit offline session |
34 |
|
|
||||||||||||
12.0 Uninstall |
Perkins diagnostic software |
35 |
|
|
|
|
|||||||||||||
|
|
|
12.1 |
Method 1 |
35 |
|
|
|
|
||||||||||
|
|
12.2 |
Method 2 |
36 |
|
|
|
|
|||||||||||
13.0 |
Glossary |
of terms |
38 |
|
|
|
|||||||||||||
2
General Information
This manual has been written specifically for version 2.0 of the diagnostic tool software for the Peregrine EDi and 1300 Series EDi family of engines. This manual gives a brief explanation of the diagnostic tool and its functions. It was written for the user who has a working knowledge of the Windows® 2000 or XP operating system, its conventions, how to use a mouse, standard menus, commands and how to Open, Save and Close files.
Screen illustrations are used throughout this manual, taken from Windows® 2000 and XP only, to help clarify use and functions. For help with any of these techniques please refer to your Windows® help documentation and Perkins Help.
Please take the time to study this manual and become familiar with the features and functions version 2.0 of the Perkins Peregrine EDi/1300 Series EDi Engine Diagnostic Software. In order to use this tool correctly, this handbook, the appropriate engine User’s Handbook and the Workshop Manual should be used together.
User’s Handbook:
Perkins Peregrine EDi, models WK to WS, publication number TPD 1360E
Perkins 1300 Series EDi, models WK to WS, publication number TPD 1352E
Workshop Manual:
Perkins Peregrine EDi and 1300 Series EDi, models WK to WS, publication number TPD 1353E (to be updated for models WR & WS. Refer to the Perkins Publicity Distribution Centre at the address below.)
Read and remember the “Safety Precautions” in the User’s Handbook, and the Workshop and Diagnostic Manuals. They are given for your protection and must be used at all times.
Danger is indicated by two methods:
Warning! This indicates that there as a possible danger to the person.
Caution: This indicates that there is a possible danger to the engine.
The tool is available from: |
The publications are available from: |
Perkins Engines Company Limited |
Perkins Literature Distribution Centre |
Parts Distribution Centre |
C/O Fisherprint Limited |
Northbank Industrial Park |
Padholme Road East |
Irlam |
Peterborough |
Manchester |
PE1 5UL |
M44 5PP |
Telephone: +44 (0) 1733 892 777 |
England |
Email: perkinsdistribution@fisherprint.co.uk |
Telephone: +44 (0) 161 776 5000 |
|
Fax: + 44 (0) 161 776 5200 |
|
3

Connection to a Laptop PC or Desktop PC
Parallel Port Data Module
Part number 27610283
Personal Computer or Laptop |
Software CD part number: - |
|
|
DIAG1300 |
|
4
1.0 Installation Instructions
This program is for and Windows® 2000 and XP only.
Before beginning installation of your Perkins PC Software it is strongly recommended that you exit all Windows programs.
If you have a previous version of this diagnostic software installed you must uninstall it as described in Section 12 of this manual before commencing authorization and installation of Version 2.0.
1)Please complete the Perkins Diagnostic Software License Application Form and send it to the address details at the top of the form.
2)The Perkins Diagnostic Software License Form is located on the Perkins Secured Internet: - www.perkins.com >> Product Support >> TIPSS >> DIAG1300 >> Perkins Diagnostic Software Application Form or obtain the form from the DIAG1300 CD (Perkins Diagnostic Software License Application Form. PDF).
3)Insert CD into the CD-ROM.
4)If Auto run is enabled on your PC/Laptop the installation of the 1300Edi service tool will begin automatically. If so, proceed to step 5.
5)Click on the Windows® Start Button and select “Run”.
6)Type D:\Setup and click OK.
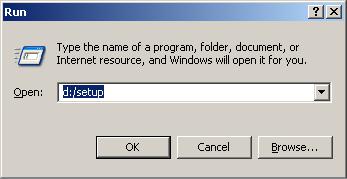 Figure 1.1
7)Windows displays a startup screen.
8)Click Next to continue installation. Follow the on-screen instructions. You must contact the Perkins Help Desk to acquire an Authorization Code, in order to proceed with the installation.
Note: - If the Perkins Help Desk has not received the completed Perkins Diagnostic Software License Application Form, the Perkins Help Desk will not provide the Authorization Code.
5
 Figure 1.2
9)Tell the Help Desk personnel the Product ID number that appears on your screen.
Important! Give the number in the three groups as it appears on the screen. Do not cancel from this screen unless you wish to restart the install and authorization process. Each time you start the software installation the Product ID number will change.
10)Follow directions given by the Help Desk personnel. They will instruct you to click on the “Next” button.
11)Enter the Authorization Code in the spaces provided. Use the Tab key to move between the boxes.
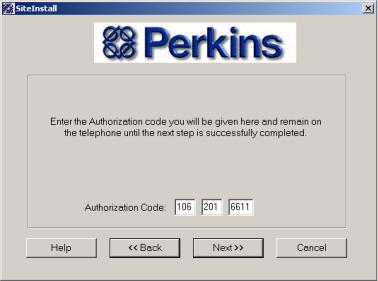 Figure 1.3
12)Press the “Next” button when instructed by the Help Desk personnel.
13)Verify the expiration date on your screen with the Help Desk personnel. If it is correct, Click on the “Done” button.
6
 Figure 1.4
Authorization is now complete, and the Perkins software application installation process will begin.
11) Follow the on-screen instructions. You will be asked to make several choices, and default settings will be offered. Accept all the defaults offered, with the possible exception of:
a)English/Imperial or Metric units
b)Select PDM or SDM (see Note below).
Note: - Option B is for the legacy Serial Port Data Module, this module is obsolete now and the PDM is the current module sold into the market place.
The PDM or SDM option refers to whether you are using a Parallel Port Data Module (PDM) or a Serial Port Data Module (SDM). The default offered is the SDM.
If you are unsure about your hardware please contact the Technical Support Centre via the request form located on the Perkins secured Internet: www.perkins.com >> Product Support >> Support Centres.
1.1 Parallel Port Data Module (PDM) Installation
If you are using the PDM, the operator will have to install the driver for the PDM. The drivers for the PDM are stored on a CD and will come with the PDM. The operator can install the drivers for the PDM by performing the steps below: -
1)Insert the CD into the CD-ROM of the PC/LAPTOP
2)If Auto run is enabled on your PC/LAPTOP the drivers will be installed and skip to step 5.
3)If not, Click on the Windows® Start Button and select “Run”.
4)Type D:\Setup and click OK.
5)Follow the onscreen prompts and click “Finish”
6)The application will prompt you to restart the PC/LAPTOP. This is recommended.
Note: - The parallel communication adapter (PDM) driver is also available on the Perkins secured Internet: www.perkins.com >> Product Support >> TIPSS >> DIAG1300 >> Parallel Communication Adapter Software driver.
Important! If you are using a PDM the service tool will not work until you have rebooted the PC with the PDM powered and connected.
7
1.2 Software patch for the DIAG 1300EDi service tool
As with any software in the market place there are bugs and with Perkins Engines Company Limited policy of continually improving it’s product s Perkins Engines Company Limited has developed a software patch to be installed on Windows® 2000 and XP platforms before a user accesses the DIAG 1300 Edi service tool.
This patch will remove most bugs from the software application.
Method 1 – Software patch located on CD-ROM
Please follow the steps below: -
1)Insert the CD into the CD-ROM of the PC/LAPTOP
2)If Auto run is enabled on your PC/LAPTOP please cancel the installation
3)If not, Click on the Windows® Start Button and select “Run”.
4)Type D:\win2000 1300 patch.exe and click OK
5)Follow the onscreen prompts and click “Finish”
6)The application will prompt you to restart the PC/LAPTOP. This is recommended.
Method 2 – Software patch located on the Perkins Secured Internet
Please follow the steps below: -
1)Download the software patch from www.perkins.com >> Product Support >> TIPSS >> DIAG1300 >> Software Patch for Windows 2000 and XP
2)Click “Save”
3)Save the file to a location on your PC/LAPTOP and click “Save”
4)Open “win2000_xp patch. Zip”
5)Extract the contents to a location on your PC/LAPTOP
6)Double click “win2000 1300 patch.exe”
7)Follow the onscreen prompts and click “Finish”
8)The application will prompt you to restart the PC/LAPTOP. This is recommended.
8
2.0 Starting and Using Perkins Diagnostic Software
If the software is to be run in Offline mode (not connected to an engine) omit Section 2.1 and start at Section 2.2.
2.1 Connecting the Hardware
Connect the PDM to the diagnostic port of the engine and to the computer as indicated in the “Connection to a Laptop PC or Desktop PC. Turn the engine key on and check that the Power light on the Data Module is on.
2.2 Starting the Software Program
Start the computer. Select Start/Programs/Perkins Systems/Engine Diagnostics/1300 EDi & Peregrine EDi, alternatively double-click the “1300 EDi & Peregrine EDi” shortcut icon on the desktop.
 Figure 2.1
The screen displays a Select Application dialog box. You can Connect or run Offline.
To connect you can choose to either double-click the application icon or click once on the icon and click Connect. See Section 11.
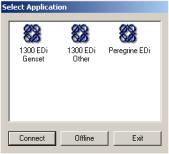 Figure 2.2
If you are not connected to an engine you will get the following error message and be given the option to exit, via the cancel button.
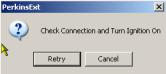 Figure 2.3
Select from the following options by clicking on a toolbar button or click on “Actions” in the menu bar to display a drop list of available procedures:
•Data Lists
•Diagnostic Codes
•Programmable Parameters
•Diagnostic Tests
•Data Recording
9
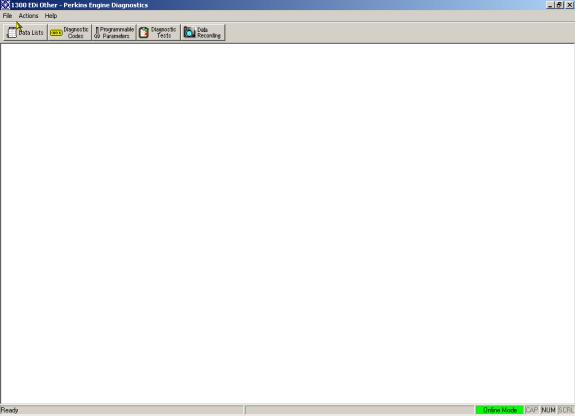
Figure 2.4
2.3 Menu Bar
Menu bar options allow you to perform the following tasks while working with the Perkins Diagnostic Software.
 Figure 2.5
File – This menu option allows you to perform the above functions. Use “options” to select English or Metric
10
units.
Actions - displays and launches application menu options Data List – launches a list of select data from the ECM Help - explains Perkins Diagnostic Software.
2.4 Save As
The File menu option Save As gives the ability to save (or export) Data Lists, Diagnostic Codes, Programmable parameters and Data Recordings to a .csv (comma-separated variable) file. This can be opened in a Spreadsheet application such as MS Excel or Lotus 1-2-3 for analysis at a later time.
Files will be saved in Directory C:\VDS\Data using the following default filenames.
• Data list Export file |
dMMDD_hhmmss.csv |
|
• Diagnostic Code Export file |
cMMDD_hhmmss.csv |
|
• |
Programmable Parameters Export file |
pMMDD_hhmmss.csv |
• |
Data Recording Export file |
rMMDD_hhmmss.csv |
The first letter of the filename denotes the type of data saved, MMDD is the month and day, and hhmmss the time in hours, minutes and seconds that the file was created (except in the case of Data Recording when it is the time of the trigger point).
The file layouts are described later in this manual under the relevant Sections.
11
3.0 Data List
A data list is a list of fixed or variable data items that the ECM monitors.
There are two standard data lists (See figure 3.1):
•Engine Data - Contains all variable parameters that can change while the engine is running, e.g. engine speed.
•Engine Information - Contains all fixed parameters, e.g. rated engine power.
To launch Data Lists click on the button located on the toolbar or select Actions/Data List. The following screen will display the available Data lists and Data Lists preview.
 Figure 3.1
3.1 View Engine Data
Select Engine Data from the available data list and click OK to view the variable engine parameters and current value status. The following screen will be displayed.
12
Loading...