

Parkside PKGA 20-Li B1 Translation Of The Original Instructions

4-IN-1 CORDLESS COMBINATION TOOL PKGA 20-Li B1
4-IN-1 CORDLESS
COMBINATION TOOL
Translation of the original instructions
4-IN-1-AKKU-KOMBIGERÄT
Originalbetriebsanleitung
IAN 315586
ΕΠΑΝΑΦΟΡΤΙΖΟΜΕΝΟ
ΠΟΛΥΕΡΓΑΛΕΙΟ 4 ΣΕ 1
Μετάφραση των αυθεντικών οδηγιών λειτουργία

Before reading, unfold the page containing the illustrations and familiarise yourself with all functions
of the device.
Πριν ξεκινήσετε την ανάγνωση, ανοίξτε τη σελίδα ε τι εικόνε και εξοικειωθείτε ε όλε τι λειτουργίε
τη συσκευή.
Klappen Sie vor dem Lesen die Seite mit den Abbildungen aus und machen Sie sich anschließend mit
allen Funktionen des Gerätes vertraut.
IE / NI /CY Translation of the original instructions Page 4
GR /CY Μετάφραση των αυθεντικών οδηγιών λειτουργία Σελίδα 25
DE / AT / CH Originalbetriebsanleitung Seite 48
1 2 3 5 6
10
4
11 12
7
16 19
17
18
8
9
14
20 23 24
2221
15
25
13
26 27 30 31 32 33
28
29
3

IE CYNI
Content
Introduction .................................4
Intended Use ................................4
General Description ......................5
Scope of delivery .............................. 5
Overview ......................................... 5
Technical Data .............................. 5
Notes on Safety ...........................6
Symbols ........................................... 7
General Safety Directions for
Power Tools ...................................... 7
Additional safety instructions ............ 12
Initial Operation .........................15
Recharging the battery ..................... 15
Practical tips ..............................15
Operation .................................. 15
Replacing the appliance attachment .. 15
Switching on/off ............................. 16
Motor unit with drill attachment
PKGA1 .......................................... 16
Motor unit with multisander
attachment PKGA2 .......................... 17
Motor unit with sabre saw
attachment PKGA3 .......................... 18
Motor unit with multifunction
tool PKGA4 .................................... 19
Cleaning/Maintenance ............... 20
Cleaning ........................................ 20
Maintenance .................................. 20
Storage ......................................20
Waste Disposal/Environmental
Protection ..................................20
Guarantee .................................21
Repair Service ............................ 22
Service-Center ............................ 22
Importer .................................... 22
Spare Parts/Accessories ............. 23
Trouble Shooting ........................ 24
Translation of the original EC
declaration of conformity ........... 72
Exploded Drawings ............... 75-77
Introduction
Congratulations on the purchase of your
new device. With it, you have chosen a
high quality product. During production,
this equipment has been checked for qual-
ity and subjected to a nal inspection. The
functionality of your equipment is therefore
guaranteed.
The operating instructions constitute
part of this product. They contain
important information on safety, use
and disposal.
Before using the product, familiarise
yourself with all of the operating
and safety instructions. Use the
product only as described and for
the applications specied. Keep this
manual safely and in the event that
the product is passed on, hand over
all documents to the third party.
Intended Use
The device is intended for tightening and
releasing screws and for drilling holes in
wood, metal or plastic.
The device is not suitable for commercial
use. Any other use that is not explicitly approved in these instructions may result in
damage to the equipment and represent a
serious danger to the user.
The equipment is designed for use by
adults. Adolescents over the age of 16
may use the device only under supervision.
The manufacturer is not liable for damages
caused by unspecied use or incorrect
operation.
The device is part of the Parkside X 20 V
TEAM series and can be operated using
X20 V TEAM series batteries. The batteries
may only be charged using chargers from
the Parkside X 20 V TEAM series.
4

IE CYNI
General Description
The illustration of the principal
functioning parts can be found
on the front and back foldout
pages.
Scope of delivery
Carefully unpack the trimmer and check
that it is complete. Dispose of the packaging material correctly.
• Motor unit with drill attachment
• Sabre saw attachment
• Multi-sander attachment
• Multifunction tool
• Accessories for drill attachment
- 6 drill bits (1,5/2/3/4/5/6 mm)
- 6 screwdriver bits, 50 mm
- Bit holder
• Accessories for sabre saw attachment
- Wood sawblade (HCS150/6TPI)
- Metal sawblade (HSS150/18TPI)
• Accessories for multi-sander attachment
- 5 sanding sheets
(2 x P* 60, 2 x P 120, 1 x P 240)
• Accessories for multifunction tool
- Plunge sawblade
- Scraper blade
- Delta sanding plate with 3 sanding
sheets (1 x P* 60, 1 x P 80, 1 x P 120)
• Rechargeable battery
• Charger
• Storage case
• Instruction Manual
*P = Grain size
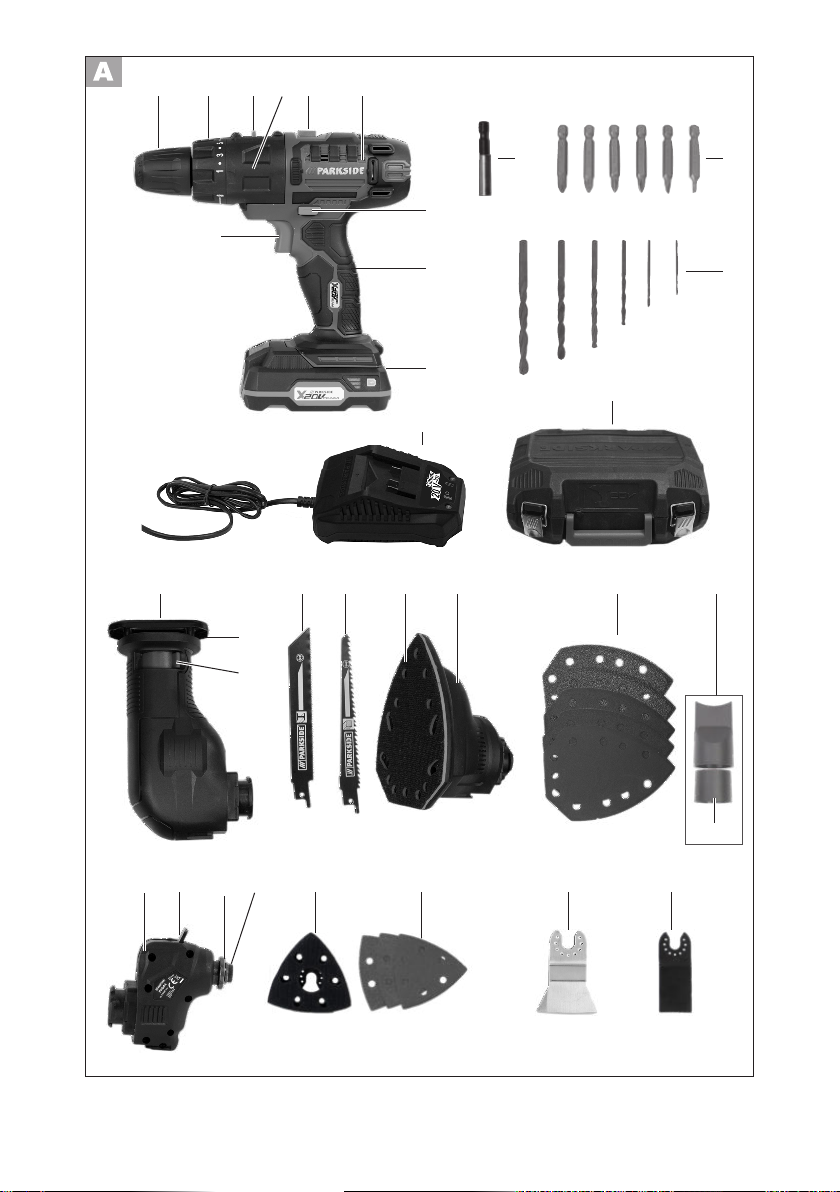
Overview
1 Keyless chuck
2 Torque adjustment ring
3 Gear selection switch
4 Drill attachment PKGA1
5 Unlocking lever for appliance at-
tachment
6 Motor unit
7 Direction switch
8 Handle
9 Rechargeable battery
10 On/off switch
11 Bit holder
12 Screwdriver bits, 50 mm, 6 no.
13 Drill bits 6 no.
14 Charger
15 Storage case
16 Sabre saw attachment PKGA3
17 Footplate
18 Lever for unlocking sawblade
19 Metal sawblade
20 Wood sawblade
21 Sanding plate
22 Multi-sander attachment PKGA2
23 5 sanding sheets
24 Dust extraction adaptor
25 Reducer
26 Multifunction tool PKGA4
27 Lever for unlocking tool
28 Arbor
29 Tool holder
30 Delta sanding plate
31 3 sanding sheets
32 Scraper blade
33 Plunge sawblade
Technical Data
4-in-1 Cordless
combination tool .................PKGA 20-Li B1
Motor voltage ............................. 20 V
Idling speed (n0) ....................21000 min
Motor unit with drill attachment ..... PKGA1
Idling speed (n0) ........ 0-400/0-1350 min
Torque ................................max. 25 Nm
Spread drill chuck .................. 1.0-10 mm
-1
-1
5
IE CYNI
Drill diameter
for wood .......................... max. 10 mm
for steel ............................. max. 8 mm
Weight (without charger)................1.5 kg
Sound pressure level
(LpA) ................... 83.7 dB(A), KpA= 3 dB
Sound power level
(LWA) ................. 94.7 dB(A), KWA= 3 dB
Vibration (ah)
drilling in metal .................. 1.322 m/s
idling ................................ 1.531 m/s
K=1.5 m/s
Motor unit with multisander
attachment .................................... PKGA2
Oscillation rate (n0) ..............0-9000 min
Sanding sheet size
.......138 x 97 mm
Weight (without charger)................1.4 kg
Sound pressure level
(LpA) ................... 88.6 dB(A), KpA= 3 dB
Sound power level
(LWA) ................. 99.6 dB(A), KWA= 3 dB
Vibration (ah) ......4.572 m/s2, K=1.5 m/s
Motor unit with sabre saw
attachment .................................... PKGA3
Stroke rate (n0) ..................... 0-3200 min
Stroke length
...................... 22 mm
Weight (without charger)................1.8 kg
Sound pressure level
(LpA) ................... 89.3 dB(A), KpA= 3 dB
Sound power level
(LWA) ............... 100.3 dB(A), KWA= 3 dB
Vibration (ah)
Sawing boards ................ 12.395 m/s
Sawing wood beams ........ 12.392 m/s
K=1.5 m/s
Motor unit with multifunction tool ... PKGA4
Oscillation rate (n0) ............0-20000 min
Oscillation angle .............................. 3.0°
Weight (without charger)................1.4 kg
Sound pressure level
(LpA) ................... 84.8 dB(A), KpA= 3 dB
Sound power level
(LWA) ................. 95.8 dB(A), KWA= 3 dB
Vibration (ah) ......4.229m/s2, K= 1.5 m/s
The stated vibration emission value was
measured in accordance with a standard
testing procedure and may be used to com-
2
pare one power tool to another.
2
The stated vibration emission value may
2
also be used for a preliminary exposure
assessment.
Warning: The vibration emission
-1
value may differ during actual use
of the power tool from the stated
value depending on the manner in
which the power tool is used.
Try to keep the exposure to vibra-
tions as low as possible. Examples
of measures to reduce vibration
2
exposure are the wearing of gloves
when using the tool (except: operating mode drilling) and limiting the
working hours. For this purpose all
-1
parts of the operating cycle have to
be considered (for example, times
when the electric tool is switched
off and times when it is switched on
but running without any load).
Notes on Safety
2
This section details the basic safety
2
instructions for working with the
2
appliance.
-1
2
6
IE CYNI
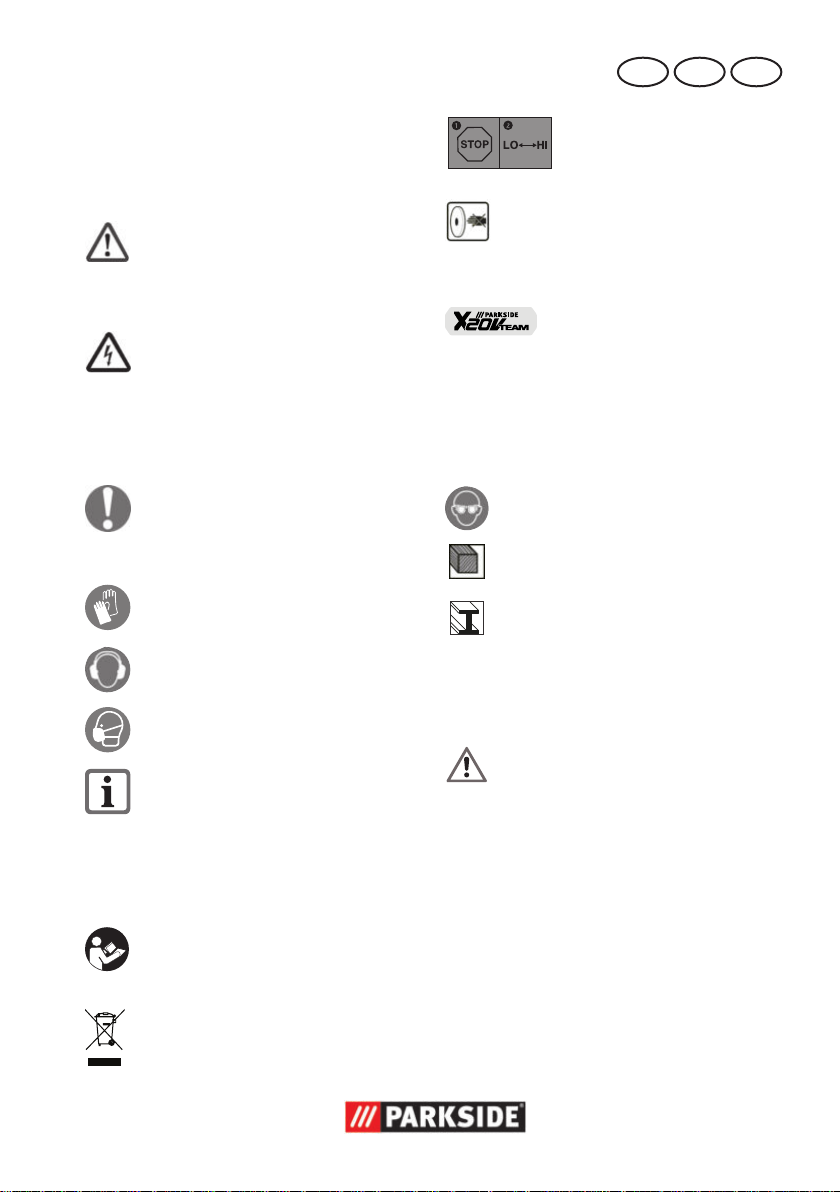
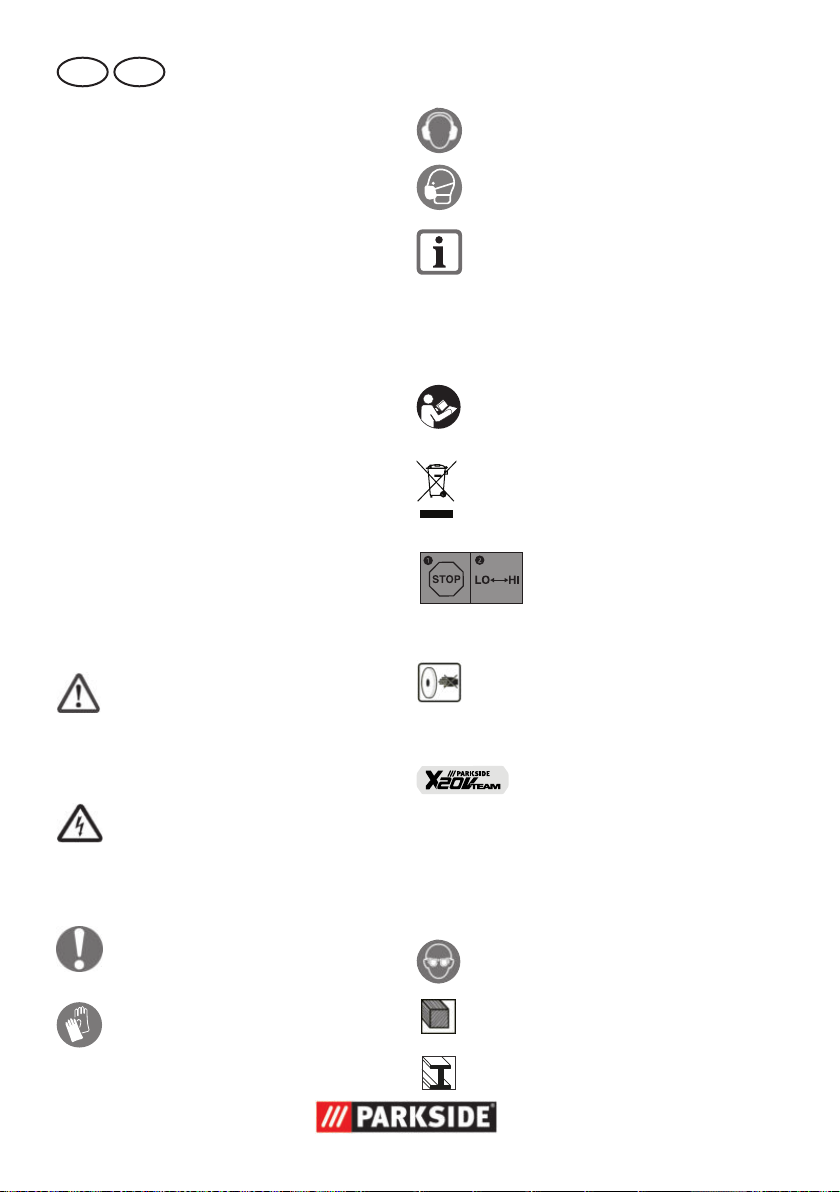
Symbols
Symbols in the manual
Warning symbols with
information on damage
and injury prevention.
Hazard symbol with
information on the prevention of personal injury caused by electric
shock.
Instruction symbols with infor-
mation on preventing damage.
Wear safety gloves.
Wear ear protection.
Wear a protective mask.
Help symbols with informa-
tion on improving tool handling.
Symbols on the Equipment
Read through the instruction
manual carefully.
Electrical appliances must
not be disposed of with the
domestic waste.
Stop appliance before
changing gear.
Injury hazard caused by
rotating tool! Keep hands
away.
This device is part of the
Parkside X20VTEAM
series.
Graphic symbols on the saw
blades:
Wear eye protection.
Suitable for sawing wood
Suitable for sawing metal
General Safety Directions
for Power Tools
WARNING! Read all
safety notices, instructions, illustrations and
technical data that have
been provided with this
power tool. Omissions in
the compliance with safety
directions and instructions
can cause electrical shock,
re and/or severe injuries.
7

IE CYNI
Retain all safety directions
and instructions for future
use.
The term „power tool“ in the warnings refers to your mains-operated
(corded) power tool or batteryoperated (cordless) power tool).
1) WORK AREA SAFETY
a) Keep work area clean
and well lit. Cluttered or dark
areas invite accidents.
b) Do not operate power
tools in explosive atmospheres, such as in the
presenceofammable
Iiquids, gases or dust.
Power tools create sparks which
may ignite the dust or fumes.
c) Keep children and by-
standers away while operating a power tool. Dis-
tractions can cause you to lose
control.
2) ELECTRICAL SAFETY
CAUTION! The following
states how to avoid accidents
and injuries due to electric
shock:
a) Power tool plugs must
match the outlet. Never
modify the plug in any
way. Do not use any
adapter plugs with
earthed (grounded) power
tools. Unmodied plugs and
matching outlets will reduce risk
of electric shock.
b) Avoid body contact with
earthed or grounded surfaces, such as pipes, radiators, ranges and refrigerators. There is an increased
risk of electric shock if your
body is earthed or grounded.
c) Do not expose power
tools to rain or wet conditions. Water entering a power
tool will increase the risk of
electric shock.
d) Do not abuse the cord.
Never use the cord for
carrying, pulling or unplugging the power tool.
Keep cord away from
heat, oil, sharp edges or
moving parts. Damaged or
entangled cords increase the
risk of electric shock.
e) When operating a power
tool outdoors, use an extension cord suitable for
outdoor use. Use of a cord
suitable for outdoor use reduces
the risk of electric shock.
f) If operating a power tool
in a damp location is unavoidable, use a residual
8

IE CYNI
current device (RCD) protected supply. Use of an
RCD reduces the risk of electric
shock.
3) PERSONAL SAFETY
CAUTION! The following
states how to avoid accidents
and injuries:
a) Stay alert, watch what
you are doing and use
common sense when
operating a power tool.
Do not use a power tool
while you are tired or un-
dertheinuenceofdrugs,
alcohol or medication. A
moment of inattention white operating power tools may result
in serious personal injury.
b) Use personal protective
equipment. Always wear
eye protection. Protective
equipment such as dust mask,
non-skid safety shoes, hard hat,
or hearing protection used for
appropriate conditions will reduce personal injuries.
c) Prevent unintentional
starting. Ensure the switch
is in the off-position before connecting to power
source and/or battery
pack, picking up or car-
rying the tool. Carrying
power tools with your nger on
the switch or energising power
tools that have the switch on
invites accidents.
d) Remove any adjusting
key or wrench before
turning the power tool on.
A wrench or a key left attached
to a rotating part of the power
tool may result in personal injury.
e) Do not overreach. Keep
proper footing and balance at all times. This ena-
bles better control of the power
tool in unexpected situations.
f) Dress properly. Do not
wear loose clothing or
jewellery. Keep your hair,
clothing and gloves away
from moving parts. Loose
clothes, jewellery or long hair
can be caught in moving parts.
g) If dust extraction and
collection devices can be
installed, make sure that
these are connected and
used correctly. Use of dust
collection can reduce dust-related hazards.
h) Do not allow yourself to
be lulled into a false sense
of security and do not disregard the safety rules for
power tools, even if you
9

IE CYNI
are familiar with the power tool after using it many
times. Careless action can
lead to serious injuries within a
fraction of a second.
4) POWER TOOL USE AND
CARE
a) Do not force the power
tool. Use the correct power tool for your application. The correct power tool
will do the job better and safer
at the rate for which it was designed.
b) Do not use the power tool
if the switch does not turn
it on and off. Any power tool
that cannot be controlled with
the switch is dangerous and
must be repaired.
c) Remove the plug from
the wall socket and/or
remove the rechargeable battery before you
change the device’s settings, change accessory
parts or put away the
power tool. Such preventive
safety measures reduce the risk
of starting the power tool accidentaIly.
d) Store idle power tools out
of the reach of children
and do not allow persons
unfamiliar with the power
tool or these instructions
to operate the power tool.
Power tools are dangerous in
the hands of untrained users.
e) Look after the power tool
and application tool carefully. Check for misalignment or binding of moving parts, breakage of
parts and any other condition that may affect the
power tool’s operation.
If damaged, have the
power tool repaired before use. Many accidents are
caused by poorly maintained
power tools.
f) Keep cutting tools sharp
and clean. Properly main-
tained cutting tools with sharp
cutting edges are less Iikely to
bind and are easier to control.
g) Use the power tool, acces-
sories and tool bits etc. in
accordance with these instructions, taking into account the working conditions and the work to be
performed. Use of the power
tool for operations different
from those intended could result
in a hazardous situation.
h) Keep handles and grip
surfaces dry, clean and
free from oil and grease.
10

IE CYNI
Slippery handles and grip surfaces do not permit safe operation and control over the power
tool in unexpected situations.
5) CAREFUL HANDLING AND
USE OF BATTERY DEVICES
a) Charge the batteries
only in chargers that are
recommended by the
manufacturer. Risk of re if
a charger that is suitable for a
specic type of battery is used
with other batteries.
b) In the power tools, use
only the batteries designed for the purpose.
The use of other batteries may
result in injuries and risk of re.
c) Keep the unused battery
away from paper clips,
coins, keys, nails, screws
and other small metal objects, which could cause
bridging of the contacts. A
short circuit between the battery
contacts may cause burns or
re.
d) If used incorrectly, liquid
may leak from the battery. Avoid contact with
this. In the event of accidental contact, rinse off
with water. If the liquid gets
into eyes, seek medical assis-
tance. Leaking battery uid may
cause skin irritations or burns.
e) Do not use damaged or
altered batteries. Damaged
or altered batteries can be
unpredictable and lead to re,
explosion or risk of injury.
f) Do not expose batteries to
reorelevatedtemperatures. Fire or temperatures
over 130°C can cause an explosion.
g) Follow all instructions
for charging and never
charge the battery or the
battery-powered tool
outside the temperature
range stated in the operating instructions. Incorrect
charging or charging outside
the permitted temperature range
may destroy the battery and in-
crease the risk of re.
6) SERVICE
a) Have your power tool ser-
vicedbyaqualiedrepair
person using only identical replacement parts. This
will ensure that the safety of the
power tool is maintained.
b) Never repair damaged
batteries. All battery repairs
should be carried out by the
manufacturer or authorised customer service centres only.
11

IE CYNI
Additional safety instructions
Warning! Sawing or
sanding can result in
the formation of hazardous dusts (e.g. arising from materials with
paints containing lead,
materials containing asbestos, metals or some
wood types) which can
present a hazard to the
operator or persons in
the vicinity. Make sure
that the workplace is
well ventilated. Always
wear safety goggles,
safety gloves and respiratory protection. Attach a dust extraction
system.
1) SPECIAL SAFETY INFORMATION FOR THE CORDLESS
COMBINATION TOOL
• Use the additional handles delivered with the
appliance. The loss of control
can result in injuries.
• Hold the electric tool by
the insulated handle surfaces when performing
work where the cutting
tool or screw may come
into contact with hidden
wiring. Contact with a live
wire can also cause a charge
in metal parts of the appliance
and result in an electric shock.
• Use suitable detectors in
ordertondhiddensupply lines or ask the local
utility company. Contact
with electrical cables can lead
to electric shock and re, contact with a gas pipe can result
in an explosion. Damage to a
water pipe can lead to property
damaged and electric shock.
• Secure the workpiece. A
workpiece that is retained with
clamping appliances or a vice
is held more securely than with
your hand.
• Be very careful when han-
dling tools such as saws,
scraper blades and drills.
These are sharp and present an
injury hazard.
• Wear safety gloves when
changing attachments. This
enables you to avoid injuries if
the appliance attachment has
heated up after use.
2) SPECIFIC SAFETY INSTRUCTIONS WHEN SAWING
• Keep hands away from
the sawing area. Do not
12

IE CYNI
reach underneath the
workpiece. Always stand
to the side of the saw
when working. Upon con-
tact with the blade there is a
risk of injury.
• Only when the electric
tool is turned on should
the sawing blade be
moved against the workpiece. There is a risk of kick-
back if the tool insert jams in
the workpiece.
• Make sure that the foot-
plate is securely placed
against the workpiece
during sawing. The saw-
blade can tilt and lead to loss
of control over the power tool.
• Afteryouhavenished
work, turn the power
tool off and do not pull
the sawblade out of the
cut until it has come to a
standstill. In this way you will
avoid any kickback and can
safely put down the power tool.
• Use only undamaged
sawblades in perfect condition. Bent or blunt blades
can break, adversely affect the
cut or cause kickback.
• Do not brake the saw-
blade after switching the
appliance off by applying
side pressure. The sawblade
may be damaged, break or
cause a kickback.
• Tighten the material
rmly.Donotsupportthe
workpiece by hand or
foot. Do not touch any objects
or the ground with the saw
running. There is a risk of kickback.
• Hold the power tool tight-
ly with both hands while
working and ensure a secure footing. The power tool
is guided more securely with
both hands.
• Wait until the power tool
has stopped before placing it down. The tool insert
can tilt and lead to loss of control over the power tool.
• Switch the appliance off
immediately if the sawing
blade jams. Spread the saw
cut out and pull the blade out
carefully. This can lead to loss
of control over the power tool.
3) SPECIAL SAFETY
INFORMATION DURING
SANDING AND SCRAPING
• Only use the power tool
for dry sanding. Do not
scrape moist materials.
Penetration of water into the
power tool increases the risk of
electric shock.
13

IE CYNI
• Avoid overheating the
sanded object and the
sander itself. Possible re
hazard.
• The workpiece gets hot
during grinding. Do not
touch the machined area,
allow it to cool down.
There is a risk of burning. Do
not use coolants or the like.
• Always empty the dust
container before work
breaks. Sanding dust in the
dust sack, micro lter, paper
sack (or in the lter sack or
extraction system lter) can
self-ignite under unfavourable
conditions such as ying sparks
caused by grinding metals.
Particular hazards are caused if
the sanding dust is mixed with
paint, polyurethane residues or
other chemical substances, or
if the sanded object is hot after
long working periods.
4) RESIDUAL RISKS
Even if properly operating and
handling this electric tool, some
residual risks will remain. Due to its
construction and build, this electric
tool may present the following hazards:
a) Lung damage, if suitable res-
piratory protection is not worn;
b) Cuts
c) Ear damage if working without
ear protection.
d) Eye damage if suitable eye pro-
tection is not worn.
e) Damage to your health caused
by swinging your hands and
arms when operating the appliance for longer periods of time
or if the unit is not held or maintained properly.
Warning! During operation,
this electric tool generates an
electromagnetic eld which,
under certain circumstances,
may impair the functionality
of active or passive medical
implants. To reduce the risk
of serious or lethal injuries,
we recommend that persons with medical implants
consult their doctor and the
manufacturer of their medical
implant before operating the
machine.
Observe the safety in-
formation and notes on
charging and proper
use as shown in the operating instructions for
your battery and charger from the Parkside
X20VTeamseries.
14
IE CYNI
Initial Operation
Recharging the battery
Ensure that the ambient tem-
perature does not exceed
50°Corfallbelow0°Cduring the charging process.
Do not subject the battery to strong
sunlight over long periods and
do not leave it on a heater (max.
50°C).
Allow a hot battery to cool before
charging.
The charging time is approx. 1 hour
(PAP 20 A1) or approx. 2 hours
(PAP 20 A3).
1. Remove the battery (9) from the appliance if necessary.
2. Insert the battery (9) in the charging
compartment of the battery charger
(14).
3. Plug the battery charger (14) into a
mains outlet.
4. When the battery is fully recharged
unplug the battery charger (3) from the
mains.
5. Pull the battery (9) out of the battery
charger (14).
Practical tips
Personal protective equip-
ment and a fully functional
appliance reduce the risk of
injuries and accidents.
Ensure that the ambient tem-
perature does not exceed
45°Corfallbelow-20°C
during work.
Wear ear protection.
Operation
Replacing the appliance attachment
Secure the appliance against
switching on (see “Switching on/off”) or remove the
rechargeable battery from
the appliance. There is an
injury hazard if the device is
switched on accidentally.
Wear safety gloves. The appliance
attachment might have heated up
after use.
Removing appliance attachment
1. Push the unlocking lever (5) into position as far as the stop and then
hold it in this position.
2. Pull the unlocked appliance attachment
off (4/16/22/26).
When working with the ap-
pliance, always wear suitable clothing and appropriate
protective equipment.
Prior to each use it must be
ensured that the appliance is
working correctly.
Fitting appliance attachment
4. Push the appliance attachment
(4/16/22/26) along the guide rail
into the motor unit (6). It locks into
place audibly.
5. Allow the unlocking lever (5) to slide
back into position .
15
IE CYNI
6. Check that the appliance attachment is
secure by pulling on it.
Switching on/off
1. Switching on: Press the on/off switch
10).
(
By using the on/off switch ( 10) you
can progressively control the speed.
Gentle pressure: low speed
Increase pressure: higher speed.
2. Switching off: Release the on/off
switch ( 10).
If you place the direction switch
( 7) in the middle position, the device is secured against being switched
on.
Motor unit with drill
attachment PKGA1
Changing the tool
Secure the appliance against
switching on (see “Switching on/off”). If the appliance
is switched on accidentally,
there is a danger of injury.
1. Rotate the keyless chuck (1) counterclockwise, until the drill chuck aperture
is large enough to accommodate the
tool.
2. Insert the tool as far as possible into
the keyless chuck (1).
3. Rotate the keyless chuck (1) clockwise
in order to clamp the tool.
4. To remove the tool again, rotate the
keyless chuck (1) and pull out the tool.
Choice of gear
Stop appliance before
changing gear.
1. Wait for the appliance to come to a
standstill.
2 Slide the gear selector ( 3) into the
required position:
1: low speed preselection.
2: high speed preselection.
Set the direction of rotation
The appliance’s direction of rotation can
be changed with the rotational direction
switch.
1. Wait for the appliance to come to a
standstill.
2. Push the rotational direction speed
( 7) into the desired position:
Clockwise rotation: to drill and
screw in screws.
Anticlockwise rotation: to un-
screw screws.
3. If you place the direction switch
( 7) in the middle position, the device
is secured against being switched on.
The direction change may only be
actuated when at a standstill!
Torque adjustment
You can preselect the maximum torque.
The torque settings are labelled 1 - 19 +
1. Wait for the appliance to come to a
standstill.
2. Turn the torque adjusting ring (2) to
select the desired torque:
Screws: Steps 1 - 19
Drilling: Step
16
IE CYNI
3. Start with a lower torque step and increase as required.
The direction change may only be
actuated when the appliance is at a
standstill!
The necessary torque is dependent
on:
- the type and hardness of the material to be treated;
- the type and length of the screws
used.
Motor unit with
multisander attachment
PKGA2
Secure the appliance against
switching on (see “Switching on/off”). If the appliance
is switched on accidentally,
there is a danger of injury.
Wear a protective mask during
grinding work.
Attaching/removing sanding
sheet
The sanding plate ( 21) is tted with
Velcro for rapid attachment of the sanding
sheet.
Attaching sanding sheet
1. Press the sanding sheet (23) evenly
onto the sanding plate (21). Ensure
that the holes in the sanding sheet
are placed above the openings in the
sanding plate.
Removing sanding sheet
2. Simply pull the sanding sheet (23) off
the sanding plate (21).
Connecting dust extraction
You can reduce dust production during
sanding by attaching a dust extraction
system.
1. Push the adaptor (24) into the opening
on the multi-sander attachment (22) as
far as the stop.
2. Connect a dust extractor suction hose
to the adaptor (24).
If necessary, you can connect the
suction hose of a vacuum cleaner
without reducer (25) to the adapter
(24).
Sanding
• Use a dust extraction system when
sanding with the multi-sander attachment.
• Move the appliance against the workpiece once it is switched on.
• Clean the sanding plate before you attach a sanding sheet.
• Only work with sanding sheets in perfect condition to achieve good sanding
results.
• Work using low and even pressure.
This protects the appliance and the
sanding sheet.
• Do not use the same sanding sheet to
sand different materials (e.g. metal
and then wood).
Selection of sanding sheet
Grain size P Application
P 60
P 80 / 120 for plain sanding
for pre-sanding rough wood
surfaces
17
IE CYNI
P 240
for ne sanding of primed
and painted surfaces
Motor unit with sabre
saw attachment PKGA3
Installing/changing the blade
Secure the appliance against
switching on (see “Switching on/off”). If the appliance
is switched on accidentally,
there is a danger of injury.
Wear gloves when handling the
sawblade. In this way, you avoid
injury from cuts.
Caution, risk of Injury!
- Do not use any blunt or bent
blades or blades which are
damaged in any other way.
- Always insert a suitable sawblade.
An overview of appropriate blades
can be found in “Spare Parts/Accessories”.
then pull the sawblade out of the sawblade mounting.
For certain work, the sawblade
can also be inserted after turning
through 180°.
Operating the sabre saw
1. Before switching the appliance on, ensure it is not in contact with the workpiece.
2. Turn the appliance on.
By using the on/off switch ( 10) you
can progressively control the stroke
rate.
Gentle pressure: low stroke rate.
Greater pressure: higher stroke rate.
The on/off switch cannot be locked.
3. Place the footplate ( 17) on the
workpiece.
4. Cut with a uniform forward motion.
5. After completion of the work, rst remove the blade from the saw cut and
then switch the appliance off.
Sawing
Wear eye protection.
Installing the blade:
1. Push the lever (18) for sawblade unlocking upwards as far as the stop.
Push the sawblade shaft (19/20) into
the sawblade mounting slot.
2. To unlock, release the lever (18), it will
return to the initial position.
3. Check that the sawblade is secure by
pulling on it.
Removing the sawblade:
4. Press the lever (18) for sawblade unlocking upwards as far as the stop and
18
• Use only undamaged sawblades in
perfect condition. Only use metal sawblades for metalworking.
• Ensure your stance is stable and hold
the appliance tightly with both hands
and away from your body.
• Before sawing the workpiece, check
for hidden foreign objects such as
nails, screws. These must be removed.
• Plunge cuts may only be made in soft
material such as wood or plasterboard.
IE CYNI
Selection of sawblade
Wood sawblade
Metal sawblade
Plunge sawblade
for wood, plastic, plasterboard
for metal sheets, proles
and tubes
for soft materials like
wood or plasterboard
Motor unit with multi-
function tool PKGA4
Wear a protective mask during
grinding work.
Changing the tool
Secure the appliance against
switching on (see “Switching on/off”). If the appliance
is switched on accidentally,
there is a danger of injury.
Ensure that the tool holder (29) is
tightly screwed in to ensure you can
safely mount and use all the supplied tools (30/32/33).
1. Push the lever (27) for tool unlocking
upwards as far as the stop.
2. Place the desired tool (30/32/33) be-
low the tool holder (29) on the arbors
(28). You may need to rotate the unlocked tool holder (29) as far as needed to allow you to place the desired
tool (30/32/33) onto the arbors (28).
12 different positions are possible.
3. Rotate the tool holder as required until
it is rmly in place.
4. Push the lever (27) for tool unlocking
forwards again. The tool holder is
xed to the tool.
Attaching/removing sanding
sheet
The delta sanding plate (30) is tted with
Velcro for rapid attachment of the sanding
sheet.
Attaching sanding sheet
1. Press the sanding sheet (31) evenly
onto the delta sanding plate (30). Ensure that the holes in the sanding sheet
are placed above the openings in the
sanding plate.
Removing sanding sheet
2. Simply pull the sanding sheet (31) off
the delta sanding plate (30).
Sanding
• Use a dust extraction system when
sanding with the multi-sander attachment.
• Move the appliance against the workpiece once it is switched on.
• Clean the sanding plate before you attach a sanding sheet.
• Only work with sanding sheets in perfect condition to achieve good sanding
results.
• Work using low and even pressure.
This protects the appliance and the
sanding sheet.
• Do not use the same sanding sheet to
sand different materials (e.g. metal
and then wood).
Selection of sanding sheet
Grain size P Application
P 60
P 80 / 120 for plain sanding
for pre-sanding rough wood
surfaces
19
IE CYNI
P 240
for ne sanding of primed
and painted surfaces
Scraping
• Use a high oscillation rate when scraping.
• Work using low pressure and at a low
angle in order not to damage the substrate material.
Cleaning/Maintenance
Repair and servicing work not
described in this manual should
always be carried by our Service
Centre. Use only original parts.
Switch off the device and remove
the battery from the device before
working with or transporting it.
The following cleaning and servicing
should be done regularly. This will ensure
a long and reliable service life.
Cleaning
Do not spray the appliance
with water and do not immerse it in water. Electric
shock hazard!
• Keep clean the ventilation slots, motor
housing and handles of the appliance.
Use a damp cloth or a brush.
Do not use cleaning agents or solvents.
You may otherwise irreparably damage the appliance.
Maintenance
• The equipment is maintenance free.
Storage
• Store the device in a dry place well out
of reach of children.
• Store the equipment between 0°C and
45°C. During storage, avoid extreme
cold or heat so the battery does not
lose power.
Waste Disposal/Environmental Protection
Remove the battery from the device and
take the device, battery, accessories and
packaging for environmentally friendly
recycling.
Electric units do not belong with
domestic waste.
• Remove the rechargeable battery before disposing of the appliance.
• Return the unit and the recharger to a
recycling centre. The plastic and metal
parts employed can be separated out
and thus recycled use can be implemented. Ask our Service-Center for
details.
• Defective units returned to us will be
disposed of for free.
20

IE CYNI
Guarantee
Dear Customer,
This equipment is provided with a 3-year
guarantee from the date of purchase.
In case of defects, you have statutory rights
against the seller of the product. These
statutory rights are not restricted by our
guarantee presented below.
Terms of Guarantee
The term of the guarantee begins on the
date of purchase. Please retain the original
receipt. This document is required as proof
of purchase.
If a material or manufacturing defect
occurs within three years of the date of
purchase of this product, we will repair or
replace – at our choice – the product for
you free of charge. This guarantee requires
the defective equipment and proof of purchase to be presented within the three-year
period with a brief written description of
what constitutes the defect and when it occurred.
If the defect is covered by our guarantee,
you will receive either the repaired product
or a new product. No new guarantee period begins on repair or replacement of the
product.
Guarantee Period and Statutory
Claims for Defects
The guarantee period is not extended by
the guarantee service. This also applies for
replaced or repaired parts. Any damages
and defects already present at the time of
purchase must be reported immediately after unpacking. Repairs arising after expiry
of the guarantee period are chargeable.
Guarantee Cover
The equipment has been carefully produced in accordance with strict quality
guidelines and conscientiously checked
prior to delivery.
The guarantee applies for all material and
manufacturing defects. This guarantee
does not extend to cover product parts
that are subject to normal wear and may
therefore be considered as wearing parts
(e.g. tools, battery) or to cover damage to
breakable parts (e.g. switches).
This guarantee shall be invalid if the product has been damaged, used incorrectly or
not maintained. Precise adherence to all of
the instructions specied in the operating
manual is required for proper use of the
product. Intended uses and actions against
which the operating manual advises or
warns must be categorically avoided.
The product is designed only for private
and not commercial use. The guarantee
will be invalidated in case of misuse or
improper handling, use of force, or interventions not undertaken by our authorised
service branch.
Processing in Case of Guarantee
To ensure quick handling of you issue,
please follow the following directions:
• Please have the receipt and identication number (IAN 315586) ready as
proof of purchase for all enquiries.
• Please nd the item number on the rating plate.
• Should functional errors or other defects occur, please initially contact the
service department specied below by
telephone or by e-mail. You will then
receive further information on the processing of your complaint.
21

IE CYNI
• After consultation with our customer
service, a product recorded as defective can be sent postage paid to the
service address communicated to you,
with the proof of purchase (receipt)
and specication of what constitutes
the defect and when it occurred. In order to avoid acceptance problems and
additional costs, please be sure to use
only the address communicated to you.
Ensure that the consignment is not sent
carriage forward or by bulky goods,
express or other special freight. Please
send the equipment inc. all accessories
supplied at the time of purchase and
ensure adequate, safe transport packaging.
Repair Service
For a charge, repairs not covered by the
guarantee can be carried out by our ser-
vice branch, which will be happy to issue
a cost estimate for you. We can handle
only equipment that has been sent with adequate packaging and postage.
Attention: Please send your equipment to
our service branch in clean condition and
with an indication of the defect.
Equipment sent carriage forward or by
bulky goods, express or other special
freight will not be accepted.
We will dispose of your defective devices
free of charge when you send them to us.
Service-Center
Service Ireland
IE
Service Northern Ireland
Tel.: 1890 930 034
NI
(0,08 EUR/Min., (peak))
(0,06 EUR/Min., (off peak))
E-Mail: grizzly@lidl.ie
IAN 315586
Service Cyprus
CY
Tel.: 8009 4409
E-Mail: grizzly@lidl.com.cy
IAN 315586
Importer
Please note that the following address is
not a service address. Please initially con-
tact the service centre specied above.
Grizzly Tools GmbH & Co. KG
Stockstädter Straße 20
DE-63762 Großostheim
GERMANY
www.grizzly-service.eu
22

IE CYNI
Spare Parts/Accessories
Spare parts and accessories can be obtained at
www.grizzly-service.eu
If you do not have internet access, please contact the Service Centre via telephone
(see “Service-Center” Page 22). Please have the order number mentioned below ready.
Position Position Description Order No.
instruction exploded
manual drawing
4 PKGA1 Drill attachment 91104151
16 PKGA3 Sabre saw attachment 91104153
19 Metal sawblade (HSS 150 mm/18 TPI*) 13800222
20 Wood sawblade (HCS 150 mm/6 TPI*) 13800221
22 PKGA2 Multi-sander attachment 91104154
23 PKGA2-7 Sanding sheets for multi-sander attachment
(2 x P 60, 2 x P 120, 1 x P 240**) 30211066
24 PKGA2-9 Dust extraction adaptor 91104150
26 PKGA4 Multifunction tool 91104158
30 Delta sanding plate 91104159
31 Sanding sheets for delta sanding plate
(1 x P 60, 1 x P 80, 1 x P 120**) 30211067
32 Scraper blade 30220082
33 Plunge sawblade 30220083
* HSS = High Speed Steel
* HCS = High Carbon Steel, steel with high carbon content
TPI = Teeth per inch
**P = Grain size
Also available:
Battery PAP 20 A1, 2,0 Ah ..... 80001166
Battery PAP 20 A3, 4,0 Ah ..... 80001168
Charger PLG 20 A1, EU .........80001313
Charger PLG 20 A1, UK ......... 80001314
Further accessories are available from the trade for every possible application
purpose.
23
IE CYNI
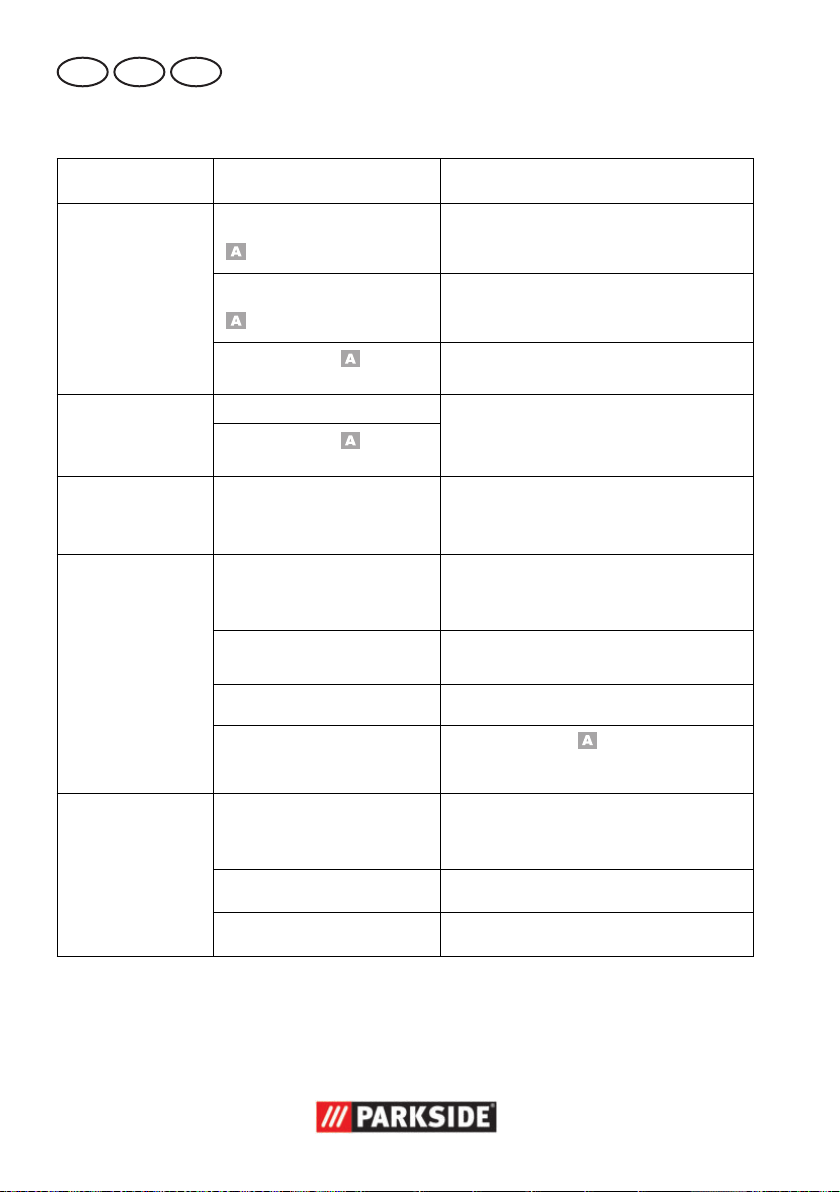
Trouble Shooting
Problem Possible Cause Error correction
Appliance doesn‘t
start
Appliance works
with interruptions
Tool does not
move although the
motor is running
Low appliance
power
Rechargeable battery
9) discharged
(
Rechargeable battery
( 9) not inserted
On/off switch ( 10) is
broken
Internal lose contact
On/off switch (
broken
Appliance attachment or
tool not correctly mounted
Tool unsuitable for the
workpiece to be worked on
Tool blunt or worn down Insert a new tool
Incorrect speed Adjust speed
Low battery power
10) is
Charge rechargeable battery (observe
the separate operating instructions for
the rechargeable battery and charger)
Insert rechargeable battery (observe
the separate operating instructions for
the rechargeable battery and charger)
Repair by Service Centre
Repair by Service Centre
Fit the appliance attachment or tool
correctly (see „Operation“)
Insert a suitable tool
Charge battery (
separate operating instructions for the
rechargeable battery and charger)
9) (observe the
Tool wears down
quickly
24
Tool unsuitable for the
workpiece to be worked on
Too much pressure applied Reduce the pressure
Speed too high Reduced speed
Insert a suitable tool (see „Operation“)

GR CY
Περιεχόμενα
Εισαγωγή .................................... 25
Σκοπός χρήσης ........................... 25
Γενική περιγραφή ....................... 26
Παραδοτέα υλικά ..................................26
Επισκόπηση ...........................................26
Τεχνικά στοιχεία .......................... 27
Υποδείξεις ασφάλειας..................28
Σύμβολα και εικονοσύμβολα ................28
Γενικές υποδείξεις ασφαλείας για
ηλεκτρικά εργαλεία ................................29
Περαιτέρω υποδείξεις ασφάλειας .......33
Θέση σε λειτουργία ..................... 37
Φόρτιση μπαταρίας ..............................37
Υποδείξεις εργασίας .................... 37
Χρήση ........................................ 37
Αλλαγή προσαρτημάτων συσκευής ......37
Ενεργοποίηση/Απενεργοποίηση..........38
Μονάδα μοτέρ με εξαρτήματα
δραπανοκατσάβιδου PKGA1 ...............38
Μονάδα μοτέρ με πολυλειαντήρα
PKGA2 ................................................... 39
Μονάδα μοτέρ με σπαθοσέγα PKGA3 ..40
Μονάδα μοτέρ με εργαλείο
πολλαπλών λειτουργιών PKGA4 ...........41
Καθαρισμός και συντήρηση ........ 42
Καθαρισμός ...........................................43
Συντήρησης............................................43
Αποθήκευση ............................... 43
Απόσυρση/προστασία του
περιβάλλοντος ............................ 43
Εγγύηση ...................................... 44
Σέρβις επισκευής ......................... 45
Service - Center ............................ 45
Εισαγωγέας ................................. 45
Ανταλλακτικά / Αξεσουάρ ........... 46
Ανίχνευση βλαβών .....................47
Μετάφραση της πρωτότυπης
Δήλωσης συμμόρφωσης CE .......... 73
Επί μέρoυς σχεδιαγράμματα ... 75-77
Εισαγωγή
Συγχαρητήρια για την αγορά της νέας συσκευής σας. Προτιμήσατε να αγοράσετε ένα
προϊόν ανώτερης ποιότητας.
Η ποιότητα αυτής της συσκευής ελέγχθηκε
κατά τη διάρκεια της παραγωγής, αλλά και σε
τελικό έλεγχο. Με τον τρόπο αυτό εξασφαλίστηκε η λειτουργικότητα της συσκευής σας.
Οι οδηγίες χρήσης αποτελούν
αναπόσπαστο τμήμα αυτού του
προϊόντος. Περιέχουν σημαντικές
υποδείξεις για την ασφάλεια, τη χρήση και διάθεση της συσκευής. Πριν
τη χρήση του προϊόντος να εξοικειωθείτε με όλες τις οδηγίες χειρισμούς
και τις υποδείξεις ασφαλείας. Να
χρησιμοποιείτε το προϊόν μόνοv
όπως περιγράφεται και μόνο για τον
αναφερόμενο σκοπό. Να φυλάξετε
καλά τις οδηγίες και να τις παραδώσετε σε τρίτους μαζί με το προϊόν.
Σκοπός χρήσης
Η συσκευή προορίζεται για το βίδωμα και
το λύσιμο βιδών, καθώς και για διάτρηση
ξύλου, μετάλλου ή πλαστικού. Τα εργαλεία
προσάρτησης προβλέπονται για λείανση,
πριόνισμα και ξύσιμο.
Αυτή η συσκευή δεν είναι κατάλληλη για
επαγγελματική χρήση. Οποιαδήποτε άλλη
χρήση, η οποία δεν εγκρίνεται ρητά μέσα
από τις οδηγίες αυτές, μπορεί να προκαλέσει ζημιές στη συσκευή και να αποτελέσει
σοβαρό κίνδυνο για το χρήστη. Η χρήση της
συσκευής απευθύνεται σε ενήλικες. Νέοι
κάτω των 16 ετών επιτρέπεται να χρησιμοποιούν τη συσκευή μόνο υπό την επίβλεψη
ενηλίκων. Ο κατασκευαστής δεν ευθύνεται
για ζημιές που προκλήθηκαν λόγω μη ενδεδειγμένης χρήσης ή λόγω εσφαλμένου
χειρισμού.
25

GR CY
Ο συσκευή είναι τμήμα της σειράς Parkside
X20V TEAM και λειτουργεί με συσσωρευτές της σειράς X 20 V TEAM. Οι συσσωρευτές επιτρέπεται να φορτίζονται μόνο
με συσκευές φόρτισης της σειράς Parkside
X20V TEAM.
Γενική περιγραφή
Θα βρείτε τις απεικονίσεις στην
μπροστινή και πίσω αναδιπλωνόμενη σελίδα.
Παραδοτέα υλικά
Βγάλτε τη συσκευή από τη συσκευασία και
ελέγξτε, αν είναι πλήρης. Διαθέστε τα υλικά
συσκευασίας σύμφωνα με τους κανονισμούς.
• Μονάδα μοτέρ με εξαρτήματα δραπανο-
κατσάβιδου
• Σπαθοσέγα
• Πολυλειαντήρας
• Πολυεργαλείο
• Αξεσουάρ Εξαρτήματα δραπανοκατσάβι-
δου
- 6 Bit διάτρησης
(1,5/2/3/4/5/6mm)
- 6 Bit βιδώματος, 50 mm
- Συγκράτηση μυτών
• Αξεσουάρ Σπαθοσέγα
- Πριονολάμα για ξύλο
(HCS150/6TPI)
- Πριονολάμα για μέταλλο
(HSS150/18TPI)
• Αξεσουάρ Πολυλειαντήρας
- 5 Φύλλα λείανσης
(2 x P* 60, 2 x P 120, 1 x P 240)
• Αξεσουάρ Πολυεργαλείο
- Βυθιζόμενη πριονολάμα
- Ξύστρα
- Πλάκα λείανσης τριβείου-δέλτα
(1 x P* 60, 1 x P 80, 1 x P 120)
• Συσσωρευτής
• Φορτιστής
• Βαλιτσάκι
• Οδηγιών χρήσης
*P = Κόκκωση
Επισκόπηση
1 Ταχυτσόκ
2 Δακτύλιος ρύθμισης ροπής
στρέψης
3 Διακόπτης επιλογής ταχυτήτων
4 Εξαρτήματα δραπανοκατσάβιδου
PKGA1
5 Μοχλός απασφάλισης για το
προσάρτημα συσκευής
6 Μονάδα μοτέρ
7 Διακόπτης κατεύθυνσης
περιστροφής
8 Λαβή
9 Συσσωρευτής
9a Ένδειξη φόρτισης μπαταρίας
10 Διακόπτης ενεργο-/απενεργοποί-
ησης
11 Συγκράτηση μυτών
12 Bit βιδώματος, 50 mm, 6 τεμάχια
13 Bit διάτρησης, 6 τεμάχια
14 Φορτιστής
15 Βαλιτσάκι
16 Σπαθοσέγα PKGA3
17 Πλάκα πέδιλου
18 Μοχλός για απασφάλιση της
πριονολάμας
19 Πριονολάμα για μέταλλο
20 Πριονολάμα για ξύλο
21 Πλάκα τροχίσματος
22 Πολυλειαντήρας PKGA2
23 5 Φύλλα λείανσης
24 Αντάπτορας για την διάταξη
αναρρόφησης σκόνης
25 Συστολή
26 Πολυεργαλείο PKGA4
27 Μοχλός για την απασφάλιση
εργαλείου
26

GR CY
28 Άξονες υποδοχής
29 Στήριγμα εργαλείου
30 Πλάκα λείανσης τριβείου-δέλτα
31 3 Φύλλα λείανσης
32 Ξύστρα
33 Βυθιζόμενη πριονολάμα
Τεχνικά στοιχεία
Πολυμηχάνημα μπαταρίας
4 σε 1 ....................... PKGA 20-Li B1
Τάση κινητήρα .....................................20 V
Αριθμός στροφών ρελαντί (n0) .. 21000 min
Μονάδα μοτέρ + εξαρτήματα δραπανοκατσάβιδου PKGA1
Αριθμός στροφών ρελαντί
(n0).............................0 - 400/0 - 1350 min
Ροπή στρέψης ............................. μέγ. 25 Nm
Διάσταση τσοκ ............................1,0 - 10 mm
Διάμετρος διάτρησης
για ξύλο ....................................μέγ. 10 mm
για χάλυβα ................................. μέγ. 8 mm
Βάρος (χωρίς φορτιστή) ......................1,5 kg
Στάθμη ηχητικής πίεσης
(LpA) ........................ 83,7 dB(A), KpA= 3 dB
Επιτρεπόμενη στάθμη θορύβου
(LWA) ...................... 94,7 dB(A), KWA= 3 dB
Δόνηση (ah)
Διάτρηση σε μέταλλο ..............1,322 m/s
ρελαντί .....................................1,531 m/s
K=1,5 m/s
Μονάδα μοτέρ + σπαθοσέγα PKGA3
Άρθυμός ταλαντώσεων (n0) ....0 - 3200 min
Μήκος ταλάντωσης
..................22 mm
Βάρος (χωρίς φορτιστή) ......................1,8 kg
Στάθμη ηχητικής πίεσης
(LpA) ........................ 89,3 dB(A), KpA= 3 dB
Επιτρεπόμενη στάθμη θορύβου
(LWA) ....................100,3 dB(A), KWA= 3 dB
Δόνηση (ah)
Κοπή σανίδων ....................... 12,395 m/s
Κοπή ξύλινων δοκών ............12,392 m/s
-1
K=1,5 m/s
Μονάδα μοτέρ + πολυεργαλείο
PKGA4
Αριθμός ταλαντώσεων (n0) .. 0 - 20000 min
Γωνία ταλάντωσης .................................. 3,0°
-1
Βάρος (χωρίς φορτιστή) ......................1,4 kg
Στάθμη ηχητικής πίεσης
(LpA) ........................ 84,8 dB(A), KpA= 3 dB
Επιτρεπόμενη στάθμη θορύβου
(LWA) ...................... 95,8 dB(A), KWA= 3 dB
Δόνηση (ah) .................................4,229 m/s
K=1,5 m/s
H αφερόμενη τιμή μετάδοσης δόνησης
μετρήθηκε βάσει τυποποιημένης μεθόδου
δοκιμής και μπορεί να χρησιμοποιηθεί για
τη σύγκριση μίας ηλεκτρικής συσκευής με
2
μία άλλη. Η αναφερόμενη τιμή μετάδοσης
2
δόνησης μπορεί επίσης να χρησιμοποιηθεί
2
και για αρχική εκτίμηση της έκθεσης.
-1
2
2
2
-1
2
2
Μονάδα μοτέρ + πολυλειαντήρας
PKGA2
Aριθμός ταλαντώσεων (n0) .....0 - 9000 min
Γυαλόχαρτο
...................... 138 x 97 mm
Βάρος (χωρίς φορτιστή) ......................1,4 kg
Στάθμη ηχητικής πίεσης
(LpA) ........................ 88,6 dB(A), KpA= 3 dB
Επιτρεπόμενη στάθμη θορύβου
(LWA) ...................... 99,6 dB(A), KWA= 3 dB
Δόνηση (ah) .................................4,572 m/s
K=1,5 m/s
Προειδοποίηση:
Η τιμή μετάδοσης της δόνησης μπο-
-1
ρεί να διαφέρει κατά την πραγματική
χρήση της ηλεκτρικής συσκευής από
την αναφερόμενη τιμή, ανάλογα με
τον τρόπο χρήσης της.
Προσπαθείτε να διατηρείτε την
επιβάρυνση λόγω κραδασμών
2
2
όσο μικρότερη γίνεται. Μέτρα για
τη μείωση της επιβάρυνσης λόγω
27
GR CY
κραδασμών είναι για παράδειγμα η
χρήση γαντιών κατά τη χρήση του
εργαλείου (εξαίρεση: είδος λειτουργίας Διάτρηση) και ο περιορισμός
του χρόνου εργασίας. Εδώ πρέπει
να ληφθούν υπόψιν όλα τα στάδια
λειτουργίας (για παράδειγμα ο χρόνος κατά τον οποίο το ηλεκτρικό εργαλείο είναι απενεργοποιημένο και ο
χρόνος κατά τον οποίο το ηλεκτρικό
εργαλείο είναι μεν ενεργοποιημένο,
αλλά λειτουργεί χωρίς επιβάρυνση).
Υποδείξεις ασφάλειας
Στο κεφάλαιο αυτό θα βρείτε τις βασικές προδιαγραφές ασφαλείας που αφορούν την εργασία με τη συσκευή.
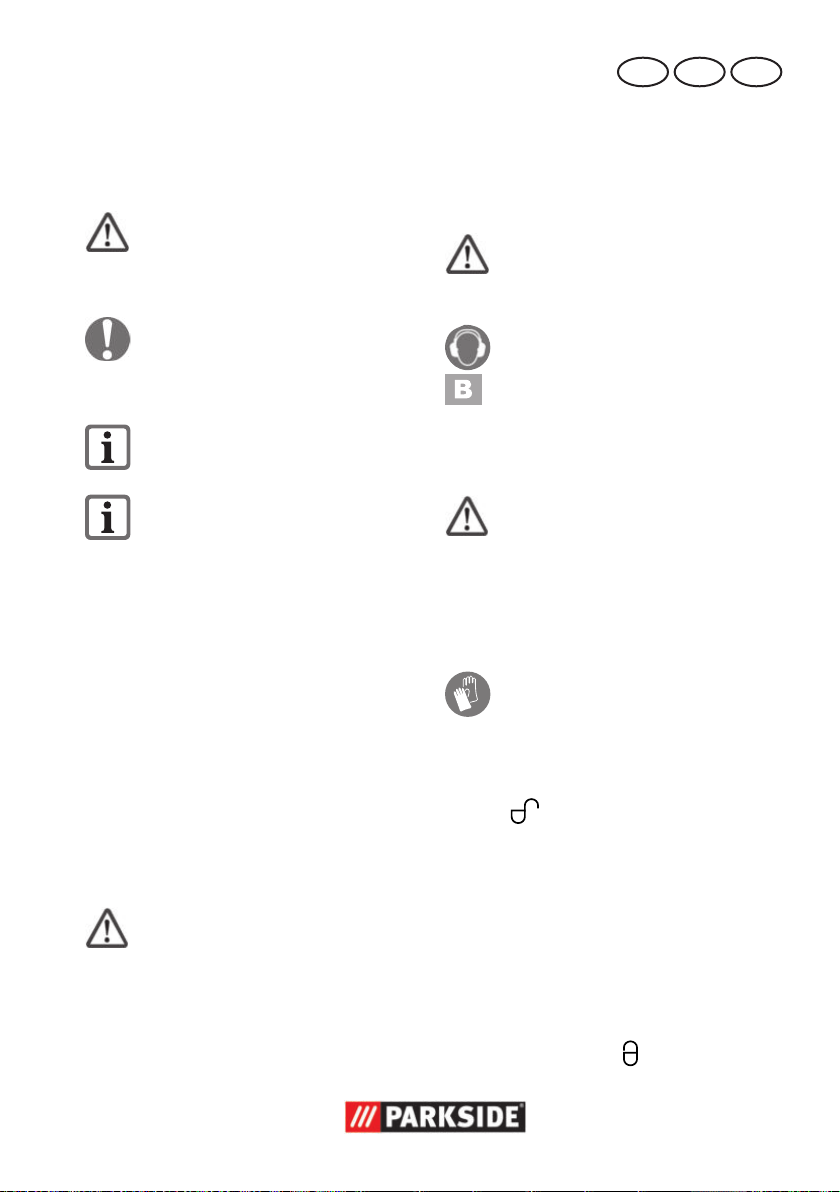
Σύμβολα και εικονοσύμβολα
Σύμβολα στις οδηγίες
Σύμβολα κινδύνου με
στοιχεία για την πρόληψη
προσωπικών και υλικών ζημιών.
Σύμβολα κινδύνων με πλη-
ροφορίες για την πρόληψη
βλαβών σε άτομα από ηλεκτροπληξία.
Φοράτε προστασία για την ακοή.
Φοράτε προστατευτική μάσκα.
Σύμβολο υπόδειξης με πληροφο-
ρίες για τον καλύτερο χειρισμό
της συσκευής.
Σήματα εικόνες στη συσκευή:
Διαβάστε προσεκτικά ολόκληρη
την οδηγία χειρισμού.
Ηλεκτρικές συσκευές δεν ανή-
κουν στα οικιακά απορρίμματα.
Σταματήστε τη συσκευή
πριν από την αλλαγή ταχύτητας.
Κίνδυνος τραυματισμού από το
περιστρεφόμενο εργαλείο! Κρατάτε τα χέρια σας μακριά.
Η συσκευή είναι τμή-
μα της σειράς Parkside
X20VTEAM
Εικονοσύμβολο επάνω στους
πριονόδισκους:
Σύμβολο υποχρέωσης με στοι-
χεία για την πρόληψη ζημιών.
Φοράτε γάντια προστασίας.
28
Φοράτε προστατευτικά γυαλιά.
Για το πριόνισμα ξύλου
Για το πριόνισμα μετάλλου

GR CY
Γενικές υποδείξεις ασφαλείας
για ηλεκτρικά εργαλεία
ΠΡΟΕΙΟΠΟΙΗΣΗ! Δια-
βάστε όλες τις υποδείξεις
ασφάλειας, τις οδηγίες, τις
εικόνες και τα τεχνικά δεδομένα που συνοδεύουν
το παρόν ηλεκτρικό εργαλείο. Παραλείψεις στην τήρηση
των υποδείξεων ασφαλείας και
των οδηγιών μπορούν να οδηγήσουν σε ηλεκτροπληξία, πυρκαγιά και/ή βαρείς τραυματισμούς.
Διατηρείτε όλες τις υποδείξεις
ασφαλείας και τις οδηγίες για
μελλοντική αναφορά.
Η έννοια „ηλεκτρικά εργαλεία“, που
χρησιμοποιείται στις υποδείξεις ασφαλείας, αναφέρεται σε ηλεκτρικά εργαλεία που λειτουργούνται με το ηλεκτρικό
δίκτυο (με καλώδιο ρεύματος) και σε
ηλεκτρικά εργαλεία που λειτουργούνται
με συσσωρευτή (δίχως καλώδιο ρεύματος).
1) Aσφάλεια στη θέση εργασίας:
α) Να διατηρείτε τη θέση εργα-
σίας σας καθαρή και καλά
φωτισμένη. Σε όχι τακτικούς ή όχι
καλά φωτισμένους χώρους εργασίας
δημιουργούνται ατυχήματα.
β) Μην εργάζεστε με το ηλεκτρι-
κό εργαλείο σε εκρηκτικό
περιβάλλον, στο οποίο βρίσκονται εύφλεκτα υγρά, αέρια
ή σκόνες. Τα ηλεκτρικά εργαλεία
παράγουν σπινθήρες που μπορούν
να αναφλέξουν τη σκόνη και τους
ατμούς.
γ) Να κρατάτε μακριά τα παιδιά
κατά τη διάρκεια χρήσης του
ηλεκτρικού εραλείουαλυσοπρίονου. Εάν δεν είστε καλά
συγκεντρωμένοι, δεν αποκλείεται να
χάσετε τον έλεγχο επί της συσκευής.
2) Ηλεκτρική ασφάλεια:
Προσοχή: Έτσι αοποφεύγετε ατυ-
χήματα και τραυματισμούς από
ηλεκτροπληξία:
α) Το βύσμα του ηλεκτρικού ερ-
γαλείου πρέπει να ταιριάζει
στην πρίζα. Δεν επιτρέπεται
καμία τροποποίηση του βύσματος. Μη χρησιμοποιείτε
προσαρμογές βυσμάτων μαζί
με γειωμένες ηλεκτρικές συσκευές. Όταν δεν έχουν αλλαχτεί
τα βύσματα και όταν χρησιμοποιείτε
κατάλληλες πρίζες, μειώνεται ο κίνδυνος ηλεκτροπληξίας.
β) Να αποφεύγετε την σωματική
επαφή με γειωμένες επιφάνειες όπως τις γειωμένες επιφάνειες σωλήνων, θερμάνσεων,
εστιών και ψυγείων. Υπάρχει
ιδιαίτερος κίνδυνος ηλεκτροπληξίας,
όταν το΄΄ωμα σας είναι γειωμένο.
29

GR CY
γ) Μην εκθέτετε το ηλεκτρικό
εργαλείο σε βροχή ή υγρασία.
Η διείσδυση νερού σε ηλεκτρική συσκευή αυξάνει τον κίνδυνο ηλεκτροπληξίας.
δ) Μη μεταφέρετε το ηλεκτρικό
εργαλείο κρατώντας το από
το καλώδιο, μη κρεμάτε τη
συσκευή από το καλώδιο και
μη χρησιμοποιείτε το καλώδιο
για να τραβήξετε το βύσμα
από την πρίζα. Να προστατεύετε το καλώδιο από ψηλές
θερμοκρασίες, λάδι, αιχμηρές
άκρες και κινούμενα τμήματα
της συσκευής. Τα ελαττωματικά ή
μπερδεμένα καλώδια αυξάνουν τον
κίνδυνο ηλεκτροπληξίας.
ε) Εάν εργάζεστε με το ηλεκτρικό
εργαλείο στο ύπαιθρο, να
χρησιμοποιείτε μόνο μπαλαντέζες που είναι κατάλληλες
για το ύπαιθρο. Η χρήση μίας
μπαλαντέζας κατάλληλης για το ύπαιθρο μειώνει τον κίνδυνο ηλεκτροπληξίας.
η) Εάν δεν μπορείτε να αποφύ-
γετε τη λειτουργία του ηλεκτρικού εργαλείου σε υγρό περιβάλλον, να χρησιμοποιείτε
διακόπτη ασφαλείας. Η χρήση
ενός διακόπτη ασφαλείας μειώνει
τον κίνδυνο ηλεκτροπληξίας.
3) Ασφάλεια ατόμων:
Προσοχή: Έτσι αποφεύγετε τους
τραυματισμούς:
α) Να είστε προσεκτικοί, να προ-
σέχετε τί κανετε, και να εργάζεστε συνετά με το ηλεκτρικό
εργαλείο. Μη χρησιμοποιείτε
το ηλεκτρικό εργαλείο όταν
είστε κουρασμένοι ή υπό την
επήρεια ναρκωτικών, οινοπνευματωδών ποτών ή φαρμάκων. Μόνο μία στιγμή απροσε-
ξίας κατά τη χρήση του ηλεκτρικού
εργαλείου μπορεί να προκαλέσει
σοβαρούς τραυματισμούς.
β) Να χρησιμοποιείοτε τα μέσα
ατομικής προστασίας και πάντα προστατευτικά γυαλιά.
Η χρήση των μέσων ατομικής προστασίας όπως αντιολισθητικά υποδήματα, προστατευτικό κράνος και
ωτοπροστασία, μειώνει τον κίνδυνο
τραυματισμών.
γ) Να αποφεύγετε την αθέλητη
θέση σε λειτουργία. Σιγουρευτείτε πως το ηλεκτρικό εργαλείο είναι απενεργοποιημένο
πριν το συνδέσετε με την παροχή ρεύματος, πριν το σηκώσετε και πριν το μεταφέρετε.
Εάν κατά την μεταφορά του ηλεκτρι-
κού αλυσοπρίονου έχετε το χέρι σας
στον διακόπτη ή η συσκευή είναι
ενεργοποιημένη όταν τη συνδέσετε
30
 Loading...